Embed Size (px)
Citation preview

Leaf Data Systems
State of Washington
Testing Laboratory User Manual v 1.0
(released 12/14/2017)
Data Entry: User Interface P a g e | 2
STATE OF WASHINGTON USER MANUAL (VERSION 1.0) ADDENDUM A
Published by:
MJ Freeway®, LLC
Copyright © 2017
All Rights Reserved. No part of the contents of this document may be reproduced or transmitted in any form, by any means without the written permission of MJ Freeway.
Use of this material is governed by the terms of the license agreement located at http://www.mjfreeway.com/license and is incorporated by reference herein. Any other use of this User Manual whatsoever, including reproduction, modification, distribution, republication, transmission, re-transmission, sale or resale without the prior written permission of MJ Freeway, LLC, is strictly prohibited.
Data Entry: User Interface P a g e | 3
STATE OF WASHINGTON USER MANUAL (VERSION 1.0) ADDENDUM A
(this page left intentionally blank)
Data Entry: User Interface P a g e | 4
STATE OF WASHINGTON USER MANUAL (VERSION 1.0) ADDENDUM A
Table of Contents PART ONE: Table of Data Set Descriptions ................................................................................................................................................................... 5
Testing Laboratory Data Set Descriptions .............................................................................................................................................................. 6
PART TWO: High Level Workflow Diagram ................................................................................................................................................................... 7
PART THREE: Manual Data Entry Procedures ............................................................................................................................................................... 9
Data Entry—User Interface: Procedures for Manual Data Entry at Testing Laboratories ...................................................................................... 10
Administrative Setup............................................................................................................................................................................................ 10
Receiving Inventory Transfers from Other Sources ............................................................................................................................................. 10
Entering Lab Results ............................................................................................................................................................................................. 11
Inventory Functions ............................................................................................................................................................................................. 11
Inventory Adjustments ........................................................................................................................................................................................ 12
Transferring Inventory to the Sending Licensee .................................................................................................................................................. 12
PART FOUR: Reporting Matrices ................................................................................................................................................................................. 13
Testing Laboratory Reports .................................................................................................................................................................................. 14

Data Entry: User Interface P a g e | 5
STATE OF WASHINGTON USER MANUAL (VERSION 1.0) ADDENDUM A
PART ONE: Table of Data Set Descriptions
Data Entry: User Interface P a g e | 6
STATE OF WASHINGTON USER MANUAL (VERSION 1.0) ADDENDUM A
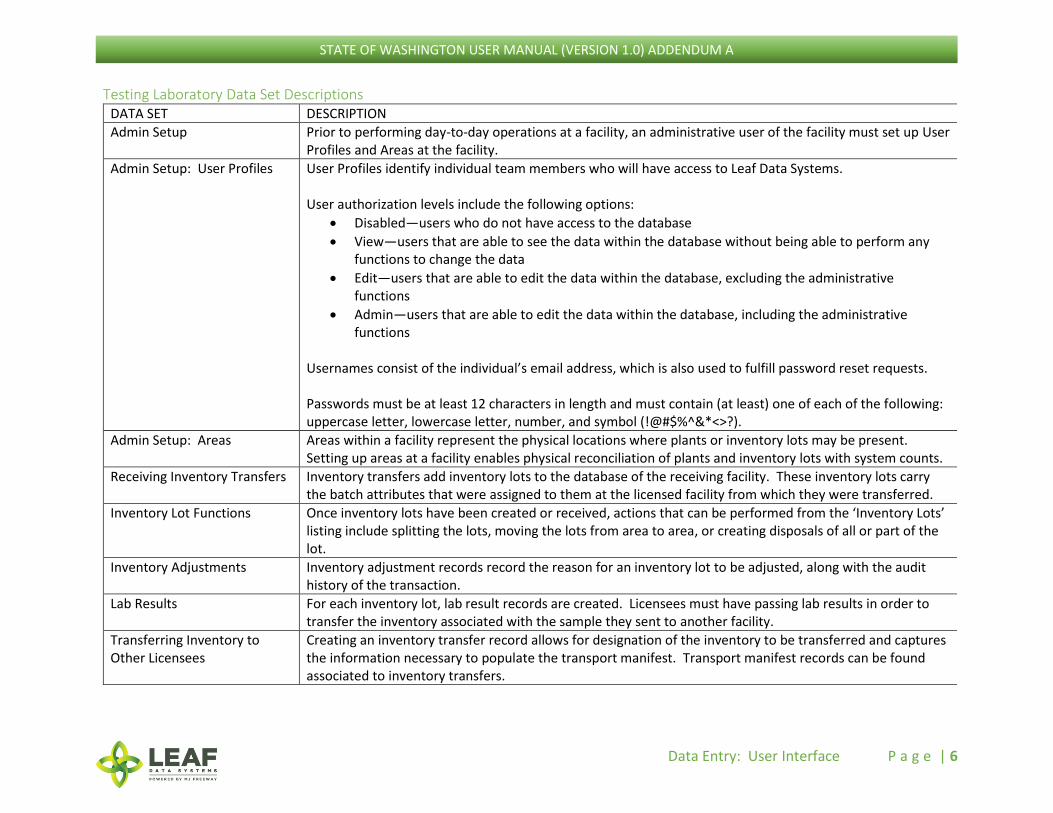
Testing Laboratory Data Set Descriptions DATA SET DESCRIPTION
Admin Setup
Prior to performing day-to-day operations at a facility, an administrative user of the facility must set up User Profiles and Areas at the facility.
Admin Setup: User Profiles User Profiles identify individual team members who will have access to Leaf Data Systems. User authorization levels include the following options:
• Disabled—users who do not have access to the database
• View—users that are able to see the data within the database without being able to perform any functions to change the data
• Edit—users that are able to edit the data within the database, excluding the administrative functions
• Admin—users that are able to edit the data within the database, including the administrative functions
Usernames consist of the individual’s email address, which is also used to fulfill password reset requests. Passwords must be at least 12 characters in length and must contain (at least) one of each of the following: uppercase letter, lowercase letter, number, and symbol (!@#$%^&*<>?).
Admin Setup: Areas Areas within a facility represent the physical locations where plants or inventory lots may be present. Setting up areas at a facility enables physical reconciliation of plants and inventory lots with system counts.
Receiving Inventory Transfers Inventory transfers add inventory lots to the database of the receiving facility. These inventory lots carry the batch attributes that were assigned to them at the licensed facility from which they were transferred.
Inventory Lot Functions Once inventory lots have been created or received, actions that can be performed from the ‘Inventory Lots’ listing include splitting the lots, moving the lots from area to area, or creating disposals of all or part of the lot.
Inventory Adjustments Inventory adjustment records record the reason for an inventory lot to be adjusted, along with the audit history of the transaction.
Lab Results For each inventory lot, lab result records are created. Licensees must have passing lab results in order to transfer the inventory associated with the sample they sent to another facility.
Transferring Inventory to Other Licensees
Creating an inventory transfer record allows for designation of the inventory to be transferred and captures the information necessary to populate the transport manifest. Transport manifest records can be found associated to inventory transfers.

Data Entry: User Interface P a g e | 7
STATE OF WASHINGTON USER MANUAL (VERSION 1.0) ADDENDUM A
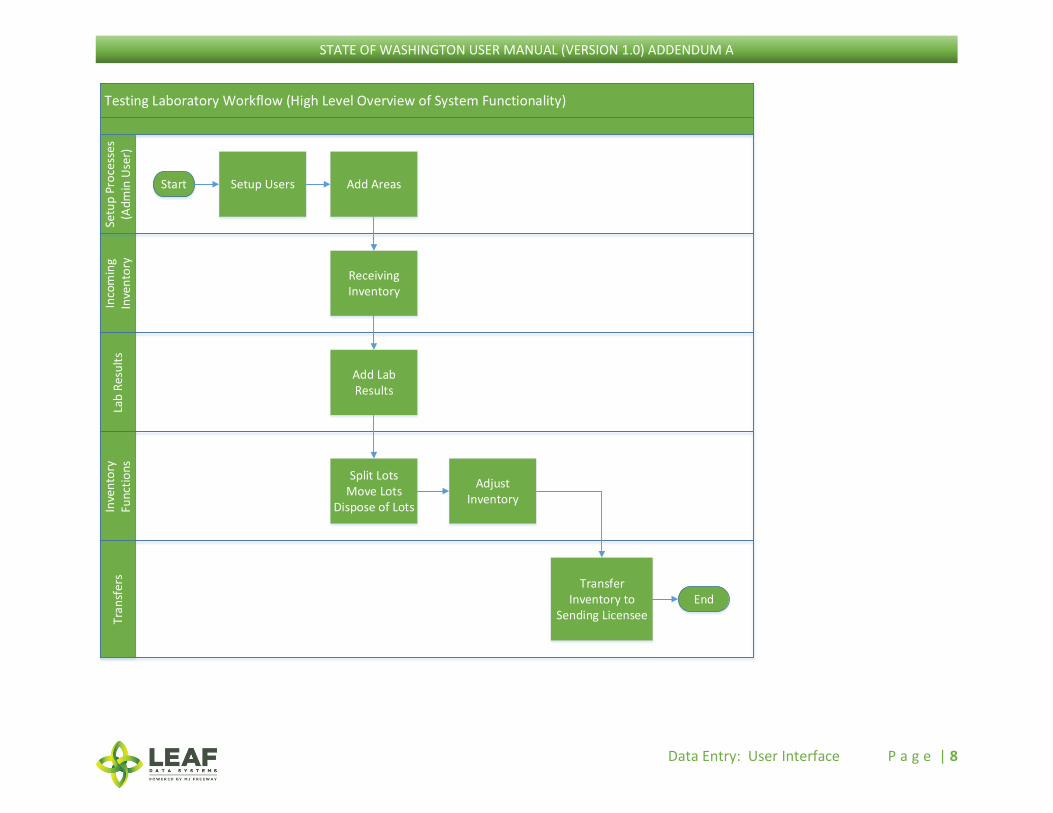
PART TWO: High Level Workflow Diagram High Level Workflow Diagram
Data Entry: User Interface P a g e | 8
STATE OF WASHINGTON USER MANUAL (VERSION 1.0) ADDENDUM A
Testing Laboratory Workflow (High Level Overview of System Functionality)In
com
ing
Inve
nto
rySe
tup
Pro
cess
es
(Adm
in U
ser)
Lab
Res
ult
sIn
ven
tory
Fu
ncti
ons
Tran
sfer
s
Transfer Inventory to
Sending LicenseeEnd
Start Setup Users Add Areas
Receiving Inventory
Split LotsMove Lots
Dispose of Lots
Adjust Inventory
Add Lab Results
Data Entry: User Interface P a g e | 9
STATE OF WASHINGTON USER MANUAL (VERSION 1.0) ADDENDUM A
PART THREE: Manual Data Entry Procedures
Data Entry: User Interface P a g e | 10
STATE OF WASHINGTON USER MANUAL (VERSION 1.0) ADDENDUM A
Data Entry—User Interface: Procedures for Manual Data Entry at Testing Laboratories
Administrative Setup
Assign User Authorization levels
1. Navigate to ‘UsersView’. 2. Find the user to setup, and click the ‘Modify’ icon within the line item containing their name.
3. Verify their email address. If it is not correct, then enter the correct email address into the email field. NOTE: Use personal email accounts for Leaf Data user profiles, since profile passwords can be reset and updated via email. Do not use shared business accounts for this purpose.
4. Select the appropriate authorization level for the user. NOTE: By default, all users aside from designated admin users at a facility are set to ‘disabled’ status until their permissions are assigned by the designated admin.
a. Changing the authorization level to ‘view’ allows a user to see information present in Leaf Data without the ability to perform data functions.
b. Changing the authorization level to ‘edit’ allows a user to view information in Leaf Data, as well as perform functions pertaining to day-to-day operations of the facility. The administrative setup functions described in this procedure are NOT able to be performed by a user with an ‘edit’ authorization level.
c. Changing the authorization level to ‘admin’ allows a user access to all information and all functionality within Leaf Data that may be viewed or performed by the associated Licensee ID.
5. Click the ‘save’ button to update the record. 6. Click the ‘password reset’ icon within the line item containing their name to notify a user of their access, and provide them with
the URL for login.
Create Areas
1. Navigate to ‘Data EntryAreas’.
2. To create a new area, click the ‘add’ button in the upper-right corner of the screen. 3. Enter a name for the area, then select the corresponding area type. 4. Click the ‘save’ button to create the area. 5. Repeat steps 2-4 until all physical locations where plants and product may exist are represented within Leaf Data.
Receiving Inventory Transfers from Other Sources 1. Navigate to ‘ReportsInventory Transfers-Receive’.
2. Within the line item of the transfer to be received, click the gear icon in the ‘Receive’ column.
3. Verify the weight of each lot of inventory being received, and log appropriate adjustments into the ‘Qty Received’ field that corresponds
to each lot.
4. Click the ‘save’ button to update the appropriate inventory records and accept the lots into the facility.
Data Entry: User Interface P a g e | 11
STATE OF WASHINGTON USER MANUAL (VERSION 1.0) ADDENDUM A
Entering Lab Results In order for licensees to be able to transfer their product to other facilities, they must attain passing QA test results. Lab Results can be entered
for each ‘sample’ that has been received at the testing laboratory.
1. Navigate to ‘Data EntryLots’ and click the ‘beaker’ icon within the lot line item where the lab results should be added.
2. Complete all applicable information for the lot being tested.
3. Typically, individual test results will be entered at varying times due to the different time frames required for each test. To update the
record, navigate to ‘Data EntryLab Results’ and click the ‘pen’ icon in the ‘Modify’ column. Record will not be saved as a final until the
status of each test and the overall testing status are denoted as ‘Completed’.
Inventory Functions As product is packaged and prepared for sale, there are multiple functions that may be necessary to be performed. Once lots are created, they
can be split into multiple lots, moved from area to area, and disposed of (either partially, or in full).
Splitting Lots
1. Navigate to ‘Data EntryLots’ and click the checkbox on the line item of the lot that must be split.
2. In the filter menu of the page, enter the gram weight of the new lot to be created into the ‘Qty’ field (adjacent to the ‘split
selected lot’ button).
3. Click the ‘split selected lot’ button.
4. The designated quantity will be shifted into its own lot, and the original lot will contain the remaining weight.
Moving Lots
1. Navigate to ‘Data EntryLots’ and click the checkbox on the line item of the lot that is being moved to a new physical location.
2. In the filter menu of the page, select the new area for the lot from the ‘Move to Area’ drop-down menu (adjacent to the ‘move
selected lots’ button).
3. Click the ‘move selected lots’ button.
4. The designated lot will be shifted into the new area that has been selected.
Disposals
1. Navigate to ‘Data EntryLots’.
2. Within the line item of the lots that is being adjusted due to a disposal, click the ‘Dispose’ icon at the far-right side of the record.
3. From the ‘Source’ drop-down menu, confirm that ‘Inventory’ is selected.
4. From the ‘Lot’ drop-down menu, confirm the global ID of the lot being destroyed.
5. From the ‘Reason’ drop-down menu, select the reason that is most appropriate for the destruction record being created.
6. Click the ‘Actual Date of Destruction’ field to enter the date when the waste was created.
7. In the ‘Qty’ field, enter the weight of the product that is being disposed of.
Data Entry: User Interface P a g e | 12
STATE OF WASHINGTON USER MANUAL (VERSION 1.0) ADDENDUM A
8. Click the ‘save’ button to create the new destruction record.
Inventory Adjustments 1. Navigate to ‘Data EntryInventory Adjustments’.
2. Click the ‘add’ button in the upper-right corner of the screen to create a new adjustment.
3. From the ‘Lot’ drop-down menu, select the lot that is to be adjusted.
4. In the ‘Qty’ field, enter the weight being adjusted from the package (and NOT the new package weight). For example, if 100 grams is
being added to the lot, type “100”, however, if 100 grams if being decremented from the lot, type “-100”.
5. From the ‘Reason’ drop-down menu, select the reason that the adjustment is being documented.
6. (Optional) In the memo field, add any additional notes that better explain the reason for the adjustment.
7. Click the ‘save’ button.
Transferring Inventory to the Sending Licensee 1. Navigate to ‘Data EntryInventory Transfers’.
2. Click the ‘add’ button in the upper-right corner of the screen to create a new transfer.
3. In the ‘Manifest Type’ drop-down menu, select whether the transfer is designated for pick-up, for delivery, or if it will be transported by
a Licensed Transporter.
4. From the ‘To Recipient’ drop-down menu, select the licensee that the inventory is being transferred to.
5. If the transfer is part of a ‘multi-stop’ manifest, check the box that says ‘Part of Multi-Stop’.
6. In the ‘Driver’ field, type the name of the driver who will be transporting the inventory (only if manifest type=delivery; if manifest
type=pick-up, leave this field blank).
7. In the ‘Driver #2’ field, type the name of an additional driver, if applicable (only if manifest type=delivery; if manifest type=pick-up, leave
this field blank).
8. Click the ‘Est Departure’ field to enter the date that the transfer of the sample is expected to occur.
9. Click the ‘Est Arrival Date’ field to enter the date that the transfer of the sample is expected to arrive at the lab facility.
10. In the ‘License Plate’, ‘Vehicle Description’, and ‘Vehicle VIN’ fields, enter the corresponding information relevant to the transfer of the
sample for population into the transportation manifest (only if manifest type=delivery; if manifest type=pick-up, leave this field blank).
11. From the ‘Lot’ drop-down menu, select the lot to be transferred.
12. In the ‘Qty’ field, enter the weight of the inventory being transferred (in grams).
13. The ‘Is Sample’ checkbox should remain unselected, as it is only utilized for transfers to labs.
14. To add additional lots to the same transportation manifest, click the ‘+Add’ link next to the ‘Lot’ heading.
15. For each inventory lot added to the transfer, the ‘Price Total’ field may be populated with the wholesale price of the item being
transferred.
16. Repeat steps 11-15 until all samples being sent to the lab are represented within the form.
17. Click the ‘save’ button to create the transfer.
Data Entry: User Interface P a g e | 13
STATE OF WASHINGTON USER MANUAL (VERSION 1.0) ADDENDUM A
PART FOUR: Reporting Matrices
Data Entry: User Interface P a g e | 14
STATE OF WASHINGTON USER MANUAL (VERSION 1.0) ADDENDUM A
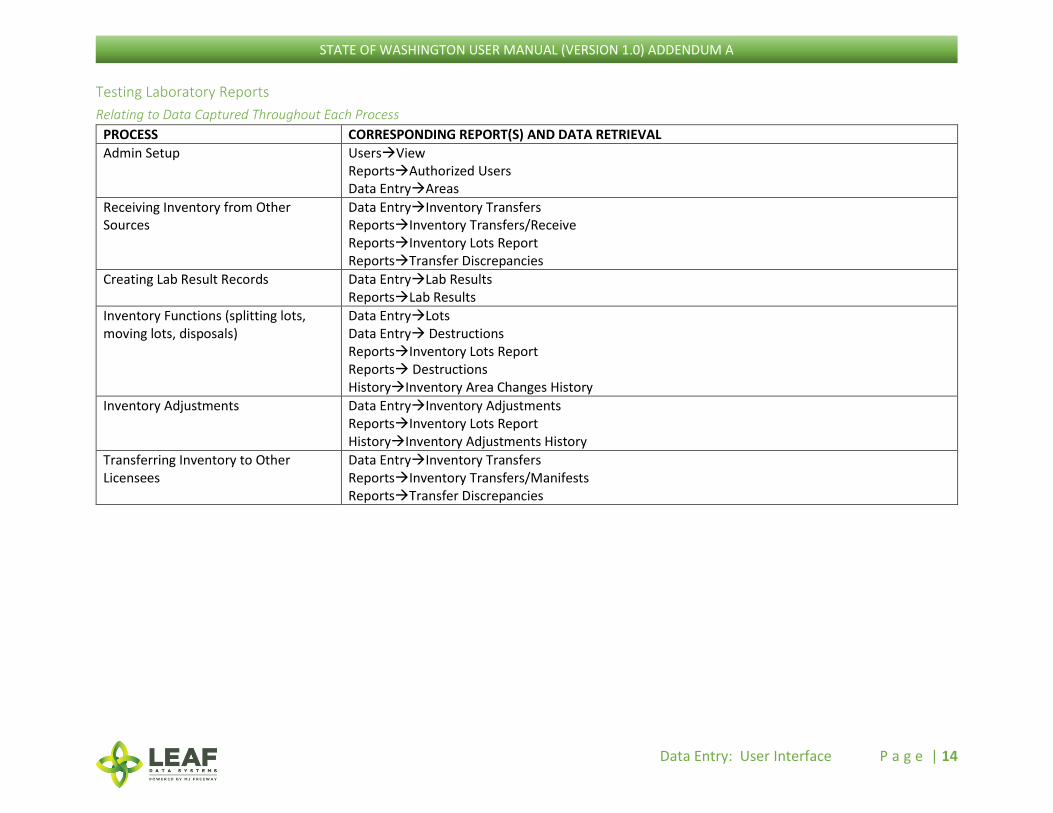
Testing Laboratory Reports
Relating to Data Captured Throughout Each Process
PROCESS CORRESPONDING REPORT(S) AND DATA RETRIEVAL
Admin Setup UsersView ReportsAuthorized Users Data EntryAreas
Receiving Inventory from Other Sources
Data EntryInventory Transfers ReportsInventory Transfers/Receive ReportsInventory Lots Report ReportsTransfer Discrepancies
Creating Lab Result Records Data EntryLab Results ReportsLab Results
Inventory Functions (splitting lots, moving lots, disposals)
Data EntryLots Data Entry Destructions ReportsInventory Lots Report Reports Destructions HistoryInventory Area Changes History
Inventory Adjustments Data EntryInventory Adjustments ReportsInventory Lots Report HistoryInventory Adjustments History
Transferring Inventory to Other Licensees
Data EntryInventory Transfers ReportsInventory Transfers/Manifests ReportsTransfer Discrepancies