Embed Size (px)
Citation preview

1
LCD Monitor User Manual
16T2
www.aoc.com
©2020 AOC. All Rights Reserved.

2
Safety ........................................................................................................................................................................ 3
National Conventions ......................................................................................................................................... 3
Installation .......................................................................................................................................................... 4
Cleaning............................................................................................................................................................. 5
Maintenance ...................................................................................................................................................... 6
Other .................................................................................................................................................................. 6
Setup ........................................................................................................................................................................ 7
Contents in Box ................................................................................................................................................. 7
Adjusting Viewing Angle ..................................................................................................................................... 8
Wall Mounting .................................................................................................................................................... 9
Connecting the Monitor .................................................................................................................................... 10
Multi-Touch Screen .......................................................................................................................................... 11
Adjusting .......................................................................................................................................................... 12
Hotkeys ............................................................................................................................................................ 12
Type C function working status for charge: ...................................................................................................... 14
OSD Setting ..................................................................................................................................................... 15
Driver ...................................................................................................................................................................... 17
i-Menu .............................................................................................................................................................. 17
e-Saver ............................................................................................................................................................ 18
Screen+ ........................................................................................................................................................... 19
Troubleshoot ........................................................................................................................................................... 20
Specification ............................................................................................................................................................ 21
General Specification ....................................................................................................................................... 21
Preset Display Modes ...................................................................................................................................... 24
Plug and Play ................................................................................................................................................... 25

3
Safety
National Conventions
The following subsections describe notational conventions used in this document.
Notes, Cautions, and Warnings
Throughout this guide, blocks of text may be accompanied by an icon and printed in bold type or in italic type.
These blocks are notes, cautions, and warnings, and they are used as follows:
NOTE: A NOTE indicates important information that helps you make better use of your computer system.
CAUTION: A CAUTION indicates either potential damage to hardware or loss of data and tells you how to avoid the
problem.
WARNING: A WARNING indicates the potential for bodily harm and tells you how to avoid the problem. Some
warnings may appear in alternate formats and may be unaccompanied by an icon. In such cases, the specific
presentation of the warning is mandated by regulatory authority.
WARNING: This product contains magnets. Please keep it away from objects that may be affected by a magnet,
such as pacemaker.
WARNING:
This product contains rechargeable lithium battery:
Incorrect replacement of battery type can defeat safeguard of the monitor.
Disposal of the battery into fire or a hot oven, or mechanically crushing or cutting of the battery can result in an
explosion.
Leaving the battery in an extremely high-temperature surrounding environment can result in an explosion or
leakage of flammable liquid or gas.
A battery subjected to extremely low air pressure may result in an explosion or leakage of flammable liquid or gas.

4
Installation
Do not place the monitor on an unstable cart, stand, tripod, bracket, or table. If the monitor falls, it can injure a
person and cause serious damage to this product. Use only a cart, stand, tripod, bracket, or table recommended by
the manufacturer or sold with this product. Follow the manufacturer’s instructions when installing the product and
use mounting accessories recommended by the manufacturer. A product and cart combination should be moved
with care.
Never push any object into the slot on the monitor cabinet. It could damage circuit parts causing a fire or
electric shock. Never spill liquids on the monitor.
Do not place the front of the product on the floor.
Leave some space around the monitor as shown below. Otherwise, air-circulation may be inadequate hence
overheating may cause a fire or damage to the monitor.
See below the recommended ventilation areas around the monitor when the monitor is installed with the stand:
Installed with stand
Leave at lease this
space around the set
11 7/8 inches
30cm
4 inches 4 inches 4 inches
10cm 10cm 10cm

5
Cleaning
Clean the cabinet regularly with cloth. You can use soft-detergent to wipe out the stain, instead of
strong-detergent which will cauterize the product cabinet.
When cleaning, make sure no detergent is leaked into the product. The cleaning cloth should not be too rough
as it will scratch the screen surface.
Please disconnect the power cord before cleaning the product.

6
Maintenance
To protect your monitor from possible damage, do not put excessive pressure on the LCD panel. When
moving your monitor, grasp the frame to lift; do not lift the monitor by placing your hand or fingers on the LCD
panel.
Unplug the monitor if you are not going to use it for an extensive period of time.
Unplug the monitor if you need to clean it with a slightly damp cloth. The screen may be wiped with a dry cloth
when the power is off. However, never use organic solvent, such as, alcohol, or ammonia-based liquids to
clean your monitor.
To avoid the risk of shock or permanent damage to the set, do not expose the monitor to dust, rain, water, or
excessive moisture environment.
If your monitor gets wet, wipe it with dry cloth as soon as possible.
If foreign substance or water gets in your monitor, please turn the power off immediately and disconnect the
power cord. Then, remove the foreign substance or water, and send it to the maintenance center.
Do not store or use the monitor in locations exposed to heat, direct sunlight or extreme cold.
After the product being repaired restore it to normal operating conditions by plugging it.
In order to maintain the best performance of your monitor and use it for a longer lifetime, please use the
monitor in a location that falls within the following temperature and humidity ranges.
Temperature: 0-40°C 32-104°F
Humidity: 20-80% RH
Other
If the product is emitting a strange smell, sound or smoke, disconnect the power plug IMMEDIATELY and
contact a Service Center.
Make sure that the ventilating openings are not blocked by a table or curtain.
Do not engage the LCD monitor in severe vibration or high impact conditions during operation.
Do not knock or drop the monitor during operation or transportation.
For display with glossy bezel the user should consider the placement of the display as the bezel may cause
disturbing reflections from surrounding light and bright surfaces.
Keep your monitor away from sharp objects.

7
Setup
Contents in Box
* Different according to region.
* USB-C has various different specifications. Before purchasing the AOC 16T2 USB-C Monitor, please confirm that
your device’s USB-C port has support for “DP Alt Mode”.
This is essential for the monitor to receive video from your device via USB-C cable.
CD Manual Smart Cover USB C-C/A cable *
Monitor
Micro HDMI-HDMI cable Power Adapter VESA_bracke Screw

8
Adjusting Viewing Angle
For optimal viewing, it is recommended to look at the full face of the monitor, and then adjust the monitor's angle to
your own preference.
Hold the Smart Cover and Monitor so you will not topple the monitor when you change the monitor's angle.
You are able to adjust the monitor's angle from 20° to 30 °(Horizontal) or from 25° to 30 °(longitudinal).
NOTE:
1. Do not adjust the viewing angle over 20~30 degrees(Horizontal) or 25~30 degrees(longitudinal) in order to
avoid damage.
2. Hold the Smart Cover and Monitor so you will not topple the monitor when you change the monitor's angle.
3. Do not touch the LCD screen when you change the angle. It may cause damage or break the LCD screen.
AOC 16T2 monitor supports an auto-pivot function to keep the display upright as the monitor is rotated between
portrait and landscape position.
Important: Install I-MENU (Version 2.0 or upper) from CD-ROM or AOC website.
The OSD menu can be switched along with the rotation of the display. i-Menu is required for rotating the display
content along with the rotation of the display. i-Menu is for Windows only.

9
Wall Mounting
Preparing to Install An Optional Wall Mounting Arm.
This monitor can be attached to a wall mounting arm you purchase separately. Disconnect power before this
procedure. Follow these steps:
1 Attach the VESA_bracket lock to the back of monitor with 4 screws.
2 Follow the manufacturer's instructions to assemble the wall mounting arm.
3 Place the wall mounting arm onto the VESA_bracket. Line up the holes of the arm with the holes in the
VESA_bracket.
4 Insert the 4 screws into the holes and tighten.
5 Reconnect the cables. Refer to the user's manual that came with the optional wall mounting arm for
instructions on attaching it to the wall.
NOTE: VESA mounting screw holes are not available for all models, please check with the dealer or official
department of AOC.

10
Connecting the Monitor
1 USB C
2 Micro HDMI
3 Power Button
4 USB C
5 Audio out
To protect equipment, always turn off the PC and LCD monitor before connecting.
1. Connect one end of the USB C-C/A signal cable to the USB C interface of LCD. Connect the other end to the
USB C interface of computer (DP Alt mode supported), mobile device or USB A interface.
2. Your computer should detect the USB Monitor automatically.
3. Connect one end of the Micro HDMI-HDMI signal cable to the Micro HDMI interface of LCD and the other end
to the HDMI interface of computer.
4. (Optional –Requires a video card with Audio port) – Connect the headphone to the headphone interface on
the side of the display.
6 Used USB C-C cable to do battery charging: Plug one end of the USB C-C signal cable fully intol the power
adapter to ensure safety. Plug the other to the USB C interface of LCD.
7 Type C cable with Type A for touch function when user use HDMI input.
If your monitor displays an image, installation is complete. If it does not display an image, please refer
Troubleshooting.

11
Multi-Touch Screen
User can use Display Multi-touch Function under operating system higher than Window 7 home premium. Before
using Display Multi-touch Function, user need to connect basic wires ( power cable, HDMI cable, USB cable). Then
user can fully enjoy Multi-touch Function. Part of specific use, please see the following drawings.

12
Adjusting
Hotkeys
1 Battery indicator light
2 Menu/Volume/Increase
3 Battery capacity display
4 Power on/off
5 Power indicator light
Battery indicator light
Battery capacity 0%~5% show red color.
Battery capacity 5%~50% show orange color.
Battery capacity 50%~75% show yellow color.
Battery capacity 75%~100% show green color.
Menu/Volume/Increase
Press to display the OSD.
When Power on, press button to display OSD or adjust OSD function (0~100 or OD strength adjustment, etc.).
When there is no OSD, press button continuously about 3 seconds to turn on the volume adjustment.
Power
Press the Power button about 3 seconds to turn on/off the monitor.
battery capacity display
When there is no OSD, Press button to show the battery capacity.
Press button and hold for 3 seconds, It allows external devices to charge 16T2 or 16T2 to charge external
devices (Mobile and Tablet only).

13
LED status indicator
Power on - white.
Standby - white flashes and goes out after about 3 minutes.
Charging - orange.
Charge your phone/tablet
When 16T2 is switched on, the phone/tablet is connected and the signal indicator shows an orange light.Press the
battery power button for 3~5 seconds, the power light appears white and starts charging (you can observe whether
the phone has been charged from the mobile phone, then the screen of power mode switch will be reconnected,
and the flash is normal).
When 16T2 is turned off, connect to the phone/tablet and the power light will appear orange. Press the battery
power button for 3 to 5 seconds and the power light will appear white and start charging (you can observe whether
the phone is charged or not from the phone).
WARNING: 16T2 default is the state of being charged, reverse to the mobile phone charging will have compatibility
problems not fully support all mobile phones.

14
Type C function working status for charge:
Charging status: (Type C 1=TC1, Type C 2=TC2)
TC1 and TC2 support PD adaptor CC profile 5V/3A input.
When TC 1 and TC 2 both are insert adaptor that will select one port to charge who is first insert.
TC 1(TC 2) insert adaptor and TC 2 (TC 1) connection to mobile phone or tablet, the status will be monitor and
mobile phone or tablet both are charged.
When (TC1 or TC2) insert adaptor and another side (TC1 or TC2) connector mobile phone or tablet that will output
5V/500mA (maximum) to charging mobile phone or tablet.
Ps. 1.support Notebook to monitor charging, not support monitor to Notebook charging.
2.Charge phone or tablet need push battery voltage display key 3~5 second switch on charge function.
TC1/TC2 Adaptor Phone/Tablet NB NA
Adaptor Plug & Play System
charging
TC1 Signal and System charging TC2 System charging
TC1 Signal/System charging TC2 System charging
TC2 System charging
Phone/Tablet TC1 System charging
TC2 Signal/Charging
TC1/TC2 Signal and System charging
TC1 Signal/System charging
TC2 Signal and System charging
TC2 Signal and System charging
NB
TC1 System charging
TC2 Signal/System
Charging
TC1 Signal and System charging TC2 Signal/System charging
TC1 Signal/System charging TC2 Signal/System charging
TC2 Signal and System charging
NA TC1 System charging TC1 Signal and System charging
TC1 Signal/System charging
NA
Power bank mode:
When push long time (3~5 second) and connection the phone/tablet
TC1 and TC2 output 5V/500mA(maximum)
WARNING: 16T2 default is the state of being charged, reverse to the mobile phone charging will have compatibility
problems not fully support all mobile phones.
Suggest to charge the mobile phone in DC ON state.
Push battery voltage display once will show battery status on LED.
Battery capacity 0%~5% show RED color.
Battery capacity 5%~50% show ORANGE color.
Battery capacity 50%~75% show YELLOW color.
Battery capacity 75%~100% show GREEN color.
Power bank mode only support Type C USB C PD device.
NOTE: 16T2 needs to be charged for 8 hours when first time use. Normally charging with accessory adaptor for 5 to 6 hours
can reach its full capacity.

15
OSD Setting
Basic and simple instruction on the control keys.
1). Press the key to activate the OSD window.
2). You can now select any one of the functions by quickly repeat-pressing the button. The cursor will navigate
towards the right as you press the key. You can release once the cursor highlights the option you want to choose.
Note that the selection is one way loop always moving one direction and then returning at beginning of the menu.
The cursor will remain on the selected function for about 3 seconds and the function icon will flash three times to
confirm the choice visible on the 1st layer of the OSD and activate it.
Input source
Select input source: HDMI
Select input source: USB C1
Select input source: USB C2
Brightness
0-100 Adjust brightness from 0~100
Contrast
0-100 Adjust contrast from 0~100
Volume
0-100 Adjust Volume from 0~100
Overdrive
Off
Adjust the response time. Weak
Medium
Strong
LowBlue Mode
Off
Decrease blue light wave by
controlling color temperature
Multimedia
Internet
Office
Reading
HDR Mode
Off
Adjust contrast HDR Mode
HDR Picture
HDR Movie
HDR Game
Language
English, Français, Español,
Português, Deutsch,
Italiano, Nederlands,
Svenska, Suomi, Polski,
Čeština, Русский, 한국어,
Türkçe, 繁體中文, 简体中
文, 日本語.
Select the OSD language
Default is English.

16
Exit
Exit the main OSD
1. Main menu will disappear if no action for about 3 seconds..
2. Sub menu will disappear if no action for about 3 seconds..
3. Before entering OSD menu,monitor will be powered off when continually pressing the buttom key for
more than 3 seconds.
4. The input source selection does not display the current input source.

17
Driver
i-Menu
Welcome to “i-Menu” software by AOC. i-Menu makes it easy to adjust your monitor display setting by using on
screen menus instead of the OSD button on the monitor. To complete installation, please follow the installation
guide.

18
e-Saver
Welcome to use AOC e-Saver monitor power management software! The AOC e-Saver features Smart Shutdown
functions for your monitors, allows your monitor to timely shutdown when PC unit is at any status (On, Off, Sleep or
Screen Saver); the actual shutdown time depends on your preferences (see example below).
Please click on "driver/e-Saver/setup.exe" to start installing the e-Saver software, follow the install wizard to
complete software installation.
Under each of the four PC status, you may choose from the pull-down menu the desired time (in minutes) you’re
your monitor to automatically shut down. The example above illustrated:
1) The monitor will never shutdown when the PC is powered on.
2) The monitor will automatically shutdown 5 minutes after the PC is powered off.
3) The monitor will automatically shutdown 10 minutes after the PC is in sleep/stand-by mode.
4) The monitor will automatically shutdown 20 minutes after the screen saver appears.
You can click “RESET” to set the e-Saver to its default settings like below.

19
Screen+
Welcome to “Screen+” software by AOC. Screen+ software is a desktop screen splitting tool; it splits the desktop
into different panels, and each panel displays a different window. You only need to drag the window to a
corresponding panel when you want to access it. It supports multiple monitor display to make your task easier.
Please follow the installation software to install it. The software Supported operating systems: Windows 10,
Windows 8,Windows 7.
20
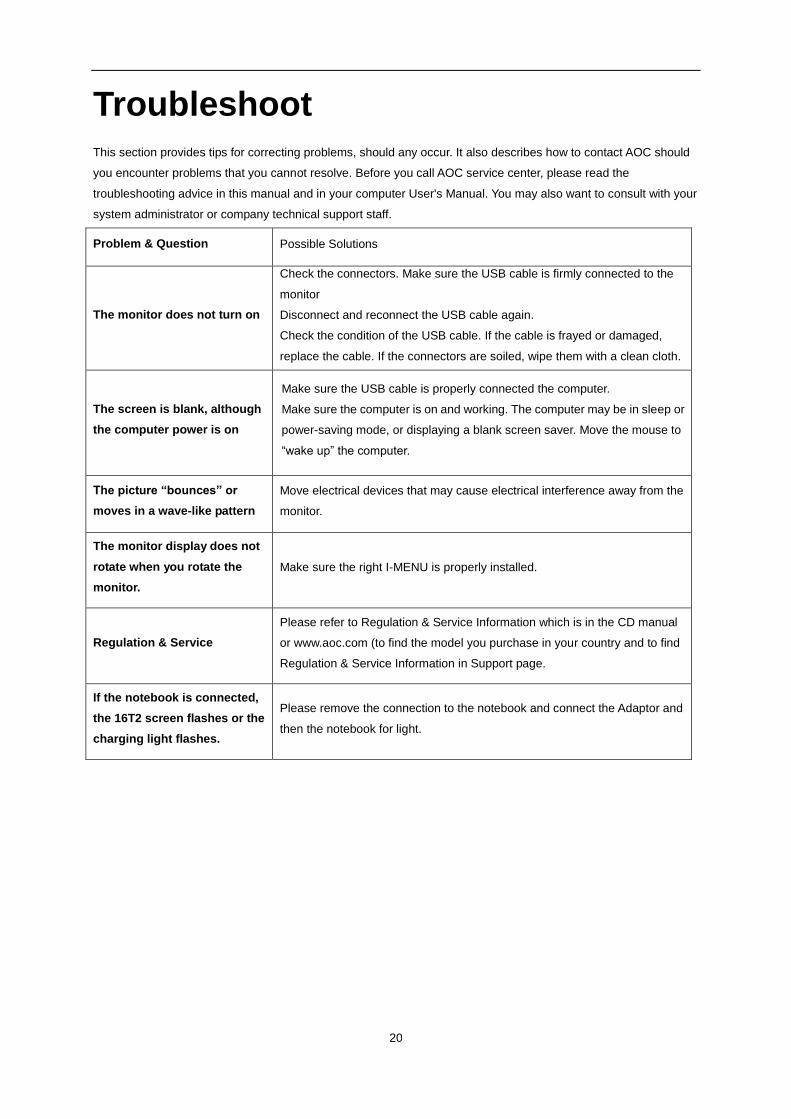
Troubleshoot This section provides tips for correcting problems, should any occur. It also describes how to contact AOC should
you encounter problems that you cannot resolve. Before you call AOC service center, please read the
troubleshooting advice in this manual and in your computer User's Manual. You may also want to consult with your
system administrator or company technical support staff.
Problem & Question Possible Solutions
The monitor does not turn on
Check the connectors. Make sure the USB cable is firmly connected to the
monitor
Disconnect and reconnect the USB cable again.
Check the condition of the USB cable. If the cable is frayed or damaged,
replace the cable. If the connectors are soiled, wipe them with a clean cloth.
The screen is blank, although
the computer power is on
Make sure the USB cable is properly connected the computer.
Make sure the computer is on and working. The computer may be in sleep or
power-saving mode, or displaying a blank screen saver. Move the mouse to
“wake up” the computer.
The picture “bounces” or
moves in a wave-like pattern
Move electrical devices that may cause electrical interference away from the
monitor.
The monitor display does not
rotate when you rotate the
monitor.
Make sure the right I-MENU is properly installed.
Regulation & Service
Please refer to Regulation & Service Information which is in the CD manual
or www.aoc.com (to find the model you purchase in your country and to find
Regulation & Service Information in Support page.
If the notebook is connected,
the 16T2 screen flashes or the
charging light flashes.
Please remove the connection to the notebook and connect the Adaptor and
then the notebook for light.

21
Specification
General Specification
Panel
Model name 16T2
Driving system TFT Color LCD
Viewable Image Size 39.49cm diagonal
Pixel pitch 0.1793 (H)mm x 0.1793 (V)mm
Display Color 262K Colors
Dot Clock 148.5MHz
Others
Horizontal scan range 30~85KHz
Horizontal scan Size(Maximum)
344.16 mm
Vertical scan range 48Hz ~ 75Hz
Vertical scan Size(Maximum) 193.59 mm
Optimal preset resolution 1920x1080@60Hz
Plug & Play VESA DDC2B/CI
Input Connector USB Type-C (DP Alt mode) / Micro HDMI
Output Connector Earphone out
Power Source(input) 5Vdc, 3A
Power Source(output) 5Vdc, 0.5A(Maximum)
Power Consumption Power on 16W
Off timer 0-24 hrs
Dimensions & Weight:
Height 229.8mm
Width 363.4mm
Depth 9.9 mm
Weight (monitor only) 990 g
Environmental
Temperature: Operating 0° to 40°C
Non-Operating -25° to 55°C
Humidity: Operating 10% to 85% (non-condensing)
Non-Operating 5% to 93% (non-condensing)
Altitude: Operating 0~ 5000m(0~ 16404 ft)
Non-Operating 0~ 12192m (0~ 40000 ft )
Support OS
Windows 7
Windows 8
Windows 10
PS: 16T2 only as a display device.

22
Compatible with all DP Alt mode PC or Laptop: Recommend list is as the below
(16T2 DC ON status).
No. Type Brand Name
Model Name 2nd
Display Supports
Touch
Mobile device
charging
1 Smart phone
HUAWEI Mate 20 √ √ √
2 Smart phone
HUAWEI P30 Pro √ √ √
3 Smart phone
HUAWEI Mate 30 Pro √ √ √
4 mobile phone
HUAWEI P20 √ √ √
5 NB DELL Latitude 5490 √ √
6 NB HP 840 G5 √ √
7 NB HP 745 G5 √ √
8 NB Lenovo ThinkPad T480s √ √
9 NB Microsoft Surface Book 2 √ √
10 NB Lenovo Thinkpad X380 Yoga √ √
11 NB HP HP Shadow Genie 5 OMEN 15 √ √
12 NB Microsoft Surface Laptop 3 √ √
13 NB Dell Inspiron 15 7591 2-in-1 √ √
14 NB HP Spectre 13-v 119tu √ √
15 NB HP OMEN 15-dh0124TX √ √
16 NB Lenovo Legion Y740 √ √
17 DT Apple Mac mini (2018)(MRTT2TA/A)(HWID: 8,1) √ √
18 AIO Apple iMac 27" (2019)(MRQY2TA/A)(HWID: 19,1) √ √
19 AIO Apple iMac Pro 27" (2017)(MQ2Y2TA/A)(HWID: 1,1) √ √
20 AIO Apple iMac 27" (2017)(MNED2TA/A)(HWID: 18,3) √ √
21 NB Acer SF713-51-M707 √ √
22 NB ASUS ROG SCAR III G531GW √ √
23 NB ASUS ROG G752VT-DH72 √ √
24 NB Dell G3 3590 √ √
25 NB Dell E7480 √ √
26 NB Dell XPS 15 9560 (P56F) √ √
27 NB Dell Latitude 7300 √ √
28 NB Dell E7380 √ √
29 NB Fujitsu LIFEBOOK WU2/C3 √ √
30 NB HP Elite Dragonfly Notebook PC (Empire) √ √
31 NB HP Spectre x360 Conve 13-w010tu √ √
32 DT Intel NUC8i7HNK √ √
33 NB Lenovo Yoga 920-13IKB 80Y7 √ √
34 NB Lenovo ThinkPad X1 Yoga (2nd Gen) TP00076C √ √
35 NB Lenovo ThinkPad 13 20GJ003ETW √ √
36 NB Lenovo ThinkPad X1C 7th √ √
37 NB MSI GT72 6QD √ √

23
No. Type Brand Name
Model Name 2nd
Display Supports
Touch
Mobile device
charging 38 DT MSI Vortex G65 √ √
39 NB Panasonic CF-SV78R8QP √ √
40 NB Razer BLADE 15.6 √ √
41 mobile phone
ASUS ROG Phone √ √ √
42 mobile phone
ASUS ZenFone Ares(ZS572KL) √ √ √
43 mobile phone
HTC U12+ √ √ √
44 mobile phone
HUAWEI Mate 20 X(5G) √ √ √
45 mobile phone
HUAWEI Mate 20 Pro √ √ √
46 mobile phone
HUAWEI P20 Pro √ √ √
47 mobile phone
HUAWEI Mate 10 Pro √ √ √
48 mobile phone
HUAWEI Mate 10 √ √ √
49 NB Lenovo ThinkPad E595 20NFCTO4WW √ √
50 NB Lenovo ThinkPad A485 √ √
51 NB Apple MacBook Pro 16" (2019)
(MVVJ2TA/A)(HWID: 16,1) √
52 NB Apple MacBook Pro 15" (2018)
(MR962TA/A)(HWID: 15,1) √
53 NB Apple MacBook Air 13" (2018)
(MRE82TA/A)(HWID: 8,1) √
54 NB Apple MacBook Pro 13" (2018)
(MR9U2TA/A)(HWID: 15,2) √
55 NB Apple MacBook Pro 15" (2017)
(MPTR2TA/A)(HWID: 14,3) √
56 NB Apple MacBook Pro 13" (2017)
(MPXV2TA/A)(HWID: 14,2) √
57 mobile phone
LG G8S ThinQ √ √
58 mobile phone
LG V40 ThinQ √ √
59 mobile phone
OnePlus 7 Pro √ √
60 mobile phone
OPPO Reno2 √ √
61 mobile phone
SONY Xperia 5 √ √
62 mobile phone
Xiaomi
(小米) UL4U √ √
24
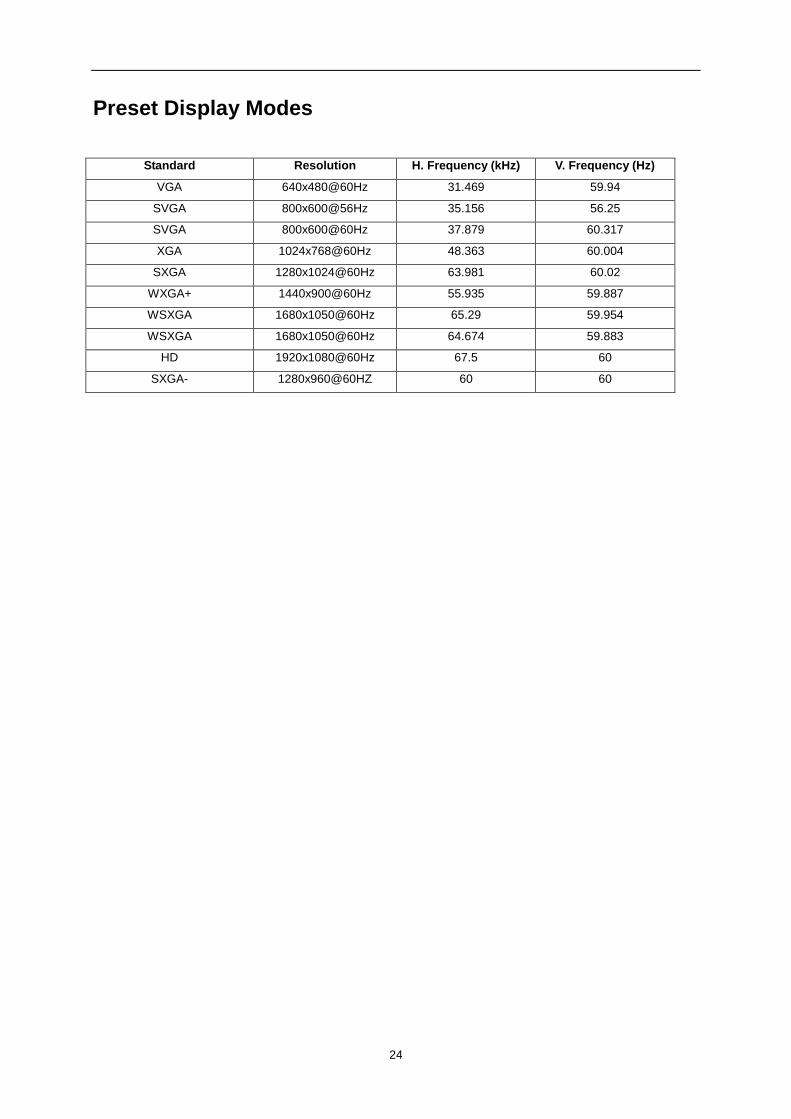
Preset Display Modes
Standard Resolution H. Frequency (kHz) V. Frequency (Hz)
VGA 640x480@60Hz 31.469 59.94
SVGA 800x600@56Hz 35.156 56.25
SVGA 800x600@60Hz 37.879 60.317
XGA 1024x768@60Hz 48.363 60.004
SXGA 1280x1024@60Hz 63.981 60.02
WXGA+ 1440x900@60Hz 55.935 59.887
WSXGA 1680x1050@60Hz 65.29 59.954
WSXGA 1680x1050@60Hz 64.674 59.883
HD 1920x1080@60Hz 67.5 60
SXGA- 1280x960@60HZ 60 60

25
Plug and Play
Plug & Play DDC2B Feature
This monitor is equipped with VESA DDC2B capabilities according to the VESA DDC STANDARD. It allows the
monitor to inform the host system of its identity and, depending on the level of DDC used, communicate additional
information about its display capabilities.
The DDC2B is a bi-directional data channel based on the I2C protocol. The host can request EDID information over
the DDC2B channel.