Embed Size (px)
Citation preview
Layout guidelines Flip flops 1
Layout guidelines accompanying the template
Flip flop / FF
Doc. ref: Guide FF
Please read this document carefully before starting to design. These guidelines accompany the Flip Flop template, to assist your designer while making the artwork. In this document you will find following topics:
1. Guidelines printable area 1.1 Printable area for printed artwork & cut outs 1.2 For printed artwork only, you have two options
2. Guidelines for printing How to deliver your artwork? 2.1 Guidelines for digital & screenprinted artwork 2.2. Guidelines for screen print only
3. Guidelines for logo cut outs How to deliver your artwork? 3.1 For a logo cut out, you have two options 3.2 Do’s and don’ts for cut out logo
4. Getting started with the Illustration template
1.GUIDELINESPRINTABLEAREA 1.1 Printable area for printed artwork & cut outs: A. Outline your artwork only on the specified printable areas.
Picture A: showing the overview of the illustrator template. à The pink area is the printable area for size small. This is 3 mm inside the pink cutting line. à The green area is the printable area for size medium. This is 3 mm inside the green cutting line. à The blue area is the printable area for size large. This is 3 mm inside the blue cutting line.
Layout guidelines Flip flops 2
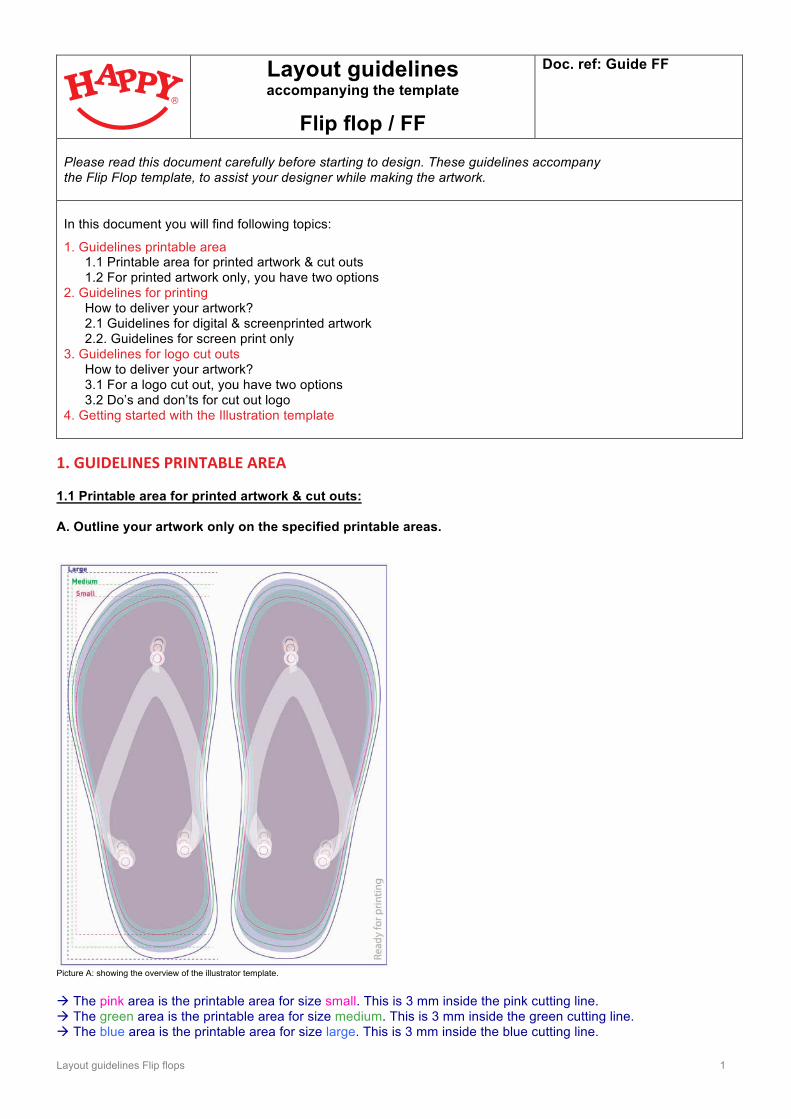
B. What is the effect of placing only 1, up to 3 different artworks on the 3 different flip flop (FF) sizes? If you have chosen for 1 film, and thus to put 1 artwork/lay-out on the 3 different FF sizes, the positioning will not be exactly centred in the same way on each FF size. Moreover, the filled-up surface of the FF will variate, according to the FF size; the logo on size S will cover more FF surface than on size M or L. The easiest way to start designing is to use size layer S as reference size layer. Considering the placing of your artwork on the template; please keep in mind that the position of the size-layers (S, M, L) is fixed and may not be shifted. 1 FILM: 1 artwork = exactly the same artwork for the 3 FF sizes S, M and L
Picture B: showing the illustrator template overview with artwork ‘logo 1’, positioned to suite all FF sizes S, M and L. Reference size layer = S: The logo is placed on the template in such a way that it fits all sizes.
Example effect: Since the different FF sizes have different measurements and proportions, Logo 1 is differently centred between the toe straps on each of the 3 sizes (see the difference in the dark coloured areas in the example above). This implies that the logo will fill up more FF surface on size S respectively, in comparison to size M or L.
3 FILMS: 3 artworks = a unique artwork per FF size
Picture C: showing the different artworks of FF size S ‘logo 1’, size M ‘logo 2’, and size L ‘logo 3’, placed in the illustrator template. The logos are positioned individually per size on the template: Logo 1 on FF size S, logo 2 on M and logo 3 on L.
This means that to have exactly the same effect as with logo 1, logo 2 and 3 should be enlarged in the design to cover more of the available surface. However, since you have 3 films, even a totally different artwork/lay-out can be used.
Example effect: 3 logos can all be centred on exactly the same way between the toe straps on each of the 3 sizes (see the similarity in the grey coloured areas in the example above).
This implies that the same positioning between the toe straps can be used, filling up the same surface, resulting in the same apperance. The final print result is more similar on the different sizes. Tip: this can be especially interesting with artwork covering the entire surface (see further) using text or logo’s that should be readable on all FF sizes.
Layout guidelines Flip flops 3
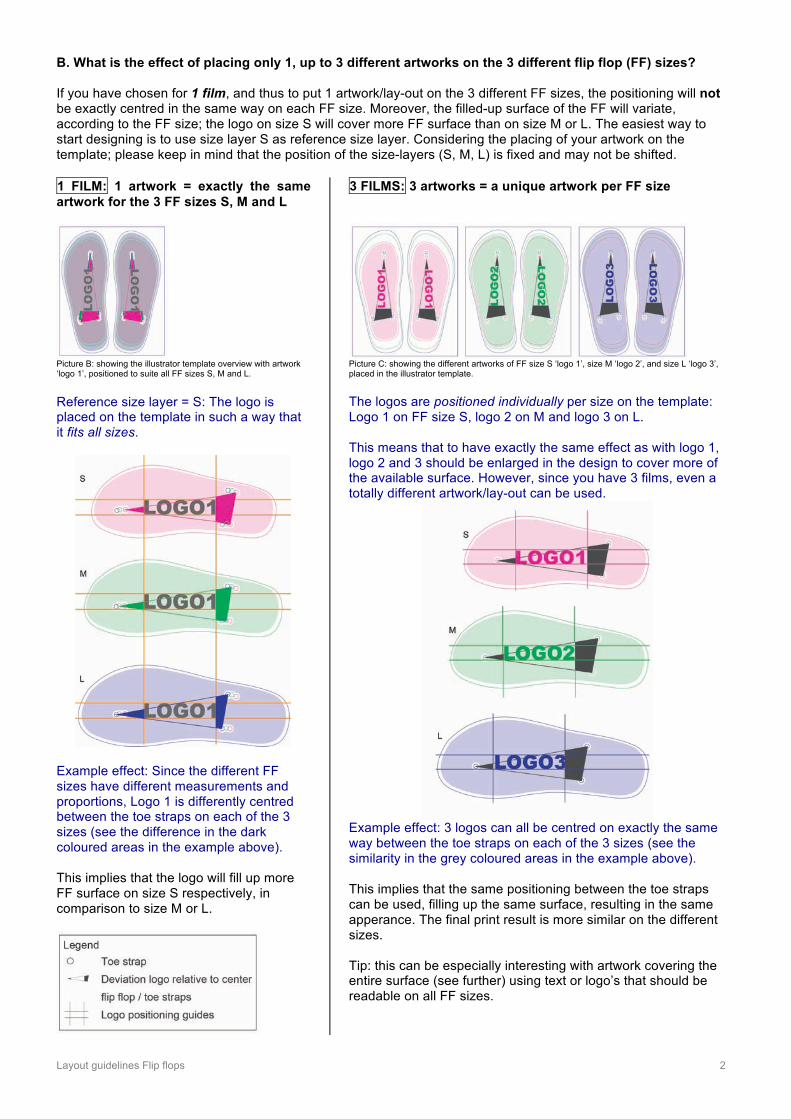
1.2 For printed artwork only, you have two options: Option 1: Artwork placed within the printable areas Keep your artwork within the coloured areas (thus 3 mm inside the cutting lines). You can utilize the entire coloured area from edge to edge. However keep your image 3 mm away from the toe straps. Example of an artwork on size layer S:
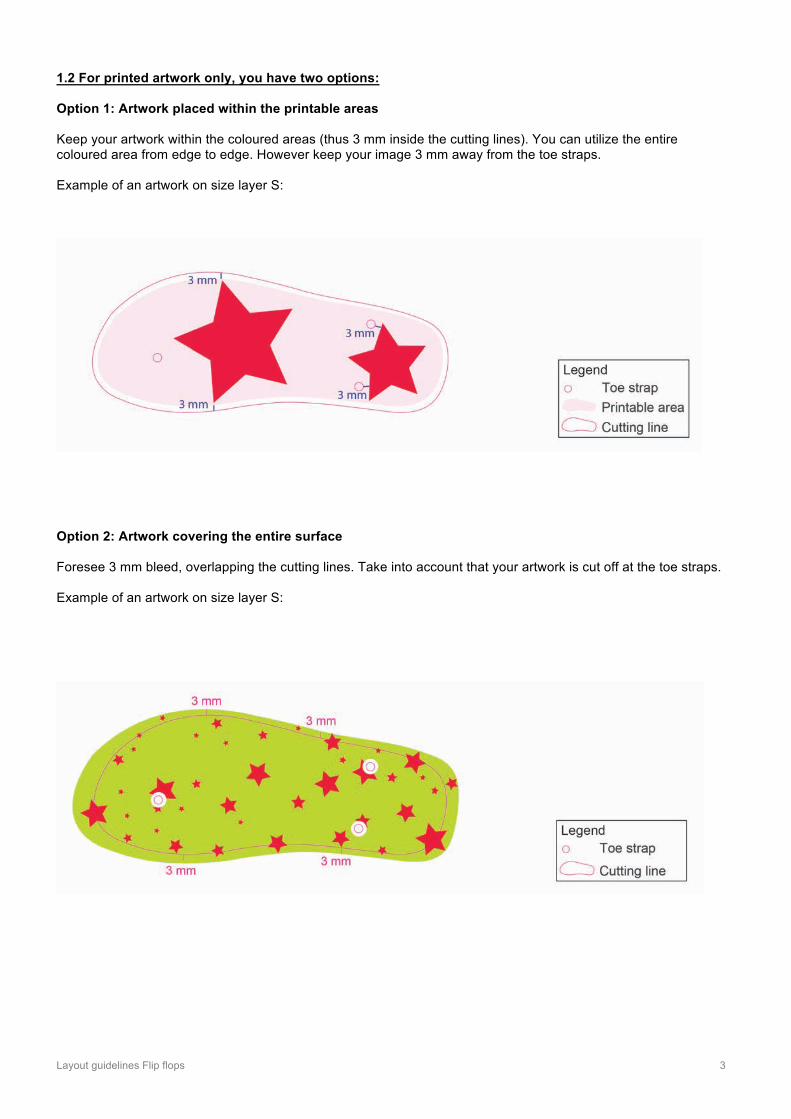
Option 2: Artwork covering the entire surface Foresee 3 mm bleed, overlapping the cutting lines. Take into account that your artwork is cut off at the toe straps. Example of an artwork on size layer S:
Layout guidelines Flip flops 4
2.GUIDELINESFORPRINTING Note that printing on EVA foam is not the same as printing on paper. Foam is flexible material with an open-cell structure thus the ink reacts differently than on paper. How to deliver your artwork?
For digital print For screen print Digital print only on white foam - Rastered images have to be: - Resolution: 300 ppi - 100 % exact dimensions of the final product - Embedded in the file - Vectorised logo’s and text have to be: - Text in outlines - Colours set as process colours Vector = best quality print result for logo’s and text à Save template with artwork to .pdf as ‘Illustrator default’ + send in the original .ai file
Screen print possible on every foam colour - Vectorised logo’s and text have to be: - Text in outlines - Colours set as PMS/spot/Pantone colours Vector = best quality print result for logo’s and text à Save template with artwork to .pdf as ‘Illustrator default’ + send in the original .ai file
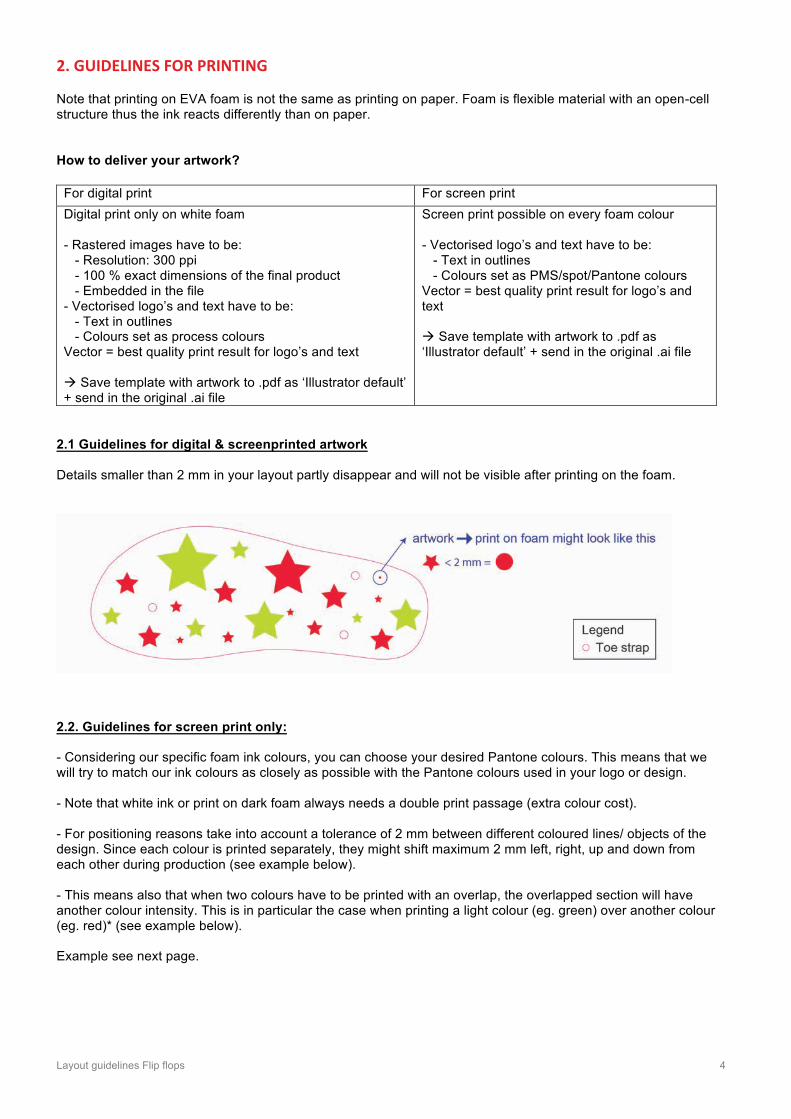
2.1 Guidelines for digital & screenprinted artwork Details smaller than 2 mm in your layout partly disappear and will not be visible after printing on the foam.
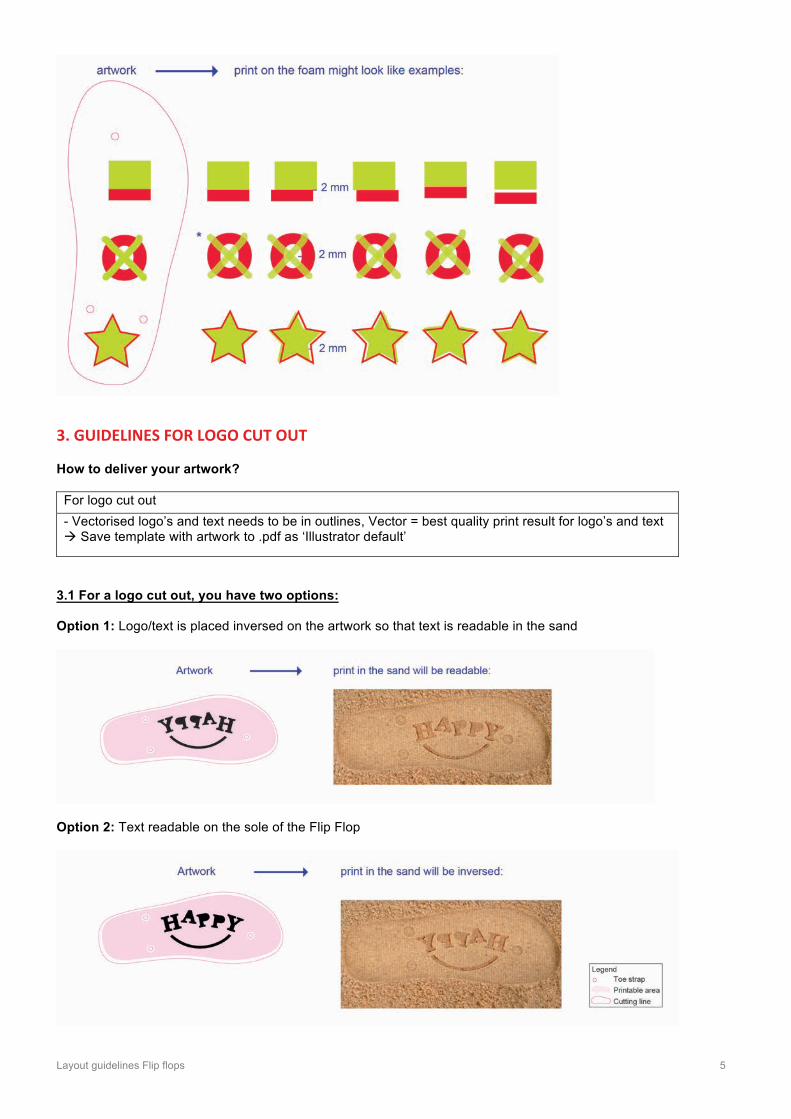
2.2. Guidelines for screen print only: - Considering our specific foam ink colours, you can choose your desired Pantone colours. This means that we will try to match our ink colours as closely as possible with the Pantone colours used in your logo or design. - Note that white ink or print on dark foam always needs a double print passage (extra colour cost). - For positioning reasons take into account a tolerance of 2 mm between different coloured lines/ objects of the design. Since each colour is printed separately, they might shift maximum 2 mm left, right, up and down from each other during production (see example below). - This means also that when two colours have to be printed with an overlap, the overlapped section will have another colour intensity. This is in particular the case when printing a light colour (eg. green) over another colour (eg. red)* (see example below). Example see next page.
Layout guidelines Flip flops 5
3.GUIDELINESFORLOGOCUTOUT How to deliver your artwork?
For logo cut out - Vectorised logo’s and text needs to be in outlines, Vector = best quality print result for logo’s and text à Save template with artwork to .pdf as ‘Illustrator default’
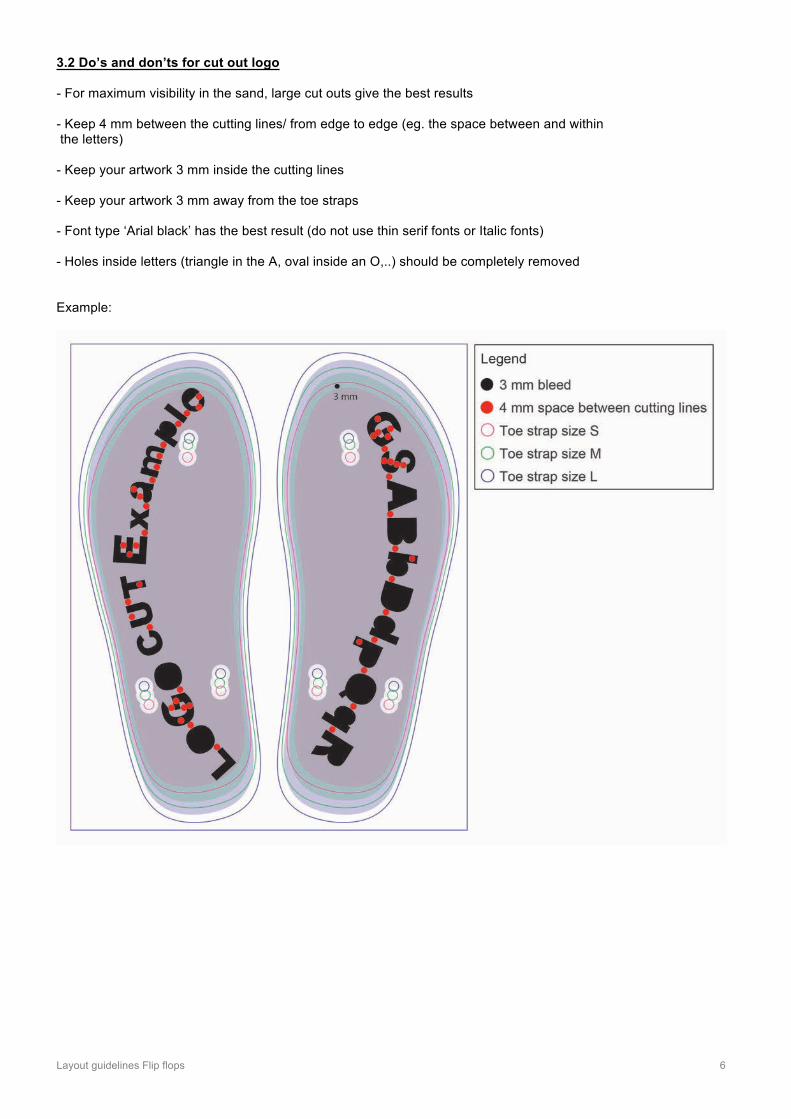
3.1 For a logo cut out, you have two options: Option 1: Logo/text is placed inversed on the artwork so that text is readable in the sand
Option 2: Text readable on the sole of the Flip Flop
Layout guidelines Flip flops 6
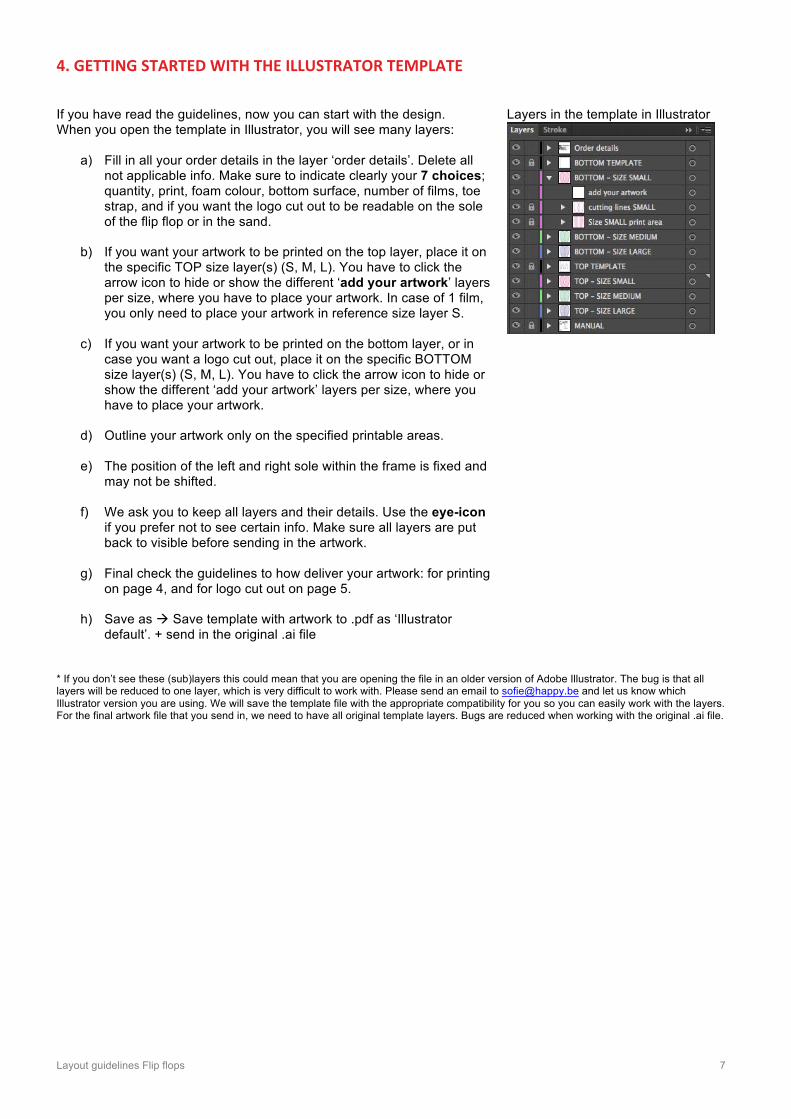
3.2 Do’s and don’ts for cut out logo - For maximum visibility in the sand, large cut outs give the best results - Keep 4 mm between the cutting lines/ from edge to edge (eg. the space between and within the letters) - Keep your artwork 3 mm inside the cutting lines - Keep your artwork 3 mm away from the toe straps - Font type ‘Arial black’ has the best result (do not use thin serif fonts or Italic fonts) - Holes inside letters (triangle in the A, oval inside an O,..) should be completely removed Example:
Layout guidelines Flip flops 7
4.GETTINGSTARTEDWITHTHEILLUSTRATORTEMPLATE If you have read the guidelines, now you can start with the design. When you open the template in Illustrator, you will see many layers:
a) Fill in all your order details in the layer ‘order details’. Delete all not applicable info. Make sure to indicate clearly your 7 choices; quantity, print, foam colour, bottom surface, number of films, toe strap, and if you want the logo cut out to be readable on the sole of the flip flop or in the sand.
b) If you want your artwork to be printed on the top layer, place it on
the specific TOP size layer(s) (S, M, L). You have to click the arrow icon to hide or show the different ‘add your artwork’ layers per size, where you have to place your artwork. In case of 1 film, you only need to place your artwork in reference size layer S.
c) If you want your artwork to be printed on the bottom layer, or in
case you want a logo cut out, place it on the specific BOTTOM size layer(s) (S, M, L). You have to click the arrow icon to hide or show the different ‘add your artwork’ layers per size, where you have to place your artwork.
d) Outline your artwork only on the specified printable areas.
e) The position of the left and right sole within the frame is fixed and
may not be shifted.
f) We ask you to keep all layers and their details. Use the eye-icon if you prefer not to see certain info. Make sure all layers are put back to visible before sending in the artwork.
g) Final check the guidelines to how deliver your artwork: for printing
on page 4, and for logo cut out on page 5.
h) Save as à Save template with artwork to .pdf as ‘Illustrator default’. + send in the original .ai file
Layers in the template in Illustrator
* If you don’t see these (sub)layers this could mean that you are opening the file in an older version of Adobe Illustrator. The bug is that all layers will be reduced to one layer, which is very difficult to work with. Please send an email to [email protected] and let us know which Illustrator version you are using. We will save the template file with the appropriate compatibility for you so you can easily work with the layers. For the final artwork file that you send in, we need to have all original template layers. Bugs are reduced when working with the original .ai file.