Embed Size (px)
Citation preview

Launching and accessing Notezilla
Launching NotezillaNotezilla runs automatically when ever you log on to your computer.This is the default setting. However you candisable this setting using Preferences. Alternatively, you can launch Notezilla from the Windows Start menu.Notezilla appears as an icon in the notification area of the Windows taskbar (next to the clock).
Notezilla Icon in Windows Taskbar
Accessing NotezillaNotezilla is accessed by clicking on the icon. Left click on the icon for a simple menu. Right click for advancedmenu.
Simple Menu on Left Click
Advanced Menu on Right Click
Writing your first sticky note
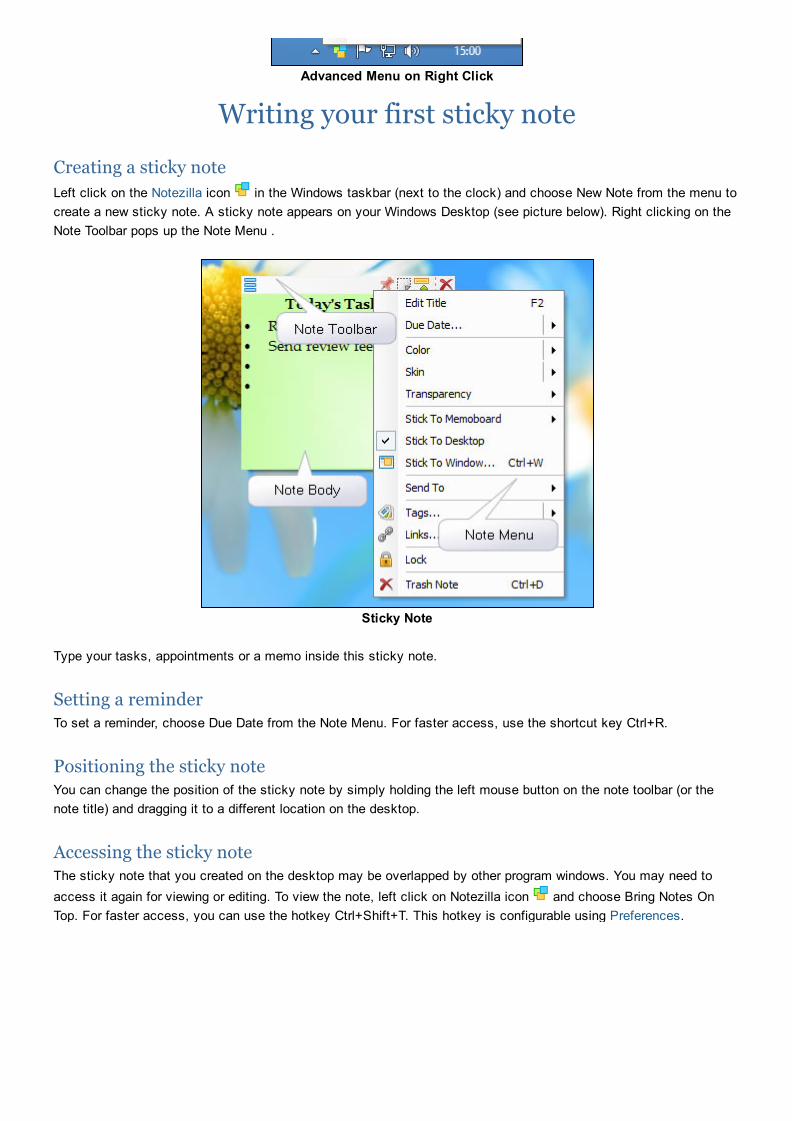
Creating a sticky noteLeft click on the Notezilla icon in the Windows taskbar (next to the clock) and choose New Note from the menu tocreate a new sticky note. A sticky note appears on your Windows Desktop (see picture below). Right clicking on theNote Toolbar pops up the Note Menu .
Sticky Note
Type your tasks, appointments or a memo inside this sticky note.
Setting a reminderTo set a reminder, choose Due Date from the Note Menu. For faster access, use the shortcut key Ctrl+R.
Positioning the sticky noteYou can change the position of the sticky note by simply holding the left mouse button on the note toolbar (or thenote title) and dragging it to a different location on the desktop.
Accessing the sticky noteThe sticky note that you created on the desktop may be overlapped by other program windows. You may need toaccess it again for viewing or editing. To view the note, left click on Notezilla icon and choose Bring Notes OnTop. For faster access, you can use the hotkey Ctrl+Shift+T. This hotkey is configurable using Preferences.
Creating sticky notes on Windows desktopThere are several ways of creating sticky notes on Windows desktop.
Notezilla Icon in Windows Taskbar
Simple MenuLeft click on the Notezilla icon and choose New Note from the menu to create a sticky note on the desktop.
Advanced MenuRight click on the Notezilla icon and choose New Note from the menu to create a sticky note on the desktop. Tocreate new notes by specific color, skin or tag, choose the appropriate menu item from the advanced menu.
HotkeyThis is the fastest way of creating a sticky note. Use the hotkey Ctrl+Shift+U to create new desktop sticky notes.This hotkey is configurable using Preferences.
Creating sticky notes inside a memoboard
Notes Browser MenuIn Notezilla all sticky notes are part of some memoboards. To create a new note inside the selected memoboard,choose File/New Note from the Notes Browser,
Notes Browser ToolbarClick on New Note button on the toolbar that appears on topleft corner of the Notes Browser.
Notes Browser Shortcut KeyPress Ctrl+N keys to create a new note inside the selected memoboard.
RightClick Context MenuIn the Notes Browser, right click or double click anywhere inside the Notes View and choose New Note Here from themenu to create a note at the mouse position.
Editing sticky note textNotezilla provides varied options to edit a sticky note. Note text is the text inside a sticky note.
Right clicking inside a sticky note brings up the Formatting Menu that lets you format text, insert date & time, insert

pictures inside a sticky note.
Formatting Menu
Formatting TextThe Formatting Menu lets you to set font, font size, font color, font style (bold, italic, underline, strikethrough), addbullets and numbering and also set the text alignment.
To format text faster, it is recommended that you use shortcut keys that are listed in the Formatting Menu againsteach menu item.
HyperlinksTo insert links to websites just type the website address in the note body.Example: http://www.conceptworld.com.
To insert links to email addresses, prefix the email address with the keyword mailto:. Example: mailto:[email protected] .
To insert links to files or folders on your hard drive, prefix the file/folder path with file://. Example: <file://C:\My Documents\My Pictures\Landscape.jpg>.
Note: If the file/folder path contains blank spaces then enclose the complete address with < and > characters asshown above.
Pasting as plain unformatted textTo paste an unformatted text inside a sticky note, choose More>Paste as plain text menu item from the FormattingMenu.
Inserting Date & TimeTo insert current date & time choose More>Short/Long date & time menu item from the Formatting Menu.

ChecklistEnabling checklist shows a check box before each line of a sticky note, that you can check and uncheck. To enablechecklist, choose Checklist from the Formatting Menu.
Inserting PicturesTo insert pictures inside a sticky note, choose Insert Picture menu item from the Formatting Menu.
Find text inside the sticky noteTo find text inside the active sticky note, choose Find menu item from the Formatting Menu.
Spell checkTo check spelling, choose Spelling menu item from the Formatting Menu. Automatic spellcheck can be enabled fromthe Preferences.
Characters/Word CountTo view the total number of characters, words, paragraphs & lines inside the selected sticky note, choose Statisticsmenu item from the Formatting Menu
Note TitleIn Notezilla the note title helps you to quickly identify the right sticky note without actually reading through itscontent. Also, if the sticky note is rolled up or locked, title is the only way to identify the sticky note.
By default, the first sentence of a sticky note is treated as the title of the note. When you type your note, the title isnot displayed because the first sentence is anyway displayed as part of the sticky note.
If you want to add your own title, just right click on the note title/toolbar and choose 'Add Title' from the menu. Youcan also press F2 to add/edit the title.
Sticky note with note menu
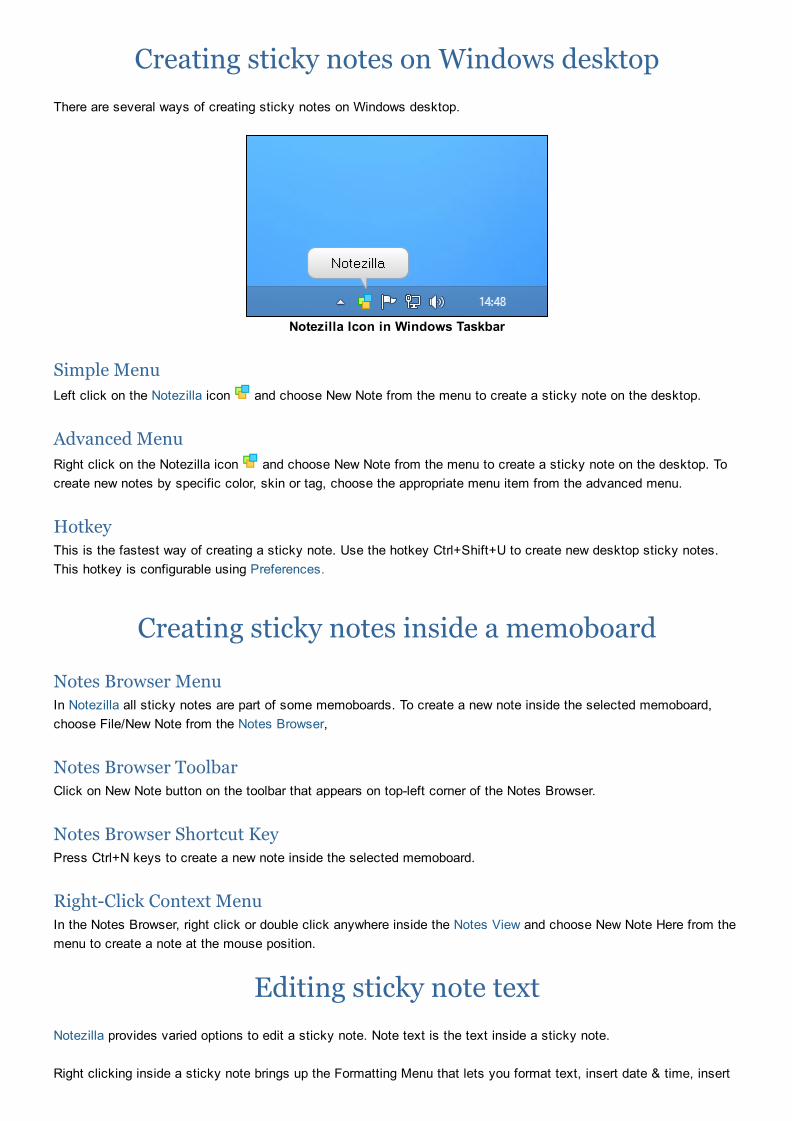
Sticky note with custom title
Setting a reminder to a sticky noteSetting reminder is the core part of Notezilla. To set a reminder, right click on the note title or note toolbar and chooseDue Date from the menu. For faster access, press the shortcut key Ctrl+R.
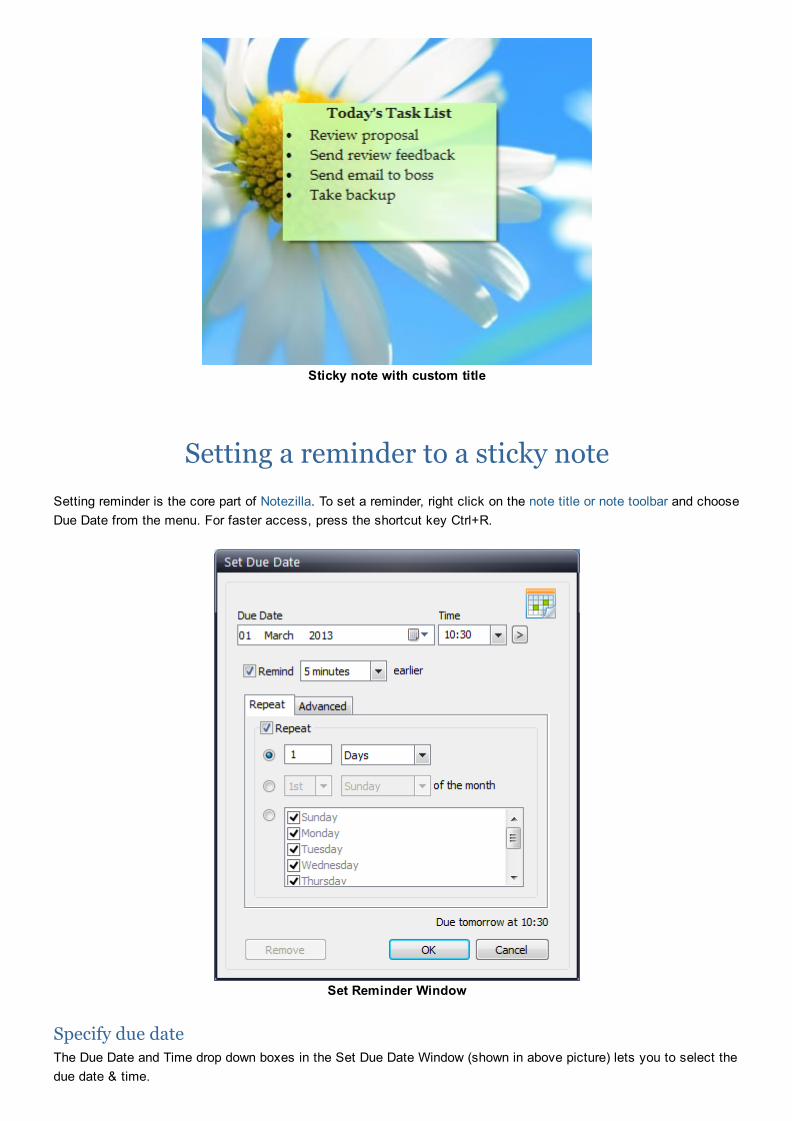
Set Reminder Window
Specify due dateThe Due Date and Time drop down boxes in the Set Due Date Window (shown in above picture) lets you to select thedue date & time.
due date & time.
Faster way to set a reminderDirectly choose the duration after which you need to be reminded from Due Date> Due in: options without using 'SetReminder' window or click on the > button and choose appropriate duration after which you need to be reminded in'Set Reminder' window.
Getting an alert ahead of Due DateIf you want to be reminded ahead of the due date, choose the appropriate duration from the drop down 'Remind xminutes earlier'
Playing a different sound (.wav or .mp3)To specify a different sound file (.wav or .mp3) that needs to be played at the reminder time, select 'Advanced' tab &click on the ... button next to the Play sound option in the Advanced tab.
Launching a program/document/website at reminder timeYou can run a program, open a document or launch a website at a configured reminder time.
To do this, select 'Advanced' tab & check off the Launch program, document or website option and specify the pathof the program, document or website.
Deleting a note automatically at specific timeOften, information inside a note may get obsolete after some time. Example: schedules, travel plan etc. You canconfigure Notezilla to delete the note automatically at particular time so that you do not end up with large number ofoutdated notes.
To do this, select the 'Advanced' tab & check off the Trash this note option.
Repeat optionsTo repeat a reminder at specific intervals, select the Repeat tab and configure required reoccurrence interval for thereminder.
Keeping sticky notes always on top
In Notezilla to make a sticky note stay always on top of all other program windows, click on the Pin icon in thenote toolbar. Only desktop notes can be made to stay on top. Faster way to making a note stay on top is to use theshortcut key Ctrl+Q from the sticky note.
Rolling up a sticky note
Notezilla allows you to roll up and down the sticky note. To roll up a sticky note, click on the Roll Up icon in thenote toolbar.
To roll down a sticky note, click on the Roll Down icon in the Note Toolbar.
Faster way to roll up/down a note is to use the shortcut key Ctrl+O from the note.

Editing sticky note color, skin & transparencyNotezilla lets you to create a note in diverse colors & skins. The sticky note color, skin and transparency is set usingthe Note Menu .
Note Menu
Changing Note ColorMove your mouse over the Color menu item of the Note Menu. A submenu will pop up from which you can choosethe color of your choice. If you just click on the Color menu item directly, the last selected color will be applied to thesticky note.
Changing Note SkinMove your mouse over the Skin menu item of the Note Menu. A dropdown menu will pop up from which you canchoose the skin of your choice. If you just click on the Skin menu item directly, the last selected skin will be appliedto the sticky note.
Changing Note TransparencyMove your mouse over the Transparency menu item of the Note Menu. A submenu will pop up from which you canselect the required transparency level.
Only desktop notes can be transparent. Notes inside memoboards always remain opaque.
Notes Browser: Alternatively, you can also change note color and skin from the Notes Browser, by selecting the noteand choosing the Appearance button from the Notes Browser toolbar.

Tagging a sticky noteTags are labels or categories that you can assign to notes in order to group them and locate them easily. It is one ofthe most useful feature of Notezilla. By adding tags you can group your notes by topics, projects, contexts oranything else that is important to you.
Example: supermarket, meetings, bills, bank, projectxyz, tocall, torepair, toclean, weekends, travel, hotels,internet, school, assignment.
A single note may have multiple tags.
Example: You may tag a note 'project1, supermarket', and tag another note 'project2, supermarket'. Now you caneasily find and group all the items that need to be purchased from the Supermarket for all the projects.
Note Tags
Assigning TagsTo assign tags to a note, choose Tags from the Note Menu or press Ctrl+T. The Note Tags window will appear (asshown above). Just type the tags separated by comma and press OK. The Note Menu will also allow you to directlyassign/remove the tag from the Tags popup menu.
Faster way to assign tagsTo quickly assign tags hover the mouse on tags from Note menu and click dropdown from sub menu. A list of alreadyexisting tags will be displayed. Directly assign tags to the note from that popup.
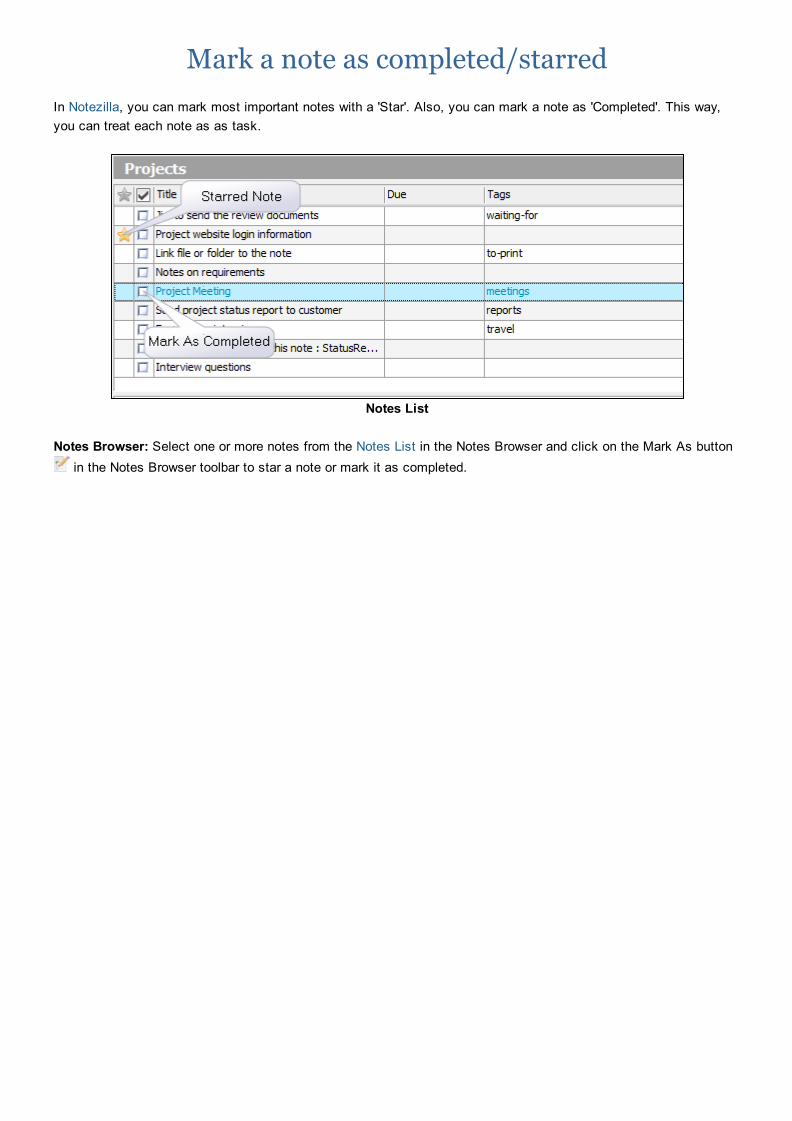
Mark a note as completed/starredIn Notezilla, you can mark most important notes with a 'Star'. Also, you can mark a note as 'Completed'. This way,you can treat each note as as task.
Notes List
Notes Browser: Select one or more notes from the Notes List in the Notes Browser and click on the Mark As button in the Notes Browser toolbar to star a note or mark it as completed.

Lock a sticky noteNotezilla lets you to password protect a note so that it cannot be read or edited. Also, the note is encrypted so that itcannot be read from the database too.
A single master password is used to lock/unlock any note. If you are locking a note for the first time after installingNotezilla, you will be requested to set the master password. You can change this master password usingPreferences.
Locking a NoteRight click on the note title or note toolbar and choose Lock menu item to lock the note. A locked note is alwaysrolled up so that its content cannot be seen or edited.
Unlocking a NoteTo unlock a locked note, click on the lock icon in the note toolbar.
Unlock/Remove Lock Window
The Unlock/Remove Lock window will appear. Type the password and choose Unlock button to unlock.
Relocking a NoteTo relock a note, just click on the lock icon in the note toolbar.
Removing the LockTo remove the lock permanently, click on the lock icon in the note toolbar. The Unlock/Remove Lock window willappear (shown in above picture). Type the password and choose Remove Lock button to remove the lock.
Linking files & folders to a sticky noteNotezilla lets you to link files & folders to a sticky note. Note that Notezilla does not create any copies of the files orfolders. It only links to existing files & folders. To link files & folders to a sticky note, just right click on the note titleor note toolbar and choose Links menu item icon from the menu.

Attach a sticky note to documents, websites orprograms
Notezilla lets you to associate a sticky note with any document, website, program or a window (such as an emailwindow, or Windows Explorer).
Stick note to any documents, websites, programs or windows
Sticking a NoteTo stick a note to any window, right click on the note title and choose Stick To Window icon from the menu. Afaster way to do this is to use the shortcut key Ctrl+W. You will be shown the list of windows that are currently open.These windows include websites, documents and programs currently open. Just select a window from the list, andchoose OK button to stick the note.
Tip: You can directly stick a note to the underlying window by pressing Ctrl+Shift+W keys from the note.
Matching only a part of the window title (Wildcards)Notezilla uses the title of the window to show or hide a particular sticky note. Sometimes, you may want to stick thenote to windows of similar kind. Eg. All pages of Ebay website, or all documents in Microsoft Word. In such casesyou would need to use the 'wildcard' method.
To match only a part of the window title, double click on any window title that is listed (shown in above picture) andprefix or suffix the title with the * wildcard.
Examples: 1. *Google Search* (shows the note for any search query in Google and in any browser)2. *Microsoft Outlook (shows the note even if you change folders in Outlook)
Attaching sticky notes to folders in Windows Explorer

Sticky note on folder in Windows Explorer
The process of sticking notes to a folder is same as sticking notes to any other website or document using Notezilla.However, to make it work perfectly, there is a setting in Windows Explorer that needs to be enabled.
Notezilla sticks sticky notes to different web pages, documents, folders & emails based on the title of the window. Incase of Windows Explorer, by default the title of the window is the folder name. So here comes the problem. If youhave multiple folders with the same name, then the sticky note would show up on all those folders because of thesame window title. This is not what we want.
In order to solve this, we just have to enable a setting in Windows Explorer – “Display the full path in title bar”. OnWindows 7, you would also see a note “Classic theme only” against this setting. It only means that the full path willbe shown only in Classic Windows theme. Other themes will use the full path internally (which is what Notezillarequires).

Windows Explorer – View Options
Showing & hiding sticky notes
Simple Notezilla Menu
Hiding a sticky noteNotezilla allows you to hide a sticky note. To hide a sticky note, click on the Hide Note icon in the Note Toolbar.Only desktop notes can be hidden.
Viewing a sticky note in Notes BrowserTo view a sticky note, double click on the the note in the Notes List of the Notes Browser.
Viewing a sticky note on desktopFrom the Notes Browser, select the sticky note that is stuck to the Windows desktop. Then click on the ‘Stick toDesktop’ toolbar button and choose ‘Show the desktop note’.
Stick To Desktop Menu in Toolbar
Alternatively, you can also right click on the note and choose ‘Stick to Desktop > Show the desktop note’ from themenu.

menu.
Stick To Desktop Menu in Noteslist
If you are already a registered user of Notezilla 8, you can download the new build for free. Go to download page
Bringing desktop notes on topThe desktop notes may be overlapped by other program windows. To bring the desktop notes on top left click on theNotezilla icon and choose 'Bring desktop notes on top' from the menu. You can also right click on the Notezilla icon
and choose 'Desktop Notes/Bring notes on top' from the menu.
The faster and recommended way of bringing desktop notes on top is to use the hotkey Ctrl+Shift+T. This hotkey isconfigurable using Preferences.
Showing all desktop notesTo show all desktop notes (including hidden notes), left click on the Notezilla icon and choose 'Show all desktopnotes' from the menu. You can also right click on the Notezilla icon and choose 'Desktop Notes/Show all notes' fromthe menu.
The faster and recommended way of showing all desktop notes is to use a hotkey. You can set a hotkey for showingall desktop notes using Preferences.
Hiding all desktop notesTo hide all desktop notes, left click on the Notezilla icon and choose 'Hide all desktop notes' from the menu. Youcan also right click on the Notezilla icon and choose 'Desktop Notes//Hide all notes' from the menu.
The faster and recommended way of hiding all desktop notes is to use a hotkey. You can set a hotkey for hiding alldesktop notes using Preferences.

Searching sticky notes
To search for sticky notes, left click or right click on the Notezilla icon and choose Search from the menu, typethe required keyword and hit Enter key.
Advanced Menu
If you are in the Notes Browser, you can use the shortcut key F3 to activate Advanced Search pane.
Advanced Search
Filtering the notes list
You can also quickly filter the active notes list by typing inside the 'Filter List' text box at the topright corner of theNotes Browser (see picture below).
The list can be filtered by title, tags, memoboard etc. You can also press Alt+F3 to set keyboard focus on the 'FilterList' text box.

Filter List
Sticking notes to memoboards
Note Menu
In Notezilla by default, all sticky notes are stuck to the 'Home' memoboard. It is better to organize your sticky notesin different memoboards for better productivity. This also improves the performance of the program.
To stick a note to another memoboard, right click on the note title and choose 'Stick To Memoboard>(Memoboard)'from the menu. The 'Stick To Memoboard' lists favorite memoboards only. You can choose 'Other...' to choose anyother memoboard.
If you are in Notes Browser, you can also drag and drop the note from the notes list to a memoboard listed in the'Memoboards' pane.

Deleting a sticky noteWhen you trash a sticky note in Notezilla, it is actually sent to the 'Trash' memoboard. The 'Trash' is emptiedperiodically.
Trash a single sticky noteTo trash a sticky note, click on the Trash Note button in the note toolbar. You can also press Ctrl+D shortcut keyfrom the sticky note. To permanently delete a sticky note without sending it to the Trash memoboard, hold the Shiftkey and click on the Trash Note icon.
Trash multiple sticky notesSelect one or more notes from the Notes List of the Notes Browser and choose the Delete button from the NotesBrowser toolbar. You can also use the Del key to trash the selected notes.
Emptying the Trash MemoboardIn the Notes Browser, right click on the Trash memoboard item in the Memoboards pane and choose Empty Trashfrom the menu.
Arranging & sorting sticky notes
Arranging Desktop NotesTo change the layout of the desktop notes, right click on the Notezilla icon and choose Desktop Notes>ArrangeNotes menu item.
Paper Roll layout cannot be applied on desktop notes due to limitations of Windows Desktop width and height.
Arranging Memoboard NotesTo change the layout of the memoboard notes , right click on the background of the Notes View and choose ArrangeNotes menu item.
LayoutsStickers: Positions the notes equally (horizontally and vertically) keeping the size of the notes intact. Paper Roll: Expands the width of the notes to the maximum width of the Notes View and positions them vertically.

Printing notes
Note Menu
Printing a single sticky noteTo print a single sticky note, right click on the note title or note toolbar and choose Send To>Printer (Ctrl+P) from themenu in Notezilla's notes browser.
Printing multiple sticky notesSelect one or more notes from the Notes List of the Notes Browser and choose Send To>Printer (Ctrl+P) option fromthe Notes Browser toolbar.

Notes BrowserNotes Browser lets you to create, view, edit & group sticky notes. To launch the Notes Browser, left click on the Notezilla icon in the Windows taskbar (next to the clock) and chooseNotes Browser from the menu.
Notes Browser
Memoboards PaneThe Memoboards pane lists all the memoboards in a hierarchy tree.
Filters PaneThe Filters pane lists the predefined filters
Notes ListThe Notes List lists the notes contained in the selected memoboard.
Notes ViewThe Notes View places the notes as actual stickies.
Search PaneThe Search pane lets you to find notes by specify query.

MemoboardA memoboard is a folder inside which sticky notes can be placed. In Notezilla basically memoboards are likecontainers for sticky notes. If your Windows desktop gets messy with too many sticky notes, you can organize theminside a memoboard. A memoboard contains 2 parts.
Notes ListNotes View
Notes Browser
Notes ListThe Notes List lets you to view notes as a list. Each note in the Notes List can be treated as a task. You can setpriority, set due date (reminder) or mark it as completed. The Notes List gives a summary of all the notes in that memoboard by listing the note titles. Learn how to insert columns in Notes List
Notes ViewThe Notes View places the notes as actual stickies. The advantage of Notes View is that you can view the content of each note at a single glance, without browsing andclicking on a note from a list. It saves a lot of time. You can group these sticky notes logically, as you would do on areal memoboard. Plus, it's real fun to deal with virtual sticky notes.

Create a memoboardTo create a new memoboard in Notezilla launch the Notes Browser and choose File>New Memoboard from the NotesBrowser menu. To create a memoboard inside an existing memoboard, right click on a memoboard item in the Memoboards pane andchoose New Memoboard from the menu.
Notes Browser
Deleting a memoboardTo delete a memoboard, right click on the memoboard item in the Memoboards pane and choose Delete from themenu. The memoboard is actually moved to the Trash memoboard

Memoboard propertiesIn Notezilla to edit memoboard properties, right click on a memoboard item in the Memoboards pane and chooseProperties from the menu.
Changing the background color of a memoboardIn the Memoboard Properties window, select the required background color and choose OK.
Activating a memoboard using a hotkeyIn the Memoboard Properties window, specify the required hotkey and choose OK. A hotkey is a systemwide unique key combination assigned to an action. Make sure you specify a key combinationthat is not used by any other program.
Setting a memoboard as 'Favorite'If you use a memoboard very often, you can mark it as a favorite memoboard so that it is listed in the NotezillaSimple Menu, Notezilla Advanced Menu & a Note's Send To menu. In the Memoboard Properties window, check the option Set as favorite memoboard and choose OK.
Automatically arranging notes inside a memoboardYou can configure Notezilla to automatically arrange notes, whenever the memoboard is activated for the first time,every time the program is launched. In the Memoboard Properties window, check the option Automatically arrange notes at startup and choose OK.
Favorite memoboardsNotezilla lets you to mark favorite memoboards. If you use a memoboard very often, you can mark it as a favoritememoboard so that it is listed in the Notezilla Simple Menu, Notezilla Advanced Menu & a Note's Send To menu.
Setting a memoboard as 'Favorite'To mark a memoboard as favorite, right click on a memoboard item in the Memoboards pane and choose Favoritefrom the menu.
FiltersFilters let you to browse all notes that having similar characteristics in a single view. Notezilla currently has thefollowing predefined filters.
All Sticky notes from all the memoboards.
Starred Starred sticky notes
Due Sticky notes with reminders/due dates
Unread Unopened sticky notes received from contacts
On desktop Sticky notes on desktop
On windows Sticky notes stuck to documents, websites, windows etc
Recently created Recently created sticky notes

Recently modified Recently modified sticky notes
Recently accessed Recently accessed sticky notes
Recently sent Recently sent sticky notes
Recently received Recently received sticky notes
Search results Sticky notes from search
Notes Browser
Accessing a FilterTo browse notes by a specific filter, select the Filters pane in the Notes Browser and choose a filter from the pane.
Activating a filter using a hotkeyYou can activate any filter using a hotkey. To set the hotkey, right click on the filter item in the Filters pane andchoose Properties from the menu.
In the Filter Properties window, specify the required hotkey and choose OK.
A hotkey is a systemwide unique key combination assigned to an action. Make sure you specify a key combinationthat is not used by any other program.
Setting a filter as 'Favorite'If you use a filter very often, you can mark it as a favorite filter so that it is listed in Notezilla Simple Menu &Notezilla Advanced Menu.. To mark a filter as favorite, right click on the filter item in the Filters pane and chooseFavorite from the menu.
Reminder Popup WindowIn Notezilla when a reminder goes off, the following popup window is displayed.

Reminder Window
SnoozeReminds you again after a short while. You can specify the duration from the drop down list next to the snoozebutton.
DismissClears the active reminder. If the reminder is configured to repeat after certain interval, then the note's reminder timeis updated accordingly.
Browse AllShows the active reminder in the Due filter (Notes Browser), along with other reminders.
RescheduleLets you to modify the reminder settings of the note (active reminder).
Goto NoteShows the note in the Notes Browser.
Trash NoteSends the note to the trash memoboard.

Preferences GeneralIn Notezilla to access the General tab, launch the Notes Browser and select Advanced>Preferences from the NotesBrowser menu.
General Tab Preferences
Automatically run Notezilla when I log on to WindowsCheck this option if you want to start Notezilla automatically, every time you start log on to your computer.
Show confirmation when a note is being TrashedCheck this option if you want to be prompted with a message box when trashing a note.
Create new notes in specific desktop areaNew notes can be created in specific desktop area. This is very useful if you are using multiple monitors. Check thisoption and choose the Set Desktop Area button to specify the desktop area.
Show shadow under desktop notesCheck this option if you want to drop shadow under each desktop note. You will need to exit and launch Notezilla again in order to apply this setting.
Play SoundSpecify the default reminder sound file that should play every time a reminder alert is shown. Uncheck this option ifyou do not want any sound to be played. Both .wav and .mp3 files are accepted.
SnoozeSpecify the default snooze duration that should be set in the Reminder Window.

Check spelling while typing noteCheck this option if you want to check spelling while typing inside note.
Preferences NoteTo access the Note tab in Notezilla, launch the Notes Browser and select Advanced>Preferences from the NotesBrowser menu. The Note tab lets you to set the default sticky note settings.
Note Tab Preferences
ColorChoose the default note color that should be used for new notes. Automatic will use the skin setting. Random willrandomly select any color from a set of 16 predefined light colors.
SkinChoose the default skin that should be used for new notes. Random will randomly select any skin from the currentlyinstalled skin.
TitleChoose the default note title, font, font size & font color. Automatic sets the note title to the first sentence that youtype inside the note.
BodyChoose the default note text, font, font size & font color.
Show modified date over the title of the note

Show modified date over the title of the noteCheck this if you want to display note's modified date on the top right corner of a sticky note.
SizeSet the default note size for the new notes.
TransparencySet the default transparency level for the new desktop notes
Stay On topCheck this to make the new notes stay always on top, by default.
Size to contentBy default a sticky note is automatically sized to content. You can disable this feature by deselecting 'Size tocontent' checkbox

Preferences HotkeysTo access the Hotkeys tab in Notezilla, launch the Notes Browser and select Advanced>Preferences from the NotesBrowser menu. A hotkey is a systemwide unique key combination assigned to an action. Make sure you specify a key combinationthat is not used by any other program.
Hotkeys Tab Preferences
Setting a HotkeyTo set a hotkey, select an action from the list, specify the key combination the edit box below the list and chooseApply button.
Removing a HotkeyTo remove a hotkey, select an action from the list, press backspace key in the edit box below the list so that the editbox shows 'None' and choose Remove button.

Preferences AdvancedTo access the Advanced tab, launch the Notes Browser and select Advanced>Preferences from the Notezilla'sNotes Browser menu.
Advanced Tab Preferences
Data FolderThis is the location where Notezilla stores all the notes data. Choose the Browse button to change this location. Youwill need to exit and launch Notezilla again to apply this setting.
Backup FolderNotezilla keeps five backup copies of its data under this folder, datewise. Choose the Browse button to change thislocation. Notezilla takes the backup, every time it is launched.
Set Master PasswordChoose this button to set the single master password used to lock/unlock notes and memoboards.
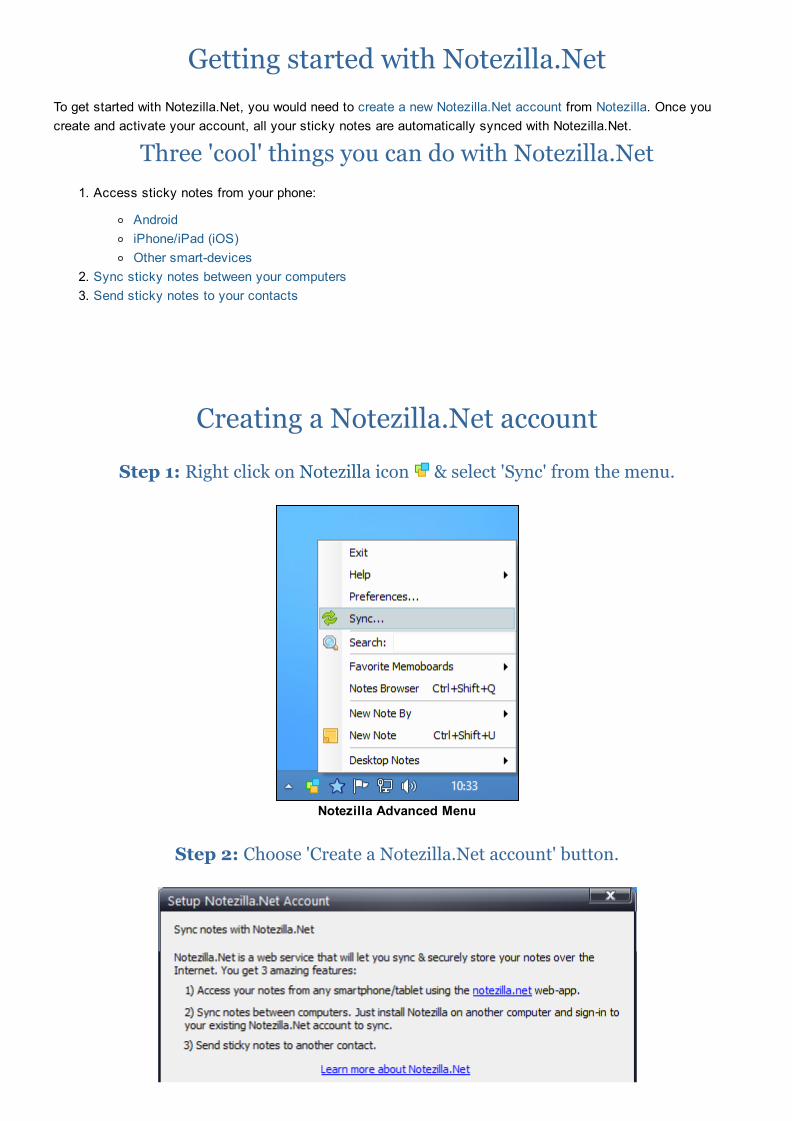
Getting started with Notezilla.NetTo get started with Notezilla.Net, you would need to create a new Notezilla.Net account from Notezilla. Once youcreate and activate your account, all your sticky notes are automatically synced with Notezilla.Net.
Three 'cool' things you can do with Notezilla.Net1. Access sticky notes from your phone:
AndroidiPhone/iPad (iOS)Other smartdevices
2. Sync sticky notes between your computers3. Send sticky notes to your contacts
Creating a Notezilla.Net account
Step 1: Right click on Notezilla icon & select 'Sync' from the menu.
Notezilla Advanced Menu
Step 2: Choose 'Create a Notezilla.Net account' button.
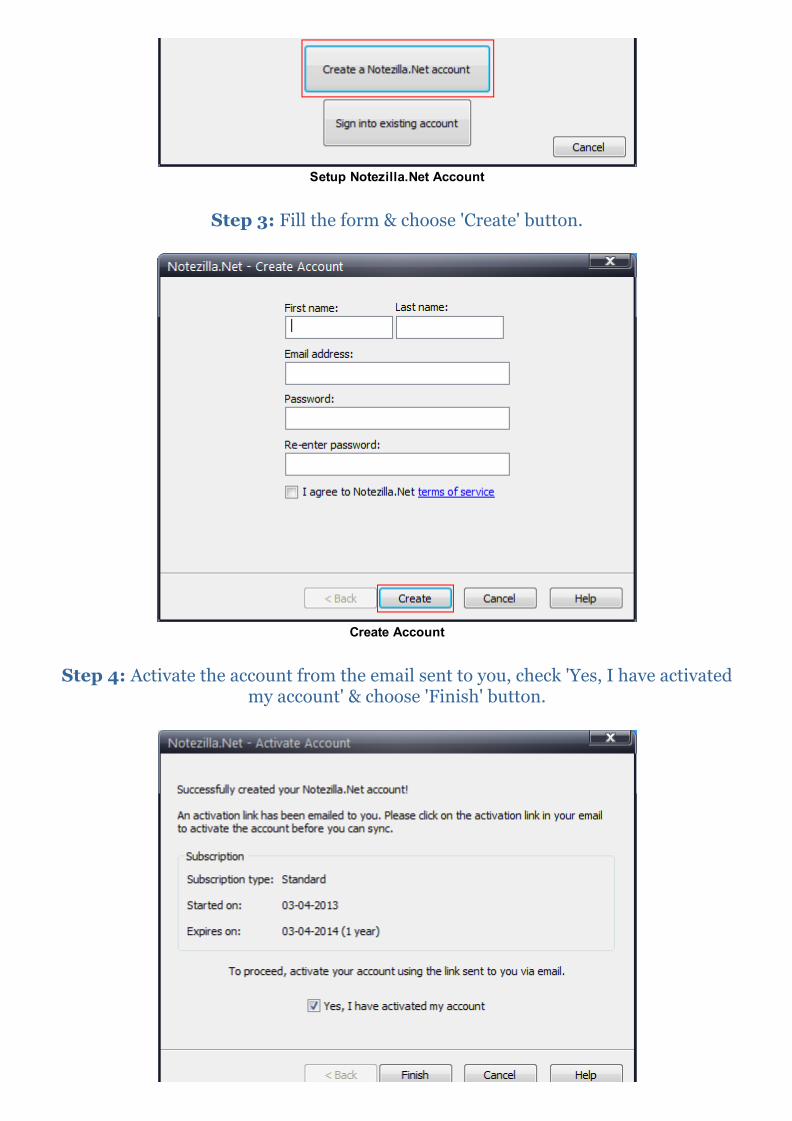
Setup Notezilla.Net Account
Step 3: Fill the form & choose 'Create' button.
Create Account
Step 4: Activate the account from the email sent to you, check 'Yes, I have activatedmy account' & choose 'Finish' button.

Activate Account
Signing into existing account
Step 1: Right click on Notezilla icon & select 'Sync' from the menu.
Advanced Menu
Step 2: Choose 'Sign into existing account' button.
Setup Notezilla.Net Account
Step 3: Fill the form & choose 'Next' button.

Sign In
Step 4: Check 'Yes, I agree' & choose 'Proceed' button.Note: Sticky notes from your Notezilla.Net account will replace all existing notes.
Download Notes Window
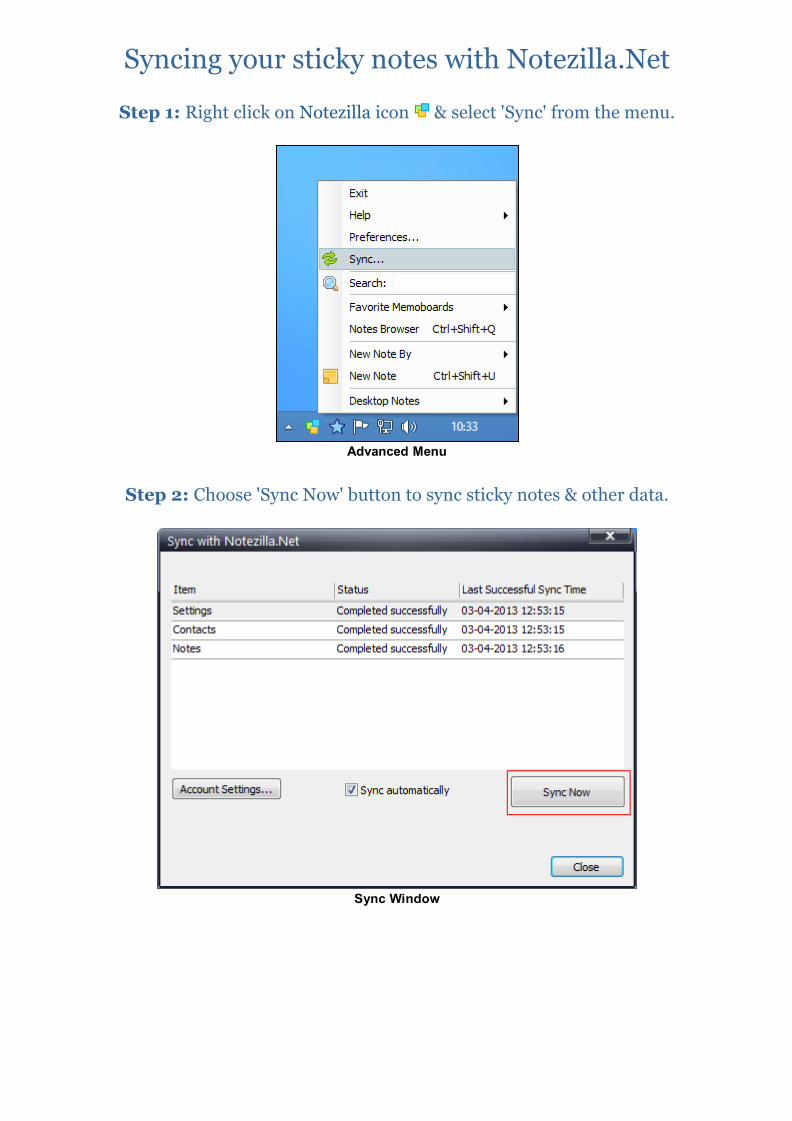
Syncing your sticky notes with Notezilla.Net
Step 1: Right click on Notezilla icon & select 'Sync' from the menu.
Advanced Menu
Step 2: Choose 'Sync Now' button to sync sticky notes & other data.
Sync Window

Syncing sticky notes between your computersSync is the contemporary feature of Notezilla. You can sync multiple computers to a common Notezilla.Net accountso that all your computers have the exact same copy of your sticky notes.
Step 1: On the first computerThis is the computer where Notezilla is already installed. All your important notes are here. You will now create aNotezilla.Net account. On creation, all your notes are automatically synced with the Notezilla.Net cloud. You can alsomanually sync your notes.
Step 2: On other computersDownload and install Notezilla on other computers and then signin to your existing Notezilla.Net account. This willdownload all your sticky notes that you had synced from the first computer.
Adding New ComputersSelect a sticky note in Notezilla, right click on its title/toolbar and choose Send To>Computer from the menu.Following 'Computers' window will be displayed. To add/edit computers, click on 'Manage Computers' button.
Computers Window
Step 2: Add a computer
Now, click on 'Add Computer' button and proceed with the steps shown to you.

Add Computers Window
Managing computers & groups
Similarly, you can edit/delete computers, edit/delete groups from the 'Computers' window shown above.
Sending sticky notes to your computers over localnetwork
Sending a sticky note
To send a sticky note in Notezilla, right click anywhere on its title/toolbar and choose Send To>Computer.

Sending a sticky note to a computer
The following Computers window will appear. Just select one or more computers and choose 'Send Now' button. Tosend a note to a single computer, you can just double click on that computer in the list.
Computers Window

Receiving sticky notes from another computer
In order to receive sticky notes from other computers, the most important step is to allow the notes to bypass thefirewall so that Notezilla can receive them. This is fairly a simple step. If you just add a computer in Notezilla, yourfirewall will be configured automatically. If you are still not able to receive notes, then you would need to manuallyconfigure the firewall to allow Notezilla program to communicate through the firewall.
When someone sends you a sticky note, you will receive a notification as shown in below picture. That's it. Now youmay view the note in Notes Browser or stick it directly to the desktop.
Receiving a sticky note from another computer
Working with contacts & groups
Creating a Notezilla.Net account
Exchanging of sticky notes between users happens over the Notezilla.Net cloud. To create a new contact, you arefirst required to create a new Notezilla.Net account from Notezilla.
Creating a new contact
Step 1: Go to Contacts window
Select a sticky note in Notezilla, right click on its title/toolbar and choose Send To>Contact from the menu.Following 'Contacts' window will be displayed. To add/edit contacts, click on 'Manage Contacts' button.
Contacts Window
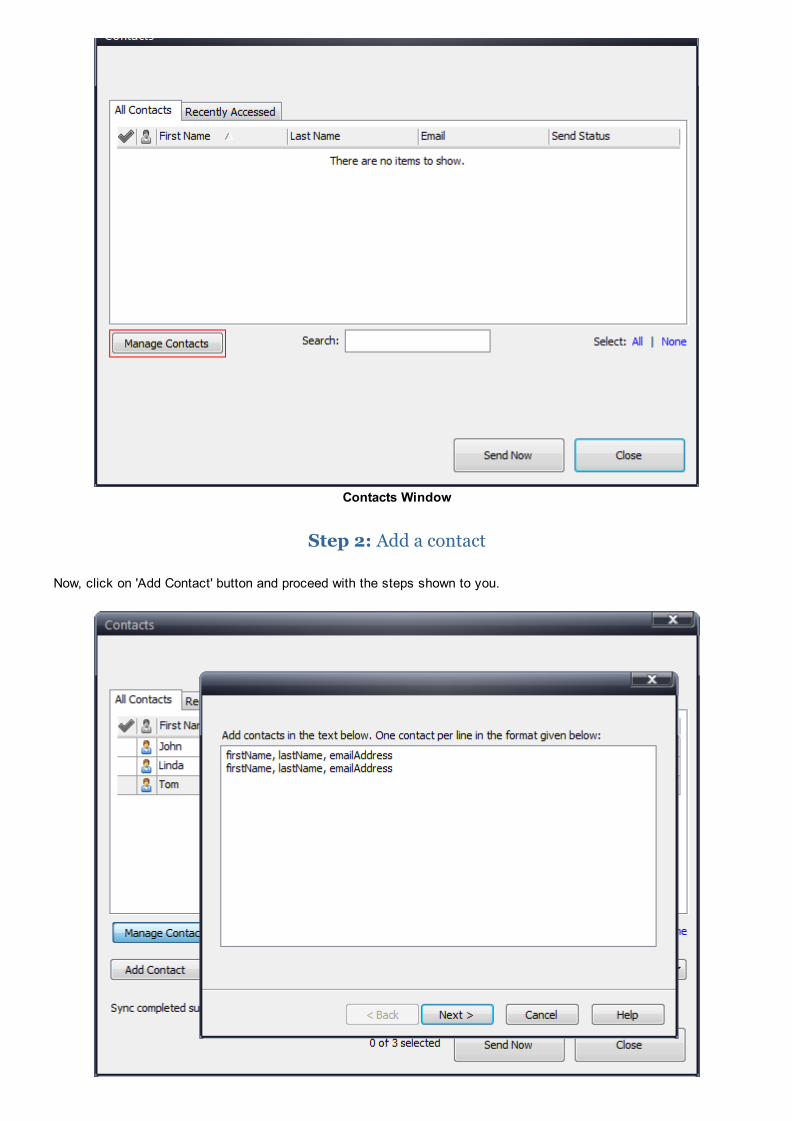
Step 2: Add a contact
Now, click on 'Add Contact' button and proceed with the steps shown to you.
Add Contacts Window

Add Contacts Window
An email is sent to your contact, requesting for her approval. You can then proceed to send sticky notes to thatcontact. If your contact had already added you to her contacts list & you had already approved her, then you will beautomatically approved when you add her as your contact.
Managing contacts & groups
Similarly, you can edit/delete contacts, edit/delete groups from the 'Contacts' window shown above.
Sending sticky notes to your contactsWith Notezilla, you can send sticky notes to anyone. Your contact may be on your local network or any where elseacross the globe. If your contact is also using Notezilla, she will receive the sticky note right on her desktop or elseshe will receive the note as an email.
Step 1: Adding a new contact
If you plan to send a sticky note to another Notezilla user then both of you must:
Use the same version of NotezillaAdd each other to your contacts list
When you add a contact, an email is sent to your contact requesting for her approval. You will be able to send stickynotes to her only after she has approved you.
Step 2: Sending a sticky note
To send a sticky note, right click anywhere on its title/toolbar and choose Send To>Contact.
Sending a sticky note to a contact
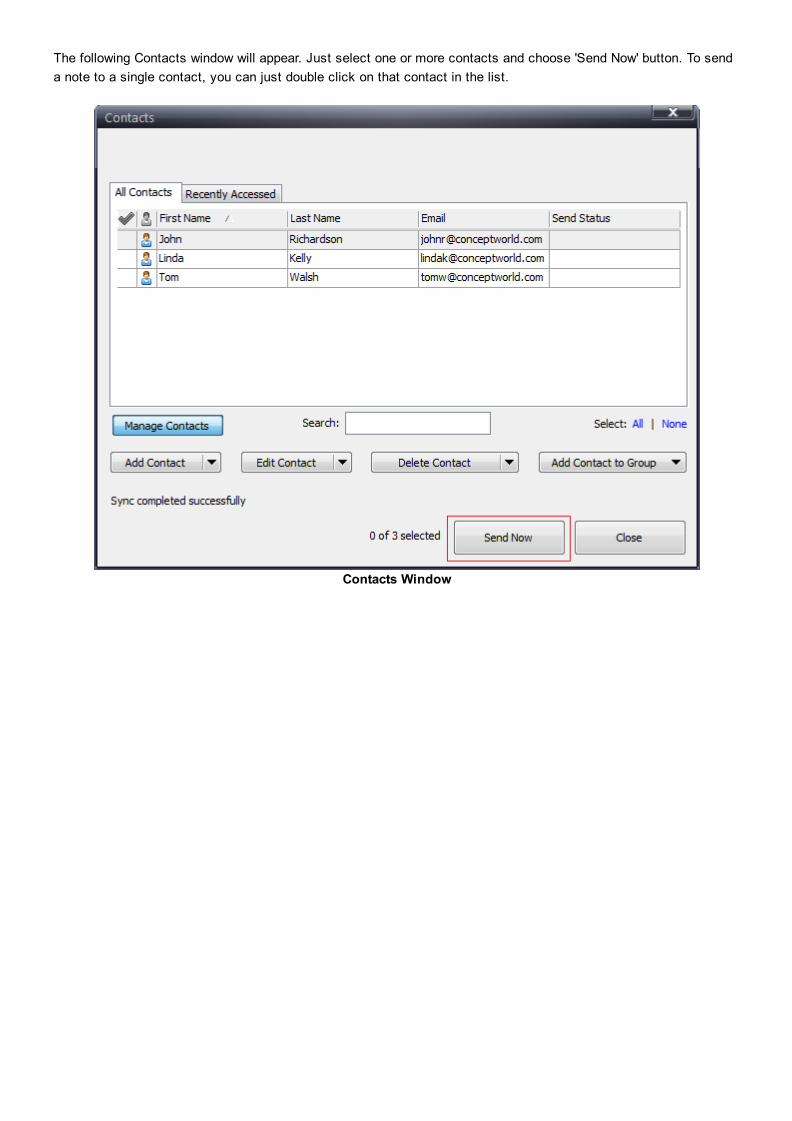
The following Contacts window will appear. Just select one or more contacts and choose 'Send Now' button. To senda note to a single contact, you can just double click on that contact in the list.
Contacts Window

Receiving sticky notes from your contacts
To receive a sticky note from another Notezilla user then both of you must:
Use the same version of NotezillaAdd each other to your contacts list
Notezilla checks for new notes every 5 minutes. If you have a new note from your contact, you will be shown thefollowing popup window.
Receiving Notes From Contacts
Backing up your notesNotezilla keeps backup of your notes data in a separate backup folder. You may want to change this backup folder toa more safer location. Or you may want to use your own backup tool.
To know these folder locations, follow the below steps.
Step 1: Right click on Notezilla icon and choose 'Preferences' from the menu.

Advanced Menu
Step 2: Click on 'Advanced' tab to view the data & backup folder locations.
To view the contents of a particular folder (data or backup), it is recommended to copy the complete address from thebelow window & open it in Windows Explorer.
If you are unable to access Notezilla, then copy this %AppData%\Conceptworld\Notezilla path and directly paste itin start menu search bar or windows explorer menu.
By default, Notezilla stores all its data under %AppData%\Conceptworld\Notezilla folder. %AppData% is a shortrepresentation of the Application Data folder on your system. The location varies based on your operating system.You can type %AppData% in Windows Explorer or Windows Start menu to directly go to your AppData folder.
Note: All Notezilla data is stored in a file called 'Notes8.db' inside the data folder.
Preferences Advanced Tab
When backing up manually or using a backup tool, make sure Notezilla is not running. You can also configure yourbackup tool to exit Notezilla using the Notezilla.exe /Shutdown command line.

Restoring your notes from backup
Restore from Notezilla's backup folder
Follow below steps in order to restore your notes from Notezilla's backup folder:
1. Open both data & backup folders in Windows Explorer.2. Exit Notezilla.3. Inside the backup folder, you would notice different dated folders (eg: Backup\20130412). Open a datedfolder that you think would contain your latest & best notes data.
4. Copy Notes8.db file (& other files) from that folder to the data folder. Replace/rename duplicate files.5. Run Notezilla.
Restoring sticky notes from backup in ...
Restore from your own backup location
Follow the steps below:
1. Open the data folder in Windows Explorer.2. Exit Notezilla.3. From your backup location copy Notes8.db file (& other files) to the data folder. Replace/rename duplicatefiles.
4. Run Notezilla.

Moving your notes to another computer
Old Computer
On the old computer, just copy all the files from the data folder to a removable drive (pen drive, external harddriveetc). Know where Notezilla stores its notes data.
You may also want to copy all the skin files. Skins are stored under %AppData%\Conceptworld\Notezilla\Skinsfolder. Just copy this address & open it in Windows Explorer. Copy all *.nsz files so that you can import them on thenew computer.
New Computer1. Download & install Notezilla on the new computer.2. Know where Notezilla stores its notes data & open that data folder in Windows Explorer.3. Exit Notezilla.4. Copy Notes8.db (& other files) from your removable drive to the data folder. Replace/rename duplicate files.5. (Optional step) Copy all skin files (*.nsz) to %AppData%\Conceptworld\Notezilla\Skins folder.Replace/rename duplicate files.
6. Run Notezilla.

Downloading & importing skins
Skins Window
Downloading skins from the InternetTo download a skin, launch the Notes Browser and choose Advanced>Skins from the Notes Browser menu. In theSkins window, choose 'Download skins from web' button. You will be taken to a webpage from where you candownload the required skins.
Importing the downloaded skin fileOnce you have downloaded the .zip file on to your hard drive, follow the below steps to import it into Notezilla.
1. Uncompress the .zip file that you downloaded from this page in to a temporary folder. The .zip file contains theskin file (.nsz file).
2. Launch Notezilla.3. Right click on Notezilla icon in the task bar (next to the clock) and choose Notes Browser from the menu.4. In the Notes Browser, choose Advanced>Skins from the menu. A "Skins" window will show up listing all theexisting skins.
5. Select "Import Skin..." button from the "Skins" window. A file dialog will appear letting you to choose a skin file(.nsz file).
6. Select the skin file (.nsz file) that you just extracted from the .zip file and choose "Open".7. The skin will be imported into Notezilla.
Keyboard Shortcuts & Hotkeys
HotkeysThe following hotkeys are configured when you install Notezilla for the first time. These hotkeys can be changedusing Preferences.
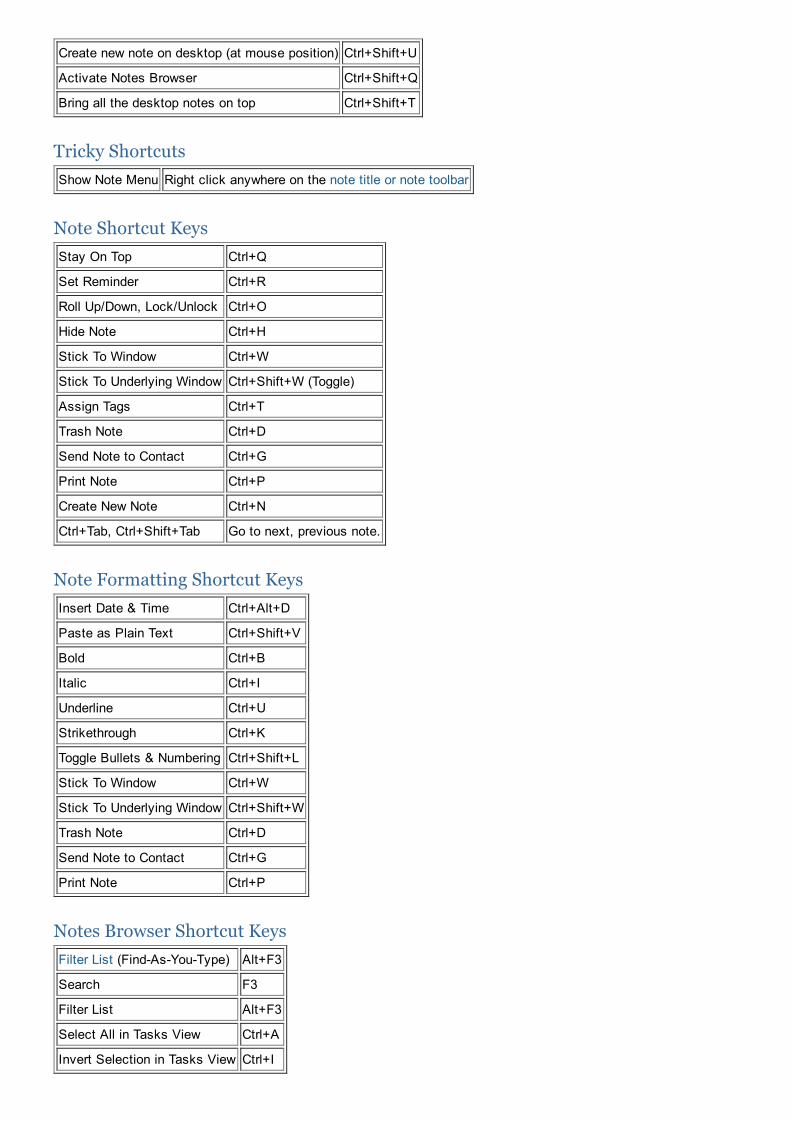
Create new note on desktop (at mouse position) Ctrl+Shift+U
Activate Notes Browser Ctrl+Shift+Q
Bring all the desktop notes on top Ctrl+Shift+T
Tricky ShortcutsShow Note Menu Right click anywhere on the note title or note toolbar
Note Shortcut KeysStay On Top Ctrl+Q
Set Reminder Ctrl+R
Roll Up/Down, Lock/Unlock Ctrl+O
Hide Note Ctrl+H
Stick To Window Ctrl+W
Stick To Underlying Window Ctrl+Shift+W (Toggle)
Assign Tags Ctrl+T
Trash Note Ctrl+D
Send Note to Contact Ctrl+G
Print Note Ctrl+P
Create New Note Ctrl+N
Ctrl+Tab, Ctrl+Shift+Tab Go to next, previous note.
Note Formatting Shortcut KeysInsert Date & Time Ctrl+Alt+D
Paste as Plain Text Ctrl+Shift+V
Bold Ctrl+B
Italic Ctrl+I
Underline Ctrl+U
Strikethrough Ctrl+K
Toggle Bullets & Numbering Ctrl+Shift+L
Stick To Window Ctrl+W
Stick To Underlying Window Ctrl+Shift+W
Trash Note Ctrl+D
Send Note to Contact Ctrl+G
Print Note Ctrl+P
Notes Browser Shortcut KeysFilter List (FindAsYouType) Alt+F3
Search F3
Filter List Alt+F3
Select All in Tasks View Ctrl+A
Invert Selection in Tasks View Ctrl+I

Command Line ParametersNotezilla supports command line arguments. These are very useful when you want to perform an action usingshortcut files. You can create shortcut files on your Windows Desktop, Windows start menu or in the Quick Launchtoolbar to execute the following actions.
Note that when creating shortcut files, you must specify the complete address of Notezilla.exe. Example: C:\ProgramFiles(x86)\Conceptworld\Notezilla\Notezilla.exe /CreateNewNote
Command Line Action
Notezilla.exe /CreateNewNote Creates new note
Notezilla.exe /BringNotesOnTop Brings desktop notes on top of other windows
Notezilla.exe /ShowAllNotes Unhides all desktop notes
Notezilla.exe /HideAllNotes Hides desktop notes
Notezilla.exe /ShowNotesBrowser Shows the Notes Browser
Notezilla.exe /Shutdown Exits Notezilla

Buy Notezilla Online/Enter Activation Key
Purchasing NotezillaTo buy Notezilla, right click on Notezilla icon and choose Help>Register from the menu. Register Notezilla dialogwill appear, in that click "Buy Notezilla online" button
Activating Notezilla (Unlocking using the activation key)To activate Notezilla, right click on Notezilla icon and choose Help>Regsiter from the menu. Register Notezilladialog will appear, in that click "Enter Activation Key" button.
It is recommended that you copy and paste the code instead of typing it.
Send Feedback
Your feedback is extremely important to us.
Please tell us what you feel about Notezilla (good, bad, anything). It matters a lot to us. Drop us an appreciation note if you are satisfied with the product. This is helpful too :)