Embed Size (px)
Citation preview
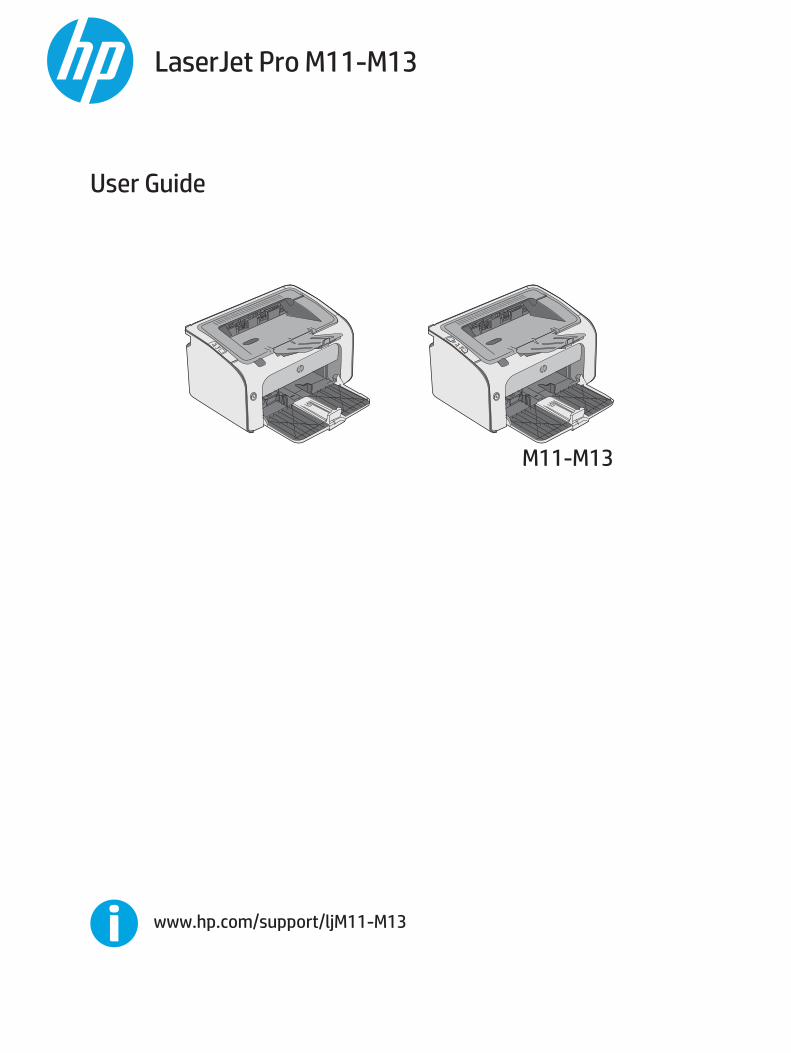
LaserJet Pro M11-M13
User Guide
www.hp.com/support/ljM11-M13
M11-M13


HP LaserJet Pro M11-M13
User Guide

Copyright and License
© Copyright 2016 HP Development Company,L.P.
Reproduction, adaptation, or translationwithout prior written permission is prohibited,except as allowed under the copyright laws.
The information contained herein is subject tochange without notice.
The only warranties for HP products and servicesare set forth in the express warranty statementsaccompanying such products and services.Nothing herein should be construed asconstituting an additional warranty. HP shall notbe liable for technical or editorial errors oromissions contained herein.
Edition 2, 10/2016
Trademark Credits
Adobe®, Adobe Photoshop®, Acrobat®, andPostScript® are trademarks of Adobe SystemsIncorporated.
Apple and the Apple logo are trademarks ofApple Inc., registered in the U.S. and othercountries.
OS X is a trademark of Apple Inc., registered inthe U.S. and other countries.
Microsoft®, Windows®, Windows® XP, andWindows Vista® are U.S. registered trademarksof Microsoft Corporation.
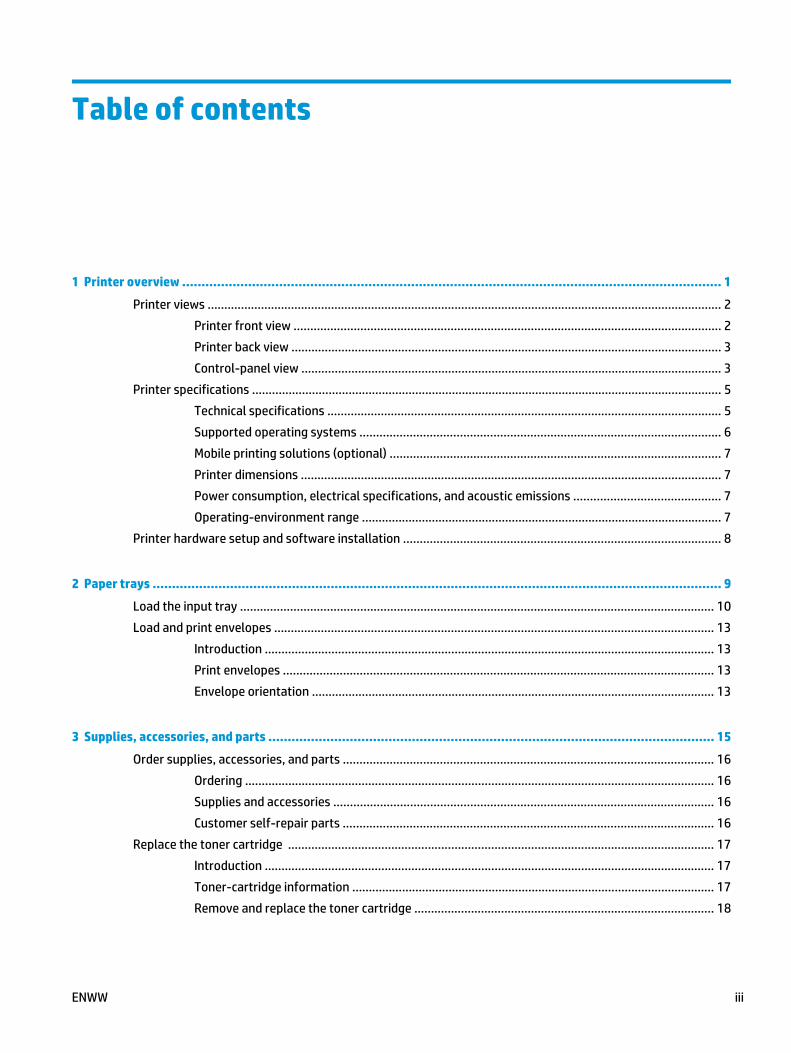
Table of contents
1 Printer overview ........................................................................................................................................... 1
Printer views .......................................................................................................................................................... 2Printer front view ................................................................................................................................ 2Printer back view ................................................................................................................................. 3Control-panel view .............................................................................................................................. 3
Printer specifications ............................................................................................................................................. 5Technical specifications ...................................................................................................................... 5Supported operating systems ............................................................................................................ 6Mobile printing solutions (optional) ................................................................................................... 7Printer dimensions .............................................................................................................................. 7Power consumption, electrical specifications, and acoustic emissions ............................................ 7Operating-environment range ............................................................................................................ 7
Printer hardware setup and software installation ............................................................................................... 8
2 Paper trays ................................................................................................................................................... 9
Load the input tray .............................................................................................................................................. 10Load and print envelopes .................................................................................................................................... 13
Introduction ....................................................................................................................................... 13Print envelopes ................................................................................................................................. 13Envelope orientation ......................................................................................................................... 13
3 Supplies, accessories, and parts ................................................................................................................... 15
Order supplies, accessories, and parts ............................................................................................................... 16Ordering ............................................................................................................................................. 16Supplies and accessories .................................................................................................................. 16Customer self-repair parts ............................................................................................................... 16
Replace the toner cartridge ................................................................................................................................ 17Introduction ....................................................................................................................................... 17Toner-cartridge information ............................................................................................................. 17Remove and replace the toner cartridge .......................................................................................... 18
ENWW iii
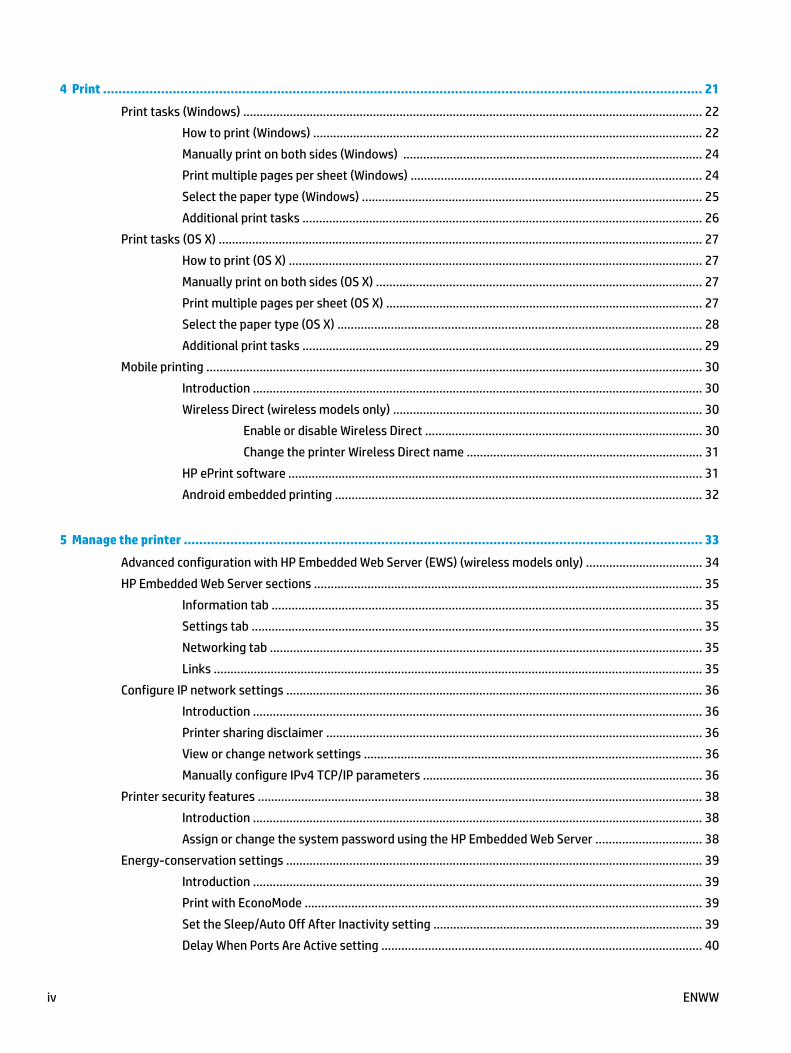
4 Print ........................................................................................................................................................... 21
Print tasks (Windows) .......................................................................................................................................... 22How to print (Windows) ..................................................................................................................... 22Manually print on both sides (Windows) .......................................................................................... 24Print multiple pages per sheet (Windows) ....................................................................................... 24Select the paper type (Windows) ...................................................................................................... 25Additional print tasks ........................................................................................................................ 26
Print tasks (OS X) ................................................................................................................................................. 27How to print (OS X) ............................................................................................................................ 27Manually print on both sides (OS X) .................................................................................................. 27Print multiple pages per sheet (OS X) ............................................................................................... 27Select the paper type (OS X) ............................................................................................................. 28Additional print tasks ........................................................................................................................ 29
Mobile printing ..................................................................................................................................................... 30Introduction ....................................................................................................................................... 30Wireless Direct (wireless models only) ............................................................................................. 30
Enable or disable Wireless Direct ................................................................................... 30Change the printer Wireless Direct name ....................................................................... 31
HP ePrint software ............................................................................................................................ 31Android embedded printing .............................................................................................................. 32
5 Manage the printer ...................................................................................................................................... 33
Advanced configuration with HP Embedded Web Server (EWS) (wireless models only) ................................... 34HP Embedded Web Server sections .................................................................................................................... 35
Information tab ................................................................................................................................. 35Settings tab ....................................................................................................................................... 35Networking tab .................................................................................................................................. 35Links .................................................................................................................................................. 35
Configure IP network settings ............................................................................................................................. 36Introduction ....................................................................................................................................... 36Printer sharing disclaimer ................................................................................................................. 36View or change network settings ..................................................................................................... 36Manually configure IPv4 TCP/IP parameters .................................................................................... 36
Printer security features ..................................................................................................................................... 38Introduction ....................................................................................................................................... 38Assign or change the system password using the HP Embedded Web Server ................................ 38
Energy-conservation settings ............................................................................................................................. 39Introduction ....................................................................................................................................... 39Print with EconoMode ....................................................................................................................... 39Set the Sleep/Auto Off After Inactivity setting ................................................................................. 39Delay When Ports Are Active setting ................................................................................................ 40
iv ENWW
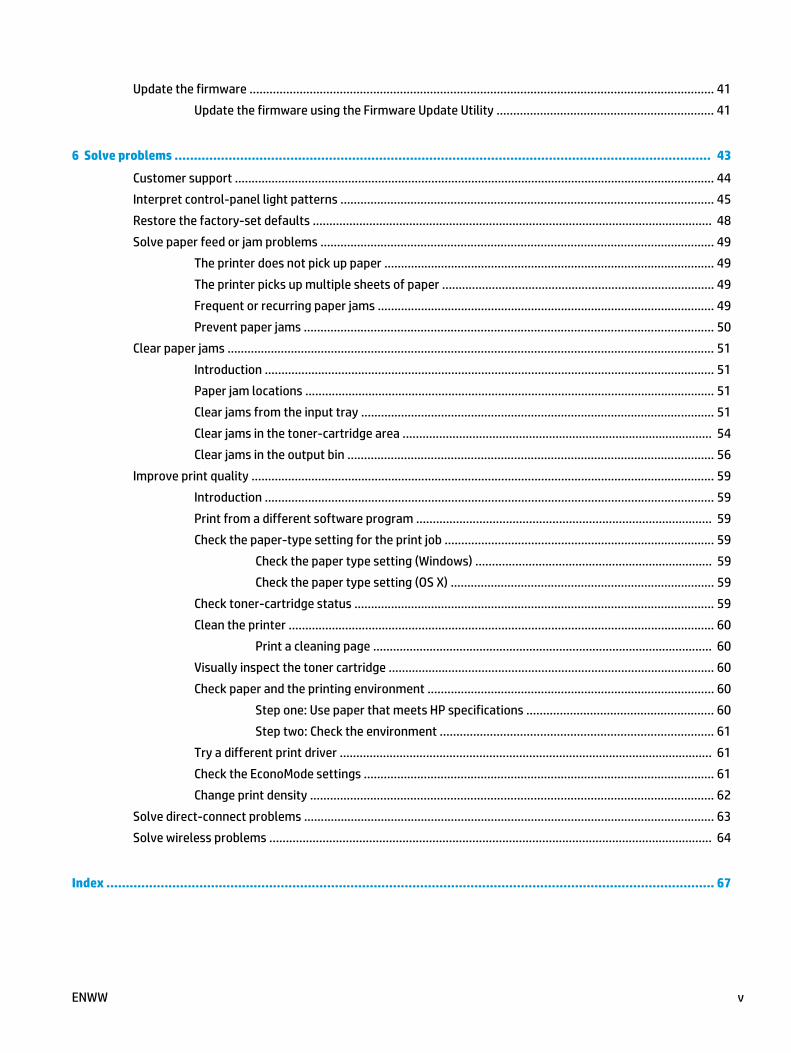
Update the firmware ........................................................................................................................................... 41Update the firmware using the Firmware Update Utility ................................................................. 41
6 Solve problems ........................................................................................................................................... 43
Customer support ................................................................................................................................................ 44Interpret control-panel light patterns ................................................................................................................ 45Restore the factory-set defaults ........................................................................................................................ 48Solve paper feed or jam problems ...................................................................................................................... 49
The printer does not pick up paper ................................................................................................... 49The printer picks up multiple sheets of paper .................................................................................. 49Frequent or recurring paper jams ..................................................................................................... 49Prevent paper jams ........................................................................................................................... 50
Clear paper jams .................................................................................................................................................. 51Introduction ....................................................................................................................................... 51Paper jam locations ........................................................................................................................... 51Clear jams from the input tray .......................................................................................................... 51Clear jams in the toner-cartridge area ............................................................................................. 54Clear jams in the output bin .............................................................................................................. 56
Improve print quality ........................................................................................................................................... 59Introduction ....................................................................................................................................... 59Print from a different software program ......................................................................................... 59Check the paper-type setting for the print job ................................................................................. 59
Check the paper type setting (Windows) ....................................................................... 59Check the paper type setting (OS X) ............................................................................... 59
Check toner-cartridge status ............................................................................................................ 59Clean the printer ................................................................................................................................ 60
Print a cleaning page ...................................................................................................... 60Visually inspect the toner cartridge .................................................................................................. 60Check paper and the printing environment ...................................................................................... 60
Step one: Use paper that meets HP specifications ........................................................ 60Step two: Check the environment .................................................................................. 61
Try a different print driver ................................................................................................................ 61Check the EconoMode settings ......................................................................................................... 61Change print density ......................................................................................................................... 62
Solve direct-connect problems ........................................................................................................................... 63Solve wireless problems ..................................................................................................................................... 64
Index ............................................................................................................................................................. 67
ENWW v

vi ENWW

1 Printer overview
● Printer views
● Printer specifications
● Printer hardware setup and software installation
For more information:
The following information is correct at the time of publication. For current information, see www.hp.com/support/ljm11-m13.
HP's all-inclusive help for the printer includes the following information:
● Install and configure
● Learn and use
● Solve problems
● Download software and firmware updates
● Join support forums
● Find warranty and regulatory information
ENWW 1
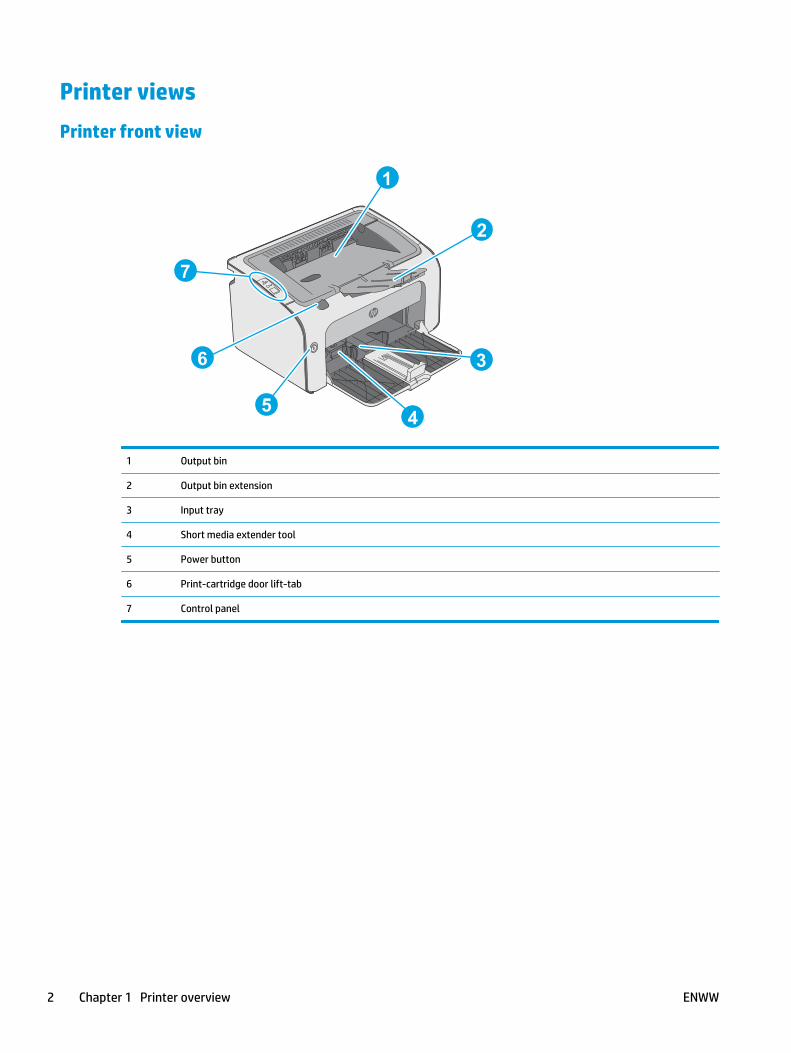
Printer viewsPrinter front view
2
5
6
1
7
3
4
1 Output bin
2 Output bin extension
3 Input tray
4 Short media extender tool
5 Power button
6 Print-cartridge door lift-tab
7 Control panel
2 Chapter 1 Printer overview ENWW

Printer back view
2
1
3
4
1 USB port
2 Power connection
3 Slot for cable-type security lock
4 Serial number
Control-panel view
2
1
Table 1-1 HP LaserJet Pro M12a (base model)
1 Attention LED The Attention light blinks when the printer requires user attention, such as when theprinter runs out of paper or a toner cartridge needs to be changed. If the light is on withoutblinking, the printer has experienced an error.
2 Ready LED The Ready light is on when the printer is ready to print. It blinks when the printer is receivingprint data or canceling a print job.
ENWW Printer views 3
21
45
3
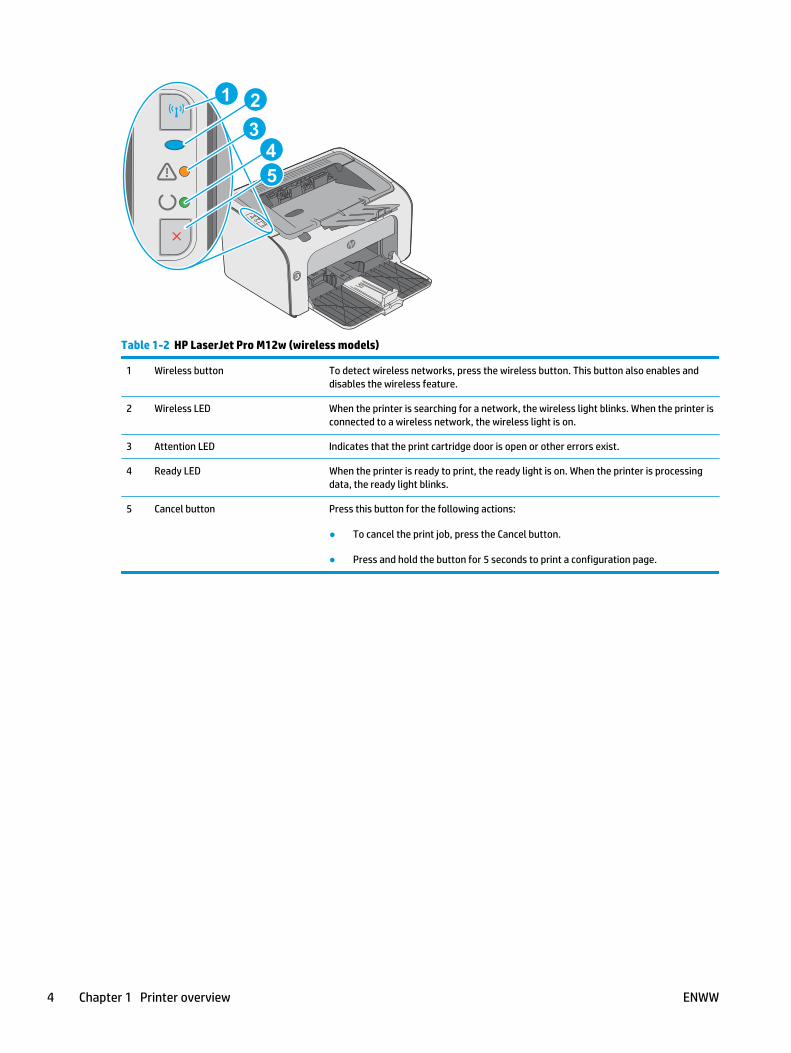
Table 1-2 HP LaserJet Pro M12w (wireless models)
1 Wireless button To detect wireless networks, press the wireless button. This button also enables anddisables the wireless feature.
2 Wireless LED When the printer is searching for a network, the wireless light blinks. When the printer isconnected to a wireless network, the wireless light is on.
3 Attention LED Indicates that the print cartridge door is open or other errors exist.
4 Ready LED When the printer is ready to print, the ready light is on. When the printer is processingdata, the ready light blinks.
5 Cancel button Press this button for the following actions:
● To cancel the print job, press the Cancel button.
● Press and hold the button for 5 seconds to print a configuration page.
4 Chapter 1 Printer overview ENWW
Printer specificationsIMPORTANT: The following specifications are correct at the time of publication, but they are subject to change.For current information, see www.hp.com/support/ljm11-m13.
● Technical specifications
● Supported operating systems
● Mobile printing solutions (optional)
● Printer dimensions
● Power consumption, electrical specifications, and acoustic emissions
● Operating-environment range
Technical specificationsSee www.hp.com/support/ljm11-m13 for current information.
ENWW Printer specifications 5
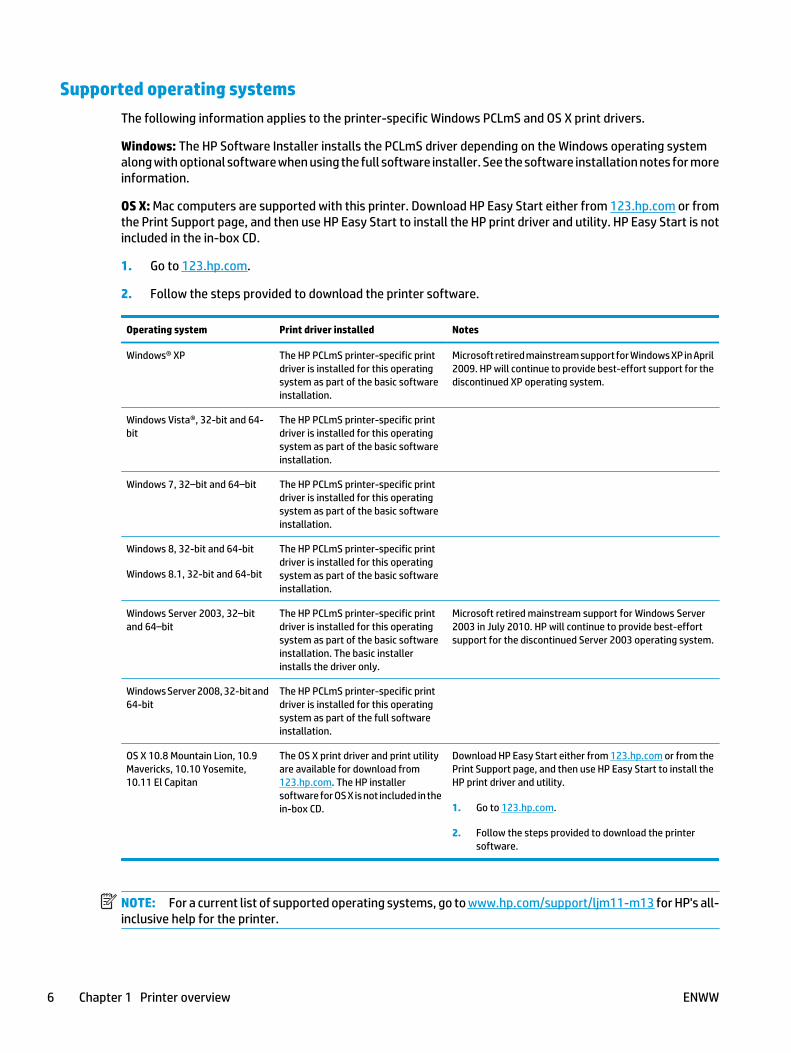
Supported operating systemsThe following information applies to the printer-specific Windows PCLmS and OS X print drivers.
Windows: The HP Software Installer installs the PCLmS driver depending on the Windows operating systemalong with optional software when using the full software installer. See the software installation notes for moreinformation.
OS X: Mac computers are supported with this printer. Download HP Easy Start either from 123.hp.com or fromthe Print Support page, and then use HP Easy Start to install the HP print driver and utility. HP Easy Start is notincluded in the in-box CD.
1. Go to 123.hp.com.
2. Follow the steps provided to download the printer software.
Operating system Print driver installed Notes
Windows® XP The HP PCLmS printer-specific printdriver is installed for this operatingsystem as part of the basic softwareinstallation.
Microsoft retired mainstream support for Windows XP in April2009. HP will continue to provide best-effort support for thediscontinued XP operating system.
Windows Vista®, 32-bit and 64-bit
The HP PCLmS printer-specific printdriver is installed for this operatingsystem as part of the basic softwareinstallation.
Windows 7, 32–bit and 64–bit The HP PCLmS printer-specific printdriver is installed for this operatingsystem as part of the basic softwareinstallation.
Windows 8, 32-bit and 64-bit
Windows 8.1, 32-bit and 64-bit
The HP PCLmS printer-specific printdriver is installed for this operatingsystem as part of the basic softwareinstallation.
Windows Server 2003, 32–bitand 64–bit
The HP PCLmS printer-specific printdriver is installed for this operatingsystem as part of the basic softwareinstallation. The basic installerinstalls the driver only.
Microsoft retired mainstream support for Windows Server2003 in July 2010. HP will continue to provide best-effortsupport for the discontinued Server 2003 operating system.
Windows Server 2008, 32-bit and64-bit
The HP PCLmS printer-specific printdriver is installed for this operatingsystem as part of the full softwareinstallation.
OS X 10.8 Mountain Lion, 10.9Mavericks, 10.10 Yosemite,10.11 El Capitan
The OS X print driver and print utilityare available for download from123.hp.com. The HP installersoftware for OS X is not included in thein-box CD.
Download HP Easy Start either from 123.hp.com or from thePrint Support page, and then use HP Easy Start to install theHP print driver and utility.
1. Go to 123.hp.com.
2. Follow the steps provided to download the printersoftware.
NOTE: For a current list of supported operating systems, go to www.hp.com/support/ljm11-m13 for HP's all-inclusive help for the printer.
6 Chapter 1 Printer overview ENWW
Mobile printing solutions (optional)The printer supports the following software for mobile printing:
● HP ePrint software
● HP ePrint via email (Requires HP Web Services to be enabled and the printer to be registered withHP Connected)
● Android printing
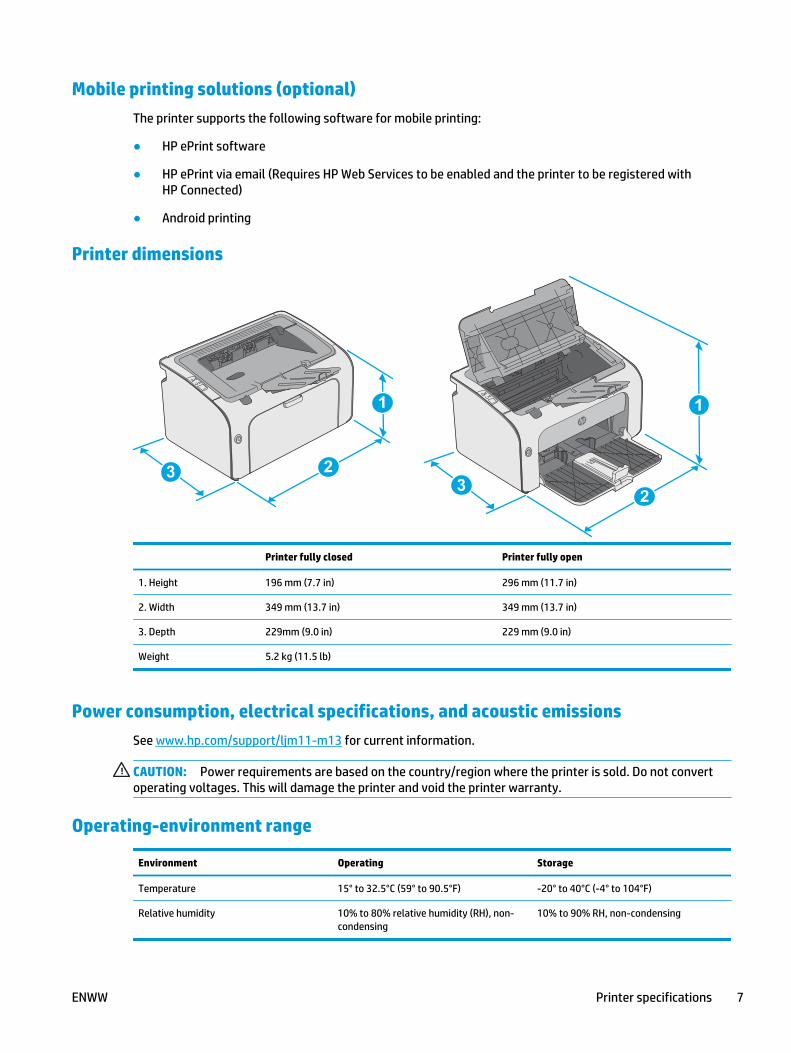
Printer dimensions
1
23
1
23
Printer fully closed Printer fully open
1. Height 196 mm (7.7 in) 296 mm (11.7 in)
2. Width 349 mm (13.7 in) 349 mm (13.7 in)
3. Depth 229mm (9.0 in) 229 mm (9.0 in)
Weight 5.2 kg (11.5 lb)
Power consumption, electrical specifications, and acoustic emissionsSee www.hp.com/support/ljm11-m13 for current information.
CAUTION: Power requirements are based on the country/region where the printer is sold. Do not convertoperating voltages. This will damage the printer and void the printer warranty.
Operating-environment range
Environment Operating Storage
Temperature 15° to 32.5°C (59° to 90.5°F) -20° to 40°C (-4° to 104°F)
Relative humidity 10% to 80% relative humidity (RH), non-condensing
10% to 90% RH, non-condensing
ENWW Printer specifications 7
Printer hardware setup and software installationFor basic setup instructions, see the Setup Poster and Getting Started Guide that came with the printer. Foradditional instructions, go to HP support on the Web.
Go to www.hp.com/support/ljm11-m13 for HP's all-inclusive help for the printer. Find the following support:
● Install and configure
● Learn and use
● Solve problems
● Download software and firmware updates
● Join support forums
● Find warranty and regulatory information
8 Chapter 1 Printer overview ENWW
2 Paper trays
● Load the input tray
● Load and print envelopes
For more information:
The following information is correct at the time of publication. For current information, see www.hp.com/support/ljm11-m13.
HP's all-inclusive help for the printer includes the following information:
● Install and configure
● Learn and use
● Solve problems
● Download software and firmware updates
● Join support forums
● Find warranty and regulatory information
ENWW 9
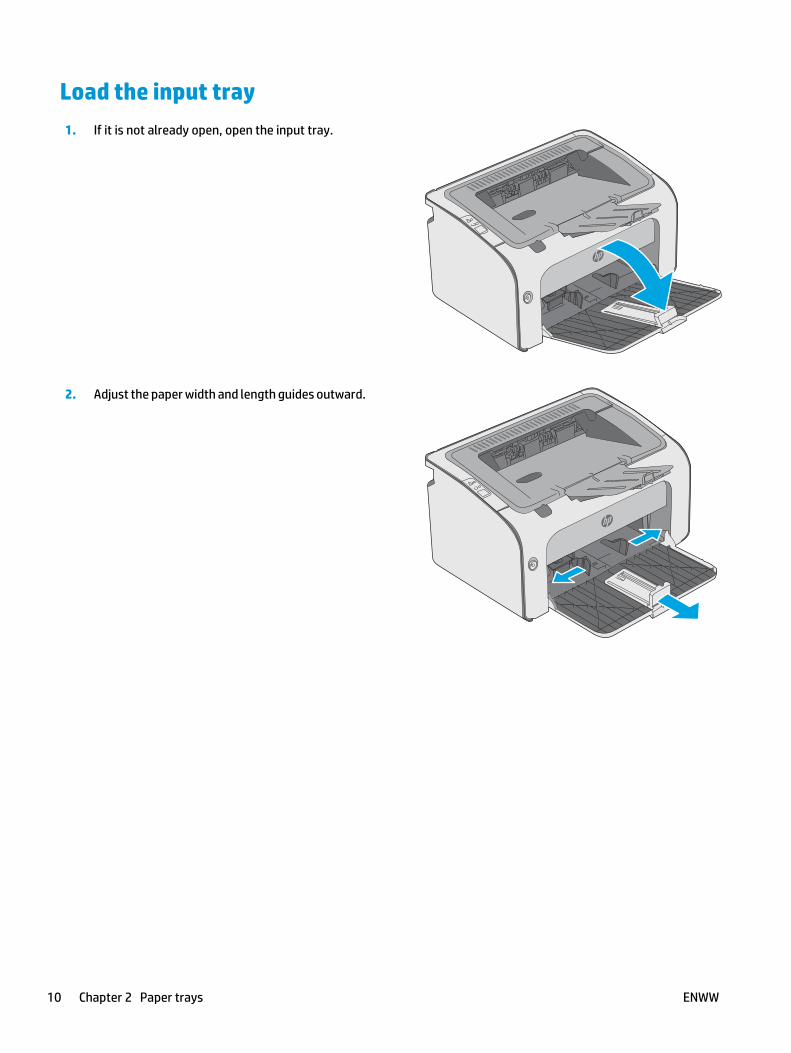
Load the input tray1. If it is not already open, open the input tray.
2. Adjust the paper width and length guides outward.
10 Chapter 2 Paper trays ENWW
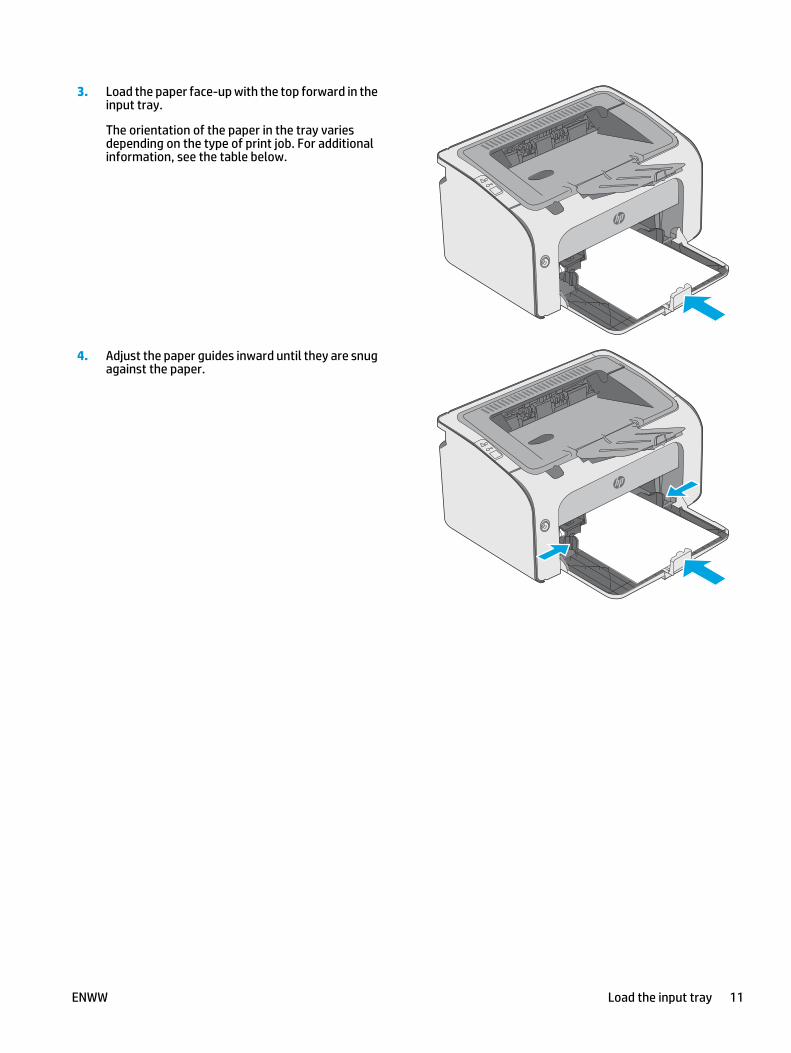
3. Load the paper face-up with the top forward in theinput tray.
The orientation of the paper in the tray variesdepending on the type of print job. For additionalinformation, see the table below.
4. Adjust the paper guides inward until they are snugagainst the paper.
ENWW Load the input tray 11
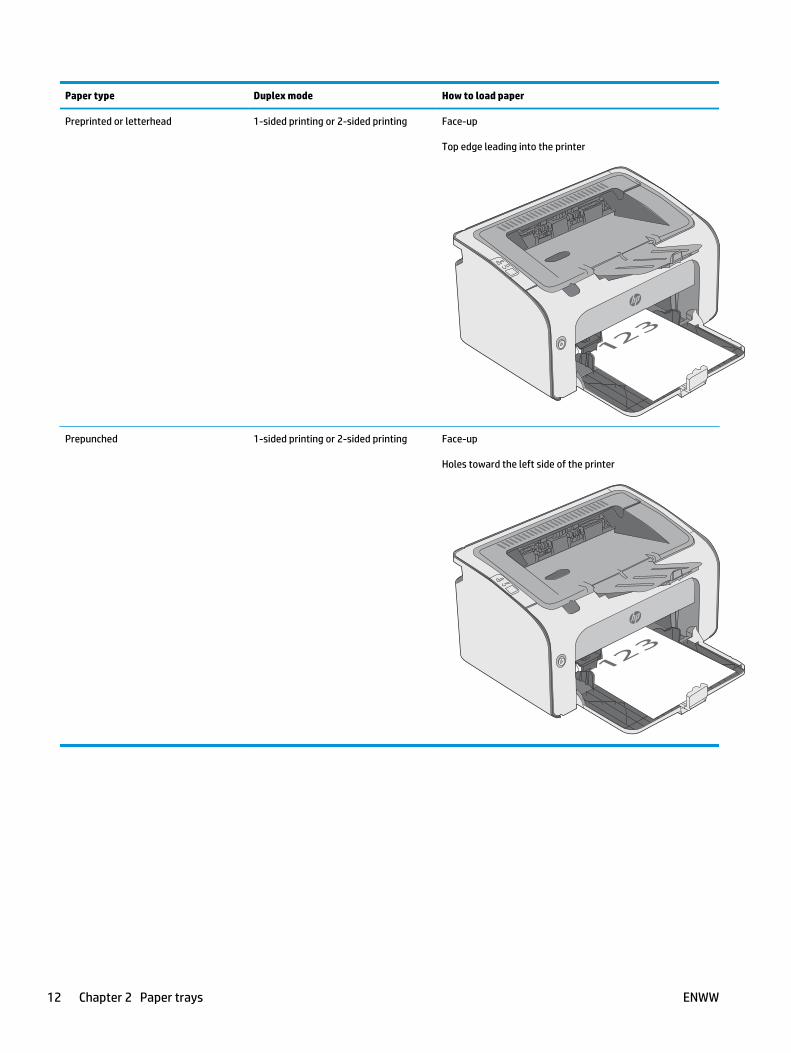
Paper type Duplex mode How to load paper
Preprinted or letterhead 1-sided printing or 2-sided printing Face-up
Top edge leading into the printer
Prepunched 1-sided printing or 2-sided printing Face-up
Holes toward the left side of the printer
12 Chapter 2 Paper trays ENWW

Load and print envelopesIntroduction
The following information describes how to print and load envelopes. For the best performance, only 5 mm (.2 in) of envelopes (4 to 6 envelopes) should be loaded into the priority feed tray, and only 10 envelopes shouldbe loaded into the input tray.
To print envelopes, follow these steps to select the correct settings in the print driver.
Print envelopes1. From the software program, select the Print option.
2. Select the printer from the list of printers, and then click or tap the Properties or Preferences button toopen the print driver.
NOTE: The name of the button varies for different software programs.
NOTE: To access these features from a Windows 8 or 8.1 Start screen, select Devices, select Print, andthen select the printer.
3. Click or tap the Paper/Quality tab.
4. In the Type is drop-down list, select Envelope.
5. Click the OK button to close the Document Properties dialog box.
6. In the Print dialog box, click the OK button to print the job.
Envelope orientation
Load envelopes in input tray face up, with the short, return addressend leading into the printer.
ENWW Load and print envelopes 13

14 Chapter 2 Paper trays ENWW
3 Supplies, accessories, and parts
● Order supplies, accessories, and parts
● Replace the toner cartridge
For more information:
The following information is correct at the time of publication. For current information, see www.hp.com/support/ljm11-m13.
HP's all-inclusive help for the printer includes the following information:
● Install and configure
● Learn and use
● Solve problems
● Download software and firmware updates
● Join support forums
● Find warranty and regulatory information
ENWW 15
Order supplies, accessories, and partsOrdering
Order supplies and paper www.hp.com/go/suresupply
Order genuine HP parts or accessories www.hp.com/buy/parts
Order through service or support providers Contact an HP-authorized service or support provider.
Order using the HP Embedded Web Server (EWS) To access, in a supported web browser on the computer, enter theprinter IP address or host name in the address/URL field. The EWScontains a link to the HP SureSupply website, which providesoptions for purchasing Original HP supplies.
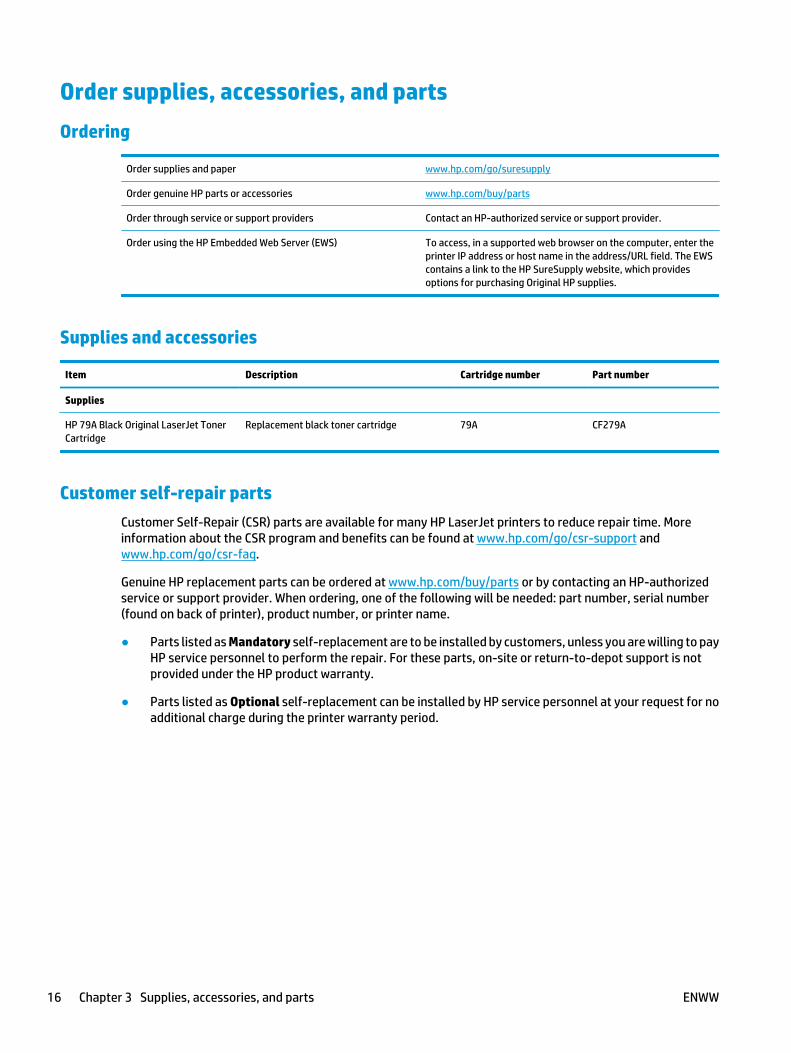
Supplies and accessories
Item Description Cartridge number Part number
Supplies
HP 79A Black Original LaserJet TonerCartridge
Replacement black toner cartridge 79A CF279A
Customer self-repair partsCustomer Self-Repair (CSR) parts are available for many HP LaserJet printers to reduce repair time. Moreinformation about the CSR program and benefits can be found at www.hp.com/go/csr-support andwww.hp.com/go/csr-faq.
Genuine HP replacement parts can be ordered at www.hp.com/buy/parts or by contacting an HP-authorizedservice or support provider. When ordering, one of the following will be needed: part number, serial number(found on back of printer), product number, or printer name.
● Parts listed as Mandatory self-replacement are to be installed by customers, unless you are willing to payHP service personnel to perform the repair. For these parts, on-site or return-to-depot support is notprovided under the HP product warranty.
● Parts listed as Optional self-replacement can be installed by HP service personnel at your request for noadditional charge during the printer warranty period.
16 Chapter 3 Supplies, accessories, and parts ENWW
Replace the toner cartridge ● Introduction
● Toner-cartridge information
● Remove and replace the toner cartridge
IntroductionThe following information provides details about the toner cartridge for the printer, and it includes instructionsto replace it.
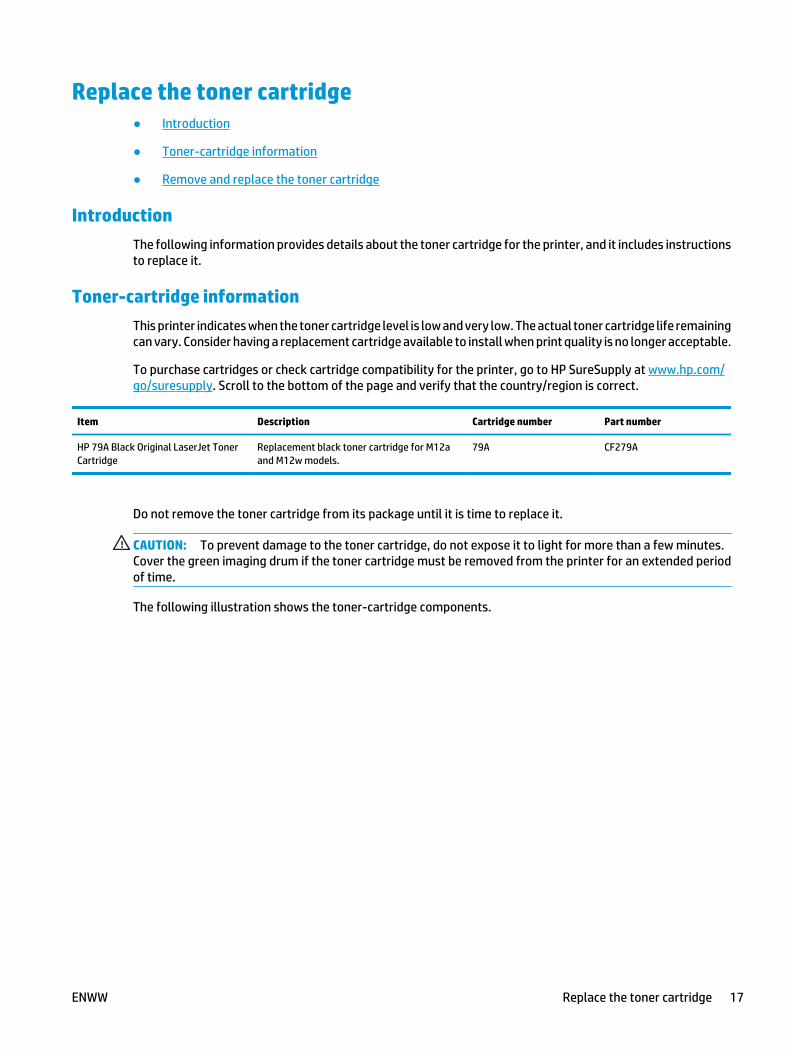
Toner-cartridge informationThis printer indicates when the toner cartridge level is low and very low. The actual toner cartridge life remainingcan vary. Consider having a replacement cartridge available to install when print quality is no longer acceptable.
To purchase cartridges or check cartridge compatibility for the printer, go to HP SureSupply at www.hp.com/go/suresupply. Scroll to the bottom of the page and verify that the country/region is correct.
Item Description Cartridge number Part number
HP 79A Black Original LaserJet TonerCartridge
Replacement black toner cartridge for M12aand M12w models.
79A CF279A
Do not remove the toner cartridge from its package until it is time to replace it.
CAUTION: To prevent damage to the toner cartridge, do not expose it to light for more than a few minutes.Cover the green imaging drum if the toner cartridge must be removed from the printer for an extended periodof time.
The following illustration shows the toner-cartridge components.
ENWW Replace the toner cartridge 17
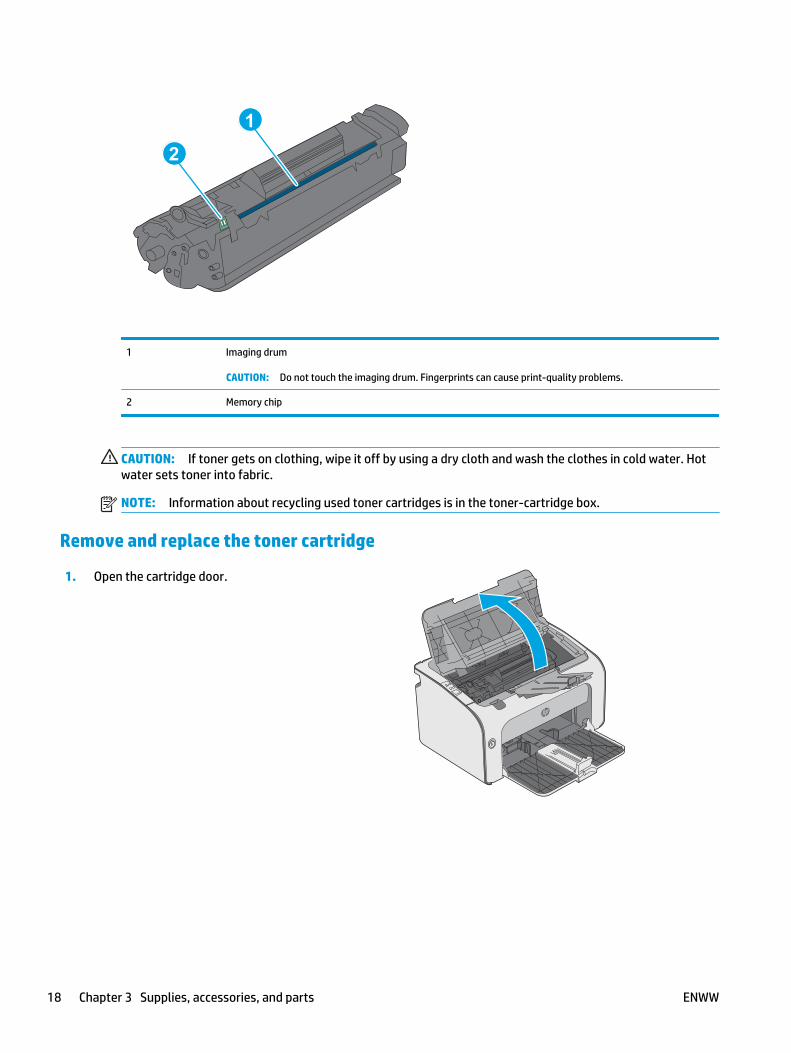
2
1
1 Imaging drum
CAUTION: Do not touch the imaging drum. Fingerprints can cause print-quality problems.
2 Memory chip
CAUTION: If toner gets on clothing, wipe it off by using a dry cloth and wash the clothes in cold water. Hotwater sets toner into fabric.
NOTE: Information about recycling used toner cartridges is in the toner-cartridge box.
Remove and replace the toner cartridge
1. Open the cartridge door.
18 Chapter 3 Supplies, accessories, and parts ENWW
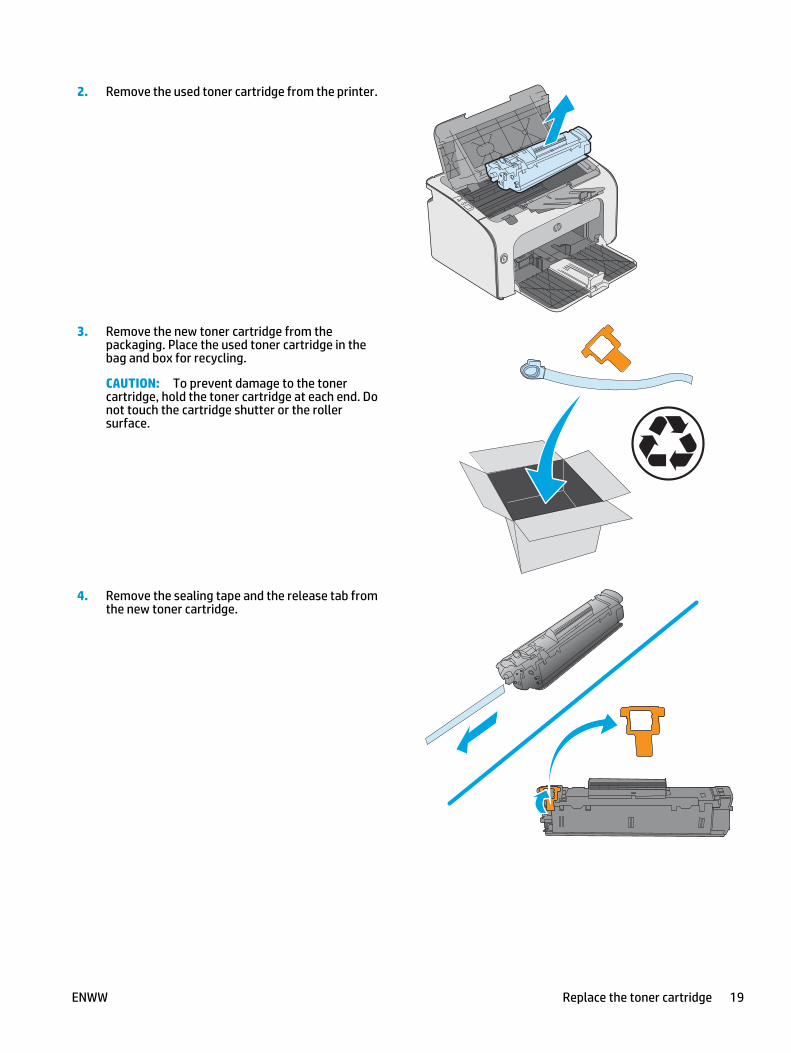
2. Remove the used toner cartridge from the printer.
3. Remove the new toner cartridge from thepackaging. Place the used toner cartridge in thebag and box for recycling.
CAUTION: To prevent damage to the tonercartridge, hold the toner cartridge at each end. Donot touch the cartridge shutter or the rollersurface.
4. Remove the sealing tape and the release tab fromthe new toner cartridge.
ENWW Replace the toner cartridge 19
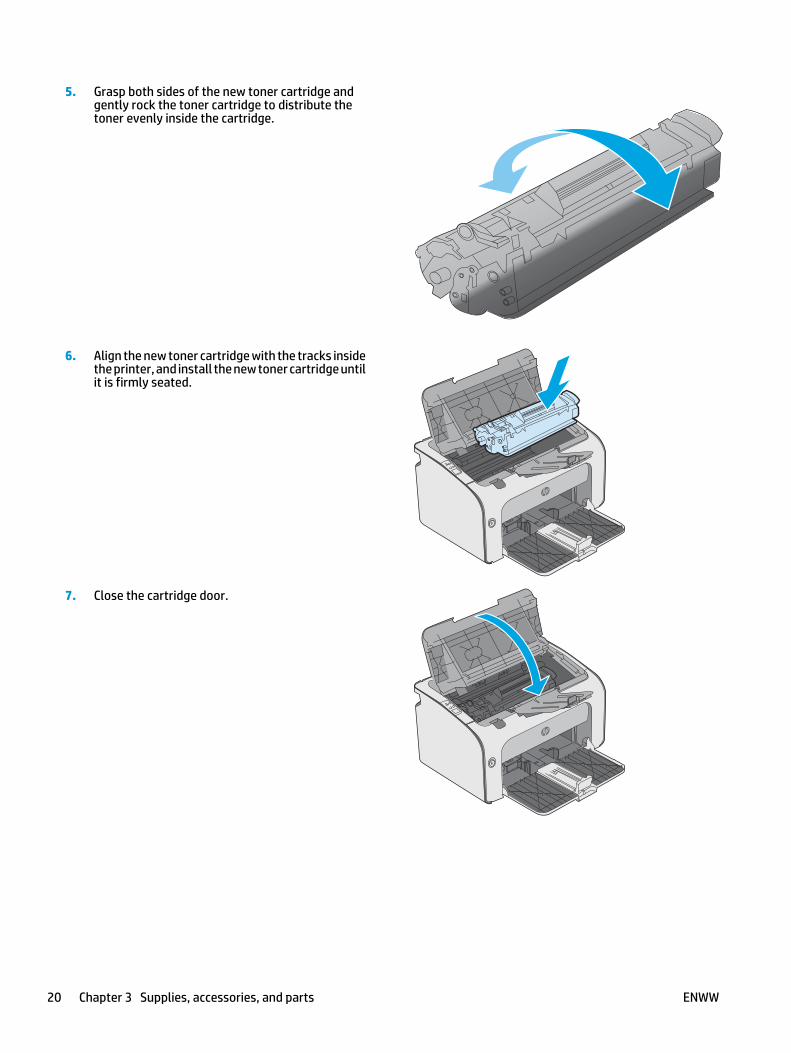
5. Grasp both sides of the new toner cartridge andgently rock the toner cartridge to distribute thetoner evenly inside the cartridge.
6. Align the new toner cartridge with the tracks insidethe printer, and install the new toner cartridge untilit is firmly seated.
7. Close the cartridge door.
20 Chapter 3 Supplies, accessories, and parts ENWW
4 Print
● Print tasks (Windows)
● Print tasks (OS X)
● Mobile printing
For more information:
The following information is correct at the time of publication. For current information, see www.hp.com/support/ljm11-m13.
HP's all-inclusive help for the printer includes the following information:
● Install and configure
● Learn and use
● Solve problems
● Download software and firmware updates
● Join support forums
● Find warranty and regulatory information
ENWW 21
Print tasks (Windows)How to print (Windows)
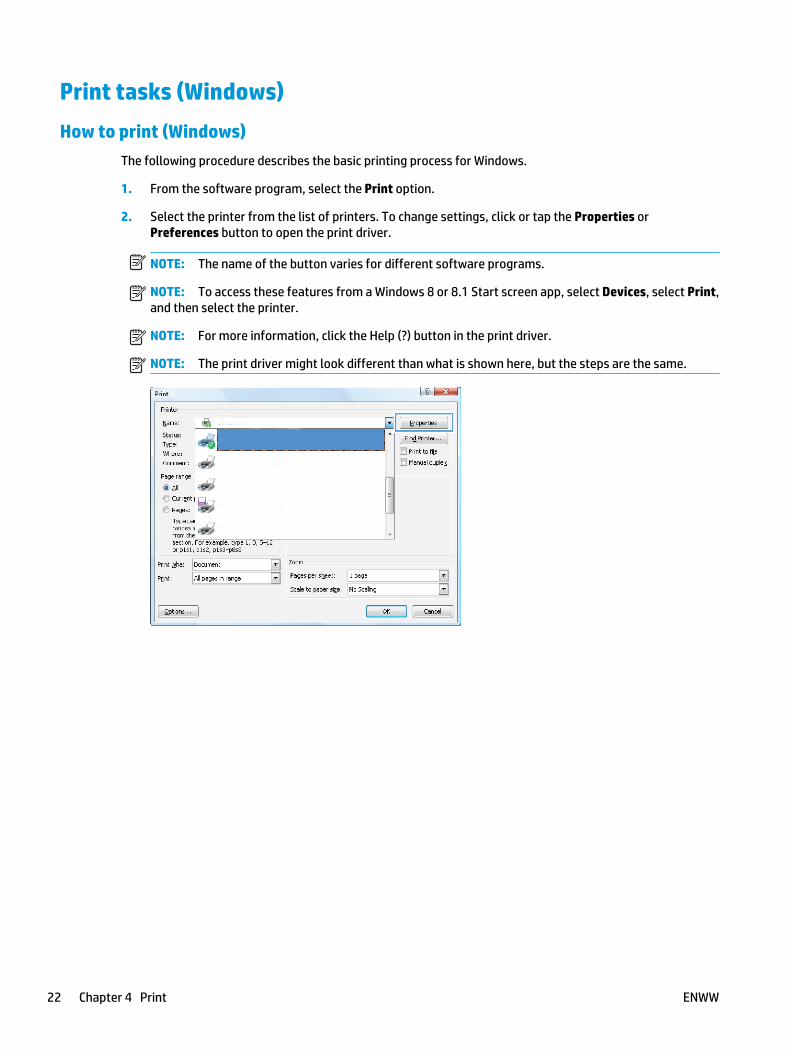
The following procedure describes the basic printing process for Windows.
1. From the software program, select the Print option.
2. Select the printer from the list of printers. To change settings, click or tap the Properties orPreferences button to open the print driver.
NOTE: The name of the button varies for different software programs.
NOTE: To access these features from a Windows 8 or 8.1 Start screen app, select Devices, select Print,and then select the printer.
NOTE: For more information, click the Help (?) button in the print driver.
NOTE: The print driver might look different than what is shown here, but the steps are the same.
22 Chapter 4 Print ENWW
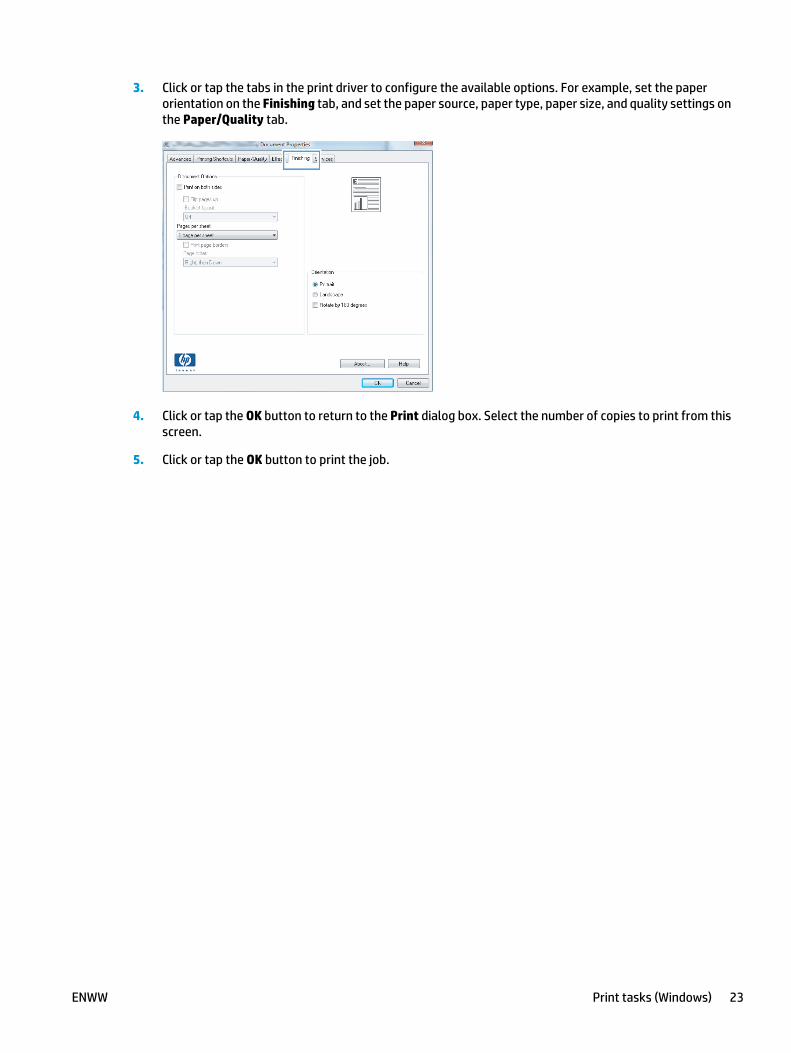
3. Click or tap the tabs in the print driver to configure the available options. For example, set the paperorientation on the Finishing tab, and set the paper source, paper type, paper size, and quality settings onthe Paper/Quality tab.
4. Click or tap the OK button to return to the Print dialog box. Select the number of copies to print from thisscreen.
5. Click or tap the OK button to print the job.
ENWW Print tasks (Windows) 23
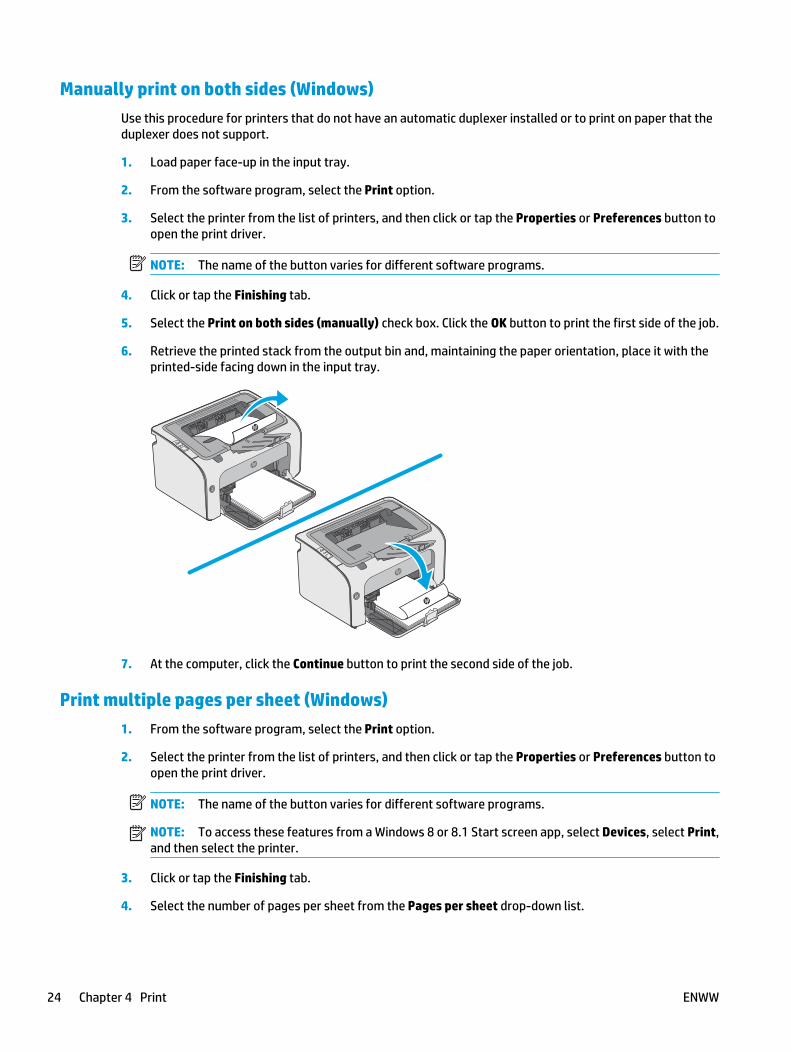
Manually print on both sides (Windows) Use this procedure for printers that do not have an automatic duplexer installed or to print on paper that theduplexer does not support.
1. Load paper face-up in the input tray.
2. From the software program, select the Print option.
3. Select the printer from the list of printers, and then click or tap the Properties or Preferences button toopen the print driver.
NOTE: The name of the button varies for different software programs.
4. Click or tap the Finishing tab.
5. Select the Print on both sides (manually) check box. Click the OK button to print the first side of the job.
6. Retrieve the printed stack from the output bin and, maintaining the paper orientation, place it with theprinted-side facing down in the input tray.
7. At the computer, click the Continue button to print the second side of the job.
Print multiple pages per sheet (Windows)1. From the software program, select the Print option.
2. Select the printer from the list of printers, and then click or tap the Properties or Preferences button toopen the print driver.
NOTE: The name of the button varies for different software programs.
NOTE: To access these features from a Windows 8 or 8.1 Start screen app, select Devices, select Print,and then select the printer.
3. Click or tap the Finishing tab.
4. Select the number of pages per sheet from the Pages per sheet drop-down list.
24 Chapter 4 Print ENWW

5. Select the correct Print page borders, Page order, and Orientation options. Click the OK button to closethe Document Properties dialog box.
6. In the Print dialog box, click the OK button to print the job.
Select the paper type (Windows)1. From the software program, select the Print option.
2. Select the printer from the list of printers, and then click or tap the Properties or Preferences button toopen the print driver.
NOTE: The name of the button varies for different software programs.
NOTE: To access these features from a Windows 8 or 8.1 Start screen app, select Devices, select Print,and then select the printer.
3. Click or tap the Paper/Quality tab.
4. From the Paper type drop-down list, select the paper type that best describes your paper.
5. Select the option for the type of paper you are using, and then click the OK button.
6. Click the OK button to close the Document Properties dialog box. In the Print dialog box, click the OKbutton to print the job.
ENWW Print tasks (Windows) 25

Additional print tasksGo to www.hp.com/support/ljm11-m13.
Instructions are available for performing specific print tasks, such as the following:
● Create and use printing shortcuts or presets
● Select the paper size, or use a custom paper size
● Select the page orientation
● Create a booklet
● Scale a document to fit a specific paper size
● Print the first or last pages of the document on different paper
● Print watermarks on a document
26 Chapter 4 Print ENWW
Print tasks (OS X)How to print (OS X)
The following procedure describes the basic printing process for OS X.
1. Click the File menu, and then click the Print option.
2. Select the printer.
3. Click Show Details or Copies & Pages, and then select other menus to adjust the print settings.
NOTE: The name of the item varies for different software programs.
4. Click the Print button.
Manually print on both sides (OS X)
NOTE: This feature is available if you install the HP print driver. It might not be available if you are usingAirPrint.
1. Click the File menu, and then click the Print option.
2. Select the printer.
3. Click Show Details or Copies & Pages, and then click the Manual Duplex menu.
NOTE: The name of the item varies for different software programs.
4. Click the Manual Duplex box, and select a binding option.
5. Click the Print button.
6. Go to the printer, and remove any blank paper that is in Tray 1.
7. Retrieve the printed stack from the output bin and place it with the printed-side facing down in the inputtray.
8. If prompted, touch the appropriate control panel button or open and close the front door to continue.
Print multiple pages per sheet (OS X)1. Click the File menu, and then click the Print option.
2. Select the printer.
3. Click Show Details or Copies & Pages, and then click the Layout menu.
NOTE: The name of the item varies for different software programs.
4. From the Pages per Sheet drop-down list, select the number of pages that you want to print on each sheet.
5. In the Layout Direction area, select the order and placement of the pages on the sheet.
6. From the Borders menu, select the type of border to print around each page on the sheet.
7. Click the Print button.
ENWW Print tasks (OS X) 27
Select the paper type (OS X)1. Click the File menu, and then click the Print option.
2. Select the printer.
3. Click Show Details or Copies & Pages, and then click the Media & Quality menu or the Paper/Qualitymenu.
NOTE: The name of the item varies for different software programs.
4. Select from the Media & Quality or Paper/Quality options.
NOTE: This list contains the master set of options available. Some options are not available on allprinters.
● Media Type: Select the option for the type of paper for the print job.
● Print Quality: Select the resolution level for the print job.
● EconoMode: Select this option to conserve toner when printing drafts of documents.
5. Click the Print button.
28 Chapter 4 Print ENWW
Additional print tasksGo to www.hp.com/support/ljm11-m13.
Instructions are available for performing specific print tasks, such as the following:
● Create and use printing shortcuts or presets
● Select the paper size, or use a custom paper size
● Select the page orientation
● Create a booklet
● Scale a document to fit a specific paper size
● Print the first or last pages of the document on different paper
● Print watermarks on a document
ENWW Print tasks (OS X) 29
Mobile printingIntroduction
HP offers multiple mobile and ePrint solutions to enable easy printing to an HP printer from a laptop, tablet,smartphone, or other mobile device. To see the full list and to determine the best choice, go to www.hp.com/go/LaserJetMobilePrinting.
NOTE: Update the printer firmware to ensure all mobile printing and ePrint capabilities are supported.
● Wireless Direct (wireless models only)
● HP ePrint software
● Android embedded printing
Wireless Direct (wireless models only)Wireless Direct enables printing from a wireless mobile device without requiring a connection to a network orthe Internet.
NOTE: Not all mobile operating systems are currently supported by Wireless Direct.
The following devices and computer operating systems support Wireless Direct:
● Android 4.0 and later tablets and phones with the HP Print Service or Mopria mobile printing plugin installed
● Most Windows 8.1 computers, tablets, and laptops that have the HP print driver installed
The following devices and computer operating systems to not support Wireless Direct, but can print to a printerthat does:
● Apple iPhone and iPad
● Mac computers running OS X
For more information on Wireless Direct printing, go to www.hp.com/go/wirelessprinting.
Enable or disable Wireless Direct
Wireless Direct capabilities must be enabled first from the printer EWS.
1. After the printer is connected to the network, print a configuration page and identify the printer IP address.To print a configuration page, complete the following steps:
a. Press and hold the Cancel button until the Ready light begins blinking.
b. Release the Cancel button.
2. Open a web browser, and in the address line, type the IP address or host name exactly as it displays onthe printer configuration page. Press the Enter key on the computer keyboard. The EWS opens.
NOTE: If the web browser displays a message indicating that accessing the website might not be safe,select the option to continue to the website. Accessing this website will not harm the computer.
30 Chapter 4 Print ENWW
3. Click the Networking tab.
4. On the Networking page, click Wireless Direct Setup. Select the checkbox, enter the network name (SSID)in the Name (SSID) field, and then click the Apply button. The IP address of the mobile device appears inthe Networking page.
NOTE: To find the network name (SSID), click the Wireless Configuration menu in the Networking page.
Change the printer Wireless Direct name
Follow this procedure to change the printer Wireless Direct Printing (SSID) name using the HP Embedded WebServer (EWS):
Step one: Open the HP Embedded Web Server
1. Print a configuration page to determine the IP address or host name.
a. Press and hold the Cancel button until the Ready light begins blinking.
b. Release the Cancel button.
2. Open a web browser, and in the address line, type the IP address or host name exactly as it displays onthe printer configuration page. Press the Enter key on the computer keyboard. The EWS opens.
NOTE: If the web browser displays a message indicating that accessing the website might not be safe,select the option to continue to the website. Accessing this website will not harm the computer.
Step two: Change the Wireless Direct name
1. Click the Networking tab.
2. On the left navigation pane, click the Wireless Direct Setup link.
3. In the Name (SSID) field, enter the new name.
4. Click Apply.
HP ePrint softwareThe HP ePrint software makes it easy to print from a Windows or Mac desktop or laptop computer to any HPePrint-capable printer. This software makes it easy to find HP ePrint-enabled printers that are registered toyour HP Connected account. The target HP printer can be located in the office or at locations across the globe.
● Windows: After installing the software, open the Print option from within your application, and then selectHP ePrint from the installed printers list. Click the Properties button to configure print options.
● OS X: After installing the software, select File, Print, and then select the arrow next to PDF (in the bottomleft of the driver screen). Select HP ePrint.
For Windows, the HP ePrint software supports TCP/IP printing to local network printers on the network (LAN orWAN) to products that support UPD PostScript®.
Windows and OS X both support IPP printing to LAN or WAN network-connected products that support ePCL.
Windows and OS X also both support printing PDF documents to public print locations and printing using HPePrint via email through the cloud.
ENWW Mobile printing 31

Go to www.hp.com/go/eprintsoftware for drivers and information.
NOTE: For Windows, the name of the HP ePrint Software print driver is HP ePrint + JetAdvantage.
NOTE: The HP ePrint software is a PDF workflow utility for OS X, and is not technically a print driver.
NOTE: HP ePrint Software does not support USB printing.
Android embedded printingHP's built-in print solution for Android and Kindle enables mobile devices to automatically find and print to HPprinters that are either on a network or within wireless range for Wireless printing.
The printer must be connected to the same network (sub-net) as the Android device.
The print solution is built into the many versions of the operating system.
NOTE: If printing is not available on your device, go to the Google Play > Android apps and install the HP PrintService Plugin.
For more information on how to use Android embedded printing and which Android devices are supported, goto www.hp.com/go/LaserJetMobilePrinting.
32 Chapter 4 Print ENWW
5 Manage the printer
● Advanced configuration with HP Embedded Web Server (EWS) (wireless models only)
● HP Embedded Web Server sections
● Configure IP network settings
● Printer security features
● Energy-conservation settings
● Update the firmware
For more information:
The following information is correct at the time of publication. For current information, see www.hp.com/support/ljm11-m13.
HP's all-inclusive help for the printer includes the following information:
● Install and configure
● Learn and use
● Solve problems
● Download software and firmware updates
● Join support forums
● Find warranty and regulatory information
ENWW 33
Advanced configuration with HP Embedded Web Server (EWS)(wireless models only)
Use the HP Embedded Web Server to manage printing functions from a computer instead of the printer controlpanel.
● View printer status information
● Determine the remaining life for all supplies and order new ones
● View and change tray configurations
● View and change the printer control-panel menu configuration
● View and print internal pages
● Receive notification of printer and supplies events
● View and change network configuration
The HP Embedded Web Server works when the printer is connected to an IP-based network. The HP EmbeddedWeb Server does not support IPX-based printer connections. Internet access is not needed to open and use theHP Embedded Web Server.
When the printer is connected to the network, the HP Embedded Web Server is automatically available.
NOTE: The HP Embedded Web Server is not accessible beyond the network firewall.
Open the HP Embedded Web Server (EWS) from a web browser
1. Print a configuration page to determine the IP address or host name.
a. Press and hold the Cancel button until the Ready light begins blinking.
b. Release the Cancel button.
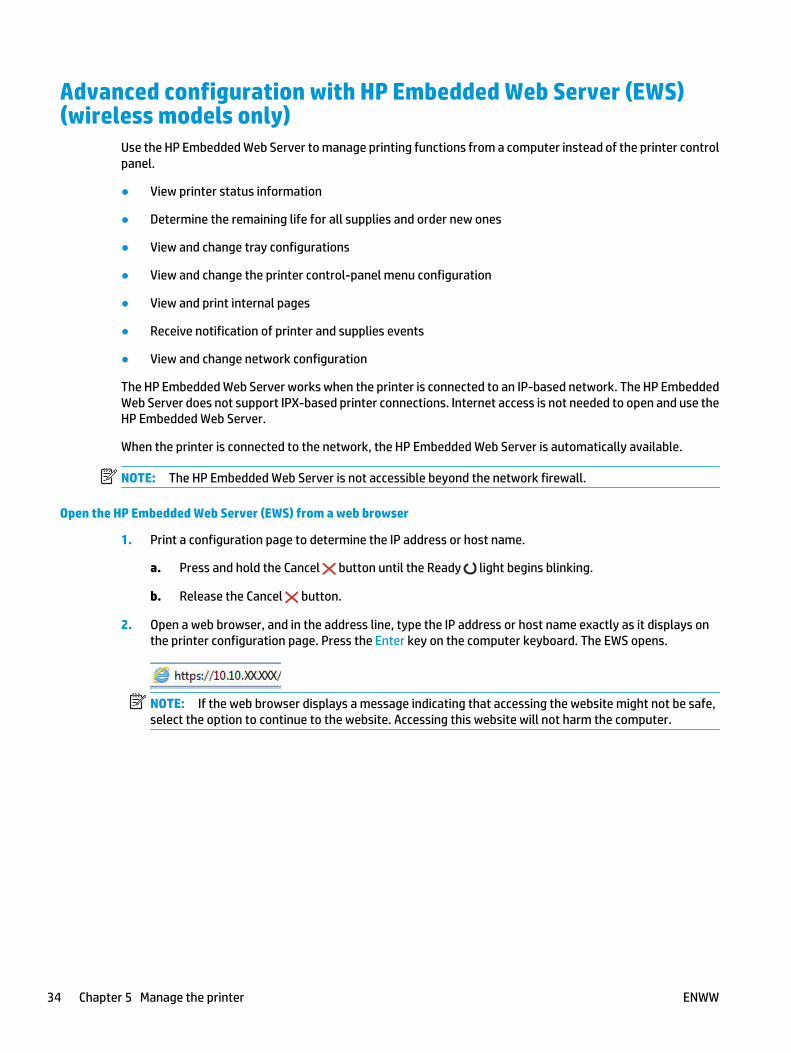
2. Open a web browser, and in the address line, type the IP address or host name exactly as it displays onthe printer configuration page. Press the Enter key on the computer keyboard. The EWS opens.
NOTE: If the web browser displays a message indicating that accessing the website might not be safe,select the option to continue to the website. Accessing this website will not harm the computer.
34 Chapter 5 Manage the printer ENWW

HP Embedded Web Server sectionsInformation tab
The Information pages group consists of the following pages:
● Device Status displays the status of the printer and HP supplies.
● Device Configuration shows the information found on the Configuration page.
● Supplies Status shows the status of HP supplies and provides part numbers. To order new supplies, clickOrder Supplies in the upper-right part of the window.
● Network Summary shows the information found on the Network Summary page.
Settings tabUse this tab to configure the printer from your computer. If this printer is networked, always consult with theprinter administrator before changing settings on this tab.
The Settings tab contains the Printing page where you can view and change the default print job settings.
Networking tabNetwork administrators can use this tab to control network-related settings for the printer when it is connectedto an IP-based network.
LinksLinks are located in the upper-right part of the status pages. You must have Internet access to use any of theselinks. If you use a dial-up connection and did not connect when you first opened the HP Embedded Web Server,you must connect before you can visit these websites. Connecting might require that you close the HP EmbeddedWeb Server and reopen it.
● Shop for Supplies. Click this link to connect to the Sure Supply website and order genuine HP suppliesfrom HP or a reseller of your choice.
● Support. Connects to the printer support site. You can search for help regarding general topics.
ENWW HP Embedded Web Server sections 35
Configure IP network settings● Introduction
● Printer sharing disclaimer
● View or change network settings
● Manually configure IPv4 TCP/IP parameters
IntroductionUse the following sections to configure the printer network settings.
Printer sharing disclaimerHP does not support peer-to-peer networking, as the feature is a function of Microsoft operating systems andnot of the HP printer drivers. Go to Microsoft at www.microsoft.com.
View or change network settingsUse the HP Embedded Web Server to view or change IP configuration settings.
1. Open the HP Embedded Web Server (EWS):
a. Print a configuration page to determine the IP address or host name.
i. Press and hold the Cancel button until the Ready light begins blinking.
ii. Release the Cancel button.
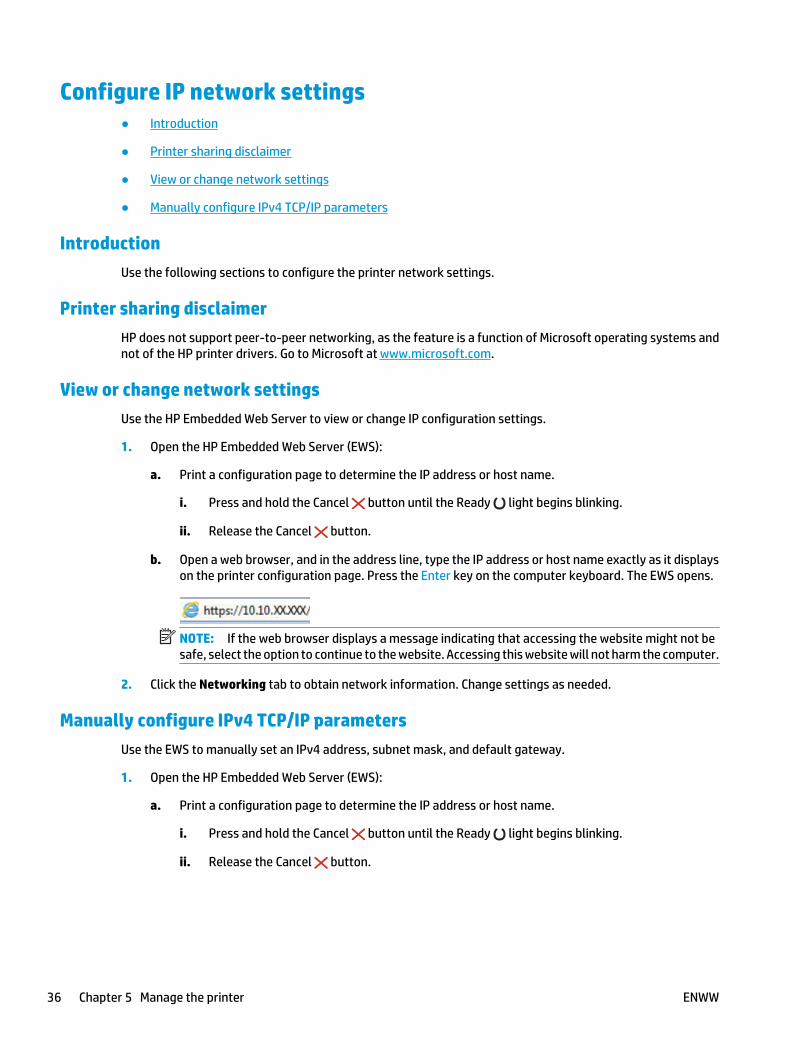
b. Open a web browser, and in the address line, type the IP address or host name exactly as it displayson the printer configuration page. Press the Enter key on the computer keyboard. The EWS opens.
NOTE: If the web browser displays a message indicating that accessing the website might not besafe, select the option to continue to the website. Accessing this website will not harm the computer.
2. Click the Networking tab to obtain network information. Change settings as needed.
Manually configure IPv4 TCP/IP parametersUse the EWS to manually set an IPv4 address, subnet mask, and default gateway.
1. Open the HP Embedded Web Server (EWS):
a. Print a configuration page to determine the IP address or host name.
i. Press and hold the Cancel button until the Ready light begins blinking.
ii. Release the Cancel button.
36 Chapter 5 Manage the printer ENWW

b. Open a web browser, and in the address line, type the IP address or host name exactly as it displayson the printer configuration page. Press the Enter key on the computer keyboard. The EWS opens.
NOTE: If the web browser displays a message indicating that accessing the website might not besafe, select the option to continue to the website. Accessing this website will not harm the computer.
2. Click the Networking tab.
3. In the IPv4 Configuration area, select Manual IP, and then edit the IPv4 configuration settings.
4. Click the Apply button.
ENWW Configure IP network settings 37
Printer security featuresIntroduction
The printer includes several security features to restrict who has access to configuration settings, to securedata, and to prevent access to valuable hardware components.
● Assign or change the system password using the HP Embedded Web Server
Assign or change the system password using the HP Embedded Web ServerAssign an administrator password for access to the printer and the HP Embedded Web Server so thatunauthorized users cannot change the printer settings.
1. Open the HP Embedded Web Server (EWS):
Network-connected printers
a. Print a configuration page to determine the IP address or host name.
i. Press and hold the Cancel button until the Ready light begins blinking.
ii. Release the Cancel button.
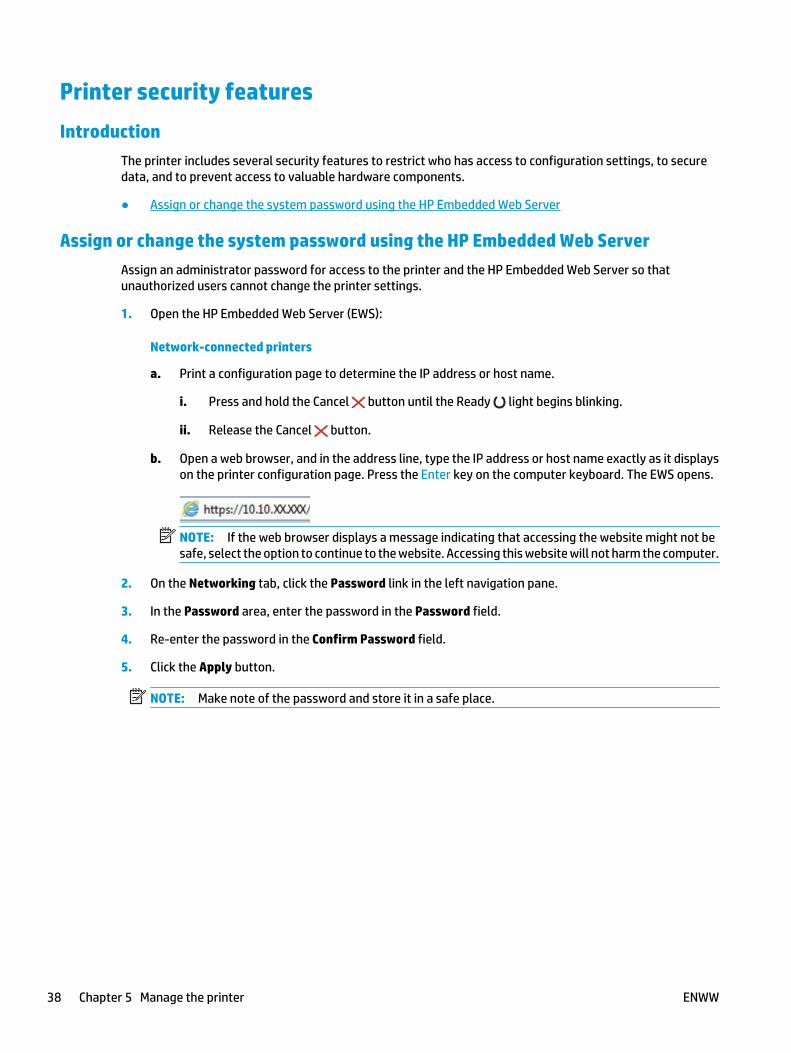
b. Open a web browser, and in the address line, type the IP address or host name exactly as it displayson the printer configuration page. Press the Enter key on the computer keyboard. The EWS opens.
NOTE: If the web browser displays a message indicating that accessing the website might not besafe, select the option to continue to the website. Accessing this website will not harm the computer.
2. On the Networking tab, click the Password link in the left navigation pane.
3. In the Password area, enter the password in the Password field.
4. Re-enter the password in the Confirm Password field.
5. Click the Apply button.
NOTE: Make note of the password and store it in a safe place.
38 Chapter 5 Manage the printer ENWW
Energy-conservation settings● Introduction
● Print with EconoMode
● Set the Sleep/Auto Off After Inactivity setting
● Delay When Ports Are Active setting
IntroductionThe printer includes several economy features to conserve energy and supplies.
Print with EconoModeThis printer has an EconoMode option for printing drafts of documents. Using EconoMode can use less toner.However, using EconoMode can also reduce print quality.
HP does not recommend the full-time use of EconoMode. If EconoMode is used full-time, the toner supply mightoutlast the mechanical parts in the toner cartridge. If print quality begins to degrade and is no longer acceptable,consider replacing the toner cartridge.
NOTE: If this option is not available in your print driver, you can set it using the HP Embedded Web Server.
1. From the software program, select the Print option.
2. Select the printer, and then click the Properties or Preferences button.
3. Click the Paper/Quality tab.
4. Click the EconoMode option.
Set the Sleep/Auto Off After Inactivity settingUse the EWS to set the amount of idle time before the printer enters sleep mode.
Complete the following procedure to change the Sleep/Auto Off After Inactivity setting:
1. Open the HP Embedded Web Server (EWS):
Network-connected printers
a. Print a configuration page to determine the IP address or host name.
i. Press and hold the Cancel button until the Ready light begins blinking.
ii. Release the Cancel button.
ENWW Energy-conservation settings 39
b. Open a web browser, and in the address line, type the IP address or host name exactly as it displayson the printer configuration page. Press the Enter key on the computer keyboard. The EWS opens.
NOTE: If the web browser displays a message indicating that accessing the website might not besafe, select the option to continue to the website. Accessing this website will not harm the computer.
2. Click the System tab, and then select the Energy Settings page.
3. Select the time for the Sleep/Auto Off After Inactivity, and then click the Apply button.
Delay When Ports Are Active setting
Method one: Use the HP Embedded Web Server (EWS)
1. Open the HP Embedded Web Server (EWS):
Network-connected printers
a. Print a configuration page to determine the IP address or host name.
i. Press and hold the Cancel button until the Ready light begins blinking.
ii. Release the Cancel button.
b. Open a web browser, and in the address line, type the IP address or host name exactly as it displayson the printer configuration page. Press the Enter key on the computer keyboard. The EWS opens.
NOTE: If the web browser displays a message indicating that accessing the website might not besafe, select the option to continue to the website. Accessing this website will not harm the computer.
2. Click the Settings tab, and then select the Energy Settings page.
3. Select Delay when ports are active check box to enable or disable the setting.
Method two: Use the printer software
1. In the list of printers, right-click the name the printer, and then click the properties menu item to open thePrinter properties dialog box.
2. Click the Device settings tab and navigate to the Energy settings area.
3. Select Delay when ports are active check box to enable or disable the setting.
NOTE: When the Delay when ports are active setting is selected, the printer will not shut down unless allports are inactive. When the setting is not selected, the printer shuts down after a period of inactivity determinedby the Shut Down After setting. An active network link or USB connection will prevent the printer from shuttingdown.
40 Chapter 5 Manage the printer ENWW
Update the firmwareHP offers periodic printer updates, new Web Services apps, and new features to existing Web Services apps.Follow these steps to update the printer firmware for a single printer. When you update the firmware, WebService apps will update automatically.
Update the firmware using the Firmware Update UtilityUse these steps to manually download and install the Firmware Update Utility from HP.com.
NOTE: You must have a print driver installed in order to use this method.
1. Go to www.hp.com/support, select your country/region language, click the Get software and drivers link,type the printer name in the search field, press the Enter button, and then select the printer from the listof search results.
2. Select the operating system.
3. Under the Firmware section, locate the Firmware Update Utility.
4. Click Download, click Run, and then click Run again.
5. When the utility launches, select the printer from the drop-down list, and then click Send Firmware.
NOTE: To print a configuration page to verify the installed firmware version before or after the updateprocess, click Print Config.
6. Follow the on-screen instructions to complete the installation, and then click the Exit button to close theutility.
ENWW Update the firmware 41

42 Chapter 5 Manage the printer ENWW
6 Solve problems
● Customer support
● Interpret control-panel light patterns
● Restore the factory-set defaults
● Solve paper feed or jam problems
● Clear paper jams
● Improve print quality
● Solve direct-connect problems
● Solve wireless problems
For more information:
The following information is correct at the time of publication. For current information, see www.hp.com/support/ljm11-m13.
HP's all-inclusive help for the printer includes the following information:
● Install and configure
● Learn and use
● Solve problems
● Download software and firmware updates
● Join support forums
● Find warranty and regulatory information
ENWW 43

Customer supportGet telephone support for your country/region
Have the printer name, serial number, date of purchase, andproblem description ready
Country/region phone numbers are on the flyer that was in the boxwith the printer or at www.hp.com/support/.
Get 24-hour Internet support, and download software utilities anddrivers
www.hp.com/support/ljm11-m13
Order additional HP service or maintenance agreements www.hp.com/go/carepack
Register the printer www.register.hp.com
44 Chapter 6 Solve problems ENWW
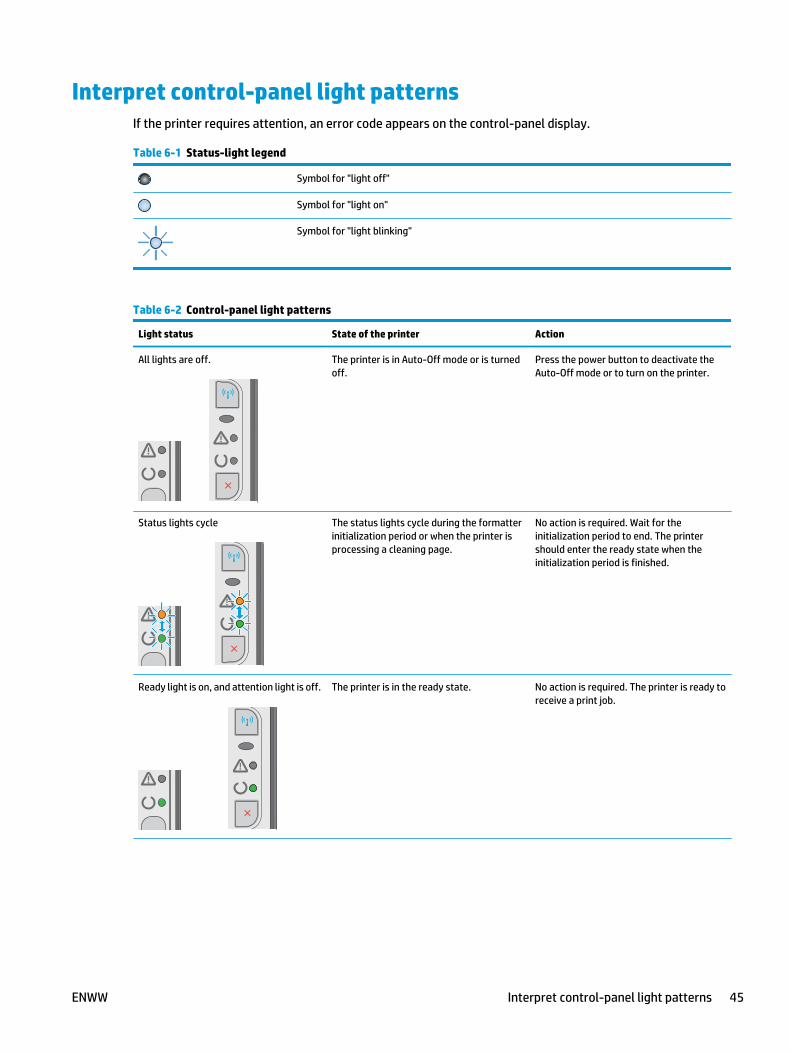
Interpret control-panel light patternsIf the printer requires attention, an error code appears on the control-panel display.
Table 6-1 Status-light legend
Symbol for "light off"
Symbol for "light on"
Symbol for "light blinking"
Table 6-2 Control-panel light patterns
Light status State of the printer Action
All lights are off. The printer is in Auto-Off mode or is turnedoff.
Press the power button to deactivate theAuto-Off mode or to turn on the printer.
Status lights cycle The status lights cycle during the formatterinitialization period or when the printer isprocessing a cleaning page.
No action is required. Wait for theinitialization period to end. The printershould enter the ready state when theinitialization period is finished.
Ready light is on, and attention light is off. The printer is in the ready state. No action is required. The printer is ready toreceive a print job.
ENWW Interpret control-panel light patterns 45
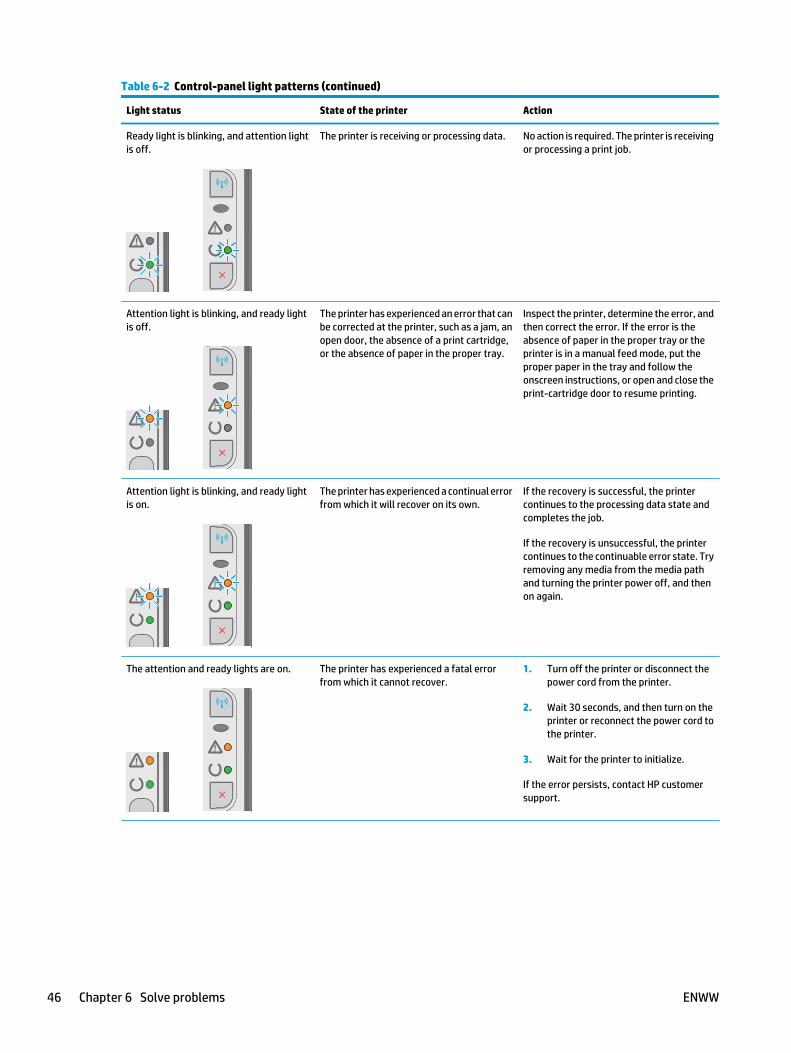
Table 6-2 Control-panel light patterns (continued)
Light status State of the printer Action
Ready light is blinking, and attention lightis off.
The printer is receiving or processing data. No action is required. The printer is receivingor processing a print job.
Attention light is blinking, and ready lightis off.
The printer has experienced an error that canbe corrected at the printer, such as a jam, anopen door, the absence of a print cartridge,or the absence of paper in the proper tray.
Inspect the printer, determine the error, andthen correct the error. If the error is theabsence of paper in the proper tray or theprinter is in a manual feed mode, put theproper paper in the tray and follow theonscreen instructions, or open and close theprint-cartridge door to resume printing.
Attention light is blinking, and ready lightis on.
The printer has experienced a continual errorfrom which it will recover on its own.
If the recovery is successful, the printercontinues to the processing data state andcompletes the job.
If the recovery is unsuccessful, the printercontinues to the continuable error state. Tryremoving any media from the media pathand turning the printer power off, and thenon again.
The attention and ready lights are on. The printer has experienced a fatal errorfrom which it cannot recover.
1. Turn off the printer or disconnect thepower cord from the printer.
2. Wait 30 seconds, and then turn on theprinter or reconnect the power cord tothe printer.
3. Wait for the printer to initialize.
If the error persists, contact HP customersupport.
46 Chapter 6 Solve problems ENWW
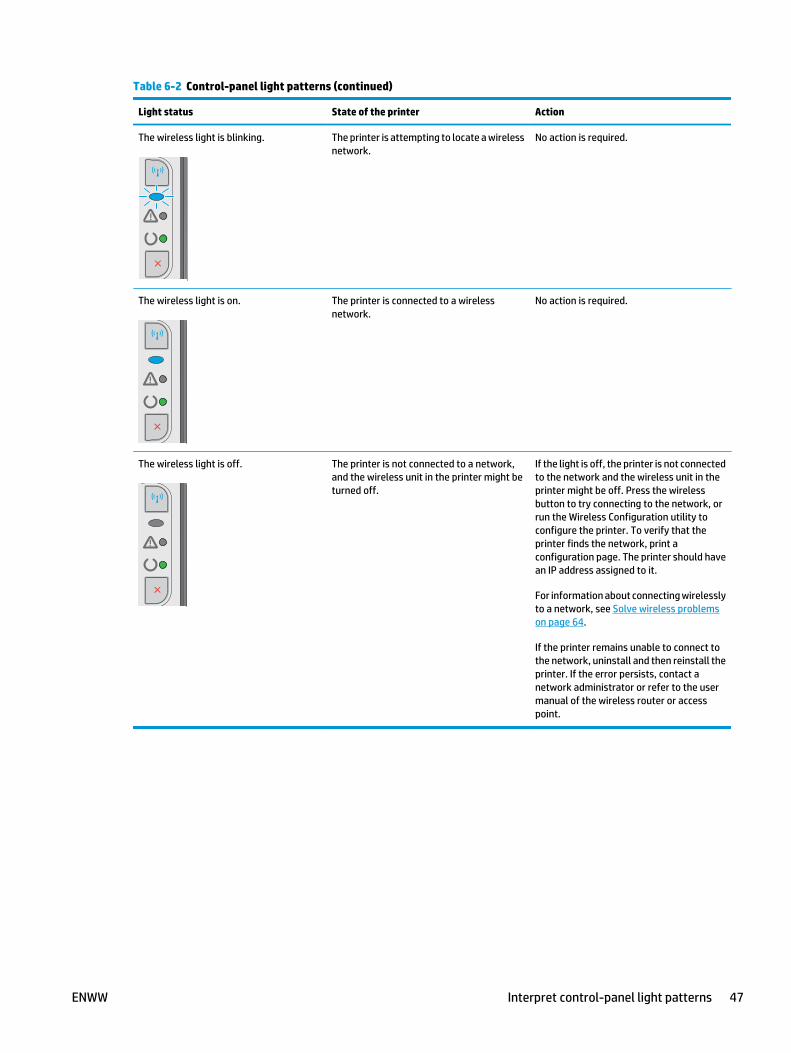
Table 6-2 Control-panel light patterns (continued)
Light status State of the printer Action
The wireless light is blinking. The printer is attempting to locate a wirelessnetwork.
No action is required.
The wireless light is on. The printer is connected to a wirelessnetwork.
No action is required.
The wireless light is off. The printer is not connected to a network,and the wireless unit in the printer might beturned off.
If the light is off, the printer is not connectedto the network and the wireless unit in theprinter might be off. Press the wirelessbutton to try connecting to the network, orrun the Wireless Configuration utility toconfigure the printer. To verify that theprinter finds the network, print aconfiguration page. The printer should havean IP address assigned to it.
For information about connecting wirelesslyto a network, see Solve wireless problemson page 64.
If the printer remains unable to connect tothe network, uninstall and then reinstall theprinter. If the error persists, contact anetwork administrator or refer to the usermanual of the wireless router or accesspoint.
ENWW Interpret control-panel light patterns 47
Restore the factory-set defaultsRestoring the factory-set defaults returns all of the printer and network settings to the factory defaults. It willnot reset the page count, tray size, or language. To restore the printer to the factory-default settings, followthese steps.
CAUTION: Restoring the factory-set defaults returns all of the settings to the factory defaults, and it alsodeletes any pages that are stored in the memory.
1. Open the HP Embedded Web Server (EWS):
Network-connected printers
a. Print a configuration page to determine the IP address or host name.
i. Press and hold the Cancel button until the Ready light begins blinking.
ii. Release the Cancel button.
b. Open a web browser, and in the address line, type the IP address or host name exactly as it displayson the printer configuration page. Press the Enter key on the computer keyboard. The EWS opens.
NOTE: If the web browser displays a message indicating that accessing the website might not besafe, select the option to continue to the website. Accessing this website will not harm the computer.
2. Click the Settings tab.
3. Select the Restore Factory Settings option, and click the Apply button.
The printer automatically restarts.
48 Chapter 6 Solve problems ENWW
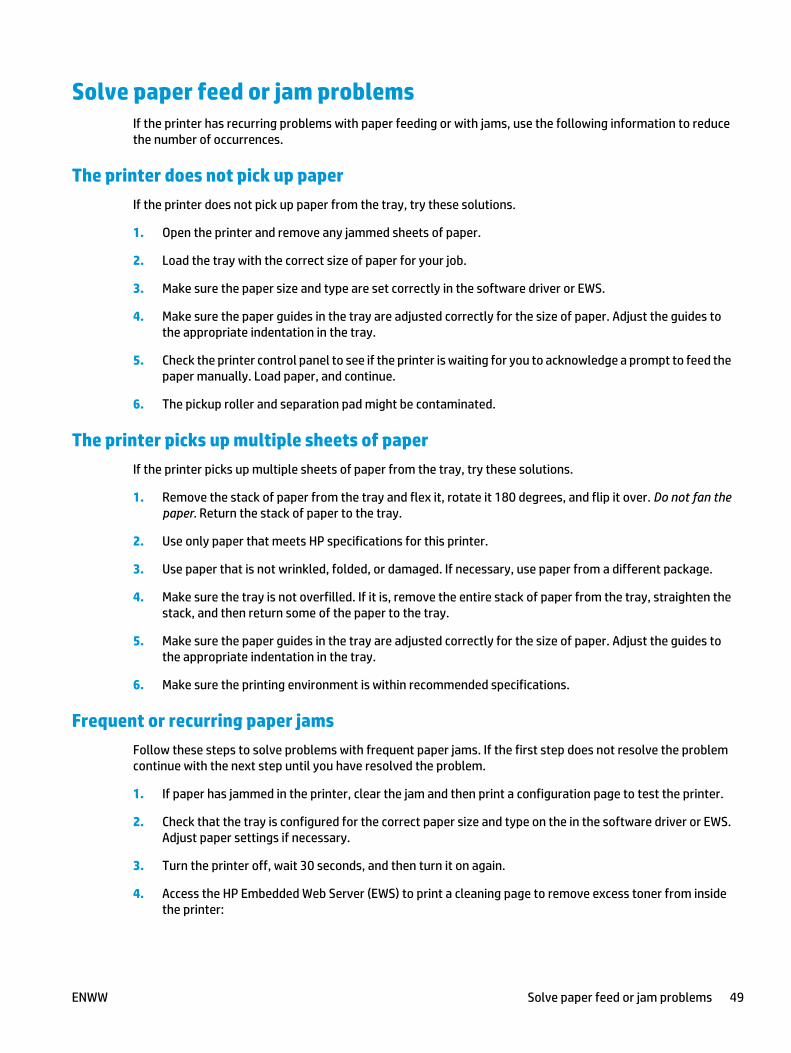
Solve paper feed or jam problemsIf the printer has recurring problems with paper feeding or with jams, use the following information to reducethe number of occurrences.
The printer does not pick up paperIf the printer does not pick up paper from the tray, try these solutions.
1. Open the printer and remove any jammed sheets of paper.
2. Load the tray with the correct size of paper for your job.
3. Make sure the paper size and type are set correctly in the software driver or EWS.
4. Make sure the paper guides in the tray are adjusted correctly for the size of paper. Adjust the guides tothe appropriate indentation in the tray.
5. Check the printer control panel to see if the printer is waiting for you to acknowledge a prompt to feed thepaper manually. Load paper, and continue.
6. The pickup roller and separation pad might be contaminated.
The printer picks up multiple sheets of paperIf the printer picks up multiple sheets of paper from the tray, try these solutions.
1. Remove the stack of paper from the tray and flex it, rotate it 180 degrees, and flip it over. Do not fan thepaper. Return the stack of paper to the tray.
2. Use only paper that meets HP specifications for this printer.
3. Use paper that is not wrinkled, folded, or damaged. If necessary, use paper from a different package.
4. Make sure the tray is not overfilled. If it is, remove the entire stack of paper from the tray, straighten thestack, and then return some of the paper to the tray.
5. Make sure the paper guides in the tray are adjusted correctly for the size of paper. Adjust the guides tothe appropriate indentation in the tray.
6. Make sure the printing environment is within recommended specifications.
Frequent or recurring paper jamsFollow these steps to solve problems with frequent paper jams. If the first step does not resolve the problemcontinue with the next step until you have resolved the problem.
1. If paper has jammed in the printer, clear the jam and then print a configuration page to test the printer.
2. Check that the tray is configured for the correct paper size and type on the in the software driver or EWS.Adjust paper settings if necessary.
3. Turn the printer off, wait 30 seconds, and then turn it on again.
4. Access the HP Embedded Web Server (EWS) to print a cleaning page to remove excess toner from insidethe printer:
ENWW Solve paper feed or jam problems 49
a. On the Information tab of the EWS, click Print Info Pages.
b. In the Print Cleaning Page area, click Print to print a cleaning page.
5. Print a configuration page to test the printer.
a. Press and hold the Cancel button until the Ready light begins blinking.
b. Release the Cancel button.
If none of these steps resolves the problem, the printer might need service. Contact HP customer support.
Prevent paper jamsTo reduce the number of paper jams, try these solutions.
1. Use only paper that meets HP specifications for this printer.
2. Use paper that is not wrinkled, folded, or damaged. If necessary, use paper from a different package.
3. Use paper that has not previously been printed or copied on.
4. Make sure the tray is not overfilled. If it is, remove the entire stack of paper from the tray, straighten thestack, and then return some of the paper to the tray.
5. Make sure the paper guides in the tray are adjusted correctly for the size of paper. Adjust the guides sothey are touching the paper stack without bending it.
6. If you are printing on heavy, embossed, or perforated paper, use the manual feed feature and feed sheetsone at a time.
7. Verify that the tray is configured correctly for the paper type and size.
8. Make sure the printing environment is within recommended specifications.
50 Chapter 6 Solve problems ENWW
Clear paper jamsIntroduction
The following information includes instructions for clearing paper jams from the product.
● Paper jam locations
● Clear jams from the input tray
● Clear jams in the toner-cartridge area
● Clear jams in the output bin
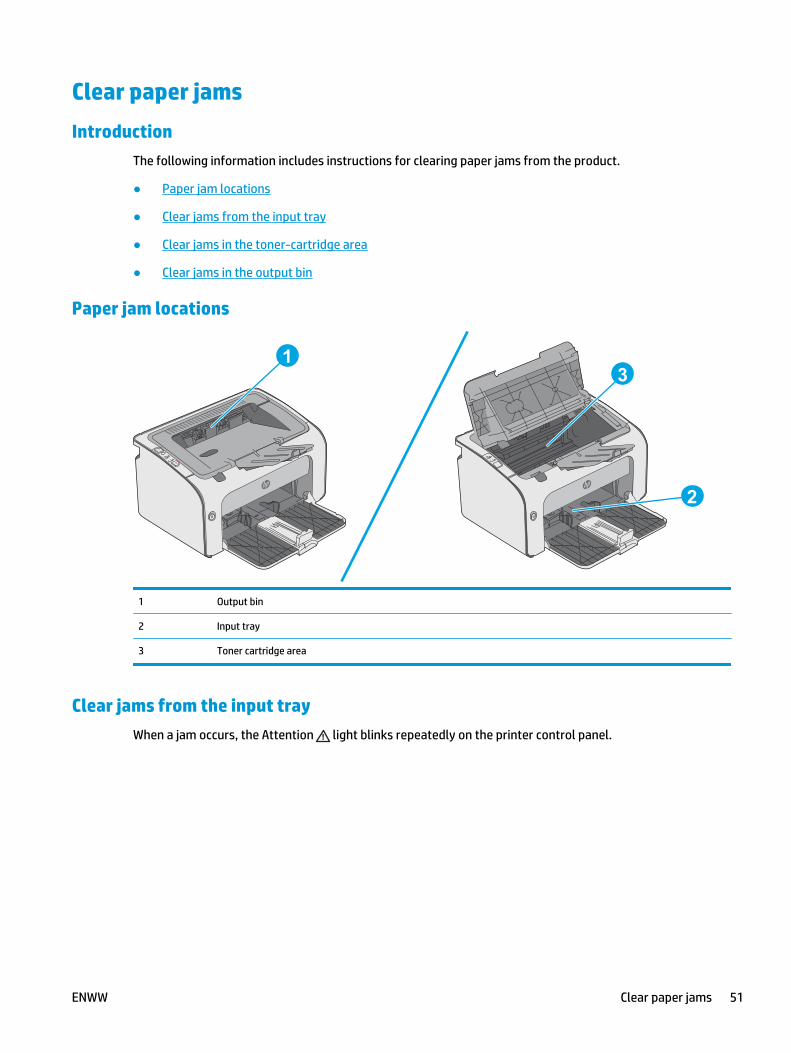
Paper jam locations
1
2
3
1 Output bin
2 Input tray
3 Toner cartridge area
Clear jams from the input trayWhen a jam occurs, the Attention light blinks repeatedly on the printer control panel.
ENWW Clear paper jams 51
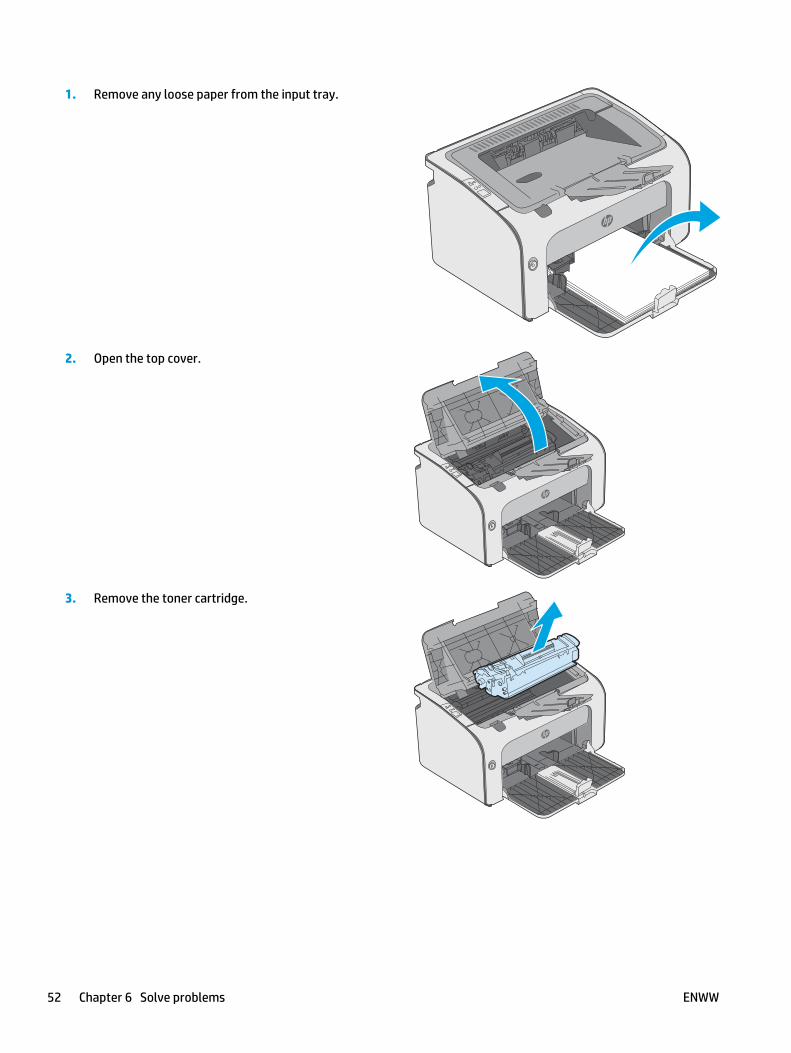
1. Remove any loose paper from the input tray.
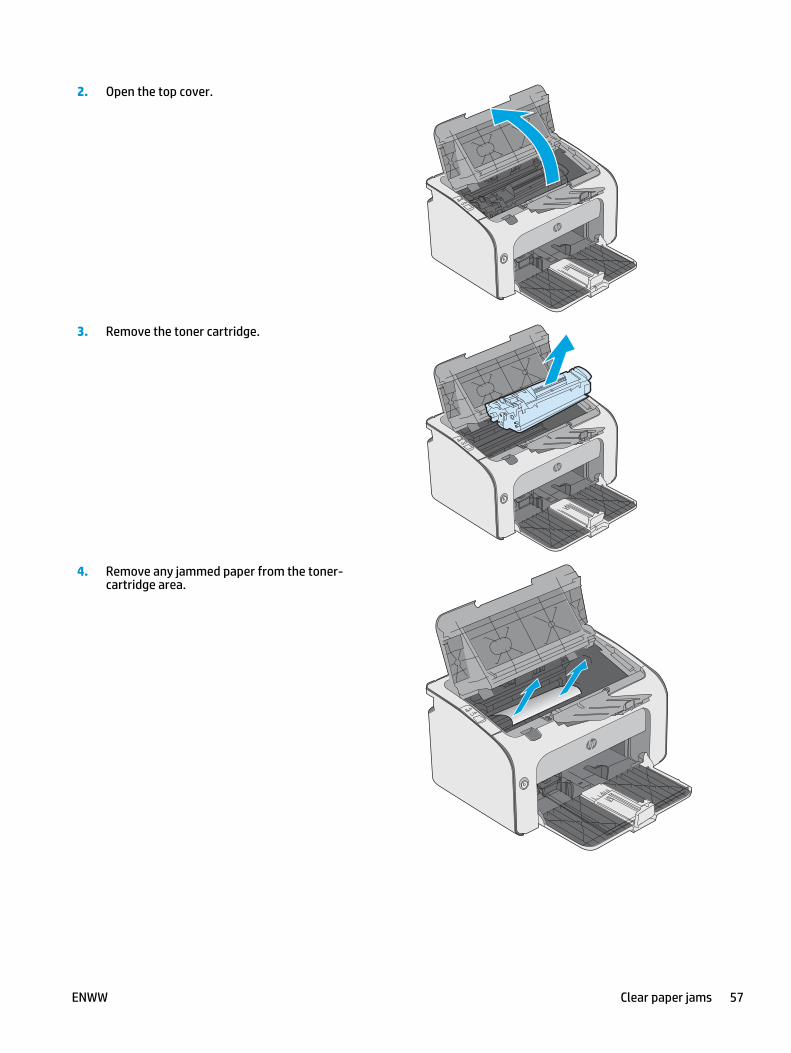
2. Open the top cover.
3. Remove the toner cartridge.
52 Chapter 6 Solve problems ENWW
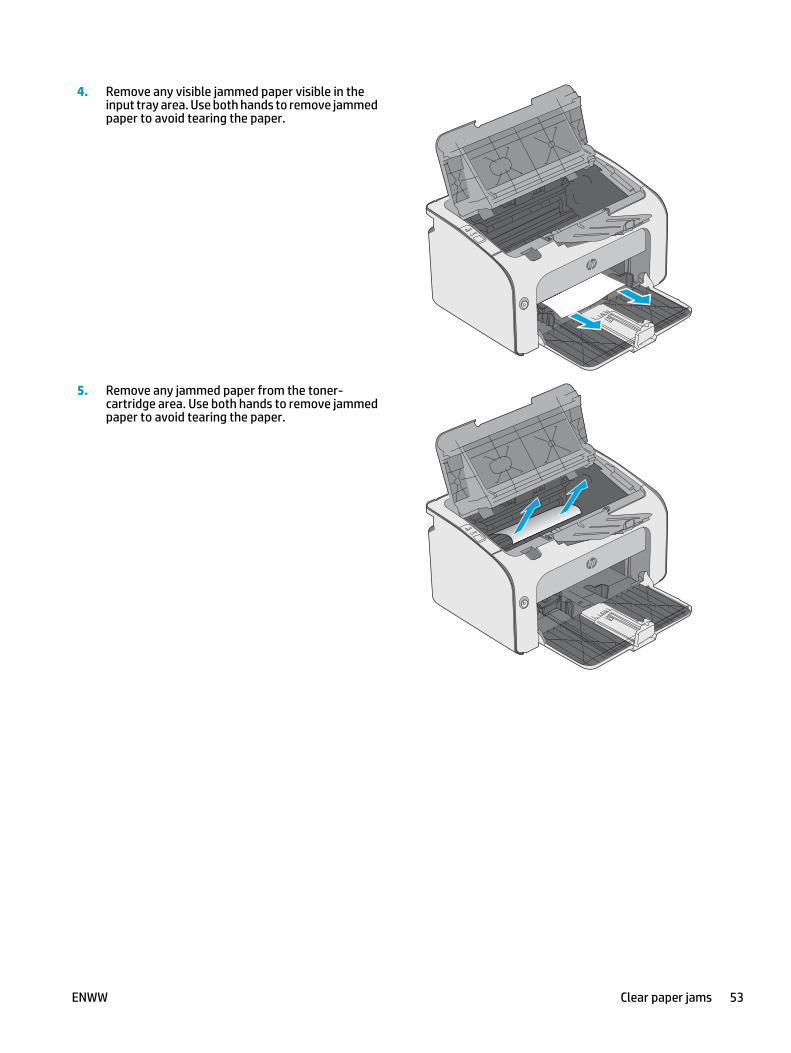
4. Remove any visible jammed paper visible in theinput tray area. Use both hands to remove jammedpaper to avoid tearing the paper.
5. Remove any jammed paper from the toner-cartridge area. Use both hands to remove jammedpaper to avoid tearing the paper.
ENWW Clear paper jams 53
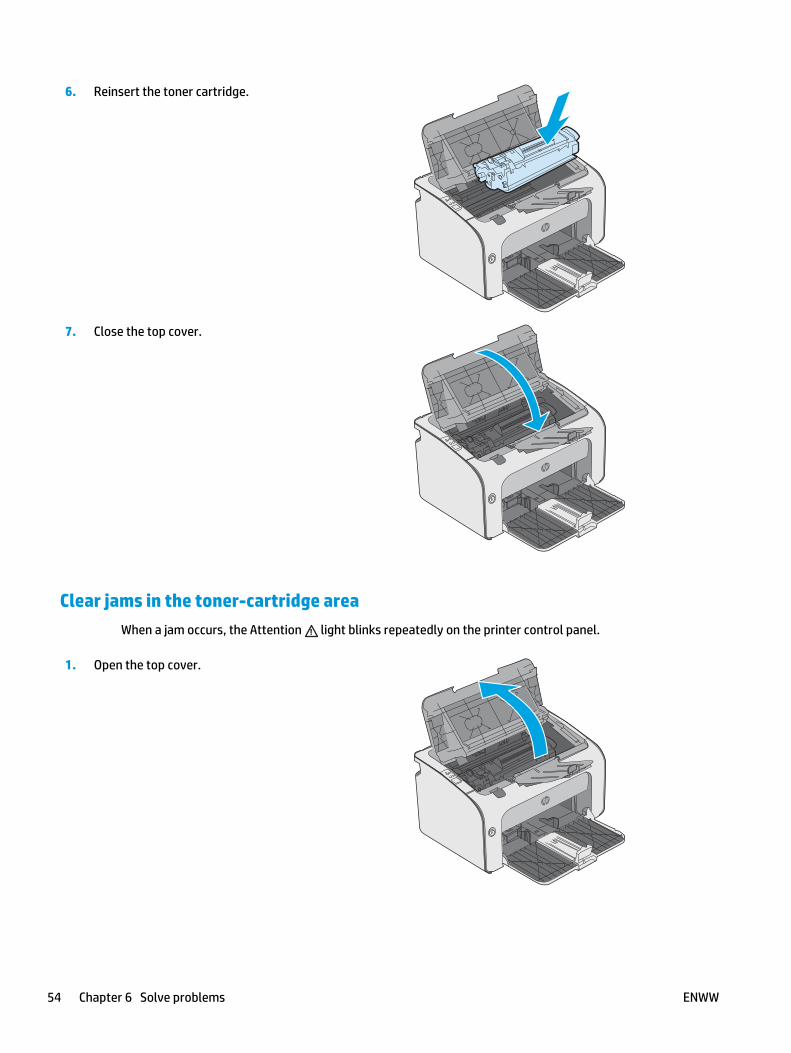
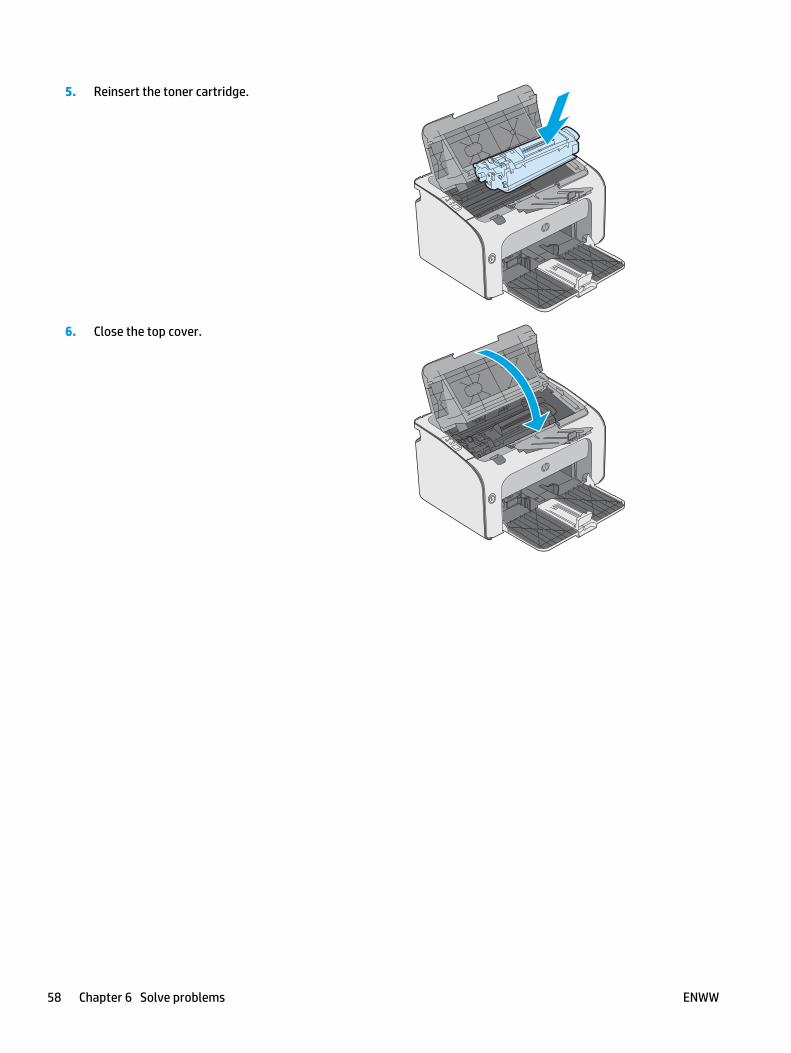
6. Reinsert the toner cartridge.
7. Close the top cover.
Clear jams in the toner-cartridge areaWhen a jam occurs, the Attention light blinks repeatedly on the printer control panel.
1. Open the top cover.
54 Chapter 6 Solve problems ENWW
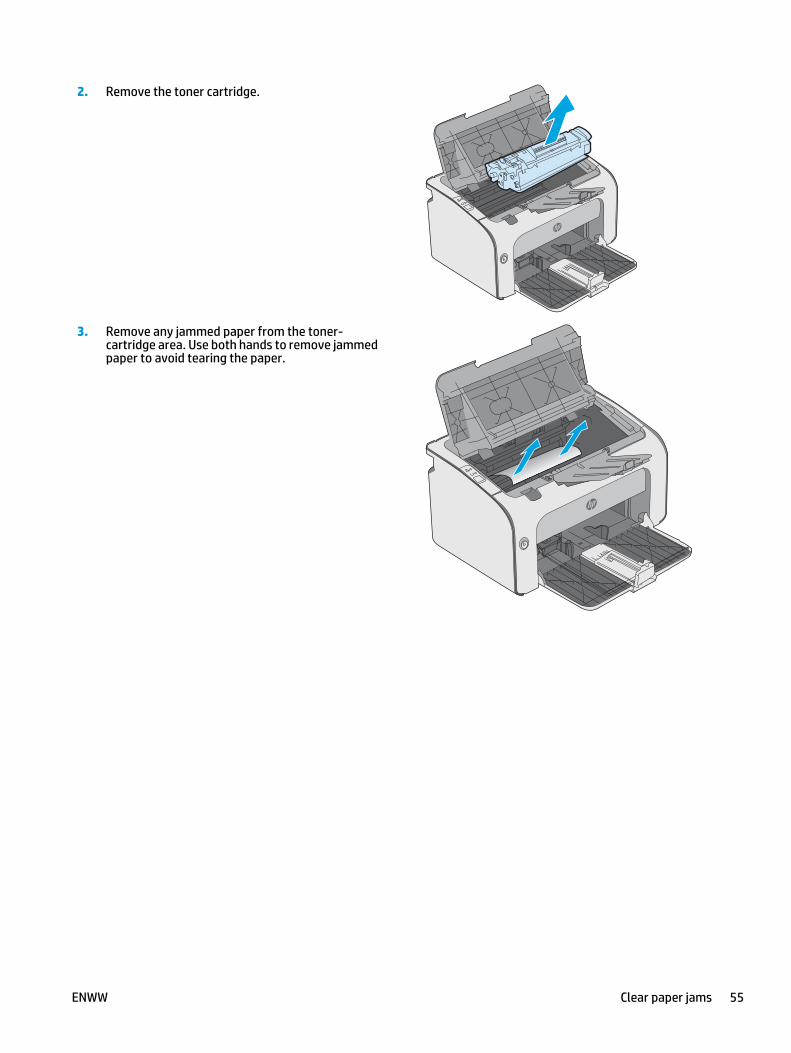
2. Remove the toner cartridge.
3. Remove any jammed paper from the toner-cartridge area. Use both hands to remove jammedpaper to avoid tearing the paper.
ENWW Clear paper jams 55
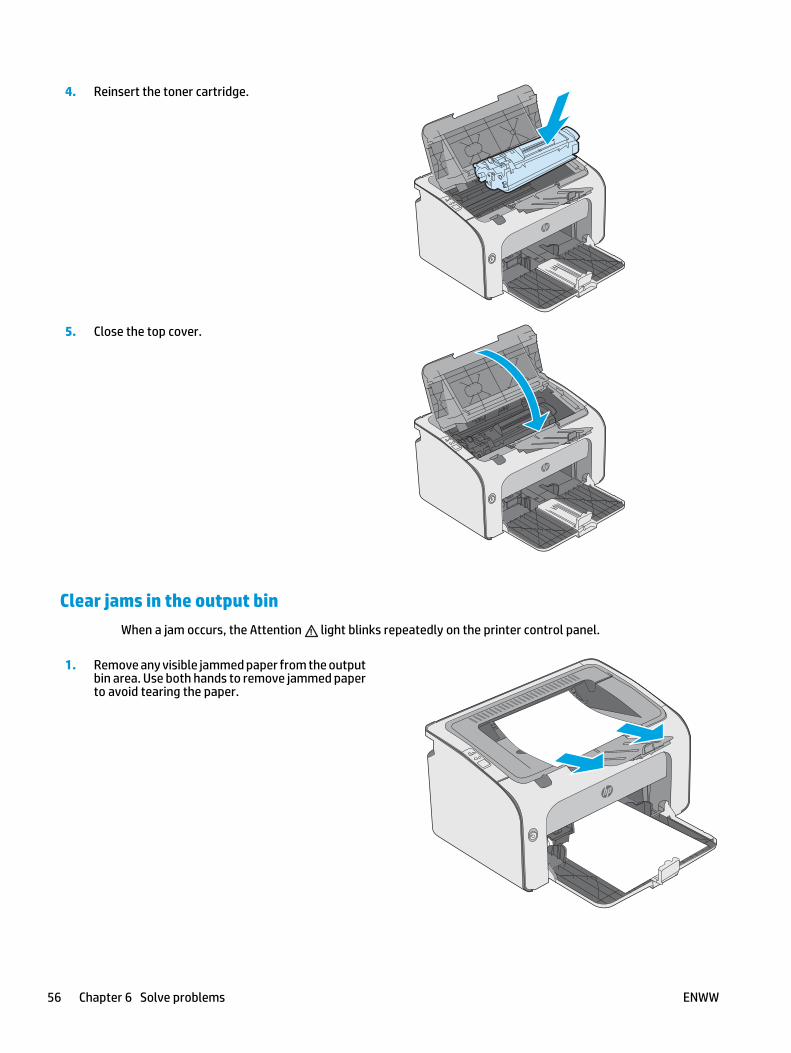
4. Reinsert the toner cartridge.
5. Close the top cover.
Clear jams in the output binWhen a jam occurs, the Attention light blinks repeatedly on the printer control panel.
1. Remove any visible jammed paper from the outputbin area. Use both hands to remove jammed paperto avoid tearing the paper.
56 Chapter 6 Solve problems ENWW
2. Open the top cover.
3. Remove the toner cartridge.
4. Remove any jammed paper from the toner-cartridge area.
ENWW Clear paper jams 57
5. Reinsert the toner cartridge.
6. Close the top cover.
58 Chapter 6 Solve problems ENWW
Improve print qualityIntroduction
If the printer is having print-quality problems, try the following solutions in the order presented to resolve theissue.
Print from a different software programTry printing from a different software program. If the page prints correctly, the problem is with the softwareprogram from which you were printing.
Check the paper-type setting for the print jobCheck the paper type setting when printing from a software program and the printed pages have smears, fuzzyor dark print, curled paper, scattered dots of toner, loose toner, or small areas of missing toner.
Check the paper type setting (Windows)
1. From the software program, select the Print option.
2. Select the printer, and then click the Properties or Preferences button.
3. Click the Paper/Quality tab.
4. Expand the list of Type is: options.
5. Expand the category of paper types that best describes your paper.
6. Select the option for the type of paper you are using, and click the OK button.
7. Click the OK button to close the Document Properties dialog box. In the Print dialog box, click the OKbutton to print the job.
Check the paper type setting (OS X)
1. Click the File menu, and then click the Print option.
2. In the Printer menu, select the printer.
3. By default, the print driver displays the Copies & Pages menu. Open the menus drop-down list, and thenclick the Finishing menu.
4. Select a type from the Media Type drop-down list.
5. Click the Print button.
Check toner-cartridge statusCheck the supplies status page for the following information:
● Estimated percentage of cartridge life remaining
● Approximate pages remaining
ENWW Improve print quality 59

● Part numbers for HP toner cartridges
● Number of pages printed
The printer prints the supplies status page when it prints the configuration page.
1. Press and hold the Cancel button until the Ready light begins blinking.
2. Release the Cancel button.
Clean the printer
Print a cleaning page
1. On the Information tab of the EWS, click Print Info Pages.
2. In the Print Cleaning Page area, click Print to print a cleaning page.
Visually inspect the toner cartridgeFollow these steps to inspect each toner cartridge.
1. Remove the toner cartridge from the printer.
2. Check the memory chip for damage.
3. Examine the surface of the green imaging drum.
CAUTION: Do not touch the imaging drum. Fingerprints on the imaging drum can cause print-qualityproblems.
4. If you see any scratches, fingerprints, or other damage on the imaging drum, replace the toner cartridge.
5. Reinstall the toner cartridge, and print a few pages to see if the problem has resolved.
Check paper and the printing environment
Step one: Use paper that meets HP specifications
Some print-quality problems arise from using paper that does not meet HP specifications.
● Always use a paper type and weight that this printer supports.
● Use paper that is of good quality and free of cuts, nicks, tears, spots, loose particles, dust, wrinkles, voids,staples, and curled or bent edges.
● Use paper that has not been previously printed on.
● Use paper that does not contain metallic material, such as glitter.
● Use paper that is designed for use in laser printers. Do not use paper that is designed only for use in Inkjetprinters.
● Use paper that is not too rough. Using smoother paper generally results in better print quality.
60 Chapter 6 Solve problems ENWW

Step two: Check the environment
The environment can directly affect print quality and is a common cause for print-quality or paper-feedingissues. Try the following solutions:
● Move the printer away from drafty locations, such as open windows or doors, or air-conditioning vents.
● Make sure the printer is not exposed to temperatures or humidity outside of printer specifications.
● Do not place the printer in a confined space, such as a cabinet.
● Place the printer on a sturdy, level surface.
● Remove anything that is blocking the vents on the printer. The printer requires good air flow on all sides,including the top.
● Protect the printer from airborne debris, dust, steam, grease, or other elements that can leave residueinside the printer.
Try a different print driverTry a different print driver when printing from a software program and the printed pages have unexpected linesin graphics, missing text, missing graphics, incorrect formatting, or substituted fonts.
Download any of the following drivers from the HP Web site: www.hp.com/support/ljm11-m13.
HP PCLmS driver ● Provided as the default driver on the printer CD. This driver is automatically installedunless you select a different one.
● Recommended for all Windows environments
● Provides the overall best speed, print quality, and printer-feature support for mostusers
● Developed to align with the Windows Graphic Device Interface (GDI) for the best speedin Windows environments
● Might not be fully compatible with third-party and custom software programs thatare based on PCL
Check the EconoMode settingsHP does not recommend the full-time use of EconoMode. If EconoMode is used full-time, the toner supply mightoutlast the mechanical parts in the toner cartridge. If print quality begins to degrade and is no longer acceptable,consider replacing the toner cartridge.
NOTE: This feature is available with the PCL 6 print driver for Windows. If you are not using that driver, youcan enable the feature by using the HP Embedded Web Server.
Follow these steps if the entire page is too dark or too light.
1. From the software program, select the Print option.
2. Select the printer, and then click the Properties or Preferences button.
3. Click the Paper/Quality tab, and locate the Print Quality area.
4. If the entire page is too dark, use these settings:
ENWW Improve print quality 61
● Select the 600 dpi option.
● Select the EconoMode check box to enable it.
If the entire page is too light, use these settings:
● Select the FastRes 1200 option.
● Clear the EconoMode check box to disable it.
5. Click the OK button to close the Document Properties dialog box. In the Print dialog, click the OK buttonto print the job.
Change print densityYou can change the print density setting by from the printer properties dialog box.
1. Windows XP, Windows 7, Windows 8, Windows 8.1, Windows Server 2008, and Windows Server 2003(using the default Start menu view): Click Start, and then click Printers and Faxes.
-or-
Windows XP, Windows 7, Windows 8, Windows 8.1, Windows Server 2008, and Windows Server 2003(using the Classic Start menu view): Click Start, and then click Printers.
-or-
Windows Vista: Click Start, click Control Panel, and then in the category for Hardware and Sound clickPrinter.
2. In the list of printers, right-click the name of this product, and then click the Properties menu item to openthe printer properties dialog box.
3. Click the Device settings tab, and then move the Print Density slider to the desired setting.
4. Click the Apply button to accept the setting, and then click the OK button to close the dialog box.
62 Chapter 6 Solve problems ENWW

Solve direct-connect problemsIf you have connected the product directly to a computer, check the USB cable.
● Verify that the cable is connected to the computer and to the product.
● Verify that the cable is not longer than 2 m (6.56 ft). Replace the cable if necessary.
● Verify that the cable is working correctly by connecting it to another product. Replace the cable if necessary.
ENWW Solve direct-connect problems 63
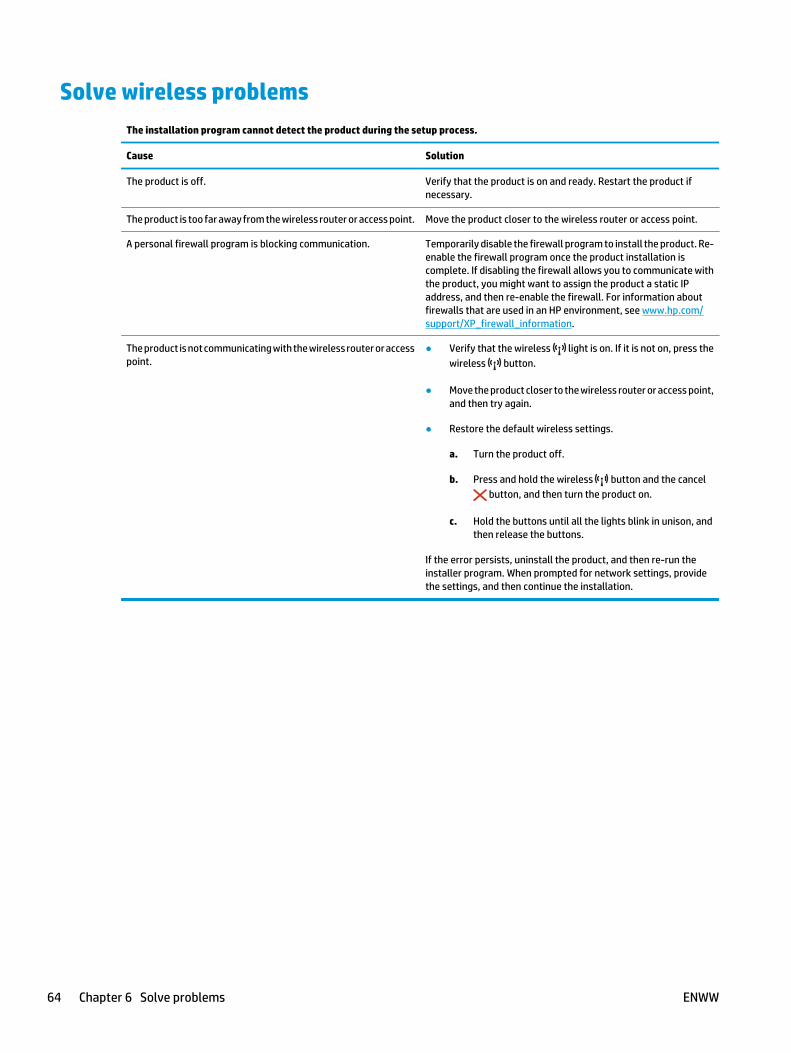
Solve wireless problemsThe installation program cannot detect the product during the setup process.
Cause Solution
The product is off. Verify that the product is on and ready. Restart the product ifnecessary.
The product is too far away from the wireless router or access point. Move the product closer to the wireless router or access point.
A personal firewall program is blocking communication. Temporarily disable the firewall program to install the product. Re-enable the firewall program once the product installation iscomplete. If disabling the firewall allows you to communicate withthe product, you might want to assign the product a static IPaddress, and then re-enable the firewall. For information aboutfirewalls that are used in an HP environment, see www.hp.com/support/XP_firewall_information.
The product is not communicating with the wireless router or accesspoint.
● Verify that the wireless light is on. If it is not on, press thewireless button.
● Move the product closer to the wireless router or access point,and then try again.
● Restore the default wireless settings.
a. Turn the product off.
b. Press and hold the wireless button and the cancel button, and then turn the product on.
c. Hold the buttons until all the lights blink in unison, andthen release the buttons.
If the error persists, uninstall the product, and then re-run theinstaller program. When prompted for network settings, providethe settings, and then continue the installation.
64 Chapter 6 Solve problems ENWW
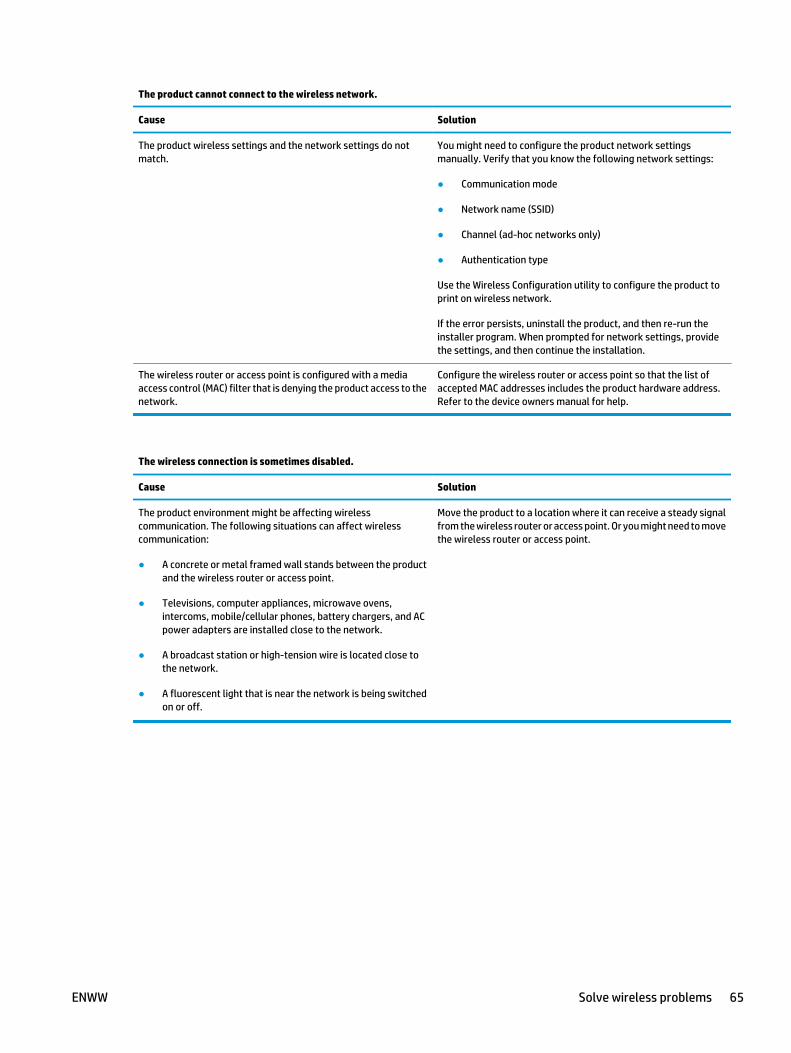
The product cannot connect to the wireless network.
Cause Solution
The product wireless settings and the network settings do notmatch.
You might need to configure the product network settingsmanually. Verify that you know the following network settings:
● Communication mode
● Network name (SSID)
● Channel (ad-hoc networks only)
● Authentication type
Use the Wireless Configuration utility to configure the product toprint on wireless network.
If the error persists, uninstall the product, and then re-run theinstaller program. When prompted for network settings, providethe settings, and then continue the installation.
The wireless router or access point is configured with a mediaaccess control (MAC) filter that is denying the product access to thenetwork.
Configure the wireless router or access point so that the list ofaccepted MAC addresses includes the product hardware address.Refer to the device owners manual for help.
The wireless connection is sometimes disabled.
Cause Solution
The product environment might be affecting wirelesscommunication. The following situations can affect wirelesscommunication:
● A concrete or metal framed wall stands between the productand the wireless router or access point.
● Televisions, computer appliances, microwave ovens,intercoms, mobile/cellular phones, battery chargers, and ACpower adapters are installed close to the network.
● A broadcast station or high-tension wire is located close tothe network.
● A fluorescent light that is near the network is being switchedon or off.
Move the product to a location where it can receive a steady signalfrom the wireless router or access point. Or you might need to movethe wireless router or access point.
ENWW Solve wireless problems 65

66 Chapter 6 Solve problems ENWW
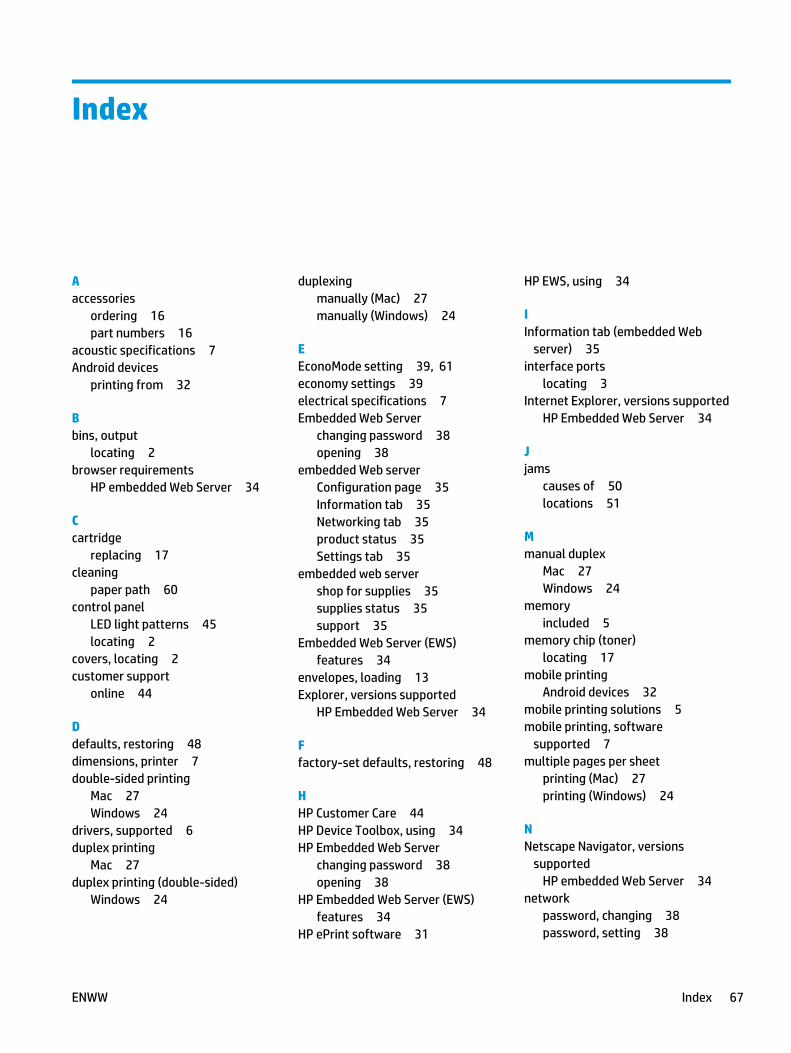
Index
Aaccessories
ordering 16part numbers 16
acoustic specifications 7Android devices
printing from 32
Bbins, output
locating 2browser requirements
HP embedded Web Server 34
Ccartridge
replacing 17cleaning
paper path 60control panel
LED light patterns 45locating 2
covers, locating 2customer support
online 44
Ddefaults, restoring 48dimensions, printer 7double-sided printing
Mac 27Windows 24
drivers, supported 6duplex printing
Mac 27duplex printing (double-sided)
Windows 24
duplexingmanually (Mac) 27manually (Windows) 24
EEconoMode setting 39, 61economy settings 39electrical specifications 7Embedded Web Server
changing password 38opening 38
embedded Web serverConfiguration page 35Information tab 35Networking tab 35product status 35Settings tab 35
embedded web servershop for supplies 35supplies status 35support 35
Embedded Web Server (EWS)features 34
envelopes, loading 13Explorer, versions supported
HP Embedded Web Server 34
Ffactory-set defaults, restoring 48
HHP Customer Care 44HP Device Toolbox, using 34HP Embedded Web Server
changing password 38opening 38
HP Embedded Web Server (EWS)features 34
HP ePrint software 31
HP EWS, using 34
IInformation tab (embedded Web
server) 35interface ports
locating 3Internet Explorer, versions supported
HP Embedded Web Server 34
Jjams
causes of 50locations 51
Mmanual duplex
Mac 27Windows 24
memoryincluded 5
memory chip (toner)locating 17
mobile printingAndroid devices 32
mobile printing solutions 5mobile printing, software
supported 7multiple pages per sheet
printing (Mac) 27printing (Windows) 24
NNetscape Navigator, versions
supportedHP embedded Web Server 34
networkpassword, changing 38password, setting 38
ENWW Index 67

Networking tab (embedded Webserver) 35
networkssupported 5
Oon/off button, locating 2online support 44operating systems (OS)
supported 5operating systems, supported 6ordering
supplies and accessories 16OS (operating system)
supported 5output bin
locating 2
Ppages per minute 5pages per sheet
selecting (Mac) 27selecting (Windows) 24
paperjams 50selecting 60
paper jamslocations 51
paper pickup problemssolving 49
paper typeselecting (Windows) 25
paper typesselecting (Mac) 28
paper, ordering 16part numbers
accessories 16replacement parts 16supplies 16toner cartridge 16toner cartridges 16
powerconsumption 7
power connectionlocating 3
power switch, locating 2print density 62print drivers, supported 6print on both sides
Mac 27
manually, Windows 24Windows 24
priority feed trayloading envelopes 13
problem-solvingdirect-connect problems 63wireless problems 64
Rreplacement parts
part numbers 16replacing
toner cartridge 17restoring factory-set defaults 48
Ssettings
factory-set defaults, restoring48
Settings tab (embedded Webserver) 35
sleep delaydisabling 39enabling 39
solvingdirect-connect problems 63wireless problems 64
specificationselectrical and acoustic 7
statuscontrol panel lights 45
suppliesordering 16part numbers 16replacing toner cartridge 17
supplies status 59support
online 44system requirements
HP Embedded Web Server 34
Ttechnical support
online 44toner cartridge
components 17part numbers 16replacing 17
toner cartridgespart numbers 16
toner-cartridge status 59
Tray 1loading 10loading envelopes 13
trayscapacity 5included 5locating 2
troubleshootingjams 50LED, errors 45LED, light patterns 45paper feed problems 49
WWeb browser requirements
HP Embedded Web Server 34Web sites
customer support 44weight, printer 7Wireless Direct printing 30
68 Index ENWW