Embed Size (px)
Citation preview
®
S
™
®
™
Laminate Shingle Instructions
™
dance with code and industry standards with the most strin-gent prevailing.
Underlayment - Apply a layer of Malarkey Right Start UDL underlayment on sheathing. Lap a minimum of 2" (51 mm) on sides, 6" (152 mm) on ends and nail sufficiently to hold in place. For application over decks with less than 4" (102 mm) in 12" (305 mm) slope see Low Slope Ap-plication Instructions at www.MalarkeyRoofing.com. Un-derlayment must carry a minimum 3" (76 mm) up onto any horizontal-to-vertical transition.
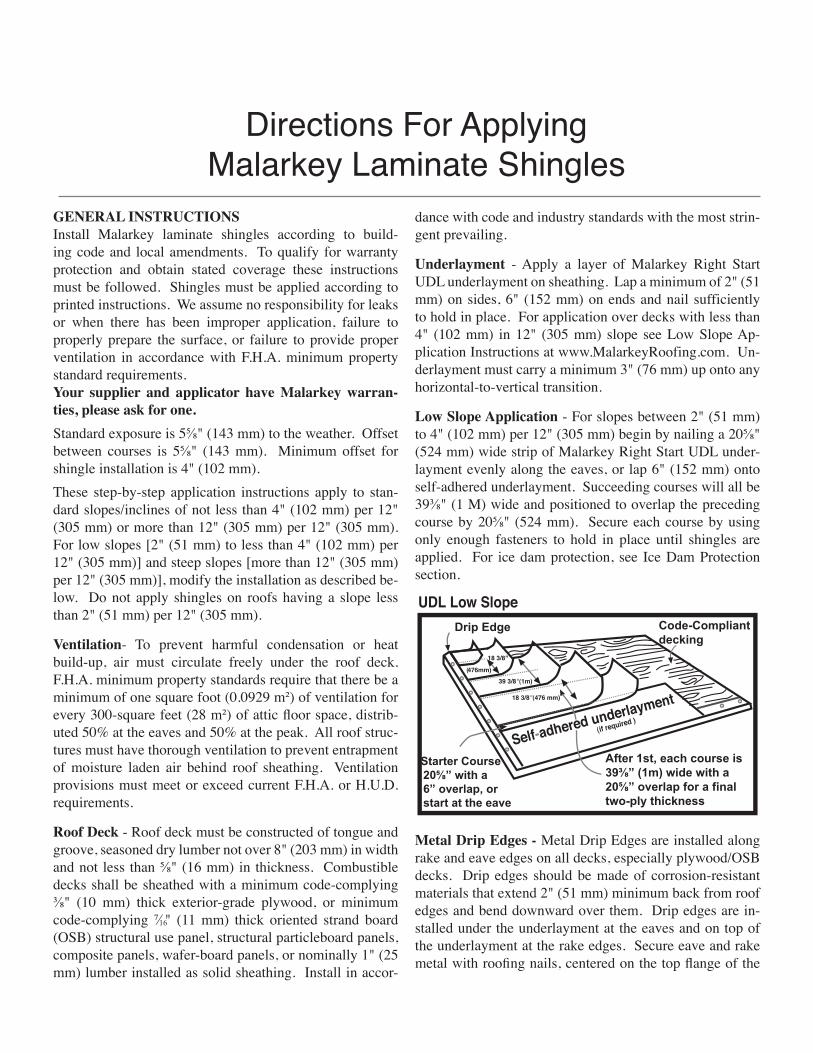
Low Slope Application - For slopes between 2" (51 mm) to 4" (102 mm) per 12" (305 mm) begin by nailing a 20⅝" (524 mm) wide strip of Malarkey Right Start UDL under-layment evenly along the eaves, or lap 6" (152 mm) onto self-adhered underlayment. Succeeding courses will all be 39⅜" (1 M) wide and positioned to overlap the preceding course by 20⅝" (524 mm). Secure each course by using only enough fasteners to hold in place until shingles are applied. For ice dam protection, see Ice Dam Protection section.
Metal Drip Edges - Metal Drip Edges are installed along rake and eave edges on all decks, especially plywood/OSB decks. Drip edges should be made of corrosion-resistant materials that extend 2" (51 mm) minimum back from roof edges and bend downward over them. Drip edges are in-stalled under the underlayment at the eaves and on top of the underlayment at the rake edges. Secure eave and rake metal with roofing nails, centered on the top flange of the
1 Directions For Applying Malarkey Laminate Shingles
GENERAL INSTRUCTIONSInstall Malarkey laminate shingles according to build-ing code and local amendments. To qualify for warranty protection and obtain stated coverage these instructions must be followed. Shingles must be applied according to printed instructions. We assume no responsibility for leaks or when there has been improper application, failure to properly prepare the surface, or failure to provide proper ventilation in accordance with F.H.A. minimum property standard requirements. Your supplier and applicator have Malarkey warran-ties, please ask for one. Standard exposure is 5⅝" (143 mm) to the weather. Offset between courses is 5⅝" (143 mm). Minimum offset for shingle installation is 4" (102 mm).These step-by-step application instructions apply to stan-dard slopes/inclines of not less than 4" (102 mm) per 12" (305 mm) or more than 12" (305 mm) per 12" (305 mm). For low slopes [2" (51 mm) to less than 4" (102 mm) per 12" (305 mm)] and steep slopes [more than 12" (305 mm) per 12" (305 mm)], modify the installation as described be-low. Do not apply shingles on roofs having a slope less than 2" (51 mm) per 12" (305 mm).
Ventilation- To prevent harmful condensation or heat build-up, air must circulate freely under the roof deck. F.H.A. minimum property standards require that there be a minimum of one square foot (0.0929 m²) of ventilation for every 300-square feet (28 m²) of attic floor space, distrib-uted 50% at the eaves and 50% at the peak. All roof struc-tures must have thorough ventilation to prevent entrapment of moisture laden air behind roof sheathing. Ventilation provisions must meet or exceed current F.H.A. or H.U.D. requirements.
Roof Deck - Roof deck must be constructed of tongue and groove, seasoned dry lumber not over 8" (203 mm) in width and not less than ⅝" (16 mm) in thickness. Combustible decks shall be sheathed with a minimum code-complying ⅜" (10 mm) thick exterior-grade plywood, or minimum code-complying ⅞" (11 mm) thick oriented strand board (OSB) structural use panel, structural particleboard panels, composite panels, wafer-board panels, or nominally 1" (25 mm) lumber installed as solid sheathing. Install in accor-
16
2 | LAMINATESHINGLEINSTRUCTIONS
Malarkey Roofing Company, 3131 N. Columbia Blvd., Portland, OR 97217-7472 • PO Box 17217, Portland, OR 97217-0217 Telephone: (503) 283-1191 • (800) 545-1191 • FAX: (503) 289-7644 • www.MalarkeyRoofing.com
metal at 8" (203 mm) to 10" (254 mm) on center (or as re-quired by building code).
Hand Tabbing - To ensure immediate sealing, Malarkey recommends hand tabbing shingles. Hand-tabbed laminate shingles require four quarter-sized dabs evenly spaced un-der each shingle. Press shingle firmly into the adhesive (ex-cessive use of adhesive may cause blistering).
Ice Dam Protection - If there is a possibility of ice form-ing along the eaves causing a back-up of water, or if it is required by building codes, install a course of self-adhered underlayment. Self-adhered underlayment is installed di-rectly to dry, clean roof deck on all eaves and rake sides of the roof and extend into the inside, warm interior wall of the roof a minimum of 24" (610 mm) or according to build-ing code requirements.
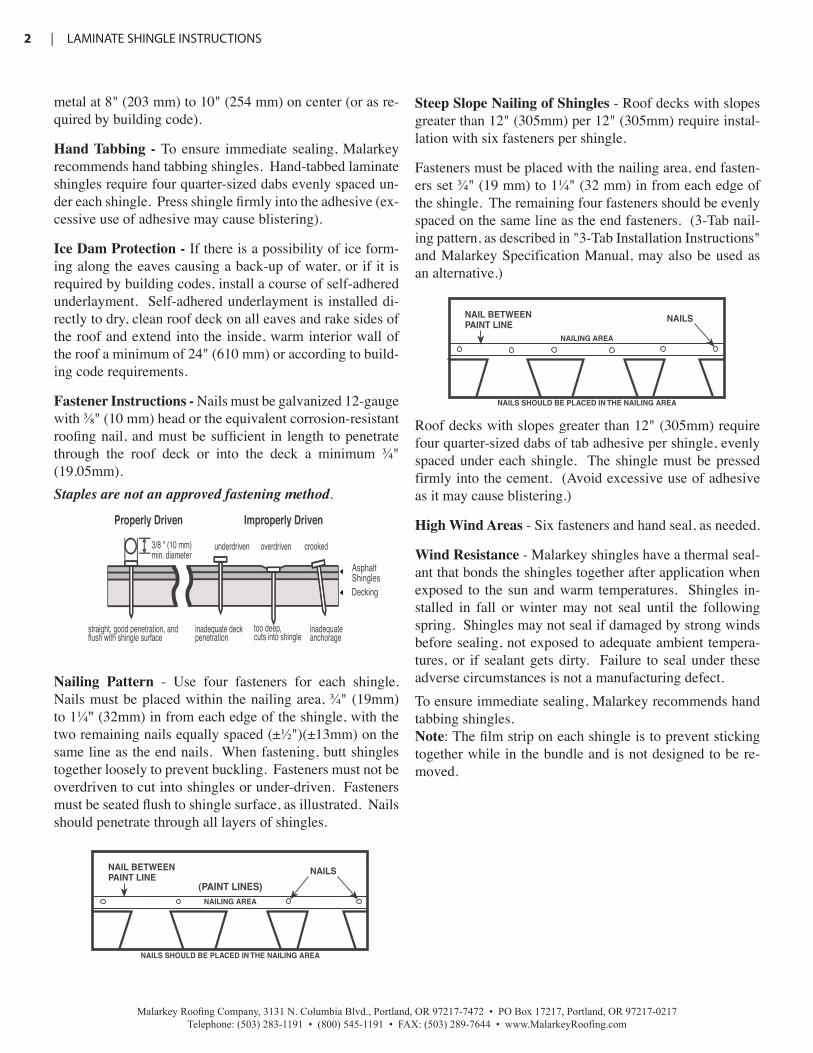
Fastener Instructions - Nails must be galvanized 12-gauge with ⅜" (10 mm) head or the equivalent corrosion-resistant roofing nail, and must be sufficient in length to penetrate through the roof deck or into the deck a minimum ¾" (19.05mm). Staples are not an approved fastening method.
Nailing Pattern - Use four fasteners for each shingle. Nails must be placed within the nailing area, ¾" (19mm) to 1¼" (32mm) in from each edge of the shingle, with the two remaining nails equally spaced (±½")(±13mm) on the same line as the end nails. When fastening, butt shingles together loosely to prevent buckling. Fasteners must not be overdriven to cut into shingles or under-driven. Fasteners must be seated flush to shingle surface, as illustrated. Nails should penetrate through all layers of shingles.
Steep Slope Nailing of Shingles - Roof decks with slopes greater than 12" (305mm) per 12" (305mm) require instal-lation with six fasteners per shingle.
Fasteners must be placed with the nailing area, end fasten-ers set ¾" (19 mm) to 1¼" (32 mm) in from each edge of the shingle. The remaining four fasteners should be evenly spaced on the same line as the end fasteners. (3-Tab nail-ing pattern, as described in "3-Tab Installation Instructions" and Malarkey Specification Manual, may also be used as an alternative.)
Roof decks with slopes greater than 12" (305mm) require four quarter-sized dabs of tab adhesive per shingle, evenly spaced under each shingle. The shingle must be pressed firmly into the cement. (Avoid excessive use of adhesive as it may cause blistering.)
High Wind Areas - Six fasteners and hand seal, as needed.
Wind Resistance - Malarkey shingles have a thermal seal-ant that bonds the shingles together after application when exposed to the sun and warm temperatures. Shingles in-stalled in fall or winter may not seal until the following spring. Shingles may not seal if damaged by strong winds before sealing, not exposed to adequate ambient tempera-tures, or if sealant gets dirty. Failure to seal under these adverse circumstances is not a manufacturing defect. To ensure immediate sealing, Malarkey recommends hand tabbing shingles. Note: The film strip on each shingle is to prevent sticking together while in the bundle and is not designed to be re-moved.
LAMINATESHINGLEINSTRUCTIONS |3
Malarkey Roofing Company, 3131 N. Columbia Blvd., Portland, OR 97217-7472 • PO Box 17217, Portland, OR 97217-0217 Telephone: (503) 283-1191 • (800) 545-1191 • FAX: (503) 289-7644 • www.MalarkeyRoofing.com
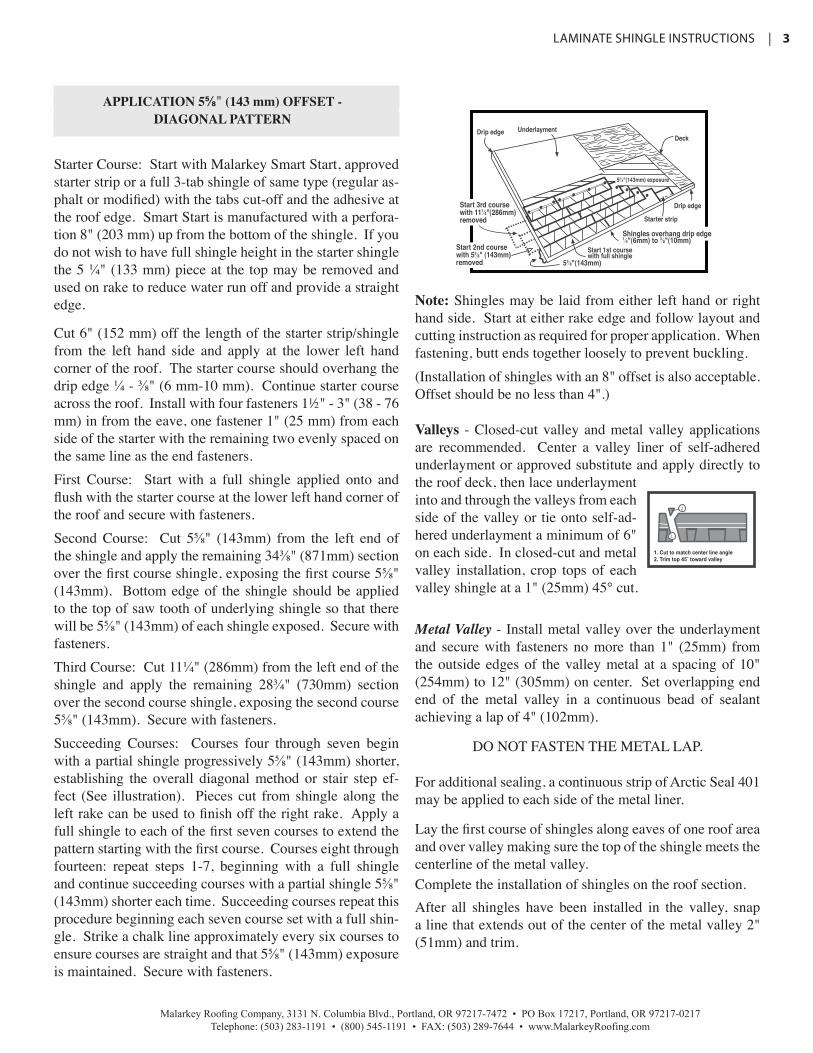
Note: Shingles may be laid from either left hand or right hand side. Start at either rake edge and follow layout and cutting instruction as required for proper application. When fastening, butt ends together loosely to prevent buckling.(Installation of shingles with an 8" offset is also acceptable. Offset should be no less than 4".)
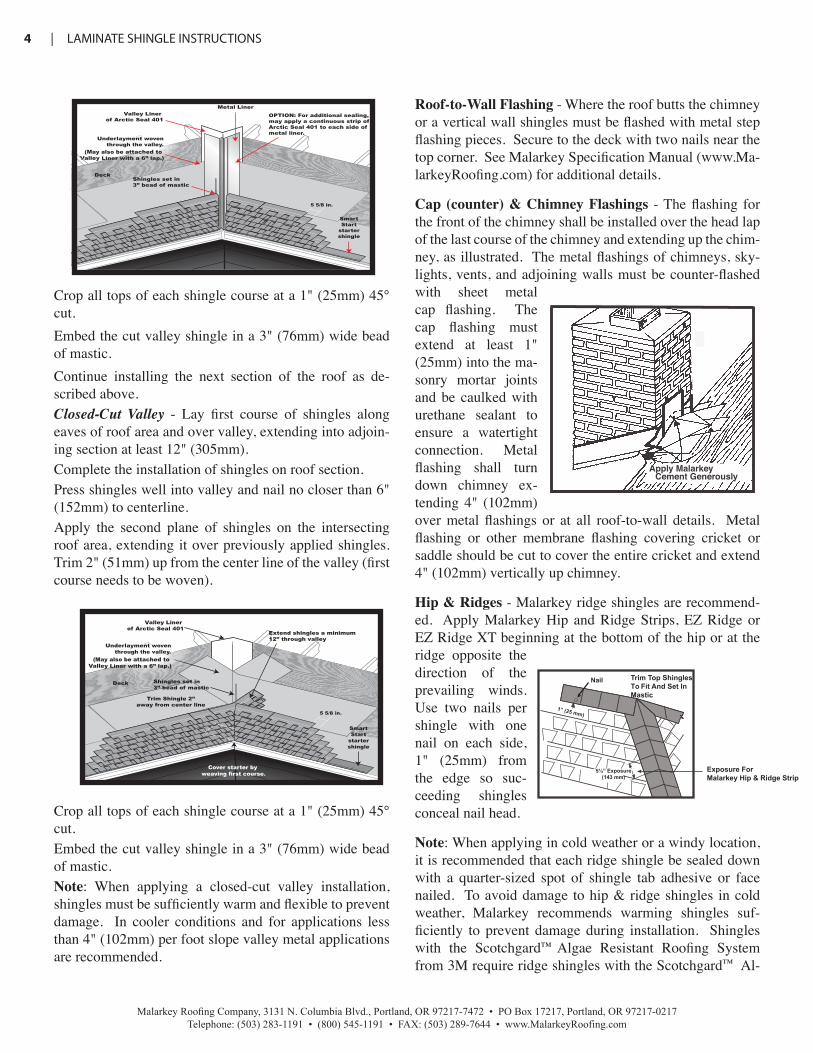
Valleys - Closed-cut valley and metal valley applications are recommended. Center a valley liner of self-adhered underlayment or approved substitute and apply directly to the roof deck, then lace underlayment into and through the valleys from each side of the valley or tie onto self-ad-hered underlayment a minimum of 6" on each side. In closed-cut and metal valley installation, crop tops of each valley shingle at a 1" (25mm) 45° cut.
Metal Valley - Install metal valley over the underlayment and secure with fasteners no more than 1" (25mm) from the outside edges of the valley metal at a spacing of 10" (254mm) to 12" (305mm) on center. Set overlapping end end of the metal valley in a continuous bead of sealant achieving a lap of 4" (102mm).
DO NOT FASTEN THE METAL LAP.
For additional sealing, a continuous strip of Arctic Seal 401 may be applied to each side of the metal liner.
Lay the first course of shingles along eaves of one roof area and over valley making sure the top of the shingle meets the centerline of the metal valley.Complete the installation of shingles on the roof section.After all shingles have been installed in the valley, snap a line that extends out of the center of the metal valley 2" (51mm) and trim.
APPLICATION 5⅝" (143 mm) OFFSET - DIAGONAL PATTERN
Starter Course: Start with Malarkey Smart Start, approved starter strip or a full 3-tab shingle of same type (regular as-phalt or modified) with the tabs cut-off and the adhesive at the roof edge. Smart Start is manufactured with a perfora-tion 8" (203 mm) up from the bottom of the shingle. If you do not wish to have full shingle height in the starter shingle the 5 ¼" (133 mm) piece at the top may be removed and used on rake to reduce water run off and provide a straight edge.
Cut 6" (152 mm) off the length of the starter strip/shingle from the left hand side and apply at the lower left hand corner of the roof. The starter course should overhang the drip edge ¼ - ⅜" (6 mm-10 mm). Continue starter course across the roof. Install with four fasteners 1½" - 3" (38 - 76 mm) in from the eave, one fastener 1" (25 mm) from each side of the starter with the remaining two evenly spaced on the same line as the end fasteners.First Course: Start with a full shingle applied onto and flush with the starter course at the lower left hand corner of the roof and secure with fasteners.Second Course: Cut 5⅝" (143mm) from the left end of the shingle and apply the remaining 34⅜" (871mm) section over the first course shingle, exposing the first course 5⅝" (143mm). Bottom edge of the shingle should be applied to the top of saw tooth of underlying shingle so that there will be 5⅝" (143mm) of each shingle exposed. Secure with fasteners.Third Course: Cut 11¼" (286mm) from the left end of the shingle and apply the remaining 28¾" (730mm) section over the second course shingle, exposing the second course 5⅝" (143mm). Secure with fasteners.Succeeding Courses: Courses four through seven begin with a partial shingle progressively 5⅝" (143mm) shorter, establishing the overall diagonal method or stair step ef-fect (See illustration). Pieces cut from shingle along the left rake can be used to finish off the right rake. Apply a full shingle to each of the first seven courses to extend the pattern starting with the first course. Courses eight through fourteen: repeat steps 1-7, beginning with a full shingle and continue succeeding courses with a partial shingle 5⅝" (143mm) shorter each time. Succeeding courses repeat this procedure beginning each seven course set with a full shin-gle. Strike a chalk line approximately every six courses to ensure courses are straight and that 5⅝" (143mm) exposure is maintained. Secure with fasteners.
1
2
1. Cut to match center line angle2. Trim top 45˚ toward valley
Starter
5 5/8 in.
SmartStart
startershingle
Shingles set in3” bead of mastic
Deck
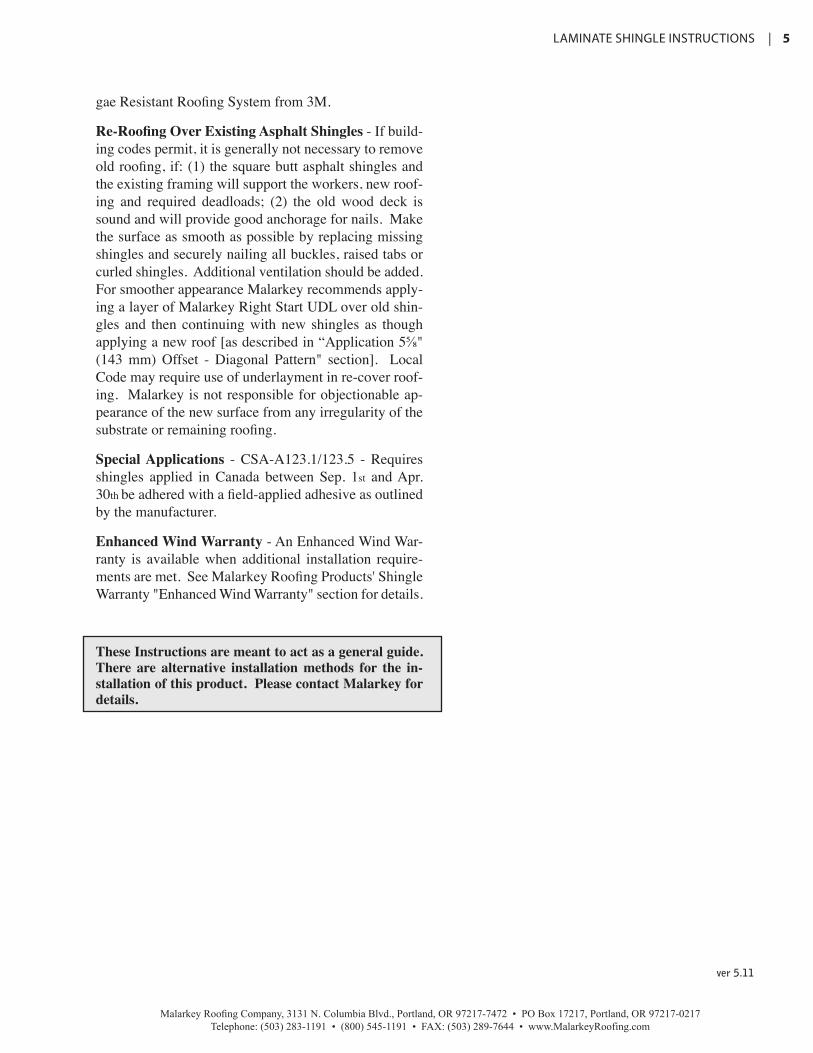
Underlayment woven through the valley.
Valley Liner of Arctic Seal 401
(May also be attached to Valley Liner with a 6” lap.)
Extend shingles a minimum12” through valley
Cover starter by weaving first course.
Trim Shingle 2”away from center line
Exposure For Malarkey Hip & Ridge Strip
Trim Top Shingles To Fit And Set In Mastic
Nail
1” (25 mm)
4 | LAMINATESHINGLEINSTRUCTIONS
Malarkey Roofing Company, 3131 N. Columbia Blvd., Portland, OR 97217-7472 • PO Box 17217, Portland, OR 97217-0217 Telephone: (503) 283-1191 • (800) 545-1191 • FAX: (503) 289-7644 • www.MalarkeyRoofing.com
Crop all tops of each shingle course at a 1" (25mm) 45° cut.Embed the cut valley shingle in a 3" (76mm) wide bead of mastic.Continue installing the next section of the roof as de-scribed above.Closed-Cut Valley - Lay first course of shingles along eaves of roof area and over valley, extending into adjoin-ing section at least 12" (305mm).Complete the installation of shingles on roof section.Press shingles well into valley and nail no closer than 6" (152mm) to centerline.Apply the second plane of shingles on the intersecting roof area, extending it over previously applied shingles. Trim 2" (51mm) up from the center line of the valley (first course needs to be woven).
Crop all tops of each shingle course at a 1" (25mm) 45° cut.Embed the cut valley shingle in a 3" (76mm) wide bead of mastic.Note: When applying a closed-cut valley installation, shingles must be sufficiently warm and flexible to prevent damage. In cooler conditions and for applications less than 4" (102mm) per foot slope valley metal applications are recommended.
Roof-to-Wall Flashing - Where the roof butts the chimney or a vertical wall shingles must be flashed with metal step flashing pieces. Secure to the deck with two nails near the top corner. See Malarkey Specification Manual (www.Ma-larkeyRoofing.com) for additional details.
Cap (counter) & Chimney Flashings - The flashing for the front of the chimney shall be installed over the head lap of the last course of the chimney and extending up the chim-ney, as illustrated. The metal flashings of chimneys, sky-lights, vents, and adjoining walls must be counter-flashed with sheet metal cap flashing. The cap flashing must extend at least 1" (25mm) into the ma-sonry mortar joints and be caulked with urethane sealant to ensure a watertight connection. Metal flashing shall turn down chimney ex-tending 4" (102mm) over metal flashings or at all roof-to-wall details. Metal flashing or other membrane flashing covering cricket or saddle should be cut to cover the entire cricket and extend 4" (102mm) vertically up chimney.
Hip & Ridges - Malarkey ridge shingles are recommend-ed. Apply Malarkey Hip and Ridge Strips, EZ Ridge or EZ Ridge XT beginning at the bottom of the hip or at the ridge opposite the direction of the prevailing winds. Use two nails per shingle with one nail on each side, 1" (25mm) from the edge so suc-ceeding shingles conceal nail head.
Note: When applying in cold weather or a windy location, it is recommended that each ridge shingle be sealed down with a quarter-sized spot of shingle tab adhesive or face nailed. To avoid damage to hip & ridge shingles in cold weather, Malarkey recommends warming shingles suf-ficiently to prevent damage during installation. Shingles with the Scotchgard™ Algae Resistant Roofing System from 3M require ridge shingles with the Scotchgard™ Al-
SmartStart
startershingle
5 5/8 in.
OPTION: For additional sealing, may apply a continuous strip of Arctic Seal 401 to each side of metal liner.
Metal Liner
Shingles set in3” bead of mastic
Deck
Valley Liner of Arctic Seal 401
Underlayment woven through the valley.
(May also be attached to Valley Liner with a 6” lap.)
LAMINATESHINGLEINSTRUCTIONS |5
Malarkey Roofing Company, 3131 N. Columbia Blvd., Portland, OR 97217-7472 • PO Box 17217, Portland, OR 97217-0217 Telephone: (503) 283-1191 • (800) 545-1191 • FAX: (503) 289-7644 • www.MalarkeyRoofing.com
gae Resistant Roofing System from 3M.
Re-Roofing Over Existing Asphalt Shingles - If build-ing codes permit, it is generally not necessary to remove old roofing, if: (1) the square butt asphalt shingles and the existing framing will support the workers, new roof-ing and required deadloads; (2) the old wood deck is sound and will provide good anchorage for nails. Make the surface as smooth as possible by replacing missing shingles and securely nailing all buckles, raised tabs or curled shingles. Additional ventilation should be added. For smoother appearance Malarkey recommends apply-ing a layer of Malarkey Right Start UDL over old shin-gles and then continuing with new shingles as though applying a new roof [as described in “Application 5⅝" (143 mm) Offset - Diagonal Pattern" section]. Local Code may require use of underlayment in re-cover roof-ing. Malarkey is not responsible for objectionable ap-pearance of the new surface from any irregularity of the substrate or remaining roofing.
Special Applications - CSA-A123.1/123.5 - Requires shingles applied in Canada between Sep. 1st and Apr. 30th be adhered with a field-applied adhesive as outlined by the manufacturer.
Enhanced Wind Warranty - An Enhanced Wind War-ranty is available when additional installation require-ments are met. See Malarkey Roofing Products' Shingle Warranty "Enhanced Wind Warranty" section for details.
These Instructions are meant to act as a general guide. There are alternative installation methods for the in-stallation of this product. Please contact Malarkey for details.
ver 5.11