Embed Size (px)
Citation preview

APPENDIX E
Laboratory Safety, Waste Disposal, and Chemical Analyses Methods
CONTENTS
Introduction ....................................................................................................................................736 Fundamentals of Laboratory Safety ..............................................................................................737
Procurement of Chemicals ...................................................................................................737Distribution of Chemicals ....................................................................................................737 Laboratory Chemical Storage ..............................................................................................737 Storage Cabinets...................................................................................................................738
Basic Rules and Procedures for Working with Chemicals ...........................................................738 Laboratory Protocol..............................................................................................................738 Personal Safety Practices .....................................................................................................738 Housekeeping .......................................................................................................................739 Personal Protection — Protective Eyewear .........................................................................739 Personal Protection — Protective Gloves............................................................................739 Personal Protection — Other Protective Clothing...............................................................741 Avoidance of Routine Exposure ..........................................................................................741 Fume Hoods .........................................................................................................................741 Choice of Chemicals ............................................................................................................742 Equipment and Glassware....................................................................................................742 Labels and Signs ..................................................................................................................742 Unattended Operations .........................................................................................................743 Electrical Safety....................................................................................................................743
Use and Storage of Chemicals in the Laboratory .........................................................................743 Procurement of Chemicals ...................................................................................................743Working with Allergens........................................................................................................743 Working with Embryotoxins ................................................................................................744 Working with Chemicals of Moderate or High Acute Toxicity or High Chronic Toxicity ...744 Chemical Storage..................................................................................................................747 Transportation.......................................................................................................................748
Procedures for Specific Classes of Hazardous Materials..............................................................748 Flammable Solvents .............................................................................................................749 Oxidizers...............................................................................................................................750 Corrosives .............................................................................................................................752
735
736 STORMWATER EFFECTS HANDBOOK
Reactives ...............................................................................................................................754 Compressed Gas Cylinders ..................................................................................................757
Emergency Procedures...................................................................................................................758 Chemical Waste Disposal Program ...............................................................................................760
Chemical Waste Containers..................................................................................................760 Waste Minimization..............................................................................................................760 Disposal of Chemicals down the Sink or Sanitary Sewer System......................................761 Chemical Substitution ..........................................................................................................761 Neutralization and Deactivation...........................................................................................761 Elimination of Nonhazardous Waste from Hazardous Waste..............................................761 Waste Disposal .....................................................................................................................762
Material Safety Data Sheets (MSDS)............................................................................................763 Product Name and Identification .........................................................................................764 Hazardous Ingredients/Identity Information ........................................................................764 Physical/Chemical Characteristics .......................................................................................764 Fire and Explosion Hazard Data..........................................................................................765 Reactivity Data .....................................................................................................................765 Health Hazard Data ..............................................................................................................765 Specific HACH MSDS Information.....................................................................................766
Summary of Field Test Kits...........................................................................................................767 Special Comments Pertaining to Heavy Metal Analyses..............................................................774 Stormwater Sample Extractions for EPA Methods 608 and 625 .................................................779 Calibration and Deployment Setup Procedure for YSI 6000upg Water Quality
Monitoring Sonde.........................................................................................................................782 References ......................................................................................................................................785
INTRODUCTION
The laboratory safety discussion included in this appendix is summarized from the Laboratory Safety and Standard Operating Procedures manual prepared for use in the Water Quality Laboratories of the Department of Civil and Environmental Engineering at the University of Alabama at Birmingham. It was prepared by Shirley Clark and Robert Pitt to ensure safe laboratory practices during our research. The manual and the excerpted information in this appendix include information concerning safe laboratory practices, the use of personal protective equipment, emergency procedures, use and storage of chemicals, and the proper method of waste disposal. This manual also covers hazard communication and incident response. This information is intended to help those in the laboratory to minimize hazards to themselves and their colleagues.
In view of the wide variety of chemical products handled in laboratories, it should not be assumed that the precautions and requirements stated here are all-inclusive. This information should be updated as needed with supplementary information to better protect the health and safety of anyone working in or visiting the laboratories.
Also included in this appendix is a summary of analytical test kits that have been reviewed as to their ability to be used in the field by a variety of users. These kits were reviewed during projects funded by the EPA (Pitt et al. 1993) and by the telecommunications industry (Day 1996; Pitt and Clark 1999). In addition, comments pertaining to needed stormwater extraction methods for organic analyses are also presented, along with information pertaining to the various methods available for analyzing heavy metals. The appendix concludes with a detailed description of calibration and setup procedures for the YSI 6000 water quality sonde that is frequently referenced in the text.

LABORATORY SAFETY, WASTE DISPOSAL, AND CHEMICAL ANALYSES METHODS 737
FUNDAMENTALS OF LABORATORY SAFETY
Procurement of Chemicals
Before a chemical is received, information on proper handling, storage, and disposal must be known to those involved. Refer to the appropriate MSDS for further information. No container may be accepted into a laboratory without an adequate identifying label. This label cannot be removed, defaced, or damaged in any way. All substances should be received in a central location. The date of receipt should be noted on all chemicals. Receipt of all chemicals must be noted in the chemical inventory, as well as the laboratory in which the chemical shall be located.
Distribution of Chemicals
When chemicals are hand-carried between laboratories, place the chemical in an outside (secondary) container or bucket. These secondary containers provide protection to the bottle and help keep it from breaking. They also help minimize spillage if the bottle does break. It is recommended that transport of chemicals inside a building be done using a cart where feasible.
Laboratory Chemical Storage
a. Read the label carefully before storing a chemical. All chemicals must be stored according to the Chemical Storage Segregation Scheme. Note that this is a simplified scheme and that in some instances, chemicals in the same category may be incompatible.
b. Store all chemicals by their hazard class. Only within segregation groups can chemicals be stored in alphabetical order. If a chemical exhibits more than one hazard, segregate by using the characteristic that exhibits the primary hazard.
c. Do not store chemicals near heat sources such as ovens or steam pipes. Also, do not store chemicals in direct sunlight.
d. Date chemicals when received and first opened. This will ensure that the oldest chemicals are used first, which will decrease the amount of chemicals for disposal. If a particular chemical can become unsafe while in storage, an expiration date should also be included. Keep in mind that expiration dates set by the manufacturer do not necessarily imply that the chemical is safe to use up to that date.
e. Do not use lab benches as permanent storage for chemicals. In these locations, the chemicals can easily be knocked over, incompatible chemicals can be stored alongside one another, and the chemicals are unprotected in the event of a fire. Each chemical must have a proper designated storage location and be returned to it after use.
f. Inspect chemicals and their containers for any signs of deterioration and for the integrity of the label.
g. Do not store any chemicals in glass containers on the floor. h. Do not use fume hoods as a permanent storage location for chemicals, with the exception of
particularly odorous chemicals that may require ventilation. The more containers, boxes, equipment, and other items that are stored in a fume hood, the greater likelihood of having chemical vapors drawn back into the room.
i. Promptly dispose of any old, outdated, or unused chemicals. j. Chemicals that require refrigeration must be sealed with tight-fitting caps and kept in lab-safe
refrigerators. Lab-safe refrigerators/freezers must be used for cold storage of flammables. k. Do not store chemicals above eye level. If the container breaks, the contents can easily fall on the
face and body. l. Do not store excessive amounts of chemicals in the lab.

738 STORMWATER EFFECTS HANDBOOK
Storage Cabinets
Flammable Material Storage Cabinets
Flammables not in active use must be stored in safe containers inside fire-resistant storage cabinets specifically designed to hold them. Flammable material storage cabinets must be specified for all labs that use flammable chemicals. The cabinets must meet NFPA 30 and OSHA 1910.106 standards. Flammable material storage cabinets are designed to protect the contents of the cabinet from the heat and flames of external fire rather than to confine burning liquids within. They can perform their protective function only if used and maintained properly. Cabinets are generally designed with double-walled construction and doors that are 2 in above the base (the cabinet is liquid-proof up to that point).
Acid Storage Cabinets
Acids should be kept in acid storage cabinets specifically designed to hold them. Such cabinets have the same construction features as flammable materials storage cabinets but are coated with epoxy enamel to guard against chemical attack, and use polyethylene trays to collect small spills and provide additional protection from corrosion for the shelves. Periodically check shelves and support for corrosion. Nitric acid should always be stored by itself or in a separate cabinet compartment.
BASIC RULES AND PROCEDURES FOR WORKING WITH CHEMICALS
Laboratory Protocol
Everyone in the lab is responsible for his or her own safety and for the safety of others. Before starting any work in the lab, make it a point to become familiar with the procedures and equipment that are to be used. Work only with chemical products when you know their flammability, reactivity, toxicity, safe handling, storage, and emergency procedures. If you do not understand or are unclear about something, ASK!
Personal Safety Practices
1. Lab coats and safety glasses are required of all persons in laboratories where chemicals are used. This includes visitors, as well as all laboratory personnel. Safety glasses can be found in a case just inside the door to each laboratory. Safety equipment must be donned before a person crosses the tape line separating the entryway to the lab from the working area. Personal protective equipment is only required in the areas designated.
2. Never wear shorts, short skirts, sandals, or open-toed or perforated shoes in the lab. 3. Minimize skin contact. Disposable gloves are available in all labs. Their use is recommended,
especially when handling dangerous chemicals or samples whose properties are unknown. This is especially important since we often work with stormwater samples that may be contaminated by raw sewage. Wash exposed skin before leaving the laboratory.
4. Keep the work area clean and uncluttered. 5. Do not smell or taste chemicals. 6. No horseplay in laboratories. Do not engage in behavior that may distract another worker. 7. Always make sure that the exits from the laboratory are free of obstruction. 8. Do not allow children or pets in the lab. 9. Never pipette anything by mouth.
10. Be aware of dangling jewelry, loose clothing, or long hair that might get caught in the equipment.

LABORATORY SAFETY, WASTE DISPOSAL, AND CHEMICAL ANALYSES METHODS 739
11. Store food and drinks in refrigerators that are designated for that use only. Food and drinks shall not be carried into the work areas in the lab. Do not consume food or drinks using glassware or utensils that are used for laboratory procedures.
12. Never work alone in the lab if it is avoidable. If you must work alone, make someone aware of your location and have him or her call or check on you periodically. If you must work alone, do not use large containers of any dangerous chemical (such as acids or solvents).
13. Wash your hands frequently throughout the day and before leaving the lab for the day. 14. Do not wear contact lenses in the lab because chemicals or particulates may get caught behind
them and cause severe damage to the eye.
Housekeeping
1. Work areas must be kept clean and free of unnecessary chemicals. Clean your work area throughout the day and before you leave at the end of the day.
2. If necessary, clean equipment after use to avoid the possibility of harming the next person who uses it or of contaminating his/her samples.
3. Keep all aisles and walkways in the lab clear to provide a safe walking surface and an unobstructed exit. 4. Do not block access to emergency equipment and utility controls.
Personal Protection — Protective Eyewear
1. Goggles provide the best all-around protection against chemical splashes, vapors, dusts, and mists. 2. Goggles that have indirect vents or are not vented provide the most protection, but an anti-fog
agent might be needed. 3. Standard safety glasses provide protection against impact. 4. If using a laser or strong UV light sources (such as photodegradation equipment), wear safety
glasses or goggles that provide protection against the specific wavelengths involved. 5. Prescription glasses are generally not appropriate in a laboratory setting. If you wear prescription
glasses, either get and wear a pair of prescription safety glasses from your optician or wear the “over-the-glasses” safety glasses when working in the laboratory.
6. Contact lenses should not be worn in a laboratory because they can trap contaminants behind them and reduce or eliminate the effectiveness of flushing with water from an eyewash. Contact lenses may also increase the amount of chemicals trapped on the surface of the eye and decrease removal of the chemical by tearing. If it is necessary to wear contact lenses in a lab, wear protective goggles at all times.
Personal Protection — Protective Gloves
1. Chemicals can permeate any glove. The vapor form of the liquid chemical will break through to the skin side of the glove in most cases within a matter of minutes. The rate at which this occurs depends on the composition of the glove, the chemicals present and their concentration, and the exposure time. While for most chemicals this vapor exposure will not be particularly harmful, for some of the more toxic chemicals, it can be. In addition, once chemicals reach the skin, the glove then acts as a barrier which aids in the penetration of the chemicals through the skin. Effectively, a process called “occlusion” can occur, by which the chemical penetrates the skin more easily when trapped between the glove and the skin than if the skin were exposed without a glove. Consult glove and chemical compatibility charts (such as Table E.1) to ensure that you are using the most appropriate glove. Be sure to check the most up-to-date recommendations from the glove vendors.
2. If direct chemical contact occurs, replace gloves regularly throughout the day. Wash hands regularly and remove gloves before answering the telephone or opening doors. Make sure that hands are clean before using gloves. If chemicals have contaminated the skin prior to the glove being put on, the glove will then speed up the process of skin penetration.
3. Check gloves for cracks, tears, and holes. If the gloves are not in good condition, replace them.

740 STORMWATER EFFECTS HANDBOOK
Table E.1 Chemical Resistance of Glove Materials (E = Excellent, G = Good, F = Fair, P = Poor)
Chemical Natural Rubber Neoprene Nitrile Vinyl
Acetaldehyde Acetic acid Acetone Acrylonitrile Ammonium hydroxide Aniline Benzaldehyde Benzene*
Benzyl chloride*
Bromine Butane Butyraldehyde Calcium hypochlorite Carbon disulfide Carbon tetrachloride*
Chlorine Chloroacetone Chloroform Chromic acid Cyclohexane Dibenzyl ether Dibutyl phthalate Diethanolamine Diethyl ether Dimethyl sulfoxide**
Ethyl acetate Ethylene dichloride*
Ethylene glycol Ethylene trichloride*
Fluorine Formaldehyde Formic acid Glycerol Hexane Hydrobromic acid (40%) Hydrochloric acid Hydrofluoric acid (30%) Hydrogen peroxide Iodine Methylamine Methyl cellosolve Methyl chloride* Methyl ethyl ketone Methylene chloride* Monoethaloamine Morpholine Naphthalene* Nitric acid Perchloric acid Phosphoric acid Potassium hydroxide Propylene dichloride* Sodium hydroxide Sodium hypochlorite Sulfuric acid Toluene* Trichloroethylene*
G G E G E E E E G G G F P G N/A F G E E E F G E G F F E G P F G F F P G P G G N/A G P E N/A P P G N/A G P G G G P P G F P F G F G G N/A G F E N/A P P F G P P F F E F E N/A P F G N/A P F G N/A P F E N/A E F G E P
N/A N/A N/A N/A F G G F P F G P G G E E P P N/A P G G N/A G G E E E G E E E G G E E P E N/A P G E N/A E G G G E G G G E G G G E G G N/A G G G E E E E N/A P P E N/A P F G G P F F G F F E N/A E F E N/A E G G E G P P P G F G F E G E N/A E G G G E P F N/A P G G G E G P F G G G F G P F G F P F G F
LABORATORY SAFETY, WASTE DISPOSAL, AND CHEMICAL ANALYSES METHODS 741
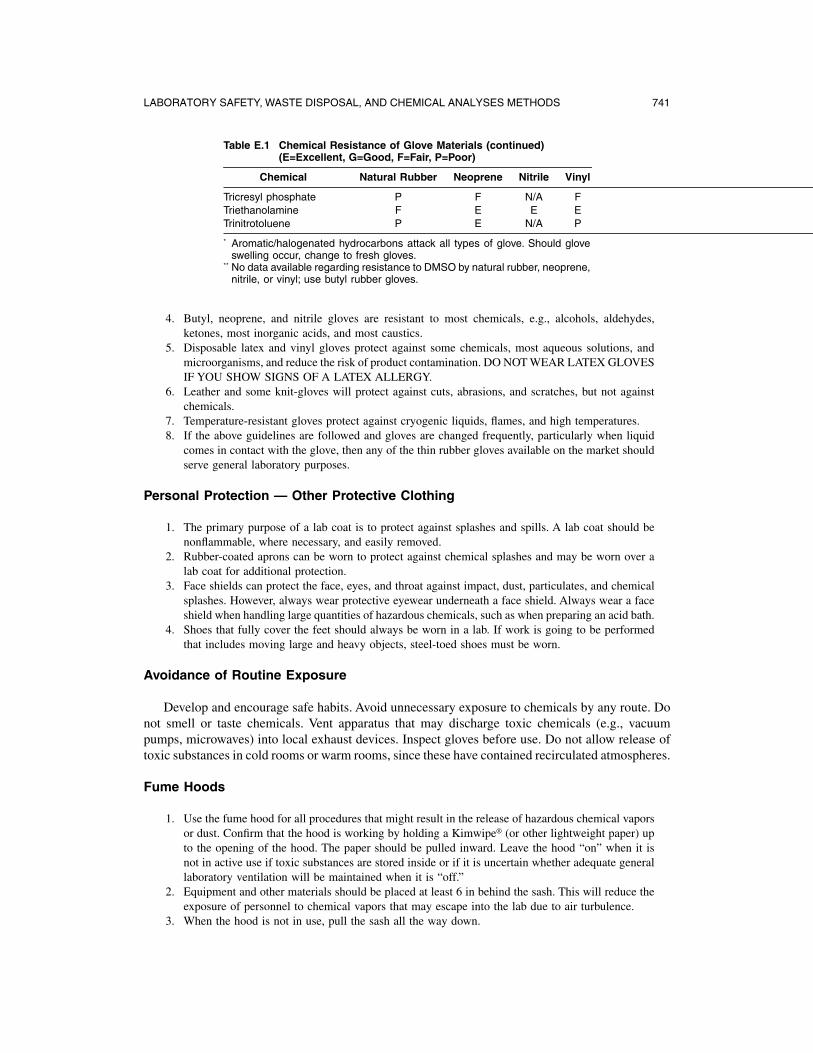
Table E.1 Chemical Resistance of Glove Materials (continued) (E=Excellent, G=Good, F=Fair, P=Poor)
Chemical Natural Rubber Neoprene Nitrile Vinyl
Tricresyl phosphate P F N/A F Triethanolamine F E E E Trinitrotoluene P E N/A P
* Aromatic/halogenated hydrocarbons attack all types of glove. Should glove swelling occur, change to fresh gloves.
** No data available regarding resistance to DMSO by natural rubber, neoprene, nitrile, or vinyl; use butyl rubber gloves.
4. Butyl, neoprene, and nitrile gloves are resistant to most chemicals, e.g., alcohols, aldehydes, ketones, most inorganic acids, and most caustics.
5. Disposable latex and vinyl gloves protect against some chemicals, most aqueous solutions, and microorganisms, and reduce the risk of product contamination. DO NOT WEAR LATEX GLOVES IF YOU SHOW SIGNS OF A LATEX ALLERGY.
6. Leather and some knit-gloves will protect against cuts, abrasions, and scratches, but not against chemicals.
7. Temperature-resistant gloves protect against cryogenic liquids, flames, and high temperatures. 8. If the above guidelines are followed and gloves are changed frequently, particularly when liquid
comes in contact with the glove, then any of the thin rubber gloves available on the market should serve general laboratory purposes.
Personal Protection — Other Protective Clothing
1. The primary purpose of a lab coat is to protect against splashes and spills. A lab coat should be nonflammable, where necessary, and easily removed.
2. Rubber-coated aprons can be worn to protect against chemical splashes and may be worn over a lab coat for additional protection.
3. Face shields can protect the face, eyes, and throat against impact, dust, particulates, and chemical splashes. However, always wear protective eyewear underneath a face shield. Always wear a face shield when handling large quantities of hazardous chemicals, such as when preparing an acid bath.
4. Shoes that fully cover the feet should always be worn in a lab. If work is going to be performed that includes moving large and heavy objects, steel-toed shoes must be worn.
Avoidance of Routine Exposure
Develop and encourage safe habits. Avoid unnecessary exposure to chemicals by any route. Do not smell or taste chemicals. Vent apparatus that may discharge toxic chemicals (e.g., vacuum pumps, microwaves) into local exhaust devices. Inspect gloves before use. Do not allow release of toxic substances in cold rooms or warm rooms, since these have contained recirculated atmospheres.
Fume Hoods
1. Use the fume hood for all procedures that might result in the release of hazardous chemical vapors or dust. Confirm that the hood is working by holding a Kimwipe® (or other lightweight paper) up to the opening of the hood. The paper should be pulled inward. Leave the hood “on” when it is not in active use if toxic substances are stored inside or if it is uncertain whether adequate general laboratory ventilation will be maintained when it is “off.”
2. Equipment and other materials should be placed at least 6 in behind the sash. This will reduce the exposure of personnel to chemical vapors that may escape into the lab due to air turbulence.
3. When the hood is not in use, pull the sash all the way down.

742 STORMWATER EFFECTS HANDBOOK
4. While personnel are working in the hood, pull the sash down as far as is practical. The sash is protection against fires, explosions, chemical splashes, and projectiles. Never put the sash above the line marked as the maximum allowable height for safe use.
5. Do not keep loose papers, paper towels, or tissues in the hood. These material can be drawn into the blower and adversely affect the performance of the hood.
6. Do not use a fume hood as a storage cabinet for chemicals. Excessive storage of chemicals and other items will disrupt the designed airflow in the hood. In particular, do not store chemicals against the baffle at the back of the hood because this will interfere with the laminar air flow.
7. Do not place objects directly in front of a fume hood. 8. Minimize the amount of foot traffic immediately in front of a hood. Walking past hoods causes
turbulence that can draw contaminants out of the hood and into the room.
Choice of Chemicals
Use only those chemicals for which the quality of the available ventilation system is appropriate. Do not begin any experiment that requires a fume hood if the hood is not working. If the hood is not working, call Maintenance immediately.
Equipment and Glassware
1. Inspect all glassware before use. Repair or discard any broken, cracked, or chipped glassware. 2. Transport all glass chemical containers in rubber or polyethylene bottle carriers. 3. Inspect laboratory apparatus before use. Use only equipment that is free from cracks, chips, or
other defects. 4. If possible, place a pan under a reaction vessel or other container to contain the liquid if the
glassware breaks. 5. Do not allow burners or any other ignition source nearby when working with flammable liquids. 6. Properly support and secure laboratory apparatus before use. 7. Either work in the fume hood or ensure that the apparatus is venting to the fume hood if there is
a possibility of hazardous vapors being evolved. 8. Always work in a fume hood if there is a possibility of an implosion or explosion. 9. If possible, vent vacuum pump exhaust into a fume hood.
10. When using a vacuum pump, place a trap between the pump and the apparatus. 11. Lubricate pump regularly if possible. Check belt condition and do not operate in a fume hood
cabinet that is used for storage of flammables.
Labels and Signs
All hazardous chemicals are required by law to be labeled by the manufacturer. The chemical hygiene officer must ensure that each existing container and any incoming containers are properly labeled. The label must provide the following information:
• The identity of the chemical • Any warnings • The manufacturer’s name and address
Temporary or transfer containers intended for immediate use by the person who transferred the chemical need not be labeled. However, if the chemical is left unattended (such as premade standards), the container must be labeled. Temporary labels must include:
• The identity of the chemical • Any warnings • The target organs affected, if applicable
LABORATORY SAFETY, WASTE DISPOSAL, AND CHEMICAL ANALYSES METHODS 743
Signs are intended to warn employees of chemical and physical dangers, such as designated areas where carcinogens or highly toxic chemicals are used or stored. All high hazard areas or hazardous chemical storage should be posted with the proper signs.
Unattended Operations
If an experiment/operation is left unattended, place an appropriate sign on the door and provide for containment of toxic substances in the event of equipment or utility service.
Electrical Safety
1. Examine all electrical cords periodically for signs of wear and damage. If damaged electrical cords are discovered, unplug the equipment and repair (or send the equipment out for repair).
2. Properly ground all electrical equipment. 3. If sparks are noticed while plugging in or unplugging equipment or if the cord feels hot, do not
use the equipment until it has been serviced. 4. Do not run electrical cords along the floor where they will be a tripping hazard and subject to
wear. If a cord must be run along the floor, protect it with a cord cover. 5. Do not run electrical cords along the floor where liquid spills may be a problem (such as around sinks). 6. Do not run electrical cords above the ceiling if possible. The cord should be visible at all times
to ensure that it is in good condition. 7. Do not plug too many items into a single outlet. Multistrip plugs can be used only if they are
protected with a circuit breaker and if they are not overused. 8. Do not use extension cords for permanent wiring.
USE AND STORAGE OF CHEMICALS IN THE LABORATORY
Procurement of Chemicals
Material Safety Data Sheets (MSDS) must accompany all initial incoming shipments of all chemicals. MSDSs must be readily available to all personnel in the labs where the chemicals are stored and where they are used. MSDSs shall be kept in three-ring binders near the door so that personnel can familiarize themselves with new chemicals before getting them out and using them.
Before ordering a new chemical, laboratory personnel should obtain information on proper handling, storage, and disposal methods for that chemical.
Consumer products used as they would be at home (such as dishwashing detergent) do not require an MSDS.
Sources of MSDSs include:
• Chemical supplier • Chemical manufacturer • Internet resources, such as the UAB Department of Occupational Health and Safety webpage
http://www.healthsafe.uab.edu
Working with Allergens
A wide variety of substances can elicit skin and lung hypersensitivity. Examples include common substances such as diazomethane, chromium, nickel, bichromates, formaldehyde, isocyanates, and certain phenols. Because of this variety and the varying responses of individuals, suitable gloves should be used whenever there is a potential for contact with chemicals that may cause skin irritation.

744 STORMWATER EFFECTS HANDBOOK
Working with Embryotoxins
Embryotoxins are substances that cause adverse effects on a developing fetus. These effects may include embryolethality, malformations, retarded growth, and postnatal function deficits.
A few substances have been demonstrated to be embryotoxic in humans. These include:
Acrylic acid Aniline Benzene Cadmium Carbon sulfide N,N-dimethylacetamide Dimethylformamide Dimethyl sulfoxide Diphenylamine Estradiol Formaldehyde Formamide Hexachlorobenzene Iodoacetic acid Lead compounds Mercury compounds Nitrobenzene Nitrous oxide Phenol Thalidomide Toluene Vinyl chloride Xylene Polychlorinated and polybrominated biphenyls
Embryotoxins requiring special controls should be stored in an adequately ventilated area. The container should be labeled in a clear manner such as the following: EMBRYOTOXIN: READ SPECIFIC PROCEDURES FOR USE. If the storage container is breakable, it should be kept in an impermeable, unbreakable secondary container having sufficient capacity to retain the material, should the primary container fail.
Working with Chemicals of Moderate or High Acute Toxicity or High Chronic Toxicity
Before beginning a laboratory operation, each worker is strongly advised to consult the standard compilations that list toxic properties of known substances and learn what is known about the substance to be used. The precautions and procedures described in this section should be followed if any of the substances to be used in significant quantities is known to be moderately or highly toxic. If any of the substances being used is known to be highly toxic, it is desirable to have two people present in the area at all times.
These procedures should be followed if the toxicological properties of any of the substances being used or prepared are UNKNOWN. If any of the substances to be used or prepared are known to have high chronic toxicity (e.g., compounds of heavy metals and other potent carcinogens), then the precautions and procedures described in this section should be supplemented with additional precautions to aid in containing and ultimately destroying the substances having high chronic toxicity.
If you are considering pregnancy, handle these substances only in a hood with a confirmed satisfactory performance, using appropriate protective apparel to prevent skin contact. If you are pregnant, notify your supervisor and consult your physician before working with these materials.
LABORATORY SAFETY, WASTE DISPOSAL, AND CHEMICAL ANALYSES METHODS 745
In addition to the safety protocols discussed earlier, the following three steps must be followed when working with one or more of these substances:
1. Label containers of substances having high chronic toxicity as follows: WARNING! HIGH ACUTE OR CHRONIC TOXICITY OR CANCER SUSPECT AGENT.
2. Protect the hands and forearms by wearing either gloves and a laboratory coat or suitable long gloves to avoid contact of the toxic material with the skin.
3. Procedures involving volatile toxic substances and those involving solid or liquid toxic substances that may result in the generation of aerosols should be conducted in a fume hood or other suitable containment device.
4. After working with toxic materials, wash the hands and arms immediately. Never eat, drink, chew gum, apply cosmetics, take medicine, or store foods in areas where toxic substances are being used.
These standard precautions will provide laboratory workers with good protection from most toxic substances. In addition, records that include amounts of material used and names of workers involved should be kept as part of the laboratory notebook record of the experiment. For strong carcinogens, an accurate record of such substances being stored and the amounts used, dates of use, and names of users must be maintained.
To minimize hazards from accidental breakage of apparatus or spills of toxic substances in the hood, containers of such substances should be stored in pans or trays made of polyethylene or other chemical-resistant material, and the apparatus should be mounted above trays of the same material. Alternatively, the working surface of the hood can be fitted with a removable liner of adsorbent, plastic-backed paper. Such procedures will make clean up of accidental spills easier. Areas where toxic substances are being used and stored must have restricted access, and warning signs should be posted if a special toxicity hazard exists. If the substance is suspected of having a high chronic toxicity, the storage area must be maintained under negative pressure with respect to its surroundings.
In general, the waste materials and solvents containing toxic substances should be stored in closed, impervious containers so that personnel handling the containers will not be exposed to their contents.
The laboratory worker must be prepared for potential accidents or spills involving toxic substances. If a toxic substance contacts the skin, the area should be washed with water. If there is a major spill outside the hood, the room or appropriate area should be evacuated and necessary measures should be taken to prevent exposures to other workers. Spills must be cleaned by personnel wearing suitable personal protective equipment.
Some examples of potent carcinogens (substances known to have high chronic toxicity), along with their corresponding chemical class, are:
Alkylating Agents: α-Halo ethers
Bis(chloromethyl)ether and chloromethyl ether Methyl chloromethyl ether
Aziridines Ethylene imine 2-Methylaziridine
Diazo, azo, and azoxy compounds 4-Dimethylaminobenzene
Electrophilic alkenes and alkynes Acrylonitrile Acrolein Ethyl acrylate
Epoxides Ethylene oxide Diepoxybutane Epichlorohydrin

746 STORMWATER EFFECTS HANDBOOK
Propylene oxide Styrene oxide
Acylating Agents: β-Propiolactone Dimethylcarbamoyl chloride β-Butyrolactone
Organohalogen compounds: 1,2-Dibromo-3-chloropropane Vinyl chloride Chloroform Methyl iodide 2,4,6-Trichlorophenol Bis(2-chloroethyl)sulfide Carbon tetrachloride Hexachlorobenzene 1,4-Dichlorobenzene
Natural products: Adriamycin Bleomycin Progesterone Aflatoxins Reserpine Safrole
Inorganic compounds: Cisplatin
Aromatic amines: 4-Aminobiphenyl Aniline o-Anisidine Benzidine and derivatives 1,1-Bis(p-chlorophenyl)-2,2,2-trichloroethane (DDT) o-Toluidine
Other Extremely Hazardous Chemicals: Arsenic, organic arsenic, and derivatives Arsine and gaseous derivatives Asbestos Azathioprine Bromodeoxyuridine 1,4-Butanediol dimethylsulfonate (Myleran) N-Butyl-N-(4-hydroxybutyl)nitrosamine (OH-BBN) Chlorambucil Chloropicrin in gas mixtures Cyanogen Cyanogen chloride Cyclophosphamide Diborane Diisopropylfluorophosphate 9,10-Dimethyl-1,2-benzanthracene (DMBA) Erionite Germane Hexaethyltetraphosphate Hydrogen cyanide Hydrogen selenide Melphalan N-Methyl-N-benzylnitrosamine N-Methyl-N-nitrosourea

LABORATORY SAFETY, WASTE DISPOSAL, AND CHEMICAL ANALYSES METHODS 747
Mustard gas 2-Naphthylamine Nitric oxide Nitrogen dioxide Nitrogen tetroxide Parathion Phosgene Phosphine 2,3,7,8-Tetrachlorodibenzo-p-dioxin Thorium dioxide
Some examples of compounds normally classified as strong carcinogens include the following:
2-Acetylaminofluorene Benzo[a]pyrene 7,12-Dimethylbenz[a]anthracene Dimethylcarbamoyl chloride Hexamethylphosphoramide 3-Methylcholanthrene 2-Nitronaphthalene Propane sultone Various N-nitrosamides
The above substances (in both lists) must be used and stored in areas with restricted access. Special warning signs must be posted in these areas. Containers should be stored in chemical-resistant trays, and work must be performed within or above these trays. Cover surfaces where these substances are used with absorbent, plastic-backed paper. Performance-certified hood or other containment devices must be used when generation of toxic vapor, gases, dusts, or aerosols might occur.
Chemical Storage
The chemical storage area should be posted with an appropriate sign. Chemicals must be stored in appropriate containers and correctly labeled. Chemical compatibility must be determined to reduce the likelihood of hazardous reactions. The following steps should be followed when assessing chemical compatibility:
1. Identify the chemical 2. Determine the hazard class of the chemical: toxic, flammable, reactive, corrosive, oxidizer, low hazard. 3. Segregate the chemicals according to the above classifications. If there is a potential for hazardous
interactions within a specific class, further separation is warranted. Label the area for each class of chemical.
4. General rules for compatibility: a. Highly toxic or carcinogenic chemicals should be ordered and stored in the smallest practical
amount. b. Flammable or combustible liquids must be stored in approved containers, flammable material
storage cabinets, or in properly designed under-hood storage areas. No more than 10 gallons of flammable liquids may be stored outside an approved flammable material storage cabinet. No more than 60 gallons of flammable liquids may be stored in a laboratory.
c. Water-reactive chemicals should be located in a cool, dry area away from potential sources of water.
d. Corrosives should be separated into acid and base subclasses. Large containers of corrosives should be stored on the lowest shelf or in special cabinets. Acids and bases should be separated from active metals and substances that can generate toxic gases upon contact. NITRIC ACID MUST BE STORED SEPARATELY.
e. Oxidizers must be separated from combustible and flammable chemicals as well as reducing agents.
748 STORMWATER EFFECTS HANDBOOK
Compressed gas cylinders must be stored in well-ventilated areas where the temperature does not exceed 125°F. Cylinders must be stored in an upright position. Cylinders not in use should have the valve protection caps in place. Cylinders must be chained down to a fixed structure using the appropriate brackets and chains.
Never mix chemicals unless such mixing is part of a documented and approved procedure.
Transportation
1. All chemicals should be labeled before being transported. 2. When chemicals are hand-carried, they should be placed in an outside container or acid-carrying
bucket to protect against breakage and spillage. 3. When chemicals are transported by wheeled cart, the cart should be stable under the load and have
wheels large enough to negotiate uneven surfaces (such as expansion joints and floor drain depressions) without tipping or stopping suddenly. Incompatible chemicals should never be transported on the same cart.
4. Laboratory moves and transfers of large amounts of chemicals should be coordinated through the Hazardous Materials Facility.
5. Secondary containment should always be used to contain substances if there is a break in the primary container.
The following are conditions for chemical transport in elevators:
Chemicals should be labeled and carried in secure, break-resistant containers with tight-fitting caps. The packing systems supplied by manufacturers are excellent at preventing breakage during transport and may be reused for this purpose. The individual transporting the hazardous chemicals should operate the elevator alone, whenever possible.
The safe transport of small quantities of flammable liquids should include provisions that include the use of rugged, pressure-resistant, nonventing containers, storage during transport in a well-ventilated vehicle, and elimination of potential ignition sources.
If there is a spill or accident, contact the University Chemical Safety Director and state your name, telephone number, location of incident, name and quantity of material involved, and the extent of injuries, if any. Take all necessary emergency measures, such as removing contaminated clothing, washing any chemicals from the skin with soap and water, and seeking prompt medical attention. If it is necessary for the individual transporting the chemicals to leave the scene of an accident or spill, he/she should delegate someone to remain at the scene until emergency personnel arrive. The responsible party should return as soon as possible.
Cylinders that contain compressed gases are primarily shipping containers and should not be subjected to rough handling or abuse. Such misuse can seriously weaken the cylinder and render it unfit for further use or transform it into a missile with sufficient energy to propel it through masonry walls. To protect the valve during transport, the cover cap should be left screwed on hand-tight until the cylinder is in place and ready for actual use. The preferred transport method, even for short distances, is by suitable hand truck with the cylinder strapped into place. Only one cylinder should be handled at a time. After a cylinder has been relocated, straps, chains, or a suitable stand to keep it from falling must restrain it.
PROCEDURES FOR SPECIFIC CLASSES OF HAZARDOUS MATERIALS
This section will address the rules and procedures for handling chemicals that fall into one or more of five fundamental classes of laboratory chemicals: flammables, corrosives, oxidizers, reactives, and compressed gases.
LABORATORY SAFETY, WASTE DISPOSAL, AND CHEMICAL ANALYSES METHODS 749
Flammable Solvents
Flammable liquids are the most common chemicals found in a laboratory. The primary hazard associated with flammable liquids is their ability to readily ignite and burn. One should note that it is the vapor of a flammable liquid, not the liquid itself, which ignites and causes a fire.
The rate at which a liquid vaporizes is a function of its vapor pressure. In general, liquids with a high vapor pressure evaporate at a higher rate compared to liquids of lower vapor pressure. It should be noted that vapor pressure increases rapidly as the temperature rises, as does the evaporation rate. A reduced-pressure environment also accelerates the rate of evaporation.
The flash point of a liquid is the lowest temperature at which a liquid gives off a vapor at a rate sufficient to form an air–vapor mixture that will ignite, but will not sustain ignition. Many common flammable solvents have flash points significantly lower than room temperature.
The limits of flammability or explosivity define the range of fuel–air mixtures that will sustain combustion. The lower limit of this range is called the lower explosive limit (LEL), and the higher limit of this range is called the upper explosive limit (UEL). Materials with very broad flammability ranges are particularly treacherous due to the fact that virtually any fuel–air combination may form an explosive atmosphere.
The vapor density of a flammable material is the density of the corresponding vapor relative to air under specific temperature and pressure conditions. Flammable vapors with densities greater than one (and thus “heavier” than air) are potentially lethal because they will accumulate at floor level and flow with remarkable ease, in much the same manner that a liquid would. The obvious threat is that these mobile vapors may eventually reach an ignition source, such as an electrical outlet or a lit Bunsen burner.
Examples of Flammable Liquids
Acetone Ethyl ether Toluene Methyl formate
Use and Storage of Flammables
1. Flammable liquids that are not in active use must be stored in safe containers inside fire-resistant storage cabinets designed for flammables, or inside storage rooms.
2. Minimize the amount of flammable liquids stored in the lab. 3. Use flammables only in areas free of ignition sources. 4. Never heat flammables with an open flame. Instead, use steam baths, water baths, oil baths, hot
air baths, sand baths, or heating mantles. 5. Never store flammable chemicals in a standard household refrigerator. There are several ignition
sources located inside a standard refrigerator that can set off a fire or violent explosion. Flammables can only be stored cold in a lab safe or explosion-proof refrigerator. Another alternative is to use an ice bath to chill the chemicals. Remember, there is no safety benefit in storing a flammable chemical in a refrigerator if the flash point of that chemical is below the temperature of that refrigerator.
6. The transfer of material to or from a metal container is generally accompanied by an accumulation of static charge on the container. This fact must be kept in mind when transferring flammable liquids, since the discharge of this static charge could generate a spark, thereby igniting the liquid. To make these transfers safer, flammable liquid dispensing and receiving containers must be bonded together before pouring. Large containers such as drums must also be grounded when used as dispensing or receiving vessels. All grounding and bonding connections must be metal to metal.
750 STORMWATER EFFECTS HANDBOOK
Health Effects Associated with Flammables
In general, the vapors of many flammables are irritating to mucous membranes of the respiratory system and eyes, and in high concentrations are narcotic. The following symptoms are typical for the respective routes of entry:
Acute Health Effects: Inhalation — headache, fatigue, dizziness, drowsiness, narcosis (stupor and unresponsiveness) Ingestion — slight gastrointestinal irritation, dizziness, fatigue Skin Contact — dry, cracked, and chapped skin Eye Contact — stinging, watery eyes, inflammation of the eyelids
Chronic Health Effects: The chronic health effects will vary depending on the specific chemical, the duration of the expo
sure, and the extent of the exposure. However, damage to the lungs, liver, kidneys, heart, and/or central nervous system may occur. Cancer and reproductive effects are also possible.
Flammable Groups Exhibiting These Health Effects: Hydrocarbons — aliphatic hydrocarbons are narcotic but their systemic toxicity is relatively low.
Aromatic hydrocarbons are all potential narcotic agents, and overexposure to the vapors can lead to loss of muscular coordination, collapse, and unconsciousness. Benzene is toxic to bone marrow and can cause leukemia.
Alcohols — vapors are only moderately narcotic. Ethers — exhibit strong narcotic properties but for the most part are only moderately toxic. Esters — vapors may result in irritation to the eyes, nose, and upper respiratory tract. Ketones — systemic toxicity is generally not high.
First-Aid Procedures for Exposures to Flammable Materials
Inhalation Exposure — remove person from contaminated area if it is safe to do so. Get medical attention and do not leave person unattended.
Ingestion Exposures — remove the person, if possible, from source of contamination. Get medical attention.
Dermal Exposures — remove person from source of contamination. Remove clothing, jewelry, and shoes from the affected areas. Flush the affected areas with water for at least 15 min and obtain medical attention.
Eye Contact — remove person from source of contamination. Flush the eyes with water for at least 15 min. Obtain medical attention.
Personal Protective Equipment
Always use a fume hood while working with flammable liquids. Nitrile and neoprene gloves are effective against most flammables. Wear a nonflammable lab coat to provide a barrier to your skin, and goggles if splashing is likely to occur.
Oxidizers
Oxidizers or oxidizing agents present fire and explosion hazards on contact with combustible materials. Depending on the class, an oxidizing material may increase the burning rate of combustibles with which it comes in contact; cause the spontaneous ignition of combustibles with which it comes in contact; or undergo an explosive reaction when exposed to heat, shock, or friction. Oxidizers are generally corrosive.
LABORATORY SAFETY, WASTE DISPOSAL, AND CHEMICAL ANALYSES METHODS 751
Examples of Common Oxidizers
Peroxides Nitrites Nitrates Chlorates Perchlorates Chlorites Hypochlorites Dichromates
Use and Storage of Oxidizers
1. In general, store oxidizers away from flammables, organic compounds, and combustible materials. 2. Strong oxidizing agents like chromic acid should be stored in glass or some other inert container,
preferably unbreakable. Corks and rubber stoppers should not be used. 3. Reaction vessels containing appreciable amounts of oxidizing materials should never be heated in
oil baths, but rather on a heating mantle or sand bath.
Use and Storage of Perchloric Acid
1. Perchloric acid is an oxidizing agent of particular concern. The oxidizing power of perchloric acid increases as concentration and temperature increase. Cold, 70% perchloric acid is a strong, nonoxidizing corrosive. A 72% perchloric acid solution at elevated temperatures is a strong oxidizing agent. An 85% perchloric acid solution is a strong oxidizer at room temperature.
2. Do not attempt to heat perchloric acid if you do not have access to a properly functioning perchloric acid fume hood. Perchloric acid can only be heated in a hood specially equipped with a wash down system to remove any perchloric acid residue. The hood should be washed down after each use and it is preferred to dedicate the hood to perchloric acid use only.
3. Whenever possible, substitute a less hazardous chemical for perchloric acid. 4. Perchloric acid can be stored in a perchloric acid fume hood. Keep only the minimum amount
necessary for your work. Another acceptable storage site for perchloric acid is on a metal shelf or in a metal cabinet away from organic or flammable materials. A bottle of perchloric acid should also be stored in a glass secondary container to contain leakage.
5. Do not allow perchloric acid to come in contact with any strong dehydrating agents such as sulfuric acid. The dehydration of perchloric acid is a severe fire and explosion hazard.
6. Do not order or use anhydrous perchloric acid. It is unstable at room temperature and can decompose spontaneously with a severe explosion. Anhydrous perchloric acid will explode upon contact with wood.
Health Effects Associated with Oxidizers
Oxidizers are covered here primarily due to their potential to add to the severity of a fire or to initiate a fire. But there are some generalizations that can be made regarding the health hazards of an oxidizing material. In general, oxidizers are corrosive and many are highly toxic.
Acute Health Effects
Some oxidizers, such as nitric and sulfuric acid vapors, chlorine, and hydrogen peroxide, act as irritant gases. All irritant gases can cause inflammation in the surface layer of tissues when in direct contact. They can also cause irritation of the upper airways, conjunctiva, and throat.
Some oxidizers, such as fluorine, can cause severe burns of the skin and mucous membranes. Chlorine trifluoride is extremely toxic and can cause severe burns to tissue.

752 STORMWATER EFFECTS HANDBOOK
Nitrogen trioxide is very damaging to tissue, especially the respiratory tract. The symptoms from an exposure to nitrogen trioxide may be delayed for hours, but fatal pulmonary edema may result.
Osmium tetroxide, another oxidant commonly employed in the laboratory, is also dangerous due to its high degree of acute toxicity. It is a severe irritant of both the eyes and the respiratory tract. Inhalation can cause headache, coughing, dizziness, lung damage, difficulty breathing, and may be fatal.
Chronic Health Effects
Nitrobenzene and chromium compounds can cause hematological and neurological changes. Compounds of chromium and manganese can cause liver and kidney disease. Chromium (VI) compounds have been associated with lung cancer.
First Aid for Oxidizers
In general, if a person has inhaled, ingested, or come into direct contact with these materials, the person must be removed from the source of contamination as quickly as possible when it is safe to do so. Medical help must be summoned. In the case of an exposure directly to the skin or eyes, it is imperative that the exposed person be taken to an emergency shower or eyewash immediately. Flush the affected areas for a minimum of 15 minutes and then get medical attention.
Personal Protective Equipment
1. In many cases, the glove of choice will be neoprene, polyvinyl chloride (PVC), or nitrile. Be sure to consult a glove compatibility chart to ensure that the glove material is appropriate for the particular chemical you are working with.
2. Goggles must be worn if the potential for splashing exists or if exposure to vapor or gas is likely. 3. Always use these materials in a chemical fume hood as most pose a hazard via inhalation.
Corrosives
General Characteristics
1. Corrosives are most commonly acids or alkalis, but many other materials can be severely damaging to living tissue.
2. Corrosives can cause visible destruction or irreversible alterations at the site of contact. Inhalation of the vapor or mist can cause severe bronchial irritation. Corrosives are particularly damaging to the skin and eyes.
3. Certain substances considered noncorrosive in their natural dry state are corrosive when wet, such as when in contact with moist skin or mucous membranes. Examples of these materials are lithium chloride, halogen fluorides, and allyl iodide.
4. Sulfuric acid is a very strong dehydrating agent and nitric acid is a strong oxidizing agent. Dehydrating agents can cause severe burns to the eyes due to their affinity for water.
Examples of Corrosives
Sulfuric acid Chromic acid Stannic chloride Ammonium bifluoride Bromine Ammonium hydroxide

LABORATORY SAFETY, WASTE DISPOSAL, AND CHEMICAL ANALYSES METHODS 753
Use and Storage of Corrosives
1. Always store acids separately from bases. Also, store acids in acid storage cabinets away from flammables since many acids are also strong oxidizers.
2. Do not work with corrosives unless an emergency shower and continuous flow eyewash are available.
3. Add acid to water, but never water to acid. This is to prevent splashing from the acid due to the generation of excessive heat as the two substances mix.
4. Never store corrosives above eye level. Store on a low shelf or cabinet. 5. It is a good practice to store corrosives in a tray or bucket to contain any leakage. 6. When possible, purchase corrosives in containers that are coated with a protective plastic film that
will minimize the danger to personnel if the container is dropped. 7. Store corrosives in a wood cabinet or one that has a corrosion-resistant lining. Corrosives
stored in an ordinary metal cabinet will quickly damage it. If the supports that hold up the shelves become corroded, the result could be serious. Acids should be stored in acid storage cabinets specially designed to hold them, and nitric acid should be stored in a separate cabinet or compartment.
Use and Storage of Hydrofluoric Acid
1. Hydrofluoric acid is extremely hazardous. Hydrofluoric acid can cause severe burns, and inhalation of anhydrous hydrogen fluoride can be fatal.
2. Initial skin contact with hydrofluoric acid may not produce any symptoms. 3. Only persons fully trained in the hazards of hydrofluoric acid should use it. 4. Always use hydrofluoric acid in a properly functioning fume hood. Be sure to wear personal
protective clothing. 5. If you suspect that you have come in direct contact with hydrofluoric acid: wash the area with
water for at least 15 minutes, remove clothing, and then promptly seek medical attention. If hydrogen fluoride vapors are inhaled, move the person immediately to an uncontaminated atmosphere (if safe to do so), keep the person warm, and seek prompt medical attention.
6. NEVER STORE HYDROFLUORIC ACID IN A GLASS CONTAINER BECAUSE IT IS INCOMPATIBLE WITH GLASS.
7. Store hydrofluoric acid separately in an acid storage cabinet and keep only the amount necessary in the lab.
8. Creams for treatment of hydrofluoric acid exposure are commercially available and should be kept on site.
Health Effects Associated with Corrosives
All corrosives are severely damaging to living tissues and also attack other materials, such as metal.
Skin contact with alkali metal hydroxides, e.g., sodium hydroxide and potassium hydroxide, is more dangerous than with strong acids. Contact with alkali metal hydroxides normally causes deeper tissue damage because there is less pain than with an acid exposure. The exposed person may not wash it off thoroughly enough or seek prompt medical attention.
All hydrogen halides are acids that are serious respiratory irritants and also cause severe burns. Hydrofluoric acid is particularly dangerous. At low concentrations, hydrofluoric acids do not immediately show any signs or symptoms upon contact with skin. It may take several hours for the hydrofluoric acid to penetrate the skin before you would notice a burning sensation. However, by this time permanent damage, such as second and third degree burns with scarring, can result.

754 STORMWATER EFFECTS HANDBOOK
Acute Health Effects
Inhalation — irritation of mucous membranes, difficulty in breathing, fits of coughing, pulmonary edema Ingestion — irritation and burning sensation of lips, mouth, and throat; pain in swallowing; swelling
of the throat; painful abdominal cramps; vomiting; shock; risk of perforation of stomach Skin Contact — burning, redness and swelling, painful blisters, profound damage to tissues; and with
alkalis, a slippery, soapy feeling Eye Contact — stinging, watery eyes, swelling of eyelids, intense pain, ulceration of eyes, loss of eyes
or eyesight
Chronic Health Effects
Symptoms associated with a chronic exposure vary greatly depending on the chemical. The chronic effect of hydrochloric acid is damage to the teeth; the chronic effects of hydrofluoric acid are decreased bone density, fluorosis, and anemia; the chronic effects of sodium hydroxide are unknown.
First Aid for Corrosives
Inhalation — remove person from source of contamination if safe to do so. Get medical attention. Keep person warm and quiet and do not leave unattended.
Ingestion — remove person from source of contamination if safe to do so. Get medical attention and inform emergency responders of the name of the chemical swallowed.
Skin Contact — remove person from source of contamination if safe to do so and take immediately to an emergency shower or source of water. Remove clothing, shoes, socks, and jewelry from affected areas as quickly as possible, cutting them off if necessary. Be careful to not get any chemical on your skin or to inhale the vapors. Flush the affected area with water for a minimum of 15 minutes. Get medical attention.
Eye Contact — remove person from source of contamination if safe to do so and take immediately to an eyewash or source of water. Rinse the eyes for a minimum of 15 minutes. Have the person look up and down and from side to side. Get medical attention. Do not let the person rub the eyes or keep them tightly shut.
Personal Protective Equipment
Always wear proper gloves when working with acids. Neoprene and nitrile gloves are effective against most acids and bases. Polyvinyl chloride (PVC) is also effective for most acids. A rubbercoated apron and goggles should also be worn. If splashing is likely to occur, wear a face shield over the gloves. Always use corrosives in a chemical fume hood.
Reactives
General Characteristics
Polymerization Reactions
Polymerization is a chemical reaction in which two or more molecules of a substance combine to form repeating structural units of the original molecule. This can result in an extremely high or uncontrolled release of heat. An example of a chemical that can undergo a polymerization reaction is styrene.
LABORATORY SAFETY, WASTE DISPOSAL, AND CHEMICAL ANALYSES METHODS 755
Water-Reactive Molecules
When water-reactive materials come in contact with water, one or more of the following can occur:
• Liberation of heat, which may cause ignition of the chemical itself if it is flammable, or ignition of flammables that are stored nearby
• Release of a flammable, toxic, or strong oxidizing gas; release of metal oxide fumes • Formation of corrosive acids
Water-reactive chemicals can be particularly hazardous to firefighting personnel responding to a fire in a lab, because water is the most commonly used fire-extinguishing medium. Examples of water-reactive materials:
Alkali metals: lithium, sodium, potassium Magnesium Silanes Alkylaluminums Zinc Aluminum
Pyrophoric material can ignite spontaneously in the presence of air. Examples of pyrophoric materials:
Diethylzinc Triethylaluminum Many organometallic compounds
Peroxide-Forming Materials
Peroxides are very unstable and some chemicals that can form them are commonly used in laboratories. This makes peroxide-forming materials some of the most hazardous substances found in a lab. Peroxide-forming materials are chemicals that react with air, moisture, or impurities to form peroxides. The tendency to form peroxides by most of these materials is greatly increased by evaporation or distillation. Organic peroxides are extremely sensitive to shock, sparks, heat, friction, impact, and light. Many peroxides formed from materials used in laboratories are more shock sensitive than TNT. Just the friction from unscrewing the cap of a container of ether that has peroxides in it can provide enough energy to cause a severe explosion.
Examples of peroxide-forming materials:
Diisopropyl ether Sodium amide Dioxane Tetrahydrofuran Butadiene Acrylonitrile Divinylacetylene Potassium amide Diethyl ether Vinyl ethers Vinylpyridine Styrene

756 STORMWATER EFFECTS HANDBOOK
Other Shock-Sensitive Materials
These materials are explosive and sensitive to heat and shock. Examples of shock-sensitive materials:
Chemicals containing nitro groups Fulminates Hydrogen peroxide (30+%) Ammonium perchlorate Benzoyl peroxide (when dry) Compounds containing the functional groups: acetylide, azide, diazo, halamine, nitroso, and ozonide
Use and Storage of Reactives
1. A good way to reduce the potential risks is to minimize the amount of material used in the experiment. Use only the amount of material necessary to achieve the desired results.
2. Always substitute a less hazardous chemical for a highly reactive chemical whenever possible. If it is necessary to use a highly reactive chemical, order only the amount that is necessary for the work.
3. Store water-reactive materials in an isolated part of the lab. A cabinet far removed from any water sources, such as sinks, emergency showers, and chillers, is an appropriate location. Clearly label the cabinet “Water-Reactive Chemicals — No Water.”
4. Store pyrophorics in an isolated part of the lab and in clearly marked cabinets. Be sure to routinely check the integrity of the container and dispose of materials in corroded or damaged containers.
5. Do not open the chemical container if peroxide formation is suspected. The act of opening the container could be sufficient to cause a severe explosion. Visually inspect liquid peroxide-forming materials for crystals or unusual viscosity before opening. Pay special attention to the area around the cap. Peroxides usually form upon evaporation, so they will most likely be formed on the threads under the cap.
6. Date all peroxide-forming materials with the date received and the expected shelf life. Chemicals such as diisopropyl ether, divinyl acetylene, sodium amide, and vinylidene chloride should be discarded after 3 months. Chemicals such as dioxane, diethyl ether, and tetrahydrofuran should be discarded after 1 year.
7. Store all peroxide-forming chemicals away from heat, sunlight, and sources of ignition. Sunlight accelerates the formation of peroxides.
8. Secure the lids and caps on these containers to discourage the evaporation and concentration of these chemicals.
9. Never store peroxide-forming chemicals in glass containers with screw cap lids or glass stoppers. Friction and grinding must be avoided. Also, never store these chemicals in a clear glass bottle where they would be exposed to light.
10. Contamination of an ether by peroxides or hydroperoxides can be detected simply by mixing the ether with 10% (w/w) aqueous potassium iodide solution — a yellow color change due to oxidation of iodide to iodine confirms the presence of peroxides. Small amounts of peroxides can be removed from contaminated ethers via distillation from lithium aluminum hydride (LiAlH4), which both reduces the peroxide and removes contaminating water and alcohols. However, if you suspect that peroxides may be present, it is wise to dispose of the material. If you notice crystal formation in the container or around the cap, do not attempt to open or move the container.
11. Never distill an ether unless it is known to be free of peroxides. 12. Store shock-sensitive materials separately from other chemicals and in a clearly labeled cabinet. 13. Never allow picric acid to dry out, as it is extremely explosive. Always store picric acid in a wetted state.
Health Hazards Associated with Reactives
Reactive chemicals are grouped as a category primarily because of the safety hazards associated with their use and storage and not because of similar acute or chronic health effects. For health hazard information on specific reactive materials, consult the MSDS or the manufacturer. However,
LABORATORY SAFETY, WASTE DISPOSAL, AND CHEMICAL ANALYSES METHODS 757
there are some hazards common to the use of reactive materials. Injuries can occur due to heat or flames, inhalation of fumes, vapors and reaction products, and flying debris.
First Aid for Reactives
If someone is seriously injured, the most important step is to contact emergency responders as quickly as possible. Explain the situation and describe the location clearly and accurately.
If someone is bleeding severely, apply a sterile dressing, clean cloth, or handkerchief to the wound. Then put protective gloves on and place the palm of your hand directly over the wound and apply pressure and keep the person calm. Continue to apply pressure until help arrives.
If a person’s clothes are on fire, he or she should drop immediately to the floor and roll. If a fire blanket is available, put it over the individual. An emergency shower, if one is immediately available, can also be used to douse the flames.
If a person goes into shock, have the individual lie down on his/her back, if safe to do so, and raise the feet about 1 ft above the floor.
Personal Protective Equipment
Wear appropriate personal protective clothing while working with highly reactive materials. This might include impact-resistant safety glasses or goggles, a face shield, gloves, a lab coat (to minimize injuries from flying glass or an explosive flash), and a shield. Conduct work within a chemical fume hood as much as possible and pull down the sash as far as is practical. When the experiment does not require you to reach into the fume hood, keep the sash closed.
Barriers can offer protection of personnel against explosion and should be used. Many safety catalogs offer commercial shields that are commonly polycarbonate and are weighted at the bottom for stability. It may be necessary to secure the shields firmly to the work surface.
Compressed Gas Cylinders
Cylinders of compressed gas can pose a chemical as well as a physical hazard. If the valve were to break off a cylinder, the amount of force present could propel the cylinder through a block wall. For example, a small cylinder of compressed breathing air used by SCUBA divers has the explosive force of 1.5 lb of TNT.
Use and Storage of Compressed Gas Cylinders
1. Whenever possible, use flammable and reactive gases in a fume hood or other well-ventilated enclosure. Certain categories of toxic gases must always be stored and used in well-ventilated enclosures.
2. Always use the appropriate regulator on a cylinder. If a regulator will not fit a cylinder’s valve, do not attempt to adapt or modify it to fit a cylinder it was not designed for. Regulators are designed to fit only specific cylinders to avoid improper use.
3. Inspect regulators, pressure-relief valves, cylinder connections, and hose lines frequently for damage.
4. Never use a cylinder that cannot be positively identified. Color-coding is not a reliable way to identify cylinders since the color can vary from supplier to supplier.
5. Do not use oil or grease on any cylinder component of an oxidizing gas because a fire or explosion can result.
6. Never transfer gases from one cylinder to another. The gas may be incompatible with the residual gas remaining in the cylinder or may be incompatible with the cylinder material.
7. Never completely empty cylinders during lab operations; rather, leave approximately 25 PSI of pressure. This will prevent any residual gas in the cylinder from becoming contaminated.

758 STORMWATER EFFECTS HANDBOOK
8. Place all cylinders so the main valve is accessible. 9. Close the main cylinder valve whenever the cylinder is not in use.
10. Remove regulators from unused cylinder and always put the safety cap in place to protect the valve. 11. Always secure cylinder, whether empty or full, to prevent it from falling over and damaging the
valve (or falling on your foot). Secure cylinders by chaining or strapping them to a wall, lab bench, or other fixed support.
12. Oxygen should be stored in an area that is at least 20 feet away from any flammable or combustible materials or separated from them by a noncombustible barrier at least 5 ft high and having a fireresistant rating of at least 1/2 hour.
13. To transport a cylinder, put on the safety cap and strap the cylinder to a hand truck in an upright position. Never roll a cylinder.
14. Always clearly mark empty cylinders and store them separately (using chalk to write “MT” on a cylinder in big letters is satisfactory for noting an empty cylinder).
15. Open cylinder valves slowly. 16. Only compatible gases should be stored together in a gas cylinder cabinet. 17. Flammable gases must be stored in properly labeled, secured areas away from possible ignition
sources and kept separate from oxidizing gases. 18. Do not store compressed gas cylinders in areas where the temperature can exceed 125°F.
EMERGENCY PROCEDURES
All accidents, hazardous materials spills, or other dangerous incidents should be reported. A list of telephone numbers must be posted on the door to each laboratory (and must be kept up to date). Telephone numbers shall also be posted beside every telephone in the laboratories. The list of telephone numbers must include 24-hour numbers for the following personnel:
Laboratory Supervisor Principal Investigator(s) Emergency Medical Services Police Department Maintenance Chemical Response Unit
Callers should explain any emergency situation clearly, calmly, and in detail.
Primary Emergency Procedures for Fires, Spills, and Accidents
1. In the event of a fire, pull the nearest fire alarm. If you are in the laboratory and a fire alarm sounds, quickly secure your work (cap bottles, etc.) so that it is not dangerous to a passer-by, lock the laboratory, and evacuate the building per the fire evacuation instructions. If the emergency is not in the laboratory where you are located, the last person to leave should turn off the lights.
2. If you are unable to control or extinguish a fire, follow the building evacuation procedure. 3. Attend to any person who may have been contaminated and/or injured if it is safe to reach them. 4. Use safety showers and eye washes as appropriate. In the case of eye contact, promptly flush eyes
with water for a minimum of 15 minutes and seek immediate medical attention. For ingestion cases, contact the Poison Control Center at 1-800-POISON1. In the case of skin contact, promptly flush the affected area with water and remove any contaminated clothing or jewelry. If symptoms persist after washing, seek medical attention.
5. Notify persons in the immediate area about the spill, evacuating all nonessential personnel from the spill area and adjoining areas that may be impacted by vapors or a potential fire.
6. If the spilled material is flammable, turn off all potential ignition sources. Avoid breathing vapors of the spilled materials. Be aware that some materials either have no odor or create olfactory fatigue, so that you stop smelling the odor very quickly.

LABORATORY SAFETY, WASTE DISPOSAL, AND CHEMICAL ANALYSES METHODS 759
7. Leave on or establish exhaust ventilation if it is safe to do so. Close doors to slow the spread of odors.
8. Notify the appropriate authorities (Laboratory Supervisor, Principal Investigator, Chemical Health and Safety) about the spill and the required documentation.
9. IF THERE IS AN IMMEDIATE THREAT TO LIFE OR HEALTH, call Emergency Services at 911.
Building Evacuation Procedures
1. Building evacuation may be necessary if there is a chemical release, fire, explosion, natural disaster, or medical emergency.
2. Be aware of the marked exits from your area and building. 3. To activate the building alarm system, pull the handle on one of the red boxes located in the
hallway. 4. Call the appropriate authorities. 5. Walk quickly to the nearest marked exit and ask others to do the same. 6. Outside, proceed to a clear reassembly area that is at least 150 ft from the affected building and
that does not interfere with the work of emergency personnel. 7. DO NOT RETURN TO THE BUILDING UNTIL YOU ARE TOLD THAT IT IS SAFE TO DO SO.
Minor Spills
1. Trained personnel should use the spill control kit appropriate to the material spilled to clean up the spill.
2. If the spill is minor and of known limited danger, clean it up immediately. Determine the appropriate cleaning method by referring to the material’s MSDS. During cleanup, wear the appropriate protective gear.
3. Cover liquid spills with compatible adsorbent material such as spill pillows or a kitty litter/ vermiculite mix, if it is compatible. If appropriate materials are available, corrosives should be neutralized prior to adsorption. Clean spills from the outer area first, cleaning toward the center.
4. Place the spilled material into an appropriate impervious container and seal. Schedule its disposal. 5. If appropriate, wash the affected surface with soap and water. Mop up the residues and place them
in an appropriate container for disposal. 6. If the spilled material is not water soluble, a solvent such as xylene may be necessary to clean the
surface(s). Check the solubility of the spilled material in various solvents and use the least toxic effective solvent available. Wear appropriate personal protective equipment.
7. Notify the Laboratory Supervisor about the need to replace the used items from the spill control kit.
Mercury Spills
Mercury is commonly used in many technical procedures. When contained properly, it is of little threat to our health. Immediate attention to mercury spills is important because spilled mercury can accumulate over time, resulting in exposure to mercury vapor.
When a spill occurs, use the following procedure:
1. Restrict the area. Allow no one to enter the room except for trained personnel to help with containment of the spill.
2. Contact the Chemical Safety Director. 3. Broken thermometers that contain small amounts of mercury may be safely collected by trained
laboratory personnel in a container that can be sealed. Always wear disposable gloves when cleaning up mercury and dispose of all mercury and mercury contaminated waste through the chemical waste program. Anyone handling mercury or cleaning up mercury spills should wash hands thoroughly using soap and water when finished. Report all mercury spills to the Chemical Safety Director.
760 STORMWATER EFFECTS HANDBOOK
CHEMICAL WASTE DISPOSAL PROGRAM
Chemical Waste Containers
Containers used for the accumulation of hazardous waste must be in good condition, free of leaks and compatible with the waste being stored in them. A waste accumulation container should be opened only when it is necessary to add waste, and should otherwise be capped. Hazardous waste must not be placed in unwashed containers that previously held incompatible materials.
If a hazardous waste container is not in good condition (i.e., it leaks), either transfer the waste from the bad container into a good container, pack the container in a larger and nonleaking container, or manage the waste in some other way that prevents the potential for a release of contamination.
A storage container holding a hazardous waste that is incompatible with any waste or other materials stored nearby in other containers must be separated from the other materials or protected from them by means of a wall, partition, or other secondary containment device.
Guidelines for Waste Containers
• Must be marked with the words “waste” or “spent” and its contents indicated. NO container should be marked with the words “hazardous” or “nonhazardous.” Paint over or remove old labels from waste containers.
• Must be kept at or near (immediate vicinity) the site of generation and under control of the generator.
• Must be compatible with the contents (i.e., acid should not be stored in metal cans). • Must be closed at all times except when actively receiving waste. • Must be properly identified before disposal. • Must be safe to transport with nonleaking screw-on caps. • Must be filled to a safe level (not beyond the bottom of the neck of the container or a 2-in headspace
for a 55-gallon drum).
NOTE: Do not use RED BAGS or SHARPS CONTAINERS (Biohazard) for hazardous waste collection.
Labeling Containers
Before chemicals can be disposed of, a waste tag is required. It should be filled out by the waste generator and attached to each container. The information on the tag is used to categorize and treat the waste. A manifest is also required. Fill out all paperwork legibly, accurately, and completely.
Waste Minimization
Avoid purchasing and using large quantities when it is not necessary. Implement microscale techniques whenever possible.
Flammable Organic Solvents
Collection for Reuse
Many flammable organics can be reused for fuel unless they are extremely toxic or give off toxic products of combustion. Do not combine any other chemicals with the flammable organic solvents listed below. Halogenated solvents (solvents containing chlorine, fluorine, or bromine), acutely toxic flammables, acids, bases, heavy metals, oxidizers, and pesticides should be collected
LABORATORY SAFETY, WASTE DISPOSAL, AND CHEMICAL ANALYSES METHODS 761
in separate containers. The following is a list of the most frequently encountered compounds that are suitable for heat recovery:
Acetone Methyl alcohol 2-Butanol Methyl cellosolve Butyl alcohol Pentane Cyclohexane Petroleum ether Diethyl ether 2-Propanol Ethyl acetate Sec-butyl alcohol Ethyl alcohol Tert-butyl alcohol Heptane Tetrahydrofuran Hexane Xylene
Disposal of Chemicals down the Sink or Sanitary Sewer System
Very few chemical wastes produced in laboratories are acceptable for disposal down the sink or sanitary sewer system. The local Sewer Use/Pretreatment Ordinance establishes uniform requirements for all users of the wastewater treatment system. Many chemicals can interfere with the proper function of the treatment facility and can render them unable to comply with state and federal regulations under the Clean Water Act of 1977.
Generators of laboratory waste are advised to exercise caution with respect to sink disposal of chemical wastes. In general, small-scale research activities (100 mL or less) of certain types of water-soluble, nontoxic, and nonflammable chemicals may be poured if they have been approved by the Chemical Safety Director. It is recommended that such materials be disposed of through the Department of Occupational Health and Safety, even in small quantities.
Chemical Substitution
Whenever possible, it is desirable to substitute nonhazardous, biodegradable chemicals for hazardous chemicals. Use of these chemicals will reduce the volume of hazardous waste generated. Examples of acceptable substitutes include:
1. Citric acid-based cleaning solutions for xylene-, benzene-, and toluene-containing cleaning solutions. 2. Nonhalogenated solvents in parts washers or other solvent processes. 3. Detergent and enzymatic cleaners can be substituted for sulfuric acid/potassium dichromate
(chromerge) cleaning solutions and ethanol/potassium hydroxide cleaning solutions.
Neutralization and Deactivation
Certain hazardous chemical wastes can be rendered nonhazardous by specific neutralization or deactivation laboratory procedures. Contact the Chemical Safety Officer to see if the waste you generate is suitable for neutralization.
Elimination of Nonhazardous Waste from Hazardous Waste
The following items are not considered to be hazardous. They should be collected in disposable containers or plastic bags, clearly labeled as nonhazardous waste, and put in the wastebasket. All compounds identified by the two letter code “NH” are nonhazardous and should not be disposed of via the chemical waste program unless they are components of a mixture with hazardous materials or are suitable for chemical recycling.

762 STORMWATER EFFECTS HANDBOOK
Nonhazardous Waste
Organic Chemicals
Acetates: calcium (Ca), sodium (Na), ammonium (NH4), and potassium (K) Amino acids and their salts Citric acid and salts of sodium (Na), potassium (K), magnesium (Mg), calcium (Ca), and ammonium (NH4) Lactic acid and salts of sodium (Na), potassium (K), magnesium (Mg), calcium (Ca), and ammonium (NH4) Sugars: glucose, lactose, fructose, sucrose, maltose
Inorganic Chemicals
Bicarbonates: sodium (Na), potassium (K) Borates: sodium (Na), potassium (K), magnesium (Mg), calcium (Ca) Bromides: sodium (Na), potassium (K) Carbonates: sodium (Na), potassium (K), magnesium (Mg), calcium (Ca) Chlorides: sodium (Na), potassium (K), magnesium (Mg), calcium (Ca) Fluorides: calcium (Ca) Iodides: sodium (Na), potassium (K) Oxides: boron (B), magnesium (Mg), calcium (Ca), aluminum (Al), silicon (Si), iron (Fe) Phosphates: sodium (Na), potassium (K), magnesium (Mg), calcium (Ca), ammonium (NH4) Silicates: sodium (Na), potassium (K), magnesium (Mg), and calcium (Ca) Sulfates: sodium (Na), potassium (K), magnesium (Mg), calcium (Ca), ammonium (NH4)
Laboratory Materials
Chromatographic adsorbents Filter paper without hazardous chemical residue Non-contaminated glassware Rubber gloves
Waste Disposal
All laboratories are required to comply with federal and state regulations regarding the packing, labeling, and transport of hazardous materials. Before contacting the Hazardous Materials Facility for waste removal, the following procedures must be completed. Improperly packed or labeled waste cannot be removed.
Step One: Packing the Waste
Containers
Collect each chemical waste in a separate screw-top container. Do not mix wastes. Use the smallest container size to match the amount of chemical waste generated. The container the chemical was originally shipped in is an ideal waste collection container, if it is an appropriate size. All waste containers must be tightly capped. Each container must be labeled as to chemical content. For mixtures, give approximate percentages of each chemical compound. Milk jugs are not acceptable for chemical storage. If using a container that originally contained another chemical, completely remove the original label prior to relabeling. Completely fill chemical waste collection containers.
Shock-Sensitive and Water-Reactive Compounds and Lecture Bottles
Shock-sensitive and water-reactive compounds and lecture bottles require special handling. These materials should always be packed separately from other chemicals.
LABORATORY SAFETY, WASTE DISPOSAL, AND CHEMICAL ANALYSES METHODS 763
Packing Filled Containers in Boxes
Chemicals that have the potential to react with each other should not be packed in the same box. Determine the packing hazard class for each chemical waste. When determining the class for
a mixture of chemicals, reactivity has priority over toxicity. If you have difficulty determining the packing class of a mixture, call the Hazardous Materials Manager.
Segregate the wastes according to the hazard class and pack them into cardboard boxes. Do not pack different classes in the same box. Place dividers and shock absorbing materials (newspapers, vermiculite) between the containers.
Step Two: Completing the Manifest
The label for the chemical waste is called a packing manifest. A manifest must be completed and attached to each box. Laboratory personnel should complete the manifest following the directions below:
1. Laboratory Information: Fill in the generator’s name (i.e., principal investigator, lab director), telephone number, department, building, room number, and the date.
2. Waste Information: The contents of each container must be identified on the manifest. Nonspecified chemical waste items are extremely difficult for hazardous materials personnel to handle. Good laboratory record keeping and labeling of all chemicals and chemical wastes prevents unknown waste items. Any chemical material that is potentially recyclable should not be contaminated with other chemicals for disposal. Where appropriate, note on the manifest if material is unopened.
3. The generator should check the information on the manifest, sign his or her name, and attach it to the corresponding box.
Step Three: Chemical Waste Removal
Attach one copy to the box and retain a copy for laboratory records. Specify where the waste is to be picked up. If your waste is not picked up in a reasonable period of time, call to inquire. Any incomplete or improperly completed manifest will be returned to the generator with an explanation for its return.
MATERIAL SAFETY DATA SHEETS (MSDS)
Since Material Safety Data Sheets (MSDS) are centrally related to the safe handling of hazardous substances, it is imperative that laboratory workers have easy access to them. There are three basic means of obtaining an MSDS:
Chemical manufacturer Chemical supplier Internet, such as through the UAB Department of Occupational Health and Safety webpage at:
http://www.healthsafe.uab.edu
In general, the preferred source for the MSDS is the chemical manufacturer, primarily because these files are actively updated to accurately reflect all that is known about the hazardous material in question.
MSDSs are the cornerstone of chemical hazard communication. They provide most of the information you should know to work with chemicals safely. The following sections describe the information normally contained in an MSDS:

764 STORMWATER EFFECTS HANDBOOK
Product Name and Identification
Name of the chemical as it appears on the label Manufacturer’s name and address Emergency telephone numbers for obtaining further information about a chemical in the event of an
emergency Chemical name or synonym C.A.S. # — the Chemical Abstract Service Registry number, which identifies the chemical Date of preparation of the MSDS
Hazardous Ingredients/Identity Information
Hazardous Ingredients
Substances which, in sufficient concentration, can produce physical or acute or chronic health hazards to persons exposed to the product. Physical hazards include fire, explosion, corrosion, and projectiles. Health hazards include any health effect, even irritation or development of allergies.
Threshold Limit Value (TLV)
A TLV is the highest airborne concentration of a substance to which nearly all adults can be repeatedly exposed, day after day, without experiencing adverse effects. These are usually based on an 8-hour time-weighted average.
Permissible Exposure Limit (PEL)
The PEL is an exposure limit established by OSHA.
Short-Term Exposure Limit (STEL)
The STEL is a 15-min time-weighted average exposure which should not be exceeded at any time during a workday. A STEL exposure should not occur more than four times per day, and there should be at least 60 min between exposures.
Lethal Dose 50 (LD50)
Lethal single dose (usually oral) in mg/kg (milligrams of chemical per kilogram of animal body weight) of a chemical that results in the death of 50% of a test animal population.
Lethal Concentration 50 (LC50)
Concentration dose expressed in ppm for gases or micrograms per liter of air for dusts or mists that results in the death of 50% of a test animal population administered in one exposure.
Physical/Chemical Characteristics
Boiling point, vapor pressure, vapor density, specific gravity, melting point, appearance, and odor are given in this section and all provide useful information about the chemical. Boiling point and vapor pressure provide a good indication of the volatility of the material. Vapor density indicates whether vapors will sink, rise, or disperse throughout the area. The farther the values are from 1 (the value assigned to atmospheric air), the faster the vapors will sink or rise.

LABORATORY SAFETY, WASTE DISPOSAL, AND CHEMICAL ANALYSES METHODS 765
Fire and Explosion Hazard Data
Flashpoint — refers to the lowest temperature at which a liquid gives off enough vapor to form an ignitable mixture with air.
Flammable or Explosive Limits — the range of concentrations over which a flammable vapor mixed with air will flash or explode if an ignition source is present.
Extinguishing Media — the fire-fighting substance that is suitable for use on the substance which is burning.
Unusual Fire and Explosive Hazards — hazards that might occur as the result of overheating or burning of the specific material.
Reactivity Data
Stability — indicates whether the material is stable or unstable under normal conditions of storage, handling, and use.
Incompatibility — lists any materials that would, upon contact with the chemical, cause the release of large amounts of energy, flammable gas or vapor, or toxic vapor or gas.
Hazardous Decomposition Products — any materials that may be produced in dangerous amounts if the specific material is exposed to burning, oxidation, heating, or allowed to react with other chemicals.
Hazardous Polymerization — a reaction with an extremely high or uncontrolled release of energy, caused by the material reacting with itself.
Health Hazard Data
Routes of Entry
Inhalation — breathing in of a gas, vapor, fume, mist, or dust.
Skin Absorption — a possible significant contribution to overall chemical exposure by way of absorption through the skin, mucous membranes, and eyes by direct or airborne contact.
Ingestion — the taking up of the substance through the mouth.
Injection — having the material penetrate the skin through a cut or by mechanical means.
Health Hazards (Acute and Chronic)
Acute — an adverse effect with symptoms developing rapidly
Chronic — an adverse effect that can be the same as an acute effect, except that the symptoms develop slowly over a long period of time or with recurrent exposures.
Carcinogen
A substance that is determined to be cancer producing or potentially cancer producing.

766 STORMWATER EFFECTS HANDBOOK
Signs and Symptoms of Overexposure
The most common symptoms or sensations a person could expect to experience from overexposure to a specific material. It is important to remember that only some symptoms will occur with exposures in most people.
Emergency and First-Aid Procedures
Instructions for treatment of a victim of acute inhalation, ingestion, and skin or eye contact with a specific hazardous substance. The victim should be examined by a physician as soon as possible.
Specific HACH MSDS Information
This information is presented here because of the large number of specialized HACH Co. reagents and procedures used in environmental laboratories. HACH MSDSs describe the hazards of their chemical products. Each of their MSDSs has 10 sections.
Header Information
Typically provides the vendor name, company address and telephone number, emergency telephone numbers, vendor’s catalog number, date of the MSDS, and version of the MSDS.
Product Information
Product name Chemical Abstract Services (CAS) number Chemical name Chemical formula, where appropriate Chemical family to which the material belongs
Ingredients (lists all components)
PCT: Percent by weight of each component in product (unless trade secret) CAS NO: Chemical Abstract Services (CAS) registry number for component SARA: If component is listed in SARA 313 and more is used than amount listed, must notify EPA. TLV: Threshold Limit Value. Maximum airborne concentration for 8-hour exposure that is recom
mended by the American Conference for Governmental Industrial Hygienists (ACGIH). PEL: Permissible Exposure Limit. Maximum airborne concentration for 8-hour exposure that
is regulated by the Occupational Health and Safety Administration (OSHA). HAZARD: Physical and health hazards of component explained.
Physical Data
Physical state, color, odor, solubility, boiling point, melting point, specific gravity, pH, vapor density, evaporation rate, corrosivity, stability, and storage precautions.
Fire, Explosion Hazard, and Reactivity Data
Flashpoint: Temperature at which liquid will give off enough vapor to ignite. Used to define flammability and ignitability
Lower Flammable Limit (LFL or LEL): Lowest concentration that will produce flash or fire when ignition source is present
LABORATORY SAFETY, WASTE DISPOSAL, AND CHEMICAL ANALYSES METHODS 767
Upper Flammable Limit (UFL or UEL): Vapor concentration in air above which the vapor concentration is too great to burn
NFPA Codes: The National Fire Protection Association (NFPA) has a system to rate the degree of hazard presented by a chemical. Codes usually found in colored diamond and range from 0 (minimal hazard) to 4 (extreme hazard). They are grouped into the following hazards: health (blue), flammability (red), reactivity (yellow), and special hazards (white).
Health Hazard Data
Describes how a chemical can enter body (ingestion, inhalation, skin contact), its acute and chronic effects, and lists if a component is a carcinogen, mutagen, or teratogen.
Precautionary Measures
Special storage instructions Handling instructions Conditions to avoid Protective equipment needed
First Aid
Spill and disposal procedures.
Transportation Data
Shipping name, hazard class, and ID number of the product.
References
Supporting references are also included in the HACH MSDS sheets.
SUMMARY OF FIELD TEST KITS
Field test kits can be important analytical tools during receiving water investigations. Chapter 6, among others, described how they can be used to obtain rapid and cost-effective data. However, the careful selection of the test kits to be used is critical. It is important to consider several factors, specifically the sensitivity of the procedure, safety hazards associated with the method, the cost (both capital and expendables) to conduct the analyses, and the time and expertise needed to conduct the test. Table E.2 summarizes these attributes, including results of conducting sensitivity tests using ultra-clean water and stormwater (Pitt and Clark 1999). The useful range is the minimum detection limit found during our tests to the upper limit that does not require dilution. The precision is the coefficient of variation based on replicate analyses, and the recovery is the slope of the regression line comparing analyses of spiked samples using these procedures and standard methods. The recovery tests were conducted using both ultra-clean water prepared using reverse osmosis (RO) and stormwater to identify any matrix interference problems. Any problems noted during the tests are also indicated, especially safety concerns, unusual amounts of expertise needed, and storage requirements.
These tests represent several classes of analytical procedures. The following sets of photos illustrate some of the simpler test kit methods. Figure E.1 illustrates the basic colorimetric procedure with a color wheel to analyze basic water color using a HACH test kit, while Figures E.2 and E.3 show simple color indicator paper strips for alkalinity. Vacuum vials are also used in several test

768 S
TO
RM
WA
TE
R E
FF
EC
TS
HA
ND
BO
OK
sensitive to a mixed microbial
Expensive instrument ($6900)
refrigeration; requires 30–60 min to conduct test; requires extensive expertise; $25 per test
(safety hazards, expertise
24-hour test period required
compound; high detection Waste contains a mercury
refrigeration; sharps and
Problems with Test
Reagents expire in 1 to 2
Not a selective test, but
required, etc.)
6-month shelf life, with
months and require
mercury in waste
limit (0.4 mg/L)
population
(RO/runoff) Recovery
0.85/1.27
1.15/1.10
1.22/1.21
1.04/0.96
na na
na
na
Precision (COV)
0.15
0.17
na
na
na na
na
na
Useful Range
0.03–2.5 mg/L
0.10–0.7
0.17–1.5
0.38–3
na na
na
na
Ammonia
Bacteria
30 min to
Reqd.
BTEX
(min)
Time
13 hr
30–60
24 hr
20
10
20
5
5
(per sample)
Expendable Cost
$0.63
$2.88
$0.33
$0.76
$4.00
$25
$435 for kit
Capital
DR/2000 $1495 for
Cost
$895 for
$895 for
Smart
Smart
Color.
Color.
Summary of All Field Test Kits Evaluated
$6900
$0.00
$500
Nitrogen, High Range
Nitrogen, Low Range
CHEMetrics Ammonia
Equipment, Inc. IME
Ammonia: Salicylate
1 DCR Photometer
Dtech (EM Science)
Industrial Municipal
La Motte Ammonia
La Motte Ammonia
and Kit Name Manufacturer
Method without
HACH Nitrogen,
Test KoolKount
BTEX Test Kit
IDEXX Colilert
PetroSense
Distillation
Assayer
Nessler’s reaction
Nessler’s reaction
determination of
determination of
determination of
determination of
ammonia using
ammonia using
ammonia using
ammonia using
Immunoassay
Method
Table E.2
Colorimetric
Colorimetric
salicylate Colorimetric
Colorimetric
salicylate
Colorimetric Colorimetric
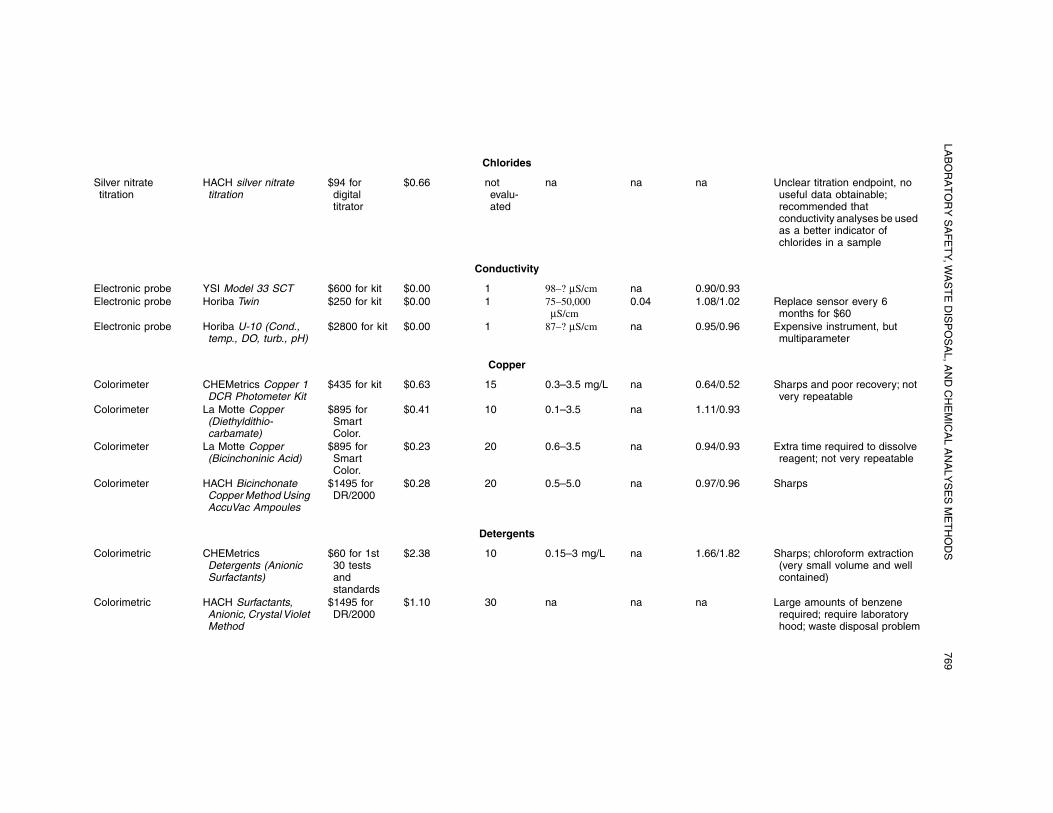
LAB
OR
AT
OR
Y S
AF
ET
Y, WA
ST
E D
ISP
OS
AL, A
ND
CH
EM
ICA
L AN
ALY
SE
S M
ET
HO
DS
769
hood; waste disposal problem
conductivity analyses be used as a better indicator of chlorides in a sample
Sharps and poor recovery; not
Extra time required to dissolve reagent; not very repeatable
Sharps; chloroform extraction (very small volume and well
Unclear titration endpoint, no
required; require laboratory Large amounts of benzene
Expensive instrument, but
useful data obtainable;
Replace sensor every 6
recommended that
very repeatable
months for $60
multiparameter
contained)
Sharps
0.90/0.93 1.08/1.02
0.95/0.96
0.64/0.52
1.11/0.93
0.94/0.93
0.97/0.96
1.66/1.82
na
na
0.04
na
na
na
na
na
na
na
na
na
0.3–3.5 mg/L
0.15–3 mg/L
98–? µS/cm
87–? µS/cm
75–50,000
0.1–3.5
0.6–3.5
0.5–5.0
µS/cm
na
na
Conductivity
Detergents
Chlorides
Copper
evaluated
not
15
10
20
20
10
30
1 1
1
$0.66
$0.00 $0.00
$0.00
$0.63
$0.41
$0.23
$0.28
$2.38
$1.10
$2800 for kit
$600 for kit $250 for kit
$435 for kit
standards
$60 for 1st
DR/2000
DR/2000
$1495 for
$1495 for
30 tests
$895 for
$895 for
titrator
Smart
Smart
$94 for
Color.
Color.
digital
and
Copper Method Using
Anionic, Crystal Violet
temp., DO, turb., pH)
CHEMetrics Copper 1 DCR Photometer Kit
Detergents (Anionic
(Bicinchoninic Acid)
AccuVac Ampoules
Horiba U-10 (Cond.,
HACH Bicinchonate
HACH silver nitrate
YSI Model 33 SCT
HACH Surfactants,
La Motte Copper
La Motte Copper
(Diethyldithio-
Surfactants)
carbamate)
CHEMetrics
Horiba Twin
Method
titration
Electronic probe Electronic probe
Electronic probe
Silver nitrate titration
Colorimeter
Colorimeter
Colorimeter
Colorimeter
Colorimetric
Colorimetric
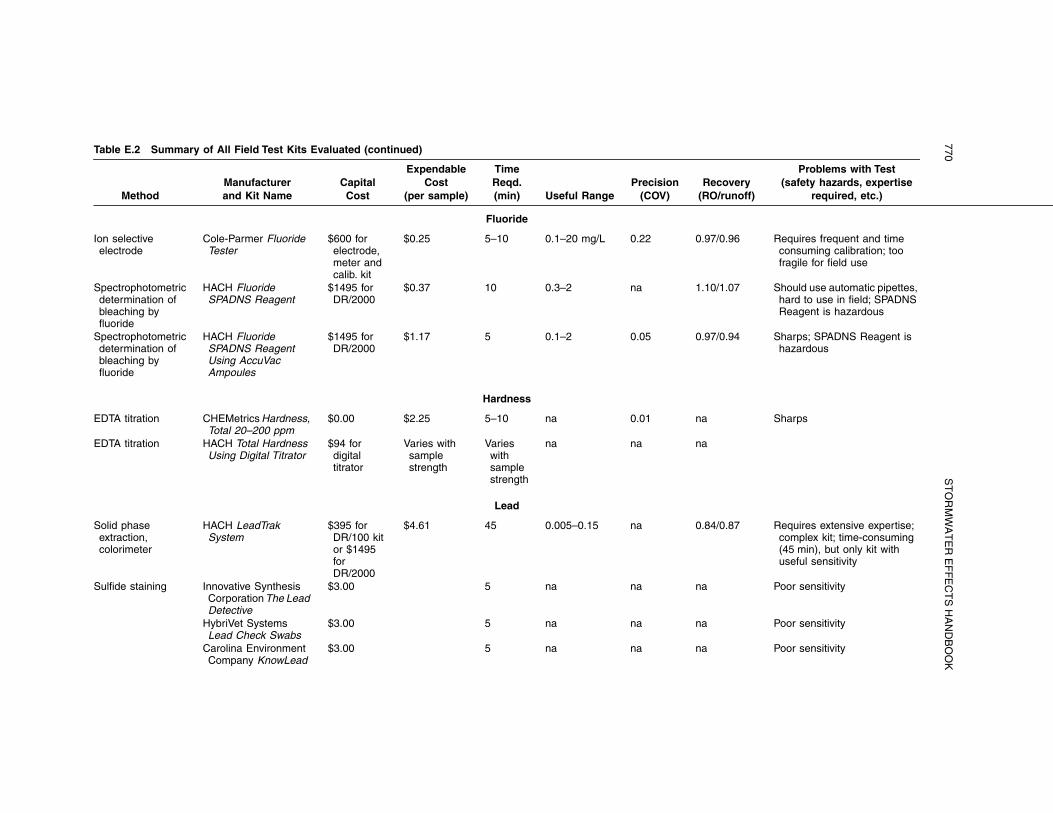
770 S
TO
RM
WA
TE
R E
FF
EC
TS
HA
ND
BO
OK
Should use automatic pipettes, hard to use in field; SPADNS
Requires extensive expertise; complex kit; time-consuming
(safety hazards, expertise
Sharps; SPADNS Reagent is
Requires frequent and time consuming calibration; too
(45 min), but only kit with
Problems with Test
Reagent is hazardous
required, etc.)
fragile for fi eld use
useful sensitivity
Poor sensitivity
Poor sensitivity
Poor sensitivity
hazardous
Sharps
(RO/runoff) Recovery
0.97/0.96
1.10/1.07
0.97/0.94
0.84/0.87
na
na
na
na
na
Precision (COV)
0.22
0.05
0.01
na
na
na
na
na
na
Useful Range
0.1–20 mg/L
0.005–0.15
0.3–2
0.1–2
na
na
na
na
na
Hardness
strength
Lead
Fluoride
sample
Reqd. (min)
Time
Varies with
5–10
5–10
10
45
5
5
5
5
(per sample)
Expendable
Varies with
Cost
strength sample
$0.25
$0.37
$1.17
$2.25
$4.61
Summary of All Field Test Kits Evaluated (continued)
DR/100 kit
meter and electrode,
or $1495
Capital
DR/2000
DR/2000
DR/2000
$1495 for
$1495 for
calib. kit
Cost
$600 for
$395 for
titrator
$94 for digital
$0.00
$3.00
$3.00
$3.00
for
CHEMetrics Hardness,
Corporation The Lead Detective
HACH Total Hardness
Company KnowLead Carolina Environment
Cole-Parmer Fluoride
Using Digital Titrator
Lead Check Swabs
Innovative Synthesis
SPADNS Reagent
SPADNS Reagent
Total 20–200 ppm
and Kit Name Manufacturer
HybriVet Systems
Using AccuVac
HACH LeadTrak
HACH Fluoride
HACH Fluoride
Ampoules
System
Tester
Spectrophotometric
Spectrophotometric
determination of
determination of
Sulfide staining
EDTA titration
EDTA titration
Method
bleaching by
bleaching by
Table E.2
Ion selective electrode
fluoride
fluoride
Solid phase extraction, colorimeter
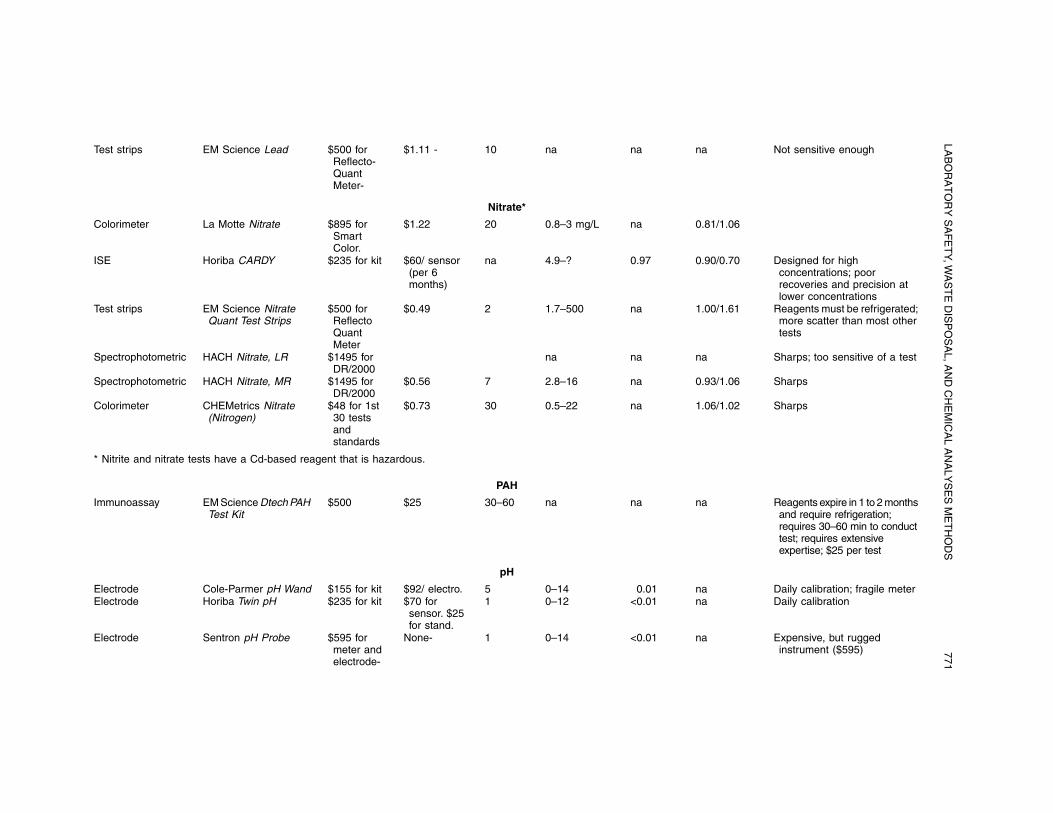
LAB
OR
AT
OR
Y S
AF
ET
Y, WA
ST
E D
ISP
OS
AL, A
ND
CH
EM
ICA
L AN
ALY
SE
S M
ET
HO
DS
771
Test strips EM Science Lead $500 for $1.11 - 10 na na na Not sensitive enough Reflecto-Quant Meter-
Nitrate*
Colorimeter La Motte Nitrate $895 for $1.22 20 0.8–3 mg/L na 0.81/1.06 Smart Color.
ISE Horiba CARDY $235 for kit $60/ sensor na 4.9–? 0.97 0.90/0.70 Designed for high (per 6 concentrations; poor months) recoveries and precision at
lower concentrations Test strips EM Science Nitrate $500 for $0.49 2 1.7–500 na 1.00/1.61 Reagents must be refrigerated;
Quant Test Strips Reflecto more scatter than most other Quant tests Meter
Spectrophotometric HACH Nitrate, LR $1495 for na na na Sharps; too sensitive of a test DR/2000
Spectrophotometric HACH Nitrate, MR $1495 for $0.56 7 2.8–16 na 0.93/1.06 Sharps DR/2000
Colorimeter CHEMetrics Nitrate $48 for 1st $0.73 30 0.5–22 na 1.06/1.02 Sharps (Nitrogen) 30 tests
and standards
* Nitrite and nitrate tests have a Cd-based reagent that is hazardous.
PAH
Immunoassay EM Science Dtech PAH $500 $25 30–60 na na na Reagents expire in 1 to 2 months Test Kit and require refrigeration;
requires 30–60 min to conduct test; requires extensive expertise; $25 per test
pH
Electrode Cole-Parmer pH Wand $155 for kit $92/ electro. 5 0–14 0.01 na Daily calibration; fragile meter Electrode Horiba Twin pH $235 for kit $70 for 1 0–12 <0.01 na Daily calibration
sensor. $25 for stand.
Electrode Sentron pH Probe $595 for None- 1 0–14 <0.01 na Expensive, but rugged meter and instrument ($595) electrode-

772 S
TO
RM
WA
TE
R E
FF
EC
TS
HA
ND
BO
OK
Meter
From Day, J. Selection of Appropriate Analytical Procedures for Volunteer Field Monitoring of Water Quality. MSCE thesis, Department of Civil and Environmental Engineering, University of Alabama at Birmingham. 1996. With permission.
frequent cleaning and test has
Optics of expensive instrument
Only readable to within ±1 pH
Uses granular cyanide and is
unit, poor comparison to pH
(safety hazards, expertise
higher concentrations; more
month; uses dilute cyanide
($500) are difficult to keep
Dilute indicator expires in a
meters for actual samples
unacceptable for fi eld use
Method designed for much
Problems with Test
scatter than other tests
required, etc.)
Reflectoquant requires
high detection limit
clean
(RO/runoff) Recovery
0.81/0.90
0.53/0.46
1.35/1.05
0.88/0.85
?/0.90
na
na
na
na
na
Precision (COV)
0.08
0.07
0.04
0.06
na
na
na
na
na
na
Useful Range
0.14–3 mg/L
0.5–7 mg/L
3.3–10
5–9.5
2.0–?
1.3–7
0–12
4–9
na
na
Potassium
Reqd. (min)
Time
Zinc
30
15
15
10
2
5
1
5
5
5
(per sample)
Expendable
$60/ sensor
Cost
months) (per 6
$0.89
$0.22
$0.29
$0.29
$0.59
$0.37
$0.56
Summary of All Field Test Kits Evaluated (continued)
$3
$235 for kit
Reflecto-
Reflecto-
Capital
DR/2000
DR/2000
$1495 for
$1495 for
Cost
$500 for
$895 for
$895 for
$895 for
$895 for
$500 for
Quant
Quant
Smart Color.
Smart Color.
Smart
Smart
Color.
Color.
Meter
$0.00
ReflectoQuant Zinc
La Motte Potassium
La Motte Potassium
Alkacid Test Strips
HACH Zinc, Zincon
ReflectoQuant pH
Tetraphenylborate
and Kit Name Manufacturer
HACH Potassium
Fisher Scientifi c
Horiba CARDY
La Motte Zinc
Reagent Set
La Motte pH
EM Science
EM Science Method
Spectrophotometric
Spectrophotometric
Spectrophotometric
Spectrophotometric
Spectrophotometric
Method
Table E.2
Test paper
Test paper
ISE
Colorimeter
Test strips

LABORATORY SAFETY, WASTE DISPOSAL, AND CHEMICAL ANALYSES METHODS 773
Figure E.1 HACH color test kit. Figure E.2 Quantistrip method for alkalinity.
Figure E.3 Compar ing Quant is t r ip Figure E.4 CHEMetrics copper test kit. against color standards.
Figure E.5 CHEMetrics color reader. Figure E.6 HACH AccuVac kit for fluoride.

774 STORMWATER EFFECTS HANDBOOK
Figure E.7 Reading AccuVac absor- Figure E.8 CHEMetrics nitrate test kit. Figure E.9 Cole Parmer bance. ORP probe.
kits to automatically draw a sample into an evacuated ampoule that contains a specific amount of reagent. Figures E.4 through E.8 are different examples of these types of kits. Figure E.9 is an example of a simple probe used to directly measure ORP of a water sample (a necessary field analysis because of changes occurring after sample collection and transport to the laboratory). Many of other types of test kits are more complex and require several steps for the analyses. Some of the most complex procedures may require as many as 10 steps and more than 30 min for analyses.
While many of the simple methods are quite useful for field monitoring, the more complex (and expensive) procedures must be more carefully weighed against traditional (and more accurate) laboratory methods. In general, we found that the field test kits were more accurate than we had originally expected. However, the sensitivities of many of the field test kits were much poorer than expected, making them much less useful. In addition, numerous safety hazards can exist with these kits, sharps and hazardous reagents and wastes being the most serious.
SPECIAL COMMENTS PERTAINING TO HEAVY METAL ANALYSES
The above discussion on field test kits points out the obvious shortcomings of trying to obtain meaningful heavy metal data using simple procedures. There are a number of methods available for heavy metals, with the traditional methods restricted to the laboratory. The following discussion summarizes these available methods, especially their sensitivities.
Table E.3 lists the metals and associated methods included in the 1995 version of Standard Methods for the Examination of Water and Wastewater. Other listings of environmental analytical methods are published by ASTM (American Society of Testing Materials) and by the U.S. Environmental Protection Agency (in the Code of Federal Regulations, especially 40 CFR, 136 “Guidelines Establishing Test Procedures for the Analysis of Pollutants”). Methods listed in these references are generally taken as approved for many purposes. Table E.3 lists about 40 different metals and 12 different basic analytical methods. Most all of the metals can be analyzed using atomic absorption spectrometry (AAS) and inductively coupled plasma emission spectrometry (ICP). In addition, many of the metals have specific chemical tests that use spectrophotometric or titration methods. For most stormwater investigations, only a relatively few of these metals are routinely evaluated, including arsenic, cadmium, chromium, copper, lead, mercury, nickel, selenium, and zinc.

LABORATORY SAFETY, WASTE DISPOSAL, AND CHEMICAL ANALYSES METHODS 775
Table E.3 Metal Methods Included in the 1995, 19th Edition of Standard Methods for the Examination of Water and Wastewater
Color AAS Flame C-V AAS ET AAS Hydride ICP ASV Other
Aluminum × × × Antimony × × Arsenic × × × Barium × × Beryllium × × × Bismuth × Cadmium × × × × Calcium × × × Cesium × Chromium × × × IC Cobalt × × Copper × × × Gold × Iridium × Iron × × × Lead × × × × Lithium × × × Magnesium × × grav Manganese × × × Mercury × × Molybdenum × × Nickel × × Osmium × Palladium × Platinum × Potassium × × × ISE Rhenium × Rhodium × Ruthenium × Selenium × × × × fluro Silver × × × Sodium × × × Strontium × × × Thallium × × Thorium × Tin × Titanium × Vanadium × × × Zinc × × ×
Note:° Color: Specific chemical colorimetric methods; AAS: Atomic absorption spectrometry; Flame: Flame emission photometry; ASV: Anodic stripping voltammetry; C-V AAS: Cold-vapor AAS; ET AAS: Electrothermal AAS; ICP: Inductively coupled plasma emission spectrometry; Hydride: Hydride generation AAS; Other: IC (ion chromatography), grav (gravimetric), ISE (ion selective electrode), and fluro (fluorometric)
Table E.4 compares the optimal metal concentration ranges for AAS and ICP, the most commonly used instrumentation (Standard Methods 1995). Instrument detection limits are about 15 times less than the lower values shown on this table, which represent the lower limits of quantification. The lower limits of the flame AAS optimal concentration ranges are generally about the same as for the plasma AES, while the electrothermal AAS lower limits are 10 to 1000 times lower. However, the plasma AES instrument has a much greater dynamic range than either AAS instrument. The plasma AES also has fewer interferences and can analyze many elements simultaneously. Because of these differences, many laboratories use a plasma AES for general

776 STORMWATER EFFECTS HANDBOOK
Table E.4 Optimal Concentration Ranges of Metals in Samples
Flame AAS Electrothermal Inductively Coupled (mg/L) AAS (mg/L) Plasma AES (mg/L)
Aluminum 5–100 0.6–100 Antimony 1–40 0.45–100 Arsenic 0.75–100 Barium 1–20 0.030–50 Beryllium 0.05–2 0.005–10 Bismuth 1–5 Cadmium 0.05–2 0.06–50 Calcium 0.2–20 0.15–100 Cesium 0.5–15 Chromium 0.2–10 0.1–50 Cobalt 0.5–10 0.1–50 Copper 0.2–10 0.1–50 Gold 0.5–20 Iron 0.3–10 0.1–100 Lead 1–20 0.6–100 Lithium 0.1–2 0.06–100 Magnesium 0.02–2 0.45–100 Manganese 0.1–10 0.06–50 Molybdenum 1–20 0.12–100 Nickel 0.3–10 0.2–50 Platinum 5–75 Potassium 0.1–2 1.5–100 Selenium 1.0–100 Silver 0.1–4 0.1–50 Sodium 0.03–1 Strontium 0.3–5 0.03–50 Thallium 0.6–100 Tin 10–200 Titanium 5–100 Vanadium 2–100 0.1–50 Zinc 0.05–2 0.03–100
0.02–0.2 0.02–0.3 0.005–0.1 0.01–0.2 0.001–0.03
0.0005–0.01
0.005–0.1 0.005–0.1 0.005–0.1
0.005–0.1 0.005–0.1
0.001–0.03 0.003–0.06 0.005–0.1
0.005–0.1 0.001–0.025
0.02–0.3
Data from Standard Methods for the Examination of Water and Wastewater. 19th edition. Water Environment Federation. Washington, D.C. 1995.
analytical work and an electrothermal AAS for individual samples for single elements at very low concentrations.
Table E.5 lists various operational and cost attributes of these metal analysis methods (Pitt et al. 1997). The trade-offs between the various types of equipment are obvious. The instruments with greater sensitivity cost more. Only an electrothermal AAS instrument can analyze many samples quickly (with an autosampler) with good sensitivity, but with only a few metals being analyzed at a time, at the most. The instruments that can analyze many metals at a time include the ICP units. However, only the ICP/MS units are capable of similar low sensitivities as the electrothermal AAS units. These units are mostly still being used in research environments and are not typically used in production laboratories, as they require well-trained specialized operators and are the most costly alternative shown.
In flame AAS, a sample is aspirated directly into a flame (typically air–acetylene) and is atomized. A light beam (from a hollow cathode lamp designed for a specific wave length) is directed through the flame and into a monochromator, and finally into a detector. The detector measures the amount of light absorbed by the atomized element. The lamp operating at the specific wavelength of the metal makes the method relatively free from spectral and radiation interferences. However, different schemes (continuum-source, Zeeman, or Smith-Hieftje) to correct for molecular absorption and light scattering interferences are typically used.
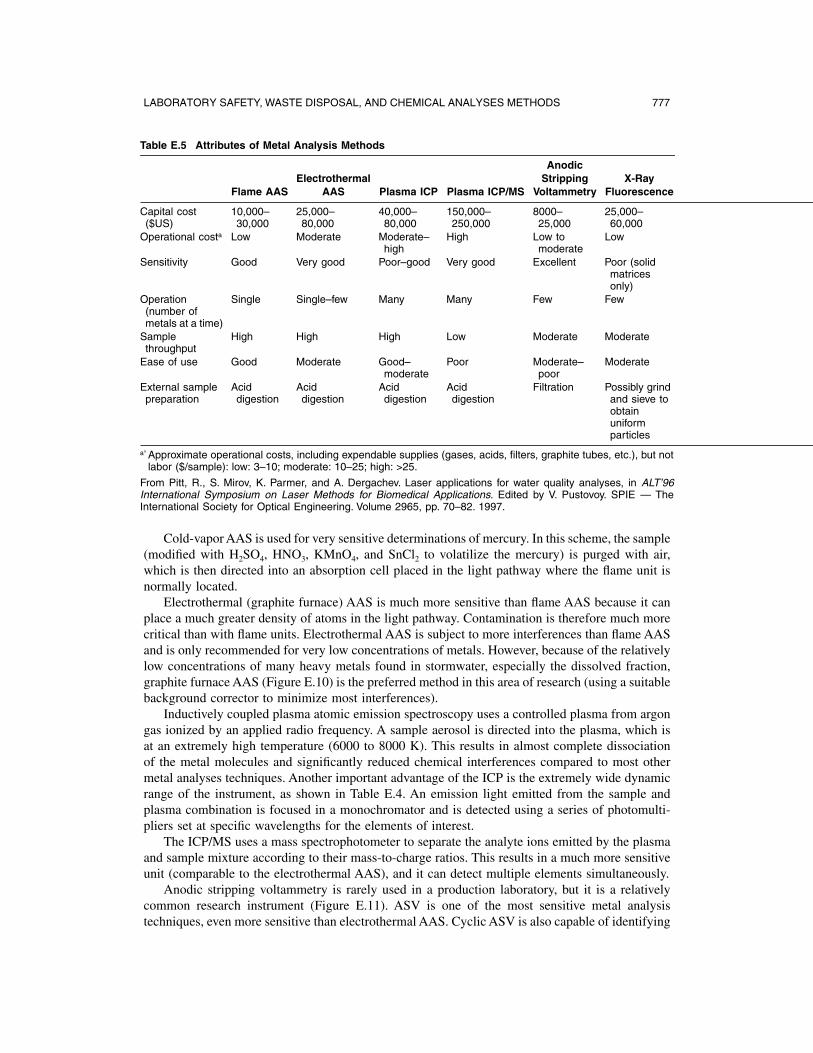
LABORATORY SAFETY, WASTE DISPOSAL, AND CHEMICAL ANALYSES METHODS 777
Table E.5 Attributes of Metal Analysis Methods
Anodic Electrothermal Stripping X-Ray
Flame AAS AAS Plasma ICP Plasma ICP/MS Voltammetry Fluorescence
Capital cost 10,000– 25,000– 40,000– ($US) 30,000 80,000 80,000
Operational costa Low Moderate Moderate– high
Sensitivity Good Very good Poor–good
Operation Single Single–few Many (number of metals at a time)
Sample High High High throughput
Ease of use Good Moderate Good– moderate
External sample Acid Acid Acid preparation digestion digestion digestion
150,000– 8000– 25,000– 250,000 25,000 60,000
High Low to Low moderate
Very good Excellent Poor (solid matrices only)
Many Few Few
Low Moderate Moderate
Poor Moderate– Moderate poor
Acid Filtration Possibly grind digestion and sieve to
obtain uniform particles
a° Approximate operational costs, including expendable supplies (gases, acids, filters, graphite tubes, etc.), but not labor ($/sample): low: 3–10; moderate: 10–25; high: >25.
From Pitt, R., S. Mirov, K. Parmer, and A. Dergachev. Laser applications for water quality analyses, in ALT’96 International Symposium on Laser Methods for Biomedical Applications. Edited by V. Pustovoy. SPIE — The International Society for Optical Engineering. Volume 2965, pp. 70–82. 1997.
Cold-vapor AAS is used for very sensitive determinations of mercury. In this scheme, the sample (modified with H2SO4, HNO3, KMnO4, and SnCl2 to volatilize the mercury) is purged with air, which is then directed into an absorption cell placed in the light pathway where the flame unit is normally located.
Electrothermal (graphite furnace) AAS is much more sensitive than flame AAS because it can place a much greater density of atoms in the light pathway. Contamination is therefore much more critical than with flame units. Electrothermal AAS is subject to more interferences than flame AAS and is only recommended for very low concentrations of metals. However, because of the relatively low concentrations of many heavy metals found in stormwater, especially the dissolved fraction, graphite furnace AAS (Figure E.10) is the preferred method in this area of research (using a suitable background corrector to minimize most interferences).
Inductively coupled plasma atomic emission spectroscopy uses a controlled plasma from argon gas ionized by an applied radio frequency. A sample aerosol is directed into the plasma, which is at an extremely high temperature (6000 to 8000 K). This results in almost complete dissociation of the metal molecules and significantly reduced chemical interferences compared to most other metal analyses techniques. Another important advantage of the ICP is the extremely wide dynamic range of the instrument, as shown in Table E.4. An emission light emitted from the sample and plasma combination is focused in a monochromator and is detected using a series of photomultipliers set at specific wavelengths for the elements of interest.
The ICP/MS uses a mass spectrophotometer to separate the analyte ions emitted by the plasma and sample mixture according to their mass-to-charge ratios. This results in a much more sensitive unit (comparable to the electrothermal AAS), and it can detect multiple elements simultaneously.
Anodic stripping voltammetry is rarely used in a production laboratory, but it is a relatively common research instrument (Figure E.11). ASV is one of the most sensitive metal analysis techniques, even more sensitive than electrothermal AAS. Cyclic ASV is also capable of identifying
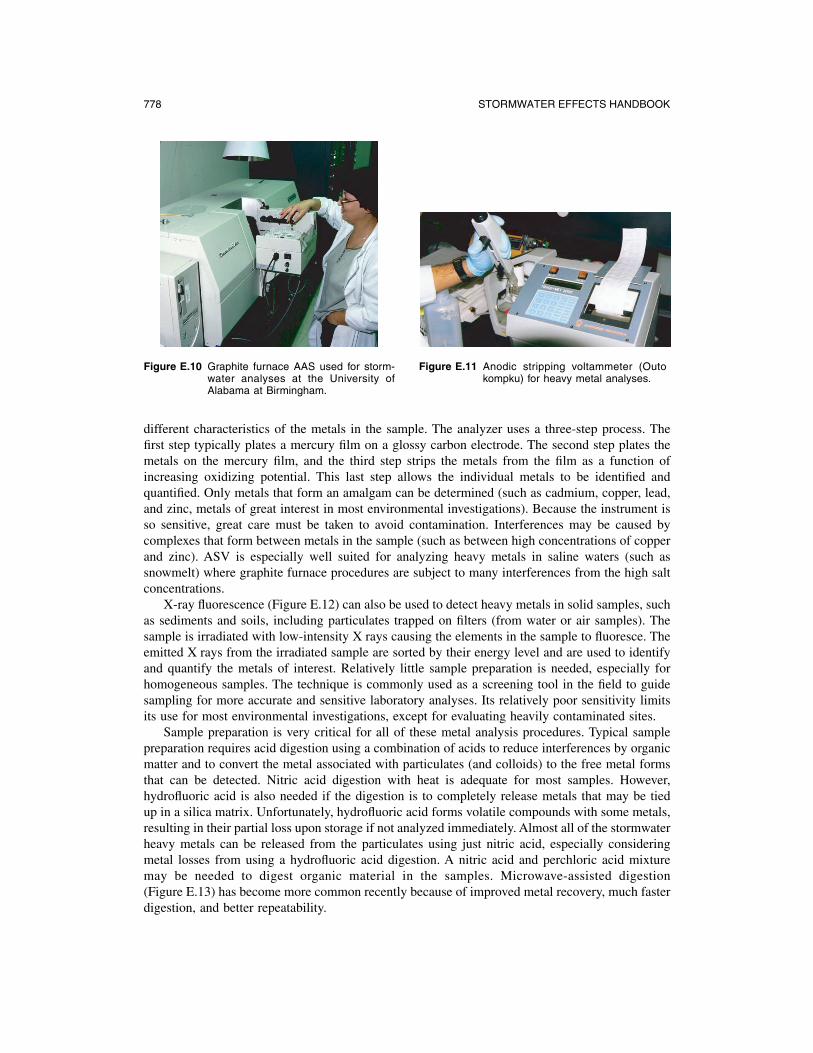
778 STORMWATER EFFECTS HANDBOOK
Figure E.10 Graphite furnace AAS used for storm- Figure E.11 Anodic stripping voltammeter (Outo water analyses at the University of kompku) for heavy metal analyses. Alabama at Birmingham.
different characteristics of the metals in the sample. The analyzer uses a three-step process. The first step typically plates a mercury film on a glossy carbon electrode. The second step plates the metals on the mercury film, and the third step strips the metals from the film as a function of increasing oxidizing potential. This last step allows the individual metals to be identified and quantified. Only metals that form an amalgam can be determined (such as cadmium, copper, lead, and zinc, metals of great interest in most environmental investigations). Because the instrument is so sensitive, great care must be taken to avoid contamination. Interferences may be caused by complexes that form between metals in the sample (such as between high concentrations of copper and zinc). ASV is especially well suited for analyzing heavy metals in saline waters (such as snowmelt) where graphite furnace procedures are subject to many interferences from the high salt concentrations.
X-ray fluorescence (Figure E.12) can also be used to detect heavy metals in solid samples, such as sediments and soils, including particulates trapped on filters (from water or air samples). The sample is irradiated with low-intensity X rays causing the elements in the sample to fluoresce. The emitted X rays from the irradiated sample are sorted by their energy level and are used to identify and quantify the metals of interest. Relatively little sample preparation is needed, especially for homogeneous samples. The technique is commonly used as a screening tool in the field to guide sampling for more accurate and sensitive laboratory analyses. Its relatively poor sensitivity limits its use for most environmental investigations, except for evaluating heavily contaminated sites.
Sample preparation is very critical for all of these metal analysis procedures. Typical sample preparation requires acid digestion using a combination of acids to reduce interferences by organic matter and to convert the metal associated with particulates (and colloids) to the free metal forms that can be detected. Nitric acid digestion with heat is adequate for most samples. However, hydrofluoric acid is also needed if the digestion is to completely release metals that may be tied up in a silica matrix. Unfortunately, hydrofluoric acid forms volatile compounds with some metals, resulting in their partial loss upon storage if not analyzed immediately. Almost all of the stormwater heavy metals can be released from the particulates using just nitric acid, especially considering metal losses from using a hydrofluoric acid digestion. A nitric acid and perchloric acid mixture may be needed to digest organic material in the samples. Microwave-assisted digestion (Figure E.13) has become more common recently because of improved metal recovery, much faster digestion, and better repeatability.

LABORATORY SAFETY, WASTE DISPOSAL, AND CHEMICAL ANALYSES METHODS 779
Figure E.12 X-ray fluorescence unit for analyses of Figure E.13 Microwave digestion of stormwater sam heavy metals in solids. ples for heavy metal analyses.
STORMWATER SAMPLE EXTRACTIONS FOR EPA METHODS 608 AND 625
The following paragraphs outline the modified organic extraction methods that have been used by UAB for the analysis of wet-weather flows (Pitt and Clark 1999). These modifications are necessary because of the large amount of particulates in the samples and the large particulate fraction of the organics of greatest interest. These particulates interfere with solid-phase extraction procedures, for example, resulting in very little recovery of organic toxicants using that method.
1. Samples are extracted using a liquid–liquid separatory funnel technique. This has been found to give the most reliable results, especially compared to solid phase extraction or critical fluid extraction methods, for stormwater samples (and most surface water samples). The problem with stormwater organics is that a substantial fraction of many of the organic compounds of interest are associated with particulates. This particulate fraction needs to be quantified, as stormwater has been shown to have significant effects on receiving water sediments. If emulsions prevent achieving acceptable solvent recovery with separatory funnel extraction, continuous extraction is used. The separatory funnel extraction scheme described below assumes a sample volume of 250 mL. Serial extraction of the base/neutrals uses 10 mL additions of methylene chloride, as does the serial extraction of the acids. Prior to the extraction, all glassware is oven baked at 300°C for 24 hours.
2. A sample volume of 250 mL is collected in a 400-mL beaker and poured into a 500-mL glass separation funnel. For every 12 samples extracted, an additional four samples are extracted for quality control and quality assurance. These include three 250-mL composite samples made of equal amounts of the 12 samples, and one 250-mL sample of reverse osmosis water. Standard solution additions consisting of 25 µL of 1000 µg/mL base/neutral spiking solution, 25 µL of 1000 µg/mL base/neutral surrogates, 12.5 µL of 2000 µg/mL acid spiking solution, and 12.5 µL of 2000 µg/mL acid surrogates are made to the separation funnels of two of the three composite samples and mixed well. Sample pH is measured with wide-range pH paper and adjusted to pH > 11 with sodium hydroxide solution.
3. A 10-mL volume of methylene chloride is added to the separatory funnel and sealed by capping. The separatory funnel is gently shaken by hand for 15 s and vented to release pressure (Figure E.14). The cap is removed from the separatory funnel and replaced with a vented snorkel stopper. The separatory funnel is then placed on a mechanical shaker and shaken for 2 min. After returning the separatory funnel to its stand and replacing the snorkel stopper with the cap, the organic layer is allowed to separate from the water phase for a minimum of 10 min, longer if an emulsion develops
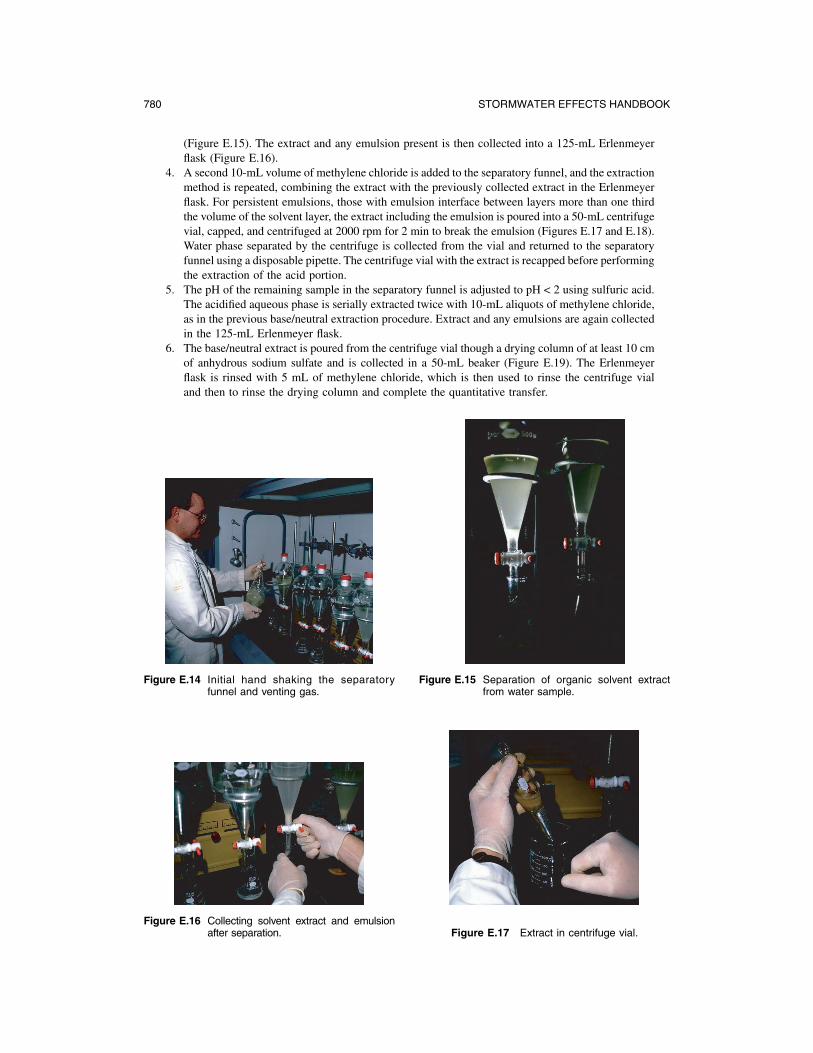
780 STORMWATER EFFECTS HANDBOOK
(Figure E.15). The extract and any emulsion present is then collected into a 125-mL Erlenmeyer flask (Figure E.16).
4. A second 10-mL volume of methylene chloride is added to the separatory funnel, and the extraction method is repeated, combining the extract with the previously collected extract in the Erlenmeyer flask. For persistent emulsions, those with emulsion interface between layers more than one third the volume of the solvent layer, the extract including the emulsion is poured into a 50-mL centrifuge vial, capped, and centrifuged at 2000 rpm for 2 min to break the emulsion (Figures E.17 and E.18). Water phase separated by the centrifuge is collected from the vial and returned to the separatory funnel using a disposable pipette. The centrifuge vial with the extract is recapped before performing the extraction of the acid portion.
5. The pH of the remaining sample in the separatory funnel is adjusted to pH < 2 using sulfuric acid. The acidified aqueous phase is serially extracted twice with 10-mL aliquots of methylene chloride, as in the previous base/neutral extraction procedure. Extract and any emulsions are again collected in the 125-mL Erlenmeyer flask.
6. The base/neutral extract is poured from the centrifuge vial though a drying column of at least 10 cm of anhydrous sodium sulfate and is collected in a 50-mL beaker (Figure E.19). The Erlenmeyer flask is rinsed with 5 mL of methylene chloride, which is then used to rinse the centrifuge vial and then to rinse the drying column and complete the quantitative transfer.
Figure E.14 Initial hand shaking the separatory Figure E.15 Separation of organic solvent extract funnel and venting gas. from water sample.
Figure E.16 Collecting solvent extract and emulsion after separation. Figure E.17 Extract in centrifuge vial.
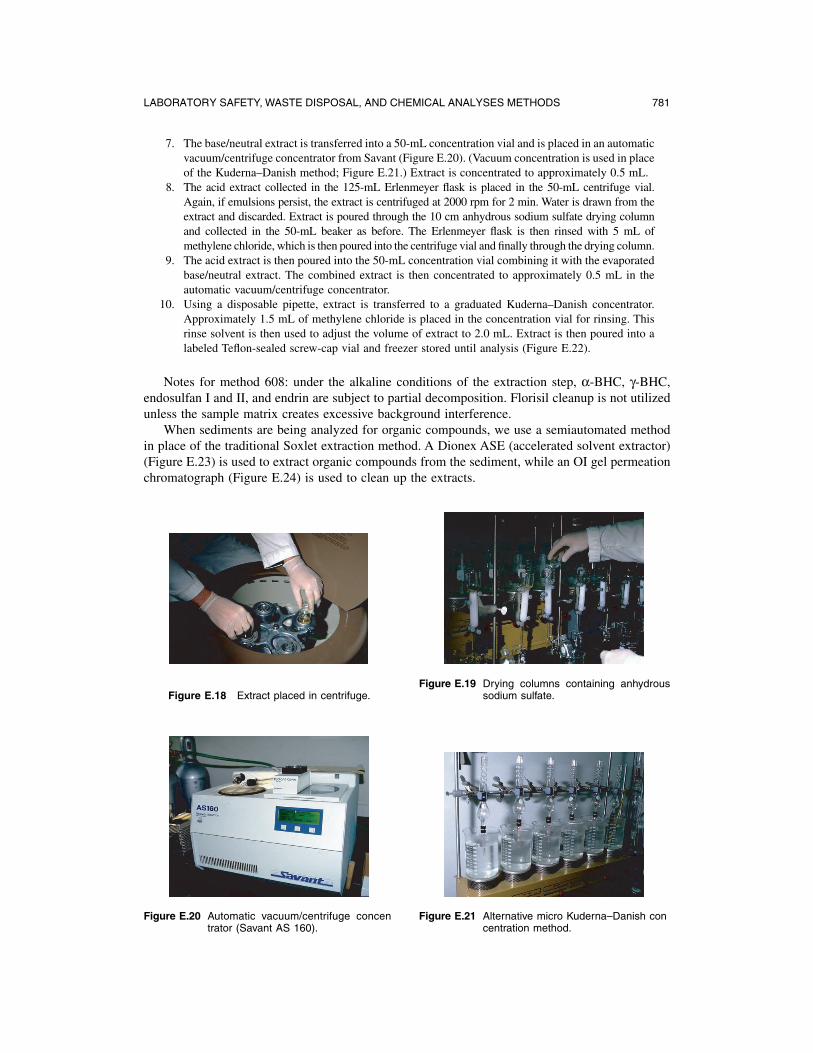
LABORATORY SAFETY, WASTE DISPOSAL, AND CHEMICAL ANALYSES METHODS 781
7. The base/neutral extract is transferred into a 50-mL concentration vial and is placed in an automatic vacuum/centrifuge concentrator from Savant (Figure E.20). (Vacuum concentration is used in place of the Kuderna–Danish method; Figure E.21.) Extract is concentrated to approximately 0.5 mL.
8. The acid extract collected in the 125-mL Erlenmeyer flask is placed in the 50-mL centrifuge vial. Again, if emulsions persist, the extract is centrifuged at 2000 rpm for 2 min. Water is drawn from the extract and discarded. Extract is poured through the 10 cm anhydrous sodium sulfate drying column and collected in the 50-mL beaker as before. The Erlenmeyer flask is then rinsed with 5 mL of methylene chloride, which is then poured into the centrifuge vial and finally through the drying column.
9. The acid extract is then poured into the 50-mL concentration vial combining it with the evaporated base/neutral extract. The combined extract is then concentrated to approximately 0.5 mL in the automatic vacuum/centrifuge concentrator.
10. Using a disposable pipette, extract is transferred to a graduated Kuderna–Danish concentrator. Approximately 1.5 mL of methylene chloride is placed in the concentration vial for rinsing. This rinse solvent is then used to adjust the volume of extract to 2.0 mL. Extract is then poured into a labeled Teflon-sealed screw-cap vial and freezer stored until analysis (Figure E.22).
Notes for method 608: under the alkaline conditions of the extraction step, α-BHC, γ-BHC, endosulfan I and II, and endrin are subject to partial decomposition. Florisil cleanup is not utilized unless the sample matrix creates excessive background interference.
When sediments are being analyzed for organic compounds, we use a semiautomated method in place of the traditional Soxlet extraction method. A Dionex ASE (accelerated solvent extractor) (Figure E.23) is used to extract organic compounds from the sediment, while an OI gel permeation chromatograph (Figure E.24) is used to clean up the extracts.
Figure E.18 Extract placed in centrifuge. Figure E.19 Drying columns containing anhydrous
sodium sulfate.
Figure E.20 Automatic vacuum/centrifuge concen trator (Savant AS 160).
Figure E.21 Alternative micro Kuderna–Danish con centration method.
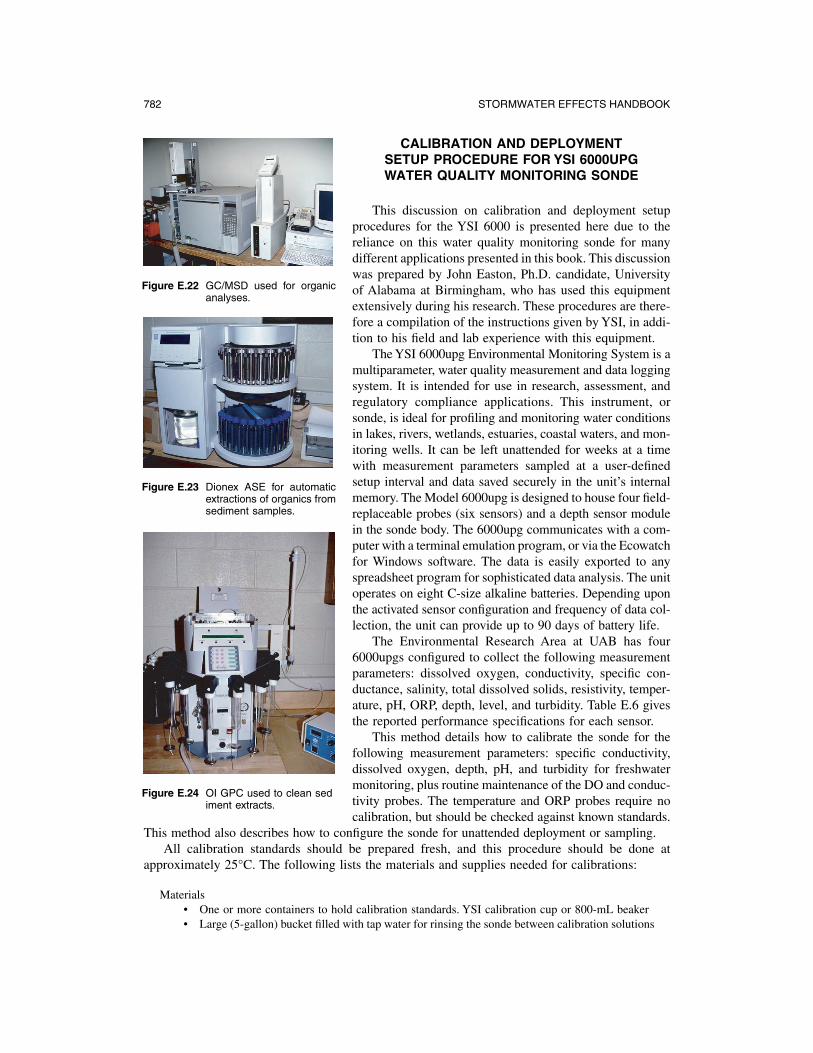
782
Figure E.22 GC/MSD used for organic analyses.
Figure E.23 Dionex ASE for automatic extractions of organics from sediment samples.
Figure E.24 OI GPC used to clean sed iment extracts.
STORMWATER EFFECTS HANDBOOK
CALIBRATION AND DEPLOYMENT SETUP PROCEDURE FOR YSI 6000UPG WATER QUALITY MONITORING SONDE
This discussion on calibration and deployment setup procedures for the YSI 6000 is presented here due to the reliance on this water quality monitoring sonde for many different applications presented in this book. This discussion was prepared by John Easton, Ph.D. candidate, University of Alabama at Birmingham, who has used this equipment extensively during his research. These procedures are therefore a compilation of the instructions given by YSI, in addition to his field and lab experience with this equipment.
The YSI 6000upg Environmental Monitoring System is a multiparameter, water quality measurement and data logging system. It is intended for use in research, assessment, and regulatory compliance applications. This instrument, or sonde, is ideal for profiling and monitoring water conditions in lakes, rivers, wetlands, estuaries, coastal waters, and monitoring wells. It can be left unattended for weeks at a time with measurement parameters sampled at a user-defined setup interval and data saved securely in the unit’s internal memory. The Model 6000upg is designed to house four fieldreplaceable probes (six sensors) and a depth sensor module in the sonde body. The 6000upg communicates with a computer with a terminal emulation program, or via the Ecowatch for Windows software. The data is easily exported to any spreadsheet program for sophisticated data analysis. The unit operates on eight C-size alkaline batteries. Depending upon the activated sensor configuration and frequency of data collection, the unit can provide up to 90 days of battery life.
The Environmental Research Area at UAB has four 6000upgs configured to collect the following measurement parameters: dissolved oxygen, conductivity, specific conductance, salinity, total dissolved solids, resistivity, temperature, pH, ORP, depth, level, and turbidity. Table E.6 gives the reported performance specifications for each sensor.
This method details how to calibrate the sonde for the following measurement parameters: specific conductivity, dissolved oxygen, depth, pH, and turbidity for freshwater monitoring, plus routine maintenance of the DO and conductivity probes. The temperature and ORP probes require no calibration, but should be checked against known standards.
This method also describes how to configure the sonde for unattended deployment or sampling. All calibration standards should be prepared fresh, and this procedure should be done at
approximately 25°C. The following lists the materials and supplies needed for calibrations:
Materials • One or more containers to hold calibration standards. YSI calibration cup or 800-mL beaker • Large (5-gallon) bucket filled with tap water for rinsing the sonde between calibration solutions
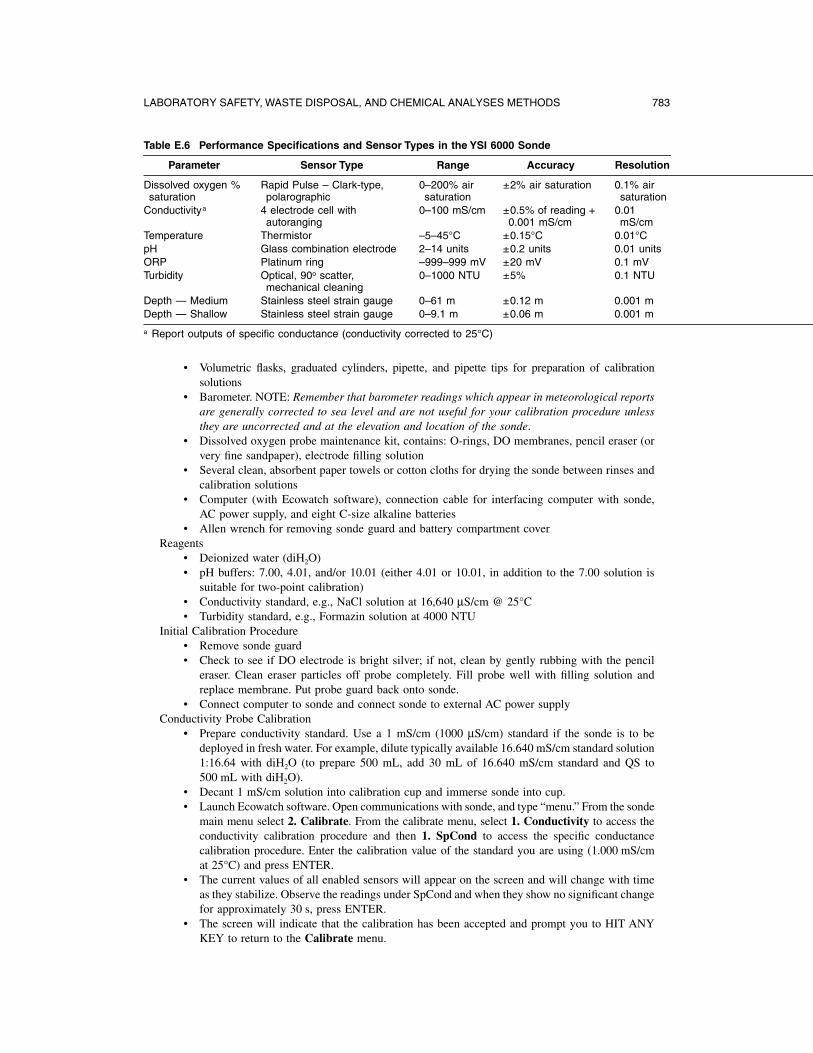
LABORATORY SAFETY, WASTE DISPOSAL, AND CHEMICAL ANALYSES METHODS 783
Table E.6 Performance Specifications and Sensor Types in the YSI 6000 Sonde
Parameter Sensor Type Range Accuracy Resolution
Dissolved oxygen % Rapid Pulse – Clark-type, 0–200% air ±2% air saturation 0.1% air saturation polarographic saturation saturation
Conductivitya 4 electrode cell with 0–100 mS/cm ±0.5% of reading + 0.01 autoranging 0.001 mS/cm mS/cm
Temperature Thermistor –5–45°C ±0.15°C 0.01°C pH Glass combination electrode 2–14 units ±0.2 units 0.01 units ORP Platinum ring –999–999 mV ±20 mV 0.1 mV Turbidity Optical, 90o scatter, 0–1000 NTU ±5% 0.1 NTU
mechanical cleaning Depth — Medium Stainless steel strain gauge 0–61 m ±0.12 m 0.001 m Depth — Shallow Stainless steel strain gauge 0–9.1 m ±0.06 m 0.001 m
a Report outputs of specific conductance (conductivity corrected to 25°C)
• Volumetric flasks, graduated cylinders, pipette, and pipette tips for preparation of calibration solutions
• Barometer. NOTE: Remember that barometer readings which appear in meteorological reports are generally corrected to sea level and are not useful for your calibration procedure unless they are uncorrected and at the elevation and location of the sonde.
• Dissolved oxygen probe maintenance kit, contains: O-rings, DO membranes, pencil eraser (or very fine sandpaper), electrode filling solution
• Several clean, absorbent paper towels or cotton cloths for drying the sonde between rinses and calibration solutions
• Computer (with Ecowatch software), connection cable for interfacing computer with sonde, AC power supply, and eight C-size alkaline batteries
• Allen wrench for removing sonde guard and battery compartment cover Reagents
• Deionized water (diH2O) • pH buffers: 7.00, 4.01, and/or 10.01 (either 4.01 or 10.01, in addition to the 7.00 solution is
suitable for two-point calibration) • Conductivity standard, e.g., NaCl solution at 16,640 µS/cm @ 25°C • Turbidity standard, e.g., Formazin solution at 4000 NTU
Initial Calibration Procedure • Remove sonde guard • Check to see if DO electrode is bright silver; if not, clean by gently rubbing with the pencil
eraser. Clean eraser particles off probe completely. Fill probe well with filling solution and replace membrane. Put probe guard back onto sonde.
• Connect computer to sonde and connect sonde to external AC power supply Conductivity Probe Calibration
• Prepare conductivity standard. Use a 1 mS/cm (1000 µS/cm) standard if the sonde is to be deployed in fresh water. For example, dilute typically available 16.640 mS/cm standard solution 1:16.64 with diH2O (to prepare 500 mL, add 30 mL of 16.640 mS/cm standard and QS to 500 mL with diH2O).
• Decant 1 mS/cm solution into calibration cup and immerse sonde into cup. • Launch Ecowatch software. Open communications with sonde, and type “menu.” From the sonde
main menu select 2. Calibrate. From the calibrate menu, select 1. Conductivity to access the conductivity calibration procedure and then 1. SpCond to access the specific conductance calibration procedure. Enter the calibration value of the standard you are using (1.000 mS/cm at 25°C) and press ENTER.
• The current values of all enabled sensors will appear on the screen and will change with time as they stabilize. Observe the readings under SpCond and when they show no significant change for approximately 30 s, press ENTER.
• The screen will indicate that the calibration has been accepted and prompt you to HIT ANY KEY to return to the Calibrate menu.

784 STORMWATER EFFECTS HANDBOOK
• If you receive an error message indicating that the calibration is out of range, assure yourself that the calibration solution was prepared correctly. If it was, remove sonde guard, and using small brush (located in pocket in user’s manual) clean out the channel on the conductivity probe. BE GENTLE. Replace sonde guard and repeat calibration steps.
• Rinse the sonde in tap or purified water and dry. DO Probe (and depth) Calibration
• Place approximately 1/8-in (3 mm) of water or a saturated sponge in the bottom of the calibration cup. Make sure the DO and temperature probes are not immersed in the water. Wait approximately 10 minutes for the air in the cup to become water saturated. NOTE: if the transport cup is used, make certain that the cup is vented to the atmosphere by loosening the vent screw.
• From the Calibrate menu, select 2. DO% to access the DO% calibration procedure. • Enter the current barometric pressure in mm Hg. (inches of Hg × 25.4 = mm Hg). • Press ENTER and the computer will indicate that the calibration procedure is in progress. • After approximately 1 min, the calibration will be complete. Press any key as instructed, and
the screen will display the percent saturation value which corresponds to your local barometric pressure input. For example, if your local barometer reads 742 mm Hg, the screen will display 97.6% (742/760) at this point. If an error message is received, proceed to the diagnostics step; otherwise, press any key to return to the Calibrate menu (and skip the following diagnostic step).
• If an error message was received, conduct a diagnostics test. From the Main menu, chose 8. Diagnostics. Check the DO charge. This value should read between 25 and 75 during calibration. If out of this range, then the probe needs to be cleaned (pencil eraser) or replaced. After cleaning, repeat the above DO calibration procedure.
• Following the DO calibration, leave the sonde in water-saturated air. From the Calibrate menu, select 3. Depth to access the depth calibration procedure.
• Input 0.00 or some known sensor offset in feet. (The depth sensor is about 0.46 ft above the bottom of the probe compartment, and this offset value could be used if installing the unit vertically and depth in relation to the sonde bottom was desired.) Press ENTER and monitor the stabilization of the depth readings with time.
• When no significant change occurs for approximately 30 s, press ENTER to confirm the calibration and zero the sensor with regard to the current barometric pressure.
• Press any key to return to the Calibrate menu. pH Probe Calibration
• Place approximately 400 mL of pH 7 buffer in a clean calibration cup. Allow at least 1 min for temperature equilibrium before proceeding.
• Immerse probe into solution. From the Calibrate menu, select 6. pH to access the pH calibration choices and then 2. 2-Point.
• Press ENTER and input the value of the buffer (7.00) at the prompt. Press ENTER, and observe the values under pH until the readings are stable for 30 s.
• Press ENTER. The display will indicate that the calibration is accepted. (If an error message is received, repeat with fresh buffer.)
• Press any key to continue. • Rinse the sonde in water and dry before proceeding. • Place approximately 400 mL of a second pH buffer solution in a clean calibration cup. The
second buffer might be pH 4.01 if the monitored water is expected to be acidic, or pH 10.01 if the monitored water is expected to be basic. Allow at least 1 min for temperature equilibrium before proceeding.
• Press ENTER and input the value of the second buffer (4.01 or 10.01) at the prompt. Press ENTER, and observe the values under pH until the readings are stable for 30 s.
• Press ENTER. After the second value calibration is complete, press any key to return to the Calibrate menu.
• Rinse the sonde in water and dry before proceeding. Turbidity Probe Calibration
• Prepare 100 NTU solution. Dilute 4000 NTU formazin solution 1:40 with diH2O (pipette 25 mL of 4000 NTU formazin solution into 1-L volumetric flask and qs to 1 L). Formazin is a hazardous material, and special care needs to be taken. Read and follow all precautions.

LABORATORY SAFETY, WASTE DISPOSAL, AND CHEMICAL ANALYSES METHODS 785
• Select 9. Turbidity from the Calibrate menu, and then 2. 2-Point. • To begin the calibration, immerse the sonde in approximately 300 mL of 0 NTU standard (clear,
deionized water), and press ENTER. • Input the value 0.00 NTU at the prompt, and press ENTER. • After calibration of the mechanical wiper speed, the screen will display real-time readings,
which will allow you to determine when turbidity values have stabilized. If the readings appear unusually high or low or are unstable, there are probably bubbles on the optical surface. Activate the mechanical wiper by pressing the “3” key to remove the bubbles.
• After stable readings are observed for approximately 40 s, press ENTER to confirm the first calibration. Press any key to continue.
• Dry the sonde and probes carefully and then place the sonde in approximately 300 mL of the second turbidity standard (100 NTU). Input the value 100.0 NTU, press ENTER, and view the stabilization of the values on the screen.
• As described previously, if the readings appear unusually high or low or are unstable, activate the wiper to remove bubbles and be sure to wait 40 s before confirming the calibration.
• After the readings have stabilized, press ENTER to confirm the calibration. Press any key to return to the Calibrate menu. Input “0” to return to the Main menu.
• Proceed to the deployment setup procedure. Deployment Setup Procedure (for unattended monitoring)
• Unplug the AC power source, and continue this procedure using the sonde’s internal (battery) power. • Select 1. Run from the sonde Main menu. The Run menu will be displayed. • Select 3. Unattended sample from the Run menu. • The current time and date, all active sensors, battery voltage, and free flash disk space will be
displayed. • Note: if the current time and date are not correct, your unattended sampling study will not begin
or end when you desire. To correct the time and date, see Section 2.5 in the instruction manual. • You will be asked to enter the starting date. Use the following format: XX/XX/XX. For example
to start on 1 January, 1999, enter “01/01/99.” • Enter the starting time. Use the following format: XX/XX/XX. You must include not only hours
and minutes, but seconds. For example, if you want to start a study at 8 AM, you must enter “08:00:00.”
• Enter the study duration in days. For example, for a 2-week study, enter “14.” • Enter interval in minutes. For example, to collect data every 15 minutes, enter “15.” • Enter the site description. • You will be asked if all start-up information is correct. Check the information carefully (especially
the estimated battery life) and, if you want to change something, press “N.” If all information is correct, press “Y.” The following message will be displayed briefly: *INSTRUMENT IS IN UNATTENDED MODE*.
• Continue to press “zero” until the Ecowatch software breaks communication with the sonde (after exit from the Main menu).
• Remove the communication cable from the sonde and screw on the waterproof connector cap. The sonde is now ready for deployment.
REFERENCES
Day, J. Selection of Appropriate Analytical Procedures for Volunteer Field Monitoring of Water Quality. MSCE thesis, Department of Civil and Environmental Engineering, University of Alabama at Birmingham. 1996.
Pitt, R.E., R.I. Field, M.M. Lalor, D.D. Adrian, and D. Barbe. Investigation of Inappropriate Pollutant Entries into Storm Drainage Systems: A User’s Guide. Rep. No. EPA/600/R-92/238, NITS Rep. No. PB93131472/AS, U.S. EPA, Storm and Combined Sewer Pollution Control Program (Edison, NJ), Risk Reduction Engineering Lab., Cincinnati, OH. 1993
Pitt, R., S. Mirov, K. Parmer, and A. Dergachev. Laser applications for water quality analyses, in ALT’96 International Symposium on Laser Methods for Biomedical Applications. Edited by V. Pustovoy. SPIE — The International Society for Optical Engineering. Vol. 2965, pp. 70–82. 1997.

786 STORMWATER EFFECTS HANDBOOK
Pitt, R. and S. Clark. Communication Manhole Water Study: Characteristics of Water Found in Communica- tions Manholes. Final Draft. Office of Water, U.S. Environmental Protection Agency. Washington, D.C. July 1999.
Standard Methods for the Examination of Water and Wastewater. 19th edition. Water Environment Federation. Washington, D.C. 1995.


![Stormwater Filtration paper - 043006[Final.doc]unix.eng.ua.edu/~rpitt/Publications/StormwaterTreatability/Filtration... · The design of a stormwater filter needs to be divided into](https://img.pdfslide.us/doc/110x75/60a289e23d0f2139d06fcc0a/stormwater-filtration-paper-043006finaldocunixenguaedurpittpublicationsstormwatertreatabilityfiltration.jpg)