Embed Size (px)
Citation preview

Labels, Instructions and Features of Convertible Child RestraintSystems (CRS): Evaluating Their Effects on CRS Installation Errors
DOT HS 811 627 July 2012

DISCLAIMER
This publication is distributed by the U.S. Department of Transportation, National Highway Traffic Safety Administration, in the interest of information exchange. The opinions, findings, and conclusions expressed in this publication are those of the authors and not necessarily those of the Department of Transportation or the National Highway Traffic Safety Administration. The United States Government assumes no liability for its contents or use thereof. If trade names, manufacturers’ names, or specific products are mentioned, it is because they are considered essential to the object of the publication and should not be construed as an endorsement. The United States Government does not endorse products or manufacturers.

i
TECHNICAL REPORT DOCUMENTATION PAGE 1. Report No. DOT HS 811 627
2. Government Accession No.
3. Recipient's Catalog No.
4. Title and Subtitle Labels, Instructions and Features of Convertible Child Restraint Systems (CRS): Evaluating Their Effects on CRS Installation Errors
5. Report Date July 2012 6. Performing Organization Code
7. Author(s) Klinich, Kathleen D., Manary, Miriam A., Flannagan, Carol A. C., Ebert-Hamilton, Sheila, Malik, L. A., Green, Paul A., and Reed, Matthew P.
8. Performing Organization Report No.
9. Performing Organization Name and Address University of Michigan Transportation Research Institute 2901 Baxter Rd. Ann Arbor, MI 48109
10. Work Unit No. (TRAIS) 11. Contract or Grant No.
12. Sponsoring Agency Name and Address VTTI National Highway Traffic Safety Administration
13. Type of Report and Period Covered
14. Sponsoring Agency Code
15. Supplementary Notes Results of Task 2, Effect of Vehicle Features on CRS publication UMTRI 2010-38.
Installation Errors, will be reported in a separate
16. Abstract This report documents a study of how CRS features, labels, and instructions contribute to CRS installation errors. Task 1A focused on assessing different physical features of 16 convertible CRS, while Task 1B evaluated baseline and modified versions of labels and instructions for two CRS models. For each phase of testing, 32 subjects were recruited based on their education level (high or low) and experience with installing CRS (none or experienced). Each subject was asked to perform four child restraint installations in a 2006 Pontiac G6 sedan. An 18-month-old CRABI anthropometric test device (ATD) weighing 25 lb was used for all installations. Each subject installed two CRS forward-facing (FF), one with LATCH and one with seatbelt, and two CRS rear-facing (RF), one with LATCH and one with the seatbelt. For Task 1A, each subject installed four of the sixteen convertible CRS. For Task 1B, each subject installed a Graco ComfortSport and Evenflo Titan twice, where each CRS had one of eight alternate instruction manuals and one of eight alternate label conditions. After each installation, the experimenter evaluated 42 factors for each installation, such as choice of belt routing path, tightness of installation, and harness snugness. Analyses used linear mixed models to identify CRS installation outcomes associated with CRS features or label/ instruction type. LATCH connector type, LATCH belt adjustor type, and the presence of belt lockoffs are associated with the tightness of the CRS installation. The type of harness shoulder height adjuster is associated with the rate of achieving a snug harness. Correct tether use is associated with the tether storage method. In general, subject assessments of the ease of use of CRS features are not highly correlated with the quality of their installation, suggesting a need for feedback with incorrect installations. The results of testing alternative labels and instructions indicate that no alternative condition significantly improved CRS installation compared to baseline conditions across all potential installation errors that were evaluated. An unintended consequence of using “combined” labels (incorporating all of the variations recommended by human factors experts that were tested individually in other conditions) is that subjects were less likely to use the CRS manual. The most promising alternative manual is a video version. Neither the labels nor manuals with improved graphics showed substantial benefit compared to baseline, even though graphics-based manuals and labels score well using the ISO and NHTSA ease-of-use rating system. The effects of varying labels and manuals on installation error are small compared to the effects of different CRS designs. The data from this study provide quantitative assessments of some CRS features that are associated with reductions in CRS installation errors. This information can be used to update the NHTSA CRS ease-of-use rating system to account for recently developed CRS features. Based on human factors recommendations, suggestions are made for assessing “clear” labels and instructions and modifying FMVSS 213 requirements to facilitate clearer labels and instructions. 17. Key Word Child restraints, installation, instructions, labels
misuse, ease-of-use, 18. Distribution Statement Document is available to the public from the National Technical Information Service www.ntis.gov
19. Security Classif. (of this report)
20. Security Classif. (of this page)
21. No. of Pages 177
22. Price
Form DOT F 1700.7 (8-72) Reproduction of completed page authorized

ii
Metric Conversion Chart
APPROXIMATE CONVERSIONS TO SI UNITS SYMBOL WHEN YOU KNOW MULTIPLY
BY TO FIND SYMBOL
LENGTH In inches 25.4 millimeters Mm Ft feet 0.305 meters m Yd yards 0.914 meters m Mi miles 1.61 kilometers km
AREA in2 squareinches 645.2 square millimeters mm2 ft2 squarefeet 0.093 square meters m2 yd2 square yard 0.836 square meters m2 Ac acres 0.405 hectares ha mi2 square miles 2.59 square kilometers km2
VOLUME fl oz fluid
ounces 29.57 milliliters mL
gal gallons 3.785 liters L ft3 cubic
feet 0.028 cubic meters m3
yd3 cubic yards
0.765 cubic meters m3
NOTE: volumes greater than 1000 L shall be shown in m3 MASS
oz ounces 28.35 grams g lb pounds 0.454 kilograms kg T short
tons (2000 lb)
0.907 megagrams (or "metric ton")
Mg (or "t")
TEMPERATURE (exact degrees) oF Fahrenheit 5 (F-32)/9
or (F-32)/1.8 Celsius oC
Task 1 Final Report
iii
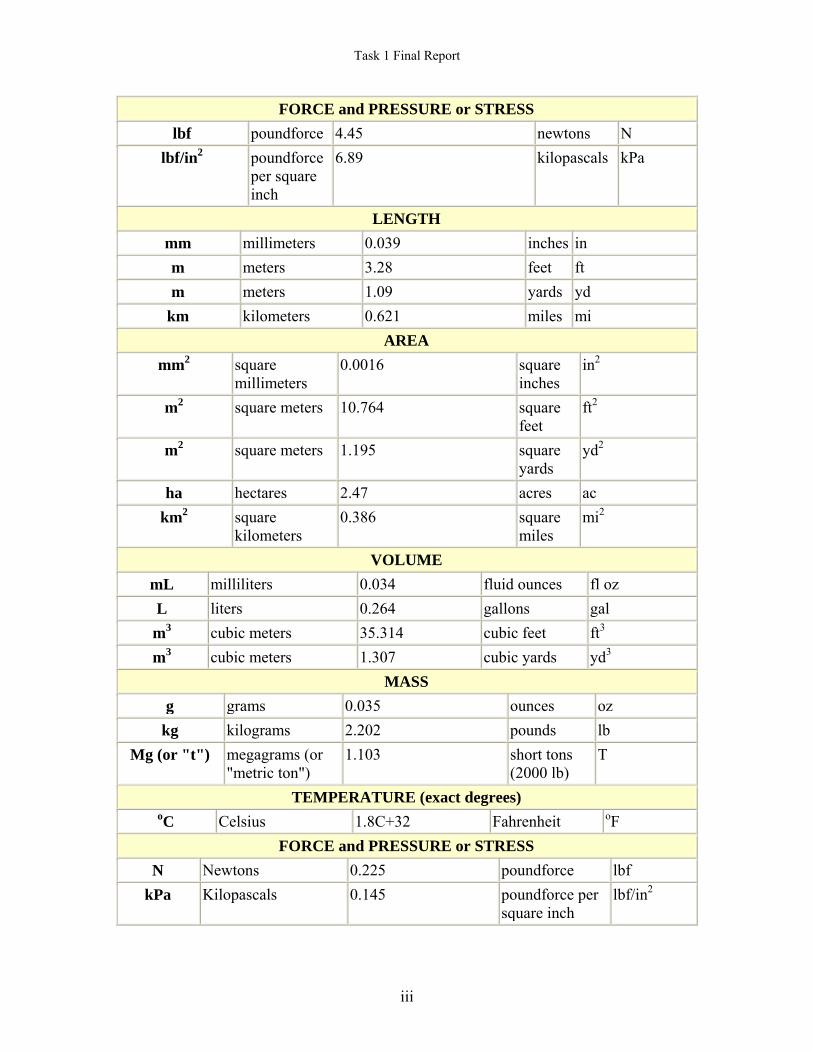
FORCE and PRESSURE or STRESS lbf poundforce 4.45 newtons N
lbf/in2 poundforce per square inch
6.89 kilopascals kPa
LENGTH mm millimeters 0.039 inches in m meters 3.28 feet ft m meters 1.09 yards yd
km kilometers 0.621 miles mi AREA
mm2 square millimeters
0.0016 square inches
in2
m2 square meters 10.764 square feet
ft2
m2 square meters 1.195 square yards
yd2
ha hectares 2.47 acres ac km2 square
kilometers 0.386 square
miles mi2
VOLUME mL milliliters 0.034 fluid ounces fl oz L liters 0.264 gallons gal m3 cubic meters 35.314 cubic feet ft3 m3 cubic meters 1.307 cubic yards yd3
MASS g grams 0.035 ounces oz
kg kilograms 2.202 pounds lb Mg (or "t") megagrams (or
"metric ton") 1.103 short tons
(2000 lb) T
TEMPERATURE (exact degrees) oC Celsius 1.8C+32 Fahrenheit oF
FORCE and PRESSURE or STRESS N Newtons 0.225 poundforce lbf
kPa Kilopascals 0.145 poundforce per square inch
lbf/in2

Task 1 Final Report
iv
*SI is the symbol for the International System of Units. Appropriate rounding should be made to comply with Section 4 of ASTM E380. (Revised March 2003)

v
Acknowledgments
This work was funded by the National Highway Traffic Safety Administration under
cooperative agreement DTNH22-09-R-00286 with collaboration between Virginia Tech
Transportation Institute and the University of Michigan.
The authors would like to acknowledge Charles Bradley, Amanda Herrick, Jamie Moore,
Nichole Ritchie Orton, and Rachael Hamilton for their contributions to this project.

Task 1 Final Report
vi
Table of Contents
Metric Conversion Chart ..................................................................................................... ii Acknowledgments............................................................................................................... v List of Figures .................................................................................................................. viii List of Tables ..................................................................................................................... xi Executive Summary ............................................................................................................ 1 Introduction ......................................................................................................................... 5 Background ......................................................................................................................... 5
Scope of the problem ...................................................................................................... 5 Factors Associated with Misuse...................................................................................... 6 Approaches to Reduce Misuse ........................................................................................ 6 The LATCH System and Misuse .................................................................................... 7 Reducing Misuse through Design ................................................................................... 7 Ease-of-use Ratings ........................................................................................................ 8 Readability and Usability of Instructions and Labels ..................................................... 9
Methods............................................................................................................................. 11 Recruitment ................................................................................................................... 11 Subject Selection ........................................................................................................... 11 Test Protocol ................................................................................................................. 13
Vehicle selection ....................................................................................................... 13 Test setup .................................................................................................................. 16 Testing sequence ....................................................................................................... 18 Testing forms ............................................................................................................ 18 Assessment forms ..................................................................................................... 19
Test Matrix .................................................................................................................... 21 CRS Features (Task 1A) ........................................................................................... 21 CRS Selection (Task 1A) .......................................................................................... 25 Instruction/Label conditions (Task 1B) .................................................................... 29 Instruction/label experiment design (Task 1B) ......................................................... 34 Data analysis ............................................................................................................. 36
Results ............................................................................................................................... 38 Subject Installation Errors: Task 1A ............................................................................. 38
Overview ................................................................................................................... 38 CRS installation tightness ......................................................................................... 39 Harness snugness ...................................................................................................... 42 Tether installation ..................................................................................................... 44 LATCH belt attached to lower anchorages ............................................................... 46 Installation method used ........................................................................................... 46 Harness routing ......................................................................................................... 47 Harness clip ............................................................................................................... 48 Recline ...................................................................................................................... 48 Correct belt path ........................................................................................................ 48 Crotch strap ............................................................................................................... 49 Locking seatbelt ........................................................................................................ 50 Instruction use ........................................................................................................... 52

Task 1 Final Report
Installation time ........................................................................................................ 52 Choosing correct restraint ......................................................................................... 53
Subject Evaluation of Features ..................................................................................... 54 Overview ................................................................................................................... 54 Subject assessments of their performance ................................................................ 55 Manuals and Labels .................................................................................................. 56 CRS attachment ........................................................................................................ 59 Pool noodles .............................................................................................................. 60 Harness ...................................................................................................................... 61 Belt routing ............................................................................................................... 62 Recline ...................................................................................................................... 63 Tether ........................................................................................................................ 65 Buckle and harness clip ............................................................................................ 66
Subject Installation Errors: Task 1B ............................................................................. 68 Subject Assessments of Labels and Instructions: Task 1B ........................................... 75 Experimenter Qualitative Assessment of Installations ................................................. 83
Instructions/manuals ................................................................................................. 84 Installation order ....................................................................................................... 84 Vehicle ...................................................................................................................... 85 Belt Routing .............................................................................................................. 85 FF/RF ........................................................................................................................ 85 Belt Locking.............................................................................................................. 85 CRS Adjustments ...................................................................................................... 86 Harness ...................................................................................................................... 86 LATCH ..................................................................................................................... 86 Subjects ..................................................................................................................... 86
Discussion………………………………………………………………………………..88 Subject Factors .............................................................................................................. 88 Unexpected results ........................................................................................................ 88 Comparison to other studies.......................................................................................... 90 Alternate Labels and Manuals ...................................................................................... 91 Study Limitations .......................................................................................................... 92 Considerations for NHTSA ease-of-use ratings ........................................................... 94 Suggestions for labels and instructions ......................................................................... 97
References ....................................................................................................................... 100 Appendix A. Ad text and flier ......................................................................................... 103 Appendix B. Subject screening script, consent forms, and race/ethnicity forms ........... 106 Appendix C. Pre-test checklist, testing script, subject and experimenter evaluation forms ............................................................................................................................... 114 Appendix D. CRS Features and illustrated dictionary of features .................................. 128 Appendix E. Samples of alternate labels ........................................................................ 147 Appendix F. Excerpts from alternate manuals ................................................................ 153
vii

Task 1 Final Report
viii
List of Figures Figure 1. Average subject age by CRS experience and education level (low and
high) for Task 1A. ..................................................................................... 13 Figure 2. Locations of 2006 Pontiac G6 rear seat lower anchorages and seatbelt
buckles. ..................................................................................................... 14 Figure 3. Tether anchorage locations and headrests in upright position for CRS
installation as directed by vehicle owner’s manual. ................................. 14 Figure 4. Close-up view of lower anchorage locations on rear passenger-side
seat. ........................................................................................................... 15 Figure 5. View of rear seat space with front seats set to test position. ..................... 15 Figure 6. Pre-test position of vehicle doors. ............................................................. 16 Figure 7. 18MO CRABI (left) and 18MO CAMI (right). ........................................ 17 Figure 8. Measuring amount of harness slack. ......................................................... 20 Figure 9. Measuring amount of tether slack. ............................................................ 20 Figure 10. Measuring amount of CRS lateral displacement under applied load. ....... 20 Figure 11. Locations of CRS belt paths when installed RF (left) and FF (right)
on the FMVSS 213 buck. .......................................................................... 22 Figure 12. Classifications of RF belt paths. ............................................................... 23 Figure 13. Classifications of FF belt paths. ................................................................ 23 Figure 14. CRS installation time for subjects who did not complete four trials. ....... 29 Figure 15. Percentage of installations passing 1” test for tightness by subject
experience and education level. ................................................................ 39 Figure 16. Percentage of LATCH installations passing 1” test for tightness by
LATCH connector type. ............................................................................ 40 Figure 17. Percentage of LATCH installations passing 1” test for tightness by
LATCH belt adjustment type. ................................................................... 41 Figure 18. Percentage of seatbelt installations passing 1” test for tightness by
LATCH connector type. ............................................................................ 42 Figure 19. Percentage of seatbelt installations passing 1” test for tightness by
LATCH adjuster type. ............................................................................... 42 Figure 20. Percentage of installations passing pinch test for snug harness by
subject CRS experience and education. .................................................... 43 Figure 21. Percentage of installations passing pinch test for snug harness by
harness shoulder height adjustment type .................................................. 44 Figure 22. Percentage of installations in which the tether was used appropriately. ... 45 Figure 23. Use of tether RF ........................................................................................ 45 Figure 24. Choice of installation method ................................................................... 46 Figure 25. Percentage of installations with harness in correct slot by subject
education and experience. Lower part of each bar indicates correct slot selection, while upper part of bar indicates slot chosen was allowed for the RF or FF mode. ................................................................................... 47
Figure 26. Percentage of installs at correct recline angle. .......................................... 48 Figure 27. Percentage of installs with belt routed through correct path by subject
experience and education level. ................................................................ 49 Figure 28. Percentage of installs with correct crotch strap position by type of
crotch strap adjustment. ............................................................................ 50

Task 1 Final Report
ix
Figure 29. Percentage of seatbelt installs by how subject locked the seatbelt. .......... 51 Figure 30. Percentage of seatbelt installs by how subject locked the seatbelt for
RF and FF installations. ............................................................................ 51 Figure 31. Percentage of installs where subject used vehicle manual by trial
number. ..................................................................................................... 52 Figure 32. Average installation time (and standard deviation) by subject CRS
experience and education. ......................................................................... 53 Figure 33. Subject rate of tight installation vs. subject assessment of how well
they attached the CRS for each CRS. ....................................................... 56 Figure 34. Subject rate of snug harness vs. subject assessment of how well they
secured the child for each CRS. ................................................................ 56 Figure 35. Rate of tight installation vs. subjects’ ratings of ease of understanding
manual about installation. ......................................................................... 57 Figure 36. Rate of snug harness installation vs. subjects’ ratings of ease of
understanding manual about securing child. ............................................. 58 Figure 37. Combined rate of tight installation, snug harness, and correct belt path
vs. subjects’ ratings of ease of understanding labels. ............................... 58 Figure 38. Rate of tight installation vs. subjects’ ratings of ease of attaching the
CRS. .......................................................................................................... 59 Figure 39. Percentage of LATCH installs with LATCH belt attached correctly vs.
subjects’ ratings of ease of attaching the LATCH belt. ............................ 60 Figure 40. Percentage of seatbelt installs with LATCH belt stored correctly vs.
subjects’ ratings of ease of storing the LATCH belt. ................................ 60 Figure 41. Percentage of trials with snug harness compared to subjects’ ratings of
ease of moving harness. ............................................................................ 61 Figure 42. Percentage of trials with snug harness compared to subjects’ ratings of
ease of tightening harness. ........................................................................ 62 Figure 43. Percentage of trials with correct belt routing vs. subjects’ rating of ease
of routing belt ............................................................................................ 63 Figure 44. Percentage of trials with correct recline angle vs. subject rating of ease
of adjusting recline. ................................................................................... 64 Figure 45. Percentage of trials with correct recline angle vs. subject rating of ease
of figuring out recline angle. ..................................................................... 64 Figure 46. Percentage of tether installations with tether used correctly vs. subjects’
assessment of how easy it was to attach tether. ........................................ 65 Figure 47. Percentage of tether installations where tether is tight vs. subjects’
assessment on how easy it was to tighten tether. ...................................... 66 Figure 48. Percentage of installations with harness correctly buckled vs. subjects’
assessments of ease of buckling harness. .................................................. 67 Figure 49. Percentage of installations with harness clip correctly fastened vs.
subjects’ assessments of ease of fastening harness clip ............................ 67 Figure 50. Percentage of installations with harness clip at correct position vs.
subjects’ assessments of ease of positioning harness clip ........................ 68 Figure 51. Percentage of trials in which the subject used the CRS manual by CRS
label type. .................................................................................................. 69
Task 1 Final Report
x
Figure 52. Lap/shoulder belt routing diagram for ComfortSport (left) and Titan (right). ....................................................................................................... 72
Figure 53. Average correct installation rate (based on eight key points) by label type. ........................................................................................................... 73
Figure 54. Percentage of correct installation (based on eight key points) by manual type. .............................................................................................. 74
Figure 55. Label with harness adjustment information: baseline on left and graphics on right. ...................................................................................... 78
Figure 56. Illustration of combined labels dealing with belt routing from ComfortSport. ........................................................................................... 79
Figure 57. Overall rates of correct installations. ........................................................ 90

Task 1 Final Report
xi
List of Tables Table 1. Summary of CRS features and subject factors that affect installation
errors ........................................................................................................... 2 Table 2. Belt path classification for each CRS. ...................................................... 23 Table 3. Readability scores for CRS labels ............................................................. 24 Table 4. Model, manufacturer, and brief descriptions of CRS selected
for study .................................................................................................... 26 Table 5. Distribution of combinations of lower connector type and LATCH
belt adjustor across CRS test set ............................................................... 26 Table 6. Distribution of combinations of lower connector type and harness
shoulder height adjustment across CRS test set ........................................ 27 Table 7. Distribution of combinations of LATCH belt adjustor and harness
shoulder height adjustment across CRS test set ........................................ 27 Table 8. Test matrix for Task 1A ............................................................................ 28 Table 9. CRS considered for use in label/instruction evaluation study .................. 29 Table 10. Pros and cons of CRS manuals selected for testing and revision. ............ 30 Table 11. Task 1B label and instruction conditions .................................................. 31 Table 12. Task analysis for convertible seats (based on Tsai and Perel, 2008) ........ 32 Table 13. Matrix for label/instruction variations. ..................................................... 35 Table 14. Summary of CRS and subject factors that affect installation ................... 38 Table 15. Rate of correct answers regarding whether different sizes of children
can use restraint, predictors, F-tests, and p-values .................................... 54 Table 16. Difference between alternate labels and baseline condition ..................... 70 Table 17. Difference between alternate manuals and baseline condition ................. 71 Table 18. Rate of correct answers regarding whether different sizes of children
can use restraint, plus predictors, F-tests, and p-values ............................ 75 Table 19. Difference between subject assessments of alternate labels and
baseline condition ..................................................................................... 76 Table 20. Difference between subject assessments of alternate manuals and
baseline condition ..................................................................................... 81 Table 21. Table of other factors affecting subject assessments during testing of
alternate labels and manuals ..................................................................... 83 Table 22. Comparison of misuse rates in current and selected field studies ............ 91 Table 23. Summary of Task 1A findings with potential application for updating
NHTSA EOU ratings. ............................................................................... 96

Task 1 Final Report
1
Executive Summary Several studies have documented high rates child restraint systems (CRS) “misuse’, which includes a large range of both safety-critical and minor deviations from manufacturers’ instructions and best practices on installation and use (Eby and Kostyniuk, 1999; Decina and Lococo 2005; Koppel and Charlton 2009; Lane, et al., 2000). Introduction of the Lower Anchorages and Tethers for CHildren (LATCH) system for securing CRS in vehicles has helped reduce misuse in some instances but has also led to new forms of misuse [Decina and Lococo, 2007). The NHTSA has established an ease-of-use rating system for CRS (NHTSA, 2002 and 2006) in an effort to encourage CRS manufacturers to include features that may reduce misuse. Improving the readability of labels and manuals has also been suggested as an approach that would reduce misuse, but quantitative evidence for this proposition is lacking. This study investigated the associations between CRS features, labels, and instructions and CRS installation errors. Task 1A focused on assessing different physical features of CRS, while Task 1B evaluated baseline and modified versions of labels and instructions for two CRS models. Results of the study will allow better assessment of the ease of use associated with specific CRS features, labels, and instructions. For each phase of testing, 32 different subjects were recruited based on their education level (high or low) and experience with installing CRS (none or expert), with each group fairly evenly distributed by gender. Each subject was asked to perform four convertible child restraint installations in a 2006 Pontiac G6 sedan. This vehicle was selected because its features were expected to provide a relatively unchallenging environment for installing CRS in the right-rear seating position. An 18-month-old CRABI anthropometric test device (ATD) weighing 25 lb was used for all installations. Each subject performed two forward-facing (FF) installations (one using LATCH and one using seatbelt) and two rear-facing (RF) installations (one using LATCH and one using the seatbelt). Each CRS was presented to the subject in the “as-delivered” configuration, with the harness, LATCH belt, and recline adjustment set to their original factory settings. The test matrix was constructed to take advantage of within-subject comparisons that provide the maximum information from the fewest subjects. Sixteen convertible CRS were used in Task 1A. Each subject installed four CRS, each from a different manufacturer. The allocation of CRS across subjects was chosen so that each subject was exposed to a range of CRS features. The following CRS features were documented for use as potential predictors of installation error during analysis: rear-facing (RF) belt path location, forward-facing (FF) belt path location, lower connector type, LATCH belt adjustor type, tether adjustor type, tether attachment (single or dual), harness shoulder height adjustor, harness tightening mechanism, method of switching LATCH belt from FF to RF, number of crotch strap positions, crotch strap adjustment mechanism, buckle type, recline method, use of a base, FF lock-off style, RF lock-off style, LATCH storage method, tether storage method, chest clip type, label readability,

Task 1 Final Report
2
and instruction manual factors (length, readability, use of color-coding, type of figures, and figure frequency). For Task 1B, each subject installed a Graco ComfortSport and Evenflo Titan twice, where each CRS had one of eight alternate instruction manuals and one of eight alternate label conditions. Alternative labels included none, baseline, improved graphics, color coded, improved text, numbered, rearranged by task, and combined. Alternative manuals included none, baseline, improved graphics, video, improved text, photo illustrations (rather than diagrams), reorganized by task, and combined. Combined labels and manuals used all of the variations recommended by human factors experts that were tested individually in other conditions. After each installation, the subject filled out a questionnaire describing his or her assessment of the installation and the rating of different CRS features or the instructions/labels. Subjects were also asked whether children of different sizes could use the particular CRS in FF or RF modes. This question assessed whether subjects could interpret the CRS labels and instructions to choose the correct CRS for a child. The experimenter, who had taken child passenger safety technician training, assessed the subject’s installation, evaluating 42 factors for each installation as correct or incorrect. Analyses were conducted using CRS features or label/instruction type as potential within-subject predictors. Subject factors (experience, education, gender) were considered as potential between-subject predictors. Dependent variables include the 1” movement test for tightness, harness snugness, and other dependent variables shown in Table 1. Linear-mixed models were used to identify predictors significantly associated with CRS installation errors. Table 1 lists key installation factors and the significantly associated CRS and subject factors.
Table 1. Summary of CRS features and subject factors that affect installation errors
Installation result (dependent measures)
Subject factors CRS factors (independent predictors)
CRS passes 1” movement test General Education CRS Experience
LATCH connector type LATCH belt adjustor type Lockoffs
Harness snug CRS Experience Gender
Harness shoulder height adjustor
Tether correct Tether storage method Harness clip FF vs. RF Correct recline Gender FF vs. RF Correct belt path General Education Rerouting of LATCH belt Crotch strap correct Type of adjustment

Task 1 Final Report
3
In general, subject assessments of the ease of using different CRS features are not highly correlated with the quality of their installation. Consequently, users’ perceptions of the ease of installation may not be reliably related to the likelihood of correct installation. No alternate label or instruction condition showed significant improvement compared to baseline across all potential installation errors that were evaluated. For the labels, an unintended consequence of using “combined” labels is that subjects were less likely to use the CRS manual (71% vs. 87%). The most promising alternate manual was a video version (correct composite installation score of 83% vs. 74% baseline). Improving the graphics on the labels or in manuals did not improve installation performance, even though graphics-based manuals and labels are rewarded in scoring using the ISO and NHTSA ease-of-use rating systems. The effects of varying labels and manuals on installation error are small compared to the effects of different CRS designs features. Subjects preferred some of the alternative versions of the labels and manuals even though the alternative versions did not improve performance. The data from this study provide quantitative identification of some CRS features that lead to reductions in CRS installation errors. These results can be used to update the NHTSA CRS ease-of-use rating system to focus on features associated with reduced misuse rates. As part of this research, an extensive investigation of the current research regarding labeling and instructions was conducted. The findings influenced the redesign of the labels and instructions for the current study, but only changing the primary mode of presentation of the manual information to a video format had a significant effect on installation errors. However, none of the modifications had an adverse affect on installation performance. Additional research on how to improve CRS labels and manuals is suggested, partly because some of the current requirements of FMVSS 213 may hamper efforts to develop improved labels. Factors that should be considered in future research, based on current best practices in instruction and label design for consumer products, include examining potential benefits of:
1) Have a reading level below 7th grade (including the required text of FMVSS 213) 2) Use numbering on labels and manuals to indicate the order of steps in proper use 3) Have labels placed near where task/action happens 4) Emphasize key steps in text rather than highlighting individual words like “DO
NOT” and “NEVER” 5) Present steps in the order of the required tasks. 6) Update the terminology in for tether instruction to call it a “top tether” rather than
the “top anchorage strap”, and indicate whether it should be used forward-facing, rear-facing, or both.
7) Update terminology to refer to the “child restraint anchorage system” as “LATCH”.
8) Eliminate reference to children who “are capable of sitting upright alone” from the allowed text that describes the height and weight limits of the CRS.

Task 1 Final Report
4
9) Require labels indicating that the seatbelt or LATCH belts must be tight. 10) Encourage color-coding by installation mode (which would involve changes to
FMVSS 213) 11) Clarify the wording regarding RF and FF weight limits to be consistent with the
latest NHTSA and AAP recommendations. 12) Provide “combined” optional “open-source” graphics and text, developed by
additional research efforts, which could be used by any manufacturer in labels or in manuals.
13) Encourage the use of standardized terms to refer to the parts and features of the CRS

Task 1 Final Report
5
Introduction This report documents the methods and results used to perform a study of how child restraint system (CRS) features, labels, and instructions contribute towards CRS installation errors. Task 1A of this task focused on assessing different physical features of CRS, while Task 1B evaluated baseline and modified versions of labels and instructions for two CRS.
Background
Scope of the problem Motor vehicle crashes are the leading cause of death for children ages 3-18 (CDC, 2011). In 2008, 1633 children under the age of 16 died and 220,000 were injured as a result of motor-vehicle crashes (NHTSA, 2009). The use of a child restraint system (CRS) is an effective countermeasure that reduces the likelihood of crash fatality by 71% for infants and 54% for toddlers, depending primarily on the restraint type and orientation (NHTSA, 2002). Misuse has been shown to markedly reduce the effectiveness of CRS (Nygren et al., 1987; Carlsson et al., 1991; Ruta et al., 1993; Czernakowski et al., 1993; Johnston at al., 1994; Graham et al. 2002; Brown et al., 2006; Lesire et al. 2007, Menon and Gahti, 2007; Bilston et al., 2007). Several recent studies have estimated CRS misuse rates ranging from 73 - 94% (Decina et al., 1994; Eby and Kostyniuk, 1999; Lane, et al., 2000; Decina and Lococo 2005; Koppel and Charlton 2009). Some of the variation in these estimates originates in the study designs, subject recruitment methods, and the level of inspection that is used to determine misuse. In addition, researchers may use different definitions of loose and improper in each study. Identified types of misuse observed in the field include:
Loose vehicle seatbelt Loose harness straps Incorrect selection of CRS for height/weight/age of child Improper positioning of harness strap Improper harness belt routing Improper vehicle belt path Unbuckled vehicle seatbelt Harness not used Harness not buckled CRS broken or damaged Vehicle seat too small to accommodate at least 80% of CRS base footprint Inappropriate CRS installation angle Incorrect CRS direction (i.e. using an infant seat forward-facing) Nonuse of a tether, when available and appropriate Incorrect tether strap tensioning Use of both LATCH and seatbelt to secure a CRS

Task 1 Final Report
6
Placement of a rear-facing (RF) CRS in front of an active frontal airbag. Improper harness retainer clip position Improper retainer clip threading Attachment of aftermarket products to the restraint
Loose vehicle installation and loose restraint harness have been consistently observed across studies as the most frequent types of misuse. Lane (2000) surveyed the CRS installations for 109 subjects and found that 84% had between 1 and 3 installation errors with an average of 2 errors per installation.
Factors Associated with Misuse Several studies have identified factors correlated with misuse. Koppel and Charlton (2009) found statistically significant differences in misuse rates between CRS types, with forward-facing (FF) harness restraints having the higher observed level of misuse than rear-facing (RF) seats or belt-positioning boosters. Eby and Kostyniuk (1999) found that higher levels of misuse were associated with: lower educational levels, situations where the driver was not the child’s legal guardian, the number of times that the seat was moved/reinstalled into different vehicles, and children who were younger and smaller. Lane et al. (2000) found a trend for less misuse with higher education attainment level and participation in a private insurance program.
Approaches to Reduce Misuse Several tactics have been employed to improve child passenger safety (CPS), reduce misuse and increase use of CRS in the US. 47 states and the District of Columbia have improved and upgraded their child restraint laws to require their use by children over age 4, which has substantially improved the overall CRS usage rate and particularly increased booster seat use (Insurance Institute for Highway Safety 2011, SafeKids Worldwide, 2007, Decina and Lococo, 2005). In 1998, NHTSA introduced their National Child Passenger Safety certification training program that has established a cadre of specially-trained child seat technicians across the nation to educate parents/caregivers and be advocates for safe travel practices for children. Over 90,000 people have taken the course, and there are currently 33,000 certified technicians as of July 2010. The program has led to an increase in the number of CRS fitting stations (over 3800) and check-up events held in the US by many different government, private, and nonprofit organizations. In the past year, the National SafeKids Campaign (the certifying body for the national CPS technician training program) celebrated its one millionth checked CRS in the US. These programs have increased the availability of hands-on CRS instructional opportunities that have been shown to be a more effective educational method than information alone (Lane et al. 2000). While this network of CPS technicians has done much to improve educational resources and has contributed to increased awareness of best practices, more work remains to reduce pediatric automotive crash fatalities and injuries resulting from misuse.
Task 1 Final Report
7
The LATCH System and Misuse The LATCH system, consisting of two lower anchors and a top tether, was phased into the US market beginning in September 1999. Two of the main reasons to introduce LATCH were 1) to provide an easier method for CRS installation that would eliminate the need to know how to lock the seatbelt system or use a locking clip and 2) to increase the use of top tethers to reduce forward head excursion, and in turn, head contacts during crash events. In 2007, Decina and Lococo published the results of a misuse survey focusing specifically on LATCH. In situations where tether use was required and all the tether hardware was available, only 51% of those surveyed were using the top tether. Loose tethers were observed in 18% of cases and loose LATCH straps were seen in 30% of cases. In 20% of cases, CRS were installed using both LATCH and seatbelt. This study highlighted that LATCH did not eliminate CRS misuse.
Reducing Misuse through Design Although education and enforcement campaigns can make important improvements in CRS use and the reduction of misuse (Decina, et al. 1994), changes in CRS design, instruction and labeling can also reduce misuse. CRS manufacturers have tried many strategies to reduce errors. Current CRS design features that are intended to reduce misuse include color-coded belt paths, puzzle buckles that help reduce incidence of false harness latching, harnesses that can be adjusted without rethreading through harness slots in the shell, audible and visual feedback on attachment mechanisms, single action harness tightening mechanisms, and built-in belt lock-off devices that eliminate the need for locking clips or switching vehicle belts into locking mode. The process of installing and using a CRS has been shown to be physically demanding (Brown et al., 2008) and some manufacturers have employed reduced force LATCH lower anchors. Rudin-Brown et al. (2003) investigated convertible CRS harness design features and their effect on perceived usability and level of misuse in a laboratory study. They found significantly higher rates of misuse in RF installations compared with FF and also found that features perceived as being more protective were also the features most misused. Although convertible CRS designs have evolved significantly since this study was conducted, and some of the features tested no longer appear in currently produced CRS, the study provides insights into applicable methods. Tsai and Perel (2008) studied CRS and vehicle factors and their relationship to CRS installation errors observed with novice installers. The factors assessed included LATCH connector type, CRS model, labels, and instructions (both CRS and vehicle). They found that misuse errors were common although the majority of subjects felt confident in the successful outcome of their installation. The study recommended simpler instructions that are easier to find and that provide a consistent message to the user. In particular, more information about how to lock the seatbelt system and when/how to use LATCH

Task 1 Final Report
8
was needed. The study also found that LATCH lower anchors need to be easier to find and use in the vehicle. In a larger related study, Tsai and Perel (2009) tested experienced and novice CRS users to determine why CRS installation errors occurred. Both groups made common mistakes in installing the CRS, including loose CRS installation, simultaneous use of LATCH and seatbelt, twisted LATCH belts, incorrect CRS angle and incorrect belt routing. Experienced subjects made the errors less frequently and many subjects reported high confidence that they had performed the installation correctly. Some subjects completed surveys to identify how labels and manuals could be improved, but alternate versions were not investigated to determine their effectiveness. Tsai and Perel recommended improvements in instructions and labels such as improving readability, making the task sequence more obvious, enhancing graphics to make their context more understandable, color coding text and parts, and positioning task labels near the related elements of the CRS.
Ease-of-use Ratings The current NHTSA Ease-of-use (EOU) Rating system (NHTSA, 2006) was developed to provide consumers with information about which CRS have features that enhance usability. The system has provided strong incentives for CRS manufacturers to improve products, labeling, and instruction manuals with respect to usability. The rating system includes questions that address each CRS area related to the most common misuse modes, although some manufacturers have suggested that the NHTSA EOU rating scheme and its wording could be improved to increase clarity and repeatability of the rating process (SafeRideNews 2003, 2008). In the field, some misuse modes arise from features and elements of the vehicle environment and others result from interactions between specific CRS and vehicle combinations. A usability rating scheme under development in the ISO Child Restraints Group has rating forms for all three elements: the CRS, the vehicle, and specific combinations of the two (ISO, 2008). This rating system currently focuses on LATCH-type systems that are called ISOFIX systems in the international arena. Some of the vehicle features that are rated in the current version of the ISO document include the vehicle owner’s manual instructions on how to identify the number and location of seating positions available for CRS installation, the visibility and labeling of the LATCH anchors, the presence of other hardware elements that could be mistaken for LATCH anchors, the actions required for preparing the seating position for CRS installation, and conflicts between LATCH and seatbelts. Adding a vehicle ease-of-use rating to the current NHTSA evaluation could present another opportunity for reducing CRS installation errors. NHTSA proposed a vehicle/CRS fit evaluation program in March 2011 to provide information to consumers about compatibility vehicle/CRS pairings. http://www.nhtsa.gov/staticfiles/rulemaking/pdf/Fit_Request_for_comments_02252011.pdf

Task 1 Final Report
9
Some of the NHTSA rating points combine several key features that are rated separately in the ISO system. For example, ISO has separate questions that rate the ease of tether strap adjustment, the number of steps required to attach the tether, and the ease of releasing tension from the tether. In the NHTSA form, these are all combined into a single question. Another difference in the ISO system is that an unacceptable score in only one of a set of selected items that are considered essential to safety will result in an overall poor score. Several elements addressed in the ISO usability are not specifically covered in the NHTSA EOU system, including ease of releasing the CRS from the vehicle, audible and visual feedback that helps convey to the user if the CRS system is properly installed, and ways to assess if a harness tightening system is prone to hidden slack, among others.
Readability and Usability of Instructions and Labels An issue repeatedly identified as leading to misuse of CRS is the difficulty of understanding instructions and labels. The topic of the readability and usability of written materials has been a topic of long-standing interest. The seminal reference on the topic is George Klare’s, The Measurement of Readability, first published in 1963, which lists 483 references. Much of that work concerned the readability of textbooks, especially for elementary education, though there was interest in periodicals, mostly for general consumption. The end product of that research was a large number of equations that predicted the readability of text, with the dependent measure being the grade reading level. Independent measures included the number of words in a sentence, the number of syllables per word, the frequency of each word in the language or if each word was on a list of common words, and structural measures such as the number of prepositional phrases, the number of indefinite clauses, the number of finite verbs, and so forth. Over the last few decades, there has been more interest in technical materials, especially technical manuals (Williams et al. 1974, Siegel and Burkett, 1974, Hartley, 1985, Doheny-Farina, 1988). More recently, the focus has shifted even further to technical documentation, especially to computer manuals (such as the IBM minimal manual project) and on-line documentation. There has been some work on the comprehension of tables and graphs (Gillan et al. 1998), but not much on other types of illustrations, though there are plenty of recommendations about how to present them (Tufte, 2001). Furthermore, recent work has focused on cognitive task analysis and how the written material specifically supports what the user needs to do. In addition, readability measures such as the Flesch-Kincaid Reading Ease score (Flesch 1948 and Kincaid et al. 1975) were incorporated into widely used word processing software such as Microsoft Word during the last decade, to make assessment of text straightforward. While extensive research on developing warnings, labels, and instructions has been performed, there are limited specific recommendations for labels and manuals. For example, there is no consensus as to whether diagrams or photos are more effective in conveying information. Graphical-based labels and manuals can be useful for users who speak other languages, but can be challenging to develop for complex tasks. General recommendations for labels and manuals (based on the sources listed in the previous paragraph) include:

Task 1 Final Report
10
1) Simple font, with emphasis provided by bold rather than italics 2) Present tasks in order 3) Number key tasks 4) Color-code manuals, text, and parts 5) Minimize the number of warnings 6) Place labels near where the task is performed 7) Aim for 5th/6th grade reading level 8) Leave sufficient white space 9) Use text of sufficient size
Research on readability applied to CRS was performed by Rudin-Brown et al. (2004) in a study that involved 48 subjects installing a CRS with pre-2003 labels, post-2003 labels, and “optimal” labels designed with human factors principles, as well as CRS without any labels. Participants who used the optimal labels had the best installations and usability ratings, followed by the group without any labels. Compared to the current study, the Rudin-Brown study did not recruit subjects based on education, and only included subjects with prior CRS installation experience. Generally, documents prepared for instructing the general public on health issues should be targeted to a fifth or sixth-grade reading level (NIH, 2010). Wegner and Girasek (2003) evaluated the reading level of CRS instructions from the 1999 NHTSA-issued CD with compilations of all manufacturer instructions for CRS sold that year in the U.S. Using the SMOG readability tool (McLauglin 1969), they found that the grade level of instructions ranged from 7th to 12th grade, with a mean value of 10th grade. They specifically evaluated some of the instruction wording required by FMVSS 213, which averaged a 10th grade reading level. As the requirements for labeling and instructions have evolved in Federal Motor Vehicle Safety Standard 213 (FMVSS 213) Child Restraint Systems (CFR, 2005), the wording requirements do not appear to have been assessed with regard to the required reading level for wide comprehension.

Task 1 Final Report
11
Methods The following methods sections apply to both Task 1A and Task 1B except where indicated in the subheading, e.g., page 21: “CRS Features (Task 1A)
Recruitment Subjects were recruited for the study using both paper fliers and published advertisements. Appendix A contains copies of the flier and ad text. The flier, which was based on the style recommended by the University of Michigan Human/Behavioral Sciences Institutional Review Board, was posted at local stores and service agencies. The advertisements were posted in the AnnArbor.com newspaper (primarily an online publication that also generates weekly print editions) and on Craigslist. In addition, the ad was also posted on the umengage.edu website which is a central location for recruiting subjects for University-led projects. The ad text was also distributed through family email lists for local elementary and high schools. Respondents contacted the investigators via telephone and were screened according to the selection criteria described below.
Subject Selection Each phase of the study involved testing of 32 volunteers (Task 1A for CRS features and Task 1B for alternate labels and instructions). No subjects tested in Task 1A were tested in Task 1B. Subjects were categorized according to general education level, characterized by the highest level or grade of school successfully completed, and their level of experience with installing CRS. These factors were selected based on results of two past studies. Eby and Kostyniuk (1999) found that higher levels of misuse were associated with: lower educational levels, situations where the driver was not the child’s legal guardian, the number of times that the seat was moved/reinstalled into different vehicles, and children who were younger and smaller. Lane et al. (2000) also found a trend for less misuse with higher education attainment level and participation in a private insurance program. Appendix B contains a copy of the script used for screening subjects. The first part of the screening sequence eliminates subjects who are under 18 years of age, are pregnant, have had their CRS evaluated at a car seat check, are CPS technicians, or do not have a valid driver’s license. For effectively continuous variables, such as education and experience levels, potential linear effects can be more efficiently identified if subjects are recruited from the more extreme ends of the spectrum of the variables, rather than choosing a dividing line at some point in the spectrum and sorting subjects into categories above and below that level. With this in mind, the strategy was to recruit subjects from the extremes. The definitions of education and experience categories are described below.

Task 1 Final Report
12
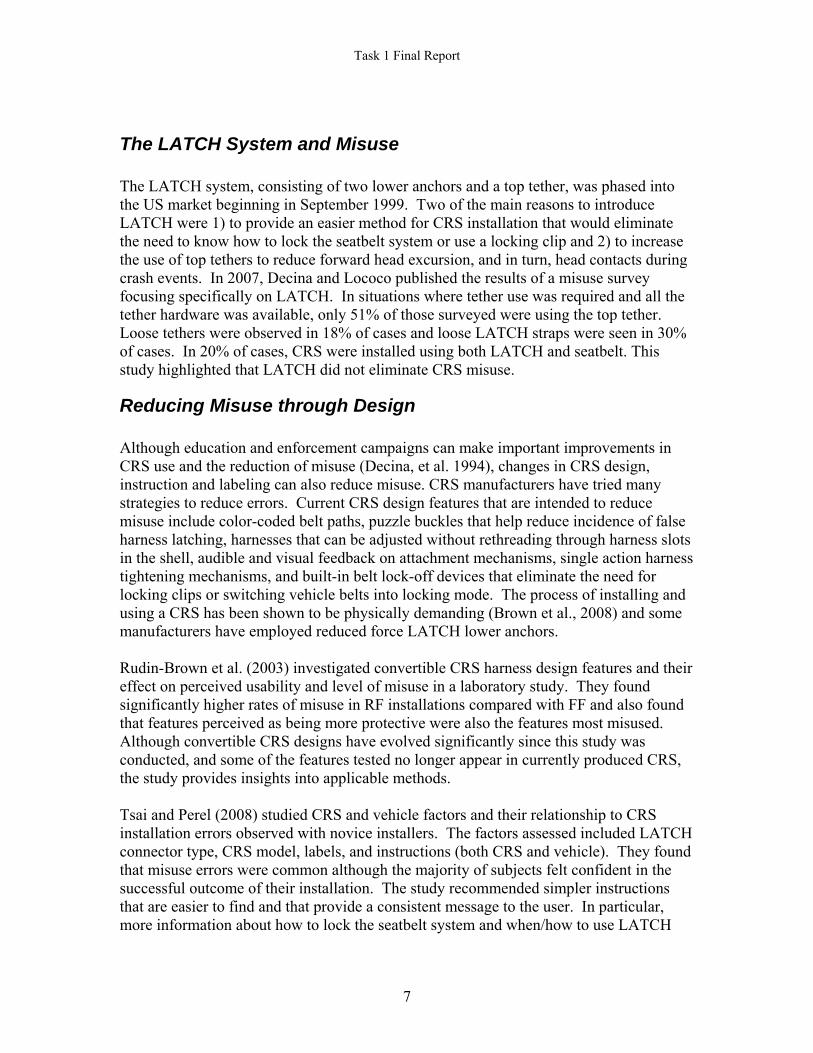
The next question determined the subject’s highest level of formal education. Those who have not gone to college were placed in the lower education tier (L), while those who have completed a college degree were placed in the higher education tier (H). The next series of questions gauges the potential volunteer’s experience with CRS installation. To be considered experienced, the subject must have installed more than one type of child restraint in more than one type of vehicle within the last 5 years a total of at least 10 times. Subjects who installed CRS frequently in the past, but were no longer transporting children in CRS, were not considered for the study. Experience with LATCH was considered as a potential requirement for experienced volunteers, but was not included because subjects with lower education levels may be more likely to drive older vehicles not equipped with LATCH. Adding LATCH to required experience was expected to unnecessarily increase difficulty of recruiting lower education subjects. Subjects who are considered inexperienced reported never having installed a CRS or shopped for a CRS, and said that they had secured a child in a CRS fewer than six times. The remaining subject screening questions determine the subject’s gender and the languages they speak if English is not their native language. Subjects were required to speak English, with their fluency judged by the experimenter during the initial phone interview. No potential subject was refused because of English language skills. When filling each of the four education/experience categories, the subject’s gender, age, and ethnic background were also recorded. The subject’s ethnic/racial background group was self-reported by the subjects during the test session using the form included in Appendix B. Completing the form was optional and not a requirement for participation in the study, although all subjects were willing to provide the information. Although subjects were selected for participation based on the education and experience characteristics, efforts were made to recruit at least three men and three women for each main subject group. For Task 1A, three subject groups were evenly divided by gender, while the fourth group had three women and five men. In addition, a variety of subject ages were recruited by trying not to have more than four subjects in a group be in the same decade of age (i.e. no more than four in their twenties or four in their thirties, etc). Figure 1 plots the average subject age (plus standard deviation) for each education/experience group, and shows that the age ranges were similar for all groups.
Task 1 Final Report
13
Figure 1. Average subject age by CRS experience and education level
(low and high) for Task 1A.
0
10
20
30
40
50
60
low high low high
Inexperienced Experienced
Aver
age
Subj
ect A
ge (y
ears
)
Appendix B contains a copy of the subject consent forms approved by the University of Michigan Institutional Review Board. Written consent was obtained for participation in the study and a separate written consent was gathered to allow video documentation of their actions and verbal comments during the activity.
Test Protocol
Vehicle selection Because Task 1 of the study focuses on characteristics of the CRS and labels/instructions, the vehicle environment for this task was chosen to be relatively uncomplicated in terms of CRS installation. Vehicle characteristics expected to result in uncomplicated CRS installations were fabric seats, visible or well-marked vehicle LATCH anchorages, relatively flat seat cushion and seatback, seatbelts located near the bight, and adjustable/removable headrests. Six vehicles readily available at UMTRI were surveyed for their ease of installation by two CPS technicians. Two different convertible CRS were installed FF and RF with LATCH and seatbelts. The 2006 Pontiac G6 sedan allowed good installations of both CRS in both modes using both attachment methods with relatively little effort compared to the other vehicles considered. The rear seat of the Pontiac G6 is illustrated in Figure 2, with red, yellow, and green lines indicating the three pairs of lower anchorages. Measuring the uncompressed surface angles of the seat, the cushion angle is 6 degrees above horizontal, while the seatback angle is 25 degrees rearward of vertical. Figure 3 shows a close-up of the head restraint and tether anchorage, while Figure 4 shows a close-up of the lower anchorages and seatbelt anchorages in the right-rear passenger seating position. Figure 5 shows the amount of rear compartment space when the front seat is set at the midtrack position with the seatback set to one notch rearward of vertical. These front seat settings provide a

Task 1 Final Report
14
cushion angle of 18 degrees above horizontal and a seatback angle of 12 degrees rearward of vertical.
Figure 2. Locations of 2006 Pontiac G6 rear seat
lower anchorages and seatbelt buckles.
Figure 3. Tether anchorage locations and headrests in upright position
for CRS installation as directed by vehicle owner’s manual.

Task 1 Final Report
15
Figure 4. Close-up view of lower anchorage locations
on rear passenger-side seat.
Figure 5. View of rear seat space with front seats set to test position.
The most challenging factor with respect to CRS installation in this vehicle is the presence of three pairs of lower anchorages in the second row seat, two of which “overlap”. As indicated by the pairs of lines in Figure 2, the rear seat is configured such that CRS can be installed in the right and center positions with LATCH, or the left and right positions with LATCH, but not all three positions simultaneously. To prevent this vehicle factor from complicating CRS installation in Task 1, the subject was directed to install the CRS on the passenger side of the vehicle where the lower anchorages do not overlap each other, as shown in Figure 4.

Task 1 Final Report
16
Following selection of the CRS used for testing, a CPS technician installed every seat in the target seating position four times: FF and RF modes, using LATCH or vehicle seatbelt. While it was possible for a CPS technician to achieve an acceptable installation under all four conditions with each CRS, the degree of difficulty doing so varied considerably.
Test setup Appendix C contains a pre-test checklist for setting up the testing area. The experimenter prepared the vehicle for testing by adjusting the rear headrests to an upright position and adjusting the front seats to their pre-test position. The testing area was configured so the subject approached the vehicle from the right side, where both right-side doors were left open as indicated in Figure 6. The left-rear door was also left open in case the subject wanted to enter to make adjustments from the other side.
Figure 6. Pre-test position of vehicle doors.
Still cameras recorded side and isometric views of each CRS installation. A digital video camera was located on a tripod near the driver door to record installations in the right-rear seat. A wireless microphone was placed in the vehicle to improve sound recording. During subject recruitment, subjects were asked if they agreed to be videotaped. If they decided after reading the consent form that they did not want to be videotaped, they were allowed to continue in the study. However, no subjects declined, and all trials were recorded for each subject. Subjects could choose if they also wanted to “think aloud” to capture some their thought process during the task. Although video data was collected for reference, detailed analysis of the video is beyond the scope of the current project. The experimenter prepared the four CRS selected from the field of 16 to be used in each session from the test matrix (see below) by labeling them with the subject ID number, the order of installation, and the date. Each CRS was configured in its “out-of-the-box” factory delivered state with a few exceptions. Packing material was removed, as was any
Task 1 Final Report
17
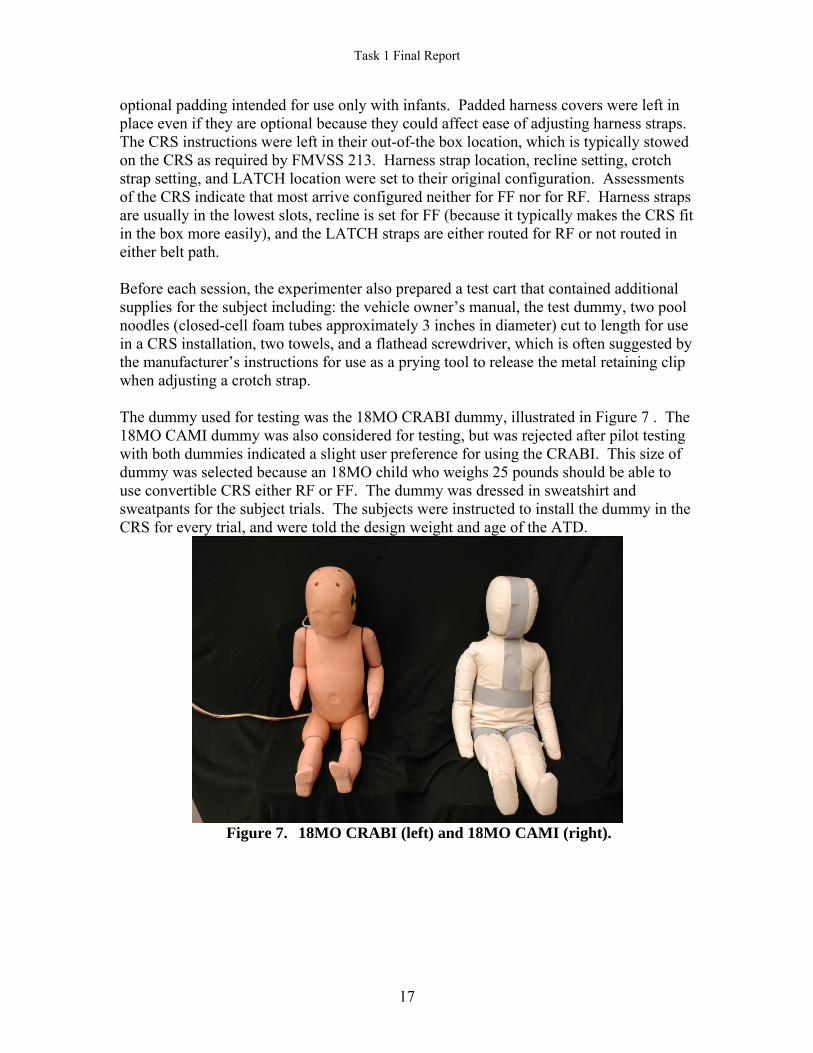
optional padding intended for use only with infants. Padded harness covers were left in place even if they are optional because they could affect ease of adjusting harness straps. The CRS instructions were left in their out-of-the box location, which is typically stowed on the CRS as required by FMVSS 213. Harness strap location, recline setting, crotch strap setting, and LATCH location were set to their original configuration. Assessments of the CRS indicate that most arrive configured neither for FF nor for RF. Harness straps are usually in the lowest slots, recline is set for FF (because it typically makes the CRS fit in the box more easily), and the LATCH straps are either routed for RF or not routed in either belt path. Before each session, the experimenter also prepared a test cart that contained additional supplies for the subject including: the vehicle owner’s manual, the test dummy, two pool noodles (closed-cell foam tubes approximately 3 inches in diameter) cut to length for use in a CRS installation, two towels, and a flathead screwdriver, which is often suggested by the manufacturer’s instructions for use as a prying tool to release the metal retaining clip when adjusting a crotch strap. The dummy used for testing was the 18MO CRABI dummy, illustrated in Figure 7 . The 18MO CAMI dummy was also considered for testing, but was rejected after pilot testing with both dummies indicated a slight user preference for using the CRABI. This size of dummy was selected because an 18MO child who weighs 25 pounds should be able to use convertible CRS either RF or FF. The dummy was dressed in sweatshirt and sweatpants for the subject trials. The subjects were instructed to install the dummy in the CRS for every trial, and were told the design weight and age of the ATD.
Figure 7. 18MO CRABI (left) and 18MO CAMI (right).

Task 1 Final Report
18
Testing sequence Appendix C contains the script used during testing. In an effort to consider the probable learning effect as each subject proceeds through four trials, the order of RF and FF installations were varied in the test matrix such that each subject performed a RF and FF installation in the first two and last two trials, but that the order varied among RF-FF-FF-RF, FF-RF-RF-FF, RF-FF-RF-FF, or FF-RF-FF-RF. The subject was asked to install the first CRS on the passenger side of the vehicle. If the subject started to install the CRS in the front seat, this was noted on the evaluation form and the subject was redirected to install the CRS in the rear seat. If asked any questions, the experimenter generally told the subject that information could be found in the CRS and vehicle owner’s manuals. However, the one exception during testing was that if the subject was unable to locate the manual in its stowed position on the CRS, the experimenter could assist the subject in finding it upon request. For the first and second installations, the subject could choose whether to install the CRS using LATCH or the vehicle seatbelt. However, for the third and fourth installations, the subject was asked to install the CRS using the method they did not use in the first two installations. If the subject used both the seatbelt and LATCH in the first two installations, they were directed to use only the seatbelt in the last two installations. Testing forms Appendix C also contains post-test evaluation forms that were filled out by the subject and the experimenter. The first part of the subject form assessed the subject’s confidence in installing the CRS and their opinion as to whether the labels and instructions agree. The second part asks subjects to rate the ease of use of different features on the CRS. If the subject had questions about terminology when filling in the form, such as “Is this the harness adjustor?”, the experimenter was allowed to identify the item for the subject. The subjects filled out the form behind a screen so they could not see the experimenter evaluating the CRS installation, but were allowed to come and look at the CRS, labels, or instructions if needed. Many subjects consulted the child restraint manual when filling out the form. Because the same size “child” was being used for all installations, the third part of the subject evaluation form assessed whether the subject would be able to choose the correct CRS for different sizes of children. Five different sizes of children were described, and the subject was supposed to use the instructions and labels to identify whether the CRS model they just installed should be used in FF or RF modes to accommodate the child described. Because the subjects were directed to install the CRS in a particular vehicle seating position, the final part of the assessment asked the subject to indicate the safest location for installing the CRS. The hope was that they would identify the rear seat or center rear seat as the best location for installing a CRS. This form was only filled out after the first

Task 1 Final Report
19
and last installations, to see if the subject changed their answer after performing four installations. Another subject assessment form was completed after the last installation. In this form, the subject indicated whether they found LATCH or seatbelt easier to use for both RF and FF installations. In addition, they gave each CRS a rating of how much they liked it on a scale of 1 to 10, with 10 indicating the best score. For Task 1B, the subjects were asked to rate how they liked the labels and instructions used in each installation on a scale of 1 to 10, as well as to offer any suggestions or comments on the instructions or labels.
Assessment forms The forms contained in Appendix C to assess the CRS installation are worded so that they are independent of specific manufacturer instructions for installation. For example, tethers may or may not be allowed or required in RF mode based on the manufacturer’s instructions. To allow correct analysis of the data, for each CRS, mode of use (RF or FF), and installation method (LATCH or seatbelt), the form was filled out to indicate the “correct answer” based on requirements in the instructions. These charts were used together with the installation data recorded by the experimenter to determine whether or not misuse occurred. A measurement was recorded when assessing harness slack, tether slack, and CRS installation tightness. Harness slack was quantified by pinching the webbing along its length and measuring the height of the loop as shown in Figure 8. The same approach was used with the tether, shown in Figure 9. If no loop could be pinched, the measurement was 0. To measure the tightness of the CRS installation, the experimenter placed a piece of tape on the vehicle seat cushion at the rearmost point of contact between the CRS structure and the seat cushion. A 50 lb normal push force was applied at the belt path and the distance the CRS moved relative to the tape was recorded as shown in Figure 10. This technique was adapted from the CRS installation assessment method used previously for New Car Assessment Program (NCAP) testing (NHTSA, 2005). The experimenter also evaluated installation tightness with the 1” test that is the measure of installation tightness taught in the CPS technician class. For this qualitative test, the experimenter grabs the CRS near the belt path and tries to move it. If the CRS moves less than 1” either side-to-side or front-to-back, it passes the 1” test.

Task 1 Final Report
20
Figure 8. Measuring amount of harness slack.
Figure 9. Measuring amount of tether slack.
Figure 10. Measuring amount of CRS lateral displacement under applied load.

Task 1 Final Report
21
Test Matrix
CRS Features (Task 1A) To begin the CRS selection process, the 2009 CRS instruction compilation CD from Safety Belt Safe was used in conjunction with CRS manufacturer websites to identify the full set of currently available convertible CRS. Thirty-six unique models were identified after eliminating products that had the same basic shell but differed on trim and miscellaneous features such as cup holders. The next step involved visiting local stores that sell CRS to better identify the different types of available features. When permitted, photos illustrating the features were taken. Manufacturers’ instruction manuals available on the internet were used to clarify different features and categorize the few seats that were not available for local inspection. This effort resulted in the identification of 16 currently available CRS that encompass the range of features thought to influence ease of use. Appendix D lists the features available on the selected CRS, and provides a pictoral glossary to illustrate what is meant by each term and classification. The CRS features described in this section were considered the predictor variables in data analysis for Task 1A. One of the most critical CRS features relevant to assessing proper securement of the child was thought to be the type of harness shoulder height adjustor. When looking at other factors related to securing the child in the harness (crotch strap adjustment, harness tightness adjustment, harness clip type, buckle), less variety was observed across the commercial products than expected. Many problematic and difficult-to-use features that existed in the past (adjusting harness snugness at the back of the CRS, 1-piece harness clips) are no longer being manufactured, but potentially important differences do still exist. As an example, even though all harnesses examined are tightened using a front adjustor, slight differences in implementation remain, such as pulling a strap, lifting a lever, or pushing a button to release the adjustor mechanism. These alternative adjustment methods were evaluated in the study. The type of lower anchorage connector and the method used to tighten the lower anchorage straps were the key variables to assess when evaluating the attachment of the CRS using LATCH installations. There are hook style or push-button style LATCH connectors. All of the hook-style LATCH belts have a single latchplate adjustment mechanism, while the button-style LATCH belts can have either one or two button-release adjustors. One manufacturer has introduced a “SuperLATCH” connector which is larger than the standard push-button connector. Another manufacturer has developed “SureLATCH” which has a retractor built into the connector that tightens the LATCH belt automatically. Tether attachment methods vary minimally across CRS because of FMVSS 213 requirements for tether hardware. All use hook-style connectors, have either one or two straps, and use locking latchplate or button-release adjustors.

Task 1 Final Report
22
The method of storing unused tether and LATCH belts was also considered. Tethers were stored either in pouches, in compartments, or on a hook on the CRS. LATCH belts were stored by hooking the ends together, or placing them on hooks on the CRS, in slots on the CRS, under the padding, or in a compartment. Three types of buckles were identified among the CRS tested. They were classified as standard, large, and puzzle buckles. For assessing CRS attachment to the vehicle using the seatbelt, the location of the belt paths and the type of lock-off on the CRS were considered the most important features. The belt path location may also affect LATCH installations. The CRS (labeled C1 through C16 as defined in Table 4) were measured on the FMVSS 213 buck to document the range of belt paths that are available, to allow consideration of belt path location as a possible predictor that affects installation tightness and to identify belt path placement information that may be helpful to CRS designers. The locations of the belt paths were quantified by installing the CRS on the 213 bench seat using a lap belt set to the FMVSS 213 required belt tension of 12-15 lb, and using a FARO 3D coordinate measurement arm to digitize the contour of the belt path opening. Figure 11 shows the locations of the measured belt paths for FF and RF CRS, respectively. Figure 12 and Figure 13 show the approximate centroids of each RF and FF belt paths, excluding slots for routing shoulder belts. Within each grouping of FF and RF belt paths, zones were visually defined that sort the belt paths into mid, high, low, fore, and aft categories relative to the range of other available belt paths, although no “high” category was defined for the RF CRS. The classification results are indicated in Table 2. While the location of the vehicle seatbelt anchorages is also critical factor, the belt path location can still contribute to a good or bad installation. In our experience, some belt path locations on CRS are more conducive to easier installation in some vehicles, while some are difficult to install in many vehicles (high, rearward belt paths can be challenging regardless of the vehicle belt geometry).
Figure 11. Locations of CRS belt paths when installed RF (left) and FF (right) on the FMVSS 213 buck.

Task 1 Final Report
23
Figure 12. Classifications of RF belt paths.
Figure 13. Classifications of FF belt paths.
Table 2. Belt path classification for each CRS. Rear-facing Forward-facing Mid C4, C7, C8, C9, C10, C15 C2, C7, C8, C9, C13, C14 Hi C5, C6 Lo C1, C3 C3 Fore C12, C13, C14, C16 C1, C4, C7, C10, C11 Aft C2, C5, C6, C11 C12, C15, C16
*CRS codes defined in Table 4.

Task 1 Final Report
24
Labels and instructions were also evaluated for consideration as potential predictors of installation misuse. Overall, little variation in style and content of labels and instructions were observed within a CRS manufacturer. Thus having a range of manufacturers represented in the CRS selection provides the current range of styles of instructions and labels. The specific effects of characteristics of labels and instructions are the focus of Task 1B. For Task 1A, the labels were considered a CRS feature. The reading difficulty of all of the text on the labels was assessed to categorize them for consideration as potential predictors of installation error. The readability analysis includes all of the labels, including the text required by FMVSS 213. Many manufacturers intersperse required text with optional text so it would be not be reasonable to analyze required and optional text separately. In addition, some manufacturers include minimal text beyond what is required. The labels for each seat were photographed and the text was transcribed into a MS Word 2007 document for each CRS. The readability of each set of labels using the Flesch-Kincaid grade level, and the Flesch reading ease are shown in Table 3.
Table 3. Readability scores for CRS labels Seat code
Flesch Reading Ease Flesch-Kincaid Reading Level
C1 62.2 8.1 C2 61.4 7.5 C3 58.9 7.8 C4 49.3 9.3 C5 53.2 9.4 C6 58.8 8.4 C7 46.4 10.4 C8 38.8 11.4 C9 48.9 9.6 C10 43.7 10.4 C11 53.7 8.9 C12 54.9 8.6 C13 47.1 10 C14 48.5 8.9 C15 46 10.1 C16 48.1 9.7 Min 38.8 7.5
Median 49.1 9.4 Max 62.2 11.4
The labels were also checked for specific content: whether they directed tether use FF and/or RF, whether the chest clip was labeled with positioning instructions, whether the labels instructed users to make the seatbelt or LATCH belt tight, and whether the labels address recommended harness slot position. The reading level of the instruction manuals was also assessed for consideration as a possible predictor of installation error. Because reading level could not be assessed easily using the pdf of the entire manual, four sections of the text were extracted from

Task 1 Final Report
25
each manual and converted into MS Word to allow calculation of reading level. Reading level was assessed using four topics present in all product manuals: including installing RF using LATCH, installing FF using seatbelt, tightening the harness, adjusting the harness shoulder height. In addition to assessing the readability of the four extracted sections, the manuals were classified in the following ways: Total number of pages Ratio of figures to pages (total number of figures divided by number of pages) Type of illustrations: diagrams, photos, or both Presence of color coding of text for different CRS usage modes
CRS Selection (Task 1A) Table 4 contains a list of the 16 CRS selected for the study. The set includes one or more from each manufacturer in the U.S. market, and where possible, includes specific top-selling models. The only manufacturer not included in this study is Triple Play, which produces a specialty convertible CRS that converts to a stroller (formerly known as the “Sit and Stroll”). This convertible was not included because it is a low-volume product and must be uninstalled from the vehicle to take the child out. The CRS were chosen in part to reduce the correlation across CRS of particular features of interest. Among production CRS, feature levels (for example, types of harness adjusters and types of LATCH belt adjusters) are often correlated, making it difficult to choose a set of CRS that will allow independent assessment of factors. The selection process is further complicated by the desire to examine a large number of features in the study while keeping the time commitment of the subjects to within a manageable range. To confirm that the selected CRS were suitable for the current study, a CPS technician installed each CRS in the right-rear position of the test vehicle using LATCH or the seatbelt in RF and FF conditions. It was possible to correctly install each seat in all modes in the test vehicle, although the degree of difficulty varied. Table 5 through Table 7 illustrate the correlation between pairs of several key CRS variables. Lower connector type, LATCH belt adjustor, and harness shoulder height adjustment are evaluated. Table 5 shows that for hook and push-button lower connectors, there are a variety of methods to adjust the LATCH belt. The Evenflo Sure-LATCH system is the only instance of automatic lower connector adjustment, so the connector and adjustment should be considered as a package. In Table 6, hook and button connectors were again paired with a variety of harness shoulder height adjustment systems. Again, the specialty lower connector types are unique and necessarily come packaged with other features. However, some comparisons might be able to shed light on the value added by these features, independent of harness shoulder height adjustment. Finally, Table 7 shows LATCH belt adjustor crossed with harness shoulder height adjustment. The combinations of these features are reasonably spread across the space,

Task 1 Final Report
26
though the rethreading harness shoulder height adjustor is the most common and therefore overrepresented.
Table 4. Model, manufacturer, and brief descriptions of CRS selected for study
CRS Code Group Manufacturer Description Toddler car seat C1 A Orbit Baby Install base and rotate RF-FF Zeus Turn 360 C2 A Combi Install base and rotate RF-FF Radian 80 C3 A Sunshine Kids Foldable CRS design with
Super LATCH Compass True Fit C4 A Learning
Curve Unique lockoff and harness shoulder height adjustor
Como C5 B Recaro Baseline Recaro design Signo C6 B Recaro Three improved usability
features Boulevard CS C7 B Britax Two improved usability features Diplomat C8 B Britax Baseline Britax design Titan Elite C9 C Evenflo Basic Evenflo design Triumph Advance Deluxe
C10 C Evenflo Unique harness height adjustor
Symphony C11 C Evenflo Sure-LATCH feature ComfortSport C12 C Graco Basic Graco design Alpha Omega Elite C13 D Dorel Similar features but different
shells Eddie Bauer 3-in-1 C14 D Dorel Maxi-Cosi Priori C15 D Dorel Only Dorel with lock-offs Scenera C16 D Dorel Basic Dorel design
Table 5. Distribution of combinations of lower connector type and LATCH belt adjustor across CRS test set
LATCH belt adjustor
Lower Connector Type Automatic Single button
release Double button
release Single locking
latchplate Hook 4 1 3 Button 1 5 Sure-LATCH (Evenflo) 1 SuperLATCH (Sunshine Kids) 1

Task 1 Final Report
27
Table 6. Distribution of combinations of lower connector type and harness shoulder height adjustment across CRS test set
Harness shoulder height Adjustment
Lower Connector Type Rethread Side knob Side handles Tabs on
harness Rotate levers
Hook 5 1 2 Button 3 2 1 Sure-LATCH (Evenflo) 1 SuperLATCH (Sunshine Kids) 1
Table 7. Distribution of combinations of LATCH belt adjustor and harness
shoulder height adjustment across CRS test set Harness shoulder height adjustment
LATCH Belt Adjustor Rethread Side knob Side handles Tabs on harness Rotate levers Automatic 1 Single button release 3 1 2 Double button release 3 2 1 Single locking latchplate 3
Since each subject could only install four CRS in the time available, the matrix of CRS models was counterbalanced across subjects and subject groups. Each subject installed two CRS RF and two FF. In addition, all 16 CRS were installed twice (once each direction) within a subject group and 8 times across all subjects. Finally, each subject installed CRS from four different manufacturers, which exposed each subject to a variety of manual and label styles, which tend to be similar within each manufacturer’s products but differ across manufacturers. Each CRS was assigned to a group (red, green, blue, or black) that roughly sorts by manufacturer. Dorel products are red, Evenflo and Graco products group black, Britax and Recaro products group blue, and the other four manufacturers in group green. The two main CRS features used to describe each CRS were the type of harness adjustor and the type of lower connector. Nine CRS have rethread-style harness adjustors, while the remaining CRS have other styles. For the style of lower connector, half use a hook-style and the other half some sort of push-button connector. Table 8 shows the test matrix used for Task 1A. The first column lists the subject number (X0=inexperienced, X2=experienced, L=lower education, H=higher education). Each subject was assigned one CRS from each manufacturer group (indicated by color). In addition, each subject was assigned at least one CRS with a rethread harness (bold text) and at least one CRS with a hook-on lower connector (italic text). Because it was considered likely that subjects would improve their skills and learn installation techniques between the first and last installations, the matrix included counterbalancing the order of trials to account for learning effects. Across the eight subjects in each group, every CRS is tested once in the first two trials and once in the last two trials to account for the possible factor of learning during the test session. In addition, this experiment design remains effective in the event that a subject cannot complete all four trials within the allotted time.

Task 1 Final Report
28
Table 8. Test matrix for Task 1A Subject Installation order
First Second Third Fourth X0L___01 C01-F C07-R C15-F C10-R X0L___02 C15-R C03-F C12-R C07-F X0L___03 C08-F C09-R C04-F C16-R X0L___04 C11-R C16-F C08-R C02-F X0L___05 C12-F C13-R C05-F C03-R X0L___06 C05-R C10-F C01-R C13-F X0L___07 C14-F C02-R C11-F C06-R X0L___08 C04-R C06-F C14-R C09-F X2L___01 C12-F C13-R C03-R C05-F X2L___02 C05-R C10-F C13-F C01-R X2L___03 C14-F C02-R C06-R C11-F X2L___04 C04-R C06-F C09-F C14-R X2L___05 C01-F C07-R C10-R C15-F X2L___06 C15-R C03-F C07-F C12-R X2L___07 C08-F C09-R C16-R C04-F X2L___08 C11-R C16-F C02-F C08-R X0H___01 C16-F C11-R C08-R C02-F X0H___02 C09-R C08-F C04-F C16-R X0H___03 C10-F C05-R C01-R C13-F X0H___04 C13-R C12-F C05-F C03-R X0H___05 C06-F C04-R C14-R C09-F X0H___06 C02-R C14-F C11-F C06-R X0H___07 C03-F C15-R C12-R C07-F X0H___08 C07-R C01-F C15-F C10-R X2H___01 C06-F C04-R C09-F C14-R X2H___02 C02-R C14-F C06-R C11-F X2H___03 C03-F C15-R C07-F C12-R X2H___04 C07-R C01-F C10-R C15-F X2H___05 C16-F C11-R C02-F C08-R X2H___06 C09-R C08-F C16-R C04-F X2H___07 C10-F C05-R C13-F C01-R X2H___08 C13-R C12-F C03-R C05-F
X0: inexperienced, X2: experienced, L: lower education, H: higher education
Red: Dorel, Blue: Recaro/Britax, Black: Evenflo/Graco, Green: Other Bold text indicates rethread harness, italic text indicates hook-type lower anchorages
R indicated rear-facing, F indicates forward-facing
In Task 1A, all of the experienced subjects completed all four installations within the allotted three hours. However, only nine of the 16 inexperienced subjects were able to complete all four installations. Figure 14 shows the installation times for the subjects

Task 1 Final Report
29
who did not complete four trials. Only one subject chose to leave before the 2-3 hour session was over. Two subjects spent 2.5 hours on their first installation.
Figure 14. CRS installation time for subjects who did not complete four trials.
0
20
40
60
80
100
120
140
160
180
X0L55
F04
XOL5OM07
X0L27
F08
X0H51
F02
X0H24
M05
X0H37
F06
X0H67
M08
Subject ID
Inst
alla
tion
time
(min
)3rd2nd1st
Instruction/Label conditions (Task 1B) For Task 1B, two different CRS were selected from those used in Task 1A. An ideal pair of CRS would have similar levels of complexity and features, but differences in the difficulty and characteristics of instructions. Table 9 lists the two sets of candidate CRS identified for use in Task 1B. CRS in group A were eliminated because they all have unique features. The Symphony, Alpha Omega, and 3-in-1 were not considered because they can also be converted to boosters, which makes their instructions more complex. The Recaro Signo and Britax Boulevard CS were not considered because the other two Recaro and Britax products were more similar in complexity to the Priori. Of the remaining seven CRS, they can be grouped as shown in Table 9 into basic and more complex CRS in terms of their usability features. The Evenflo Triumph Advance Deluxe is somewhat in between these two levels, so it was not considered for testing in Task 1B.
Table 9. CRS considered for use in label/instruction evaluation study Basic Complex Cosco Scenera Evenflo Titan Elite Graco ComfortSport
Maxi-Cosi Priori Recaro Como Britax Diplomat
The advantage of choosing more-complex CRS is that because they have more features, their instructions and labels may be more complicated and have more room for

Task 1 Final Report
30
improvements. The advantage of choosing the basic CRS is that using these may allow the study to focus on improvements in instructions/labels that reduce the two main areas of misuse (loose installation and loose harness), which would apply to all CRS. In addition, because these are basic CRS without extra ease-of-use features, they may be more difficult to install and benefit more from improved instructions and labels. The methods identified for improving the instructions and labels to reduce misuse can then be applied to the more complex CRS. The Evenflo Titan Elite and Graco ComfortSport were selected for testing in Task 1B. Table 10 describes the pros and cons of each instruction manual based on assessment by the research team using human factors recommendations and their experience with many CRS manuals.
Table 10. Pros and cons of CRS manuals selected for testing and revision. Evenflo Titan Elite Graco ComfortSport Pros • Numbering of steps
• CRS adjustment instructions presented before installation instructions
• Close-up and context pictures of diagrams
• 6th grade reading level • Installation checklist at end
• Thorough discussion of vehicle belt systems
• Good explanation of vehicle LATCH system
• 6th grade reading level • Detailed illustrations • Numbering of steps
Cons • Extensive section of warnings in the beginning of the manual
• Text highlights words such as “Do not” and “must” and “AND” in bold red text, making it difficult to read and distracts the reader from the content meaning
• Minimal information provided about vehicle belt systems and too much emphasis on use of locking clip
• Term “LATCH harness” is confusing
• Relevant text is on different page from figures.
• Term “Harness tie” is confusing • Text highlights “MUST” and “DO
NOT” in bold which is difficult to read and distracts from meaning, as is emphasis on LATCH, RF, and FF in bold red italics.
• Information on CRS adjustments presented after installation instructions
Eight variations in both instructions and labels were developed as indicated in Table 11. These options were partly developed based on prior studies of CRS labels and instructions (Tsai and Perel, 2008, Rudin-Brown et al., 2004, Wegner and Girasek, 2003). The manual and label designs were considered the predictor variables in data analysis for Task 1B. Appendix E contains samples of baseline and alternate labels for each CRS, while Appendix F contains excerpts from the alternate manuals from each CRS that illustrate the changes made to each version.

Task 1 Final Report
31
Table 11. Task 1B label and instruction conditions
Labels Instructions 1 None X X 2 Baseline X X 3 Improved graphics X X 4 Reorganized by task X X 5 Numbered X 5 Video X 6 Improved text X X 7 Color code text, graphics, parts X 7 Picture-based illustrations X 8 Combined X X
For the two seats selected, eight label and eight instruction conditions were developed. For the manuals, electronic version of the manuals were obtained and converted to a format suitable for editing. To generate electronic versions of the labels, the labels were carefully removed from the two child restraints. The labels were scanned and imported into graphics editing software (Adobe Illustrator), which was used to make editable copies of the baseline labels. These files were also used to print duplicate baseline labels for testing. Condition 1 for each CRS was no labels or “none”, since the study by Rudin-Brown et al. (2003) indicated lower rates of misuse with no labels compared to baseline labels. Labels imprinted on the shell of one CRS were covered during testing. The second condition for each CRS was the manufacturer’s original baseline label or instructions. For the “improved graphics” test condition versions of both the labels and instructions, the graphics were improved, text was minimized, and additional graphics were added. However, the order of information presented in the manuals was not changed, and the number and arrangement of the labels remained the same. Improving the graphics involved color-coding the diagrams using purple for RF and green for FF and rearranging the pictures so they were closer to the text that referred to them, when needed. For the manuals “reorganized by task” condition, the manual was reordered to follow the CRS installation steps shown in Table 12. This breakdown of CRS installation by task was based on the work by Tsai and Perel (2009) on infant restraint installations. The reorganized manual has a checklist on the cover describing these steps, and is rearranged so the user can start on page 1 and proceed sequentially through the manual without having to skip back and forth. Some of the text and graphics were removed in the reorganization, but the sections of text and graphics that remained were not modified from the original. Large blocks of general warnings are placed at the end, following information about uninstalling the child restraint. Information about cleaning and accessories that are not critical to installation are also at the end. To facilitate use of the manual, tabs indicating the main tasks and key subtasks were also added.

Task 1 Final Report
32
Table 12. Task analysis for convertible seats (based on Tsai and Perel, 2008)
Main Task Subtask Description Choose CRS 1.1 Consider age, weight, height of child
1.2 Choose RF or FF mode Prepare car (subtasks in order)
2.1 Identify tether anchorage location for each position 2.2 Determine if lower anchorages can be used to secure CRS (some
limited to 40-lb of child weight by vehicle manufacturer) 2.3 Select child seat location 2.4 Identify lower anchorage location OR identify how to lock vehicle
belt system Prepare CRS (any order)
3.1 Adjust harness strap height to correct location 3.2 Adjust crotch strap to correct location 3.3 Adjust headrest location (if adjustable) 3.4 Adjust LATCH straps for RF or FF mode 3.5 Adjust recline for RF or FF 3.6 Identify belt path for FF or RF 3.7 Identify if lock-offs are available
Perform install (in order)
4.1 Place CRS in selected location 4.2 Route seatbelt through belt path OR attach LATCH hooks to lower
anchorages 4.3 Tighten seatbelt or LATCH adjustments 4.4 For seatbelt installations, lock belt using lock-offs or vehicle system 4.5 Attach tether 4.6 Tighten tether
Secure child (in order)
5.1 Place child in seat 5.2 Buckle harness 5.3 Tighten harness 5.4 Adjust harness clip to armpit height
Check install (any order)
6.1 Check angle 6.2 Check tightness of installation (1” movement test) 6.3 Check that tops of harness are at or below shoulders for RF install OR
at or above shoulders for FF install 6.4 Check harness strap tightness (webbing pinch test) 6.5 Check harness clip position
For the labels “rearranged by task” condition, the information and images from the labels were extracted and placed on separate labels that were positioned near where the task occurs. For example, both child restraints have large main labels with general directions and illustrations of the belt paths. The directions and graphics for belt routing for RF and FF were extracted and placed on separate labels that were positioned directly under each belt path. Another example is the text directing tether use was removed from the main label and printed on a separate label positioned near the top of the child restraint close to the tether location. Only the information on the original labels was used in the rearranged labels, and no additional information was added. The text and graphics were not modified, only rearranged.

Task 1 Final Report
33
Using revised text was a test condition for both labels and instructions. This first involved rewriting the original text into simpler, direct language. Tools for assessing readability were used to verify the reduced complexity of the text. In addition, text was color-coded with purple used to identify information related to RF CRS use and green to identify information related to FF use. Distracting emphasis on single words (i.e., “MUST” “DO NOT”) was eliminated, and instead entire key phrases were emphasized by bold text, so a person skimming through the manual might pick up important points. The labels were numbered in task sequence for the condition denoted “numbered” in the tables). For this label condition, the labels retained the original text and graphics, but were reordered to reflect the recommended order of tasks presented in Table 12. Numbers highlighted in yellow circles were then added to direct the subject through the correct sequence of instructions on the labels. Another condition for the labels was “color-coded”. In this label condition, the text and graphics were modified to be color coded purple for RF and green for FF. In addition, purple and green “outline” stickers were created for placement around the belt paths and harness slots. One of the conditions for the manuals involved replacing all of the diagrams with annotated photographs. Several manufacturers have replaced some or all diagrams with photos. The manual was edited to replace the diagrams with photos showing the same components. The same captions and annotations used on the diagrams were included on the photos. Another condition for the manuals was to replace the written manual with an instructional DVD. The videos were based on the task outline of Table 12 and examples found on different manufacturers’ websites. Separate videos were created for FF and RF installation for each of the two seats. Once the subject viewed the DVD on the available laptop computer, they could choose whether to review installation with LATCH or installation with the seatbelt. After the subject chose the installation type, they could choose to watch the whole video, or jump to a step in the installation. The final condition for both the labels and instructions was a “combined” written condition combining the features of the prior test conditions (with the exception of the video information) and other human factors recommendations for developing manuals and labels. For the labels, developing combined labels involved the following:
1) Adding a “start here” label to the front of the seat with an arrow pointing to the first step.
2) Numbering labels so users can follow needed steps in order 3) Placing labels close to the parts of the CRS relevant to the task. 4) Directions to the location of the next label in the sequence if it was not on the
same side of the product. 5) Using succinct, readable text (5th/6th grade level).

Task 1 Final Report
34
6) Adding graphics. 7) Color coding text and graphics (purple for RF and green for FF). 8) Color coding belt paths and harness slot locations. 9) Labeling CRS parts such as the tether, recline stand, and LATCH belt. 10) Adding information to the label so that the key tasks listed in Table 12 are
included.
Developing combined instructions involved the following: 1) Adding a checklist of required steps to the front cover. 2) Adding tabs to side of manual to identify the sections for key steps. 3) Reorganizing manual to follow task-based steps. Users can go from beginning to
end, sometimes skipping steps not required for the particular installation, but do not need to jump back and forth in the manual.
4) Revising text to 5th or 6th grade level. 5) Color coding text and graphics (purple for RF and green for FF). 6) Adding graphics to clarify existing instructions. 7) Placing captions and relevant text adjacent to figures; no “see fig. a”. 8) Removing distracting text emphasis (bold, italics); using simple font (Arial).
Providing emphasis, where necessary, using bold text and increased font size. 9) Moving warnings to the end of the manual or inserting them where they apply in
the installation process, removing graphics highlighting warnings, rewriting warnings so they begin with key point emphasized in bold.
10) Removing redundant instructions. 11) Editing graphics so RF and FF are depicted consistently throughout the manual
and differently from each other. 12) Avoiding crowding text and graphics to leave white space. 13) Adding graphics and text as needed to cover key steps not included in original
manual
Instruction/label experiment design (Task 1B) The overall set of conditions for Task 1B was selected based on a fractional factorial combination of several factors. The crossed factors include 8 types of instructions, 8 types of labels, 2 seats, 2 directions of installation (FF and RF) and 2 types of installation (LATCH, seatbelt). These factors (FF/LATCH, FF/Belt, RF/LATCH, RF/Belt) produce 512 possible conditions. To reduce this to 32, conditions were carefully chosen so that the set of test conditions has certain properties. First, each level of each variable is tested an equal numbers of times (e.g., each label is tested 4 times, each seat is tested 16 times). Second, each combination of label and instruction occurs no more than once, since only half can be tested at most (there are 64 total). A few specific label/instruction combinations were avoided, including no label/no instructions and baseline/baseline. Each label and each instruction is tested once in each of the four installation conditions. Each subject saw four of these 32 conditions, which were selected so that they were

Task 1 Final Report
35
tested once in each installation condition and twice per seat. Each condition was evaluated by 16 subjects. These characteristics ensure that each of the main effects can be estimated, primarily within subjects. Some higher-order interactions ended up as between-subject effects (making it a split-plot design), most of these interactions were not of interest. The within-subjects design made main effects (rather than interactions) testable within subjects. An unexpected factor in testing for Task 1B was the amount of time it took to switch label conditions. Two of each CRS were available for testing. Depending on the complexity of the label conditions being switched (the “combined” and “rearranged” test conditions involved substantially more labels), switching labels could take two to three hours. As a result, the experimenter attempted to schedule within a two-day window one subject from each group who would be tested using the same label conditions, which affected the order of the test matrix. The test matrix used is found in Table 13, with Titan conditions shown in blue and ComfortSport conditions shown in red. As done in Task 1A, the subject chose their installation method (LATCH or seatbelt) for the first FF and RF installation, but was asked to use the opposite method for the last two installations.
Table 13. Matrix for label/instruction variations.
Subject CRS Install Method
Label Code Labels
Instruction Code Instructions Order
1 Titan FF choose L1 None M4 Reorg 1 1 ComfortSport RF choose L8 Combined M5 Video 2 1 Titan RF other L3 Graphics M2 Baseline 3 1 ComfortSport FF other L7 Color code M6 Text 4 2 Titan FF choose L4 Rearranged M2 Baseline 1 2 ComfortSport RF choose L2 Baseline M1 None 2 2 ComfortSport FF other L5 Numbered M3 Graphics 3 2 Titan RF other L7 Color code M4 Reorg 4 3 ComfortSport RF choose L7 Color code M8 Combined 1 3 Titan FF choose L3 Graphics M4 Reorg 2 3 Titan RF other L1 None M6 Text 3 3 ComfortSport FF other L8 Combined M2 Baseline 4 4 Titan FF choose L6 text M1 None 1 4 Titan RF choose L2 Baseline M3 Graphics 2 4 ComfortSport FF other L4 Rearranged M8 Combined 3 4 ComfortSport RF other L5 Numbered M7 Photos 4 5 ComfortSport RF choose L6 text M7 Photos 1 5 ComfortSport FF choose L8 Combined M3 Graphics 2 5 Titan FF other L7 Color code M1 None 3 5 Titan RF other L1 None M5 Video 4 6 ComfortSport RF choose L4 Rearranged M4 Reorg 1 6 ComfortSport FF choose L3 Graphics M6 Text 2 6 Titan RF other L5 Numbered M2 Baseline 3 6 Titan FF other L2 Baseline M8 Combined 4 7 Titan FF choose L2 Baseline M7 Photos 1 7 Titan RF choose L6 text M3 Graphics 2 7 ComfortSport FF other L5 Numbered M5 Video 3 7 ComfortSport RF other L4 Rearranged M1 None 4 8 ComfortSport RF choose L3 Graphics M8 Combined 1

Task 1 Final Report
36
8 ComfortSport FF choose L1 None M7 Photos 2 8 Titan RF other L8 Combined M6 Text 3 8 Titan FF other L6 text M5 Video 4
Use of this design allows estimation of main effects and two-way interactions of each variable as well as interactions between subject-group factors and instruction/label factors. Higher-order interactions between the variables are assumed to be negligible.
Data analysis
Installation data were analyzed (for both Tasks 1A and 1B) using linear mixed models and generalized linear mixed models as dictated by the type of dependent measure (continuous or categorical). In addition to the types of misuse documented for each installation, dependent variables included the responses from the subject assessment forms completed for each test session. The potential correlation between subject confidence in their installation, the quality of the actual installation, and CRS factors was also explored. Linear mixed models (LMM) and generalized linear mixed models (GLMM) are maximum likelihood modeling approaches that allow for the inclusion of almost any combination of random and fixed effects, as well as a wide array of models of the patterns of covariance (Littell et al., 2006). Linear mixed models duplicate the results of within-subject analysis of variance using least-squares error when the design is completely balanced (a requirement for the least-squares methods). However, one of the advantages of the maximum-likelihood approach is that subjects do not have to complete exactly the same conditions, and if a subject is unable to complete one or more trials, his/her remaining data is still usable in modeling. LMM analyses were conducted in SAS (PROC MIXED). LMM takes only continuous dependent measures and uses a normal error model, analogous to multiple regression. The difference is in the estimation of random effects. In our analyses, subject was treated as a random effect, along with the interactions between subject and various fixed effects. In addition, order may be considered. This approach allows us to take advantage of the greater power of within-subject comparisons to draw conclusions for all but the between-subjects effects of education and experience. GLMM (PROC GLMMIX in SAS) is a newer extension of LMM that allows for estimation of models containing both random and fixed effects dependent measures that do not fit the standard multiple regression/normal error model. These include count data (Poisson or negative binomial distribution function and log link for modeling errors), binary data (logistic distribution function and logit link) for two-category dependent measures (e.g., correct/incorrect), ordinal response (cumulative logistic regression), and nominal response (multinomial distribution and generalized logit link). In all cases, subject and interactions with subject can be estimated as random effects to account for covariance associated with having the same subjects perform multiple installations.

Task 1 Final Report
37
Between-subjects effects were education and experience. All other main effects (CRS features or label/manual design) were within-subjects. Two-way interactions between CRS features or label/manual design and installation method (LATCH or seatbelt) were also within subject. In all analyses, p-values less than 0.05 were considered significant.

Task 1 Final Report
38
Results
Subject Installation Errors: Task 1A
Overview Table 14 lists the rate of correct installation for different factors that were assessed, plus the CRS and subject factors associated with each. Further details are presented in the subsequent sections.
Table 14. Summary of CRS and subject factors that affect installation Percentage
Correct Predictors F-test p-
value CRS tight 28%
High education 44% Low education 14%
F(1,73)=5.62 0.0204
CRS experience 41% none 17%
F(1,73)=3.63 0.0605
LATCH connector type F(3,109)=3.16 0.0276 LATCH belt adjustor type F(3,109)=2.50 0.0635 Lockoffs F(1,111)=3.80 0.0539
Harness snug 55%
CRS experience 64% none 37%
F(1,72)=3.55 0.0637
Men 67% women 37% F(1,72)=4.75 0.0327 Harness shoulder height adjustor
F(4,72)=2.58 0.0447
Tether used appropriately
73% Tether storage method Hook> pouch or compartment
F(2,113)=5.95 0.0035
Harness clip position correct
53%
Correct belt path 83% Higher education 93% Lower education 74%
F(1,62)=4.80 0.0323
LATCH Belt does not need rerouting (96%) vs. those that do (78%)
F(1,19)=5.33 0.0324
Correct recline 78% Men 88% women 69% F(1,38.98)=4.31 0.0445 FF 91% RF 66% F(1,34.73)=7.96 0.0078
Crotch strap correct
83%
Lower anchorages correct
59%
Harness slot correct
53%

Task 1 Final Report
39
CRS installation tightness To assess whether a CRS installation is sufficiently tight, the CPS curriculum states that the CRS should be grasped at the belt path and moved side-to-side and fore-and-aft. The CRS is considered sufficiently tight if it moves less than 1” in any direction. Both education and experience influenced whether the subject’s CRS installation passed the 1” test. Inexperienced subjects passed in 17% of installations, while 41% of experienced subject installations passed [F(1,73)=3.63; p=0.0605]. Among highly educated subjects, 44% of installations passed vs. 14% of installations by subjects with lower formal educational achievement [F(1,73)=5.62; p=0.0204]. The effect of education and experience on rate of installations passing the 1” test is shown in Figure 15. Only one installation by a subject in the lower education, inexperienced category was assessed as having sufficient CRS tightness.
Figure 15. Percentage of installations passing 1” test for tightness by subject
experience and education level.
3.8%
30.8%
21.9%
59.4%
0%
10%
20%
30%
40%
50%
60%
70%
80%
90%
100%
low edu high edu low edu high edu
Inexperienced Experienced
Perc
enta
ge o
f ins
talls
pas
sing
1"
test
Subjects did not increase the rate of performing tight installations between the first and fourth trials. The installation direction (FF or RF) also did not affect level of successful tightening, with correct tightness seen in 28% in FF installs and 32% in RF installs. Similarly, seatbelt installations were not statistically different from LATCH installations in tightness. The location of the belt path was not a significant predictor of installation tightness. Figure 16 shows the rate of passing the 1” installation tightness test in LATCH installations by the type of LATCH belt connector, while Figure 17 shows the same measure by LATCH belt adjustor. The type of lower connector was significant [F(3,109)=3.16, p=0.0276], and the type of adjustor was marginally significant [F(3,109)=2.50, p=0.0635.] However, the correlation among seat features means that we

Task 1 Final Report
40
cannot statistically separate the effects of connector and adjustor. The three different types of push-button connectors have higher rates of tight installation than hook-type connectors. Automatic tightening belts had the highest rate of tight installation, while belts with a single button-release adjustor had the worst. Belts with two button-release adjustors or a single latchplate adjustor were in between with similar rates of tight installations. A single seat had the automatic belt adjustment type and the Sure-LATCH adjustment. The Super-LATCH connector was also only available on one seat, though that seat was paired with the poorer-performing single button-release adjustor type.
Figure 16. Percentage of LATCH installations passing 1”
test for tightness by LATCH connector type.
35.0%
17.2%
66.7%
100.0%
0%
10%
20%
30%
40%
50%
60%
70%
80%
90%
100%
Push-button(n=20)
Hook (n=29) Sure-LATCH (n=3) Super-LATCH(n=1)
LATCH connector type
Perc
enta
ge o
f LA
TCH
inst
alls
that
pas
s 1"
m
ovem
ent t
est

Task 1 Final Report
41
Figure 17. Percentage of LATCH installations passing 1”
test for tightness by LATCH belt adjustment type.
66.7%
13.0%
35.3%40.0%
0%
10%
20%
30%
40%
50%
60%
70%
Automatic (n=3) One button-release (n=23)
Two button-release (n=17)
One Latchplate(n=10)
LATCH belt adjustment type
Perc
enta
ge o
f LA
TCH
inst
alls
that
pas
s 1"
m
ovem
ent t
est
In addition, type of LATCH connector and type of LATCH adjustor were only significant when all installations were considered, and the method of installation (LATCH or seatbelt) was not a significant predictor of CRS tightness. Figure 18 and Figure 19 show the rate of tight installation for seatbelt installations as a function of LATCH belt connector type and LATCH belt adjustment type. For the connector type, trends are similar (Sure-LATCH > push-button > hook-on) except that the Super-LATCH does not have as high of a successful installation rate. For the adjustment type, the single latchplate has lower rates of successful installation tightness. Because the characteristics of the LATCH belt would not be expected to have an effect on CRS installation tightness with the seatbelt, there must be another characteristic of the CRS (such as shape of the shell) that is also contributing to the ability of subjects to obtain a tight installation using either the LATCH belt or the seatbelt.

Task 1 Final Report
42
Figure 18. Percentage of seatbelt installations passing 1” test for tightness by LATCH connector type.
36.7%
22.2%
50.0%
14.3%
0%
10%
20%
30%
40%
50%
60%
Push-button (n=30) Hook (n=18) Sure-LATCH (n=4) Super-LATCH(n=7)
LATCH belt connector type
Perc
enta
ge o
f sea
tbel
t ins
talls
that
pas
s 1"
mov
emen
t tes
t
50.0%
27.8%
38.5%
9.1%
0%
10%
20%
30%
40%
50%
60%
Automatic (n=4) One button-release(n=18)
Two button-release(n=26)
One Latchplate(n=11)
LATCH belt adjustment type
Perc
enta
ge o
f sea
tbel
t ins
talls
that
pas
s 1"
mov
emen
t tes
t
Figure 19. Percentage of seatbelt installations passing 1” test for tightness by LATCH adjuster type.
The presence of a lockoff improved the rate of tight installations [F(1,111)=3.80, p=0.0539] For RF, 50% of installs with lockoffs were sufficiently tight, while only 18% of installs without lockoffs were tight. Among FF installations, 32% of installations with lockoffs passed the 1” tightness test, while only 24% of installations without lockoffs did.
Harness snugness When assessing whether subjects tightened the harness enough to be sufficiently snug as determined by the harness pinch test, 64% of trials with experienced subjects and 37% of

Task 1 Final Report
43
trials with inexperienced subjects had the correct amount of snugness (F(1,72)=3.55; p=0.0637). Education was not a significant factor in the quality of harness tightening. Variation in snug harness by subject group is shown in Figure 20. Gender was also significant: 67% of men made the harness sufficiently snug, while only 36% of women did (F(1,72)=4.75; p=0.0327).
Figure 20. Percentage of installations passing pinch test for
snug harness by subject CRS experience and education.
38.5%34.6%
50.0%
78.1%
0%
10%
20%
30%
40%
50%
60%
70%
80%
90%
100%
low edu high edu low edu high edu
Inexperienced Experienced
Perc
enta
ge o
f ins
talls
pas
sing
pin
ch te
st fo
r sn
ug h
arne
ss
Harness shoulder height adjustor was a significant predictor of harness snugness [F(4,72)=2.58; p=0.0447]. Figure 21 shows the percentage of installs with sufficient snugness for five different styles of harness shoulder height adjustor. Because CRS features are correlated, other factors may also be contributing to these results.

Task 1 Final Report
44
Figure 21. Percentage of installations passing pinch test for snug harness by harness shoulder height adjustment type
49.2%53.8%
14.3%
85.7%
46.7%
0%
10%
20%
30%
40%
50%
60%
70%
80%
90%
100%
Rethread(n=65)
Side Knob(n=15)
Side handles(n=7)
Tabs onharness(n=14)
Rotate levers(n=15)
Harness height adjustment type
Perc
enta
ge o
f ins
talls
that
pas
s ha
rnes
s pi
nch
test
Tether installation The only predictor of whether the tether was appropriately used was the method of tether storage as shown in Figure 22 [F(2,113)=5.95; p=0.0035]. Appropriate use was using the tether in FF mode, or using as directed in RF mode. CRS that store the tether on a hook on the CRS had the highest rates of appropriate use, perhaps because the tether was more visible than when stored in a pouch or compartment.

Task 1 Final Report
45
83.3%
50.0%
62.5%
0%
10%
20%
30%
40%
50%
60%
70%
80%
90%
100%
On hook (n=78) Pouch (n=30) Compartment (n=8)
Method of tether storage
Perc
enta
ge o
f ins
talls
that
use
d te
ther
ap
prop
riate
ly
Figure 22. Percentage of installations in which the tether was used appropriately.
Figure 23 shows the distribution of tether use for RF installations. In 71% of trials, the tether was not used RF, which complies with the manufacturer instructions for use. In 9% of trials, the tether was supposed to be used and was installed correctly. In 10% of trials, the tether was supposed to be used but was not. In the last 10% of trials, the tether was not supposed to be used but was attached. In only three of the CRS tested in this study do manufacturers require RF tether use.
70.7%
8.6% 10.3% 10.3%
0%
10%
20%
30%
40%
50%
60%
70%
80%
Correct-did not usetether
Correctly usedtether
Misuse-did not usetether
Misuse-used tether
Use of tether rear-facing
Perc
enta
ge o
f RF
inst
alls
Figure 23. Use of tether RF

Task 1 Final Report
46
LATCH belt attached to lower anchorages LATCH lower connectors were classified as correctly used if they were fully attached to the correct anchorage hardware in the vehicle and properly oriented. The most common type of misuse was attaching the connectors upside down. If subjects did not attach the LATCH belt to the correct hardware, they most frequently chose the right lower anchorage intended for installing a CRS in the center position rather than the left lower anchorage intended for installing a CRS in the right outboard position. This error might be less likely on a vehicle that has two rather than three pairs of lower anchorages. Other subjects attached lower connectors to things that were not the anchorage, such as the belt webbing or buckle. Only one CRS factor was associated with correct attachment of the lower anchorages [F(1,24=3.28, p=0.0826)]. When the out-of-the-box condition had the LATCH belt stowed in its storage position, 67% of subjects correctly attached the LATCH belt when using it to install the CRS. When the LATCH belt was not in its stored position (i.e. some CRS are shipped with the LATCH belt routed or hanging loose), only 45% of subjects correctly attached the LATCH belt. No other CRS feature or instruction/label characteristic was predictive of correct lower anchorage use.
Installation method used The subjects were allowed to choose the method of installation (LATCH vs. seatbelt) during the first two trials, and then asked to install using the opposite method in the last two trials. Just over 40% of the first two trials involved LATCH installation. No subject or CRS features were predictive of which method was used.
Figure 24. Choice of installation method
3.2%
43.5%
53.2%
3.5%
44.7%
51.8%
0%
10%
20%
30%
40%
50%
60%
Both LATCH Seatbelt
Installation method
Perc
enta
ge o
f tria
ls
First two trials
Overall

Task 1 Final Report
47
Both the LATCH and seatbelt were used at the same time to install the CRS in four trials. All four of these trials were RF configurations. Three experienced and one inexperienced subject used both, and two in each education category. All four were women. Two installations with both LATCH and seatbelt occurred in the subject’s first and second trial, while two were in the fourth trial.
Harness routing Overall, 53% of installations had the harness correctly positioned relative to the ATD shoulders, as defined by using the slot closest to the ATD’s shoulders and following the at-or-below rule for RF and at-or-above rule for FF. (All manufacturer instructions recommended this practice.) Figure 25 shows that this value does not vary significantly with subject group. The upper part of each bar in Figure 25 indicates the percentage of installations where the subject used a slot that was appropriate for the installation mode, but was not closest to the ATD’s shoulder. For example, this would include a RF installation when the harness was positioned in the lowest slot when the best choice would have been the second highest slot. No CRS features were associated with subjects choosing the correct harness slot location.
Figure 25. Percentage of installations with harness in correct slot by subject
education and experience. Lower part of each bar indicates correct slot selection, while upper part of bar indicates slot chosen was allowed for the RF or
FF mode. The harness was defined as correctly threaded if it was not twisted or folded and was attached correctly to the harness splitter plate. However, this definition does not consider harness height adjustment, which was assessed separately. 83% of experienced subjects and 65% of inexperienced subjects correctly threaded the harness, but the difference was not significant.
46.2% 50.0% 53.1%59.4%
30.8% 26.9%
37.5% 21.9%
0%
10%
20%
30%
40%
50%
60%
70%
80%
90%
100%
low edu high edu low edu high edu
Inexperienced Experienced
Perc
enta
ge o
f ins
talla
tions
with
har
ness
in
corr
ect s
lot

Task 1 Final Report
48
Harness clip
Almost all subjects (95%) correctly fastened the harness clip, and there were no successful predictors for the cases where it was not. Experienced subjects placed the harness clip at the correct height in 53% of trials, while only 35% of inexperienced subjects did, but these results are not statistically different. Of the 16 CRS, 38% have directions on the chest clip that direct it to be placed at the child’s armpit height, but the presence of this instruction was not significantly associated with harness clip placement. In 98% of trials, the chest clip was correctly threaded on the harness. Subjects were more likely to correctly position the harness clip at armpit level in FF mode compared to RF mode. [F(1,75)=3.24, p=0.0758]
Recline
When assessing whether subjects installed the CRS at the correct recline angle, men were more likely to achieve the correct angle than women [88% vs. 69%; F(1,38.98)=4.31, p=0.0445]. Correct recline was achieved in 91% of FF installs and 66% of RF installs [F(1,34.73)=7.96, p=0.0078]. The percentage of trials with the correct recline angle according to recline mechanism is shown in Figure 26, although differences were not statistically significant. Most errors resulted in the angle being too upright.
62.5%
86.4%
61.5%
73.3% 71.4%
0%
10%
20%
30%
40%
50%
60%
70%
80%
90%
100%
Automatic(n=8)
Front handle(n=66)
Flip aroundcenter pivot
(n=13)
Flip aroundrear pivot
(n=15)
Base (n=14)
Type of recline mechanism
Perc
enta
ge o
f ins
talls
at c
orre
ct re
clin
e an
gle
Figure 26. Percentage of installs at correct recline angle.
Correct belt path
Education was a predictive factor for subjects choosing the correct belt path, with 93% of higher education subjects choosing the correct belt path compared to 74% of lower education subjects (F(1,62)=4.80; p=0.0323). Figure 27 shows the percentage of installs with the correct belt path by subject education and experience.

Task 1 Final Report
49
.
80.8%
96.2%
65.6%
90.6%
0%
10%
20%
30%
40%
50%
60%
70%
80%
90%
100%
low edu high edu low edu high edu
Inexperienced Experienced
Perc
enta
ge o
f ins
talls
with
bel
t thr
ough
cor
rect
pat
h
Figure 27. Percentage of installs with belt routed through correct path by subject experience and education level.
Lower connector rerouting had a significant effect on proper belt-path use (F(1,19)=5.33; p=0.0324). For LATCH installations, 78% of LATCH belts were routed correctly for CRS requiring rerouting of the LATCH belt through the FF or RF belt path. For CRS where rerouting was not necessary, 96% of LATCH belts were correctly routed. No factors predicted correct belt path routing for seatbelt installations.
Crotch strap Figure 28 shows the variation in correct crotch strap placement with type of adjustment mechanism. The sliding method appeared to produce the best results. However, on many CRS, the out-of-the-box position of the crotch strap was acceptable for use with the 18MO ATD, so these results likely do not represent how subjects successfully adjusted the crotch strap.

Task 1 Final Report
50
100.0%
69.2% 71.4%
100.0%
0%
10%
20%
30%
40%
50%
60%
70%
80%
90%
100%
No adjust (n=41) Move retainer clip(n=52)
Button (n=7) Slide (n=14)
Crotch strap adjustment type
Perc
enta
ge o
f ins
talls
with
cor
rect
cro
tch
stra
p po
sitio
n
Figure 28. Percentage of installs with correct crotch strap position by type of crotch strap adjustment.
Locking seatbelt Figure 29 shows the distributions of seatbelt installs according to the method used by subjects to lock the seatbelt. For CRS without seatbelt lockoffs, the retractor should be switched to locking mode. For CRS with lockoffs, some require using both the lockoff and switching the retractor, while others specify that only the lockoff should be used. Green bars indicate correct use (lower three bars) and red bars indicate misuse where the seatbelt is not actually locked (top four bars). Blue bars indicate incorrect use, where the subject did not lock the seatbelt as directed, but locked the seatbelt using a different method, which would probably not have negative consequences. Only two subjects used a locking clip.

Task 1 Final Report
51
0% 5% 10% 15% 20% 25% 30%
Retractor switched
Lockoff correctly used
Lockoff and retractor used correctly
Lockoff correct and retractor unnecessarily switched
Lockoff incorrect and retractor unnecessarily switched
Locking clip used
Retractor switched and locking clip used
Retractor not switched
Lockoff used but retractor not switched
Lockoff used incorrectly
Lockoff misused and retractor not switched
Figure 29. Percentage of seatbelt installs by how subject locked the seatbelt. The direction of installation affected how subjects locked the belts as shown in Figure 30. A greater proportion of FF trials involved a misused lockoff (not used) compared to RF trials. Subjects were more likely to incorrectly use a lockoff (used, but not as directed because they also locked the retractor) in RF trials than in FF trials.
12.9%
25.8%
6.5%
35.5%
19.4%
6.7%
30.0%
26.7%
6.7%
30.0%
0% 5% 10% 15% 20% 25% 30% 35% 40%
Correct lockoff
Correct retractor
Incorrect lockoff
Misused lockoff
Misused retractor
Percentage of seatbelt installations
RF
FF
Figure 30. Percentage of seatbelt installs by how subject locked the seatbelt for RF and FF installations.

Task 1 Final Report
52
Instruction use The subject consulted the CRS manual in 92% of trials. (The experimenter did not assess how extensively each subject used the manual.) No subject or CRS factors (including trial) predicted whether the subject did so. Overall, the subjects used the vehicle manual in 21% of trials. As shown in Figure 31, the rate of subjects consulting the vehicle manual dropped from about 35% in the first trial to 8% in the fourth trial [F(1,114=6.71, p=0.0108].
34.4%
23.3%
14.8%
8.0%
0%
5%
10%
15%
20%
25%
30%
35%
40%
1 (n=32) 2 (n =30) 3 (n=27) 4 (n=25)
Trial
Perc
enta
ge o
f ins
talls
whe
re s
ubje
ct u
sed
vehi
cle
man
ual
Figure 31. Percentage of installs where subject used vehicle manual by trial number.
Installation time The mean installation time according to subject group is shown in Figure 32. Installation time was approximately doubled for inexperienced subjects compared to experienced subjects [F(1,23.7=7.60; p=0.0110], but no effect of subject education was observed. The average installation time also varied with the method of installation [F(2,72.8)=4.40; p=0.0157], with average time of 33 minutes for LATCH installations and 28 minutes for seatbelt installations.

Task 1 Final Report
53
2420
4240
0
10
20
30
40
50
60
70
80
90
low edu high edu low edu high edu
Inexperienced Experienced
Mea
n in
stal
latio
n tim
e (m
in)
Figure 32. Average installation time (and standard deviation) by subject CRS experience and education.
Choosing correct restraint Subjects were asked to determine if five hypothetical children would be able to use the CRS RF or FF. Table 15 shows the overall rates of getting each answer correct, as well as factors that contribute to subjects correctly answering. Overall, subjects were best at identifying that the largest children should not use convertibles RF. Only 21% of subjects correctly identified that a 4-lb child is too small to use most of the convertibles in the study. Unfortunately, 12% of subjects indicated that a 4-lb infant could use the restraints FF. The third RF question had two significant predictors of correct answer, with those who had just completed a RF installation more likely to obtain the correct answer than those who had just completed a FF installation. In addition, length of the manual was a predictor, with subjects more likely to obtain the correct answer if the manual was longer. The length of the manual was also significantly correlated with the correct answer to the fourth and fifth FF questions, although the fourth question was more likely to be correctly answered with a longer manual, while the fifth question was more likely to be correctly answered with a shorter manual.

Task 1 Final Report
54
Table 15. Rate of correct answers regarding whether different sizes of children
can use restraint, predictors, F-tests, and p-values Percentage
Correct Predictors F-test p-value
RF
3 days old 4 lb, 17 in
21%
9 months old 23 lb, 25 in
93%
18 months old 30 lb, 30 in
60% RF>FF Number of pages (longer = better)
F(1,103)=4.65 F(1,103)=4.25
0.0333 0.0418
3 years old 45 lb, 44 in
93%
5 years old 37 lb, 46 in
95%
FF 3 days old 4 lb, 17 in
88%
9 months old 23 lb, 25 in
70%
18 months old 30 lb, 30 in
66%
3 years old 45 lb, 44 in
61% Number of pages (longer=better)
F(1,107)=3.34 0.0704
5 years old 37 lb, 46 in
66% Number of pages (longer=worse)
F(1,105)=4.12 0.0449
Subject Evaluation of Features
Overview This section documents the Task 1A subject responses to questionnaires completed after they performed each installation. For some questions, subjects were asked whether they strongly disagreed, disagreed, were neutral, agreed, or strongly agreed, which were coded using a rating scale of 1 to 5, with 5 being positive. Remaining questions asked how hard or easy it was to do certain tasks, and subjects had five choices ranging from very hard to very easy. Mean values of subject rating were calculated for each child restraint and plotted against relevant installation errors to document how subject perception matched performance. Each point represents a different CRS, and different symbol types represent different relevant features or different CRS manufacturers.

Task 1 Final Report
55
Some cases in which the subjects misinterpreted the question were excluded. Specific interpretation errors were:
1) Many subjects rated ease of using lockoffs in trials that did not involve a CRS using lockoffs.
2) Many subjects rated agreement between CRS and vehicle manuals when they did not use the vehicle manual.
3) Many inexperienced subjects did not respond to the question “similar to what I would do at home” because they did not currently install CRS at home.
4) Many subjects rated ease of adjusting crotch strap when they did not move it. 5) Many subjects rated ease of tightening vehicle belt when they performed
LATCH installations. In almost every instance, there is no visible correlation between subject ratings and performance. Because of this, no statistical analysis of these relationships was performed, other than making a linear fit through the data and indicating R2 values on the plot.
Subject assessments of their performance In general, when considering average subject ratings and average correct installation rates for each CRS, subject ratings of how well they attached the CRS had no relationship to the objective measurement of their performance. Figure 33 shows subjects’ assessment of how well they attached the CRS compared to the percentage of trials passing the 1” movement test for tightness. Results for each CRS are shown using different symbols for each manufacturer. Figure 34 shows subject assessment of how well they secured the child compared to the percentage of installations passing the pinch test for each CRS. Overall there is no correlation between self-assessment and rate of obtaining a snug harness. An exception is that the two CRS obtaining the highest rate of correct harness snugness were rated highest by the subjects on how well they secured the child.

Task 1 Final Report
56
R2 = 0.0003
0%
10%
20%
30%
40%
50%
60%
70%
0 1 2 3 4 5
Subject assessment on how well they attached the CRS (5=best)
Perc
enta
ge o
f tria
ls p
assi
ng 1
" m
ovem
ent t
est
for t
ight
ness
Figure 33. Subject rate of tight installation vs. subject assessment of how well they attached the CRS for each CRS.
R2 = 0.0052
0%
10%
20%
30%
40%
50%
60%
70%
80%
90%
0 1 2 3 4 5
Subject assessment on how well they secured the child (5=best)
Perc
enta
ge o
f tria
ls p
assi
ng p
inch
test
for s
nug
harn
ess
Figure 34. Subject rate of snug harness vs. subject assessment of how well they secured the child for each CRS.
Manuals and Labels Figure 35 shows the percentage of trials that passed the 1” movement test compared to subjects’ ratings of how easy it was to understand the manual about installation. Different symbols represent different manufacturers, because manual styles tend to be

Task 1 Final Report
57
similar for each manufacturer. There is no correlation between manual ratings and correct installation. The percentage of trials passing the pinch test for harness snugness is compared to subjects’ rating of how easy it was to understand the manual about securing the child in Figure 36. Different symbols represent different manufacturers. In general, there is no correlation between manual ratings and harness snugness, except the two CRS with the highest rate of correct installation were also the most highly rated by the subjects. For comparing subjects’ ratings of ease of understanding labels, the percentage of trials in which the subject had the CRS tight, harness snug, and correct belt path was calculated as shown in Figure 37, with different manufacturers represented by different symbols. Again, there is no correlation between subject ratings and correct installation rate considering these three factors.
R2 = 9E-06
0%
10%
20%
30%
40%
50%
60%
70%
0 1 2 3 4 5
Subject rating of ease of understanding manual about installation (5=best)
Perc
enta
ge o
f tria
ls p
assi
ng 1
" m
ovem
ent t
est
for t
ight
ness
Figure 35. Rate of tight installation vs. subjects’ ratings of ease of understanding manual about installation.

Task 1 Final Report
58
R2 = 0.0387
0%
10%
20%
30%
40%
50%
60%
70%
80%
90%
0 1 2 3 4 5
Subject rating of ease of understanding manual about securing child (5=best)
Perc
enta
ge o
f tria
ls p
assi
ng p
inch
test
for s
nug
harn
ess
Figure 36. Rate of snug harness installation vs. subjects’ ratings of ease of understanding manual about securing child.
R2 = 0.0018
0%
5%
10%
15%
20%
25%
30%
35%
40%
45%
0 1 2 3 4 5
Subject rating of ease of understanding labels (5=best)
Perc
enta
ge o
f tria
ls w
ith ti
ght i
nsta
llatio
n, s
nug
harn
ess,
and
cor
rect
bel
t pat
h
Figure 37. Combined rate of tight installation, snug harness, and correct belt path vs. subjects’ ratings of ease of understanding labels.

Task 1 Final Report
59
CRS attachment The rate of tight installation vs. subjects’ assessments of how easy it was to attach the CRS is shown in Figure 38. In this case, there was a weak relationship between CRS tightness and subjective ratings. For three of the four manufacturers where multiple CRS were tested (red square, blue diamond, cyan triangle), the CRS within each manufacturer with the higher rate of tight installation was rated easier to use by subjects. Figure 39 shows the percentage of LATCH installs where the LATCH belt was correctly attached compared to subjects’ ratings of how easy it was to attach the LATCH belt. The symbols designate different types of LATCH belt connectors. There is no association between subject ratings, correctly tightening the CRS, and the type of LATCH belt connector. Subject ratings of ease of storing the LATCH belt are shown in Figure 40 compared to rates of correctly stowing the LATCH belt during seatbelt installations. No particular method of LATCH belt storage was preferred by subjects or used correctly, but there was a weak relationship between subject ease-of-use ratings and correct storage.
R2 = 0.1469
0%
10%
20%
30%
40%
50%
60%
70%
0 1 2 3 4 5
Subject assessment on how easy it was to attach the CRS (5=best)
Perc
enta
ge o
f tria
ls p
assi
ng 1
" m
ovem
ent t
est
for t
ight
ness
Figure 38. Rate of tight installation vs. subjects’ ratings of ease of attaching the CRS.

Task 1 Final Report
60
R2 = 4E-05
0%
10%
20%
30%
40%
50%
60%
70%
80%
90%
100%
0 1 2 3 4 5
Subject assessment on how easy it was to attach LATCH belt (5=best)
Perc
enta
ge o
f LAT
CH tr
ials
inst
alla
tions
with
LA
TCH
belt
atta
ched
cor
rect
ly
Blue diamond: push-on connectorRed triangle: hook-on connectorPurple square: SuperLATCHCyan circle: SureLATCH
Figure 39. Percentage of LATCH installs with LATCH belt attached correctly vs. subjects’ ratings of ease of attaching the LATCH belt.
R2 = 0.1273
0%
10%
20%
30%
40%
50%
60%
70%
80%
90%
100%
0 1 2 3 4 5
Subject assessment on how easy it was to store LATCH belt (5=best)
Perc
enta
ge o
f sea
tbel
t ins
talla
tions
with
LAT
CH
belt
stor
ed c
orre
ctly
Blue diamond: hook on backRed triangle: hook on sideGreen square: hook together in backOpen black circle: under seat coverGreen X: slots behind seatCyan open triangle: in compartment
Figure 40. Percentage of seatbelt installs with LATCH belt stored correctly vs. subjects’ ratings of ease of storing the LATCH belt.
Pool noodles Pool noodles were provided on the test cart because some CRS manuals suggest their use in rear-facing installations. In pre-test installations by the experimenter (a trained CPST), the correct angle could be achieved without using a pool noodle for all 16 CRS in the selected seating position. Subjects used pool noodles in 11 installations, including two in

Task 1 Final Report
61
FF installations where they are not allowed. Subjects achieved the correct angle in 8 of the 9 RF installations that used pool noodles.
Harness Figure 41 shows the percentage of trials with the correct harness slot compared to the subjects’ rating of how easy it was to move the harness for each CRS, with symbols indicating different styles of harness height adjustment systems. The rate of correct harness slot placement and the subject rating of each type of system vary widely. The percentage of trials with a snug harness is compared to the subjects’ rating of how easy it was to tighten the harness for each CRS in Figure 42, with symbols indicating different styles of harness height adjustment systems. In general, there is no correlation between ratings of how hard it was to tighten the harness and harness snugness, except the two CRS with the highest rate of snug harness were also the most highly rated.
R2 = 0.0009
0%
10%
20%
30%
40%
50%
60%
70%
0 1 2 3 4 5
Subject rating of ease of moving harness (5=best)
Perc
enta
ge o
f tri
als
with
cor
rect
har
ness
slo
t Blue diamond: rethreadOpen green triangle: side handles Red triangle: tabs on harnessOpen purple square: rotate leversCyan circle: side knobs
Figure 41. Percentage of trials with snug harness compared to subjects’ ratings of ease of moving harness.

Task 1 Final Report
62
R2 = 0.1196
0%
10%
20%
30%
40%
50%
60%
70%
80%
90%
0 1 2 3 4 5
Subject rating of ease of tightening harness (5=best)
Perc
enta
ge o
f tria
ls w
ith s
nug
harn
ess
Blue diamond: rethreadOpen green triangle: side handles Red triangle: tabs on harnessOpen purple square: rotate leversCyan circle: side knobs
Figure 42. Percentage of trials with snug harness compared to subjects’ ratings of ease of tightening harness.
Belt routing Figure 43 shows the percentage of trials with correct belt routing compared to how subjects rated the ease of routing the belt for each CRS. Both seatbelt and LATCH belt routing are included. CRS where no rerouting of LATCH belt is required when changing from RF to FF are shown by red triangles. Although subjects tended to perform better when no rerouting of LATCH belts is required, they did not necessarily rate those systems as easier to use.

Task 1 Final Report
63
R2 = 0.0345
0%
10%
20%
30%
40%
50%
60%
70%
80%
90%
100%
0 1 2 3 4 5
Subject rating of ease of routing belt (5=best)
Perc
enta
ge o
f tria
ls w
ith c
orre
ct b
elt r
outin
g
Blue diamond: rerouting requiredRed triangle: no rerouting required
Figure 43. Percentage of trials with correct belt routing vs. subjects’ rating of ease of routing belt
Recline Figure 44 shows the percentage of trials with correct recline angle vs. subject rating of ease of adjusting recline. Different methods of adjusting recline are shown by different symbols, and each point represents a different CRS. Most of the CRS that use a front handle recline adjustment performed better and were rated better than the CRS that flip a recline stand, and both types were rated higher and mostly performed better than the automatic leveling system. The two CRS using a base to adjust recline had variable results in terms of performance and ratings. Subjects also rated how easy it was to figure out the correct recline angle as shown in Figure 45. Trends are similar to those seen for adjusting correct recline angle, except that the automatic system was rated higher.
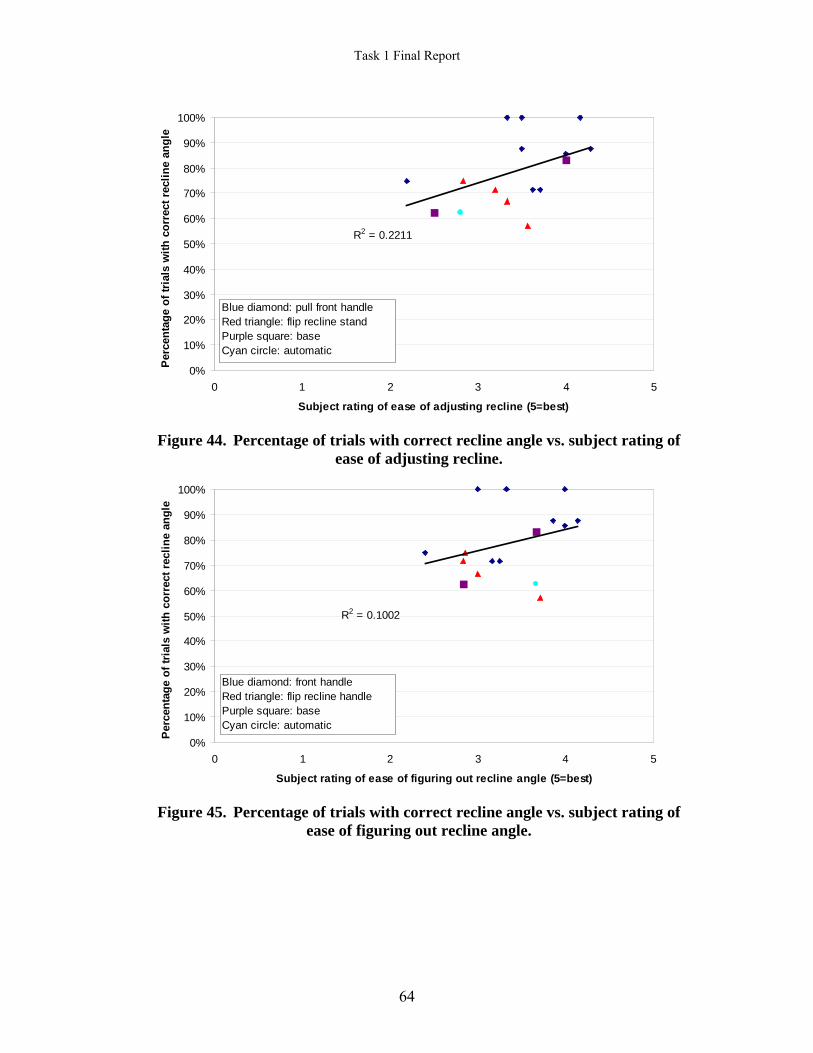
Task 1 Final Report
64
R2 = 0.2211
0%
10%
20%
30%
40%
50%
60%
70%
80%
90%
100%
0 1 2 3 4 5
Subject rating of ease of adjusting recline (5=best)
Perc
enta
ge o
f tria
ls w
ith c
orre
ct re
clin
e an
gle
Blue diamond: pull front handleRed triangle: flip recline standPurple square: baseCyan circle: automatic
Figure 44. Percentage of trials with correct recline angle vs. subject rating of ease of adjusting recline.
R2 = 0.1002
0%
10%
20%
30%
40%
50%
60%
70%
80%
90%
100%
0 1 2 3 4 5
Subject rating of ease of figuring out recline angle (5=best)
Perc
enta
ge o
f tria
ls w
ith c
orre
ct re
clin
e an
gle
Blue diamond: front handleRed triangle: flip recline handlePurple square: baseCyan circle: automatic
Figure 45. Percentage of trials with correct recline angle vs. subject rating of ease of figuring out recline angle.

Task 1 Final Report
65
Tether Figure 46 shows the rate of correct tether attachment (among installations using the tether) vs. subjects’ ratings of ease of attaching tether. Figure 47 shows the percentage of tether installations that were tight vs. subjects’ ratings of ease of tightening tether. On both plots, triangles represent tether straps with latchplate adjusters, and diamonds designate tether straps with button-release adjusters. Darker colors (blue and red) represent tether straps with a single attachment to the CRS, while lighter colors (gray and cyan) represent tether straps with a dual attachment to the CRS. Neither of these measures shows any correlation between type of tether strap, correct tether use, and subject ratings.
R2 = 0.0322
0%
10%
20%
30%
40%
50%
60%
70%
80%
90%
100%
0 1 2 3 4 5
Subject assessment on how easy it was to attach tether (5=best)
Perc
enta
ge o
f ins
talla
tions
usi
ng te
ther
w
ith te
ther
att
ache
d co
rrec
tly
Blue diamond: single, button-adjusterRed triangle: single, latchplate adjusterGray diamond: double, button-adjusterCyan triangle: double, latchplate adjuster
Figure 46. Percentage of tether installations with tether used correctly vs. subjects’ assessment of how easy it was to attach tether.

Task 1 Final Report
66
R2 = 0.0409
0%
10%
20%
30%
40%
50%
60%
70%
80%
90%
100%
0 1 2 3 4 5
Subject assessment on how easy it was to tighten tether (5=best)
Perc
enta
ge o
f ins
talla
tions
usi
ng te
ther
w
here
teth
er is
tigh
t
Blue diamond: single, button-adjusterRed triangle: single, latchplate adjusterGray diamond: double, button-adjusterCyan triangle: double, latchplate adjuster
Figure 47. Percentage of tether installations where tether is tight vs. subjects’ assessment on how easy it was to tighten tether.
Buckle and harness clip Figure 48 shows the percentage of installations in which the harness was correctly buckled vs. subjects’ assessment of how easy it was to buckle the harness. The subjects were somewhat more likely to have a higher correct buckling rate with the bigger size of buckle compared to the standard buckle, and subjects also rated these types of buckles more highly. Although the puzzle buckle was correctly used in all cases, subjects did not find it as easy to use as the other two styles. Figure 49 shows the rate of correctly fastening the harness clip attachment vs. subjects’ assessments of ease of fastening harness clip. Symbols represent different types of harness clips, with the stiffness ratings subjectively determined by the experimenter. No particular style of harness clip was preferred by subjects nor exceptional in correct-use rate. Figure 50 shows the rate of correctly positioning the harness clip at armpit level vs. subjects’ assessments of doing so, with triangles indicating CRS that have directions on the harness clip for positioning it to armpit level.

Task 1 Final Report
67
R2 = 0.0503
0%
10%
20%
30%
40%
50%
60%
70%
80%
90%
100%
0 1 2 3 4 5
Subject assessment on how easy it was to buckle harness (5=best)
Perc
enta
ge o
f ins
talla
tions
with
har
ness
co
rrec
tly b
uckl
ed
Blue diamond: big buckleRed triangle: standard buckleCyan square: puzzle buckle
Figure 48. Percentage of installations with harness correctly buckled vs. subjects’ assessments of ease of buckling harness.
R2 = 0.1491
50%
55%
60%
65%
70%
75%
80%
85%
90%
95%
100%
0 1 2 3 4 5
Subject assessment on how easy it was to fasten harness clip (5=best)
Perc
enta
ge o
f ins
talla
tions
with
har
ness
cl
ip c
orre
ctly
fast
ened
Blue diamond: pinch, high stiffnessCyan square: pinch, medium stiffnessGreen open circle: pinch, low stiffnessRed triangle: push button
Figure 49. Percentage of installations with harness clip correctly fastened vs. subjects’ assessments of ease of fastening harness clip

Task 1 Final Report
68
R2 = 0.1139
0%
10%
20%
30%
40%
50%
60%
70%
80%
90%
100%
0 1 2 3 4 5
Subject assessment on how easy it was to adjust harness clip position (5=best)
Perc
enta
ge o
f ins
talla
tions
with
har
ness
cl
ip a
t cor
rect
hei
ght
Blue diamond: no label on clipRed triangle: label on clip
Figure 50. Percentage of installations with harness clip at correct position vs. subjects’ assessments of ease of positioning harness clip
Subject Installation Errors: Task 1B In the testing performed for Task 1B, overall rate of manual use for subjects who were offered a manual was 87%. Experienced subjects were less likely to use the CRS manual than inexperienced subjects [F(1,72)=2.90, p=0.0939]. Figure 51 shows the rate of subjects using the CRS manual for each different label condition. Although not statistically significant, subjects with combined label conditions had the lowest rate of CRS manual use compared to other label conditions (t=1.39, p=0.1691). For subsequent analysis, subjects who were given a manual but did not use it were reclassified as “no manual” subjects.

Task 1 Final Report
69
88%
92%
88%
83%
100%
92%
83%
71%
0% 20% 40% 60% 80% 100%
None
Baseline
Graphics
Rearrange
Numbered
Text
Color-coded
Combined
Labe
l typ
e
Used CRS Manual
Figure 51. Percentage of trials in which the subject used the CRS manual by CRS label type.
Table 16 and Table 17 show the different factors that were assessed in each installation for each label condition and manual condition, respectively. The chart is color coded to indicate which label conditions were marginally or significantly better or worse with each label condition. Most alternate label and manual conditions had the same rate of correct installation as the baseline condition with a few exceptions. Subjects were more likely to try LATCH installation first with graphics, rearranged, numbered, or combined labels, as well as with graphics, reorganized, text, photo, and combined manuals. Harness clip was more likely to be fastened correctly with reorganized and video manuals, text labels, and no labels. Harness clip was less likely to be fastened correctly with the photo manuals. No subjects using the video manual incorrectly installed the CRS by using both LATCH and seatbelt. Subjects using color-coded labels were less likely to have the CRS sufficiently tight, and subjects without labels were marginally more likely to have an incorrect installation angle.

Task 1 Final Report
70
Table 16. Difference between alternate labels and baseline condition
2: correct install rate significantly better than baseline (p<0.05) 1: correct install rate marginally better than baseline (0.05<p<0.1) -1: correct install rate marginally lower than baseline (0.05<p<0.1) -2: correct install rate significantly lower than baseline (p<0.05) Blank: correct install rate the same Bold text indicates factors considered most critical
L1 L2 L3 L4 L5 L6 L7 L8 none baseline graphics Rearrange numbered text Color
code Combined
CRS pass 1” movement test?
-2
Did harness pass pinch test?
Is harness in correct shoulder slots?
Is belt routed through correct path?
Is tether used appropriately? (yes FF, no RF)
Is tether attached correctly?
Is tether tight? Is harness threaded correctly?
Is seatbelt locked? Is recline angle correct?
-1
Is LATCH belt attached correctly?
Did subject try LATCH installation first?
2 2 2 2
Did subject install either or LATCH and seatbelt?
Did subject use vehicle manual?
Did subject use child restraint manual?
Is harness clip fastened correctly?
2 2
Is harness clip at armpit level?
1
Is belt twisted? Is buckle fastened properly?
Is tether stored correctly? Is LATCH belt stored correctly?
CRS slack measurement Harness slack measurement
Tether slack measurement

Task 1 Final Report
71
Table 17. Difference between alternate manuals and baseline condition M1 M2 M3 M4 M5 M6 M7 M8 None Baseline Graphics Reorg Video text Photos Combined CRS pass 1” movement test?
Did harness pass pinch test?
Is harness in correct shoulder slots?
Is belt routed through correct path?
Is tether used appropriately? (yes FF, no RF)
Is tether attached correctly? Is tether tight? Is harness threaded correctly? Is seatbelt locked? Is recline angle correct? Is LATCH belt attached correctly?
Did subject try LATCH installation first?
2 2 2 2 2
Did subject install with either LATCH or seatbelt?
2
Did subject use vehicle manual?
Did subject use child restraint manual?
Is harness clip fastened correctly?
2 2 -1
Is harness clip at armpit level?
Is belt twisted? Is buckle fastened properly? Is tether stored correctly? Is LATCH belt stored correctly?
CRS slack easurement Harness slack measurement Tether slack measurement 2: correct install rate significantly better than baseline (p<0.05) 1: correct install rate marginally better than baseline (0.05<p<0.1) -1: correct install rate marginally lower than baseline (0.05<p<0.1) -2: correct install rate significantly lower than baseline (p<0.05) Blank: correct install rate the same Bold text indicates factors considered most critical Other factors besides label and manual type had a stronger effect on installation error. For passing the 1” movement test, FF installations did significantly better than RF installations [F(1,80)=7.67, p=0.0070)], and were more likely to have the seatbelt locked

Task 1 Final Report
72
[F(1,28)=4.82, p=0.0366]. This likely occurs because the seatbelt was more likely to be locked (by switching the retractor) in FF compared to RF tests [F(1,30)=6.86, p=0.0137]. Subjects with no experience were marginally more likely to pass the harness pinch test than experienced subjects [F(1,74)=3.37, p=0.0704]. However, the experimenter noted that many subjects did not properly adjust the harness routing or height, and may have achieved a snug harness by forcing the dummy into the harness that was too small for it either because of improper slot height or use of the wrong pocket when rethreading. The ComfortSport was more likely to have proper belt routing than the Titan, possibly because of better diagrams of the belt routing used on most label conditions [F(1,80)=6.75, p=0.0112]. Examples of lap/shoulder belt routing for FF installations are shown in Figure 52. The Titan drawing does not illustrate use of the tether.
Figure 52. Lap/shoulder belt routing diagram for ComfortSport (left) and Titan
(right). In an effort to provide an overall rating on the effectiveness of each manual and label condition, the following eight errors were evaluated for each installation. If an installation had all of these items correct, it received a rating of 100%. If half were correct, it received a rating of 50%.
1) Did CRS pass 1” movement test for tightness? 2) Did harness pass pinch test? 3) Was harness positioned in correct shoulder slots? 4) Was belt routed through correct path? 5) Was buckle fastened properly? 6) Was the seatbelt locked (seatbelt installs only)? 7) Was the recline angle correct? 8) Was the LATCH belt attached correctly (LATCH installs only)
Figure 53 shows the rate of correct installation by label type. None of the alternate labels were statistically different from baseline [F(7,72)=0.53, p=0.8065].
Copyright permission not granted by Evenflo to include example of Titan drawing

Task 1 Final Report
73
Figure 53. Average correct installation rate
(based on eight key points) by label type. Figure 54 shows the percentage of correct installation based on the same eight points for each manual type. Variations from baseline are not statistically different [F(7,96.9)=1.12, p=0.3556]. The video manual and combined manual were closest to showing an improved rate of correct installations compared to baseline, and the “no manual” condition had the lowest correct installation rate. Subjects experienced a learning effect, with improvements in installation over the course of four trials [F(1, 89.4)=5.26, p=0.0242]. Since the video manuals were used more often in the latter two trials than the first two trials, this may account for some of its higher ratings.
73%
68%
69%
70%
73%
67%
66%
72%
0% 20% 40% 60% 80% 100%
None
Baseline
Graphics
Rearrange
Numbered
Text
Color-coded
Combined
Labe
l typ
e
Correct installation of eight key points

Task 1 Final Report
74
65%
74%
68%
69%
83%
69%
69%
68%
0% 20% 40% 60% 80% 100%
None
Baseline
Graphics
Reorg
Video
Text
Photo
Combined
Man
ual t
ype
Correct installation rate based on eight key points
Figure 54. Percentage of correct installation (based on eight key points) by manual type.
As in Task 1A, subjects in Task 1B were asked to determine if five hypothetical children would be able to use the CRS RF or FF. Table 18 shows the overall rates of getting each answer correct, as well as factors that contribute to subjects correctly answering. No label or manual conditions predicted correct subject answers. Only 29% of subjects correctly identified a 4-lb, 3-day-old infant as being too small for these two restraints that have a lower weight limit of 5 lb; higher education subjects were substantially more likely to answer this question correctly. The Titan had a lower correct rate of identifying RF use for a 9-month-old infant compared to the ComfortSport. Subjects without experience were marginally more likely to identify a 45-pound child to be too large to use these CRS RF. For the FF, only 70% identified the 9-month-old, 23-lb infant as being too young to use these two restraints FF. Lower education subjects were more likely to do so than higher education subjects, and results improved between the 1st and 4th trials. Education was associated with correctly determining whether a 30-lb,18-month-old should use the restraint, and more people correctly assessed the answer with the Titan compared to the ComfortSport. Only 14% of subjects correctly identified a 45-lb, 3-year-old as being too large for the ComfortSport but acceptable for the Titan when FF.

Task 1 Final Report
75
Table 18. Rate of correct answers regarding whether different sizes of children can use restraint, plus predictors, F-tests, and p-values
Percentage Correct
Predictors F-test p-value
RF 3 days old 4 lb, 17 in
29% High education: 49% Low education: 9%
F(1,93)=5.20
0.0248
9 months old 23 lb, 25 in
87% Titan: 78% ComfortSport: 97%
F(1,123)=8.11 0.0052
18 months old 30 lb, 30 in
83%
3 years old 45 lb, 44 in
91% Experienced: 84% Inexperienced: 98%
F(1,92)=2.96 0.0887
5 years old 37 lb, 46 in
95%
FF 3 days old 4 lb, 17 in
98%
9 months old 23 lb, 25 in
70% High education: 59% Low education: 80% Trial 1: 58% Trial 4: 81%
F(1,92)=3.1 F(1,92)=7.85
0.0818 0.0062
18 months old 30 lb, 30 in
84% High education: 95% Low education: 73% Titan: 89% ComfortSport: 79%
F(1,43.82)=4.02 F(1,123)=3.23
0.0513 0.0747
3 years old 45 lb, 44 in
14%
5 years old 37 lb, 46 in
51%
Subject Assessments of Labels and Instructions: Task 1B Overall, subject ratings were statistically the same in most areas for baseline and alternate labels. The first column of Table 19 shows the average subject rating for each factor using a scale of 1 to 5 where 5 is best. This column is color coded so items with the highest scores are blue and lowest scores are red. The rest of the chart is also color coded to indicate which subject assessments were rated marginally or significantly better or worse with each label condition.

Task 1 Final Report
76
Table 19. Difference between subject assessments of
alternate labels and baseline condition Mean
Value (5=best)
L1 L2 L3 L4 L5 L6 L7 L8 Agree/Disagree none baseline graphics Rearrange numbered text Color
code Combined
I attached CRS correctly
3.82
I secured child properly
4.02 1
Labels agreed with manual
3.49
Vehicle manual agreed with CRS manual
3.22
Today was similar to what I would do at home
3.49 -1 -1 -1
Hard/Easy Understand labels 3.27 1 2 2 Understand manual about installation
3.25 2
Understand manual about securement
3.45
Move shoulder harness
3.34 1
Adjust crotch strap 3.30 1 Route vehicle belt 3.63 2 Adjust angle 3.47 Figure out angle 3.57 Attach CRS 3.29 Store LATCH 3.30 Attach LATCH 3.27 1 2 1 2 Tighten vehicle belt
3.13 2
Attach tether 3.85 2 Adjust tether 3.67 1 2 2 2 2 Buckle harness 3.69 Tighten harness 3.54 Fasten chest clip 3.98 1 2 Adjust chest clip 3.94 First column: blue=higher ratings and red=lower ratings 2 (blue): ratings significantly better than baseline (p<0.05) 1 (cyan): ratings marginally better than baseline (0.05<p<0.1) -1 (yellow): ratings marginally lower than baseline (0.05<p<0.1)

Task 1 Final Report
77
When rating whether labels were easy to understand, the “rearranged” and “combined” labels were rated significantly higher than baseline. Both of these labels are characterized by having the relevant label positioned on the CRS close to where the task occurs. Subjects rated the “no label” condition as easier to understand than the baseline label condition. When the subject evaluated the labels with improved text, subjects gave significantly higher ratings for the manual being easy to understand regarding installation procedures. As shown below, the alternate text on the ComfortSport may have more clearly directed subjects to use the manual:
Baseline ComfortSport: Even if using this infant restraint seems easy to figure out on your own, it is very IMPORTANT to FOLLOW THE OWNER’S MANUAL. If you do not have an owner’s manual call 1-800-345-4109 to receive one. Revised text ComfortSport: 90% of child restraints are installed wrong. Follow the directions in the owner’s manual, even if you think you did it right. You can order a new manual by calling 1-800-345-4109.
Subjects rated the graphic label as marginally easier to understand than the baseline labels in regard to the information conveyed about how to move the shoulder harness to fit the child. The Titan does not address how to move the shoulder harness on its original label, so the improved graphics version also does not address this step. The original and graphics versions of the harness instructions from the ComfortSport are shown in Figure 55, suggesting that reduced text and extra diagrams showing harness placement relevant to shoulder were considered favorable improvements by subjects. The color-coded label was rated marginally better than baseline with regard to crotch strap ease of adjustment. However, neither the color-coded nor baseline labels on either CRS address crotch strap adjustment, so the reason for this finding is unclear.

Task 1 Final Report
78
Figure 55. Label with harness adjustment information: baseline on left and graphics on right.
The combined labels were rated significantly better than baseline with regard to routing the vehicle belt. A feature of the combined labels on both CRS models was that the belt routing was split into two steps. As shown in the top of Figure 56, step (5) was to find the correct belt path, using a label positioned in between the RF and FF belt paths (also marked by labels and belt path diagrams). Step (6), shown in the bottom of Figure 56, was to route the belt and included details about removing the cover to access the LATCH belt.

Task 1 Final Report
79
(5) Find the correct belt path Forward-facing
Rear-facing (6) Route belt If using vehicle seatbelt, store the LATCH harness. Then put the vehicle seatbelt through belt path. OR If using LATCH, pull back front cover and put LATCH harness through belt path. Then reattach cover. Forward-facing Rear-facing
Figure 56. Illustration of combined labels dealing with belt routing from ComfortSport.
Four of the alternate labels (rearranged, numbered, text, color coded) were rated as better than baseline with regard to ease of attaching the LATCH belt. The alternate text and placement dealing with attachment of the CRS with LATCH are shown below for the ComfortSport. The wording is the same on the Titan, except that it does not include the term “LATCH” as a description of the vehicle’s child restraint anchorage system. In three of the alternate labels, the directions on securing the child restraint with LATCH are more prominent than on the baseline and color-code labels. On the rearranged label, the information is printed separately on a label positioned between the belt paths. On the numbered label, the text is highlighted as step 7. On the text label, this direction was placed first on the main label and reworded using simpler language. The color-coded label uses the same text, placement, and wording as baseline, so it is unclear why subjects thought LATCH use was easier with this label condition.
Baseline and color-code (in middle of text on main label): Secure this child restraint with the vehicle’s child restraint anchorage system (LATCH) if available or with a vehicle belt. Rearranged (placed between belt paths): Secure this child restraint with the vehicle’s child restraint anchorage system (LATCH) if available or with a vehicle belt.

Task 1 Final Report
80
Numbered (step 7 on main label): Secure this child restraint with the vehicle’s child restraint anchorage system (LATCH) if available or with a vehicle belt. Text (first point on main label): Secure this child restraint tightly using LATCH (if available) or with a vehicle seatbelt, not both.
The numbered label was rated better for ease of tightening vehicle belt. There is nothing distinctive to the label regarding belt tightening, and it is hypothesized that this may have been rated highest for this label group because all of the subjects used the CRS manual. The text label was rated higher for ease of attaching the tether. Compared to baseline, the tether text (both shown below) is highlighted in green and purple, calls it a top tether rather than a top anchorage strap, and provides directions to store the tether for RF installations.
Baseline: Secure the top anchorage strap provided with this child restraint when used forward facing. Revised text: When using this restraint forward-facing, attach the top tether. When using this restraint rear-facing, store the top tether.
Five of the label conditions showed improved ratings of ease of adjusting tether compared to baseline. However, there are no directions on the labels regarding tightening the top tether for these conditions, so the reason for the subject preference is unclear. The combined and color-coded labels received higher ratings for fastening the chest clip. The color-coded labels do not address this, so the reason for its higher ratings are unclear. The combined label is the only label that mentions the chest clip, with a label positioned on the front of the seat shown below.
(9) Secure child in restraint • Place harness over shoulders • Buckle harness. • Pull front strap until harness is snug. • Fasten chest clip and move it to armpit level.
Table 20 shows how subject ratings of different factors varied for each manual compared to baseline conditions. When using no manual, reorganized, and combined manuals, the subjects rated themselves lower on their ability to secure the child properly. The ratings of the agreement between the information in the vehicle manual and the child restraint manual are somewhat questionable because more subjects answered the question than actually used the vehicle manual. Several manual conditions led subjects to indicate that what they did during the test session would not be similar to what they did at home.

Task 1 Final Report
81
Table 20. Difference between subject assessments of alternate manuals and baseline condition
Mean Value (5=best)
M1 M2 M3 M4 M5 M6 M7 M8
Agree/Disagree none baseline graphics Reorg Video text Photo Combined I attached CRS Correctly
3.82
I secured child Properly
4.02 -2 -2 -2
Labels agreed with manual
3.49
Vehicle manual agreed with CRS manual
3.22 1 2 -1 -2 -2
Today was similar to what I would do at home
3.49 -2 -2 -1 -2
Hard/Easy Understand labels 3.27 Understand manual about installation
3.25 2 2 1 1
Understand manual about securement
3.45 1 2
Move shoulder harness
3.34 1 -1
Adjust crotch strap 3.30 Route vehicle belt 3.63 Adjust angle 3.47 -2 Figure out angle 3.57 Attach CRS 3.29 1 Store LATCH 3.30 Attach LATCH 3.27 Tighten vehicle belt 3.13 Attach tether 3.85 Adjust tether 3.67 2 2 2 2 2 Buckle harness 3.69 -2 -2 Tighten harness 3.54 Fasten chest clip 3.98 Adjust chest clip 3.94 -2 2 (blue): ratings significantly better than baseline (p<0.05) 1: (cyan) ratings marginally better than baseline (0.05<p<0.1) -1: (orange) ratings marginally lower than baseline (0.05<p<0.1) -2: (red) ratings significantly lower than baseline (p<0.05) Blank: ratings statistically the same as for baseline (p>0.1) When specifically assessing how easy manuals were to understand regarding the CRS installation, the reorganized and improved text manuals received significantly higher ratings than the baseline, and the photo illustration and combined manuals received marginally higher ratings than the baseline. When assessing ease of understanding the manual regarding securing the child, the video was rated significantly higher than baseline and the reorganized manual was rated marginally higher than baseline.

Task 1 Final Report
82
When assessing the ease of moving the shoulder harness to different heights, the graphics manual was rated marginally better than baseline, while the reorganized manual was considered marginally worse. For adjusting the recline angle, the photo manual was rated significantly lower than baseline. For attaching the CRS to the vehicle, the combined manual was rated marginally higher than baseline. Several manuals (including no manual) were rated significantly higher than baseline with regard to adjusting the tether. Subjects without manual and with the reorganized manual gave significantly lower ratings to the ease of buckling the harness. Subjects without the manual also rated the ease of adjusting the chest clip lower than baseline. Table 21 shows subject ratings of particular items that were statistically different for other factors: subject experience, CRS, trial, and installation mode. Ratings by experienced subjects were marginally higher than those by inexperienced subjects for “I secured the child properly”, ease of routing vehicle belt, and ease of tightening harness. Experienced subjects’ ratings of “ease of figuring out angle” were statistically higher than inexperienced subjects. In a few instances, subject ratings were different for each CRS. Subjects rated the ComfortSport marginally easier for attaching the tether, and the Titan marginally easier for reconfiguring the shoulder harness and adjusting the crotch strap. Subjects gave statistically higher ratings to the ComfortSport for ease of figuring out angle. The ComfortSport has an angle indicator on it, while the Titan has an arrow that must be level to horizontal. In many areas, subjects gave higher ratings as they proceeded through the trials, indicated by the factors highlighted in the trial column in blue. In addition, subjects gave higher ratings to many items in FF installations compared to RF installations. In no instance did subjects rate tasks easier to perform in RF compared to FF.

Task 1 Final Report
83
Table 21. Table of other factors affecting subject assessments during testing of alternate labels and manuals
Experienced vs. None
ComfortSport vs. Titan
Trial FF vs RF
Agree/Disagree I attached CRS Correctly 1 I secured child Properly
Labels agreed with manual 2 Vehicle manual agreed with CRS manual
2
Today was similar to what I would do at home
Hard/Easy 2 Understand labels 2 Understand manual about installation
2
Understand manual about securement
-1 2
Move shoulder harness -1 Adjust crotch strap 1 Route vehicle belt 2 2 Adjust angle 2 2 2 Figure out angle Attach CRS Store LATCH 2 Attach LATCH 2 Tighten vehicle belt 1 2 Attach tether 2 2 Adjust tether 2 Buckle harness 1 2 1 Tighten harness Fasten chest clip 2 (blue): significant difference (p<0.05) 1: (cyan) marginally significant (0.05<p<0.1) -1: (orange) marginally significant, opposite direction than +1 (0.05<p<0.1) Blank: ratings statistically the same (p>0.1)
Experimenter Qualitative Assessment of Installations The following section describes the experimenters’ qualitative assessment and perceptions of the installations performed in the both Task1A and 1B testing. A quantitative assessment of the data would be possible with a systematic analysis of video data. However, this analysis was not planned for this study. Some of the observations listed below may form the basis of subsequent investigation.

Task 1 Final Report
84
Instructions/manuals About one-fifth of subjects commented that if they were installing the CRS in their personal vehicle, they would read instructions more carefully, call the manufacturer for help, or have someone else do the installation. A few subjects were confused by instructions with 3-in-1 seats and tried to remove the base/harness to use as a belt-positioning booster. Almost all inexperienced subjects had some confusion understanding instructions, particularly with the terms used to identify different CRS components. Many subjects were frustrated with the instructions and by the lack of help from the experimenter. People were confused with the terms LATCH and tether. A suggestion was made to say “top tether” and “lower LATCH”. Experimenters often received positive verbal feedback when a video version of the instruction manual was available. A potential problem with video is that older subjects (over age 60) were unfamiliar with using a laptop computer to play a DVD, and hesitated at using it. At least three subjects used the video step-by-step, watching a segment then performing that part of the installation. For the combined label conditions, the front adjustor had a specific label on it indicating that subjects should push or pull the mechanism to loosen the harness. More than one person did not realize that pushing the mechanism needed to be accompanied by pulling on the harness webbing in order to loosen the harness. Instead they expected that pushing the mechanism would simply loosen the harness automatically. Five or six people commented that the color-coded outline labels for the harness slots on the front of the CRS were helpful. Two or three people commented that photos were better than diagrams. Most subjects used both the manual and the labels. One subject liked that labels reinforced information in manual.
Installation order The experimenters conducting the testing reported frequent levels of frustration by the test subjects. A common scenario they noticed was that a subject would struggle to install the CRS in the vehicle, then become irritated once they realized that they needed to remove the CRS to adjust the harness strap position. When harness adjustments were needed, some subjects left the CRS in the vehicle and tried to adjust things without removing the CRS, while others removed the seat from the vehicle and made adjustments.

Task 1 Final Report
85
Vehicle The vehicle manual indicates that the vehicle headrest should be removed for FF installations. However, no subject removed the headrest even though some looked for instructions on how to do so. Asking subjects to install the CRS in the rear-right outboard position was confusing for some people, who wanted to install the CRS in the center rear. Only a few people tried to install CRS in front seat first. Very few subjects moved the front seat when performing installations. The vehicle manual did not have a clear recommendation on what seating position to use other than to use the rear seat, and expressly forbids installation of a RF CRS in the front seat. The vehicle is equipped with a front airbag auto shut-off if a CRS is used in the front passenger seating position.
Belt Routing Three or four subjects got the seatbelt stuck in the child restraint and needed help getting it loose. It was more common to use the FF belt path for a RF installation than vice versa. At least two subjects used two seatbelts to install the CRS.
FF/RF Three or four subjects chose not to install the dummy RF as requested, because they did not think the ATD would fit in a particular CRS RF because of the dummy’s overall height or because the legs were too long to fit. People often did not pay attention to the indicator for RF angle. Among those that did check RF angle, many became frustrated at the effort it took to achieve the correct angle. A common error was that subjects left the CRS in FF mode for RF install. FF installations usually went faster than RF installations, and many subjects seemed to prefer FF to RF installations, possibly because they were able to perform FF installations faster. People often checked tightness of RF installations incorrectly by pulling on the top of the restraint rather than at the belt path.
Belt Locking Two people used a locking clip in the seatbelt installations. Over 1/3 of subjects performing seatbelt installations did not lock the seatbelt by switching the retractor into locking mode as they were supposed to do.

Task 1 Final Report
86
CRS Adjustments Most people did not use the base or add-on braces when installing the Orbit Baby, even though use of one or the other is required for correctly installing the restraint. People rarely changed crotch strap location, which was an option on 10 of the 16 CRS tested.
Harness Many subjects could not figure out how to loosen the harness enough to fit the ATD. This was more common in Task 1B. They either did not secure the dummy in the harness, or wedged the dummy in and did not fully fasten the harness. Many people did not change the harness height, because they could not figure out how to do so, they did not realize they should, or they chose not to because they wanted to get done. Two or three people changed the harness strap length but did not route it correctly to change the slot through which the harness was routed. Some harness adjusters had a tendency to get stuck, which made them difficult to use. Some people had trouble determining the armpit location on the ATD. Five or six people only fastened the chest clip and did not buckle the harness. Problems in adjusting the harness were a frequent cause of frustration.
LATCH Subjects frequently used the wrong inboard lower LATCH anchor. Four or five subjects only attached one end of the LATCH belt, leaving the other side loose or stored. Five or six people thought the LATCH system was removed from the CRS or was not available in the vehicle. At least one person thought that the request to install FF using the seatbelt meant that they should not use the top tether. Three or four people used the wrong top tether anchor, two attached the top tether to a lower anchorage, and two or three attached the LATCH belt to the top tether anchorage. Five or six subjects routed the seatbelt in the FF path and the LATCH belt in the RF path for one of their installations.
Subjects Subjects in the inexperienced, lower education group were more likely to get frustrated, and had a higher tendency to want to quit. Many of the inexperienced subjects commented that participation in the study was a good learning experience for them, and they had never expected it to be so complicated. One experienced subject indicated that they felt their own knowledge was more useful than the manual. Common complaints from subjects were that the dummy was too heavy and must weigh more than 25 pounds. Subjects also commented that some of the CRS were heavy. No subjects received any serious injuries, but many had scrapes and bruises and one hit their head on the vehicle door frame.

Task 1 Final Report
87
Several subjects stated that it wasn’t worth $40 to participate in the study. Four people dropped out of the study from frustration. A number of subjects had problems understanding the questionnaire. On the video recordings of the test sessions, some people were very vocal, while others never said anything.

Task 1 Final Report
88
Discussion
Subject Factors Subject formal education level and prior experience with CRS installation were the two main factors considered in subject recruitment. Higher level of education was associated with sufficiently tight CRS installation and choosing the correct belt path. That these two critical CRS installation factors (as opposed to child securement factors) were improved by a subject’s education level suggests that the sections of labels and manuals addressing installation of the CRS may be too challenging for subjects who have not attended college, or that subjects were not able to find the relevant section. Prior experience with CRS installation improved levels of achieving sufficiently tight CRS installation and making the harness snug enough. However, experience was not a factor when considering most other installation tasks, indicating that experience with installing at least two different child restraints regularly (our definition of experienced) does not translate into improved outcomes when installing four child restraints that may have different features. Although not considered a main recruiting factor, the subjects were fairly balanced with regard to gender. As a result, it could be considered a potential predictor. Men were more likely than women to have a sufficiently snug harness. Men were also more likely to achieve the correct installation recline angle than women. Although the mean age of each subject group was similar, the range of ages within each group differed, and did not allow it to be considered as a predictor. This study did not examine some important subject factors that may affect misuse rates. An increasing percentage of parents of US children are primary speakers of a language other than English, most notably Spanish. The utility of graphics and the appropriate vocabulary and reading level for text in Spanish may become increasingly important.
Unexpected results We had originally thought that subjects might improve their installation techniques as they gained experience performing four installations in the same vehicle. However, there was no improvement in any installation factor, such as harness snugness or installation tightness, over the course of four trials in the first phase of the testing. The four CRS installed by each subject in Task 1A were from four different manufacturers, and were selected to provide a range of features being examined. Experience with one CRS installation apparently did not help on the subsequent trials. In retrospect, because no feedback was provided after each installation, our initial assumption was incorrect, and subjects apparently did not learn from four trials that each used a different method/mode (seatbelt/LATCH, RF/FF) of installation even though they were all in the same vehicle. This was an unexpected benefit of the study, because it allowed a similar assessment of CRS features regardless of the trial number. The only factor that varied with trial was

Task 1 Final Report
89
use of the vehicle manual, which decreased from the first through the fourth trial as the subjects continued installations in (and became more familiar with) the same vehicle. In Task 1B, in which subjects installed two similar CRS with variable instructions and labels twice, there was some improvement in quality of installation over the four trials, indicating that repeated use of a single product is more likely to result in learning. The current study identified a few factors for which no predictors of correct installation were identified: the initial choice of LATCH or seatbelt to install the first two CRS, whether LATCH anchorages were correctly attached, and proper fastening of the buckle. In 96% of the trials in Task 1A and 87% of the trials in Task 1B, the subjects were observed to consult the CRS manual at least briefly. However, the amount of time they spent with the manual and how they used it was not monitored. Subjects were instructed that they could use the CRS manuals and labels, which may have contributed to the high rate of CRS manual use. This finding contradicted the common perception that no one ever looks at the CRS manual. Another unexpected finding was that the mode or method of installation were not often significant predictors of installation factors. For example, CRS installation tightness and choosing the correct belt path was similar for LATCH and seatbelt installations, as well as for FF and RF modes. Similar rates of correct recline angle were found in LATCH and seatbelt installations. In the vehicle used during this study, LATCH did not generally result in improved installation. Very few subject assessments of CRS ease-of-use were correlated with correct use of that feature. Many subjects rated features as easy to use when they did not use them correctly, and almost all subject ratings were higher than three on a scale of 1 to 5, with 5 being best. Only three items that were rated better by users were somewhat associated with improved rates of correct use: type of buckle (bigger buckle was preferred over standard), tabs-on-harness height adjusters, and recline adjustment mechanism. This suggests that higher priority should be given to providing negative feedback to users if installations are not correct, because users currently cannot judge between good and bad installations. The unexpected lack of improvement in installation through four trials with different CRS, and the lack of correlation between subjective ratings and objective outcomes, suggests several possibilities. Differences in CRS and installation direction and methods (FF/RF, LATCH/seatbelt) may have reduced the benefit of previous installations with different CRS. Most importantly, the accurate, timely feedback that is critical to learning was missing. The rate of installation mistakes was high, yet the subjects did not accurately perceive these mistakes and the investigators (by design) did not point them out. This observation has broad implications for efforts to reduce CRS misuse, because it suggests that efforts that do not provide specific, timely feedback to the installer on critical issues are not likely to be highly successful in reducing the incidence of those

Task 1 Final Report
90
errors. The feedback could come from the CRS itself (integrated angle indicators with red and green regions are an example), but the current study suggests that the design and labeling improvements studied have only marginal effects on misuse rates on critical variables, such as installation tightness and harness snugness. One solution to this problem from NHTSA’s experience is the car-seat check: certified technicians ensuring proper installation of a particular CRS in a particular vehicle for a particular child. The current study indirectly reinforces the benefits of such direct intervention by an experienced technician, by demonstrating that even improved labels and manuals do not markedly reduce misuse rates.
Comparison to other studies Figure 57 shows the overall rates of correct installations for key areas of CRS use in Task 1A. Like most prior studies, insufficient tightness of the CRS installation and insufficient snugness of the harness were among the most frequently observed problems.
28%
52%
55%
59%
73%
73%
78%
79%
82%
83%
83%
91%
96%
0% 10% 20% 30% 40% 50% 60% 70% 80% 90% 100%
CRS sufficiently tight
Harness snug
Chest clip positioned properly
Lower anchorages used correctly
Harness routed properly
Tether used correctly:FF
Correct recline angle
Tether used correctly:RF
Harness in acceptable slots
Belt routed properly
Crotch strap correct
Buckle fastened correctly
Using LATCH or seatbelt
Figure 57. Overall rates of correct installations. Several of the installation error rates of the current, controlled laboratory study varied from results found in field studies as shown in Table 22. Field studies indicate up to 20% of installations are performed with both LATCH and seatbelt, while this only occurred 3.5% of the time in the current study. Prior studies also indicated higher misuse rates in RF installations compared to FF installations, but most installation factors that were evaluated did not depend on installation mode. It is possible that the availability of more CRS with RF lockoffs, which have been shown to reduce the rate of loose CRS installations, may have helped reduce the differences in error rate.

Task 1 Final Report
91
Table 22. Comparison of misuse rates in current and selected field studies Observed Misuse
%Current study (n=116)
%Eby (n=1258)
%Decina – 2005 (n=5527) (RF and FF convertible data only)
%Decina 2007 (n=353, only CRS LATCH install aspects reported)
Incorrect belt routing
17 18 2
Incorrect recline angle
22 1 21
Locking clip misuse
31 7-5
Loose CRS install
72 51 51 – 54 30
CRS not secured to vehicle
0 – 2
CRS installed with both seatbelt and LATCH
4 20
Harness not buckled
56 1 – 1
Loose harness 48 58 54 – 59 Incorrect harness slots
18 6 – 11
Harness misrouted
27 30 11 - 18
Harness clip not used
4 48
Alternate Labels and Manuals The results of the alternate label and manual testing in Task 1B were mostly inconclusive and results did not strongly demonstrate improved effectiveness for any of the tested label and manual changes. It is possible that changing an entire group of labels or entire manual at once is not the best way to analyze incremental changes. In future studies, we suggest focusing on one task in greater detail, such as changing harness slots, to examine how different approaches to labels and manuals affect installation performance. The disadvantage to this approach is that real-world users must use the entire manual, so examining one factor at a time is not reflective of true subject experience. One unintended consequence of the label manipulation was that subjects using CRS with combined labels showed a reduced tendency to use the manual. The combined labels were developed with the thought of providing an abridged version of the manual, because of the perception that people did not want to read the manual. However, CRS manual use

Task 1 Final Report
92
rate was 87% among subjects who were given a manual, and several subjects reacted unfavorably when provided with a “no manual” test condition. The video manual reduced the number of installation errors, and many subjects commented favorably on it. The test conditions of the study were likely close to optimal for using a video manual, since a laptop was available next to the vehicle for viewing the video within the environment where the CRS was installed. Subjects were able to view and pause the video as they performed the installation, which may not be possible in many real-world conditions. In addition, a few older subjects (over age 60) did not use the video manual because they appeared to be unfamiliar with watching videos on a computer (even though we offered assistance in doing so). One concern resulting from the study is that graphics-based labels and manuals did not show improvements compared to baseline. Currently proposed ISO ease-of-use ratings reward labels and diagrams that are primarily graphic. The advantage is that lack of fluency in English is not a barrier to understanding. However, our approach to improving graphics did not improve subject performance using improved-graphics labels and manuals. The steps taken in the current study to develop improved graphics were to:
1) Supplement label graphics with additional illustrations taken from the manual and with new illustrations
2) Reduce the amount of text 3) Color code graphics for RF and FF 4) Place text closer to the related graphics in manuals
It is clearly challenging to develop graphics that effectively communicate key installation steps without text. More research is needed to identify how to develop clear graphics for use in CRS installation instruction.
Study Limitations This testing was conducted in a university setting, using an ATD, selected CRS, and a single vehicle. The subjects were recruited by word of mouth and newspaper ads, and hence do not represent a cross section of potential CRS users. The availability and willingness of the subjects to participate in the study may be associated with certain biases. For example, such individuals might be more inquisitive or willing to try new things than other individuals. As noted previously, the use of production child restraints meant that design factors of interest were correlated across restraints, and also correlated with other factors not explicitly studied, such as trim levels. Although the complex experimental design of Task 1A provided useful results with a modest sample size, that modest sample size also means that some features were only available on a single product and other features were correlated with label design and each other. The design focused on decorrelating certain major features as much as possible, but without building a fully modular seat, it is impossible to test every combination of features in an efficient study. The results suggest some design factors that might be examined more directly in a subsequent study. For

Task 1 Final Report
93
example, the influence of LATCH system design on installation tightness could be evaluated by retrofitting a single CRS with multiple systems. In addition, the tradeoff between features and labels or instructions could be more closely examined in a subsequent study. The high levels of frustration that were noted may have been reduced if the participants installed only one child restraint model in one configuration, which of course is a more realistic condition. The time-consuming nature of the installations (averaging about 30 minutes) meant that the frustration may have become cumulative, leading to less attentive performance (although the rates of successful installation did not change with trial order) in Task 1A of the study. The study also did not examine the potential effect of securing one’s own child, rather than a dummy. Parents securing their own children with a single CRS may devote more time to obtaining a good installation. On the other hand, the similarities between misuse rates in the current study and previous field data on misuse suggest that this may not be the case. The requirement that subjects be fluent in English also limits the generalizability of the results. The percentage of US children whose parents are not fluent in English is increasing, so focused studies on such populations may be warranted. The study used only one vehicle for testing. Both the seatbelt and lower anchorages were near the bight, which was located at the intersection of the seat cushion and seatback. Results may differ on vehicles where the lower anchorages and seatbelt anchorages have more disparate locations. Many different types of misuse were evaluated and reported. In most cases, gross misuse is not distinguished from moderate or minor misuse, although different types of misuse have the potential to affect CRS effectiveness differently. While there is consensus that loose attachment of the CRS is critical, and proper chest clip height less important, the importance of other misuse (such as obtaining a tight tether) are debatable. In addition, having multiple minor errors in an installation can act together to reduce effectiveness as much as a single major error. Some types of misuse may not pose a problem in minor crashes, where they would in more severe crashes. Thus even minor misuses are evaluated in this study because reducing their rates of occurrence are expected to provide some benefit. A challenge in the study is that assessment of misuse in some instances depends on the judgment of the experimenter. Techniques for quantifying the amount of tether and harness slack were developed for the study, and another method for measuring the amount of installation looseness was also adapted for the program. Some evaluations of misuse, such as seatbelt or harness routing, are straightforward, while others, such as the chest clip being appropriately positioned, rely on the experimenter’s judgment. Efforts to minimize variation in assessment of misuse was controlled by using only two experimenters who had both taken CPS technician training and by development of

Task 1 Final Report
94
evaluation protocols during pilot testing. We did not perform studies of interrater reliability and agreement because judgment was relevant only for limited types of misuse. We believe that the stringency of assessment in a laboratory setting is equal to or greater than most observational studies to characterize misuse. In most instances, different misuses related to a single task are reported separately. For example, rather than simply indicating whether the harness was used correctly, harness snugness, harness slot height, and harness threading were evaluated separately. A similar strategy was employed with the tether. Evaluating related installation tasks separately provides more information, and thus opportunities for improvement, than grouping related tasks into a single category. However, users who adjust the harness to the correct height may not have routed the straps appropriately or achieved a snug harness.
Considerations for NHTSA ease-of-use ratings The current NHTSA EOU ratings are divided into four areas: instructions, labels, securing the child, and vehicle instructions. These four areas are used to define separate rating schemes for RF CRS (including infant seats, RF convertibles and 3-in-1 in RF mode), FF seats (including FF only in harness mode, Convertible FF, and 3-in-1 FF), and boosters (including FF only in booster mode, boosters, 3-in-1 in booster mode) to address the relevant features. The data from the Task 1A study suggest some potential improvements that could be implemented in a future version of the NHTSA EOU rating system, but care must be taken to interpret the results in a way that emphasizes hardware performance rather than specifying hardware design whenever possible. Table 23 gives an overview of findings with potential EOU applicability. The potential reductions in misuse from belt lockoffs, easier switching of the LATCH belt from RF to FF modes, and characteristics of LATCH belt tightening mechanisms are new items that could be considered for inclusion in NHTSA EOU. (Switching LATCH belt is addressed in the “conversion” section, but could be revised to be considered more explicitly.) The improved positioning of the crotch belt that was seen with non-clip based adjustment mechanisms should be evaluated in light of the safety benefits of a properly adjusted crotch belt, which may be minimal. Another interesting result from this study impacts the current EOU item addressing adjustment of the harness slot heights. Currently more points are awarded to systems that do not need to be rethreaded. The data from the current study show that not all alternatives to rethreading are equal. The subjects performed best with system that employed tabs on the harness for readjustment. Moderate performance was achieved with systems that used rethreading, side knobs and rotating lever adjustors while systems that adjusted via side handles created the most problems. The qualities of the best-performing system are that the adjustment mechanism is operated while facing the child,
Task 1 Final Report
95
so the harness can be adjusted and assessed simultaneously. The labels are also visible from this viewpoint. The results from Task 1A concerning LATCH connector type are already essentially covered in the NHTSA EOU rating in a manner consistent with the findings. The current study found that push-button lower LATCH connectors result in better installations that hook-on LATCH connectors. The NHTSA EOU assessment of whether twisting is required to release the lower connector divides products into the same two groups and rates them consistently with the results of this study. The absence of any correlation between subject ease-of-use ratings of CRS features and their performance in terms of correct usage suggests that some type of negative feedback for incorrect usage could be beneficial. The ISO rating systems currently look at visual or audio feedback for certain types of correct installations. Given that loose CRS installation remains the biggest problem in CRS installation, methods to provide feedback for this particular error would likely provide the most benefit.

Task 1 Final Report
96
Table 23. Summary of Task 1A findings with potential application for updating NHTSA EOU ratings.
CRS Feature
1A Finding
Related item in current EOU
Notes
Seatbelt Lockoffs
Lockoffs reduced misuse related to loose installations
None Since lockoffs add expense to CRS, need to leave latitude for a variety of designs with same benefit
LATCH belt adjustment
Automatic tightening is best Single latchplate and two button-release adjustors are next Single button-release adjustor is worst
None Need to define/express effect in term of adjustment function rather than hardware feature
LATCH connector
Push-button type better than hook type
Addressed in part by question about hook twisting for release
LATCH belt switchover
Systems where LATCH belt does not need to be rerouted through FF or RF belt path are better than CRS where rerouting is necessary
None Rerouting can be addressed directly, similar to harness rerouting questions
Harness shoulder height adjustment
Tabs on harness best Rethread, side knob, and rotating levers intermediate Side handles worst
Rated but features rewarded do not fully align with study findings
See if ancillary data suggest why side handles are worst.
Crotch strap adjustment
Slide through channel better than removing retaining clip One or two positions better than three
None Assess safety impact of misadjusted crotch strap, which is likely modest.

Task 1 Final Report
97
Suggestions for labels and instructions Modifying labels and manuals to be more consistent with current human factors recommendations did not show statistically significant improvements in reducing installation error. However, implementing them did not increase installation error, and subjects preferred some elements of the alternate labels. To summarize:
1) Subjects tended to prefer alternate labels to baseline 2) Alternate label and manual conditions neither improved nor worsened
installation performance. 3) Video manuals were promising in reducing installation errors 4) Subjects tended to rate reorganized, improved text, photos, combined, and
video manuals as easier to understand than baseline. The current NHTSA ease-of-use rating determines whether labels and manuals are “clear and concise”. However, the definition of what this means is not necessarily clear. Based on the trends seen in the label and instruction part of the study, and the extensive body of research guiding human factors recommendations for labels and instructions, we suggest that the following items be considered when determining whether labels and manuals are “clear and concise” during ease-of-use assessment for the NHTSA rating. However, further research should be conducted to identify the potential benefit of these suggestions and how they might be refined.
1) Reading level of text. The label and manual text could be evaluated using widely available readability scoring programs. Grade levels below 7th grade would receive the highest score, 7th -8th grade a mid score, and higher than 8th grade would receive the lowest score.
2) Emphasis on key points. Many manuals use bold or colored text to highlight words such as “DO NOT” and “NEVER”. This emphasis makes the text harder to read and can be annoying to the user. Manuals that emphasize key phrases that can be picked up by skimming through text, rather than negative commands, could be awarded more points for clarity. Some examples of good emphasis:
a. Never put a child restraint in a front vehicle seat unless recommended by vehicle owner’s manual. According to the National Highway Traffic Safety Administration (NHTSA), children up to age 12 are safer in the back seat. For vehicles with air bags, check the vehicle owner’s manual for child restraint installation information
b. Vehicle seatbelt system MUST hold child restraint securely. Not all vehicle seatbelts can be used with a child restraint. If vehicle seatbelt does not hold child restraint securely, read “Vehicle Seatbelts” section.
c. Infants who weigh less than 20 lbs. (9 kg) must be rear-facing. 3) Labels and manuals presenting tasks in the order they should be done. The CRS
installation task analysis could be used as a guideline for how information should

Task 1 Final Report
98
be presented in manuals and on labels, with more points awarded if the labels and manuals are organized according to the order of tasks. In particular, instructions on adjustments that need to be made to the CRS (shoulder harness slots, recline angle) should be presented before sections on installation of the CRS.
4) Numbering of labels and instructions. Users generally don’t know where to start when confronted with a CRS with multiple labels. Numbering helps direct subjects to the correct order of installation tasks. Labels and instructions that direct the users through the installation process with numbering would receive more points.
5) Labels placed near task. Using multiple labels placed around the CRS, rather than placing all information on one or two labels, allows subjects to pay attention to a relevant label when they are performing a particular task. Some examples: tether instructions and harness slot adjustment instructions should be near the tether and harnesses. Diagrams of belt paths should be near the belt paths. Adjusting recline directions should be near the recline mechanism.
6) Percentage of key tasks included on labels. The following things are considered key installation tasks. CRS would receive highest scores if their labels address all of these items.
a. Height and weight limits for use b. How different size children should use the CRS (RF or FF) c. Direct users to vehicle manual to choose best position, find LATCH
anchorages, and learn how to lock seatbelt. d. Adjust recline e. Adjust harness height f. Choose belt path and route belt g. Tighten belt h. Attach tether (or store it if not used) i. Buckle and tighten harness j. Fasten and adjust chest clip k. Check CRS tightness and harness snugness
7) Following CPS recommended best practice. Manufacturers should use standardized terminology and recommended practices to minimize confusion. Some examples: The word “harness” should be reserved for the components that secure the child, so a LATCH belt should not be called a LATCH harness. Chest clip should be used rather than harness tie. The pinch test for harness snugness should be used rather than the “finger under harness test”. The 1” test for CRS tightness should be done while grasping the CRS at the belt path, not elsewhere.
The results indicate that video manuals may have potential and should be explored further in more realistic settings. If video manuals prove to be useful when users must provide the viewing apparatus, the EOU system might reward CRS that provide a video manual in addition to the required paper manual. Although use of graphics-based labels and manuals provides one option for assisting users who read multiple languages, adding graphics, reducing text, and color-coding diagrams were not sufficient in this study to develop graphical labels and manuals that

Task 1 Final Report
99
showed a benefit compared to baseline manuals for this English-speaking subject pool. As a possible solution, we suggest that the NHTSA might consider a future research program to develop “open source” combined graphics that can be used by manufacturers on their labels and in manuals. In addition, any ease-of-use ratings that encourage graphics-only labels need to be defined to encourage good graphics, not just any graphics. User background may influence the interpretation of graphics. Some sections of FMVSS 213 would prevent implementation of these suggestions. Section 5.5 FMVSS 213 currently has some specific requirements for the content of labels and instructions that do not agree with current best practice recommendations for CRS installation and use. Some of the required terminology is not current (LATCH and top tether), and some of the required text has a reading level higher than recommended for general instructions. Specific instances where FMVSS 213 label and instruction requirements conflict with the NHTSA Standardized Passenger Safety Curriculum and NHTSA’s latest recommendations for optimal child passenger safety include:
1) Requiring that the “top tether” be referred to as a “top anchorage strap”, and not requiring instruction on whether tethers should be used forward-facing, rear-facing, or both.
2) Requiring that the “LATCH” system be referred to as “child restraint anchorage system”.
3) Allowing use of the phrase “children who are capable of sitting upright alone” as a criteria for forward-facing use in the allowed text that describes the height and weight limits of the restraint. The current NHTSA recommendation is for children to remain rear-facing until age 2 or until they outgrow the height or weight limits of their restraint.
In addition, the most common misuse of CRS has consistently been loose installations, yet very few manufacturers state on the labels that the seatbelt or LATCH belt must be tight. Pending future research, language specifying that the belt should be very tight may be warranted. Further research is also suggested to identify the potential benefit of providing a library of “combined” optional graphics and text that can be used by any manufacturer in labels or in manuals.

Task 1 Final Report
100
References Bilston L, Yean, M, Brown J (2009) Reconstruction of crashes involving injured child
occupants the risk of serious injuries associated with suboptimal restraint use may be reduced by better controlling occupant kinematics. Traffic Injury Prevention 8: 47-61
Brown J, McCaskill M, Henderson M, Bilston L, (2006) Serious injury is associated with suboptimal restraint use in child motor vehicle occupants. Jounral of Paediatrics and Child Health 42:345-349.
Brown, SHM, Grondin, DE, Potvin, JR (2008). Strength limitations to proper child safety seat installations: implications for child safety. Applied Ergonomics 40:617-621.
Carlsson, G, Norin, H, Ysander, L, (1991). Rearward facing child seats – the safest car restraint for children? Accident Analysis and Prevention 23:2-3:175-182.
Centers for Disease Control and Prevention. Injury Prevention & Control, Web-Based Injury Statistics Query and Reporting System (WISQARS). Available at: www.cdc.gov/injury/wisqars/index.html. Accessed May 25, 2011
Code of Federal Regulations (2005) Title 49, Transportation, Part 571.213; Child restraint systems. National Archives and Records Service, Office of the Federal Register Washington, D.C.
Czernakowski W, Muller M. (1993) Miuse Mode and effect analysis: an approach to predict and quantify misuse of child restraint systems. Accident analysis and preventioin 25:3, 323-333.
Decina, LE, Lococo, KH, (2005). Child restraint system use and misuse in six states. Accident Analysis and Prevention 37:583-590.
Decina, LE, Lococo, KH, (2007). Observed LATCH use and misuse characteristics of child restraint systems in seven states. Journal of Safety Research 38:271-281.
Decina, LE, Temple, MG, Dorer, HS (1994). Increasing child safety seat use and proper use among toddlers: evaluation of an enforcement and education program. Accident Analysis and Prevention 26:667-673.
Doheny-Farina, S (ed). 1988. Effective Documentation, Cambridge, MA: MIT Press.
Eby, DW, Kostyniuk, LP (1999). A statewide analysis of child safety seat use and misuse in Michigan. Accident Analysis and Prevention 31:555-566.
Flesch, R. (1948). A new readability yardstick, Journal of Applied Psychology, Vol. 32, pp. 221–233
Gillan D J, Wickens C D, Hollands J G, Carswell C M (1998). Guidelines for presenting quantitative data in HFES publications. Human Factors 40(1): 28-41.
Graham C, Kitteredge D, Stuemky J (1992) Injuries associated with child safety seat misuse. Pediatric Emergency Care:8:6 351-353.
Hartley, J (1985). Designing Instructional Text (2nd ed). London, UK: Kogan Page.

Task 1 Final Report
101
International Standards Organization (2008) Road Vehicles – Methods and Criteria for Usability Evaluation of Child Restraint Systems and Their Interface With Vehicle Anchorage Systems – Part 1 Vehicles and Child Restraints Equipped with ISOFIX Anchorages and Attachments. CD 29061-1, Geneva, Switzerland.
Johnston, C, Rivara, FP, Soderberg, R (1994) Children in car crashes: analysis of data for injury and use of restraints. Pediatrics 93:960-965.
Kincaid, J. P., Fishburne, R. P. Jr., Rogers, R. L., and Chisson, B. S. (1975); Derivation of new readability formulas (Automated Readability Index, Fog Count and Flesch Reading Ease Formula) for Navy enlisted personnel, Research Branch Report 8-75, Millington, TN: Naval Technical Training, U. S. Naval Air Station, Memphis, TN
Klare, G. (1963). The Measurement of Readability, Ames, Iowa: Iowa State University Press.
Koppel, S, Charlton, JL (2009). Child restraint system misuse and/or inappropriate use in Australia. Traffic Injury Prevention 10:302-307.
Lane, WG, Liu CL, and Newlin, E (2000) The association between hands-on instruction and proper child safety seat installation. Pediatrics 106(4):924-928.
Lesire P., Cuny S, Alonso F, Tejera G, Cataldi M. ( 2007) Misuse of child restraint systems in crash situations: dangers and possible consequences. AAAM 51: 207-222.
Littell, R.C., Milliken, G.A., Stroup, W.W., Wolfinger, R.D. and Schabenberger, O. (2006), SAS for Mixed Models, 2nd ed., SAS Institute Inc, Cary NC
McLaughlin, G. (1969) SMOG grading: A new readability formula. Journal of Reading 12(8): 639-646.
Menon R, Ghati Y (2007) Misuse Study of LATCH attachments: a series of frontal sled tests. AAAM 51: 129-154.
National Highway Traffic Safety Administration (2002). Safety Rating Program for Child Restraint Systems Docket NHTSA-2001-1053, US Department of Transportation, Washington DC.
National Highway Traffic Safety Administration (2005). Laboratory Test Procedure for New Car Assessment Program Child Restraint Testing. US Department of Transportation, Washington DC.
National Highway Traffic Safety Administration (2006). Consumer Information Rating Program for Child Restraints Docket NHTSA-2006-25344, US Department of Transportation, Washington DC.
National Highway Traffic Safety Administration (2009). Traffic Safety Facts 2008, DOT HS 811-170, National Center for Statistics and Analysis, Washington DC.
National Institutes of Health (2010). http://www.nlm.nih.gov/medlineplus/etr.html
Nygren A, Tingvall C, Turbell T (1987) Misuse of child restraints cars and potential hazards from such misuse: road traffic observations and barrier sled tests. Acta Paediatr Scand 339:1-9

Task 1 Final Report
102
Rudin-Brown CM, Kumagai JK, Angel HA, Iwasa-Madge, KM, and Noy YI (2003). Usability issues concerning child restraint systems harness design Accident Analysis and Prevention 35:341-348.
Rudin-Brown, CM, Greenley, MP, Barone, A, Armstrong, J, Salway, A, Norris, BJ (2004). The design of child restraint system (CRS) labels and warnings affects overall CRS usability. Traffic Injury Prevention. 5(1):8-17.
Ruta D, Beattie T, Narayan, V (1993). A prospective study of non-fatal childhood road traffic accidents: what can seat restraint achieve? Journal of Public Health Medicine 15:88-92.
SafeKids Worldwide (2007) SafeKids Buckle Up: Ten Years and Growing SafeKids Worldwide, Washington, D C http://www.usa.safekids.org/skbu/cps/docs/SKBU%2010%20Years-LR.pdf
SafeRideNews January/February 2008. NHTSA Updates Ease of Use Rating System.
SafeRideNews May/June 2003. NHTSARates Ease of Use of Child Restraints.
Siegel, AI, Lautman, MR, Burkett JR. (1974). Reading grade level adjustment and auditory supplementation techniques for increasing textual comprehensibility. Journal of Educational Psychology 66:895-902.
Subramanian R (2003). Motor Vehicle Traffic Crashes as a Leading Cause of Death in the United States, 2001 DOT HS 809 695 National Center for Statistics and Analysis, Washington DC.
Tsai, Y-F and Perel M (2009) Driver’s Mistakes When Installing Child Seats DOT HS 811 234 National Highway Traffic Safety Administration, US Department of Transportation, Washington DC.
Tsai, Y-F and Perel, M (2008). How Difficult Can It Be?: Investigating Child Seat Installation Errors, Warrendale, PA: Society of Automotive Engineers.
Tufte, ER (2001). The Visual Display of Quantitative Information (2nd ed.), Cheshire, CN: Graphics Press.
Wegner MV, Girasek DC (2003). How readable are child safety seat installations instructions? Pediatrics 111:588-591.
Williams, AR, Jr, Siegel, AI, and Burkett, JR (1974). Readability of Textual Material—A Survey of the Literature, Lowry AFB, Colorado: US Air Force Systems Command.

Task 1 Final Report
103
Appendix A. Ad text and flier

Recruiting Flier
104
VOLUNTEERS NEEDED For a study of how people install child seats at the University of Michigan Transportation
Research Institute.
Time Required: up to 3 hours
Payment: $40
Volunteer requirements: Age 18 or older, licensed driver, not pregnant Experienced or inexperienced with child seats
For more information please contact:
Laura Malik, (734) 764-4722, [email protected]
IRB # 33844 Principal Investigator: Kathleen Klinich Ph.D.
The University of Michigan Transportation Research Institute seeks subjects for a study of how people install child seats. You must be age 18 or older and have a valid driver’s license. We need people with and without child seat experience.
Chi
ld s
eat s
tudy
Laur
a
(734
) 764
-472
2
Chi
ld s
eat s
tudy
Laur
a
(734
) 764
-472
2
C
hild
sea
t stu
dy
Laur
a
(734
) 764
-472
2
Chi
ld s
eat s
tudy
Laur
a
(734
) 764
-472
2
Chi
ld s
eat s
tudy
Laur
a
(734
) 764
-472
2
Chi
ld s
eat s
tudy
Laur
a
(734
) 764
-472
2
Chi
ld s
eat s
tudy
Laur
a
(734
) 764
-472
2
Chi
ld s
eat s
tudy
Laur
a
(734
) 764
-472
2
Chi
ld s
eat s
tudy
Laur
a
(734
) 764
-472
2
Chi
ld s
eat s
tudy
Laur
a
(734
) 764
-472
2

Task 1 Final Report
105
The study will take up to 3 hours. Pay is $40. We will test people on UM North campus. For more information, please contact Laura at [email protected] or (734) 764-4722.

Task 1 Final Report
106
Appendix B. Subject screening script, consent forms, and race/ethnicity forms

Subject Screening Form
107
Thank you for volunteering for this child seat study. I need to ask you several questions to see if you qualify for this phase of the study. Name: ________________________________________________________________________ Contact number: ________________________________________________________________________ General Questions
1. How old are you? Reject if less than 18 years old
2. What is your gender?
Male Female
3. Are you pregnant? Reject if pregnant
Yes No
4. Have you ever had your child’s / grandchild’s child seat checked at a car seat check? Reject if yes
Yes No
5. Have you ever worked at a car seat check? Reject if yes
Yes No
6. Do you have a valid driver’s license? Reject if no
Yes No
7. What is the highest level of education you have completed?
8. Is English your native language?
Yes No
If no, what other languages do you speak?
Education response: Did not graduate from high school or complete GED: lower education Graduated from college or higher: higher education High school graduate or attended college but did not graduate: wait list

Subject Screening Form
108
Experience – Part 1
9. Have you ever installed a child seat in a vehicle? (If no, skip to Experience – Part 2)
Yes No
10. Have you installed more than one type of child seat in a vehicle?
Yes No
11. Have you installed a child seat in more than one model of vehicle?
Yes No
12. Have you installed a child seat at least 10 times?
Yes No
13. Have you done these installations in the last five years?
Yes No
Responses: All yes: experienced and current Mixed: wait list Experience – Part 2
14. Have you ever buckled a child into an installed child seat?
Yes No
15. Have you ever shopped for a child seat for someone?
Yes No
Responses: All no: inexperienced Any yes: wait list WAIT LIST: You do not fit into one of the categories for this part of the testing. Can we keep your name and number in case we can use you for another part of the study? Let me tell you a little more about the study. You will be coming to our lab on north campus.

Subject Screening Form
109
Additional Questions
16. We will ask you to get in and out of a car and lift items that weigh up to 25 pounds. Do you think you will be able to do this several times over the course of 3 hours?
Yes No
17. We might take video of you using the child seat. Is this okay?
Yes No
Please wear comfortable clothes and shoes. When you come, we suggest that you do not wear any jewelry on your hands or wrists that might get caught during installations. Children
18. Will you be bringing anyone with you? (If yes, continue)
Yes No
19. Are you their legal guardian?
Yes No
20. How many children will you be bringing?
21. What are their ages?

Race/Ethnicity Questionnaire
110
The University of Michigan Transportation Research Institute Child Seat Installation Study
Date: Subject ID: Please check 1 of the following 3 options Hispanic or Latino Not Hispanic or Latino No Response Please check one or more: American Indian or Alaska Native Asian Black or African American Native Hawaiian or Other Pacific Islander White No Response

Consent Form Revised 6/8/2009
IRB: Health Sciences and Behavioral Sciences
IRB Number: HUM00033844
Document Approved On: 9/16/2009
Page 111 of 159
Consent to Participate in a Research Study
Evaluating Effects of CRS and Vehicle Features on CRS Installation Errors
Principal Investigator: Kathleen D. Klinich, PhD
Assistant Research Scientist University of Michigan Transportation Research Institute 2901 Baxter Rd. Ann Arbor, MI 48109
Co-investigators: Miriam Manary, MS, Senior Research Associate
Carol A. C. Flannagan, PhD, Assistant Research Scientist Matthew P. Reed, PhD, Research Professor Paul A. Green, PhD, Research Professor University of Michigan Transportation Research Institute 2901 Baxter Rd. Ann Arbor, MI 48109
Invitation to participate in a research study Dr. Kathleen Klinich invites you to participate in a research study about what makes it hard or easy to install child seats. The study is funded by the National Highway Traffic Safety Administration. Description of subject involvement If you agree to be part of the research study, we will ask you to install four different child seats in vehicles. After each time, you will answer some questions about the installation. In some cases, we may videotape you installing the child seat while you talk about what you are doing or thinking. Benefits You will directly benefit from being in this study because you will learn more about installing child seats. The results of the study may lead to child seat designs and vehicle designs that are easier to use. Risks and discomforts The researchers have taken steps to minimize the risks of this study. Even so, you may still experience some risks related to your participation, even when the researchers are careful to avoid them. These risks may include the following:
Minor scrapes, bruises, or sore muscles from efforts to install child seat and getting in and out of vehicles.
Frustration from installing child seats.

Consent Form Revised 6/8/2009
IRB: Health Sciences and Behavioral Sciences
IRB Number: HUM00033844
Document Approved On: 9/16/2009
Page 112 of 159
Compensation We will pay you $40 for being in the study, which should take 2 to 3 hours. Confidentiality We plan to publish the results of this study, but will not include any information that would identify you. There are some reasons why people other than the researchers may need to see information you provided as part of the study. This includes organizations responsible for making sure the research is done safely and properly, including the University of Michigan, government offices or the study sponsor, National Highway Traffic Safety Administration. To keep your information safe, the researchers will assign a code number to you so your name will only be on the consent form and subject payment form. None of the data will have your name on it. Also, if you tell us something that makes us believe that you or others have been or may be physically harmed, we may report that information to the appropriate agencies. Storage and future use of data The data and videos from your test session will be stored on a central computer requiring a password to access it. The researchers will retain the data indefinitely for research purposes. The researchers will discard your consent form and payment form after 1 year by shredding them. The data/specimens may be made available to other researchers for other studies following the completion of this research study but will not contain information that could identify your name. Voluntary nature of the study Participating in this study is completely voluntary. Even if you decide to participate now, you may change your mind and stop at any time. If you decide to withdraw early, you can decide if we can use the data we collected or discard it. If you decide not to finish your test session, we will pay you $12 per hour for the time you have spent. Contact information If you have questions about this research, including questions about scheduling or your compensation for participating, you may contact Kathleen Klinich, (734) 936-1113 or [email protected]. If you have questions about your rights as a research participant, please contact the University of Michigan Institutional Review Board Health Sciences and Behavioral Sciences, 540 E
Consent Form Revised 6/8/2009
IRB: Health Sciences and Behavioral Sciences
IRB Number: HUM00033844
Document Approved On: 9/16/2009
Page 113 of 159
Liberty, Ste 202, Ann Arbor, MI 48104-2210, (734) 936-0933 [or toll free, (866) 936-0933], [email protected]. Consent By signing this document, you are agreeing to be in the study. You will be given a copy of this document for your records and one copy will be kept with the study records. Be sure that questions you have about the study have been answered and that you understand what you are being asked to do. You may contact the researcher if you think of a question later. I agree to participate in the study. _____________________________________ ____________________ Signature Date Video Consent By signing this part of the document, you are agreeing to be videotaped in the study. Video and photographs of you may be used in scientific papers and presentations without blurring or blocking your face, but you will not be identified by name. If the faculty or staff of the University judges that education or research may benefit from the use of the pictures, the University may publish or sell (not-for-profit) the pictures for academic purposes or use them in any other professional manner that the University believes is proper, provided that I am not identified by name in any such publication or use. I understand that the pictures belong to the University, and I will not receive payment or any other compensation in connection with the pictures. I agree to be videotaped during this study. _____________________________________ ____________________ Signature Date

114
Appendix C. Pre-test checklist, testing script, subject and experimenter
evaluation forms

CRS Installation Evaluation Form (completed by experimenter)
115
Subject ID: Installation number: 1 2 3 4 CRS: C1 C2 C3 C4 C5 C6 C7 C8 C9 C10 C11 C12 C13 C14 C15 C16 Configuration: RF FF Method: L SB Both Installed position: 1R 2L 2C 2R 3L 3C 3R Start time: End time: Date: Evaluator: Yes No NA Comment Did subject try installation in front seat? Did subject try LATCH installation first? Did subject install with both LATCH and seatbelt? Did subject use vehicle manual? Did subject use child restraint manual? Did subject adjust front seat (where)? Does CRS pass 1” movement test (measure)? Is CRS touching front seatback? Did subject use noodles or towels (what, #)? Is recline angle set correctly? Is belt routed through correct path? Is belt twisted? Is driver side lockoff used to lock belt? Is passenger side lockoff used to lock belt? Is center lockoff used to lock belt? Is retractor switched to lock belt? LATCH attached to correct lower anchors? Lower connectors attached appropriately? Is tether hook attached to anchorage? Is tether hook attached correctly? Is tether routed correctly wrt headrest? Is tether tight? (measure) Is crotch strap in correct location? Does harness pass pinch test (measure)? Is harness twisted or folded? Did subject move harness height? Is harness at or above shoulders (slot number)? Is harness at or below shoulders? Is harness locked so it doesn’t pull out? Is buckle fastened properly? Is harness clip fastened correctly? Is harness clip at armpit level? Is harness clip threaded correctly? Can harness be adjusted when installed? Is harness threaded correctly?

Testing Script / Protocol
116
CRS should be set up in “out-of-the-box” configuration, including: Recline Harness slot routing location Tether storage LATCH storage Instruction storage Introduction Thank you for coming in today. We’re doing a study on how people install child seats, and we are going to ask you to put a child seat in this vehicle four times today. You can use the instructions for the child seat and the vehicle. Let me know each time when you are done – I will take some measurements and you will answer some questions, then we will go on to the next child seat. We will videotape some of the installations. When we do, we would like you to talk about what you are doing and thinking. You might want to remove your jewelry (watch, large rings, etc.). Please remember that most people make mistakes when installing child seats. We want you to do your best, but not get frustrated. We are testing the child seats, not you. This is a consent form for you to be in our study. Please look through it and let me know if you have any questions. I will give you a copy of the form to keep. We would also like you to fill out this ethnicity form. You can still participate if you do not want to fill out this form. Give subject consent form to read and sign; give subject ethnic/race form to fill out. The top of this cart has tools you can use for installing the child seat. This is your baby for today. He is 18 months old and weighs 25 pounds. Here are the instructions for the vehicle, and instructions for the child seat are stored on the child seat. Pool noodles will be on test cart.

Testing Script / Protocol
117
Installation #1 Please install this seat ______________ facing for this child on the passenger side of the vehicle. By forward facing, I mean the child is facing the same direction as the driver. By rear facing, I mean the child is facing the trunk. Point subject towards first child restraint to be installed. Record start time of installation. If subject tries to install CRS in front seat, note it on check form and say For today’s study, we would like you to install the child seat in the back seat. Record end time of installation. Give subject questionnaire – direct them to fill it out behind a screen so they can’t view the experimenter checking installations. Assess installation using check form. Note method of installation to prepare for next installation in same direction. If you want to look at the labels or instructions to answer the questions, let me know. If so, experimenter will pause assessment while subject reviews labels on installed child seat. Experimenter can answer questions about filling out the form, such as identifying CRS features (e.g. this thing is the harness clip, this is the tether). Installation #2 Please install this seat ______________ facing for this child on the passenger side of the vehicle. By forward facing, I mean the child is facing the same direction as the driver. By rear facing, I mean the child is facing the trunk. Point subject towards second child restraint to be installed. Record start time of installation. Record end time of installation. Give subject questionnaire – direct them to fill it out behind a screen so they can’t view the experimenter checking installations. Assess installation using check form. Note method of installation to prepare for next installation in same direction. If you want to look at the labels or instructions to answer the questions, let me know. If so, experimenter will pause assessment while subject reviews labels on installed child seat. Experimenter can answer questions about filling out the form, such as identifying CRS features (e.g. this thing is the harness clip, this is the tether). Installation #3

Testing Script / Protocol
118
Please install this seat ______________ facing for this child on the passenger side of the vehicle. Since you installed using ___________________ before, please put it in using ___________________ this time. If subject installed using both LATCH and seatbelt the first time, direct them to install with just the seatbelt this time.
Point subject towards third child restraint to be installed. Record start time of installation.
Record end time of installation. Give subject questionnaire – direct them to fill it out behind a screen so they can’t view the experimenter checking installations. Assess installation using check form.
If you want to look at the labels or instructions to answer the questions, let me know. If so, experimenter will pause assessment while subject reviews labels on installed child seat. Experimenter can answer questions about filling out the form, such as identifying CRS features (e.g. this thing is the harness clip, this is the tether). Installation #4
Please install this seat ______________ facing for this child on the passenger side of the vehicle. Since you installed using ___________________ before, please put it in using ___________________ this time. If subject installed using both LATCH and seatbelt the first time, direct them to install with just the seatbelt this time.
Point subject towards fourth child restraint to be installed. Record start time of installation.
Record end time of installation. Give subject questionnaire – direct them to fill it out behind a screen so they can’t view the experimenter checking installations. Assess installation using check form.
If you want to look at the labels or instructions to answer the questions, let me know. If so, experimenter will pause assessment while subject reviews labels on installed child seat. Experimenter can answer questions about filling out the form, such as identifying CRS features (e.g. this thing is the harness clip, this is the tether). Thank you for being in our study today. Please fill out this payment form so we can pay you.
If subject decides to drop out of the study, pay $12/hr rate for the participation so far. If subject does not complete all four installations within 3 hours, they can stay longer if possible or just finish the third installation.

Testing Script / Protocol
119
Questions If subject can’t find instructions for the child seat and asks for help, experimenter can show them where they are. If subject asks experimenter questions, say: I’m not allowed to help you, but you can find information about that in the manuals for the child seat and the vehicle. If subject asks the experimenter to assist with a particular task, say: I’m sorry, I’m not allowed to help you. Just do your best without hurting yourself or getting too frustrated. If subject says I can’t do this, state: OK, please try and finish the installation except skip this part. If subject asks what LATCH is, state: You can find out about LATCH in the manuals for the child seat and the vehicle. If subject asks how they did, experimenter is allowed to provide a general assessment such as: You did pretty good or You improved between the first and last or There are some areas that could be improved like tightness of the installation Here is information about the things we are looking at, and here is information about how you can get your car seat checked at the UM hospital. Provide subject with SafetyBeltSafe handout on “Quick Checklist for Safety Seat Misuse” and flyer for Mott Buckle Up Hotline (fitting station at UM hospital).

Subject Evaluation Form – Phase 1
120
Subject ID: Installation number: 1 2 3 4 CRS: C1 C2 C3 C4 C5 C6 C7 C8 C9 C10 C11 C12 C13 C14 C15 C16 Configuration: RF FF Method: L SB Both Date: Check one answer for each question Do you agree with these statements?
Strongly Disagree Disagree Neutral Agree Strongly
Agree NA
I attached the child seat to the vehicle correctly.
I secured the child in the seat properly.
The labels on the child seat matched the instructions in child seat manual.
The vehicle manual matched the child seat manual.
What I did today is similar to what I would do at home to install a child seat.
How hard or easy was it to:
Very Hard Hard Neutral Easy Very
Easy NA
Understand labels on child seat
Understand instruction manual about installing child seat.
Understand instruction manual about securing child.
Move shoulder harness between slots
Adjust the crotch strap. Figure out where to route the vehicle belt.
Adjust the angle of the child seat.
Figure out what angle the child seat should be.

Subject Evaluation Form – Phase 1
121
How hard or easy was it to:
Very Hard Hard Neutral Easy Very
Easy NA
Attach child seat to vehicle. Attach the lower LATCH connectors.
Store the lower LATCH connectors.
Tighten the vehicle belt. Use the lockoffs on child seat that pinch the vehicle belt
Attach the tether strap on the top of the child seat to the vehicle
Adjust the tether strap on the top of the child seat
Buckle the child seat harness to the crotch strap
Tighten the harness around the dummy.
Fasten the two parts of the plastic harness clip together
Adjust the harness clip height.
The first column of this chart describes different kids by age, weight, and height. Use the labels and instructions to figure out if these kids could use this child seat rear-facing or forward-facing.
Child Could this child use this seat rear-facing? (yes or no)
Could this child use the seat forward-facing? (yes or no)
3 days old 4 lb 17 in
9 months old 23 lb 25 in
18 months old 30 lb 30 in
3 years old 45 lb 44 in
5 years old 37 lb 46 in
Go back and circle the safest choice (between RF and FF) for each child
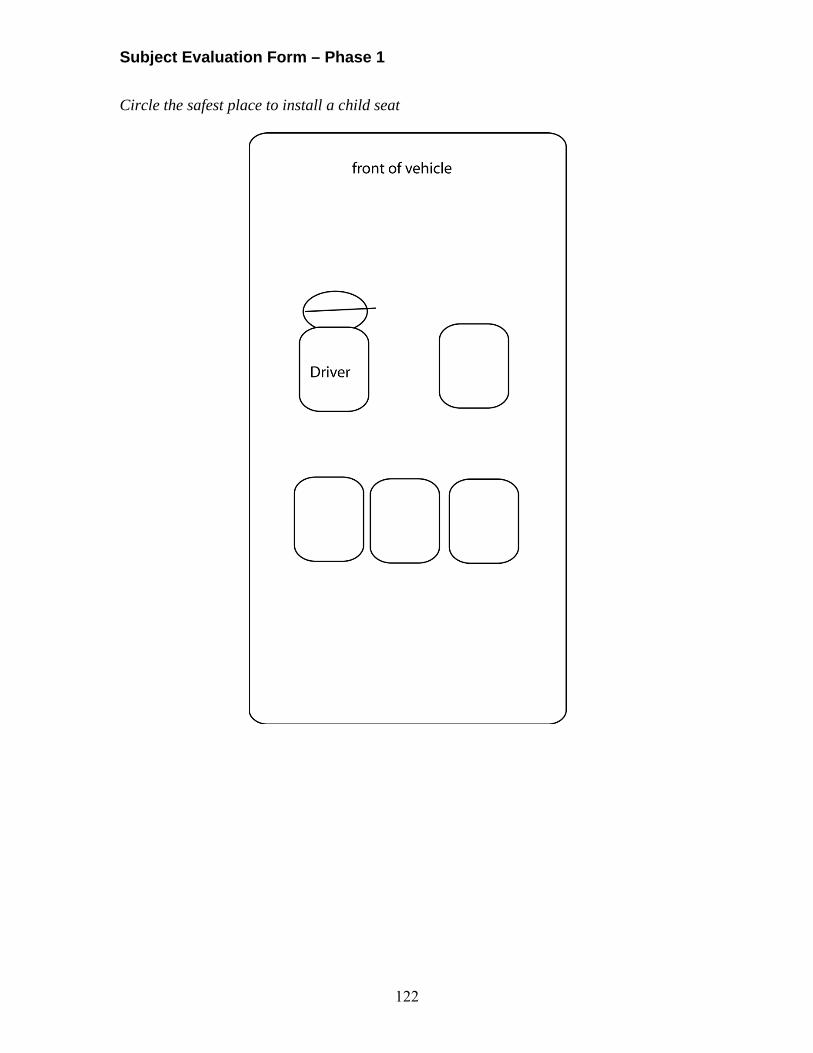
Subject Evaluation Form – Phase 1
122
Circle the safest place to install a child seat

Subject Evaluation Form – Phase 2
123
Subject ID: Installation number: 1 2 3 4 CRS: Titan ComfortSport Label: L1 L2 L3 L4 L5 L6 L7 L8 Instruction: M1 M2 M3 M4 M5 M6 M7 M8 Configuration: RF FF Method: L SB Both Date: Check one answer for each question Do you agree with these statements?
Strongly Disagree Disagree Neutral Agree Strongly
Agree NA
I attached the child seat to the vehicle correctly.
I secured the child in the seat properly.
The labels on the child seat matched the instructions in child seat manual.
The vehicle manual matched the child seat manual.
What I did today is similar to what I would do at home to install a child seat.
How hard or easy was it to:
Very Hard Hard Neutral Easy Very
Easy NA
Understand labels on child seat
Understand instruction manual about installing child seat.
Understand instruction manual about securing child.
Move shoulder harness between slots
Adjust the crotch strap. Figure out where to route the vehicle belt.
Adjust the angle of the child seat.
Figure out what angle the child seat should be.

Subject Evaluation Form – Phase 2
124
How hard or easy was it to:
Very Hard Hard Neutral Easy Very
Easy NA
Attach child seat to vehicle. Attach the lower LATCH connectors.
Store the lower LATCH connectors.
Tighten the vehicle belt. Use the lockoffs on child seat that pinch the vehicle belt
Attach the tether strap on the top of the child seat to the vehicle
Adjust the tether strap on the top of the child seat
Buckle the child seat harness to the crotch strap
Tighten the harness around the dummy.
Fasten the two parts of the plastic harness clip together
Adjust the harness clip height.
The first column of this chart describes different kids by age, weight, and height. Use the labels and instructions to figure out if these kids could use this child seat rear-facing or forward-facing.
Child Could this child use this seat rear-facing? (yes or no)
Could this child use the seat forward-facing? (yes or no)
3 days old 4 lb 17 in
9 months old 23 lb 25 in
18 months old 30 lb 30 in
3 years old 45 lb 44 in
5 years old 37 lb 46 in
Go back and circle the safest choice (between RF and FF) for each child

Subject Evaluation Form – Phase 2
125
Circle the safest place to install a child seat

Subject Session Assessment Form – Phase 1
126
Subject ID: Date: Which method did you like best for installing child seats rear-facing (circle one)
LATCH Seatbelt Which method did you like best for installing child seats forward-facing (circle one)
LATCH Seatbelt Please give each child seat a rating on how much you liked it. 1 is worst, 10 is best. Order Name of Child Seat 1 2 3 4 5 6 7 8 9 10
1
2
3
4

Subject Session Assessment Form – Phase 2
127
Subject ID: Date: Which method did you like best for installing child seats rear-facing (circle one)
LATCH Seatbelt Which method did you like best for installing child seats forward-facing (circle one)
LATCH Seatbelt Please give each set of labels a rating on how much you liked it. 1 = worst, 10 = best, NA = you didn’t use the labels. Order Name of Child Seat 1 2 3 4 5 6 7 8 9 10 NA
1
2
3
4
Please give each set of instructions a rating on how much you liked it. 1 = worst, 10 = best, NA = you didn’t use the instructions. Order Name of Child Seat 1 2 3 4 5 6 7 8 9 10 NA
1
2
3
4
Do you have any suggestions or comments on the labels?

128
Appendix D. CRS Features and illustrated dictionary of features

129
Lower Connector Type
Hook
Push Button
SureLATCH
SuperLATCH

130
Tether Adjustment
Button Release
Locking Latchplate, Type 1
Locking Latchplate, Type 2
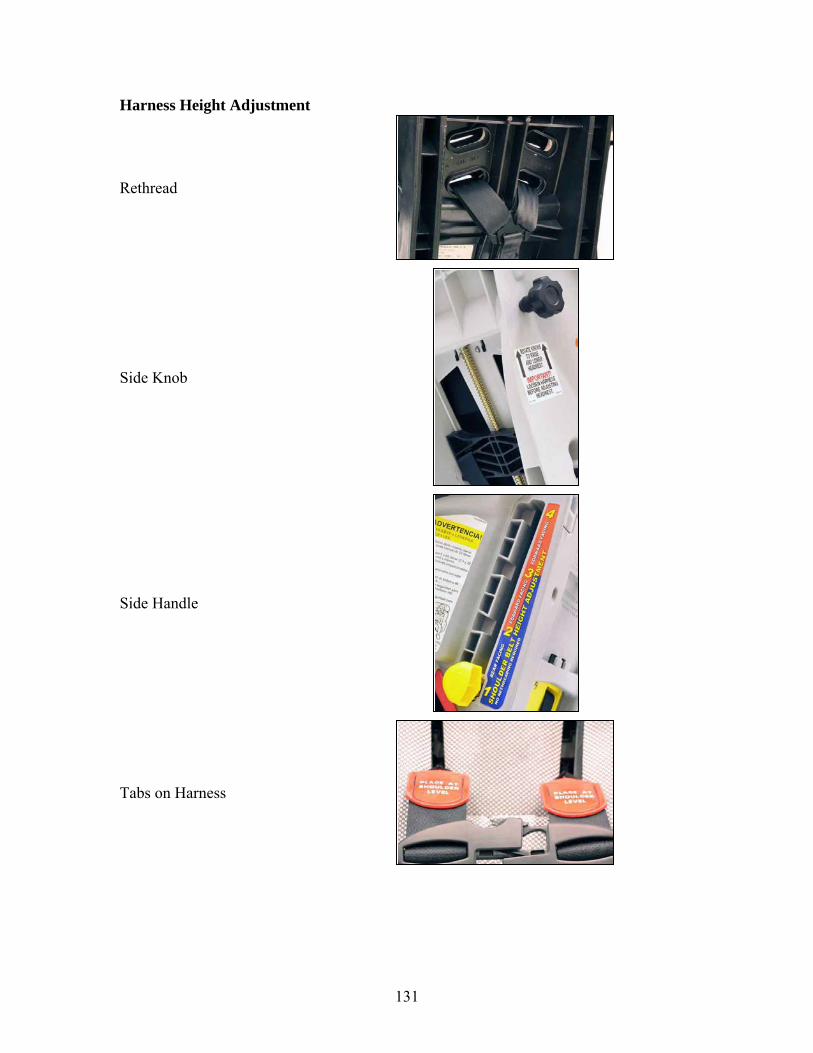
131
Harness Height Adjustment
Rethread
Side Knob
Side Handle
Tabs on Harness

132
Rotate Levers

133
Recline Methods
Pull Front Handle, Type 1
Pull Front Handle, Type 2
Pull Front Handle, Type 3
Pull Seat Through Channel Using Bar

134
Squeeze Front Handle
Flip Recline Foot
Base, Built-in
Base, Removable

135
Lower Connector Adjustment
Automatic
Single Button Release
Double Button Release
Single Locking Latchplate

136
Tether Strap
Single
Double

137
Lower Connector RF to FF
Switching Not Needed, Type 1
Switching Not Needed, Type 2
Switch Through Belt Path

138
Front Harness Adjuster Type
Press Lever
Lift
Pull Strap
Press Lever on Knob

139
Push Button

140
Lock-Off Type
Lever, FF
Flip Clamp, FF
Clamp + Tab, FF Type 1
Clamp + Tab, FF Type 2

141
Clamp + Tab, FF Type 3
Clamp + Tab, RF Type 1
Clamp + Tab, RF Type 2
Clamp + Tab, RF Type 3

142
Double Clamp, FF
Double Clamp, RF

143
Tether Storage Compartment
Hook
Pouch

144
LATCH Storage Compartment
Hook
Slot
Hook Together
Under Seat Padding

145
Crotch Strap Adjustment Rethread
Sliding

146
Buckle Type Puzzle
Standard Large

147
Appendix E. Samples of alternate labels

148
Baseline ComfortSport main label.
Numbered ComfortSport main label.

149
Graphics ComfortSport main label.
Revised text ComfortSport main label.

150
Color-coded ComfortSport main label.
ComfortSport rearranged label: Recline label close to recline adjuster. Forward-facing belt routing directions under FF belt path. Rear-facing belt routing directions under RF belt path. Instructions to secure CRS with belt or LATCH in between belt paths. Instructions to store LATCH connectors near storage location. Level instructions under level.

151
ComfortSport rearranged label: front label gives instructions for tightening harness.
ComfortSport rearranged label: top side label describes tether use, middle side label front label gives instructions for positioning harness.

152
ComfortSport combined label: Numbered, instructions near task, color coded text, graphics and belt paths, additional graphics.

153
Appendix F. Excerpts from alternate manuals

154
Baseline (top) and combined (bottom) ComfortSport table of contents showing revisions to order, headings, and content.
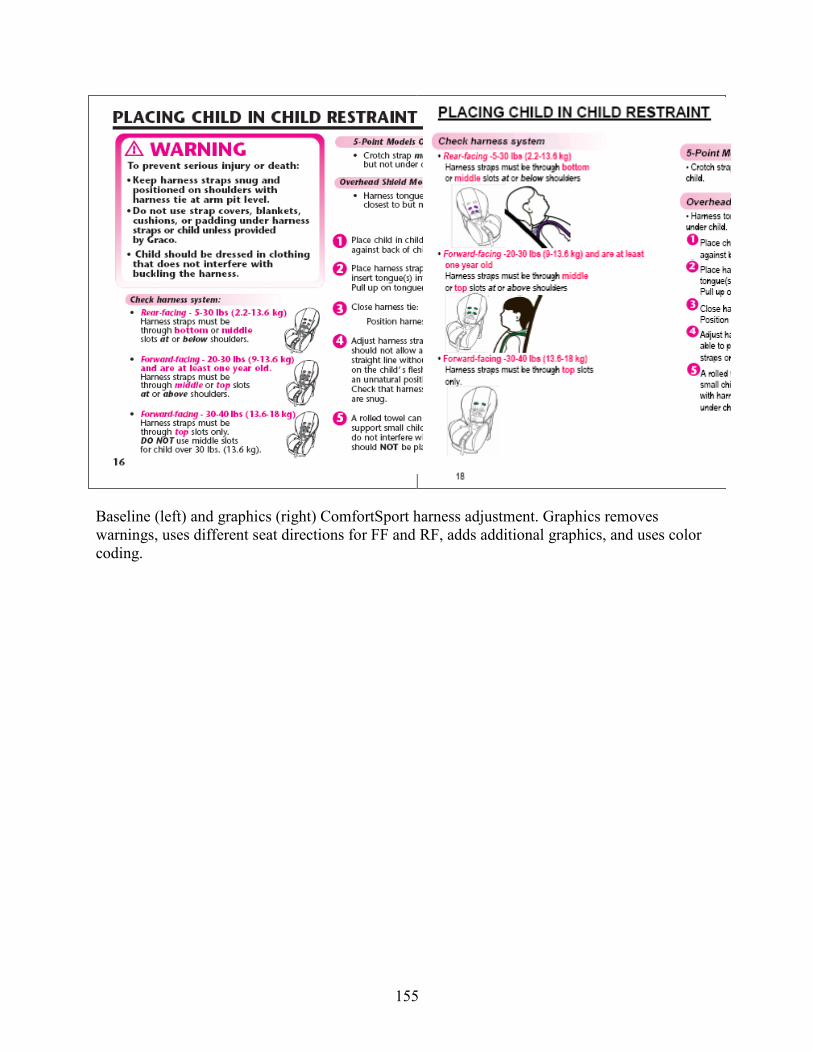
155
Baseline (left) and graphics (right) ComfortSport harness adjustment. Graphics removes warnings, uses different seat directions for FF and RF, adds additional graphics, and uses color coding.

156
Revised text (left) and photo (right) ComfortSport harness adjustment. Revised text simplifies text and uses color coding for different modes.

157
Combined ComfortSport harness adjustment. Changes include improved text and graphics, color coding, and rearranging so instructions for changing harness strap slots immediately follow directions on how to choose correct harness slots.

158
Baseline (top) and photo (bottom) ComfortSport LATCH belt routing.

159
Revised text (top) and ideal (bottom) ComfortSport LATCH belt routing. Changes include simplified text, color-coded text and graphics, moving graphics closer to relevant text. Belt routing section is also placed earlier in the manual, since it must be done before CRS is installed.

160
Baseline ComfortSport LATCH installation.

161
Revised text (top) and photo (bottom) ComfortSport LATCH installation. Revised text includes simplified text and color-coded headings.

162
Graphics (top) and reorganized (bottom) ComfortSport LATCH installation. Improved graphics involves color-coding pictures and moving pictures closer to relevant text. Reorganized involves combining separate sections for rear-facing and forward-facing LATCH installations to reduce redundant text.

163
Combined ComfortSport LATCH installation. Combined involves combining separate sections for rear-facing and forward-facing LATCH installations to reduce redundant text, color coding text and graphics, simplifying text, and moving graphics closer to relevant text.

DOT HS 811 627 July 2012
8436-071712-v2


![[CREATING LABELS] MAKING TEXT DESIGNING LABELS … · [CREATING LABELS] MAKING TEXT DESIGNING LABELS PRINTING LABELS COMPLETED LABELS USEFUL FUNCTIONS USER'S GUIDE / Español Printed](https://img.pdfslide.us/doc/110x75/5e718e59f26dfc19d238892e/creating-labels-making-text-designing-labels-creating-labels-making-text-designing.jpg)