Embed Size (px)
Citation preview
Surface Engineering Using Soft Materials
Lab 6
Spring 2016
Pappalardo II Micro/Nano Laboratories
Safety notes
Gloves, goggles, and lab coats must be worn at all times while performing the following experiments.
I. Introduction
In the previous labs, we have seen how lithography and molding are used for fabrication of micro-devices.
Lithography has been a key technology for manufacture of semiconductor devices including computer
processers and integrated circuits. However, nowadays researchers and engineers are applying micro- and
nanotechnologies to a wide range of applications from biological and chemical sensing to materials synthesis,
from tissue engineering to optics. As the size of these devices decreases, their surface-to-volume ratio increases,
and control of surface properties becomes increasingly important. In many cases, the surfaces need to be
engineered to molecular-level detail for proper functioning of the devices. For example, an electrochemical
glucose sensor to monitor sugar levels in diabetic patients requires a certain enzyme called glucose oxidase to
be placed on its sensing electrodes1; analysis using electrophoresis needs to minimize adsorption of the
molecules being separated on the walls of the channel2; and tissue engineering demands a tight control of a
cell’s microenvironment3. These needs cannot be met by lithography alone, and researchers have learned to
harness the unique properties of biological and chemical molecules to develop a range of micro- and nano-
fabrication techniques for engineering of surfaces that complement the lithography-based techniques. In this
lab, we will learn how surfaces can be engineered using a technique known as microcontact printing in
combination with self-assembly using biochemical building blocks. These techniques can be used to pattern
surfaces with a variety of functional molecules to make the surfaces hydrophobic or hydrophilic, or to self-
assemble biological molecules and other components in specific patterns.
Microcontact printing4, 5 belongs to a broader set of techniques known as soft lithography6-8, which include
PDMS molding that we saw in Lab 2. Soft lithography techniques were pioneered by the George Whitesides
group at Harvard, and share the common feature of using a patterned elastomer as the stamp, mold, or mask to
generate micropatterns and microstructures. Microcontact printing enables control over surface chemistry,
1
2
allows for patterning on non-planar surfaces, and enables patterning of a wide range of chemical and biological
materials. Furthermore, microcontact printing and other soft lithography techniques are relatively inexpensive
and convenient to use, and enable feature sizes ranging from 30 nm to about 500 µm6. Microcontact printing
uses the relief patterns on a PDMS stamp to form patterns of molecules on the surfaces of the substrates by
contact (Figure 1). In the first step, a layer of molecules is coated on the stamp, typically exposing the stamp to
a solution containing the molecule to be patterned, followed by drying of the solution to leave molecules on the
Figure 1. Schematic of the microcontact printing method showing fabrication of the silicon master mold for making a PDMS stamp (left) and its use for patterning a self-assembled monolayer (SAM) on gold. The SAM is subsequently used for selectively etching the gold (right) (Reproduced from reference 4).
This image has been removed due to copyright restrictions.Please see http://www.mdpi.com/materials/materials-07-00805/article_deploy/html/images/materials-07-00805f12-1024.png.
surface of the stamp. In the second step, the stamp is placed on the substrate to be patterned and brought into
intimate contact, which is greatly facilitated by the compliance of PDMS. Depending on the interaction of the
molecules with the surface, some of the molecules from the stamp are transferred to the surface. The stamp is
then lifted off, leaving behind a surface patterned with the desired molecules.
Self-assembly is the spontaneous organization of components (small molecules, biomolecules, nano- or
micro-scale objects) into stable, ordered structures typically through non-covalent interactions (i.e. without
forming chemical bonds, to distinguish self-assembly from usual chemical reactions)6. Examples of self-
assembly include folding of proteins, formation of DNA double helix from two strands of DNA, or assembly of
nano-magnets into well-defined arrays. Initial developments of microcontact printing exploited self-assembly of
certain molecules on surfaces, which results in the formation of self-assembled monolayers (SAMs). A self-
assembled single layer of molecules on a surface is called a self-assembled monolayer (mono = single).
Molecules known as alkanethiols can spontaneously assemble into monolayers on surfaces of metals including
Figure 2. Left: Self-assembled monolayer of alkanethiolate molecules on gold surface. The terminal group (X) can be varied, yielding SAMs with different properties and reactive groups. Right: Cells selectively assemble on patterns of fibronectin (a protein that supports cells adhesion). To create fibronectin patterns, SAMs with hydrophilic and hydrophobic end groups were patterned by microcontact printing; fibronectin selectively assembled on the hydrophobic layer (Reproduced from references 7 & 10).
3
This image has been removed due to copyright restrictions. This image has been removed due to copyright restrictions.Please see Page 9 in http://web.pdx.edu/~larosaa/ Please see Figure 5 in https://pdfs.semanticscholar.org/Fabrication_and_Characterization_of_nanomaterials/ 7c60/7a962beaba9dff9063823d266bb4017a9889.pdf.Lectures/Soft_lithography_YAN.pdf.
gold and silver through interaction with the thiol (-SH) group which is present on one end of the alkanethiol
molecule (Figure 2)6. While alkanethiols can form SAMs on gold surfaces, the rich variety of biological
molecules and their interactions provides a vast range of tools for self-assembly of a variety of materials. In
combination with microcontact printing, self-assembly becomes a powerful tool for fabrication of a variety of
surfaces that can be used for patterning any type of molecule on the surface for applications ranging from tissue
engineering to biosensing or chemical sensing (Figure 2)9, 10. We will now explore how microcontact printing
and self-assembly are used for patterning molecules and other structures on surface.
II. Laboratory Objectives
In this laboratory module, we will use microcontact printing with poly (dimethylsiloxane) (PDMS)
stamps to (a) pattern proteins on glass surfaces, (b) self-assemble microspheres on protein-patterned surfaces
using specific streptavidin-biotin binding, and (c) pattern hydrophilic self-assembled monolayers of alkanethiols
on gold surfaces. We will also see how we can selectively condense water on hydrophilic patterns obtained by
this method and also use the SAMs as masks for etching of the gold substrate.
III. Experimental
A. Microcontact printing of BSA (bovine serum albumin) on glass
We will begin today’s lab by patterning fluorescently labeled bovine (BSA) serum albumin on a glass
surface. BSA is a protein that easily adsorbs on most surfaces, and other molecules find it difficult to adsorb on
surfaces that have been exposed to BSA. Therefore, it is often used in biological protocols to “block” a surface,
i.e. to prevent other molecules from adsorbing on the surface. Here, we will start with BSA because is easy to
pattern, and the patterned surfaces can be observed readily under the fluorescence microscope.
On your lab bench, you will find
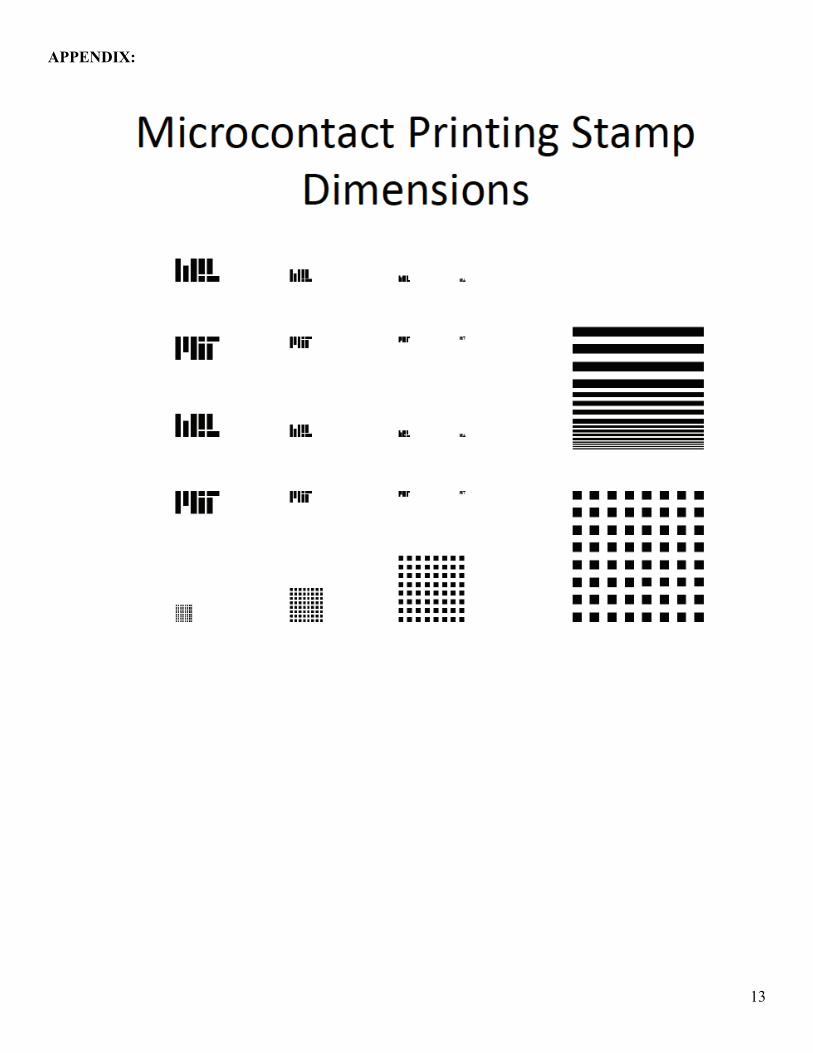
• PDMS stamps placed in ethanol (See Appendix for stamp feature dimensions) 4
5
• 1 mg/mL fluorescein-labeled BSA (FITC-BSA) solution
Glass slides •
Cleaning the surface to be patterned:
Clean one glass slide with ethanol and dry using nitrogen gun.
Preparing the stamp:
• Remove the PDMS stamp from ethanol using clean tweezers.
It is important that the PDMS stamp surface be very clean, otherwise the patterning will fail; ethanol helps to
keep the surface clean and to remove unwanted chemical contaminants from PDMS. Avoid touching the PDMS
stamp surface with anything (even gloves or tweezers often have dirt on them), instead, use the edges or sides to
hold the stamp (be careful, don’t drop it!). Can you see patterns on one side of the PDMS stamp?
• Dry the PDMS stamp with the nitrogen gun.
Place the PDMS stamp face-up on clean kimwipes on your bench. •
Inking the stamp:
• Put FITC-BSA solution on the PDMS stamp so that the stamp is covered (100-500 L).
Wait for 5 min.
Rinse with water using the squeeze bottles provided.
Use the nitrogen hose to remove the solution from the stamp, but do not excessively dry the stamp.
μ
•
•
•
Stamping:
• Place the inked stamp on top of the cleaned glass substrate.
6
Make sure that the PDMS has made good contact with the glass surface (looking at the reflection from the
glass surface is an easy way to check the contact). Once the stamp touches the glass surface, do not move it.
Disturbing the stamp will cause smudging and blurring of the pattern.
• Wait for 3 minutes.
After 3 min, peel the stamp from the glass surface, taking care to ensure that the stamp does not slide or
smudge.
•
Inspection of the pattern:
After removing the stamp from the glass slide, bring the slide to the Nikon microscope. The FITC-BSA
consists of BSA chemically linked to a few fluorescent molecules of fluorescein. Fluorescein absorbs blue light
and emits green light (recall the beads used in the microfluidics experiments). Examine the glass slide using the
fluorescent setting, and also using the usual bright light illumination. Try different magnifications; you may find
that the best images are obtained at high magnifications. Record images of the observed patterns.
B. Patterning of microspheres through self-assembly using streptavidin-biotin linkages
In this experiment, we will pattern microspheres on a glass surface using microcontact printing and self-
assembly. In the first step, we will pattern biotin-BSA (BSA molecules modified with biotin) on glass using
microcontact printing. Then, we will expose the surface to streptavidin-coated microspheres. Streptavidin binds
to biotin, which will result in self-assembly of the microspheres in the pattern defined by the initial
microcontact printing.
While self-assembly of microspheres may not be widely used in real life, this approach illustrates many
procedures used for self-assembly of biomolecules and cells on surfaces. Streptavidin, a protein found in the
bacterium streptomyces avidinii, can bind four molecules of biotin (or vitamin B7) with extraordinary strength;
the streptavidin-biotin bond is among the strongest non-covalent interactions known11. The streptavidin-biotin

7
linkage is therefore especially widely used to attach (or “immobilize”) biotin-modified biomolecules on
surfaces.
On your lab bench, you will find
• PDMS stamps placed in ethanol
0.1 mg/mL biotin-BSA solution
1 mg/mL fluorescein-labeled BSA (FITC-BSA) solution
1% solids 3 μmstreptavidin-coated microsphere solution
Glass slides
•
•
•
•
Patterning of biotin-BSA:
• Using the procedure followed for patterning FITC-BSA in the previous experiment, pattern biotin-BSA
on a cleaned glass slide using a new PDMS stamp (do not reuse stamps).
Remove the stamp from the slide (vertically, no dragging or smudging).
Wash the patterned area of the glass slide with PBS buffer using the squeeze bottle.
Place a drop of PBS on the patterned area, and wipe the other side of the glass slide. Avoid drying of the
surface as far as possible.
•
•
•
Self-assembly of streptavidin microspheres:
• Place the glass side inside a Petri dish with a wet tissue (to slow evaporation).
Drop about 20 µL of streptavidin-coated beads on top of slide.
Cover the petri dish and let the slide sit for at least 30 minutes (perform the next experiment in the
meanwhile).
Examine the resulting surface under the microscope. Record images of the assembled microspheres. Do
not let the surface dry!
•
•
•
8
Control experiment using microspheres without a streptavidin coating:
You can check whether microspheres that are not coated with streptavidin assemble into patterns on the biotin-
BSA-patterned glass slide. You can use the same stamp (but ink it again) to pattern biotin-BSA as before.
Follow the same procedure as for the streptavidin microsphere assembly, but instead of adding streptavidin
microspheres, add microspheres that are not coated with streptavidin (these are the same ones we used in the
Electrokinetics lab). Such experiments are called “controls”. If self-assembly is determined by the streptavidin-
biotin interaction, we may expect to see minimal self-assembly here. Examine the resulting surface under the
microscope. Record images of the result.
C. Patterning of self-assembled monolayers on gold
In the final experiment, we will pattern self-assembled alkanethiol monolayers on gold. Alkanethiols
comprise an alkane (…-CH2-CH2-CH2-…) chain with a thiol (-SH) group on one end. The thiol group can bind
to surfaces of metals such as gold and silver, and combined with the interactions between the alkane chains,
results in the formation of SAMs (Figure 2). The other end of the alkane chain may have different functional
groups such as -CH3, -CH2OH, -COOH, etc. that give the SAM different properties and present different
chemical end groups for further chemical modification if desired. Alkanethiol SAMs find a wide range of utility
for modification of surface hydrophilicity, patterning of molecules, and can even be used as a mask for etching
the underlying gold substrate. SAMs have also attracted attention for potential applications in molecular
electronics and cheap thermoelectric energy conversion devices.
On your lab bench, you will find
• PDMS stamps placed in ethanol
• 2% solution of mercaptohexadecanoic acid (MHDA) in ethanol
• Gold-coated glass slides
9
Cleaning of the surface:
Clean one gold-coated glass slide with ethanol and dry using nitrogen.
Preparing the stamp:
As in the previous experiment, dry the PDMS stamp using the nitrogen gun. Place the PDMS stamp face-up on
clean kimwipes on your bench.
Inking the stamp:
• Place a drop of 2% MHDA solution on the PDMS stamp so that it is completely covered.
• Wait for 30 min.
• Rinse with ethanol, making sure no white deposits remain on the surface of the stamp.
• Dry the stamp using nitrogen to ensure that no liquid remains on the stamp.
Stamping:
• Place inked stamp on top of the cleaned gold substrate for 60 s. Ensure that the PDMS has made good
contact with the surface.
• After 60 s, peel the stamp from the surface, taking care to ensure that the stamp does not slide.
• Rinse the slide with ethanol, followed by deionized water. Dry with nitrogen.
Exploration:
Try microcontact printing of MHDA with a longer stamping duration of 5-10 min on the same slide with the
same stamp. Observe the pattern by etching with gold etchant (see below), and compare with 60 s stamping
duration.
Observation of hydrophilicity of the surface:
Place a drop of water on the patterned surface and tilt the slide so that the drop slides off. The patterned area
should become visible when you do this experiment.
Condensation on the patterned surface:
Ask your partner to exhale through the mouth on the glass surface while the slide still is placed on the
microscope. Use bright-field illumination or a combination of fluorescence and bright-field for best results.
Observe condensation of water from your breath on the surface as your partner exhales on the patterned surface.
Record images of condensation and evaporation.
Etching the gold using the patterned alkanethiol as a mask:
The SAM can be used as a mask to etch the gold and pattern it, just like a photoresist. Safety note: This
experiment may be performed only under the direct supervision of your lab instructor. Place the gold
slide in the gold etching solution (KI + I2) provided for about 60-90 s under continuous shaking and remove the
slide. Immediately put the slide in the water bath to stop the etching process. The process is very sensitive- if
you leave the slide longer in the etching solution, all the gold may be etched away! Do you see patterns of gold
remaining where you patterned the SAM? You may also notice a thin titanium film remaining behind- titanium
is used as an adhesion layer since gold does not like to adhere to a glass surface. Use the microscope to record
images of the patterned gold.
Lab Writeup Questions:
Patterning of FITC-BSA:
1. (2 points) Present representative images of the patterned BSA obtained using the fluorescence microscope, including scale bars. Present images of any observed defects in the pattern, and briefly discuss what you think may have caused them.
2. (1 point) If the BSA molecules form a monolayer on the surface of the glass slide, approximately estimate the number of molecules on the surface in a 1 µm x 1 µm area? For this and the next question, assume that the BSA-FITC has dimensions of 4 x 4 x 14 nm.
10
11
3. (1 point) Give an order-of-magnitude estimate the number of molecules that were transferred to the glass
slide when you patterned the surface (~ 1 cm2 area). How does it compare to the number of molecules that you actually used for inking the stamp (give an order-of-magnitude comparison)? Assume that the molecular weight of BSA is 70,000 Dalton. BSA-FITC concentration was 1 mg/mL.
Self-assembly of the microspheres: 4. (2 points) Present representative images of the assembled streptavidin-coated microspheres and
microspheres without a streptavidin coating at low and higher magnifications. Include scale bars. Do you observe any difference between the self-assembly of the two types of microspheres? Mention any interesting observations that you made (e.g. was the patterning uniform?).
5. (1 point) Give an order of magnitude estimate of the number of streptavidin-biotin bonds that hold a microsphere to the surface. Describe your approach and assumptions used to estimate this number. The streptavidin molecule is ~5 nm in size. Assume that each streptavidin molecule can form two bonds with the BSA-biotin, and that the surfaces of the glass and microsphere have to be within 10 nm of each other to form bonds, with the smallest distance between the two surfaces being 5 nm (because of the streptavidin and BSA on the surfaces).
Microcontact printing on gold slides:
6. (2 points) What did you observe during the condensation experiment (present images/image sequence, including scale bars)? From these observations, deduce whether the patterned MHDA made the surface more hydrophilic or more hydrophobic than the gold surface.
7. (1 point) Present images of the gold etched patterns that you obtained, including scale bars. Mention any interesting observations that you made.
12
References
1. Wilson, R.; Turner, A. P. F., Glucose-Oxidase - an Ideal Enzyme. Biosensors & Bioelectronics 1992, 7, (3), 165-185. 2. Horvath, J.; Dolnik, V., Polymer wall coatings for capillary electrophoresis. Electrophoresis 2001, 22, (4), 644-655. 3. Khademhosseini, A.; Langer, R.; Borenstein, J.; Vacanti, J. P., Microscale technologies for tissue engineering and biology. Proceedings of the National Academy of Sciences of the United States of America 2006, 103, (8), 2480-2487. 4. Perl, A.; Reinhoudt, D. N.; Huskens, J., Microcontact Printing: Limitations and Achievements. Advanced Materials 2009, 21, (22), 2257-2268. 5. Quist, A. P.; Pavlovic, E.; Oscarsson, S., Recent advances in microcontact printing. Analytical and Bioanalytical Chemistry 2005, 381, (3), 591-600. 6. Xia, Y. N.; Whitesides, G. M., Soft lithography. Annual Review of Materials Science 1998, 28, 153-184. 7. Xia, Y. N.; Whitesides, G. M., Soft lithography. Angewandte Chemie-International Edition 1998, 37, (5), 551-575. 8. Whitesides, G. M.; Ostuni, E.; Takayama, S.; Jiang, X. Y.; Ingber, D. E., Soft lithography in biology and biochemistry. Annual Review of Biomedical Engineering 2001, 3, 335-373. 9. Lahiri, J.; Ostuni, E.; Whitesides, G. M., Patterning ligands on reactive SAMs by microcontact printing. Langmuir 1999, 15, (6), 2055-2060. 10. Kane, R. S.; Takayama, S.; Ostuni, E.; Ingber, D. E.; Whitesides, G. M., Patterning proteins and cells using soft lithography. Biomaterials 1999, 20, (23-24), 2363-2376. 11. Green, N. M., Avidin and Streptavidin. Methods in Enzymology 1990, 184, 51-67.
13
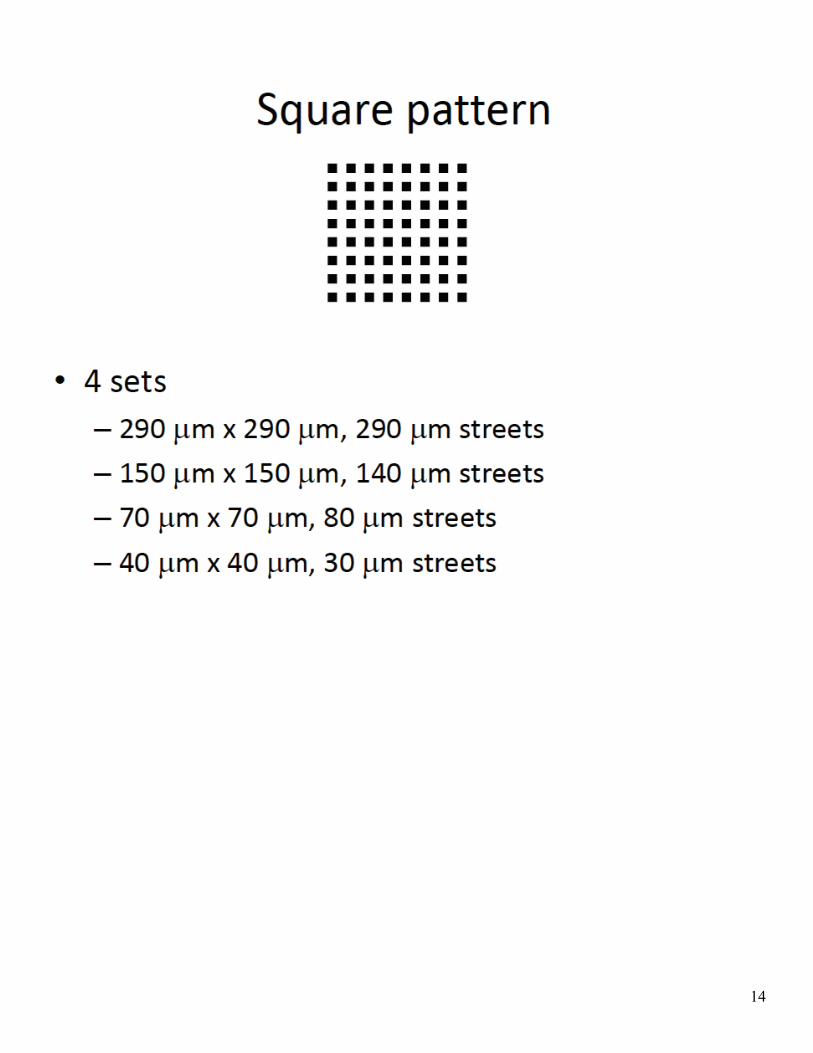
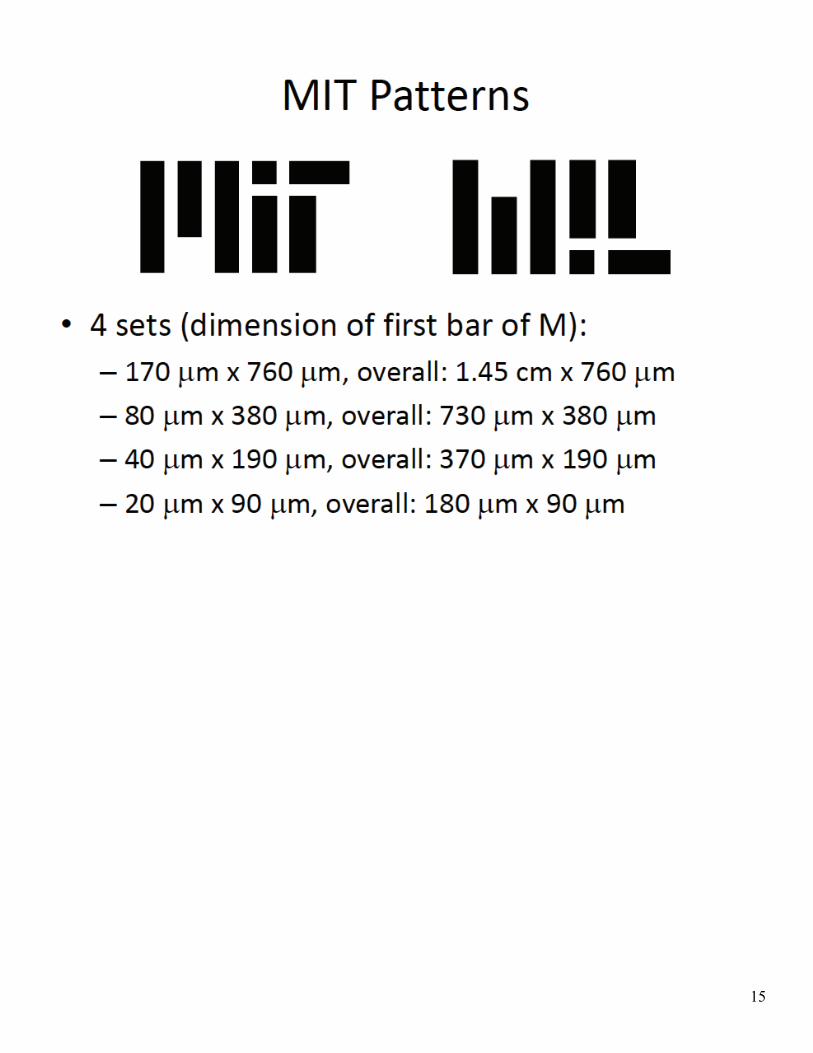
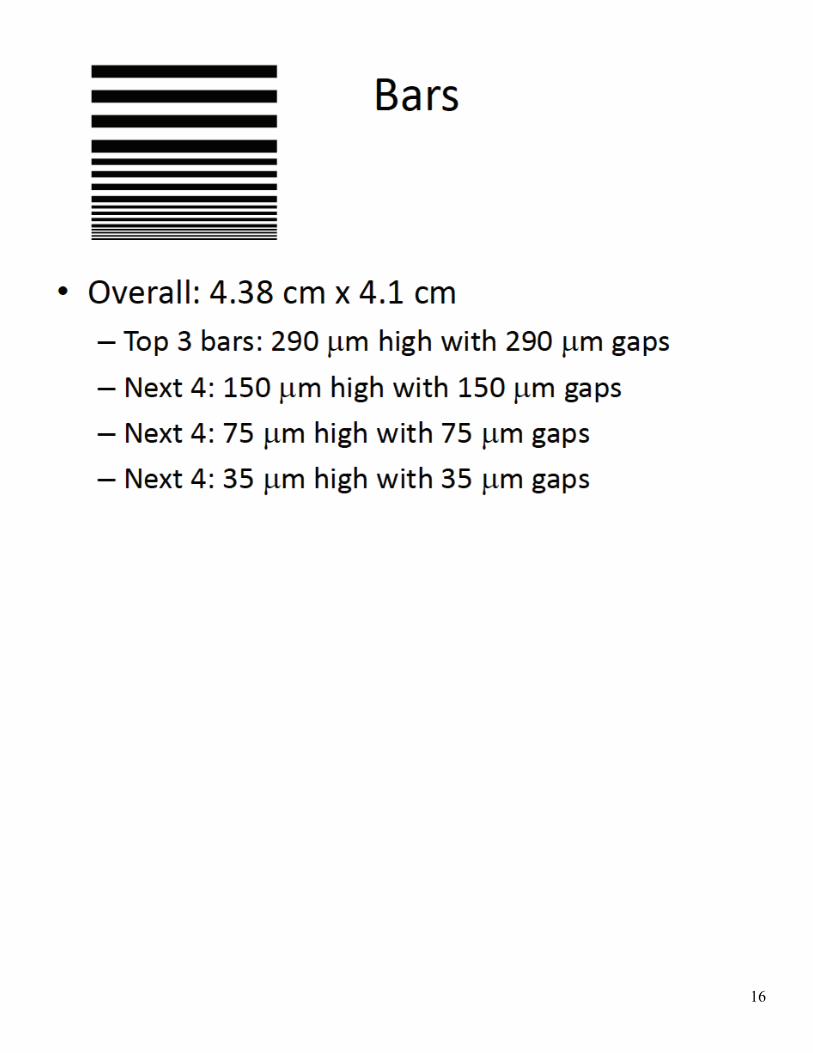
APPENDIX:
14
15
16

MIT OpenCourseWarehttps://ocw.mit.edu
2.674 / 2.675 Micro/Nano Engineering LaboratorySpring 2016
For information about citing these materials or our Terms of Use, visit: https://ocw.mit.edu/terms.