Embed Size (px)
Citation preview
Lab 1: Exploring Internet Email Protocols and BlueJDue: In class on Wednesday, 2/7
In most of our labs this semester, you will be writing Java programs that explore the operation of commu-nications services provided through the Internet. This lab, however, will be a bit different. You will still be exploring Internet communication mechanisms and Java programs, but you will do it using existing applications and a short Java program we will provide rather than by writing a program of your own.
In this lab you will learn about two important Internet email protocols by experimenting with their opera-tion in various ways. The protocols we want you to explore are SMTP (Simple Mail Transfer Protocol), which is the standard protocol used to send email messages, and POP (Post Office Protocol), which is one of two protocols that are widely used by mail clients when you are reading your email.
You will also use BlueJ, the IDE (Integrated Development Environment) we will be using in labs throughout the semester, to enter and run a simple Java program. The goal of this exercise will be to give you some concrete experience with the mechanics of entering and running a program so that you can bet-ter appreciate the introduction to Java we will present in class.
There are several things you should do to prepare for this lab. First, however, we want to tell you some-thing you do not have to do before lab. You do not have to read the entire lab handout. You only have to read the first page. For most of the other labs in this course, carefully reading the entire lab handout be-fore coming to lab will be an extremely important part of your preparation for lab. This week’s lab hand-out, however, is designed to function as a tutorial. As you read through most of the handout, you will be expected to perform the operations it describes using one of the computers in our lab. You may want to skim the handout a bit before you come to lab but don’t waste time reading beyond the first page.
On the other hand, this lab will assume that you are familiar with the readings assigned from the course reading packet. These readings are described on the course web site
http://www.cs.williams.edu/~cs134
under the topic “Lecture Schedule and Readings.” In particular, we expect you to read Chapter 1 and the first section of Chapter 4 of “Programming with Java, Swing and Squint” before coming to lab.
Finally, there is something very simple you can do to make the lab go smoothly. By the end of the first day of class, we will create an account for each of you on our department’s server. During lab, you will be using the account to send and read email messages. Before lab, you should send a few email messages to this account. The address for the account will be composed of your user name followed by our server’s name, cortland.cs.williams.edu. For example, if your user name is 09jrl, then the address we want you to send some email to is:
If you want some variety, feel free to have some friends send some mail to this account as well. Be sure, however, that you don’t send too many messages to this account. The main reason we are using accounts on our server rather than having you use your standard Williams email account is to avoid having to proc-ess too many messages. During the lab, you will be monitoring conversations between a mail program and our mail server. If you have too many messages sent to your account, the number of packets you in-tercept when you monitor the conversation between the Mail program and our mail server will be over-whelming. Having somewhere between 4 and 8 messages sent to your cortland.cs.williams.edu account before lab would be great.
CS 134 Spring 2007
1
Part I: Exploring Email ProtocolsYou will use three programs to explore how some of the mail protocols used within the Internet function:
Mail: The standard mail client provided with Apple’s Macintosh operating system. You will use this program to send and read some email messages using the mail account we have created for you on our department’s server.
TCPCapture: This is a program we have constructed which allows you to intercept and inspect messages sent from your machine through the Internet. You will use it to determine exactly what messages are exchanged between the Apple Mail program and our email server when you send messages and check your mail.
You may have noticed a bit of a vocabulary problem here. In order to send an email message, a client program sends several messages of its own. It is confusing to use the word “message” for both sorts of communications. So in the rest of this handout we will use the word “message” only when talking about actual email messages. We will use the term “packet” to refer to the smaller, individual communications sent between clients and servers.
NetTap: This is a program we have constructed that allows you to exchange packets directly with a re-mote server rather than depending on a client program like a mail program or a web browser. Af-ter having seen the packets the Apple Mail program uses to communicate with a mail server, you will use this program to communicate with the mail server directly.
Configuring Your AccountThe first step you need to complete for this lab is to configure the preferences for the your account on our system by changing your password and entering the information to use when the Mail program tries to connect to a mail server. We will lead you through this process in some detail in recognition of the fact that some of you may not have previous experience with the Macintosh interface. We will expect you to become comfortable with this interface quickly because we will not provide the same level of step-by-step instructions in future labs.
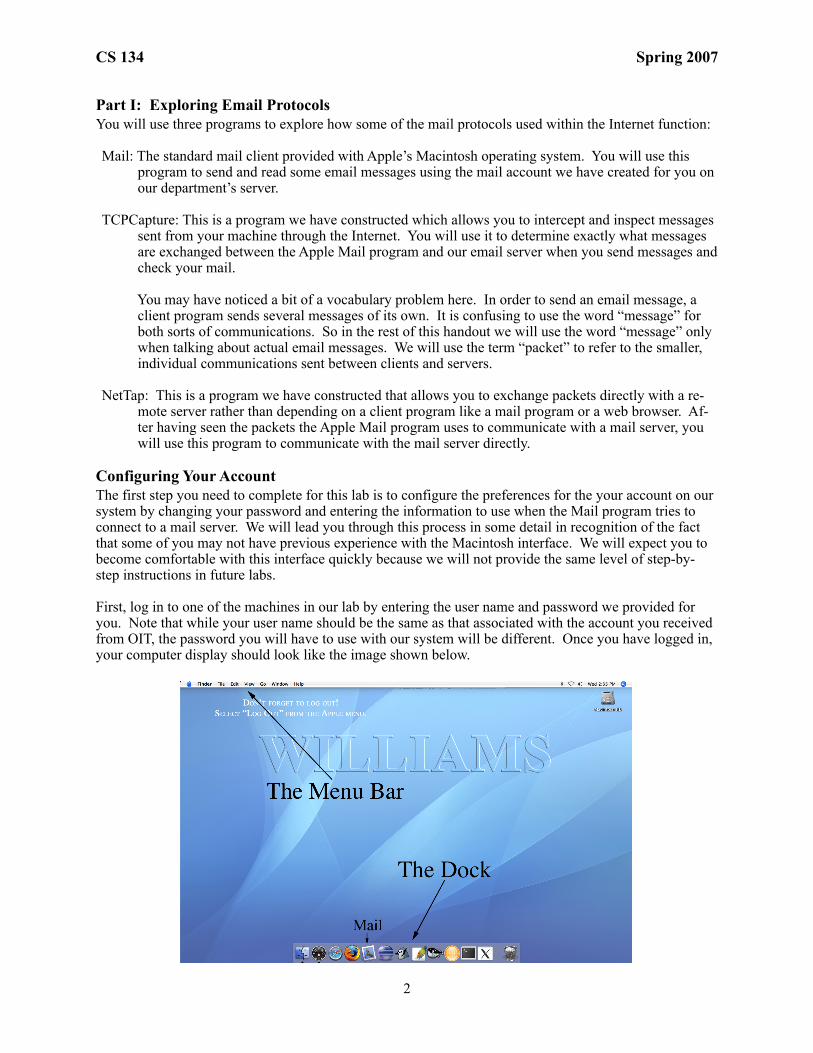
First, log in to one of the machines in our lab by entering the user name and password we provided for you. Note that while your user name should be the same as that associated with the account you received from OIT, the password you will have to use with our system will be different. Once you have logged in, your computer display should look like the image shown below.
CS 134 Spring 2007
2
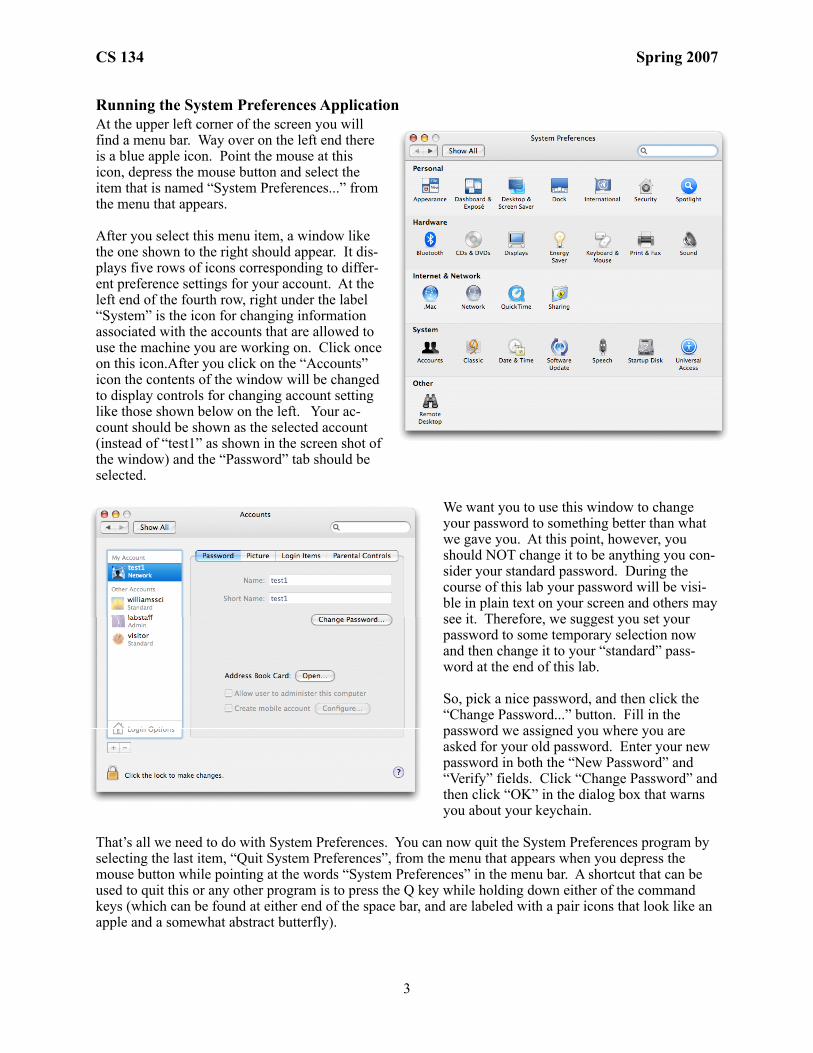
Running the System Preferences ApplicationAt the upper left corner of the screen you will find a menu bar. Way over on the left end there is a blue apple icon. Point the mouse at this icon, depress the mouse button and select the item that is named “System Preferences...” from the menu that appears.
After you select this menu item, a window like the one shown to the right should appear. It dis-plays five rows of icons corresponding to differ-ent preference settings for your account. At the left end of the fourth row, right under the label “System” is the icon for changing information associated with the accounts that are allowed to use the machine you are working on. Click once on this icon.After you click on the “Accounts” icon the contents of the window will be changed to display controls for changing account setting like those shown below on the left. Your ac-count should be shown as the selected account (instead of “test1” as shown in the screen shot of the window) and the “Password” tab should be selected.
We want you to use this window to change your password to something better than what we gave you. At this point, however, you should NOT change it to be anything you con-sider your standard password. During the course of this lab your password will be visi-ble in plain text on your screen and others may see it. Therefore, we suggest you set your password to some temporary selection now and then change it to your “standard” pass-word at the end of this lab.
So, pick a nice password, and then click the “Change Password...” button. Fill in the password we assigned you where you are asked for your old password. Enter your new password in both the “New Password” and “Verify” fields. Click “Change Password” and then click “OK” in the dialog box that warns you about your keychain.
That’s all we need to do with System Preferences. You can now quit the System Preferences program by selecting the last item, “Quit System Preferences”, from the menu that appears when you depress the mouse button while pointing at the words “System Preferences” in the menu bar. A shortcut that can be used to quit this or any other program is to press the Q key while holding down either of the command keys (which can be found at either end of the space bar, and are labeled with a pair icons that look like an apple and a somewhat abstract butterfly).
CS 134 Spring 2007
3

Configuring the Mail ProgramNext we want to configure the Apple Mail program to use your account on our mail server. We want to do this without letting the program actually go and fetch your mail. We want to keep it from doing this until we are ready to run the TCPCapture program so that we can watch the conversation between the Mail client program and our server. So, as you follow the steps to configure your account we will instruct you not to enter your password at one point when the configuration process asks for it. This will keep the program from being able to contact the server until you want it to.
To start, you need to activate the Mail program. You can do this by clicking once on the Mail program’s icon in the dock (the strip of icons displayed at the bottom of your computer’s screen). Its icon is sup-posed to look like a postage stamp. If you aren’t sure you have the correct icon just point the mouse at it and the name of the program associated with the icon should appear above the icon.
Mail should first display a window informing you that it wants to guide you through the process of setting up your mail account. Click “Continue.”
Next, mail should display a dialog box like that shown on the right. The menu displayed next to the label “Account Type” will initially be set to “.Mac”. Change this item to “POP” since we want to experiment with the Post Office Protocol. When you do this, the other fields you need to fill in will change a bit. The “Account Description” will be changed to POP Account. Leave this as it is. Type your full name into the “Full Name” field. Finally, type your CS 134 email account address into the “Email Ad-dress” field. This should look something like: [email protected] . Once this is done, click “Continue.”
The next window asks you to provide information about the “Incoming Mail Server.” This is the machine the Mail program will be using POP to communicate with. Type “cortland.cs.williams.edu” into the “In-coming Mail Server” field. The “User name” field should already contain your account id (something like 09jrl). If it does, leave that as it is. Please do NOT fill in the “Password” field. This is how we will force the Mail program to wait until you are ready before it tries to contact the POP server. Click “Con-tinue.” The program will warn you that it can’t connect to the server (since you didn’t give it your pass-word!). Double check that everything else is entered correctly and then just click “Continue” again to go to the next window without entering your password.
The next window invites you to configure the Mail program to use an encryption scheme to keep your mail private as it travels from the server to your client machine. Normally, this would be a good thing, but for this lab we want to be able to read the packets intercepted by TCPCapture as the Mail program talks to the server. Also, select “Password” from the “Authentication” drop down box. Now, make sure the box to enable SSL is not checked and then just click “Continue”.
Now you need to enter information about the server that will handle your outgoing mail. For us, this will be the same machine that handles incoming mail, “cortland.cs.williams.edu”. So, enter this machine name in the “Outgoing Mail Server” field. As with encryption, we don’t want to complicate things by enabling authentication (even though it would usually be a good idea). So, once the outgoing mail server name has been entered, click “Continue.”
That’s it. The next window just displays a summary of the settings you have selected. Press “Continue” once more and then press “Done” in the next window to complete the process. Mail will probably display a dialog encouraging you to read about its neat features. Press “No.”
CS 134 Spring 2007
4
Using TCPCaptureOur next step is to start running the TCPCapture program. This is not a standard application program. In fact, it makes some people nervous to have it around at all since it has the potential to snoop on network traffic. So, you can’t start it by simply clicking on its icon in the dock as you did for the Mail program. Instead, you will have to work a bit to find where it is hidden on your disk.
To start, you need to open a Finder window on your desktop so that you can navigate your way through the folders of files stored on your computer. The easiest way to do this is to double-click on the icon la-beled “Macintosh HD” near the top right corner of your screen. If you can’t see this icon, your best op-tion is to click once on the icon for the Finder in the dock (it looks like a smiling face and is always the leftmost icon in the dock).
In the left column of the Finder window there is an icon labeled “Applications.” Click on this icon once to display the contents of the Applications folder in your Finder window. Find the icon for the “Utilities” folder that now appears within the window and double-click to display the contents of the Utilities folder. Within this folder, find the icon for TCPCapture and double-click on it to start the program.
Immediately after you launch TCPCapture an odd looking window containing some messages that talk about your last login will appear. Ignore this (In fact, once the actual program is running you might want to close this window by clicking once in the red circle in its upper left corner).
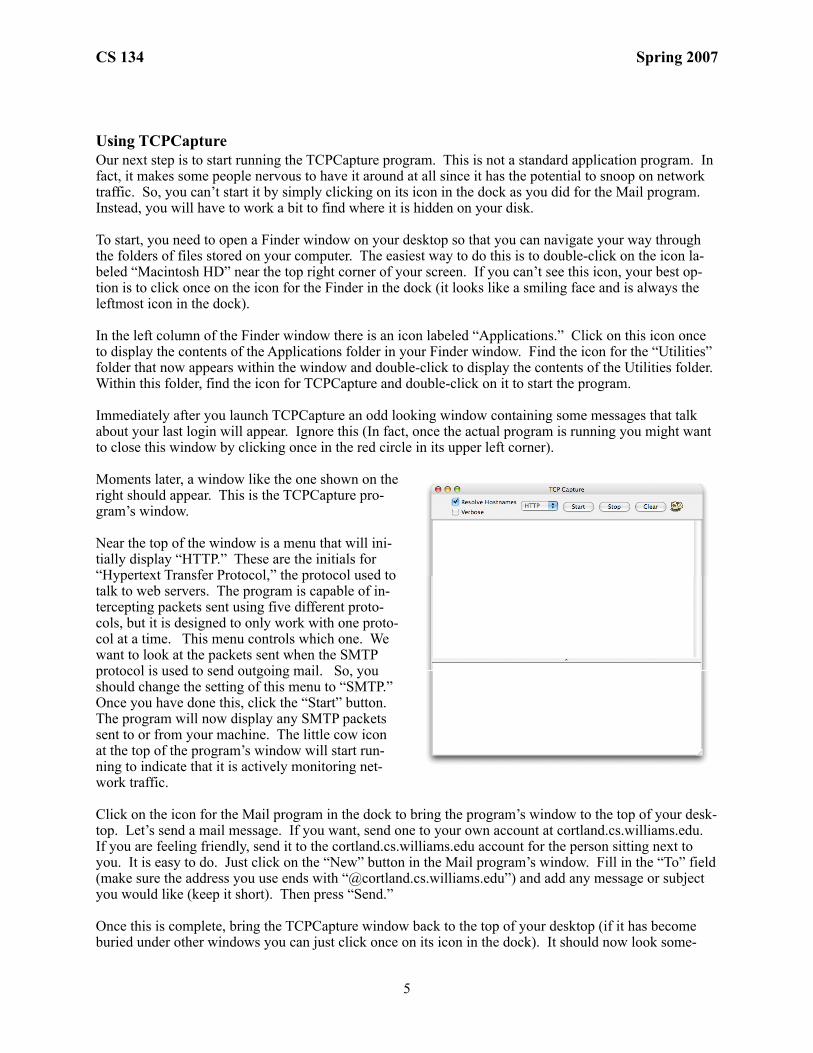
Moments later, a window like the one shown on the right should appear. This is the TCPCapture pro-gram’s window.
Near the top of the window is a menu that will ini-tially display “HTTP.” These are the initials for “Hypertext Transfer Protocol,” the protocol used to talk to web servers. The program is capable of in-tercepting packets sent using five different proto-cols, but it is designed to only work with one proto-col at a time. This menu controls which one. We want to look at the packets sent when the SMTP protocol is used to send outgoing mail. So, you should change the setting of this menu to “SMTP.” Once you have done this, click the “Start” button. The program will now display any SMTP packets sent to or from your machine. The little cow icon at the top of the program’s window will start run-ning to indicate that it is actively monitoring net-work traffic.
Click on the icon for the Mail program in the dock to bring the program’s window to the top of your desk-top. Let’s send a mail message. If you want, send one to your own account at cortland.cs.williams.edu. If you are feeling friendly, send it to the cortland.cs.williams.edu account for the person sitting next to you. It is easy to do. Just click on the “New” button in the Mail program’s window. Fill in the “To” field (make sure the address you use ends with “@cortland.cs.williams.edu”) and add any message or subject you would like (keep it short). Then press “Send.”
Once this is complete, bring the TCPCapture window back to the top of your desktop (if it has become buried under other windows you can just click once on its icon in the dock). It should now look some-
CS 134 Spring 2007
5
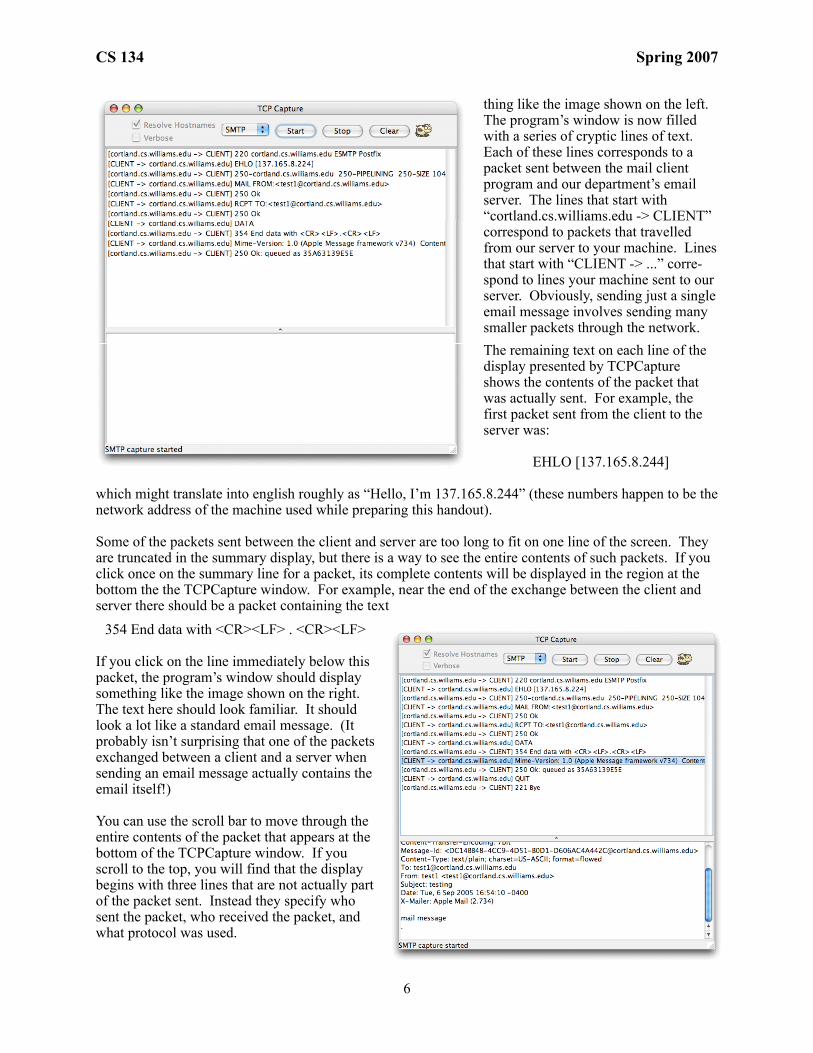
thing like the image shown on the left. The program’s window is now filled with a series of cryptic lines of text. Each of these lines corresponds to a packet sent between the mail client program and our department’s email server. The lines that start with “cortland.cs.williams.edu -> CLIENT” correspond to packets that travelled from our server to your machine. Lines that start with “CLIENT -> ...” corre-spond to lines your machine sent to our server. Obviously, sending just a single email message involves sending many smaller packets through the network.
The remaining text on each line of the display presented by TCPCapture shows the contents of the packet that was actually sent. For example, the first packet sent from the client to the server was:
EHLO [137.165.8.244]
which might translate into english roughly as “Hello, I’m 137.165.8.244” (these numbers happen to be the network address of the machine used while preparing this handout).
Some of the packets sent between the client and server are too long to fit on one line of the screen. They are truncated in the summary display, but there is a way to see the entire contents of such packets. If you click once on the summary line for a packet, its complete contents will be displayed in the region at the bottom the the TCPCapture window. For example, near the end of the exchange between the client and server there should be a packet containing the text
354 End data with <CR><LF> . <CR><LF>
If you click on the line immediately below this packet, the program’s window should display something like the image shown on the right. The text here should look familiar. It should look a lot like a standard email message. (It probably isn’t surprising that one of the packets exchanged between a client and a server when sending an email message actually contains the email itself!)
You can use the scroll bar to move through the entire contents of the packet that appears at the bottom of the TCPCapture window. If you scroll to the top, you will find that the display begins with three lines that are not actually part of the packet sent. Instead they specify who sent the packet, who received the packet, and what protocol was used.
CS 134 Spring 2007
6
Now that we have found the packet that actually contains the email being sent, we should try to figure out what the other packets are for. First, note that each of the packets sent from the client to the server other than the email message itself start with a four letter code. Each of these codes is a command name. The commands you should find in your TCPCapture window and their uses are explained below:
EHLO - identify the client machine to the server.
MAIL - provides the return address for the message’s sender. The command name must be followed by “FROM: <sendername@somemachinename>” where “sendername@somemachinename should be the email address of the sender.
RCPT - provides the destination address to which the message should be delivered. The command name must be followed by “TO: <user@somemachinename>” where “user@somemachinename is the email destination address for the message.
DATA - indicates that the message itself will follow immediately.
Similarly, if you look at the lines sent to the client from the server, they all start with three digit codes like 220 and 250. The 220 code simply means “ready” while “250” means that the server accepted the last packet from the client.
In fact, these numerical codes are the only critical information contained in the lines sent from the server to the client. The client program doesn’t really need to look at any of the text that follows. Any text that follows these numerical codes is there to help any human who happens to be reading the packets ex-changed.
There are many other commands and responses recognized by SMTP servers, but these six are the most important. If you want to learn about the others, visit:
http://en.wikipedia.org/wiki/SMTP
or read the complete and official description of the SMTP protocol at:
http://www.faqs.org/rfcs/rfc2821.html
(Seriously, you probably don’t want to try to read the complete description, but you may find it interesting to take a peek.)
Using NetTapWhen a mail server receives packets like those you intercepted using TCPCapture, it doesn’t know (or care) what mail client program they came from. In our case, we used the Apple Mail program, but the mail server would accept the packets just as happily from Microsoft Outlook Express, Eudora, or any other mail client. In fact, the server doesn’t even care whether they came from a mail client. All it cares about is that the packets somehow get sent to it through the network.
To illustrate this fact, we have constructed a simple program that isn’t a mail client but can be used to send packets to an SMTP server. The program is named NetTap.jar. Like TCPCapture, it can be found in the Utilities folder within the Application folder on each of the machines in the lab.
CS 134 Spring 2007
7
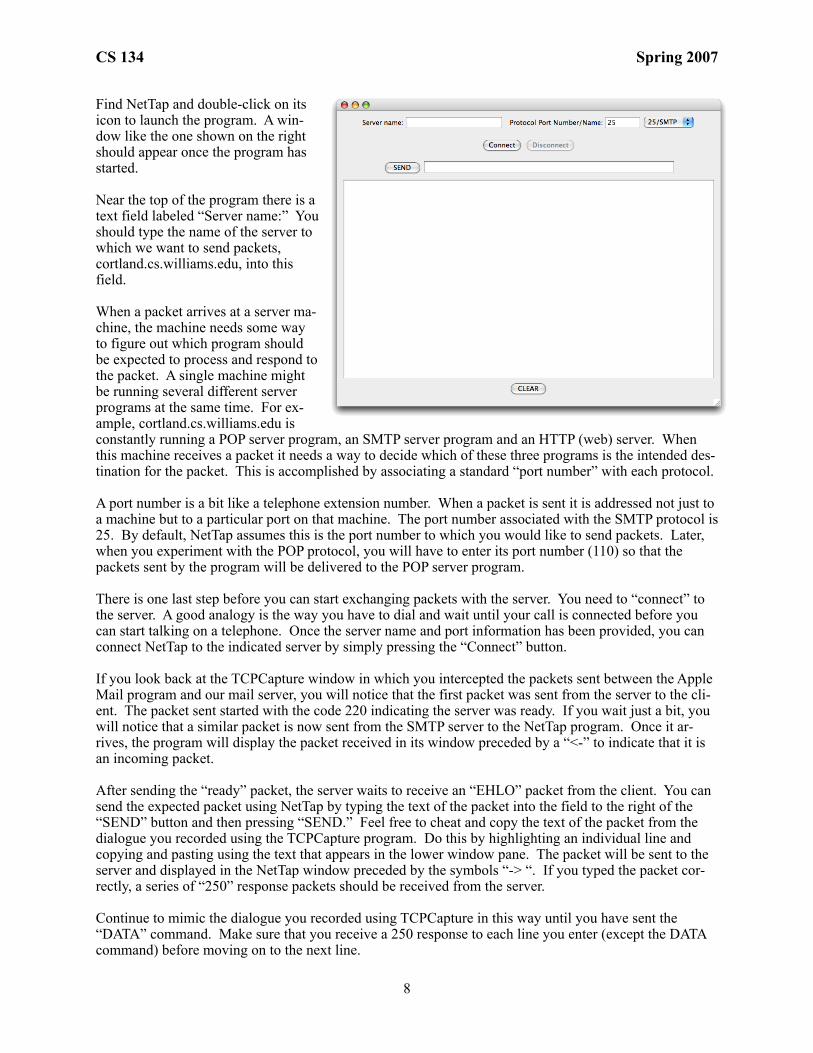
Find NetTap and double-click on its icon to launch the program. A win-dow like the one shown on the right should appear once the program has started.
Near the top of the program there is a text field labeled “Server name:” You should type the name of the server to which we want to send packets, cortland.cs.williams.edu, into this field.
When a packet arrives at a server ma-chine, the machine needs some way to figure out which program should be expected to process and respond to the packet. A single machine might be running several different server programs at the same time. For ex-ample, cortland.cs.williams.edu is constantly running a POP server program, an SMTP server program and an HTTP (web) server. When this machine receives a packet it needs a way to decide which of these three programs is the intended des-tination for the packet. This is accomplished by associating a standard “port number” with each protocol.
A port number is a bit like a telephone extension number. When a packet is sent it is addressed not just to a machine but to a particular port on that machine. The port number associated with the SMTP protocol is 25. By default, NetTap assumes this is the port number to which you would like to send packets. Later, when you experiment with the POP protocol, you will have to enter its port number (110) so that the packets sent by the program will be delivered to the POP server program.
There is one last step before you can start exchanging packets with the server. You need to “connect” to the server. A good analogy is the way you have to dial and wait until your call is connected before you can start talking on a telephone. Once the server name and port information has been provided, you can connect NetTap to the indicated server by simply pressing the “Connect” button.
If you look back at the TCPCapture window in which you intercepted the packets sent between the Apple Mail program and our mail server, you will notice that the first packet was sent from the server to the cli-ent. The packet sent started with the code 220 indicating the server was ready. If you wait just a bit, you will notice that a similar packet is now sent from the SMTP server to the NetTap program. Once it ar-rives, the program will display the packet received in its window preceded by a “<-” to indicate that it is an incoming packet.
After sending the “ready” packet, the server waits to receive an “EHLO” packet from the client. You can send the expected packet using NetTap by typing the text of the packet into the field to the right of the “SEND” button and then pressing “SEND.” Feel free to cheat and copy the text of the packet from the dialogue you recorded using the TCPCapture program. Do this by highlighting an individual line and copying and pasting using the text that appears in the lower window pane. The packet will be sent to the server and displayed in the NetTap window preceded by the symbols “-> “. If you typed the packet cor-rectly, a series of “250” response packets should be received from the server.
Continue to mimic the dialogue you recorded using TCPCapture in this way until you have sent the “DATA” command. Make sure that you receive a 250 response to each line you enter (except the DATA command) before moving on to the next line.
CS 134 Spring 2007
8

After receiving the DATA command, the server expects you to send the body of the email message you want delivered. The Apple Mail program (and most other real email clients) include many things in addi-tion to the text of the message including a subject line and the date the message was sent. You don’t need to mimic all this. Just enter the message you want to send line-by-line and enter a line containing a single period when you are done.
That’s it. You have just sent an email message without the help of an email program! Later on in the lab, we will check to make sure it was actually delivered by using the Apple Mail program to check all the mail that has been sent to your CS mail account. For now, either press the “Disconnect” button or send the server a “QUIT” command to terminate your conversation.
If you left TCPCapture running while you were using NetTap (you probably were since we never told you to stop it), you might want to take a look at the packets it captured while you were using NetTap.
Experimenting with POPWe can also use TCPCapture and NetTap to explore the function of one of the protocols used to retrieve email, the POP protocol. This time, we will approach the process in the opposite order. First, you will learn about the types of packets that can be sent to a POP server by entering them yourself using NetTap. Then, you will use TCPCapture to see how the Apple Mail program actually uses this protocol.
Like SMTP, the POP protocol requires that the client start each packet it sends to the server with a four letter command name. The commands you will need to use in this lab and their functions are discussed below. As with SMTP, if you wish to learn more, you might either read the Wikipedia discussion of POP:
http://en.wikipedia.org/wiki/Post_Office_Protocol
or read the official description:
http://www.ietf.org/rfc/rfc1939.txt
In this case, the official description is actually short enough that you may find it readable.
The first two commands you will need are used to identify the account whose mail is to be accessed:
USER - The first packet sent to the server should be composed of the code “USER” followed by a user name (such as 09jrl).
PASS - The second packet sent to the server should be composed of the word “PASS” followed by the account password. (This is why we warned you that your password might appear on your com-puter’s screen during this lab.)
When your are all done you will enter a very simple command:
QUIT - This command requires no additional information.
In between, you may want to use three other commands:
STAT - Asks the server to send you a concise message indicating how many mail message are available.
RETR - This command asks the server to send you the contents of one of your messages. Each retrieve request should include the number of the message to retrieve. Try a small number like 1 or 2.
DELE - This command deletes a message. Each delete request should include the number of the mes-sage to delete.
The POP server sends packets back to the client in response to each command it receives. Like SMTP, these packets begin with a code indicating whether the request from the client was acceptable or not. Un-
CS 134 Spring 2007
9
like SMTP, however, POP does not use numeric codes. A packet from the server that starts with “+OK” indicates that the server is happy while a packet starting with “-ERR” indicates distress. Finally, like SMTP, a POP server usually includes explanatory information after the “+OK” or “-ERR” summary code.
With this background, you should be able to use NetTap to connect to our department’s POP server and read the mail that has been sent to your mail account on our server.
Start by changing the “Protocol Port Number/Name” to 110, the port number for POP. Leave the server name set as “cortland.cs.williams.edu.” To keep things clear, you should probably also “Clear” the Net-Tap screen. Then click “Connect” to start your conversation with our POP server. You should notice that you are no longer talking to the SMTP server right away. Rather than receiving a “220” packet to let you know that the server is ready, you will instead receive a packet that starts with the code “+OK.”
Once you are connected, send “USER” and “PASS” commands to the server to log in. As we warned you, your password will now appear in plain text on the screen. The system should respond with a mes-sage telling you that your mailbox is locked and ready.
Now, pick a message number between 1 and the total number of messages available and send an “RETR” command to the server requesting that message. (If you are not sure how many messages are there, use the “STAT” command.) Access a few of your messages this way. Finally, send a “QUIT” command to the server.
How “Mail” Uses POPAs a final step in this investigation of the SMTP and POP protocols, we would like you to use TCPCap-ture to record the packets exchanged between Apple’s Mail program and our POP server when you use Mail to read email from our server.
First, go back to the TCPCapture program. If you didn’t “Stop” the capture process before, press the “Stop” button now. Then, change the protocol menu from SMTP to POP and press “Clear” and “Start.” Next, switch to the Apple Mail program and press the “Get Mail” button. The program will ask for your password. Now, you can finally let Mail know what your password is. If you want, you can tell Apple Mail to remember your password in its keychain, although whenever you change it, the password dialog will reappear. In a few moments, the Mail window should fill with a list of the headers of all the mes-sages waiting in your mailbox.
First, look at the end of this list of messages to make sure the message you sent using NetTap arrived just as well as the message you sent using the Mail program.
Now, go back to the TCPCapture window and examine the exchange of packets that flowed between Mail and our POP server.
We would like you to use TCPCapture to explore two questions about how the Apple Mail program uses the POP protocol. As your “report” for this lab, we ask that you turn in before class on Wednesday, a brief, typed paper including your answers to the following questions:
• First, when you look at the TCPCapture window you will notice that the Mail program uses two com-mands we have not discussed, “UIDL” and “LIST”. How and why does Mail use these commands? You should base your answer on a combination of the information you can glean from the references we provided above and from experimenting with Mail and TCPCapture. In particular, it may help if you send yourself some more messages (or delete some messages), quit and restart the Mail application, and use TCPCapture to see what messages are exchanged when you tell Mail to get your new mail again
• Second, what does the Mail program do when you tell it to delete a message? Again, use a combination of the references we suggested and your ability to experiment with TCPCapture to answer this question.
CS 134 Spring 2007
10
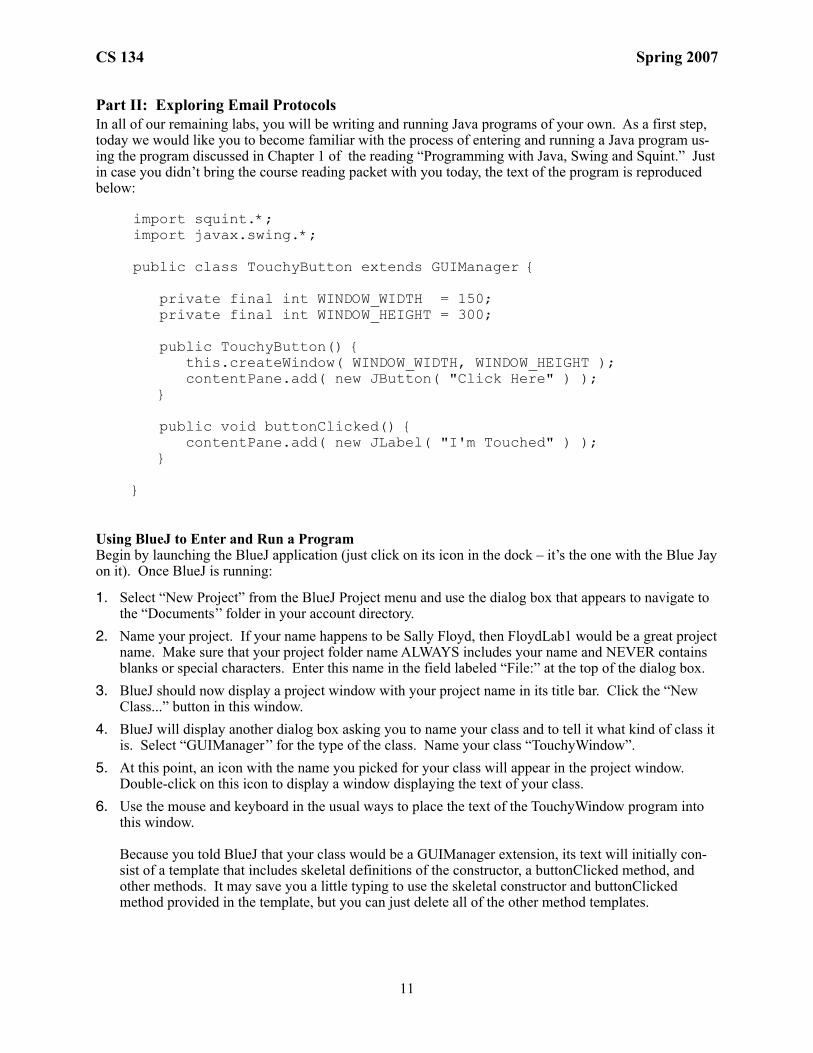
Part II: Exploring Email ProtocolsIn all of our remaining labs, you will be writing and running Java programs of your own. As a first step, today we would like you to become familiar with the process of entering and running a Java program us-ing the program discussed in Chapter 1 of the reading “Programming with Java, Swing and Squint.” Just in case you didn’t bring the course reading packet with you today, the text of the program is reproduced below:
import squint.*;import javax.swing.*;
public class TouchyButton extends GUIManager {
private final int WINDOW_WIDTH = 150; private final int WINDOW_HEIGHT = 300;
public TouchyButton() { this.createWindow( WINDOW_WIDTH, WINDOW_HEIGHT ); contentPane.add( new JButton( "Click Here" ) ); }
public void buttonClicked() { contentPane.add( new JLabel( "I'm Touched" ) ); } }
Using BlueJ to Enter and Run a ProgramBegin by launching the BlueJ application (just click on its icon in the dock – it’s the one with the Blue Jay on it). Once BlueJ is running:
1. Select “New Project” from the BlueJ Project menu and use the dialog box that appears to navigate to the “Documents’’ folder in your account directory.
2. Name your project. If your name happens to be Sally Floyd, then FloydLab1 would be a great project name. Make sure that your project folder name ALWAYS includes your name and NEVER contains blanks or special characters. Enter this name in the field labeled “File:” at the top of the dialog box.
3. BlueJ should now display a project window with your project name in its title bar. Click the “New Class...” button in this window.
4. BlueJ will display another dialog box asking you to name your class and to tell it what kind of class it is. Select “GUIManager’’ for the type of the class. Name your class “TouchyWindow”.
5. At this point, an icon with the name you picked for your class will appear in the project window. Double-click on this icon to display a window displaying the text of your class.
6. Use the mouse and keyboard in the usual ways to place the text of the TouchyWindow program into this window.
Because you told BlueJ that your class would be a GUIManager extension, its text will initially con-sist of a template that includes skeletal definitions of the constructor, a buttonClicked method, and other methods. It may save you a little typing to use the skeletal constructor and buttonClicked method provided in the template, but you can just delete all of the other method templates.
CS 134 Spring 2007
11
When you have finished typing in the program’s text, you can tell BlueJ to execute your code as follows:
1. Click on “Compile” in the top left corner of the the editor window.
2. Point the mouse at the icon for the TouchyWindow class in the project window, depress the “ctrl” (control) key, and then depress the mouse button to make a menu appear.
3. Select the first item in the menu. It should look like “new TouchyWindow()”. This tells BlueJ to cre-ate an instance of your class and to execute the instructions you placed in its constructor. Just use the default name for your instance provided by BlueJ. After continuing, a red icon for this new instance will appear in the bottom of the project window. A window will appear on the screen and any GUI components your code creates should appear within the window.
You should now be able to interact with your program. Click the mouse on the “Click Here” button a few times. Each time you click, a copy of the phrase “I’m Touched” should be added to the window. When the excitement wears off, select “Quit” from the “BlueJ Virtual Machine” menu to terminate your pro-gram. DO NOT just close the window by clicking on the red button in the upper-left corner. Actually quit instead.
What if the program doesn’t work?While you are working on this lab, a disturbing thing may happen. Your program may not do what you expect. Even slight typing mistakes can completely bewilder BlueJ, and in retaliation it will display an error message that is likely to leave you fairly confused. Therefore, if something goes wrong, just ask one your lab instructor or one of the teaching assistants to help you understand and correct the mistake.
Submission Instructions
Once the program appears to be working correclty, quit BlueJ, return to the Finder, and look in your “Documents” folder. You should find the folder that BlueJ created for your project. Its name should be the one you picked for your project (something like FloydLab1).
• Click on the Desktop, then go to the “Go” menu and select “Connect to Server.”
• Type “cortland” for the Server Address and click “Connect.”
• A window will come up which says “Connect to the file server cortland.”, select Guest, then click “Connect.”
• A window will appear where you should select the volume “Courses” to mount and then click “OK.”
• A window will come up which says “You are connected . . .” Click “OK.”
• A Finder window will appear where you should double-click on “cs134”,
• Drag your project’s folder (whose name should look like FloydLab1) into either “Dropoff-Monday” if you are in Monday’s lab or “Dropoff-Tuesday” if you are in Tuesday’s lab. When you do this, the Mac will warn you that you will not be able to look at this folder. That is fine. Just click “OK”.
• Log off of the computer before you leave.
Finishing upWhen you are all done, don’t forget to use System preferences as described at the beginning of this hand-out to reset your password in case anyone saw it while you were working. Then, quit all the applications you have been using during the lab and select the “Log Out” item from the menu displayed when you press the mouse on the apple icon at the upper left corner of the screen to log out.
CS 134 Spring 2007
12


![[MS-SPO]: SharePoint Protocols OverviewMS-SPO... · SharePoint Protocols Overview ... 2018 [MS-SPO]: SharePoint Protocols Overview This overview describes the SharePoint Protocols](https://img.pdfslide.us/doc/110x75/5ece03cb25b3922c1e1461bd/ms-spo-sharepoint-protocols-overview-ms-spo-sharepoint-protocols-overview.jpg)