Embed Size (px)
Citation preview
COS 495 – Autonomous Robot Navigation Fall 2011
Lab 0 Manual 1.1 Goals The programming interface goals of this lab are as follows:
• Introduce students to the Microsoft Visual Studio .NET programming environment • Introduce students to C# programming language • Enable students to compile and run their first C# program • Introduce students to online documentation and help
The programming abstraction goals of this lab are as follows:
• Introduce students to the concept of serial flow • Introduce students to the concept of variables • Introduce students to the concept of a loop
The programming application goal of this lab is to:
• Construct a simple ASCII image within a C# console window • Allow students to use creativity in their programming.
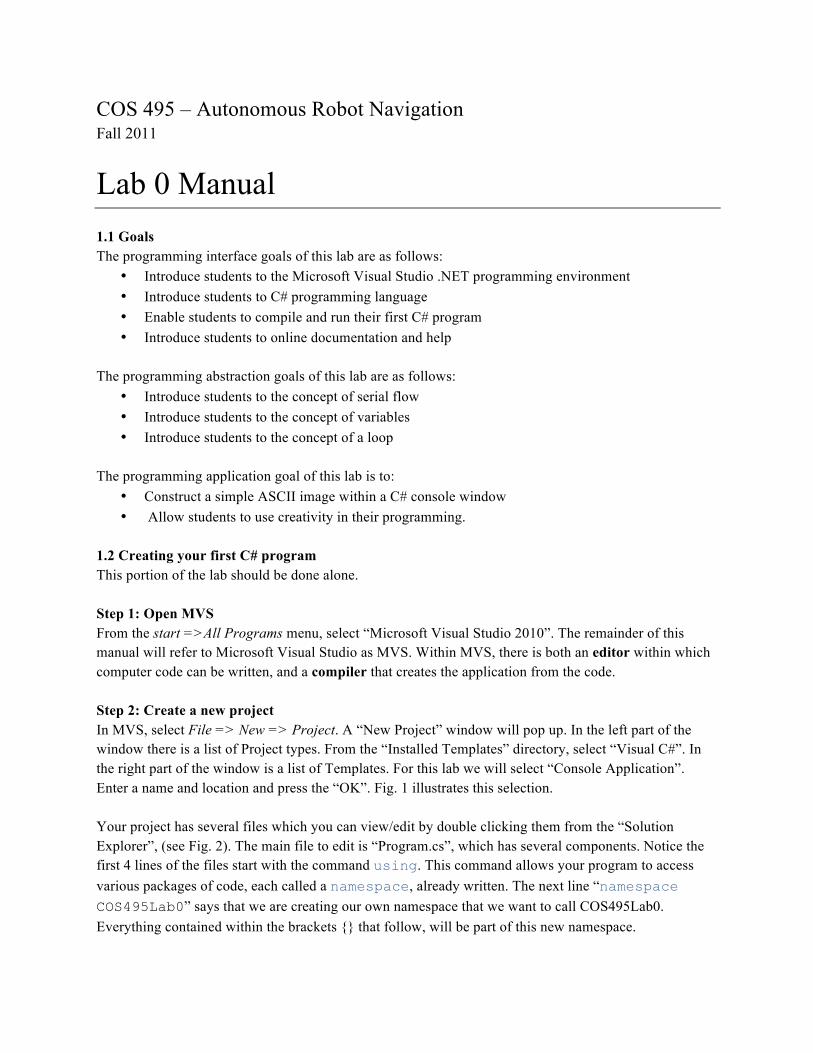
1.2 Creating your first C# program This portion of the lab should be done alone. Step 1: Open MVS From the start =>All Programs menu, select “Microsoft Visual Studio 2010”. The remainder of this manual will refer to Microsoft Visual Studio as MVS. Within MVS, there is both an editor within which computer code can be written, and a compiler that creates the application from the code. Step 2: Create a new project In MVS, select File => New => Project. A “New Project” window will pop up. In the left part of the window there is a list of Project types. From the “Installed Templates” directory, select “Visual C#”. In the right part of the window is a list of Templates. For this lab we will select “Console Application”. Enter a name and location and press the “OK”. Fig. 1 illustrates this selection. Your project has several files which you can view/edit by double clicking them from the “Solution Explorer”, (see Fig. 2). The main file to edit is “Program.cs”, which has several components. Notice the first 4 lines of the files start with the command using. This command allows your program to access various packages of code, each called a namespace, already written. The next line “namespace COS495Lab0” says that we are creating our own namespace that we want to call COS495Lab0. Everything contained within the brackets {} that follow, will be part of this new namespace.
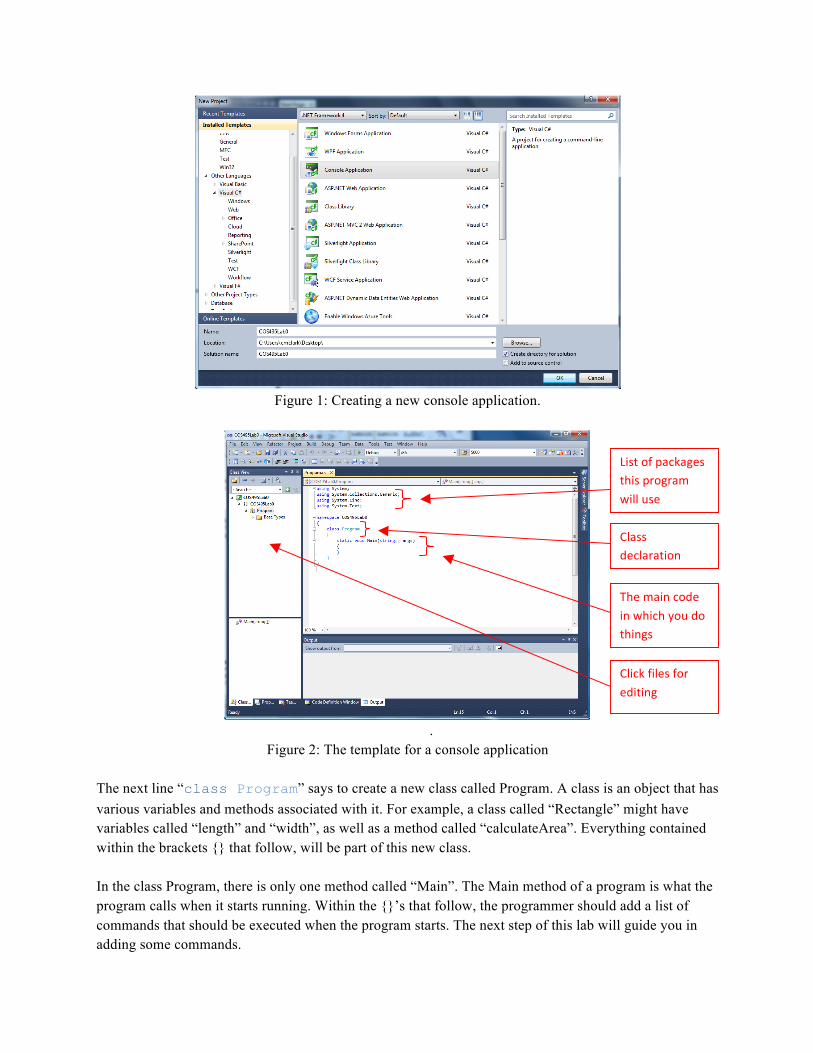
Figure 1: Creating a new console application.
.
Figure 2: The template for a console application The next line “class Program” says to create a new class called Program. A class is an object that has various variables and methods associated with it. For example, a class called “Rectangle” might have variables called “length” and “width”, as well as a method called “calculateArea”. Everything contained within the brackets {} that follow, will be part of this new class. In the class Program, there is only one method called “Main”. The Main method of a program is what the program calls when it starts running. Within the {}’s that follow, the programmer should add a list of commands that should be executed when the program starts. The next step of this lab will guide you in adding some commands.
Click files for editing
List of packages this program will use
The main code in which you do things
Class declaration
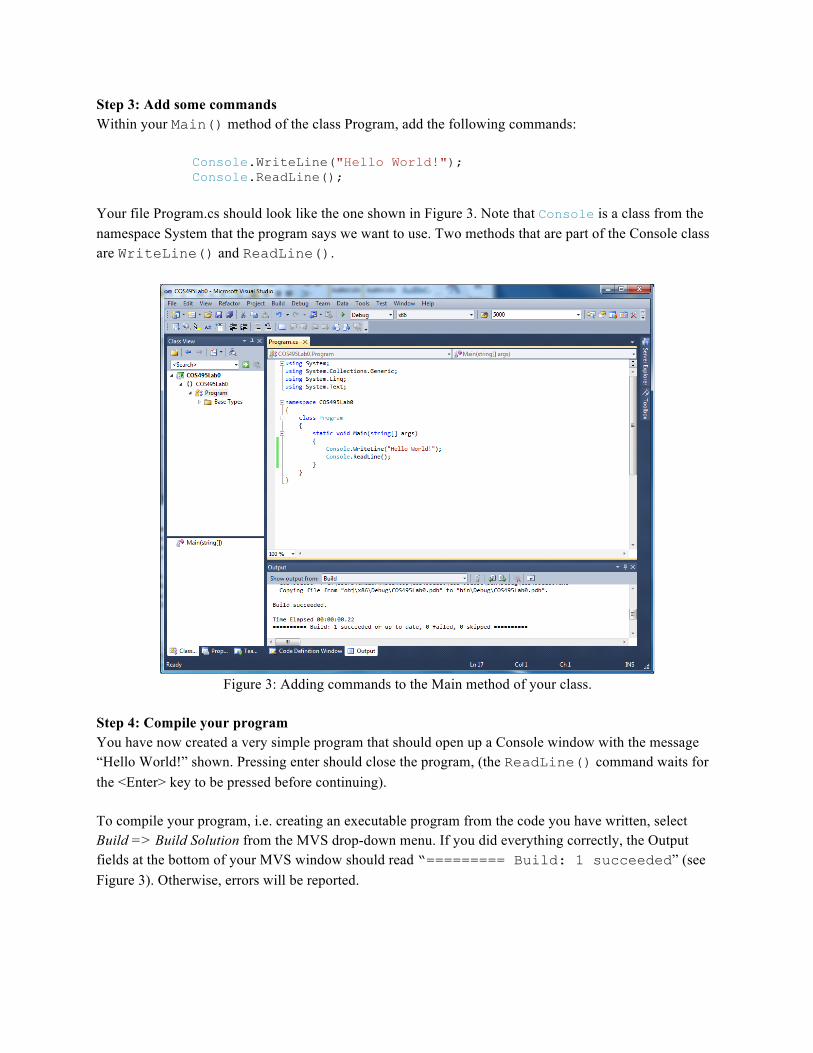
Step 3: Add some commands Within your Main() method of the class Program, add the following commands: Console.WriteLine("Hello World!"); Console.ReadLine(); Your file Program.cs should look like the one shown in Figure 3. Note that Console is a class from the namespace System that the program says we want to use. Two methods that are part of the Console class are WriteLine() and ReadLine().
Figure 3: Adding commands to the Main method of your class.
Step 4: Compile your program You have now created a very simple program that should open up a Console window with the message “Hello World!” shown. Pressing enter should close the program, (the ReadLine() command waits for the <Enter> key to be pressed before continuing). To compile your program, i.e. creating an executable program from the code you have written, select Build => Build Solution from the MVS drop-down menu. If you did everything correctly, the Output fields at the bottom of your MVS window should read “========= Build: 1 succeeded” (see Figure 3). Otherwise, errors will be reported.
Step 5: Run your program To run your program, click the green triangle OR select Debug => Start Debugging from the MVS drop-down menu. A console window should pop up with your “Hello World!” message. Hit the <Enter> key to close the program. Congratulations! You have created, compiled, and run your first C# program! Step 6: Add user inputs to your program Now that we have some running code, we will modify it in several ways to start learning tools to make more complex programs. Modify your Main method to look like the program below: static void Main(string[] args) { Console.WriteLine("Hello World!"); Console.ReadLine(); Console.WriteLine("What is your name?"); string usersName; usersName = Console.ReadLine(); Console.WriteLine("Hello {0}!", usersName); Console.ReadLine(); } Notice the fourth line in the method, it creates a new variable called “usersName”. This variable is declared to be of type string. There are many types of variables one can make while programming including integers, floats, etc. One can think of string types as text consisting of a string of letters. The line that follows sets the value of usersName to be whatever text is entered by the user. The value of usersName is printed back on the next line. Compile and run this code to make sure you understand how the sequence of commands work. Step 7: Add a condition check It is time to introduce a condition check using an if statement. Modify your Main method to look like: static void Main(string[] args) { Console.WriteLine("Hello World!"); Console.ReadLine(); Console.WriteLine("What is your name?"); string usersName; usersName = Console.ReadLine(); if (usersName.Equals("Chris") ) { Console.WriteLine("You are a great professor {0}!", usersName); } else { Console.WriteLine("You are a sad case for a student {0}!", usersName); } Console.ReadLine(); }
Note how the program changes its operation, depending on the value of usersName. One can read such statements as: if (an expression is true) then do whatever commands are in the {} brackets else do whatever commands are in the next set of {} brackets. Step 7: Add a loop It is time to introduce loops. Often we want to call a set of commands many times. In the code below, a for loop is used. This loop will use the counter i to keep track of how many times to repeat the commands in the {} brackets that follow. The int i=0, statement says lets declare a variable called i and lets set it to the value 0. The next conditional check i<numIterations says that the commands should be repeated if the value of i is less than the value of numIterations. Finally, the i++ statement says to increment the value of i by 1 at the end of each iteration of the loop. static void Main(string[] args) { Console.WriteLine("Hello World!"); Console.ReadLine(); Console.WriteLine("What is your name?"); string usersName; usersName = Console.ReadLine(); if (usersName.Equals("Chris") ) { Console.WriteLine("You are a great professor {0}!", usersName); } else { Console.WriteLine("You are a sad case for a student {0}!", usersName); } Console.ReadLine(); Console.WriteLine("How many times should I loop?"); usersName = Console.ReadLine(); int numIterations = Convert.ToInt16(usersName); for (int i = 0; i < numIterations; i++) { Console.WriteLine("Loop !"); } Console.ReadLine(); } Step 8: Comment your code We have been sloppy! When writing code you should add comments to describe what you are doing. Statements preceded by // indicate that the statement on that particular line is a comment and not a command. For example, one should explain what the commands are being used for: // Read in the number of iterations from the user usersName = Console.ReadLine();
This commenting of code helps people (including yourself) read code and understand what it is supposed to do. 1.3 Find documentation on the net Use Google to find C# documentation. Find descriptions of the methods ToInt16(), Sqrt(), and while(). Be sure to understand what the methods do. 1.4 Creating your second C# program Find another student in the class (could be the same student from 1.3). For this part of the lab, you are required to design some ASCII art – images created using ASCII characters in your console. First, search the web for some interesting examples of ASCII art so you have ideas for techniques. Working with your partner, use your C# Console application to create an ASCII image of a robot. The image could be inspired by an image, photo, sketch or your imagination. The image must be dynamic in that it responds to at least 3 different user inputs, (e.g. how wide should the image be? Should the robot be happy or sad?...). The program should also include at least 1 for loop. 1.6 Deliverables None for this lab.