Embed Size (px)
Citation preview

L21 - FactoryTalk AssetCentre Hands-On Lab
For Classroom Use Only!
Important User Information
This documentation, whether, illustrative, printed, “online” or electronic (hereinafter “Documentation”) is intended for use only as a learning aid when using Rockwell Automation approved demonstration hardware, software and firmware. The Documentation should only be used as a learning tool by qualified professionals. The variety of uses for the hardware, software and firmware (hereinafter “Products”) described in this Documentation, mandates that those responsible for the application and use of those Products must satisfy themselves that all necessary steps have been taken to ensure that each application and actual use meets all performance and safety requirements, including any applicable laws, regulations, codes and standards in addition to any applicable technical documents. In no event will Rockwell Automation, Inc., or any of its affiliate or subsidiary companies (hereinafter “Rockwell Automation”) be responsible or liable for any indirect or consequential damages resulting from the use or application of the Products described in this Documentation. Rockwell Automation does not assume responsibility or liability for damages of any kind based on the alleged use of, or reliance on, this Documentation. No patent liability is assumed by Rockwell Automation with respect to use of information, circuits, equipment, or software described in the Documentation.
Except as specifically agreed in writing as part of a maintenance or support contract, equipment users are responsible for:
• properly using, calibrating, operating, monitoring and maintaining all Products consistent with all Rockwell Automation
or third-party provided instructions, warnings, recommendations and documentation;
• ensuring that only properly trained personnel use, operate and maintain the Products at all times;
• staying informed of all Product updates and alerts and implementing all updates and fixes; and • all other factors affecting the Products that are outside of the direct control of Rockwell Automation.
Reproduction of the contents of the Documentation, in whole or in part, without written permission of Rockwell Automation is prohibited. Throughout this manual we use the following notes to make you aware of safety considerations:
Identifies information about practices or circumstances that can cause an explosion in a hazardous environment, which may lead to personal injury or death, property damage, or economic loss.
Identifies information that is critical for successful application and understanding of the product.
Identifies information about practices or circumstances that can lead to personal injury or death, property damage, or economic loss. Attentions help you: • identify a hazard • avoid a hazard • recognize the consequence
Labels may be located on or inside the drive to alert people that dangerous voltage may be present.
Labels may be located on or inside the drive to alert people that surfaces may be dangerous temperatures.
N999 – Your lab title goes here
Presenter: <<Your name>> <<Your business group>>

3 of 86
FactoryTalk AssetCentre Hands-on Lab
Contents
Before you begin ........................................................................................................................................... 5
About this lab .................................................................................................................................................................................... 5
Software ............................................................................................................................................................................................ 5
Lab files............................................................................................................................................................................................. 5
Virtual Machines and lab domains .................................................................................................................................................... 6
User and Passwords ......................................................................................................................................................................... 6
Lab Background ................................................................................................................................................................................ 7
FactoryTalk AssetCentre Server Background ................................................................................................................................... 8
Introduction to FactoryTalk AssetCentre: Operate ...................................................................... 9
Launching FactoryTalk AssetCentre ............................................................................................................. 9
FactoryTalk AssetCentre Interface Walk-through ........................................................................................................................... 10
Check out a Master File from Archive ......................................................................................................... 11
Recovering from a Disaster......................................................................................................................... 14
Download Master File ..................................................................................................................................................................... 14
Undo Check-Out Master File .......................................................................................................................................................... 15
Archive (Change Control) ............................................................................................................................ 17
Check-out Master File via Studio 5000 Logix Designer .................................................................................................................. 17
Verify the file is checked-out in FactoryTalk AssetCentre ............................................................................................................... 20
Make Online Changes .................................................................................................................................................................... 21
Logs ............................................................................................................................................................. 24
Start the Logs plug-in ...................................................................................................................................................................... 25
Select Audit Log View ..................................................................................................................................................................... 26
Using Filters .................................................................................................................................................................................... 27
Searches ..................................................................................................................................................... 29
Start the Search plug-in .................................................................................................................................................................. 29
Search Interface Walk-through ....................................................................................................................................................... 30

4 of 86
View the report ................................................................................................................................................................................ 32
Schedules.................................................................................................................................................... 35
Start Scheduling plug-in .................................................................................................................................................................. 35
Scheduler Interface Walk-through .................................................................................................................................................. 36
Execute the schedule...................................................................................................................................................................... 37
Examine schedule results ............................................................................................................................................................... 38
Check-in Studio 5000 Logix Designer File (housekeeping) ........................................................................ 40
Introduction to FactoryTalk AssetCentre: Design ...................................................................... 42
Configure an Audit Log Search ................................................................................................................... 42
Launching FactoryTalk AssetCentre ............................................................................................................................................... 42
Creating a Search ........................................................................................................................................................................... 43
Configure a Recurring Search ........................................................................................................................................................ 50
Execute Search............................................................................................................................................................................... 53
Configure a New ControlLogix Device for Disaster Recovery .................................................................... 57
Retrieve ACD File ........................................................................................................................................................................... 57
Configure Logix 5000 Asset ............................................................................................................................................................ 60
Configure ControlLogix Disaster Recovery ..................................................................................................................................... 66
Execute ControlLogix Disaster Recovery Task ............................................................................................................................... 70
What’s New in FactoryTalk AssetCentre v6.00 and v6.10? ........................................................................ 73
Explore Agent Group View .............................................................................................................................................................. 74
Explore Custom Device Plug-in ...................................................................................................................................................... 75
Explore Rockwell Automation Motor Control Asset ........................................................................................................................ 79
Explore Database Limitation Options .............................................................................................................................................. 81
Conclusion................................................................................................................................................... 85

5 of 86
Before you begin
About this lab
Welcome to the Hands-On Lab for FactoryTalk AssetCentre. This lab has two main sections: Operate and Design.
The Operate section provides you with an opportunity to explore pre-configured FactoryTalk AssetCentre Core and Extended
features. Core features include version control for factory floor assets like ControlLogix, PLC5, SLC500, PanelView Plus, Drives,
etc. Extended features include Disaster Recovery for these devices. The Design section walks through the configuration of
scheduled reports, as well as the configuration of a brand new asset and its Disaster Recovery properties.
Software
This Hands-On Lab uses the following software:
Microsoft Windows Server 2012 R2
FactoryTalk AssetCentre v6.10
Studio 5000 Logix Designer v21
RSLogix Emulate 5000 v21
MSSQL 2012
Lab files
This Hands-On Lab uses the following files:
Contents of C:\Lab Files\

6 of 86
Classroom setup
This lab is conducted using one VMware Workstation virtual machine running on each PC in the classroom. VMware Workstation
is virtual machine software that allows you to emulate one or more PCs on your ‘host’ PC.
Virtual Machines and lab domains
The virtual machine is setup as follows:
Machine description Machine name Operating system
FactoryTalk AssetCentre System FTAC-DEMO1215 Windows Server 2012 R2
FactoryTalk AssetCentre does not require a domain; this lab is conducted in a Windows workgroup named WORKGROUP.
User and Passwords
Following are the Windows user logins and passwords that may be used in the lab:
Login Password Full user name Group / user type
administrator rockwell System Administrator Windows Administrator
FactoryTalk Administrators
Labuser rockwell System Administrator Windows Administrator
FactoryTalk Administrators
FactoryTalk Security’s single sign-on feature has been enabled as part of this lab. This means that FactoryTalk Security will
automatically use your operating system login to authenticate your security rights in FactoryTalk AssetCentre. Should you need
to manually log into FactoryTalk AssetCentre, we will use the same log-in credentials (see above).
7 of 86
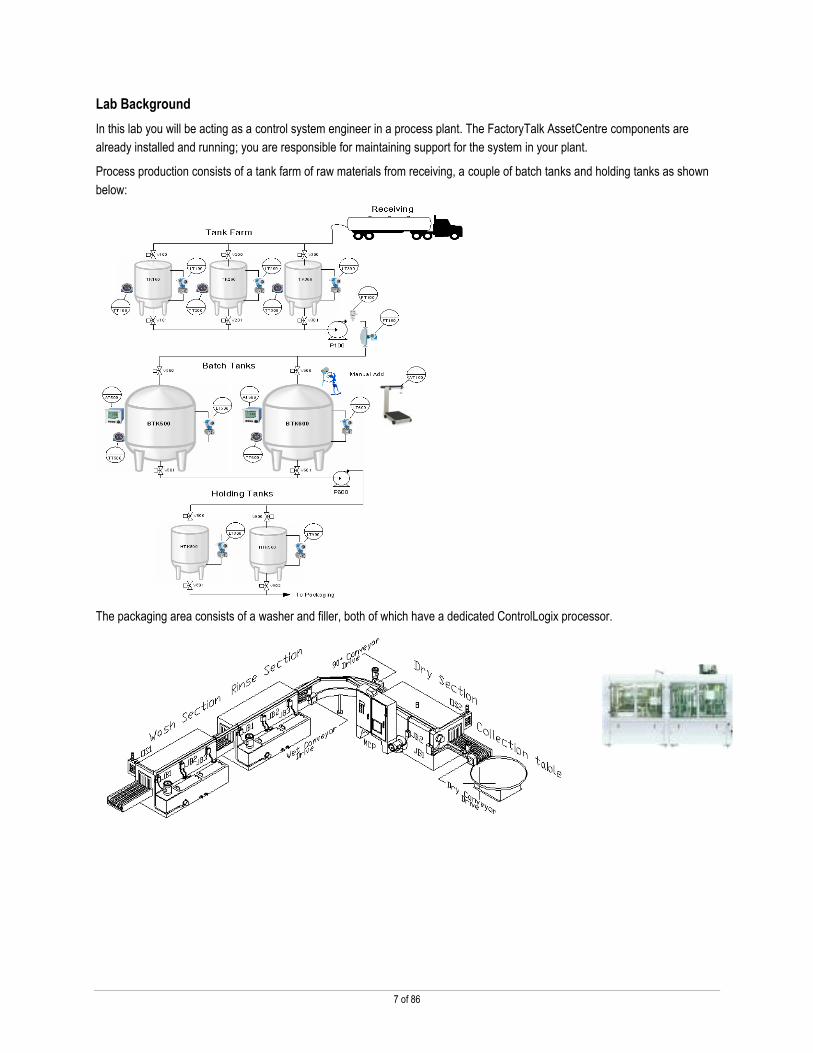
Lab Background
In this lab you will be acting as a control system engineer in a process plant. The FactoryTalk AssetCentre components are
already installed and running; you are responsible for maintaining support for the system in your plant.
Process production consists of a tank farm of raw materials from receiving, a couple of batch tanks and holding tanks as shown
below:
The packaging area consists of a washer and filler, both of which have a dedicated ControlLogix processor.

8 of 86
FactoryTalk AssetCentre Server Background
FactoryTalk® AssetCentre provides you with a centralized
tool for securing, managing, versioning, tracking and reporting
automation related asset information across your entire
enterprise. And perhaps more importantly, it can do this
automatically, with limited additional management oversight or
work from employees.
FactoryTalk AssetCentre can impact uptime, productivity,
quality, employee safety or regulatory compliance. Whatever
your area of concern, FactoryTalk AssetCentre and its
flexible, scalable solution can help you and your organization
meet your asset uptime goals.
With FactoryTalk AssetCentre, you can:
Secure access to the system
Track detailed users’ actions
Manage historical versioning of any electronic file
Provide automatic backup and compare operations on supported devices
Configure process instrumentation
Manage instrumentation calibration schedules and certificates
FactoryTalk AssetCentre has an evolving set of add-on capabilities that allow you to optimize and leverage your factory
automation and process device investments. These optional capabilities expand upon the robust central features already found
in the FactoryTalk AssetCentre server and allow you the ability to extend the value of the
system as needs change within your manufacturing environment.

9 of 86
Introduction to FactoryTalk AssetCentre: Operate
This section of the lab will highlight the basic functionality of a configured FactoryTalk AssetCentre system.
Launching FactoryTalk AssetCentre
In this section you will launch the FactoryTalk AssetCentre Client and review the main interface.
1. From the Start menu select AssetCentre Client. You can also double-click the FactoryTalk AssetCentre Client icon on the desktop:
After a few seconds, you should see a software interface that looks similar to this:

10 of 86
FactoryTalk AssetCentre Interface Walk-through
This is the FactoryTalk AssetCentre client. It is used to both administer and configure the system, and manage
assets on the plant floor.
This is the Asset View. It contains the asset tree, a free-form plant model created by the system administrator that represents the organization of a plant and the physical control assets located in the plant. Users interact with this plant model to check asset configurations in and out of the system, view audit logs, or manage disaster recovery schedules.
This is the Workspace Pane. FactoryTalk AssetCentre capabilities are opened here for user interaction.
This toolbar is used to start FactoryTalk AssetCentre capabilities.
– opens the asset view
- Opens Agent Group view, allowing monitoring and configuration
– opens the source control function
– opens the log viewer, allowing users to review the content of the event, audit and diagnostics logs
– opens the schedule management and configuration function
– opens the search management and configuration function
– opens the selected asset’s property grid
– opens the application help
- opens the DTM Home Page. Functions such as Upload, Download, Online, etc. are available from this page
- opens the Calibration management functions
11 of 86
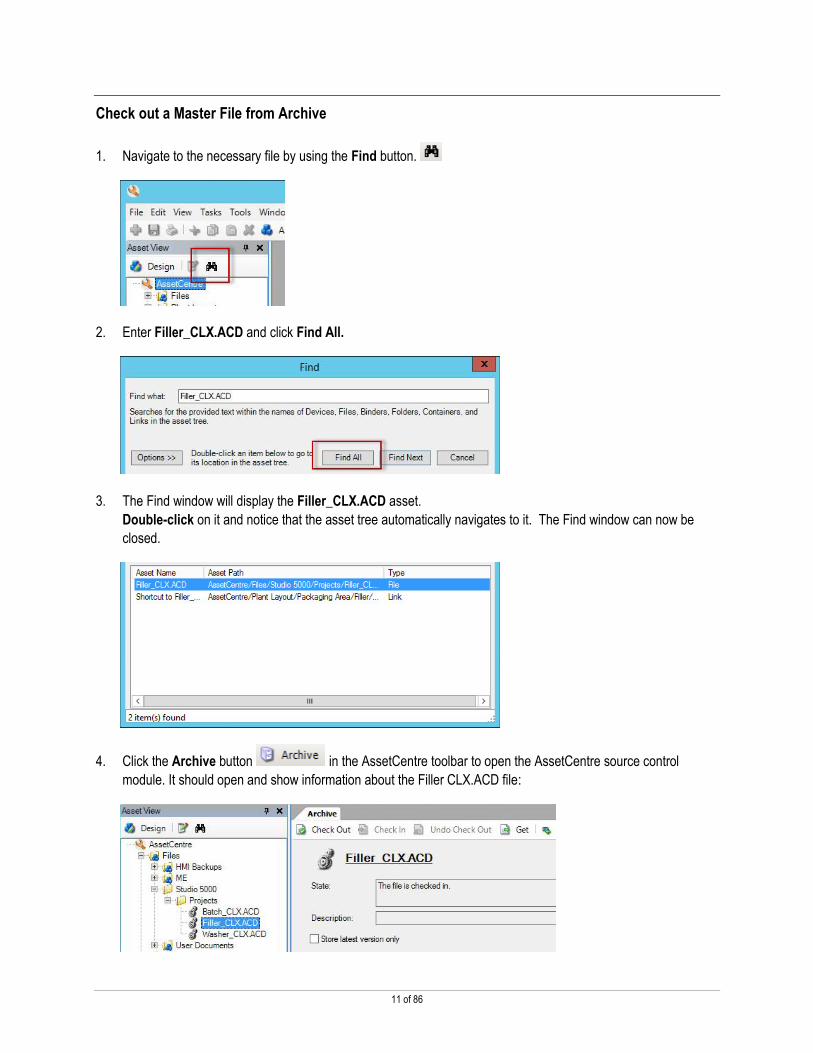
Check out a Master File from Archive
1. Navigate to the necessary file by using the Find button.
2. Enter Filler_CLX.ACD and click Find All.
3. The Find window will display the Filler_CLX.ACD asset.
Double-click on it and notice that the asset tree automatically navigates to it. The Find window can now be
closed.
4. Click the Archive button in the AssetCentre toolbar to open the AssetCentre source control
module. It should open and show information about the Filler CLX.ACD file:

12 of 86
This is the Archive plug-in interface when a file asset is selected in the plant model.
This is the Archive plug-in toolbar. The buttons perform the following tasks:
Writes the selected file or folder to local working folder with read-write access and locks the selection to prevent multiple user editing
Reads the local working folder and update the source control repository creating new versions as needed
Returns the selection to an un-checked out state and unlocks the selection Writes the selected file or folder to the local working folder with read-only
access
Creates a logical reference to a versioned set of selected files or folders
Removes a logical reference to a versioned set of files or folders
Writes the selected historic version to local working folder for read-only access
Sets the selected historic version as the master version for the selected asset.
Creates a new version from the selected historic version.
History Display the version history for the selected plant model file asset
Labels Displays any labels associated with the selected plant model asset
Filters the version history view: Version-related activities displays those activities that resulted in a new version being created. All activities display all activities whether they generated a new version or not.
Indicates which plant model asset is selected; provides a hot-link to retrieve the selected file and launch the associated editor
This pane reflects the tab selection (History, Labels). In this instance it is displaying the version history for the selected plant model file asset.

13 of 86
5. Right-click the Filler_CLX.ACD file and select Open to check out and open the file in Studio 5000 Logix
Designer.
6. A list of options is displayed:
7. Click Check Out to check the file out for editing and open it in Studio 5000 Logix Designer.
8. The Check Out dialog is displayed; click OK to check it out to the default working folder on your machine.
9. The file is checked out to the C:\Studio 5000\Projects folder; the State field should display this information for
you and a check mark should appear next to the file’s icon, indicating that the file is currently checked out:
Studio 5000 Logix Designer is launched and the Filler_CLX.ACD file is opened.
A check mark here indicates that the file is currently checked out
TIP: You can also do a file Open by clicking on the Filler CLX.ACD file icon in the Archive view

14 of 86
Recovering from a Disaster
FactoryTalk AssetCentre source control leverages the centralized database and provides automatic version control.
This provides proper file management and single master relationships.
Any electronic file can be put under source control — Studio 5000 Logix Designer (.acd), Microsoft files
(.doc, .xls, .ppt, etc.) Computer Aided Design (CAD) files (.dwg), and others.
Supported source control functions include:
Check-out: Writes the selected file or folder to a local working folder with read-write access and locks the
selection to prevent multiple-user editing.
Check-In: Reads the local working folder and updates the source control repository, creating new versions
as needed.
Get: Writes the selected file or folder to the local working folder with read-only access. Note: A Get can
retrieve the latest or any historical version that is in the archive.
Undo Check Out: Returns the selection to an unchecked out state and unlocks the selections.
In this portion of the lab you will interact with the FactoryTalk AssetCentre Archive system to do a Check-out
operation on the latest Filler CLX Master file. You will download the master file to restore a controller that has failed
due to an electrical storm last night.
Download Master File
Now that the source .ACD file has been checked out of FactoryTalk AssetCentre, it is possible to use it to program
the ControlLogix processor. In this section you will go online and download the project to the controller.
1. In Studio 5000 Logix Designer, click Communications from the file menu, and select Download.
2. Click Download again.
3. Once Download is complete, click Yes to put the controller back into Run mode.

15 of 86
Undo Check-Out Master File
Now that the Master file (project) has been downloaded to the Filler CLX, the Checked-out file needs to be addressed
by either a Check-In or an Undo Checkout. If you’re sure no changes have been made, then it is possible to select
Undo-Checkout. This option will cancel the checked-out status of the file, allowing it to be checked-out again by
other users, but will not create a new version entry in FactoryTalk AssetCentre. It’s important to note that
FactoryTalk Security can be used to restrict users from performing an undo check-out, thereby forcing a check-in for
all checked-out files.
If there has been a change, you should perform a Check-In. This option will still make the file available to other
users, but will create a new version entry in FactoryTalk AssetCentre for the new file. For our lab purposes we know
there was no change, therefore we’ll perform an Undo Check-out and remove the local copy.
1. Close Studio 5000 Logix Designer.
Since we want to perform an Undo Check Out click Cancel to the check in dialog.
Note: FactoryTalk AssetCentre prompts for an automatic check-in because we used the Open command, which automatically checked out and opened the file in context of the application. The Open command also wants to automatically check in the file when we exit the application. If we had performed a Check out vs. Open we would not be getting this prompt.
2. Click the Undo Check Out button to undo the checked out file.
3. On the Undo Check Out dialog, verify that Delete the local copy is selected. This allows source control to
remove the copy of the file on disk when Undo Check-out is performed, so that only one ‘living’ copy is managed
by source control.
Click Undo Check Out button to undo the checked out file

16 of 86
4. Enter a comment like “File checked out for download purposes only” in the Comment field and click OK.
The file Checked Out status is now removed from the FactoryTalk AssetCentre source control and no additional
version has been created.
5. To view all activities associated with the version click the All Activities radio button. This will display your
recent actions of check-out and the undo checkout along with the comment you entered.
Note: Checking the file out of FactoryTalk AssetCentre moves the file from the AssetCentre database to the local hard drive of the client computer.
6. Change back to Version-related activities before moving on.

17 of 86
Archive (Change Control)
In this portion of the lab you will interact with the FactoryTalk AssetCentre system to perform a Check-out on the
Master file, go online with the controller to make a change, and lastly perform a check-In. This change is in
response to operations wanting a decrease on a delay timer.
Check-out Master File via Studio 5000 Logix Designer
For this portion of the lab, we’ll look at a new way to check-out the file. To begin working with the file, we’ll need to
get access to it from the FactoryTalk AssetCentre archive. FactoryTalk AssetCentre check-in, check-out and get
functions are now integrated into Studio 5000 Logix Designer and RSLogix 5000 V17 and higher, which means we
can gain access to the file directly from Studio 5000 Logix Designer without using the FactoryTalk AssetCentre client.
1. Launch Studio 5000 Logix Designer, from desktop:
2. In Studio 5000 Logix Designer, click the File menu and select Open.
3. With the Open/Import Project dialog click the Source Control option located on the left.

18 of 86
4. Click the Login button
5. Login with a blank domain, Labuser as the user, rockwell as the password
6. Click OK and the browse window will populate with the FactoryTalk AssetCentre asset tree.

19 of 86
7. The icons represent parent assets in the FactoryTalk AssetCentre tree view, e.g., Generic Containers,
Folders, ControlLogix processors, process instruments, etc.
8. Navigate to the following: Files \ Studio 5000 \ Projects.
9. Select the Washer_CLX.ACD file and, click the Get button. This will open the Check-Out dialog; from here you
can enter a file check-out comment and specify if you want to retrieve a local copy and where to retrieve it to.
Note: Because the ‘Check out’ box is checked, the file will be checked out of the AssetCentre archive despite the button being labeled “Get.”
It is also possible to perform a “Get” instead of a full check out. To perform a Get only, uncheck the check box labeled ‘Check out.’ A ‘Get’ will acquire a read-only copy of the file without performing a check-out (and thereby locking the file.)

20 of 86
10. In the Comment field, enter “The lab told me to enter this.”
Note: The “To” path is the Working Directory setting configured in FactoryTalk AssetCentre.
11. Click OK to retrieve the file from FactoryTalk AssetCentre and open it Studio 5000 Logix Designer.
Verify the file is checked-out in FactoryTalk AssetCentre
1. Switch back to FactoryTalk AssetCentre, in the asset tree, expand the tree to AssetCentre → Files → Studio
5000 → Projects and select Projects.
2. With the Archive tab open, the file is checked out to the C:\Studio 5000\Projects folder; the State field should
display this information for you and a check mark should appear next to the file’s icon, indicating that the file is
currently checked out:
Remember that interacting with the FactoryTalk AssetCentre Client is not necessary at this point. We’re only
confirming that Studio 5000 Logix Designer not only acquired a version of the file, but also communicated this
check-out with the FactoryTalk AssetCentre Client, even though we never directly interacted with the Client itself.
A check mark here indicates that the file is currently checked out

21 of 86
3. Switch back to Studio 5000 Logix Designer.
4. Also note, the program file shows as checked out via the icon in the Studio 5000 Logix Designer project tree.
Make Online Changes
In this section you will go online with the controller and make a simple change. You will then review your changes via
RSLogix Compare and via Factory Talk AssetCentre Audits.
1. In Studio 5000 Logix Designer, click the Controller Status drop down selector and select Go Online:
2. Click the Download button to the Studio 5000 Logix Designer message, and then Download again.
3. Once Download is complete, click Yes to put the controller back into Run mode.
4. Navigate to Tasks → Main Task → MainProgram and double-click MainRoutine.
Note: Since we are using a soft controller, every time the computer reboots you will need to either upload or download to the controller. In our case we have chosen to Download. This is not normal behavior with a Hardware version of ControlLogix when the offline program matches the online program.

22 of 86
5. The view editor will open:
6. Click on the Preset value 5000 and change it to 1001.
The above change was audited and captured in AssetCentre. We will review the audits in the next section.

23 of 86
7. Next we will delete Rung 1 to show Studio 5000 Logix Designer compare. Right mouse click Rung 1 and
select Delete Rung.
8. Click the Finalize Edits button to commit the change.
9. Click Yes to the Studio 5000 Logix Designer message box.
10. Double Click on Controller Tags from the Project tree.
11. Click the Edit Tags tab.
12. Highlight the myCoil row, right mouse click and select Delete to delete the controller tag myCoil.
13. Click the save button in Studio 5000 Logix Designer.
14. Click Yes to acknowledge the Studio 5000 Logix Designer message.

24 of 86
Logs
In this section you will look at FactoryTalk AssetCentre logs to view what kinds of messages are logged. Using the
FactoryTalk AssetCentre Log Viewer you can review and search entries in three different logs, they are:
Event Log: This log captures system events. Examples of system events are: a schedule initiates execution, a
schedule completes execution, or a scheduled search executes.
Diagnostic and Health Log: This log captures information published ONLY by the RSMACC Network Health
product. RSMACC Network Health monitors DeviceNet, ControlNet, and Ethernet I/P networks listening for
diagnostic messages sent by the control devices. When a message is received the system looks up the diagnostic
code and determines possible root cause and corrective action steps, and publishes this information to this log.
Audit Log: This log captures user actions taken within a software product that supports audit logging. Rockwell
Automation software products that generate audit messages include: RSLogix 5, RSLogix 500, RSLogix 5000 /
Studio 5000 Logix Designer, FactoryTalk View SE/ME and FactoryTalk AssetCentre.
What exactly is an “audit”?
An audit is an action generated by human interaction with the control system or control system software. Audits
record actions resulting in a change to the control system and specify “Who performed an explicit operation on a
specific resource from a particular location and when the operation occurred”.
An audit log entry is generated for any user operation that creates, modifies, or deletes an electronic record (device
configuration, tag value, alarm, recipe parameter, etc.) in the control system.
Capture audit messages such as:
Data value changes (time, tag, instructors, etc.)
Create, delete or changing of rungs
Create, delete or changing or tags
User log-in/out
Example of Rockwell Automation applications that produce audit messages are:
RSLogix5, RSLogix500 and RSLogix 5000 / Studio 5000 Logix Designer
PanelView Plus
FactoryTalk View Site Edition
FactoryTalk AssetCentre
And more . . .
RSLogix 5000 / Studio 5000 Logix Designer itself produces over 150 audit messages!

25 of 86
The following information is recorded in each audit log entry:
Logged date and time – the date and time the entry is added to the database
Performed date and time – the date and time the operation was performed
Resource – the device name (typically a computer) where the operation was performed
Username – information documenting the user (typically the user’s FactoryTalk Security ID)
Location – the name of the resource the user was modifying. This might be a PLC name, project file, or
workstation name depending on the operation being performed
Message – a textual entry describing the operation performed. Depending on the action being recorded the
description may contain both the previous and new content of the specific item being modified. For example,
when a tag value is changed in Studio 5000 Logix Designer, both the old value and new value are contained
in the message.
Start the Logs plug-in
1. In the AssetCentre client, to start the Logs plug-in, click the Logs button. The Logs plug-in will open
in the workspace pane.

26 of 86
Log Viewer interface walk-through
This is the Log Viewer toolbar. The buttons perform the following tasks:
Shows the user the content of the Event log
Shows the user the content of the Audit log
Shows the user the content of the Diagnostic and Health log
Shows the results of a Quick Search
Opens the Quick Search dialog
Refreshes the current view, updating the view with the most current log entries from the currently viewed log.
Prints the current log view
These are the column headings for the currently displayed log. You can click on the column heading to sort the information by the selected column. The logs are shown sorted by Occurred Time by default.
These are filtering fields. This allows you to quickly focus the log entries being displayed to those that are of interest to you at the time. This pane shows the current log
entries for the selected log view: Event, Audit, or Diagnostic and Health.

27 of 86
Select Audit Log View
1. By default the log viewer displays the Event log. Click the Audit Log button to view the Audit log.
2. Now you can spend a few minutes reviewing some of the Audit log entries. You should be able to find the audit
messages the system automatically generated as you modified the ControlLogix Washer_CLX program.
3. To read the details for any audit entry, a) select the message in the upper pane, and then b) read the entry
details in the bottom pane.
Using Filters
Let’s view the audit messages from Studio 5000 Logix Designer that pertain to the controller named Washer_CLX in
which you made some changes.
1. Move the mouse pointer until it is in the Resource column located in the Filter row.
2. Click the drop-down button in the Resource column and scroll down to select Washer_CLX.
The audit log view will automatically update to show only those messages where the Resource equals
“Washer_CLX”
Click on an entry in this pane…
and read the entry details in this pane.
Move the mouse pointer to this position.

28 of 86
3. Now, let’s apply a second filter to our view, this time we will filter on the myTimer Tag. Click the filter button
in the Message column and select Contains.
4. With the “Contains” filter type set, type myTimer in the filter area, noticing that as you type the view is
dynamically updating!
5. Select the “Changed Data Value of Tag [ \myTimer.Pre ] from” row. Notice our previous timer value change
has been audited and you can see the old timer value and the new timer value.
6. To clear any previous filter for a particular column, click the Clear button on that column heading, or you can
clear all filters by clicking the Clear button on the far left hand side of the view. Clear all filters by clicking this
button.
In the next section of the lab, we will view a predefined report, predefined reports are Searches.

29 of 86
Searches
The Searches functionality allows scheduled and on demand searches and can include traceability information from
Audit, Events or Source Control. Scheduled reports can be e-mailed to a specific e-mail distribution list, or if run on
demand (manually), can be printed or saved as an electronic file format of Microsoft® Excel®, Microsoft® Word,
Crystal Reports®, Adobe® Acrobat®, or Rich Text Format.
Easily create searches for:
Weekly programming change reports for any Allen-Bradley controller
Daily operator inputs from PanelView Plus (Ethernet) terminals
Change history report for any electronic file
and more . . .
In this section of the lab you will learn about FactoryTalk AssetCentre’s searching capability. FactoryTalk
AssetCentre has two types of searches: scheduled and unscheduled.
Scheduled searches are used for executing a search on a recurring basis. This kind of search is good for
detecting specific conditions or user behaviors within the log data. For instance you can create a scheduled
search to detect un-safe programming practices among your maintenance staff by searching the audit log
for empty branches or forces made at the end of each shift.
Unscheduled searches are used for ad hoc purposes like searching the audit log to determine if anyone
has made a change in a control system that was working fine a few hours ago, but now is down and
preventing production.
In this section we will be using a search to view our Studio 5000 Logix Designer changes found in the audit log.
Start the Search plug-in
1. Switch back to the FactoryTalk AssetCentre client, if it doesn’t already have focus.
2. To start the Search plug-in, click the Searches toolbar button.
30 of 86
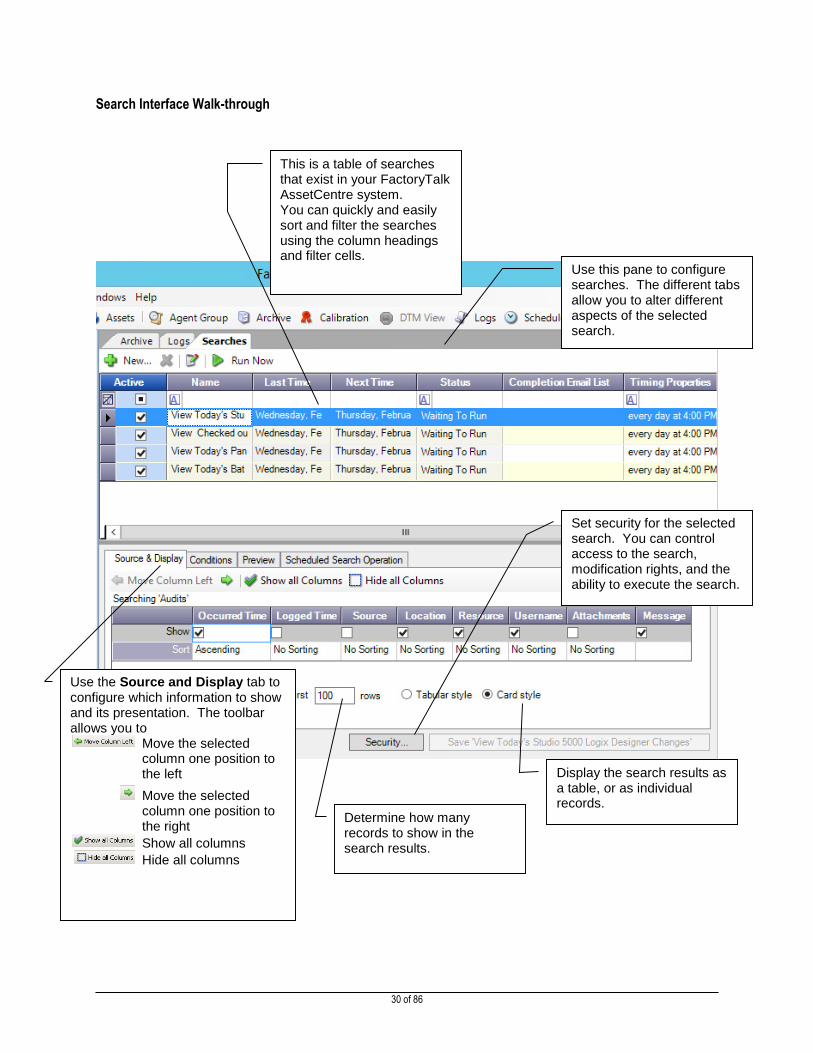
Search Interface Walk-through
Use the Source and Display tab to configure which information to show and its presentation. The toolbar allows you to Move the selected
column one position to the left
Move the selected column one position to the right
Show all columns
Hide all columns
Display the search results as a table, or as individual records.
Set security for the selected search. You can control access to the search, modification rights, and the ability to execute the search.
This is a table of searches that exist in your FactoryTalk AssetCentre system. You can quickly and easily sort and filter the searches using the column headings and filter cells.
Use this pane to configure searches. The different tabs allow you to alter different aspects of the selected search.
Determine how many records to show in the search results.

31 of 86
The Conditions tab is used to create the search conditions to extract the desired information from the system databases.
Create a new search condition
Modify the selected search condition
Delete the selected search condition
Start or end a group of conditions
Join conditions
Move the selected condition higher in the evaluation order
Move the selected condition lower in the evaluation order
These rows allow you to configure display options for the search results Show include the
selected column
Sort the selected column can be sorted in ascending or descending order or left unsorted
Use the Preview tab to evaluate whether or not your search will return the desired information

32 of 86
View the report
1. Select the View Today’s Studio 5000 Logix Designer Changes.
2. Click on the Run Now button in the Search toolbar to manually start the search.
You will notice that a new tab has appeared in the Workspace pane.
This tab contains the results of your search.
From here you can print or save to a file.

33 of 86
3. Navigate through the report (using ) find our myTimer change of 5000 to 1001.
Note that there may be multiple pages to the report, depending on the day’s activity.
4. Lastly, navigate through the report to find our myCoil delete changes, remember we deleted a rung and deleted
the myCoil Tag itself.
Rung Delete
Tag Delete
5. Close the report view by clicking on the Close button.
Click here to close the report.

34 of 86
6. With the Searches view now being displayed, select the View Checked out Studio 5000 Logix Designer files.
7. Click on the Run Now button in the Search toolbar to manually start the search.
Remember, we never checked in the Washer program and therefore it’s being reported.
Note that this report is shown in the ‘Tabular Style’ versus the ‘Card style’ of the first report.
Close the report view by clicking on the Close button.
35 of 86
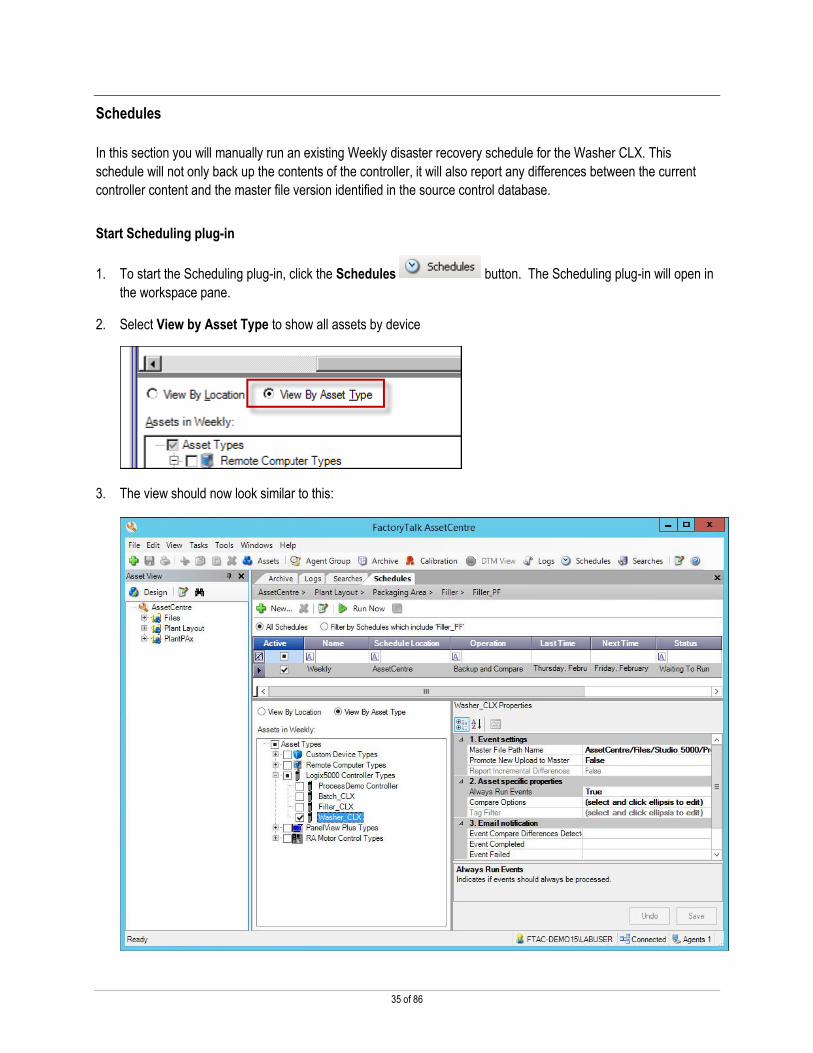
Schedules
In this section you will manually run an existing Weekly disaster recovery schedule for the Washer CLX. This
schedule will not only back up the contents of the controller, it will also report any differences between the current
controller content and the master file version identified in the source control database.
Start Scheduling plug-in
1. To start the Scheduling plug-in, click the Schedules button. The Scheduling plug-in will open in
the workspace pane.
2. Select View by Asset Type to show all assets by device
3. The view should now look similar to this:

36 of 86
Scheduler Interface Walk-through
This is the Scheduling toolbar. Using the toolbar icons you can create and manage your schedules.
Create a new schedule
Delete a schedule
Modify the selected schedule’s properties
Execute a schedule immediately.
Stop a scheduled search’s execution
This is a table of schedules that exist in your FactoryTalk AssetCentre system. You can quickly and easily sort and filter the schedules using the column headings and filter cells.
This is a list of the assets that the schedule will operate on. Using the checkboxes you can quickly disable or re-enable an asset’s participation in a schedule.
This is the property sheet for the asset selected in the left-hand pane. Using these properties you can configure how the schedule operates on a particular asset. For example, you can configure compare options, or select a specific configuration file version using this property sheet.
37 of 86
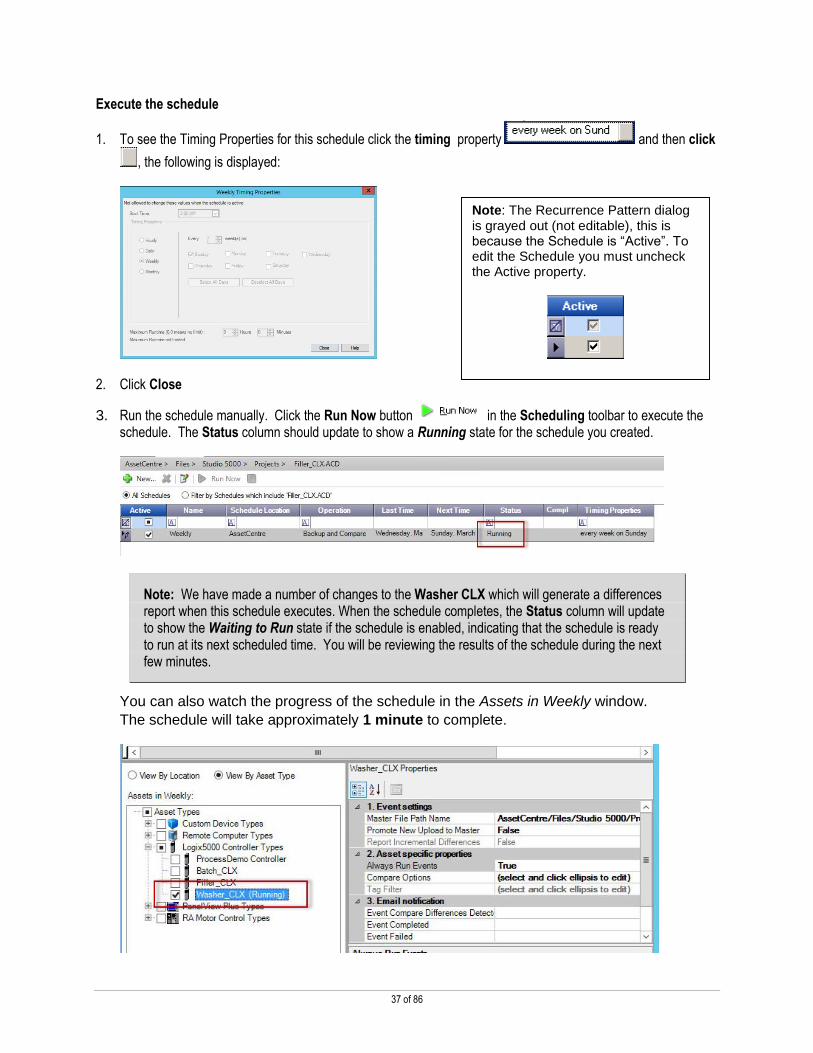
Execute the schedule
1. To see the Timing Properties for this schedule click the timing property and then click
, the following is displayed:
2. Click Close
3. Run the schedule manually. Click the Run Now button in the Scheduling toolbar to execute the schedule. The Status column should update to show a Running state for the schedule you created.
Note: We have made a number of changes to the Washer CLX which will generate a differences report when this schedule executes. When the schedule completes, the Status column will update to show the Waiting to Run state if the schedule is enabled, indicating that the schedule is ready to run at its next scheduled time. You will be reviewing the results of the schedule during the next few minutes.
You can also watch the progress of the schedule in the Assets in Weekly window.
The schedule will take approximately 1 minute to complete.
Note: The Recurrence Pattern dialog is grayed out (not editable), this is because the Schedule is “Active”. To edit the Schedule you must uncheck the Active property.

38 of 86
Examine schedule results
1. When the schedule has completed, the status will show differences found:
2. Click the Logs button in the toolbar and toggle to the Event Log. It may be necessary to scroll to see new entries.
The bold font indicates new messages that have not yet been viewed since the event log viewer has been open.
3. Let’s filter the list by selecting RA Disaster Recovery Agent from the Source field

39 of 86
4. Double-click the first Attachment Icon in the list. This will display the difference report created via the schedule.
5. Click the View button.
6. Page through and review the Scheduled Event Report.
Note that the changes made to the controller while online have not yet been checked into the archive, as the file is still open in Studio 5000 Logix Designer. The compare report will show the changes, however, because it is run against the controller itself.
7. Close the Acrobat reader by clicking the Close button in the upper right-hand corner of the software window.
8. Click the Close button to close the Attachment dialog in FactoryTalk AssetCentre.
9. Click the Clear button on the Source column heading.
Click View to open the attachment.

40 of 86
Check-in Studio 5000 Logix Designer File (housekeeping)
We no longer need our Studio 5000 Logix Designer open so we can go ahead and check in our changes in
FactoryTalk AssetCentre archive.
1. Click the File menu option in Studio 5000 Logix Designer and go to Source Control and select Check-In.
2. With the Check-In dialog displayed, change the Local Copy option to Delete and enter a comment in the
comment field like “Changed a bunch of stuff”.
3. Click OK.
4. Click Yes to the Studio 5000 Logix Designer prompt of “Upload tag values before saving project”. The file is
checked in to FactoryTalk AssetCentre source control and the Studio 5000 Logix Designer project exits.
5. Exit Studio 5000 Logix Designer
6. Switch back to FactoryTalk AssetCentre Archive tab.
7. Select the Projects folder and click on the Washer_CLX.ACD file in the asset tree.

41 of 86
8. Note there is an additional version of the file, and the comment you entered is displayed with version:
The new version of the file is now stored in source control

42 of 86
Introduction to FactoryTalk AssetCentre: Design
This section of the lab will focus on how to configure some of the critical functionality of FactoryTalk AssetCentre.
Configure an Audit Log Search
The FactoryTalk AssetCentre Audit & Event Logs can be queried for specific entries using the built in search
functionality. Searches can be configured and run manually, or on a scheduled basis. Results of a scheduled search
can be emailed in PDF format.
Launching FactoryTalk AssetCentre
In this section you will launch the FactoryTalk AssetCentre Client, if it’s not already open.
1. From the Start menu select AssetCentre Client. You can also double-click the FactoryTalk AssetCentre Client
icon on the desktop:

43 of 86
Creating a Search
In this section, a search will be created to query historical Force information.
1. Click the Searches toolbar button.
2. Click the New button.

44 of 86
3. Name the search Filler_CLX Forces.
4. Under Data Sources, select Audits.
5. This Search will be scheduled later in the lab. For now, click Finished to continue.
6. The new schedule will automatically be highlighted.
Notice that it does not have a checkmark option in the Active column. This is because there is currently no time schedule for the search, which means it cannot be scheduled to run.

45 of 86
7. The lower half of the window is used to define the conditions upon which to search and how to display results.
Source & Display: Define what columns of information will be displayed, how they’ll be sorted, and in what order they’ll be shown.
Conditions: Add/Remove the criteria that will be used to perform the search.
Previews: Test the search using the first 10 results to verify the defined conditions and formatting.
Scheduled Search Operation: Create email distribution lists and adjust time zone format.
8. Change the Occurred Time’s sort order to Descending, which will show the most recent audits first.
9. From the Conditions tab, click the New Condition button.

46 of 86
10. Select Occurred Time as the Column.
Use Absolute date/time, which means that the search will run for a specific range each time
Click the Before radio button and enter June 1, 2015 as the date
11. Click OK. The new condition will be added, which returns the first 100 rows of all audits before that date.
47 of 86
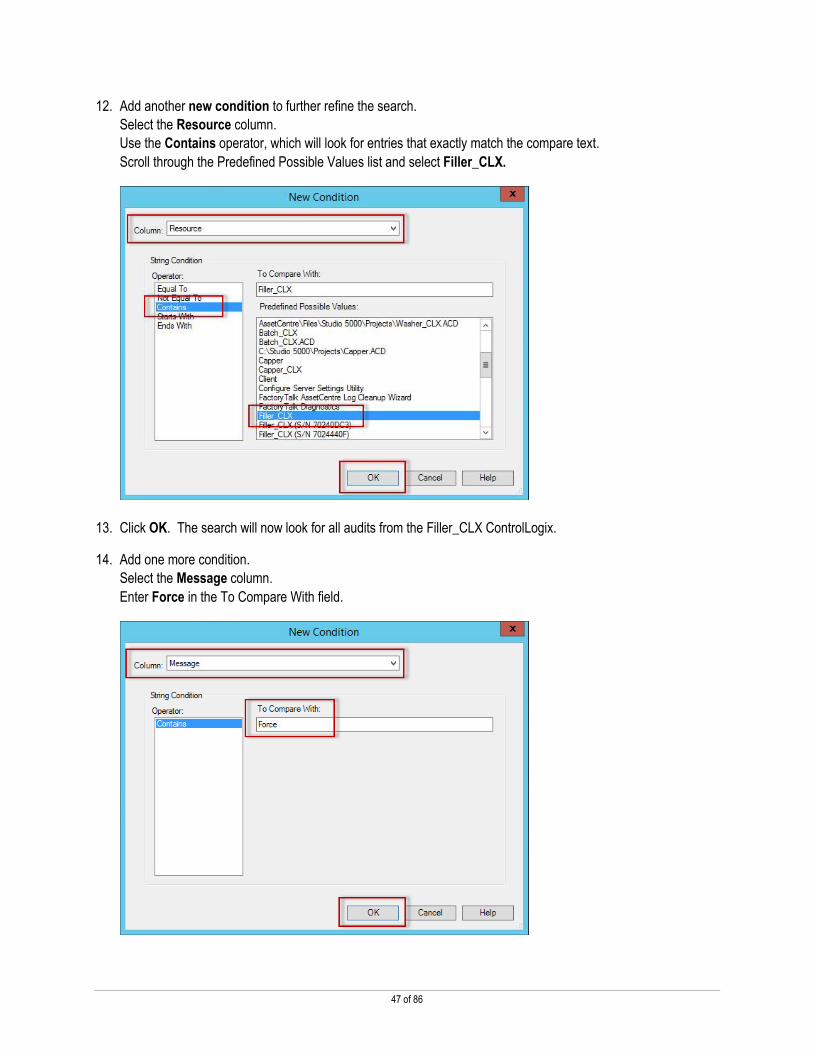
12. Add another new condition to further refine the search.
Select the Resource column.
Use the Contains operator, which will look for entries that exactly match the compare text.
Scroll through the Predefined Possible Values list and select Filler_CLX.
13. Click OK. The search will now look for all audits from the Filler_CLX ControlLogix.
14. Add one more condition.
Select the Message column.
Enter Force in the To Compare With field.

48 of 86
15. Click OK. The three search conditions will now look for any audits concerning the Filler_CLX ControlLogix that
contain a Force message.
Notice that second and third search conditions are preceded by the word And. This means that all three conditions must be met. The Not and Or buttons can be used to change how each condition should be applied, and the parentheses buttons can be used to change order of operations.
16. Use the Preview tab to ensure that some results are returned.
17. Use the Run Now button to see the actual report.

49 of 86
18. The report will be displayed showing the Force Enable, a Force On, Force Off, and Unforce of an input, and a
Force On of an output. Note that the report is using ‘Tabular Style’ for the formatting, which can be difficult to
read with longer messages. Close the report when finished.
19. From the Searches tab, return to the Source & Display tab.
20. Select the Card Style radio button to change the report’s format, and Save the report.

50 of 86
21. Click the Run Now button again.
22. The report will be displayed in a different format, which is often easier to read.
Notice that the resource listed is Filler_CLX (S/N 7024440F). The search was configured to find any resources containing Filler_CLX because the serial number changes each time a new SoftLogix module is created. The exact serial number could be used for an actual ControlLogix module if desired.
23. Close the report when finished.
Configure a Recurring Search
This section will use the search configured from the previous section, and modify it to be used as part of a scheduled
search that will return results for an 8 hour span of time.
1. With the Filler_CLX Forces search still highlighted, navigate back to the Conditions tab.

51 of 86
2. Double-click the Occurred Time… condition.
3. Update the condition to search for information from the previous 8 hours. Use Relative to date/time report is run. Uncheck the Ignore time setting. Use the After option. Enter in 8 hours ago.
4. Click OK to finish updating the condition.

52 of 86
5. Schedule the search to run every 8 hours. With the search highlighted, click the Timing Properties column.
Once the cell is selected, a button will appear that can be used to make scheduling changes:
6. Click the button and update the Timing Properties. Select the Hourly option. Every 8 hours. Set the maximum runtime to 10 minutes, as the query should not take long to run.
7. Click OK
8. Save the new report configuration
53 of 86
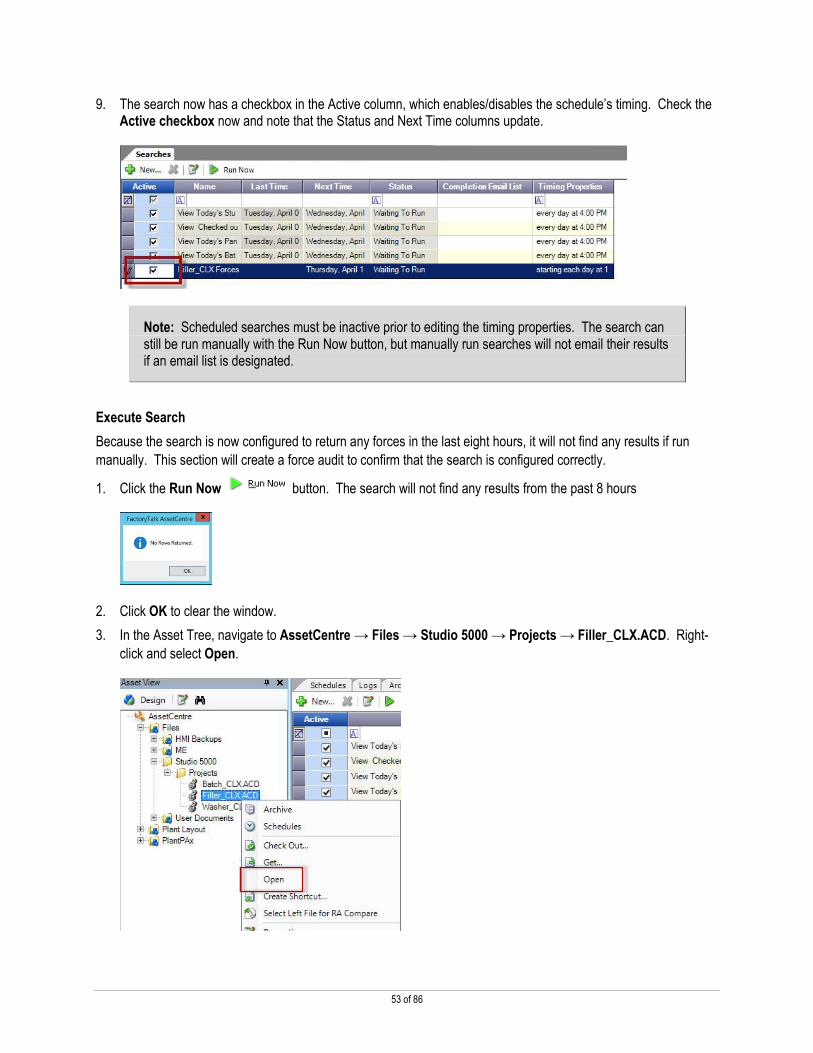
9. The search now has a checkbox in the Active column, which enables/disables the schedule’s timing. Check the Active checkbox now and note that the Status and Next Time columns update.
Note: Scheduled searches must be inactive prior to editing the timing properties. The search can still be run manually with the Run Now button, but manually run searches will not email their results if an email list is designated.
Execute Search
Because the search is now configured to return any forces in the last eight hours, it will not find any results if run
manually. This section will create a force audit to confirm that the search is configured correctly.
1. Click the Run Now button. The search will not find any results from the past 8 hours
2. Click OK to clear the window.
3. In the Asset Tree, navigate to AssetCentre → Files → Studio 5000 → Projects → Filler_CLX.ACD. Right-
click and select Open.

54 of 86
4. Since this is just for testing purposes with no intent to change the program, click Get
5. Select Get writable copy then click OK.

55 of 86
6. When the file opens, Go Online with the controller
7. If prompted, click Download, then Download again. Finally, click Yes to switch the controller back to Run
Mode.
8. When the controller is online, click No Forces → I/O Forcing → Enable All I/O Forces
9. Click Yes to enable I/O Forces.
10. Now that I/O Forces are enabled, the search will return an audit of the event. Return to the AssetCentre client
and manually run the search.
11. Note that the search now returns a report showing the single entry for the enabling of forces. Close the report
when finished reviewing.

56 of 86
12. Switch back to Logix Designer and click No Forces → I/O Forcing → Disable All I/O Forces
13. Click Yes to disable forces.
14. Close Logix Designer and select No to discard the changes.
15. Back in the AssetCentre client, clicking Run Now will yield a report with both the enable and disable of forces.
16. Close the report when finished.
57 of 86
Configure a New ControlLogix Device for Disaster Recovery
ControlLogix Disaster Recovery allows for the automated backup and comparison of program files running in ControlLogix controllers. Once a ControlLogix device is configured as an asset in the FactoryTalk AssetCentre asset tree, it can be added to a Disaster Recovery schedule. The results of the Disaster Recovery schedule are added to the FactoryTalk AssetCentre Event Log, and can also be configured to be emailed. This appendix will walk through how to add and configure a new ControlLogix asset, configure it for Disaster Recovery, then execute a Disaster Recovery schedule against it.
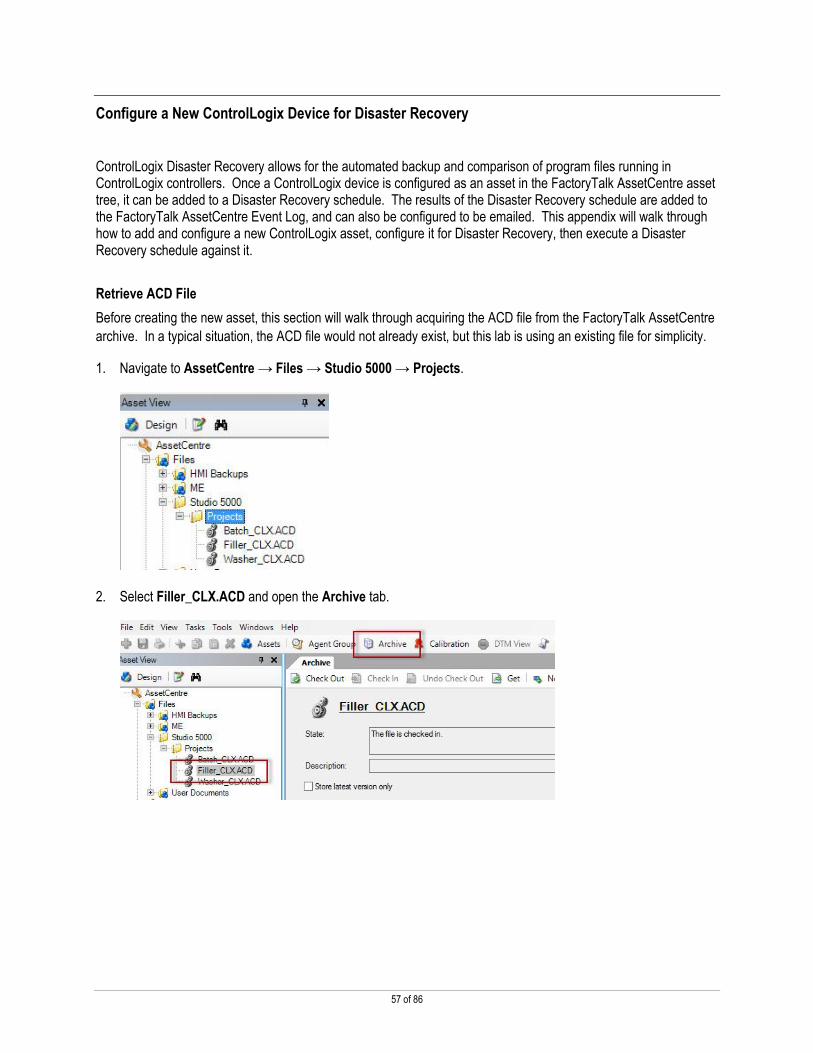
Retrieve ACD File
Before creating the new asset, this section will walk through acquiring the ACD file from the FactoryTalk AssetCentre
archive. In a typical situation, the ACD file would not already exist, but this lab is using an existing file for simplicity.
1. Navigate to AssetCentre → Files → Studio 5000 → Projects.
2. Select Filler_CLX.ACD and open the Archive tab.

58 of 86
3. Select Version 12 then click the Get Version button.
4. Select Get writeable copy and Override working folders with path. Use the Browse button to select the
desktop.

59 of 86
5. Click OK.
6. On the desktop, double-click the ACD file to open it in Logix Designer.
7. Double-click Controller Tags
8. Change SP_Actual to 24.
9. Click Save and exit Logix Designer.

60 of 86
Configure Logix 5000 Asset
In this section of the lab, a new asset will be configured to point to the same ControlLogix as the existing Filler_CLX
asset. This will not cause any problems in FactoryTalk AssetCentre, but creating duplicate assets outside of test
purposes is not worthwhile.
1. From the FactoryTalk AssetCentre client, click the Design button to enter design mode.
2. Browse to AssetCentre → Plant Layout → Packaging Area.
3. Click the Add button.

61 of 86
4. Select Generic Container and click OK.
5. Name it Filler Line 2 and click OK.

62 of 86
6. The new container will be added to the tree and automatically selected. Click the Add button again.
7. Select Logix5000 Controller and click OK.
8. Name it Filler2_CLX and then click the Addressing Info browse button

63 of 86
9. In the RSLinx Classic RSWho window to and select AB_VBP-1 → 02, RSLogix 5000 Emulator, Filler_CLX.
Note: If a ControlLogix device can be browsed to using RSLinx Classic, it can be added to FactoryTalk AssetCentre. RSLinx Classic is the communication software used to connect to Logix 5000 assets.
10. Click Select.
11. Notice that a number of read-only properties have been filled in automatically. Now click the Configuration
Data browse button.

64 of 86
12. Click the Add button.
13. Browse to the Desktop and select the Filler_CLX.ACD file. Click Open.

65 of 86
14. Select the Filler_CLX.ACD file and click OK. This will add the file to the archive and associate it with the new
ControlLogix asset.
15. The ControlLogix’s asset configuration is complete. Click OK to finalize the configuration.
16. Expand the new container and asset in the asset tree. Notice that the file has been added as a child node of the
ControlLogix asset.
Note: Configuration Data files like Filler_CLX.ACD do not have to be added to the asset tree below their corresponding asset. They can be added anywhere in the asset tree.
ACD files can be version controlled by the FactoryTalk AssetCentre archive and are associated with ControlLogix assets to allow for comparison operations against production versions.
1. Click the Design button again to disable Design mode.

66 of 86
Configure ControlLogix Disaster Recovery
Once a ControlLogix asset has been added to the asset tree, it can be configured for use in a Disaster Recovery
schedule. This section of the lab will explore the Disaster Recovery configuration, including tag filtering.
1. To start the Scheduling plug-in, click the Schedules button. The Scheduling plug-in will open in
the workspace pane.
2. Select the Weekly schedule.
3. In the lower pane, select View by Asset Type to show all assets by device.
Notice that the new asset has already been added to the Weekly schedule because the schedule was configured
to include all assets in the AssetCentre asset tree. It will dynamically update with any additions or removals.
4. Select Filler2_CLX.

67 of 86
5. Note the Disaster Recovery Task properties:
Master File Path Name: Derived from the Configuration Data property, this is the file against which comparisons will be made.
Promote New Upload to Master: Determines whether a new archive version will be created if differences are detected.
Report Incremental Differences: Allows the user to split the file stream between a production version for comparison and a development version.
Always Run Events: If set to False, FactoryTalk AssetCentre will use the ControlLogix Change Log to determine if an upload and comparison need to be run prior to performing any actions.
Compare Options: Set which parts of a project get compared following an upload.
Tag Filter: Allows for the selection of specific tags for comparison (versus all tags or all constant tags.)
6. Click the Compare Options browse button.

68 of 86
7. Select Tag Filter then click OK.
8. Now that the Tag Filter is enabled, select and open it using the browse button.
Note: It may take a few moments for the Tag Filter dialog to populate, as the ACD file is currently being opened and queried for all available tags.
9. The Tag Filter dialog will open, looking similar to this:

69 of 86
10. Expand Controller Tags and select SP_Actual.
Note: When the comparison between the production program and archive program is made, it will now alert on any differences in the SP_Actual tag value.
11. Click Next.
12. Click Finish.
13. Save the changes to the scheduled task.

70 of 86
Execute ControlLogix Disaster Recovery Task
In this section of the lab, a Disaster Recovery schedule including a ControlLogix task will be executed. The
comparison results will then be viewed.
1. Ensure that Filler2_CLX is the only asset selected in the schedule.
2. Click the Run Now button to launch the schedule
3. The Task will show a Running state until completed.

71 of 86
4. Upon completion, the task will show that differences were found.
5. Open the Logs tab and select Event Log.
6. Find the most recent Disaster Recovery task completion (noted by the yellow triangle Warning severity) and
double-click the paper clip icon.
7. Click View to open the compare report.
8. The compare report will show one tag difference, configured from the tag filter, and some program differences.
This is expected because the latest version was not extracted from the archive, and a manual value change was
made as part of the lab.
72 of 86
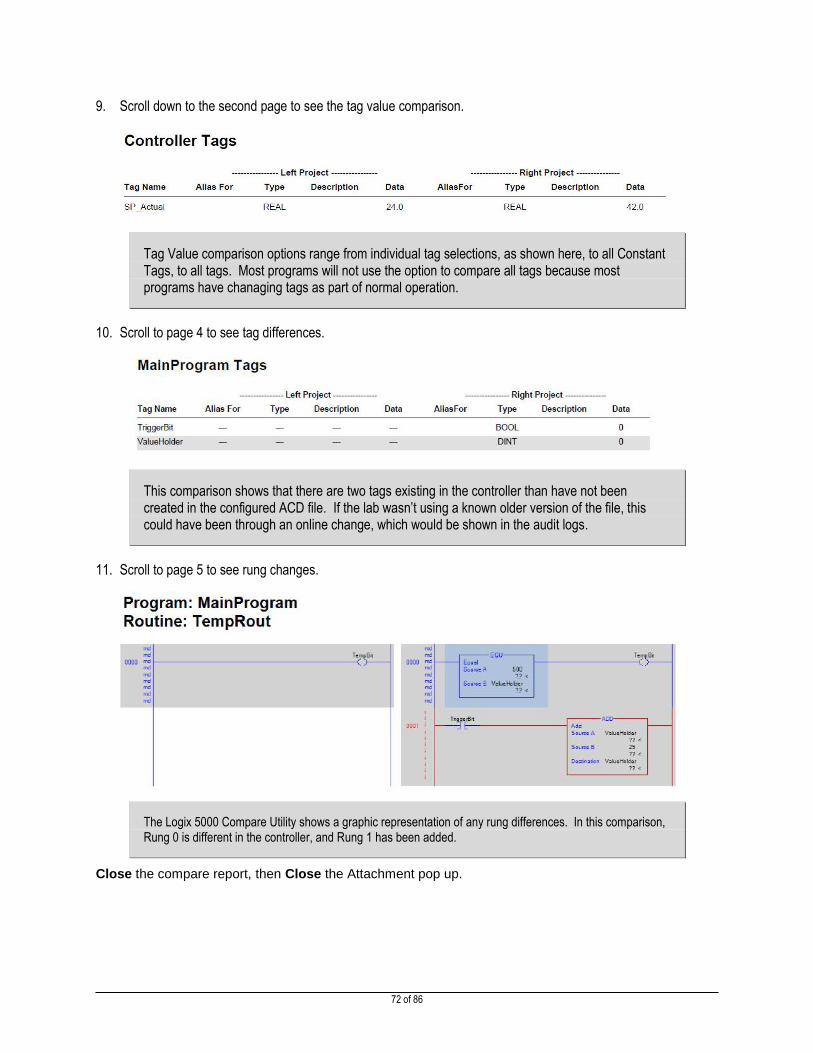
9. Scroll down to the second page to see the tag value comparison.
Tag Value comparison options range from individual tag selections, as shown here, to all Constant Tags, to all tags. Most programs will not use the option to compare all tags because most programs have chanaging tags as part of normal operation.
10. Scroll to page 4 to see tag differences.
This comparison shows that there are two tags existing in the controller than have not been created in the configured ACD file. If the lab wasn’t using a known older version of the file, this could have been through an online change, which would be shown in the audit logs.
11. Scroll to page 5 to see rung changes.
The Logix 5000 Compare Utility shows a graphic representation of any rung differences. In this comparison, Rung 0 is different in the controller, and Rung 1 has been added.
Close the compare report, then Close the Attachment pop up.
73 of 86
What’s New in FactoryTalk AssetCentre v6.00 and v6.10?
The new functionality introduced in version 6.00 of FactoryTalk AssetCentre falls into these three main groups:
Agent Groups: Agent Groups allow for the categorization of individual Agents within a FactoryTalk AssetCentre system. By default, and in versions prior to 6.0, all Agents were required to be identically configured such that the AssetCentre Server could assign a task to any existing Agent. With Agent Groups, an asset can have an assigned Agent Group, allowing for Agents to have different configurations.
Custom Device: The Custom Device asset allows users to create assets that are not natively part of FactoryTalk AssetCentre. Using Custom Device assets, users can customize scheduled operations to be performed by FactoryTalk AssetCentre Agents. A Custom Device asset allows for the execution of a user-defined operation, collection of the resulting file(s), and then execution of an optional post-backup operation.
UDC Drive Support: FactoryTalk AssetCentre has always supported Rockwell Automation Drives that are administered by Drive Executive Software. As of version 6.0, FactoryTalk AssetCentre also supports Rockwell Automation Drives that are administered using UDC (Unified Device Configuration,) which is currently embedded within the CCW programming suite.
The new functionality introduced in version 6.10 of FactoryTalk AssetCentre falls into these three main groups:
Database Management: The new Database Limits options allow FactoryTalk AssetCentre to automatically monitor the size of the database and its various components, including total size, diagnostic log sizes, and archive version totals. User notification and email alerts can be configured to assist in monitoring the database limits.
Custom Device Compare: The Custom Device Plug-in functionality has been upgraded in version 6.10 to allow for the configuration of customer compare engines as part of the Disaster Recovery operation.
Microsoft SQL Express Support: As of version 6.10, the FactoryTalk AssetCentre server supports Microsoft SQL Express.

74 of 86
Explore Agent Group View
The Agent Group View allows for the monitoring and configuration of Agent Groups in the FactoryTalk AssetCentre
system. By default, up to two agent groups can be configured. Adding more Agent Groups beyond that requires
additional capacity licensing.
1. Open the Agent Group view

75 of 86
Explore Custom Device Plug-in
Custom Device Plug-in functionality is managed at a global level, then implemented and refined at the device level.
Individual assets reference the global profile, which can then be customized to specific asset needs.
1. From the AssetCentre Client, open Tools → Options.
2. Select Custom Devices.
3. The Custom Device profiles currently configured will be displayed.
76 of 86
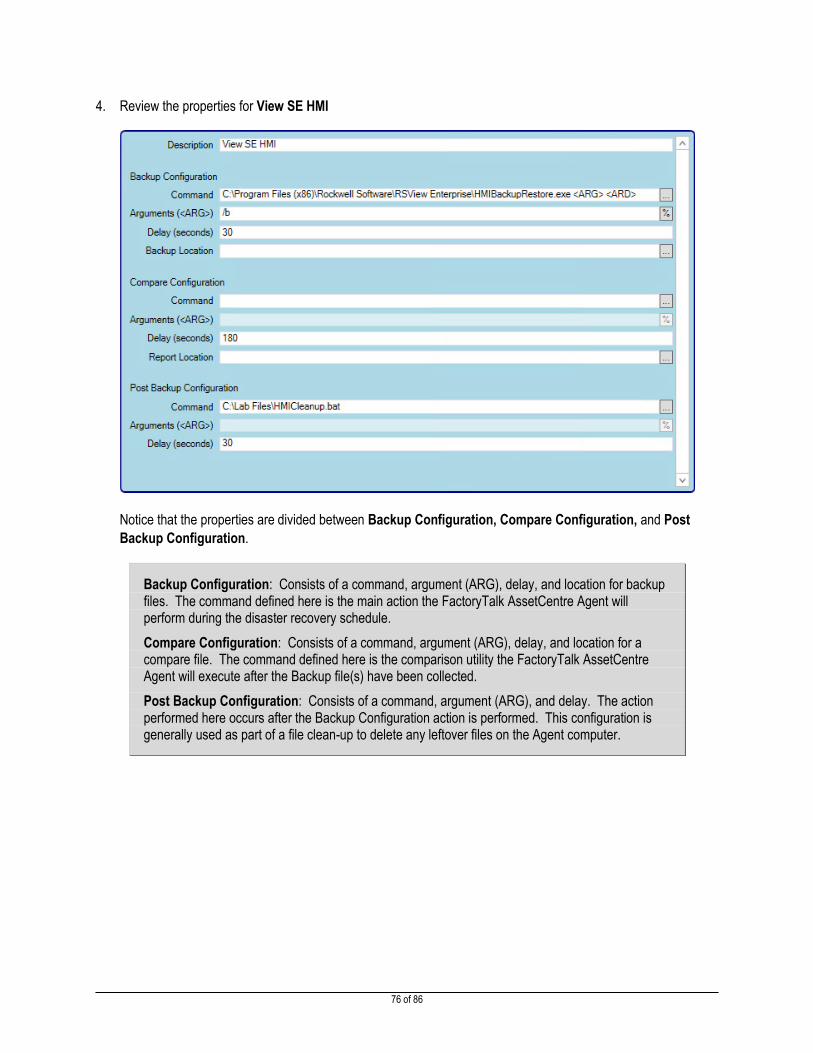
4. Review the properties for View SE HMI
Notice that the properties are divided between Backup Configuration, Compare Configuration, and Post
Backup Configuration.
Backup Configuration: Consists of a command, argument (ARG), delay, and location for backup files. The command defined here is the main action the FactoryTalk AssetCentre Agent will perform during the disaster recovery schedule.
Compare Configuration: Consists of a command, argument (ARG), delay, and location for a compare file. The command defined here is the comparison utility the FactoryTalk AssetCentre Agent will execute after the Backup file(s) have been collected.
Post Backup Configuration: Consists of a command, argument (ARG), and delay. The action performed here occurs after the Backup Configuration action is performed. This configuration is generally used as part of a file clean-up to delete any leftover files on the Agent computer.

77 of 86
The following properties are available for Custom Device Configurations:
Command: A command is the file that the FactoryTalk AssetCentre Agent will execute. This could be an executable file (*.exe), batch file (*.bat), visual basic script (*.vbs), or Microsoft PowerShell™ script (*.ps1.)
ARG: An ARG will be appended to the command executed by a FactoryTalk AssetCentre. An ARG is a global property inherited by any Custom Device asset making reference to its Custom Device Configuration.
Delay: The number of seconds that the Agent process will wait for the command to complete. If the command does not complete prior to the delay expiring, the Agent process will terminate the command and issue a timeout error. Setting the field to 0 (default) tells the agent process to wait infinitely for the command to complete.
Backup Location: The directory path or file where the Agent will retrieve the backup files as part of a Disaster Recovery schedule. Once retrieved, the files can be checked into the AssetCentre Archive.
Report Location: The complete file path where the Agent will collect the comparison report file as part of the Disaster Recovery schedule. Once retrieved, the report can be emailed if desired, and will be stored in the Event Log.
Finally, each device can customize the backup and post backup commands (not pictured here, refer to step 8):
ARD: This is an argument defined in the Custom Device asset properties for the Backup or Post Backup actions. The ARD will be appended to the command executed by a FactoryTalk AssetCentre. An ARD allows for individual asset customization, whereas the Custom Device Configuration and ARG properties are applied to all Custom Device Assets making reference to them.
5. Notice that no Backup Location has been defined, and that there is an additional placeholder in the command
labelled <ARD.>
These properties are defined at the device level in this configuration because each asset have a unique
command and location.
78 of 86
6. Close the Options window by pressing Cancel.
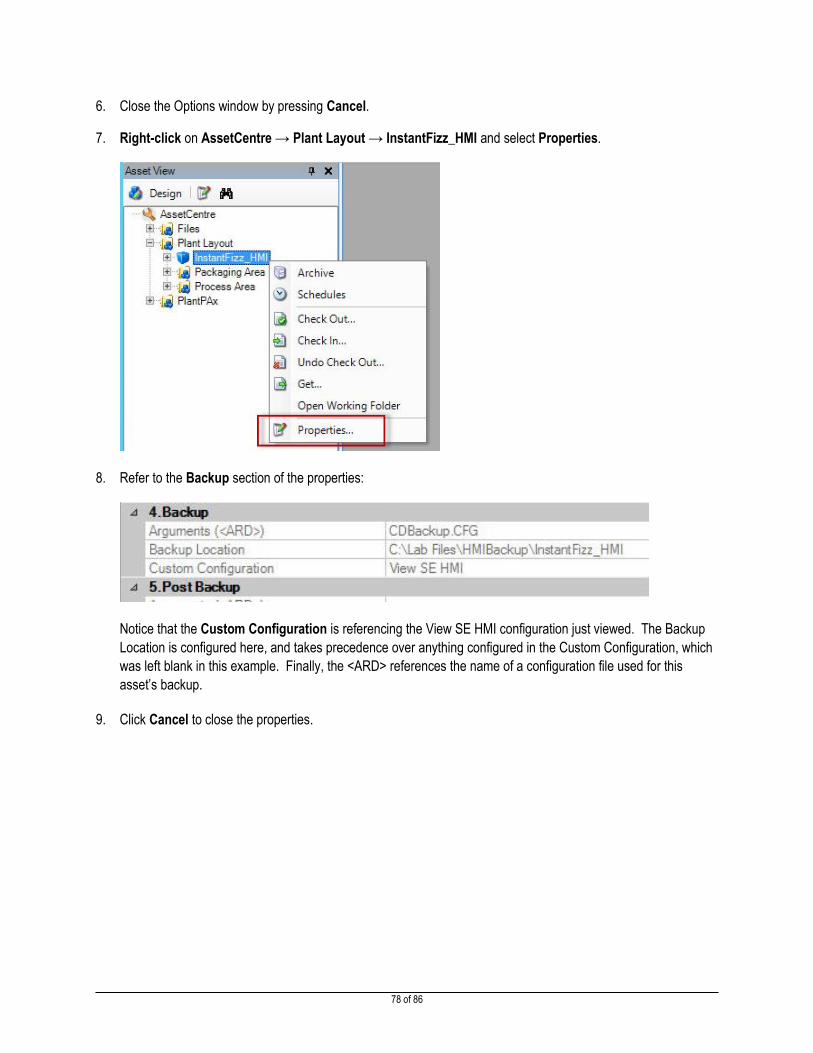
7. Right-click on AssetCentre → Plant Layout → InstantFizz_HMI and select Properties.
8. Refer to the Backup section of the properties:
Notice that the Custom Configuration is referencing the View SE HMI configuration just viewed. The Backup
Location is configured here, and takes precedence over anything configured in the Custom Configuration, which
was left blank in this example. Finally, the <ARD> references the name of a configuration file used for this
asset’s backup.
9. Click Cancel to close the properties.

79 of 86
Explore Rockwell Automation Motor Control Asset
The RA Motor Control asset is used to service Rockwell Automation Drives that are supported via Unified Device
Configuration technology, which is currently embedded in the Connected Components Workbench. This section will
briefly outline the new asset type.
1. Browse to AssetCentre → Plant Layout → Packaging Area → Filler → Filler_PF.
2. Right-click on the Filler_PF asset, which is an RA Motor Control, and select Properties.
3. Notice that the main difference between an RA Motor Control asset and an RA Drive asset is the addition of a
Backup Data property.
Backup Data refers to the in-production version of the project. Use this field to point to the runtime version of the project that is downloaded and running in the processor. Note that this field can be automatically filled in after the first Disaster Recovery schedule is run, if no runtime version is available when the asset is created.

80 of 86
4. Another difference is that a selected device option is shown:
RA Motor Control configuration data binders can contain multiple assets within the same project. As part of the configuration data property management, the user is prompted to select the specific asset’s *.IUUX file within the configuration data binder.
5. Click Cancel to close the properties.
6. Expand Filler_PF and select Filler_PF Project. Click the Archive button
7. RA Motor Control assets make use of binder to contain the Configuration Data projects

81 of 86
Explore Database Limitation Options
The Database Limitations configuration are optional, and are designed to inform users of the size of various parts of the
database. Additionally, archive size can be automatically managed by configuring the maximum number of versions of a file.
This section will provide an overview of the functionality.
1. Notice that the AssetCentre Client now includes the database size and percentage of maximum in the status bar:
Note: This status is automatically enabled when the Database Limitation options are in use.
Two thresholds can be configured to visually show the maximum configured boundary:
Warning Level Critical Level
2. To view the Database Limitation option configuration, open Tools → Options.
3. Select Database Limitations.

82 of 86
4. The Database Limitations options will be displayed:
Total maximum size of the AssetCentre database: Used to allow the user to specify a maximum size. When this size is reached, database activity will be reduced nearly to read-only status, with only critical operations allowed.
Maximum number of versions per archive asset: Used to automatically prune archive versions, operating as First In, First Out. The first version of a file will always be kept, but beginning with the second version, the oldest version will be removed and a new version will be checked in with this limit is reached. Note that it can be overridden at the file level in the archive.
Maximum size of database tables capturing logs: Similar principle to the maximum size of the database, if an individual log table reaches this maximum size, only critical logging will continue.
Database capacity status refresh rate: The frequency with which the client updates the database properties.
Email notification: List of email recipients for maximum size thresholds.
SCAN to Proceed button: Used to ensure that the current AssetCentre system is within the configured boundaries. The configuration cannot be lower than any of the existing system properties.
5. Change the maximum size of the AssetCentre database to 1.00

83 of 86
6. Notice that the SCAN to Proceed button has become enabled, and the OK button is disabled. It is not possible
to save a configuration without first confirming that it falls within the current system properties.
Click Scan to PROCEED.
7. The scan results shows that all configured options are within the current system properties. Click Close.
Note: If any options were less than the current system properties, a result of Fail would be shown. In the event of an Asset Version being lower than an existing asset, the asset name would be shown in addition to its current number of versions.
8. Notice that the OK button has now enabled. Click OK.
9. Notice that the Warning threshold coloring has now activated in the status bar.
Note: The current configuration for the Warning threshold is 70% of maximum. The Critical threshold is 90%. If the maximum database size had reached the Critical threshold, it would turn red instead of yellow:

84 of 86
10. Browse in the Asset Tree to AssetCentre → Files → Studio 5000 → Projects → Batch_CLX.ACD and open
the Archive tab.
11. Notice that the total number of asset versions, and the total disk usage are now shown:
12. Also notice that this asset has more than 25 versions, which is the configured maximum limit. A global limit may
not be appropriate for every asset, so the limit can be configured for each individual asset as necessary. In this
example, 160 versions are configured to override the global setting of 25.

85 of 86
Conclusion
You have successfully completed this lab.
In this lab you have learned quite a bit on how to navigate the user interface and capabilities of FactoryTalk AssetCentre. You can see how this integrated solution empowers you with the information you need to operate, maintain, and refine your process system.
Assets and intellectual property are the key components companies use to manufacture products and increase profit through productivity. Without the proper investments in both, the plant or process does not produce and production suffers. One of the most important things a company can do to maintain quality, and therefore their bottom line, is to protect their assets and intellectual property. In this lab, you saw how different FactoryTalk AssetCentre capabilities can be used to help protect your critical assets and intellectual property, and therefore your bottom line.

86 of 86
Copyright© 2015 Rockwell Automation, Inc. All rights reserved.