Embed Size (px)
Citation preview

Oven Directions For Use
Dens
fil®
Den
sHea
t®
Ove
n III I
nstru
ction
Man
ual
DensHeat Oven III
The Obturator Oven has been specially developed for heating Densfil® endodontic obturators for use in root canal therapy. Do not use this oven for any other purpose.
There are none known.
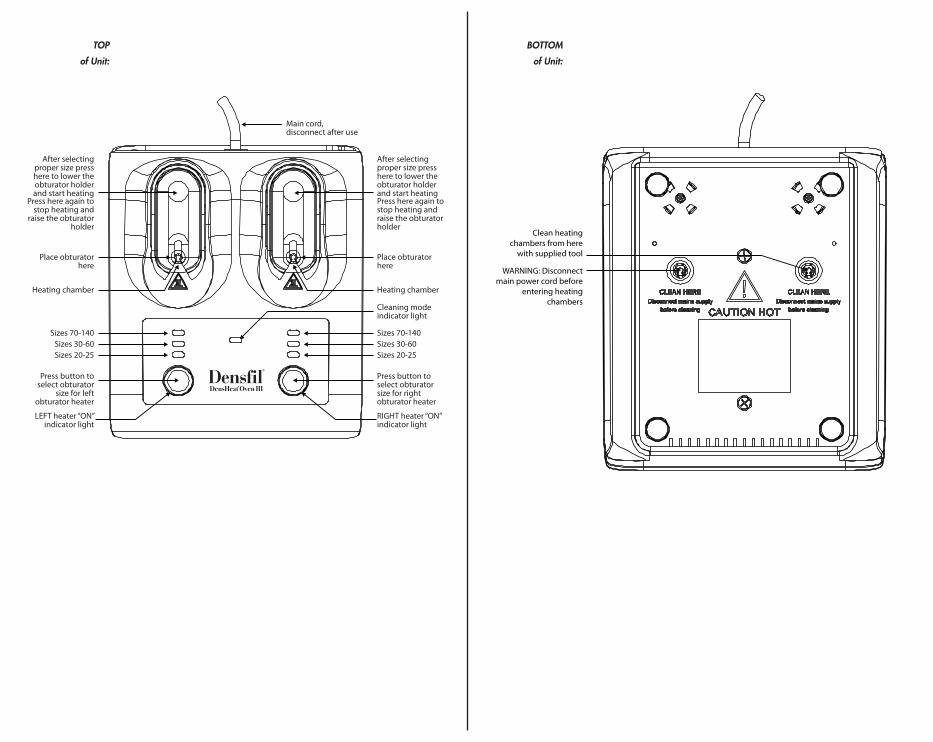
1. Turn the power on by plugging the oven into a 115 VAC outlet. Both indicator lights around the buttons will light up. To wake-up the oven from stand-by mode, push and hold either one of the buttons until the indicator light around the button is illuminated and two signal “beeps” are heard, and release the button. A second, lower signal “beep” will sound. On both sides the smallest obturator size is selected as shown by indicator lights. The oven is now ready for use. At any time the oven can be turned off. Push and hold either one of the bottom buttons until the indicator light around the button turns off.
2. Put both obturator holders in the upper position by pressing the back of the holder (marked area).
3. DISINFECT the obturator in a 5.25% sodium hypochloride solution (bleach) for one minute. RINSE the obturator in 70% alcohol. DRY the obturator for several seconds on a clean work surface to allow evaporation of excess alcohol.
4. After disinfecting the obturator and setting the silicone stop, place the Obturator in one of the obturator holders, lightly press on top to have it firmly seated. Regardless of what working length you have determined, the silicone stop must be under the holder. Make sure the obturator is hanging straight, not at an angle. The obturator must clear all sides of the heating chamber.
5. Push the button which corresponds to the selected obturator holder, to select the size of the Obturator you wish to heat. Repeatedly push this button to select the correct size.
6. To start the heating process push the obturator holder down until you hear it click. It will raise a little but keep in a steady down position. The indicator light around the button will show that the heater is on (constantly on). The obturator is now being heated. Heating time varies – depending on obturator size – from 20 to 49 seconds, and is regulated automatically.
The heating times for the selected obturator sizes are as follows: Size Signal Time Tolerance 20 — 25 20 seconds ± 5 seconds 30 — 60 44 seconds ± 7 seconds 70 — 140 49 seconds ± 8 seconds
7. After the first signal “beep,” the obturator is ready for use. Push the back of the obturator holder (marked area) to let it raise slowly. The indicator light around the button will go off. Take the obturator carefully out of the holder by pulling it towards you, making sure not to scrape the obturator on any part of the holder.
8. You may leave the obturator in the Obturator Oven for up to 90 seconds after the first signal “beep.” It will keep the obturator at the appropriate temperature and ready for use. The oven will “beep” every 15 seconds to remind you that the obturator is still in the oven. After 90 seconds, the heating ele-ment will switch off automatically.
9. If you want to heat more obturators, you may use one holder or both to continue your work efficiently. Each holder is operated by its own button and indicators. If you hear a signal “beep” then look at indicator lights around the buttons which indicate obturator heater is ready (flashing). When both heaters have finished their cycle and no buttons are pushed, the oven will go into a power-saving, stand-by mode after 5 minutes.
10. See below table for oven specifications:
Indications
Contraindications
Instructions
for Use
The equipment is designed to be safe for indoor use under the following environmental conditions:
Maximum Altitude 2000 m / 6562 ft
Storage temperature -20 to +65º C -4 to +149º F
Storage humidity 20 to 80%, no condensation
Operating temperature +5 to +40º C +41 to +104º F
Max. operating humidity 80% at +31° C to 50% at 40° C (lin.) 80% at +87° F to 50% at 122° F (lin.)
Mains voltage �uctuations Up to ±10% of the nominal voltage
Transient overvoltages Category II
Rated pollution degree 2
Mass of the equipment .56 kg / 1.23 lbs
Overall size of the equipment (W x D x H) 155 x 178 x 81 mm / 6.1” x 7” x 3.2”
If there is any doubt about the compatibility of decontamination or cleaning agents please contact the manufacturer or DENTSPLY.

The oven is designed with two precision heating alerts:
1. First size LED button blinks: The targeted temperature of the heat-ing element was not reached within specified time (time-out). Use the other heating element to warm the obturator. This may be re-set by turning the power off and turning the power on. If the error occurs again the oven should no longer be used and sent for repair.
2. Second size LED button blinks: The hardware safety circuit has been activated due to a failure in the heating element, causing overheating. This may be re-set by turning power off, discon-nect the power cord, reconnect the power cord, and turn the power on. If the error occurs again the oven should no longer be used and sent for repair.
Clean oven after each use. Any gutta-percha remaining on the holder or in the heating chamber may be effectively removed with Orange Solvent (generic dental solvent) on a cotton pledget. Press and hold both buttons at once for 2 seconds to put the oven into the cleaning mode. This will cause both heaters to heat up to a medium temperature of 140°F/60°C. The indicator lights around the buttons will show that the heaters are on (constantly on). A signal “beep” and flashing indicator lights around the buttons will warn that the desired temperature has been reached. Disconnect the main plug and clean the heater chambers with a wire brush, as directed on the last page of the oven illustration.
To abort the cleaning mode without disconnecting the main plug and to enter the normal mode again press either button for 2 seconds.
1. To prevent fire or electric shock, do not expose this product to moisture.
2. Unplug the oven when not in use.
3. Do not remove the cover of the oven.
4. This oven is designed for use in the dental office. Do not use in any other environment.
5. To reduce the risk of electric shock, do not remove cover; there are no user-serviceable parts inside.
6. This oven is intended for use in heating gutta-percha coated obturators only. Do not insert anything other than an obturator into the oven.
7. Changes or modifications not expressly approved by Maillefer could void the user’s authority to operate the equipment.
Voltage rating; 115VAC, 50/60 Hertz, range of the supply voltage +/- 10%, power-save stand-by mode: <1.5W normal use: 380W max Fuse Rating: 4AT 250V
This equipment has been tested and found to comply with the limits for a Class B digital device, pursuant to part 15 of the FCC rules. These limits are designed to provide reasonable protection against harmful interference in a residential installation. This equipment generates, uses and can radiate radio frequency energy and, if not installed and used in accordance with the instructions, may cause harmful interference to radio communications. However, there is no guarantee that interference will not occur in a particular installation. If this equipment does cause harmful interference to radio or television reception, which can be de-termined by turning the equipment off and on, the user is encouraged to try to correct the interference by one or more of the following measures:
• Reorient or relocate the receiving antenna.
• Increase the separation between the equipment and the receiver.
• Connect the equipment into an outlet on a circuit different from that to which the receiver is connected.
• Consult the dealer or an experienced radio/TV technician for help.
Caution: Hot Surface
Class II Equipment
Caution: See Directions for Use
Consult Instructions for Use
Do Not Throw Away
Manufacturer’s Information
Technical
Specifications
Explanation of
Marking Symbols
NOTE:
Precision Heating
Alerts
Cleaning Instructions
Warning
Precautions
BOTTOM
of Unit:
TOP
of Unit:
Main cord,disconnect after use
After selectingproper size presshere to lower theobturator holderand start heatingPress here again tostop heating andraise the obturatorholder
Press button toselect obturatorsize for rightobturator heater
RIGHT heater “ON”indicator light
Place obturatorhere
Heating chamber
Sizes 30-60Sizes 20-25
Cleaning modeindicator light
After selectingproper size presshere to lower theobturator holderand start heating
Press here again tostop heating and
raise the obturatorholder
Press button toselect obturator
size for leftobturator heater
LEFT heater “ON”indicator light
Place obturatorhere
Heating chamber
Sizes 30-60Sizes 70-140Sizes 70-140
Sizes 20-25
DensHeat Oven III
Clean heatingchambers from here
with supplied tool
WARNING: Disconnectmain power cord before
entering heatingchambers

Manufactured For:
Class II EquipmentMade in the Netherlands Do Not Throw AwayConsult Instructions for Use
For Dental Use Only Rx Only
DENTSPLY MailleferDENTSPLY International, Inc.608 Rolling Hills DriveJohnson City, TN 37604Phone: 1-800-924-7393Fax: 1-800-924-7389www.maillefer.dentsply.com
Caution: Hot Surface
© 2012 DENTSPLY Maillefer DFUDENSHEAT1/12