Embed Size (px)
Citation preview

KULINARISK GB


ENGLISH 4
ContentsSafety information 4Safety instructions 5Installation 8Product description 8Before first use 9Daily use 9Clock functions 12Using the accessories 13
Additional functions 14Helpful hints and tips 15Care and cleaning 16What to do if… 19Technical data 20Environment concerns 21IKEA GUARANTEE 21
Subject to change without notice.
Safety informationBefore the installation and use of the appliance, carefully readthe supplied instructions. The manufacturer is not responsible ifan incorrect installation and use causes injuries and damages.Always keep the instructions with the appliance for future refer-ence.Children and vulnerable people safety
Warning! Risk of suffocation, injury or permanent disability.• This appliance can be used by children aged from 8 years
and above and persons with reduced physical, sensory ormental capabilities or lack of experience and knowledge ifthey are supervised by an adult or a person who is responsi-ble for their safety.
• Do not let children play with the appliance.• Keep all packaging away from children.• Keep children and pets away from the appliance when it op-
erates or when it cools down. Accessible parts are hot.• If the appliance has a child safety device, we recommend
that you activate it.• Cleaning and user maintenance shall not be made by chil-
dren without supervision.
ENGLISH 4
General Safety• Only a qualified person must install this appliance and re-
place the cable.• Internally the appliance becomes hot when in operation. Do
not touch the heating elements that are in the appliance. Al-ways use oven gloves to remove or put in accessories orovenware.
• Do not use a steam cleaner to clean the appliance.• Before maintenance cut the power supply.• Do not use harsh abrasive cleaners or sharp metal scrapers
to clean the glass door since they can scratch the surface,which may result in shattering of the glass.
• Excess spillage must be removed before the pyrolytic clean-ing. Remove all parts from the oven.
• Only use the core temperature sensor recommended for thisappliance.
• To remove the shelf supports first pull the front of the shelfsupport and then the rear end away from the side walls. In-stall the shelf supports in the opposite sequence.
• If the supply cord is damaged, it must be replaced by themanufacturer, an authorized Service or similarly qualifiedpersons in order to avoid a hazard.
• Ensure that the appliance is switched off before replacing thelamp to avoid the possibility of electric shock.
Safety instructionsInstallation
Warning! Only a qualified person mustinstall this appliance.
• Remove all the packaging.• Do not install or use a damaged appli-
ance.• Obey the installation instruction supplied
with the appliance.
• Always be careful when you move theappliance because it is heavy. Alwayswear safety gloves.
• Do not pull the appliance by the handle.• Make sure that the appliance is installed
below and adjacent safe structures.• The sides of the appliance must stay ad-
jacent to appliances or to units with thesame height.
ENGLISH 5
Electrical connectionWarning! Risk of fire and electricalshock.
• All electrical connections should be madeby a qualified electrician.
• The appliance must be earthed.• Make sure that the electrical information
on the rating plate agrees with the powersupply. If not, contact an electrician.
• Always use a correctly installed shock-proof socket.
• Do not use multi-plug adapters and ex-tension cables.
• Make sure not to cause damage to themains plug and to the mains cable. Con-tact the Service or an electrician tochange a damaged mains cable.
• Do not let mains cables to come in touchwith the appliance door, specially whenthe door is hot.
• The shock protection of live and insulatedparts must be fastened in such a way thatit cannot be removed without tools.
• Connect the mains plug to the mainssocket only at the end of the installation.Make sure that there is access to themains plug after the installation.
• If the mains socket is loose, do not con-nect the mains plug.
• Do not pull the mains cable to disconnectthe appliance. Always pull the mainsplug.
• Use only correct isolation devices: lineprotecting cut-outs, fuses (screw typefuses removed from the holder), earthleakage trips and contactors.
• The electrical installation must have anisolation device which lets you disconnectthe appliance from the mains at all poles.The isolation device must have a contactopening width of minimum 3 mm.
• This appliance complies with the E.E.C.Directives
• Fully close the appliance door, beforeyou connect the mains plug to the mainssocket.
UseWarning! Risk of injury, burns orelectric shock or explosion.
• Use this appliance in a household envi-ronment.
• Do not change the specification of thisappliance.
• Make sure that the ventilation openingsare not blocked.
• Do not let the appliance stay unattendedduring operation.
• Deactivate the appliance after each use.• Be careful when you open the appliance
door while the appliance is in operation.Hot air can release.
• Do not operate the appliance with wethands or when it has contact with water.
• Do not apply pressure on the open door.• Do not use the appliance as a work sur-
face or as a storage surface.• Always keep the appliance door closed
when the appliance is in operation.• Open the appliance door carefully. The
use of ingredients with alcohol can causea mixture of alcohol and air.
• Do not let sparks or open flames to comein contact with the appliance when youopen the door.
• Do not put flammable products or itemsthat are wet with flammable products in,near or on the appliance.
Warning! Risk of damage to theappliance.
• To prevent damage or discoloration tothe enamel:– do not put ovenware or other objects inthe appliance directly on the bottom.– do not put aluminium foil directly on thebottom of the appliance.– do not put water directly into the hotappliance.– do not keep moist dishes and food inthe appliance after you finish the cooking.– be careful when you remove or installthe accessories.
ENGLISH 6
• Discoloration of the enamel has no effecton the performance of the appliance. It isnot a defect in the sense of the warrantylaw.
• Use a deep pan for moist cakes. Fruit jui-ces cause stains that can be permanent.
Care and CleaningWarning! Risk of injury, fire or damageto the appliance.
• Before maintenance, deactivate the ap-pliance and disconnect the mains plugfrom the mains socket.
• Make sure the appliance is cold. There isthe risk that the glass panels can break.
• Replace immediately the door glass pan-els when they are damaged. Contact theService.
• Be careful when you remove the doorfrom the appliance. The door is heavy!
• Clean regularly the appliance to preventthe deterioration of the surface material.
• Remaining fat or food in the appliancecan cause fire.
• If you use an oven spray, obey the safetyinstructions on the packaging.
Pyrolytic cleaningWarning! Risk of fire and burns.
• Before carrying out a Pyrolitic self-clean-ing function or the First Use functionplease remove from the oven cavity:– Any excess food residues, oil or grease
spills / deposits.– Any removable objects (including
shelves, side rails etc., provided withthe product) particularly any non-stickpots, pans, trays, utensils etc.
• Read carefully all the instructions for Py-rolytic cleaning.
• Keep children away from the appliancewhile the Pyrolytic cleaning is in opera-tion. The appliance becomes very hot.
• Pyrolitic cleaning is a high temperatureoperation that can release fumes fromcooking residues and construction materi-als, as such consumers are strongly ad-vised to:
– Provide good ventilation during andafter each Pyrolytic cleaning.
– Provide good ventilation during andafter the first use at maximum temper-ature operation.
– Remove any pets (especially birds)from the vicinity of the appliance loca-tion during and after the Pyrolyticcleaning and first use maximum tem-perature operation to a well ventilatedarea.
• Unlike all humans, some birds and rep-tiles can be extremely sensitive to poten-tial fumes emitted during the cleaningprocess of all Pyrolytic Ovens.
• Small pets can also be highly sensitive tothe localized temperature changes in thevicinity of all Pyrolytic Ovens when thePyrolytic self cleaning program is in oper-ation.
• Non-stick surfaces on pots, pans, trays,utensils etc., can be damaged by the hightemperature Pyrolytic cleaning operationof all Pyrolytic Ovens and can be also asource for low level harmful fumes.
• Fumes released from all Pyrolytic Ovens /Cooking Residues as described are notharmful to humans, including infants orpersons with medical conditions.
Internal light• The type of light bulb or halogen lamp
used for this appliance, is only for house-hold appliances. Do not use it for houselighting.
Warning! Risk of electrical shock.• Before replacing the lamp, disconnect the
appliance from the power supply.• Only use lamps with the same specifica-
tions.Disposal
Warning! Risk of injury or suffocation.• Disconnect the appliance from the mains
supply.• Cut off the mains cable and discard it.
ENGLISH 7
• Remove the door catch to prevent chil-dren and pets to get closed in the appli-ance.
InstallationWarning! Refer to the Safety chapters.Refer to the Assembly Instructions forthe installation.
Electrical installationWarning! Only a qualified person mustdo the electrical installation.The manufacturer is not responsible ifyou do not follow the safety precau-
tions from the chapter "Safety Information".This appliance is only supplied with a maincable.CableCable types applicable for installation orreplacement: H07 RN-F, H05 RN-F, H05RRF, H05 VV-F, H05 V2V2-F (T90), H05 BB-F.
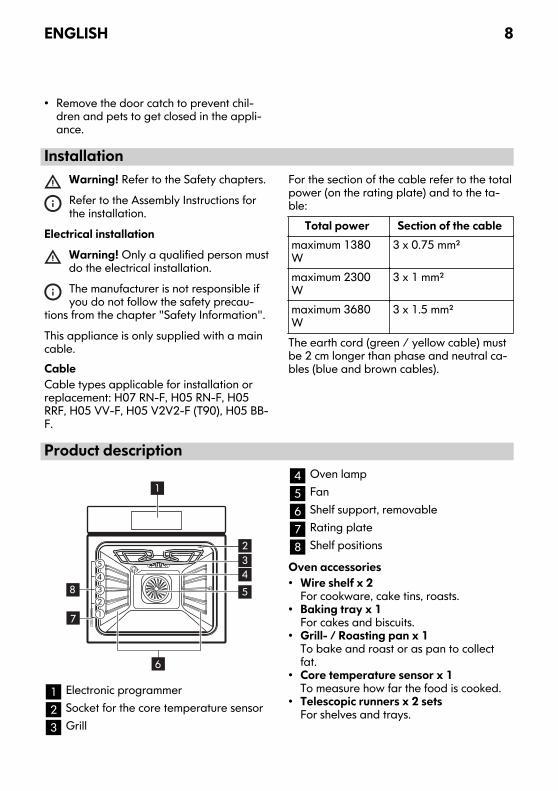
For the section of the cable refer to the totalpower (on the rating plate) and to the ta-ble:
Total power Section of the cablemaximum 1380W
3 x 0.75 mm²
maximum 2300W
3 x 1 mm²
maximum 3680W
3 x 1.5 mm²
The earth cord (green / yellow cable) mustbe 2 cm longer than phase and neutral ca-bles (blue and brown cables).
Product description
7
8 5
6
54
123
1
432
1 Electronic programmer2 Socket for the core temperature sensor3 Grill
4 Oven lamp5 Fan6 Shelf support, removable7 Rating plate8 Shelf positions
Oven accessories• Wire shelf x 2
For cookware, cake tins, roasts.• Baking tray x 1
For cakes and biscuits.• Grill- / Roasting pan x 1
To bake and roast or as pan to collectfat.
• Core temperature sensor x 1To measure how far the food is cooked.
• Telescopic runners x 2 setsFor shelves and trays.
ENGLISH 8
Before first useWarning! Refer to the Safety chapters.
Initial cleaning• Remove all accessories and removable
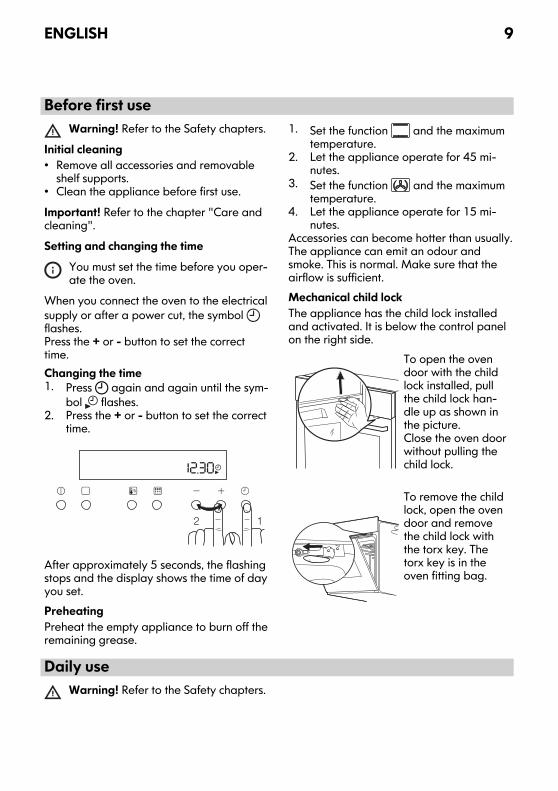
shelf supports.• Clean the appliance before first use.Important! Refer to the chapter "Care andcleaning".Setting and changing the time
You must set the time before you oper-ate the oven.
When you connect the oven to the electricalsupply or after a power cut, the symbol flashes.Press the + or - button to set the correcttime.Changing the time1. Press again and again until the sym-
bol flashes.2. Press the + or - button to set the correct
time.
12
After approximately 5 seconds, the flashingstops and the display shows the time of dayyou set.PreheatingPreheat the empty appliance to burn off theremaining grease.
1. Set the function and the maximumtemperature.
2. Let the appliance operate for 45 mi-nutes.
3. Set the function and the maximumtemperature.
4. Let the appliance operate for 15 mi-nutes.
Accessories can become hotter than usually.The appliance can emit an odour andsmoke. This is normal. Make sure that theairflow is sufficient.Mechanical child lockThe appliance has the child lock installedand activated. It is below the control panelon the right side.
To open the ovendoor with the childlock installed, pullthe child lock han-dle up as shown inthe picture.Close the oven doorwithout pulling thechild lock.
To remove the childlock, open the ovendoor and removethe child lock withthe torx key. Thetorx key is in theoven fitting bag.
Daily useWarning! Refer to the Safety chapters.
ENGLISH 9
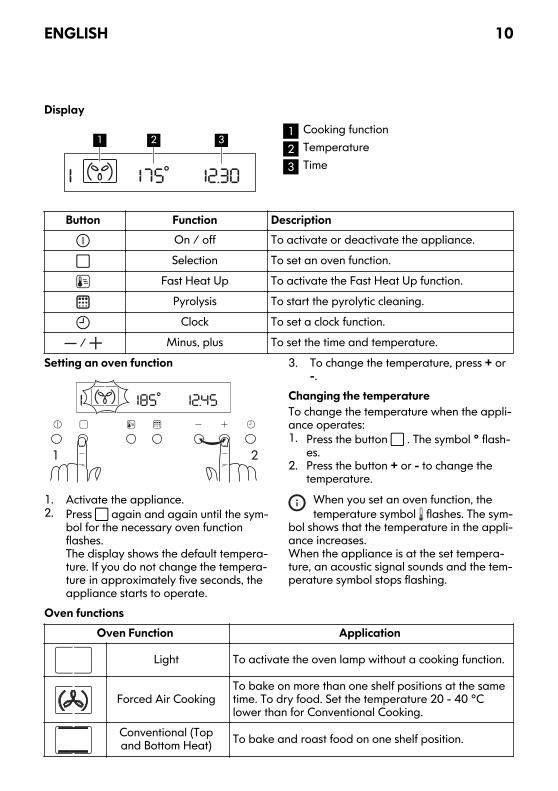
Display
1 2 31 Cooking function2 Temperature3 Time
Button Function DescriptionOn / off To activate or deactivate the appliance.Selection To set an oven function.
Fast Heat Up To activate the Fast Heat Up function.Pyrolysis To start the pyrolytic cleaning.
Clock To set a clock function.
/ Minus, plus To set the time and temperature. Setting an oven function
1 2
1. Activate the appliance.2. Press again and again until the sym-
bol for the necessary oven functionflashes.The display shows the default tempera-ture. If you do not change the tempera-ture in approximately five seconds, theappliance starts to operate.
3. To change the temperature, press + or-.
Changing the temperatureTo change the temperature when the appli-ance operates:1. Press the button . The symbol ° flash-
es.2. Press the button + or - to change the
temperature.When you set an oven function, thetemperature symbol flashes. The sym-
bol shows that the temperature in the appli-ance increases.When the appliance is at the set tempera-ture, an acoustic signal sounds and the tem-perature symbol stops flashing.
Oven functionsOven Function Application
Light To activate the oven lamp without a cooking function.
Forced Air CookingTo bake on more than one shelf positions at the sametime. To dry food. Set the temperature 20 - 40 °Clower than for Conventional Cooking.
Conventional (Topand Bottom Heat) To bake and roast food on one shelf position.
ENGLISH 10
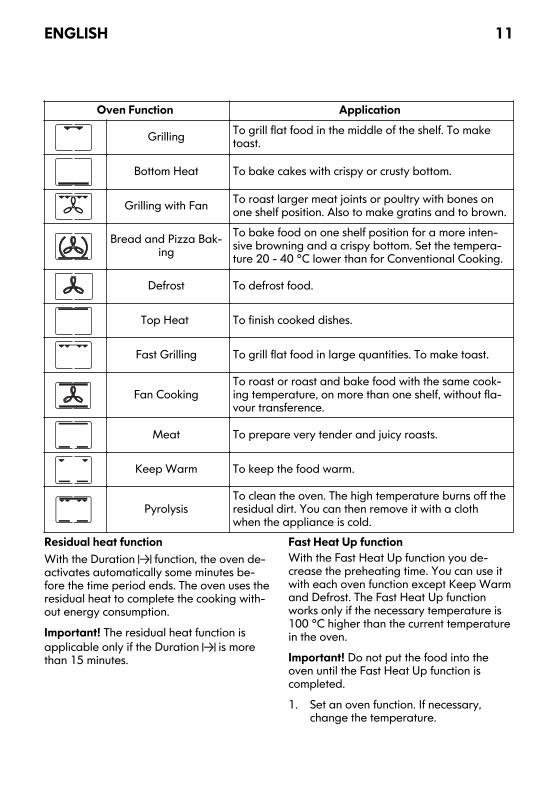
Oven Function Application
Grilling To grill flat food in the middle of the shelf. To maketoast.
Bottom Heat To bake cakes with crispy or crusty bottom.
Grilling with Fan To roast larger meat joints or poultry with bones onone shelf position. Also to make gratins and to brown.
Bread and Pizza Bak-ing
To bake food on one shelf position for a more inten-sive browning and a crispy bottom. Set the tempera-ture 20 - 40 °C lower than for Conventional Cooking.
Defrost To defrost food.
Top Heat To finish cooked dishes.
Fast Grilling To grill flat food in large quantities. To make toast.
Fan CookingTo roast or roast and bake food with the same cook-ing temperature, on more than one shelf, without fla-vour transference.
Meat To prepare very tender and juicy roasts.
Keep Warm To keep the food warm.
PyrolysisTo clean the oven. The high temperature burns off theresidual dirt. You can then remove it with a clothwhen the appliance is cold.
Residual heat functionWith the Duration function, the oven de-activates automatically some minutes be-fore the time period ends. The oven uses theresidual heat to complete the cooking with-out energy consumption.Important! The residual heat function isapplicable only if the Duration is morethan 15 minutes.
Fast Heat Up functionWith the Fast Heat Up function you de-crease the preheating time. You can use itwith each oven function except Keep Warmand Defrost. The Fast Heat Up functionworks only if the necessary temperature is100 °C higher than the current temperaturein the oven.Important! Do not put the food into theoven until the Fast Heat Up function iscompleted.1. Set an oven function. If necessary,
change the temperature.
ENGLISH 11
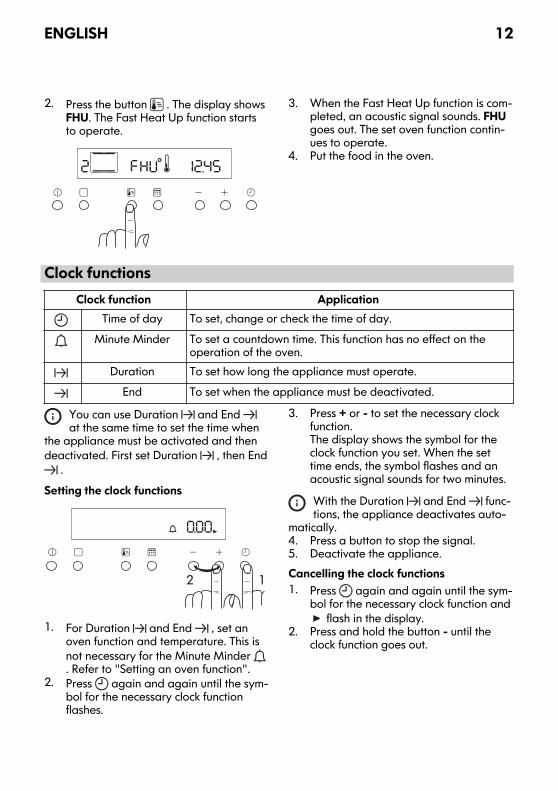
2. Press the button . The display showsFHU. The Fast Heat Up function startsto operate.
3. When the Fast Heat Up function is com-pleted, an acoustic signal sounds. FHUgoes out. The set oven function contin-ues to operate.
4. Put the food in the oven.
Clock functionsClock function Application
Time of day To set, change or check the time of day.Minute Minder To set a countdown time. This function has no effect on the
operation of the oven.Duration To set how long the appliance must operate.
End To set when the appliance must be deactivated.
You can use Duration and End at the same time to set the time when
the appliance must be activated and thendeactivated. First set Duration , then End
.Setting the clock functions
12
1. For Duration and End , set anoven function and temperature. This isnot necessary for the Minute Minder . Refer to "Setting an oven function".
2. Press again and again until the sym-bol for the necessary clock functionflashes.
3. Press + or - to set the necessary clockfunction.The display shows the symbol for theclock function you set. When the settime ends, the symbol flashes and anacoustic signal sounds for two minutes.
With the Duration and End func-tions, the appliance deactivates auto-
matically.4. Press a button to stop the signal.5. Deactivate the appliance.Cancelling the clock functions1. Press again and again until the sym-
bol for the necessary clock function and flash in the display.
2. Press and hold the button - until theclock function goes out.
ENGLISH 12
Using the accessoriesWarning! Refer to the Safety chapters.
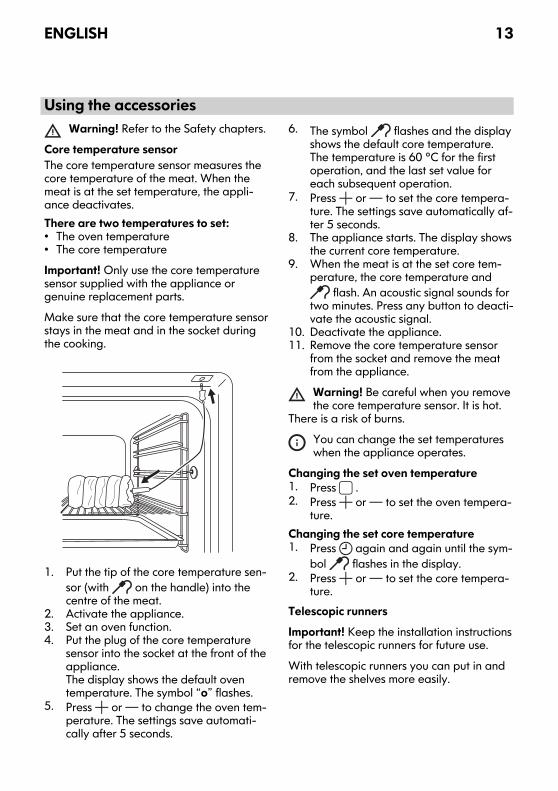
Core temperature sensorThe core temperature sensor measures thecore temperature of the meat. When themeat is at the set temperature, the appli-ance deactivates.There are two temperatures to set:• The oven temperature• The core temperatureImportant! Only use the core temperaturesensor supplied with the appliance orgenuine replacement parts.Make sure that the core temperature sensorstays in the meat and in the socket duringthe cooking.
1. Put the tip of the core temperature sen-sor (with on the handle) into thecentre of the meat.
2. Activate the appliance.3. Set an oven function.4. Put the plug of the core temperature
sensor into the socket at the front of theappliance.The display shows the default oventemperature. The symbol “o” flashes.
5. Press or to change the oven tem-perature. The settings save automati-cally after 5 seconds.
6. The symbol flashes and the displayshows the default core temperature.The temperature is 60 °C for the firstoperation, and the last set value foreach subsequent operation.
7. Press or to set the core tempera-ture. The settings save automatically af-ter 5 seconds.
8. The appliance starts. The display showsthe current core temperature.
9. When the meat is at the set core tem-perature, the core temperature and
flash. An acoustic signal sounds fortwo minutes. Press any button to deacti-vate the acoustic signal.
10. Deactivate the appliance.11. Remove the core temperature sensor
from the socket and remove the meatfrom the appliance.Warning! Be careful when you removethe core temperature sensor. It is hot.
There is a risk of burns.You can change the set temperatureswhen the appliance operates.
Changing the set oven temperature1. Press .2. Press or to set the oven tempera-
ture.Changing the set core temperature1. Press again and again until the sym-
bol flashes in the display.2. Press or to set the core tempera-
ture.Telescopic runnersImportant! Keep the installation instructionsfor the telescopic runners for future use.With telescopic runners you can put in andremove the shelves more easily.
ENGLISH 13
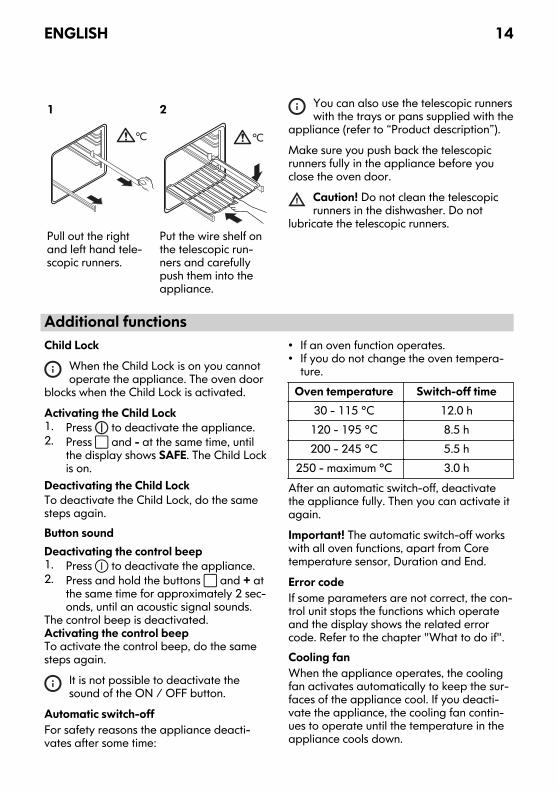
1
°C
Pull out the rightand left hand tele-scopic runners.
2
°C
Put the wire shelf onthe telescopic run-ners and carefullypush them into theappliance.
You can also use the telescopic runnerswith the trays or pans supplied with the
appliance (refer to “Product description”).Make sure you push back the telescopicrunners fully in the appliance before youclose the oven door.
Caution! Do not clean the telescopicrunners in the dishwasher. Do not
lubricate the telescopic runners.
Additional functionsChild Lock
When the Child Lock is on you cannotoperate the appliance. The oven door
blocks when the Child Lock is activated.Activating the Child Lock1. Press to deactivate the appliance.2. Press and - at the same time, until
the display shows SAFE. The Child Lockis on.
Deactivating the Child LockTo deactivate the Child Lock, do the samesteps again.Button soundDeactivating the control beep1. Press to deactivate the appliance.2. Press and hold the buttons and + at
the same time for approximately 2 sec-onds, until an acoustic signal sounds.
The control beep is deactivated.Activating the control beepTo activate the control beep, do the samesteps again.
It is not possible to deactivate thesound of the ON / OFF button.
Automatic switch-offFor safety reasons the appliance deacti-vates after some time:
• If an oven function operates.• If you do not change the oven tempera-
ture.Oven temperature Switch-off time
30 - 115 °C 12.0 h120 - 195 °C 8.5 h200 - 245 °C 5.5 h
250 - maximum °C 3.0 hAfter an automatic switch-off, deactivatethe appliance fully. Then you can activate itagain.Important! The automatic switch-off workswith all oven functions, apart from Coretemperature sensor, Duration and End.Error codeIf some parameters are not correct, the con-trol unit stops the functions which operateand the display shows the related errorcode. Refer to the chapter "What to do if".Cooling fanWhen the appliance operates, the coolingfan activates automatically to keep the sur-faces of the appliance cool. If you deacti-vate the appliance, the cooling fan contin-ues to operate until the temperature in theappliance cools down.
ENGLISH 14
Safety thermostatIncorrect operation of the appliance or de-fective components can cause dangerousoverheating. To prevent this, the oven has a
safety thermostat which interrupts the pow-er supply. The oven activates again auto-matically when the temperature drops.
Helpful hints and tips• The appliance has five shelf levels. Count
the shelf levels from the bottom of the ap-pliance floor.
• The appliance has a special system whichcirculates the air and constantly recyclesthe steam. With this system you can cookin a steamy environment and keep thefood soft inside and crusty outside. It de-creases the cooking time and energyconsumption to a minimum.
• Moisture can condense in the applianceor on the door glass panels. This is nor-mal. Always stand back from the appli-ance when you open the appliance doorwhile cooking. To decrease the conden-sation, operate the appliance for 10 mi-nutes before cooking.
• Clean the moisture after each use of theappliance.
• Do not put the objects directly on the ap-pliance floor and do not put aluminiumfoil on the components when you cook.This can change the baking results andcause damage to the enamel.
Baking cakes• Do not open the oven door before 3/4 of
the set cooking time is up.
• If you use two baking trays at the sametime, keep one empty level betweenthem.
Cooking meat and fish• Use a deep pan for very fatty food to
prevent the oven from stains that can bepermanent.
• Leave the meat for approximately 15 mi-nutes before carving so that the juicedoes not seep out.
• To prevent too much smoke in the ovenduring roasting, add some water into thedeep pan. To prevent the smoke conden-sation, add water each time after it driesup.
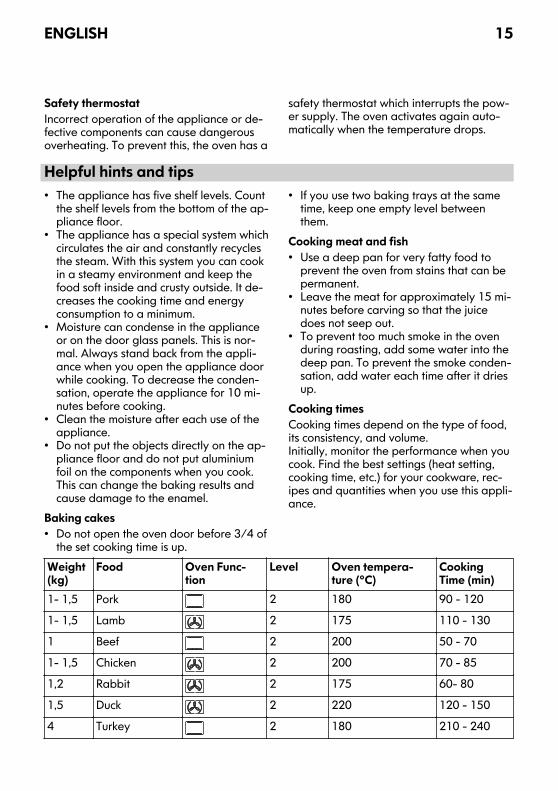
Cooking timesCooking times depend on the type of food,its consistency, and volume.Initially, monitor the performance when youcook. Find the best settings (heat setting,cooking time, etc.) for your cookware, rec-ipes and quantities when you use this appli-ance.
Weight(kg)
Food Oven Func-tion
Level Oven tempera-ture (°C)
CookingTime (min)
1- 1,5 Pork 2 180 90 - 120
1- 1,5 Lamb 2 175 110 - 130
1 Beef 2 200 50 - 70
1- 1,5 Chicken 2 200 70 - 85
1,2 Rabbit 2 175 60- 80
1,5 Duck 2 220 120 - 150
4 Turkey 2 180 210 - 240
ENGLISH 15
Weight(kg)
Food Oven Func-tion
Level Oven tempera-ture (°C)
CookingTime (min)
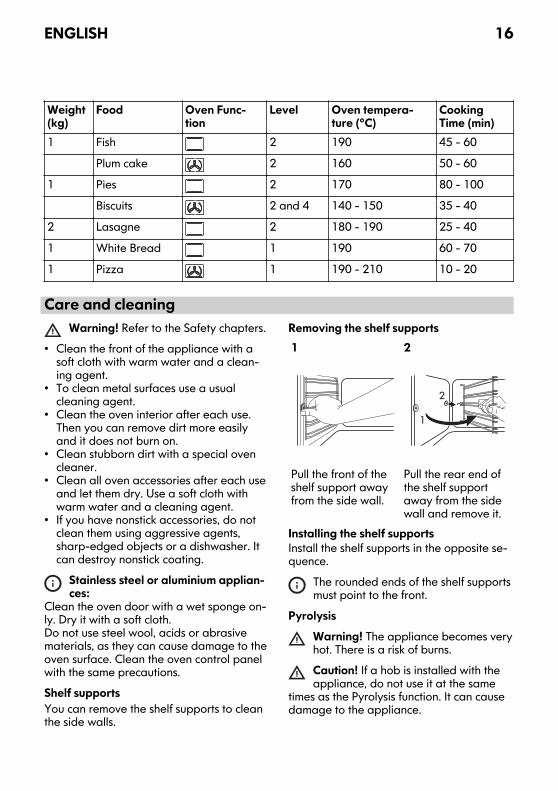
1 Fish 2 190 45 - 60
Plum cake 2 160 50 - 60
1 Pies 2 170 80 - 100
Biscuits 2 and 4 140 - 150 35 - 40
2 Lasagne 2 180 - 190 25 - 40
1 White Bread 1 190 60 - 70
1 Pizza 1 190 - 210 10 - 20
Care and cleaningWarning! Refer to the Safety chapters.
• Clean the front of the appliance with asoft cloth with warm water and a clean-ing agent.
• To clean metal surfaces use a usualcleaning agent.
• Clean the oven interior after each use.Then you can remove dirt more easilyand it does not burn on.
• Clean stubborn dirt with a special ovencleaner.
• Clean all oven accessories after each useand let them dry. Use a soft cloth withwarm water and a cleaning agent.
• If you have nonstick accessories, do notclean them using aggressive agents,sharp-edged objects or a dishwasher. Itcan destroy nonstick coating.
Stainless steel or aluminium applian-ces:
Clean the oven door with a wet sponge on-ly. Dry it with a soft cloth.Do not use steel wool, acids or abrasivematerials, as they can cause damage to theoven surface. Clean the oven control panelwith the same precautions.Shelf supportsYou can remove the shelf supports to cleanthe side walls.
Removing the shelf supports1
Pull the front of theshelf support awayfrom the side wall.
2
2
1
Pull the rear end ofthe shelf supportaway from the sidewall and remove it.
Installing the shelf supportsInstall the shelf supports in the opposite se-quence.
The rounded ends of the shelf supportsmust point to the front.
PyrolysisWarning! The appliance becomes veryhot. There is a risk of burns.Caution! If a hob is installed with theappliance, do not use it at the same
times as the Pyrolysis function. It can causedamage to the appliance.
ENGLISH 16
1. Remove the removable shelf supportsand accessories from the appliance.Refer to "Removing the shelf supports".Caution! Do not let the removableshelf supports stay in the appliance
during the Pyrolysis. There is a risk ofdamage.2. Remove the worst dirt manually.3. Fully close the oven door.
The cleaning procedure cannot start ifyou do not close the oven door and if
you do not remove the core temperaturesensor from the socket.4. Press again and again until the dis-
play shows .– The display shows P1 and one
after the other.– An acoustic signal sounds as a re-
minder to remove all accessoriesfrom the oven.
– The clock display shows 1:30.– Duration flashes.
5. When flashes, press + or - to set thenecessary procedure:• P1 - if the oven is not very dirty. The
procedure is 1 h 30 min long.• P2 - if the oven is more dirty. The
procedure is 2 h 30 min long.6. Press to start the procedure.
The bars on the symbol come on oneby one to show that the temperature inthe appliance increases. The symbol flashes.After some minutes the door locks. Thedisplay shows the symbol .
When the Pyrolysis is completed, the dis-play shows the time of day. The oven doorstays locked. When the appliance is coolagain, an acoustic signal sounds and thedoor unlocks.
To stop the Pyrolysis before it is com-pleted, press .
Setting the end time for the Pyrolysis
You can use the End function to de-lay the start of the procedure.
1. Start the Pyrolysis procedure.2. Press again and again until the sym-
bol flashes. The display shows thetime for the end of the Pyrolysis.
3. Press + or - to adjust the time for theend of the Pyrolysis.
Oven lampWarning! Be careful when you changethe oven lamp. There is a risk of
electrical shock.Before you change the oven lamp:• Deactivate the oven.• Remove the fuses in the fuse box or deac-
tivate the circuit breaker.Put a cloth on the bottom of the ovento prevent damage to the oven light
and glass cover.Always hold the halogen lamp with a clothto prevent grease residue from burning onthe lamp.1. Turn the glass cover counterclockwise to
remove it.2. Clean the glass cover.3. Replace the oven light bulb with a 40
watt, 230V (50Hz), 350 °C heat resist-ant oven light bulb (Connection type:G9).
4. Install the glass cover.Cleaning the oven doorThe oven door has four glass panels. Youcan remove the oven door and the internalglass panels to clean them.
The oven door can close if you try toremove the glass panels before you re-
move the oven door.
ENGLISH 17
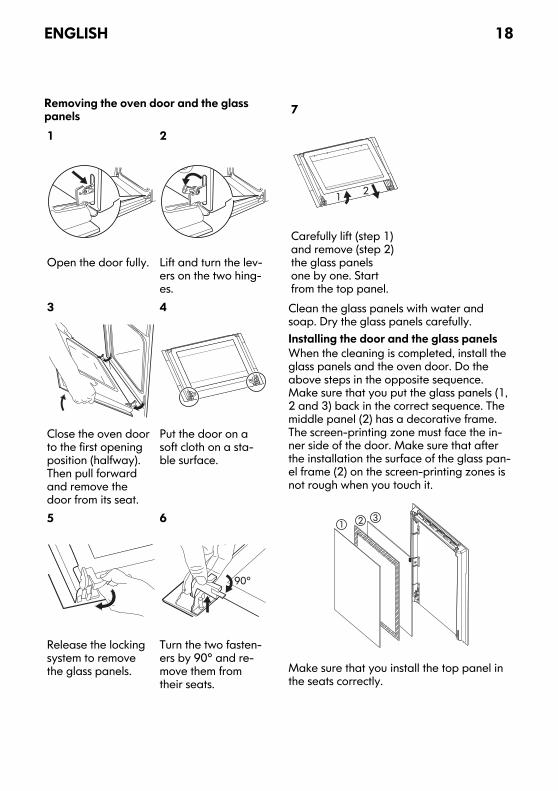
Removing the oven door and the glasspanels1
Open the door fully.
2
Lift and turn the lev-ers on the two hing-es.
3
Close the oven doorto the first openingposition (halfway).Then pull forwardand remove thedoor from its seat.
4
Put the door on asoft cloth on a sta-ble surface.
5
Release the lockingsystem to removethe glass panels.
6
90°
Turn the two fasten-ers by 90° and re-move them fromtheir seats.
7
21
Carefully lift (step 1)and remove (step 2)the glass panelsone by one. Startfrom the top panel.
Clean the glass panels with water andsoap. Dry the glass panels carefully.Installing the door and the glass panelsWhen the cleaning is completed, install theglass panels and the oven door. Do theabove steps in the opposite sequence.Make sure that you put the glass panels (1,2 and 3) back in the correct sequence. Themiddle panel (2) has a decorative frame.The screen-printing zone must face the in-ner side of the door. Make sure that afterthe installation the surface of the glass pan-el frame (2) on the screen-printing zones isnot rough when you touch it.
1 2 3
Make sure that you install the top panel inthe seats correctly.
ENGLISH 18
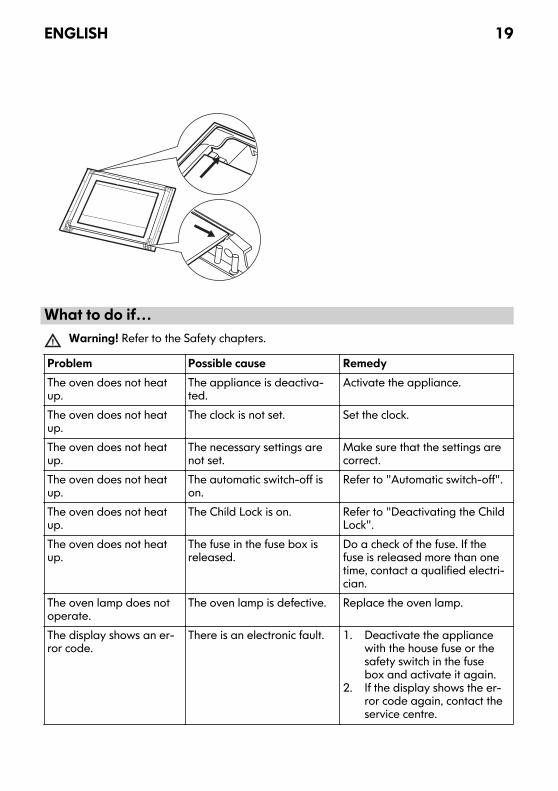
What to do if…Warning! Refer to the Safety chapters.
Problem Possible cause RemedyThe oven does not heatup.
The appliance is deactiva-ted.
Activate the appliance.
The oven does not heatup.
The clock is not set. Set the clock.
The oven does not heatup.
The necessary settings arenot set.
Make sure that the settings arecorrect.
The oven does not heatup.
The automatic switch-off ison.
Refer to "Automatic switch-off".
The oven does not heatup.
The Child Lock is on. Refer to "Deactivating the ChildLock".
The oven does not heatup.
The fuse in the fuse box isreleased.
Do a check of the fuse. If thefuse is released more than onetime, contact a qualified electri-cian.
The oven lamp does notoperate.
The oven lamp is defective. Replace the oven lamp.
The display shows an er-ror code.
There is an electronic fault. 1. Deactivate the appliancewith the house fuse or thesafety switch in the fusebox and activate it again.
2. If the display shows the er-ror code again, contact theservice centre.
ENGLISH 19
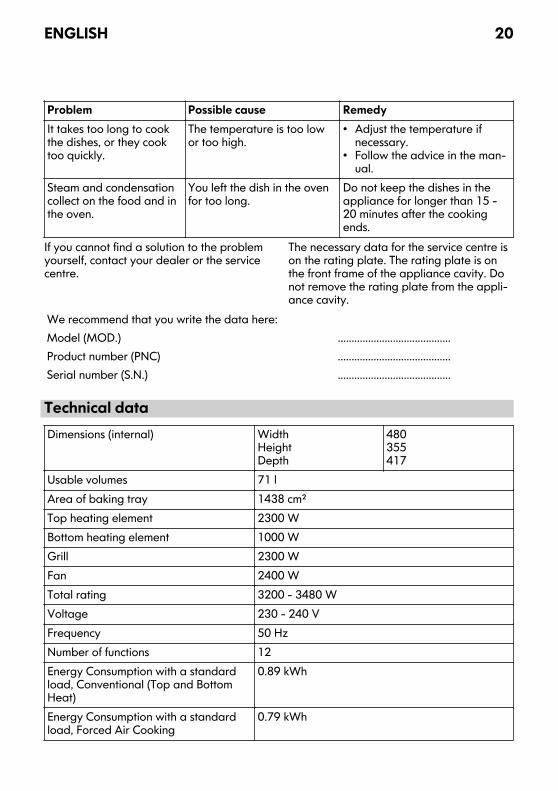
Problem Possible cause RemedyIt takes too long to cookthe dishes, or they cooktoo quickly.
The temperature is too lowor too high.
• Adjust the temperature ifnecessary.
• Follow the advice in the man-ual.
Steam and condensationcollect on the food and inthe oven.
You left the dish in the ovenfor too long.
Do not keep the dishes in theappliance for longer than 15 -20 minutes after the cookingends.
If you cannot find a solution to the problemyourself, contact your dealer or the servicecentre.
The necessary data for the service centre ison the rating plate. The rating plate is onthe front frame of the appliance cavity. Donot remove the rating plate from the appli-ance cavity.
We recommend that you write the data here:Model (MOD.) .........................................Product number (PNC) .........................................Serial number (S.N.) .........................................
Technical dataDimensions (internal) Width
HeightDepth
480355417
Usable volumes 71 lArea of baking tray 1438 cm²Top heating element 2300 WBottom heating element 1000 WGrill 2300 WFan 2400 WTotal rating 3200 - 3480 WVoltage 230 - 240 VFrequency 50 HzNumber of functions 12Energy Consumption with a standardload, Conventional (Top and BottomHeat)
0.89 kWh
Energy Consumption with a standardload, Forced Air Cooking
0.79 kWh
ENGLISH 20
Environment concernsRecycle the materials with the symbol .Put the packaging in applicable containersto recycle it.Help protect the environment and humanhealth and to recycle waste of electricaland electronic appliances. Do not disposeappliances marked with the symbol withthe household waste. Return the product toyour local recycling facility or contact yourmunicipal office.
Packaging materialThe packaging material is environmentally-friendly and recyclable. Plastic parts aremarked with international abbreviationssuch as PE, PS, etc. Dispose of the packag-ing material in the containers provided forthis purpose at your local waste manage-ment facility.
IKEA GUARANTEEHow long is the IKEA guarantee valid?This guarantee is valid for five (5) yearsfrom the original date of purchase of Yourappliance at IKEA, unless the appliance isnamed LAGAN in which case two (2) yearsof guarantee apply. The original sales re-ceipt is required as proof of purchase. Ifservice work is carried out under guarantee,this will not extend the guarantee period forthe appliance,Which appliances are not covered by theIKEA five (5) years guarantee?The range of appliances named LAGANand all appliances purchased in IKEA be-fore 1st of August 2007Who will execute the service?IKEA service provider will provide the serv-ice through its own service operations orauthorized service partner network.
What does this guarantee cover?The guarantee covers faults of the appli-ance, which have been caused by faultyconstruction or material faults from the dateof purchase from IKEA. This guarantee ap-plies to domestic use only. The exceptionsare specified under the headline “What isnot covered under this guarantee?” Withinthe guarantee period, the costs to remedythe fault e.g. repairs, parts, labour and trav-el will be covered, provided that the appli-ance is accessible for repair without specialexpenditure. On these conditions the EUguidelines (Nr. 99/44/EG) and the respec-tive local regulations are applicable. Re-placed parts become the property of IKEA.What will IKEA do to correct the problem?IKEA appointed service provider will exam-ine the product and decide, at its sole dis-cretion, if it is covered under this guarantee.If considered covered, IKEA service provideror its authorized service partner through itsown service operations, will then, at its solediscretion, either repair the defective prod-uct or replace it with the same or a compa-rable product.What is not covered under thisguarantee?• Normal wear and tear.
ENGLISH 21
• Deliberate or negligent damage, dam-age caused by failure to observe operat-ing instructions, incorrect installation or byconnection to the wrong voltage, dam-age caused by chemical or electro-chem-ical reaction, rust, corrosion or waterdamage including but not limited to dam-age caused by excessive lime in the wa-ter supply, damage caused by abnormalenvironmental conditions.
• Consumable parts including batteriesand lamps.
• Non-functional and decorative partswhich do not affect normal use of the ap-pliance, including any scratches and pos-sible color differences.
• Accidental damage caused by foreignobjects or substances and cleaning or un-blocking of filters, drainage systems orsoap drawers.
• Damage to the following parts: ceramicglass, accessories, crockery and cutlerybaskets, feed and drainage pipes, seals,lamps and lamp covers, screens, knobs,casings and parts of casings. Unless suchdamages can be proved to have beencaused by production faults.
• Cases where no fault could be found dur-ing a technician’s visit.
• Repairs not carried out by our appointedservice providers and/or an authorizedservice contractual partner or where non-original parts have been used.
• Repairs caused by installation which isfaulty or not according to specification.
• The use of the appliance in a non-domes-tic environment i.e. professional use.
• Transportation damages. If a customertransports the product to their home orother address, IKEA is not liable for anydamage that may occur during transport.However, if IKEA delivers the product tothe customer's delivery address, thendamage to the product that occurs duringthis delivery will be covered by this guar-antee.
• Cost for carrying out the initial installationof the IKEA appliance. However, if anIKEA service provider or its authorizedservice partner repairs or replaces theappliance under the terms of this guaran-tee, the service provider or its authorizedservice partner will re-install the repairedappliance or install the replacement, ifnecessary.
This restriction do not apply to fault-freework carried out by a qualified specialistusing our original parts in order to adaptthe appliance to the technical safety specifi-cations of another EU country.How country law appliesThe IKEA guarantee gives You specific legalrights, which covers or exceed local de-mands. However these conditions do notlimit in any way consumer rights describedin the local legislationArea of validityFor appliances which are purchased in oneEU country and taken to another EU coun-try, the services will be provided in theframework of the guarantee conditions nor-mal in the new country. An obligation tocarry out services in the framework of theguarantee exists only if the appliance com-plies and is installed in accordance with:• the technical specifications of the country
in which the guarantee claim is made;• the Assembly Instructions and User Man-
ual Safety Information;The dedicated After Sales Service forIKEA appliances:Please do not hesitate to contact IKEA AfterSales Service to:1. make a service request under this guar-
antee;2. ask for clarification on installation of the
IKEA appliance in the dedicated IKEAkitchen furniture. The service won’t pro-vide clarifications related to:– the overall IKEA kitchen installation;– connections to electricity (if machine
comes without plug and cable), towater and to gas since they have tobe executed by an authorized serv-ice engineer.
ENGLISH 22
3. ask for clarification on user manual con-tents and specifications of the IKEA ap-pliance.
To ensure that we provide you with the bestassistance, please read carefully the As-sembly Instructions and/or the User Manualsection of this booklet before contacting us.How to reach us if You need our service
Please refer to the last page of this manualfor the full list of IKEA appointed contactsand relative national phone numbers.Important! In order to provide You with aquicker service, we recommend that Youuse the specific phone numbers listed at the
end of this manual. Always refer to thenumbers listed in the booklet of the specificappliance You need an assistance for.Before calling us, assure that You have tohand the IKEA article number (8 digit code)for the appliance of which you need ourassistance.Important! SAVE THE SALES RECEIPT! It isYour proof of purchase and required for theguarantee to apply. Note that the receiptreports also the IKEA article name andnumber (8 digit code) for each of theappliances you have purchased.Do You need extra help?For any additional questions not related toAfter Sales of your appliances, please con-tact our nearest IKEA store call centre. Werecommend you read the appliance docu-mentation carefully before contacting us.
ENGLISH 23
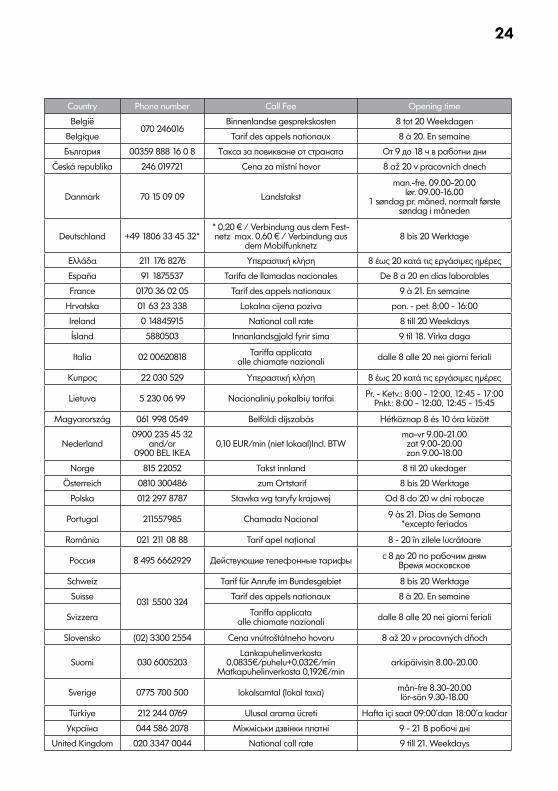
emit gninepOeeF llaCrebmun enohPyrtnuoCBelgië
070 246016 Binnenlandse gesprekskosten 8 tot 20 Weekdagen
eniames nE .02 à 8 xuanoitan sleppa sed firaT euqigleBБългария 00359 888 16 0 8 Такса за повикване от страната От 9 до 18 ч в работни дни
Česká republika 246 019721 Cena za místní hovor 8 až 20 v pracovních dnech
Danmark 70 15 09 09 Landstakst man.-fre. 09.00-20.00
lør. 09.00-16.001 søndag pr. måned, normalt første
søndag i måneden
Deutschland +49 1806 33 45 32* * 0,20 € / Verbindung aus dem Fest-netz max. 0,60 € / Verbindung aus
dem Mobilfunknetz8 bis 20 Werktage
Ελλάδα 211 176 8276 Υπεραστική κλήση 8 έως 20 κατά τις εργάσιμες ημέρες España 91 1875537 Tarifa de llamadas nacionales De 8 a 20 en días laborables France 0170 36 02 05 Tarif des appels nationaux 9 à 21. En semaine
Hrvatska 01 63 23 338 Lokalna cijena poziva pon. - pet. 8:00 - 16:00Ireland 0 14845915 National call rate 8 till 20 Weekdays Ísland 5880503 Innanlandsgjald fyrir síma 9 til 18. Virka daga
Italia 02 00620818 Tariffa applicataalle chiamate nazionali dalle 8 alle 20 nei giorni feriali
Κυπρος 22 030 529 Υπεραστική κλήση 8 έως 20 κατά τις εργάσιμες ημέρες
Lietuva 5 230 06 99 Nacionalinių pokalbių tarifai Pr. - Ketv.: 8:00 - 12:00, 12:45 - 17:00Pnkt.: 8:00 - 12:00, 12:45 - 15:45
Magyarország 061 998 0549 Belföldi díjszabás Hétköznap 8 és 10 óra között
Nederland 0900 235 45 32
and/or0900 BEL IKEA
0,10 EUR/min (niet lokaal)Incl. BTWma-vr 9.00-21.00zat 9.00-20.00zon 9.00-18.00
Norge 815 22052 Takst innland 8 til 20 ukedager Österreich 0810 300486 zum Ortstarif 8 bis 20 Werktage
Polska 012 297 8787 Stawka wg taryfy krajowej Od 8 do 20 w dni robocze
Portugal 211557985 Chamada Nacional 9 às 21. Dias de Semana*excepto feriados
România 021 211 08 88 Tarif apel naţional 8 - 20 în zilele lucrătoare
Россия 8 495 6662929 Действующие телефонные тарифы с 8 до 20 по рабочим днямВремя московское
Schweiz
031 5500 324
Tarif für Anrufe im Bundesgebiet 8 bis 20 Werktage eniames nE .02 à 8 xuanoitan sleppa sed firaT essiuS
Svizzera Tariffa applicataalle chiamate nazionali dalle 8 alle 20 nei giorni feriali
Slovensko (02) 3300 2554 Cena vnútroštátneho hovoru 8 až 20 v pracovných dňoch
Suomi 030 6005203Lankapuhelinverkosta
0,0835€/puhelu+0,032€/minMatkapuhelinverkosta 0,192€/min
arkipäivisin 8.00-20.00
Sverige 0775 700 500 lokalsamtal (lokal taxa) mån-fre 8.30-20.00lör-sön 9.30-18.00
Türkiye 212 244 0769 Ulusal arama ücreti Hafta içi saat 09:00’dan 18:00’a kadar Україна 044 586 2078 Міжміськи дзвінки платні 9 - 21 В робочі дні
United Kingdom 020 3347 0044 National call rate 9 till 21. Weekdays
24

25

26

27

© Inter IKEA Systems B.V. 2008 AA-720220-2
8929
5404
5-G
-212
013