Embed Size (px)
Citation preview

KPI Net Training & Reference Guide
©Copyright 2017. Houston Digital Corporation

.
KPINet.........................................................................................................1
Launching KPINet....................................................................................................... 1
Loading your Data ...................................................................................................... 2
Step 1 ............................................................................................................................2
Step 2 ............................................................................................................................2
Step 3 ............................................................................................................................2
Step 4 ............................................................................................................................3
Editing Your Data ....................................................................................................... 4
Area’s.............................................................................................................................4
(1) Filter Area ..............................................................................................................4
(2) Data Area...............................................................................................................4
(3) Row Area...............................................................................................................4
(4) Column Area...........................................................................................................4
Adding Fields ..................................................................................................................5
Field List......................................................................................................................5
Customer .................................................................................................................5
Vehicle.....................................................................................................................5
Rental Car Company..................................................................................................5
Insurance Company ..................................................................................................5 Repair
Order.............................................................................................................6
Marketing.................................................................................................................6
Accounts Receivable..................................................................................................6
Production................................................................................................................6
Parts and Sublets......................................................................................................6
Labor and Techs.......................................................................................................6
Dates.......................................................................................................................7
Sales and Costs ........................................................................................................7

Rates.......................................................................................................................7
Organizing Data ..............................................................................................................8
Sort ............................................................................................................................8
Filter...........................................................................................................................8 Drag
and Drop.............................................................................................................8
Right Click Menu ..........................................................................................................8
Saving Your Data........................................................................................................ 9
Save...............................................................................................................................9
Remove..........................................................................................................................9
Export/Print ....................................................................................................................9


KPINet
Summit’s KPINet is a pivot table based custom report engine. Collision Repairers will be able to
sort, count, and total almost any data available in Summit. Take your time when reviewing
this guide as there are literally millions of report possibilities.
Launching KPINet
There are two ways to launch KPINet from Summit’s System Module
(1) Left click on the KPINet link on the left side of the screen.
(2) Right click on the Open RO list, select analysis, then left click on KPINet.
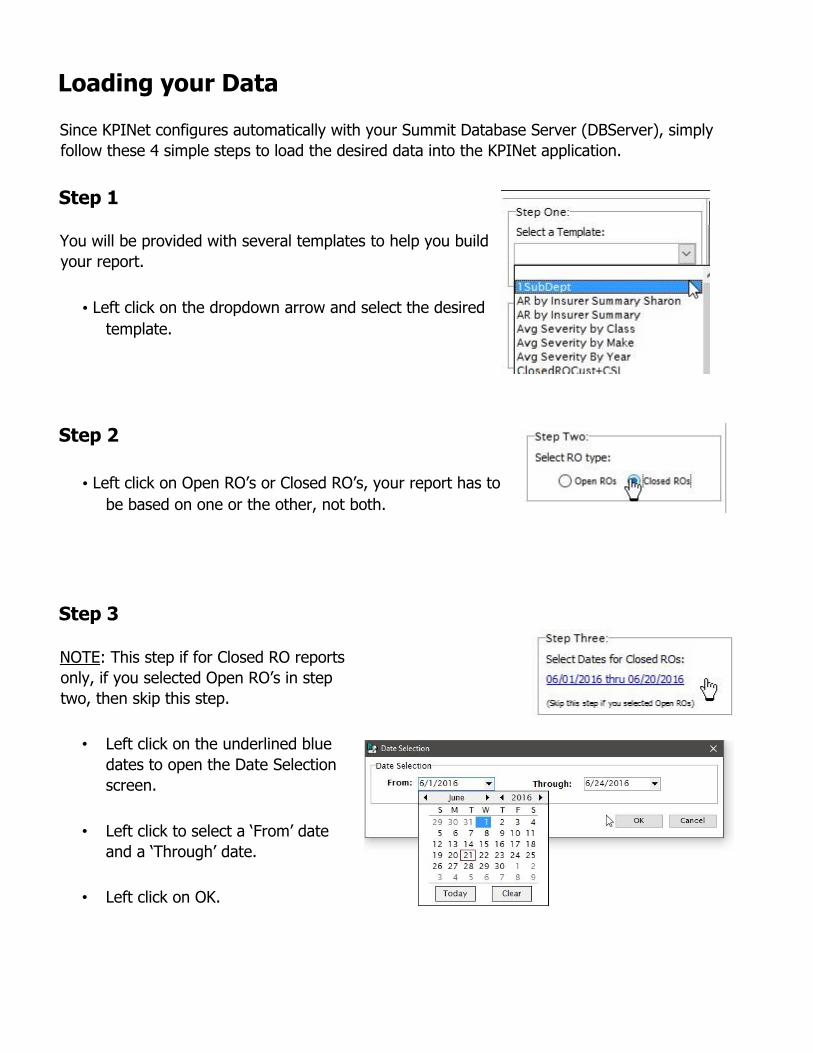
Loading your Data
Since KPINet configures automatically with your Summit Database Server (DBServer), simply
follow these 4 simple steps to load the desired data into the KPINet application.
Step 1
You will be provided with several templates to help you build
your report.
• Left click on the dropdown arrow and select the desired
template.
Step 2
• Left click on Open RO’s or Closed RO’s, your report has to
be based on one or the other, not both.
Step 3
NOTE: This step if for Closed RO reports
only, if you selected Open RO’s in step
two, then skip this step.
• Left click on the underlined blue
dates to open the Date Selection
screen.
• Left click to select a ‘From’ date
and a ‘Through’ date.
• Left click on OK.

Step 4
• Left click on Load Data.
KPINet will compile your selected information and display it
for editing.

Editing Your Data
The following information is essential to understanding how to create custom reports.
Area’s
(1) Filter Area
Think of this as your storage area. Here you can add all the fields necessary for your report.
(2) Data Area
This includes the information your report will produce. Add the fields here (2A), and they will
show up in the report here (2B).
(3) Row Area
This area makes up the rows of your report, you can sort the report by fields placed here. Add
the fields here (3A), and they will show up in the report here (3B).
1
2 A
3 A
3 B
4 A B 2
4 B

•
•
(4) Column Area
Here you can add additional columns for your report. Add the fields here (4A), and they will
show up in the report here (4B). Adding Fields
To add additional fields to your report:
• Right click on an existing field
• Left click on Show Field List
This will display the PivotGrid Field List:
• Left click on the desired field
• Left click on the dropdown arrow and choose the area
to add the field
• Left click on Add To
Field List
The following is a list of fields you can add to any report:
Vehicle (cont.)
Customer • VIN
• Address • Paint Code
• Address2 • Mileage In
• City • Mileage Out
• State • Prod Date
• Zip • License #
• Phone # • Options
• Cellular #
TIP: Fields that you would no longer like to view in the ‘filter’ area can be moved BACK to the ‘Field List’ by right
clicking on the Field and choosing ‘Hide.’

• Work Phone Rental Car Company
• Deductible • Rental Car Co.
Email • Rental Car Email
CSI • Fleet
Vehicle Insurance Company
• Year • Ins. Code
• Make • Ins. Contact • Model • Contact
• Style • Ins. Address
• Color • Ins. Address 2
• Hat • Ins. City
Insurance Company (cont.)
• Ins. State
• Ins. Zip
• Ins. Phone #
• Ins. Phone #2
• Ins. Email
• Claim #
• Policy #
• Date of Loss
Repair Order
• RO #
• Est #
• CSR
• Estimating System
• Accuracy
• EMS File #
• Assignment Status
• Voided
• Non-Drivable
• Lost Business Reason
• Total Loss
Marketing
• Marketing Source
• Referral Source
Accounts Receivable
• Balance Due
• Amount Paid
Production
• Vehicle Status
Sub Department
# Target Date Changes
• Job Classification
• Cycle Time (Avg) • PCE-RO
(Avg)
• PCE-Actual (Avg)
• Priority
• Misc. Notes
• Warning Flag Notes
• Warning Flag Notes 2
Parts and Sublets
• OEM % (Avg)
• AM % (Avg)
Parts and Sublets (cont)
• LKQ % (Avg)
• # Images (Ttl)
• # Images (Avg)
• # PO’s (Ttl)
• # PO’s (Avg)
• # Parts (Ttl)
• # Parts (Avg)
• Supplement Imported

• # Sups (Ttl)
• # Sups (Avg)
• # Sublets (Ttl)
• # Sublets (Avg)
• # Parts On Order (Ttl)
• # Parts On Order (Avg)
• # Parts Rec’d (Ttl)
• # Parts Rec’d (Avg)
• # Parts Back Ordered (Ttl)
• # Parts Back Ordered (Avg)
• # Credit Returns (Ttl)
• # Credit Returns (Avg)
• # OCR (Ttl)
• # OCR (Avg)
• # Late Parts (Ttl)
• # Late Parts (Avg)
• # To Be Ordered
Labor and Techs
• Throughput (Ttl)
• Throughput (Avg)
• Tech-Body
• Tech-Refinish
• Tech-Mechanical
• Tech-Frame
• Tech-Structural
• Tech-Detail
• Tech-Glass
• Tech-Electrical
• Total Hours
• Total clocked Hours
• Hours-Body
• Hours-Refinish
• Hours-Mechanical
• Hours-Frame
• Hours-Structural
• Hours-Glass
• Hours-Detail
• Hours-Electrical
Dates
• Parts Ordered
• Parts Needed
• OP Date
• Sched Out
• Sched In
• RO Date
• Est Date
• Closed Date
• Closed Month
• Vehicle Drop Off Date
• Vehicle Delivery Date
• Repairs Start Date
• Ins. Authorization Date
• Thank-you Date
Follow Up #2
Follow Up #1
• Customer Authorization
• Vehicle Ready
• Estimate Appt
• Estimate Contact
• Assignment Date
• Export Date
• Custom Date 1 • Custom
Date 2 • Custom Date 3
• Custom Date 4
Sales and Costs
• Sales Total (w/Tax)
• Severity (Ttl)
• Total Costs
• Sales-New Parts
• Cost-New Parts
• Sales-Labor (Electrical)
• Cost-Labor (Electrical)
• Sales-Labor (Detail)
• Cost-Labor (Detail)
• Sales-Labor (Body)
• Cost-Labor (Body)
• Sales-Labor (Refinish)

• Cost-Labor (Refinish)
• Sales-Labor (Glass)
• Cost-Labor (Glass)
• Sales-Labor (Frame)
• Cost-Labor (Frame)
Sales and Costs (cont.)
• Sales-Labor (Structural)
• Cost-Labor (Structural)
• Sales-Labor (Mechanical)
• Cost-Labor (Mechanical)
• Sales-Paint Materials
• Cost-Paint Materials
• Sales-Haz Waste Removal
• Cost-Haz Waste Removal
• Sales-Shop Supplies
• Cost-Shop Supplies
• Sales-Towing
• Cost-Towing
• Sales-Sublet • Cost-Sublet
• Sales-Misc.

• Cost-Misc.
• Sales-Parts Used
• Cost-Parts Used
• Sales-Parts Aftermarket
• Cost-Parts Aftermarket
• Sales-Parts Recorded
• Cost-Parts Recorded • Sales-Parts
Remanufactured
• Cost-Parts
Remanufactured
• Sales-Parts Re-chromed
• Cost-Parts Re-chromed
• Sales-Storage
• Cost-Storage
• Sales-Custom
• Cost-Custom
Rates
• Rate-Body
• Rate-Refinish
• Rate-Frame
• Rate-Mechanical
• Rate-Glass
• Rate-Structural
• Rate-Detail
• Rate-Electrical
• Rate-Paint
• Rate-Paint Cap
• Rate-Haz Waste
• Tax 1%
• Tax 2%
• Tax 3%
Organizing Data
Sort
You can sort your report by
any field located in the Row
Area by:
• Left click on the arr ow (1) located on the right side
of the desired field.
• Left click on the arrow a second time to sort the
opposite direction.
Filter
• Left click on the dropdown arrow and then left click
on the check mark boxes (2) to filter certain
information.
Dr ag and Drop
You can change the order of the fields by:
• Left click on a field and dragging it to the desired
location.
1
2

Copyright 2016. All Rights Reserved.
Right Click Menu
Right click on the margins to access this menu.
Through this menu you can change the look and feel of your
report by showing totals and by adding grid lines.
Saving Your Data
Once your report is configured and organized the way you
like it you can save, remove, or export the report.
Save
The save option will add the template to the template
dropdown list.
Remove
The remove option will remove the template from
the template dropdown list.
Export/Print
The export option will export your report to excel, which
gives you the ability to print your report through excel in
any format you choose.
NOTE: There is no printing in KPINet, to finalize and
print your report, you will need to export to excel.

Copyright 2016. All Rights Reserved.

Copyright 2016. All Rights Reserved.