Embed Size (px)
Citation preview

Online AffiliateKP HealthConnectTM
REGISTRATIONGUIDE
2021
02/15/2021
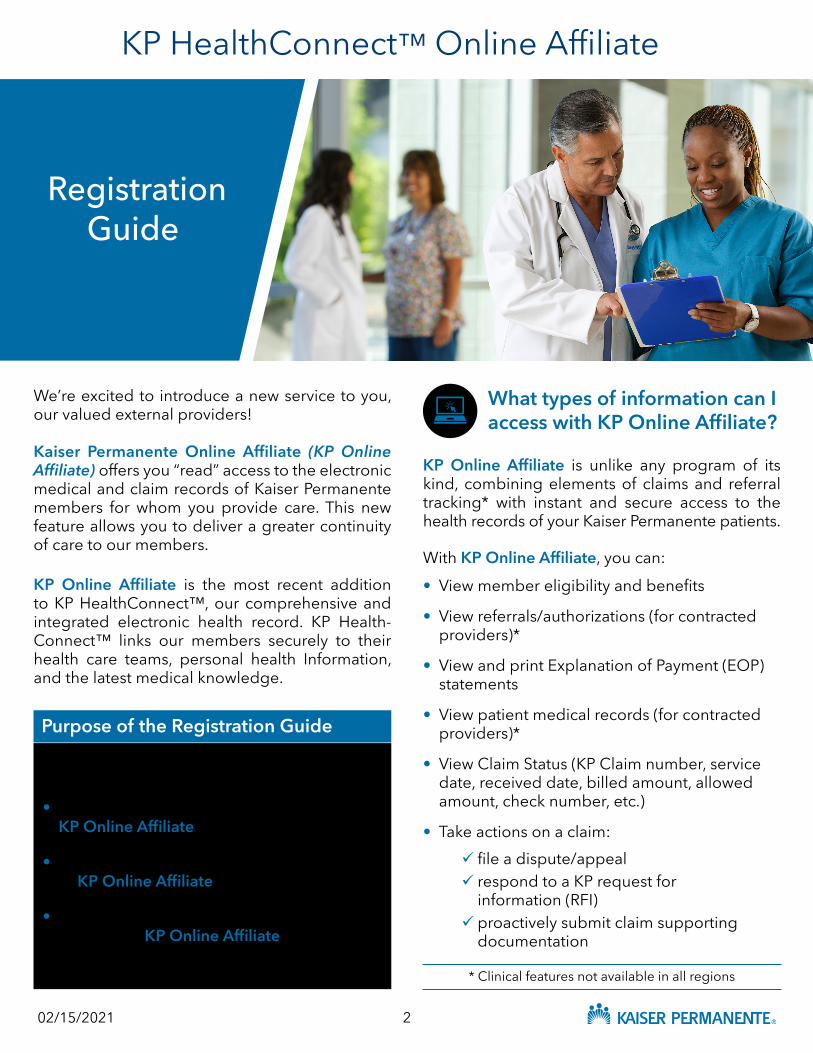
KP HealthConnect™ Online Affiliate
RegistrationGuide
We’re excited to introduce a new service to you, our valued external providers!
Kaiser Permanente Online Affiliate (KP Online Affiliate) offers you “read” access to the electronic medical and claim records of Kaiser Permanente members for whom you provide care. This new feature allows you to deliver a greater continuity of care to our members.
What types of information can I access with KP Online Affiliate?
KP Online Affiliate is the most recent addition to KP HealthConnect™, our comprehensive and integrated electronic health record. KP Health-Connect™ links our members securely to their health care teams, personal health Information, and the latest medical knowledge.
This registration guide has a three-fold purpose:
Purpose of the Registration Guide
KP Online Affiliate is unlike any program of its kind, combining elements of claims and referral tracking* with instant and secure access to the health records of your Kaiser Permanente patients.
With KP Online Affiliate, you can:
• Walk through the steps of activating your KP Online Affiliate account
• Show you how to use the basic functionalities of KP Online Affiliate
• Explain what kinds of information you can access with KP Online Affiliate
• View member eligibility and benefits
• View referrals/authorizations (for contracted providers)*
• View and print Explanation of Payment (EOP) statements
• View patient medical records (for contracted providers)*
• View Claim Status (KP Claim number, service date, received date, billed amount, allowed amount, check number, etc.)
• Take actions on a claim: 9 file a dispute/appeal 9 respond to a KP request for information (RFI) 9 proactively submit claim supporting documentation
* Clinical features not available in all regions
202/15/2021

3
ACTIVATING YOUR ACCOUNTWhile signing up for your KP Online Affiliate account involves only a few steps, activating an account may take some time as several approvals and communication happen behind the scenes.
You are an important part of extending excellence in patient care to our members. We appreciate your patience with this process.
What to expectThere are three steps in activating an account:
Registering as an Individual User/Administrator
Verifying the User’s Identity
Logging In with the User ID and Password
1
2
3
Registering as an Individual User/Administrator
New User Registration involves two steps:1. Registration (entering of the User’s specific information)2. Verifying Identity (ensuring the User’s information and identity are accurate)
To start the registration process:1. Launch Internet browser (Internet Explorer, Google Chrome and Safari are supported browsers)2. Type providers.kaiserpermanente.org into the address line (or click the link if viewing online) to
go to the Community Provider Portal (CPP)3. Press ENTER, the CPP home page appears 4. Select your provider region from the dropdown list5. For all provider regions (except WA), click Online Affiliate located in menu bar on left6. For all provider regions (except WA), click Registration in the activity menu on the bottom left7. Under “Registration” click on the appropriate Select registration type option (see Figure 1)
Figure 1
Individual User: An individual person needing to request access to Online Affiliate.Administrator: A person needing to register for access to Online Affiliate deemed as the point of contact for a provider/vendor group and has authority to initiate access for other people in the group. If approved for Administrator access, this individual will have the capability to initiate user registration requests for others in their group via a bulk load process.Registered User (needing to activate): A person whose registration was initiated by an administrator for their provider/vendor group and received an email with the subject “Please complete your registration.”
02/15/2021

ACTIVATING YOUR ACCOUNT
Registering as an Individual User/Administrator (continued)
Registration Screen8. Complete the following sections:
A. Personal information B. Work information C. Provider associations and access request (page 5)D. User Supervisor or Provider Group Administrator information (page 6)E. Review (page 7)
4
Figure 2
Figure 3
A. Personal information (Figure 2)
B. Work information (Figure 3)
02/15/2021

5
ACTIVATING YOUR ACCOUNT
Registering as an Individual User/Administrator (continued) (continued)Registration ScreenC. Provider associations and access request
¾ For both the License or Certification and Access type/job role dropdown menus, if you select Other, you will then have a text field to type in more specific information. (Figure 4)
Figure 4
¾ Figure 5 below provides an example of an approved association. (Note: There may be a delay in loading the provider name after entering the Tax ID number.)
Figure 5
02/15/2021
6
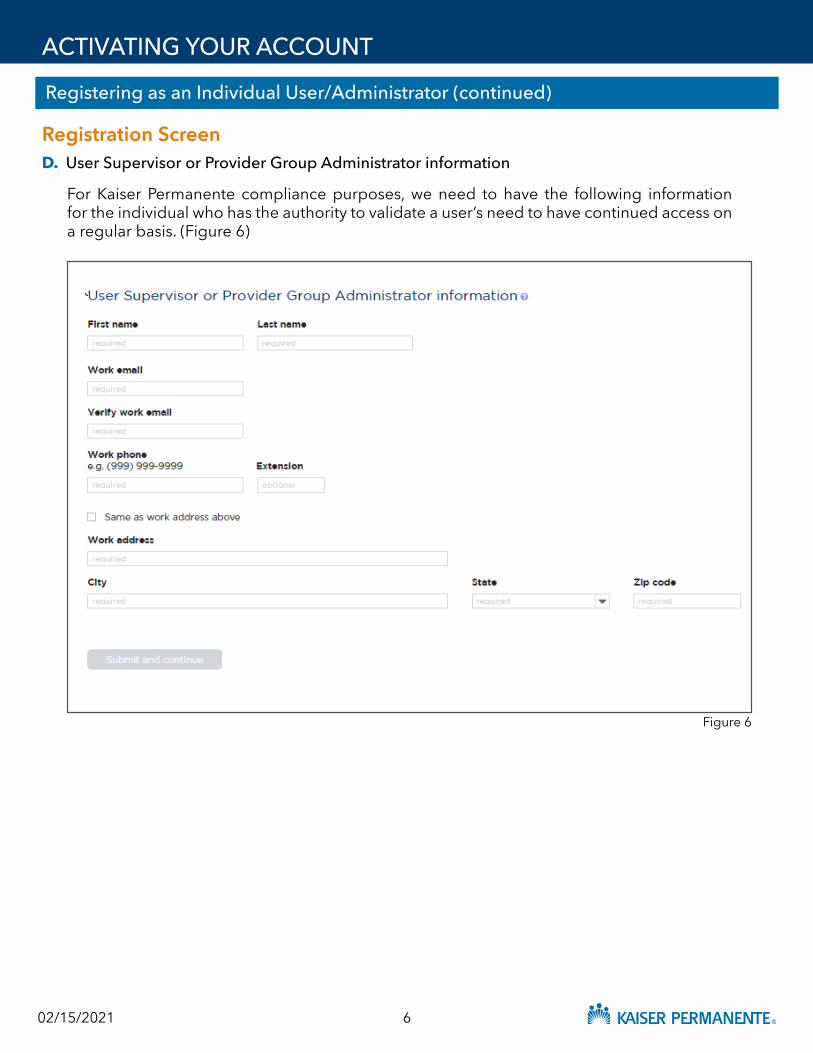
D. User Supervisor or Provider Group Administrator information
ACTIVATING YOUR ACCOUNT
Registering as an Individual User/Administrator (continued) (continued)
For Kaiser Permanente compliance purposes, we need to have the following information for the individual who has the authority to validate a user’s need to have continued access on a regular basis. (Figure 6)
Figure 6
Registration Screen
02/15/2021

7
E. Review
ACTIVATING YOUR ACCOUNT
Registering as an Individual User/Administrator (continued) (continued)
Double check all previously entered information. If any corrections need to be made, press the Edit button and make the necessary changes. Once complete, click on the Register button to continue to the next step in the registration process. (Figure 7)
Figure 7
Registration Screen
02/15/2021
8
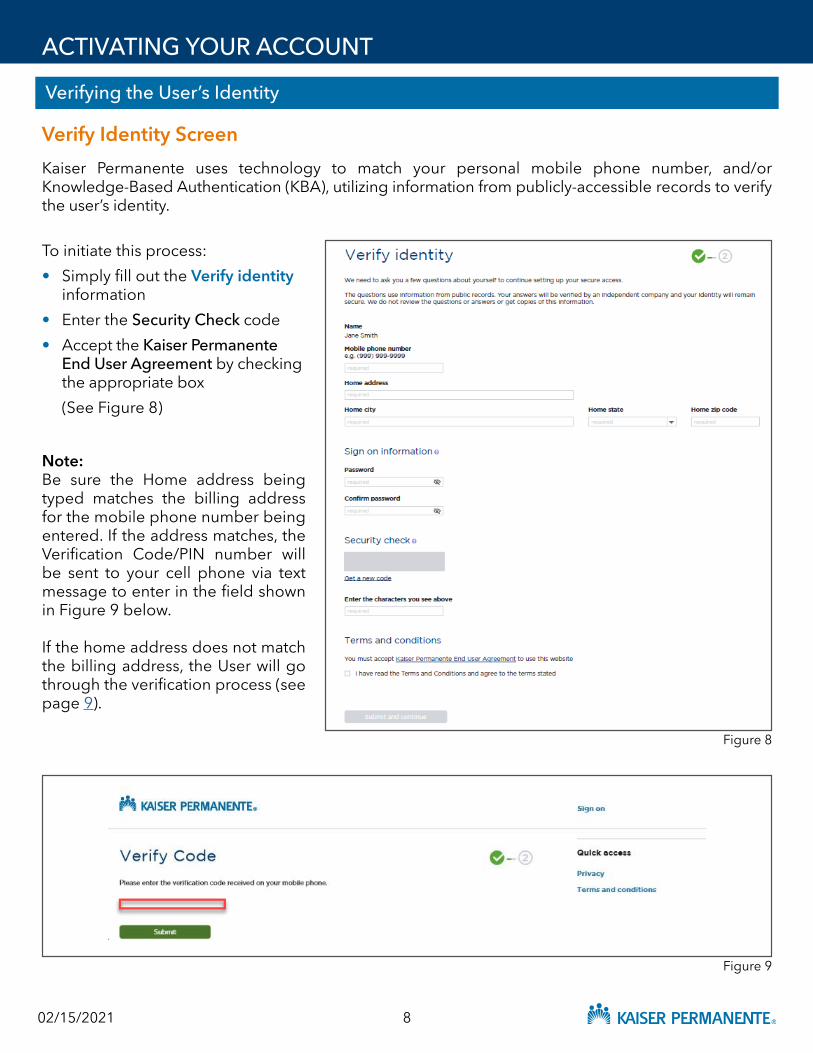
ACTIVATING YOUR ACCOUNT
Verifying the User’s Identity
Verify Identity ScreenKaiser Permanente uses technology to match your personal mobile phone number, and/or Knowledge-Based Authentication (KBA), utilizing information from publicly-accessible records to verify the user’s identity.
Note: Be sure the Home address being typed matches the billing address for the mobile phone number being entered. If the address matches, the Verification Code/PIN number will be sent to your cell phone via text message to enter in the field shown in Figure 9 below.
If the home address does not match the billing address, the User will go through the verification process (see page 9).
Figure 8
Figure 9
To initiate this process:• Simply fill out the Verify identity
information• Enter the Security Check code• Accept the Kaiser Permanente
End User Agreement by checking the appropriate box
(See Figure 8)
02/15/2021

9
ACTIVATING YOUR ACCOUNT
Verifying the User’s Identity (continued)
Verify Identity Screen
Note: When creating the user password, follow these password guidelines. (Figure 10)
Figure 10
In case the mobile phone number matching was unsuccessful, the user will then be presented with three questions, taken from publicly-accessible records. (Figure 11)
Figure 11
02/15/2021

10
ACTIVATING YOUR ACCOUNT
Verifying the User’s Identity (continued)
If submission is successful, you will see the Confirmation message shown in Figure 12 below. If not, you will be referred to a regional Kaiser Permanente representative for further assistance. See the List of Email Contacts by Region on page 18 for contact information.
Note: You will see two green checkmarks that replace the “1” and “2” on the top right. This indicates completion of both registration steps. (Figure 12)
Verify Identity Screen
Figure 12
Logging In with the User ID and Password
Once approved as a new user, you will receive an email containing your User ID (may be referred to as “NUID” by Kaiser Permante staff), which is a unique alpha-numeric identifier consisting of one letter followed by six numbers (i.e., A123456 or Z987654).
Enter the User ID and Password you created during the registration process in order to log in to the Portal. (Figure 13)
Sign On Screen
Figure 13
02/15/2021

11
MANAGING YOUR ACCOUNT INFORMATION
Profile
Users can manage account information and edit as needed. Simply navigate to the Profile page by clicking the Profile link under the My account menu, then click the Edit button to make changes. Note: Once clicked, the Edit button changes to Done (shown below in Figure 14). Click on Done to save changes.
Provider Associations and Access
To modify provider associations and access, click on the Provider associations and access link from the My account menu. New provider associations can be added by filling in the fields shown below in Figure 15. If the user wants to remove access to an existing provider, simply click on the Remove button (also shown below).
Figure 14
Figure 15
02/15/2021

12
Security
Users can change existing password by navigating to the Security page from the My account menu. Click on the ? icon next to New password to display password requirements (also in Figure 19 on page 14). Enter a new password that meets the requirements in the New password field, then re-enter in the Confirm new password field, then click on Confirm. (Figure 16)
MANAGING YOUR ACCOUNT INFORMATION
Figure 16
02/15/2021

RESETTING THE USER PASSWORD
In the event that the user cannot remember the password, a reset process can be initiated by clicking on the password link at the bottom of the Sign on fields (shown below in Figure 17).
Next, enter your National User ID (NUID), and Date of Birth. (Figure 18)
Figure 17
13
Figure 18
02/15/2021

14
RESETTING THE USER PASSWORD
Once the National User ID and correct Date of Birth have been entered, you will be taken through an Identity Verification process that starts with the information shown below in Figure 19.
Check the box next to “I’m not a robot” then click on the Continue with Identity Verification button. A visual verification screen should appear.
After identity verification is complete, you will need to enter your Full Name, Home Address, and Phone information. (Figure 20)
Figure 19
Figure 20
02/15/2021

15
RESETTING THE USER PASSWORD
For security purposes, the user will be sent a PIN number to proceed with the password reset. You have the option to receive the PIN via SMS text message or by voice to the phone information you entered in the Personal Number field. Select your PIN Delivery Preference, then click on the Confirm Information button. (Figure 21)
Figure 21
Once the PIN number has been received, enter it in the PIN Sent field. Click on the Submit button. (Figure 22)
Figure 22
02/15/2021

16
RESETTING THE USER PASSWORD
If the correct PIN was entered, you will be taken to the Reset Password screen to enter your new password. Review the password requirements displayed in the window. Type in your new password on the first field and enter it again on the second field (this is to prevent any potential data entry errors). Click on the Reset Password button. (Figure 23)
Once the password has been successfully reset, you should see the message as shown in Figure 24.
Figure 23
Figure 24
02/15/2021

17
REGIONAL PORTAL LINKS
Users that have access to multiple KP Online Affliate regions can access the specific regional Online Affiliate portal by navigating and clicking the Regional portal links located on the right side of the page under Quick access (as shown below in Figure 25).
To navigate to a different regional portal, click on the dropdown menu and select the desired region (shown in Figure 26 below).
Note: For access to the Northwest region (Oregon and SW Washington), click on the sign on here link located on the bottom left of the page (also shown below in Figure 26).
Figure 25
Figure 26
02/15/2021

18
REGIONAL PORTAL LINKS
List of Regional Portal Links
These links are for sign-on purposes only. Please access the dropdown list on the Regional portal links page for the most current information.
REGION LINK
CA – Northern https://epiclink-nc.kp.org/ncal/epiclink
CA – Southern https://epiclink-sc.kp.org/scal/epiclink
Colorado https://epiclink-co.kp.org/cor/epiclink
Hawaii https://epiclink-hi.kp.org/Hawaii/epiclink
Georgia https://epiclink-ga.kp.org/Georgia/epiclink
Maryland/Virginia/DC https://epiclink.kp.org/MAS/epiclink
Oregon/SW Washington https://epiclink-nw.kp.org/northwest/epiclink
REGION EMAIL CONTACT
CA – Northern [email protected]
CA – Southern [email protected]
Colorado [email protected]
Hawaii [email protected]
Georgia [email protected]
Maryland/Virginia/DC [email protected]
Oregon/SW Washington [email protected]
List of Email Contacts by RegionShould you need to reach out for assistance, please use the following email addresses. Note that this list is subject to change, please refer to the Regional portal links page for the most current information.
02/15/2021