Embed Size (px)
Citation preview
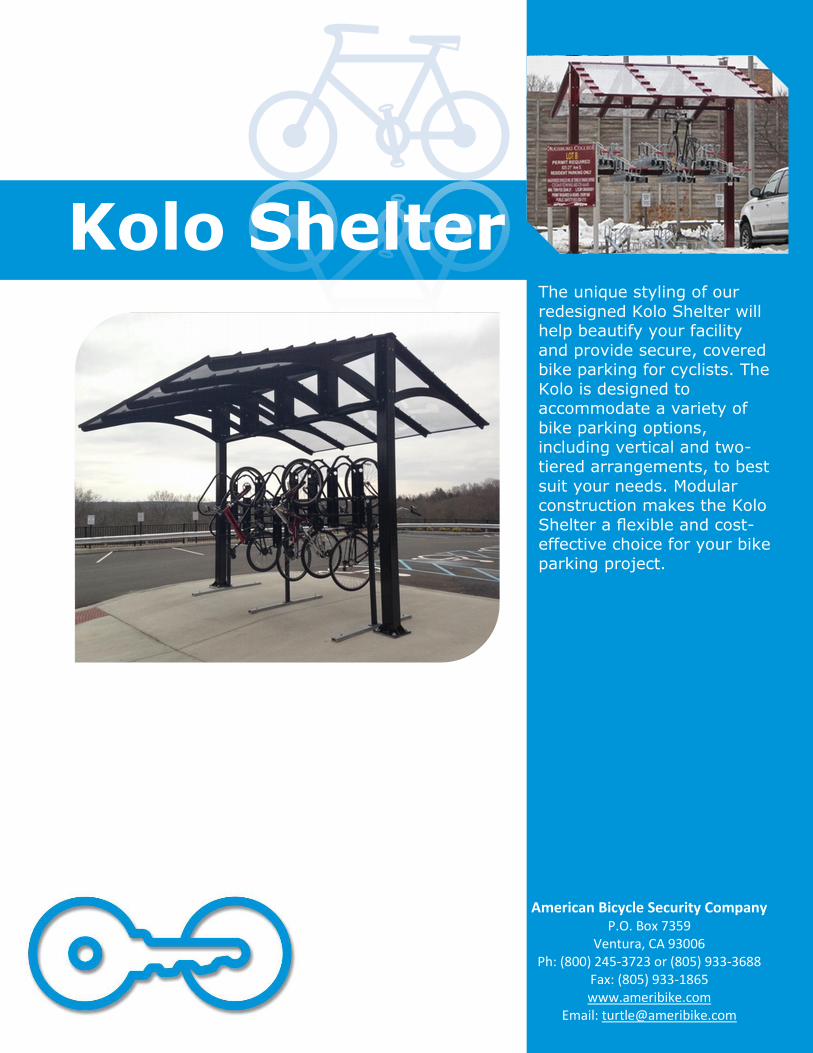
The unique styling of our
redesigned Kolo Shelter will help beautify your facility
and provide secure, covered bike parking for cyclists. The
Kolo is designed to accommodate a variety of
bike parking options, including vertical and two-
tiered arrangements, to best
suit your needs. Modular construction makes the Kolo
Shelter a flexible and cost-effective choice for your bike
parking project.
American Bicycle Security Company P.O. Box 7359
Ventura, CA 93006 Ph: (800) 245-3723 or (805) 933-3688
Fax: (805) 933-1865 www.ameribike.com
Email: [email protected]
Kolo Shelter

Page 1 of 7
Kolo Shelter
American Bicycle Security Company P.O. Box 7359
Ventura, CA 93006 Ph: (800) 245-3723 or (805) 933-3688
Fax: (805) 933-1865 www.ameribike.com
Email: [email protected]
Product Kolo Shelter
Capacity See diagrams below and to left
Materials Uprights: 6”x¼” square tube Center member: 6”x¼” square tube, C6 channel Feet: ½” plate Rafter: 3/16” plate Roof Panels: ½” UV resistant polycarbonate
Finishes Standard options: Galvanized Powder Coated
Installation Methods
Surface Mount. It is the responsibility of the installer to ensure that all base materials into which the shelter will be installed can support the rack and will not be damaged by any required installation procedures. See structural drawings for details.
Space Use & Setbacks
Overall dimensions: Short: L 80”, W 185”, H 135” Medium: L 117”, W 185”, H 135” Long: L 154”, W 185”, H 135”
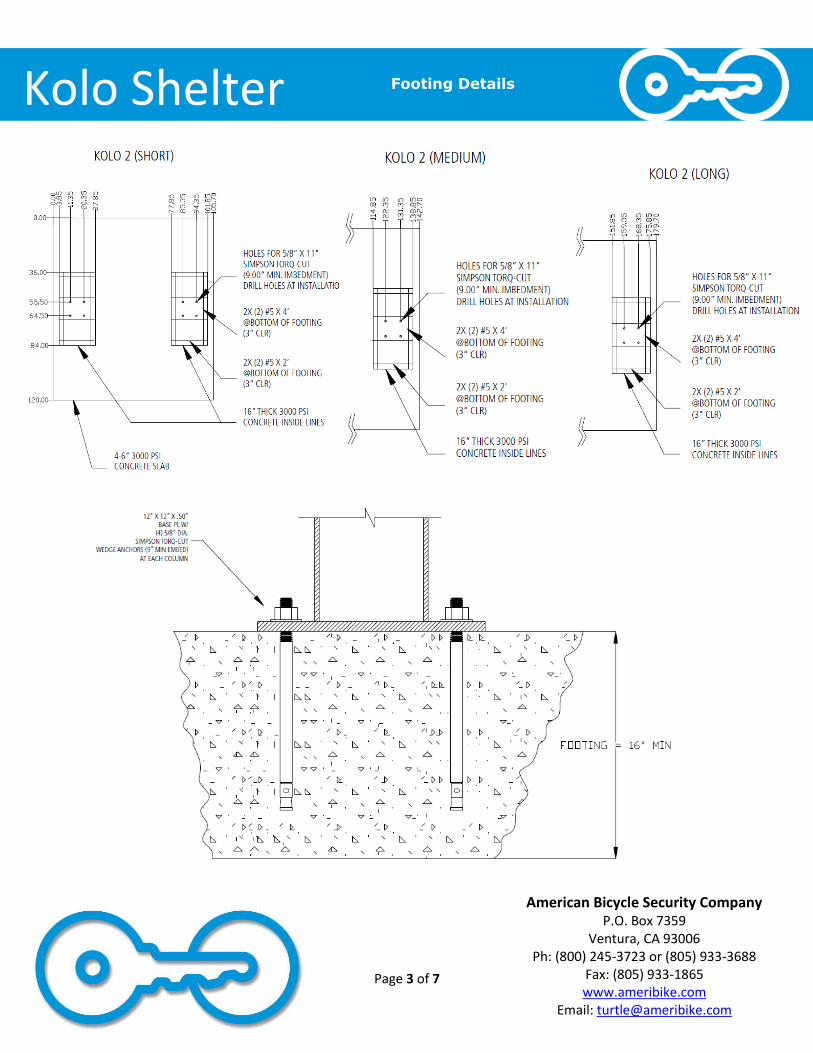
Load Data Dead load = self-weight of structure Live load = 40 psf Wind load = 90 mph exposure B Seismic load = Moderate Footing: see page 4 Anchor bolt = 5/8” diameter x 11” Simpson Torq-Cut wedge anchor
*These can also be modular.
RAL 9005 RAL 9003
RAL 3003
RAL 2004 RAL 1023
Bright Yellow
RAL 6016 RAL 6018
RAL 6005
RAL 5005
RAL 5015
RAL 7042
RAL 8014
Bronze
RAL 9007
Flat Black
Purple
RAL 7011
RAL 1001
RAL 3005

Page 2 of 7
Kolo Shelter
American Bicycle Security Company P.O. Box 7359
Ventura, CA 93006 Ph: (800) 245-3723 or (805) 933-3688
Fax: (805) 933-1865 www.ameribike.com
Email: [email protected]
Tools needed for Installation:
Tape Measure Marker or chalk Level Sledge Hammer Rubber Mallet Large Hammer Drill Standard Drill
3/8” Socket with drill attachment 1” Diameter Masonry Bit 5/8” Diameter Masonry Bit 7/16” Wrench/Socket 15/16” Wrench/Socket Spud Wrench Heavy Lifting Equipment and Strap
Parts List
Page 3 of 7
Kolo Shelter
American Bicycle Security Company P.O. Box 7359
Ventura, CA 93006 Ph: (800) 245-3723 or (805) 933-3688
Fax: (805) 933-1865 www.ameribike.com
Email: [email protected]
Footing Details
Page 4 of 7
Kolo Shelter
American Bicycle Security Company P.O. Box 7359
Ventura, CA 93006 Ph: (800) 245-3723 or (805) 933-3688
Fax: (805) 933-1865 www.ameribike.com
Email: [email protected]
Installation Instructions
Installation Steps:
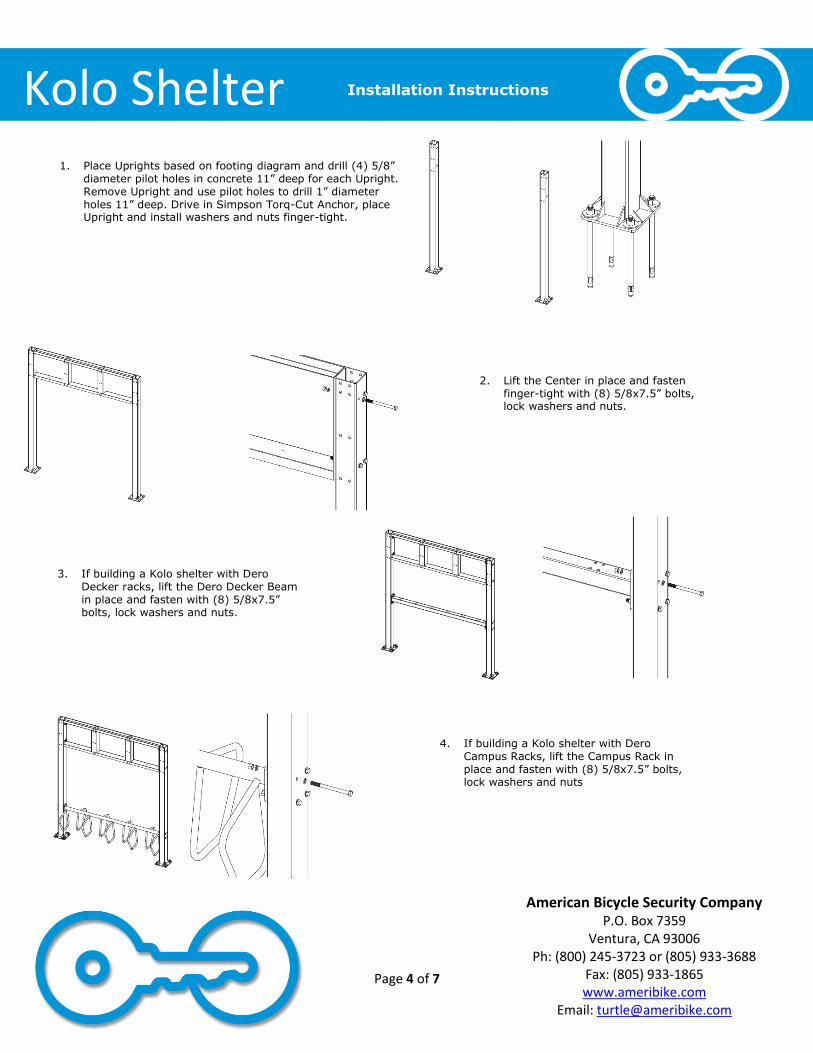
1. Place Uprights based on footing diagram and drill (4) 5/8” diameter pilot holes in concrete 11” deep for each Upright. Remove Upright and use pilot holes to drill 1” diameter holes 11” deep. Drive in Simpson Torq-Cut Anchor, place Upright and install washers and nuts finger-tight.
2. Lift the Center in place and fasten finger-tight with (8) 5/8x7.5” bolts, lock washers and nuts.
3. If building a Kolo shelter with Dero Decker racks, lift the Dero Decker Beam in place and fasten with (8) 5/8x7.5” bolts, lock washers and nuts.
4. If building a Kolo shelter with Dero Campus Racks, lift the Campus Rack in place and fasten with (8) 5/8x7.5” bolts, lock washers and nuts
Page 5 of 7
Kolo Shelter
American Bicycle Security Company P.O. Box 7359
Ventura, CA 93006 Ph: (800) 245-3723 or (805) 933-3688
Fax: (805) 933-1865 www.ameribike.com
Email: [email protected]
Installation Instructions
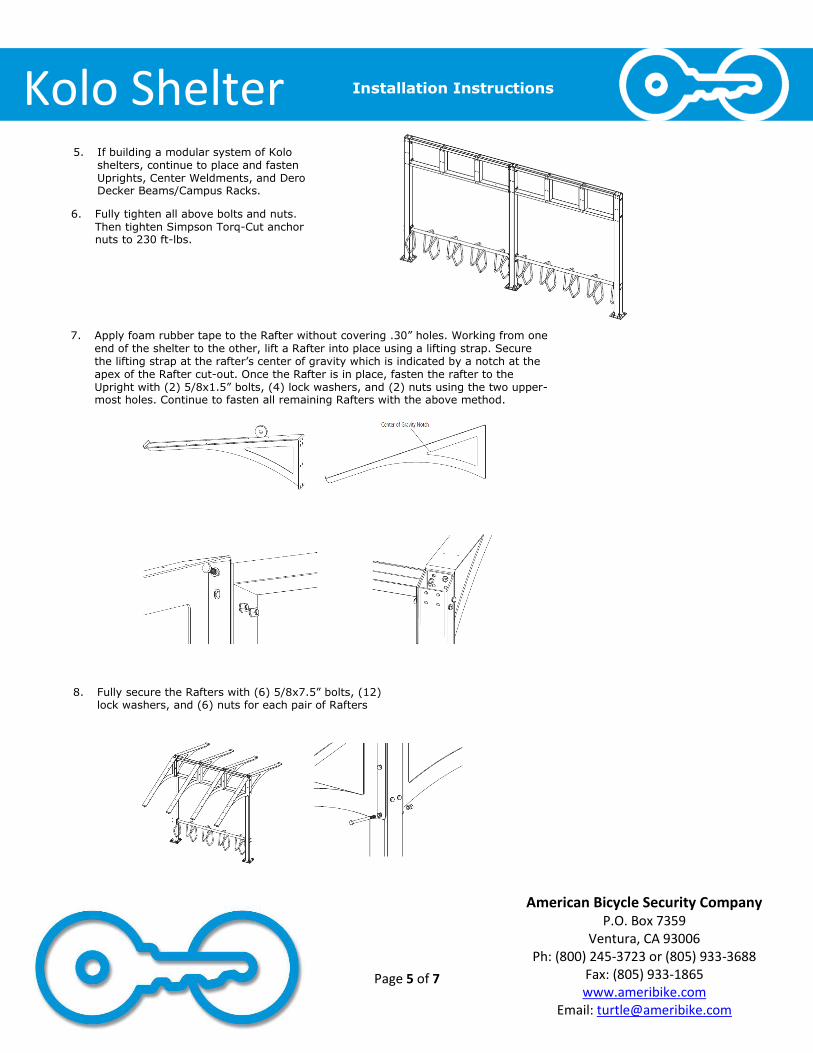
5. If building a modular system of Kolo shelters, continue to place and fasten Uprights, Center Weldments, and Dero Decker Beams/Campus Racks.
6. Fully tighten all above bolts and nuts. Then tighten Simpson Torq-Cut anchor nuts to 230 ft-lbs.
7. Apply foam rubber tape to the Rafter without covering .30” holes. Working from one end of the shelter to the other, lift a Rafter into place using a lifting strap. Secure the lifting strap at the rafter’s center of gravity which is indicated by a notch at the apex of the Rafter cut-out. Once the Rafter is in place, fasten the rafter to the Upright with (2) 5/8x1.5” bolts, (4) lock washers, and (2) nuts using the two upper-most holes. Continue to fasten all remaining Rafters with the above method.
8. Fully secure the Rafters with (6) 5/8x7.5” bolts, (12) lock washers, and (6) nuts for each pair of Rafters
Page 6 of 7
Kolo Shelter
American Bicycle Security Company P.O. Box 7359
Ventura, CA 93006 Ph: (800) 245-3723 or (805) 933-3688
Fax: (805) 933-1865 www.ameribike.com
Email: [email protected]
Installation Instructions
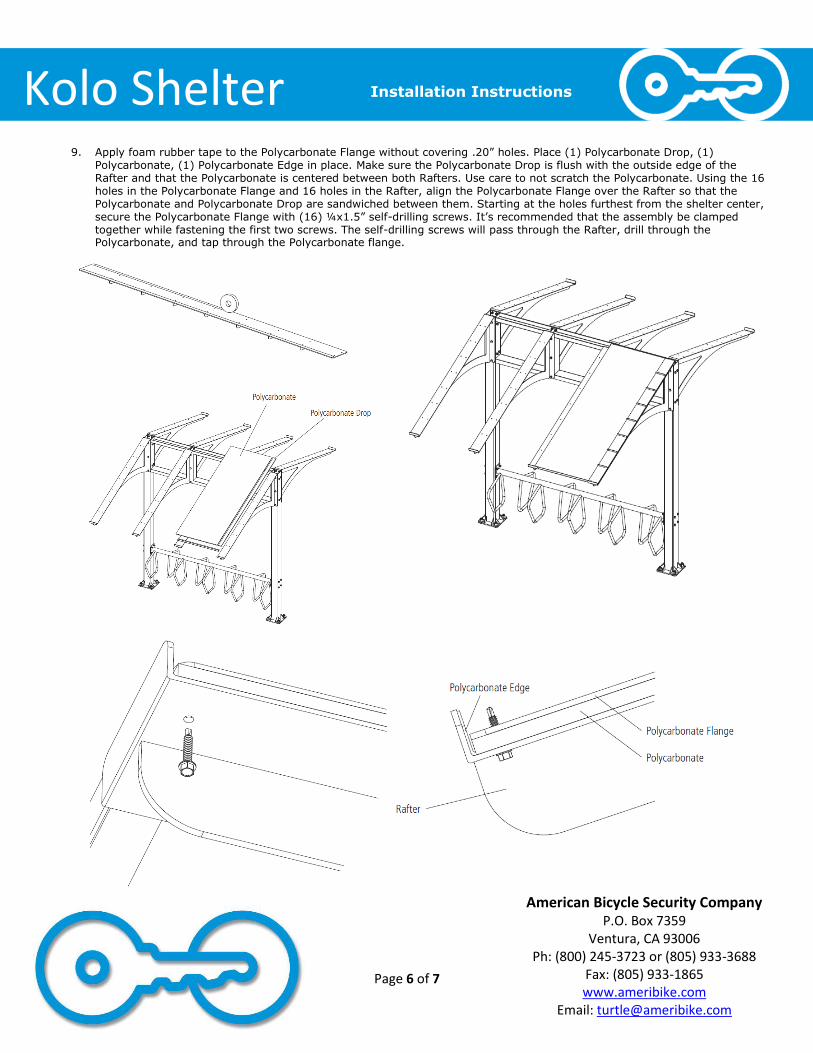
9. Apply foam rubber tape to the Polycarbonate Flange without covering .20” holes. Place (1) Polycarbonate Drop, (1) Polycarbonate, (1) Polycarbonate Edge in place. Make sure the Polycarbonate Drop is flush with the outside edge of the Rafter and that the Polycarbonate is centered between both Rafters. Use care to not scratch the Polycarbonate. Using the 16 holes in the Polycarbonate Flange and 16 holes in the Rafter, align the Polycarbonate Flange over the Rafter so that the Polycarbonate and Polycarbonate Drop are sandwiched between them. Starting at the holes furthest from the shelter center, secure the Polycarbonate Flange with (16) ¼x1.5” self-drilling screws. It’s recommended that the assembly be clamped together while fastening the first two screws. The self-drilling screws will pass through the Rafter, drill through the Polycarbonate, and tap through the Polycarbonate flange.
Page 7 of 7
Kolo Shelter
American Bicycle Security Company P.O. Box 7359
Ventura, CA 93006 Ph: (800) 245-3723 or (805) 933-3688
Fax: (805) 933-1865 www.ameribike.com
Email: [email protected]
Installation Instructions
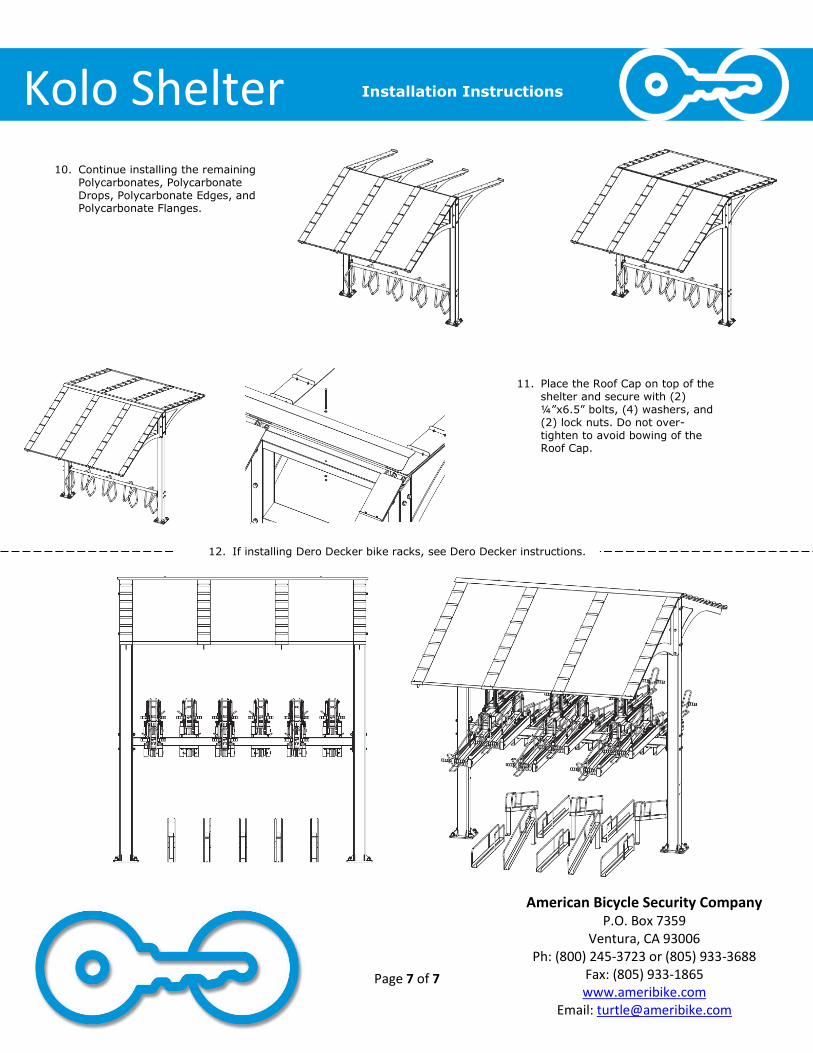
10. Continue installing the remaining Polycarbonates, Polycarbonate Drops, Polycarbonate Edges, and Polycarbonate Flanges.
11. Place the Roof Cap on top of the shelter and secure with (2) ¼”x6.5” bolts, (4) washers, and (2) lock nuts. Do not over-tighten to avoid bowing of the Roof Cap.
12. If installing Dero Decker bike racks, see Dero Decker instructions.