Embed Size (px)
Citation preview

KODEC75X
EN Oven User Manual

CONTENTS1. SAFETY INFORMATION....................................................................................22. SAFETY INSTRUCTIONS..................................................................................43. PRODUCT DESCRIPTION................................................................................ 74. CONTROL PANEL............................................................................................. 85. BEFORE FIRST USE......................................................................................... 86. DAILY USE......................................................................................................... 97. CLOCK FUNCTIONS....................................................................................... 118. USING THE ACCESSORIES........................................................................... 129. ADDITIONAL FUNCTIONS.............................................................................. 1510. HINTS AND TIPS........................................................................................... 1511. CARE AND CLEANING..................................................................................3312. TROUBLESHOOTING....................................................................................3613. ENERGY EFFICIENCY.................................................................................. 37
WE’RE THINKING OF YOUThank you for purchasing an Electrolux appliance. You’ve chosen a product thatbrings with it decades of professional experience and innovation. Ingenious andstylish, it has been designed with you in mind. So whenever you use it, you canbe safe in the knowledge that you’ll get great results every time.Welcome to Electrolux.Visit our website to:
Get usage advice, brochures, trouble shooter, service and repair information:www.electrolux.com/support
Register your product for better service:www.registerelectrolux.com
Buy Accessories, Consumables and Original spare parts for your appliance:www.electrolux.com/shop
CUSTOMER CARE AND SERVICEAlways use original spare parts.When contacting our Authorised Service Centre, ensure that you have thefollowing data available: Model, PNC, Serial Number.The information can be found on the rating plate.
Warning / Caution-Safety information General information and tips Environmental information
Subject to change without notice.
1. SAFETY INFORMATIONBefore the installation and use of the appliance, carefullyread the supplied instructions. The manufacturer is not
www.electrolux.com2

responsible for any injuries or damage that are the resultof incorrect installation or usage. Always keep theinstructions in a safe and accessible location for futurereference.
1.1 Children and vulnerable people safety• This appliance can be used by children aged from 8
years and above and persons with reduced physical,sensory or mental capabilities or lack of experienceand knowledge if they have been given supervision orinstruction concerning the use of the appliance in asafe way and understand the hazards involved.Children of less than 8 years of age and persons withvery extensive and complex disabilities shall be keptaway from the appliance unless continuouslysupervised.
• Do not let children play with the appliance.• Keep all packaging away from children and dispose of
it appropriately.• WARNING: Keep children and pets away from the
appliance when it operates or when it cools down.Accessible parts become hot during use.
• If the appliance has a child safety device, it should beactivated.
• Children shall not carry out cleaning and usermaintenance of the appliance without supervision.
1.2 General Safety• Only a qualified person must install this appliance and
replace the cable.• WARNING: The appliance and its accessible parts
become hot during use. Care should be taken to avoidtouching heating elements.
• Always use oven gloves to remove or put inaccessories or ovenware.
• Before carrying out any maintenance, disconnect theappliance from the power supply.
ENGLISH 3

• WARNING: Ensure that the appliance is switched offbefore replacing the lamp to avoid the possibility ofelectric shock.
• Do not use the appliance before installing it in thebuilt-in structure.
• Do not use a steam cleaner to clean the appliance.• Do not use harsh abrasive cleaners or sharp metal
scrapers to clean the glass door since they canscratch the surface, which may result in shattering ofthe glass.
• If the mains power supply cable is damaged, it mustbe replaced by the manufacturer, its AuthorisedService Centre or similarly qualified persons to avoidan electrical hazard.
• To remove the shelf supports first pull the front of theshelf support and then the rear end away from theside walls. Install the shelf supports in the oppositesequence.
• Use only the food sensor (core temperature sensor)recommended for this appliance.
2. SAFETY INSTRUCTIONS2.1 Installation
WARNING!Only a qualified person mustinstall this appliance.
• Remove all the packaging.• Do not install or use a damaged
appliance.• Follow the installation instructions
supplied with the appliance.• Always take care when moving the
appliance as it is heavy. Always usesafety gloves and enclosed footwear.
• Do not pull the appliance by thehandle.
• Install the appliance in a safe andsuitable place that meets installationrequirements.
• Keep the minimum distance fromother appliances and units.
• Before mounting the appliance, checkif the oven door opens withoutrestraint.
• The appliance is equipped with anelectric cooling system. It must beoperated with the electric powersupply.
• The built-in unit must meet thestability requirements of DIN 68930.
Cabinet minimumheight (Cabinet un‐der the worktopminimum height)
578 (600) mm
Cabinet width 560 mm
Cabinet depth 550 (550) mm
Height of the front ofthe appliance
594 mm
www.electrolux.com4

Height of the backof the appliance
576 mm
Width of the front ofthe appliance
595 mm
Width of the back ofthe appliance
559 mm
Depth of the appli‐ance
567 mm
Built in depth of theappliance
546 mm
Depth with opendoor
1027 mm
Ventilation openingminimum size.Opening placed onthe bottom rear side
560 x 20 mm
Mains supply cablelength. Cable isplaced in the rightcorner of the backside
1500 mm
Mounting screws 4 x 25 mm
2.2 Electrical connectionWARNING!Risk of fire and electricshock.
• All electrical connections should bemade by a qualified electrician.
• The appliance must be earthed.• Make sure that the parameters on the
rating plate are compatible with theelectrical ratings of the mains powersupply.
• Always use a correctly installedshockproof socket.
• Do not use multi-plug adapters andextension cables.
• Make sure not to cause damage tothe mains plug and to the mainscable. Should the mains cable need tobe replaced, this must be carried outby our Authorised Service Centre.
• Do not let mains cables touch orcome near the appliance door or theniche below the appliance, especiallywhen it operates or the door is hot.
• The shock protection of live andinsulated parts must be fastened insuch a way that it cannot be removedwithout tools.
• Connect the mains plug to the mainssocket only at the end of theinstallation. Make sure that there isaccess to the mains plug after theinstallation.
• If the mains socket is loose, do notconnect the mains plug.
• Do not pull the mains cable todisconnect the appliance. Always pullthe mains plug.
• Use only correct isolation devices: lineprotecting cut-outs, fuses (screw typefuses removed from the holder), earthleakage trips and contactors.
• The electrical installation must havean isolation device which lets youdisconnect the appliance from themains at all poles. The isolationdevice must have a contact openingwidth of minimum 3 mm.
• This appliance is supplied with a mainplug and a main cable.
2.3 UseWARNING!Risk of injury, burns andelectric shock or explosion.
• This appliance is for household useonly.
• Do not change the specification of thisappliance.
• Make sure that the ventilationopenings are not blocked.
• Do not let the appliance stayunattended during operation.
• Deactivate the appliance after eachuse.
• Be careful when you open theappliance door while the appliance isin operation. Hot air can release.
• Do not operate the appliance with wethands or when it has contact withwater.
• Do not apply pressure on the opendoor.
• Do not use the appliance as a worksurface or as a storage surface.
• Open the appliance door carefully.The use of ingredients with alcohol
ENGLISH 5
can cause a mixture of alcohol andair.
• Do not let sparks or open flames tocome in contact with the appliancewhen you open the door.
• Do not put flammable products oritems that are wet with flammableproducts in, near or on the appliance.
WARNING!Risk of damage to theappliance.
• To prevent damage or discoloration tothe enamel:– do not put ovenware or other
objects in the appliance directlyon the bottom.
– do not put aluminium foil directlyon the bottom of cavity of theappliance.
– do not put water directly into thehot appliance.
– do not keep moist dishes andfood in the appliance after youfinish the cooking.
– be careful when you remove orinstall the accessories.
• Discoloration of the enamel orstainless steel has no effect on theperformance of the appliance.
• Use a deep pan for moist cakes. Fruitjuices cause stains that can bepermanent.
• This appliance is for cookingpurposes only. It must not be used forother purposes, for example roomheating.
• Always cook with the oven doorclosed.
• If the appliance is installed behind afurniture panel (e.g. a door) makesure the door is never closed whenthe appliance operates. Heat andmoisture can build up behind a closedfurniture panel and cause subsequentdamage to the appliance, the housingunit or the floor. Do not close thefurniture panel until the appliance hascooled down completely after use.
2.4 Care and cleaningWARNING!Risk of injury, fire, ordamage to the appliance.
• Before maintenance, deactivate theappliance and disconnect the mainsplug from the mains socket.
• Make sure the appliance is cold.There is the risk that the glass panelscan break.
• Replace immediately the door glasspanels when they are damaged.Contact the Authorised ServiceCentre.
• Be careful when you remove the doorfrom the appliance. The door isheavy!
• Clean regularly the appliance toprevent the deterioration of thesurface material.
• Clean the appliance with a moist softcloth. Use only neutral detergents. Donot use abrasive products, abrasivecleaning pads, solvents or metalobjects.
• If you use an oven spray, follow thesafety instructions on its packaging.
• Do not clean the catalytic enamel withdetergents.
2.5 Internal lightingWARNING!Risk of electric shock.
• Concerning the lamp(s) inside thisproduct and spare part lamps soldseparately: These lamps are intendedto withstand extreme physicalconditions in household appliances,such as temperature, vibration,humidity, or are intended to signalinformation about the operationalstatus of the appliance. They are notintended to be used in otherapplications and are not suitable forhousehold room illumination.
• Use only lamps with the samespecifications.
2.6 Service• To repair the appliance contact the
Authorised Service Centre.• Use original spare parts only.
2.7 DisposalWARNING!Risk of injury or suffocation.
www.electrolux.com6

• Disconnect the appliance from themains supply.
• Cut off the mains electrical cableclose to the appliance and dispose ofit.
• Remove the door catch to preventchildren or pets from becomingtrapped in the appliance.
3. PRODUCT DESCRIPTION3.1 General overview
1
2
3
4
5
2 3 5
8
14 11
9
10
641
12
7
13
1 Control panel2 Knob for the heating functions3 Power lamp / symbol4 Display5 Control knob (for the temperature)6 Temperature indicator / symbol7 Plus Steam8 Socket for the food sensor9 Heating element
10 Lamp11 Fan12 Shelf support, removable13 Cavity embossment14 Shelf positions
3.2 AccessoriesWire shelf
For cookware, cake tins, roasts.
Baking tray
For cakes and biscuits.
Grill- / Roasting pan
To bake and roast or as a pan to collectfat.
Food Sensor
To measure the temperature inside food.
ENGLISH 7

Telescopic runners To insert and remove trays and wireshelfmore easily.
4. CONTROL PANEL4.1 Retractable knobsTo use the appliance press the knob.The knob comes out.
4.2 Sensor fields / Buttons
To set the time.
To set a clock function.
To set the time.
To turn the True Fan Cooking PLUS function on and off.
4.3 Display
A B A C A. Clock functionsB. TimerC. Food sensor indicator
5. BEFORE FIRST USEWARNING!Refer to Safety chapters.
5.1 Before first useThe oven can emit an odour and smoke during preheating. Make sure that the room isventilated.
Step 1 Step 2 Step 3
www.electrolux.com8

Set the clock Clean the oven Preheat the empty oven
1. , - press to set thetime. After approxi‐mately 5 sec., theflashing stops and thedisplay shows the time.
1. Remove all accesso‐ries and removableshelf supports from theoven.
2. Clean the oven and theaccessories with a softcloth, warm water anda mild detergent.
1. Set the maximum tem‐perature for the func‐tion: .Time: 1 h.
2. Set the maximum tem‐perature for the func‐tion: .Time: 15 min.
Turn off the oven and wait until it is cold. Place the accessories and the removableshelf supports in the oven.
6. DAILY USEWARNING!Refer to Safety chapters.
6.1 How to set: Heatingfunction
Step 1 Turn the knob for the heat‐ing functions to select aheating function.
Step 2 Turn the control knob to se‐lect the temperature.
Step 3 When the cooking ends,turn the knobs to the off po‐sition to turn off the oven.
6.2 Setting the function: True Fan Cooking PLUSWARNING!Risk of burns and damage to the appliance.
Step 1 Make sure that the oven is cold.
Step 2 Fill the cavity embossmentwith tap water.
The maximum capacity ofthe cavity embossment is 250ml. Do not refill the cavity em‐bossment during cooking orwhen the oven is hot.
Step 3 Set the function: .Press: . The indicator turns on. It works only with the function: TrueFan Cooking PLUS.
Step 4 Turn the control knob for the temperature to set temperature.
Step 5 Preheat the empty oven for 10 min to create humidity.
ENGLISH 9

Step 6 Put food in the oven.Refer to "Hints and tips" chapter. Do not open the oven door during cook‐ing.
Step 7 Turn the knob for the heating functions to the off position to turn off theoven.
- press to turn off the oven. The indicator turns off.
Step 8 After the function ends, carefully open the door. Released humidity cancause burns.
Step 9 Make sure that the oven is cold. Remove the remaining water from thecavity embossment.
6.3 Heating functions
Heatingfunction
Application
Off position
The oven is off.
Light
To turn on the lamp.
True FanCooking /True FanCookingPLUS
To bake on up to threeshelf positions at thesame time and to dryfood.Set the temperature 20- 40 °C lower than forConventional Cooking.To add humidity duringthe cooking. To get theright colour and crispycrust during baking. Togive more juiciness dur‐ing reheating.
Pizza Func‐tion
To bake pizza. To makeintensive browning anda crispy bottom.
ConventionalCooking /Cat‐
alysis
To bake and roast foodon one shelf position.To turn on the catalyticcleaning.
Heatingfunction
Application
Bottom Heat
To bake cakes withcrispy bottom and topreserve food.
Defrost
To defrost food (vegeta‐bles and fruit). The de‐frosting time dependson the amount and sizeof the frozen food.
Moist Baking
This function is de‐signed to save energyduring cooking. Whenyou use this function,the temperature in thecavity may differ fromthe set temperature.The residual heat isused. The heating pow‐er may be reduced. Formore information referto "Daily Use" chapter,Notes on: Moist Baking.
Grill
To grill thin pieces offood and to toast bread.
Turbo Grilling
To roast large meatjoints or poultry withbones on one shelf po‐sition. To make gratinsand to brown.
www.electrolux.com10

The lamp may turn offautomatically at atemperature below 60 °Cduring some oven functions.
6.4 Notes on: Moist BakingThis function was used to comply withthe energy efficiency class andecodesign requirements according to EU65/2014 and EU 66/2014. Testsaccording to EN 60350-1.
The oven door should be closed duringcooking so that the function is notinterrupted and the oven operates withthe highest energy efficiency possible.For the cooking instructions refer to"Hints and tips" chapter, Moist Baking.For general energy savingrecommendations refer to "EnergyEfficiency" chapter, Energy Saving.
7. CLOCK FUNCTIONS7.1 Clock functions
Clock function Application
Time of DayTo set, change or check the time of day.
DurationTo set how long the oven works.
Minute MinderTo set a countdown. This function has no effect on theoperation of the oven. You can set this function at anytime, also when the oven is off.
7.2 How to set: Clock functions
How to set: Time of Day
- flashes when you connect the oven to the electrical supply, when there was apower cut or when the timer is not set.
, - press to set the time.After approximately 5 sec., the flashing stops and the display shows the time.
How to change: Time of DayStep 1 - press repeatedly to change the time of day. - starts to flash.
Step 2 , - press to set the time.After approximately 5 sec., the flashing stops and the display shows thetime.
How to set: DurationStep 1 Set an oven function and the temperature.
Step 2 - press repeatedly. - starts to flash.
ENGLISH 11

How to set: DurationStep 3 , - press to set the duration.
The display shows: . - flashes when the set time ends. The signal sounds and the oven
turns off.
Step 4 Press any button to stop the signal.
Step 5 Turn the knobs to the off position.
How to set: Minute MinderStep 1 - press repeatedly. - starts to flash.
Step 2 , - press to set the time.The function starts automatically after 5 sec.When the set time ends, the signal sounds.
Step 3 Press any button to stop the signal.
Step 4 Turn the knobs to the off position.
How to cancel: Clock functionsStep 1 - press repeatedly until the clock function symbol starts to flash.
Step 2 Press and hold: .The clock function turns off after few seconds.
8. USING THE ACCESSORIESWARNING!Refer to Safety chapters.
8.1 Food SensorFood Sensor - measures thetemperature inside the food. When thefood is at the set temperature, the oventurns off.Set 2 temperatures:• the oven temperature: minimum
120 °C,• the food core temperature.For the best cooking results:• Ingredients should be at the room
temperature.• Food Sensor - do not use it with liquid
dishes.• Food Sensor - during cooking it must
remain in the dish.
Food categories: meat, poultryand fish1. Insert the tip of the core temperature
sensor into the centre of meat or fish,in the thickest part if possible. Makesure that at least 3/4 of the coretemperature sensor is inside of thedish.
2. Put the plug of the core temperaturesensor into the socket located in thefront frame of the appliance.
www.electrolux.com12

The indicator for the core temperaturesensor flashes.3. Press the button or to set the
core temperature. You can set thetemperature from 30 °C to 99 °C.
4. Set the oven function andtemperature.
When the dish is at the set coretemperature, an acoustic signal soundsfor 2 minutes. Press any button to stopthe signal.5. Deactivate the appliance.6. Remove the plug of the core
temperature sensor from the socket.Remove the dish from the appliance.
If the dish is not cooked to yoursatisfaction, do the above steps againand set a higher core temperature.You can change the temperature at anytime during the cooking. Press tochange the set core temperature.
WARNING!Be careful when you removethe tip and plug of the coretemperature sensor. Thecore temperature sensor ishot. There is a risk of burns.
Food category: casserole1. Place half of the ingredients in a
baking dish.2. Insert the tip of the core temperature
sensor exactly in the centre of thecasserole. The core temperaturesensor should be stabilized in oneplace during baking. Use a solidingredient to achieve that. Use therim of the baking dish to support thesilicone handle of the coretemperature sensor. The tip of thecore temperature sensor should nottouch the bottom of a baking dish.
3. Cover the core temperature sensorwith the remaining ingredients.
4. Put the plug of the core temperaturesensor into the socket located in thefront frame of the appliance.
The indicator for the core temperaturesensor flashes.5. Press the button or to set the
core temperature. You can set thetemperature from 30 °C to 99 °C.
6. Set the oven function and the oventemperature.
When the dish is at the set coretemperature, an acoustic signal soundsfor 2 minutes. Press any button to stopthe signal.
ENGLISH 13

7. Deactivate the appliance.8. Remove the plug of the core
temperature sensor from the socket.Remove the dish from the appliance.
If the dish is not cooked to yoursatisfaction, do the above steps againand set a higher core temperature.You can change the temperature at anytime during the cooking. Press tochange the set core temperature.
WARNING!Be careful when you removethe tip and plug of the coretemperature sensor. Thecore temperature sensor ishot. There is a risk of burns.
8.2 Inserting accessoriesA small indentation at the top increasessafety. The indentations are also anti-tipdevices. The high rim around the shelfprevents cookware from slipping of theshelf.
Wire shelf:Push the shelf between the guidebars of the shelf support.
Baking tray / Deep pan:Push the tray between the guide barsof the shelf support.
Wire shelf, Baking tray / Deep pan:Push the tray between the guide barsof the shelf support and the wire shelfon the guide bars above.
www.electrolux.com14

8.3 Using telescopic runnersDo not oil the telescopic runners.
Make sure you push back the telescopicrunners fully in the oven before you closethe oven door.
Wire shelf:Put the wire shelf on the telescopicrunners.
Deep pan:Put the deep pan on the telescopicrunners.
Wire shelf and deep pan together:Place the wire shelf and the deep pantogether on the telescopic runner.
9. ADDITIONAL FUNCTIONS9.1 Cooling fanWhen the oven operates, the cooling fanturns on automatically to keep the
surfaces of the oven cool. If you turn offthe oven, the cooling fan can continue tooperate until the oven cools down.
10. HINTS AND TIPSRefer to Safety chapters.
ENGLISH 15

10.1 Cooking recommendations
The temperature and cooking times in the tables are guidelines only. They dependon the recipes and the quality and quantity of the ingredients used.Your oven may bake or roast differently to the oven you had before. The tables be‐low show recommended settings for temperature, cooking time and shelf position forspecific types of the food.If you cannot find the settings for a special recipe, look for the similar one.
10.2 True Fan Cooking PLUSUse the second shelf position.Use a baking tray.
CAKES / PASTRIES / BREADS(ml) (°C) (min)
Cookies / Scones / Croissants 100 150 - 180 10 - 20
Focaccia 100 200 - 210 10 - 20
Pizza 100 230 10 - 20
Bread rolls 100 200 20 - 25
Bread 100 180 35 - 40
Plum cake / Apple pie / Cinnamon rolls, baked ina cake mould
100 - 150 160 - 180 30 - 60
Use 150 ml of water unless specified otherwise.
FROZEN READY MEALS(°C) (min)
Pizza 200 - 210 10 - 20
Croissants 170 - 180 15 - 25
Lasagne, use 200 ml 180 - 200 35 - 50
Use 100 ml of water.Set the temperature to 110 °C.
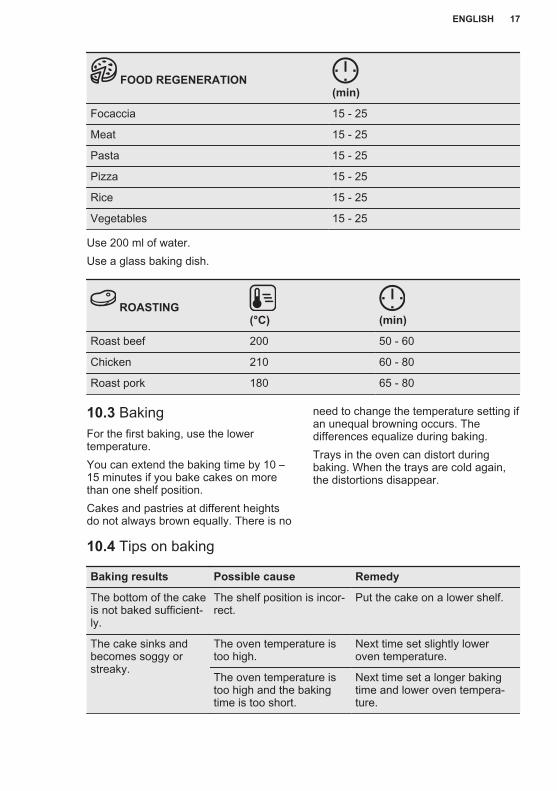
FOOD REGENERATION(min)
Bread rolls 10 - 20
Bread 15 - 25
www.electrolux.com16
FOOD REGENERATION(min)
Focaccia 15 - 25
Meat 15 - 25
Pasta 15 - 25
Pizza 15 - 25
Rice 15 - 25
Vegetables 15 - 25
Use 200 ml of water.Use a glass baking dish.
ROASTING(°C) (min)
Roast beef 200 50 - 60
Chicken 210 60 - 80
Roast pork 180 65 - 80
10.3 BakingFor the first baking, use the lowertemperature.You can extend the baking time by 10 –15 minutes if you bake cakes on morethan one shelf position.Cakes and pastries at different heightsdo not always brown equally. There is no
need to change the temperature setting ifan unequal browning occurs. Thedifferences equalize during baking.Trays in the oven can distort duringbaking. When the trays are cold again,the distortions disappear.
10.4 Tips on baking
Baking results Possible cause RemedyThe bottom of the cakeis not baked sufficient‐ly.
The shelf position is incor‐rect.
Put the cake on a lower shelf.
The cake sinks andbecomes soggy orstreaky.
The oven temperature istoo high.
Next time set slightly loweroven temperature.
The oven temperature istoo high and the bakingtime is too short.
Next time set a longer bakingtime and lower oven tempera‐ture.
ENGLISH 17
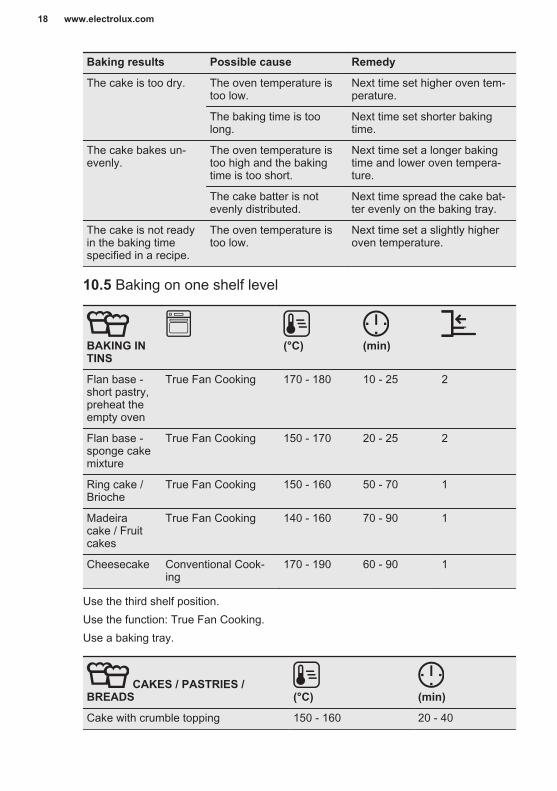
Baking results Possible cause RemedyThe cake is too dry. The oven temperature is
too low.Next time set higher oven tem‐perature.
The baking time is toolong.
Next time set shorter bakingtime.
The cake bakes un‐evenly.
The oven temperature istoo high and the bakingtime is too short.
Next time set a longer bakingtime and lower oven tempera‐ture.
The cake batter is notevenly distributed.
Next time spread the cake bat‐ter evenly on the baking tray.
The cake is not readyin the baking timespecified in a recipe.
The oven temperature istoo low.
Next time set a slightly higheroven temperature.
10.5 Baking on one shelf level
BAKING INTINS
(°C) (min)
Flan base -short pastry,preheat theempty oven
True Fan Cooking 170 - 180 10 - 25 2
Flan base -sponge cakemixture
True Fan Cooking 150 - 170 20 - 25 2
Ring cake /Brioche
True Fan Cooking 150 - 160 50 - 70 1
Madeiracake / Fruitcakes
True Fan Cooking 140 - 160 70 - 90 1
Cheesecake Conventional Cook‐ing
170 - 190 60 - 90 1
Use the third shelf position.Use the function: True Fan Cooking.Use a baking tray.
CAKES / PASTRIES /BREADS (°C) (min)Cake with crumble topping 150 - 160 20 - 40
www.electrolux.com18

CAKES / PASTRIES /BREADS (°C) (min)Fruit flans (made of yeast dough /sponge cake mixture), use a deep pan
150 35 - 55
Fruit flans made of short pastry 160 - 170 40 - 80
Preheat the empty oven.Use the function: Conventional Cooking.Use a baking tray.
CAKES /PASTRIES /BREADS
(°C) (min)
Swiss roll 180 - 200 10 - 20 3
Rye bread: first: 230 20 1
then: 160 - 180 30 - 60
Buttered almondcake / Sugar cakes
190 - 210 20 - 30 3
Cream puffs /Eclairs
190 - 210 20 - 35 3
Plaited bread /Bread crown
170 - 190 30 - 40 3
Fruit flans (made ofyeast dough /sponge cake mix‐ture), use a deeppan
170 35 - 55 3
Yeast cakes withdelicate toppings(e.g. quark, cream,custard)
160 - 180 40 - 80 3
Christstollen 160 - 180 50 - 70 2
Use the third shelf position.
BISCUITS(°C) (min)
Short pastry biscuits True Fan Cooking 150 - 160 10 - 20
ENGLISH 19

BISCUITS(°C) (min)
Rolls, preheat theempty oven
True Fan Cooking 160 10 - 25
Biscuits made ofsponge cake mixture
True Fan Cooking 150 - 160 15 - 20
Puff pastries, preheatthe empty oven
True Fan Cooking 170 - 180 20 - 30
Biscuits made of yeastdough
True Fan Cooking 150 - 160 20 - 40
Macaroons True Fan Cooking 100 - 120 30 - 50
Pastries made of eggwhite / Meringues
True Fan Cooking 80 - 100 120 - 150
Rolls, preheat theempty oven
ConventionalCooking
190 - 210 10 - 25
10.6 Bakes and gratinsUse the first shelf position.
(°C) (min)Baguettes toppedwith melted cheese
True Fan Cooking 160 - 170 15 - 30
Vegetables au gratin,preheat the emptyoven
Turbo Grilling 160 - 170 15 - 30
Lasagne Conventional Cooking 180 - 200 25 - 40
Fish bakes Conventional Cooking 180 - 200 30 - 60
Stuffed vegetables True Fan Cooking 160 - 170 30 - 60
Sweet bakes Conventional Cooking 180 - 200 40 - 60
Pasta bake Conventional Cooking 180 - 200 45 - 60
10.7 Multilevel BakingUse the function: True Fan Cooking.
Use the baking trays.
www.electrolux.com20
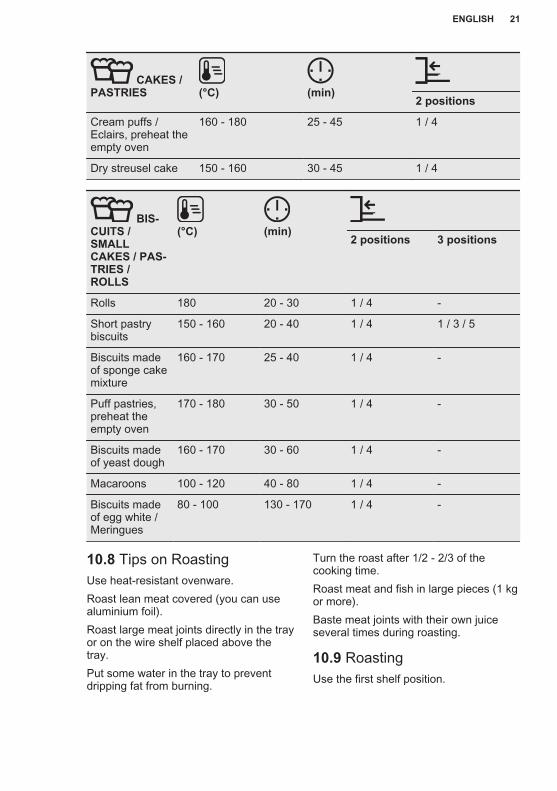
CAKES /PASTRIES (°C) (min) 2 positionsCream puffs /Eclairs, preheat theempty oven
160 - 180 25 - 45 1 / 4
Dry streusel cake 150 - 160 30 - 45 1 / 4
BIS‐CUITS /SMALLCAKES / PAS‐TRIES /ROLLS
(°C) (min) 2 positions 3 positions
Rolls 180 20 - 30 1 / 4 -
Short pastrybiscuits
150 - 160 20 - 40 1 / 4 1 / 3 / 5
Biscuits madeof sponge cakemixture
160 - 170 25 - 40 1 / 4 -
Puff pastries,preheat theempty oven
170 - 180 30 - 50 1 / 4 -
Biscuits madeof yeast dough
160 - 170 30 - 60 1 / 4 -
Macaroons 100 - 120 40 - 80 1 / 4 -
Biscuits madeof egg white /Meringues
80 - 100 130 - 170 1 / 4 -
10.8 Tips on RoastingUse heat-resistant ovenware.Roast lean meat covered (you can usealuminium foil).Roast large meat joints directly in the trayor on the wire shelf placed above thetray.Put some water in the tray to preventdripping fat from burning.
Turn the roast after 1/2 - 2/3 of thecooking time.Roast meat and fish in large pieces (1 kgor more).Baste meat joints with their own juiceseveral times during roasting.
10.9 RoastingUse the first shelf position.
ENGLISH 21

BEEF
(°C) (min)Pot roast 1 - 1.5 kg Conventional
Cooking230 120 - 150
Roast beef or fillet,rare, preheat theempty oven
per cm ofthickness
Turbo Grilling 190 - 200 5 - 6
Roast beef or fillet,medium, preheatthe empty oven
per cm ofthickness
Turbo Grilling 180 - 190 6 - 8
Roast beef or fillet,well done, preheatthe empty oven
per cm ofthickness
Turbo Grilling 170 - 180 8 - 10
PORK
Use the function: Turbo Grilling.
(kg) (°C) (min)Shoulder / Neck / Hamjoint
1 - 1.5 160 - 180 90 - 120
Chops / Spare rib 1 - 1.5 170 - 180 60 - 90
Meatloaf 0.75 - 1 160 - 170 50 - 60
Pork knuckle, pre‐cooked
0.75 - 1 150 - 170 90 - 120
VEAL
Use the function: Turbo Grilling.
(kg) (°C) (min)Roast veal 1 160 - 180 90 - 120
www.electrolux.com22

VEAL
Use the function: Turbo Grilling.
(kg) (°C) (min)Veal knuckle 1.5 - 2 160 - 180 120 - 150
LAMB
Use the function: Turbo Grilling.
(kg) (°C) (min)Lamb leg / Roastlamb
1 - 1.5 150 - 170 100 - 120
Lamb saddle 1 - 1.5 160 - 180 40 - 60
GAME
Use the function: Conventional Cooking.
(kg) (°C) (min)Saddle / Hare leg,preheat the emptyoven
up to 1 230 30 - 40
Venison saddle 1.5 - 2 210 - 220 35 - 40
Haunch of venison 1.5 - 2 180 - 200 60 - 90
ENGLISH 23

POULTRY
Use the function: Turbo Grilling.
(kg) (°C) (min)Poultry, portions 0.2 - 0.25 each 200 - 220 30 - 50
Chicken, half 0.4 - 0.5 each 190 - 210 35 - 50
Chicken, poulard 1 - 1.5 190 - 210 50 - 70
Duck 1.5 - 2 180 - 200 80 - 100
Goose 3.5 - 5 160 - 180 120 - 180
Turkey 2.5 - 3.5 160 - 180 120 - 150
Turkey 4 - 6 140 - 160 150 - 240
FISH (STEAMED)
Use the function: Conventional Cooking.
(kg) (°C) (min)Whole fish 1 - 1.5 210 - 220 40 - 60
10.10 Crispy baking with: PizzaFunction
PIZZA
Use the first shelf position.
(°C) (min)Tarts 180 - 200 40 - 55
Spinachflan
160 - 180 45 - 60
PIZZA
Use the first shelf position.
(°C) (min)Quiche lor‐raine /Swiss flan
170 - 190 45 - 55
Cheese‐cake
140 - 160 60 - 90
www.electrolux.com24

PIZZA
Use the first shelf position.
(°C) (min)Vegetablepie
160 - 180 50 - 60
PIZZA
Preheat the empty oven beforecooking.
Use the second shelf position.
(°C) (min)Pizza, thincrust, use adeep pan
200 - 230 15 - 20
Pizza, thickcrust
180 - 200 20 - 30
PIZZA
Preheat the empty oven beforecooking.
Use the second shelf position.
(°C) (min)Unleavenedbread
230 - 250 10 - 20
Puff pastryflan
160 - 180 45 - 55
Flammku‐chen
230 - 250 12 - 20
Pierogi 180 - 200 15 - 25
10.11 GrillPreheat the empty oven before cooking.Grill only thin pieces of meat or fish.Put a pan on the first shelf position tocollect fat.
GRILL
Use the function: Grill
(°C) (min)1st side
(min)2nd side
Roast beef 210 - 230 30 - 40 30 - 40 2
Beef fillet 230 20 - 30 20 - 30 3
Pork loin 210 - 230 30 - 40 30 - 40 2
Veal loin 210 - 230 30 - 40 30 - 40 2
ENGLISH 25

GRILL
Use the function: Grill
(°C) (min)1st side
(min)2nd side
Lamb saddle 210 - 230 25 - 35 20 - 25 3
Whole fish, 0.5kg - 1 kg
210 - 230 15 - 30 15 - 30 3 / 4
10.12 Frozen Foods
DEFROSTING
Use the function: True Fan Cooking.
(°C) (min)Pizza, frozen 200 - 220 15 - 25 2
Pizza American, frozen 190 - 210 20 - 25 2
Pizza, chilled 210 - 230 13 - 25 2
Pizza snacks, frozen 180 - 200 15 - 30 2
French fries, thin 200 - 220 20 - 30 3
French fries, thick 200 - 220 25 - 35 3
Wedges / Croquettes 220 - 230 20 - 35 3
Hash browns 210 - 230 20 - 30 3
Lasagne / Cannelloni,fresh
170 - 190 35 - 45 2
Lasagne / Cannelloni,frozen
160 - 180 40 - 60 2
Baked cheese 170 - 190 20 - 30 3
Chicken wings 190 - 210 20 - 30 2
www.electrolux.com26

10.13 DefrostRemove the food packaging and put thefood on a plate.Do not cover the food, as this can extendthe defrost time.For large portions of food place anupturned empty plate on the bottom of
the oven cavity. Put the food in a deepdish and set it on top of the plate insidethe oven. Remove the shelf supports ifnecessary.
Use the first shelf position.
(kg) (min)Defrostingtime
(min)Further de‐frosting time
Chicken 1 100 - 140 20 - 30 Turn halfwaythrough.
Meat 1 100 - 140 20 - 30 Turn halfwaythrough.
Trout 0.15 25 - 35 10 - 15 -
Strawberries 0.3 30 - 40 10 - 20 -
Butter 0.25 30 - 40 10 - 15 -
Cream 2 x 0.2 80 - 100 10 - 15 Whip the creamwhen still slightlyfrozen in places.
Gateau 1.4 60 60 -
10.14 PreservingUse the function Bottom Heat.Use only preserve jars of the samedimensions available on the market.Do not use jars with twist-off and bayonettype lids or metal tins.Use the first shelf position.Put no more than six one-litre preservejars on the baking tray.Fill the jars equally and close with aclamp.The jars cannot touch each other.Put approximately 1/2 litre of water intothe baking tray to give sufficient moisturein the oven.When the liquid in the jars starts tosimmer (after approximately 35 - 60
minutes with one-litre jars), stop the ovenor decrease the temperature to 100 °C(see the table).Set the temperature to 160 - 170 °C.
SOFT FRUIT(min)Cooking timeuntil simmering
Strawberries / Blue‐berries / Raspber‐ries / Ripe goose‐berries
35 - 45
ENGLISH 27
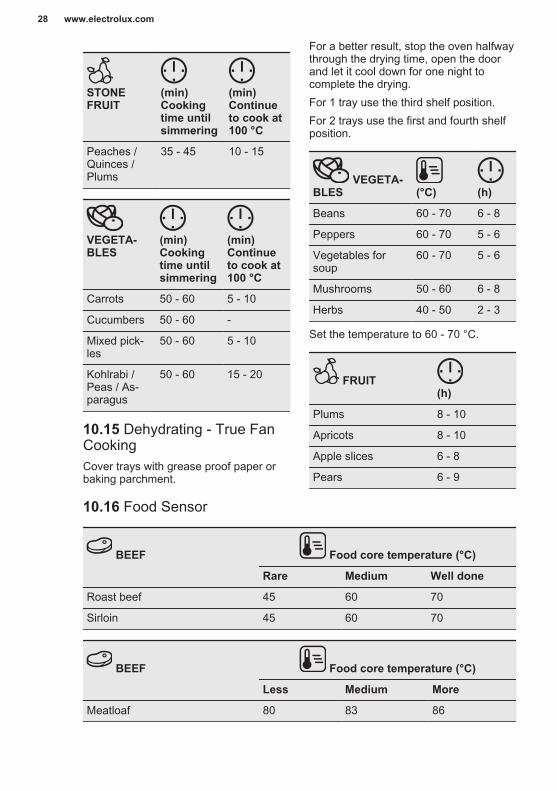
STONEFRUIT
(min)Cookingtime untilsimmering
(min)Continueto cook at100 °C
Peaches /Quinces /Plums
35 - 45 10 - 15
VEGETA‐BLES
(min)Cookingtime untilsimmering
(min)Continueto cook at100 °C
Carrots 50 - 60 5 - 10
Cucumbers 50 - 60 -
Mixed pick‐les
50 - 60 5 - 10
Kohlrabi /Peas / As‐paragus
50 - 60 15 - 20
10.15 Dehydrating - True FanCookingCover trays with grease proof paper orbaking parchment.
For a better result, stop the oven halfwaythrough the drying time, open the doorand let it cool down for one night tocomplete the drying.For 1 tray use the third shelf position.For 2 trays use the first and fourth shelfposition.
VEGETA‐BLES (°C) (h)Beans 60 - 70 6 - 8
Peppers 60 - 70 5 - 6
Vegetables forsoup
60 - 70 5 - 6
Mushrooms 50 - 60 6 - 8
Herbs 40 - 50 2 - 3
Set the temperature to 60 - 70 °C.
FRUIT(h)
Plums 8 - 10
Apricots 8 - 10
Apple slices 6 - 8
Pears 6 - 9
10.16 Food Sensor
BEEF Food core temperature (°C)Rare Medium Well done
Roast beef 45 60 70
Sirloin 45 60 70
BEEF Food core temperature (°C)Less Medium More
Meatloaf 80 83 86
www.electrolux.com28

PORK Food core temperature (°C)Less Medium More
Ham / Roast 80 84 88
Saddle chop / Pork loin, smoked /Pork loin, poached 75 78 82
VEAL Food core temperature (°C)Less Medium More
Roast veal 75 80 85
Veal knuckle 85 88 90
MUTTON / LAMB Food core temperature (°C)Less Medium More
Mutton leg 80 85 88
Mutton saddle 75 80 85
Roast lamb / Lamb leg 65 70 75
GAME Food core temperature (°C)Less Medium More
Hare saddle / Venison saddle 65 70 75
Hare leg / Hare, whole / Venisonleg 70 75 80
POULTRY Food core temperature (°C)Less Medium More
Chicken 80 83 86
Duck, whole / half / Turkey,whole / breast 75 80 85
Duck, breast 60 65 70
ENGLISH 29

FISH (SALMON,TROUT, ZANDER)
Food core temperature (°C)Less Medium More
Fish, whole / large / steamed /Fish, whole / large / roasted 60 64 68
CASSEROLES - PRE‐COOKED VEGETABLES
Food core temperature (°C)Less Medium More
Zucchini casserole / Broccolicasserole / Fennel casserole 85 88 91
CASSEROLES - SAVOU‐RY
Food core temperature (°C)Less Medium More
Cannelloni / Lasagne / Pastabake 85 88 91
CASSEROLES - SWEET Food core temperature (°C)Less Medium More
White bread casserole with /without fruit / Rice porridge cas‐serole with / without fruit / Sweetnoodle casserole
80 85 90
10.17 Moist Baking - recommended accessoriesUse the dark and non-reflective tins and containers. They have better heat absorptionthan the light colour and reflective dishes.
Pizza pan Baking dishRamekins
Flan base tin
Dark, non-reflective28 cm diameter
Dark, non-reflective26 cm diameter
Ceramic8 cm diame‐
ter, 5 cmheight
Dark, non-reflective28 cm diameter
www.electrolux.com30

10.18 Moist BakingFor the best results follow suggestionslisted in the table below.
(°C) (min)Bread sticks, 0.5 kg in total 190 - 200 50 - 60 3
Baked scallops in shells 180 - 200 30 - 40 4
Whole fish in salt, 0.3 - 0.5 kg 190 - 200 45 - 50 4
Whole fish in parchment, 0.3 - 0.5kg
190 - 200 50 - 60 3
Amaretti (20; 0.5 kg in total) 170 - 180 40 - 50 3
Apple crumble 190 - 200 50 - 60 4
Chocolate muffins (20; 0.5 kg in to‐tal)
160 - 170 35 - 45 3
10.19 Information for testinstitutesTests according to: EN 60350, IEC60350.
BAKING ON ONE LEVEL. Baking in tins
(°C) (min)Fatless sponge cake True Fan Cooking 140 - 150 35 - 50 2
Fatless sponge cake ConventionalCooking
160 35 - 50 2
Apple pie, 2 tins Ø20cm
True Fan Cooking 160 60 - 90 2
Apple pie, 2 tins Ø20cm
ConventionalCooking
180 70 - 90 1
ENGLISH 31

BAKING ON ONE LEVEL. Biscuits
Use the third shelf position.
(°C) (min)Short bread / Pastrystrips
True Fan Cooking 140 25 - 40
Short bread / Pastrystrips, preheat the emptyoven
Conventional Cooking 160 20 - 30
Small cakes, 20 per tray,preheat the empty oven
True Fan Cooking 150 20 - 35
Small cakes, 20 per tray,preheat the empty oven
Conventional Cooking 170 20 - 30
MULTILEVEL BAKING. Biscuits
(°C) (min)Short bread / Pastrystrips
True Fan Cooking 140 25 - 45 1 / 4
Small cakes, 20 pertray, preheat the emptyoven
True Fan Cooking 150 23 - 40 1 / 4
Fatless sponge cake True Fan Cooking 160 35 - 50 1 / 4
GRILL
Preheat the empty oven for 5 minutes.
Grill with the maximum temperature setting.
(min)Toast Grill 1 - 3 5
www.electrolux.com32

GRILL
Preheat the empty oven for 5 minutes.
Grill with the maximum temperature setting.
(min)Beef steak, turn halfwaythrough
Grill 24 - 30 4
11. CARE AND CLEANINGWARNING!Refer to Safety chapters.
11.1 Notes on cleaning
CleaningAgents
Clean the front of the oven with a soft cloth with warm water and amild detergent.
Use a cleaning solution to clean metal surfaces.
Clean stains with a mild detergent. Do not apply it on the catalyticsurfaces.
EverydayUse
Clean the cavity after each use. Fat accumulation or other residuemay cause fire.
Do not store the food in the oven for longer than 20 minutes. Dry thecavity with a soft cloth after each use.
Accessories
Clean all accessories after each use and let them dry. Use a softcloth with warm water and a mild detergent. Do not clean the acces‐sories in a dishwasher.
Do not clean the non-stick accessories using abrasive cleaner orsharp-edged objects.
11.2 How to clean: CavityembossmentClean the cavity embossment to removelimestone residue after cooking withsteam.
ENGLISH 33
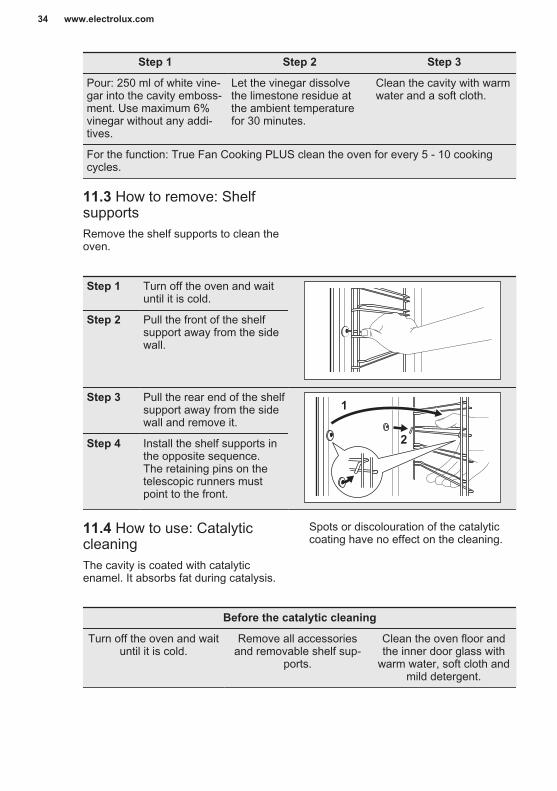
Step 1 Step 2 Step 3Pour: 250 ml of white vine‐gar into the cavity emboss‐ment. Use maximum 6%vinegar without any addi‐tives.
Let the vinegar dissolvethe limestone residue atthe ambient temperaturefor 30 minutes.
Clean the cavity with warmwater and a soft cloth.
For the function: True Fan Cooking PLUS clean the oven for every 5 - 10 cookingcycles.
11.3 How to remove: ShelfsupportsRemove the shelf supports to clean theoven.
Step 1 Turn off the oven and waituntil it is cold.
Step 2 Pull the front of the shelfsupport away from the sidewall.
Step 3 Pull the rear end of the shelfsupport away from the sidewall and remove it.
2
1
Step 4 Install the shelf supports inthe opposite sequence.The retaining pins on thetelescopic runners mustpoint to the front.
11.4 How to use: CatalyticcleaningThe cavity is coated with catalyticenamel. It absorbs fat during catalysis.
Spots or discolouration of the catalyticcoating have no effect on the cleaning.
Before the catalytic cleaningTurn off the oven and wait
until it is cold.Remove all accessories
and removable shelf sup‐ports.
Clean the oven floor andthe inner door glass with
warm water, soft cloth andmild detergent.
www.electrolux.com34
Clean the oven with catalytic cleaningStep 1 Step 2 Step 3
Set the function and theoven temperature:
250 °CDuration: 1 h
After cleaning, turn the knobfor the oven functions to the
off position.
When the oven is cold,clean the cavity with a
wet soft cloth.
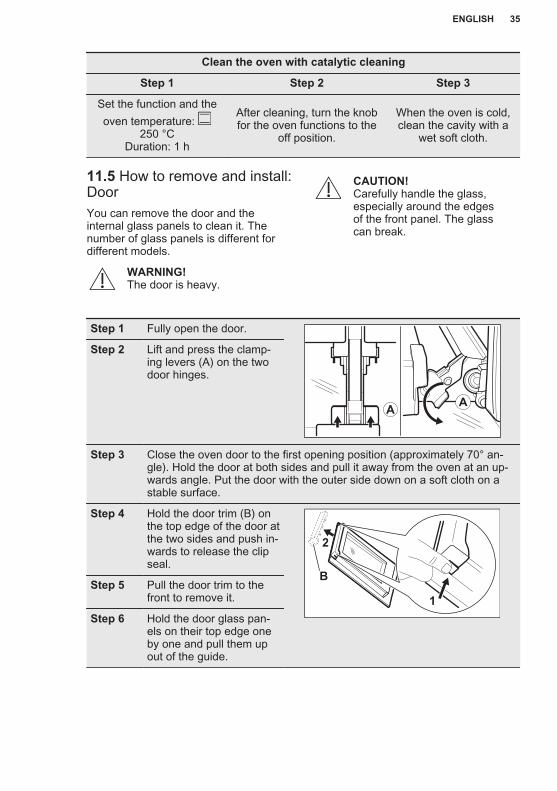
11.5 How to remove and install:DoorYou can remove the door and theinternal glass panels to clean it. Thenumber of glass panels is different fordifferent models.
WARNING!The door is heavy.
CAUTION!Carefully handle the glass,especially around the edgesof the front panel. The glasscan break.
Step 1 Fully open the door.
AA
Step 2 Lift and press the clamp‐ing levers (A) on the twodoor hinges.
Step 3 Close the oven door to the first opening position (approximately 70° an‐gle). Hold the door at both sides and pull it away from the oven at an up‐wards angle. Put the door with the outer side down on a soft cloth on astable surface.
Step 4 Hold the door trim (B) onthe top edge of the door atthe two sides and push in‐wards to release the clipseal.
1
2
BStep 5 Pull the door trim to thefront to remove it.
Step 6 Hold the door glass pan‐els on their top edge oneby one and pull them upout of the guide.
ENGLISH 35

Step 7 Clean the glass panel withwater and soap. Dry theglass panel carefully. Donot clean the glass panelsin the dishwasher.
Step 8 After cleaning, do theabove steps in the oppo‐site sequence.
Step 9 Install the smaller panel first, then the larger and the door.Make sure that the glasses are inserted in the correct position otherwisethe surface of the door may overheat.
11.6 How to replace: LampWARNING!Risk of electric shock.The lamp can be hot.
Before you replace the lamp:Step 1 Step 2 Step 3
Turn off the oven. Wait un‐til the oven is cold.
Disconnect the oven fromthe mains.
Put a cloth on the bottomof the cavity.
Top lamp
Step 1 Turn the glass cover to removeit.
Step 2 Clean the glass cover.
Step 3 Replace the lamp with a suitable 300 °C heat-resistant lamp.
Step 4 Install the glass cover.
12. TROUBLESHOOTINGWARNING!Refer to Safety chapters.
12.1 What to do if...In any cases not included in this tableplease contact with an AuthorisedService Centre.
Problem Check if...The oven does notheat up.
The fuse is blown.
www.electrolux.com36

Problem Check if...The Food Sensordoes not operate.
The plug of theFood Sensor isfully inserted intothe socket.
The display shows"12.00".
There was a powercut. Set the time ofday.
The water leaksout of the cavityembossment.
There is too muchwater in the cavityembossment.
Unsatisfying cook‐ing performance ofthe function: TrueFan CookingPLUS .
You filled the cavi‐ty embossmentwith water.
Problem Check if...The lamp does notwork.
The lamp is burntout.
12.2 Service dataIf you cannot find a solution to theproblem yourself, contact your dealer oran Authorised Service Centre.The necessary data for the servicecentre is on the rating plate. The ratingplate is on the front frame of the ovencavity. Do not remove the rating platefrom the oven cavity.
We recommend that you write the data here:Model (MOD.) .........................................
Product number (PNC) .........................................
Serial number (S.N.) .........................................
13. ENERGY EFFICIENCY13.1 Energy saving
The oven has features whichhelp you save energy duringeveryday cooking.
Make sure that the oven door is closedwhen the oven operates. Do not openthe oven door too often during cooking.Keep the door gasket clean and makesure it is well fixed in its position.Use metal cookware to improve energysaving.When possible, do not preheat the ovenbefore cooking.Keep breaks between baking as short aspossible when you prepare a few dishesat one time.Cooking with fanWhen possible, use the cookingfunctions with fan to save energy.
Residual heatWhen the cooking duration is longer than30 min, reduce the oven temperature tominimum 3 - 10 min before the end ofcooking. The residual heat inside theoven will continue to cook.Use the residual heat to warm up otherdishes.Keep food warmChoose the lowest possible temperaturesetting to use residual heat and keep ameal warm.Moist BakingFunction designed to save energy duringcooking.
ENGLISH 37

14. ENVIRONMENTAL CONCERNSRecycle materials with the symbol .Put the packaging in relevant containersto recycle it. Help protect theenvironment and human health byrecycling waste of electrical andelectronic appliances. Do not dispose of
appliances marked with the symbol with the household waste. Return theproduct to your local recycling facility orcontact your municipal office.
*
www.electrolux.com38


www.electrolux.com/shop
8673
6233
0-B-
0620
21