Embed Size (px)
DESCRIPTION
knitting
Citation preview
Armscye?
In sewing, theopening in thegarment body throughwhich the armprotrudes is called thearmscye (pronounced"arm's eye"), which isa somewhat moregraceful word thanthe "armhole" used inknitting.
Cool stuff! Techniques with Theresa Thinking beyond Travelling knitter Watch this space
Patts 103 Color Pass it on! Maniacs Masters Achoo! Charity Knitting camp
By Jenna Wilson
Ravellings on the knitted sleeve -- Part I
To some knitters or would-be designers, there is nothing so daunting as designing a knitted sleeve thatfits.
The problem with sleeves -- whether the simple, boxy drop-shoulder style, or those involving moreintricate shaping -- is that there always seems to be a whiff of uncertainty about the finished product.
First, there's uncertainty in length. A knit garment body that winds up being an inch too long or shortcan be camouflaged or forgiven, unless you're particularly fastidious. But a long sleeve that misses thewrist by an inch is an aggravation, especially if it was knit from the wrist upwards. Knitting the sleevefrom the shoulder down to the wrist makes lengthening or shortening easier, but you may not get anaccurate measurement of the sleeve length until you have bound off and blocked the sleeve.
And then there's the uncertainty in determining a proper upper arm width. Both a too-narrow and atoo-wide sleeve can be uncomfortable.
Finally, there's the uncertainty of armscye depth. How much space do youneed to allow freedom of movement for the wearer's arm? How shallow canyou make an armhole without uncomfortably binding the shoulder? Knittedfabric, having some inherent stretch, can accommodate a slightly snug fit,but hand knitted fabric cannot compensate for gross misjudgment.
So, if you're in the position of having to add sleeves to an existingsleeveless vest or top, or designing a garment from scratch, how do youpick the right sleeve style, and how do you crunch the numbers to make thesleeves fit the body?
To answer these questions, you'll need to be acquainted with the commontypes of sleeves used for clothing, and what measurements to take. In thisissue, we'll look at different types of sleeves and their respective pros andcons, and then discuss measuring and designing the simplest species ofsleeves: drop shoulder and modified drop shoulder sleeves.
A SLEEVE PRIMER
Drop shoulder
What it looks like
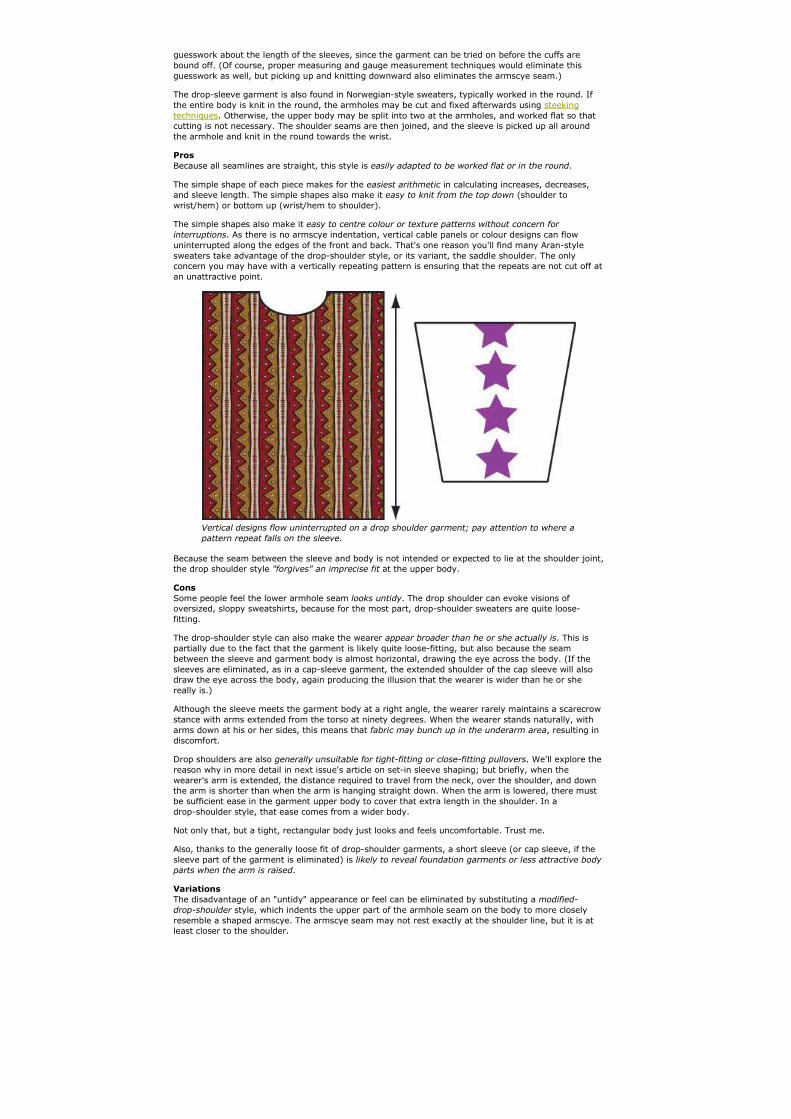
The drop-shoulder style has the simplest lines of any sleeve style. The body of the garment is usually asimple rectangle, with little, if any, shaping. The body width (the rectangle width) extends past theactual shoulder line of the wearer; in fact, if no sleeves were added to the drop-shoulder body, theshoulder portion of the garment would extend into cap sleeves. The armscye is not shaped at all.
The sleeve is also based on a simple rectangle, usually with a taper towards the wrist. The sleeve isshorter than the wearer's actual arm; the upper edge of the sleeve does not reach the shoulder. Thelength of the upper edge of the sleeve equals two times the depth of the armscye. Once assembled,the sleeve extends from the garment body at a right angle.
A schematic of a drop shoulder garment. When assembled, the garment is distinctly "T"
shaped, and needs lots of wearing room [ease] to fit properly.
Assembly
If the garment is knit flat (i.e., with the body in two pieces, a front and back), a drop-sleeve pullover isassembled by first seaming or joining the shoulders of the front and back body, then centering the topsof the sleeves with the shoulder seams, and sewing or grafting the sleeves to the body. The wholebody is then folded in half at the shoulders, and the side and sleeve seams sewn.
Alternatively, once the shoulders are joined, the sleeves may be picked up along the side edge,centered around the shoulder seams, and knit down towards the wrist. This eliminates some
guesswork about the length of the sleeves, since the garment can be tried on before the cuffs arebound off. (Of course, proper measuring and gauge measurement techniques would eliminate thisguesswork as well, but picking up and knitting downward also eliminates the armscye seam.)
The drop-sleeve garment is also found in Norwegian-style sweaters, typically worked in the round. Ifthe entire body is knit in the round, the armholes may be cut and fixed afterwards using steekingtechniques. Otherwise, the upper body may be split into two at the armholes, and worked flat so thatcutting is not necessary. The shoulder seams are then joined, and the sleeve is picked up all aroundthe armhole and knit in the round towards the wrist.
Pros
Because all seamlines are straight, this style is easily adapted to be worked flat or in the round.
The simple shape of each piece makes for the easiest arithmetic in calculating increases, decreases,and sleeve length. The simple shapes also make it easy to knit from the top down (shoulder towrist/hem) or bottom up (wrist/hem to shoulder).
The simple shapes also make it easy to centre colour or texture patterns without concern for
interruptions. As there is no armscye indentation, vertical cable panels or colour designs can flowuninterrupted along the edges of the front and back. That's one reason you'll find many Aran-stylesweaters take advantage of the drop-shoulder style, or its variant, the saddle shoulder. The onlyconcern you may have with a vertically repeating pattern is ensuring that the repeats are not cut off atan unattractive point.
Vertical designs flow uninterrupted on a drop shoulder garment; pay attention to where a
pattern repeat falls on the sleeve.
Because the seam between the sleeve and body is not intended or expected to lie at the shoulder joint,the drop shoulder style "forgives" an imprecise fit at the upper body.
Cons
Some people feel the lower armhole seam looks untidy. The drop shoulder can evoke visions ofoversized, sloppy sweatshirts, because for the most part, drop-shoulder sweaters are quite loose-fitting.
The drop-shoulder style can also make the wearer appear broader than he or she actually is. This ispartially due to the fact that the garment is likely quite loose-fitting, but also because the seambetween the sleeve and garment body is almost horizontal, drawing the eye across the body. (If thesleeves are eliminated, as in a cap-sleeve garment, the extended shoulder of the cap sleeve will alsodraw the eye across the body, again producing the illusion that the wearer is wider than he or shereally is.)
Although the sleeve meets the garment body at a right angle, the wearer rarely maintains a scarecrowstance with arms extended from the torso at ninety degrees. When the wearer stands naturally, witharms down at his or her sides, this means that fabric may bunch up in the underarm area, resulting indiscomfort.
Drop shoulders are also generally unsuitable for tight-fitting or close-fitting pullovers. We'll explore thereason why in more detail in next issue's article on set-in sleeve shaping; but briefly, when thewearer's arm is extended, the distance required to travel from the neck, over the shoulder, and downthe arm is shorter than when the arm is hanging straight down. When the arm is lowered, there mustbe sufficient ease in the garment upper body to cover that extra length in the shoulder. In adrop-shoulder style, that ease comes from a wider body.
Not only that, but a tight, rectangular body just looks and feels uncomfortable. Trust me.
Also, thanks to the generally loose fit of drop-shoulder garments, a short sleeve (or cap sleeve, if thesleeve part of the garment is eliminated) is likely to reveal foundation garments or less attractive body
parts when the arm is raised.
Variations
The disadvantage of an "untidy" appearance or feel can be eliminated by substituting a modified-
drop-shoulder style, which indents the upper part of the armhole seam on the body to more closelyresemble a shaped armscye. The armscye seam may not rest exactly at the shoulder line, but it is atleast closer to the shoulder.
A schematic of a modified drop shoulder garment. When assembled, the lines are similar
to the drop shoulder style.
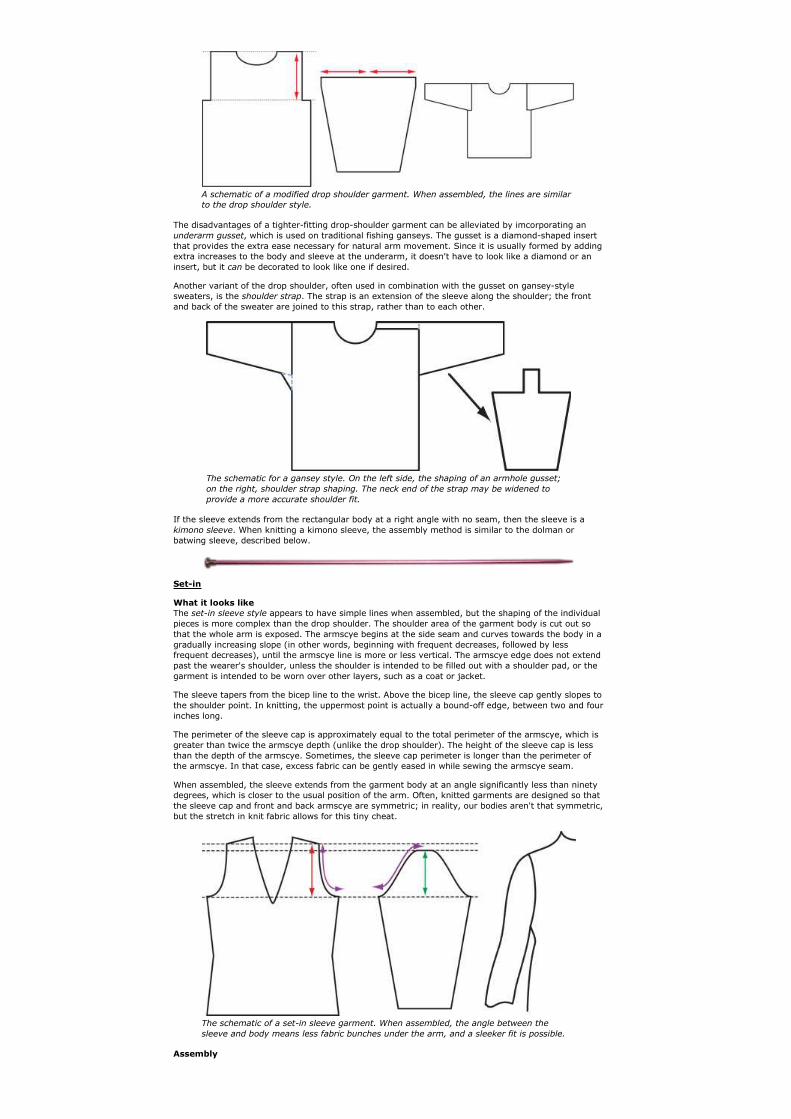
The disadvantages of a tighter-fitting drop-shoulder garment can be alleviated by imcorporating anunderarm gusset, which is used on traditional fishing ganseys. The gusset is a diamond-shaped insertthat provides the extra ease necessary for natural arm movement. Since it is usually formed by addingextra increases to the body and sleeve at the underarm, it doesn't have to look like a diamond or aninsert, but it can be decorated to look like one if desired.
Another variant of the drop shoulder, often used in combination with the gusset on gansey-stylesweaters, is the shoulder strap. The strap is an extension of the sleeve along the shoulder; the frontand back of the sweater are joined to this strap, rather than to each other.
The schematic for a gansey style. On the left side, the shaping of an armhole gusset;
on the right, shoulder strap shaping. The neck end of the strap may be widened to
provide a more accurate shoulder fit.
If the sleeve extends from the rectangular body at a right angle with no seam, then the sleeve is akimono sleeve. When knitting a kimono sleeve, the assembly method is similar to the dolman orbatwing sleeve, described below.
Set-in
What it looks like
The set-in sleeve style appears to have simple lines when assembled, but the shaping of the individualpieces is more complex than the drop shoulder. The shoulder area of the garment body is cut out sothat the whole arm is exposed. The armscye begins at the side seam and curves towards the body in agradually increasing slope (in other words, beginning with frequent decreases, followed by lessfrequent decreases), until the armscye line is more or less vertical. The armscye edge does not extendpast the wearer's shoulder, unless the shoulder is intended to be filled out with a shoulder pad, or thegarment is intended to be worn over other layers, such as a coat or jacket.
The sleeve tapers from the bicep line to the wrist. Above the bicep line, the sleeve cap gently slopes tothe shoulder point. In knitting, the uppermost point is actually a bound-off edge, between two and fourinches long.
The perimeter of the sleeve cap is approximately equal to the total perimeter of the armscye, which isgreater than twice the armscye depth (unlike the drop shoulder). The height of the sleeve cap is lessthan the depth of the armscye. Sometimes, the sleeve cap perimeter is longer than the perimeter ofthe armscye. In that case, excess fabric can be gently eased in while sewing the armscye seam.
When assembled, the sleeve extends from the garment body at an angle significantly less than ninetydegrees, which is closer to the usual position of the arm. Often, knitted garments are designed so thatthe sleeve cap and front and back armscye are symmetric; in reality, our bodies aren't that symmetric,but the stretch in knit fabric allows for this tiny cheat.
The schematic of a set-in sleeve garment. When assembled, the angle between the
sleeve and body means less fabric bunches under the arm, and a sleeker fit is possible.
Assembly
Because of the shaping of the armscye and sleeve cap, a set-in sleeve garment is usually knit flat. Thefront and back body are joined at the shoulders, and then the sleeve cap is sewn into the armscye.Because a curved edge is being matched to a (mostly) straight edge, neat sewing is sometimes achallenge. If necessary, any excess fabric along the sleeve cap should be eased (slightly gathered) tofit the armscye. Once the sleeve cap is sewn in, the body side seams and the straight sleeve seams aresewn.
Alternatively, the front and back body first may be joined at the shoulder and side seams, and thesleeve sewn into a tube along its long seam. The sleeve is then set into (hence the name, "set-in") thearmscye, matching the underarm seams together and the centre of the sleeve cap with the shoulderseam. This is usually the order of operations used in sewing. In knitting, you'd use this assemblymethod if the lower part of the body was knit in the round, then divided for knitting and shaping theupper body.
It is possible to pick up and knit a set-in sleeve from the armscye down to the wrist, but this techniquewill require short rows to give the sleeve proper shape.
Pros
Because it more closely mimics the wearer's usual arm position, the set-in sleeve overcomes the maindisadvantages of the drop shoulder: no fabric bunching in the underarm area, making for a more
comfortable fit, and vertical armscye seams instead of horizontal seams, which promotes a more
slimming look.
The shaping of the sleeve cap provides the necessary "space" in the garment's upper body required toallow for freedom of arm movement, without having to add extra room to the garment body in amanner similar to the drop-shoulder style. This means that the set-in sleeve style is suitable for tight-
fitting or close-fitting tops. It's still good for looser clothing, as well.
If the sleeve is set into a short-sleeved top, the closer fit around the arm and shoulder means thatraising one's arm does not reveal any, ahem, unappealing features.
Cons
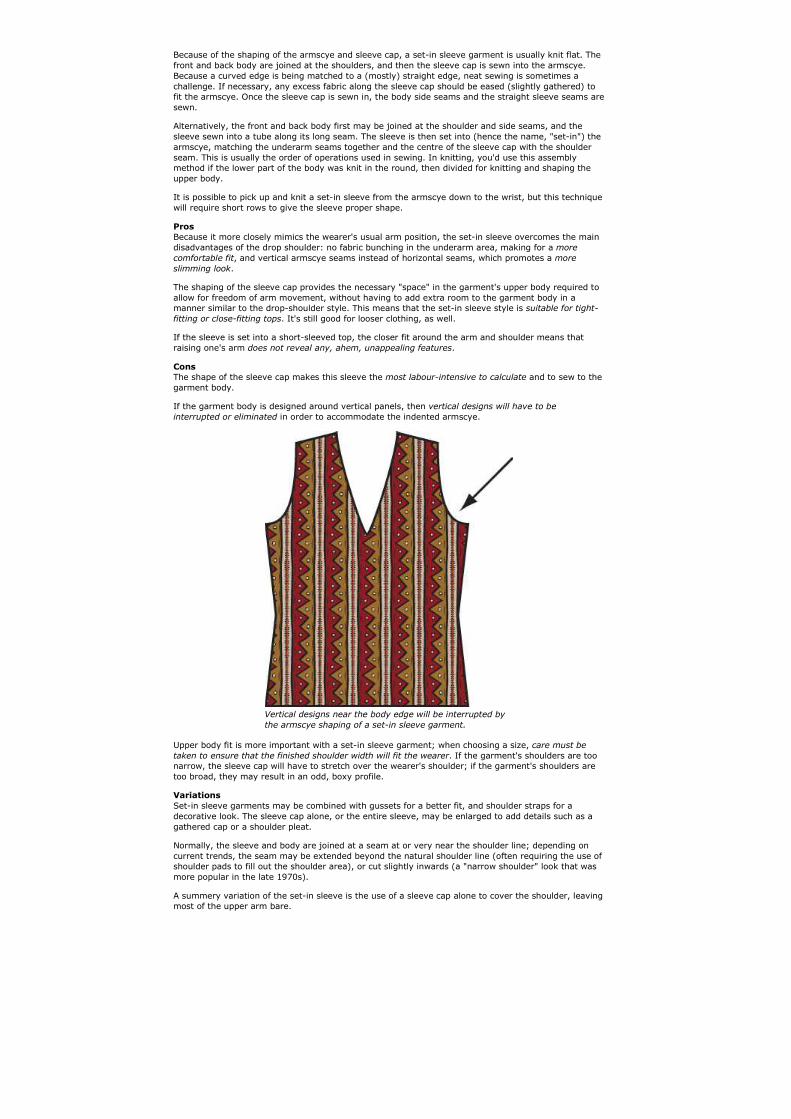
The shape of the sleeve cap makes this sleeve the most labour-intensive to calculate and to sew to thegarment body.
If the garment body is designed around vertical panels, then vertical designs will have to be
interrupted or eliminated in order to accommodate the indented armscye.
Vertical designs near the body edge will be interrupted by
the armscye shaping of a set-in sleeve garment.
Upper body fit is more important with a set-in sleeve garment; when choosing a size, care must be
taken to ensure that the finished shoulder width will fit the wearer. If the garment's shoulders are toonarrow, the sleeve cap will have to stretch over the wearer's shoulder; if the garment's shoulders aretoo broad, they may result in an odd, boxy profile.
Variations
Set-in sleeve garments may be combined with gussets for a better fit, and shoulder straps for adecorative look. The sleeve cap alone, or the entire sleeve, may be enlarged to add details such as agathered cap or a shoulder pleat.
Normally, the sleeve and body are joined at a seam at or very near the shoulder line; depending oncurrent trends, the seam may be extended beyond the natural shoulder line (often requiring the use ofshoulder pads to fill out the shoulder area), or cut slightly inwards (a "narrow shoulder" look that wasmore popular in the late 1970s).
A summery variation of the set-in sleeve is the use of a sleeve cap alone to cover the shoulder, leavingmost of the upper arm bare.
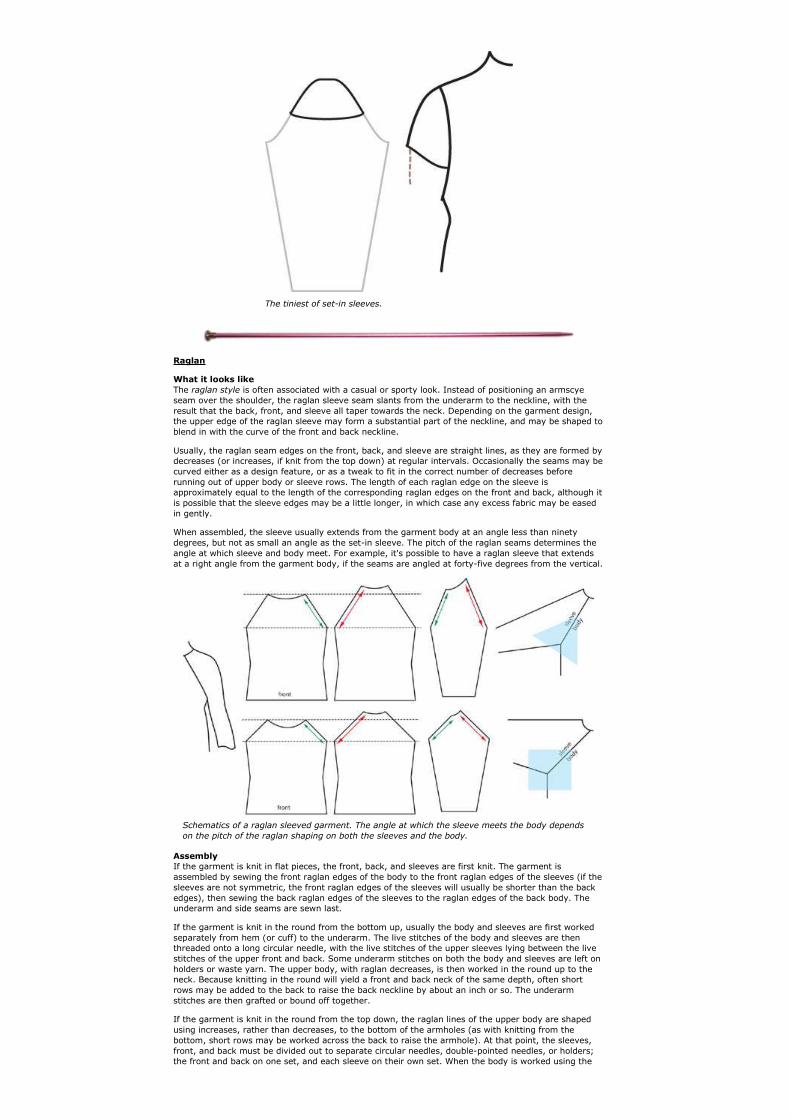
The tiniest of set-in sleeves.
Raglan
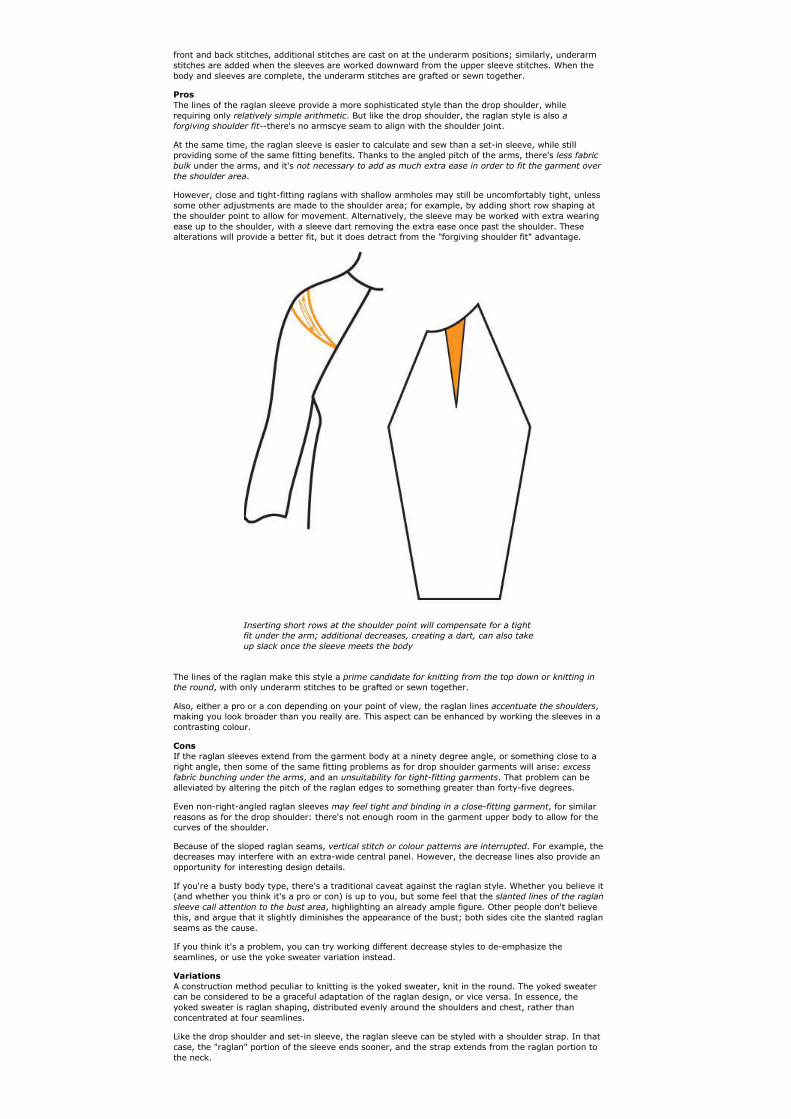
What it looks like
The raglan style is often associated with a casual or sporty look. Instead of positioning an armscyeseam over the shoulder, the raglan sleeve seam slants from the underarm to the neckline, with theresult that the back, front, and sleeve all taper towards the neck. Depending on the garment design,the upper edge of the raglan sleeve may form a substantial part of the neckline, and may be shaped toblend in with the curve of the front and back neckline.
Usually, the raglan seam edges on the front, back, and sleeve are straight lines, as they are formed bydecreases (or increases, if knit from the top down) at regular intervals. Occasionally the seams may becurved either as a design feature, or as a tweak to fit in the correct number of decreases beforerunning out of upper body or sleeve rows. The length of each raglan edge on the sleeve isapproximately equal to the length of the corresponding raglan edges on the front and back, although itis possible that the sleeve edges may be a little longer, in which case any excess fabric may be easedin gently.
When assembled, the sleeve usually extends from the garment body at an angle less than ninetydegrees, but not as small an angle as the set-in sleeve. The pitch of the raglan seams determines theangle at which sleeve and body meet. For example, it's possible to have a raglan sleeve that extendsat a right angle from the garment body, if the seams are angled at forty-five degrees from the vertical.
Schematics of a raglan sleeved garment. The angle at which the sleeve meets the body depends
on the pitch of the raglan shaping on both the sleeves and the body.
Assembly
If the garment is knit in flat pieces, the front, back, and sleeves are first knit. The garment isassembled by sewing the front raglan edges of the body to the front raglan edges of the sleeves (if thesleeves are not symmetric, the front raglan edges of the sleeves will usually be shorter than the backedges), then sewing the back raglan edges of the sleeves to the raglan edges of the back body. Theunderarm and side seams are sewn last.
If the garment is knit in the round from the bottom up, usually the body and sleeves are first workedseparately from hem (or cuff) to the underarm. The live stitches of the body and sleeves are thenthreaded onto a long circular needle, with the live stitches of the upper sleeves lying between the livestitches of the upper front and back. Some underarm stitches on both the body and sleeves are left onholders or waste yarn. The upper body, with raglan decreases, is then worked in the round up to theneck. Because knitting in the round will yield a front and back neck of the same depth, often shortrows may be added to the back to raise the back neckline by about an inch or so. The underarmstitches are then grafted or bound off together.
If the garment is knit in the round from the top down, the raglan lines of the upper body are shapedusing increases, rather than decreases, to the bottom of the armholes (as with knitting from thebottom, short rows may be worked across the back to raise the armhole). At that point, the sleeves,front, and back must be divided out to separate circular needles, double-pointed needles, or holders;the front and back on one set, and each sleeve on their own set. When the body is worked using the
front and back stitches, additional stitches are cast on at the underarm positions; similarly, underarmstitches are added when the sleeves are worked downward from the upper sleeve stitches. When thebody and sleeves are complete, the underarm stitches are grafted or sewn together.
Pros
The lines of the raglan sleeve provide a more sophisticated style than the drop shoulder, whilerequiring only relatively simple arithmetic. But like the drop shoulder, the raglan style is also aforgiving shoulder fit--there's no armscye seam to align with the shoulder joint.
At the same time, the raglan sleeve is easier to calculate and sew than a set-in sleeve, while stillproviding some of the same fitting benefits. Thanks to the angled pitch of the arms, there's less fabric
bulk under the arms, and it's not necessary to add as much extra ease in order to fit the garment over
the shoulder area.
However, close and tight-fitting raglans with shallow armholes may still be uncomfortably tight, unlesssome other adjustments are made to the shoulder area; for example, by adding short row shaping atthe shoulder point to allow for movement. Alternatively, the sleeve may be worked with extra wearingease up to the shoulder, with a sleeve dart removing the extra ease once past the shoulder. Thesealterations will provide a better fit, but it does detract from the "forgiving shoulder fit" advantage.
Inserting short rows at the shoulder point will compensate for a tight
fit under the arm; additional decreases, creating a dart, can also take
up slack once the sleeve meets the body
The lines of the raglan make this style a prime candidate for knitting from the top down or knitting in
the round, with only underarm stitches to be grafted or sewn together.
Also, either a pro or a con depending on your point of view, the raglan lines accentuate the shoulders,making you look broader than you really are. This aspect can be enhanced by working the sleeves in acontrasting colour.
Cons
If the raglan sleeves extend from the garment body at a ninety degree angle, or something close to aright angle, then some of the same fitting problems as for drop shoulder garments will arise: excess
fabric bunching under the arms, and an unsuitability for tight-fitting garments. That problem can bealleviated by altering the pitch of the raglan edges to something greater than forty-five degrees.
Even non-right-angled raglan sleeves may feel tight and binding in a close-fitting garment, for similarreasons as for the drop shoulder: there's not enough room in the garment upper body to allow for thecurves of the shoulder.
Because of the sloped raglan seams, vertical stitch or colour patterns are interrupted. For example, thedecreases may interfere with an extra-wide central panel. However, the decrease lines also provide anopportunity for interesting design details.
If you're a busty body type, there's a traditional caveat against the raglan style. Whether you believe it(and whether you think it's a pro or con) is up to you, but some feel that the slanted lines of the raglan
sleeve call attention to the bust area, highlighting an already ample figure. Other people don't believethis, and argue that it slightly diminishes the appearance of the bust; both sides cite the slanted raglanseams as the cause.
If you think it's a problem, you can try working different decrease styles to de-emphasize theseamlines, or use the yoke sweater variation instead.
Variations
A construction method peculiar to knitting is the yoked sweater, knit in the round. The yoked sweatercan be considered to be a graceful adaptation of the raglan design, or vice versa. In essence, theyoked sweater is raglan shaping, distributed evenly around the shoulders and chest, rather thanconcentrated at four seamlines.
Like the drop shoulder and set-in sleeve, the raglan sleeve can be styled with a shoulder strap. In thatcase, the "raglan" portion of the sleeve ends sooner, and the strap extends from the raglan portion tothe neck.
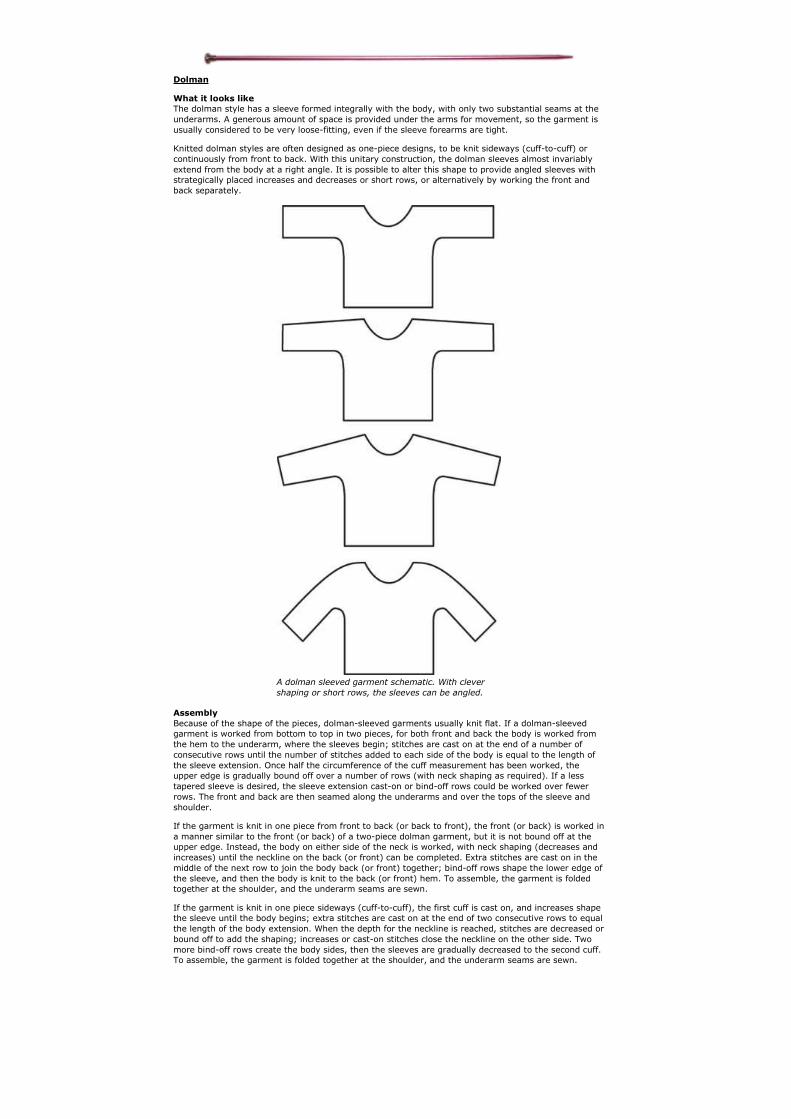
Dolman
What it looks like
The dolman style has a sleeve formed integrally with the body, with only two substantial seams at theunderarms. A generous amount of space is provided under the arms for movement, so the garment isusually considered to be very loose-fitting, even if the sleeve forearms are tight.
Knitted dolman styles are often designed as one-piece designs, to be knit sideways (cuff-to-cuff) orcontinuously from front to back. With this unitary construction, the dolman sleeves almost invariablyextend from the body at a right angle. It is possible to alter this shape to provide angled sleeves withstrategically placed increases and decreases or short rows, or alternatively by working the front andback separately.
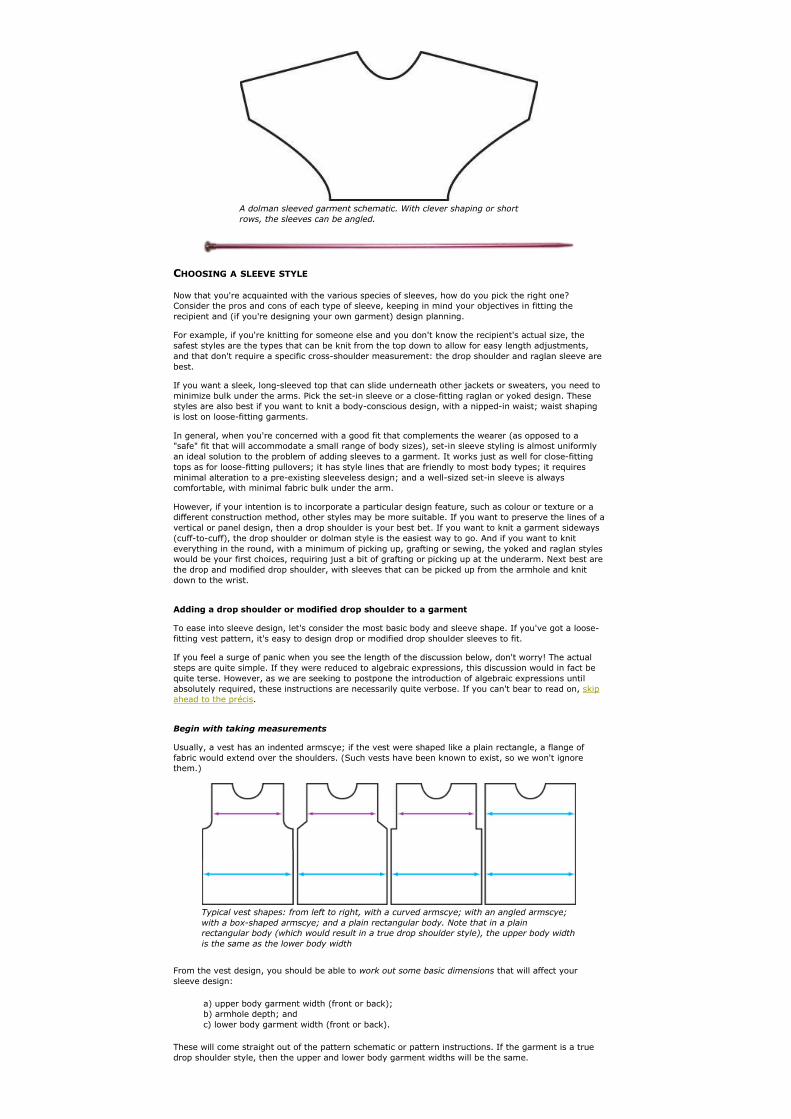
A dolman sleeved garment schematic. With clever
shaping or short rows, the sleeves can be angled.
Assembly
Because of the shape of the pieces, dolman-sleeved garments usually knit flat. If a dolman-sleevedgarment is worked from bottom to top in two pieces, for both front and back the body is worked fromthe hem to the underarm, where the sleeves begin; stitches are cast on at the end of a number ofconsecutive rows until the number of stitches added to each side of the body is equal to the length ofthe sleeve extension. Once half the circumference of the cuff measurement has been worked, theupper edge is gradually bound off over a number of rows (with neck shaping as required). If a lesstapered sleeve is desired, the sleeve extension cast-on or bind-off rows could be worked over fewerrows. The front and back are then seamed along the underarms and over the tops of the sleeve andshoulder.
If the garment is knit in one piece from front to back (or back to front), the front (or back) is worked ina manner similar to the front (or back) of a two-piece dolman garment, but it is not bound off at theupper edge. Instead, the body on either side of the neck is worked, with neck shaping (decreases andincreases) until the neckline on the back (or front) can be completed. Extra stitches are cast on in themiddle of the next row to join the body back (or front) together; bind-off rows shape the lower edge ofthe sleeve, and then the body is knit to the back (or front) hem. To assemble, the garment is foldedtogether at the shoulder, and the underarm seams are sewn.
If the garment is knit in one piece sideways (cuff-to-cuff), the first cuff is cast on, and increases shapethe sleeve until the body begins; extra stitches are cast on at the end of two consecutive rows to equalthe length of the body extension. When the depth for the neckline is reached, stitches are decreased orbound off to add the shaping; increases or cast-on stitches close the neckline on the other side. Twomore bind-off rows create the body sides, then the sleeves are gradually decreased to the second cuff.To assemble, the garment is folded together at the shoulder, and the underarm seams are sewn.
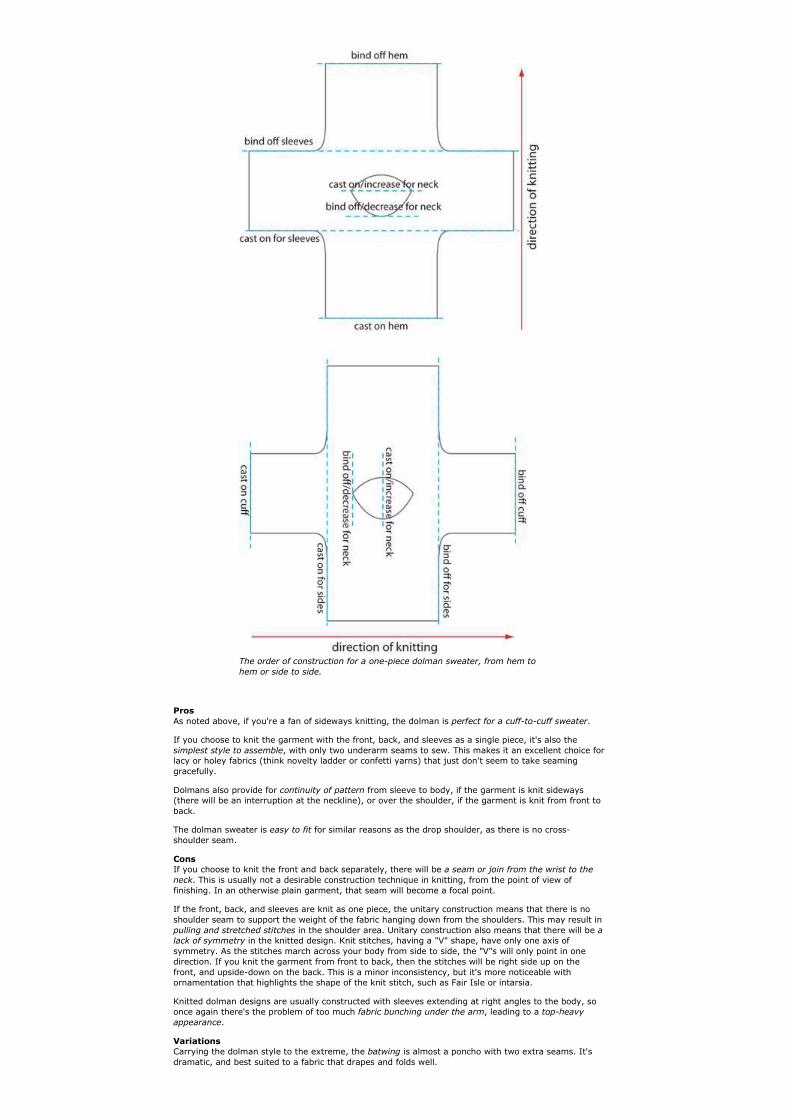
The order of construction for a one-piece dolman sweater, from hem to
hem or side to side.
Pros
As noted above, if you're a fan of sideways knitting, the dolman is perfect for a cuff-to-cuff sweater.
If you choose to knit the garment with the front, back, and sleeves as a single piece, it's also thesimplest style to assemble, with only two underarm seams to sew. This makes it an excellent choice forlacy or holey fabrics (think novelty ladder or confetti yarns) that just don't seem to take seaminggracefully.
Dolmans also provide for continuity of pattern from sleeve to body, if the garment is knit sideways(there will be an interruption at the neckline), or over the shoulder, if the garment is knit from front toback.
The dolman sweater is easy to fit for similar reasons as the drop shoulder, as there is no cross-shoulder seam.
Cons
If you choose to knit the front and back separately, there will be a seam or join from the wrist to the
neck. This is usually not a desirable construction technique in knitting, from the point of view offinishing. In an otherwise plain garment, that seam will become a focal point.
If the front, back, and sleeves are knit as one piece, the unitary construction means that there is noshoulder seam to support the weight of the fabric hanging down from the shoulders. This may result inpulling and stretched stitches in the shoulder area. Unitary construction also means that there will be alack of symmetry in the knitted design. Knit stitches, having a "V" shape, have only one axis ofsymmetry. As the stitches march across your body from side to side, the "V"s will only point in onedirection. If you knit the garment from front to back, then the stitches will be right side up on thefront, and upside-down on the back. This is a minor inconsistency, but it's more noticeable withornamentation that highlights the shape of the knit stitch, such as Fair Isle or intarsia.
Knitted dolman designs are usually constructed with sleeves extending at right angles to the body, soonce again there's the problem of too much fabric bunching under the arm, leading to a top-heavy
appearance.
Variations
Carrying the dolman style to the extreme, the batwing is almost a poncho with two extra seams. It'sdramatic, and best suited to a fabric that drapes and folds well.
A dolman sleeved garment schematic. With clever shaping or short
rows, the sleeves can be angled.
CHOOSING A SLEEVE STYLE
Now that you're acquainted with the various species of sleeves, how do you pick the right one?Consider the pros and cons of each type of sleeve, keeping in mind your objectives in fitting therecipient and (if you're designing your own garment) design planning.
For example, if you're knitting for someone else and you don't know the recipient's actual size, thesafest styles are the types that can be knit from the top down to allow for easy length adjustments,and that don't require a specific cross-shoulder measurement: the drop shoulder and raglan sleeve arebest.
If you want a sleek, long-sleeved top that can slide underneath other jackets or sweaters, you need tominimize bulk under the arms. Pick the set-in sleeve or a close-fitting raglan or yoked design. Thesestyles are also best if you want to knit a body-conscious design, with a nipped-in waist; waist shapingis lost on loose-fitting garments.
In general, when you're concerned with a good fit that complements the wearer (as opposed to a"safe" fit that will accommodate a small range of body sizes), set-in sleeve styling is almost uniformlyan ideal solution to the problem of adding sleeves to a garment. It works just as well for close-fittingtops as for loose-fitting pullovers; it has style lines that are friendly to most body types; it requiresminimal alteration to a pre-existing sleeveless design; and a well-sized set-in sleeve is alwayscomfortable, with minimal fabric bulk under the arm.
However, if your intention is to incorporate a particular design feature, such as colour or texture or adifferent construction method, other styles may be more suitable. If you want to preserve the lines of avertical or panel design, then a drop shoulder is your best bet. If you want to knit a garment sideways(cuff-to-cuff), the drop shoulder or dolman style is the easiest way to go. And if you want to kniteverything in the round, with a minimum of picking up, grafting or sewing, the yoked and raglan styleswould be your first choices, requiring just a bit of grafting or picking up at the underarm. Next best arethe drop and modified drop shoulder, with sleeves that can be picked up from the armhole and knitdown to the wrist.
Adding a drop shoulder or modified drop shoulder to a garment
To ease into sleeve design, let's consider the most basic body and sleeve shape. If you've got a loose-fitting vest pattern, it's easy to design drop or modified drop shoulder sleeves to fit.
If you feel a surge of panic when you see the length of the discussion below, don't worry! The actualsteps are quite simple. If they were reduced to algebraic expressions, this discussion would in fact bequite terse. However, as we are seeking to postpone the introduction of algebraic expressions untilabsolutely required, these instructions are necessarily quite verbose. If you can't bear to read on, skipahead to the précis.
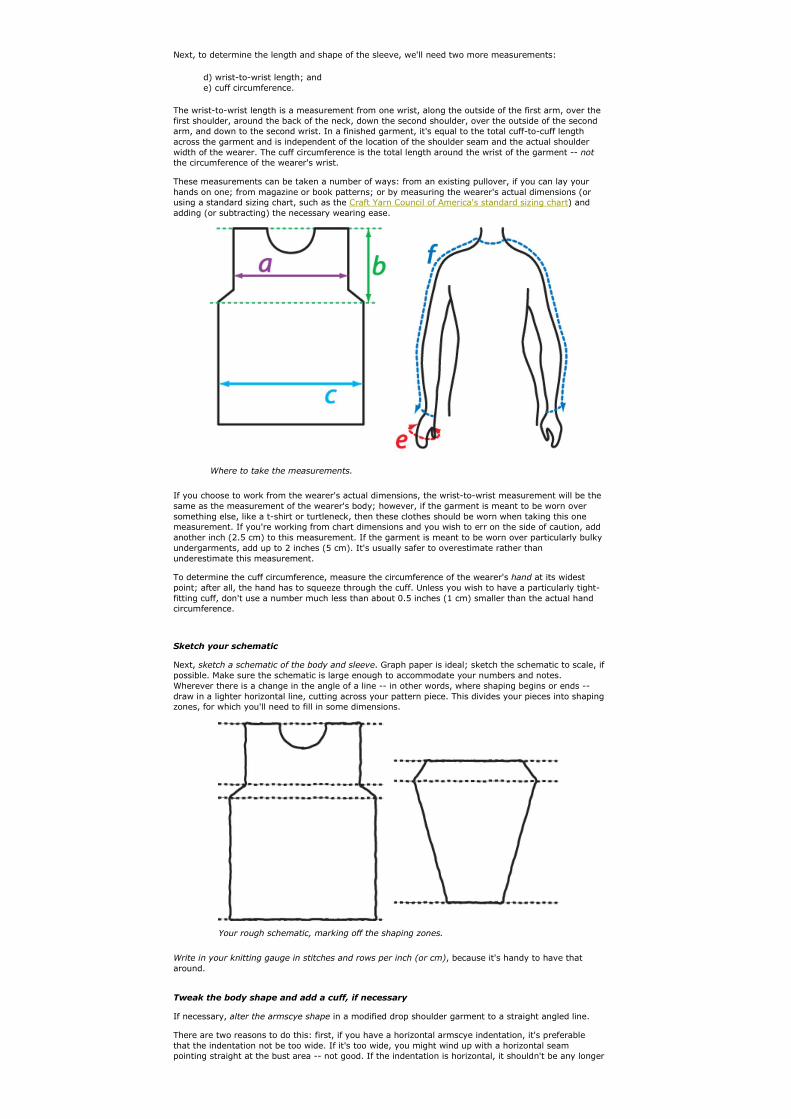
Begin with taking measurements
Usually, a vest has an indented armscye; if the vest were shaped like a plain rectangle, a flange offabric would extend over the shoulders. (Such vests have been known to exist, so we won't ignorethem.)
Typical vest shapes: from left to right, with a curved armscye; with an angled armscye;
with a box-shaped armscye; and a plain rectangular body. Note that in a plain
rectangular body (which would result in a true drop shoulder style), the upper body width
is the same as the lower body width
From the vest design, you should be able to work out some basic dimensions that will affect yoursleeve design:
a) upper body garment width (front or back);b) armhole depth; andc) lower body garment width (front or back).
These will come straight out of the pattern schematic or pattern instructions. If the garment is a truedrop shoulder style, then the upper and lower body garment widths will be the same.
Next, to determine the length and shape of the sleeve, we'll need two more measurements:
d) wrist-to-wrist length; ande) cuff circumference.
The wrist-to-wrist length is a measurement from one wrist, along the outside of the first arm, over thefirst shoulder, around the back of the neck, down the second shoulder, over the outside of the secondarm, and down to the second wrist. In a finished garment, it's equal to the total cuff-to-cuff lengthacross the garment and is independent of the location of the shoulder seam and the actual shoulderwidth of the wearer. The cuff circumference is the total length around the wrist of the garment -- not
the circumference of the wearer's wrist.
These measurements can be taken a number of ways: from an existing pullover, if you can lay yourhands on one; from magazine or book patterns; or by measuring the wearer's actual dimensions (orusing a standard sizing chart, such as the Craft Yarn Council of America's standard sizing chart) andadding (or subtracting) the necessary wearing ease.
Where to take the measurements.
If you choose to work from the wearer's actual dimensions, the wrist-to-wrist measurement will be thesame as the measurement of the wearer's body; however, if the garment is meant to be worn oversomething else, like a t-shirt or turtleneck, then these clothes should be worn when taking this onemeasurement. If you're working from chart dimensions and you wish to err on the side of caution, addanother inch (2.5 cm) to this measurement. If the garment is meant to be worn over particularly bulkyundergarments, add up to 2 inches (5 cm). It's usually safer to overestimate rather thanunderestimate this measurement.
To determine the cuff circumference, measure the circumference of the wearer's hand at its widestpoint; after all, the hand has to squeeze through the cuff. Unless you wish to have a particularly tight-fitting cuff, don't use a number much less than about 0.5 inches (1 cm) smaller than the actual handcircumference.
Sketch your schematic
Next, sketch a schematic of the body and sleeve. Graph paper is ideal; sketch the schematic to scale, ifpossible. Make sure the schematic is large enough to accommodate your numbers and notes.Wherever there is a change in the angle of a line -- in other words, where shaping begins or ends --draw in a lighter horizontal line, cutting across your pattern piece. This divides your pieces into shapingzones, for which you'll need to fill in some dimensions.
Your rough schematic, marking off the shaping zones.
Write in your knitting gauge in stitches and rows per inch (or cm), because it's handy to have thataround.
Tweak the body shape and add a cuff, if necessary
If necessary, alter the armscye shape in a modified drop shoulder garment to a straight angled line.
There are two reasons to do this: first, if you have a horizontal armscye indentation, it's preferablethat the indentation not be too wide. If it's too wide, you might wind up with a horizontal seampointing straight at the bust area -- not good. If the indentation is horizontal, it shouldn't be any longer
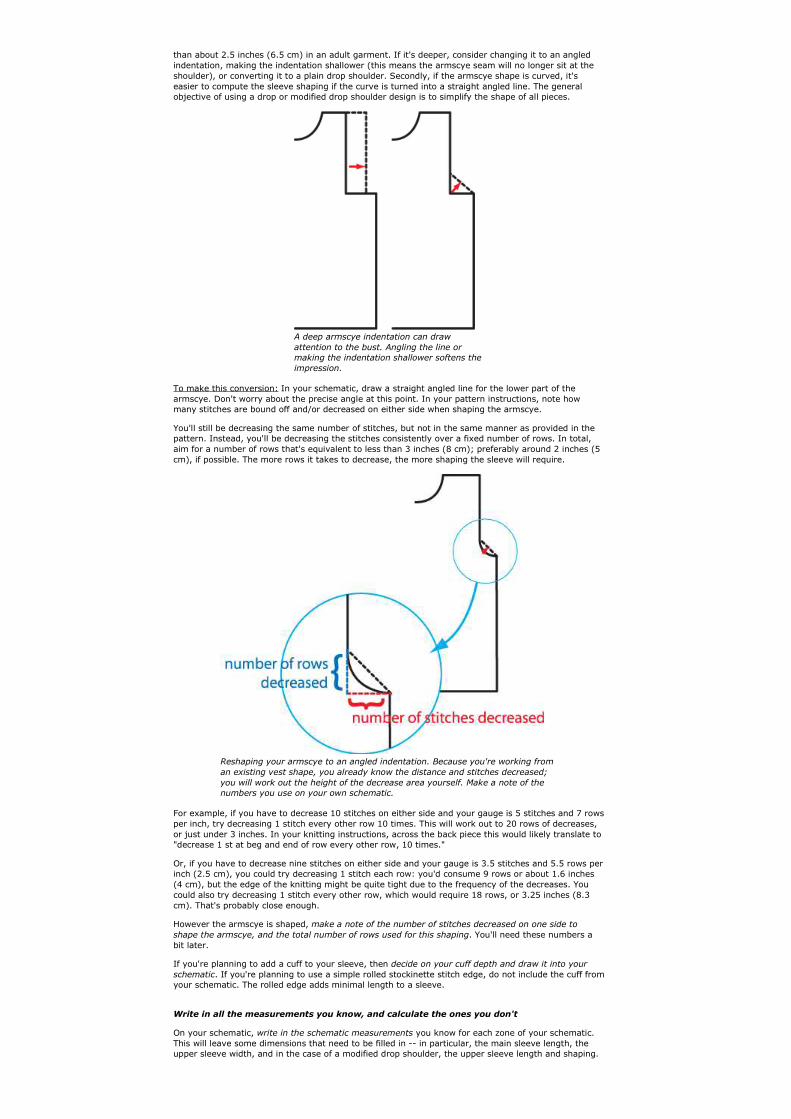
than about 2.5 inches (6.5 cm) in an adult garment. If it's deeper, consider changing it to an angledindentation, making the indentation shallower (this means the armscye seam will no longer sit at theshoulder), or converting it to a plain drop shoulder. Secondly, if the armscye shape is curved, it'seasier to compute the sleeve shaping if the curve is turned into a straight angled line. The generalobjective of using a drop or modified drop shoulder design is to simplify the shape of all pieces.
A deep armscye indentation can draw
attention to the bust. Angling the line or
making the indentation shallower softens the
impression.
To make this conversion: In your schematic, draw a straight angled line for the lower part of thearmscye. Don't worry about the precise angle at this point. In your pattern instructions, note howmany stitches are bound off and/or decreased on either side when shaping the armscye.
You'll still be decreasing the same number of stitches, but not in the same manner as provided in thepattern. Instead, you'll be decreasing the stitches consistently over a fixed number of rows. In total,aim for a number of rows that's equivalent to less than 3 inches (8 cm); preferably around 2 inches (5cm), if possible. The more rows it takes to decrease, the more shaping the sleeve will require.
Reshaping your armscye to an angled indentation. Because you're working from
an existing vest shape, you already know the distance and stitches decreased;
you will work out the height of the decrease area yourself. Make a note of the
numbers you use on your own schematic.
For example, if you have to decrease 10 stitches on either side and your gauge is 5 stitches and 7 rowsper inch, try decreasing 1 stitch every other row 10 times. This will work out to 20 rows of decreases,or just under 3 inches. In your knitting instructions, across the back piece this would likely translate to"decrease 1 st at beg and end of row every other row, 10 times."
Or, if you have to decrease nine stitches on either side and your gauge is 3.5 stitches and 5.5 rows perinch (2.5 cm), you could try decreasing 1 stitch each row: you'd consume 9 rows or about 1.6 inches(4 cm), but the edge of the knitting might be quite tight due to the frequency of the decreases. Youcould also try decreasing 1 stitch every other row, which would require 18 rows, or 3.25 inches (8.3cm). That's probably close enough.
However the armscye is shaped, make a note of the number of stitches decreased on one side to
shape the armscye, and the total number of rows used for this shaping. You'll need these numbers abit later.
If you're planning to add a cuff to your sleeve, then decide on your cuff depth and draw it into your
schematic. If you're planning to use a simple rolled stockinette stitch edge, do not include the cuff fromyour schematic. The rolled edge adds minimal length to a sleeve.
Write in all the measurements you know, and calculate the ones you don't
On your schematic, write in the schematic measurements you know for each zone of your schematic.This will leave some dimensions that need to be filled in -- in particular, the main sleeve length, theupper sleeve width, and in the case of a modified drop shoulder, the upper sleeve length and shaping.
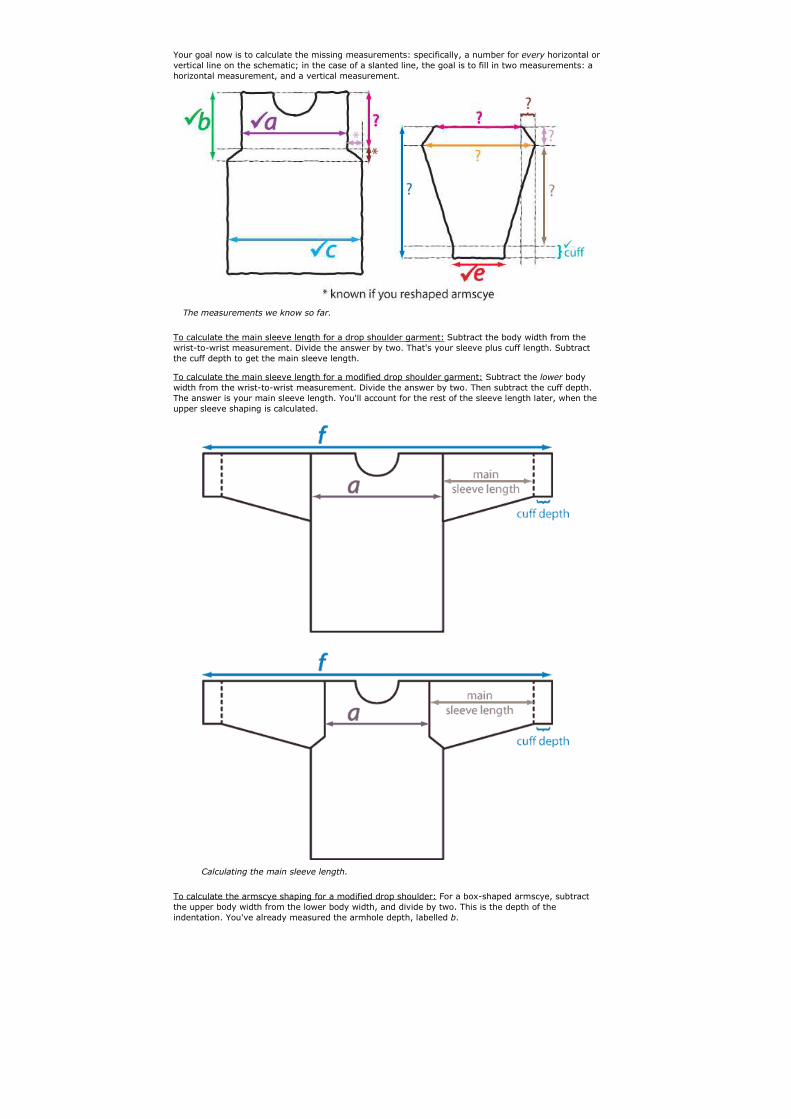
Your goal now is to calculate the missing measurements: specifically, a number for every horizontal orvertical line on the schematic; in the case of a slanted line, the goal is to fill in two measurements: ahorizontal measurement, and a vertical measurement.
The measurements we know so far.
To calculate the main sleeve length for a drop shoulder garment: Subtract the body width from thewrist-to-wrist measurement. Divide the answer by two. That's your sleeve plus cuff length. Subtractthe cuff depth to get the main sleeve length.
To calculate the main sleeve length for a modified drop shoulder garment: Subtract the lower bodywidth from the wrist-to-wrist measurement. Divide the answer by two. Then subtract the cuff depth.The answer is your main sleeve length. You'll account for the rest of the sleeve length later, when theupper sleeve shaping is calculated.
Calculating the main sleeve length.
To calculate the armscye shaping for a modified drop shoulder: For a box-shaped armscye, subtractthe upper body width from the lower body width, and divide by two. This is the depth of theindentation. You've already measured the armhole depth, labelled b.
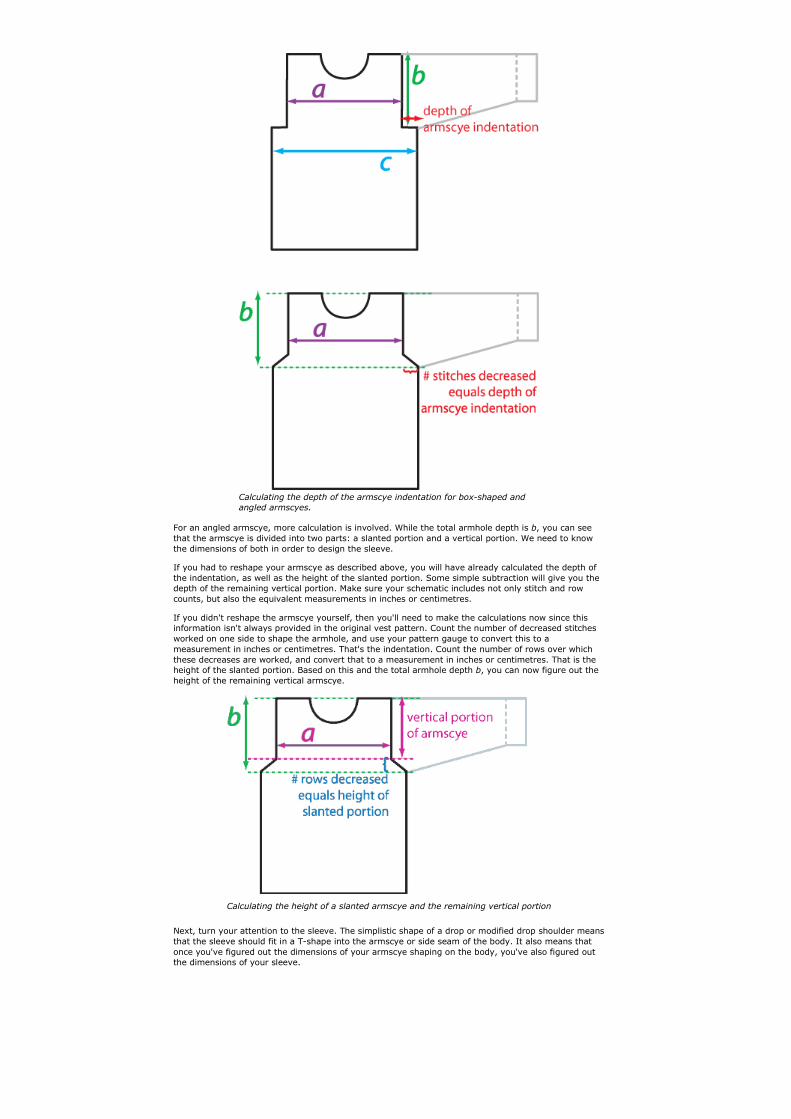
Calculating the depth of the armscye indentation for box-shaped and
angled armscyes.
For an angled armscye, more calculation is involved. While the total armhole depth is b, you can seethat the armscye is divided into two parts: a slanted portion and a vertical portion. We need to knowthe dimensions of both in order to design the sleeve.
If you had to reshape your armscye as described above, you will have already calculated the depth ofthe indentation, as well as the height of the slanted portion. Some simple subtraction will give you thedepth of the remaining vertical portion. Make sure your schematic includes not only stitch and rowcounts, but also the equivalent measurements in inches or centimetres.
If you didn't reshape the armscye yourself, then you'll need to make the calculations now since thisinformation isn't always provided in the original vest pattern. Count the number of decreased stitchesworked on one side to shape the armhole, and use your pattern gauge to convert this to ameasurement in inches or centimetres. That's the indentation. Count the number of rows over whichthese decreases are worked, and convert that to a measurement in inches or centimetres. That is theheight of the slanted portion. Based on this and the total armhole depth b, you can now figure out theheight of the remaining vertical armscye.
Calculating the height of a slanted armscye and the remaining vertical portion
Next, turn your attention to the sleeve. The simplistic shape of a drop or modified drop shoulder meansthat the sleeve should fit in a T-shape into the armscye or side seam of the body. It also means thatonce you've figured out the dimensions of your armscye shaping on the body, you've also figured outthe dimensions of your sleeve.
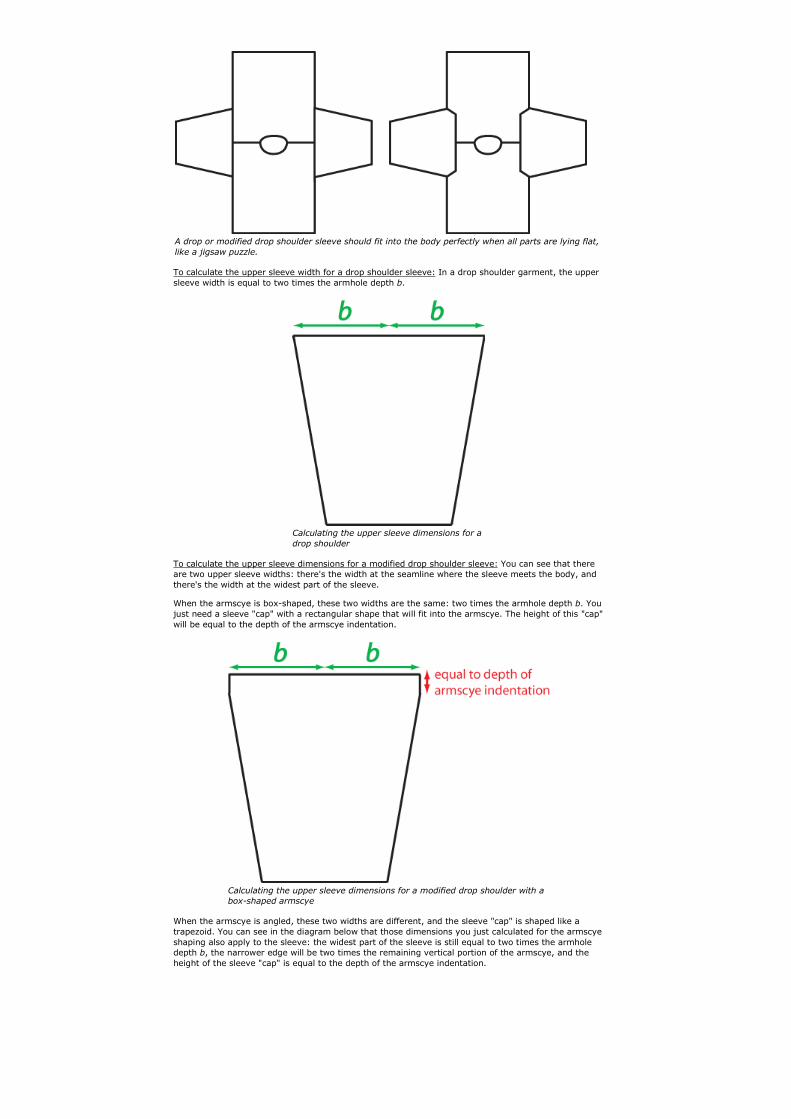
A drop or modified drop shoulder sleeve should fit into the body perfectly when all parts are lying flat,
like a jigsaw puzzle.
To calculate the upper sleeve width for a drop shoulder sleeve: In a drop shoulder garment, the uppersleeve width is equal to two times the armhole depth b.
Calculating the upper sleeve dimensions for a
drop shoulder
To calculate the upper sleeve dimensions for a modified drop shoulder sleeve: You can see that thereare two upper sleeve widths: there's the width at the seamline where the sleeve meets the body, andthere's the width at the widest part of the sleeve.
When the armscye is box-shaped, these two widths are the same: two times the armhole depth b. Youjust need a sleeve "cap" with a rectangular shape that will fit into the armscye. The height of this "cap"will be equal to the depth of the armscye indentation.
Calculating the upper sleeve dimensions for a modified drop shoulder with a
box-shaped armscye
When the armscye is angled, these two widths are different, and the sleeve "cap" is shaped like atrapezoid. You can see in the diagram below that those dimensions you just calculated for the armscyeshaping also apply to the sleeve: the widest part of the sleeve is still equal to two times the armholedepth b, the narrower edge will be two times the remaining vertical portion of the armscye, and theheight of the sleeve "cap" is equal to the depth of the armscye indentation.
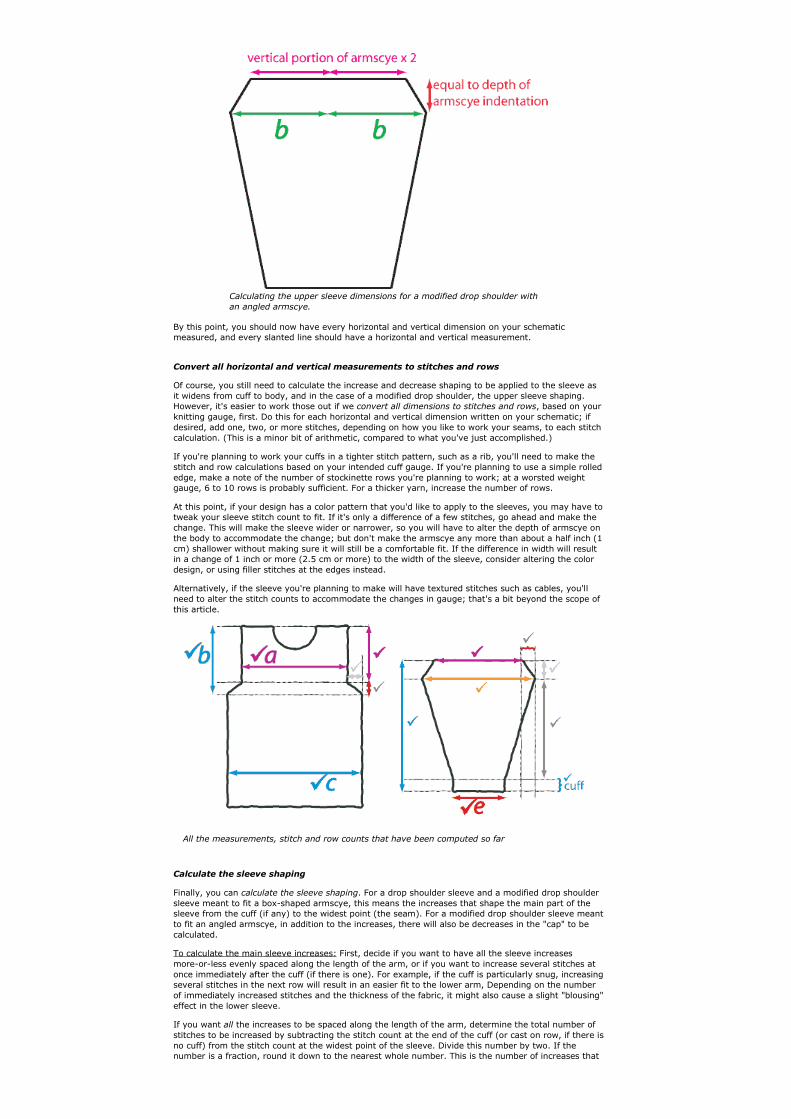
Calculating the upper sleeve dimensions for a modified drop shoulder with
an angled armscye.
By this point, you should now have every horizontal and vertical dimension on your schematicmeasured, and every slanted line should have a horizontal and vertical measurement.
Convert all horizontal and vertical measurements to stitches and rows
Of course, you still need to calculate the increase and decrease shaping to be applied to the sleeve asit widens from cuff to body, and in the case of a modified drop shoulder, the upper sleeve shaping.However, it's easier to work those out if we convert all dimensions to stitches and rows, based on yourknitting gauge, first. Do this for each horizontal and vertical dimension written on your schematic; ifdesired, add one, two, or more stitches, depending on how you like to work your seams, to each stitchcalculation. (This is a minor bit of arithmetic, compared to what you've just accomplished.)
If you're planning to work your cuffs in a tighter stitch pattern, such as a rib, you'll need to make thestitch and row calculations based on your intended cuff gauge. If you're planning to use a simple rollededge, make a note of the number of stockinette rows you're planning to work; at a worsted weightgauge, 6 to 10 rows is probably sufficient. For a thicker yarn, increase the number of rows.
At this point, if your design has a color pattern that you'd like to apply to the sleeves, you may have totweak your sleeve stitch count to fit. If it's only a difference of a few stitches, go ahead and make thechange. This will make the sleeve wider or narrower, so you will have to alter the depth of armscye onthe body to accommodate the change; but don't make the armscye any more than about a half inch (1cm) shallower without making sure it will still be a comfortable fit. If the difference in width will resultin a change of 1 inch or more (2.5 cm or more) to the width of the sleeve, consider altering the colordesign, or using filler stitches at the edges instead.
Alternatively, if the sleeve you're planning to make will have textured stitches such as cables, you'llneed to alter the stitch counts to accommodate the changes in gauge; that's a bit beyond the scope ofthis article.
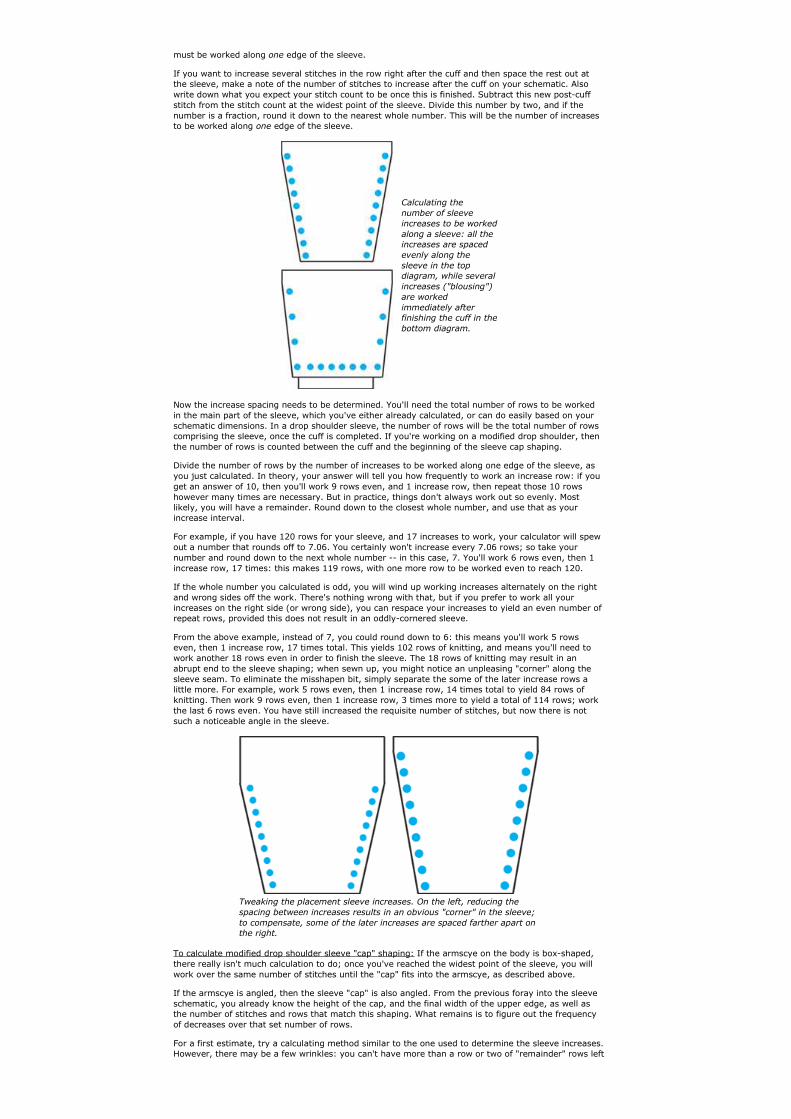
All the measurements, stitch and row counts that have been computed so far
Calculate the sleeve shaping
Finally, you can calculate the sleeve shaping. For a drop shoulder sleeve and a modified drop shouldersleeve meant to fit a box-shaped armscye, this means the increases that shape the main part of thesleeve from the cuff (if any) to the widest point (the seam). For a modified drop shoulder sleeve meantto fit an angled armscye, in addition to the increases, there will also be decreases in the "cap" to becalculated.
To calculate the main sleeve increases: First, decide if you want to have all the sleeve increasesmore-or-less evenly spaced along the length of the arm, or if you want to increase several stitches atonce immediately after the cuff (if there is one). For example, if the cuff is particularly snug, increasingseveral stitches in the next row will result in an easier fit to the lower arm, Depending on the numberof immediately increased stitches and the thickness of the fabric, it might also cause a slight "blousing"effect in the lower sleeve.
If you want all the increases to be spaced along the length of the arm, determine the total number ofstitches to be increased by subtracting the stitch count at the end of the cuff (or cast on row, if there isno cuff) from the stitch count at the widest point of the sleeve. Divide this number by two. If thenumber is a fraction, round it down to the nearest whole number. This is the number of increases that
must be worked along one edge of the sleeve.
If you want to increase several stitches in the row right after the cuff and then space the rest out atthe sleeve, make a note of the number of stitches to increase after the cuff on your schematic. Alsowrite down what you expect your stitch count to be once this is finished. Subtract this new post-cuffstitch from the stitch count at the widest point of the sleeve. Divide this number by two, and if thenumber is a fraction, round it down to the nearest whole number. This will be the number of increasesto be worked along one edge of the sleeve.
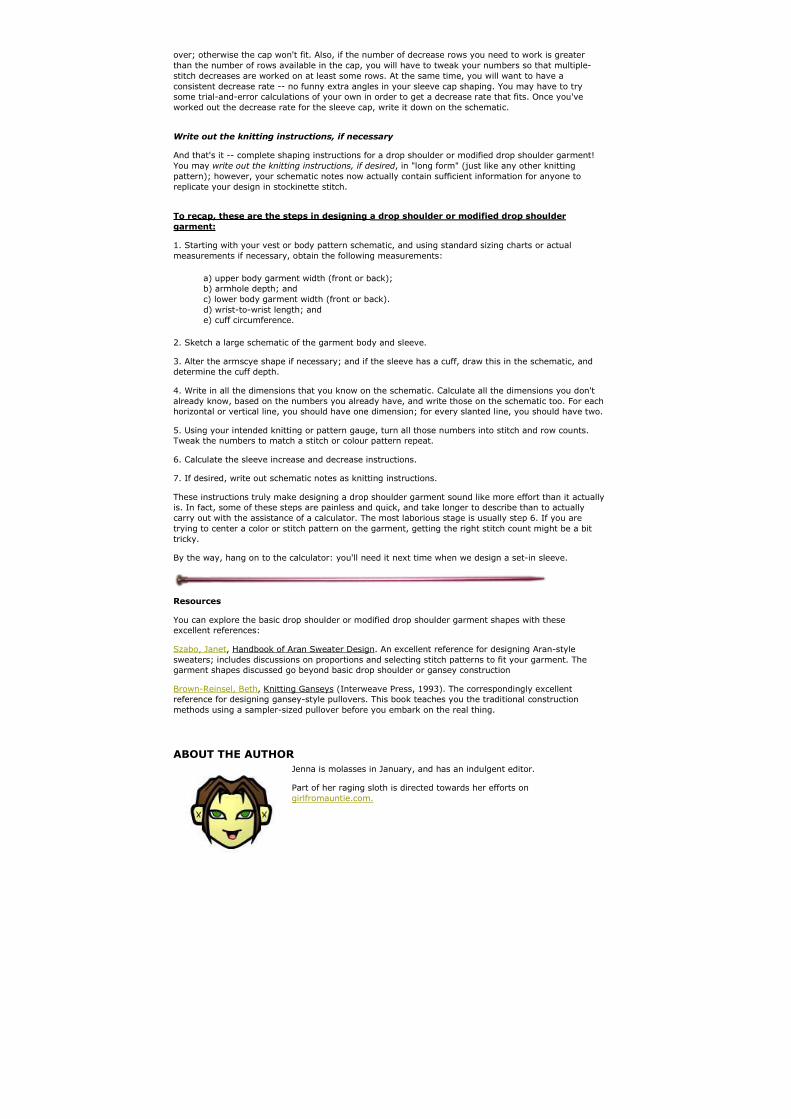
Calculating the
number of sleeve
increases to be worked
along a sleeve: all the
increases are spaced
evenly along the
sleeve in the top
diagram, while several
increases ("blousing")
are worked
immediately after
finishing the cuff in the
bottom diagram.
Now the increase spacing needs to be determined. You'll need the total number of rows to be workedin the main part of the sleeve, which you've either already calculated, or can do easily based on yourschematic dimensions. In a drop shoulder sleeve, the number of rows will be the total number of rowscomprising the sleeve, once the cuff is completed. If you're working on a modified drop shoulder, thenthe number of rows is counted between the cuff and the beginning of the sleeve cap shaping.
Divide the number of rows by the number of increases to be worked along one edge of the sleeve, asyou just calculated. In theory, your answer will tell you how frequently to work an increase row: if youget an answer of 10, then you'll work 9 rows even, and 1 increase row, then repeat those 10 rowshowever many times are necessary. But in practice, things don't always work out so evenly. Mostlikely, you will have a remainder. Round down to the closest whole number, and use that as yourincrease interval.
For example, if you have 120 rows for your sleeve, and 17 increases to work, your calculator will spewout a number that rounds off to 7.06. You certainly won't increase every 7.06 rows; so take yournumber and round down to the next whole number -- in this case, 7. You'll work 6 rows even, then 1increase row, 17 times: this makes 119 rows, with one more row to be worked even to reach 120.
If the whole number you calculated is odd, you will wind up working increases alternately on the rightand wrong sides off the work. There's nothing wrong with that, but if you prefer to work all yourincreases on the right side (or wrong side), you can respace your increases to yield an even number ofrepeat rows, provided this does not result in an oddly-cornered sleeve.
From the above example, instead of 7, you could round down to 6: this means you'll work 5 rowseven, then 1 increase row, 17 times total. This yields 102 rows of knitting, and means you'll need towork another 18 rows even in order to finish the sleeve. The 18 rows of knitting may result in anabrupt end to the sleeve shaping; when sewn up, you might notice an unpleasing "corner" along thesleeve seam. To eliminate the misshapen bit, simply separate the some of the later increase rows alittle more. For example, work 5 rows even, then 1 increase row, 14 times total to yield 84 rows ofknitting. Then work 9 rows even, then 1 increase row, 3 times more to yield a total of 114 rows; workthe last 6 rows even. You have still increased the requisite number of stitches, but now there is notsuch a noticeable angle in the sleeve.
Tweaking the placement sleeve increases. On the left, reducing the
spacing between increases results in an obvious "corner" in the sleeve;
to compensate, some of the later increases are spaced farther apart on
the right.
To calculate modified drop shoulder sleeve "cap" shaping: If the armscye on the body is box-shaped,there really isn't much calculation to do; once you've reached the widest point of the sleeve, you willwork over the same number of stitches until the "cap" fits into the armscye, as described above.
If the armscye is angled, then the sleeve "cap" is also angled. From the previous foray into the sleeveschematic, you already know the height of the cap, and the final width of the upper edge, as well asthe number of stitches and rows that match this shaping. What remains is to figure out the frequencyof decreases over that set number of rows.
For a first estimate, try a calculating method similar to the one used to determine the sleeve increases.However, there may be a few wrinkles: you can't have more than a row or two of "remainder" rows left
over; otherwise the cap won't fit. Also, if the number of decrease rows you need to work is greaterthan the number of rows available in the cap, you will have to tweak your numbers so that multiple-stitch decreases are worked on at least some rows. At the same time, you will want to have aconsistent decrease rate -- no funny extra angles in your sleeve cap shaping. You may have to trysome trial-and-error calculations of your own in order to get a decrease rate that fits. Once you'veworked out the decrease rate for the sleeve cap, write it down on the schematic.
Write out the knitting instructions, if necessary
And that's it -- complete shaping instructions for a drop shoulder or modified drop shoulder garment!You may write out the knitting instructions, if desired, in "long form" (just like any other knittingpattern); however, your schematic notes now actually contain sufficient information for anyone toreplicate your design in stockinette stitch.
To recap, these are the steps in designing a drop shoulder or modified drop shoulder
garment:
1. Starting with your vest or body pattern schematic, and using standard sizing charts or actualmeasurements if necessary, obtain the following measurements:
a) upper body garment width (front or back);b) armhole depth; andc) lower body garment width (front or back).d) wrist-to-wrist length; ande) cuff circumference.
2. Sketch a large schematic of the garment body and sleeve.
3. Alter the armscye shape if necessary; and if the sleeve has a cuff, draw this in the schematic, anddetermine the cuff depth.
4. Write in all the dimensions that you know on the schematic. Calculate all the dimensions you don'talready know, based on the numbers you already have, and write those on the schematic too. For eachhorizontal or vertical line, you should have one dimension; for every slanted line, you should have two.
5. Using your intended knitting or pattern gauge, turn all those numbers into stitch and row counts.Tweak the numbers to match a stitch or colour pattern repeat.
6. Calculate the sleeve increase and decrease instructions.
7. If desired, write out schematic notes as knitting instructions.
These instructions truly make designing a drop shoulder garment sound like more effort than it actuallyis. In fact, some of these steps are painless and quick, and take longer to describe than to actuallycarry out with the assistance of a calculator. The most laborious stage is usually step 6. If you aretrying to center a color or stitch pattern on the garment, getting the right stitch count might be a bittricky.
By the way, hang on to the calculator: you'll need it next time when we design a set-in sleeve.
Resources
You can explore the basic drop shoulder or modified drop shoulder garment shapes with theseexcellent references:
Szabo, Janet, Handbook of Aran Sweater Design. An excellent reference for designing Aran-stylesweaters; includes discussions on proportions and selecting stitch patterns to fit your garment. Thegarment shapes discussed go beyond basic drop shoulder or gansey construction
Brown-Reinsel, Beth, Knitting Ganseys (Interweave Press, 1993). The correspondingly excellentreference for designing gansey-style pullovers. This book teaches you the traditional constructionmethods using a sampler-sized pullover before you embark on the real thing.
ABOUT THE AUTHOR
Jenna is molasses in January, and has an indulgent editor.
Part of her raging sloth is directed towards her efforts ongirlfromauntie.com.