Embed Size (px)
Citation preview

Knitting Socks with Knitting Daily:
8 Free Sock Knitting Patterns
©F+W Media, Inc. | All rights reserved | F+W Media grants permission for any or all pages in this issue to be copied for personal use | www.knittingdaily.com 2
KNITTING SOCKS WITH KNITTING DAILY: 8 FREE
SOCK KNITTING PATERNS
A Knitting Daily eBook edited by
Kathleen Cubley
E D I T O R I A L S T A F F
EDITOR, KNITTING DAILY Kathleen Cubley
C R E A T I V E S E R V I C E S
PRODUCTION DESIGNER Janice TapiaPHOTOGRAPHY As noted
ILLUSTRATION Gayle Ford
Projects and information are for inspiration and personal use only. Interweave Knits and Knitting Daily do not recommend, approve, or endorse any of the advertisers, products, services, or views advertised in this publication. Nor does Knits or Knitting Daily evaluate the advertisers’ claims in any way. You should, therefore, use your own judgment in evalu ating the advertisers, products, services, and views advertised in Knits or Knitting Daily.
Contents
Time Traveler Socks by Jennifer Raymond ............................ PAGE 3
Speed Bump Socks by Deb Barnhill ......................................PAGE 10
Flying Trapeze Socks by Chrissy Gardiner ...........................PAGE 14
On-Your-Toes Socks by Ann Budd ..........................................PAGE 18
Border Socks by Mary Jane Mucklestone .................................. PAGE 21
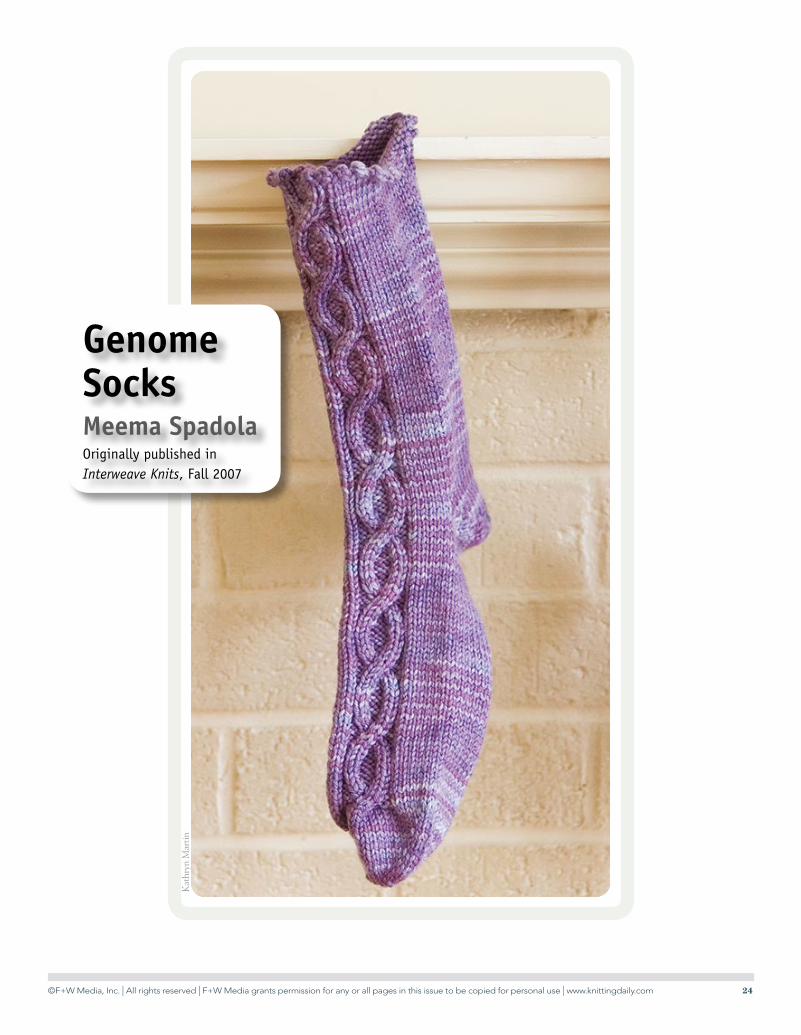
Genome Socks by Meema Spadola ............................................PAGE 24
Albus Argyle Socks by Anne Berk .......................................... PAGE 27
Stranded Boot Stockings by Kari Anderson ................... PAGE 32
KNITTERS WHO CLASSIFY THEMSELVES AS “SOCK KNITTERS” CAN NEVER HAVE ENOUGH SOCK YARN OR SOCK PATTERNS.
Although we know we can’t possibly knit as many pairs of socks as we have patterns for, we still collect those patterns because we love sock knitting!
So for you sock knitters and sock knitters to-be, we present our free, updated sock eBook, Knitting Socks with Knitting Daily: 8 Free Sock Knitting Patterns!
We’ve kept a couple of our popular Knitting Daily sock patterns for you here: the cabled Genome Socks and workaday On Your Toes Socks, a great intro to toe-up sock knitting.
New to the collection are lovely lace Time Traveler Socks; colorful striped Speed Bump
Socks; Flying Trapeze Socks, a cabled collection for the whole family; colorwork Border
Socks—perfect for the guy in your life, fun-to-knit Albus Argyle Socks, and statement Stranded Boot Stockings.
That’s eight free sock knitting patterns for you. Please enjoy!
Cheers,
Kathleen Cubley Editor, KnittingDaily.com
Knitting Socks with Knitting Daily: 8 Free Sock Knitting Patterns
©F+W Media, Inc. | All rights reserved | F+W Media grants permission for any or all pages in this issue to be copied for personal use | www.knittingdaily.com 3
Har
per P
oint
Pho
togr
aphy
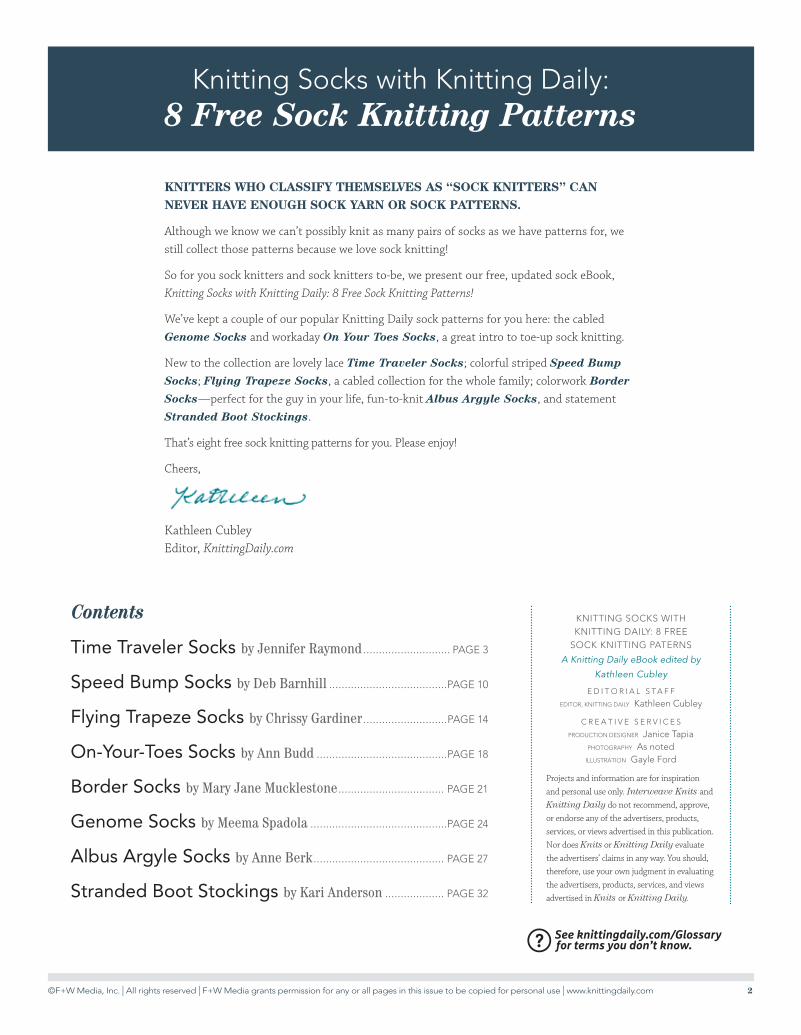
Time TravelerJennifer RaymondOriginally published in Sockupied, Fall 2014
©F+W Media, Inc. | All rights reserved | F+W Media grants permission for any or all pages in this issue to be copied for personal use | www.knittingdaily.com 4
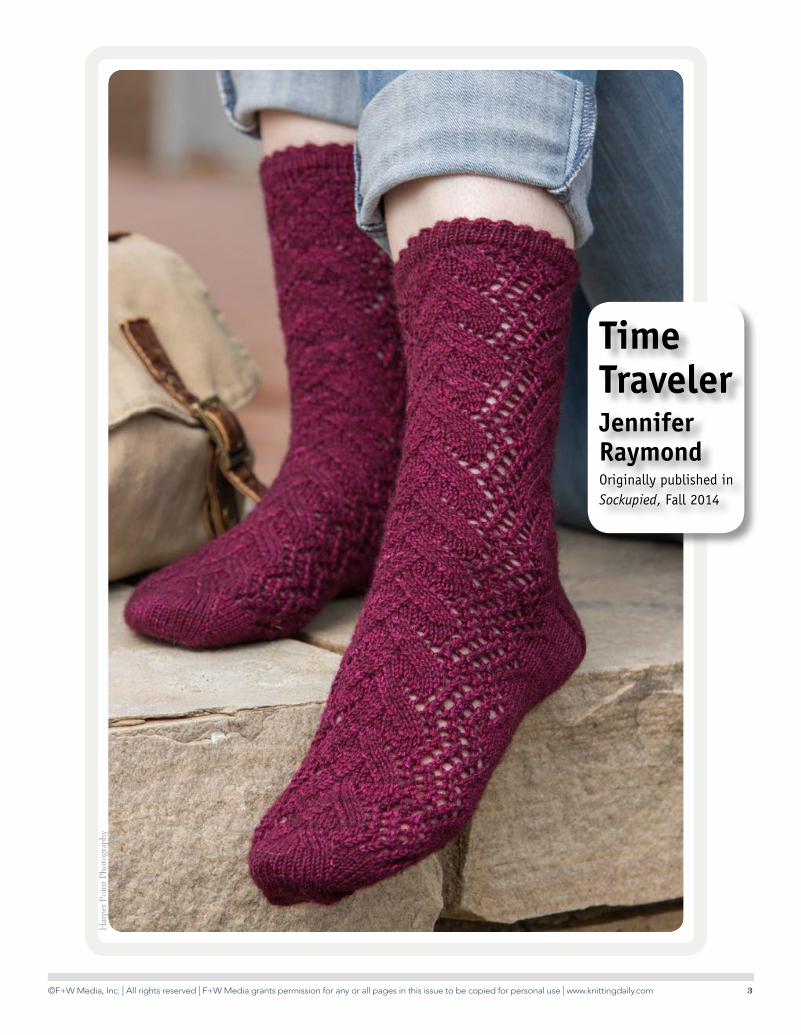
time traveler
Jennifer updated a stitch pattern from a vintage book to cre-ate a new twist in simple lace socks. The zigzag effect is found in many vintage patterns, but also feels right at home in these every day socks.by JENNIFER RAYMOND
FINISHED SIZE 7 (8½, 9½)" (18 [21.5, 24] cm) foot circumfer-ence and 8½ (9¾, 10¾)" (21.5 [25, 27.5] cm) long from back of heel to tip of toe; foot length is adjustable. Socks shown meas-ure 7" (18 cm).
YARN Hazel Knits Artisan Sock (90% superwash Merino wool, 10% nylon; 400 yd [366 m]/4¼ oz [120 g]): jam session,1 skein (see Notes).
NEEDLES U.S. size 0 (2 mm).
materials Adjust needle size if necessary to obtain the correct gauge.
NOTIONS Markers (m); tapestry needle.
GAUGE 32 sts and 46 rnds = 4" (10 cm) in St st.
JENNIFER CROWLEY RAYMOND is a knit and crochet designer who creates quirky yet classic garments. Visit her online at www.tinkingturtle .com or attend one of her classes in the metro Washington, D.C. area.

©F+W Media, Inc. | All rights reserved | F+W Media grants permission for any or all pages in this issue to be copied for personal use | www.knittingdaily.com 5
NOTES• Size 9½" (24 cm) socks use almost
all of one skein; consider purchas-ing an extra skein as insurance.
TOEUsing the Turkish method (see Glos-sary), CO 24 (28, 32) sts—12 (14, 16) sts on each needle. Place marker (pm) and join in the rnd.Next rnd *K1, pm, k10 (12, 14), pm, k1; rep from * once more.Inc rnd *Knit to m, M1 (see Glossary), sl m, knit to m, sl m, M1; rep from * once more, knit to end—4 sts inc’d.Cont in St st, rep Inc rnd every other rnd 7 (9, 10) more times—56 (68, 76) sts: 28 (34, 38) sts each for sole and instep.
Size 7" (18 cm) only:Remove beg-of-rnd m, unknit 2 sts, pm for new beg of rnd.
All sizes:Next rnd K11 (11, 12), remove m, k10 (12, 14), remove m, k11 (11, 12), pm for end of instep, knit to end—32 (34, 38) instep sts, 24 (34, 38) sole sts.
FOOTNext rnd K0 (1, 3), work Row 1 of Foot chart over 32 sts, k0 (1, 3), sl m, knit to end.Cont in patt until piece measures 6½ (7¼, 8)" (16.5 [18.5, 20.5] cm) from tip of toe, or 2 (2½, 2¾)" (5 [6.5, 7] cm) less than desired foot length.
HEELShape GussetNext rnd Work in patt to m, sl m, knit to m, M1, sl m, knit to m, sl m, M1, knit to end—2 sole sts inc’d.Next rnd Work even.Rep last 2 rnds 4 (5, 6) more times, removing 2 sole m on last rnd—66 (80, 90) sts: 32 (34, 38) instep sts, 34 (46, 52) sole sts.
Turn HeelSet-up rnd Work instep sts in patt, sl m; heel turn is worked back and forth in rows over sole sts.Shape heel using short-rows (see Glos-sary) as foll:Short-row 1 (RS) K25 (32, 37), wrap next st, turn.Short-row 2 (WS) P16 (18, 22), wrap next st, turn.Short-row 3 Knit to 1 st before wrapped st, wrap next st, turn.Short-row 4 Purl to 1 st before wrapped st, wrap next st, turn.Rep last 2 short-rows 5 (6, 7) more times—4 (4, 6) unwrapped sts in center; 7 (8, 9) wrapped sts each side.
Heel FlapRow 1 (RS) Knit to wrapped st, [work wrap tog with wrapped st] 6 (7, 8) times, pm, insert right needle into wrap
then kwise into wrapped st and sl both to right needle, sl next st kwise, work wrap and 2 sl sts tog as for sssk (see Glossary), turn—1 heel st dec’d.Row 2 (WS) Sl 1 pwise with yarn in front (wyf), purl to wrapped st, [work wrap tog with wrapped st] 6 (7, 8) times, pm, purl wrap tog with next 2 sts, turn—1 heel st dec’d.Row 3 Sl 1 kwise with yarn in back (wyb), sl m, k16 (18, 22), sl m, ssk, turn—1 st dec’d.Row 4 Sl 1 pwise wyf, sl m, p16 (18, 22), sl m, p2tog, turn—1 st dec’d.Rep last 2 rows 6 (7, 6) more times—50 (62, 74) sts rem: 32 (34, 38) instep sts, 18 (28, 36) sole sts. Knit to end of rnd, removing 2 heel m.
Interweave Knits IS A MUST-HAVE FOR THOSE WHO LOVE TO KNIT!
interweaveknits.com
I N T E R W E A V E
KNITS
©F+W Media, Inc. | All rights reserved | F+W Media grants permission for any or all pages in this issue to be copied for personal use | www.knittingdaily.com 6
glossary
Rotate needles and work stitches on bottom needle (Figures 4 + 5).
1
2
3
4
65
1
2
3
4
65
1
2
3
4
65
1
2
3
4
65
1
2
3
4
65
Figure 2 Figure 3Figure 1
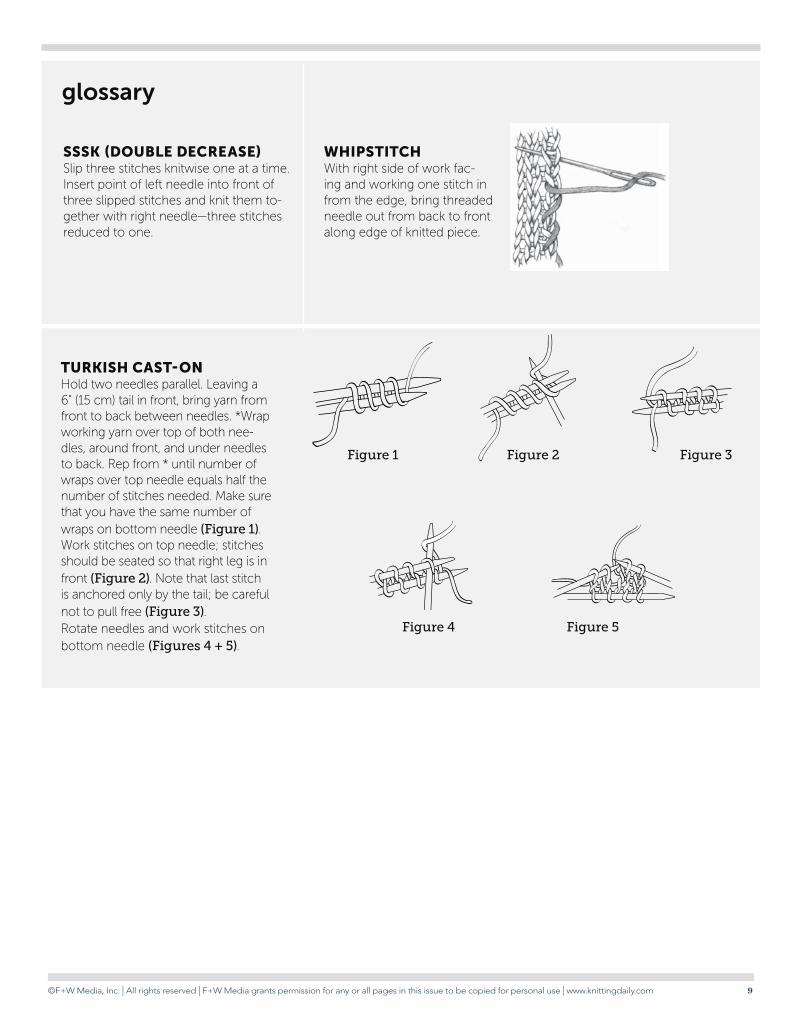
TURKISH CAST-ON Hold two needles parallel. Leaving a 6" (15 cm) tail in front, bring yarn from front to back between needles. *Wrap working yarn over top of both nee-dles, around front, and under needles to back. Rep from * until number of wraps over top needle equals half the number of stitches needed. Make sure that you have the same number of wraps on bottom needle (Figure 1). Work stitches on top needle; stitches should be seated so that right leg is in front (Figure 2). Note that last stitch is anchored only by the tail; be careful not to pull free (Figure 3).
Figure 5Figure 4
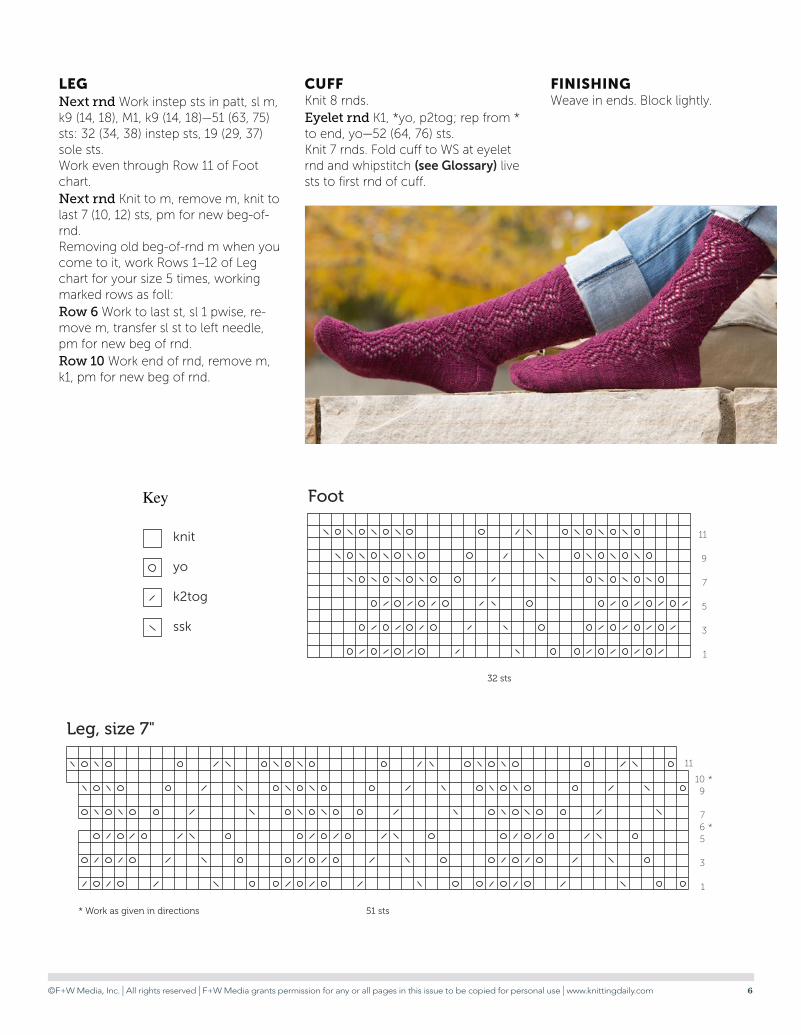
FINISHINGWeave in ends. Block lightly.
LEGNext rnd Work instep sts in patt, sl m, k9 (14, 18), M1, k9 (14, 18)—51 (63, 75) sts: 32 (34, 38) instep sts, 19 (29, 37) sole sts.Work even through Row 11 of Foot chart.Next rnd Knit to m, remove m, knit to last 7 (10, 12) sts, pm for new beg-of-rnd.Removing old beg-of-rnd m when you come to it, work Rows 1–12 of Leg chart for your size 5 times, working marked rows as foll:Row 6 Work to last st, sl 1 pwise, re-move m, transfer sl st to left needle, pm for new beg of rnd.Row 10 Work end of rnd, remove m, k1, pm for new beg of rnd.
CUFFKnit 8 rnds. Eyelet rnd K1, *yo, p2tog; rep from * to end, yo—52 (64, 76) sts. Knit 7 rnds. Fold cuff to WS at eyelet rnd and whipstitch (see Glossary) live sts to first rnd of cuff.
glossary
SSSK (DOUBLE DECREASE)Slip three stitches knitwise one at a time. Insert point of left needle into front of three slipped stitches and knit them to-gether with right needle—three stitches reduced to one.
WHIPSTITCHWith right side of work fac-ing and working one stitch in from the edge, bring threaded needle out from back to front along edge of knitted piece.
32 sts
11
9
7
5
3
1
Foot
knit
yo
k2tog
ssk
*
*
* Work as given in directions 51 sts
109
765
3
1
11
Leg, size 7"
Key
©F+W Media, Inc. | All rights reserved | F+W Media grants permission for any or all pages in this issue to be copied for personal use | www.knittingdaily.com 7
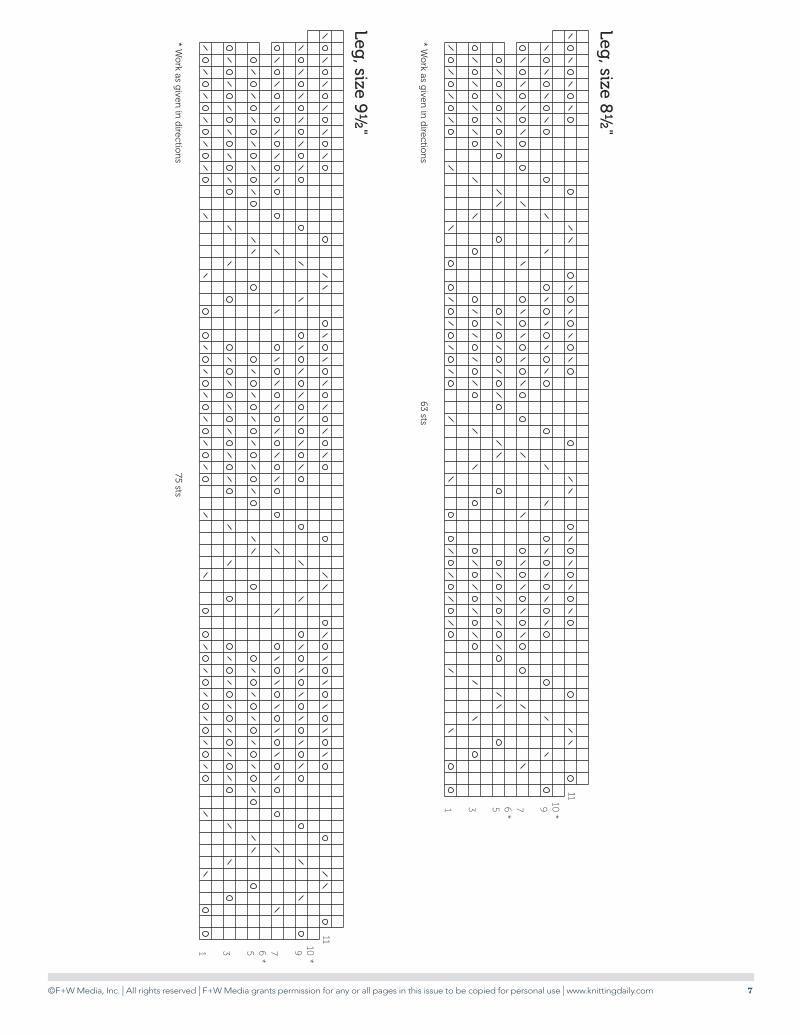
* *
* Wo
rk as given
in d
irection
s75
sts
10976531
11
Leg, size 9
½"
* *
* Wo
rk as given
in d
irection
s63 sts
10976531
11
Leg, size 8
½"
©F+W Media, Inc. | All rights reserved | F+W Media grants permission for any or all pages in this issue to be copied for personal use | www.knittingdaily.com 8
glossary
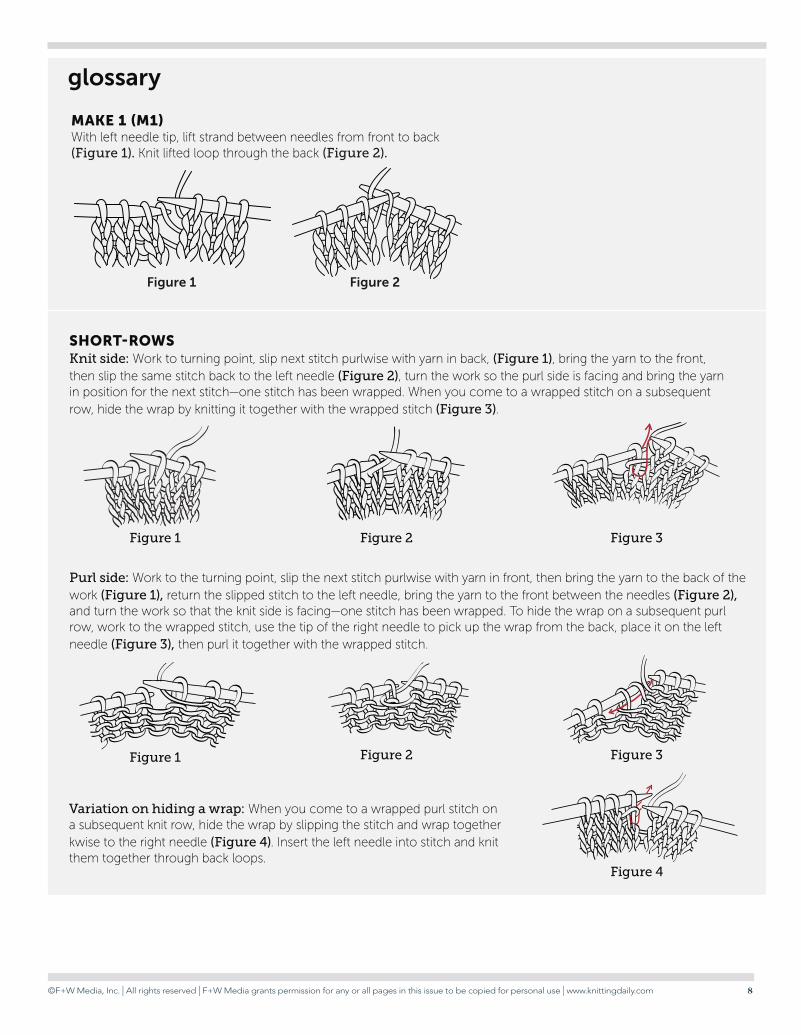
MAKE 1 (M1)With left needle tip, lift strand between needles from front to back (Figure 1). Knit lifted loop through the back (Figure 2).
Figure 1 Figure 2
SHORT-ROWS Knit side: Work to turning point, slip next stitch purlwise with yarn in back, (Figure 1), bring the yarn to the front, then slip the same stitch back to the left needle (Figure 2), turn the work so the purl side is facing and bring the yarn in position for the next stitch—one stitch has been wrapped. When you come to a wrapped stitch on a subsequent row, hide the wrap by knitting it together with the wrapped stitch (Figure 3).
Figure 1 Figure 3Figure 2
Figure 1 Figure 3Figure 2
Purl side: Work to the turning point, slip the next stitch purlwise with yarn in front, then bring the yarn to the back of the work (Figure 1), return the slipped stitch to the left needle, bring the yarn to the front between the needles (Figure 2), and turn the work so that the knit side is facing—one stitch has been wrapped. To hide the wrap on a subsequent purl row, work to the wrapped stitch, use the tip of the right needle to pick up the wrap from the back, place it on the left needle (Figure 3), then purl it together with the wrapped stitch.
Variation on hiding a wrap: When you come to a wrapped purl stitch on a subsequent knit row, hide the wrap by slipping the stitch and wrap together kwise to the right needle (Figure 4). Insert the left needle into stitch and knit them together through back loops.
Figure 4
1
2
6
3
7
4
1
2
6
3
7
4
1
2
6
3
7
4
1
2
6
3
7
4
1
2
6
3
7
4
1
2
6
3
7
4
©F+W Media, Inc. | All rights reserved | F+W Media grants permission for any or all pages in this issue to be copied for personal use | www.knittingdaily.com 9
glossary
Rotate needles and work stitches on bottom needle (Figures 4 + 5).
1
2
3
4
65
1
2
3
4
65
1
2
3
4
65
1
2
3
4
65
1
2
3
4
65
Figure 2 Figure 3Figure 1
TURKISH CAST-ON Hold two needles parallel. Leaving a 6" (15 cm) tail in front, bring yarn from front to back between needles. *Wrap working yarn over top of both nee-dles, around front, and under needles to back. Rep from * until number of wraps over top needle equals half the number of stitches needed. Make sure that you have the same number of wraps on bottom needle (Figure 1). Work stitches on top needle; stitches should be seated so that right leg is in front (Figure 2). Note that last stitch is anchored only by the tail; be careful not to pull free (Figure 3).
Figure 5Figure 4
FINISHINGWeave in ends. Block lightly.
LEGNext rnd Work instep sts in patt, sl m, k9 (14, 18), M1, k9 (14, 18)—51 (63, 75) sts: 32 (34, 38) instep sts, 19 (29, 37) sole sts.Work even through Row 11 of Foot chart.Next rnd Knit to m, remove m, knit to last 7 (10, 12) sts, pm for new beg-of-rnd.Removing old beg-of-rnd m when you come to it, work Rows 1–12 of Leg chart for your size 5 times, working marked rows as foll:Row 6 Work to last st, sl 1 pwise, re-move m, transfer sl st to left needle, pm for new beg of rnd.Row 10 Work end of rnd, remove m, k1, pm for new beg of rnd.
CUFFKnit 8 rnds. Eyelet rnd K1, *yo, p2tog; rep from * to end, yo—52 (64, 76) sts. Knit 7 rnds. Fold cuff to WS at eyelet rnd and whipstitch (see Glossary) live sts to first rnd of cuff.
glossary
SSSK (DOUBLE DECREASE)Slip three stitches knitwise one at a time. Insert point of left needle into front of three slipped stitches and knit them to-gether with right needle—three stitches reduced to one.
WHIPSTITCHWith right side of work fac-ing and working one stitch in from the edge, bring threaded needle out from back to front along edge of knitted piece.
32 sts
11
9
7
5
3
1
Foot
knit
yo
k2tog
ssk
*
*
* Work as given in directions 51 sts
109
765
3
1
11
Leg, size 7"
Key
©F+W Media, Inc. | All rights reserved | F+W Media grants permission for any or all pages in this issue to be copied for personal use | www.knittingdaily.com 10
Har
per P
oint
Pho
togr
aphy
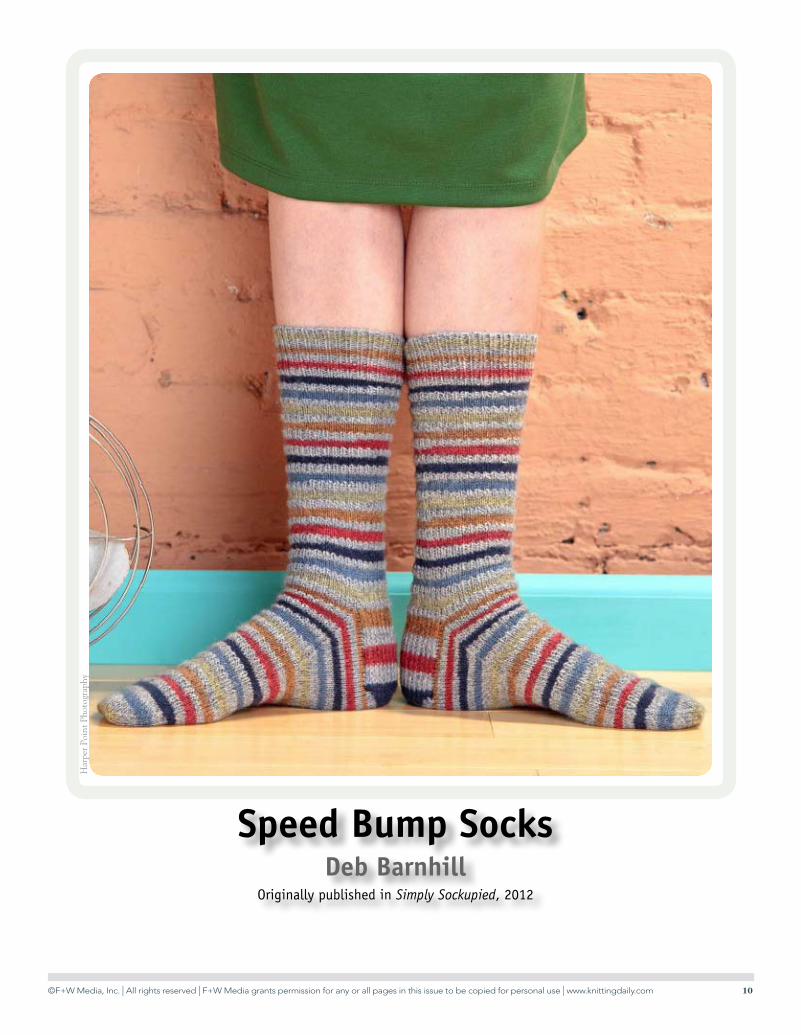
Speed Bump SocksDeb Barnhill
Originally published in Simply Sockupied, 2012
©F+W Media, Inc. | All rights reserved | F+W Media grants permission for any or all pages in this issue to be copied for personal use | www.knittingdaily.com 11
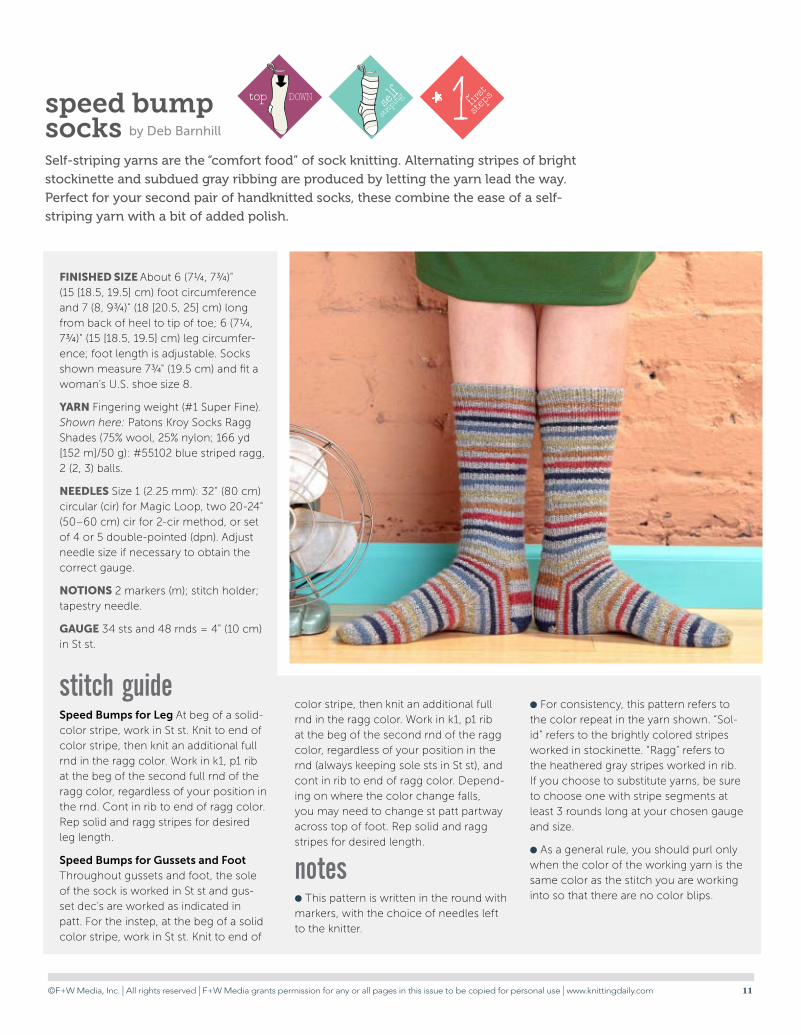
Self-striping yarns are the “comfort food” of sock knitting. Alternating stripes of bright stockinette and subdued gray ribbing are produced by letting the yarn lead the way. Perfect for your second pair of handknitted socks, these combine the ease of a self-striping yarn with a bit of added polish.
speed bump socks by Deb Barnhill
top DOWN
toe UP
cables
color
work
lace
picot
self
short
row
kitche
ner
first
steps
blaze
a trail
K
Sr
1 2 3ste
p it u
p
top DOWN
toe UP
cables
color
work
lace
picot
self
short
row
kitche
ner
first
steps
blaze
a trail
K
Sr
1 2 3ste
p it u
p
top DOWN
toe UP
cables
color
work
lace
picot
self
short
row
kitche
ner
first
steps
blaze
a trail
K
Sr
1 2 3ste
p it u
p
stitch guide Speed Bumps for Leg At beg of a solid-color stripe, work in St st. Knit to end of color stripe, then knit an additional full rnd in the ragg color. Work in k1, p1 rib at the beg of the second full rnd of the ragg color, regardless of your position in the rnd. Cont in rib to end of ragg color. Rep solid and ragg stripes for desired leg length.
Speed Bumps for Gussets and Foot Throughout gussets and foot, the sole of the sock is worked in St st and gus-set dec’s are worked as indicated in patt. For the instep, at the beg of a solid color stripe, work in St st. Knit to end of
FInIshed sIze About 6 (7¼, 7¾)" (15 [18.5, 19.5] cm) foot circumference and 7 (8, 9¾)" (18 [20.5, 25] cm) long from back of heel to tip of toe; 6 (7¼, 7¾)" (15 [18.5, 19.5] cm) leg circumfer-ence; foot length is adjustable. Socks shown measure 7¾" (19.5 cm) and fit a woman’s U.S. shoe size 8.
Yarn Fingering weight (#1 Super Fine). Shown here: Patons Kroy Socks Ragg Shades (75% wool, 25% nylon; 166 yd [152 m]/50 g): #55102 blue striped ragg, 2 (2, 3) balls.
needLes Size 1 (2.25 mm): 32" (80 cm) circular (cir) for Magic Loop, two 20-24" (50–60 cm) cir for 2-cir method, or set of 4 or 5 double-pointed (dpn). Adjust needle size if necessary to obtain the correct gauge.
notIons 2 markers (m); stitch holder; tapestry needle.
GauGe 34 sts and 48 rnds = 4" (10 cm) in St st.
color stripe, then knit an additional full rnd in the ragg color. Work in k1, p1 rib at the beg of the second rnd of the ragg color, regardless of your position in the rnd (always keeping sole sts in St st), and cont in rib to end of ragg color. Depend-ing on where the color change falls, you may need to change st patt partway across top of foot. Rep solid and ragg stripes for desired length.
notes ● This pattern is written in the round with markers, with the choice of needles left to the knitter.
● For consistency, this pattern refers to the color repeat in the yarn shown. “Sol-id" refers to the brightly colored stripes worked in stockinette. “Ragg" refers to the heathered gray stripes worked in rib. If you choose to substitute yarns, be sure to choose one with stripe segments at least 3 rounds long at your chosen gauge and size.
● As a general rule, you should purl only when the color of the working yarn is the same color as the stitch you are working into so that there are no color blips.

©F+W Media, Inc. | All rights reserved | F+W Media grants permission for any or all pages in this issue to be copied for personal use | www.knittingdaily.com 12
CuffAt beg of a ragg stripe, CO 56 (64, 72) sts. Divide sts and join for working in the rnd. Work in k1, p1 rib for about 1½ (1½, 2)" (3.8 [3.8, 5] cm), or desired cuff length, ending after completing a ragg stripe.
LEGChange to speed bumps patt for leg (see Stitch Guide) and work until leg measures about 5¾ (6½, 8½)" (14.5 [16.5, 21.5] cm) from CO, or desired length, ending after completing a ragg stripe. Knit 1 rnd in next solid color.
Set aside working yarn but do not break yarn. A separate ball will be used to work the heel flap so the stripe sequence will con-tinue down the foot without disruption.
HEELHeel flapPlace last 28 (32, 36) sts worked onto holder for top of foot. Heel flap will be worked back and forth over rem 28 (32, 36) sts.
With a second ball of yarn, wind to beg of same color stripe worked in last rnd of leg. Work heel flap with this ball as foll:
Row 1: (RS) *Sl 1 purlwise (pwise) with yarn in back (wyb), k1; rep from * to end.
Row 2: (WS) Sl 1 pwise with yarn in front (wyf), purl to end.
Rep last 2 rows 15 (17, 19) more times—heel flap measures about 1¾ (2, 2¼)" (4.5 [5, 5.5] cm).
Turn HeelWork short-rows as foll:
Short-row 1: (RS) Sl 1 pwise wyb, k16 (18, 20), ssk, k1, turn work.
Short-row 2: (WS) Sl 1 pwise wyf, p7, p2tog, p1, turn.
Short-row 3: (RS) Sl 1 pwise wyb, knit to 1 st before gap formed by previous row, ssk (1 st each side of gap), k1, turn.
Short-row 4: (WS) Sl 1 pwise wyf, purl to 1 st before gap formed by previous row, p2tog (1 st each side of gap), p1, turn.
Rep last 2 short-rows 3 (4, 5) more times, ending with a WS row—18 (20, 22) heel sts rem. Break heel flap yarn.
Shape GussetsPlace marker (pm) to indicate end of instep. With working yarn and RS facing, pick up and knit (see Glossary) 1 st between heel flap and leg, then 16 (18, 20) sts along edge of heel flap, k18 (20, 22) heel flap sts, pick up and knit 16 (18, 20) sts along edge of heel flap, then 1 st between heel flap and leg—80 (90, 100) sts total; 28 (32, 36) sts for instep and 52 (58, 64) sts for sole. Pm and rejoin for working in rnds as foll:
Rnd 1: (dec rnd) Work in speed bumps patt for gussets and foot (see Stitch Guide) to m, ssk, knit to last 2 sts, k2tog—2 sts dec’d.
Rnd 2: Work in speed bumps patt for gus-sets and foot to m, knit to end of rnd.
Rep last 2 rnds 11 (12, 13) more times—56 (64, 72) sts rem; 28 (32, 36) sts each for instep and sole.
fOOTCont in patt as established until foot meas-ures about 5½ (6½, 7¾)" (14 [16.5, 19.5] cm) from back of heel, or 1½ (1½, 2)" (3.8 [3.8, 5] cm) less than desired finished length, end-ing at the end a ragg stripe, then working a full rnd in the next solid stripe. Before beg the toe, every st on the needles should be a solid color.
TOENote: Work all sts in St st.
Rnd 1: (dec rnd) *K1, ssk, knit to 3 sts before m, k2tog, k1; rep from * once more—4 sts dec’d.
Rnd 2: Knit.
Rep last 2 rnds 7 (8, 10) more times, then work Rnd 1 once more—20 (24, 24) sts rem; 10 (12, 12) sts each for instep and sole. Re-move m and cut yarn, leaving a 12" (30.5 cm) tail.
fINISHINGWith tail threaded on a tapestry needle, use Kitchener st (see Glossary) to graft rem sts tog. Weave in loose ends and block lightly.
deb barnhILL is a passionate knitter, designer, and teacher from Nova Scotia. Her designs have appeared in Knitty maga-zine, Alpacas magazine, and the books Knitting Socks with Handpainted Yarns and Beyond Toes: Knitting Adventures with Judy’s Magic Cast-on. She was a teacher at the first two Sock Summits, winning the Fastest Sock Knitter competition at the 2011 event. Deb is an enthusiastic teacher known for her ability to inform, inspire, and entertain knitters of every level. Find her online at www.knittingpharm.com.
©F+W Media, Inc. | All rights reserved | F+W Media grants permission for any or all pages in this issue to be copied for personal use | www.knittingdaily.com 13
Figure 1 Figure 2 Figure 3
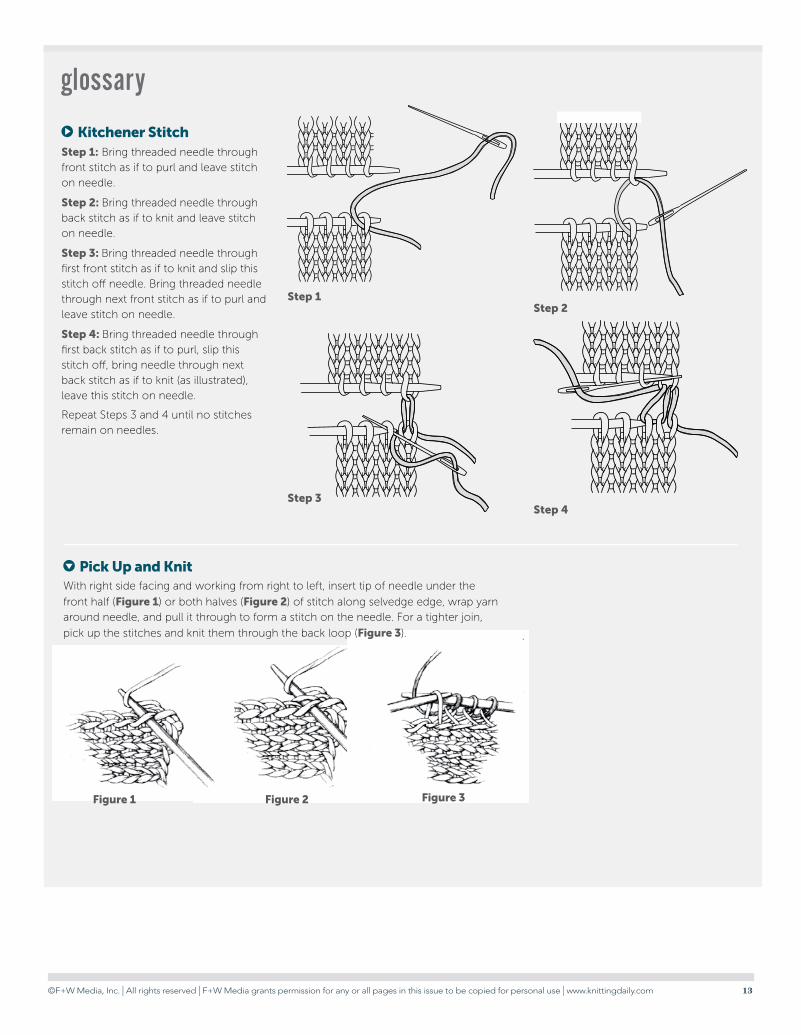
Pick up and KnitWith right side facing and working from right to left, insert tip of needle under the
front half (Figure 1) or both halves (Figure 2) of stitch along selvedge edge, wrap yarn around needle, and pull it through to form a stitch on the needle. For a tighter join,
pick up the stitches and knit them through the back loop (Figure 3).
step 1step 2
step 3step 4
Kitchener stitch step 1: Bring threaded needle through front stitch as if to purl and leave stitch on needle.
step 2: Bring threaded needle through back stitch as if to knit and leave stitch on needle.
step 3: Bring threaded needle through first front stitch as if to knit and slip this stitch off needle. Bring threaded needle through next front stitch as if to purl and leave stitch on needle.
step 4: Bring threaded needle through first back stitch as if to purl, slip this stitch off, bring needle through next back stitch as if to knit (as illustrated), leave this stitch on needle.
Repeat Steps 3 and 4 until no stitches remain on needles.
glossary
©F+W Media, Inc. | All rights reserved | F+W Media grants permission for any or all pages in this issue to be copied for personal use | www.knittingdaily.com 14
Am
anda
Ste
vens
on L
upke
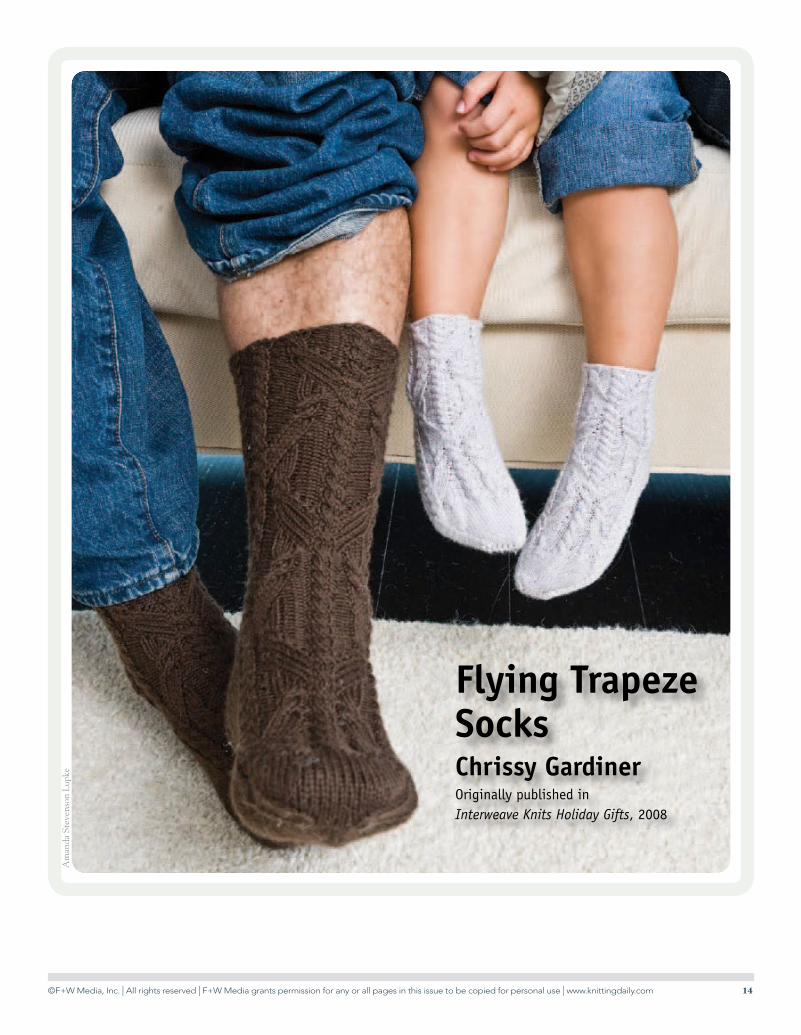
Flying Trapeze SocksChrissy GardinerOriginally published in Interweave Knits Holiday Gifts, 2008
©F+W Media, Inc. | All rights reserved | F+W Media grants permission for any or all pages in this issue to be copied for personal use | www.knittingdaily.com 15
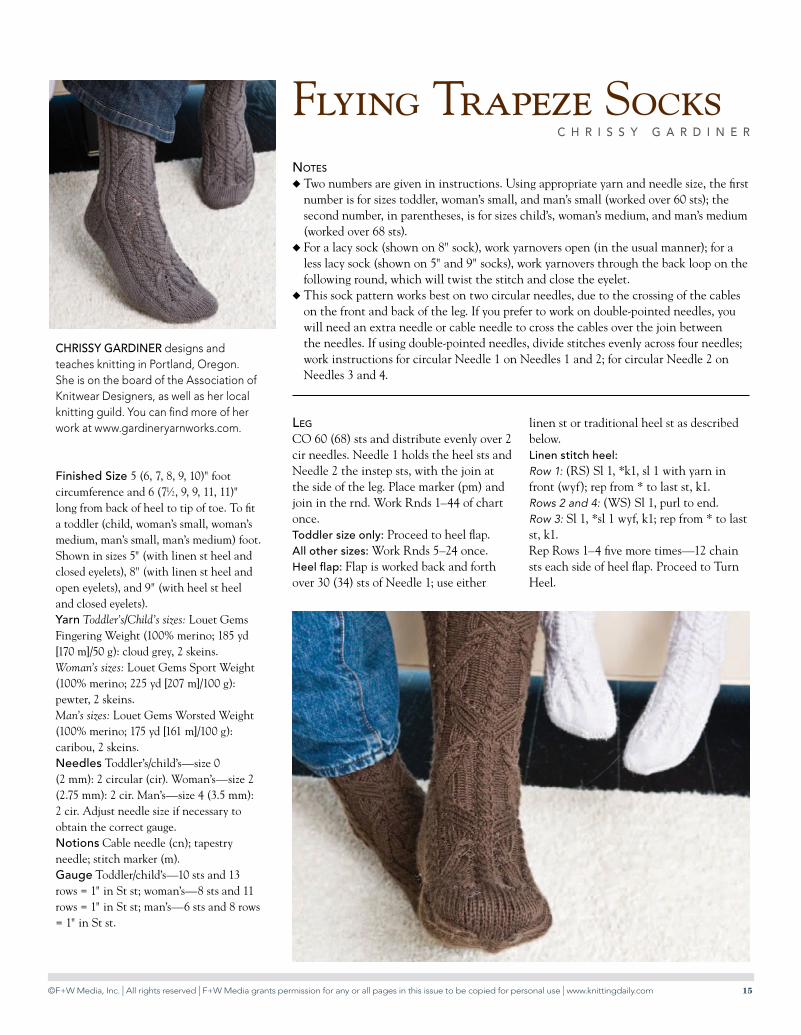
Chrissy Gardiner designs and teaches knitting in Portland, Oregon. She is on the board of the Association of Knitwear Designers, as well as her local knitting guild. You can find more of her work at www.gardineryarnworks.com.
Finished size 5 (6, 7, 8, 9, 10)" foot circumference and 6 (71⁄2, 9, 9, 11, 11)" long from back of heel to tip of toe. To fit a toddler (child, woman’s small, woman’s medium, man’s small, man’s medium) foot. Shown in sizes 5" (with linen st heel and closed eyelets), 8" (with linen st heel and open eyelets), and 9" (with heel st heel and closed eyelets).yarn Toddler’s/Child’s sizes: Louet Gems Fingering Weight (100% merino; 185 yd [170 m]/50 g): cloud grey, 2 skeins.Woman’s sizes: Louet Gems Sport Weight (100% merino; 225 yd [207 m]/100 g): pewter, 2 skeins.Man’s sizes: Louet Gems Worsted Weight (100% merino; 175 yd [161 m]/100 g): caribou, 2 skeins.needles Toddler’s/child’s—size 0 (2 mm): 2 circular (cir). Woman’s—size 2 (2.75 mm): 2 cir. Man’s—size 4 (3.5 mm): 2 cir. Adjust needle size if necessary to obtain the correct gauge.notions Cable needle (cn); tapestry needle; stitch marker (m).Gauge Toddler/child’s—10 sts and 13 rows = 1" in St st; woman’s—8 sts and 11 rows = 1" in St st; man’s—6 sts and 8 rows = 1" in St st.
Flying Trapeze SocksC h r i s s y G a r d i n e r
Notes
u Two numbers are given in instructions. Using appropriate yarn and needle size, the first number is for sizes toddler, woman’s small, and man’s small (worked over 60 sts); the second number, in parentheses, is for sizes child’s, woman’s medium, and man’s medium (worked over 68 sts).
u For a lacy sock (shown on 8" sock), work yarnovers open (in the usual manner); for a less lacy sock (shown on 5" and 9" socks), work yarnovers through the back loop on the following round, which will twist the stitch and close the eyelet.
u This sock pattern works best on two circular needles, due to the crossing of the cables on the front and back of the leg. If you prefer to work on double-pointed needles, you will need an extra needle or cable needle to cross the cables over the join between the needles. If using double-pointed needles, divide stitches evenly across four needles; work instructions for circular Needle 1 on Needles 1 and 2; for circular Needle 2 on Needles 3 and 4.
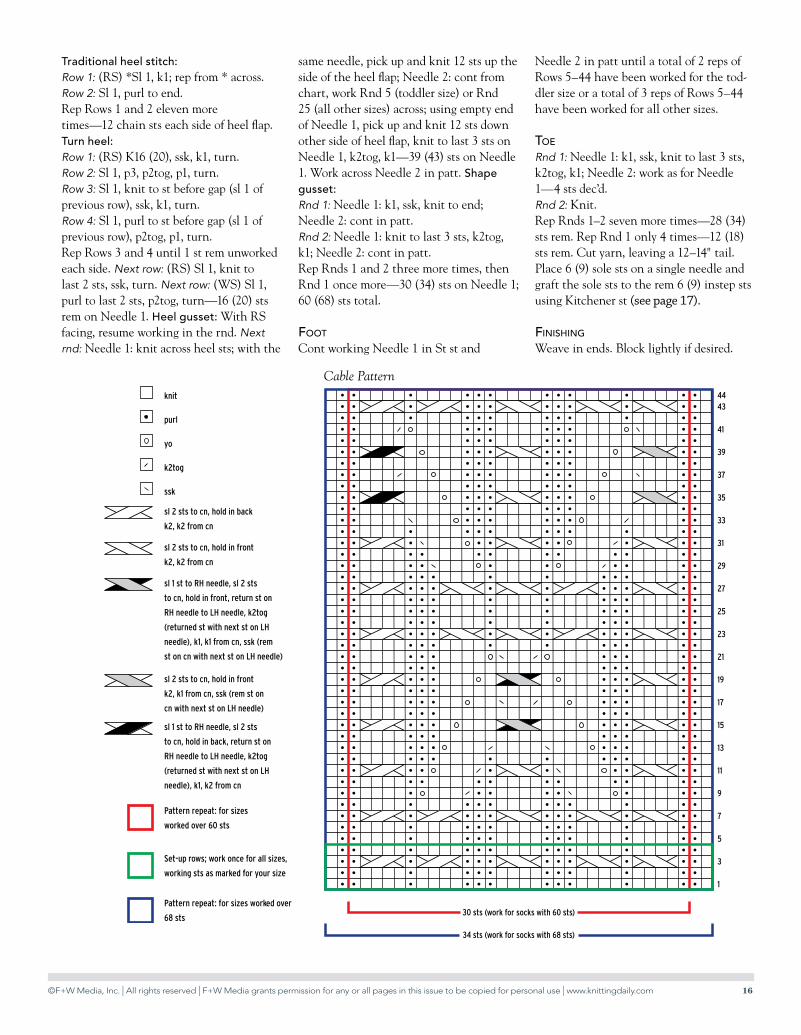
LegCO 60 (68) sts and distribute evenly over 2 cir needles. Needle 1 holds the heel sts and Needle 2 the instep sts, with the join at the side of the leg. Place marker (pm) and join in the rnd. Work Rnds 1–44 of chart once. Toddler size only: Proceed to heel flap.all other sizes: Work Rnds 5–24 once.heel flap: Flap is worked back and forth over 30 (34) sts of Needle 1; use either
linen st or traditional heel st as described below. Linen stitch heel:Row 1: (RS) Sl 1, *k1, sl 1 with yarn in front (wyf); rep from * to last st, k1.Rows 2 and 4: (WS) Sl 1, purl to end.Row 3: Sl 1, *sl 1 wyf, k1; rep from * to last st, k1.Rep Rows 1–4 five more times—12 chain sts each side of heel flap. Proceed to Turn Heel.
©F+W Media, Inc. | All rights reserved | F+W Media grants permission for any or all pages in this issue to be copied for personal use | www.knittingdaily.com 16
Traditional heel stitch:Row 1: (RS) *Sl 1, k1; rep from * across.Row 2: Sl 1, purl to end.Rep Rows 1 and 2 eleven more times—12 chain sts each side of heel flap.Turn heel:Row 1: (RS) K16 (20), ssk, k1, turn.Row 2: Sl 1, p3, p2tog, p1, turn.Row 3: Sl 1, knit to st before gap (sl 1 of previous row), ssk, k1, turn.Row 4: Sl 1, purl to st before gap (sl 1 of previous row), p2tog, p1, turn.Rep Rows 3 and 4 until 1 st rem unworked each side. Next row: (RS) Sl 1, knit to last 2 sts, ssk, turn. Next row: (WS) Sl 1, purl to last 2 sts, p2tog, turn—16 (20) sts rem on Needle 1. heel gusset: With RS facing, resume working in the rnd. Next rnd: Needle 1: knit across heel sts; with the
same needle, pick up and knit 12 sts up the side of the heel flap; Needle 2: cont from chart, work Rnd 5 (toddler size) or Rnd 25 (all other sizes) across; using empty end of Needle 1, pick up and knit 12 sts down other side of heel flap, knit to last 3 sts on Needle 1, k2tog, k1—39 (43) sts on Needle 1. Work across Needle 2 in patt. shape gusset:Rnd 1: Needle 1: k1, ssk, knit to end; Needle 2: cont in patt.Rnd 2: Needle 1: knit to last 3 sts, k2tog, k1; Needle 2: cont in patt.Rep Rnds 1 and 2 three more times, then Rnd 1 once more—30 (34) sts on Needle 1; 60 (68) sts total.
Foot
Cont working Needle 1 in St st and
Needle 2 in patt until a total of 2 reps of Rows 5–44 have been worked for the tod-dler size or a total of 3 reps of Rows 5–44 have been worked for all other sizes.
toe
Rnd 1: Needle 1: k1, ssk, knit to last 3 sts, k2tog, k1; Needle 2: work as for Needle 1—4 sts dec’d.Rnd 2: Knit.Rep Rnds 1–2 seven more times—28 (34) sts rem. Rep Rnd 1 only 4 times—12 (18) sts rem. Cut yarn, leaving a 12–14" tail. Place 6 (9) sole sts on a single needle and graft the sole sts to the rem 6 (9) instep sts using Kitchener st (see page 4).
FiNishiNg
Weave in ends. Block lightly if desired.
yo
k2tog
ssk
sl 2 sts to cn, hold in back
k2, k2 from cn
sl 2 sts to cn, hold in front
k2, k2 from cn
knit
purl
Pattern repeat: for sizes
worked over 60 sts
sl 2 sts to cn, hold in front
k2, k1 from cn, ssk (rem st on
cn with next st on LH needle)
sl 1 st to RH needle, sl 2 sts
to cn, hold in front, return st on
RH needle to LH needle, k2tog
(returned st with next st on LH
needle), k1, k1 from cn, ssk (rem
st on cn with next st on LH needle)
sl 1 st to RH needle, sl 2 sts
to cn, hold in back, return st on
RH needle to LH needle, k2tog
(returned st with next st on LH
needle), k1, k2 from cn
Set-up rows; work once for all sizes,
working sts as marked for your size
Pattern repeat: for sizes worked over
68 sts
25
23
21
19
17
15
13
11
9
7
5
3
1
43
41
39
37
35
31
29
27
33
44
30 sts (work for socks with 60 sts)
34 sts (work for socks with 68 sts)
Cable Pattern
(see page 17).
©F+W Media, Inc. | All rights reserved | F+W Media grants permission for any or all pages in this issue to be copied for personal use | www.knittingdaily.com 17
Illu
stra
tion
by
Gay
le F
ord
beg beginning; begin; begins bet between BO bind off CC contrasting color cm centimeter(s) cn cable needle CO cast on cont continue(s); continuing dec(s) decrease(s); decreasing dpn double-pointed needle(s) foll following; follows g gram(s) inc increase(s); increasing k knit k1f&b knit into front and back of
same st k2tog knit two stitches together kwise knitwise LC left cross m(s) marker(s) MC main color mm millimeter(s) M1 make one (increase) M1R (L) make one right (left) p purl p1f&b purl into front and back of
same st p2tog purl two stitches together patt(s) pattern(s) pm place marker psso pass slipped stitch over p2sso pass two slipped stitches
over pwise purlwise RC right cross rem remain(s); remaining rep repeat; repeating rev St st reverse stockinette stitch rib ribbing rnd(s) round(s) RS right side rev sc reverse single crochet sc single crochet sk skip sl slip sl st slip stitch (sl 1 st pwise
unless otherwise indicated) ssk slip 1 kwise, slip 1 kwise,
k2 sl sts tog tbl (decrease) ssp slip 1 kwise, slip 1 kwise,
p2 sl sts tog tbl (decrease) st(s) stitch(es) St st stockinette stitch tbl through back loop tog together WS wrong side wyb with yarn in back wyf with yarn in front yo yarn over * repeat starting point
(i.e., repeat from *) * * repeat all instructions
between asterisks ( ) alternate measurements
and/or instructions [ ] instructions that are to be
worked as a group a specified number of times
abbreviaTions
Step 1: Bring threaded needle through front stitch as if to purl and leave stitch on needle.
Step 2: Bring threaded needle through back stitch as if to knit and leave stitch on needle.
Step 3: Bring threaded needle through first front stitch as if to knit and slip this stitch off needle. Bring threaded needle through next front stitch as if to purl and leave stitch on needle.
Step 4: Bring threaded needle through first back stitch as if to purl (as illustrated), slip this stitch off, bring needle through next back stitch as if to knit, leave this stitch on needle.
Repeat Steps 3 and 4 until no stitches remain on needles.
Kitchener stitch

©F+W Media, Inc. | All rights reserved | F+W Media grants permission for any or all pages in this issue to be copied for personal use | www.knittingdaily.com 18
Car
ol K
apla
n
On-Your-Toes SocksAnn BuddOriginally published in Interweave Knits, Summer 2007
©F+W Media, Inc. | All rights reserved | F+W Media grants permission for any or all pages in this issue to be copied for personal use | www.knittingdaily.com 19
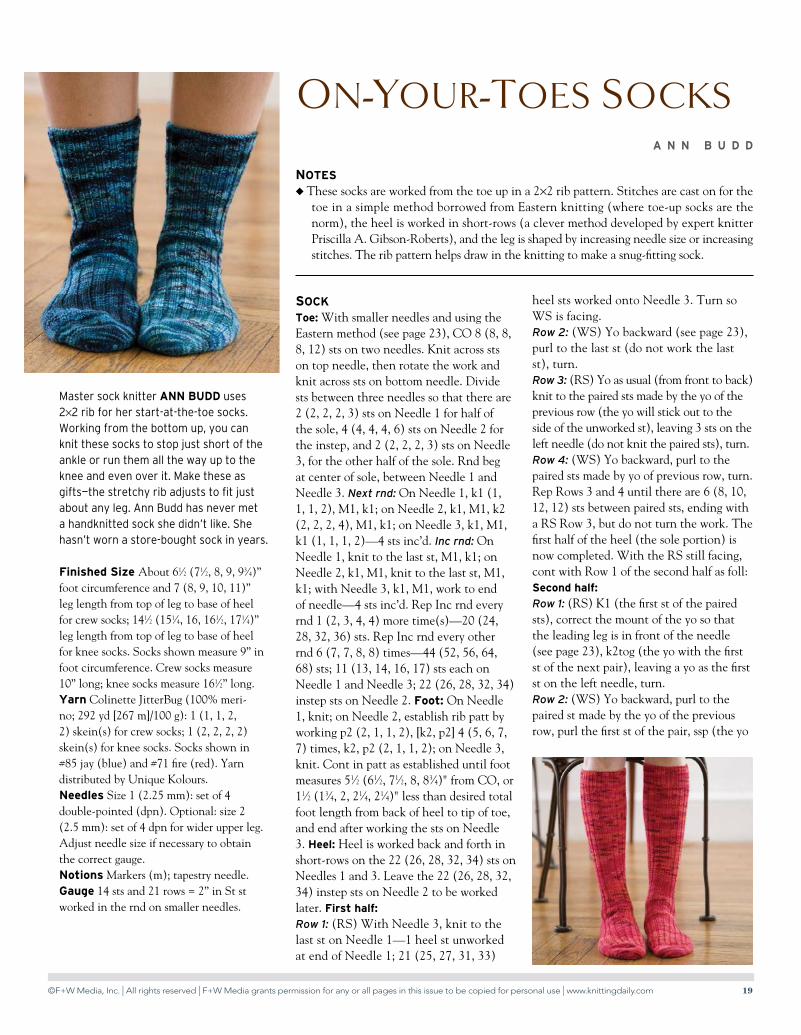
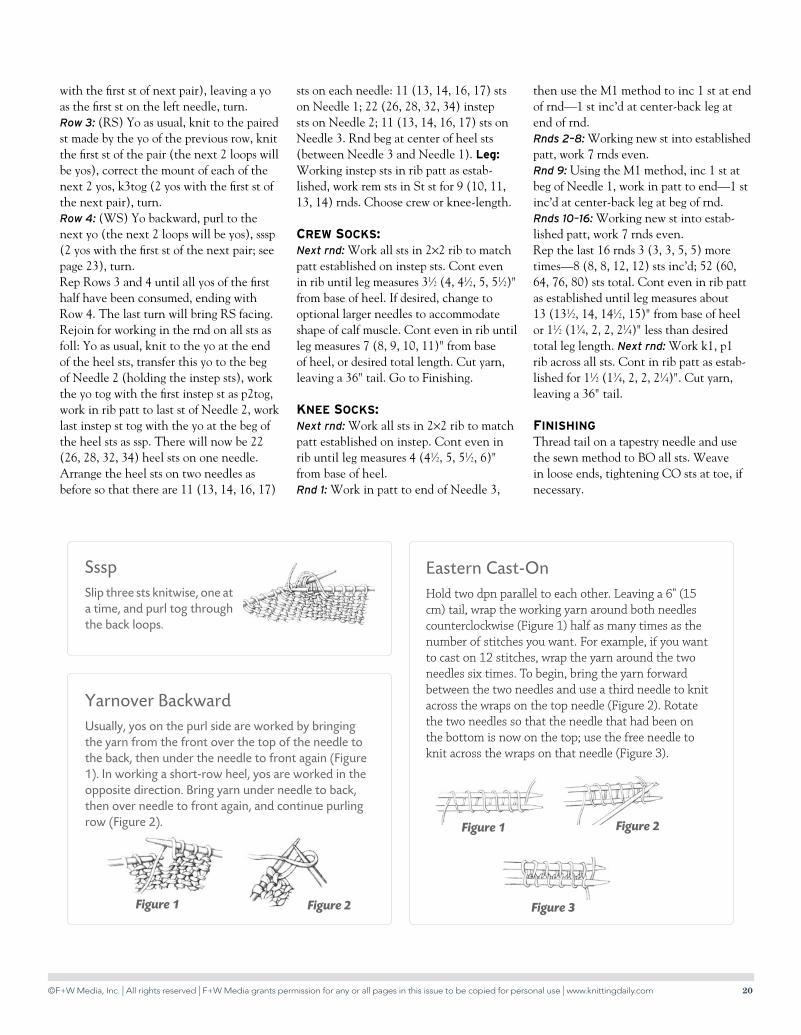
SockToe: With smaller needles and using the Eastern method (see page 23), CO 8 (8, 8, 8, 12) sts on two needles. Knit across sts on top needle, then rotate the work and knit across sts on bottom needle. Divide sts between three needles so that there are 2 (2, 2, 2, 3) sts on Needle 1 for half of the sole, 4 (4, 4, 4, 6) sts on Needle 2 for the instep, and 2 (2, 2, 2, 3) sts on Needle 3, for the other half of the sole. Rnd beg at center of sole, between Needle 1 and Needle 3. Next rnd: On Needle 1, k1 (1, 1, 1, 2), M1, k1; on Needle 2, k1, M1, k2 (2, 2, 2, 4), M1, k1; on Needle 3, k1, M1, k1 (1, 1, 1, 2)—4 sts inc’d. Inc rnd: On Needle 1, knit to the last st, M1, k1; on Needle 2, k1, M1, knit to the last st, M1, k1; with Needle 3, k1, M1, work to end of needle—4 sts inc’d. Rep Inc rnd every rnd 1 (2, 3, 4, 4) more time(s)—20 (24, 28, 32, 36) sts. Rep Inc rnd every other rnd 6 (7, 7, 8, 8) times—44 (52, 56, 64, 68) sts; 11 (13, 14, 16, 17) sts each on Needle 1 and Needle 3; 22 (26, 28, 32, 34) instep sts on Needle 2. Foot: On Needle 1, knit; on Needle 2, establish rib patt by working p2 (2, 1, 1, 2), [k2, p2] 4 (5, 6, 7, 7) times, k2, p2 (2, 1, 1, 2); on Needle 3, knit. Cont in patt as established until foot measures 51⁄2 (61⁄2, 71⁄2, 8, 83⁄4)" from CO, or 11⁄2 (13⁄4, 2, 21⁄4, 21⁄4)" less than desired total foot length from back of heel to tip of toe, and end after working the sts on Needle 3. Heel: Heel is worked back and forth in short-rows on the 22 (26, 28, 32, 34) sts on Needles 1 and 3. Leave the 22 (26, 28, 32, 34) instep sts on Needle 2 to be worked later. First half:
Row 1: (RS) With Needle 3, knit to the last st on Needle 1—1 heel st unworked at end of Needle 1; 21 (25, 27, 31, 33)
heel sts worked onto Needle 3. Turn so WS is facing.Row 2: (WS) Yo backward (see page 23), purl to the last st (do not work the last st), turn.Row 3: (RS) Yo as usual (from front to back) knit to the paired sts made by the yo of the previous row (the yo will stick out to the side of the unworked st), leaving 3 sts on the left needle (do not knit the paired sts), turn.Row 4: (WS) Yo backward, purl to the paired sts made by yo of previous row, turn.Rep Rows 3 and 4 until there are 6 (8, 10, 12, 12) sts between paired sts, ending with a RS Row 3, but do not turn the work. The first half of the heel (the sole portion) is now completed. With the RS still facing, cont with Row 1 of the second half as foll: Second half:
Row 1: (RS) K1 (the first st of the paired sts), correct the mount of the yo so that the leading leg is in front of the needle (see page 23), k2tog (the yo with the first st of the next pair), leaving a yo as the first st on the left needle, turn.Row 2: (WS) Yo backward, purl to the paired st made by the yo of the previous row, purl the first st of the pair, ssp (the yo
On-YOur-TOes sOcks
Master sock knitter ANN BUDD uses 2×2 rib for her start-at-the-toe socks. Working from the bottom up, you can knit these socks to stop just short of the ankle or run them all the way up to the knee and even over it. Make these as gifts—the stretchy rib adjusts to fit just about any leg. Ann Budd has never met a handknitted sock she didn’t like. She hasn’t worn a store-bought sock in years.
Finished Size About 61⁄2 (71⁄2, 8, 9, 93⁄4)” foot circumference and 7 (8, 9, 10, 11)” leg length from top of leg to base of heel for crew socks; 141⁄2 (151⁄4, 16, 161⁄2, 171⁄4)” leg length from top of leg to base of heel for knee socks. Socks shown measure 9” in foot circumference. Crew socks measure 10” long; knee socks measure 161⁄2” long. Yarn Colinette JitterBug (100% meri-no; 292 yd [267 m]/100 g): 1 (1, 1, 2, 2) skein(s) for crew socks; 1 (2, 2, 2, 2) skein(s) for knee socks. Socks shown in #85 jay (blue) and #71 fire (red). Yarn distributed by Unique Kolours. Needles Size 1 (2.25 mm): set of 4 double-pointed (dpn). Optional: size 2 (2.5 mm): set of 4 dpn for wider upper leg. Adjust needle size if necessary to obtain the correct gauge.Notions Markers (m); tapestry needle.Gauge 14 sts and 21 rows = 2” in St st worked in the rnd on smaller needles.
A N N B U D D
NoteSu These socks are worked from the toe up in a 2×2 rib pattern. Stitches are cast on for the
toe in a simple method borrowed from Eastern knitting (where toe-up socks are the norm), the heel is worked in short-rows (a clever method developed by expert knitter Priscilla A. Gibson-Roberts), and the leg is shaped by increasing needle size or increasing stitches. The rib pattern helps draw in the knitting to make a snug-fitting sock.
©F+W Media, Inc. | All rights reserved | F+W Media grants permission for any or all pages in this issue to be copied for personal use | www.knittingdaily.com 20
with the first st of next pair), leaving a yo as the first st on the left needle, turn.Row 3: (RS) Yo as usual, knit to the paired st made by the yo of the previous row, knit the first st of the pair (the next 2 loops will be yos), correct the mount of each of the next 2 yos, k3tog (2 yos with the first st of the next pair), turn.Row 4: (WS) Yo backward, purl to the next yo (the next 2 loops will be yos), sssp (2 yos with the first st of the next pair; see page 23), turn.Rep Rows 3 and 4 until all yos of the first half have been consumed, ending with Row 4. The last turn will bring RS facing. Rejoin for working in the rnd on all sts as foll: Yo as usual, knit to the yo at the end of the heel sts, transfer this yo to the beg of Needle 2 (holding the instep sts), work the yo tog with the first instep st as p2tog, work in rib patt to last st of Needle 2, work last instep st tog with the yo at the beg of the heel sts as ssp. There will now be 22 (26, 28, 32, 34) heel sts on one needle. Arrange the heel sts on two needles as before so that there are 11 (13, 14, 16, 17)
sts on each needle: 11 (13, 14, 16, 17) sts on Needle 1; 22 (26, 28, 32, 34) instep sts on Needle 2; 11 (13, 14, 16, 17) sts on Needle 3. Rnd beg at center of heel sts (between Needle 3 and Needle 1). Leg: Working instep sts in rib patt as estab-lished, work rem sts in St st for 9 (10, 11, 13, 14) rnds. Choose crew or knee-length.
crew SockS: Next rnd: Work all sts in 2×2 rib to match patt established on instep sts. Cont even in rib until leg measures 31⁄2 (4, 41⁄2, 5, 51⁄2)" from base of heel. If desired, change to optional larger needles to accommodate shape of calf muscle. Cont even in rib until leg measures 7 (8, 9, 10, 11)" from base of heel, or desired total length. Cut yarn, leaving a 36" tail. Go to Finishing.
kNee SockS:Next rnd: Work all sts in 2×2 rib to match patt established on instep. Cont even in rib until leg measures 4 (41⁄2, 5, 51⁄2, 6)" from base of heel.Rnd 1: Work in patt to end of Needle 3,
then use the M1 method to inc 1 st at end of rnd—1 st inc’d at center-back leg at end of rnd. Rnds 2–8: Working new st into established patt, work 7 rnds even.Rnd 9: Using the M1 method, inc 1 st at beg of Needle 1, work in patt to end—1 st inc’d at center-back leg at beg of rnd.Rnds 10–16: Working new st into estab-lished patt, work 7 rnds even.Rep the last 16 rnds 3 (3, 3, 5, 5) more times—8 (8, 8, 12, 12) sts inc’d; 52 (60, 64, 76, 80) sts total. Cont even in rib patt as established until leg measures about 13 (131⁄2, 14, 141⁄2, 15)" from base of heel or 11⁄2 (13⁄4, 2, 2, 21⁄4)" less than desired total leg length. Next rnd: Work k1, p1 rib across all sts. Cont in rib patt as estab-lished for 11⁄2 (13⁄4, 2, 2, 21⁄4)". Cut yarn, leaving a 36" tail.
FiNiShiNgThread tail on a tapestry needle and use the sewn method to BO all sts. Weave in loose ends, tightening CO sts at toe, if necessary.
Figure 2
Yarnover BackwardUsually, yos on the purl side are worked by bringing the yarn from the front over the top of the needle to the back, then under the needle to front again (Figure 1). In working a short-row heel, yos are worked in the opposite direction. Bring yarn under needle to back, then over needle to front again, and continue purling row (Figure 2).
Figure 1
Eastern Cast-On Hold two dpn parallel to each other. Leaving a 6" (15 cm) tail, wrap the working yarn around both needles counterclockwise (Figure 1) half as many times as the number of stitches you want. For example, if you want to cast on 12 stitches, wrap the yarn around the two needles six times. To begin, bring the yarn forward between the two needles and use a third needle to knit across the wraps on the top needle (Figure 2). Rotate the two needles so that the needle that had been on the bottom is now on the top; use the free needle to knit across the wraps on that needle (Figure 3).
Figure 1 Figure 2
Figure 3
SsspSlip three sts knitwise, one at a time, and purl tog through the back loops.
©F+W Media, Inc. | All rights reserved | F+W Media grants permission for any or all pages in this issue to be copied for personal use | www.knittingdaily.com 21
Car
mel
Zuc
ker
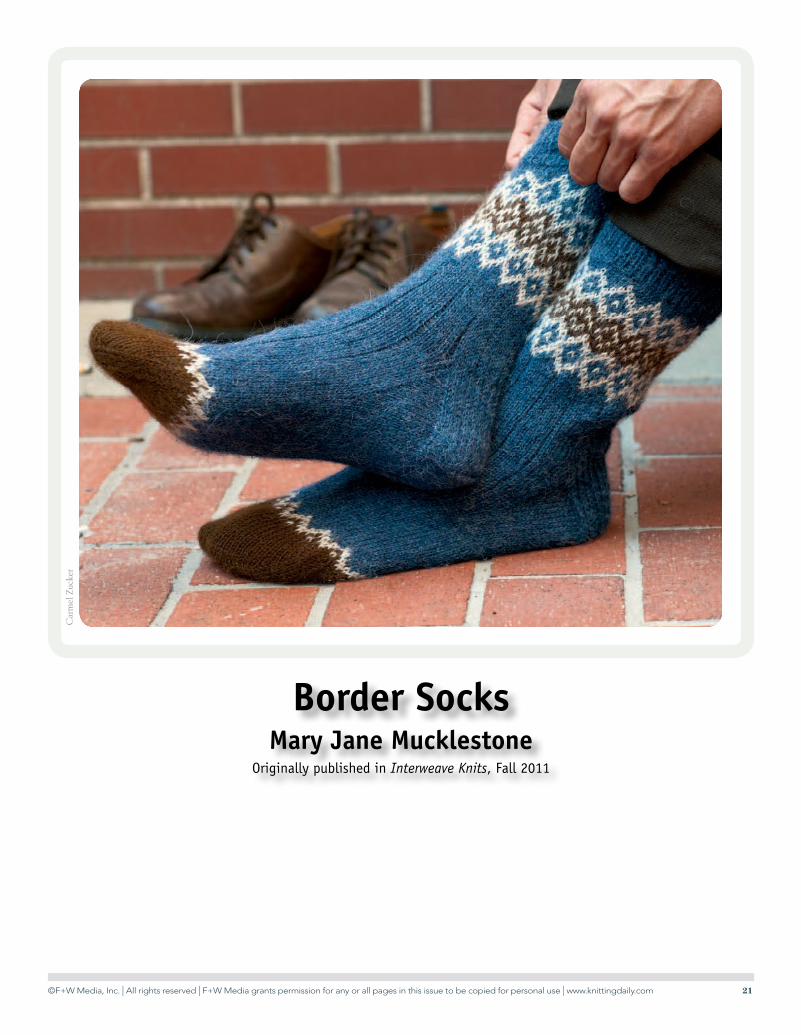
Border SocksMary Jane Mucklestone
Originally published in Interweave Knits, Fall 2011
©F+W Media, Inc. | All rights reserved | F+W Media grants permission for any or all pages in this issue to be copied for personal use | www.knittingdaily.com 22
border SockS
M a r y J a n e M u c k l e s t o n e
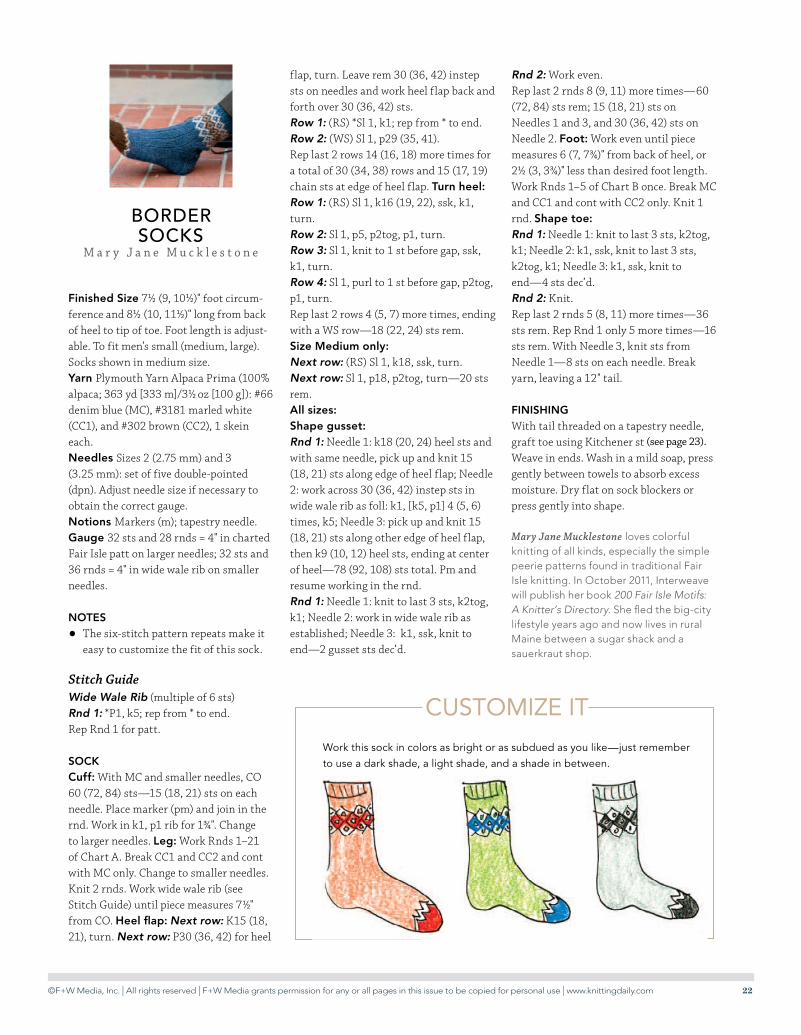
Finished Size 71/2 (9, 101/2)" foot circum-ference and 81/2 (10, 111/2)" long from back of heel to tip of toe. Foot length is adjust-able. To fit men’s small (medium, large). Socks shown in medium size.Yarn Plymouth Yarn Alpaca Prima (100% alpaca; 363 yd [333 m]/31/2 oz [100 g]): #66 denim blue (MC), #3181 marled white (CC1), and #302 brown (CC2), 1 skein each.Needles Sizes 2 (2.75 mm) and 3 (3.25 mm): set of five double-pointed (dpn). Adjust needle size if necessary to obtain the correct gauge. Notions Markers (m); tapestry needle. Gauge 32 sts and 28 rnds = 4" in charted Fair Isle patt on larger needles; 32 sts and 36 rnds = 4" in wide wale rib on smaller needles.
NoteS
• The six-stitch pattern repeats make it easy to customize the fit of this sock.
Stitch GuideWide Wale Rib (multiple of 6 sts)Rnd 1: *P1, k5; rep from * to end.Rep Rnd 1 for patt.
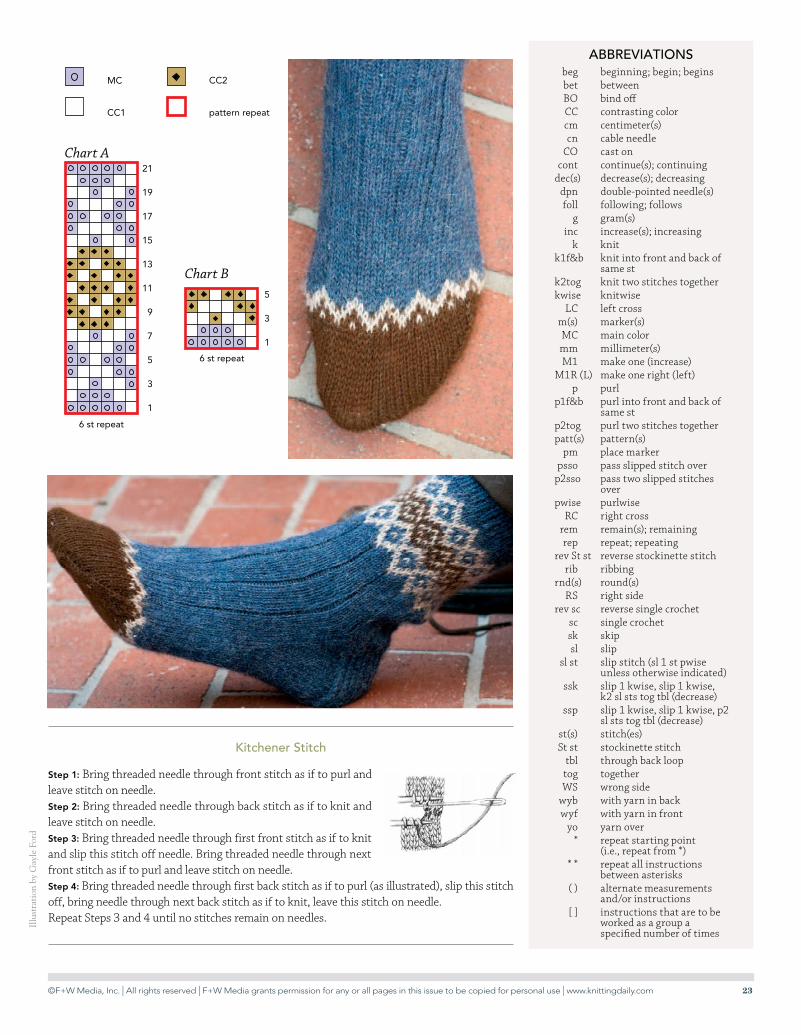
Sockcuff: With MC and smaller needles, CO 60 (72, 84) sts—15 (18, 21) sts on each needle. Place marker (pm) and join in the rnd. Work in k1, p1 rib for 13/4". Change to larger needles. Leg: Work Rnds 1–21 of Chart A. Break CC1 and CC2 and cont with MC only. Change to smaller needles. Knit 2 rnds. Work wide wale rib (see Stitch Guide) until piece measures 71/2" from CO. Heel flap: Next row: K15 (18, 21), turn. Next row: P30 (36, 42) for heel
flap, turn. Leave rem 30 (36, 42) instep sts on needles and work heel flap back and forth over 30 (36, 42) sts. Row 1: (RS) *Sl 1, k1; rep from * to end. Row 2: (WS) Sl 1, p29 (35, 41). Rep last 2 rows 14 (16, 18) more times for a total of 30 (34, 38) rows and 15 (17, 19) chain sts at edge of heel flap. turn heel:Row 1: (RS) Sl 1, k16 (19, 22), ssk, k1, turn. Row 2: Sl 1, p5, p2tog, p1, turn. Row 3: Sl 1, knit to 1 st before gap, ssk, k1, turn. Row 4: Sl 1, purl to 1 st before gap, p2tog, p1, turn. Rep last 2 rows 4 (5, 7) more times, ending with a WS row—18 (22, 24) sts rem. Size Medium only: Next row: (RS) Sl 1, k18, ssk, turn. Next row: Sl 1, p18, p2tog, turn—20 sts rem. All sizes: Shape gusset: Rnd 1: Needle 1: k18 (20, 24) heel sts and with same needle, pick up and knit 15 (18, 21) sts along edge of heel flap; Needle 2: work across 30 (36, 42) instep sts in wide wale rib as foll: k1, [k5, p1] 4 (5, 6) times, k5; Needle 3: pick up and knit 15 (18, 21) sts along other edge of heel flap, then k9 (10, 12) heel sts, ending at center of heel—78 (92, 108) sts total. Pm and resume working in the rnd. Rnd 1: Needle 1: knit to last 3 sts, k2tog, k1; Needle 2: work in wide wale rib as established; Needle 3: k1, ssk, knit to end—2 gusset sts dec’d.
Rnd 2: Work even. Rep last 2 rnds 8 (9, 11) more times—60 (72, 84) sts rem; 15 (18, 21) sts on Needles 1 and 3, and 30 (36, 42) sts on Needle 2. Foot: Work even until piece measures 6 (7, 73/4)" from back of heel, or 21/2 (3, 33/4)" less than desired foot length. Work Rnds 1–5 of Chart B once. Break MC and CC1 and cont with CC2 only. Knit 1 rnd. Shape toe: Rnd 1: Needle 1: knit to last 3 sts, k2tog, k1; Needle 2: k1, ssk, knit to last 3 sts, k2tog, k1; Needle 3: k1, ssk, knit to end—4 sts dec’d. Rnd 2: Knit. Rep last 2 rnds 5 (8, 11) more times—36 sts rem. Rep Rnd 1 only 5 more times—16 sts rem. With Needle 3, knit sts from Needle 1—8 sts on each needle. Break yarn, leaving a 12" tail.
FiNiSHiNGWith tail threaded on a tapestry needle, graft toe using Kitchener st (see page 3). Weave in ends. Wash in a mild soap, press gently between towels to absorb excess moisture. Dry flat on sock blockers or press gently into shape.
Mary Jane Mucklestone loves colorful knitting of all kinds, especially the simple peerie patterns found in traditional Fair Isle knitting. In October 2011, Interweave will publish her book 200 Fair Isle Motifs: A Knitter’s Directory. She fled the big-city lifestyle years ago and now lives in rural Maine between a sugar shack and a sauerkraut shop.
Work this sock in colors as bright or as subdued as you like—just remember to use a dark shade, a light shade, and a shade in between.
customize it
(see page 23).
©F+W Media, Inc. | All rights reserved | F+W Media grants permission for any or all pages in this issue to be copied for personal use | www.knittingdaily.com 23
beg beginning; begin; begins bet between BO bind off CC contrasting color cm centimeter(s) cn cable needle CO cast on cont continue(s); continuing dec(s) decrease(s); decreasing dpn double-pointed needle(s) foll following; follows g gram(s) inc increase(s); increasing k knit k1f&b knit into front and back of
same st k2tog knit two stitches together kwise knitwise LC left cross m(s) marker(s) MC main color mm millimeter(s) M1 make one (increase) M1R (L) make one right (left) p purl p1f&b purl into front and back of
same st p2tog purl two stitches together patt(s) pattern(s) pm place marker psso pass slipped stitch over p2sso pass two slipped stitches
over pwise purlwise RC right cross rem remain(s); remaining rep repeat; repeating rev St st reverse stockinette stitch rib ribbing rnd(s) round(s) RS right side rev sc reverse single crochet sc single crochet sk skip sl slip sl st slip stitch (sl 1 st pwise
unless otherwise indicated) ssk slip 1 kwise, slip 1 kwise,
k2 sl sts tog tbl (decrease) ssp slip 1 kwise, slip 1 kwise, p2
sl sts tog tbl (decrease) st(s) stitch(es) St st stockinette stitch tbl through back loop tog together WS wrong side wyb with yarn in back wyf with yarn in front yo yarn over * repeat starting point
(i.e., repeat from *) * * repeat all instructions
between asterisks ( ) alternate measurements
and/or instructions [ ] instructions that are to be
worked as a group a specified number of times
AbbreviAtionS
CC1
MC
CC2
pattern repeat
CC1
MC
CC2
pattern repeat
21
19
17
15
13
11
9
7
5
3
1
6 st repeat
Chart A
5
3
1
6 st repeat
Chart B
Illu
stra
tion
by
Gay
le F
ord
Step 1: Bring threaded needle through front stitch as if to purl and leave stitch on needle.Step 2: Bring threaded needle through back stitch as if to knit and leave stitch on needle.Step 3: Bring threaded needle through first front stitch as if to knit and slip this stitch off needle. Bring threaded needle through next front stitch as if to purl and leave stitch on needle.Step 4: Bring threaded needle through first back stitch as if to purl (as illustrated), slip this stitch off, bring needle through next back stitch as if to knit, leave this stitch on needle.Repeat Steps 3 and 4 until no stitches remain on needles.
kitchener Stitch
©F+W Media, Inc. | All rights reserved | F+W Media grants permission for any or all pages in this issue to be copied for personal use | www.knittingdaily.com 24
Kat
hryn
Mar
tin
Genome SocksMeema SpadolaOriginally published in Interweave Knits, Fall 2007
©F+W Media, Inc. | All rights reserved | F+W Media grants permission for any or all pages in this issue to be copied for personal use | www.knittingdaily.com 25
Genome Socksdesign by Meema Spadola
Originally published in Interweave Knits, Fall 2007
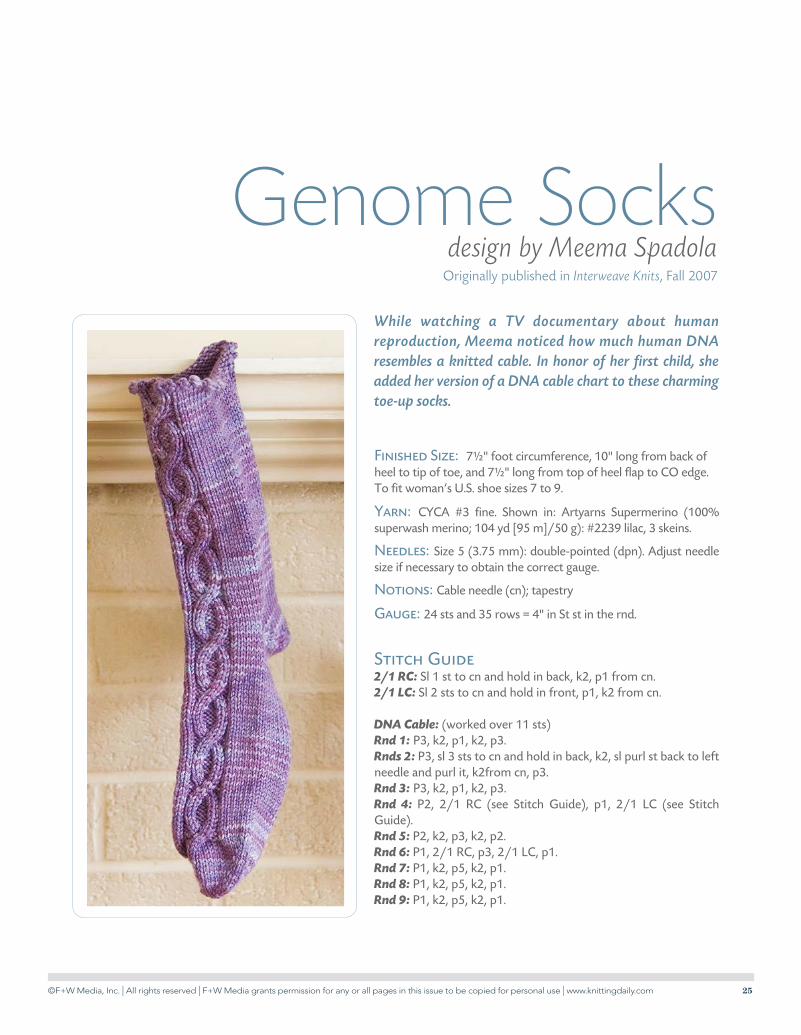
While watching a TV documentary about human reproduction, Meema noticed how much human DNA resembles a knitted cable. In honor of her first child, she added her version of a DNA cable chart to these charming toe-up socks.
Finished Size: 7½" foot circumference, 10" long from back of heel to tip of toe, and 7½" long from top of heel flap to CO edge. To fit woman’s U.S. shoe sizes 7 to 9.
Yarn: CYCA #3 fine. Shown in: Artyarns Supermerino (100% superwash merino; 104 yd [95 m]/50 g): #2239 lilac, 3 skeins.
Needles: Size 5 (3.75 mm): double-pointed (dpn). Adjust needle size if necessary to obtain the correct gauge.
Notions: Cable needle (cn); tapestry
Gauge: 24 sts and 35 rows = 4" in St st in the rnd.
Stitch Guide2/1 RC: Sl 1 st to cn and hold in back, k2, p1 from cn.2/1 LC: Sl 2 sts to cn and hold in front, p1, k2 from cn.
DNA Cable: (worked over 11 sts)Rnd 1: P3, k2, p1, k2, p3.Rnds 2: P3, sl 3 sts to cn and hold in back, k2, sl purl st back to left needle and purl it, k2from cn, p3.Rnd 3: P3, k2, p1, k2, p3.Rnd 4: P2, 2/1 RC (see Stitch Guide), p1, 2/1 LC (see Stitch Guide).Rnd 5: P2, k2, p3, k2, p2.Rnd 6: P1, 2/1 RC, p3, 2/1 LC, p1.Rnd 7: P1, k2, p5, k2, p1.Rnd 8: P1, k2, p5, k2, p1.Rnd 9: P1, k2, p5, k2, p1.
©F+W Media, Inc. | All rights reserved | F+W Media grants permission for any or all pages in this issue to be copied for personal use | www.knittingdaily.com 26
Rnd 10: P1, 2/1 LC, p3, 2/1 RC, p1.Rnd 11: P2, k2, p3, k2, p2.Rnd 12: P2, 2/1 LC, p1, 2/1 RC, p2.
Picot Bind-Off: BO 2 sts, *sl rem st on right needle back to left needle, use the knitted method to CO 2 sts, BO 4 sts; rep from * to end.
SockUse the Eastern method (see page 20) to CO 8 sts over 2 dpn. Knit 1 rnd. Divide sts on 3 dpn in the foll order: 2 sts on Needle 3, 2 sts on Needle 1, 4 sts on Needle 2. Needle 2 holds the instep sts, Needles 1 and 3 hold the sole sts. Rnd beg at center of sole. Rnd 1: Needle 1: K1, M1, k1; Needle 2: k1, M1, k2, M1, k1;
Needle 3: k1, M1, k1—4 sts inc’d.Rnd 2: Needle 1: Knit to last st, M1, k1; Needle 2: k1, M1, knit to
last st, M1, k1; Needle 3: k1, M1, knit to end—4 sts inc’d. Rearrange sts as foll: first 10 sts of rnd on Needle 1; next 28 sts on Needle 2; last 10 sts of rnd on Needle 3.Rep Rnd 2 eight more times—48 sts. Next rnd: Needle 1: K10; Needle 2: k8, work DNA cable (see Stitch Guide) over 11 sts, k9; Needle 3: k10. Work in patt until foot measures 7½", or desired total length minus 1½".
HeelPlace 20 sts of sole on one dpn. Work these 20 sts back and forth for heel as foll:Row 1: (RS) K19, turn, leaving last st unworked. Row 2: (WS) Yo backward (see page 20), purl to last st, turn,
leaving last st unworked.Row 3: Yo as usual, knit to last 3 sts (the paired sts made by the
yo of previous row; yo will stick out to the side of unworked st), turn, leaving 3 sts unworked.
Row 4: Yo backward, purl to the paired sts made by the yo of the previous row, turn, leaving 3 sts unworked.
Rep Rows 3 and 4 until there are 8 sts between yos at center of row. Without turning work, cont working RS row as foll: K1(first st of yo pair), correct the mount of the yo so that the
leading leg is in front of the needle (i.e., sl the yo pwise, use the left needle to enter the slipped yo from front to back to correct st mount, and place the st on the left needle in its corrected orientation), k2tog (i.e., the yo with the first st of the next pair), leaving a yo as the first st on the left needle, turn.
Row 1: (WS) Yo backward, purl to the paired sts made by the yo of the previous row, p1 (first st of the pair), ssp; i.e., the yo with the first st of the next pair), leaving a yo as the first st on the left needle, turn.
Row 2: (RS) Yo as usual, knit to the paired sts made by the yo of the previous row, knit the first st of the pair (foll 2 sts are yos), correct the mount of each of the next 2 yos, k3tog (i.e., 2 yos with the first st of the next pair), turn.
Row 3: (WS) Yo backward, purl to the next yo, (next 2 sts are yos), sssp (see page 20; i.e., 2 yos with the first st of the next pair), turn.
Row 4: (RS) Yo as usual, knit to the next yo (next 2 sts are yos), correct the mount of each of these yos, k3tog (i.e., 2 yos with the first st of the next pair), turn.
Rep Rows 3 and 4 until all yos have been consumed, ending with Row 3. Turn so RS is facing. Rejoin for working in the rnd as foll: Yo as usual, knit to the yo at the end of heel sts, transfer this yo to the beg of the next needle (instep sts) and work the yo tog with the first instep st as k2tog, knit to the last st of the instep sts, keeping DNA cable in patt, and work the last instep st tog with the yo at the beg of the heel sts as ssk—20 heel sts, 48 sts total.
LegDivide heel sts evenly onto 2 dpn. Work in patt until leg measures about 7½" or desired length, ending with Row 8 of cable panel. BO all sts using the picot BO (see Stitch Guide).
FinishingWeave in loose ends, tightening up sts along CO row. If necessary, use additional yarn threaded on a tapestry needle to close up any holes along the sides of the short-row heel. Block by spritzing with water and lay-ing flat to dry. -

©F+W Media, Inc. | All rights reserved | F+W Media grants permission for any or all pages in this issue to be copied for personal use | www.knittingdaily.com 27
Ann
Sw
anso
n
Albus Argyle SocksAnne Berk
©F+W Media, Inc. | All rights reserved | F+W Media grants permission for any or all pages in this issue to be copied for personal use | www.knittingdaily.com 28
albus argylesocks
A n n e B e r k
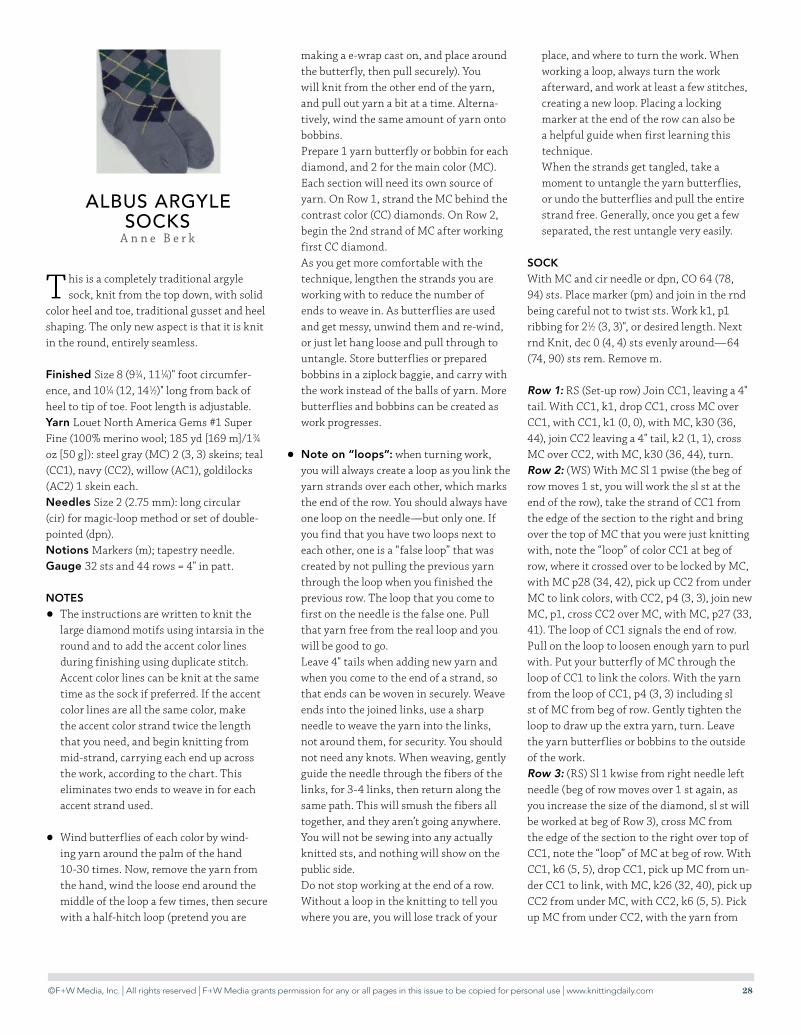
This is a completely traditional argyle sock, knit from the top down, with solid
color heel and toe, traditional gusset and heel shaping. The only new aspect is that it is knit in the round, entirely seamless.
Finished Size 8 (91⁄4, 111⁄4)" foot circumfer-ence, and 101⁄4 (12, 141⁄2)" long from back of heel to tip of toe. Foot length is adjustable. Yarn Louet North America Gems #1 Super Fine (100% merino wool; 185 yd [169 m]/13⁄4 oz [50 g]): steel gray (MC) 2 (3, 3) skeins; teal (CC1), navy (CC2), willow (AC1), goldilocks (AC2) 1 skein each.Needles Size 2 (2.75 mm): long circular (cir) for magic-loop method or set of double-pointed (dpn).Notions Markers (m); tapestry needle.Gauge 32 sts and 44 rows = 4" in patt.
Notes
• The instructions are written to knit the large diamond motifs using intarsia in the round and to add the accent color lines during finishing using duplicate stitch. Accent color lines can be knit at the same time as the sock if preferred. If the accent color lines are all the same color, make the accent color strand twice the length that you need, and begin knitting from mid-strand, carrying each end up across the work, according to the chart. This eliminates two ends to weave in for each accent strand used.
• Wind butterflies of each color by wind-ing yarn around the palm of the hand 10-30 times. Now, remove the yarn from the hand, wind the loose end around the middle of the loop a few times, then secure with a half-hitch loop (pretend you are
making a e-wrap cast on, and place around the butterfly, then pull securely). You will knit from the other end of the yarn, and pull out yarn a bit at a time. Alterna-tively, wind the same amount of yarn onto bobbins.
Prepare 1 yarn butterfly or bobbin for each diamond, and 2 for the main color (MC). Each section will need its own source of yarn. On Row 1, strand the MC behind the contrast color (CC) diamonds. On Row 2, begin the 2nd strand of MC after working first CC diamond. As you get more comfortable with the technique, lengthen the strands you are working with to reduce the number of ends to weave in. As butterflies are used and get messy, unwind them and re-wind, or just let hang loose and pull through to untangle. Store butterflies or prepared bobbins in a ziplock baggie, and carry with the work instead of the balls of yarn. More butterflies and bobbins can be created as work progresses.
• Note on “loops”: when turning work, you will always create a loop as you link the yarn strands over each other, which marks the end of the row. You should always have one loop on the needle—but only one. If you find that you have two loops next to each other, one is a “false loop” that was created by not pulling the previous yarn through the loop when you finished the previous row. The loop that you come to first on the needle is the false one. Pull that yarn free from the real loop and you will be good to go. Leave 4" tails when adding new yarn and when you come to the end of a strand, so that ends can be woven in securely. Weave ends into the joined links, use a sharp needle to weave the yarn into the links, not around them, for security. You should not need any knots. When weaving, gently guide the needle through the fibers of the links, for 3-4 links, then return along the same path. This will smush the fibers all together, and they aren’t going anywhere. You will not be sewing into any actually knitted sts, and nothing will show on the public side. Do not stop working at the end of a row. Without a loop in the knitting to tell you where you are, you will lose track of your
place, and where to turn the work. When working a loop, always turn the work afterward, and work at least a few stitches, creating a new loop. Placing a locking marker at the end of the row can also be a helpful guide when first learning this technique. When the strands get tangled, take a moment to untangle the yarn butterflies, or undo the butterflies and pull the entire strand free. Generally, once you get a few separated, the rest untangle very easily.
sock With MC and cir needle or dpn, CO 64 (78, 94) sts. Place marker (pm) and join in the rnd being careful not to twist sts. Work k1, p1 ribbing for 21⁄2 (3, 3)", or desired length. Next rnd Knit, dec 0 (4, 4) sts evenly around—64 (74, 90) sts rem. Remove m.
Row 1: RS (Set-up row) Join CC1, leaving a 4" tail. With CC1, k1, drop CC1, cross MC over CC1, with CC1, k1 (0, 0), with MC, k30 (36, 44), join CC2 leaving a 4" tail, k2 (1, 1), cross MC over CC2, with MC, k30 (36, 44), turn.Row 2: (WS) With MC Sl 1 pwise (the beg of row moves 1 st, you will work the sl st at the end of the row), take the strand of CC1 from the edge of the section to the right and bring over the top of MC that you were just knitting with, note the “loop” of color CC1 at beg of row, where it crossed over to be locked by MC, with MC p28 (34, 42), pick up CC2 from under MC to link colors, with CC2, p4 (3, 3), join new MC, p1, cross CC2 over MC, with MC, p27 (33, 41). The loop of CC1 signals the end of row. Pull on the loop to loosen enough yarn to purl with. Put your butterfly of MC through the loop of CC1 to link the colors. With the yarn from the loop of CC1, p4 (3, 3) including sl st of MC from beg of row. Gently tighten the loop to draw up the extra yarn, turn. Leave the yarn butterflies or bobbins to the outside of the work.Row 3: (RS) Sl 1 kwise from right needle left needle (beg of row moves over 1 st again, as you increase the size of the diamond, sl st will be worked at beg of Row 3), cross MC from the edge of the section to the right over top of CC1, note the “loop” of MC at beg of row. With CC1, k6 (5, 5), drop CC1, pick up MC from un-der CC1 to link, with MC, k26 (32, 40), pick up CC2 from under MC, with CC2, k6 (5, 5). Pick up MC from under CC2, with the yarn from
©F+W Media, Inc. | All rights reserved | F+W Media grants permission for any or all pages in this issue to be copied for personal use | www.knittingdaily.com 29
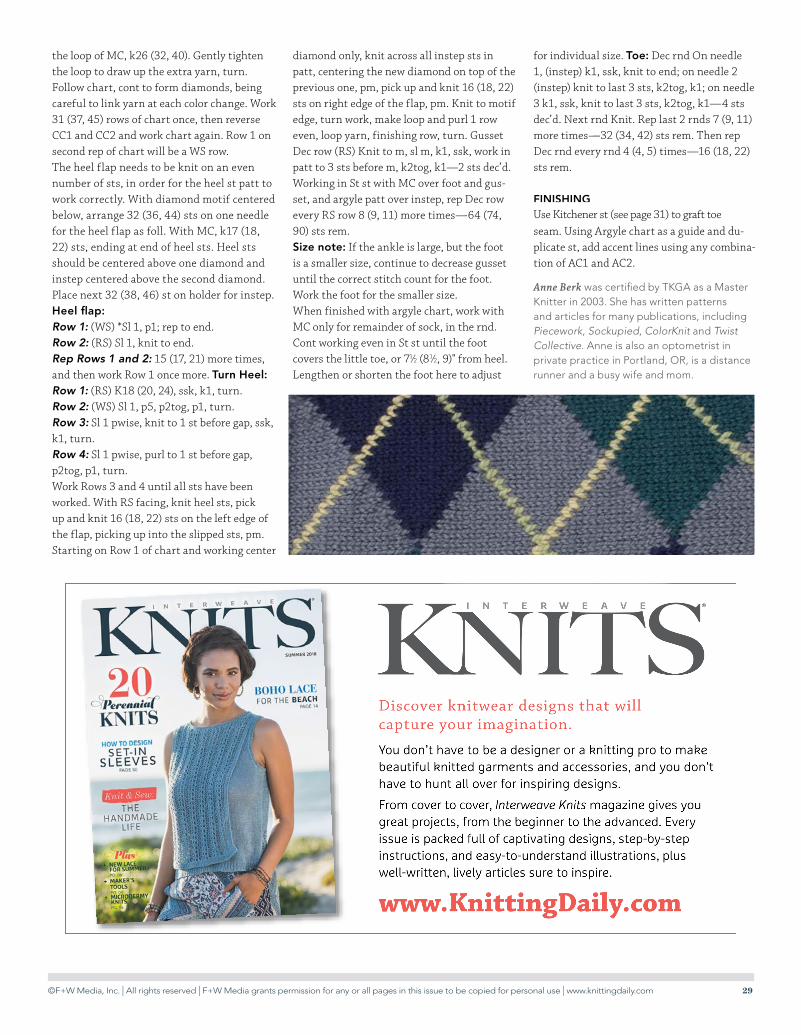
the loop of MC, k26 (32, 40). Gently tighten the loop to draw up the extra yarn, turn. Follow chart, cont to form diamonds, being careful to link yarn at each color change. Work 31 (37, 45) rows of chart once, then reverse CC1 and CC2 and work chart again. Row 1 on second rep of chart will be a WS row.The heel flap needs to be knit on an even number of sts, in order for the heel st patt to work correctly. With diamond motif centered below, arrange 32 (36, 44) sts on one needle for the heel flap as foll. With MC, k17 (18, 22) sts, ending at end of heel sts. Heel sts should be centered above one diamond and instep centered above the second diamond. Place next 32 (38, 46) st on holder for instep. Heel flap: Row 1: (WS) *Sl 1, p1; rep to end. Row 2: (RS) Sl 1, knit to end. Rep Rows 1 and 2: 15 (17, 21) more times, and then work Row 1 once more. turn Heel: Row 1: (RS) K18 (20, 24), ssk, k1, turn. Row 2: (WS) Sl 1, p5, p2tog, p1, turn. Row 3: Sl 1 pwise, knit to 1 st before gap, ssk, k1, turn.Row 4: Sl 1 pwise, purl to 1 st before gap, p2tog, p1, turn. Work Rows 3 and 4 until all sts have been worked. With RS facing, knit heel sts, pick up and knit 16 (18, 22) sts on the left edge of the flap, picking up into the slipped sts, pm. Starting on Row 1 of chart and working center
diamond only, knit across all instep sts in patt, centering the new diamond on top of the previous one, pm, pick up and knit 16 (18, 22) sts on right edge of the flap, pm. Knit to motif edge, turn work, make loop and purl 1 row even, loop yarn, finishing row, turn. Gusset Dec row (RS) Knit to m, sl m, k1, ssk, work in patt to 3 sts before m, k2tog, k1—2 sts dec’d. Working in St st with MC over foot and gus-set, and argyle patt over instep, rep Dec row every RS row 8 (9, 11) more times—64 (74, 90) sts rem.size note: If the ankle is large, but the foot is a smaller size, continue to decrease gusset until the correct stitch count for the foot. Work the foot for the smaller size.When finished with argyle chart, work with MC only for remainder of sock, in the rnd. Cont working even in St st until the foot covers the little toe, or 71⁄2 (81⁄2, 9)" from heel. Lengthen or shorten the foot here to adjust
for individual size. toe: Dec rnd On needle 1, (instep) k1, ssk, knit to end; on needle 2 (instep) knit to last 3 sts, k2tog, k1; on needle 3 k1, ssk, knit to last 3 sts, k2tog, k1—4 sts dec’d. Next rnd Knit. Rep last 2 rnds 7 (9, 11) more times—32 (34, 42) sts rem. Then rep Dec rnd every rnd 4 (4, 5) times—16 (18, 22) sts rem.
FiNisHiNGUse Kitchener st (see page 5) to graft toe seam. Using Argyle chart as a guide and du-plicate st, add accent lines using any combina-tion of AC1 and AC2.
Anne Berk was certified by TKGA as a Master Knitter in 2003. She has written patterns and articles for many publications, including Piecework, Sockupied, ColorKnit and Twist Collective. Anne is also an optometrist in private practice in Portland, OR, is a distance runner and a busy wife and mom.
Use Kitchener st (see page 31) to graft toe
MC
CC1
CC2
AC1
AC2
turn
ing
poin
t
Key
64 s
ts
31 29 27 25 23 21 19 17 15 13 11 9 7 5 3 1
Smal
l, si
ze 8
"
Illu
stra
tion
by
Gay
le F
ord
ste
p 1
: Bri
ng t
hrea
ded
nee
dle
thro
ugh
fron
t st
itch
as
if t
o pu
rl a
nd
leav
e st
itch
on n
eedl
e.s
tep
2: B
ring
thr
eade
d n
eedl
e th
roug
h b
ack
stitc
h as
if to
kni
t and
leav
e st
itch
on n
eedl
e.st
ep 3
: Brin
g th
read
ed n
eedl
e th
roug
h fir
st fr
ont s
titch
as
if to
kni
t and
slip
this
stitc
h of
f nee
dle.
Brin
g th
read
-ed
nee
dle
thro
ugh
next
fron
t sti
tch
as if
to p
url a
nd
leav
e st
itch
on n
eedl
e.st
ep 4
: Brin
g th
read
ed n
eedl
e th
roug
h fir
st b
ack
stitc
h as
if to
pur
l (as
illu
stra
ted)
, slip
this
sti
tch
off,
brin
g ne
edle
thro
ugh
next
bac
k st
itch
as if
to k
nit,
leav
e th
is
stitc
h on
nee
dle.
Rep
eat
Step
s 3
and
4 un
til n
o st
itch
es r
emai
n on
ne
edle
s.
kit
chen
er s
titc
h
©F+W Media, Inc. | All rights reserved | F+W Media grants permission for any or all pages in this issue to be copied for personal use | www.knittingdaily.com 30
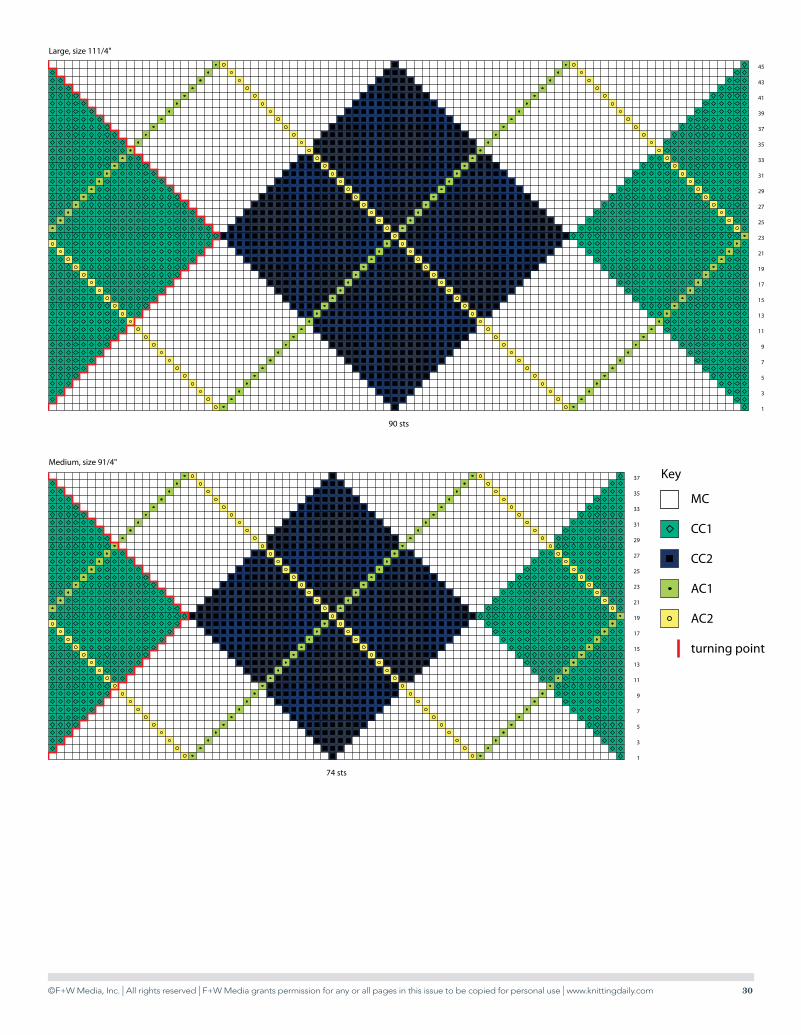
MC
CC1
CC2
AC1
AC2
turning point
Key
90 sts
45
43
41
39
37
35
33
31
29
27
25
23
21
19
17
15
13
11
9
7
5
3
1
Large, size 111/4"
74 sts
37
35
33
31
29
27
25
23
21
19
17
15
13
11
9
7
5
3
1
Medium, size 91/4"
©F+W Media, Inc. | All rights reserved | F+W Media grants permission for any or all pages in this issue to be copied for personal use | www.knittingdaily.com 31
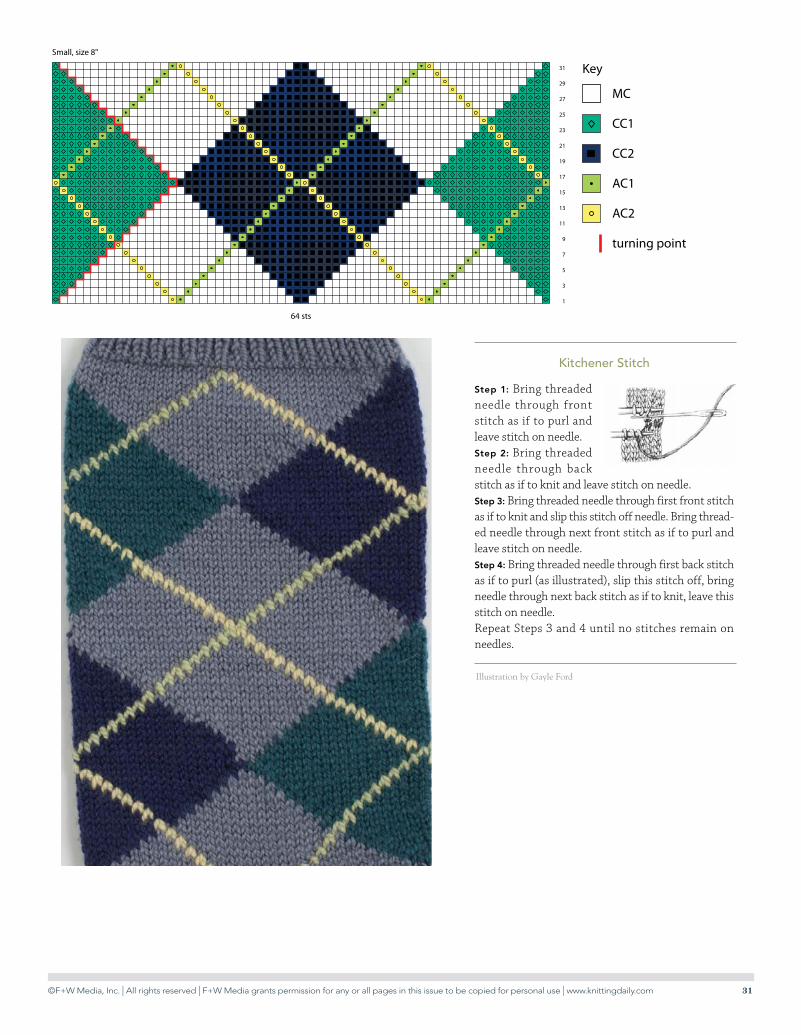
MC
CC1
CC2
AC1
AC2
turning point
Key
64 sts
31
29
27
25
23
21
19
17
15
13
11
9
7
5
3
1
Small, size 8"
Illustration by Gayle Ford
step 1: Bring threaded needle through front stitch as if to purl and leave stitch on needle.step 2: Bring threaded needle through back stitch as if to knit and leave stitch on needle.step 3: Bring threaded needle through first front stitch as if to knit and slip this stitch off needle. Bring thread-ed needle through next front stitch as if to purl and leave stitch on needle.step 4: Bring threaded needle through first back stitch as if to purl (as illustrated), slip this stitch off, bring needle through next back stitch as if to knit, leave this stitch on needle.Repeat Steps 3 and 4 until no stitches remain on needles.
kitchener stitch
©F+W Media, Inc. | All rights reserved | F+W Media grants permission for any or all pages in this issue to be copied for personal use | www.knittingdaily.com 32
Kat
hryn
Mar
tin
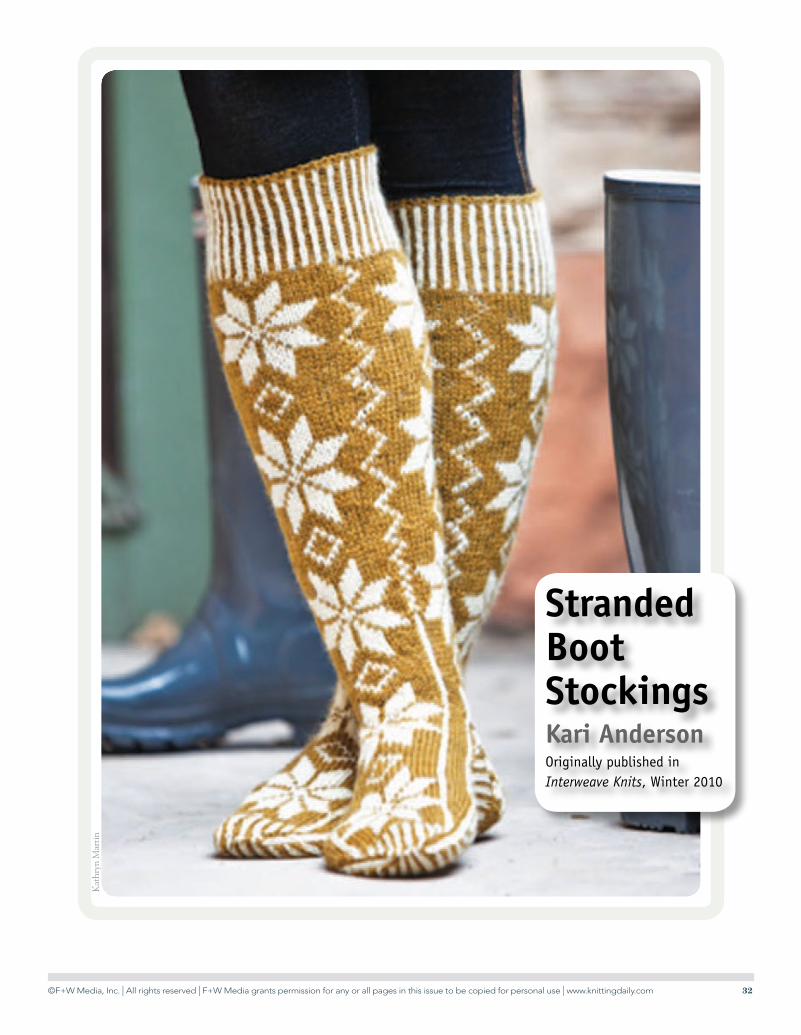
Stranded Boot StockingsKari AndersonOriginally published in Interweave Knits, Winter 2010
©F+W Media, Inc. | All rights reserved | F+W Media grants permission for any or all pages in this issue to be copied for personal use | www.knittingdaily.com 33
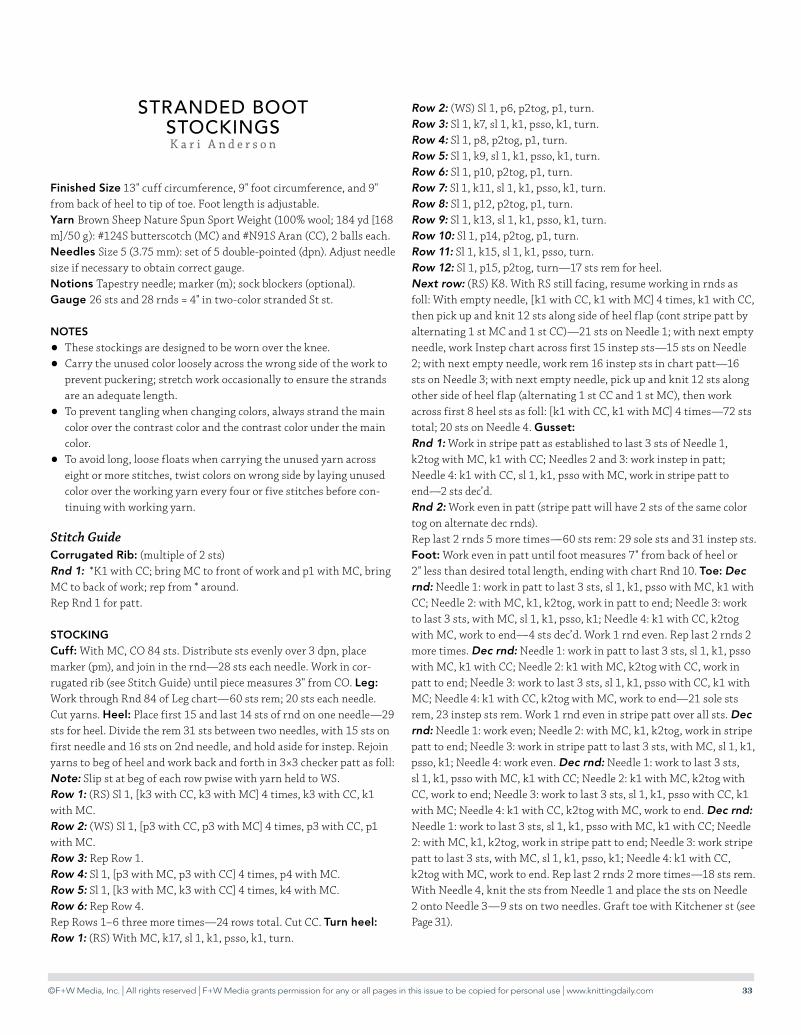
Stranded Boot StockingS K a r i A n d e r s o n
Finished Size 13" cuff circumference, 9" foot circumference, and 9" from back of heel to tip of toe. Foot length is adjustable. Yarn Brown Sheep Nature Spun Sport Weight (100% wool; 184 yd [168 m]/50 g): #124S butterscotch (MC) and #N91S Aran (CC), 2 balls each.Needles Size 5 (3.75 mm): set of 5 double-pointed (dpn). Adjust needle size if necessary to obtain correct gauge.Notions Tapestry needle; marker (m); sock blockers (optional).Gauge 26 sts and 28 rnds = 4" in two-color stranded St st.
NoteS
• These stockings are designed to be worn over the knee.
• Carry the unused color loosely across the wrong side of the work to prevent puckering; stretch work occasionally to ensure the strands are an adequate length.
• To prevent tangling when changing colors, always strand the main color over the contrast color and the contrast color under the main color.
• To avoid long, loose floats when carrying the unused yarn across eight or more stitches, twist colors on wrong side by laying unused color over the working yarn every four or five stitches before con-tinuing with working yarn.
Stitch GuideCorrugated Rib: (multiple of 2 sts)Rnd 1: *K1 with CC; bring MC to front of work and p1 with MC, bring MC to back of work; rep from * around.Rep Rnd 1 for patt.
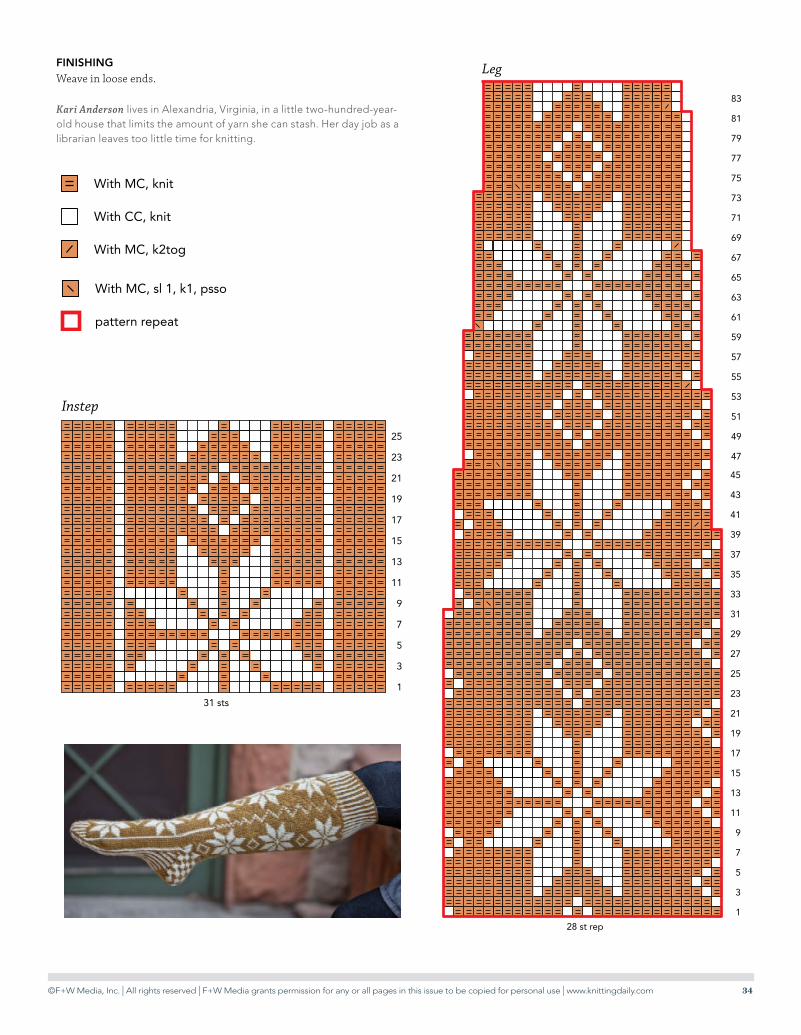
StoCkiNGCuff: With MC, CO 84 sts. Distribute sts evenly over 3 dpn, place marker (pm), and join in the rnd—28 sts each needle. Work in cor-rugated rib (see Stitch Guide) until piece measures 3" from CO. Leg: Work through Rnd 84 of Leg chart—60 sts rem; 20 sts each needle. Cut yarns. Heel: Place first 15 and last 14 sts of rnd on one needle—29 sts for heel. Divide the rem 31 sts between two needles, with 15 sts on first needle and 16 sts on 2nd needle, and hold aside for instep. Rejoin yarns to beg of heel and work back and forth in 3×3 checker patt as foll: Note: Slip st at beg of each row pwise with yarn held to WS.Row 1: (RS) Sl 1, [k3 with CC, k3 with MC] 4 times, k3 with CC, k1 with MC. Row 2: (WS) Sl 1, [p3 with CC, p3 with MC] 4 times, p3 with CC, p1 with MC. Row 3: Rep Row 1.Row 4: Sl 1, [p3 with MC, p3 with CC] 4 times, p4 with MC.Row 5: Sl 1, [k3 with MC, k3 with CC] 4 times, k4 with MC. Row 6: Rep Row 4. Rep Rows 1–6 three more times—24 rows total. Cut CC. turn heel: Row 1: (RS) With MC, k17, sl 1, k1, psso, k1, turn.
Row 2: (WS) Sl 1, p6, p2tog, p1, turn. Row 3: Sl 1, k7, sl 1, k1, psso, k1, turn. Row 4: Sl 1, p8, p2tog, p1, turn. Row 5: Sl 1, k9, sl 1, k1, psso, k1, turn. Row 6: Sl 1, p10, p2tog, p1, turn. Row 7: Sl 1, k11, sl 1, k1, psso, k1, turn. Row 8: Sl 1, p12, p2tog, p1, turn. Row 9: Sl 1, k13, sl 1, k1, psso, k1, turn. Row 10: Sl 1, p14, p2tog, p1, turn. Row 11: Sl 1, k15, sl 1, k1, psso, turn. Row 12: Sl 1, p15, p2tog, turn—17 sts rem for heel. Next row: (RS) K8. With RS still facing, resume working in rnds as foll: With empty needle, [k1 with CC, k1 with MC] 4 times, k1 with CC, then pick up and knit 12 sts along side of heel flap (cont stripe patt by alternating 1 st MC and 1 st CC)—21 sts on Needle 1; with next empty needle, work Instep chart across first 15 instep sts—15 sts on Needle 2; with next empty needle, work rem 16 instep sts in chart patt—16 sts on Needle 3; with next empty needle, pick up and knit 12 sts along other side of heel flap (alternating 1 st CC and 1 st MC), then work across first 8 heel sts as foll: [k1 with CC, k1 with MC] 4 times—72 sts total; 20 sts on Needle 4. Gusset:Rnd 1: Work in stripe patt as established to last 3 sts of Needle 1, k2tog with MC, k1 with CC; Needles 2 and 3: work instep in patt; Needle 4: k1 with CC, sl 1, k1, psso with MC, work in stripe patt to end—2 sts dec’d. Rnd 2: Work even in patt (stripe patt will have 2 sts of the same color tog on alternate dec rnds). Rep last 2 rnds 5 more times—60 sts rem: 29 sole sts and 31 instep sts. Foot: Work even in patt until foot measures 7" from back of heel or 2" less than desired total length, ending with chart Rnd 10. toe: Dec rnd: Needle 1: work in patt to last 3 sts, sl 1, k1, psso with MC, k1 with CC; Needle 2: with MC, k1, k2tog, work in patt to end; Needle 3: work to last 3 sts, with MC, sl 1, k1, psso, k1; Needle 4: k1 with CC, k2tog with MC, work to end—4 sts dec’d. Work 1 rnd even. Rep last 2 rnds 2 more times. Dec rnd: Needle 1: work in patt to last 3 sts, sl 1, k1, psso with MC, k1 with CC; Needle 2: k1 with MC, k2tog with CC, work in patt to end; Needle 3: work to last 3 sts, sl 1, k1, psso with CC, k1 with MC; Needle 4: k1 with CC, k2tog with MC, work to end—21 sole sts rem, 23 instep sts rem. Work 1 rnd even in stripe patt over all sts. Dec rnd: Needle 1: work even; Needle 2: with MC, k1, k2tog, work in stripe patt to end; Needle 3: work in stripe patt to last 3 sts, with MC, sl 1, k1, psso, k1; Needle 4: work even. Dec rnd: Needle 1: work to last 3 sts, sl 1, k1, psso with MC, k1 with CC; Needle 2: k1 with MC, k2tog with CC, work to end; Needle 3: work to last 3 sts, sl 1, k1, psso with CC, k1 with MC; Needle 4: k1 with CC, k2tog with MC, work to end. Dec rnd: Needle 1: work to last 3 sts, sl 1, k1, psso with MC, k1 with CC; Needle 2: with MC, k1, k2tog, work in stripe patt to end; Needle 3: work stripe patt to last 3 sts, with MC, sl 1, k1, psso, k1; Needle 4: k1 with CC, k2tog with MC, work to end. Rep last 2 rnds 2 more times—18 sts rem. With Needle 4, knit the sts from Needle 1 and place the sts on Needle 2 onto Needle 3—9 sts on two needles. Graft toe with Kitchener st (see Page 4). Page 31).
©F+W Media, Inc. | All rights reserved | F+W Media grants permission for any or all pages in this issue to be copied for personal use | www.knittingdaily.com 34
31 sts
25
23
21
19
17
15
13
11
9
7
5
3
1
Instep
28 st rep
45
43
41
39
37
35
33
31
29
27
25
23
21
19
17
15
13
11
9
7
5
3
1
47
49
51
53
55
57
59
61
63
65
67
69
71
73
75
77
79
81
83
Leg
With MC, knit
With CC, knit
With MC, k2tog
With MC, sl 1, k1, psso
pattern repeat
With MC, knit
With CC, knit
With MC, k2tog
With MC, sl 1, k1, psso
pattern repeat
FiNiSHiNGWeave in loose ends.
Kari Anderson lives in Alexandria, Virginia, in a little two-hundred-year-old house that limits the amount of yarn she can stash. Her day job as a librarian leaves too little time for knitting.


![7 Free Sock Knitting Patterns[1]](https://img.pdfslide.us/doc/110x75/5571f78949795991698b8d86/7-free-sock-knitting-patterns1.jpg)