Embed Size (px)
Citation preview
E
RJA518623-001V01
KL-120
User’s Guide
E-1
Safety Precautions
Thank you for purchasing this quality CASIO product.Before using it, be sure to read the following Safety Precautions. Keep the manualin a convenient location for future reference when necessary.
DangerThis symbol indicates information that, if ignored or applied incorrectly,creates the danger of death or serious personal injury.
WarningThis symbol indicates information that, if ignored or applied incorrectly,creates the possibility of death or serious personal injury.
CautionThis symbol indicates information that, if ignored or applied incorrectly,creates the possibility of personal injury or material damage.
Examples of graphic markings
indicates something you should not do. The symbol shown here
indicates you should not try to take the unit apart.
indicates something you should do.
Read This First!
• CASIO COMPUTER CO., LTD. shall not be held liable for any loss orclaims by you or any other person or entity that may arise through the useof this printer.
• Reproduction of this manual in any form, either in part or its entirety, isforbidden without the express permission of CASIO COMPUTER CO.,LTD.
• The contents of the manual are subject to change without notice.• The software is continually being revised and updated. Because of this,
the software supplied to you and the contents of the displays it producesmay be different from those described in this manual, or some itemsdescribed in this manual may no longer be available.
© Copyright 2008 CASIO COMPUTER CO., LTD. All rights reserved.
• Be sure to read this manual carefully before attempting to use the prod-uct for the first time.
En
glish
E-2
Warning
Dropping and rough treatmentContinued use of the product after it has been damaged due todropping or other rough treatment creates the risk of fire andelectric shock. Immediately perform the following steps if theproduct should ever become damaged.1. Turn off power.2. Contact your original retailer.
Do not disassemble or modify the product.Never try to take the product apart or modify it in any way. Doingso creates the risk of electric shock, burn injury, or other personalinjury.Leave all internal inspection, maintenance, and repair up to youroriginal retailer.
Water and foreign objectsWater, liquids, or foreign objects (especially metal) getting insidethe product creates the risk of fire and electric shock. Immediatelyperform the following steps if liquid or a foreign object should everget inside the product.1. Turn off power.2. Contact your original retailer.
Do not incinerate.Never dispose of the product by incineration. Doing so createsthe risk of fire and personal injury due to explosion.
Plastic bag precautionNever place the plastic bags in which the product comes packedover your head. Doing so creates the risk of suffocation.Particular care is required in households where young childrenare present.
Danger
Alkaline BatteriesPerform the following steps immediately if fluid leaking from alkalinebatteries ever gets into your eyes.1. Do not rub your eyes! Rinse them with water.2. Contact your physician immediately.
Leaving alkaline battery fluid in your eyes can lead to loss of sight.
Warning
Smoke, abnormal odor, overheating, and otherabnormalities
Continued use of the product while it is emitting smoke or strangeodor, or overheating creates the risk of fire and electric shock.Immediately perform the following steps whenever any of the abovesymptoms are present.1. Turn off power.2. Contact your original retailer.
BatteriesMisuse of batteries can cause them to leak, resulting in damageto nearby objects, or to explode, creating the risk of fire andpersonal injury. Always make sure you observe the followingprecautions.• Never try to take batteries apart or allow them to become
shorted.• Never expose batteries to heat or dispose of them by
incineration.• Never mix old batteries with new ones.• Never mix batteries of different types.• Do not charge the batteries.• Make sure the positive (+) and negative (–) ends of the batteries
are facing correctly.

E-3
Warning
Do not affix labels to a container to be used in amicrowave oven.
Do not affix labels to any container you plan to use in a microwaverange. The label material contains metal, which creates the risk offire and burn injury when heated in a microwave oven. It can alsocause deformation of the container to which the label is affixed.
Caution
BatteriesMisuse of batteries can cause them to leak resulting in damage tonearby objects, or to explode, creating the risk of fire and personalinjury. Always make sure you observe the following precautions.• Use only batteries that are specified for use with this product.• Remove batteries from the product if you do not plan to use it
for a long time.
Keep backup copies of all important dataBe sure that you keep separate copies of important data in anotebook or some other location. Malfunction of the product,repairs, and dead batteries can cause data stored memory to belost.
Keep heavy objects off.Never place a heavy object on top of the product. Doing so cancause the object to lose balance and fall, creating the risk ofpersonal injury.
Avoid unstable surfaces.Never place the product on an unstable table, desk, etc. Doing socan cause the product to fall, creating the risk of personal injury.
Caution
LocationAvoid the locations listed below for the product. Such locationscreate the risk of fire and electric shock.• Areas subject to high humidity and large amounts of dust• Food preparation areas or other location subjected to oil steam• Near heaters, on a heated carpet, in direct sunlight, in a closed
vehicle parked in the sun, and other areas subjected to highheat.
Loading and replacing batteriesThe springs inside of the battery compartment have sharp edges.Take care that you do not touch the springs with your fingers whenloading or replacing batteries. Doing so creates the risk of personalinjury.
Display Screen• Never push on the display screen’s LCD panel or subject it to
strong impact. Doing so can cause the LCD panel’s glass tocrack, creating the risk of personal injury.
• Should the LCD panel ever crack or break, never touch the liquidinside of the panel. LCD panel liquid can cause skin irritation.
• Should LCD panel liquid ever get inside your mouth,immediately wash out your mouth with water and contact yourphysician.
• Should LCD panel liquid ever get into your eyes or onto yourskin, rinse with clear water for at least 15 minutes, and thencontact a physician.
High temperature precautionNever touch the print head or other metal objects near the head.These items become very hot, and touching them creates the riskof burn injury.
E-4
Introduction
Congratulations on your selection of the CASIO KL-120 Label Printer. This CASIOLabel Printer makes it possible for you to print adhesive labels for a wide varietyof applications, such as: name tags, CD/DVD labels, binders, and otherapplications.
You can produce attractive, original labels thanks to such features as:
• Variable tape sizes (6mm, 9mm, 12mm, 18mm)• Attractive sans-serif font• Font effects (shading, underline, box)• Character Styles (normal, bold, outline)• Built-in symbols• Text memory• Layout Printing• Mirror image printing• 5-language display messages (English, German, French, Italian, Spanish)
All of this makes the CASIO Label Printer the perfect tool for just about all ofyour labeling needs!
Important!• Contact a nearby dealer whenever you require servicing.• Note that the manufacturer shall not be held liable for any loss or
claims by third parties which may arise out of the use of this product.• Note that the manufacturer shall not be held liable for any damages
incurred as a result of data loss caused by malfunctions, repairs, orinterruption of power supply.
• It is up to the user to keep backup records of important data.• Keep this manual on hand for future reference.
Operating Precautions
Observe the following precautions to ensure that the printer provides you withthe years of trouble-free operation for which it is designed.• Avoid using the printer in areas exposed to direct sunlight, and in areas sub-
jected to high humidity, electrostatic charge, sudden temperature changes,and temperature extremes. Operating Temperature Range: 10°C to 35°C (50°Fto 95°F)
• Battery capacity becomes lower at temperatures of 10°C (50°F) and colder.This can cause the “LOW BATTERY!” message to appear sooner than normal.If this happens, move the printer to a location that is within the operatingtemperature range (10°C to 35°C (50°F to 95°F)).
• Never subject the printer to strong impact or shock.• Never allow paper clips, pins, or other similar objects to get inside the printer
mechanism.• Never pull on the tape with excessive force or try to push it into the cassette.• Place the printer on a level surface when printing. A tilted surface can make
normal printing impossible.• Unclear printing can indicate a dirty print head. If printing becomes unclear,
use the procedures on page E-23 to clean the print head and rubber roller.
E-5
Part 6 Printing............................................................................ E-18Printing a Tape .......................................................................................... E-18Print Preview ............................................................................................. E-19Feeding the Tape ....................................................................................... E-19
Part 7 Configuring Form Settings............................................ E-19
Part 8 Layout Printing ............................................................... E-20Using Layout Printing ................................................................................ E-20
Part 9 Memory ........................................................................... E-21
Part 10 Configuring the Printer Setup ..................................... E-22
Part 11 Reference ...................................................................... E-23Cleaning the Printer Head and Roller ....................................................... E-23Initializing the Label Printer ....................................................................... E-24Troubleshooting ......................................................................................... E-24Error Messages/Display Messages ........................................................... E-26Alpha Characters ...................................................................................... E-28Symbols .................................................................................................... E-28Layout Formats ......................................................................................... E-29Specifications ............................................................................................ E-30
Contents
Safety Precautions ...................................................................... E-1
Operating Precautions ............................................................... E-4
Part 1 Getting Acquainted .......................................................... E-6General Guide ............................................................................................. E-6Label Printer Menus .................................................................................... E-6
Part 2 Getting Ready ................................................................... E-7Power Supply .............................................................................................. E-7Replacing Batteries ..................................................................................... E-7Turning Power On and Off ........................................................................... E-8Resetting the Memory ................................................................................. E-8Display Language Setting ........................................................................... E-9Auto Power Off Function ............................................................................. E-9Retrieving a Sentence from Memory .......................................................... E-9Tape Cartridges .......................................................................................... E-9
Part 3 Inputting Characters and Symbols ............................... E-10Display Symbols and Indicators ................................................................ E-10Basic Alpha-Numeric Input ....................................................................... E-11About the CODE key… ............................................................................. E-12Special Symbols ....................................................................................... E-12Using Text Blocks ...................................................................................... E-13
Part 4 Deleting and Inserting Characters ................................ E-14Moving the Cursor ..................................................................................... E-14Deleting Individual Characters .................................................................. E-14Clearing the Display .................................................................................. E-14Text Editing ................................................................................................ E-14
Part 5 Character Size, Text Effects and Character Styles ...... E-15Character Size .......................................................................................... E-15Text Effects ................................................................................................ E-17Character Styles ....................................................................................... E-18
E-6
General Guide
Part 1 Getting Acquainted
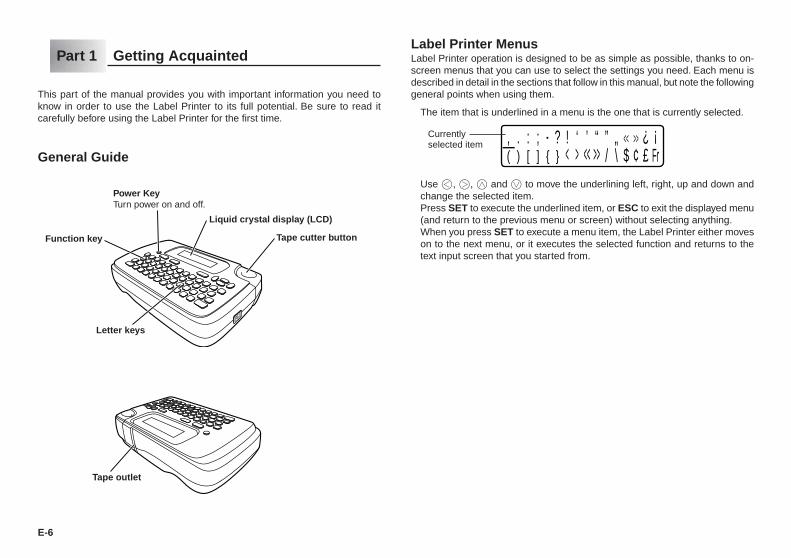
This part of the manual provides you with important information you need toknow in order to use the Label Printer to its full potential. Be sure to read itcarefully before using the Label Printer for the first time.
Power KeyTurn power on and off.
Function key
Letter keys
Tape outlet
Liquid crystal display (LCD)
Tape cutter button
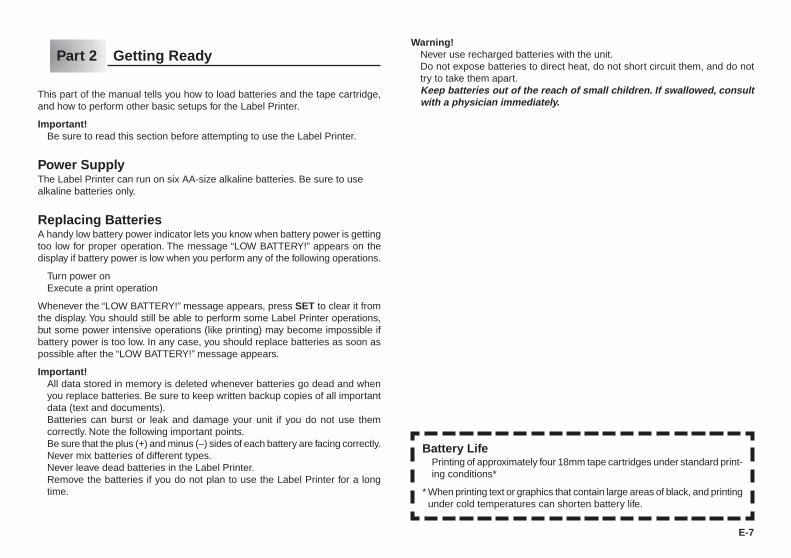
Label Printer MenusLabel Printer operation is designed to be as simple as possible, thanks to on-screen menus that you can use to select the settings you need. Each menu isdescribed in detail in the sections that follow in this manual, but note the followinggeneral points when using them.
• The item that is underlined in a menu is the one that is currently selected.
,(
.)
:[
;]
•
{?}
! ‘< > << >>
<< >>’ “/ \”
$„
¢ £ Fr¿ ¡
• Use c, v, x and z to move the underlining left, right, up and down andchange the selected item.
• Press SET to execute the underlined item, or ESC to exit the displayed menu(and return to the previous menu or screen) without selecting anything.
• When you press SET to execute a menu item, the Label Printer either moveson to the next menu, or it executes the selected function and returns to thetext input screen that you started from.
Currentlyselected item
E-7
Part 2 Getting Ready
This part of the manual tells you how to load batteries and the tape cartridge,and how to perform other basic setups for the Label Printer.
Important!• Be sure to read this section before attempting to use the Label Printer.
Power SupplyThe Label Printer can run on six AA-size alkaline batteries. Be sure to usealkaline batteries only.
Replacing BatteriesA handy low battery power indicator lets you know when battery power is gettingtoo low for proper operation. The message “LOW BATTERY!” appears on thedisplay if battery power is low when you perform any of the following operations.
• Turn power on• Execute a print operation
Whenever the “LOW BATTERY!” message appears, press SET to clear it fromthe display. You should still be able to perform some Label Printer operations,but some power intensive operations (like printing) may become impossible ifbattery power is too low. In any case, you should replace batteries as soon aspossible after the “LOW BATTERY!” message appears.
Important!• All data stored in memory is deleted whenever batteries go dead and when
you replace batteries. Be sure to keep written backup copies of all importantdata (text and documents).
• Batteries can burst or leak and damage your unit if you do not use themcorrectly. Note the following important points.
• Be sure that the plus (+) and minus (–) sides of each battery are facing correctly.• Never mix batteries of different types.• Never leave dead batteries in the Label Printer.• Remove the batteries if you do not plan to use the Label Printer for a long
time.
Warning!• Never use recharged batteries with the unit.• Do not expose batteries to direct heat, do not short circuit them, and do not
try to take them apart.• Keep batteries out of the reach of small children. If swallowed, consult
with a physician immediately.
Battery Life• Printing of approximately four 18mm tape cartridges under standard print-
ing conditions*
* When printing text or graphics that contain large areas of black, and printingunder cold temperatures can shorten battery life.
E-8
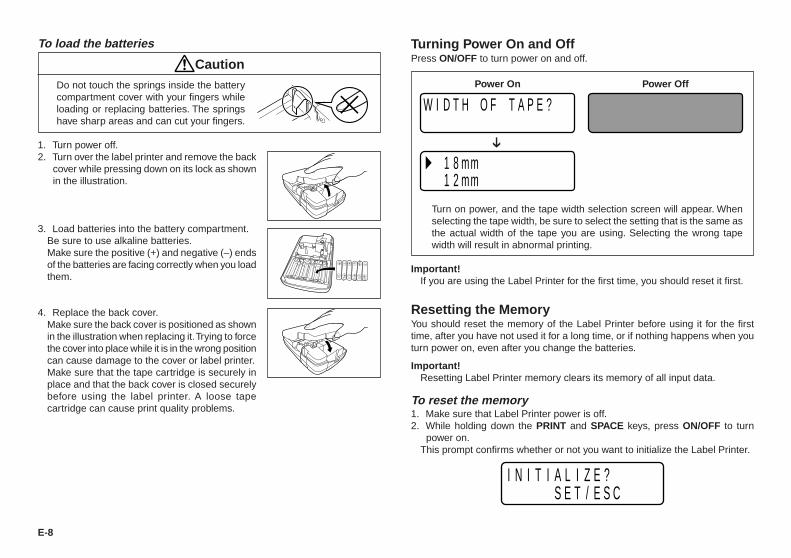
To load the batteries
Caution• Do not touch the springs inside the battery
compartment cover with your fingers whileloading or replacing batteries. The springshave sharp areas and can cut your fingers.
1. Turn power off.2. Turn over the label printer and remove the back
cover while pressing down on its lock as shownin the illustration.
3. Load batteries into the battery compartment.• Be sure to use alkaline batteries.• Make sure the positive (+) and negative (–) ends
of the batteries are facing correctly when you loadthem.
4. Replace the back cover.• Make sure the back cover is positioned as shown
in the illustration when replacing it. Trying to forcethe cover into place while it is in the wrong positioncan cause damage to the cover or label printer.
• Make sure that the tape cartridge is securely inplace and that the back cover is closed securelybefore using the label printer. A loose tapecartridge can cause print quality problems.
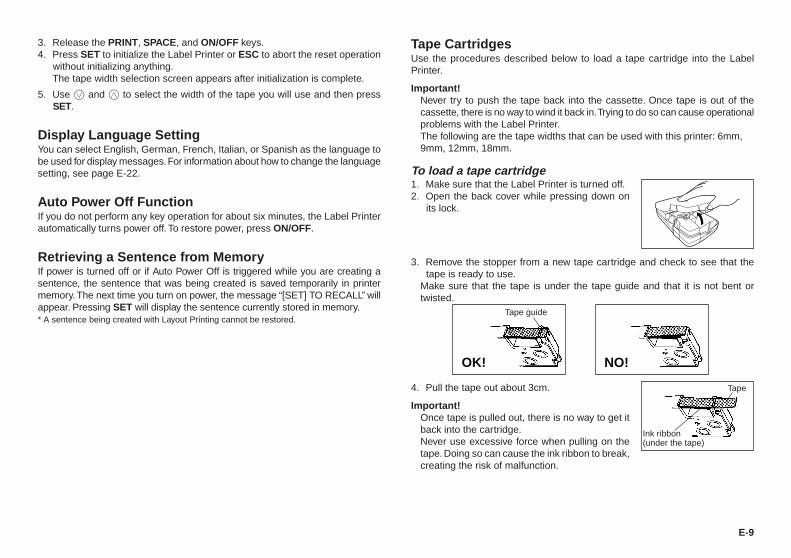
Turning Power On and OffPress ON/OFF to turn power on and off.
• Turn on power, and the tape width selection screen will appear. Whenselecting the tape width, be sure to select the setting that is the same asthe actual width of the tape you are using. Selecting the wrong tapewidth will result in abnormal printing.
Important!• If you are using the Label Printer for the first time, you should reset it first.
Resetting the MemoryYou should reset the memory of the Label Printer before using it for the firsttime, after you have not used it for a long time, or if nothing happens when youturn power on, even after you change the batteries.
Important!• Resetting Label Printer memory clears its memory of all input data.
To reset the memory1. Make sure that Label Printer power is off.2. While holding down the PRINT and SPACE keys, press ON/OFF to turn
power on.• This prompt confirms whether or not you want to initialize the Label Printer.
I N I IT AS
LE
IT
Z/
EE
?S C
Power On Power Off
➔
W I D HT O F T A P E ?
1 mm8mm21
E-9
Tape CartridgesUse the procedures described below to load a tape cartridge into the LabelPrinter.
Important!• Never try to push the tape back into the cassette. Once tape is out of the
cassette, there is no way to wind it back in. Trying to do so can cause operationalproblems with the Label Printer.
• The following are the tape widths that can be used with this printer: 6mm,9mm, 12mm, 18mm.
To load a tape cartridge1. Make sure that the Label Printer is turned off.2. Open the back cover while pressing down on
its lock.
3. Remove the stopper from a new tape cartridge and check to see that thetape is ready to use.
• Make sure that the tape is under the tape guide and that it is not bent ortwisted.
4. Pull the tape out about 3cm.
Important!• Once tape is pulled out, there is no way to get it
back into the cartridge.• Never use excessive force when pulling on the
tape. Doing so can cause the ink ribbon to break,creating the risk of malfunction.
3. Release the PRINT, SPACE, and ON/OFF keys.4. Press SET to initialize the Label Printer or ESC to abort the reset operation
without initializing anything.The tape width selection screen appears after initialization is complete.
5. Use z and x to select the width of the tape you will use and then pressSET.
Display Language SettingYou can select English, German, French, Italian, or Spanish as the language tobe used for display messages. For information about how to change the languagesetting, see page E-22.
Auto Power Off FunctionIf you do not perform any key operation for about six minutes, the Label Printerautomatically turns power off. To restore power, press ON/OFF.
Retrieving a Sentence from MemoryIf power is turned off or if Auto Power Off is triggered while you are creating asentence, the sentence that was being created is saved temporarily in printermemory. The next time you turn on power, the message “[SET] TO RECALL” willappear. Pressing SET will display the sentence currently stored in memory.* A sentence being created with Layout Printing cannot be restored.
NO!OK!
Tape guide
Tape
Ink ribbon(under the tape)
E-10
(a)
(b)
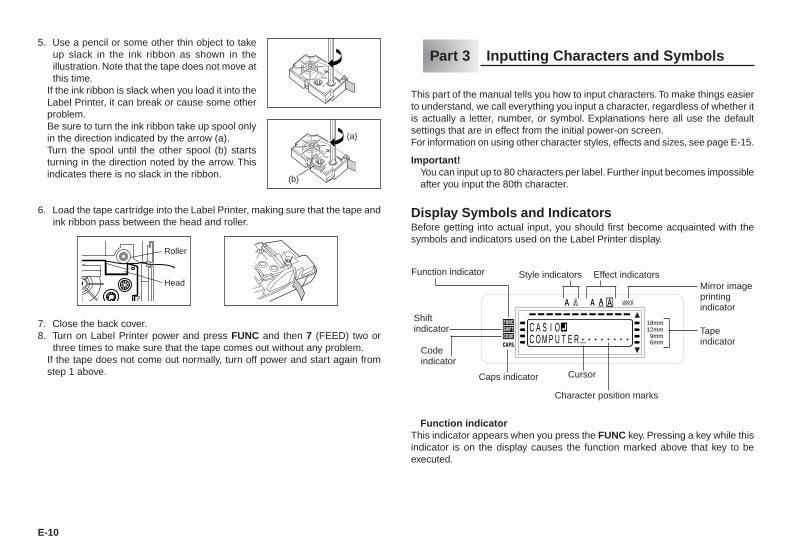
5. Use a pencil or some other thin object to takeup slack in the ink ribbon as shown in theillustration. Note that the tape does not move atthis time.
• If the ink ribbon is slack when you load it into theLabel Printer, it can break or cause some otherproblem.
• Be sure to turn the ink ribbon take up spool onlyin the direction indicated by the arrow (a).
• Turn the spool until the other spool (b) startsturning in the direction noted by the arrow. Thisindicates there is no slack in the ribbon.
6. Load the tape cartridge into the Label Printer, making sure that the tape andink ribbon pass between the head and roller.
7. Close the back cover.8. Turn on Label Printer power and press FUNC and then 7 (FEED) two or
three times to make sure that the tape comes out without any problem.• If the tape does not come out normally, turn off power and start again from
step 1 above.
Part 3 Inputting Characters and Symbols
This part of the manual tells you how to input characters. To make things easierto understand, we call everything you input a character, regardless of whether itis actually a letter, number, or symbol. Explanations here all use the defaultsettings that are in effect from the initial power-on screen.For information on using other character styles, effects and sizes, see page E-15.
Important!• You can input up to 80 characters per label. Further input becomes impossible
after you input the 80th character.
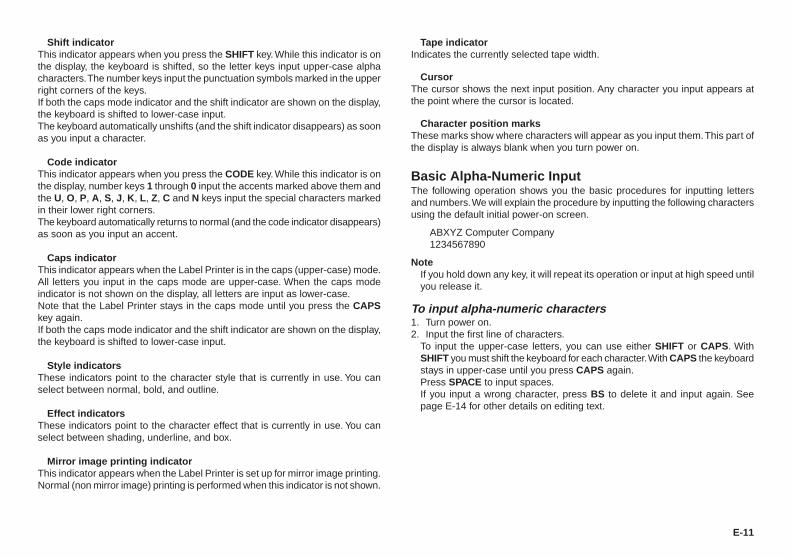
Display Symbols and IndicatorsBefore getting into actual input, you should first become acquainted with thesymbols and indicators used on the Label Printer display.
C A S OITUPMOC E R • • • • • • • •
18mm12mm
MIRROR
9mm6mm
• Function indicatorThis indicator appears when you press the FUNC key. Pressing a key while thisindicator is on the display causes the function marked above that key to beexecuted.
Shiftindicator
CursorCaps indicator
Effect indicatorsFunction indicator
Character position marks
Style indicators
Codeindicator
Tapeindicator
Mirror imageprintingindicator
Roller
Head
E-11
• Shift indicatorThis indicator appears when you press the SHIFT key. While this indicator is onthe display, the keyboard is shifted, so the letter keys input upper-case alphacharacters. The number keys input the punctuation symbols marked in the upperright corners of the keys.If both the caps mode indicator and the shift indicator are shown on the display,the keyboard is shifted to lower-case input.The keyboard automatically unshifts (and the shift indicator disappears) as soonas you input a character.
• Code indicatorThis indicator appears when you press the CODE key. While this indicator is onthe display, number keys 1 through 0 input the accents marked above them andthe U, O, P, A, S, J, K, L, Z, C and N keys input the special characters markedin their lower right corners.The keyboard automatically returns to normal (and the code indicator disappears)as soon as you input an accent.
• Caps indicatorThis indicator appears when the Label Printer is in the caps (upper-case) mode.All letters you input in the caps mode are upper-case. When the caps modeindicator is not shown on the display, all letters are input as lower-case.Note that the Label Printer stays in the caps mode until you press the CAPSkey again.If both the caps mode indicator and the shift indicator are shown on the display,the keyboard is shifted to lower-case input.
• Style indicatorsThese indicators point to the character style that is currently in use. You canselect between normal, bold, and outline.
• Effect indicatorsThese indicators point to the character effect that is currently in use. You canselect between shading, underline, and box.
• Mirror image printing indicatorThis indicator appears when the Label Printer is set up for mirror image printing.Normal (non mirror image) printing is performed when this indicator is not shown.
• Tape indicatorIndicates the currently selected tape width.
• CursorThe cursor shows the next input position. Any character you input appears atthe point where the cursor is located.
• Character position marksThese marks show where characters will appear as you input them. This part ofthe display is always blank when you turn power on.
Basic Alpha-Numeric InputThe following operation shows you the basic procedures for inputting lettersand numbers. We will explain the procedure by inputting the following charactersusing the default initial power-on screen.
ABXYZ Computer Company1234567890
Note• If you hold down any key, it will repeat its operation or input at high speed until
you release it.
To input alpha-numeric characters1. Turn power on.2. Input the first line of characters.• To input the upper-case letters, you can use either SHIFT or CAPS. With
SHIFT you must shift the keyboard for each character. With CAPS the keyboardstays in upper-case until you press CAPS again.
• Press SPACE to input spaces.• If you input a wrong character, press BS to delete it and input again. See
page E-14 for other details on editing text.

E-12
3. When you reach the end of a line of text, press to input a newline mark.• A newline operation is indicated on the display by the symbol. This shows
where you changed lines.• The maximum number of lines you can input depends on the width of the tape
you have loaded in the Label Printer.
Tape Width Maximum Number of Lines• 6mm ............................ 1• 9mm ............................ 1• 12mm .......................... 2• 18mm .......................... 2
4. Input the characters in the second line.5. To print the text that you input, press PRINT. For details on printing, see
page E-18.
About the CODE key…The CODE key makes it possible to input punctuation needed for a number ofdifferent languages. The following shows the key operations you should use foreach of the characters formed using the CODE key.
Key Operation Input Key Operation Input Key Operation Input
CODE U ÜCODE O ŒCODE P ÅCODE A ÆCODE J ÖCODE K ÄCODE L J
CODE Z W
CODE C ÇCODE N ÑCODE 1 ´CODE 2 `CODE 3 ¨CODE 4 ˜
■ CAPS on
CODE 5 ˆCODE 6 ˇCODE 7 °CODE 8 /CODE 9 ˝CODE 0 ˛
Example: To input á.
1. Press CODE.2. Press 1.3. Press A.
Special SymbolsYou can also access a menu of special symbols by pressing SYMBOL.(There are a total of 86 different symbols.)
To input special symbols1. With the cursor at the location where you want to input a special symbol,
press FUNC and then 4 (SYMBOL).• The symbol that is underlined on the display is the one that is currently selected.
,(
.)
:[
;]
•
{?}
! ‘< > << >>
<< >>’ “/ \”
$„
¢ £ Fr¿ ¡
2. Use the c, v, x and z cursor keys to move the underlining to the symbolyou want.
• Not all of the available symbols fit on the display. The menu will scroll whenyou press the cursor keys.
3. After you underline the symbol you want, press SET.• This returns to the input screen, with the symbol you selected input at the
location where the cursor was located when you displayed the symbol list.
Key Operation Input Key Operation Input Key Operation Input
CODE U üCODE O œCODE P åCODE A æCODE S ßCODE J öCODE K ä
CODE L j
CODE Z w
CODE C çCODE N ñCODE 1 ´CODE 2 `CODE 3 ¨
■ CAPS off
CODE 4 ˜CODE 5 ˆCODE 6 ˇCODE 7 °CODE 8 /CODE 9 ˝CODE 0 ˛

E-13
Using Text BlocksIn the example label shown below, “Promotion Plan” and “Retail Package SampleData” are independent units called “text blocks,” or simply “blocks.” You candivided your tape label text into blocks and then apply the following settings ona block-by-block basis.
• Number of text lines (page E-12)• Text alignment (page E-19)• Character pitch (page E-19)
Block 1 Block 2• Two lines (page E-12)
ExampleTo layout “Promotion Plan” and “Retail Package Sample Data” as separate blockswithin the same tape label
1. Input the text for the first block.• Here we will input “Promotion Plan”.
2. Press FUNC and then .• This inputs a “block mark,” which makes the text to the left of a block.
P r o tm i oo n P l a n B••••• • • • • • • • • • • •
Block markBlock marks appear on the displayonly. They are not printed on the tape.
3. Input the text for the next first block.• Here we will input “Retail Package”.
P r o tm i oo n P l aR e t ia l P ca ak g e
n• •
B
• To delete a block mark, move the cursor to the B symbol, and then press DEL.Note that you cannot delete a block mark by pressing the BS key.
• You can have up to three blocks inside of a single tape label layout.• You can also divide text you have already input into blocks. Simply move the
cursor to the location where you want to input a block mark, and then pressFUNC .
• Block marks cannot be input when FIX is selected for TAPE LENGTH. See“CLRS TAPE LNGTH SET/ESC” (page E-27) in “Error Messages/DisplayMessages” for more information.
The block mark is located here.(Nothing is printed at block mark locations.)
E-14
To delete characters using the DEL key
Example: To change the word “commmputer” to “computer”.
1. Use c and v to move the cursor under the first (far left) “m”.2. Press DEL twice to delete the two m’s at the cursor’s position, shifting “mputer”
to the left as you do.3. Press FUNC and then v to jump back to the end of the characters for more
input.
Clearing the DisplayUse the following procedure to clear all input text from the display.
To clear the displayPress FUNC and then DEL (CLS).At this time the message “CLEAR? SET/ESC” appears on the display to confirmthat you want to clear the display. Press SET to clear or ESC to abort the operationwithout clearing anything.
Text EditingYou can use the following procedures to edit text on the display.
To insert new characters
Example: To change the text “ABCDEF” to “ABCXYZDEF”.
1. With the original text on the display, move the cursor under the letter “D”.2. Input the new characters (XYZ).• Inputting the new characters causes them to be inserted at the cursor position.
The existing characters are opened up to make room for the new characters.
To change existing characters to different ones
Example: To change the text “ABCDEF” to “XYZDEF”.
1. With the original text on the display, use either the BS key or DEL key todelete the characters to be changed (ABC).
2. Input the new characters (XYZ).
Part 4 Deleting and Inserting Characters
This section describes everything you need to know about deleting and editingcharacters you have already input.
Moving the CursorUse the cursor keys to move the cursor around the display and position it fordeleting and editing characters.
To move the cursor• Press c to move the cursor to the left, and v to move the cursor to the right.• Press x to move the cursor to the up, and z to move the cursor to the down.• Press FUNC and then c to make the cursor jump to the beginning (far left) of
the characters on the display.• Press FUNC and then v to make the cursor jump to the end (far right) of the
characters on the display.• Holding down the c, v, x or z cursor key moves the cursor at high speed.
Deleting Individual CharactersYou can delete individual characters with either the BS key or the DEL key. Theonly difference between the operation of these two keys is the location of thecursor.
To delete characters using the BS key
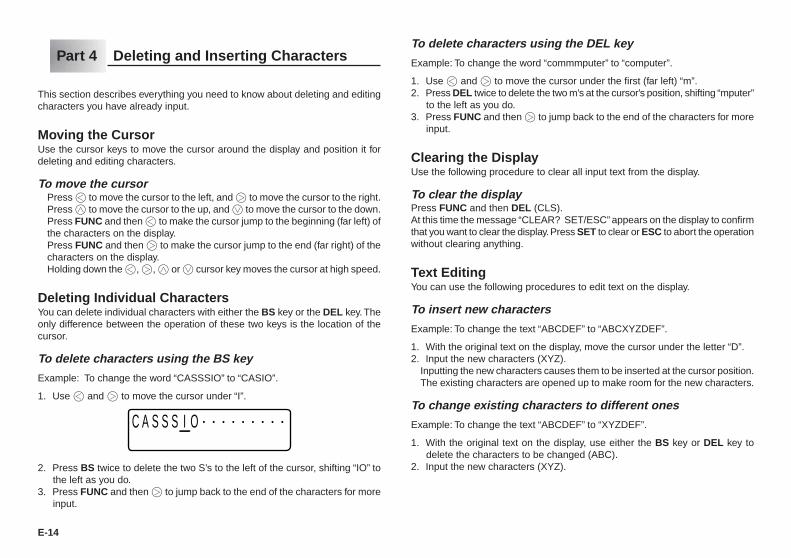
Example: To change the word “CASSSIO” to “CASIO”.
1. Use c and v to move the cursor under “I”.
C A S SS I O • • • • • • • • •
2. Press BS twice to delete the two S’s to the left of the cursor, shifting “IO” tothe left as you do.
3. Press FUNC and then v to jump back to the end of the characters for moreinput.
E-15
tape size
Part 5 Character Size, Text Effects and Character Styles
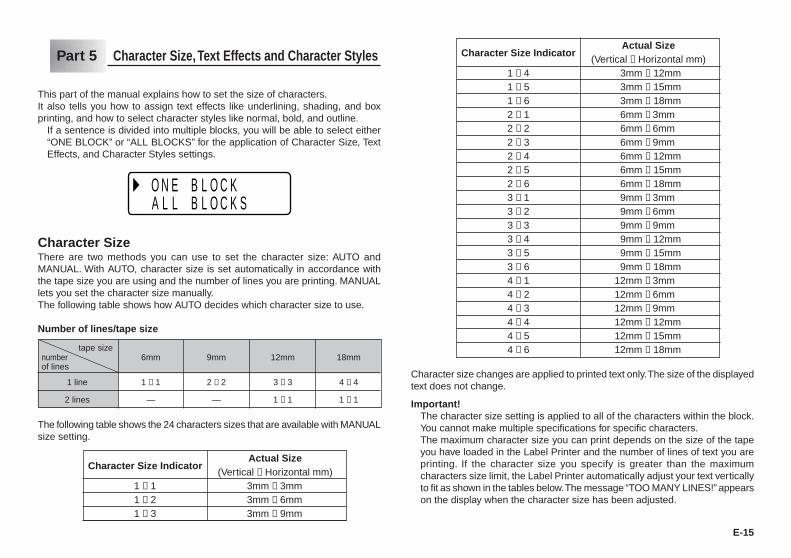
This part of the manual explains how to set the size of characters.It also tells you how to assign text effects like underlining, shading, and boxprinting, and how to select character styles like normal, bold, and outline.• If a sentence is divided into multiple blocks, you will be able to select either
“ONE BLOCK” or “ALL BLOCKS” for the application of Character Size, TextEffects, and Character Styles settings.
O E B L O C KB L O C K S
NLLA
Character SizeThere are two methods you can use to set the character size: AUTO andMANUAL. With AUTO, character size is set automatically in accordance withthe tape size you are using and the number of lines you are printing. MANUALlets you set the character size manually.The following table shows how AUTO decides which character size to use.
Number of lines/tape size
The following table shows the 24 characters sizes that are available with MANUALsize setting.
Character size changes are applied to printed text only. The size of the displayedtext does not change.
Important!• The character size setting is applied to all of the characters within the block.
You cannot make multiple specifications for specific characters.• The maximum character size you can print depends on the size of the tape
you have loaded in the Label Printer and the number of lines of text you areprinting. If the character size you specify is greater than the maximumcharacters size limit, the Label Printer automatically adjust your text verticallyto fit as shown in the tables below. The message “TOO MANY LINES!” appearson the display when the character size has been adjusted.
Character Size IndicatorActual Size
(Vertical × Horizontal mm)1 × 4 3mm × 12mm1 × 5 3mm × 15mm1 × 6 3mm × 18mm2 × 1 6mm × 3mm2 × 2 6mm × 6mm2 × 3 6mm × 9mm2 × 4 6mm × 12mm2 × 5 6mm × 15mm2 × 6 6mm × 18mm3 × 1 9mm × 3mm3 × 2 9mm × 6mm3 × 3 9mm × 9mm3 × 4 9mm × 12mm3 × 5 9mm × 15mm3 × 6 9mm × 18mm4 × 1 12mm × 3mm4 × 2 12mm × 6mm4 × 3 12mm × 9mm4 × 4 12mm × 12mm4 × 5 12mm × 15mm4 × 6 12mm × 18mm
6mm 9mm 12mm 18mm
1 line 1 × 1 2 × 2 3 × 3 4 × 4
2 lines — — 1 × 1 1 × 1
Character Size IndicatorActual Size
(Vertical × Horizontal mm)1 × 1 3mm × 3mm1 × 2 3mm × 6mm1 × 3 3mm × 9mm
numberof lines

E-16
Horizontal
1 2 3 4 5 6
1 1 × 1 1 × 2 1 × 3 1 × 4 1 × 5 1 × 6
2 1 × 1 1 × 2 1 × 3 1 × 4 1 × 5 1 × 6
3 1 × 1 1 × 2 1 × 3 1 × 4 1 × 5 1 × 6
4 1 × 1 1 × 2 1 × 3 1 × 4 1 × 5 1 × 6
Ver
tical
Horizontal
1 2 3 4 5 6
1 1 × 1 1 × 2 1 × 3 1 × 4 1 × 5 1 × 6
2 2 × 1 2 × 2 2 × 3 2 × 4 2 × 5 2 × 6
3 3 × 1 3 × 2 3 × 3 3 × 4 3 × 5 3 × 6
4* 4 × 1 4 × 2 4 × 3 4 × 4 4 × 5 4 × 6
Ver
tical
Horizontal
1 2 3 4 5 6
1 1 × 1 1 × 2 1 × 3 1 × 4 1 × 5 1 × 6
2 1 × 1 1 × 2 1 × 3 1 × 4 1 × 5 1 × 6
3 1 × 1 1 × 2 1 × 3 1 × 4 1 × 5 1 × 6
4 1 × 1 1 × 2 1 × 3 1 × 4 1 × 5 1 × 6V
ertic
al
6mm (1 line)
9mm (1 line)
12mm (1 line)
Horizontal
1 2 3 4 5 6
1 1 × 1 1 × 2 1 × 3 1 × 4 1 × 5 1 × 6
2 1 × 1 1 × 2 1 × 3 1 × 4 1 × 5 1 × 6
3 1 × 1 1 × 2 1 × 3 1 × 4 1 × 5 1 × 6
4 1 × 1 1 × 2 1 × 3 1 × 4 1 × 5 1 × 6
Ver
tical
Horizontal
1 2 3 4 5 6
1 1 × 1 1 × 2 1 × 3 1 × 4 1 × 5 1 × 6
2 2 × 1 2 × 2 2 × 3 2 × 4 2 × 5 2 × 6
3 2 × 1 2 × 2 2 × 3 2 × 4 2 × 5 2 × 6
4 2 × 1 2 × 2 2 × 3 2 × 4 2 × 5 2 × 6
Ver
tical
Horizontal
1 2 3 4 5 6
1 1 × 1 1 × 2 1 × 3 1 × 4 1 × 5 1 × 6
2 2 × 1 2 × 2 2 × 3 2 × 4 2 × 5 2 × 6
3 3 × 1 3 × 2 3 × 3 3 × 4 3 × 5 3 × 6
4 3 × 1 3 × 2 3 × 3 3 × 4 3 × 5 3 × 6
Ver
tical
12mm (2 lines)
18mm (1 line)
* At this size, certain text effects can cause closely spaced lines of text to overlap.
18mm (2 lines)
Important!• Whenever a horizontal size of 1 is being used, the lines of certain character
styles can become broken.
E-17
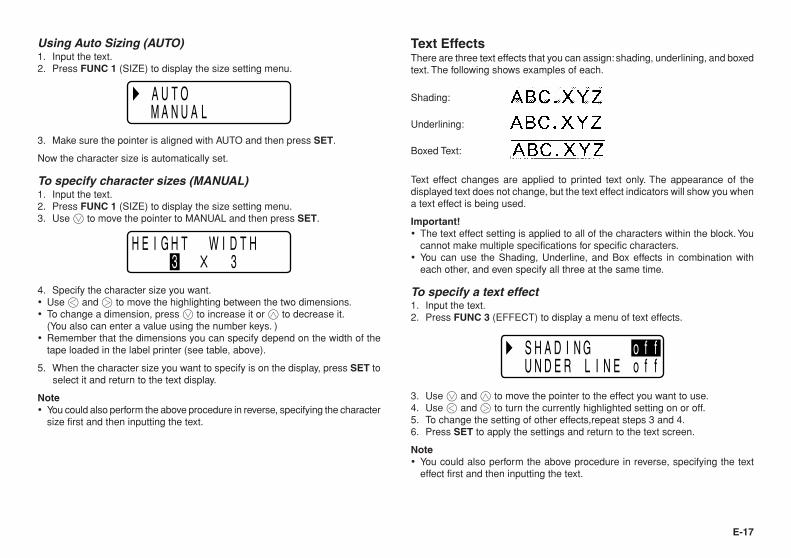
Using Auto Sizing (AUTO)1. Input the text.2. Press FUNC 1 (SIZE) to display the size setting menu.
A T OA LU
UNAM
3. Make sure the pointer is aligned with AUTO and then press SET.
Now the character size is automatically set.
To specify character sizes (MANUAL)1. Input the text.2. Press FUNC 1 (SIZE) to display the size setting menu.3. Use z to move the pointer to MANUAL and then press SET.
I H T✕
GH E D HTW I33
4. Specify the character size you want.• Use c and v to move the highlighting between the two dimensions.• To change a dimension, press z to increase it or x to decrease it.
(You also can enter a value using the number keys. )• Remember that the dimensions you can specify depend on the width of the
tape loaded in the label printer (see table, above).
5. When the character size you want to specify is on the display, press SET toselect it and return to the text display.
Note• You could also perform the above procedure in reverse, specifying the character
size first and then inputting the text.
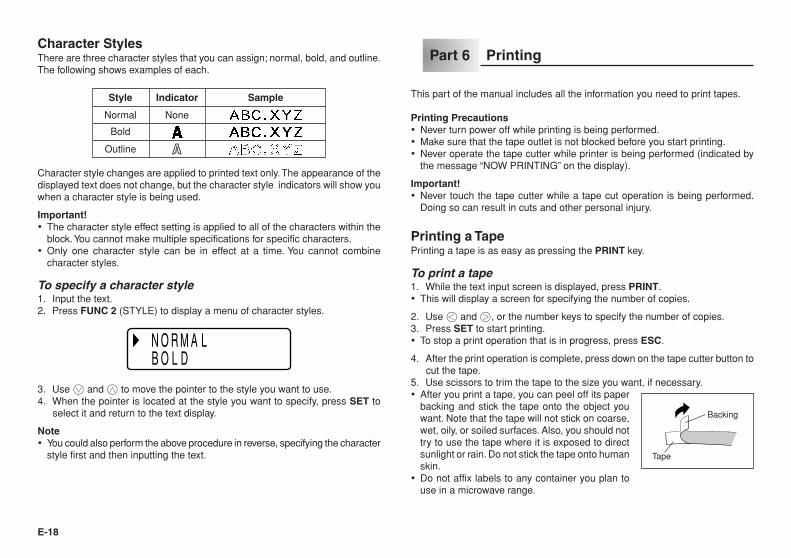
Text EffectsThere are three text effects that you can assign: shading, underlining, and boxedtext. The following shows examples of each.
Shading:
Underlining:
Boxed Text:
Text effect changes are applied to printed text only. The appearance of thedisplayed text does not change, but the text effect indicators will show you whena text effect is being used.
Important!• The text effect setting is applied to all of the characters within the block. You
cannot make multiple specifications for specific characters.• You can use the Shading, Underline, and Box effects in combination with
each other, and even specify all three at the same time.
To specify a text effect1. Input the text.2. Press FUNC 3 (EFFECT) to display a menu of text effects.
S A D I N GR L I N EE
HDNU
o f fo f f
3. Use z and x to move the pointer to the effect you want to use.4. Use c and v to turn the currently highlighted setting on or off.5. To change the setting of other effects,repeat steps 3 and 4.6. Press SET to apply the settings and return to the text screen.
Note• You could also perform the above procedure in reverse, specifying the text
effect first and then inputting the text.
E-18
Tape
Backing
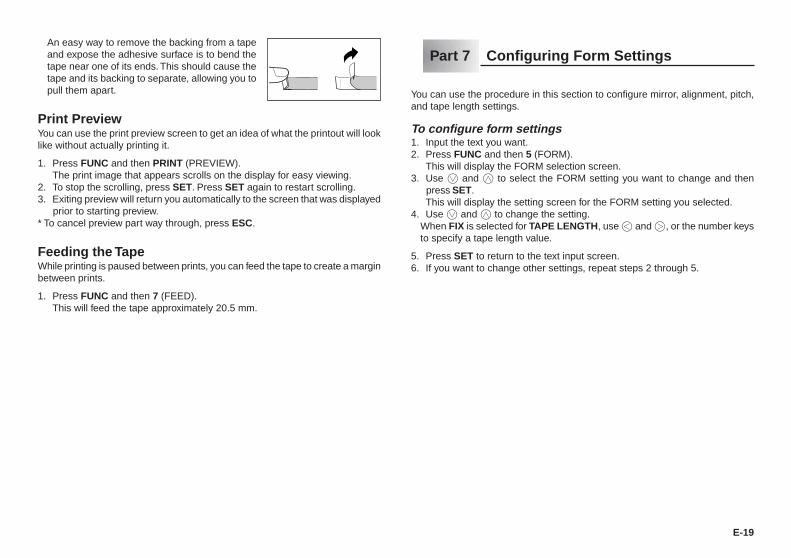
Character StylesThere are three character styles that you can assign; normal, bold, and outline.The following shows examples of each.
Style Indicator Sample
Normal None
Bold
Outline
Character style changes are applied to printed text only. The appearance of thedisplayed text does not change, but the character style indicators will show youwhen a character style is being used.
Important!• The character style effect setting is applied to all of the characters within the
block. You cannot make multiple specifications for specific characters.• Only one character style can be in effect at a time. You cannot combine
character styles.
To specify a character style1. Input the text.2. Press FUNC 2 (STYLE) to display a menu of character styles.
N R M A LD
OLOB
3. Use z and x to move the pointer to the style you want to use.4. When the pointer is located at the style you want to specify, press SET to
select it and return to the text display.
Note• You could also perform the above procedure in reverse, specifying the character
style first and then inputting the text.
Part 6 Printing
This part of the manual includes all the information you need to print tapes.
Printing Precautions• Never turn power off while printing is being performed.• Make sure that the tape outlet is not blocked before you start printing.• Never operate the tape cutter while printer is being performed (indicated by
the message “NOW PRINTING” on the display).
Important!• Never touch the tape cutter while a tape cut operation is being performed.
Doing so can result in cuts and other personal injury.
Printing a TapePrinting a tape is as easy as pressing the PRINT key.
To print a tape1. While the text input screen is displayed, press PRINT.• This will display a screen for specifying the number of copies.
2. Use c and v, or the number keys to specify the number of copies.3. Press SET to start printing.• To stop a print operation that is in progress, press ESC.
4. After the print operation is complete, press down on the tape cutter button tocut the tape.
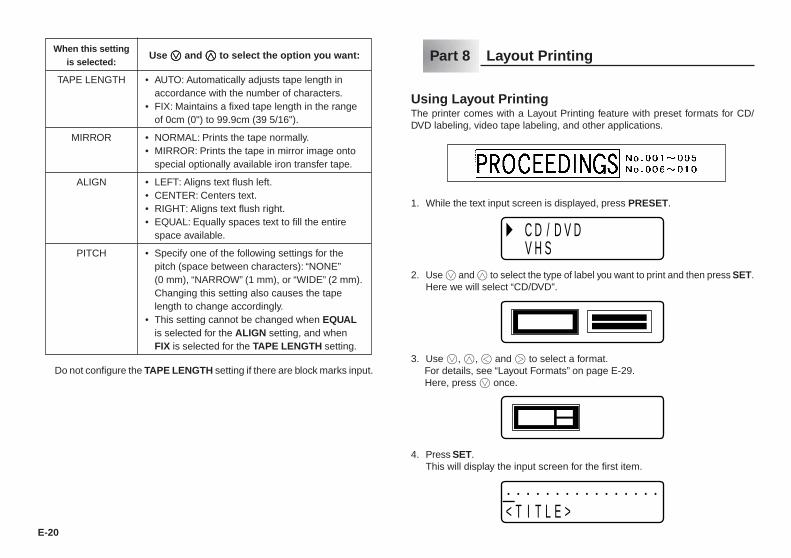
5. Use scissors to trim the tape to the size you want, if necessary.• After you print a tape, you can peel off its paper
backing and stick the tape onto the object youwant. Note that the tape will not stick on coarse,wet, oily, or soiled surfaces. Also, you should nottry to use the tape where it is exposed to directsunlight or rain. Do not stick the tape onto humanskin.
• Do not affix labels to any container you plan touse in a microwave range.
E-19
• An easy way to remove the backing from a tapeand expose the adhesive surface is to bend thetape near one of its ends. This should cause thetape and its backing to separate, allowing you topull them apart.
Print PreviewYou can use the print preview screen to get an idea of what the printout will looklike without actually printing it.
1. Press FUNC and then PRINT (PREVIEW).The print image that appears scrolls on the display for easy viewing.
2. To stop the scrolling, press SET. Press SET again to restart scrolling.3. Exiting preview will return you automatically to the screen that was displayed
prior to starting preview.* To cancel preview part way through, press ESC.
Feeding the TapeWhile printing is paused between prints, you can feed the tape to create a marginbetween prints.
1. Press FUNC and then 7 (FEED).This will feed the tape approximately 20.5 mm.
Part 7 Configuring Form Settings
You can use the procedure in this section to configure mirror, alignment, pitch,and tape length settings.
To configure form settings1. Input the text you want.2. Press FUNC and then 5 (FORM).
This will display the FORM selection screen.3. Use z and x to select the FORM setting you want to change and then
press SET.This will display the setting screen for the FORM setting you selected.
4. Use z and x to change the setting.• When FIX is selected for TAPE LENGTH, use c and v, or the number keys
to specify a tape length value.
5. Press SET to return to the text input screen.6. If you want to change other settings, repeat steps 2 through 5.
E-20
When this settingis selected:
TAPE LENGTH
MIRROR
ALIGN
PITCH
Use zzzzz and xxxxx to select the option you want:
• AUTO: Automatically adjusts tape length inaccordance with the number of characters.
• FIX: Maintains a fixed tape length in the rangeof 0cm (0") to 99.9cm (39 5/16").
• NORMAL: Prints the tape normally.• MIRROR: Prints the tape in mirror image onto
special optionally available iron transfer tape.
• LEFT: Aligns text flush left.• CENTER: Centers text.• RIGHT: Aligns text flush right.• EQUAL: Equally spaces text to fill the entire
space available.
• Specify one of the following settings for thepitch (space between characters): “NONE”(0 mm), “NARROW” (1 mm), or “WIDE” (2 mm).Changing this setting also causes the tapelength to change accordingly.
• This setting cannot be changed when EQUALis selected for the ALIGN setting, and whenFIX is selected for the TAPE LENGTH setting.
Part 8 Layout Printing
Using Layout PrintingThe printer comes with a Layout Printing feature with preset formats for CD/DVD labeling, video tape labeling, and other applications.
1. While the text input screen is displayed, press PRESET.
C / D V DDSHV
2. Use z and x to select the type of label you want to print and then press SET.Here we will select “CD/DVD”.
3. Use z, x, c and v to select a format. For details, see “Layout Formats” on page E-29. Here, press z once.
4. Press SET.This will display the input screen for the first item.
< T I LT E >• • • • • • •• • • • • • • • •
• Do not configure the TAPE LENGTH setting if there are block marks input.
E-21
Part 9 Memory
This part of the manual tells you how to store text data in memory for instantrecall when you need it. You can store two blocks of text in memory, containingup of 80 characters.
Important!• All data stored in memory is deleted whenever batteries go dead and when
you replace batteries. Be sure to keep written backup copies of all importantdata.
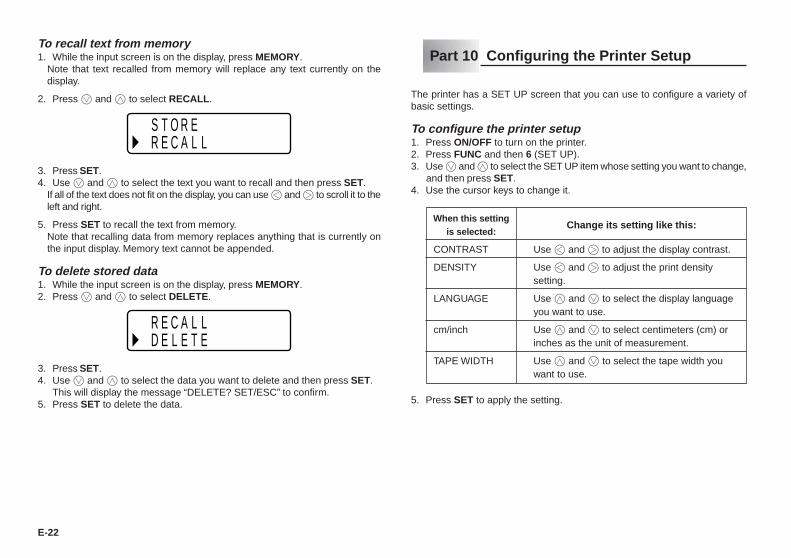
To store data1. Input the text you want to store.2. Press MEMORY.3. Press z and x to select STORE.
S O ERLA L
TCER
4. Press SET.5. Use z and x to select the location of the data you want to store.6. Press SET to store the text in memory or ESC to abort the store procedure
without storing anything.• If there is nothing in memory yet, pressing SET stores your text.• If there is already text stored in memory, the message “OVERWRITE? SET/
ESC” appears when you press SET. Press SET again to replace the existingtext with the new text, or ESC to cancel the store operation.
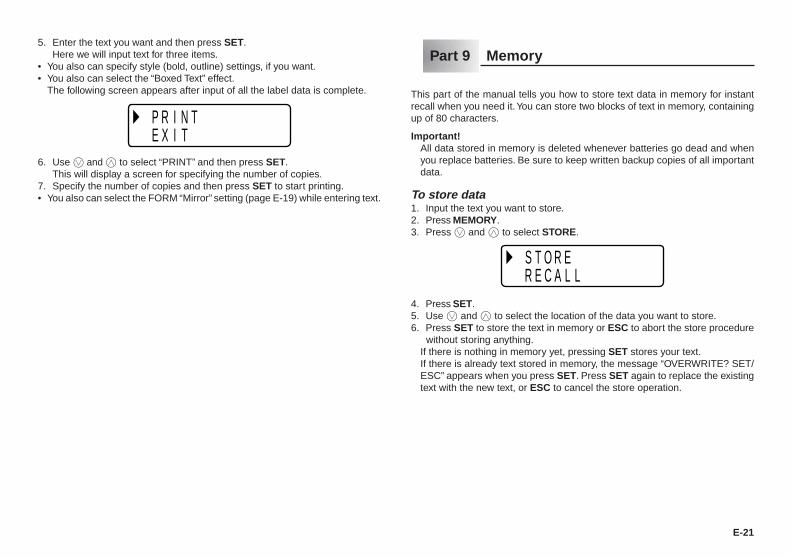
5. Enter the text you want and then press SET.Here we will input text for three items.
• You also can specify style (bold, outline) settings, if you want.• You also can select the “Boxed Text” effect.
The following screen appears after input of all the label data is complete.
P I N TT
RIXE
6. Use z and x to select “PRINT” and then press SET.This will display a screen for specifying the number of copies.
7. Specify the number of copies and then press SET to start printing.• You also can select the FORM “Mirror” setting (page E-19) while entering text.
E-22
To recall text from memory1. While the input screen is on the display, press MEMORY.• Note that text recalled from memory will replace any text currently on the
display.
2. Press z and x to select RECALL.
S O ERLA L
TCER
3. Press SET.4. Use z and x to select the text you want to recall and then press SET.• If all of the text does not fit on the display, you can use c and v to scroll it to the
left and right.
5. Press SET to recall the text from memory.• Note that recalling data from memory replaces anything that is currently on
the input display. Memory text cannot be appended.
To delete stored data1. While the input screen is on the display, press MEMORY.2. Press z and x to select DELETE.
TE ELEDLA LCER
3. Press SET.4. Use z and x to select the data you want to delete and then press SET.
This will display the message “DELETE? SET/ESC” to confirm.5. Press SET to delete the data.
Part 10 Configuring the Printer Setup
The printer has a SET UP screen that you can use to configure a variety ofbasic settings.
To configure the printer setup1. Press ON/OFF to turn on the printer.2. Press FUNC and then 6 (SET UP).3. Use z and x to select the SET UP item whose setting you want to change,
and then press SET.4. Use the cursor keys to change it.
When this settingis selected:
CONTRAST
DENSITY
LANGUAGE
cm/inch
TAPE WIDTH
Change its setting like this:
• Use c and v to adjust the display contrast.
• Use c and v to adjust the print densitysetting.
• Use x and z to select the display languageyou want to use.
• Use x and z to select centimeters (cm) orinches as the unit of measurement.
• Use x and z to select the tape width youwant to use.
5. Press SET to apply the setting.
E-23
Demo PrintingDemo printing uses built-in data to demonstrate the type of tape label printingthat can be performed by the printer.
Important!• If there is label data from your last label layout session is still in memory,
performing a demo print will delete it. If you think you will need the data later,save it in memory (page E-21) before performing a demo print.
1. Make sure a tape cartridge is loaded in the printer.2. If the printer is on, press ON/OFF to turn it off.3. Press ON/OFF to turn on the printer.4. Use z and x to select the width of the tape you will use and then press
SET.5. Press FUNC and then 6 (SET UP).6. Use x and z to select DEMO PRINT, and then press SET.7. Use x and z to select PRINT, and then press SET.8. Confirm that 1 is specified for the number of copies.• You can change the number of copies if you want.
9. Press SET to start printing.• The demo print contents depend on the width of the tape cartridge currently
loaded in the printer.
10. After printing is complete, use x and z to select EXIT, and then pressSET.
11. In response to the confirmation message that appears, press SET.
Part 11 Reference
This section contains information about the Label Printer that you can use asreference when you need it.
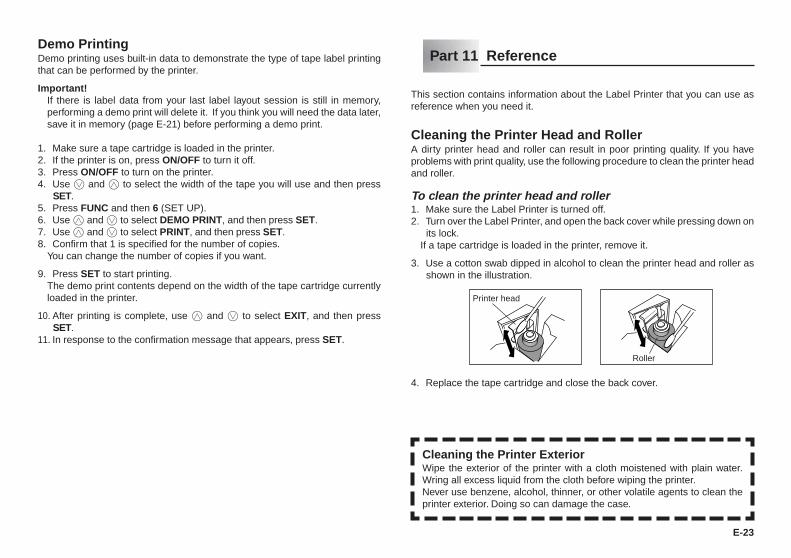
Cleaning the Printer Head and RollerA dirty printer head and roller can result in poor printing quality. If you haveproblems with print quality, use the following procedure to clean the printer headand roller.
To clean the printer head and roller1. Make sure the Label Printer is turned off.2. Turn over the Label Printer, and open the back cover while pressing down on
its lock.• If a tape cartridge is loaded in the printer, remove it.
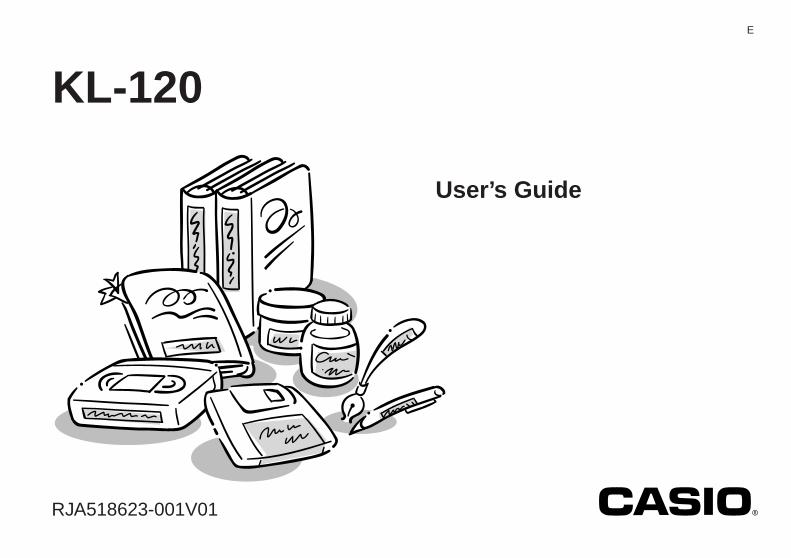
3. Use a cotton swab dipped in alcohol to clean the printer head and roller asshown in the illustration.
4. Replace the tape cartridge and close the back cover.
Roller
Printer head
Cleaning the Printer ExteriorWipe the exterior of the printer with a cloth moistened with plain water.Wring all excess liquid from the cloth before wiping the printer.Never use benzene, alcohol, thinner, or other volatile agents to clean theprinter exterior. Doing so can damage the case.
E-24
Initializing the Label PrinterIf you experience serious malfunction of the Label Printer or if operation failscompletely, try performing the following operation to initialize the printer.
Important!• Initializing the Label Printer deletes all memory contents. Make sure you have
a back-up copy of text stored in memory if you need it.
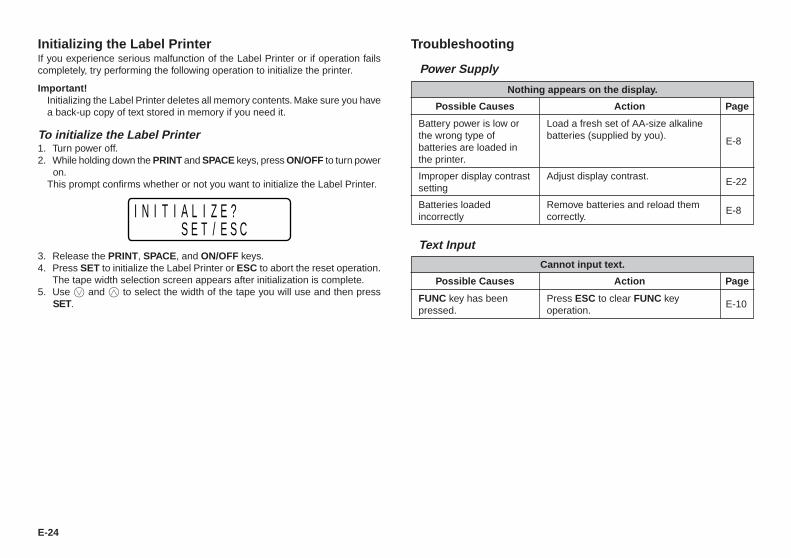
To initialize the Label Printer1. Turn power off.2. While holding down the PRINT and SPACE keys, press ON/OFF to turn power
on.• This prompt confirms whether or not you want to initialize the Label Printer.
I N I IT AS
LE
IT
Z/
EE
?S C
3. Release the PRINT, SPACE, and ON/OFF keys.4. Press SET to initialize the Label Printer or ESC to abort the reset operation.
The tape width selection screen appears after initialization is complete.5. Use z and x to select the width of the tape you will use and then press
SET. FUNC key has beenpressed.
Press ESC to clear FUNC keyoperation.
E-10
Troubleshooting
••••• Power Supply
Load a fresh set of AA-size alkalinebatteries (supplied by you).
Adjust display contrast.
Remove batteries and reload themcorrectly.
Nothing appears on the display.
Possible Causes Action Page
E-8
E-22
E-8
Battery power is low orthe wrong type ofbatteries are loaded inthe printer.
Improper display contrastsetting
Batteries loadedincorrectly
••••• Text Input
Cannot input text.
Possible Causes Action Page

E-25
Tape cartridgecompartment cover is notclosed completely.
No more tape left in thecartridge.
Tape jam
Securely close the cover.
Replace the tape cartridge with anew one.
Remove the tape cartridge and pullout the jammed tape by hand. Cut offexcess tape with scissors, andcarefully replace the cartridge intothe label printer.
Important!Never allow the tape outlet tobecome blocked and never touchtape as it is being fed during printing.
Tape does not come out when PRINT is pressed.
Possible Causes Action Page
E-9
E-9
E-9
Printing is blurred, blotched, broken, etc.
Possible Causes Action Page
Improper print densitysetting
Improper loading of thecartridge
Dirty printer head orrubber roller
Adjust the print density setting.
Remove the tape cartridge andreload it correctly.
Clean the printer head and roller.
E-22
E-9
E-23
Tape comes out when PRINT is pressed, but nothing is printed on it.
Possible Causes Action Page
Only blank spaces wereinput.
Input the text you want to print. E-10
••••• Printing
Remove the tape cartridge and checkto make sure the ink ribbon is notbroken. Next, take up any slack in theink ribbon and then reload the tapecartridge.
Important!• Before loading a tape cartridge into
the label printer, always make sureyou take up any slack in the inkribbon first.
• If the ink ribbon is broken, youmust change to another tapecartridge.
Tape cartridge loadedwhile the ink ribbon isslack.
Ink ribbon is being fed from the tape outlet along with the tape.
Possible Causes Action Page
E-9
Load a fresh set of AA-size alkalinebatteries (supplied by you).
Battery power is low orthe wrong type ofbatteries are loaded inthe printer.
Printer powers down while printing is in progress.
Possible Causes Action Page
E-8
E-26
••••• Using Labels
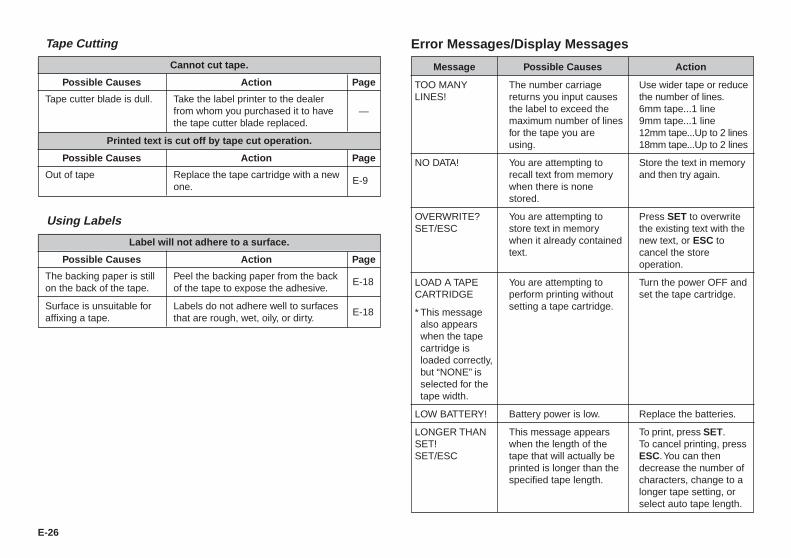
Label will not adhere to a surface.
Possible Causes Action Page
Peel the backing paper from the backof the tape to expose the adhesive.
Labels do not adhere well to surfacesthat are rough, wet, oily, or dirty.
The backing paper is stillon the back of the tape.
Surface is unsuitable foraffixing a tape.
E-18
E-18
Message
TOO MANYLINES!
NO DATA!
OVERWRITE?SET/ESC
LOAD A TAPECARTRIDGE
* This messagealso appearswhen the tapecartridge isloaded correctly,but “NONE” isselected for thetape width.
LOW BATTERY!
LONGER THANSET!SET/ESC
Possible Causes
• The number carriagereturns you input causesthe label to exceed themaximum number of linesfor the tape you areusing.
• You are attempting torecall text from memorywhen there is nonestored.
• You are attempting tostore text in memorywhen it already containedtext.
• You are attempting toperform printing withoutsetting a tape cartridge.
• Battery power is low.
• This message appearswhen the length of thetape that will actually beprinted is longer than thespecified tape length.
Action
• Use wider tape or reducethe number of lines.6mm tape...1 line9mm tape...1 line12mm tape...Up to 2 lines18mm tape...Up to 2 lines
• Store the text in memoryand then try again.
• Press SET to overwritethe existing text with thenew text, or ESC tocancel the storeoperation.
• Turn the power OFF andset the tape cartridge.
• Replace the batteries.
• To print, press SET.• To cancel printing, press
ESC. You can thendecrease the number ofcharacters, change to alonger tape setting, orselect auto tape length.
Error Messages/Display Messages
Cannot cut tape.
Possible Causes Action Page
Tape cutter blade is dull. Take the label printer to the dealerfrom whom you purchased it to havethe tape cutter blade replaced.
—
Printed text is cut off by tape cut operation.
Possible Causes Action Page
Replace the tape cartridge with a newone.
Out of tapeE-9
••••• Tape Cutting

E-27
Message
DATA ERROR!
NO INPUT TEXT!
PRINT ERROR!
TOO MANYCHARACTERS!
Possible Causes
• Data in memory hasbecome corrupted forsome reason.
• You are attempting a printor preview operationwhen no text are input.
• The tape became jammedduring printing.
• You are attempting toinput more than80 characters into text.
• The number of charactersyou are trying to inputwhile using LayoutPrinitng exceeds themaximum number ofallowable characters.
Action
• Press any key besidesON/OFF to clear theerror message. Inresponse to the“INITIALIZE THEPRINTER!” messagethat appears, press anykey besides ON/OFF toinitialize the LabelPrinter.
• Input the text and thentry again.
• Turn off the printer andremove the tapecartridge. Next, removethe jammed tape.
* If the steps describedabove do not clear theerror message, contactyour retailer or yournearest CASIO servicecenter.
• Reduce the number ofcharacters in thesentence.
Message
TOO MANYBLOCKS!
LOAD A TAPE12mm ORWIDER
CLRS TAPELNGTHSET/ESC
Possible Causes
• You are attempting toinput more than two blockmarks ( B ) into text.
• A 6mm or 9mm tapecartridge was loaded inthe printer while a 2-lineor 2-block format isselected for LayoutPrinting.
• You are attempting toinput a block mark whileFIX is selected for TAPELENGTH.
Action
• Use only one or twoblock marks ( B ) in asingle sentence.
• Turn off the printer andreplace the tapecartridge with one that is12mm or wider.
• If you want to cancel theTAPE LENGTH settingand input a block mark,press SET. If you do notwant to input a blockmark, press ESC.
E-28
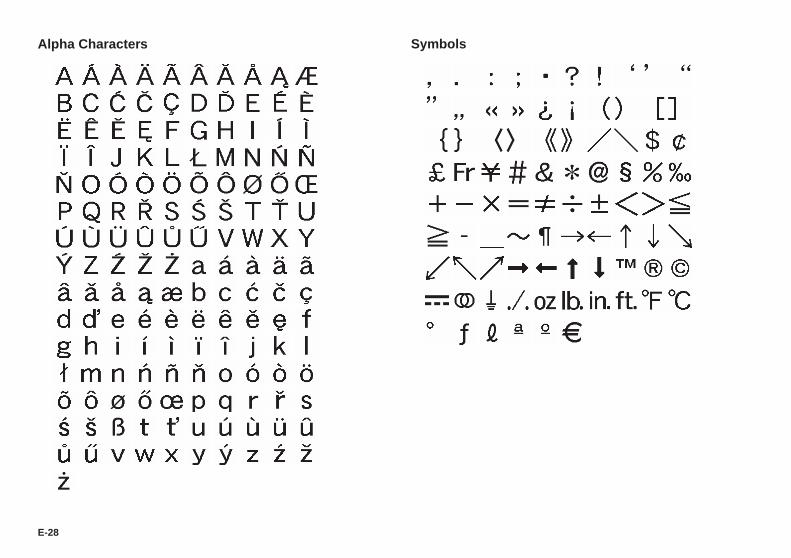
Alpha Characters Symbols

E-29
Type
CD/DVD
VHS
mini DV
MD/FD/MO
Input Item
TITLE
TITLE
COMMENT
TITLE
COMMENT1
COMMENT2
TITLE
TITLE
COMMENT
TITLE
COMMENT1
COMMENT2
TITLE
TITLE
COMMENT
TITLE
COMMENT1
COMMENT2
TITLE
TITLE
COMMENT
TITLE
COMMENT1
COMMENT2
MaximumNumber
25
25
25
16
16
16
24
36
36
15
13
13
17
17
17
10
6
6
21
21
21
12
8
8
TAPE Width (mm)18 12 9 6
– –
– –
– –
– –
– –
– –
– –
– –
Format
Layout Formats
Type
CASSETTE
FILE
Input Item
TITLE
TITLE
COMMENT
TITLE
COMMENT1
COMMENT2
TITLE
TITLE
COMMENT
TITLE
COMMENT1
COMMENT2
MaximumNumber
20
20
20
24
14
14
31
31
31
22
13
13
TAPE Width (mm)18 12 9 6
– –
– –
– –
– –
Format
E-30
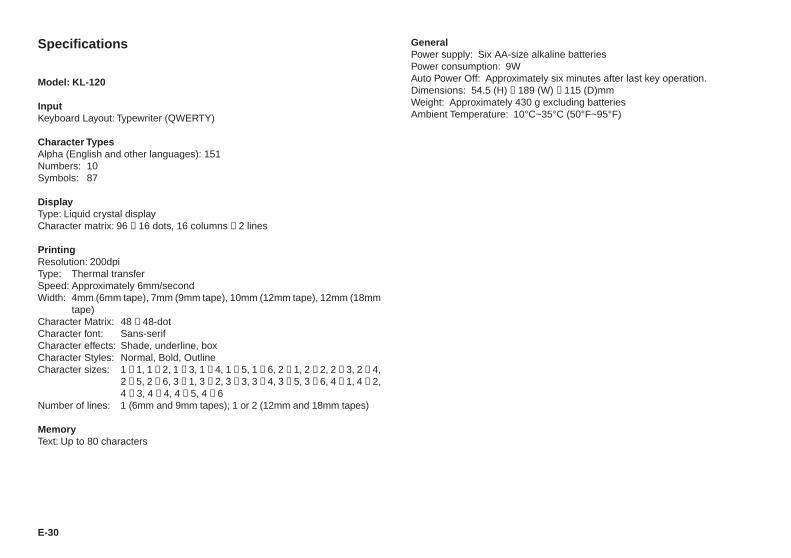
Specifications
Model: KL-120
InputKeyboard Layout: Typewriter (QWERTY)
Character TypesAlpha (English and other languages): 151Numbers: 10Symbols: 87
DisplayType: Liquid crystal displayCharacter matrix: 96 × 16 dots, 16 columns × 2 lines
PrintingResolution: 200dpiType: Thermal transferSpeed: Approximately 6mm/secondWidth: 4mm (6mm tape), 7mm (9mm tape), 10mm (12mm tape), 12mm (18mm
tape)Character Matrix: 48 × 48-dotCharacter font: Sans-serifCharacter effects: Shade, underline, boxCharacter Styles: Normal, Bold, OutlineCharacter sizes: 1 × 1, 1 × 2, 1 × 3, 1 × 4, 1 × 5, 1 × 6, 2 × 1, 2 × 2, 2 × 3, 2 × 4,
2 × 5, 2 × 6, 3 × 1, 3 × 2, 3 × 3, 3 × 4, 3 × 5, 3 × 6, 4 × 1, 4 × 2,4 × 3, 4 × 4, 4 × 5, 4 × 6
Number of lines: 1 (6mm and 9mm tapes); 1 or 2 (12mm and 18mm tapes)
MemoryText: Up to 80 characters
GeneralPower supply: Six AA-size alkaline batteriesPower consumption: 9WAuto Power Off: Approximately six minutes after last key operation.Dimensions: 54.5 (H) × 189 (W) × 115 (D)mmWeight: Approximately 430 g excluding batteriesAmbient Temperature: 10°C~35°C (50°F~95°F)

CASIO COMPUTER CO., LTD.6-2, Hon-machi 1-chome
Shibuya-ku, Tokyo 151-8543, Japan
MO0805-A Printed in China/Imprimé en Chine