Embed Size (px)
Citation preview
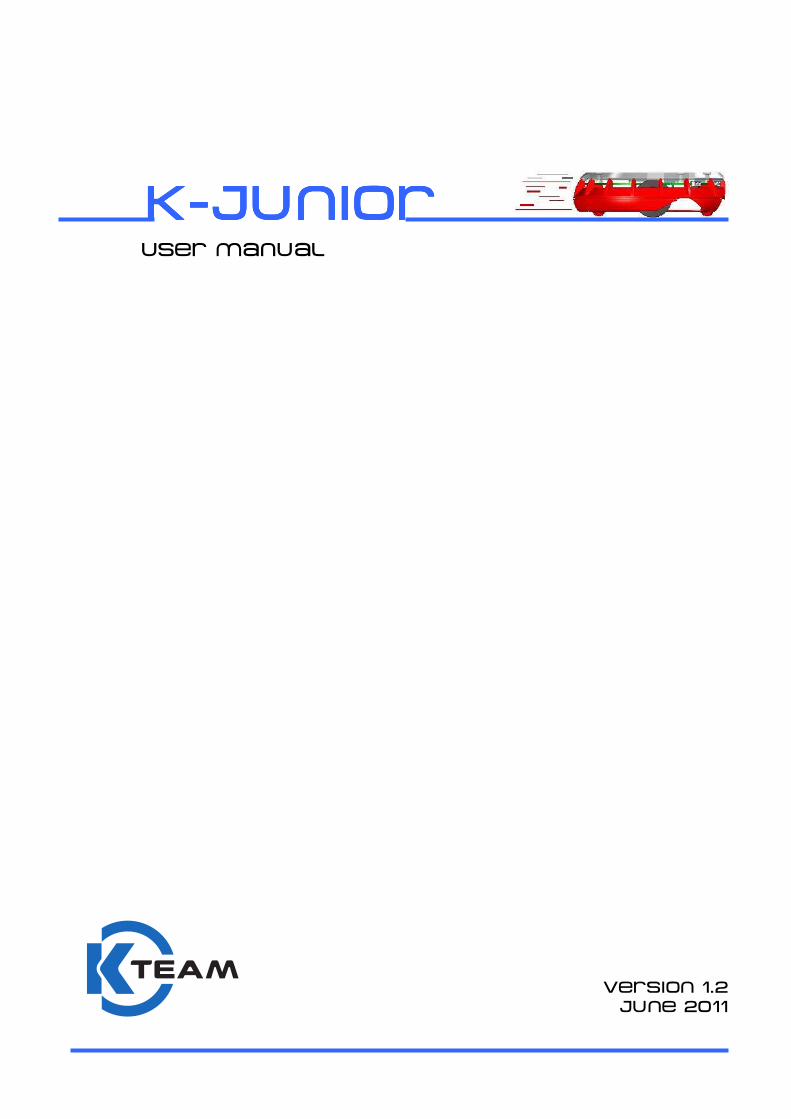
KKKK----JuniorJuniorJuniorJunior
User manual
Version 1.2
June 2011

K-Junior User Manual rev 1.2 2
K-Junior User Manual rev 1.2 3
Documentation Author Frederic Lambercy K-Team S.A. Rue Galilee 9, Y-Park 1400 Yverdon-les-Bains Switzerland Email: [email protected] Url: www.k-team.com Trademark Acknowledgements: IBM PC: International Business Machines Corp. Macintosh: Apple Corp. SUN Sparc-Station: SUN Microsystems Corp. LabVIEW: National Instruments Corp. Matlab: MathWorks Corp. Khepera: K-Team and LAMI LEGAL NOTICE:
• The contents of this manual are subject to change without notice • All efforts have been made to ensure the accuracy of the content of this manual.
However, should any error be detected, please inform K-Team. • The above notwithstanding, K-Team can assume no responsibility for any error in this
manual.
K-Junior User Manual rev 1.2 4
TABLE OF CONTENTS
1 INTRODUCTION................................................................................................... 6
1.1 THE K-JUNIOR STORY ................................................................................................. 6 1.2 HOW TO USE THIS HANDBOOK..................................................................................... 6 1.3 SAFETY PRECAUTIONS................................................................................................. 7 1.4 RECYCLING ................................................................................................................. 7
2 UNPACKING AND INSPECTION...................................................................... 8
2.1 PACKAGE CONTENT .................................................................................................... 8 2.2 FIRST START-UP.......................................................................................................... 9
3 THE ROBOT AND ITS ACCESSORIES...................................................... 10
3.1 GLOBAL VIEW........................................................................................................... 10 3.2 THE K-JUNIOR ROBOT............................................................................................... 11
3.2.1 Microprocessor ................................................................................................ 11 3.2.2 LEDs................................................................................................................. 11 3.2.3 Buzzer ............................................................................................................... 11 3.2.4 IR Remote Control and communication ........................................................... 11 3.2.5 Switches ............................................................................................................ 12 3.2.6 Infra-red sensors .............................................................................................. 12 3.2.7 Bluetooth communication................................................................................. 14 3.2.8 USB communication ......................................................................................... 14 3.2.9 Battery .............................................................................................................. 14 3.2.10 Drive mechanism.............................................................................................. 15
3.3 ACCESSORIES............................................................................................................ 16 3.3.1 Mini USB cable ................................................................................................ 16 3.3.2 Felt Pen ............................................................................................................ 16 3.3.3 Pen to configure Dip Switch............................................................................. 16 3.3.4 Universal USB charger (Deluxe pack only)..................................................... 17 3.3.5 Webots-K-Junior (Deluxe pack only) ............................................................... 17
3.4 EXTENSIONS.............................................................................................................. 17 3.4.1 HemLinCam ..................................................................................................... 18 3.4.2 HemGenIO ....................................................................................................... 18 3.4.3 HemTextToSpeech ............................................................................................ 19 3.4.4 HemUltraSonicSensor ...................................................................................... 19 3.4.5 HemGripper ..................................................................................................... 20 3.4.6 HemWirelessCam ............................................................................................. 20
K-Junior User Manual rev 1.2 5
4 RUNNING MODES........................................................................................ 21
4.1 REMOTE CONTROL.................................................................................................... 21 4.2 OBSTACLE AND FALL AVOIDANCE ............................................................................ 22 4.3 LINE FOLLOWING ...................................................................................................... 22 4.4 DANCE ...................................................................................................................... 23 4.5 BOT-STUDIO EXECUTION .......................................................................................... 23 4.6 USB SERIAL PORT CONTROL.................................................................................... 24 4.7 BLUETOOTH COMMUNICATION CONTROL................................................................. 26 4.8 INFRA-RED REMOTE CONTROL ................................................................................. 27 4.9 IR EMITTER, SHORT RANGE COMMUNICATION........................................................... 28 4.10 SOFTWARE TOOLS FOR K-JUNIOR ............................................................................. 29
5 REPROGRAMMING K-JUNIOR....................................................................... 30
5.1 K-JUNIOR UPLOADER (TINY BOOTLOADER SOFTWARE) ........................................... 30 5.2 CCS C COMPILER...................................................................................................... 31 5.3 GETTING STARTED REPROGRAMMING........................................................................ 31 5.4 OTHERS..................................................................................................................... 31
A COMMUNICATION PROTOCOL..................................................................... 32
B EXTENSION CONNECTORS............................................................................ 38
C ELECTRONIC SHEMATICS............................................................................. 39
D WARRANTY....................................................................................................... 41
K-Junior User Manual rev 1.2 6
1 INTRODUCTION
Thank you for buying K-Junior. K-Junior will initiate your experience to the extraordinary world of mobile robotics. Thanks to its wealth of sensors, motors and its software openness, you will be able to create complex behaviour, making you an expert of this promising technology. 1.1 The K-Junior Story
K-Junior was developed to replace the actual Hemisson robot which was based on a result from extra-curricular activities of students at the Swiss Institute of Technology (EPFL). The K-Junior is essentially for the education and to learn the base of mobile robotics and programming. The meaning of this new robot was to remove the weakness of the Hemisson and add news features to match with the student and teachers interest.
To simplify the learning, the software was developed on the same base as Hemisson
and all extension turrets are compatible with the new K-Junior Robot. All Hemisson’s user will be able to upgrade their robot without changing their extensions and learning easily the use of the K-Junior.
1.2 How to use this handbook
This handbook introduces the K-Junior robot and its various operating modes. For a
quick start, jump to section 2.2. If this handbook does not answer one of the problems you are confronted with, please
consult the K-Team web site (www.k-team.com) and, especially the Forum and the FAQs • Unpacking and Inspection: K-Junior’s package description and first start-up • The Robot and its accessories: K-Junior Hardware overview, accessories and
extensions descriptions. • Running Modes: description of the different running modes and how to use it. • Reprogramming the K-Junior: description of the software environment to program
the K-Junior. • Serial Communication protocol: description of the Bluetooth and USB serial
communication and a list of the different available commands. • Extension connectors: Mapping of the extension connectors. • Electronic Schematics: Schematics of the K-Junior.
K-Junior User Manual rev 1.2 7
1.3 Safety precautions
Here are some recommendations on how to correctly use the K-Junior Robot: • Keep the Robot away from wet area. Contact with water could cause
malfunction and/or breakdown. • Store your robot in a stable position. This will avoid the risks of falls, which
could break it or cause damage to a person. • Use only the official charger or the cable which is delivered with the robot. Do
not try to use another charger; this can cause irreversible damage to the battery. • Do not attach any connectors while the robot is powered on. To avoid any
damage, make all connections when the robot power is off. • Never leave the K-Junior powered when it is unused. When you have finished
working with K-Junior, turn it off. It will save the battery life
1.4 Recycling Think about the end of life of your robot! Parts of the robot can be recycled and it is important to do so. It is for instance important to keep batteries out of the solid waste stream. When you throw away a battery, it eventually ends up in a landfill or municipal incinerator. These batteries, which contain Lithium Polymer, can contribute to the toxicity levels of landfills or incinerator ash. By recycling the batteries through recycling programs, you can help to create a cleaner and safer environment for generations to come. For those reasons please take care to the recycling of your robot at the end of its life cycle, for instance sending back the robot to the manufacturer or to your local dealer. Thanks for your contribution to a cleaner environment!
K-Junior User Manual rev 1.2 8
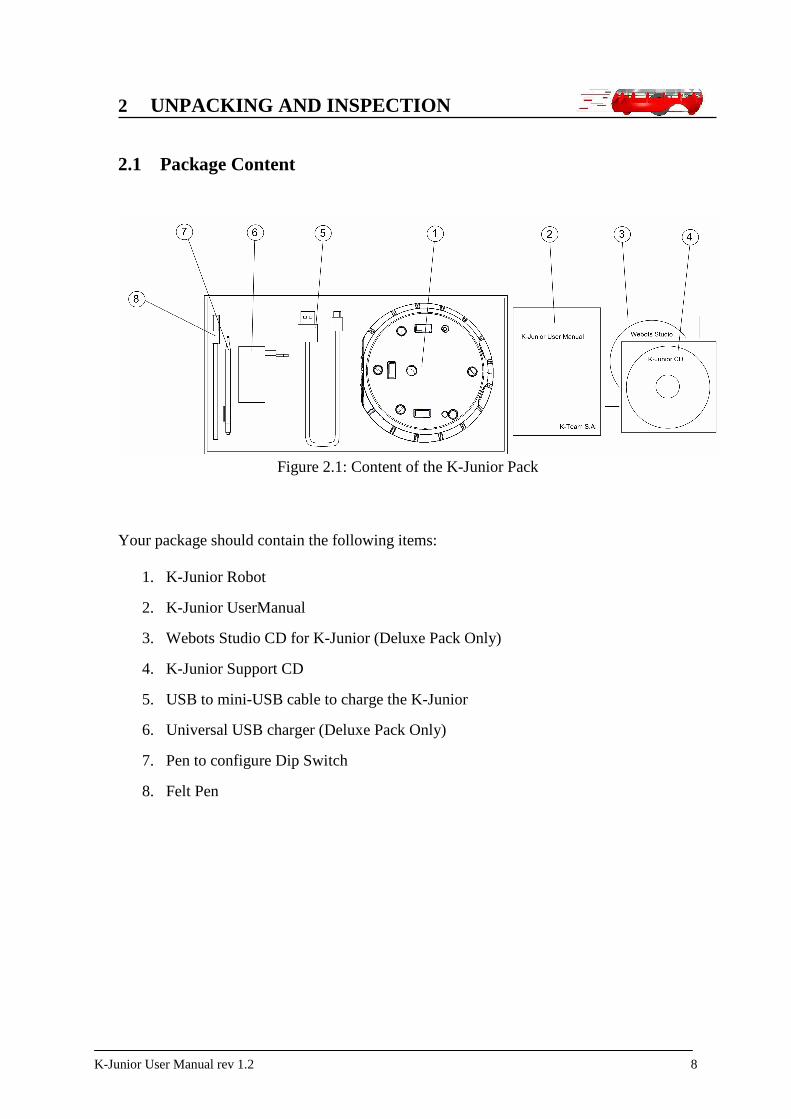
2 UNPACKING AND INSPECTION 2.1 Package Content
Figure 2.1: Content of the K-Junior Pack
Your package should contain the following items:
1. K-Junior Robot
2. K-Junior UserManual
3. Webots Studio CD for K-Junior (Deluxe Pack Only)
4. K-Junior Support CD
5. USB to mini-USB cable to charge the K-Junior
6. Universal USB charger (Deluxe Pack Only)
7. Pen to configure Dip Switch
8. Felt Pen
K-Junior User Manual rev 1.2 9
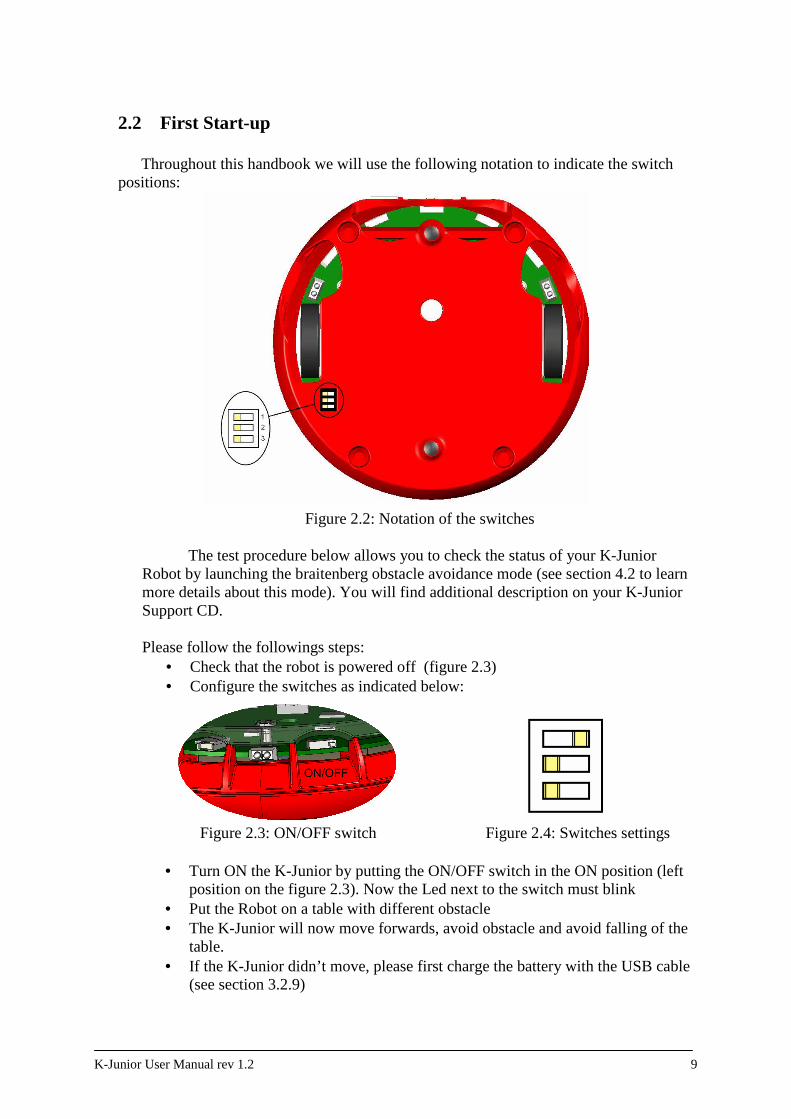
2.2 First Start-up
Throughout this handbook we will use the following notation to indicate the switch
positions:
Figure 2.2: Notation of the switches
The test procedure below allows you to check the status of your K-Junior Robot by launching the braitenberg obstacle avoidance mode (see section 4.2 to learn more details about this mode). You will find additional description on your K-Junior Support CD. Please follow the followings steps:
• Check that the robot is powered off (figure 2.3) • Configure the switches as indicated below:
Figure 2.3: ON/OFF switch Figure 2.4: Switches settings
• Turn ON the K-Junior by putting the ON/OFF switch in the ON position (left position on the figure 2.3). Now the Led next to the switch must blink
• Put the Robot on a table with different obstacle • The K-Junior will now move forwards, avoid obstacle and avoid falling of the
table. • If the K-Junior didn’t move, please first charge the battery with the USB cable
(see section 3.2.9)
K-Junior User Manual rev 1.2 10
3 THE ROBOT AND ITS ACCESSORIES
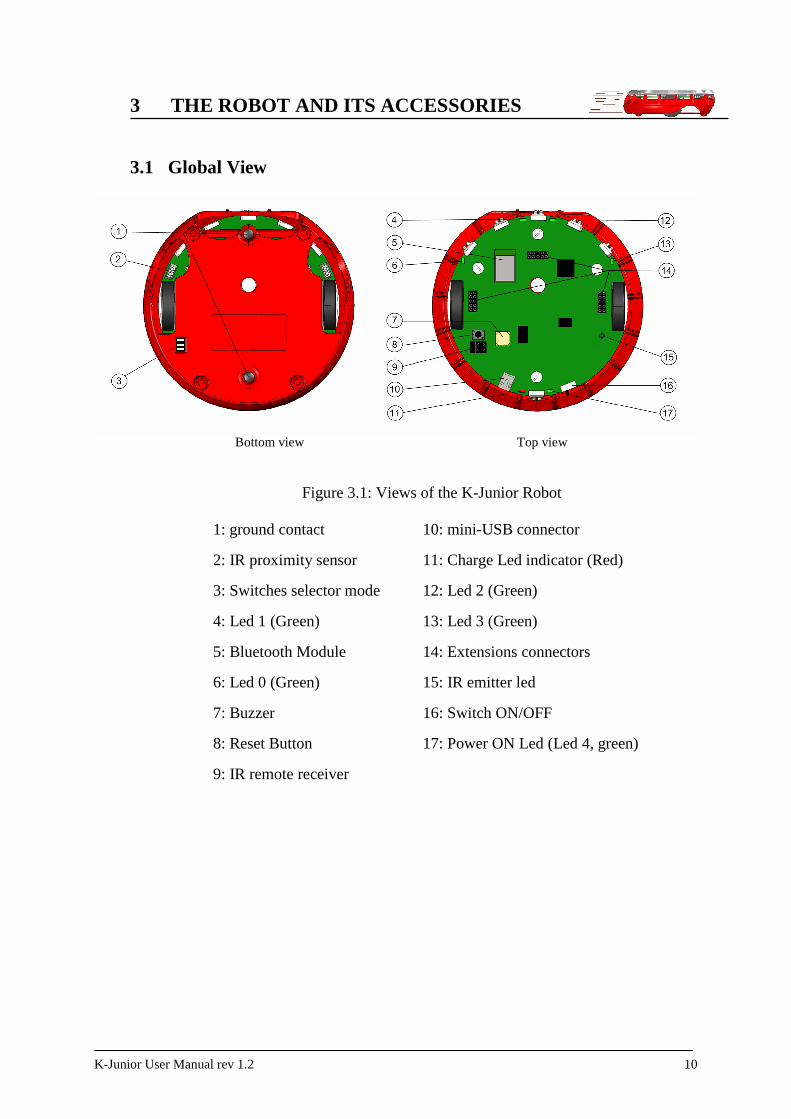
3.1 Global View
Bottom view Top view
Figure 3.1: Views of the K-Junior Robot
1: ground contact 10: mini-USB connector
2: IR proximity sensor 11: Charge Led indicator (Red)
3: Switches selector mode 12: Led 2 (Green)
4: Led 1 (Green) 13: Led 3 (Green)
5: Bluetooth Module 14: Extensions connectors
6: Led 0 (Green) 15: IR emitter led
7: Buzzer 16: Switch ON/OFF
8: Reset Button 17: Power ON Led (Led 4, green)
9: IR remote receiver
K-Junior User Manual rev 1.2 11
3.2 The K-Junior Robot 3.2.1 Microprocessor
K-Junior’s microcontroller is Microchip PIC16F887 at 8MHz in SMD packaging. It is one of the most powerful 14 bits PIC of Microchip line card. It relies on a simplified set of 35 instructions. It works in very low power mode as its frequency is at 8MHz and its supply at 3.3V.
Inside the PIC16F887, there are three kind of Flash memory • 8192 words of 14 bits of Flash memory • 368 Bytes of RAM • 256 Bytes of EEPROM For more information on PIC16F887 internal resources, please consult documentation on Microchip website (http://www.microchip.com).
3.2.2 LEDs K-Junior has six SMD LEDs. Five programmable and one to indicate the Battery
state of charge. By default, when the robot is power On, On/Off Led (Led 4) blinks and the other are turn off. All the programmable Led (led0 to led4) can be configure as automatic mode to blinks. If all the five green leds are set to automatic mode, this will form a scanner lights.
The Battery charge led turn On (Red) when the USB cable is connected to the K-Junior. As soon as the charge is complete, this led will turn Off.
3.2.3 Buzzer K-Junior contains a Buzzer module which can produce different frequency sound.
The frequency band width is from 20Hz to 2 kHz, with a resolution of 100 (where 0 is Off, 1 is 20Hz and 100 is 2 kHz). With these capabilities, you will be able to play some simple melodies. To find the corresponding frequency sound with the defined value, please use this formula:
eBuzzerValuencySoundFrequ
−=
101
2000
3.2.4 IR Remote Control and communication An IR remote receiver allows controlling the K-Junior wirelessly. This is a 36 kHz
demodulator using the rc5 code. You can control or send data to your robot with a standard TV remote control. More information is provided in section 4.8.
An IR emitter allows sending data from one robot to another. The emitter will use the same code (rc5) as a TV remote, but you will be able to choose the Data and the address to communicate with other Robot. More information is provided in section 4.9.
K-Junior User Manual rev 1.2 12
3.2.5 Switches
There are one Dip switch (three channels) and one power ON/OFF switch. The Dip switch is located in the Bottom of the robot (See figure 2.2) and the power ON/OFF switch at the back of the K-Junior (see figure 2.3). The Dip switch select internal behaviours describe in chapter 4.
The ON/OFF switch allows turning On the K-Junior, see figure 2.3 to know the correct sense of the switch. When the K-Junior is turn ON, the Led 4 must blinks. If not, the battery is certainly discharged. Then tried to charge the Robot with the USB cable and at the same time, turn On the Robot.
3.2.6 Infra-red sensors There are 10 similar IR sensors: six on the side and four facing the ground. As a
matter of fact, the sensor includes two components: • An infra-red light emitter (LED) • An infra-red light receiver (phototransistor) We will describe below the two operating modes of these infra-red sensors.
Passive mode In passive mode, only the phototransistor is used to measure the ambient IR
emission, also called luminance measurement. For you information, there are many natural or artificial IR sources in your environment, e.g. sunlight, incandescent lamps or a candle flame.
Active mode
In active mode, IR light is first emitted by the LED and then a measurement of the returned IR light is made by the phototransistor. If there is an object near the sensor, it will reflect IR light. Moreover, the closer the obstacle, the more IR light will be reflected.
However, IR reflection from an object will vary very much depending on the material, colour and surface finishing. Usually, the darker the object, the less IR it reflects, but, as you can see below, there are some exceptions:
• White paper: 100% • White PVC: 90% • White polystyrene: 120% • Black on white paper made with drawing ink (Higgins, Pelikan, …): 4-6% • Black on white paper made with fibber-tip pen, black (Stabilo): 76% • Plexiglas, 1mm thick: 10% • Cast aluminium, matt: 45% • Aluminium, bright: 110% • Gold plating, matt: 150% • Brass, bright: 160%
K-Junior User Manual rev 1.2 13
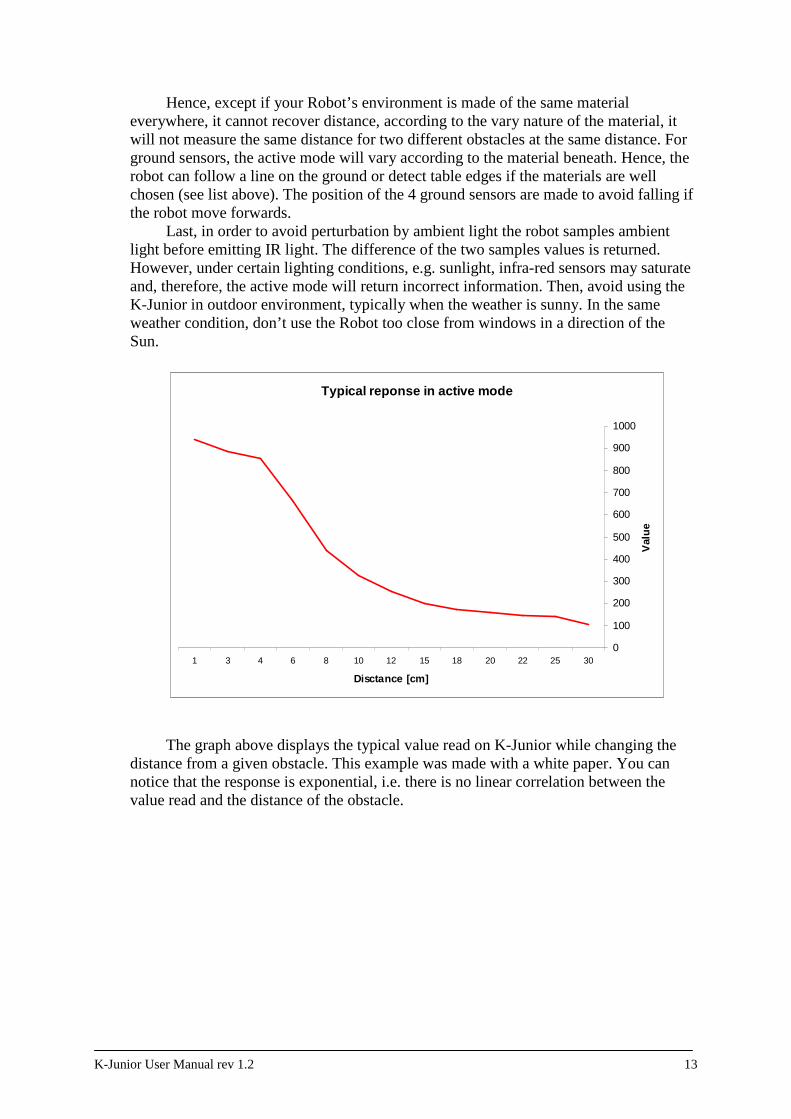
Hence, except if your Robot’s environment is made of the same material everywhere, it cannot recover distance, according to the vary nature of the material, it will not measure the same distance for two different obstacles at the same distance. For ground sensors, the active mode will vary according to the material beneath. Hence, the robot can follow a line on the ground or detect table edges if the materials are well chosen (see list above). The position of the 4 ground sensors are made to avoid falling if the robot move forwards.
Last, in order to avoid perturbation by ambient light the robot samples ambient light before emitting IR light. The difference of the two samples values is returned. However, under certain lighting conditions, e.g. sunlight, infra-red sensors may saturate and, therefore, the active mode will return incorrect information. Then, avoid using the K-Junior in outdoor environment, typically when the weather is sunny. In the same weather condition, don’t use the Robot too close from windows in a direction of the Sun.
The graph above displays the typical value read on K-Junior while changing the
distance from a given obstacle. This example was made with a white paper. You can notice that the response is exponential, i.e. there is no linear correlation between the value read and the distance of the obstacle.
Typical reponse in active mode
0
100
200
300
400
500
600
700
800
900
1000
302522201815121086431
Disctance [cm]
Val
ue
K-Junior User Manual rev 1.2 14
3.2.7 Bluetooth communication A WT12 from Bluegiga is integrated in the K-Junior to allow Wireless
communication with a PC and other Robot. This module is a class 2 Bluetooth 2.0 + EDR (Enhanced Data Rates). At the power on, the module waits for a communication which must be established by a PC. It will be seeing as a Bluetooth serial port with a name like “K-Junior 1234”, where 1234 is the serial number of the Robot.
Once the communication established, you will be able to remote control your Robot through a COM port using the serial protocol commands. With one Bluetooth dongle, you can communicate with up to 7 K-Junior at the same time.
If you want to make a small network without any PC, you can use the iWrap command of the module to scan, connect and create a network. For more information about the WT12 and its iWrap firmware, please see on the Bluegiga web site (http://www.bluegiga.com) and search the datasheet of the WT12 module.
3.2.8 USB communication The K-Junior has an integrated USB to serial adaptor chip, which allows
connecting your Robot to your PC with a mini USB cable. At the same time you communicate with the K-Junior, the USB will charge the battery. This communication method is not the best to keep the Robot’s mobility, but this is the only way to update your K-Junior and to program it with your own application.
3.2.9 Battery The K-Junior has an integrated 3.7V Li-Pol battery pack, with a Capacity of
1250mAh. This battery ensures autonomy up to 4 hours without additional turret. The charging circuit is integrated in the Robot to allow a charge with a mini USB cable and a PC. The Charging time is approximately 4 hours when connected to a computer.
The charge Led (red) turn on during all the process of the charge. As soon as the battery is completely charged, the red Led will turn off.
K-Junior User Manual rev 1.2 15
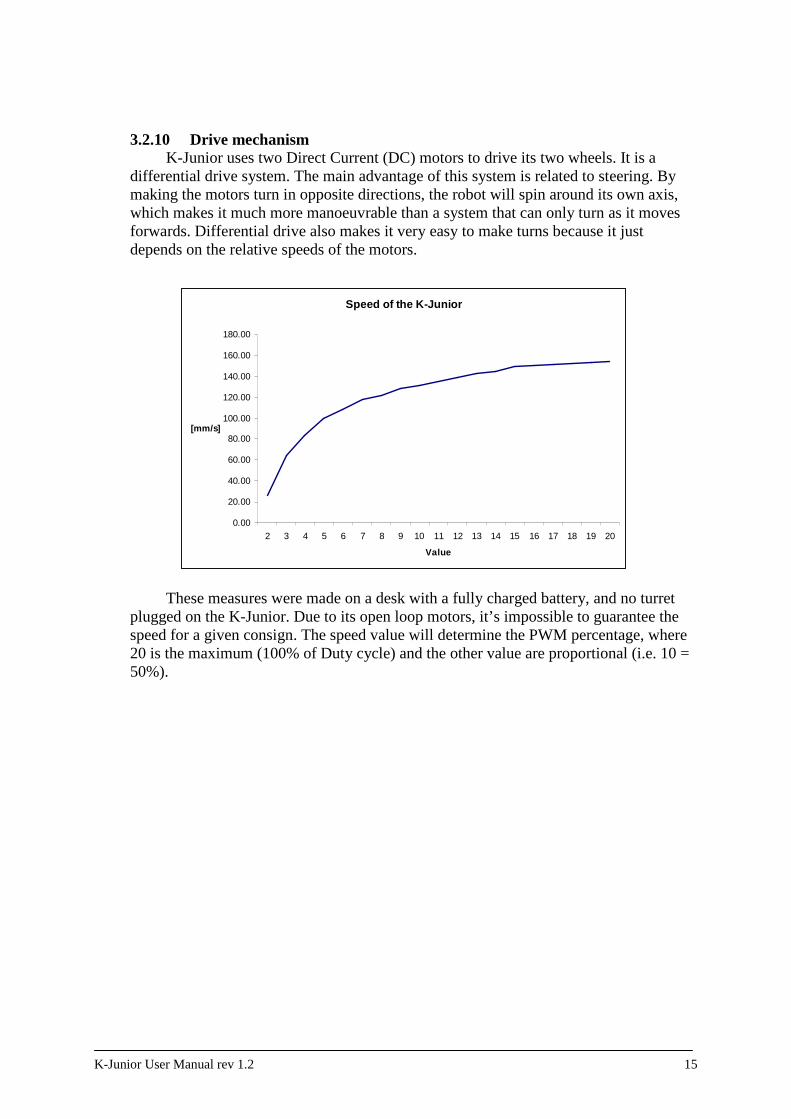
3.2.10 Drive mechanism K-Junior uses two Direct Current (DC) motors to drive its two wheels. It is a
differential drive system. The main advantage of this system is related to steering. By making the motors turn in opposite directions, the robot will spin around its own axis, which makes it much more manoeuvrable than a system that can only turn as it moves forwards. Differential drive also makes it very easy to make turns because it just depends on the relative speeds of the motors.
These measures were made on a desk with a fully charged battery, and no turret
plugged on the K-Junior. Due to its open loop motors, it’s impossible to guarantee the speed for a given consign. The speed value will determine the PWM percentage, where 20 is the maximum (100% of Duty cycle) and the other value are proportional (i.e. 10 = 50%).
Speed of the K-Junior
0.00
20.00
40.00
60.00
80.00
100.00
120.00
140.00
160.00
180.00
2 3 4 5 6 7 8 9 10 11 12 13 14 15 16 17 18 19 20
Value
[mm/s]
K-Junior User Manual rev 1.2 16
3.3 Accessories We will detail hereafter accessories included in your K-Junior Pack
3.3.1 Mini USB cable
We provide a mini USB cable to connect your K-Junior to your computer. For that, your computer must have a standard USB port. Once the K-Junior connected to your computer, this one will ask you to install a new material. This is the USB to serial chip which is on the K-Junior. Choose the driver provided on the K-Junior CD (or on our website). The driver will now assign a COM port to your K-Junior, and allows you to communicate with it through a terminal (see section 4.6).
Once your driver will be installed, the charge of your K-Junior will start with the maximum current that can deliver an USB port (~500mA). This cable will be useful to update and/or to load your program into the K-Junior. So, even if you used always the Bluetooth to communicate, keep this cable carefully. If you loose it, you can buy a new one from your local computer store.
3.3.2 Felt Pen
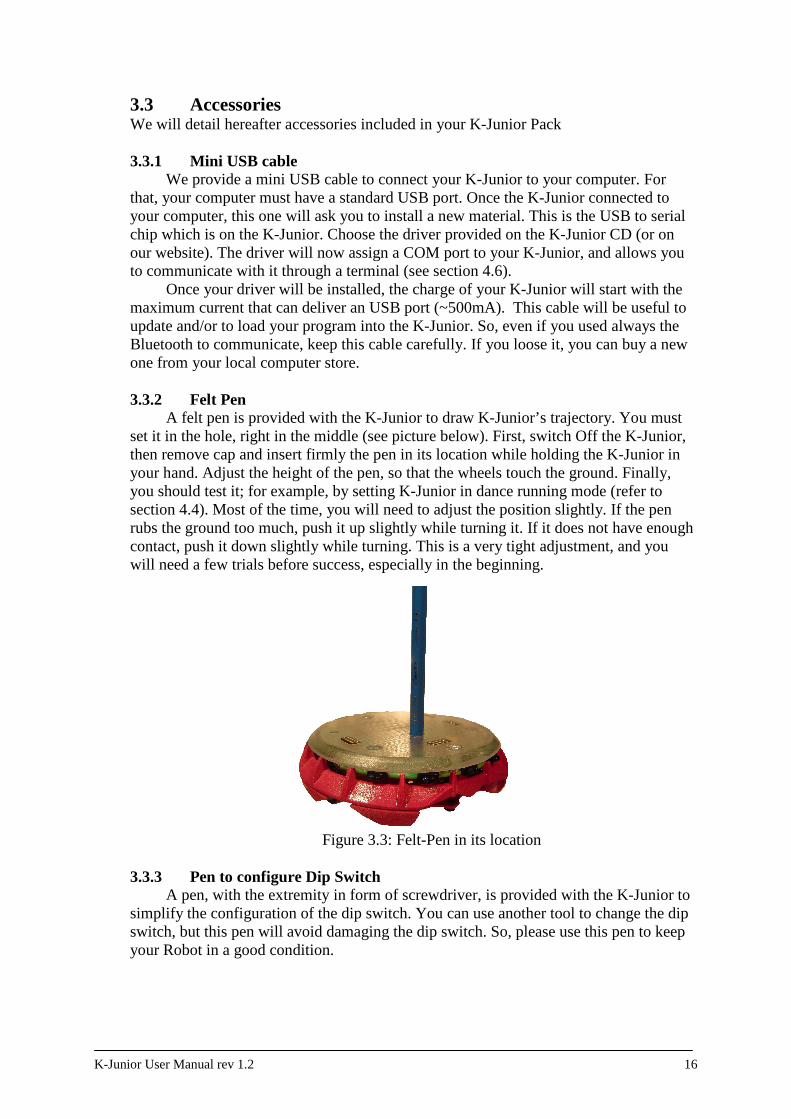
A felt pen is provided with the K-Junior to draw K-Junior’s trajectory. You must set it in the hole, right in the middle (see picture below). First, switch Off the K-Junior, then remove cap and insert firmly the pen in its location while holding the K-Junior in your hand. Adjust the height of the pen, so that the wheels touch the ground. Finally, you should test it; for example, by setting K-Junior in dance running mode (refer to section 4.4). Most of the time, you will need to adjust the position slightly. If the pen rubs the ground too much, push it up slightly while turning it. If it does not have enough contact, push it down slightly while turning. This is a very tight adjustment, and you will need a few trials before success, especially in the beginning.
Figure 3.3: Felt-Pen in its location
3.3.3 Pen to configure Dip Switch A pen, with the extremity in form of screwdriver, is provided with the K-Junior to
simplify the configuration of the dip switch. You can use another tool to change the dip switch, but this pen will avoid damaging the dip switch. So, please use this pen to keep your Robot in a good condition.

K-Junior User Manual rev 1.2 17
3.3.4 Universal USB charger (Deluxe pack only) This universal charger will allow you to decrease the charging time of your K-
Junior. If you are using your K-Junior intensively, this charger will be very useful to keep your robot immobile the less time as possible.
3.3.5 Webots-K-Junior (Deluxe pack only) Webots-K-Junior (the 3D simulators) and Bot-Studio (the graphical programming
environment) are provided on CD-ROM. You may access the CR-ROM with Microsoft Windows 2000/Xp/Vista, Linux or Mac OS X.
To install Webots-K-Junior, please insert the CD-ROM and follow instructions (see section 4.10). If nothing happens upon CD-ROM insertion, please open the file index.html in CD-ROM root directory. Your license number is printed on the CDROM case.
3.4 Extensions K-Junior has an open architecture: 3 extensions connectors allow to add devices,
either made by K-Team S.A. (cf. www.k-team.com), or that you will build yourself. Each of the three extensions connectors is dedicated:
• Front connector provides I2C bus communication and power supply • Left side connector allows flash-memory programming • Right side connector ensures a good mechanical fixing.
You will find all the information to build you own devices in connector pinning
schematics in the Appendix B, and in K-Junior schematics in Appendix C All the Hemisson Extensions are fully compatible with the K-Junior robot (and
inversely). Then all the following extensions will have the prefix “Hem” but can be used with the K-Junior.
K-Junior User Manual rev 1.2 18
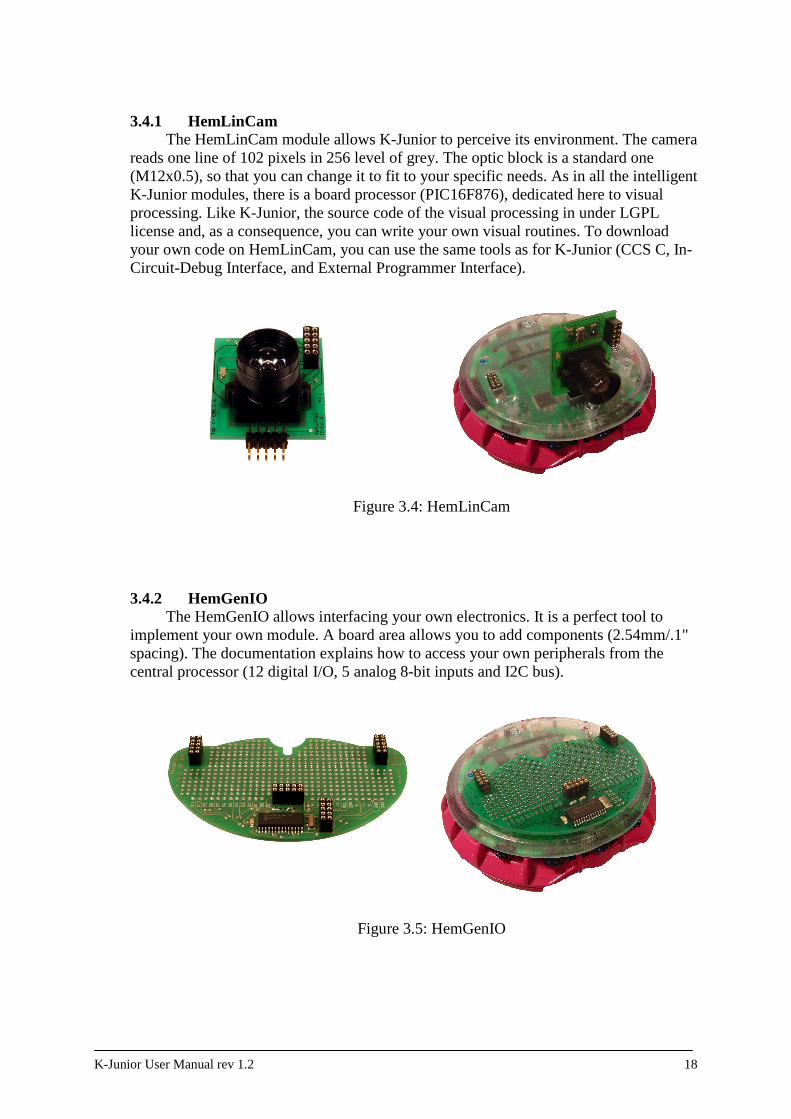
3.4.1 HemLinCam
The HemLinCam module allows K-Junior to perceive its environment. The camera reads one line of 102 pixels in 256 level of grey. The optic block is a standard one (M12x0.5), so that you can change it to fit to your specific needs. As in all the intelligent K-Junior modules, there is a board processor (PIC16F876), dedicated here to visual processing. Like K-Junior, the source code of the visual processing in under LGPL license and, as a consequence, you can write your own visual routines. To download your own code on HemLinCam, you can use the same tools as for K-Junior (CCS C, In-Circuit-Debug Interface, and External Programmer Interface).
Figure 3.4: HemLinCam
3.4.2 HemGenIO The HemGenIO allows interfacing your own electronics. It is a perfect tool to
implement your own module. A board area allows you to add components (2.54mm/.1" spacing). The documentation explains how to access your own peripherals from the central processor (12 digital I/O, 5 analog 8-bit inputs and I2C bus).
Figure 3.5: HemGenIO
K-Junior User Manual rev 1.2 19
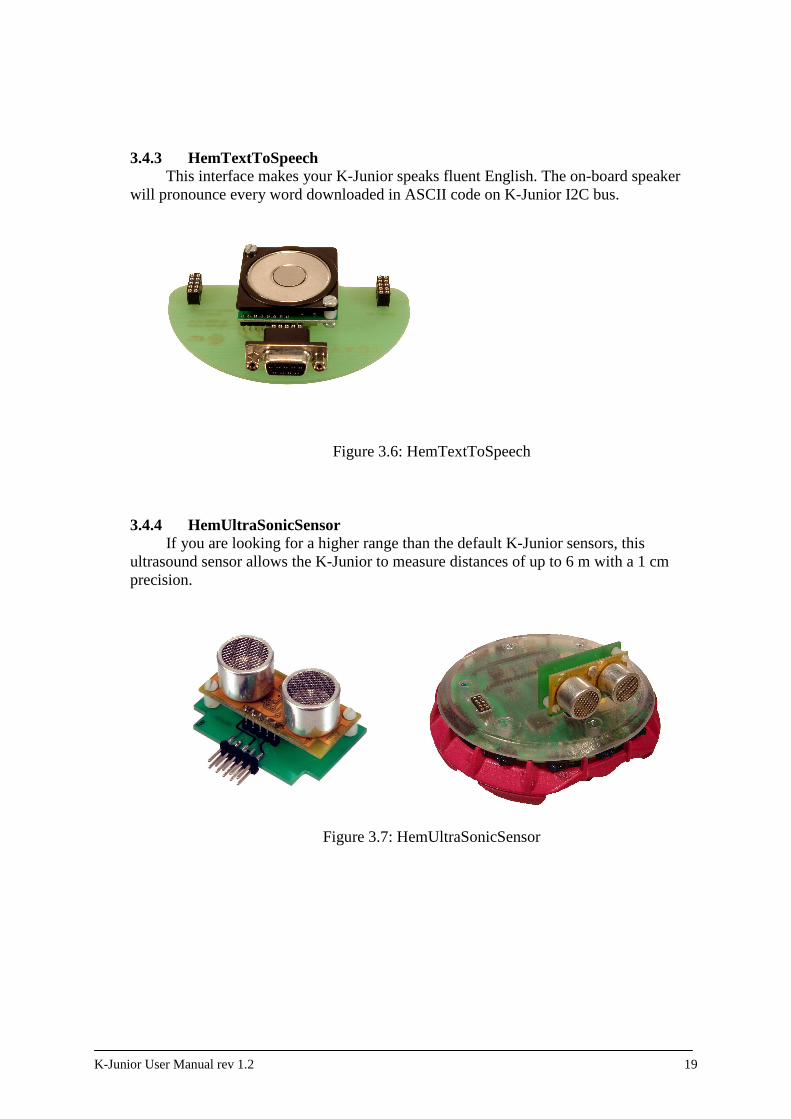
3.4.3 HemTextToSpeech This interface makes your K-Junior speaks fluent English. The on-board speaker
will pronounce every word downloaded in ASCII code on K-Junior I2C bus.
Figure 3.6: HemTextToSpeech
3.4.4 HemUltraSonicSensor If you are looking for a higher range than the default K-Junior sensors, this
ultrasound sensor allows the K-Junior to measure distances of up to 6 m with a 1 cm precision.
Figure 3.7: HemUltraSonicSensor
K-Junior User Manual rev 1.2 20
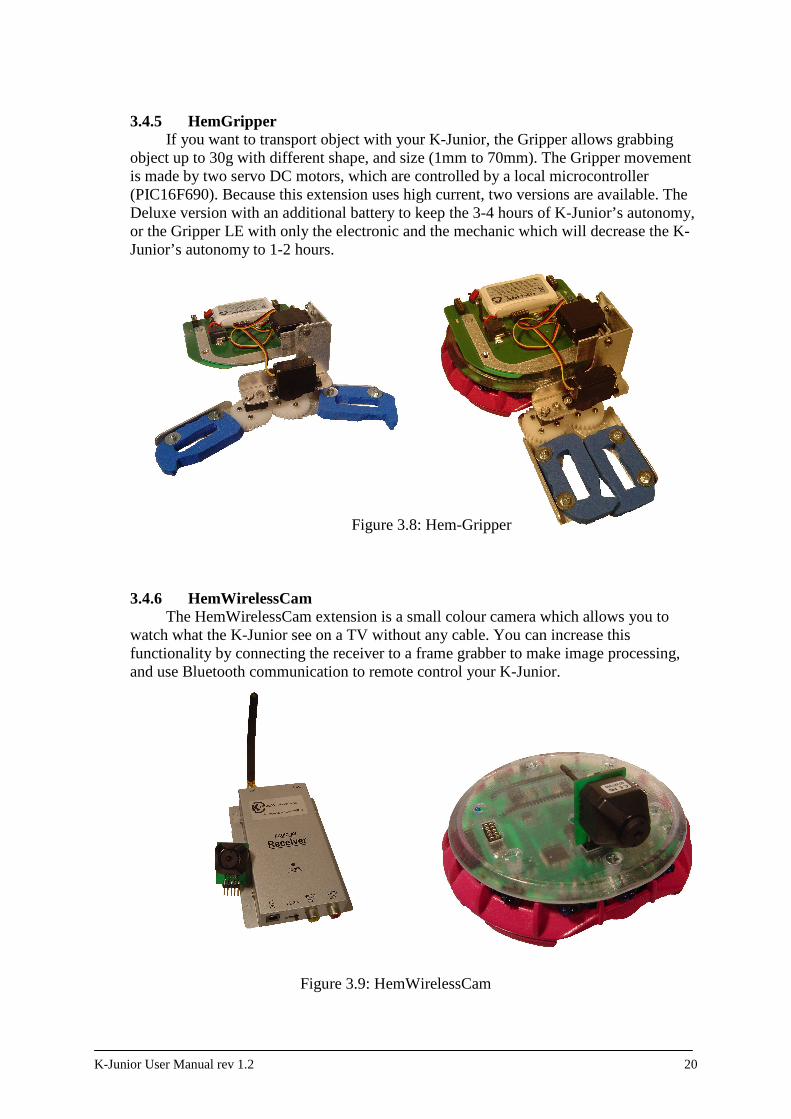
3.4.5 HemGripper
If you want to transport object with your K-Junior, the Gripper allows grabbing object up to 30g with different shape, and size (1mm to 70mm). The Gripper movement is made by two servo DC motors, which are controlled by a local microcontroller (PIC16F690). Because this extension uses high current, two versions are available. The Deluxe version with an additional battery to keep the 3-4 hours of K-Junior’s autonomy, or the Gripper LE with only the electronic and the mechanic which will decrease the K-Junior’s autonomy to 1-2 hours.
Figure 3.8: Hem-Gripper
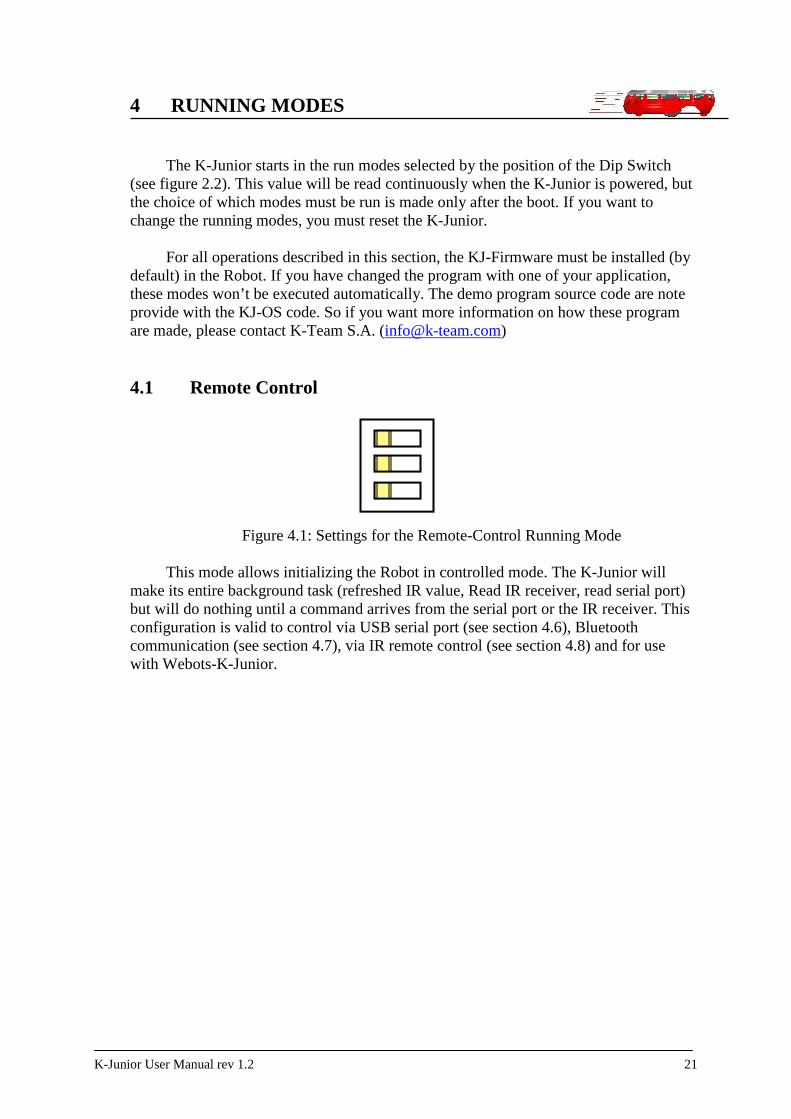
3.4.6 HemWirelessCam The HemWirelessCam extension is a small colour camera which allows you to
watch what the K-Junior see on a TV without any cable. You can increase this functionality by connecting the receiver to a frame grabber to make image processing, and use Bluetooth communication to remote control your K-Junior.
Figure 3.9: HemWirelessCam
K-Junior User Manual rev 1.2 21
4 RUNNING MODES
The K-Junior starts in the run modes selected by the position of the Dip Switch
(see figure 2.2). This value will be read continuously when the K-Junior is powered, but the choice of which modes must be run is made only after the boot. If you want to change the running modes, you must reset the K-Junior.
For all operations described in this section, the KJ-Firmware must be installed (by
default) in the Robot. If you have changed the program with one of your application, these modes won’t be executed automatically. The demo program source code are note provide with the KJ-OS code. So if you want more information on how these program are made, please contact K-Team S.A. ([email protected])
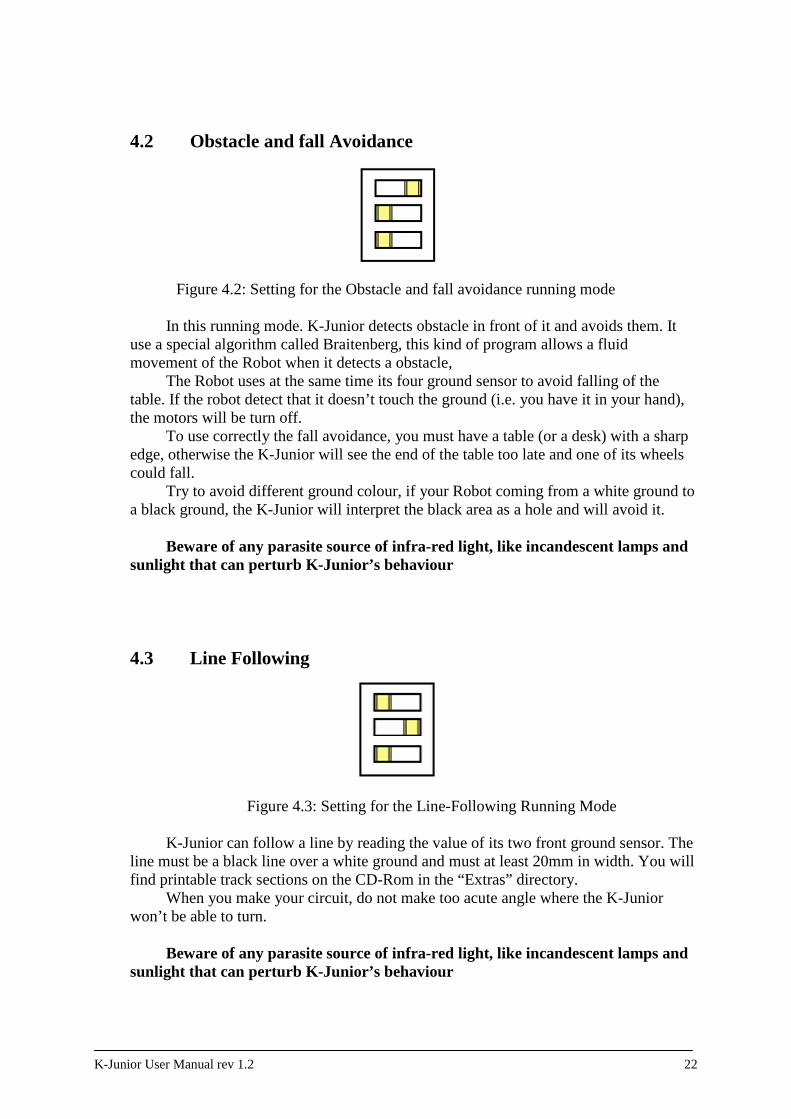
4.1 Remote Control
Figure 4.1: Settings for the Remote-Control Running Mode
This mode allows initializing the Robot in controlled mode. The K-Junior will make its entire background task (refreshed IR value, Read IR receiver, read serial port) but will do nothing until a command arrives from the serial port or the IR receiver. This configuration is valid to control via USB serial port (see section 4.6), Bluetooth communication (see section 4.7), via IR remote control (see section 4.8) and for use with Webots-K-Junior.
K-Junior User Manual rev 1.2 22
4.2 Obstacle and fall Avoidance
Figure 4.2: Setting for the Obstacle and fall avoidance running mode
In this running mode. K-Junior detects obstacle in front of it and avoids them. It use a special algorithm called Braitenberg, this kind of program allows a fluid movement of the Robot when it detects a obstacle,
The Robot uses at the same time its four ground sensor to avoid falling of the table. If the robot detect that it doesn’t touch the ground (i.e. you have it in your hand), the motors will be turn off.
To use correctly the fall avoidance, you must have a table (or a desk) with a sharp edge, otherwise the K-Junior will see the end of the table too late and one of its wheels could fall.
Try to avoid different ground colour, if your Robot coming from a white ground to a black ground, the K-Junior will interpret the black area as a hole and will avoid it.
Beware of any parasite source of infra-red light, like incandescent lamps and
sunlight that can perturb K-Junior’s behaviour
4.3 Line Following
Figure 4.3: Setting for the Line-Following Running Mode
K-Junior can follow a line by reading the value of its two front ground sensor. The line must be a black line over a white ground and must at least 20mm in width. You will find printable track sections on the CD-Rom in the “Extras” directory.
When you make your circuit, do not make too acute angle where the K-Junior won’t be able to turn.
Beware of any parasite source of infra-red light, like incandescent lamps and
sunlight that can perturb K-Junior’s behaviour
K-Junior User Manual rev 1.2 23
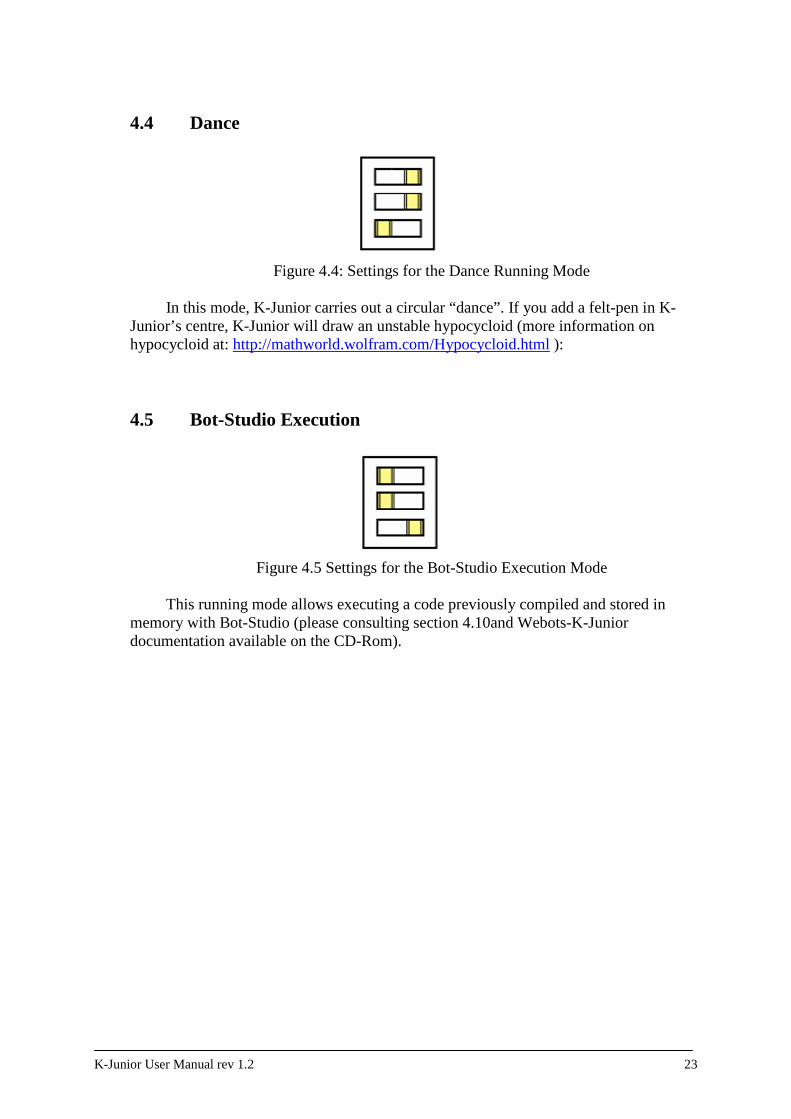
4.4 Dance
Figure 4.4: Settings for the Dance Running Mode
In this mode, K-Junior carries out a circular “dance”. If you add a felt-pen in K-Junior’s centre, K-Junior will draw an unstable hypocycloid (more information on hypocycloid at: http://mathworld.wolfram.com/Hypocycloid.html ):
4.5 Bot-Studio Execution
Figure 4.5 Settings for the Bot-Studio Execution Mode
This running mode allows executing a code previously compiled and stored in memory with Bot-Studio (please consulting section 4.10and Webots-K-Junior documentation available on the CD-Rom).
K-Junior User Manual rev 1.2 24
4.6 USB Serial Port Control
You can control your K-Junior via an USB port. Follow these steps to install, configure and use your K-Junior through the serial USB port:
• Connect your K-Junior to your computer with the Mini-USB cable provided
with the Pack. • Select the Remote Control Mode (see section 4.1) and turn On the K-Junior
• The K-Junior will be seen as a new hardware device and your computer will
ask for a driver. Select the driver (K-JuniorUSBDrivers.zip) provided on the CD-Rom. This will install the USB to serial adapter which is integrated on the K-Junior. Note: if you have many K-Juniors, you have to install only one time the driver. The other Robot will be detected automatically.
• The K-Junior will now be recognized as a serial COM port.
• Now you have to parameterise the driver to configure the baud speed of the K-
Junior.
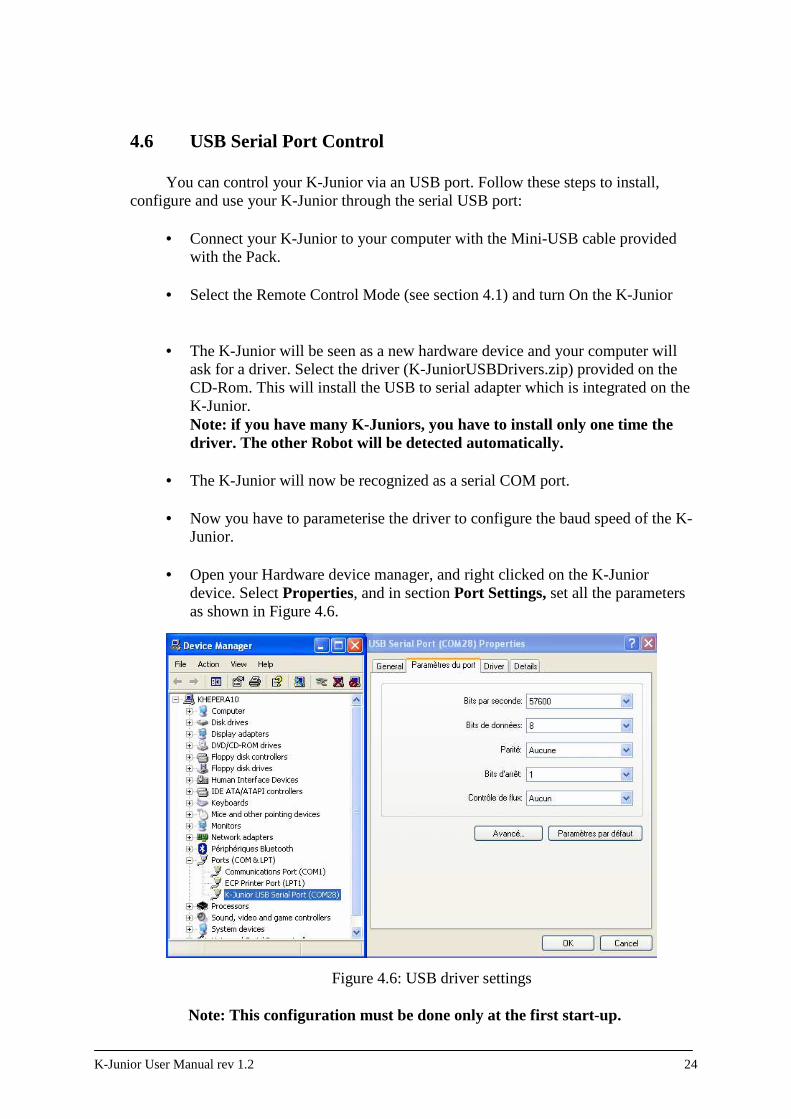
• Open your Hardware device manager, and right clicked on the K-Junior device. Select Properties, and in section Port Settings, set all the parameters as shown in Figure 4.6.
Figure 4.6: USB driver settings
Note: This configuration must be done only at the first start-up.
K-Junior User Manual rev 1.2 25
• To communicate with the Robot, you have to open a terminal software like
HyperTerminal or TeraTerm, • Select the correct COM port (see in the hardware Device manager to know the
K-Junior’s allocated COM port) and the correct settings:
� 57600 Bits per second � 8 Data bits � No Parity bit � 1 Stop bit � No Flow Control
• Reset the K-Junior by pressing the reset button (see element 8 at Figure 3.1)
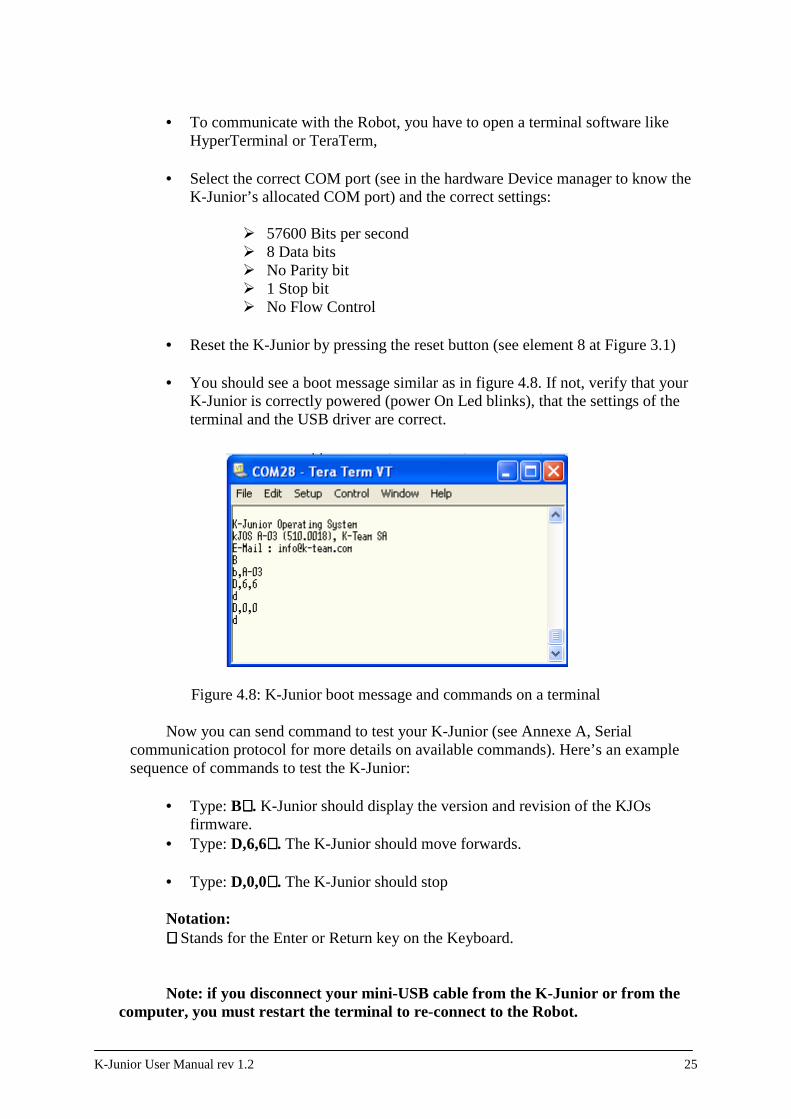
• You should see a boot message similar as in figure 4.8. If not, verify that your
K-Junior is correctly powered (power On Led blinks), that the settings of the terminal and the USB driver are correct.
Figure 4.8: K-Junior boot message and commands on a terminal
Now you can send command to test your K-Junior (see Annexe A, Serial communication protocol for more details on available commands). Here’s an example sequence of commands to test the K-Junior:
• Type: B↵↵↵↵. K-Junior should display the version and revision of the KJOs
firmware. • Type: D,6,6↵↵↵↵. The K-Junior should move forwards. • Type: D,0,0↵↵↵↵. The K-Junior should stop
Notation: ↵↵↵↵ Stands for the Enter or Return key on the Keyboard. Note: if you disconnect your mini-USB cable from the K-Junior or from the
computer, you must restart the terminal to re-connect to the Robot.
K-Junior User Manual rev 1.2 26
4.7 Bluetooth Communication Control
If you want to remote control your K-Junior and keep its complete mobility, the best solution is to use the Bluetooth Communication mode. This feature will allow you to communicate with your K-Junior up to 20 meters without cables. Follow these instructions to establish your first Bluetooth connection
• As the USB serial Port control, you must configure the K-Junior in Remote
Control Mode (see section 4.1). • Turn On your K-Junior and verify that it’s correctly powered (Power On Led
blinks). If not, charge the battery with the mini-USB cable. • Connect or turn ON your Bluetooth dongle on your computer and search for
available Bluetooth device. • The K-Junior device must appear as a PDA with only the serial port service. Its
name will be “K-Junior 1234”, where 1234 is the serial number of the Robot. • Establish the connection with the K-Junior. Your computer will ask you for a
security password, enter “0000”. Note: this password is asked only at the first connection with the K-Junior
• Your computer will now allocate a COM port to the K-Junior. • Now open a terminal for the allocated COM port with the same settings as
explained for the USB Serial Port Control (section 4.6)
• Reset the K-Junior by pressing the reset button (see element 8 at Figure 3.1) to see the K-Junior’s boot message
• Try to send some commands as explain before to validate the communication Note: Now the connection will be made automatically as soon as you will open the allocated COM port. But, if you connect another Bluetooth serial port when the K-Junior is turn Off, you must re-make the connection manually to allocate the K-Junior to the COM port.
For your information, you can use any third party software, like MATLAB, Labview, (etc…) to control your K-Junior through the USB serial port or through the Bluetooth communication. You can also write your own software to control the K-Junior.
K-Junior User Manual rev 1.2 27
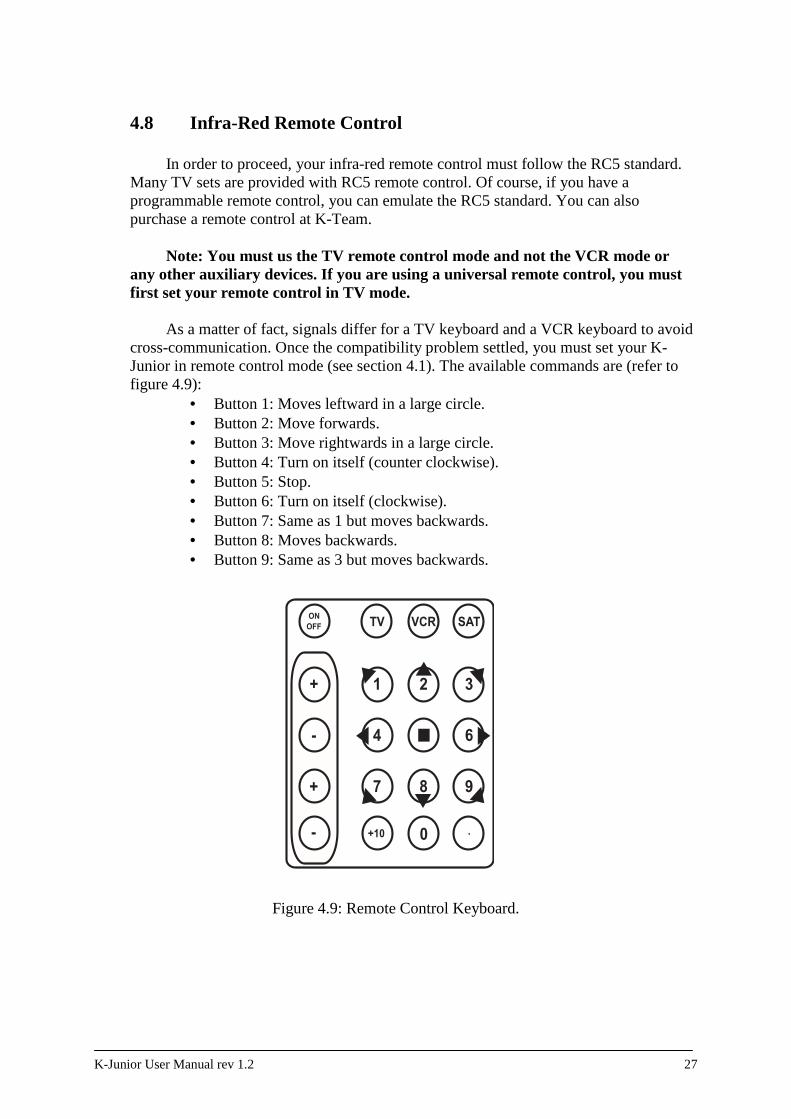
4.8 Infra-Red Remote Control
In order to proceed, your infra-red remote control must follow the RC5 standard. Many TV sets are provided with RC5 remote control. Of course, if you have a programmable remote control, you can emulate the RC5 standard. You can also purchase a remote control at K-Team.
Note: You must us the TV remote control mode and not the VCR mode or
any other auxiliary devices. If you are using a universal remote control, you must first set your remote control in TV mode.
As a matter of fact, signals differ for a TV keyboard and a VCR keyboard to avoid
cross-communication. Once the compatibility problem settled, you must set your K-Junior in remote control mode (see section 4.1). The available commands are (refer to figure 4.9):
• Button 1: Moves leftward in a large circle. • Button 2: Move forwards. • Button 3: Move rightwards in a large circle. • Button 4: Turn on itself (counter clockwise). • Button 5: Stop. • Button 6: Turn on itself (clockwise). • Button 7: Same as 1 but moves backwards. • Button 8: Moves backwards. • Button 9: Same as 3 but moves backwards.
Figure 4.9: Remote Control Keyboard.
1 2 3
4 6
7 8 9
TV VCR SAT ON
OFF
+
-
+10 0
+
- .
K-Junior User Manual rev 1.2 28
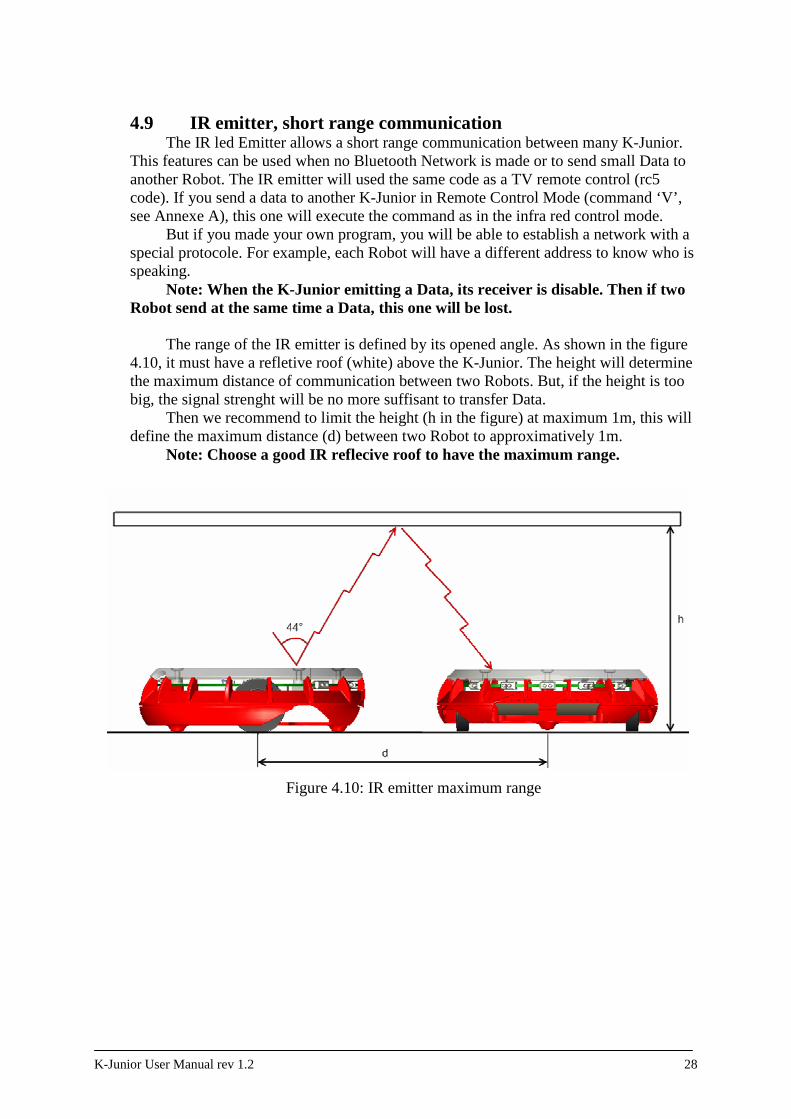
4.9 IR emitter, short range communication
The IR led Emitter allows a short range communication between many K-Junior. This features can be used when no Bluetooth Network is made or to send small Data to another Robot. The IR emitter will used the same code as a TV remote control (rc5 code). If you send a data to another K-Junior in Remote Control Mode (command ‘V’, see Annexe A), this one will execute the command as in the infra red control mode.
But if you made your own program, you will be able to establish a network with a special protocole. For example, each Robot will have a different address to know who is speaking.
Note: When the K-Junior emitting a Data, its receiver is disable. Then if two Robot send at the same time a Data, this one will be lost.
The range of the IR emitter is defined by its opened angle. As shown in the figure 4.10, it must have a refletive roof (white) above the K-Junior. The height will determine the maximum distance of communication between two Robots. But, if the height is too big, the signal strenght will be no more suffisant to transfer Data.
Then we recommend to limit the height (h in the figure) at maximum 1m, this will define the maximum distance (d) between two Robot to approximatively 1m.
Note: Choose a good IR reflecive roof to have the maximum range.
Figure 4.10: IR emitter maximum range

K-Junior User Manual rev 1.2 29
4.10 Software Tools for K-Junior
You can find there some applications software for the K-Junior:
http://ftp.k-team.com/K-Junior/software/Applications/Binaries/
• Navigator_Stand_alone_app.zip : GUI Navigator for the K-Junior
This is KJ_Navigator application, a simple and user-friendly interface created for illustrating the main capabilities of the K-Junior Robot.

K-Junior User Manual rev 1.2 30
5 REPROGRAMMING K-JUNIOR
A boot loader based on the TinyBootloader is inside the K-Junior Memory (see
official web page for more information http://www.etc.ugal.ro/cchiculita/software/picbootloader.htm ). It allows the update of the K-Junior with the Tiny Bootloader Software (see in the CR-Rom). You can also upload your own program to replace the K-Junior Firmware.
Beware, uploading your own code inside K-Junior’s memory means that you
are responsible for damages caused to its memory. The serial port upload process relies on this boot loader locate at the bottom of the
memory. At the boot, the loader will wait 1 second before launching the application write in Flash. If a special character is received from the serial port, the boot loader will start to write the new firmware in the memory.
If your code overwrites this piece of code, you will need the external programmer interface (HemICDadaptor or HemFlexExtProg) and an adequate PIC programmer to reprogram the K-Junior. You can also return the K-Junior to K-team S.A., but this kind of repair is not covered by the warranty.
5.1 K-Junior Uploader (Tiny Bootloader Software) K-Junior Uploader software allows to upgrade your firmware or to load your own
version of KJOs. Here’s a short description on how to load a new firmware in the K-Junior.
• First connect your K-Junior to your computer with the min-USB cable • Turn On your K-Junior • Launch the K-Junior Uploader Software (tinybldWin.exe) • Configure the Baud speed to 19200 • Select the correct COM port. If the K-Junior’s COM port doesn’t appear,
push the Search button. • Browse your firmware file (i.e. KJ-Firmware.A-03.hex) • Hold the K-Junior’s Reset Button pressed • Click on Write Flash button and release the reset button • Once the uploading is finished, the firmware (or your application) will start
automatically.
K-Junior User Manual rev 1.2 31
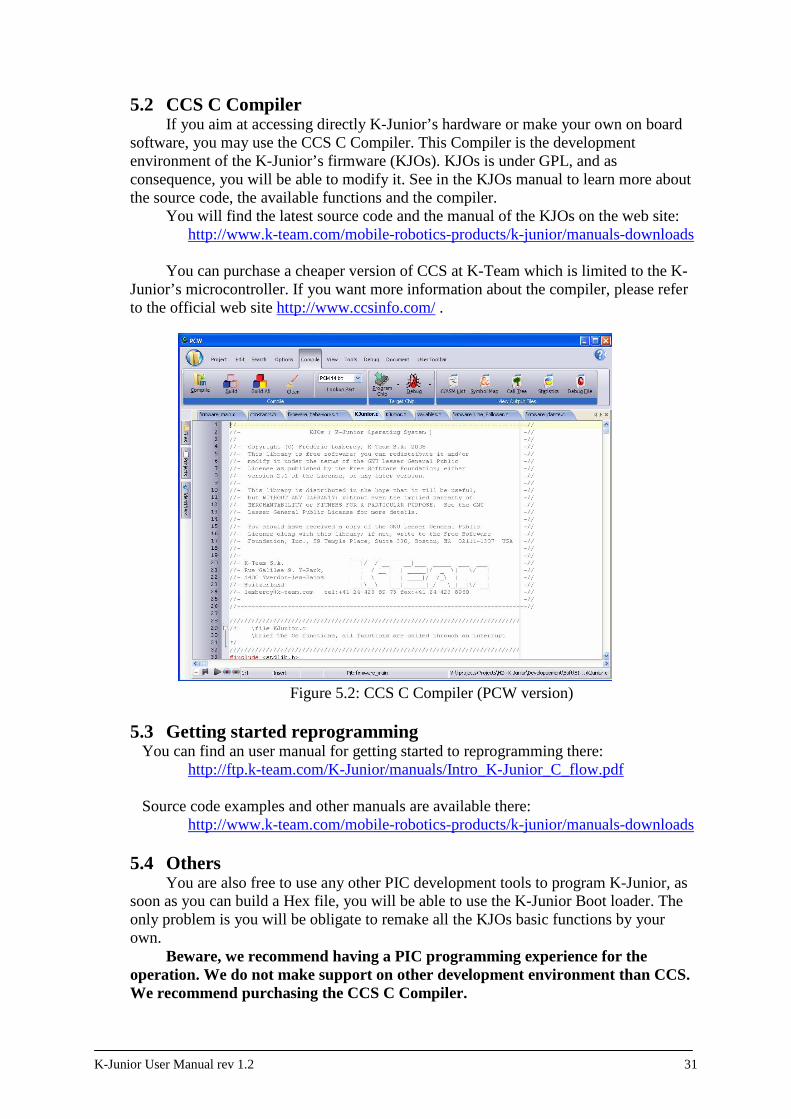
5.2 CCS C Compiler If you aim at accessing directly K-Junior’s hardware or make your own on board
software, you may use the CCS C Compiler. This Compiler is the development environment of the K-Junior’s firmware (KJOs). KJOs is under GPL, and as consequence, you will be able to modify it. See in the KJOs manual to learn more about the source code, the available functions and the compiler.
You will find the latest source code and the manual of the KJOs on the web site: http://www.k-team.com/mobile-robotics-products/k-junior/manuals-downloads
You can purchase a cheaper version of CCS at K-Team which is limited to the K-Junior’s microcontroller. If you want more information about the compiler, please refer to the official web site http://www.ccsinfo.com/ .
Figure 5.2: CCS C Compiler (PCW version)
5.3 Getting started reprogramming You can find an user manual for getting started to reprogramming there:
http://ftp.k-team.com/K-Junior/manuals/Intro_K-Junior_C_flow.pdf
Source code examples and other manuals are available there: http://www.k-team.com/mobile-robotics-products/k-junior/manuals-downloads
5.4 Others You are also free to use any other PIC development tools to program K-Junior, as
soon as you can build a Hex file, you will be able to use the K-Junior Boot loader. The only problem is you will be obligate to remake all the KJOs basic functions by your own.
Beware, we recommend having a PIC programming experience for the operation. We do not make support on other development environment than CCS. We recommend purchasing the CCS C Compiler.
K-Junior User Manual rev 1.2 32
A COMMUNICATION PROTOCOL This communication protocol allows complete control of the K-Junior’s
functions through an USB or a Bluetooth serial line. The required configuration is presented in section 4.6 (USB) and 4.7 (Bluetooth).
The protocol is made of commands and responses, all in standard ASCII codes. A
command is sent from the host computer to the K-Junior: it is starting with an upper case alpha character and followed, if necessary, with numerical parameters separated with comma and terminated by a line feed. The response is sent by the robot to the host computer: it is starting with the same character that was initiating the command but using lower case, and followed, if necessary, with numerical parameters.
To better understand this protocol, please refer to the USB serial communication
test (section 4.6).
Notation: ↵↵↵↵ Stands for carriage return (Enter or Return key pressed) \r stands for ASCII character 0x0A (line feed) \n stands for ASCII character 0x0D (carriage return)
A Move the robot during a define time Format of the command: A,speed_motor_left, speed_motor_right, time ↵↵↵↵ Format of the response: a \r\n Effect: Set the speed of the both motors during a define time. The unit of the
time is 100ms, so a value of 15 will move the robot during 1.5s, then stop the motors.
Example: A,-7,7,15↵↵↵↵ Note: Only available with firmware revision A-09 or greater. B Read firmware version Format of the command: B ↵↵↵↵ Format of the response: b,version_KJOs \r\n Effect: Return the software version stored in the flash memory C Unused D Set Speed Format of the command: D,speed_motor_left, speed_motor_right ↵↵↵↵ Format of the response: d \r\n Effect: Set the speed of the both motors. 0 will stop the engine. Maximum
forward speed is 20 and maximum backward -20 Example: D,7,-7↵↵↵↵ Note: If you set a value bigger than 20, the K-Junior will limit by it self to 20
K-Junior User Manual rev 1.2 33
E Read Speed Format of the command: E ↵↵↵↵ Format of the response: e, speed_motor_left, speed_motor_right \r\n Effect: Read the speed of the motors. As the motors is in open loop, this value
will the same as the last Set Speed command F Read Time Stamp Format of the command: F ↵↵↵↵ Format of the response: f, time_stamp \r\n Effect: Read the time stamp base. The unit is the millisecond, and the
maximum time is based on a 32 bits variable (more than 1000 hours). This value is reset at each boot.
G Reset Time Stamp Format of the command: G↵↵↵↵ Format of the response: g \r\n Effect: Reset the Time Stamp base. H Buzzer Format of the command: H,frequency↵↵↵↵ Format of the response: h \r\n Effect: Configure the frequency of the Buzzer. 0 will turn it Off. 1 is 20Hz and
100 2 kHz. Please refer to section 3.2.3 to select your desired frequency.
Example: H,80↵↵↵↵ I Read Switches Format of the command: I ↵↵↵↵ Format of the response: i, value \r\n Effect: Read the value of the dip switch setting. Note: switch 1 is LSB and 3 MSB (see figure 2.2).
K-Junior User Manual rev 1.2 34
J Scan the I2C Bus Format of the command: J ↵↵↵↵ Format of the response: j,extension_address \r\n Effect: Scan the whole I2C Bus to detect which extension is plugged. The
returned value is in Hexadecimal. K Unused L Change Led State Format of the command: L, led_number, led_value↵↵↵↵ Format of the response: l \r\n Effect: Configure the state of the selected led (0 to 4). Value 0 will turn it Off,
1 = On, 2 = toggle and 3 = blinks. Example: L, 2, 1↵↵↵↵ Note: If you change the state of the Power ON Led (Led4), it will stop blinking and change to your desired state. M Read ambient light sensors (only an area) Format of the command: M, area ↵↵↵↵ Format of the response: m, area_ambiant_light_values \r\n Effect: Read the 10 bits (0 to 1024) brightness values of the sensors contains in
the selected area. Area 0 is for the Front_left, Front and Front_right sensors. Area 1 is for the Left, Right and the Rear sensors. And area 2 is for the four ground sensors (Ground_Left, Ground_Front_left, Ground_Front_right, Ground_Right respectively).
Example: M, 1 ↵↵↵↵ Note: A value of 0 means that the sensors is saturate with IR light, and a big value means that there’s no IR light source in front of the sensor.

K-Junior User Manual rev 1.2 35
N Read proximity sensors Format of the command: N ↵↵↵↵ Format of the response: n, Left, Front_Left, Front, Front_Right, Right, Rear,
Ground_Left, Ground_Front_Left, Ground_Front_Right, Ground_Right \r\n
Effect: Read the 10 bit (0 to 1024) proximity value of each infra-red sensors. Note: The smaller the value, the further the object is from it. A value of 900 (i.e.) means that an obstacle is very close from the sensor. O Read ambient light sensors Format of the command: O ↵↵↵↵ Format of the response: o, Left, Front_Left, Front, Front_Right, Right, Rear,
Ground_Left, Ground_Front_Left, Ground_Front_Right, Ground_Right \r\n
Effect: Read the 10 bit (0 to 1024) brightness value of each infra-red sensors. Note: A value of 0 means that the sensors is saturate with IR light, and a big value means that there’s no IR light source in front the sensor. P Read proximity sensors (only an area) Format of the command: P, area ↵↵↵↵ Format of the response: p, area_proximity_values \r\n Effect: Read the 10 bits (0 to 1024) proximity value of the sensors contains in
the selected area. Area 0 is for the Front_left, Front and Front_right sensors. Area 1 is for the Left, Right and the Rear sensors. And area 2 is for the four ground sensors (Ground_Left, Ground_Front_left, Ground_Front_right, Ground_Right respectively).
Example: P, 2 ↵↵↵↵ Note: A value of 0 means that the sensors is saturate with IR light, and a big value ( (~800) means that there’s no IR light source in front of the sensor. Q Reserved for Webots-K-Junior

K-Junior User Manual rev 1.2 36
R Read I2C Extension Bus Format of the command: R, Slave_Write_Address, Register_Address,
Number_of_Register ↵↵↵↵ Format of the response: r, Register_Data\r\n Effect: Read a given number of registers of an I2C peripheral. Please provide
register write address, i.e. odd address. Examples: R,C0,20,03 ↵↵↵↵ Reads three registers at address 0x20, 0x21 and 0x22 of peripheral 0xC0 Note: All parameters must in hexadecimal format. The response will be in decimal format (0 to 255) S Reserved for Webots-K-Junior T Read TV remote buffer Format of the command: T ↵↵↵↵ Format of the response: t, TV_Addr, TV_Data\r\n Effect: Read the last address and data bytes received by the TV remote
receiver. U Reserved for Webots-K-Junior V Transmit a RC5 Data on the IR emitter Format of the command: V, TV_Addr, TV_Data ↵↵↵↵ Format of the response: v \r\n Effect: Send an address and a data through the IR emitter. All K-Junior close
to the emitter, will receive the command as a TV remote control. Example: V,8,21 ↵↵↵↵ Note: The address value can be configure from 0 to 31 (5 bits), and the data from 0 to 63 (6 bits).
K-Junior User Manual rev 1.2 37
W Write I 2C Extension Bus Format of the command: W, Slave_Address, Register_Address, Value ↵↵↵↵ Format of the response: w\r\n Effect: Write a value in a register of the selected extension. Examples: W,C0,40,32 ↵↵↵↵ Writes 0x32 at address 0x40 of peripheral 0xC0 Note: All parameters must in hexadecimal format. X Reserved for Webots-K-Junior Y Unused Z Processor Reset Format of the command: Z ↵↵↵↵ Format of the response: z\r\n Effect: This command allows resetting the K-Junior as it was cycled On/Off
K-Junior User Manual rev 1.2 38
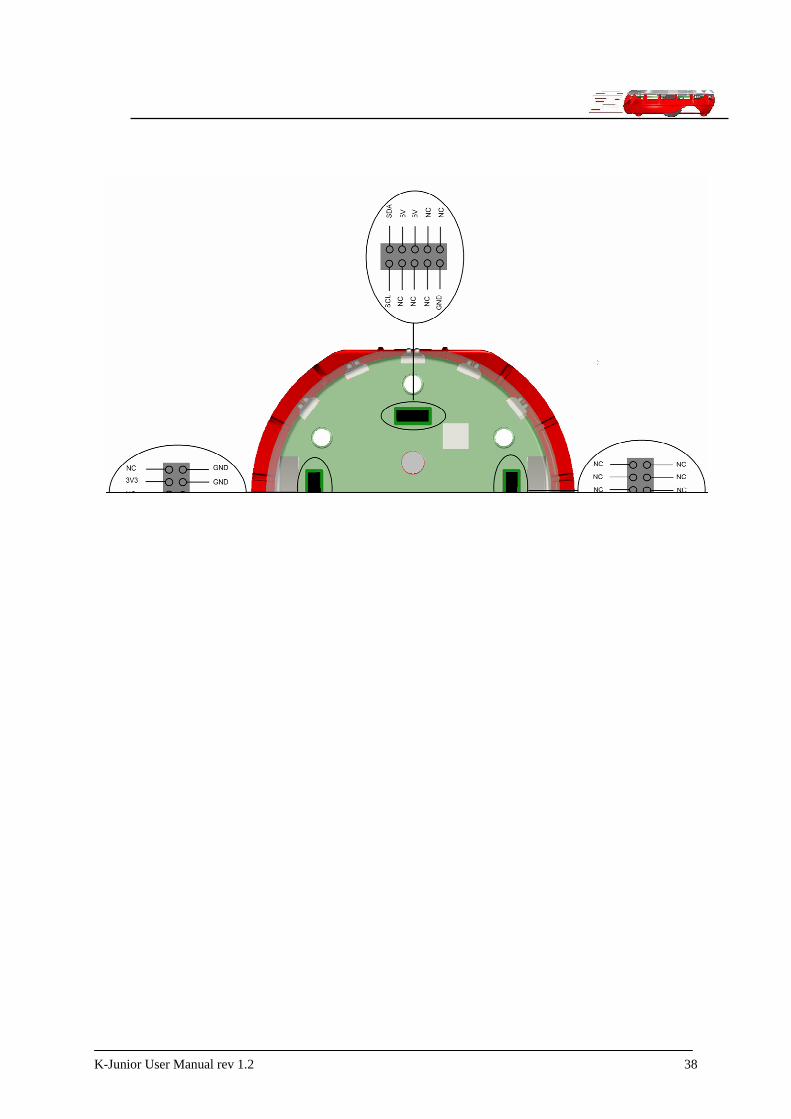
B EXTENSION CONNECTORS
Figure B.1: K-Junior connectors pinning
Note: The PWIN signal, on the mini-USB connector, is the Power In to charge the battery. Apply a +5V between this pin and the GND to charge the battery.
K-Junior User Manual rev 1.2 39
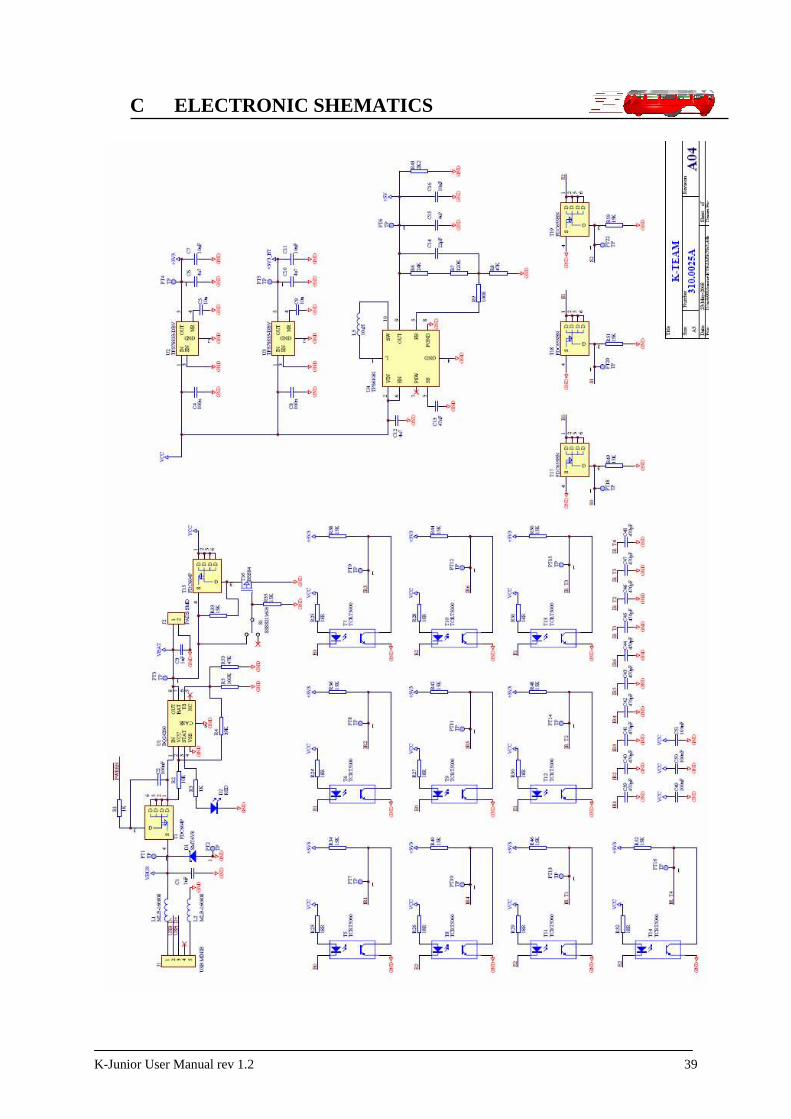
C ELECTRONIC SHEMATICS
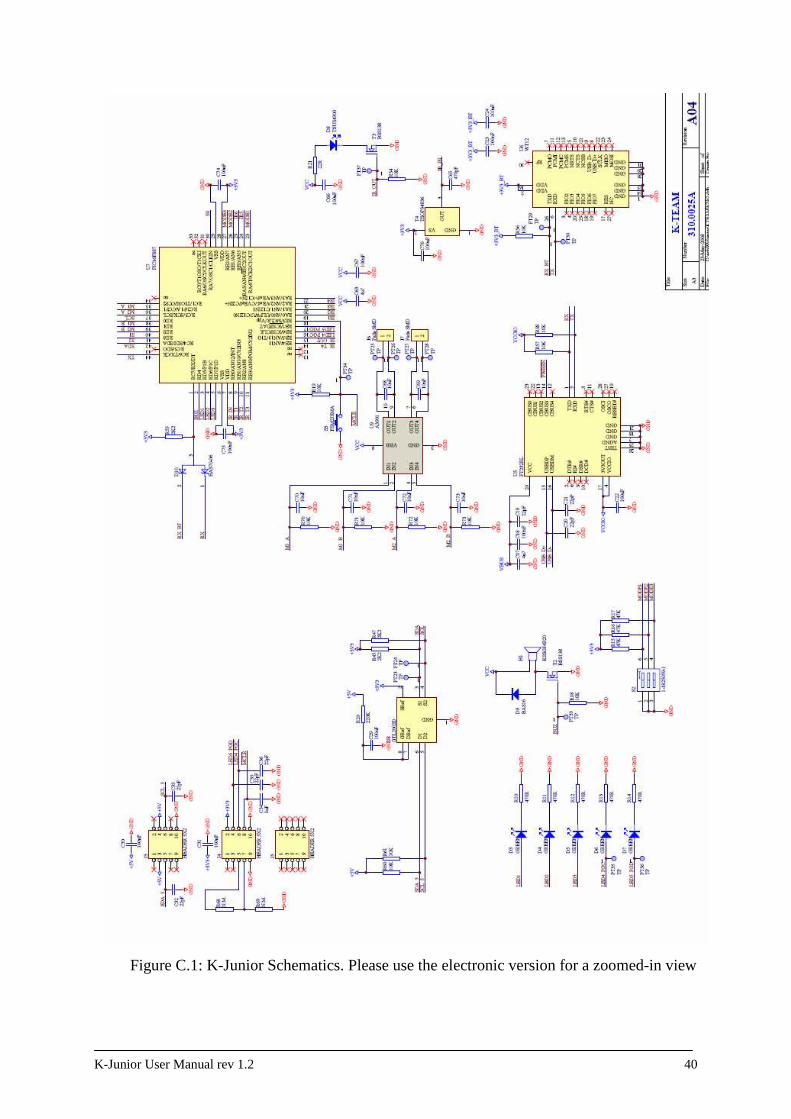
K-Junior User Manual rev 1.2 40
Figure C.1: K-Junior Schematics. Please use the electronic version for a zoomed-in view

K-Junior User Manual rev 1.2 41
D WARRANTY
K-TEAM warrants that K-Junior Pack, respectively K-Junior Pack Deluxe, is free from defects in materials and workmanship and in conformity with the respective specifications of the product for the minimal legal duration, respectively one year from the date of delivery.
Upon discovery of a defect in materials, workmanship or failure to meet the
specifications in the Product during the afore mentioned period, Customer must request help on K-Team Internet forum on http://www.k-team.com/kforum/ by detailing:
• The type of K-Junior used (package, version). • The expansion modules. • The programming environment of the robot (standard, version, OS). • The standard use of Product before the appearance of the problem. • The description of the problem.
If no answers have been received within two working days, Customer can contact K-TEAM support by phone or by electronic mail with the full reference of its order and K-Junior serial number.
K-TEAM shall then, at K-TEAM's sole discretion, either repair such Product or
replace it with the equivalent product without charging any technical labour fee and repair parts cost to Customer, on the condition that Customer brings such Product to K-TEAM within the period mentioned before. In case of repair or replacement, K-TEAM may own all the parts removed from the defective Product. K-TEAM may use new and/or reconditioned parts made by various manufacturers in performing warranty repairs and replacement of the Product. Even if K-TEAM repairs or replaces the Product, its original warranty term is not extended.
This limited warranty is invalid if the factory-applied serial number has been
altered or removed from the Product.

K-Junior User Manual rev 1.2 42
This limited warranty covers only the hardware and software components contained in the Product. It does not cover technical assistance for hardware or software usage and it does not cover any software products contained in the Product. K-TEAM excludes all warranties expressed or implied in respect of any additional software provided with Product and any such software is provided "AS IS" unless expressly provided for in any enclosed software limited warranty. Please refer to the End User License Agreements included with the Product for your rights with regard to the licensor or supplier of the software parts of the Product and the parties' respective obligations with respect to the software.
This limited warranty is non-transferable. It is likely that the contents of Customer's flash memory will be lost or reformatted
in the course of the service and K-TEAM will not be responsible for any damage to or loss of any programs, data or other information stored on any media or any part of the Product serviced hereunder or damage or loss arising from the Product not being available for use before, during or after the period of service provided or any indirect or consequential damages resulting therefore.
IF DURING THE REPAIR OF THE PRODUCT THE CONTENTS OF THE
FLASH MEMORY ARE ALTERED, DELETED, OR IN ANY WAY MODIFIED, K-TEAM IS NOT RESPONSIBLE WHATEVER. CUSTOMER'S PRODUCT WILL BE RETURNED TO CUSTOMER CONFIGURED AS ORIGINALLY PURCHASED (SUBJECT TO AVAILABILITY OF SOFTWARE).
Be sure to remove all third parties' hardware, software, features, parts, options,
alterations, and attachments not warranted by K-TEAM prior to Product service. K-TEAM is not responsible for any loss or damage to these items.
This warranty is limited as set out herein and does not cover, any consumable
items (such as batteries) supplied with the Product; any accessory products which is not contained in the Product; cosmetic damages; damage or loss to any software programs, data, or removable storage media; or damage due to (1) acts of God, accident, misuse, abuse, negligence, commercial use or modifications of the Product; (2) improper operation or maintenance of the Product; (3) connection to improper voltage supply; or (4) attempted repair by any party other than a K-TEAM authorized robot service facility.
This limited warranty does not apply when the malfunction results from the use of
the Product in conjunction with any accessories, products or ancillary or peripheral equipment, or where it is determined by K-Team that there is no fault with the Product itself.

K-Junior User Manual rev 1.2 43
K-TEAM EXPRESSLY DISCLAIMS ALL OTHER WARRANTIES THAN STATED HEREINBEFORE, EXPRESSED OR IMPLIED, INCLUDING WITHOUT LIMITATION IMPLIED WARRANTIES OF MERCHANTABILITY AND FIT NESS FOR A PARTICULAR PURPOSE TO THE FULLEST EXTENT PERMITTED BY LAW.
Limitation of Liability: IN NO EVENT SHALL EITHER PARTY BE LIABLE
TO THE OTHER FOR ANY INDIRECT, SPECIAL, INCIDENTAL OR CONSEQUENTIAL DAMAGES RESULTING FROM PERFORMANCE OR FAILURE TO PERFORM UNDER THE CONTRACT, OR FROM THE FURNISHING, PERFORMANCE OR USE OF ANY GOODS OR SERVICE SOLD OR PROVIDED PURSUANT HERETO, WHETHER DUE TO A BREACH OF CONTRACT, BREACH OF WARRANTY, NEGLIGENCE, OR OTHERWISE. SAVE THAT NOTHING HEREIN SHALL LIMIT EITHER PARTY'S LIABILITY FOR DEATH OR PERSONAL INJURY ARISING FROM ITS NEGLIGENCE, NEITHER PARTY SHALL HAVE ANY LIABILITY TO THE OTHER FOR INDIRECT OR PUNITIVE DAMAGES OR FOR ANY CLAIM BY ANY THIRD PARTY EXCEPT AS EXPRESSLY PROVIDED HEREIN.
K-Junior User Manual rev 1.2 44
K-Team S.A.
Rue Galilee 9
1400 Yverdon-les-bains
Switzerland