Embed Size (px)
Citation preview

Aluminum
Gloss Black
Gloss Green
Gloss Orange
Gloss Red
Gloss Yellow
Semigloss Black
Satin White
Silver
Steel
Transparent Red
If you have any questions or comments, call our hotline at: (800) 833-3570or, please write to:
Revell-Monogram Consumer Service Department, 725 Landwehr, Northbrook, Illinois 60062Be sure to include the plan number (85238110200), part number, description, your return address and phone number.
Visit our website: www.revell-monogram.com
71 CUDA KIT2381 85238110200
* REPEAT SEVERAL TIMES* A REPETER PLUSIEURS FOIS
* CEMENT TOGETHER* A COLLER
* ALTERNATIVE ASSEMBLY* ENSEMBLAGE ALTERNATIVE
* REMOVE AND THROW AWAY* A RETIRER ET JETER
* DO NOT CEMENT* NE PAS COLLER
* OPTIONAL PARTS* PIECES EN OPTION
* DECAL * DECAL COMANIE
REVELL-MONOGRAM, LLC Northbrook, IL. Copyright © 2003. All rights reserved. Made in U.S.A.
Needing a small, sporty car to compete with the likes of the wildly successful Ford Mustang, Plymouth® added a fastback roofline to their compact Valiant model and named it the Barracuda. While it had Chrysler’s® small 273 cubic inch V8 engine, it was really still an economy car and posed no threat to competitor’s sales figures. Subsequent restyling in 1967 made both the Valiant and the Barracuda more attractive but it wasn’t until 1970 that the Barracuda really became a player in the then red hot Pony Car wars. The 1970 ‘Cuda, as the performance oriented models were now called, and its sister car for the Dodge division, the Challenger, were re-engineered to be longer and wider. This provided both a wider track for better handling and straight line traction and a larger engine compartment. This last feature was especially important as Plymouth had some monster motors it wanted to shove into the car. The most fabled and feared of the Mopar powerplants was the 426 Hemi. Nicknamed for its hemispherical combustion chambers, the Hemi was expensive, temperamental and difficult to drive if
used as everyday transportation. But it was as close to an actual race engine as one could get without building it yourself. Because of that, production numbers for all Chrysler models with the Hemi engine option were low compared to the other engine choices available. Typically, the Hemi would be ordered in a car intended for racing. That meant the least expensive two door hard-top or sedan with as few options as possible, all in the pursuit of weight reduction, the key to speed. Convertible models, which were heavier by nature than their steel roofed counterparts, were ordered with the Hemi far less frequently. With impending regulations from both the government and insur-ance companies looming, the viability of monster motors like the 426 Hemi was fading. 1971 was the last year Chrysler installed the engine in street vehicles and less than 10 Hemi ‘Cuda ragtops were built the entire model year. In fact, the yellow and white example used as the prototype for this Revell kit was the very last car of this body type and engine combination Chrysler would ever build.
Aluminum
Noir lustré
Vert lustré
Orange lustré
Rouge lustré
Jaune lustré
Noir satiné
Blanc satiné
Argent
Acier
Rouge transparent
This optional paint guide is provided if you choose to detail paint your model.
Ce guide de peinture vous sera fourni si vous choisissez de peindre votre modèle en détail.
* Study the assembly drawings.* Each plastic part is identified by a number.* In the assembly drawings, some parts will be
marked by a star (★) to indicate chrome plated plastic.
* For better paint and decal adhesion, wash the plastic parts in a mild detergent solution. Rinse and let air dry.
* Check the fit of each piece before cementing in place.
* Use only cement for polystyrene plastic.* Scrape plating and paint from areas
to be cemented.* Allow paint to dry thoroughly before
handling parts.* Any unused parts may be discarded.
DECAL APPLICATION INSTRUCTIONS
1. Cut desired decal from sheet.2. Dip decal in water for a few seconds.3. Place wet decal on paper towel.4. Wait until decal is movable on paper backing.5. Place decal in position on model, face up and
slide backing away.6. Press out air bubbles with a soft damp cloth.7. Milkiness that may appear is for better decal
adhesion and will dry clear. Wipe away any excess adhesive.
8. Do not touch decal until fully dry.9. Allow the decals 48 hours to dry before
applying clear coat.
NOTE: Decals are compatible with setting solutions or solvents.
READ THIS BEFORE YOU BEGIN LIRE CE QUI SUIT AVANT DE COMMENCER
* Etudier les schémas de montage.* Chaque pièce en plastique est identifiée par un numéro.* Sur les schémas de montage, certaines pièces sont
marquées d'une étoile (★) pour indiquer qu'elles sont en plastique chromé.
* Pour une meilleure prise de la peinture et des autocollants, laver les pièces en plastique avec une solution détergente peu concentrée. Les rincer et les laisser sécher à l'air.
* Vérifier que chaque pièce s'ajuste bien avant de la coller en place.
* N'utiliser que de la colle pour polystyrène.* Gratter les parties à coller pour enlever le chrome et la peinture.* Laisser la peinture bien sécher avant de manipuler les pièces.* Toute pièce inutilisée peut être jetée.
DIRECTIVES D'APPLICATION DES AUTOCOLLANTS
1. Découper l'autocollant désiré de la feuille.2. Tremper l'autocollant dans de l'eau pendant quelques secondes.3. Placer l'autocollant mouillé sur une serviette en papier.4. Attendez que l'autocollant puisse être déplacé sur son support
en papier.5. Mettre l'autocollant en position sur le modèle face sur
le dessus et faire glisser le support pour l'enlever.6. Appuyer avec un chiffon doux humide pour éliminer les bulles d'air.7. La substance laiteuse qui peut apparaître est destinée à
améliorer l'adhésion de l'autocollant et devient incolore au séchage. Essuyer pour enlever tout excédent d'adhésif.
8. Ne pas toucher l'autocollant tant qu'il n'est pas bien sec.9. Laisser l'autocollant sécher pendant 48 heures avant
d'appliquer une couche transparente.
REMARQUE: Les autocollants sont compatibles avec les solutions de fixage ou les solvants.
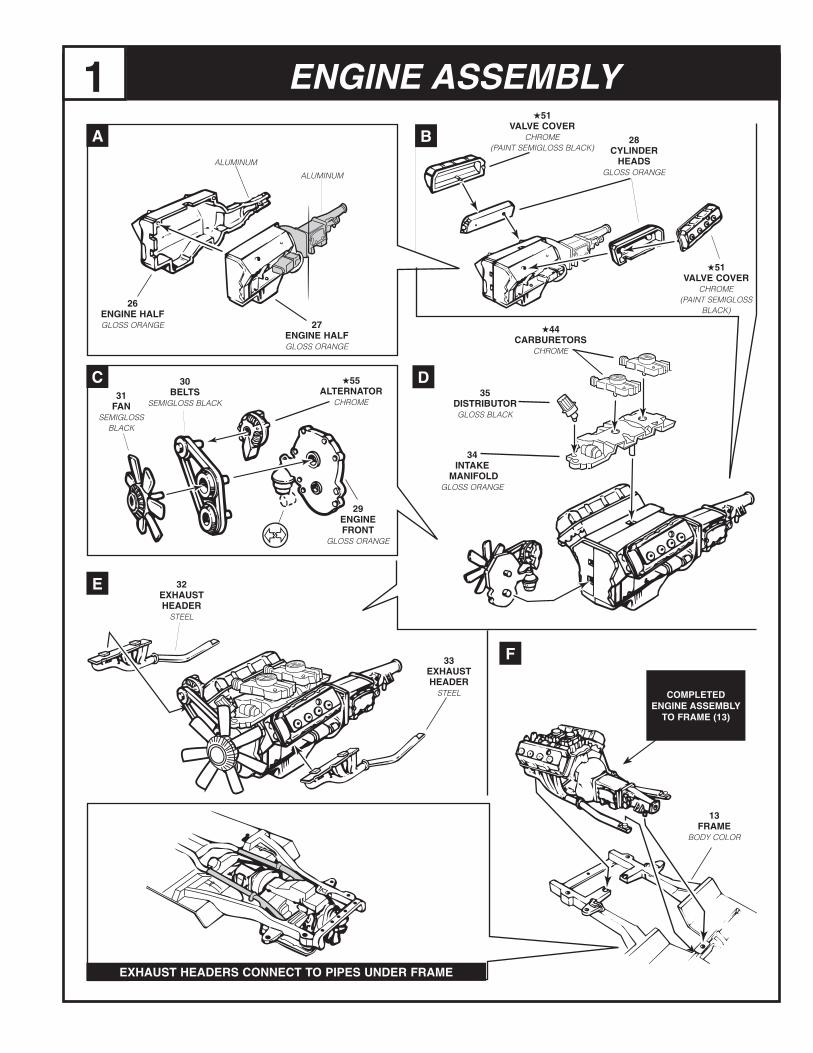
ENGINE ASSEMBLY1
EXHAUST HEADERS CONNECT TO PIPES UNDER FRAME
COMPLETEDENGINE ASSEMBLY
TO FRAME (13)
A
C D
E
F
27ENGINE HALFGLOSS ORANGE
34INTAKE
MANIFOLDGLOSS ORANGE
28CYLINDER
HEADSGLOSS ORANGE
26ENGINE HALFGLOSS ORANGE
29ENGINE FRONT
GLOSS ORANGE
35DISTRIBUTORGLOSS BLACK
32EXHAUST HEADER
STEEL
33EXHAUST HEADER
STEEL
31FAN
SEMIGLOSS BLACK
30BELTS
SEMIGLOSS BLACK
ALUMINUM
ALUMINUM
★51VALVE COVER
CHROME(PAINT SEMIGLOSS BLACK)
★55ALTERNATOR
CHROME
★44CARBURETORS
CHROME
★51VALVE COVER
CHROME(PAINT SEMIGLOSS
BLACK)
B
13FRAME
BODY COLOR

WHEEL ASSEMBLY 2
SUSPENSION ASSEMBLY 3
★52OUTER WHEEL
CHROME
14FRONT
SUSPENSIONSEMIGLOSS
BLACK
15REAR
SUSPENSIONSEMIGLOSS BLACK
(PAINT SHADED AREA STEEL)
SEMIGLOSS BLACK
ALUMINUM
ALUMINUM
ALUMINUM
ALUMINUM
SEMIGLOSS BLACK
ALUMINUM
TIRE
18INNER WHEEL
SEMIGLOSS BLACK
FRONT
REAR

WINDSHIELD AND RADIATOR ASSEMBLY4
INTERIOR ASSEMBLY 5A B
C
D
SEMIGLOSS BLACK
SEMIGLOSS BLACK
SILVER
60WINDSHIELD
CLEAR
1BODY
7RADIATOR SHROUD
BODY COLOR
19INTERIOR
SEMIGLOSS BLACK(PAINT SHADED
AREA SATIN WHITE)
66RIGHT
DOOR PANELSATIN WHITE
SILVER
63FILLER PIECE
SEMIGLOSS BLACK
23STEERING
WHEELSEMIGLOSS BLACK
SEMIGLOSS BLACK
SILVERSILVER
22DASHBOARD
SEMIGLOSS BLACK
62FILLER PIECE
SEMIGLOSS BLACK
65LEFT
DOOR PANELSATIN WHITE
★49REAR VIEW
MIRRORCHROME
★45SHIFTERCHROME
20
17
19
18

INTERIOR ASSEMBLY CONTINUED5
FRAME ASSEMBLY6
E F COMPLETEDINTERIOR
ASSEMBLYTO BODY
CLEAN OUT HOLES FOR
SPOILER
20SEAT FRONT
SATIN WHITE
21SEAT BACKSATIN WHITE
67BOOT
SATIN WHITE
6REAR PANBODY COLOR
★43TAILLIGHT
CHROME
★39BUMPERCHROME
TRANSPARENT RED
★38TAILLIGHT
CHROMEA B
D E
C
FRAME TO
BODY
TRANSPARENT RED

FRONT ASSEMBLY7
ENGINE COMPARTMENT ASSEMBLY8
61HEAD LIGHTS
CLEAR
SEMIGLOSS BLACK
56MASTER
CYLINDERSEMIGLOSS
BLACK(PAINT SHADED
AREA ALUMINUM)
36WATER HOSE
SEMIGLOSS BLACK
SILVER
PAINT BATTERY SEMIGLOSS BLACK, CONTACTS SILVER,
CELLS GLOSS GREEN
★41LIGHT
BEZELSCHROME
★50DRIVINGLIGHTSCHROME4
GRILLEBODY COLOR
★40FRONT
BUMPERCHROME
GLOSS WHITE
SEMIGLOSS BLACK
SILVER
PAINT WIRE GLOSS RED
PAINT WIRE GLOSS BLACK

FINAL ASSEMBLY9
9SPOILER
12MIRROR
HOUSINGBODY COLOR
11MIRROR
HOUSINGBODY COLOR
48TOP
AIR SCOOPSEMIGLOSS BLACK
47BOTTOM
AIR SCOOPSEMIGLOSS
BLACK
2HOOD
★42MIRRORCHROME
★42MIRRORCHROME
SILVER
SEMIGLOSS BLACK
SILVER
SILVER
SEMIGLOSS BLACK
SEMIGLOSS BLACK
(UNDER HOOD)
13B
13A
APPLY DECAL 13A TO THE UNDERSIDE OF THE HOOD

85238110200
DECAL PLACEMENT10