Embed Size (px)
Citation preview

f-14b tomcat KIT 5525 85552500200
Gray
Light Gray
Gunship Gray
Olive Green
Insignia Blue
Semi Gloss White
Flat Yellow
Aluminum
Silver
Steel
Gloss Red
Gloss Green
Semi Gloss Black
Flat Black
Medium Gray
Medium Dark Gray
* REPEAT SEVERAL TIMES* A REPETER PLUSIEURS FOIS
* CEMENT TOGETHER* A COLLER
* ALTERNATIVE ASSEMBLY* ENSEMBLAGE ALTERNATIVE
* REMOVE AND THROW AWAY* A RETIRER ET JETER
* DO NOT CEMENT* NE PAS COLLER
* OPTIONAL PARTS* PIECES EN OPTION
* DECAL * DECAL COMANIE
this paint guide is provided to complete this kit as shown on the box.
Ce guide de peintures est fourni pour reproduire le modèle réduit qui apparaît sur la boîte.
Gris
Gris clair
Gris hélicoptére
Gris vert
Bleu embléme
Blanc satiné
Jaune mat
Aluminium
Argent
Acier
Rouge brillant
Vert brillant
Noir satiné
Blanc mat
Gris moyen
Gris foncé moyen
* Study the assembly drawings.* Each plastic part is identified by a number.* In the assembly drawings, some parts will be
marked by a star (★) to indicate chrome plated plastic.
* For better paint and decal adhesion, wash the plastic parts in a mild detergent solution. Rinse and let air dry.
* Check the fit of each piece before cementing in place.
* Use only cement for polystyrene plastic.* Scrape plating and paint from areas
to be cemented.* Allow paint to dry thoroughly before
handling parts.* Any unused parts may be discarded.
DEcaL aPPLIcatIoN INStRUctIoNS
1. Cut desired decal from sheet.2. Dip decal in water for a few seconds.3. Place wet decal on paper towel.4. Wait until decal is movable on paper backing.5. Place decal in position on model, face up and
slide backing away.6. Press out air bubbles with a soft damp cloth.7. Milkiness that may appear is for better decal
adhesion and will dry clear. Wipe away any excess adhesive.
8. Do not touch decal until fully dry.9. Allow the decals 48 hours to dry before
applying clear coat.
NotE: Decals are compatible with setting solutions or solvents.
REaD tHIS bEfoRE YoU bEGIN LIRE cE QUI SUIt aVaNt DE commENcER
* Etudier les schémas de montage.* Chaque pièce en plastique est identifiée par un numéro.* Sur les schémas de montage, certaines pièces sont
marquées d'une étoile (★) pour indiquer qu'elles sont en plastique chromé.
* Pour une meilleure prise de la peinture et des autocollants, laver les pièces en plastique avec une solution détergente peu concentrée. Les rincer et les laisser sécher à l'air.
* Vérifier que chaque pièce s'ajuste bien avant de la coller en place.
* N'utiliser que de la colle pour polystyrène.* Gratter les parties à coller pour enlever le chrome et la peinture.* Laisser la peinture bien sécher avant de manipuler les pièces.* Toute pièce inutilisée peut être jetée.
DIREctIVES D'aPPLIcatIoN DES aUtocoLLaNtS
1. Découper l'autocollant désiré de la feuille.2. Tremper l'autocollant dans de l'eau pendant quelques secondes.3. Placer l'autocollant mouillé sur une serviette en papier.4. Attendez que l'autocollant puisse être déplacé sur son support
en papier.5. Mettre l'autocollant en position sur le modèle face sur
le dessus et faire glisser le support pour l'enlever.6. Appuyer avec un chiffon doux humide pour éliminer les bulles d'air.7. La substance laiteuse qui peut apparaître est destinée à
améliorer l'adhésion de l'autocollant et devient incolore au séchage. Essuyer pour enlever tout excédent d'adhésif.
8. Ne pas toucher l'autocollant tant qu'il n'est pas bien sec.9. Laisser l'autocollant sécher pendant 48 heures avant
d'appliquer une couche transparente.
REmaRQUE: Les autocollants sont compatibles avec les solutions de fixage ou les solvants.
If you have any questions or comments, call our hotline at: (800) 833-3570or, please write to:
Revell Inc Consumer Service Department, 1850 Howard Street Unit A, Elk Grove Village, Illinois 60007Be sure to include the plan number (85552500200), part number, description, your return address and phone number.
Visit our website: www.revell.com
Revell Inc Elk Grove Village, IL. Copyright © 2008. All rights reserved.
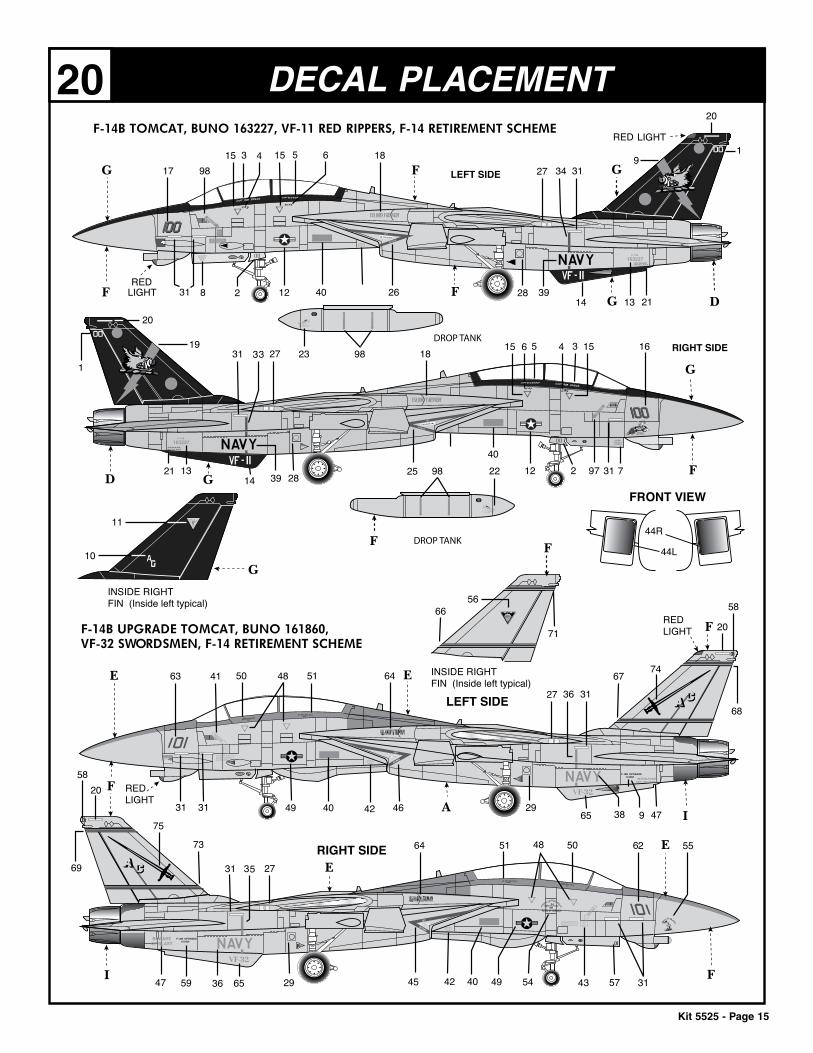
The Grumman F-14 Tomcat was a supersonic, twin-engine, two seat, vari-able geometry wing aircraft. The F-14 was used as a precision strike bomber, defence interceptor and tactical recon-naissance platform from 1974 to 2006. Your Revell kit has optional AIM-54 Phoenix missles, AIM-9 Sidewinders, AIM-7 Sparrow III's, 2000 lb JDAM bombs, 500 lb. LGB bombs and 500 lb. MK-82 bombs, seated pilot or standing figures of pilot and radar officer plus two long range fuel tanks. Optional decal markings are included for F-14B Tomcat, BUNO 163227, VF-11 Red Rippers or F-14B Upgrade Tomcat, BUNO 161860, VF-32 Swordsman.
Kit 5525 - Page 2
COCKPIT ASSEMBLY1122
FRONT INSTRUMENT
PANELSEMI GLOSS
BLACK
11COCKPIT
SEMI GLOSSBLACK
GRAY
GRAY
GRAY
GREEN
GREEN
123REAR
INSTRUMENT PANELSEMI GLOSS BLACK
19REAR
CONTROL STICKSEMI GLOSS
BLACK
15RIGHT
SEAT SIDEGRAY
16LEFTSEAT SIDE
GRAY
65PILOT
66PILOT ARM
14SEAT
DARK GRAY
17EJECTION
SEAT HANDLE
18FRONT
CONTROL STICKSEMI GLOSS
BLACK
COLOR NOTE:
WHITE: HELMETS OLIVE GREEN: SUIT, LIFE VEST, AND PARACHUTE STRAPS SILVER: BUCKLES ON STRAPS DARK GRAY: MASK AND HOSE BLACK: BOOTS
1FUSELAGE
TOP
FUSELAGE SIDE / WING ASSEMBLY2
Kit 5525 - Page 3
21LEFT
FUSELAGE SIDEHOLES FOR
FUEL TANKS
HOLES FOR FUEL TANKS
DECAL44L
DECAL44R
20RIGHT
FUSELAGE SIDE
2FUSELAGE BOTTOM
23COMPRESSOR BLADES
STEEL
JET INTAKEDANGER
VIEW WITH WINGS IN PLACE
FUSELAGE TOGETHER
2FUSELAGE
BOTTOM
ALUMINUM
ALUMINUM
7RIGHT
WING TOP8
LEFTWING TOP
10LEFT
WING BOTTOM
9RIGHT
WING BOTTOM
NOTE: IF YOU DECIDE TO USE THE PART #26 LADDER IN STEP (18) THEN CAREFULLY CUT OUT THE SHADED SECTION IN THIS STEP.
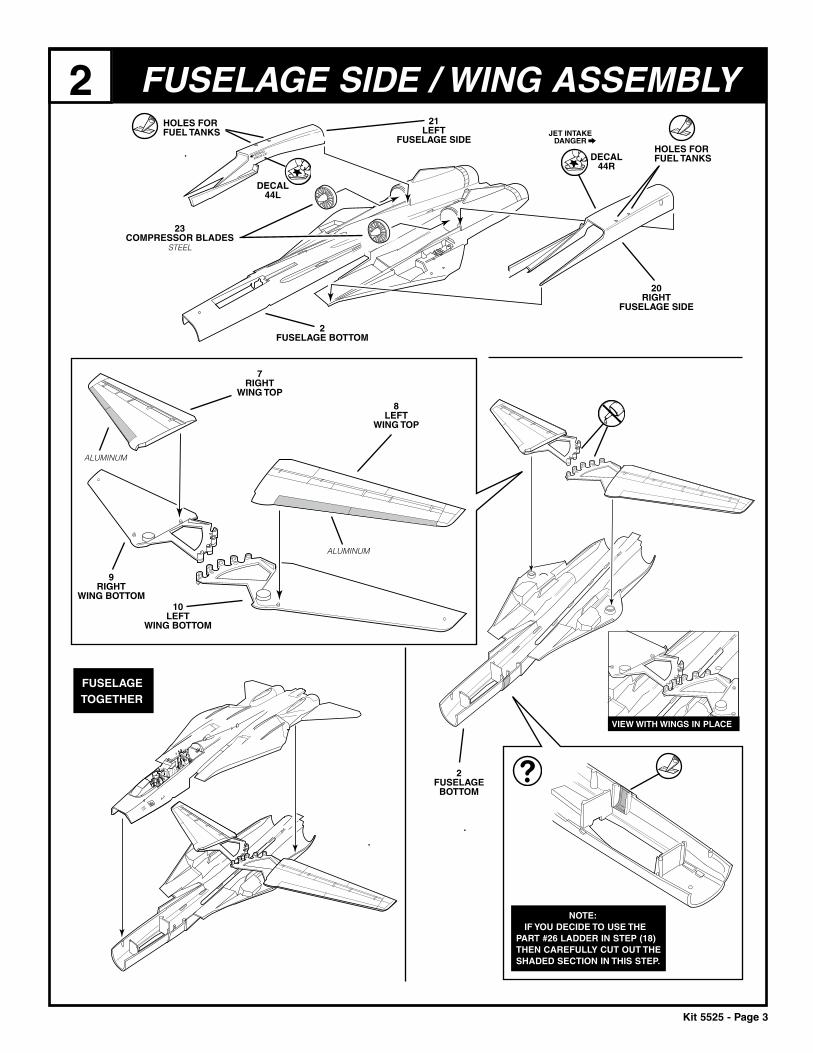
GEAR DOOR / POD ASSEMBLY3
GUN PANEL / EXHAUST ASSEMBLY4
Kit 5525 - Page 4
126LEFT
NOSE GEARDOOR BLISTER
127LEFT
NOSE GEARDOOR BOX
STEEL
28LEFT
NOSE GEAR WELLSEMI GLOSS WHITE
22RADOME
25GUN PANEL
71ANGLE OF
ATTACK PROBE
27RIGHT
NOSE GEAR WELLSEMI GLOSS WHITE
125RIGHT
HALF CHIN PODLIGHT GRAY
124LEFT
HALF CHIN PODLIGHT GRAY
103AFTERBURNER
STEEL101
EXHAUST NOZZLE
STEEL
102EXHAUST NOZZLE
WITH SLOTSTEEL
3ARRESTING HOOK
SEMI GLOSS WHITE
STEEL
ALUMINUM
34 NOSE GEARACTUATOR
SEMI GLOSS WHITE
ALUMINUM
TCS with ALQ - 100 ANTENNA

“D”
“B”
Kit 5525 - Page 5
TAIL ASSEMBLY5
LEFT MAIN WHEEL ASSEMBLY6
4RIGHT
VERTICAL TAIL
5LEFT
VERTICAL TAIL
6VERTICAL TAIL
FAIRING
6VERTICAL TAIL
FAIRING
DARK GRAYDARK GRAY
REAR VIEW OF FINS
SEMI GLOSS WHITE
120MAIN WHEEL
FRONTFLAT BLACK
52LEFT
MAIN GEAR STRUTINNER HALF
SEMI GLOSS WHITE
63LEFT
MAIN GEAR STRUTOUTER HALF
SEMI GLOSS WHITE
121MAIN WHEEL
BACKFLAT BLACK
SILVER
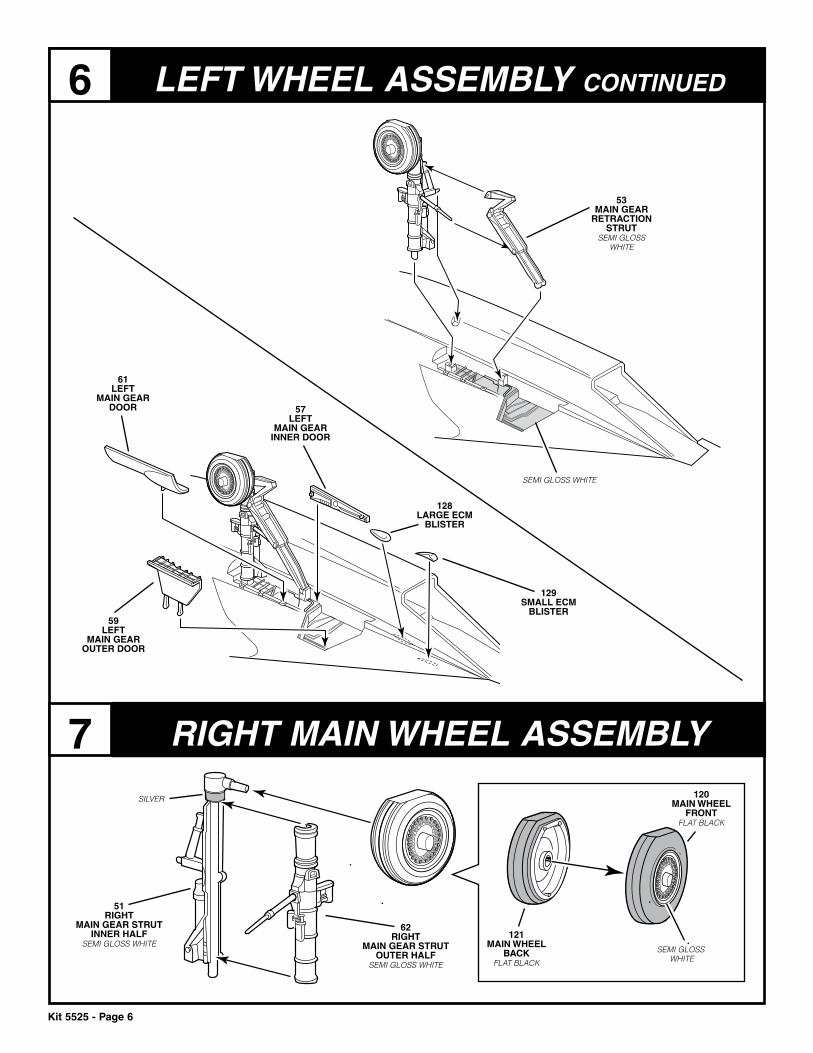
RIGHT MAIN WHEEL ASSEMBLY7
LEFT WHEEL ASSEMBLY CONTINUED6
Kit 5525 - Page 6
53MAIN GEAR
RETRACTION STRUT
SEMI GLOSSWHITE
57LEFT
MAIN GEAR INNER DOOR
61LEFT
MAIN GEAR DOOR
59LEFT
MAIN GEAR OUTER DOOR
129SMALL ECM
BLISTER
128LARGE ECM
BLISTER
SEMI GLOSS WHITE
SEMI GLOSS WHITE
SILVER 120MAIN WHEEL
FRONTFLAT BLACK
51RIGHT
MAIN GEAR STRUTINNER HALF
SEMI GLOSS WHITE
62RIGHT
MAIN GEAR STRUTOUTER HALF
SEMI GLOSS WHITE
121MAIN WHEEL
BACKFLAT BLACK
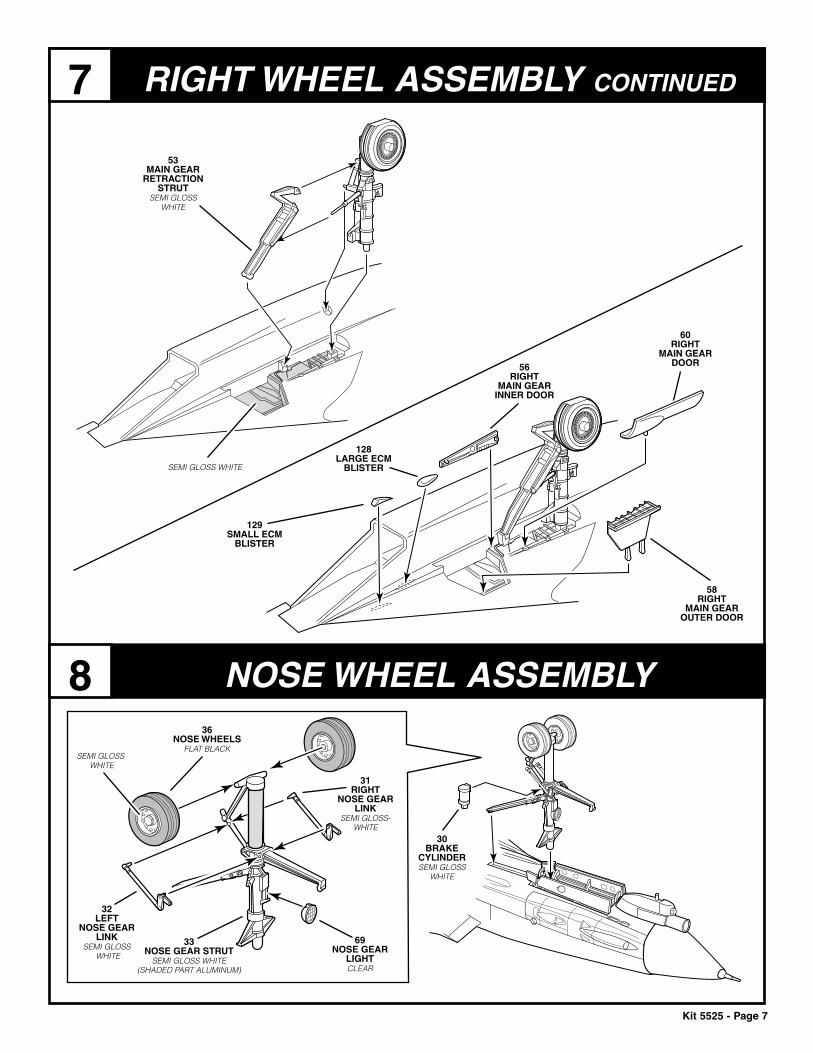
NOSE whEEl ASSEMBlY8
RIGhT whEEl ASSEMBlY CONTINUED7
Kit 5525 - Page 7
SEMI GLOSS WHITE
SEMI GLOSS WHITE
60RIGHT
MAIN GEAR DOOR56
RIGHTMAIN GEAR
INNER DOOR
129SMALL ECM
BLISTER
36NOSE WHEELS
FLAT BLACK
69NOSE GEAR
LIGHTCLEAR
31RIGHT
NOSE GEAR LINK
SEMI GLOSS-WHITE
32LEFT
NOSE GEAR LINK
SEMI GLOSS WHITE
33NOSE GEAR STRUT
SEMI GLOSS WHITE(SHADED PART ALUMINUM)
128LARGE ECM
BLISTER
58RIGHT
MAIN GEAR OUTER DOOR
53MAIN GEAR
RETRACTION STRUT
SEMI GLOSSWHITE
30BRAKE
CYLINDERSEMI GLOSS
WHITE
Kit 5525 - Page 8
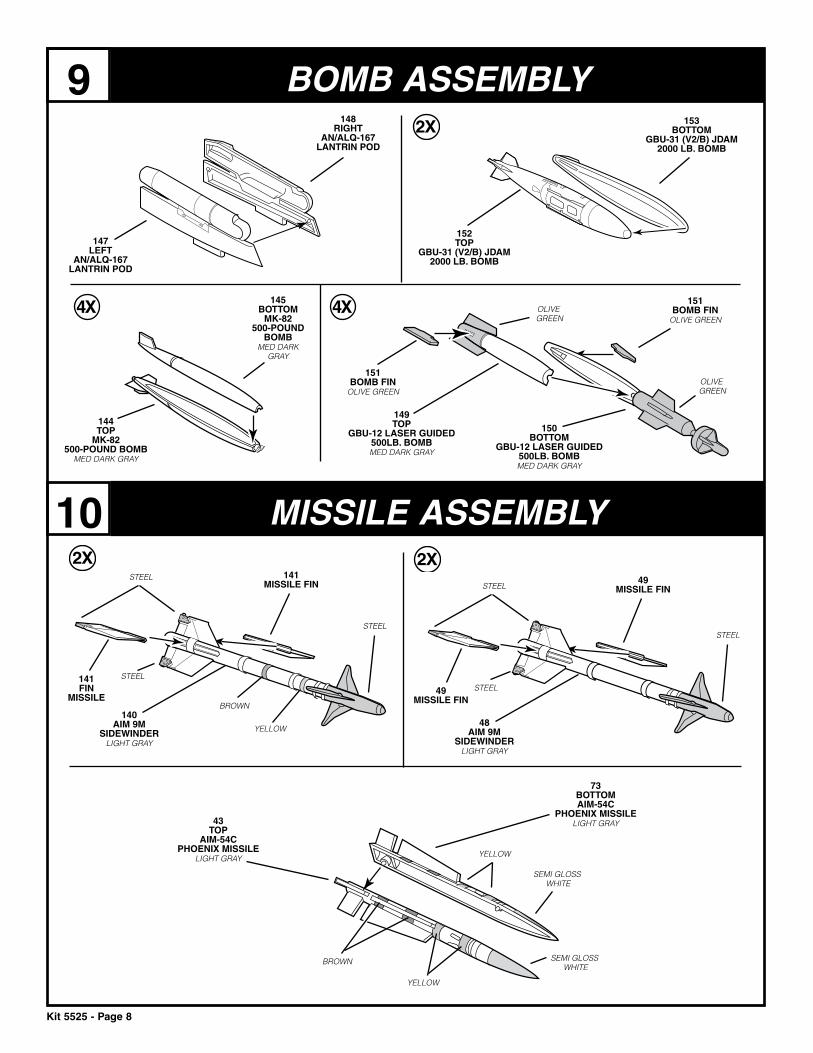
BOMB ASSEMBLY9
MISSILE ASSEMBLY10
147LEFT
AN/ALQ-167 LANTRIN POD
148RIGHT
AN/ALQ-167 LANTRIN POD
152TOP
GBU-31 (V2/B) JDAM 2000 LB. BOMB
153BOTTOM
GBU-31 (V2/B) JDAM 2000 LB. BOMB
144TOP
MK-82500-POUND BOMB
MED DARK GRAY
145BOTTOM
MK-82500-POUND
BOMBMED DARK
GRAY
149TOP
GBU-12 LASER GUIDED 500LB. BOMBMED DARK GRAY
150BOTTOM
GBU-12 LASER GUIDED 500LB. BOMBMED DARK GRAY
151 BOMB FIN
OLIVE GREEN
151 BOMB FIN
OLIVE GREEN
48AIM 9M
SIDEWINDERLIGHT GRAY
49MISSILE FIN
49MISSILE FIN
STEEL
STEEL
STEEL
140AIM 9M
SIDEWINDERLIGHT GRAY
141MISSILE FIN
141FIN
MISSILE
STEEL
STEEL
STEEL
YELLOW
BROWN
SEMI GLOSS WHITE
SEMI GLOSS WHITE
73BOTTOMAIM-54C
PHOENIX MISSILELIGHT GRAY43
TOPAIM-54C
PHOENIX MISSILELIGHT GRAY
YELLOW
YELLOW
BROWN
OLIVE GREEN
OLIVE GREEN
Kit 5525 - Page 9
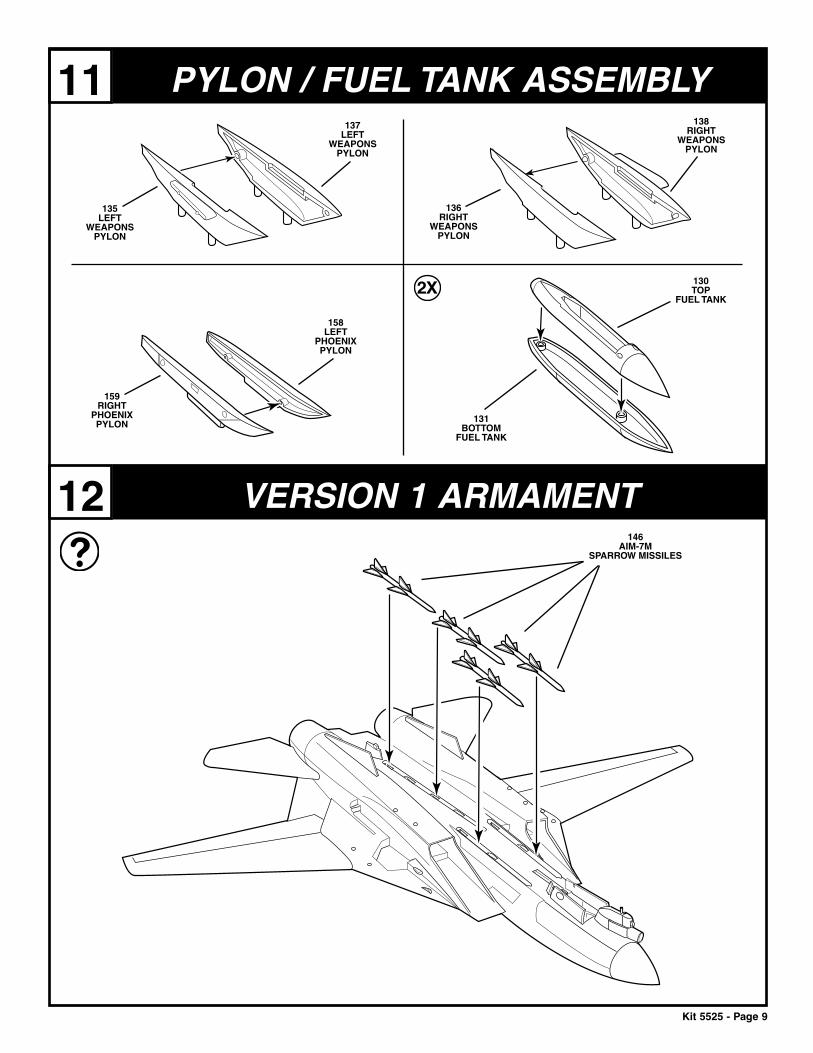
version 1 armament12146
AIM-7MSPARROW MISSILES
PYLon / FUeL tanK assembLY11
131BOTTOM
FUEL TANK
130TOP
FUEL TANK
136RIGHT
WEAPONS PYLON
138RIGHT
WEAPONS PYLON
135LEFT
WEAPONS PYLON
137LEFT
WEAPONS PYLON
158LEFT
PHOENIX PYLON
159RIGHT
PHOENIX PYLON
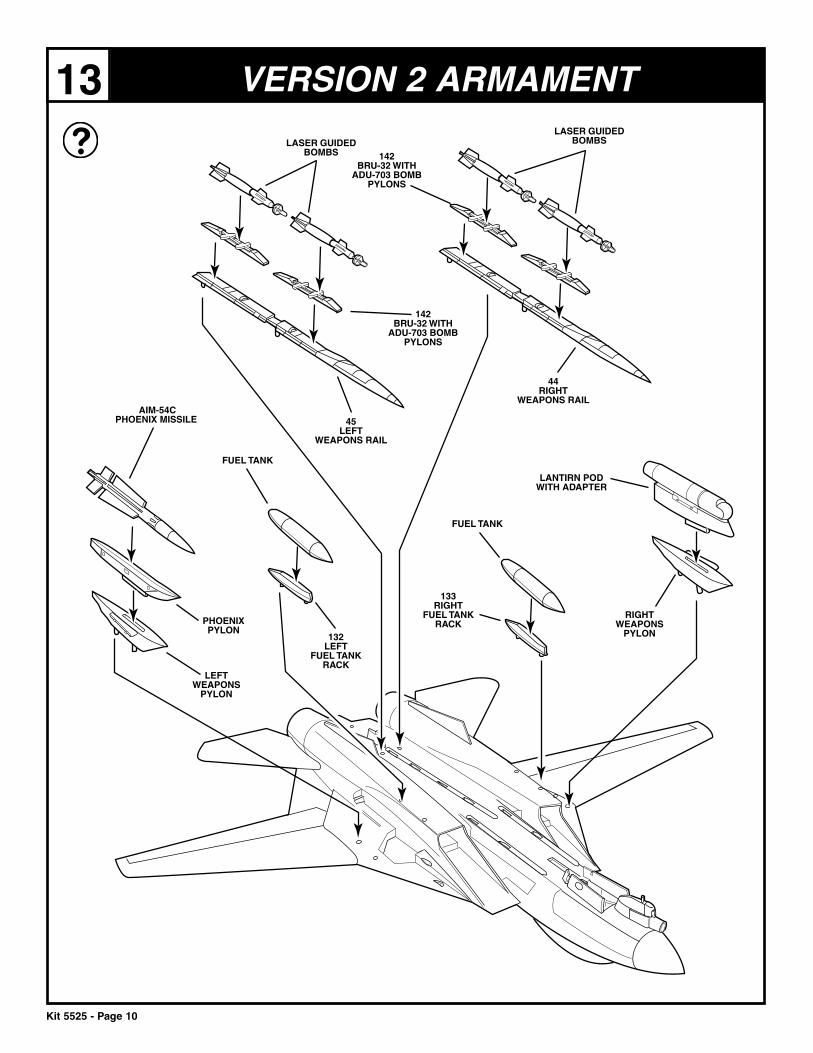
Kit 5525 - Page 10
142BRU-32 WITH
ADU-703 BOMB PYLONS
142BRU-32 WITH
ADU-703 BOMB PYLONS
version 2 armament13
45LEFT
WEAPONS RAIL
44RIGHT
WEAPONS RAIL
PHOENIXPYLON
AIM-54CPHOENIX MISSILE
132LEFT
FUEL TANK RACK
133RIGHT
FUEL TANK RACK
LASER GUIDED BOMBS
LASER GUIDED BOMBS
LEFTWEAPONS
PYLON
RIGHTWEAPONS
PYLON
LANTIRN PODWITH ADAPTER
FUEL TANK
FUEL TANK
Kit 5525 - Page 11
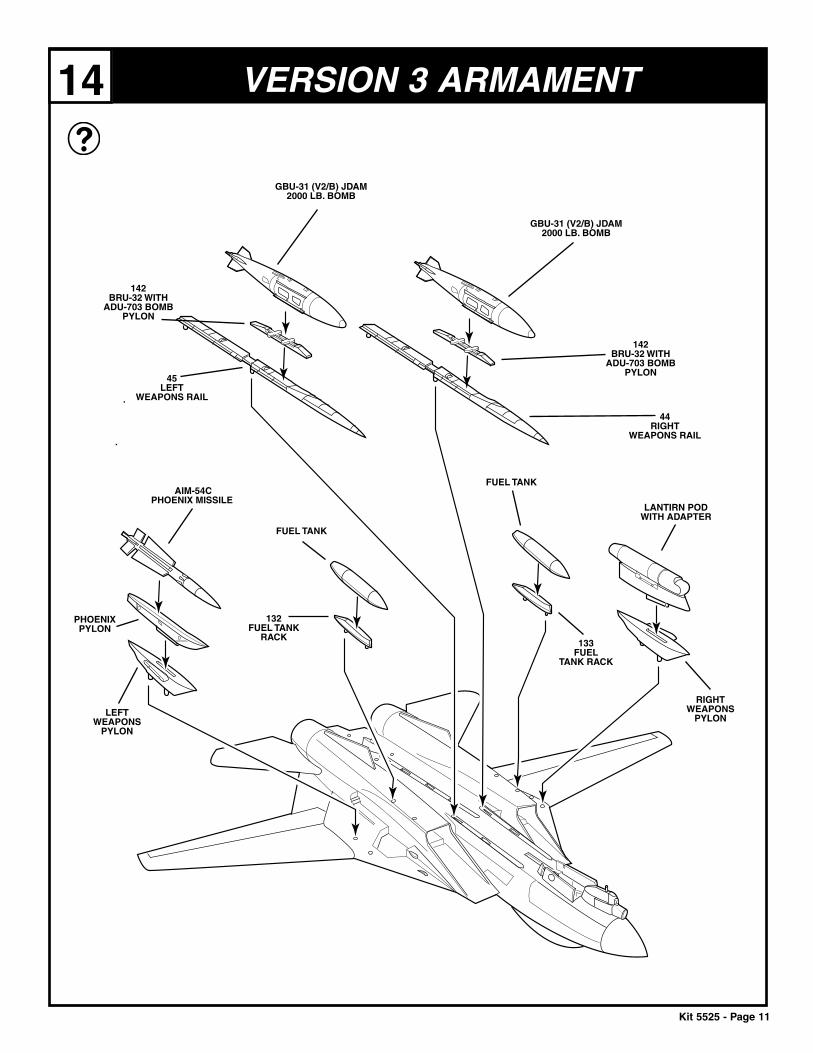
142BRU-32 WITH
ADU-703 BOMB PYLON
142BRU-32 WITH
ADU-703 BOMB PYLON
version 3 armament14
FUEL TANK
132FUEL TANK
RACK133
FUEL TANK RACK
FUEL TANK
44RIGHT
WEAPONS RAIL
45LEFT
WEAPONS RAIL
GBU-31 (V2/B) JDAM 2000 LB. BOMB
GBU-31 (V2/B) JDAM 2000 LB. BOMB
LEFTWEAPONS
PYLON
LANTIRN PODWITH ADAPTER
RIGHTWEAPONS
PYLON
PHOENIXPYLON
AIM-54CPHOENIX MISSILE
Kit 5525 - Page 12
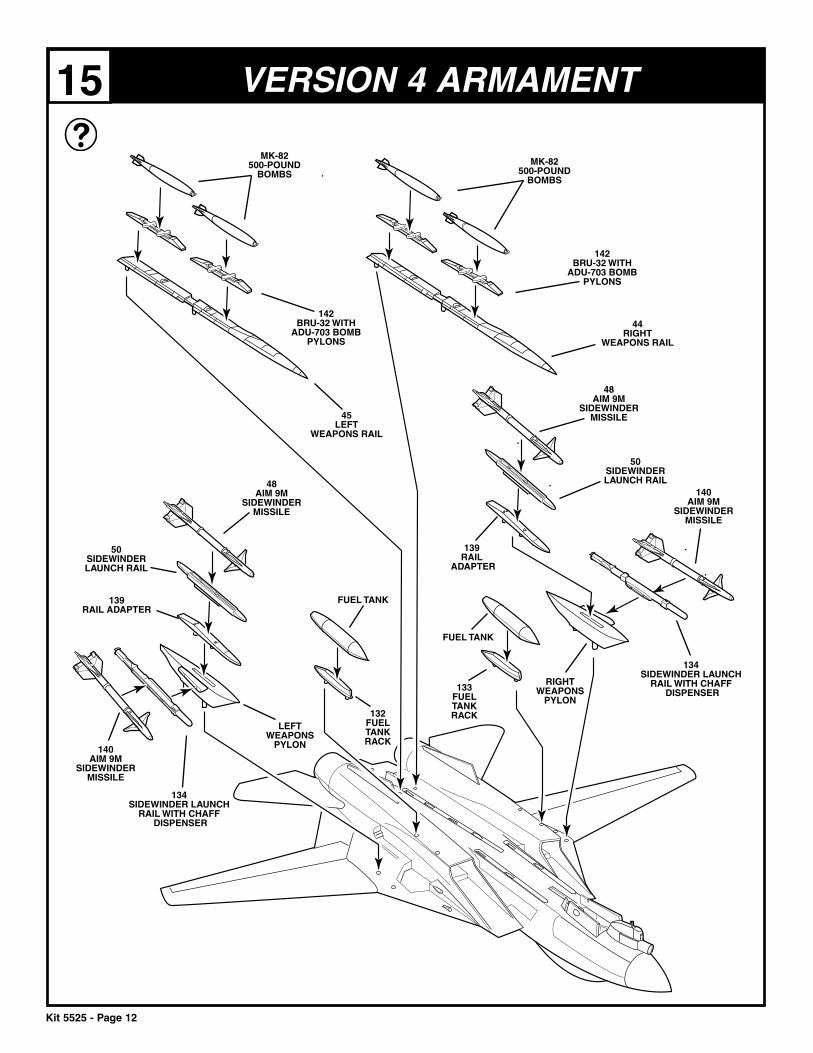
version 4 armament 15
50SIDEWINDER LAUNCH RAIL
50SIDEWINDER LAUNCH RAIL
134SIDEWINDER LAUNCH
RAIL WITH CHAFF DISPENSER
134SIDEWINDER LAUNCH
RAIL WITH CHAFF DISPENSER
139RAIL ADAPTER
139RAIL
ADAPTER
140AIM 9M
SIDEWINDERMISSILE
48AIM 9M
SIDEWINDERMISSILE
140AIM 9M
SIDEWINDERMISSILE
48AIM 9M
SIDEWINDERMISSILE
FUEL TANK
FUEL TANK
132FUEL TANKRACK
133FUEL TANKRACK
44RIGHT
WEAPONS RAIL
45LEFT
WEAPONS RAIL
142BRU-32 WITH
ADU-703 BOMB PYLONS
MK-82500-POUND
BOMBSMK-82
500-POUND BOMBS
142BRU-32 WITH
ADU-703 BOMB PYLONS
LEFTWEAPONS
PYLON
RIGHTWEAPONS
PYLON
Kit 5525 - Page 13
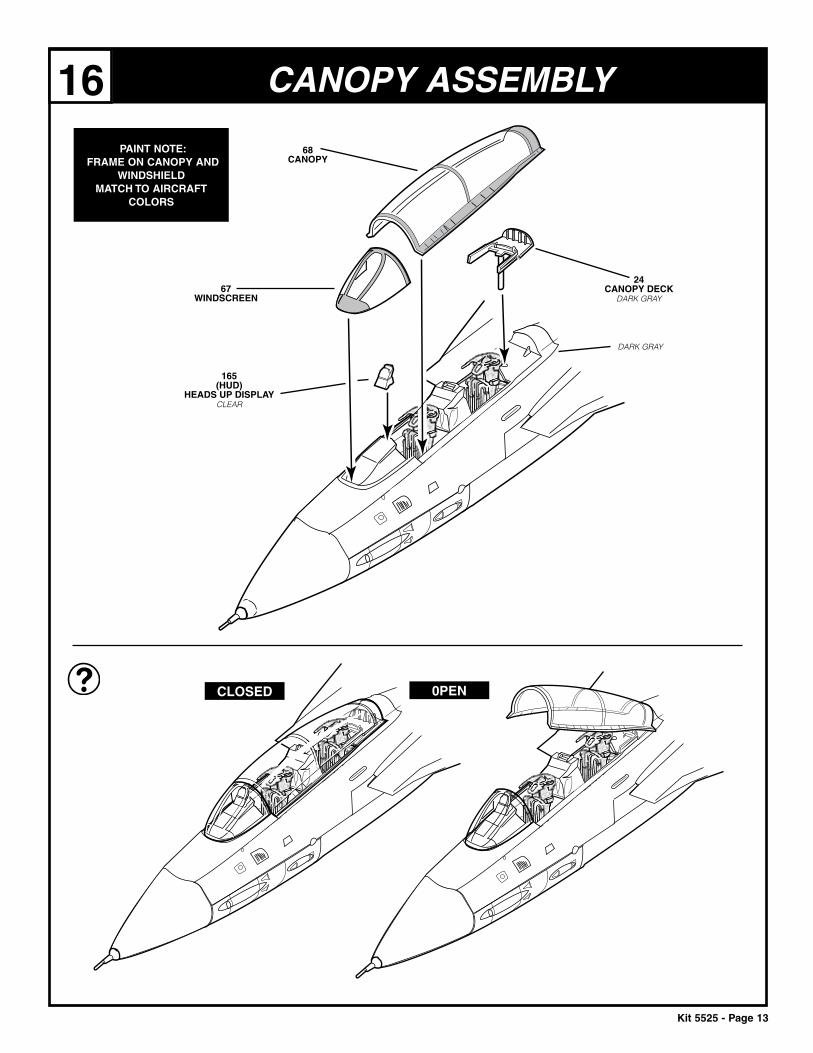
CANOPY ASSEMBLY16
0PENCLOSED
PAINT NOTE: FRAME ON CANOPY AND
WINDSHIELDMATCH TO AIRCRAFT
COLORS
24CANOPY DECK
DARK GRAY
165(HUD)
HEADS UP DISPLAY CLEAR
68CANOPY
67WINDSCREEN
DARK GRAY
Kit 5525 - Page 14
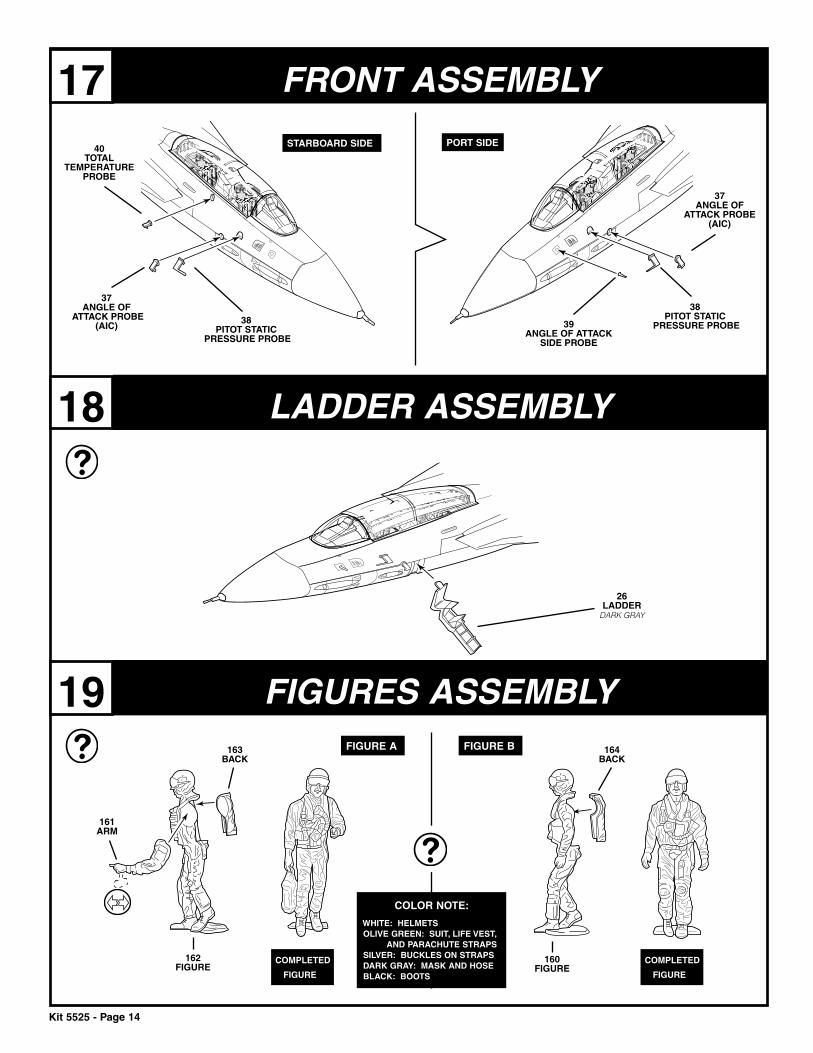
FRONT assembly17
laDDeR assembly18
FIGURes assembly19
26LADDER
DARK GRAY
162FIGURE
161ARM
163BACK
164BACK
160FIGURE
37ANGLE OF
ATTACK PROBE(AIC)
37ANGLE OF
ATTACK PROBE(AIC)
40TOTAL
TEMPERATURE PROBE
38PITOT STATIC
PRESSURE PROBE38PITOT STATIC
PRESSURE PROBE
39ANGLE OF ATTACK
SIDE PROBE
STARBOARD SIDE PORT SIDE
FIGURE A
COMPLETED
FIGURE
COMPLETED
FIGURE
FIGURE B
COLOR NOTE:
WHITE: HELMETS OLIVE GREEN: SUIT, LIFE VEST, AND PARACHUTE STRAPS SILVER: BUCKLES ON STRAPS DARK GRAY: MASK AND HOSE BLACK: BOOTS
Kit 5525 - Page 15
decal placement20
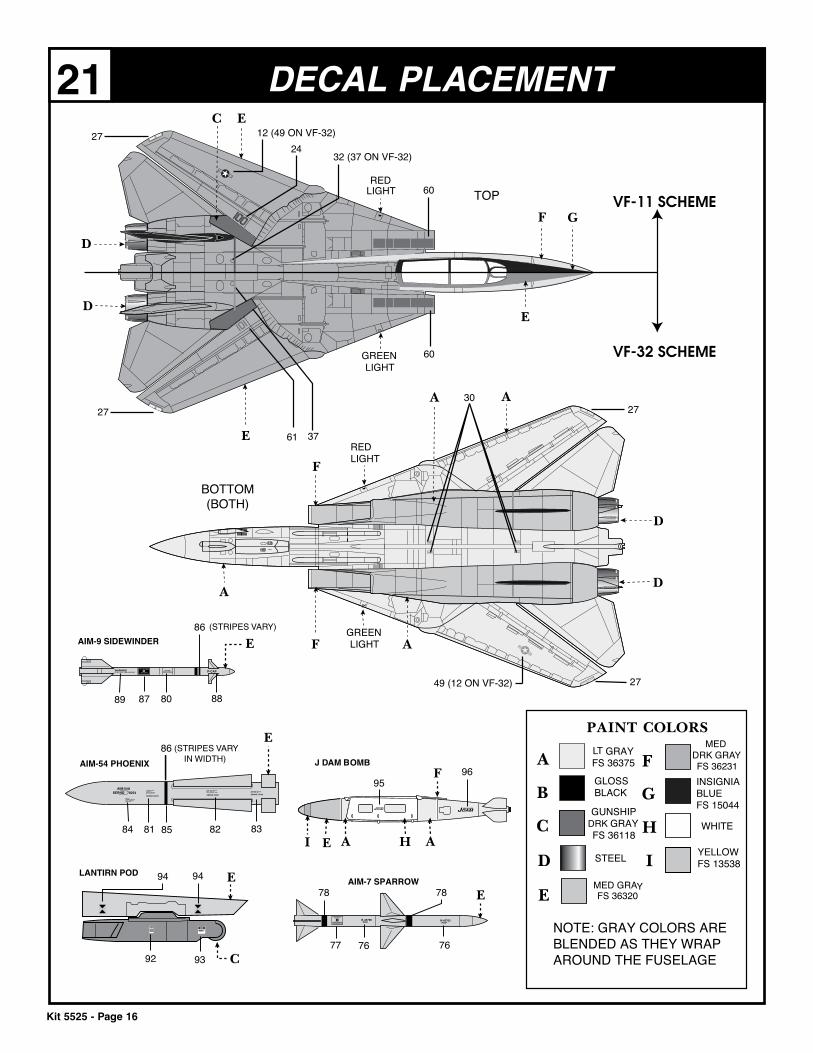
decal placement21
Kit 5525 - Page 16


![Development of Flexible Drilling Jig for Wing-Fuselage ... · Wiemann [5] introduced a flexible template for drill units which can be pinned into piloted datum holes, allowing the](https://img.pdfslide.us/doc/110x75/5cad8fe488c993ab5e8b6c32/development-of-flexible-drilling-jig-for-wing-fuselage-wiemann-5-introduced.jpg)