Embed Size (px)
Citation preview

_______________________________________________________________________________________________ Copyright © 2015 BroadLearning Education (Asia) Ltd.
P.1
KIS Kindergarten Integrated Platform
Start-up Guide for eInventory (Asset Management)
Before you start using eInventory (Asset Management) system, please read and follow the
instructions as below:
Basic Settings︰
Assign eInventory Administrator
Set up School Buildings, Location & Sub-Location (i.e. Floors & Rooms)
Set up items' Category & Sub-Category (i.e. Computer equipment [Category]
> PC, Laptop, Printer, [Sub-category])
Set up Resource management group, add user as group „Leader‟ or
„Members‟ (for stocktake related group's items)
Set up Funding Source
Set up Write-off reason
Set up system properties (Group Leader‟s authority, warranty expiry reminder,
stocktake period, barcode format)
Daily Use︰
Add item records (Import items)
Update items' status
Perform stocktake
Handle write-off item

_______________________________________________________________________________________________ Copyright © 2015 BroadLearning Education (Asia) Ltd.
P.2
A) Basic Settings
Step 1:Set up Module Administrator (By eClass administrator)
1. eClass Intranet > School settings > Role
2. Add Role identity
Click (add Role) at the right hand side of the table.
Enter the role name, after that click "Done" .
Click into the role name to add the member list & assign the module administration
to the role member.

_______________________________________________________________________________________________ Copyright © 2015 BroadLearning Education (Asia) Ltd.
P.3
3. Add Role Member List
eClass Intranet > School settings > Role > Name of Role > Member List
Click "New" to add the member to this Role.
Select particular user, press ">" to "User(s) Selected" list.
Click "Add" to add the selected member.
Members have been added to the list successfully.

_______________________________________________________________________________________________ Copyright © 2015 BroadLearning Education (Asia) Ltd.
P.4
4. Assign Module Administration to Role
eClass Intranet > School settings > Role > Name of Role > Module Administration
Check the module(s) to assign administration to the Role member.
Click "Save" to apply.
***Settings will be effective after login again***
The related colleagues will become eInventory Administrator to manage eInventory.

_______________________________________________________________________________________________ Copyright © 2015 BroadLearning Education (Asia) Ltd.
P.5
Step 2:Set up item's Location (By eClass administrator)
1. eClass Intranet > School settings
2. Go to Campus
3. Add School Locations
Building:i.e. Main Building, New Wings Building, Run Run Shaw Building
Location:i.e. 1/F, 2/F
Sub-location:i.e. Room 101, Room 102
4. Press [+] to enter building code, barcode and name, then click "add". If more
buildings need to add, press [+] again.

_______________________________________________________________________________________________ Copyright © 2015 BroadLearning Education (Asia) Ltd.
P.6
5. Press[Spanner] in the building's location (Floor)
Click [+] to add new location.
6. Press [+] in Sub-location, fill in the fields and Click "Submit".

_______________________________________________________________________________________________ Copyright © 2015 BroadLearning Education (Asia) Ltd.
P.7
7. Location setting complete. You may edit the information if need.
Button Function
Add information
Maintain information
Edit information
Move the data field
Expand the data layer
Collapse the data layer

_______________________________________________________________________________________________ Copyright © 2015 BroadLearning Education (Asia) Ltd.
P.8
[eInventory (Asset management) Admin can perform the following settings]
Step 3:Set up item's Categories and Sub-Categories
1. eClass Intranet > eInventory >Settings
2. Choose "Category"
3. Press "New" / "Import"
- New︰Enter item category code, category chinese and english name, display
order, upload photo or not and status, then press "Submit".
- Import#︰Download template, enter mandatory fields (mark with "*"), after that
upload the file which save in Unicode format. (#Please refer to (Tips [About importing
the files] )in last page)

_______________________________________________________________________________________________ Copyright © 2015 BroadLearning Education (Asia) Ltd.
P.9
4. After setup the category, press numbering to "New" / "Import" the sub-category.
- New︰Enter item category code, sub-category
chinese & english name, display order, whether the
item need to fill-in license, warranty and serial number,
upload photo or not and status, then press "Submit".
- Import#︰Download template, enter mandatory fields (mark with "*"), after that
upload the file which save in Unicode format. (#Please refer to (Tips [About importing
the files] )in last page)

_______________________________________________________________________________________________ Copyright © 2015 BroadLearning Education (Asia) Ltd.
P.10
Step 4:Set up item's Resources Management Group, Group Leader# and Members
1. Choose "Resource Management Groups"
2. Press "New" / "Import"
- New︰Enter Group Code, group chinese & english name, display order,
whether import members from Group, and then press "Submit".
- Import︰Select "Resource Management Group", download template, enter
mandatory fields (mark with "*"), after that upload the file which save in Unicode
format. (#Please refer to (Tips [About importing the files] )in last page)

_______________________________________________________________________________________________ Copyright © 2015 BroadLearning Education (Asia) Ltd.
P.11
3. After create resource management group, press the group name to set the resource
management group list.
- New︰Select the user and role, press "submit".
- Import︰Select "Member", download template, enter mandatory fields (mark with
"*"), after that upload the file which save in Unicode format. (#Please refer to (Tips
[About importing the files] )in last page)
*Group Leader can add items and become a variance manager for handle variance
after stocktake.
Step 5:Set up funding source
1. Choose "Funding Source"
2. Press "New" / "Import"
- New︰Enter funding code, funding chinese & english name, select funding
type(school/government) and display order, then press "submit".
- Import︰download template, enter mandatory fields (mark with "*"), after that
upload the file which save in Unicode format. (#Please refer to (Tips [About importing
the files] )in last page)
[# Note︰Funding Type should be enter in English "school" / "government"]
Step 6:Set up write-off Reason
1. Choose "Write-off Reason "
2. Press "New", enter write-off reason chinese & english name and display order, then
press "submit".
Step 7:Set up system properties
1. Choose "System Properties"
2. Set up group leader's authority.(leader can add items / approve write-off items or not)
3. Set up stocktake period, warranty expiry reminder, barcode maximum length and
format, press "submit".
_______________________________________________________________________________________________ Copyright © 2015 BroadLearning Education (Asia) Ltd.
P.12
B) Daily Use︰
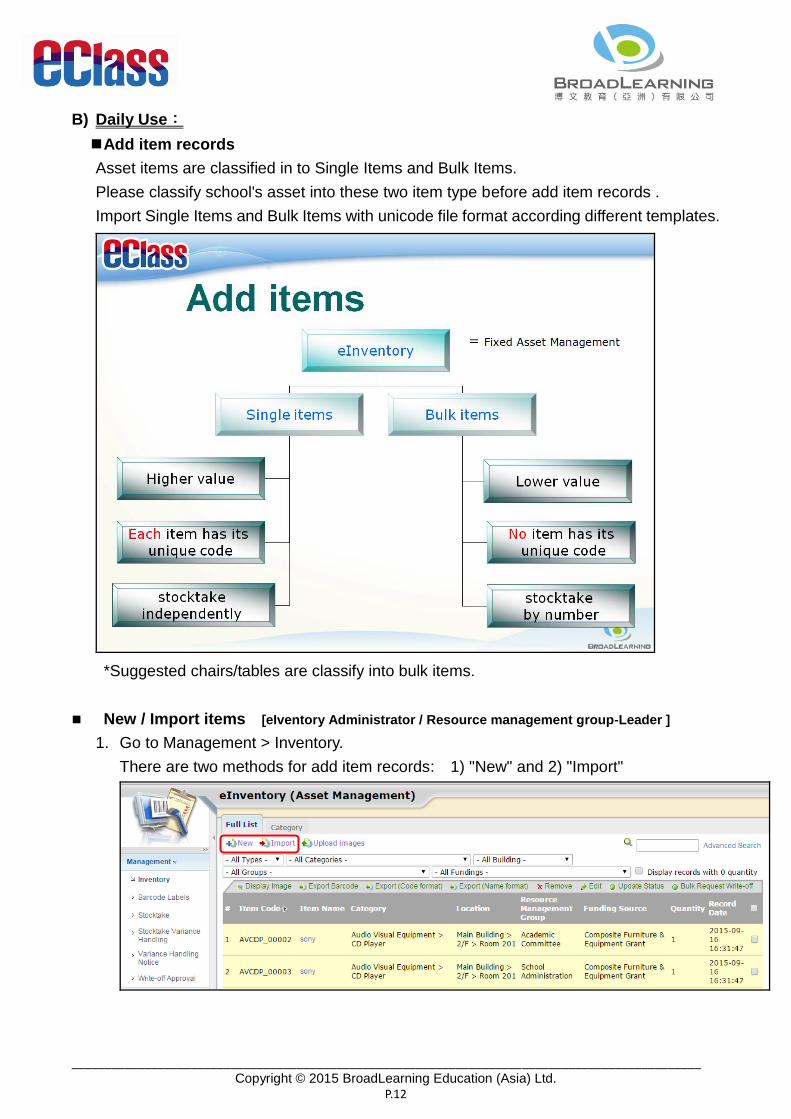
Add item records
Asset items are classified in to Single Items and Bulk Items.
Please classify school's asset into these two item type before add item records .
Import Single Items and Bulk Items with unicode file format according different templates.
*Suggested chairs/tables are classify into bulk items.
New / Import items [eIventory Administrator / Resource management group-Leader ]
1. Go to Management > Inventory.
There are two methods for add item records: 1) "New" and 2) "Import"

_______________________________________________________________________________________________ Copyright © 2015 BroadLearning Education (Asia) Ltd.
P.13
Add Single Item
Method 1:"New" Single items
Step 1: Enter basic item information
1. Select an item type(single item), item category & sub-category.
2. Fill in the necessary item details. Fields with asterisks(*) are mandatory.
(Purchased date is suggest to input)
3. Press "Next" to continue enter details for individual items.

_______________________________________________________________________________________________ Copyright © 2015 BroadLearning Education (Asia) Ltd.
P.14
Step 2: Enter details for individual items
1. Assign item code, barcode, location, resource management group.
You can press "Generate Item Code" & "Generate Barcode" to have the system
generate a unique numbering for the item.
2. Press "Submit" to add an item.
* Note: Please go to Settings > System Properties > select "Yes" in "Allow Group Leader Add
Items", if you wants resource management group leader can add item records.
Barcode format setting for School :(suggestion)
1) Use school original barcode
2) Same with "item code"
3) Generated by system

_______________________________________________________________________________________________ Copyright © 2015 BroadLearning Education (Asia) Ltd.
P.15
Method 2:"Import" Single items(#Please refer to (Tips [About importing the files] )in last page)
1. Press "Import" and select item type be "Single items" to download template.
2. Fill-in the item information into the fields(* represents mandatory field), save file
format in Unicode.
3. Select action type be "Insert", upload the unicode file.

_______________________________________________________________________________________________ Copyright © 2015 BroadLearning Education (Asia) Ltd.
P.16
Add Bulk Item
Method 1:"New" Bulk items
Step 1: Enter basic item information
1. Select an item type(bulk item), item category & sub-category.
2. Fill in the necessary item details. Fields with asterisks(*) are mandatory.
(Purchased date is suggest to input)
3. Press "Next" to continue enter details for individual items.
# Variance Manager︰selected Group Leader can
handle variance after stocktake, suggest "Variance
Manager" is the same with "Resource Management
Group".

_______________________________________________________________________________________________ Copyright © 2015 BroadLearning Education (Asia) Ltd.
P.17
Step 2: Enter details for individual items
1. Assign item code, barcode, location, resource management group and funding
source.
You can press "Generate Item Code" & "Generate Barcode" to have the system
generate a unique numbering for the item.
2. Press "Submit" to add an item.
* Note: Please go to Settings > System Properties > select "Yes" in "Allow Group Leader Add
Items", if you wants resource management group leader can add item records.

_______________________________________________________________________________________________ Copyright © 2015 BroadLearning Education (Asia) Ltd.
P.18
Method 2:"Import" Bulk items(#Please refer to (Tips [About importing the files] )in last page)
1. Press "Import" and select item type be "Bulk Items " to download template.
2. Fill-in the item information into the fields(* represents mandatory field), save file
format in Unicode.
3. Select action type be "Insert", upload the unicode file.

_______________________________________________________________________________________________ Copyright © 2015 BroadLearning Education (Asia) Ltd.
P.19
Update items' status
1. Go to eClass Intranet > eInventory > Management > Inventory.
2. Select the item you want to update and press "Update Status".
3. Go to different tab to perform "Update Item Status", "Update Item Location" and
"Request write-off" for the selected item.
Perform Stocktake
Step 1:Define Stocktake Period [Set by eInventory (Asset management) Admin]
1. Go to eClass Intranet > eInventory > Settings > System Properties
2. Choose the period start date and end date from the calendar icons respectively.
3. Press "Update".
Step 2:Perform Stocktake
1. Go to eClass Intranet > eInventory > Management > Stocktake
2. Select a sub-location from the Location drop down menu.
3. Press "Next".
4. The Stocktake List showing all the registered single and bulk items appears.
- Single item: Use Bar-code Reader to scan the barcode or mark the item under
"Found" manually.
- Bulk item: Enter the stocktake quantity number
5. Press "Next", optionally fill in stocktake remarks for items.
Handle Stocktake Variance [Only for eInventory (Asset management) Admin
and Resource Management Group Leader]
# Handling can only be conducted after stocktake period
1. Go to eClass Intranet >
eInventory > Management >
Stocktake Variance Handling
2. System displays stocktake
variances by locations.
3. Press the Item Name of a single
or bulk item.
4. System displays the selected
item's variance records together
with user interface elements for
handling the variances. Choose
the action suits your situation:
Move to original location,
Reassign to new location or Request write-off.

_______________________________________________________________________________________________ Copyright © 2015 BroadLearning Education (Asia) Ltd.
P.20
Handle write-off item
1. Go to eClass Intranet > eInventory > Management > Write-off Approval
2. Select a record to approve/reject.
3. Press the Approve/Reject button.
C) Report
1. Go to eInventory > Report.
2. Reports can be print out or export data as csv file.
Item Content
1. Stocktake Select date range, shows item's information and last
stocktake condition.
2. Stocktake Progress Select date range and location/ resource management group,
show current stocktake progress.
3. Item Status According to location/ item type/ resource management group/
category to show item conditions (normal, damaged, repairing)
4. Written-off Items Select date range to shows what items have been written off.
5. Warranty Expiry Shows items whose warranty period is going to expire in the
number of days set in Settings > Others > Warranty reminder.
6. Fixed Assets Register
A summary of all asset items possessed by the school
according select purchase date range and display item
column(s).
7. Deletion Log Select date range to view the item deletion log in inventory.
8. Fixed Assets stocktake
List
Select location and resource management group to show the
stocktake item list by locations.
_______________________________________________________________________________________________ Copyright © 2015 BroadLearning Education (Asia) Ltd.
P.21
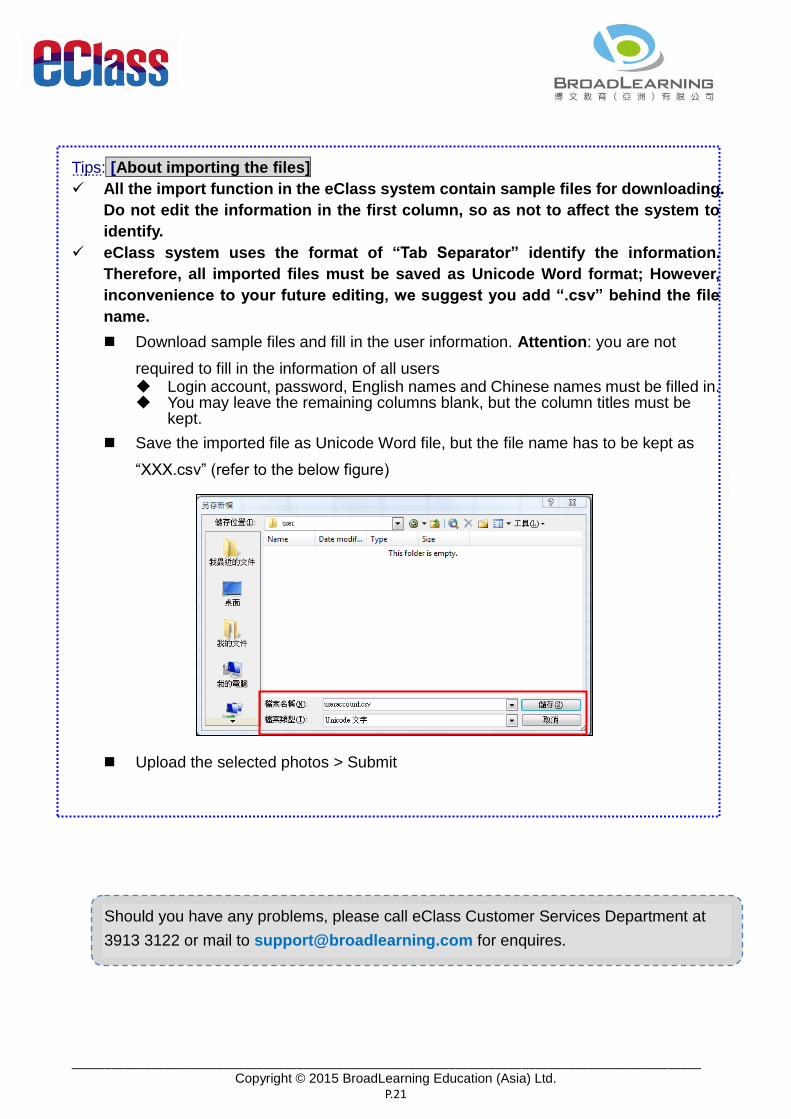
Tips: [About importing the files]
All the import function in the eClass system contain sample files for downloading.
Do not edit the information in the first column, so as not to affect the system to
identify.
eClass system uses the format of “Tab Separator” identify the information.
Therefore, all imported files must be saved as Unicode Word format; However,
inconvenience to your future editing, we suggest you add “.csv” behind the file
name.
Download sample files and fill in the user information. Attention: you are not
required to fill in the information of all users Login account, password, English names and Chinese names must be filled in. You may leave the remaining columns blank, but the column titles must be
kept.
Save the imported file as Unicode Word file, but the file name has to be kept as
“XXX.csv” (refer to the below figure)
Upload the selected photos > Submit
Should you have any problems, please call eClass Customer Services Department at
3913 3122 or mail to [email protected] for enquires.
[email protected] for enquires.