Embed Size (px)
Citation preview

KIP Certified AutoCAD Driver
IPlot Driver Installation and Operation

IPLOT Environments
This information is solely for use of KIP Personnel and KIP Authorized Dealers. No part of this publication may be copied, reproduced or distributed in any form without express written permission from KIP. 2011 KIP.
Contents
Introduction ..................................................................................................................................................................... 1 Installation ........................................................................................................................................................................ 1 Section 1 – Using KIP Windows Driver with IPlot ........................................................................................................ 2 Section 2 – Using Offline Raster Driver with IPlot ....................................................................................................... 8 Add Printer ..................................................................................................................................................................... 10 Configure Driver Instance ........................................................................................................................................... 12 Creating .SET Files (for IPLOT use) .............................................................................................................................. 13 Client Use Example ...................................................................................................................................................... 16

IPLOT Environments
No part of this publication may be copied, reproduced or distributed in any form without express written permission from KIP. 2014 KIP.
- 1 -
Introduction
Bentley MicroStation is a CAD and information modeling software that is used in various design environments. IPlot is a add-on for Microstation that facilitates specialized printing requirements comprised of a Print Server and IPlot components..
The following information is designed to assist with the setup and use of the Microstation/IPlot applications within a KIP printing environment.
Installation
There are two methods of Installation:
Using KIP Windows Driver (section 1) customers can print directly to the KIP via the KIP Windows Driver. Please see the Installation guide for the KIP Windows driver as this will need to be installed prior to performing the server installation steps. In this method the KIP Driver will utilize a configured LPR port, thus allowing only one way communication.
Note: The KIP Windows driver will not display Printer information or retrieve accounting information.
Bentley Select Offline Raster Driver (section 2) customers have the ability to obtain the Interplot Offline Raster Driver Pack that is available from via an active Bentley Selectsupport contract.
The InterPlot Offline Raster Driver Pack supports the offline printing of a variety of monochrome and color raster formats. It may be loaded on any supported Microsoft Windows Server platform as an addition to the current IPLOT server installation.
The Offline Raster Driver installs as any other printer object, and can we leveraged to direct output to a TCP/IP port for printing. This is useful in situations where a typical Windows Driver does not satisfy constraints within specific IPlot environments.
Please Contact Bentley to obtain this package. Once this is obtained, install the Offline Raster Driver Pack by following the installation Instructions provided on the server that hosts IPlot.

IPLOT Environments
No part of this publication may be copied, reproduced or distributed in any form without express written permission from KIP. 2014 KIP.
- 2 -
Section 1 – Using KIP Windows Driver with IPlot Step 1 Configuring the KIP Controller WSe7
a. Close the User interface on the
b. Got to Start/Devices and Printers
c. Right click the IPS icon – there are already
preconfigured queues on the controller. We will just
use one of these and change the configuration.
d. Select Printer Properties
e. Select IPS (for this example we will use this location)
f. Select the Ports Tab
g. In the ports tab change the port connection from KIP
0 to the 127.0.0.1 Standard TCP/IP Port
h. Select Apply

IPLOT Environments
No part of this publication may be copied, reproduced or distributed in any form without express written permission from KIP. 2014 KIP.
- 3 -
Step 1a Configuring the KIP Controller on Windows XP
a. Close the User interface on the
b. Got to Start/Devices and Printers
c. Select File\Server Properties\Ports\Add Port and then New Port.
d. Create the Standard TCP/IP Port pointing to 127.0.0.1 and select
Next, follow steps for setup.
e. Once the port is set it MUST be configured (by Default Port 9100
will be set and this has to be changed)
f. Select Custom\Settings
g. Change the Port Number from 9100 to 8421 and leave the
Protocol as RAW
h. Select OK
i. Next, attach the printer object (i.e. IPS or IPS1) to the loopback
port that was just created.

IPLOT Environments
No part of this publication may be copied, reproduced or distributed in any form without express written permission from KIP. 2014 KIP.
- 4 -
Step 2 Configuring the IPlot Server
a. Determine the IPlot Server platform 2003 Server or 2008/2008 R2 Server
Step 3 Installing a traditional LPR port Monitor (2008/2008 R2 Server)
a. Go to Server Manager
b. Select Features
c. Select Add Feature
d. Select LPR Port Monitor
e. Select Next
Step 4 Installing Print Services Roll
a. While still in Server
Manager select Rolls b. Select Add Rolls
c. Select Print and
Document Services
d. Select Next

IPLOT Environments
No part of this publication may be copied, reproduced or distributed in any form without express written permission from KIP. 2014 KIP.
- 5 -
e. When the next window opens select the LPD Service
f. Select Next
g. Reboot the server (this is necessary and cannot be skipped)
Installing a traditional LPR port Monitor (2003 Server) a. Go to Add remove
programs
b. Select Add Remove
Windows
Components
c. Select Other Networks
File and Print Services
d. Select Details
e. Select Print Services
for Unix
f. Select Ok
g. Reboot the server (this is necessary and cannot be skipped)

IPLOT Environments
No part of this publication may be copied, reproduced or distributed in any form without express written permission from KIP. 2014 KIP.
- 6 -
Step 5 Registry change (applies to both 2003 and 2008/2008 R2)
a. Go to Start\Run b. Type Regedit c. Drill down to HKEY_LOCAL_MACHINE\SOFTWARE\MICROSOFT\LPDSVC\lpr d. Select the Use
UseNonRFCSourcePorts and edit the value
e. Change Value Data to 1 (note if this selection does not exist create a new DWORD with this name. Note: The name is case sensitive and must be; UseNonRFCSourcePorts
h. Reboot the server (this is
necessary and cannot be
skipped)
Step 6 Creating the port(applies to both 2003 and 2008/2008 R2)
a. Go to Start\Devices and Printers
b. Go to Printer Server Properties
c. Select the Ports Tab
d. Select Add Port
e. Select the LPR Port
f. Select New Port
g. Enter the IP Address of the KIP Printer
h. Enter the Queue Name (In our Example we had selected IPS so we enter IPS as queue name

IPLOT Environments
No part of this publication may be copied, reproduced or distributed in any form without express written permission from KIP. 2014 KIP.
- 7 -
i. When complete select the newly established port
j. Select OK
IPLOT Environments
No part of this publication may be copied, reproduced or distributed in any form without express written permission from KIP. 2014 KIP.
- 8 -
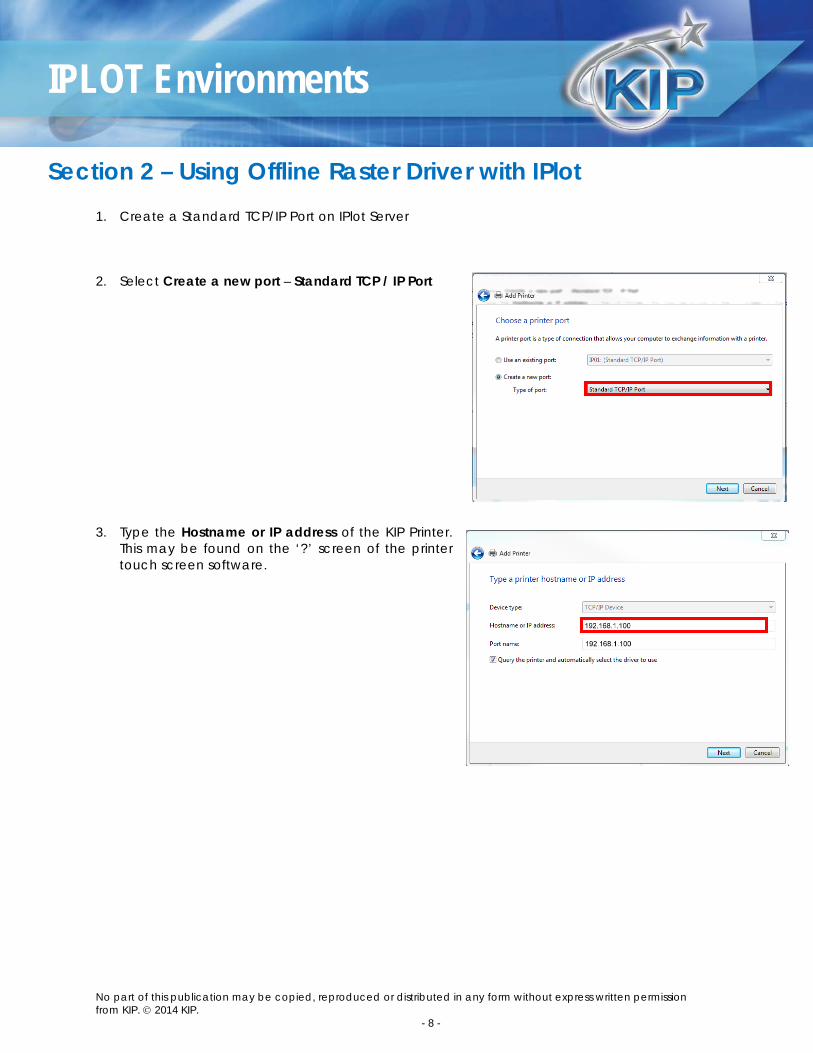
Section 2 – Using Offline Raster Driver with IPlot 1. Create a Standard TCP/IP Port on IPlot Server
2. Select Create a new port – Standard TCP / IP Port
3. Type the Hostname or IP address of the KIP Printer. This may be found on the ‘?’ screen of the printer touch screen software.

IPLOT Environments
No part of this publication may be copied, reproduced or distributed in any form without express written permission from KIP. 2014 KIP.
- 9 -
4. Select Custom Settings from Device Type
5. Modify the Port Settings as follows:
a. Protocol – Raw
b. Raw Settings – Port Number – 8421

IPLOT Environments
No part of this publication may be copied, reproduced or distributed in any form without express written permission from KIP. 2014 KIP.
- 10 -
Add Printer
1. Add a local Printer
2. Choose the TCP/IP port created prior

IPLOT Environments
No part of this publication may be copied, reproduced or distributed in any form without express written permission from KIP. 2014 KIP.
- 11 -
3. Choose Bentley from Manufacturer listing
4. Choose ‘Mono Raster Offline Driver from printers list
(for Mono systems)
5. Give the printer an appropriate name
6. Share if necessary.
7. Message will appear that the device has been installed successfully

IPLOT Environments
No part of this publication may be copied, reproduced or distributed in any form without express written permission from KIP. 2014 KIP.
- 12 -
Configure Driver Instance
1. Right click the newly created printer object
2. Select ‘Printer Properties’
3. Select ‘Device Settings’ tab
4. Click on ‘Properties’ button
5. Change the Format: to TIFF Group 4, Resolution: to
600 and set a desired default Form/Page Size
Note: Pick your LARGEST size here. If your desired size is
not available use the custom selection and key in the
appropriate width and height.

IPLOT Environments
No part of this publication may be copied, reproduced or distributed in any form without express written permission from KIP. 2014 KIP.
- 13 -
Creating .SET Files (for IPLOT use)
1. Open ProjectWise Interplot Organizer (on the IPLOT server)
2. Open Edit\Settings File\Create …

IPLOT Environments
No part of this publication may be copied, reproduced or distributed in any form without express written permission from KIP. 2014 KIP.
- 14 -
3. Add ‘Common’ and ‘IPLOT’ to ‘Sections
Created:’
4. Select ‘Common’, then ‘Edit Section’
5. Select the named printer from the list
6. Select ‘OK’.

IPLOT Environments
No part of this publication may be copied, reproduced or distributed in any form without express written permission from KIP. 2014 KIP.
- 15 -
7. Select the IPLOT, then ‘Edit Section’
8. This is where you will choose the desired
default paper size, pen tables, and other
IPLOT attributes that become unique to the
printer in question as well as the IPLOT
environment in question.
9. Select ‘Save As…’, and name the .SET file
with the same nomenclature as the printer object selected in step 5 (i.e. KIP7100)
Note: This step can be done multiple times to create multiple named .SET files that can be used from
within the IPLOT client side application integrations, eliminating the need to create multiple printer
instances. The name of the .SET file loaded initially, must be named the same as the printer object name
if it is desired for the printer object to load the set file properly as a default.

IPLOT Environments
No part of this publication may be copied, reproduced or distributed in any form without express written permission from KIP. 2014 KIP.
- 16 -
Client Use Example
1. Open desired drawing with supported Bentley
Product (example done with Bentley view)
2. File\IPLOT…
3. Select Printer from Dropdown (note settings
being applied)
4. Select Plot
5. Confirm Printed Output.


U.S.A. ■ Phone: (800) 252-6793 ■ Email: [email protected] ■ Website: www.kip.com
CANADA ■ Phone: (800) 653-7552 ■ Email: [email protected] ■ Website: www.kip.com
KIP is a registered trademark of the KIP Group. All other product names mentioned herein are trademarks of their respective companies. All product features and specifications are subject to change without notice. Complete product specifications are available upon request.