Embed Size (px)
Citation preview

3A5422EEN
Instructions
King™ Spray Packages and PumpsHigh pressure spray packages for applying high performance coatings. For professional use only.
See Models on page 6 for maximum working pressures.
Important Safety InstructionsRead all warnings and instructions in this manual before using the equipment. Save these instructions.

2 3A5422E
ContentsRelated Manuals . . . . . . . . . . . . . . . . . . . . . . . . . . . 2Warnings . . . . . . . . . . . . . . . . . . . . . . . . . . . . . . . . . 3Sprayer Packages . . . . . . . . . . . . . . . . . . . . . . . . . . 5
Air Motor Part Matrix . . . . . . . . . . . . . . . . . . . . . . 5Pump Packages . . . . . . . . . . . . . . . . . . . . . . . . . . . . 6
Air Motor Part Matrix . . . . . . . . . . . . . . . . . . . . . . 6Component Identification . . . . . . . . . . . . . . . . . . . . 7
Cart Mount Systems . . . . . . . . . . . . . . . . . . . . . . 7Wall Mount Systems . . . . . . . . . . . . . . . . . . . . . . 8
System Components . . . . . . . . . . . . . . . . . . . . . . . . 9*Bleed Type Master Air Valve (B) . . . . . . . . . . . . 9* Air Pressure Relief Valve (C) . . . . . . . . . . . . . . 9* Air Filter (D) . . . . . . . . . . . . . . . . . . . . . . . . . . . 9Air Regulator Adjustment (G) . . . . . . . . . . . . . . . 9* Fluid Drain/Purge Valve (J) . . . . . . . . . . . . . . . 9De-Ice Control (T) . . . . . . . . . . . . . . . . . . . . . . . . 9
Grounding . . . . . . . . . . . . . . . . . . . . . . . . . . . . . . . . 9Installation . . . . . . . . . . . . . . . . . . . . . . . . . . . . . . . 11
Wall Mount Assembly . . . . . . . . . . . . . . . . . . . . 11Hopper Assembly . . . . . . . . . . . . . . . . . . . . . . . 11
Setup . . . . . . . . . . . . . . . . . . . . . . . . . . . . . . . . . . . . 12Pressure Relief Procedure . . . . . . . . . . . . . . . . . . 13Clearing a Clogged Tip . . . . . . . . . . . . . . . . . . . . . 14Flush . . . . . . . . . . . . . . . . . . . . . . . . . . . . . . . . . . . . 15Prime . . . . . . . . . . . . . . . . . . . . . . . . . . . . . . . . . . . . 17Spray . . . . . . . . . . . . . . . . . . . . . . . . . . . . . . . . . . . . 19Shutdown . . . . . . . . . . . . . . . . . . . . . . . . . . . . . . . . 19Maintenance . . . . . . . . . . . . . . . . . . . . . . . . . . . . . . 20
Preventative Maintenance Schedule . . . . . . . . 20Daily Maintenance . . . . . . . . . . . . . . . . . . . . . . 20Corrosion Protection . . . . . . . . . . . . . . . . . . . . . 20Cart Maintenance . . . . . . . . . . . . . . . . . . . . . . . 20
Troubleshooting . . . . . . . . . . . . . . . . . . . . . . . . . . . 21Remove Lower . . . . . . . . . . . . . . . . . . . . . . . . . . . . 22
Disconnect and Reconnect Lower . . . . . . . . . . . 22Parts . . . . . . . . . . . . . . . . . . . . . . . . . . . . . . . . . . . . 24
Airless King Sprayer Packages . . . . . . . . . . . . . 24Air Assisted Sprayer Packages . . . . . . . . . . . . . 26King Sprayer Cart Packages Parts . . . . . . . . . . 28Cart Parts . . . . . . . . . . . . . . . . . . . . . . . . . . . . . 30Wall Mount Packages Parts . . . . . . . . . . . . . . . 31Pump Package Parts . . . . . . . . . . . . . . . . . . . . . 32Zinc Circulation Kit (238588) . . . . . . . . . . . . . . . 35Air Controls . . . . . . . . . . . . . . . . . . . . . . . . . . . . 36
Dimensions . . . . . . . . . . . . . . . . . . . . . . . . . . . . . . . 38Sprayer Cart Packages . . . . . . . . . . . . . . . . . . . 38Sprayer Cart Packages . . . . . . . . . . . . . . . . . . . 38Wall Mount Bracket Mounting Hole Diagram . . . 39
Performance Charts . . . . . . . . . . . . . . . . . . . . . . . . 40Calculate Fluid Outlet Pressure . . . . . . . . . . . . . 40Calculate Pump Air Flow/Consumption . . . . . . . 4030:1 . . . . . . . . . . . . . . . . . . . . . . . . . . . . . . . . . . 4040:1 . . . . . . . . . . . . . . . . . . . . . . . . . . . . . . . . . . 4145:1 . . . . . . . . . . . . . . . . . . . . . . . . . . . . . . . . . . 4150:1 . . . . . . . . . . . . . . . . . . . . . . . . . . . . . . . . . . 4260:1 . . . . . . . . . . . . . . . . . . . . . . . . . . . . . . . . . . 4270:1 . . . . . . . . . . . . . . . . . . . . . . . . . . . . . . . . . . 4390:1 . . . . . . . . . . . . . . . . . . . . . . . . . . . . . . . . . . 43
Technical Specifications . . . . . . . . . . . . . . . . . . . . 45Graco Standard Warranty . . . . . . . . . . . . . . . . . . . 46
Related ManualsManual in English
Description
3A5423 Xtreme XL™ Air Motor, Instructions - Parts
3A0293 Air Controls, Instructions - Parts
311825 Dura-Flo™ Lowers, Instructions - Parts
311762 Xtreme® Lower, Instructions - Parts

Warnings
3A5422E 3
WarningsThe following warnings are for the setup, use, grounding, maintenance, and repair of this equipment. The exclamation point symbol alerts you to a general warning and the hazard symbols refer to procedure-specific risks. When these symbols appear in the body of this manual or on warning labels, refer back to these Warnings. Product-specific hazard symbols and warnings not covered in this section may appear throughout the body of this manual where applicable.
WARNINGFIRE AND EXPLOSION HAZARDFlammable fumes, such as solvent and paint fumes, in work area can ignite or explode. Paint or solvent flowing through the equipment can cause static sparking. To help prevent fire and explosion:• Use equipment only in well ventilated area.• Eliminate all ignition sources; such as pilot lights, cigarettes, portable electric lamps, and plastic
drop cloths (potential static sparking). • Ground all equipment in the work area. See Grounding instructions.• Never spray or flush solvent at high pressure.• Keep work area free of debris, including solvent, rags and gasoline.• Do not plug or unplug power cords, or turn power or light switches on or off when flammable fumes
are present.• Use only grounded hoses.• Hold gun firmly to side of grounded pail when triggering into pail. Do not use pail liners unless they
are anti-static or conductive.• Stop operation immediately if static sparking occurs or you feel a shock. Do not use equipment
until you identify and correct the problem.• Keep a working fire extinguisher in the work area.
SKIN INJECTION HAZARDHigh-pressure fluid from gun, hose leaks, or ruptured components will pierce skin. This may look like just a cut, but it is a serious injury that can result in amputation. Get immediate surgical treatment.• Do not spray without tip guard and trigger guard installed.• Engage trigger lock when not spraying.• Do not point gun at anyone or at any part of the body.• Do not put your hand over the spray tip.• Do not stop or deflect leaks with your hand, body, glove, or rag.• Follow the Pressure Relief Procedure when you stop spraying and before cleaning, checking, or
servicing equipment.• Tighten all fluid connections before operating the equipment.• Check hoses and couplings daily. Replace worn or damaged parts immediately.

Warnings
4 3A5422E
MOVING PARTS HAZARDMoving parts can pinch, cut or amputate fingers and other body parts.• Keep clear of moving parts.• Do not operate equipment with protective guards or covers removed.• Pressurized equipment can start without warning. Before checking, moving, or servicing
equipment, follow the Pressure Relief Procedure and disconnect all power sources.
TOXIC FLUID OR FUMES HAZARDToxic fluids or fumes can cause serious injury or death if splashed in the eyes or on the skin, inhaled, or swallowed.• Read SDSs to know the specific hazards of the fluids you are using.• Store hazardous fluid in approved containers, and dispose of it according to applicable guidelines.
EQUIPMENT MISUSE HAZARDMisuse can cause death or serious injury.• Do not operate the unit when fatigued or under the influence of drugs or alcohol.• Do not exceed the maximum working pressure or temperature rating of the lowest rated system
component. See in all equipment manuals.• Use fluids and solvents that are compatible with equipment wetted parts. See in all equipment
manuals. Read fluid and solvent manufacturer’s warnings. For complete information about your material, request Safety Data Sheets (SDSs) from distributor or retailer.
• Do not leave the work area while equipment is energized or under pressure.• Turn off all equipment and follow the Pressure Relief Procedure when equipment is not in use.• Check equipment daily. Repair or replace worn or damaged parts immediately with genuine
manufacturer’s replacement parts only.• Do not alter or modify equipment. Alterations or modifications may void agency approvals and
create safety hazards.• Make sure all equipment is rated and approved for the environment in which you are using it.• Use equipment only for its intended purpose. Call your distributor for information.• Route hoses and cables away from traffic areas, sharp edges, moving parts, and hot surfaces.• Do not kink or over bend hoses or use hoses to pull equipment.• Keep children and animals away from work area.• Comply with all applicable safety regulations.
PERSONAL PROTECTIVE EQUIPMENTWear appropriate protective equipment when in the work area to help prevent serious injury, including eye injury, hearing loss, inhalation of toxic fumes, and burns. Protective equipment includes but is not limited to:• Protective eyewear, and hearing protection. • Respirators, protective clothing, and gloves as recommended by the fluid and solvent
manufacturer.
WARNING
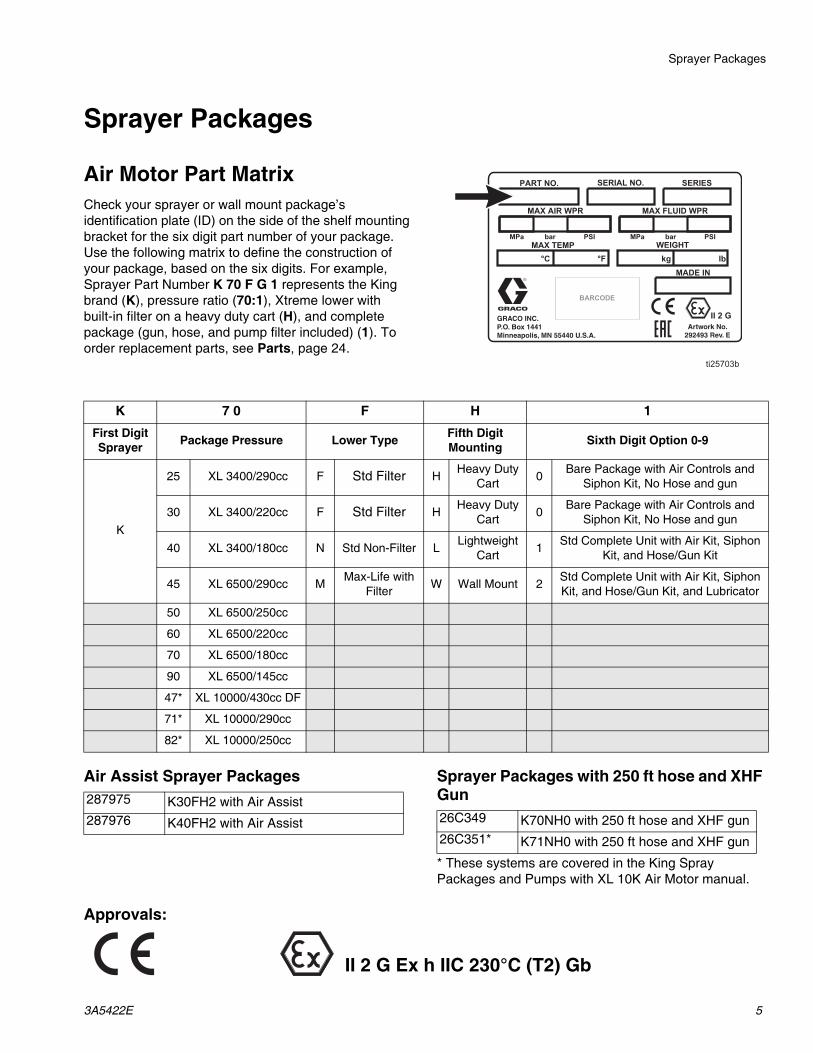
Sprayer Packages
3A5422E 5
Sprayer Packages
Air Motor Part MatrixCheck your sprayer or wall mount package’s identification plate (ID) on the side of the shelf mounting bracket for the six digit part number of your package. Use the following matrix to define the construction of your package, based on the six digits. For example, Sprayer Part Number K 70 F G 1 represents the King brand (K), pressure ratio (70:1), Xtreme lower with built-in filter on a heavy duty cart (H), and complete package (gun, hose, and pump filter included) (1). To order replacement parts, see Parts, page 24.
Air Assist Sprayer Packages Sprayer Packages with 250 ft hose and XHF Gun
* These systems are covered in the King Spray Packages and Pumps with XL 10K Air Motor manual.
Approvals:
Artwork No.292493 Rev. E
GRACO INC.P.O. Box 1441Minneapolis, MN 55440 U.S.A.
K 7 0 F H 1
First Digit Sprayer
Package Pressure Lower TypeFifth Digit Mounting
Sixth Digit Option 0-9
K
25 XL 3400/290cc F Std Filter HHeavy Duty
Cart0
Bare Package with Air Controls and Siphon Kit, No Hose and gun
30 XL 3400/220cc F Std Filter HHeavy Duty
Cart0
Bare Package with Air Controls and Siphon Kit, No Hose and gun
40 XL 3400/180cc N Std Non-Filter LLightweight
Cart1
Std Complete Unit with Air Kit, Siphon Kit, and Hose/Gun Kit
45 XL 6500/290cc MMax-Life with
FilterW Wall Mount 2
Std Complete Unit with Air Kit, Siphon Kit, and Hose/Gun Kit, and Lubricator
50 XL 6500/250cc
60 XL 6500/220cc
70 XL 6500/180cc
90 XL 6500/145cc
47* XL 10000/430cc DF
71* XL 10000/290cc
82* XL 10000/250cc
287975 K30FH2 with Air Assist287976 K40FH2 with Air Assist 26C349 K70NH0 with 250 ft hose and XHF gun
26C351* K71NH0 with 250 ft hose and XHF gun
II 2 G Ex h IIC 230°C (T2) Gb

Pump Packages
6 3A5422E
Pump Packages
Air Motor Part MatrixCheck the identification plate (ID) on your pump package (attached to the black motor shroud) for the six digit part number of your pump package. For example, Pump Part Number P 70 H C 2 represents the pump (P), pressure ratio (70:1), high performance (H), carbon steel construction (C), and built-in filter (2). To order replacement parts, see Parts on page 24.
* These systems are covered in the King Spray Packages and Pumps with XL 10K Air Motor manual.
Approvals:
PART NO. SERIAL SERIES
Artwork 293037 Rev. C
MAX AIR WPRMAX FLUID WPRMPa
bar
PSI
MPa
bar
PSI
II 2 G
GRACO INC. MPLS, MN
GRACO.COM / PATENTS
P 7 0 H C 2
First Digit Pump
Package Pressure Motor Type Lower Type Filter Option
P
25 XL 3400/220cc HHigh
PerformanceC Carbon Steel 1 No Filter in Lower
30 XL 3400/220cc HHigh
PerformanceC Carbon Steel 1 No Filter in Lower
40 XL 3400/180cc M Max Life 2Built-in Filter in Lower (Max Life only offered with built-in filter)
45 XL 6500/290cc
50 XL 6500/250cc
60 XL 6500/220cc
70 XL 6500/180cc
90 XL 6500/145cc
47* XL 10000/430cc DF
71* XL 10000/290cc
82* XL 10000/250cc
II 2 G Ex h IIC 230°C (T2) Gb

Component Identification
3A5422E 7
Component Identification
Cart Mount Systems
Ref. Description
A Air Inlet, 1 in npt(f) on claw fittingB Bleed Type Master Air Valve (required)C Air Pressure Relief Valve (required)D Air Filter / Water Separator (required)E Air Pressure GaugeF Packing NutG Air Regulator AdjustmentH Air MotorJ Fluid Drain/Purge Valve (required)K Fluid Filter (if equipped)L Grounding Wire (required)M Pump
N Suction Hose with Swivel and Tube (if equipped)
P Pump Fluid OutletPG Pump GuardR Optional Fluid Outlet,
for second spray gunS Spray GunT De-Ice Control (Bleed Air)U Hopper (if equipped)W Fluid Hose
Ref. Description

Component Identification
8 3A5422E
Wall Mount Systems
Ref. Description
A Air Inlet on Claw FittingB Bleed Type Master Air Valve (required)C Air Pressure Relief Valve (required)D Air Filter / Water Separator (required)E Air Pressure GaugeF Packing NutG Air Regulator AdjustmentH Air MotorJ Fluid Drain / Purge Valve (required)K Fluid Filter (if equipped)L Grounding Wire (required)M PumpN Suction Hose and TubeP Fluid OutletPG Pump GuardR Optional Fluid OutletS Spray GunT De-Ice Control (Bleed Air)W Fluid Hose

System Components
3A5422E 9
System Components* Required system components.
*Bleed Type Master Air Valve (B)
• Be sure the valve is easily accessible from the pump and located downstream from the air regulator.
• Required in your system to relieve air trapped between it and the air motor when the valve is closed.
- Open the valve to supply air to the motor.
- Close the valve to shut off air to the motor, and bleed any trapped air from the motor.
* Air Pressure Relief Valve (C)Automatically opens to relieve air pressure if the supplied pressure exceeds the preset limit.
* Air Filter (D)Remove harmful dirt from compressed air supply. A minimum 40 micron filter is used.
Air Regulator Adjustment (G)Adjusts air pressure to the motor and fluid outlet pressure of pump. Locate it close to the pump. Read air pressure on air pressure gauge (E).
* Fluid Drain/Purge Valve (J)Open valve to relieve pressure and when flushing or priming pump. Close valve when spraying.
De-Ice Control (T)Turn bleed air knob (open) to reduce icing.
Grounding
Pump: use ground wire and clamp (supplied). Connect ground wire (L) to ground stud on the air motor. Connect ground clamp to a true earth ground.
Air and fluid hoses: use only electrically conductive hoses with a maximum of 500 ft. (150 m) combined hose length to ensure grounding continuity. Check electrical resistance of hoses. If total resistance to ground exceeds 29 megohms, replace hose immediately.
Air compressor: follow manufacturer’s recommendations.
Spray gun / Dispense valve: ground through connection to a properly grounded fluid hose and pump.
Fluid supply container: follow local code.
Object being sprayed: follow local code. Do not use with dispense valve.
Solvent pails used when flushing: follow local code. Use only conductive metal pails, placed on a grounded surface. Do not place the pail on a non-conductive surface, such as paper or cardboard, which interrupts grounding continuity.
To maintain grounding continuity when flushing or relieving pressure: hold metal part of the spray gun/dispense valve firmly to the side of a grounded metal pail, then trigger the gun/valve.
Trapped air can cause the pump to cycle unexpectedly, which could result in serious injury from splashing or moving parts. Perform the Pressure Relief Procedure (page 13) to remove trapped air.
The equipment must be grounded to reduce the risk of static sparking. Static sparking can cause fumes to ignite or explode. Grounding provides an escape wire for the electric current.

Grounding
10 3A5422E
Grounding Installation
Tools Required:
• Grounding wires and clamps for pails
• Two 5 gallon (19 liter) metal pails
1. Connect the ground wire (244524) (L) to the ground stud on the air motor.
2. Connect the other end of the ground wire to a true earth ground.
3. Ground the object being sprayed, fluid supply container, and all other equipment in the work area. Follow your local code. Use only electrically conductive air and fluid hoses.
4. Ground all solvent pails. Use only metal pails, which are conductive, placed on a grounded surface. Do not place pail on a non-conductive surface, such as paper or cardboard, which interrupts grounding continuity.
ti8250a
L

Installation
3A5422E 11
Installation When spraying in enclosed areas, such as storage tanks, locate the pump outside the area.
Wall Mount AssemblyNOTE: Before mounting any pump assembly to the wall always follow the Pressure Relief Procedure on page 13.
1. Ensure the wall is strong enough to support the weight of the pump assembly and accessories, fluid, hoses, and stress caused during pump operation.
2. Drill four 7/16 in. (11 mm) holes using bracket as a template. Use any of the three mounting hole groupings in the bracket. See Wall Mount Bracket Mounting Hole Diagram on page 39.
3. Bolt bracket securely to wall using bolts and washers designed to hold in the wall’s construction.
4. Attach pump assembly to mounting bracket.
5. Connect air and fluid hoses (see Setup, page 12).
Hopper Assembly
1. If necessary, disconnect and remove suction hose (NA).
2. Attach bracket (KK) to the cart (JJ) with nuts (MM) and screws (HH).
3. Loosely attach bracket (GG) to bracket (KK) with nuts (MM) and screws (HH).
4. Install elbow (PP) and fitting (BB) on the pump.
5. Install fitting (DD) and fitting (CC) on hopper (EE).
6. Connect fitting (CC) to fitting (BB). Adjust bracket (GG) height to fit under the lip on the back of the hopper (EE). Tighten nuts (MM).

Setup
12 3A5422E
Setup
Tools Required:
• Two adjustable wrenches
• Non-sparking hammer or plastic mallet
• Torque wrench
• Flathead screwdriver
1. Ground sprayer (see Grounding, page 9).
2. Use a flathead screwdriver to remove pump guard (PG).
3. Check packing nut (F). Remove packing nut cover and fill with Throat Seal Liquid (TSL). Replace cover, the torque packing nut (F) to 100–110 ft-lb (135–150 N•m).
4. Replace pump guard (PG).
5. Attach suction hose (N) and tighten.
6. Attach electrically conductive fluid hose to pump outlet (P) and tighten.
7. Attach electrically conductive fluid hose (and air hose if using an air-assisted gun) to gun and tighten. Check that all pressure connections are tight.
8. Close the bleed type mater air valve (B). Purge the air supply hose. Attach the whip check cable (WC) to the air supply hose and connect to 3/4 in. npt(f) air inlet (A). Pull the whip check cable tight.
9. Flush and prime before using. See Flush on page 15, and Prime on page 17.
To avoid tip over, ensure cart is on a flat and level surface. Failure to do so could result in injury or equipment
PG

Pressure Relief Procedure
3A5422E 13
Pressure Relief Procedure
Follow the Pressure Relief Procedure whenever you see this symbol.
1. Engage gun trigger lock.
2. Close bleed type master air valve (B).
3. Disengage gun trigger lock.
NOTE: If using an air-assisted gun, turn gun air regulator counter-clockwise to relieve pressure.
4. Hold a metal part pf the gun firmly against a grounded metal pail. Trigger the gun until pressure is relieved.
NOTE: If fluid does not flow from gun, see Clearing a Clogged Tip on page 14.
5. Engage trigger lock.
6. Drain fluid. To drain fluid, slowly open all fluid drain valves, including fluid drain/purge valve (J), in system into a waste pail. If there is a return tube, open return line ball valve. Close valve after fluid is drained.
7. If you suspect the spray tip or hose is clogged or that pressure has not been fully relieved.
a. VERY SLOWLY loosen tip guard retaining nut or hose end coupling to relieve pressure gradually.
b. Loosen nut or coupling completely.
c. Clear hose or tip obstruction.
This equipment stays pressurized until pressure is manually relieved. To help prevent serious injury from pressurized fluid, such as skin injection, splashing fluid and moving parts, follow the Pressure Relief Procedure when you stop spraying and before cleaning, checking, or servicing equipment.
ti5049a
tii5048a
tii8252a
J

Clearing a Clogged Tip
14 3A5422E
Clearing a Clogged Tip
1. Follow the Pressure Relief Procedure on page 13.
2. Rotate tip 180° so arrow on tip cylinder faces backward.
3. Disengage trigger lock.
4. Trigger gun into pail or onto ground to remove clog.
5. Engage trigger lock, then rotate tip 180° back to spray position.
6. If tip is still clogged, shut off sprayer and disconnect the power source.
7. Follow the Pressure Relief Procedure on page 13.
8. Remove and clean the spray tip.

Flush
3A5422E 15
Flush
Flush the Pump:
• Before first use
• When changing fluids
• Before repairing equipment
• Before fluid dries or settles out in a dormant pump (check the pot life of catalyzed fluids)
• At the end of the day
• Before storing the pump
Flush at the lowest pressure possible. Flush with a fluid that is compatible with the fluid you are pumping and with the wetted parts in your system. Check with your fluid manufacturer or supplier for recommended flushing fluids and flushing frequency.
1. Perform Pressure Relief Procedure on page 13.
2. Remove tip and tip guard from gun.
3. If desired, remove fluid filter. Reinstall filter cap after removing fluid filter.
4. Place suction tube in a compatible solvent.
NOTE: Do not stretch hose tight. Let it hang to assist fluid flow into the pump.
5. Turn air regulator adjustment knob (G) counterclockwise until air pressure gauge (E) reads zero.
6. Open bleed type master air valve (B).
7. Flush hose and gun:
a. Disengage gun trigger lock. Hold the gun against a grounded metal pail.
To avoid fire and explosion, always ground equipment and waste container. To avoid static sparking and injury from splashing, always flush at lower possible pressure.

Flush
16 3A5422E
b. Trigger gun, slowly turn air regulator adjustment knob (G) clockwise until pump beings to cycle and a steady stream comes from gun. Trigger gun for 10-15 seconds during initial setup. If flushing material, trigger gun until clean solvent flows from gun.
NOTE: If using an air-assisted gun, increase air pressure by turning gun regulator clockwise.
c. After solvent is running clean, turn the air regulator adjustment knob (G) counter clockwise until it stops and the gauge reads zero. The pump will stop. Once the material stops flowing, release the trigger and engage the trigger lock.
NOTE: When shutting down the unit for the day, stop the pump with the rod buried in the pump.
d. Close the bleed type master air valve.
8. If flushing through drain/purge valve:
a. Place drain tube in a grounded waste pail. Open fluid drain/purge valve (J) slightly by rotating counterclockwise.
b. Turn air regulator adjustment knob (G) counterclockwise until air pressure gauge (E) reads zero
c. Open bleed type master air valve (B).
d. Start the pump by rotating the air regulator adjustment knob (G) clockwise until pump begins to move.
e. When clean solvent flows from drain tube close fluid drain/purge valve (J) by rotating clockwise. Pump will stall.
f. Stop the pump with the rod buried in the pump.
g. Turn the air regulator adjustment knob (G) counterclockwise until air pressure gauge (E) reads zero.
h. Close bleed type master air valve (B).
9. Perform Pressure Relief Procedure on page 13.
10. Remove fluid filter and soak in solvent. Replace filter cap.
ti8727a
J
J

Prime
3A5422E 17
Prime
1. Perform the Pressure Relief Procedure, page 13.
2. Lock gun trigger. Remove tip and tip guard from gun.
3. Place suction tube in the material that will be sprayed.
NOTE: Do not stretch hose tight. Let it hang to assist fluid flow into the pump.
4. Turn air regulator adjustment knob (G) counterclockwise until air pressure gauge (E) reads zero.
5. Open bleed type master air valve (B).
6. Prime through drain valve if necessary. NOTE: Usually required for high viscosity materials.
a. Place drain tube in a grounded waste pail. Open drain/purge valve (J) by slightly rotating counterclockwise.
NOTICE
Do not prime pump through drain/purge valve using two-component materials. Mixed two-component materials will harden in valve and result in clogging.
J

Prime
18 3A5422E
b. Start the pump by rotating the air regulator adjustment knob (G) clockwise until pump begins to move.
7. Prime hose and gun:
a. Disengage gun trigger lock. Hold the metal part of the gun against a grounded metal pail.
b. Trigger gun, slowly open air regulator adjustment knob (G) until pump beings to cycle and a steady stream comes from gun. Trigger gun for 10-15 seconds.
NOTE: If using an air-assisted gun, increase air pressure by turning gun regulator clockwise.
c. Engage trigger lock.
d. The equipment is now ready to spray; proceed to the Spray section on page 19.
ti5048a
ti8727a

Spray
3A5422E 19
Spray
1. Perform the Prime procedure on page 17.
2. Perform Pressure Relief Procedure on page 13.
3. Install tip and tip guard on gun.
4. Turn air regulator adjustment knob (G) counterclockwise to decrease pressure to zero.
5. Open bleed type master air valve (B).
6. Turn air regulator adjustment knob (G) until air pressure gauge (E) reads desired pressure. Turn clockwise to increase pressure, counterclockwise to decrease pressure.
7. Disengage gun trigger lock.
8. Spray a test pattern. Read fluid manufacturer’s recommendations. Adjust pressure as necessary. If using an air-assisted gun, increase gun air pressure while testing spray pattern.
9. Perform the Flush procedure on page 15.
Shutdown
Perform the Prime procedure on page 17.
Always flush the pump before the fluid dries on the displacement pump rod. Perform the Flush procedure on page 15.
NOTICE
Running the pump while dry will cause the pump to quickly accelerate to a high speed and cause damage. To avoid damage, do not allow pump to run dry.
G
NOTICE
Leaving water or water-based fluid in the pump overnight can cause the equipment to rust or corrode. If you are pumping water-based fluid, flush with water first, then with a rust inhibitor such as mineral spirits. Relieve pressure, but leave rust inhibitor in pump to protect parts from corrosion.
ti5048a

Maintenance
20 3A5422E
Maintenance
Preventative Maintenance ScheduleThe operating conditions of your particular system determine how often maintenance is required. Establish a preventive maintenance schedule by recording when and what kind of maintenance is needed, and then determine a regular schedule for checking your system.
Daily Maintenance
NOTE: For over night shutdown, stop pump at bottom of its stroke to prevent fluid from drying on exposed displacement rod and damaging throat packings. Perform the Prime procedure on page 17.
1. Perform the Flush procedure on page 15.
2. Perform the Prime procedure on page 17.
3. Check packing nut (F). Adjust packings and replace TSL as necessary. Torque to 25-30 ft-lb (34-41 N•m).
4. Drain water from air filter.
5. Clean suction tube using a compatible solvent. It is recommended that you clean the outside of the sprayer using a cloth and compatible solvent.
6. Check hoses, tubes, and couplings. Tighten all fluid connections before each use.
7. Clean fluid line filter.
Corrosion ProtectionAlways flush the pump before the fluid dries on the displacement rod. Never leave water or water-based fluid in the pump overnight.
Cart MaintenancePeriodically lubricate the axle between points AXA and AXB with lightweight oil.
Keep the cart clean by wiping up spills daily, using a compatible solvent.
NOTICE
Leaving water or water-based fluid in the pump over night can cause the equipment to rust or corrode. If you are pumping water-base fluid, flush with water first, then with a rust inhibitor, such as mineral spirits. Relieve pressure, but leave rust inhibitor in pump to protect parts from corrosion.

Troubleshooting
3A5422E 21
Troubleshooting
NOTE: To find parts lists for the parts identified in the troubleshooting tables, see page numbers listed in the table below.
1. Perform Pressure Relief Procedure on page 13.
2. Check all possible causes and problems before disassembling pump.
3. See air motor manual for air motor specific troubleshooting
* To determine if fluid hose or gun is obstructed, follow the Pressure Relief Procedure on page 13. Disconnect fluid hose and place a container at pump fluid outlet to catch any fluid. Turn on air power just enough to start pump. If pump starts, the obstruction is in fluid hose or gun.
Problem Cause Solution
Does not operate. Valve closed or clogged. Clear air line; increase air supply. Check that valves are open.
Fluid hose or gun obstructed. Clean hose or gun.*
Dried fluid on displacement rod. Clean rod; always stop pump at bottom of stroke; keep wet-cup filled with compatible solvent.
Air motor parts dirty, worn, or damaged. Clean or repair air motor. See motor manual.
Output low on both strokes. Air line restricted or air supply inadequate. Valves closed or clogged.
Clear air line; increase air supply. Check that valves are open.
Fluid hose/gun obstructed; hose ID too small.
Clear hose or gun*; use hose with larger ID.
Air motor icing. Open De-Ice control.
Output low on down stroke. Open or worn intake valve. Clear or service intake valve.
High viscosity fluid. Adjust intake spacers.
Output low on upstroke. Open or worn piston valve or packings. Clear piston valve; replace packings.
Erratic accelerated speed. Fluid supply exhausted, clogged suction. Refill supply and prime pump. Clean suction tube.
High viscosity fluid. Reduce viscosity; adjust intake spacers.
Open or worn piston valve or packings. Clear piston valve; replace packings.
Open or worn intake valve. Clear or service intake valve.
Runs sluggishly. Possible icing. Stop pump. Open De-Ice control.
Cycles or fails to hold pressure at stall.
Worn check valves or seals. Service lower. See Remove Lower (page 22) and Xtreme Lowers manual.
Air bubbles in fluid. Loose suction line. Tighten. Use compatible liquid thread sealant or PTFE tape on connections.
Poor finish or irregular spray pattern.
Incorrect fluid pressure at gun. See gun manual; read fluid manufacturer’s recommendations.
Fluid is too thin or too thick. Adjust fluid viscosity; read fluid manufacturer’s recommendations.

Remove Lower
22 3A5422E
Remove LowerRequired Tools:
• Set of adjustable wrenches
• Torque wrench
• Rubber mallet
• Thread lubricant
• Anti-seize lubricant 222955
• Loctite® 2760™ or equivalent
• Flathead screwdriver
Disconnect and Reconnect Lower
1. Perform the Flush procedure on page 15. Stop the pump at the bottom of its stroke.
2. Perform Pressure Relief Procedure on page 13.
3. Disconnect air hose.
4. Disconnect fluid hose (W). Hold pump outlet fitting (P) with a wrench to keep it from loosening while you disconnect suction hose (N).
NOTE: Note the relative position of pump fluid outlet (P) to inlet of motor for easier reassembly alignment. If motor does not require service, leave it attached to its mounting.
5. Use a flathead screwdriver to remove the pump guard (PG).
6. If using a cart-mounted unit, tip the cart onto its back.
NOTE: Lay rags onto the floor to catch TSL that may spill out of the packing nut.
7. Hold the flats of the air motor piston rod with a wrench. Use another wrench to loosen the coupling nut (CN).
8. Remove the tie rod nuts (TN).
9. Hold the lower and slide it off the tie rods (TN) to remove. Refer to the Lower manual to service the lower. To service motor, refer to separate motor manual.
10. Reconnect the lower by following the disconnect steps in reverse order.
NOTE: Torque nuts to 50-60 ft-lb (68-81 N•m).
11. Refill packing nut with TSL.
P

Remove Lower
3A5422E 23
Parts
24 3A5422E
Parts
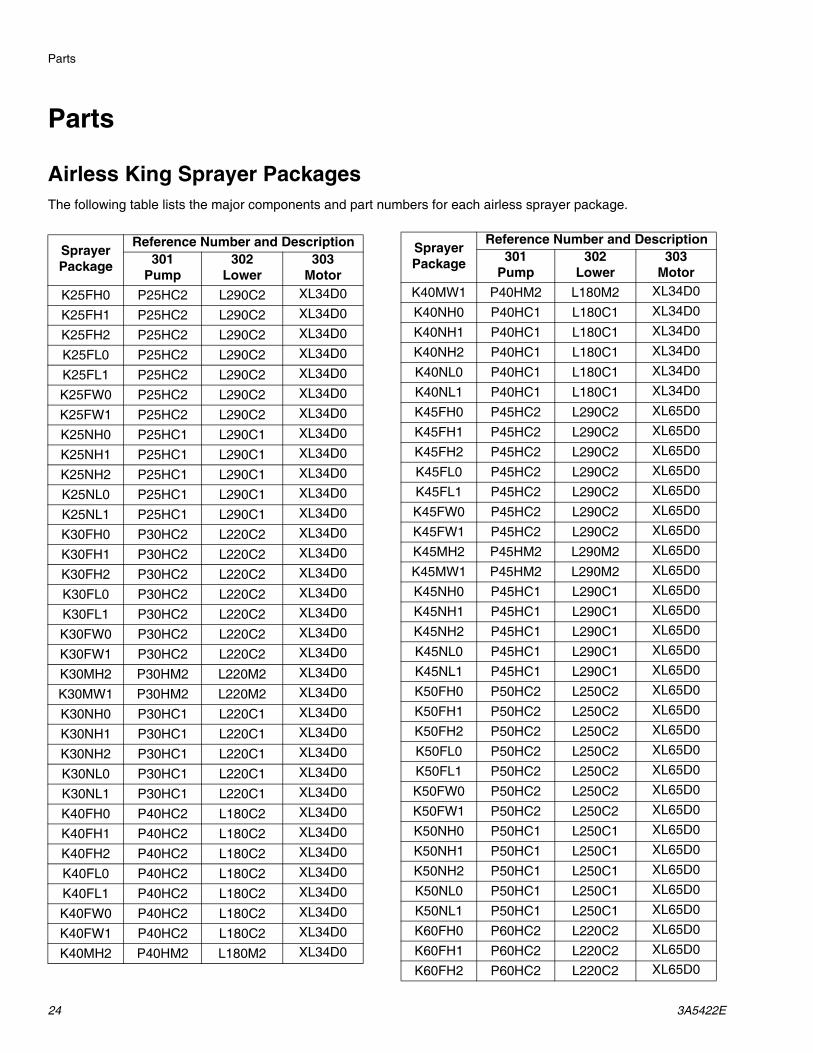
Airless King Sprayer PackagesThe following table lists the major components and part numbers for each airless sprayer package.
Sprayer Package
Reference Number and Description301
Pump302
Lower303
Motor
K25FH0 P25HC2 L290C2 XL34D0
K25FH1 P25HC2 L290C2 XL34D0
K25FH2 P25HC2 L290C2 XL34D0
K25FL0 P25HC2 L290C2 XL34D0
K25FL1 P25HC2 L290C2 XL34D0
K25FW0 P25HC2 L290C2 XL34D0
K25FW1 P25HC2 L290C2 XL34D0
K25NH0 P25HC1 L290C1 XL34D0
K25NH1 P25HC1 L290C1 XL34D0
K25NH2 P25HC1 L290C1 XL34D0
K25NL0 P25HC1 L290C1 XL34D0
K25NL1 P25HC1 L290C1 XL34D0
K30FH0 P30HC2 L220C2 XL34D0
K30FH1 P30HC2 L220C2 XL34D0
K30FH2 P30HC2 L220C2 XL34D0
K30FL0 P30HC2 L220C2 XL34D0
K30FL1 P30HC2 L220C2 XL34D0
K30FW0 P30HC2 L220C2 XL34D0
K30FW1 P30HC2 L220C2 XL34D0
K30MH2 P30HM2 L220M2 XL34D0
K30MW1 P30HM2 L220M2 XL34D0
K30NH0 P30HC1 L220C1 XL34D0
K30NH1 P30HC1 L220C1 XL34D0
K30NH2 P30HC1 L220C1 XL34D0
K30NL0 P30HC1 L220C1 XL34D0
K30NL1 P30HC1 L220C1 XL34D0
K40FH0 P40HC2 L180C2 XL34D0
K40FH1 P40HC2 L180C2 XL34D0
K40FH2 P40HC2 L180C2 XL34D0
K40FL0 P40HC2 L180C2 XL34D0
K40FL1 P40HC2 L180C2 XL34D0
K40FW0 P40HC2 L180C2 XL34D0
K40FW1 P40HC2 L180C2 XL34D0
K40MH2 P40HM2 L180M2 XL34D0
K40MW1 P40HM2 L180M2 XL34D0
K40NH0 P40HC1 L180C1 XL34D0
K40NH1 P40HC1 L180C1 XL34D0
K40NH2 P40HC1 L180C1 XL34D0
K40NL0 P40HC1 L180C1 XL34D0
K40NL1 P40HC1 L180C1 XL34D0
K45FH0 P45HC2 L290C2 XL65D0
K45FH1 P45HC2 L290C2 XL65D0
K45FH2 P45HC2 L290C2 XL65D0
K45FL0 P45HC2 L290C2 XL65D0
K45FL1 P45HC2 L290C2 XL65D0
K45FW0 P45HC2 L290C2 XL65D0
K45FW1 P45HC2 L290C2 XL65D0
K45MH2 P45HM2 L290M2 XL65D0
K45MW1 P45HM2 L290M2 XL65D0
K45NH0 P45HC1 L290C1 XL65D0
K45NH1 P45HC1 L290C1 XL65D0
K45NH2 P45HC1 L290C1 XL65D0
K45NL0 P45HC1 L290C1 XL65D0
K45NL1 P45HC1 L290C1 XL65D0
K50FH0 P50HC2 L250C2 XL65D0
K50FH1 P50HC2 L250C2 XL65D0
K50FH2 P50HC2 L250C2 XL65D0
K50FL0 P50HC2 L250C2 XL65D0
K50FL1 P50HC2 L250C2 XL65D0
K50FW0 P50HC2 L250C2 XL65D0
K50FW1 P50HC2 L250C2 XL65D0
K50NH0 P50HC1 L250C1 XL65D0
K50NH1 P50HC1 L250C1 XL65D0
K50NH2 P50HC1 L250C1 XL65D0
K50NL0 P50HC1 L250C1 XL65D0
K50NL1 P50HC1 L250C1 XL65D0
K60FH0 P60HC2 L220C2 XL65D0
K60FH1 P60HC2 L220C2 XL65D0
K60FH2 P60HC2 L220C2 XL65D0
Sprayer Package
Reference Number and Description301
Pump302
Lower303
Motor

Parts
3A5422E 25
K60FL0 P60HC2 L220C2 XL65D0
K60FL1 P60HC2 L220C2 XL65D0
K60FW0 P60HC2 L220C2 XL65D0
K60FW1 P60HC2 L220C2 XL65D0
K60MH2 P60HM2 L220M2 XL65D0
K60MW1 P60HM2 L220M2 XL65D0
K60NH0 P60HC1 L220C1 XL65D0
K60NH1 P60HC1 L220C1 XL65D0
K60NH2 P60HC1 L220C1 XL65D0
K60NL0 P60HC1 L220C1 XL65D0
K60NL1 P60HC1 L220C1 XL65D0
K70FH0 P70HC2 L180C2 XL65D0
K70FH1 P70HC2 L180C2 XL65D0
K70FH2 P70HC2 L180C2 XL65D0
K70FL0 P70HC2 L180C2 XL65D0
K70FL1 P70HC2 L180C2 XL65D0
K70FW0 P70HC2 L180C2 XL65D0
K70FW1 P70HC2 L180C2 XL65D0
K70MH2 P70HM2 L180M2 XL65D0
K70MW1 P70HM2 L180M2 XL65D0
K70NH0 P70HC1 L180C1 XL65D0
K70NH1 P70HC1 L180C1 XL65D0
K70NH2 P70HC1 L180C1 XL65D0
K70NL0 P70HC1 L180C1 XL65D0
K70NL1 P70HC1 L180C1 XL65D0
K90FH0 P90HC2 L145C2 XL65D0
K90FH1 P90HC2 L145C2 XL65D0
K90FH2 P90HC2 L145C2 XL65D0
K90FL0 P90HC2 L145C2 XL65D0
K90FL1 P90HC2 L145C2 XL65D0
K90MH2 P90HM2 L145M2 XL65D0
K90NH0 P90HC1 L145C1 XL65D0
K90NH1 P90HC1 L145C1 XL65D0
K90NH2 P90HC1 L145C1 XL65D0
K90NL0 P90HC1 L145C1 XL65D0
K90NL1 P90HC1 L145C1 XL65D0
Sprayer Package
Reference Number and Description301
Pump302
Lower303
Motor
K47FH0 P47HC1 24W644 24X856
K47FH1 P47HC1 24W644 24X856
K47FH2 P47HC1 24W644 24X856
K47FW0 P47HC1 24W644 24X856
K47FW1 P47HC1 24W644 24X856
K71FH0 P71HC2 B29HC2 24X856
K71FH1 P71HC2 B29HC2 24X856
K71FH2 P71HC2 B29HC2 24X856
K71FW0 P71HC2 B29HC2 24X856
K71FW1 P71HC2 B29HC2 24X856
K71NH0 P71HC1 B29HC1 24X856
K71NH1 P71HC1 B29HC1 24X856
K71NH2 P71HC1 B29HC1 24X856
K82FH0 P82HC2 B25HC2 24X856
K82FH1 P82HC2 B25HC2 24X856
K82FH2 P82HC2 B25HC2 24X856
K82FW0 P82HC2 B25HC2 24X856
K82FW1 P82HC2 B25HC2 24X856
K82NH0 P82HC1 B25HC1 24X856
K82NH1 P82HC1 B25HC1 24X856
K82NH2 P82HC1 B25HC1 24X856
Sprayer Package
Reference Number and Description301
Pump302
Lower303
Motor

Parts
26 3A5422E
Air Assisted Sprayer Packages
410*
415*
435*
427*
428*
438*(To air inlet) To air control
444‡
440*
439*
441*
437*416*
417*
427*435*
415*
430*
428*
431*
419
434
433
403
404
429
443
406405
407
402‡

Parts
3A5422E 27
Air-Assisted Sprayer Packages Parts List
Models 287975 and 287976
Not shown.
* Included in Air Regulator Mounting Kit 288527.
‡ Included in Hose Suction Kit 25D515.
See page Sprayer Cart Packages, page 38, to verify correct part numbers.
Ref. Part Description Qty.401 P30HC2 PUMP, assy. 287975 1
P40HC2 PUMP, assy. 287976 1402 ‡ 17X355 CART, heavy duty 1403 ‡ - - - - - TUBE, suction 1404 ‡ - - - - - HOSE, suction, 1 in.,
NPT x quick connect, 6 ft.1
405 ‡ - - - - - ADAPTER, elbow 1406 ‡ - - - - - ADAPTER, quick connect 1407 244524 WIRE, ground assembly w/ clamp 1410* 26C352 BRACKET, air controls 1415* 116513 REGULATOR, air, gun 1416* 100101 SCREW, mounting, cap, hex hd 6417* 116514 NUT, regulator mount 1418 100133 WASHER, lock 4419 24C857 GUN, spray 1427* 108190 GAUGE, pressure, gun 1428* 116473 VALVE, ball, vented, 2 way 1429 210868 HOSE, air, coupled, 50 ft. 1430* 156971 NIPPLE, short 1431* 114128 ELBOW, male, swivel 1433 H52550 HOSE, fluid; nylon, 1/4 in. ID; 1/4
npsm(fbe); 50 ft.1
434 189018 SWIVEL 1435* 111763 ELBOW, 1/4 npt 1436* 100023 WASHER, flat 2437* 112958 NUT, hex, flanged 2438* C20900 FITTING, tee, run 1439* 114129 CONNECTOR, male 1440* 100505 BUSHING, pipe 1441* - - - - - TUBE 1443 159842 ADAPTER, bushing, 1/4 npt(m) x
1/2 npt(f)1
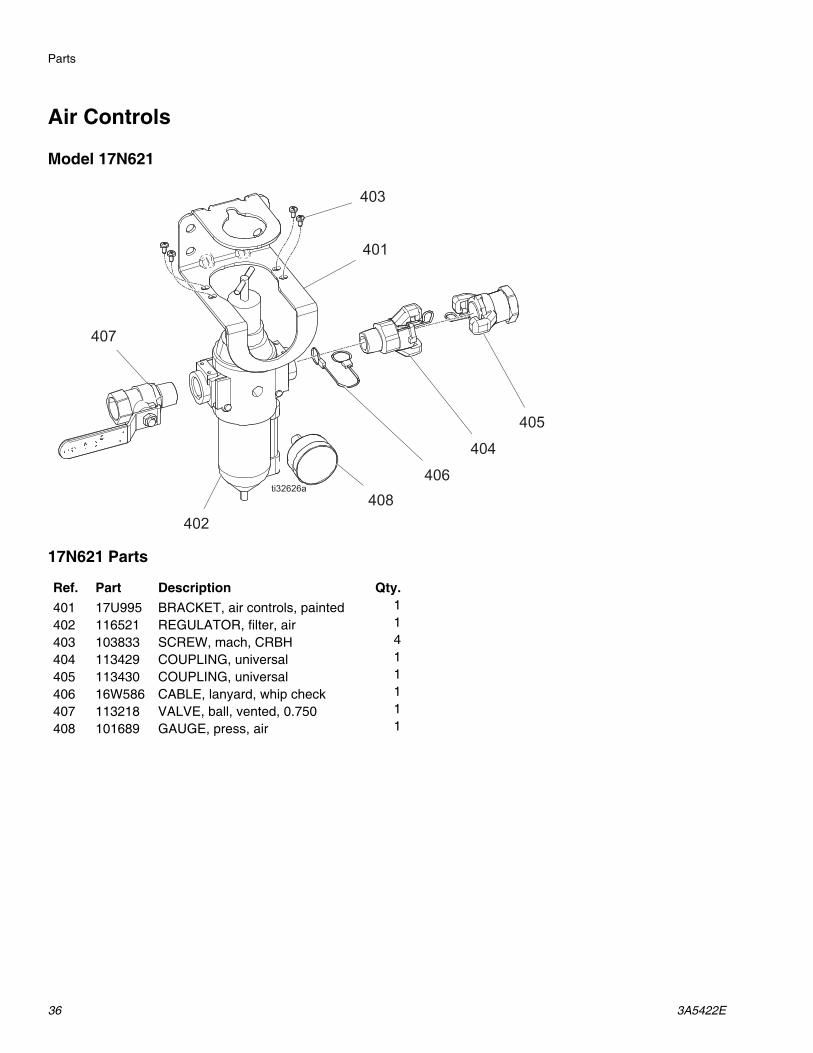
444 17N621 CONTROLS, air, heavy duty cart 1

Parts
28 3A5422E
King Sprayer Cart Packages PartsDataTrak Kits
24X550 and 24X552
L1

Parts
3A5422E 29
King Sprayer Cart Packages Parts List
The following parts are included with only airless sprayer packages:
Ref. Part Description Qty.
1 - - - - - CART (see Cart Parts, page 30) 12 - - - - - WHEEL (see Cart Parts, page 30) 23 154628 WASHER 24 113436 RING, retaining 25 113361 CAP, tube, round 26 - - - - - PUMP (see Pump Package Parts
tables starting on page 32)1
7 100133 WASHER, lock, 3/8 48 100101 SCREW, cap, hex hd 49 - - - - - AIR CONTROLS 1
17N621 Standard filter/regulator25D529 Filter/regulator and lubricator
10 112395 SCREW, cap, flng hd 411 - - - - - AIR LINE 1
17S137 HOSE, models ending in 117V125 HOSE, models ending in 2
12 25D515 HOSE, suction, 5 gal to 1-1/4 npt 113 25D498 TOOL BOX, black 114 115248 SCREW, cap, hex hd 415 114231 NUT, lock, hex (standard) 418 244524 WIRE, ground assembly, w/clamp 121 206994 FLUID, TSL 8 oz bottle 130* - - - - - SAFETY VALVE 1
113498 110 psi, K30 - K70 models116643 90 psi, K90 models
31 17V369 KIT, sprayer, bare units 133 17V371 KIT, sprayer, w/pump, filter 134 181072 KIT, repair, strainer 1L1 15F674 LABEL, safety, motor 1
* Not included with air controls. Order separately.
Replacement Danger and Warning labels are available at no cost.
Ref. Part Description Qty.
101 - - - - - GUN, spray 1XTR504 XTR5 spray gun for models
with 25:1 - 50:1 ratio onlyXTR704 XTR7 spray gun for models
with 55:1 - 90:1 ratio only102 - - - - - HOSE, fluid; nylon; 1/4 in. ID,
1/4 npsm(fbe); 6 ft.1
H42506 Models with 25:1 - 45:1 ratioH52506 Models with 46:1 - 55:1 ratioH72506 Models with 60:1 - 90:1 ratio
103 - - - - - HOSE, fluid; nylon, 3/8 in. ID; 3/8 npsm(fbe); 50 ft.
1
H43850 Models with 25:1 - 45:1 ratioH53850 Models with 46:1 - 55:1 ratioH73850 Models with 60:1 - 90:1 ratio
104 164856 FITTING, nipple, reducing; 3/8 x 1/4 npt(m)
1

Parts
30 3A5422E
Cart Parts
17X355 - Heavy Duty Cart 17X356 - Light Weight Cart
Ref. Part Description Qty.
3 154628 WASHER 2
4 113436 RING, retaining 2
5 113361 CAP, tube, round 2
C1 24Z852 CART, heavy duty 1
C3 113362 WHEEL, semi-pneumatic 2
Ref. Part Description Qty.
4 113436 RING, retaining 2
C2 17S256 CART, light weight 1
C4 116406 WHEEL, semi-pneumatic 2
C5 16W767 PLUG, tubing 2

Parts
3A5422E 31
Wall Mount Packages Parts
NOTE: Apply stainless steel pipe sealant to all non-swiveling pipe threads.
Ref. Part Description Qty.
201 - - - - - PUMP (see Pump Package Parts tables starting on page 32)
1
202 24X180 BRACKET, wall 1
203 116401 ADAPTER, elbow 1
204 116402 ADAPTER, qconnect 1
205 247301 HOSE, suction, 1 in. npt x qconnect
1
206 197682 TUBE, suction 1
207 114967 COUPLING, pipe, 1 in. 1
208 195151 TUBE, intake 1
209 181072 STRAINER, inlet 1
210 244524 WIRE, ground assembly w/ clamp
1
210a - - - - - SCREW, ground 1
211 17S137 HOSE, coupled, 13.75 in. 1
213 100133 WASHER, lock, 3/8 in. 8
214 100101 SCREW, cap, hex hd 4
215 100131 NUT, full hex 4
217 25D649 MODULE, air, wall mount, 3/4 in. 1
218 111192 SCREW, cap flange hd 4
220 206994 FLUID, TSL 8 oz bottle 1
221* - - - - - SAFETY VALVE 1
113498 110 psi, K30 - K70 models116643 90 psi, K90 models
* Not included with air controls. Order separately.
Ref. Part Description Qty.

Parts
32 3A5422E
Pump Package Parts
DescriptionPump List
Page
Pump Packages with L180C# Lowers (40:1, 70:1 ratio) 33Pump Packages with L220C# Lowers (30:1, 60:1 ratio) 33Pump Packages with L250C# Lowers (50:1 ratio) 34Pump Packages with L290C# Lowers (25:1, 45:1 ratio) 34Pump Packages with L145C# Lowers (90:1 ratio) 34
Ref. Part Description Qty.
301 - - - - - MOTOR, standard 1
302 15H392 ROD, adapter 1
303 15F837 ROD, tie, 14–1/4 long 3
304 197340 COVER, coupler 1
305 244819 COUPLING, assembly, 145–290 Xtreme
1
306 - - - - - LOWER, Xtreme, 220, nf, Xseal(see Pump Packages table above)
1
307 101712 NUT, lock 3
308 244820 CLIP, hairpin (w/lanyard) 1
309 17S727 GUARD, rod coupler 2
310 17P245 LABEL, King 1
311 15H117 LABEL, identification 1
Ref. Part Description Qty.

Parts
3A5422E 33
Pump Packages with L180C# Lowers (40:1, 70:1 Ratio)
Pump Packages with L220C# Lowers (30:1, 60:1 Ratio)
Pump Package Pump Lower Motor
K40FH0 P40HC2 L180C2 XL34D0
K40FH1 P40HC2 L180C2 XL34D0
K40FH2 P40HC2 L180C2 XL34D0
K40FL0 P40HC2 L180C2 XL34D0
K40FL1 P40HC2 L180C2 XL34D0
K40FW0 P40HC2 L180C2 XL34D0
K40FW1 P40HC2 L180C2 XL34D0
K40MH2 P40HM2 L180M2 XL34D0
K40MW1 P40HM2 L180M2 XL34D0
K40NH0 P40HC2 L180C2 XL34D0
K40NH1 P40HC2 L180C2 XL34D0
K40NH2 P40HC2 L180C2 XL34D0
K40NL0 P40HC2 L180C2 XL34D0
K40NL1 P40HC2 L180C2 XL34D0
K70FH0 P70HC2 L180C2 XL65D0
K70FH1 P70HC2 L180C2 XL65D0
K70FH2 P70HC2 L180C2 XL65D0
K70FL0 P70HC2 L180C2 XL65D0
K70FL1 P70HC2 L180C2 XL65D0
K70FW0 P70HC2 L180C2 XL65D0
K70FW1 P70HC2 L180C2 XL65D0
K70MH2 P70HM2 L180M2 XL65D0
K70MW1 P70HM2 L180M2 XL65D0
K70NH0 P70HC2 L180M2 XL65D0
K70NH1 P70HC2 L180M2 XL65D0
K70NH2 P70HC2 L180C2 XL65D0
K70NL0 P70HC2 L180C2 XL65D0
K70NL1 P70HC2 L180C2 XL65D0
Pump Package Pump Lower Motor
Pump Package Pump Lower Motor
K30FH0 P30HC2 L220C2 XL34D0
K30FH1 P30HC2 L220C2 XL34D0
K30FH2 P30HC2 L220C2 XL34D0
K30FL0 P30HC2 L220C2 XL34D0
K30FL1 P30HC2 L220C2 XL34D0
K30FW0 P30HC2 L220C2 XL34D0
K30FW1 P30HC2 L220C2 XL34D0
K30MH2 P30HM2 L220M2 XL34D0
K30MW1 P30HM2 L220M2 XL34D0
K30NH0 P30HC1 L220C1 XL34D0
K30NH1 P30HC1 L220C1 XL34D0
K30NH2 P30HC1 L220C1 XL34D0
K30NL0 P30HC1 L220C1 XL34D0
K30NL1 P30HC1 L220C1 XL34D0
K60FH0 P60HC2 L220C2 XL65D0
K60FH1 P60HC2 L220C2 XL65D0
K60FH2 P60HC2 L220C2 XL65D0
K60FL0 P60HC2 L220C2 XL65D0
K60FL1 P60HC2 L220C2 XL65D0
K60FW0 P60HC2 L220C2 XL65D0
K60FW1 P60HC2 L220C2 XL65D0
K60MH2 P60HM2 L220M2 XL65D0
K60MW1 P60HM2 L220M2 XL65D0
K60NH0 P60HC1 L220C1 XL65D0
K60NH1 P60HC1 L220C1 XL65D0
K60NH2 P60HC1 L220C1 XL65D0
K60NL0 P60HC1 L220C1 XL65D0
K60NL1 P60HC1 L220C1 XL65D0
Pump Package Pump Lower Motor

Parts
34 3A5422E
Pump Packages with L250C# Lowers (50:1 Ratio)
Pump Packages with L290C# Lowers (25:1, 45:1 Ratio)
Pump Packages with L145C# Lowers (90:1 Ratio)
Pump Package Pump Lower Motor
K50FH0 P50HC2 L250C2 XL65D0
K50FH1 P50HC2 L250C2 XL65D0
K50FH2 P50HC2 L250C2 XL65D0
K50FL0 P50HC2 L250C2 XL65D0
K50FL1 P50HC2 L250C2 XL65D0
K50FW0 P50HC2 L250C2 XL65D0
K50FW1 P50HC2 L250C2 XL65D0
K50NH0 P50HC1 L250C1 XL65D0
K50NH1 P50HC1 L250C1 XL65D0
K50NH2 P50HC1 L250C1 XL65D0
K50NL0 P50HC1 L250C1 XL65D0
K50NL1 P50HC1 L250C1 XL65D0
Pump Package Pump Lower Motor
K25FH0 P25HC2 L290C2 XL34D0
K25FH1 P25HC2 L290C2 XL34D0
K25FH2 P25HC2 L290C2 XL34D0
K25FL0 P25HC2 L290C2 XL34D0
K25FL1 P25HC2 L290C2 XL34D0
K25FW0 P25HC2 L290C2 XL34D0
K25FW1 P25HC2 L290C2 XL34D0
K25NH0 P25HC1 L290C1 XL34D0
K25NH1 P25HC1 L290C1 XL34D0
K25NH2 P25HC1 L290C1 XL34D0
K25NL0 P25HC1 L290C1 XL34D0
K25NL1 P25HC1 L290C1 XL34D0
K45FH0 P45HC2 L290C2 XL65D0
K45FH1 P45HC2 L290C2 XL65D0
K45FH2 P45HC2 L290C2 XL65D0
K45FL0 P45HC2 L290C2 XL65D0
K45FL1 P45HC2 L290C2 XL65D0
K45FW0 P45HC2 L290C2 XL65D0
K45FW1 P45HC2 L290C2 XL65D0
K45MH2 P45HM2 L290M2 XL65D0
K45MW1 P45HM2 L290M2 XL65D0
K45NH0 P45HC1 L290C1 XL65D0
K45NH1 P45HC1 L290C1 XL65D0
K45NH2 P45HC1 L290C1 XL65D0
K45NL0 P45HC1 L290C1 XL65D0
K45NL1 P45HC1 L290C1 XL65D0
Pump Package Pump Lower Motor
K90FH0 P90HC2 L145C2 XL65D0
K90FH1 P90HC2 L145C2 XL65D0
K90FH2 P90HC2 L145C2 XL65D0
K90FL0 P90HC2 L145C2 XL65D0
K90FL1 P90HC2 L145C2 XL65D0
K90MH2 P90HM2 L145M2 XL65D0
K90NH0 P90HC1 L145C1 XL65D0
K90NH1 P90HC1 L145C1 XL65D0
K90NH2 P90HC1 L145C1 XL65D0
K90NL0 P90HC1 L145C1 XL65D0
K90NL1 P90HC1 L145C1 XL65D0
Pump Package Pump Lower Motor

Parts
3A5422E 35
Zinc Circulation Kit (238588)
Zinc Sprayer Packages
Not shown.
534(Fluid Return Line)
537
536535
542
529
530531
532
533†
Ref. Part Description Qty.501 P25DC1 PUMP, assy. 287971 and 287973 1
P40DC1 PUMP, assy. 287972 and 287974 1516 100101 SCREW, mounting, cap, hex hd 4518 100133 WASHER, lock 4529 238612 VALVE, ball 1530 100081 BUSHING, pipe 1531 502570 FITTING, tee, pipe 1532 - - - - - BUSHING, pipe
100380 Model 287973 1157191 Model 287974 1
533 158491 FITTING, nipple
534 235148 HOSE, coupled, 6 ft 1535 100896 FITTING, bushing, pipe 1536 157785 FITTING, swivel 1537 165767 TUBE, suction 1542 24P719 VALVE, ball 1
Ref. Part Description Qty.
Parts
36 3A5422E
Air Controls
Model 17N621
17N621 Parts
Ref. Part Description Qty.
401 17U995 BRACKET, air controls, painted 1
402 116521 REGULATOR, filter, air 1
403 103833 SCREW, mach, CRBH 4
404 113429 COUPLING, universal 1
405 113430 COUPLING, universal 1
406 16W586 CABLE, lanyard, whip check 1
407 113218 VALVE, ball, vented, 0.750 1
408 101689 GAUGE, press, air 1

Parts
3A5422E 37
Model 25D529
25D529 Parts
Ref. Part Description Qty.
401 17U995 BRACKET, air controls, painted 1
402 116521 REGULATOR, filter, air 1
403 103833 SCREW, mach, CRBH 4
404 113429 COUPLING, universal 1
405 113430 COUPLING, universal 1
406 16W586 CABLE, lanyard, whip check 1
409 113218 VALVE, ball, vented 1
410 - - - - - SAFETY VALVE 1
113498 110 psi, K30 - K70 models116643 90 psi, K90 models
411 101689 GAUGE, pressure, air 1
427 116522 KIT, conversion, air control 1
428 C11034 LUBRICATOR, air 1

Dimensions
38 3A5422E
Dimensions
Sprayer Cart Packages
Sprayer Cart Packages
Mount B D E
Xtreme28.5 in.
(72.4 cm)51 in.
(129.5 cm)25.75 in.(65.4 cm)
Mount A B C D
Xtreme26.25 in.(66.7 cm)
43.5 in. (110.5 cm)
22.0 in.(55.9 cm)
23.0 in. (58.4 cm)

Dimensions
3A5422E 39
Wall Mount Bracket Mounting Hole Diagram
Ref. DimensionsA 7.424 in. (188.5 mm)B 7.75 in. (450.8 mm)C 7.424 in. (188.5 mm)D 6.186 in. (157 mm)E 6.186 in. (157 mm)K 14.50 in. (368.3 mm)M 12.375 in. (314.3 mm)N 9.0 in. (228.6 mm)P 11.75 in. (298.45 mm)R 5.25 in. (133.3 mm)S 17.75 in. (450.8 mm)T 17.75 in. (450.8 mm)U 9.0 in. (228.6 mm)V 2.875 in. (73 mm)X 11.75 in. (298.4 mm)

Performance Charts
40 3A5422E
Performance Charts
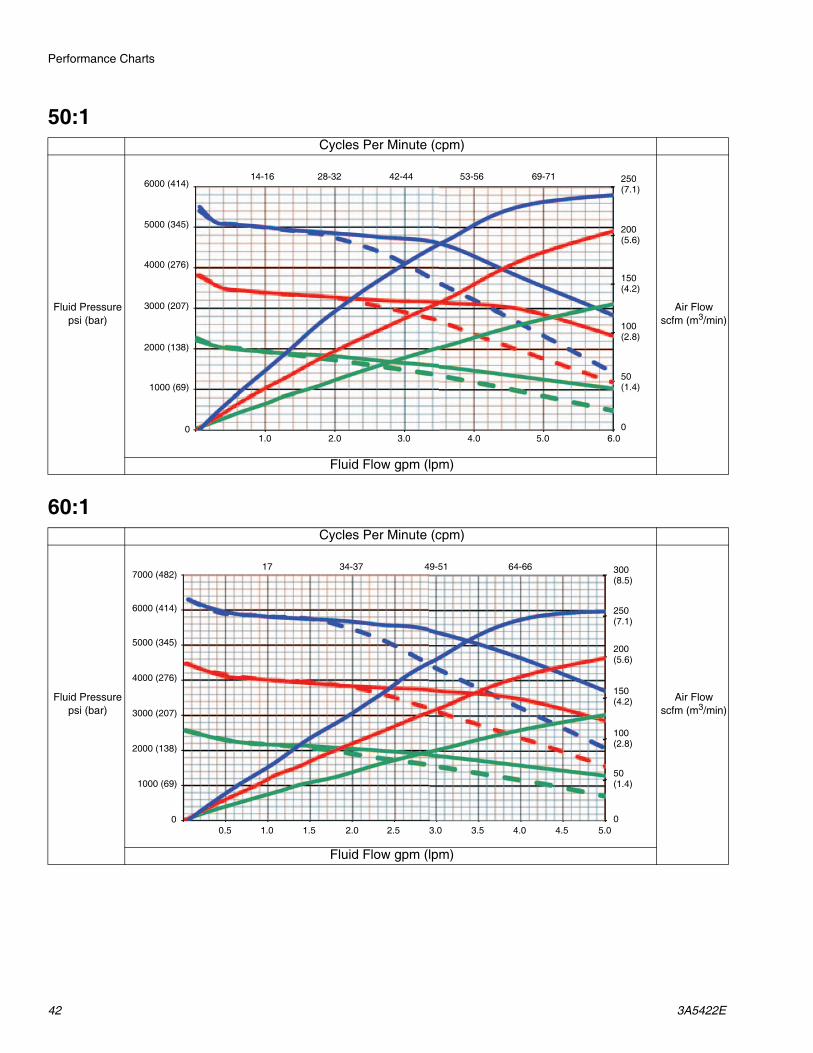
Calculate Fluid Outlet PressureTo calculate fluid outlet pressure (psi/MPa/bar) at a specific fluid flow (gpm/lpm) and operating air pressure (psi/MPa/bar), use the following instructions and pump data charts.
1. Locate desired flow along the bottom of the chart.
2. Follow the vertical line up to the intersection with the selected fluid outlet pressure curve. Follow left to scale to read fluid outlet pressure.
Calculate Pump Air Flow/ConsumptionTo calculate pump air/consumption (scfm or m3/min) at a specific fluid flow (gpm/lpm) and air pressure (psi/MPa/bar), use the following instructions and pump data charts.
1. Locate desired flow along the bottom of the chart.
2. Follow the vertical line up to the intersection with the selected fluid outlet pressure curve. Follow right to scale to read air flow consumption.
30:1
Ref. PressureA 100 psi (0.7 MPa, 7 bar)B 70 psi (480 MPa, 4.8 bar)C 40 psi (280 MPa, 2.8 bar)
Cycles Per Minute (cpm)
Fluid Pressurepsi (bar)
Air Flowscfm (m3/min)
Fluid Flow gpm (lpm)
p p
250(7.1)
200(5.6)
150(4.2)
100(2.8)
50(1.4)
0
4000
3500
3000
2500
2000
0
17 34-37
0.5 1.5 2.5 3.5
300(8.5)
1.0 2.0 3.0 4.0
1500
1000
500
64-66
4.5 5.0
49-51

Performance Charts
3A5422E 41
40:1
45:1
Cycles Per Minute (cpm)
Fluid Pressurepsi (bar)
Air Flowscfm (m3/min)
Fluid Flow gpm (lpm)
p 67 69 cpm 5000
250(7.1)
200(5.6)
150(4.2)
100(2.8)
50(1.4)
0
4500
4000
3500
3000
2500
2000
0
20-21 38-40 67-69
0.5 1.5 2.5 3.5
300(8.5)
1.0 2.0 3.0 4.0
1500
1000
500
Cycles Per Minute (cpm)
Fluid Pressurepsi (bar)
Air Flowscfm (m3/min)
Fluid Flow gpm (lpm)
5000 (345) 250(7.1)
200(5.6)
150(4.2)
100(2.8)
50(1.4)
0
4500 (310)
4000 (276)
3500 (241)
3000 (207)
2500 (172)
2000 (138)
1500 (103)
1000 (69)
500 (34)
0
13 24-26 37-38 47-48 59-61
1.0 2.0 3.0 4.0 5.0 6.0
Performance Charts
42 3A5422E
50:1
60:1
Cycles Per Minute (cpm)
Fluid Pressurepsi (bar)
Air Flowscfm (m3/min)
Fluid Flow gpm (lpm)
6000 (414) 250(7.1)
200(5.6)
150(4.2)
100(2.8)
50(1.4)
0
5000 (345)
4000 (276)
3000 (207)
2000 (138)
1000 (69)
0
14-16 28-32 42-44 53-56 69-71
1.0 2.0 3.0 4.0 5.0 6.0
Cycles Per Minute (cpm)
Fluid Pressurepsi (bar)
Air Flowscfm (m3/min)
Fluid Flow gpm (lpm)
7000 (482)
250(7.1)
200(5.6)
150(4.2)
100(2.8)
50(1.4)
0
6000 (414)
5000 (345)
4000 (276)
3000 (207)
2000 (138)
1000 (69)
0
17 34-37 49-51 64-66
0.5 1.5 2.5 3.5 4.5
300(8.5)
1.0 2.0 3.0 4.0 5.0

Performance Charts
3A5422E 43
70:1
90:1
Cycles Per Minute (cpm)
Fluid Pressurepsi (bar)
Air Flowscfm (m3/min)
Fluid Flow gpm (lpm)
5000 (345)
4000 (276)
3000 (207)
2000 (138)
1000 (69)
8000 (556)
0
20-21 38-40 67-69
7000 (482)
6000 (414)
0.5 1.5 2.5 3.51.0 2.0 3.0 4.0
250(7.1)
200(5.6)
150(4.2)
100(2.8)
50(1.4)
0
300(8.5)
Cycles Per Minute (cpm)
Fluid Pressurepsi (bar)
Air Flowscfm (m3/min)
Fluid Flow gpm (lpm)
0
250(7.1)
200(5.6)
150(4.2)
100(2.8)
50(1.4)
0
300(8.5)
20-21 38-40 67-69
5000 (345)
4000 (276)
3000 (207)
2000 (138)
1000 (69)
8000 (556)
7000 (482)
6000 (414)
0.5 1.5 2.5 3.51.0 2.0 3.0 4.0

Performance Charts
44 3A5422E

Technical Specifications
3A5422E 45
Technical Specifications
King Spray PackagesUS Metric
Maximum air inlet pressure to sprayer 150 psi 1 MPa, 10.3 barStroke length (nominal) 4.75 in. 12.0 cmMaximum pump speed(Do not exceed maximum recommended speed of fluid pump, to prevent premature pump wear)
60 cycles per minute
Sound Data See Xtreme XL Motor manual for sound data.Air Inlet Size 1 in. npt(f)Wetted Parts Carbon steel; ally steel; 304, 440 and 17–4 PH grades of
stainless steel; zinc and nickel plating; ductile iron; tungsten carbide; PTFE; leather
Fluid Inlet Size
All Xtreme Lower Pumps 1 1/4 npt(m)Dura-Flo Lower Pumps 2 in. npt(f)
Fluid Outlet Size (Number of Outlets)
Xtreme Lower Pumps With Built-In Filters (2) 1/2 in. npt(f)Xtreme Lower Pumps Without Filters (1) 1 in. npt(f)Dura-Flo Lower Pumps (1) 3/4 npt(m)
Maximum Air Operating Pressure
K25 100 psi 0.7 MPa, 7 barK30 100 psi 0.7 MPa, 7 barK40 100 psi 0.7 MPa, 7 barK45 100 psi 0.7 MPa, 7 barK50 100 psi 0.7 MPa, 7 barK60 100 psi 0.7 MPa, 7 barK70 100 psi 0.7 MPa, 7 barK90 80 psi 0.55 MPa, 5.5 bar
Maximum Fluid Working Pressure
K25 2375 psi 16.4 MPa, 164 barK30 3150 psi 21.7 MPa, 217 barK40 3800 psi 26.2 MPa, 262 barK45 4500 psi 31 MPa, 310 bar K50 5000 psi 34.5 MPa, 345 barK60 6000 psi 41.7 MPa, 417 barK70 7250 psi 50 MPa, 500 barK90 7250 psi 50 MPa, 500 bar
Weight: Heavy Duty Cart / Light Weight Cart
K25 228 lb / 196 lb 103 kg / 89 kgK30 227.4 lb / 196.1 lb 103.6 kg / 89.0 kgK40 223.4 lb / 191.1 lb 101.3 kg / 86.7 kgK45 247.4 lb / 215.1 lb 112.2 kg / 97.6 kgK50 246.4 lb / 214.1 lb 111.8 kg / 97.1 kgK60 246.4 lb / 214.1 lb 111.8 kg / 97.1 kgK70 242.4 lb / 210.1 lb 109.9 kg / 95.3 kgK90 242.4 lb / 210.1 lb 109.9 kg / 95.3 kg

All written and visual data contained in this document reflects the latest product information available at the time of publication. Graco reserves the right to make changes at any time without notice.
Original instructions. This manual contains English. MM 3A5422Graco Headquarters: Minneapolis
International Offices: Belgium, China, Japan, Korea
GRACO INC. AND SUBSIDIARIES • P.O. BOX 1441 • MINNEAPOLIS MN 55440-1441 • USACopyright 2017, Graco Inc. All Graco manufacturing locations are registered to ISO 9001.
www.graco.comRevision E, October 2019
Graco Standard WarrantyGraco warrants all equipment referenced in this document which is manufactured by Graco and bearing its name to be free from defects in material and workmanship on the date of sale to the original purchaser for use. With the exception of any special, extended, or limited warranty published by Graco, Graco will, for a period of twelve months from the date of sale, repair or replace any part of the equipment determined by Graco to be defective. This warranty applies only when the equipment is installed, operated and maintained in accordance with Graco’s written recommendations.
This warranty does not cover, and Graco shall not be liable for general wear and tear, or any malfunction, damage or wear caused by faulty installation, misapplication, abrasion, corrosion, inadequate or improper maintenance, negligence, accident, tampering, or substitution of non-Graco component parts. Nor shall Graco be liable for malfunction, damage or wear caused by the incompatibility of Graco equipment with structures, accessories, equipment or materials not supplied by Graco, or the improper design, manufacture, installation, operation or maintenance of structures, accessories, equipment or materials not supplied by Graco.
This warranty is conditioned upon the prepaid return of the equipment claimed to be defective to an authorized Graco distributor for verification of the claimed defect. If the claimed defect is verified, Graco will repair or replace free of charge any defective parts. The equipment will be returned to the original purchaser transportation prepaid. If inspection of the equipment does not disclose any defect in material or workmanship, repairs will be made at a reasonable charge, which charges may include the costs of parts, labor, and transportation.
THIS WARRANTY IS EXCLUSIVE, AND IS IN LIEU OF ANY OTHER WARRANTIES, EXPRESS OR IMPLIED, INCLUDING BUT NOT LIMITED TO WARRANTY OF MERCHANTABILITY OR WARRANTY OF FITNESS FOR A PARTICULAR PURPOSE.
Graco’s sole obligation and buyer’s sole remedy for any breach of warranty shall be as set forth above. The buyer agrees that no other remedy (including, but not limited to, incidental or consequential damages for lost profits, lost sales, injury to person or property, or any other incidental or consequential loss) shall be available. Any action for breach of warranty must be brought within two (2) years of the date of sale.
GRACO MAKES NO WARRANTY, AND DISCLAIMS ALL IMPLIED WARRANTIES OF MERCHANTABILITY AND FITNESS FOR A PARTICULAR PURPOSE, IN CONNECTION WITH ACCESSORIES, EQUIPMENT, MATERIALS OR COMPONENTS SOLD BUT NOT MANUFACTURED BY GRACO. These items sold, but not manufactured by Graco (such as electric motors, switches, hose, etc.), are subject to the warranty, if any, of their manufacturer. Graco will provide purchaser with reasonable assistance in making any claim for breach of these warranties.
In no event will Graco be liable for indirect, incidental, special or consequential damages resulting from Graco supplying equipment hereunder, or the furnishing, performance, or use of any products or other goods sold hereto, whether due to a breach of contract, breach of warranty, the negligence of Graco, or otherwise.
FOR GRACO CANADA CUSTOMERSThe Parties acknowledge that they have required that the present document, as well as all documents, notices and legal proceedings entered into, given or instituted pursuant hereto or relating directly or indirectly hereto, be drawn up in English. Les parties reconnaissent avoir convenu que la rédaction du présente document sera en Anglais, ainsi que tous documents, avis et procédures judiciaires exécutés, donnés ou intentés, à la suite de ou en rapport, directement ou indirectement, avec les procédures concernées.
Graco InformationFor the latest information about Graco products, visit www.graco.com.For patent information, see www.graco.com/patents.
TO PLACE AN ORDER, contact your Graco distributor or call to identify the nearest distributor.Phone: 612-623-6921 or Toll Free: 1-800-328-0211 Fax: 612-378-3505