Embed Size (px)
Citation preview
Kimberly-ClarK* MIC-KEY* Low-Profile Gastrostomy Feeding Tube
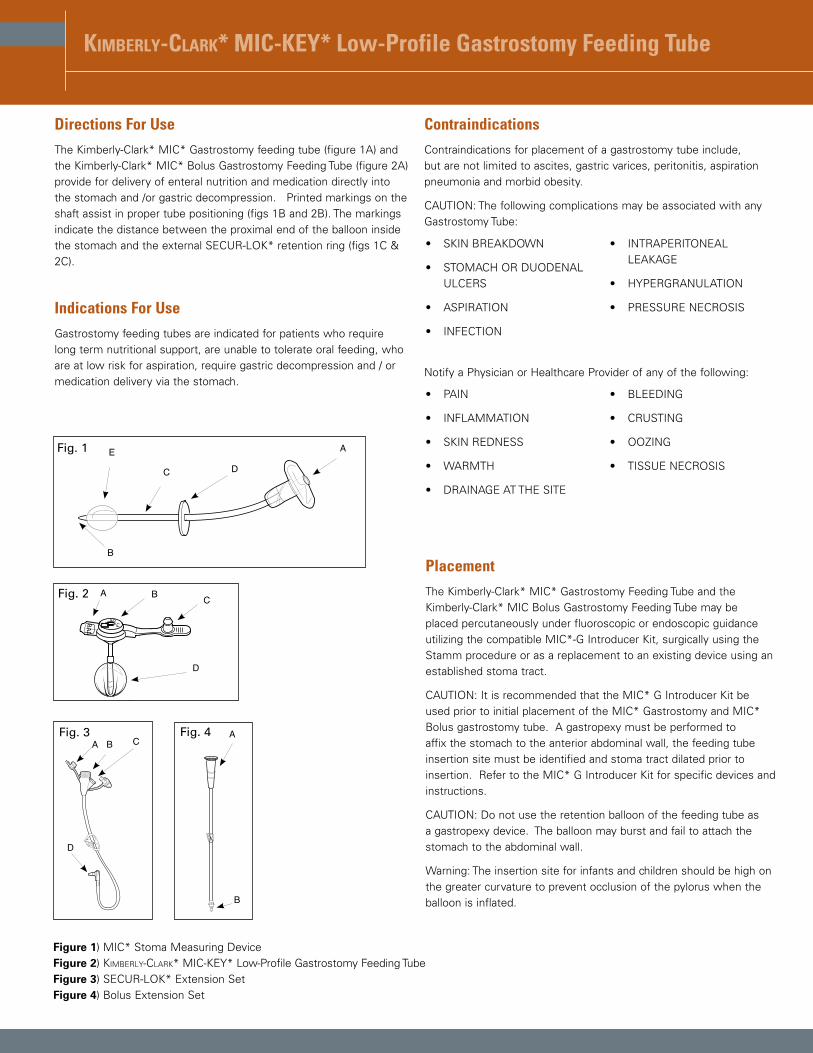
Directions For UseThe Kimberly-Clark* MIC* Gastrostomy feeding tube (figure 1A) and the Kimberly-Clark* MIC* Bolus Gastrostomy Feeding Tube (figure 2A) provide for delivery of enteral nutrition and medication directly into the stomach and /or gastric decompression. Printed markings on the shaft assist in proper tube positioning (figs 1B and 2B). The markings indicate the distance between the proximal end of the balloon inside the stomach and the external SECUR-LOK* retention ring (figs 1C & 2C).
Indications For UseGastrostomy feeding tubes are indicated for patients who require long term nutritional support, are unable to tolerate oral feeding, who are at low risk for aspiration, require gastric decompression and / or medication delivery via the stomach.
Contraindications Contraindications for placement of a gastrostomy tube include, but are not limited to ascites, gastric varices, peritonitis, aspiration pneumonia and morbid obesity.
CAUTION: The following complications may be associated with any Gastrostomy Tube:
Notify a Physician or Healthcare Provider of any of the following:
Fig. 1 A
DC
E
BPlacementThe Kimberly-Clark* MIC* Gastrostomy Feeding Tube and the Kimberly-Clark* MIC Bolus Gastrostomy Feeding Tube may be placed percutaneously under fluoroscopic or endoscopic guidance utilizing the compatible MIC*-G Introducer Kit, surgically using the Stamm procedure or as a replacement to an existing device using an established stoma tract.
CAUTION: It is recommended that the MIC* G Introducer Kit be used prior to initial placement of the MIC* Gastrostomy and MIC* Bolus gastrostomy tube. A gastropexy must be performed to affix the stomach to the anterior abdominal wall, the feeding tube insertion site must be identified and stoma tract dilated prior to insertion. Refer to the MIC* G Introducer Kit for specific devices and instructions.
CAUTION: Do not use the retention balloon of the feeding tube as a gastropexy device. The balloon may burst and fail to attach the stomach to the abdominal wall.
Warning: The insertion site for infants and children should be high on the greater curvature to prevent occlusion of the pylorus when the balloon is inflated.
Figure 1) MIC* Stoma Measuring DeviceFigure 2) Kimberly-ClarK* MIC-KEY* Low-Profile Gastrostomy Feeding Tube Figure 3) SECUR-LOK* Extension SetFigure 4) Bolus Extension Set
�BAL
Fr
cm
MKG-003 For series Codes )0120-XX-XX and 0620-XX Japan Only
D
A B CFig. 2
MIC
Lock
A B C
D
Fig. 3 A
B
Fig. 4
• SKIN BREAKDOWN
• STOMACH OR DUODENAL ULCERS
• ASPIRATION
• INFECTION
• INTRAPERITONEAL LEAKAGE
• HYPERGRANULATION
• PRESSURE NECROSIS
• PAIN
• INFLAMMATION
• SKIN REDNESS
• WARMTH
• DRAINAGE AT THE SITE
• BLEEDING
• CRUSTING
• OOZING
• TISSUE NECROSIS
Kimberly-ClarK* MIC-KEY* Low-Profile Gastromstomy Feeding Tube
Fr
cm
BAL
123
Fr
cm
BAL
123
Illustration B1 Illustration B2
Illustration B3 Illustration B4
4
12
3
Illustration A1 Illustration A2
Illustration A3 Illustration A4
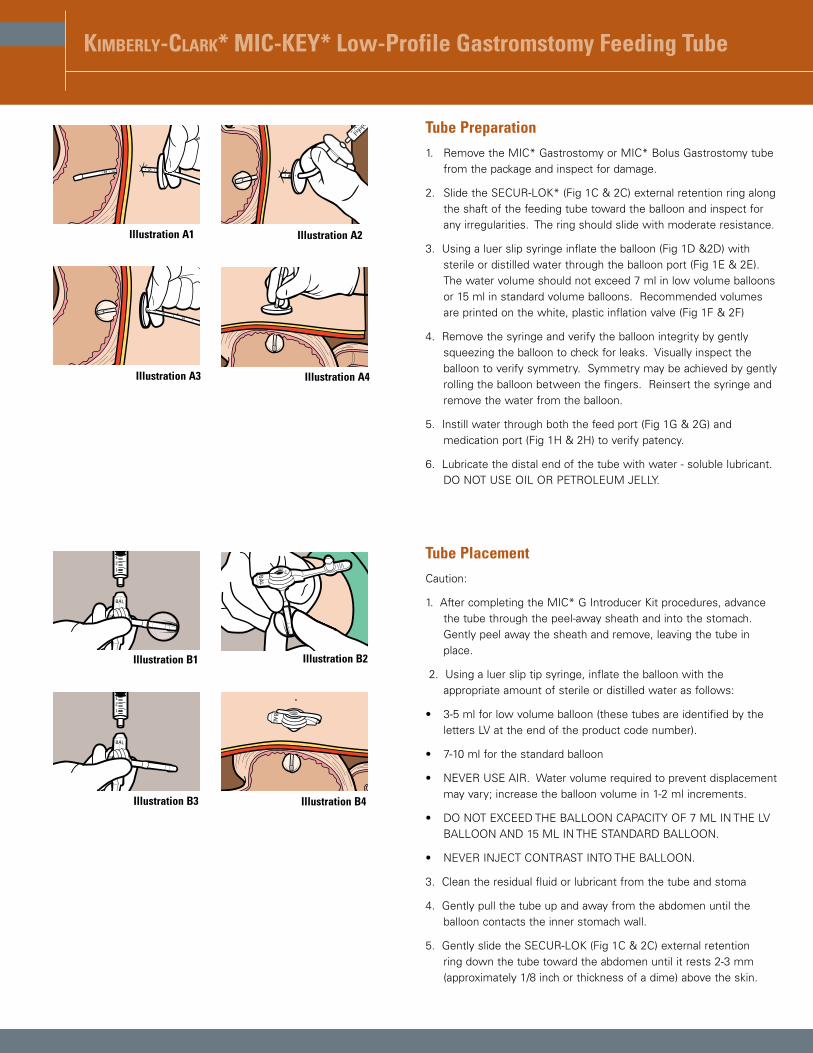
Tube Preparation1. Remove the MIC* Gastrostomy or MIC* Bolus Gastrostomy tube
from the package and inspect for damage.
2. Slide the SECUR-LOK* (Fig 1C & 2C) external retention ring along the shaft of the feeding tube toward the balloon and inspect for any irregularities. The ring should slide with moderate resistance.
3. Using a luer slip syringe inflate the balloon (Fig 1D &2D) with sterile or distilled water through the balloon port (Fig 1E & 2E). The water volume should not exceed 7 ml in low volume balloons or 15 ml in standard volume balloons. Recommended volumes are printed on the white, plastic inflation valve (Fig 1F & 2F)
4. Remove the syringe and verify the balloon integrity by gently squeezing the balloon to check for leaks. Visually inspect the balloon to verify symmetry. Symmetry may be achieved by gently rolling the balloon between the fingers. Reinsert the syringe and remove the water from the balloon.
5. Instill water through both the feed port (Fig 1G & 2G) and medication port (Fig 1H & 2H) to verify patency.
6. Lubricate the distal end of the tube with water - soluble lubricant. DO NOT USE OIL OR PETROLEUM JELLY.
Tube PlacementCaution:
1. After completing the MIC* G Introducer Kit procedures, advance the tube through the peel-away sheath and into the stomach. Gently peel away the sheath and remove, leaving the tube in place.
2. Using a luer slip tip syringe, inflate the balloon with the appropriate amount of sterile or distilled water as follows:
• 3-5 ml for low volume balloon (these tubes are identified by the letters LV at the end of the product code number).
• 7-10 ml for the standard balloon
• NEVER USE AIR. Water volume required to prevent displacement may vary; increase the balloon volume in 1-2 ml increments.
• DO NOT EXCEED THE BALLOON CAPACITY OF 7 ML IN THE LV BALLOON AND 15 ML IN THE STANDARD BALLOON.
• NEVER INJECT CONTRAST INTO THE BALLOON.
3. Clean the residual fluid or lubricant from the tube and stoma
4. Gently pull the tube up and away from the abdomen until the balloon contacts the inner stomach wall.
5. Gently slide the SECUR-LOK (Fig 1C & 2C) external retention ring down the tube toward the abdomen until it rests 2-3 mm (approximately 1/8 inch or thickness of a dime) above the skin.
Kimberly-ClarK* MIC-KEY* Low-Profile Gastrostomy Feeding Tube
BAL
Fr
cm
BAL
Fr
cm
Illustration C1 Illustration C2
Illustration C3 Illustration C4
Verify Proper Tube Placement5. After placing the tube and before beginning any feeding or
instillation of medication verify tube placement endoscopically, by air auscultation, aspiration of gastric contents or radiographic verification.
• Aspirate gastric contents – Attach a bolus syringe with 10 ml of water to the feed port. Draw back the piston of the syringe to aspirate gastric contents. Flush the tube with water after verifying gastric contents.
• Air Auscultation – Draw 5-10 cc’s of air into a syringe, then place a stethoscope over the stomach on the left side of the abdomen just above the waist. Inject air into the feed port and listen with the stethoscope for air bubbles as the air enters the stomach. A gushing sound or the sound of air bubbles should be clearly identified.
• Radiographic verification – Use radiographic verification if there is any doubt as to the position of the tube.
12. Flush the tube to verify patency
13. Check for moisture around the stoma. If there are signs of gastric leakage, check the tube position and the SECUR-LOK* Ring placement. Add fluid as needed in 1-2 ml increments. DO NOT EXCEED BALLOON CAPACITY AS INDICATED EARLIER.
14. Check to make sure that the SECUR-LOK* Ring is not placed too tightly against the skin and rests 2-3mm above the abdomen.
15. Document the date, the type, the size and lot number of the tube, the fill volume of the balloon, the centimeter mark on the tube that is closest to the top of the external bolster, skin condition and patient tolerance to the procedure. Start feeding and medication administration only after confirmation of proper tube placement and patency.
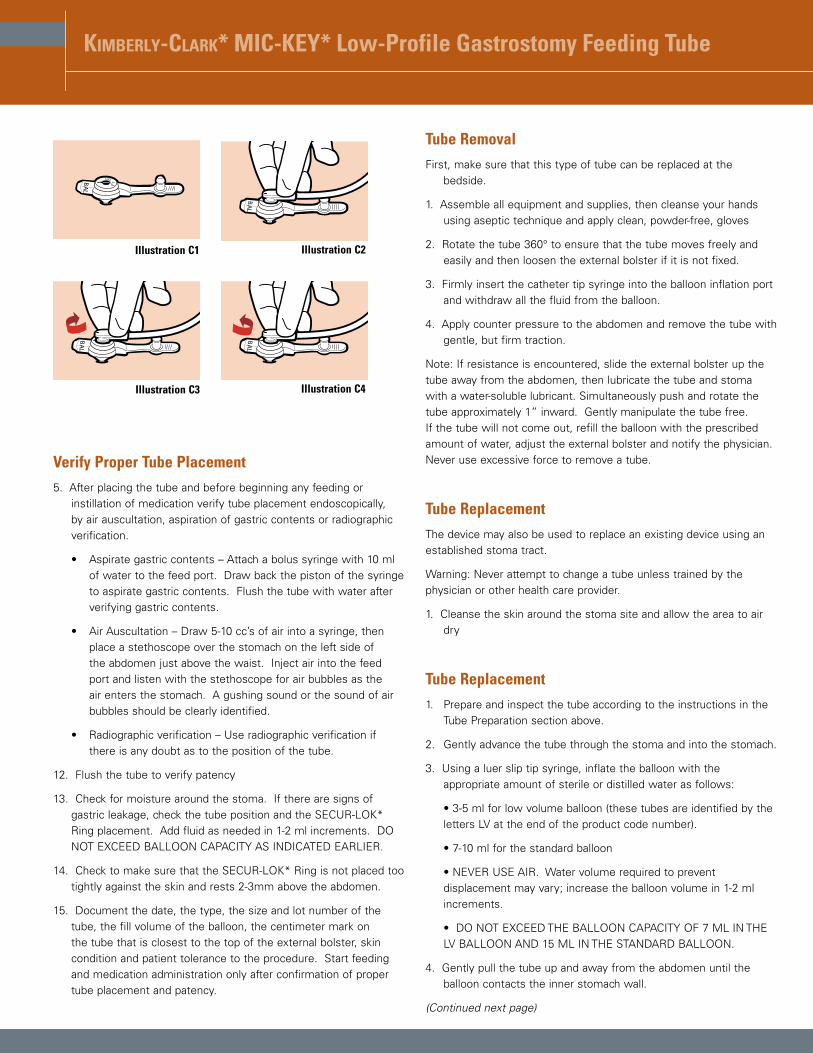
Tube RemovalFirst, make sure that this type of tube can be replaced at the
bedside.
1. Assemble all equipment and supplies, then cleanse your hands using aseptic technique and apply clean, powder-free, gloves
2. Rotate the tube 360° to ensure that the tube moves freely and easily and then loosen the external bolster if it is not fixed.
3. Firmly insert the catheter tip syringe into the balloon inflation port and withdraw all the fluid from the balloon.
4. Apply counter pressure to the abdomen and remove the tube with gentle, but firm traction.
Note: If resistance is encountered, slide the external bolster up the tube away from the abdomen, then lubricate the tube and stoma with a water-soluble lubricant. Simultaneously push and rotate the tube approximately 1” inward. Gently manipulate the tube free. If the tube will not come out, refill the balloon with the prescribed amount of water, adjust the external bolster and notify the physician. Never use excessive force to remove a tube.
Tube ReplacementThe device may also be used to replace an existing device using an established stoma tract.
Warning: Never attempt to change a tube unless trained by the physician or other health care provider.
1. Cleanse the skin around the stoma site and allow the area to air dry
Tube Replacement1. Prepare and inspect the tube according to the instructions in the
Tube Preparation section above.
2. Gently advance the tube through the stoma and into the stomach.
3. Using a luer slip tip syringe, inflate the balloon with the appropriate amount of sterile or distilled water as follows:
• 3-5 ml for low volume balloon (these tubes are identified by the letters LV at the end of the product code number).
• 7-10 ml for the standard balloon
• NEVER USE AIR. Water volume required to prevent displacement may vary; increase the balloon volume in 1-2 ml increments.
• DO NOT EXCEED THE BALLOON CAPACITY OF 7 ML IN THE LV BALLOON AND 15 ML IN THE STANDARD BALLOON.
4. Gently pull the tube up and away from the abdomen until the balloon contacts the inner stomach wall.
(Continued next page)
Kimberly-ClarK* MIC-KEY* Low-Profile Gastrostomy Feeding Tube
5. Clean any residual fluid or lubricant from the tube and stoma.
6. Gently slide the SECUR-LOK (Fig 1C & 2C) external retention ring down the tube toward the abdomen until it rests 2-3 mm (approximately 1/8 inch or thickness of a dime) above the skin.
7. After placing the tube and before beginning any feeding or instillation of medication verify tube placement endoscopically, by air auscultation, aspiration of gastric contents or radiographic verification.
• Aspirate gastric contents – Attach a bolus syringe with 10 ml of water to the feed port. Draw back the piston of the syringe to aspirate gastric contents. Flush the tube with water after verifying gastric contents.
• Air Auscultation – Draw 5-10 cc’s of air into a syringe, then place a stethoscope over the stomach on the left side of the abdomen just above the waist. Inject air into the feed port and listen with the stethoscope for air bubbles as the air enters the stomach. A gushing sound or the sound of air bubbles should be clearly identified.
• Radiographic verification – Use radiographic verification if there is any doubt as to the position of the tube.
8. Flush the tube to verify patency
9. Check for moisture around the stoma. If there are signs of gastric leakage, check the tube position and the SECUR-LOK* Ring placement. Add fluid as needed in 1-2 ml increments. DO NOT EXCEED BALLOON CAPACITY AS INDICATED EARLIER.
10. Check to make sure that the SECUR-LOK* Ring is not placed too tightly against the skin and rests 2-3mm above the abdomen.
11. Document the date, the type, the size and lot number of the tube, the fill volume of the balloon, the centimeter mark on the tube that is closest to the top of the external bolster, skin condition and patient tolerance to the procedure. Start feeding and medication administration only after confirmation of proper tube placement and patency.
Daily UseInsert the feed set or bolus syringe tip into the feed port (figs 1A & 2A). Use a FIRM ¼ clockwise twist to secure the connection. Begin the procedure.
DO NOT ADMINISTER FEEDINGS OR MEDICATIONS INTO THE BALLOON PORT (Figs 1E & 2E)
After feeding, disconnect the set or syringe tip from the port with a FIRM ¼ counter clockwise twist.
Using a catheter tip syringe, flush the tube with the prescribed amount of water allowing all of the water to run through the tube.
Medication Administration Use liquid medication when possible and consult the pharmacist to determine if it is safe to crush solid medication and mix with water. If safe, pulverize the solid medication into a fine powder form and dissolve the powder in water before administering through the feeding tube. Never crush enteric coated medication or mix medication with formula.
Using a catheter tip syringe flush the tube with the prescribed amount of water.
Tube Patency GuidelinesProper tube flushing is the best way to avoid clogging and maintain tube patency. The following are guidelines to avoid clogging and maintain tube patency.
• Flush the feeding tube with water every 4-6 hours during continuous feeding, anytime the feeding is interrupted, before and after every intermittent or bolus feeding, or at least every 8 hours if the tube is not being used.
• Flush the feeding tube after checking gastric residuals to avoid contact of formula with gastric acids. This will prevent coagulation of the formula that can lead to a clogged tube.
• Flush the feeding tube before and after medication administration and between medications. This will prevent the medication from interacting with formula and potentially causing the tube to clog.
• Use liquid medication when possible and consult the pharmacist to determine if it is safe to crush solid medication and to mix with water. If safe, pulverize the solid medication into a fine powder form and dissolve the powder in warm water before administering through the feeding tube. Never crush enteric-coated medication or mix medication with formula.
• Avoid using acidic irrigants such as cranberry juice and cola beverages to flush feeding tubes as the acidic quality when combined with formula proteins may actually contribute to tube clogging.
General flushing guidelines• Use a 30 to 60 ml luer slip tip syringe. Do not use smaller size
syringes as this can increase pressure on the tube and potentially rupture smaller tubes.
• Use room temperature tap water for tube flushing. Sterile water may be appropriate where the quality of municipal water supplies is of concern. The amount of water will depend on the patient’s needs, clinical condition, and type of tube, but the average volume ranges from 10 to 50 mls for adults, and 3 to 10 mls for infants. Hydration status also influences the volume used for flushing feeding tubes. In many cases, increasing the flushing volume can avoid the need for supplemental intravenous fluid.
(Continued next page)
Kimberly-ClarK* MIC-KEY* Low-Profile Gastrostomy Feeding Tube
However, individuals with renal failure and other fluid restrictions should receive the minimum flushing volume necessary to maintain patency.
• Do not use excessive force to flush the tube. Excessive force can perforate the tube and can cause injury to the gastrointestinal tract.
• Document the time and amount of water used in the patient’s record. This will enable all caregivers to monitor the patient’s needs more accurately.
Balloon MaintenanceCheck the water volume in the balloon once a week.
• Insert a luer slip tip syringe into the balloon inflation port and withdraw the fluid while holding the tube in place. Compare the amount of water in the syringe to the amount recommended or the amount initially prescribed and documented in the patient record. If the amount is less than recommended or prescribed, refill the balloon with the water initially removed, then draw up and add the amount needed to bring the balloon volume up to the recommended and prescribed amount of water. Be aware as you deflate the balloon there may be some gastric contents that can leak from around the tube. Document the fluid volume, the amount of volume to be replaced (if any), the date and time.
• Wait 10-20 minutes and repeat the procedure. The balloon is leaking if it has lost fluid, and the tube should be replaced. A deflated or ruptured balloon could cause the tube to dislodge or be displaced. If the balloon is ruptured, it will need to be replaced. Secure the tube into position using tape, then follow facility protocol and/or call the physician for instructions.
Note: Refill the balloon using sterile or distilled water, not air or saline. Saline can crystallize and clog the balloon valve or lumen, and air may seep out and cause the balloon to collapse. Be sure to use the recommended amount of water as over-inflation can obstruct the lumen or decrease balloon life and under-inflation will not secure the tube properly.
Tube OcclusionTube occlusion is generally caused by:
• Poor flushing techniques
• Failure to flush after measurement of gastric residuals
• Inappropriate administration of medication
• Pill fragments
• Viscous medications
• Thick formulas, such as concentrated or enriched formulas that are generally thicker and more likely to obstruct tubes
• Formula contamination that leads to coagulation
• Reflux of gastric or intestinal contents up the tube
To Unclog A Tube• Make sure that the feeding tube is not kinked or clamped off.
• If the clog is visible above the skin surface, gently massage or milk the tube between fingers to break up the clog.
• Next, place a catheter tip syringe filled with warm water into the appropriate adaptor or lumen of the tube and gently pull back on then depress the plunger to dislodge the clog.
• If the clog remains, repeat step #3. Gentle suction alternating with syringe pressure will relieve most obstructions.
• If this fails, consult with the physician and consider trying a solution of pancreatic enzymes and sodium bicarbonate (1 crushed Viokase tablet or 1 teaspoon Viokase powder mixed with 1 nonenteric-coated sodium bicarbonate tablet, or 1⁄8 teaspoon baking soda dissolved in 5 ml warm water) instilled through a catheter tip syringe. Allow to remain in the tube for 30 minutes. Do not use cranberry juice, cola drinks, meat tenderizer or chymotrypsin, as they can actually cause clogs or create adverse reactions in some patients. Diet sodas (non-cola) and carbonated/seltzer water may prove successful in removing some clogs. If the clog is stubborn and cannot be removed, the tube will have to be replaced.
Balloon LongevityPrecise balloon life cannot be predicted. Silicone balloons generally last 1-8 months, but the life span of the balloon varies according to several factors. These factors may include medications, volume of water used to inflate the balloon, gastric pH and tube care.
Warning: For enteral nutrition and/or medication only
Single Use Only
For More Information: For additional information please contact Customer Care at the following numbers:
In the United States:
International:
Educational Booklets: “A guide to Proper Care” and a Stoma Site and Enteral Feeding Tube Troubleshooting Guide is available upon request. Please contact your local representative or contact Customer Care.
Visit Our Website: mic-key.com
KC trademark verbiage XXXXXXXXXXXXX
Symbols and Definitions XXXXXXXXXXXXXXXXXXXXXXXXXXX
FOR ENTERAL NUTRITION ONLY
* Registered Trademark or Trademark of Kimberly-Clark Worldwide, Inc. or its affiliates. © 2003 KCWW. All rights reserved.
Kimberly-ClarK* MIC-KEY* Low-Profile Transgastric-Jejunal Feeding TubeEndoscopic/Radiological Placement
Directions For Use The Kimberly-Clark* MIC-KEY* TRANSGASTRIC JEJUNAL FEEDING TUBE (see figure 1) provides for simultaneous gastric decompression/drainage and delivery of enteral nutrition into the distal duodenum or proximal jejunum.
Indications For UseTransgastric Jejunal feeding tubes are indicated for use in patients who cannot absorb adequate nutrition through the stomach, who have intestinal motility problems, gastric outlet obstruction, severe gastroesophageal reflux, are at risk of aspiration, or in those who have had a previous esophagectomy or gastrectomy.
The Kimberly-Clark* MIC-KEY* Transgastric Jejunal Feeding Tubes may be placed percutaneously under fluoroscopic or endoscopic guidance utilizing the compatible MIC-KEY* Jejunal / Transgastric Jejunal Introducer Kit or as a replacement tube through an established stoma tract.
CAUTION: The MIC-KEY* Jejunal / Transgastric Jejunal Introducer Kit must be used prior to initial placement of the MIC-KEY* Transgastric Jejunal Feeding Tube. A gastropexy must be performed to affix the
stomach to the anterior abdominal wall, the feeding tube insertion site must be identified and stoma tract dilated and measured prior to insertion to ensure patient safety and comfort. Refer to the MIC-KEY* Jejunal / Transgastric Jejunal Introducer Kit for devices and instructions.
CAUTION: Do not use the retention balloon of the feeding tube as a gastropexy device. The balloon can burst and fail to attach the stomach to the abdominal wall.
Contraindications Potential contraindications for placement of a gastrostomy tube include, but are not limited to ascites, peritonitis and morbid obesity.
CAUTION: The following complications may be associated with any Transgastric Jejunal Feeding Tube:
Notify a physician or healthcare provider of any of the following:
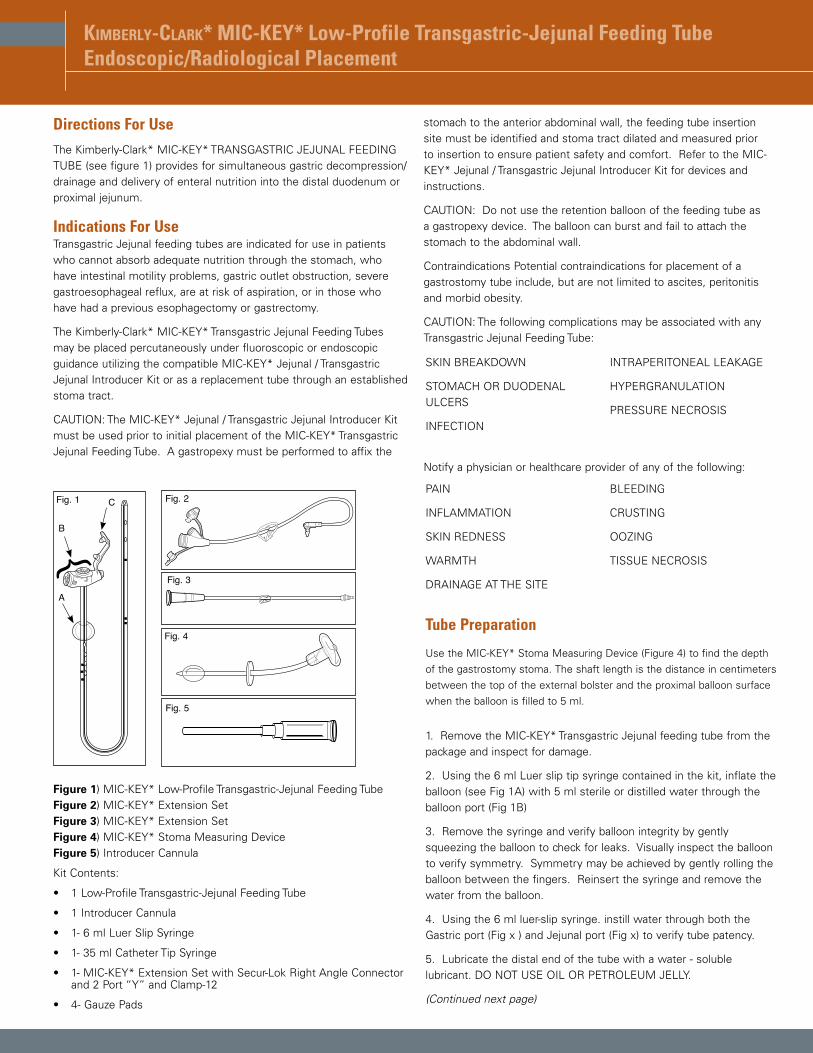
Tube Preparation
Use the MIC-KEY* Stoma Measuring Device (Figure 4) to find the depth of the gastrostomy stoma. The shaft length is the distance in centimeters between the top of the external bolster and the proximal balloon surface when the balloon is filled to 5 ml.
1. Remove the MIC-KEY* Transgastric Jejunal feeding tube from the package and inspect for damage.
2. Using the 6 ml Luer slip tip syringe contained in the kit, inflate the balloon (see Fig 1A) with 5 ml sterile or distilled water through the balloon port (Fig 1B)
3. Remove the syringe and verify balloon integrity by gently squeezing the balloon to check for leaks. Visually inspect the balloon to verify symmetry. Symmetry may be achieved by gently rolling the balloon between the fingers. Reinsert the syringe and remove the water from the balloon.
4. Using the 6 ml luer-slip syringe. instill water through both the Gastric port (Fig x ) and Jejunal port (Fig x) to verify tube patency.
5. Lubricate the distal end of the tube with a water - soluble lubricant. DO NOT USE OIL OR PETROLEUM JELLY.
(Continued next page)
MLPTJ-001
Fig. 1
A
B
C
{Fig. 5
SMD
-002
Fig. 4
MICLock
Fig. 2
Fig. 3
Figure 1) MIC-KEY* Low-Profile Transgastric-Jejunal Feeding Tube Figure 2) MIC-KEY* Extension SetFigure 3) MIC-KEY* Extension Set Figure 4) MIC-KEY* Stoma Measuring Device Figure 5) Introducer Cannula
Kit Contents:
• 1 Low-Profile Transgastric-Jejunal Feeding Tube
• 1 Introducer Cannula
• 1- 6 ml Luer Slip Syringe
• 1- 35 ml Catheter Tip Syringe
• 1- MIC-KEY* Extension Set with Secur-Lok Right Angle Connector and 2 Port “Y” and Clamp-12
• 4- Gauze Pads
SKIN BREAKDOWN
STOMACH OR DUODENAL ULCERS
INFECTION
INTRAPERITONEAL LEAKAGE
HYPERGRANULATION
PRESSURE NECROSIS
PAIN
INFLAMMATION
SKIN REDNESS
WARMTH
DRAINAGE AT THE SITE
BLEEDING
CRUSTING
OOZING
TISSUE NECROSIS
Kimberly-ClarK* MIC-KEY* Low-Profile Transgastric-Jejunal Feeding Tube
Fr
cm
BAL
123
Fr
cm
BAL
123
Illustration B1 Illustration B2
Illustration B3 Illustration B4
Illustration B5 Illustration B6
Illustration B7 Illustration B8
4
12
3
Illustration A1 Illustration A2
Illustration A3 Illustration A4
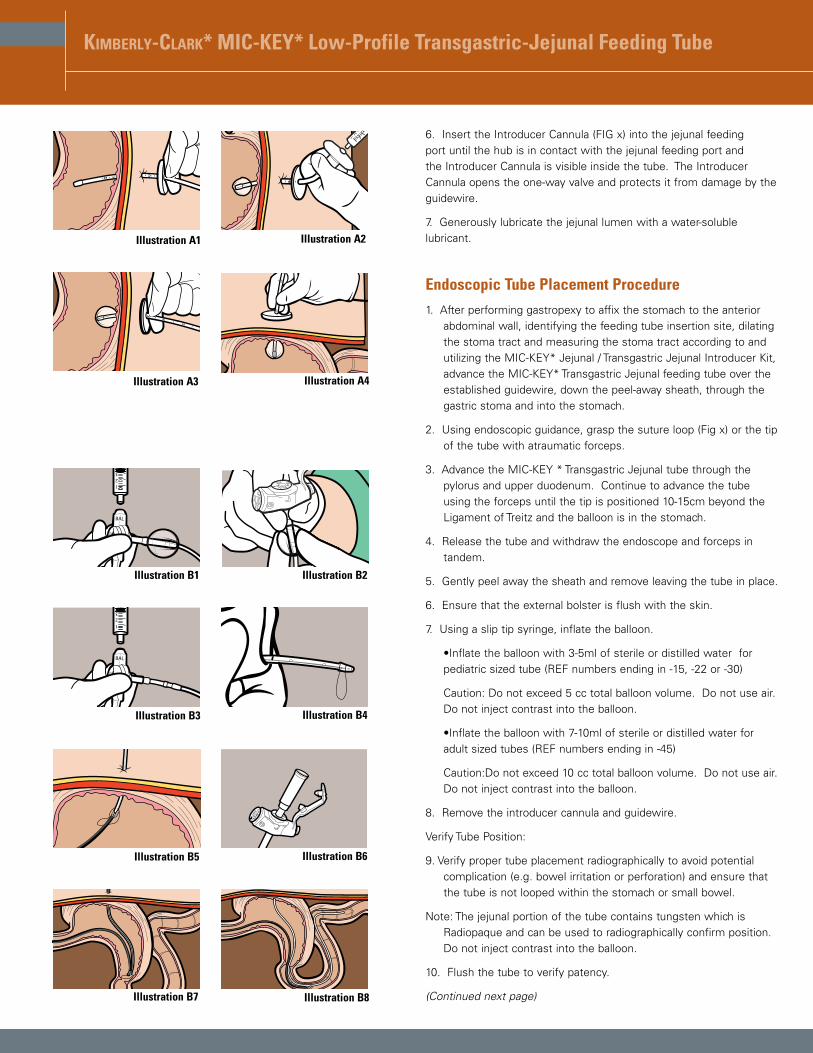
6. Insert the Introducer Cannula (FIG x) into the jejunal feeding port until the hub is in contact with the jejunal feeding port and the Introducer Cannula is visible inside the tube. The Introducer Cannula opens the one-way valve and protects it from damage by the guidewire.
7. Generously lubricate the jejunal lumen with a water-soluble lubricant.
Endoscopic Tube Placement Procedure1. After performing gastropexy to affix the stomach to the anterior
abdominal wall, identifying the feeding tube insertion site, dilating the stoma tract and measuring the stoma tract according to and utilizing the MIC-KEY* Jejunal / Transgastric Jejunal Introducer Kit, advance the MIC-KEY* Transgastric Jejunal feeding tube over the established guidewire, down the peel-away sheath, through the gastric stoma and into the stomach.
2. Using endoscopic guidance, grasp the suture loop (Fig x) or the tip of the tube with atraumatic forceps.
3. Advance the MIC-KEY * Transgastric Jejunal tube through the pylorus and upper duodenum. Continue to advance the tube using the forceps until the tip is positioned 10-15cm beyond the Ligament of Treitz and the balloon is in the stomach.
4. Release the tube and withdraw the endoscope and forceps in tandem.
5. Gently peel away the sheath and remove leaving the tube in place.
6. Ensure that the external bolster is flush with the skin.
7. Using a slip tip syringe, inflate the balloon.
•Inflate the balloon with 3-5ml of sterile or distilled water for pediatric sized tube (REF numbers ending in -15, -22 or -30)
Caution: Do not exceed 5 cc total balloon volume. Do not use air. Do not inject contrast into the balloon.
•Inflate the balloon with 7-10ml of sterile or distilled water for adult sized tubes (REF numbers ending in -45)
Caution:Do not exceed 10 cc total balloon volume. Do not use air. Do not inject contrast into the balloon.
8. Remove the introducer cannula and guidewire.
Verify Tube Position:
9. Verify proper tube placement radiographically to avoid potential complication (e.g. bowel irritation or perforation) and ensure that the tube is not looped within the stomach or small bowel.
Note: The jejunal portion of the tube contains tungsten which is Radiopaque and can be used to radiographically confirm position. Do not inject contrast into the balloon.
10. Flush the tube to verify patency.
(Continued next page)
Kimberly-ClarK* MIC-KEY* Low-Profile Transgastric-Jejunal Feeding Tube
Illustration C1 Illustration C2
Illustration C3 Illustration C4
Illustration C5 Illustration C6
Illustration C7 Illustration C8
Fr
cm
BAL
123
Fr
cm
BAL
123
Illustration C9
11. Check for moisture around the stoma. If there are signs of gastric leakage, check the tube position and external bolster placement. Add fluid as needed in 1-2 ml increments. DO NOT EXCEED BALLOON CAPACITY AS INDICATED EARLIER.
12. Check to make sure that the external bolster is not placed too tightly against the skin and rests 2-3 mm above the skin.
13. Document the date, the type, the size and lot number of the tube, the fill volume of the balloon, skin condition and patient tolerance to the procedure. Start feeding and medication administration only after confirmation of proper tube placement and patency.
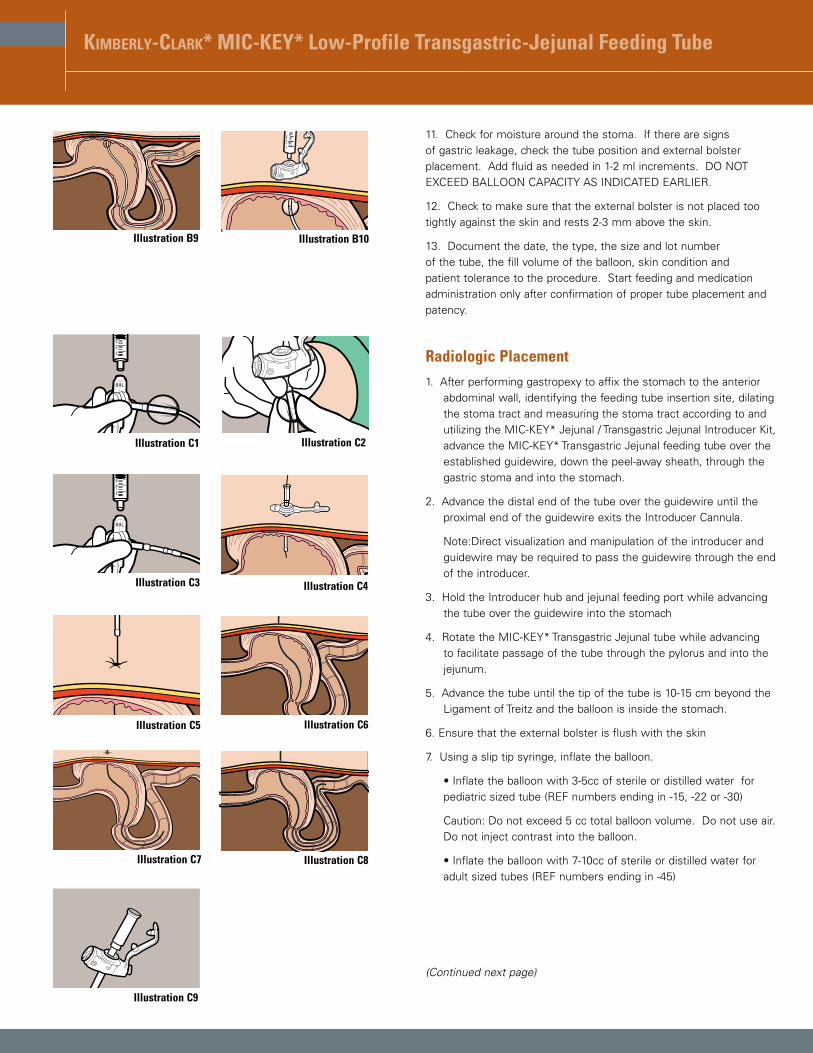
Radiologic Placement1. After performing gastropexy to affix the stomach to the anterior
abdominal wall, identifying the feeding tube insertion site, dilating the stoma tract and measuring the stoma tract according to and utilizing the MIC-KEY* Jejunal / Transgastric Jejunal Introducer Kit, advance the MIC-KEY* Transgastric Jejunal feeding tube over the established guidewire, down the peel-away sheath, through the gastric stoma and into the stomach.
2. Advance the distal end of the tube over the guidewire until the proximal end of the guidewire exits the Introducer Cannula.
Note:Direct visualization and manipulation of the introducer and guidewire may be required to pass the guidewire through the end of the introducer.
3. Hold the Introducer hub and jejunal feeding port while advancing the tube over the guidewire into the stomach
4. Rotate the MIC-KEY* Transgastric Jejunal tube while advancing to facilitate passage of the tube through the pylorus and into the jejunum.
5. Advance the tube until the tip of the tube is 10-15 cm beyond the Ligament of Treitz and the balloon is inside the stomach.
6. Ensure that the external bolster is flush with the skin
7. Using a slip tip syringe, inflate the balloon.
• Inflate the balloon with 3-5cc of sterile or distilled water for pediatric sized tube (REF numbers ending in -15, -22 or -30)
Caution: Do not exceed 5 cc total balloon volume. Do not use air. Do not inject contrast into the balloon.
• Inflate the balloon with 7-10cc of sterile or distilled water for adult sized tubes (REF numbers ending in -45)
(Continued next page)
123
Illustration B9 Illustration B10
Kimberly-ClarK* MIC-KEY* Low-Profile Transgastric-Jejunal Feeding Tube
Illustration C10
Illustration D1 Illustration D2
Illustration D3 Illustration D4
Illustration D5
123
Illustration C11
Caution: Do not exceed 10 cc total balloon volume. Do not use air. Do not inject contrast into the balloon.
6. Remove the guidewire through the Introducer Cannula while holding the cannula in position.
8. Remove the introducer cannula.
Verify Tube Position:
9. Verify proper tube placement radiographically to avoid potential complication (e.g. bowel irritation or perforation) and ensure that the tube is not looped within the stomach or small bowel.
Note: The jejunal portion of the tube contains tungsten which is Radiopaque and can be used to radiographically confirm position.
10. Flush the lumen to verify patency.
11. Check for moisture around the stoma. If there are signs of gastric leakage, check the tube position and external bolster placement. Add fluid as needed in 1-2 ml increments. DO NOT EXCEED BALLOON CAPACITY AS INDICATED EARLIER.
13. Check to make sure that the external bolster is not placed too tightly against the skin and rests 2-3mm above the skin.
14. Document the date, the type, the size and lot number of the tube, the fill volume of the balloon, skin condition and patient tolerance to the procedure. Start feeding and medication administration only after confirmation of proper tube placement and patency.
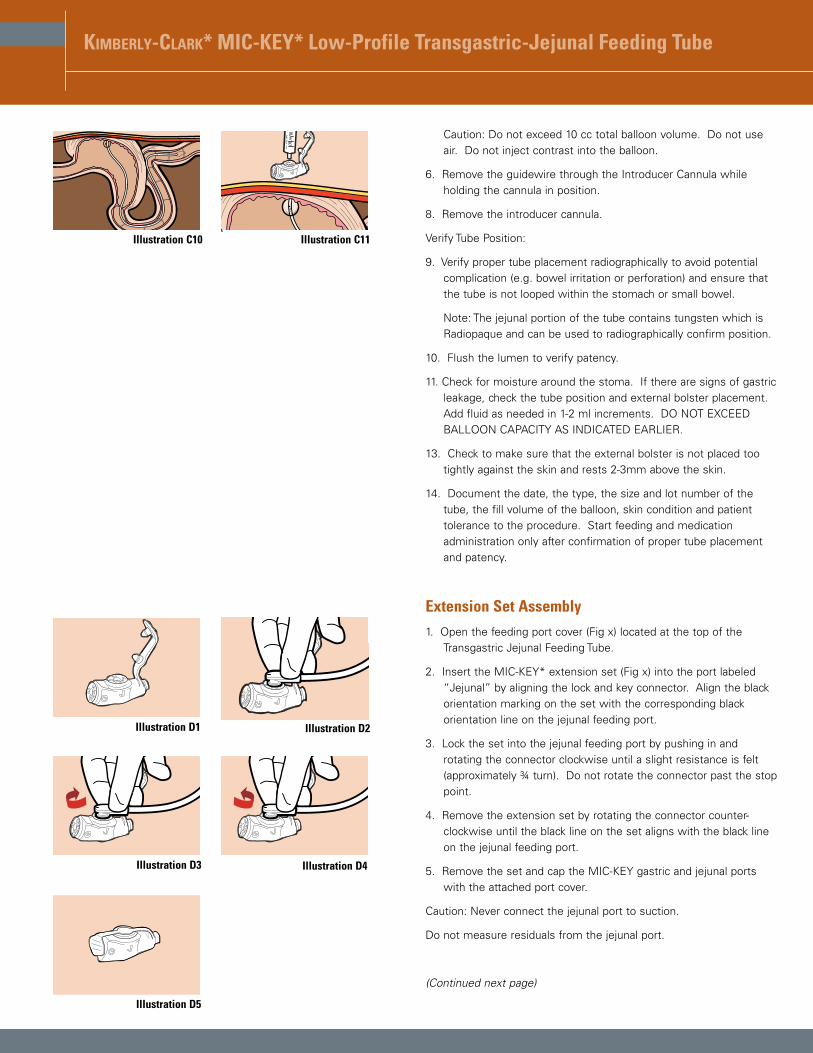
Extension Set Assembly1. Open the feeding port cover (Fig x) located at the top of the
Transgastric Jejunal Feeding Tube.
2. Insert the MIC-KEY* extension set (Fig x) into the port labeled “Jejunal” by aligning the lock and key connector. Align the black orientation marking on the set with the corresponding black orientation line on the jejunal feeding port.
3. Lock the set into the jejunal feeding port by pushing in and rotating the connector clockwise until a slight resistance is felt (approximately ¾ turn). Do not rotate the connector past the stop point.
4. Remove the extension set by rotating the connector counter-clockwise until the black line on the set aligns with the black line on the jejunal feeding port.
5. Remove the set and cap the MIC-KEY gastric and jejunal ports with the attached port cover.
Caution: Never connect the jejunal port to suction.
Do not measure residuals from the jejunal port.
(Continued next page)
Kimberly-ClarK* MIC-KEY* Low-Profile Transgastric-Jejunal Feeding Tube
Illustration E1 Illustration E2
Illustration E3 Illustration E4
Illustration E5
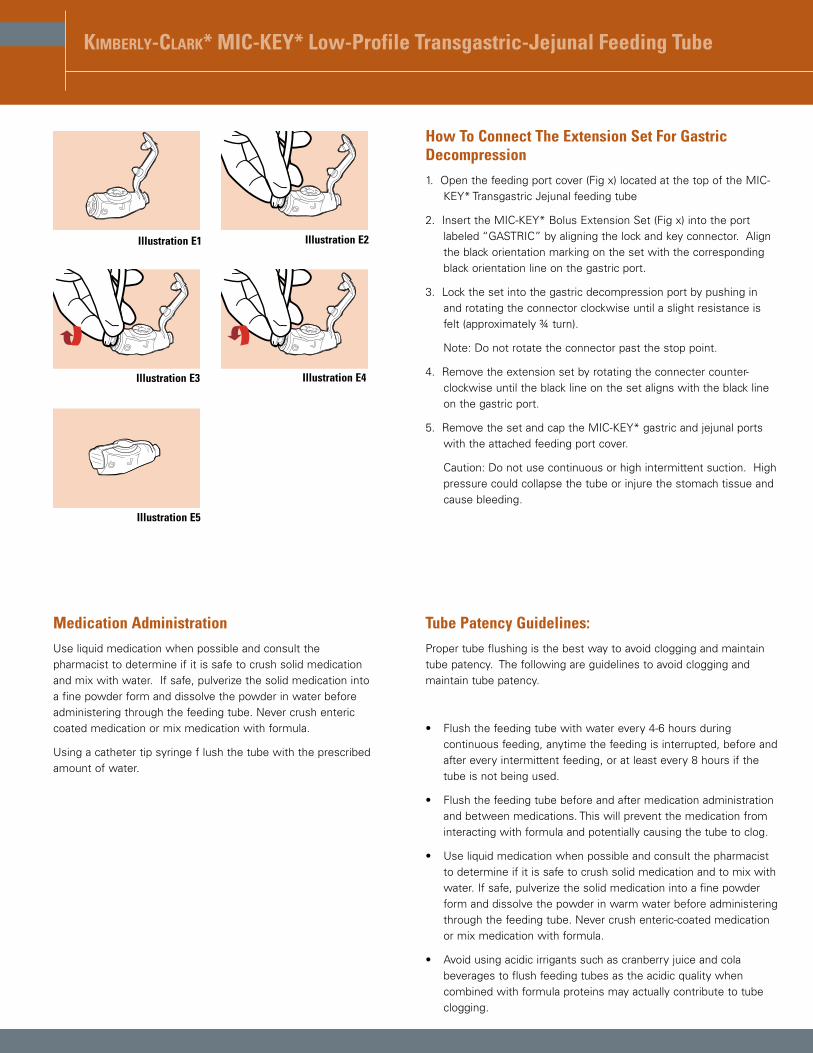
How To Connect The Extension Set For Gastric Decompression1. Open the feeding port cover (Fig x) located at the top of the MIC-
KEY* Transgastric Jejunal feeding tube
2. Insert the MIC-KEY* Bolus Extension Set (Fig x) into the port labeled “GASTRIC” by aligning the lock and key connector. Align the black orientation marking on the set with the corresponding black orientation line on the gastric port.
3. Lock the set into the gastric decompression port by pushing in and rotating the connector clockwise until a slight resistance is felt (approximately ¾ turn).
Note: Do not rotate the connector past the stop point.
4. Remove the extension set by rotating the connecter counter-clockwise until the black line on the set aligns with the black line on the gastric port.
5. Remove the set and cap the MIC-KEY* gastric and jejunal ports with the attached feeding port cover.
Caution: Do not use continuous or high intermittent suction. High pressure could collapse the tube or injure the stomach tissue and cause bleeding.
Medication Administration
Use liquid medication when possible and consult the pharmacist to determine if it is safe to crush solid medication and mix with water. If safe, pulverize the solid medication into a fine powder form and dissolve the powder in water before administering through the feeding tube. Never crush enteric coated medication or mix medication with formula.
Using a catheter tip syringe f lush the tube with the prescribed amount of water.
Tube Patency Guidelines:Proper tube flushing is the best way to avoid clogging and maintain tube patency. The following are guidelines to avoid clogging and maintain tube patency.
• Flush the feeding tube with water every 4-6 hours during continuous feeding, anytime the feeding is interrupted, before and after every intermittent feeding, or at least every 8 hours if the tube is not being used.
• Flush the feeding tube before and after medication administration and between medications. This will prevent the medication from interacting with formula and potentially causing the tube to clog.
• Use liquid medication when possible and consult the pharmacist to determine if it is safe to crush solid medication and to mix with water. If safe, pulverize the solid medication into a fine powder form and dissolve the powder in warm water before administering through the feeding tube. Never crush enteric-coated medication or mix medication with formula.
• Avoid using acidic irrigants such as cranberry juice and cola beverages to flush feeding tubes as the acidic quality when combined with formula proteins may actually contribute to tube clogging.
Kimberly-ClarK* MIC-KEY* Low-Profile Transgastric-Jejunal Feeding Tube
General Flushing Guidelines:• Use a 30 to 60 cc slip tip syringe. Do not use smaller size syringes
as this can increase pressure on the tube and potentially rupture smaller tubes.
• Use room temperature tap water for tube flushing. Sterile water may be appropriate where the quality of municipal water supplies is of concern. The amount of water will depend on the patient’s needs, clinical condition, and type of tube, but the average volume ranges from 10 to 50 mls for adults, and 3 to 10 mls for infants. Hydration status also influences the volume used for flushing feeding tubes. In many cases, increasing the flushing volume can avoid the need for supplemental intravenous fluid. However, individuals with renal failure and other fluid restrictions should receive the minimum flushing volume necessary to maintain patency.
• Do not use excessive force to flush the tube. Excessive force can perforate the tube and can cause injury to the gastrointestinal tract.
• Document the time and amount of water used in the patient’s record. This will enable all caregivers to monitor the patient’s needs more accurately.
Balloon MaintenanceCheck the water volume in the balloon once a week.
• Insert a slip tip syringe into the balloon inflation port and withdraw the fluid while holding the tube in place. Compare the amount of water in the syringe to the amount recommended or the amount initially prescribed and documented in the patient record. If the amount is less than recommended or prescribed, refill the balloon with the water initially removed, then draw up and add the amount needed to bring the balloon volume up to the recommended and prescribed amount of water. Be aware as you deflate the balloon there may be some gastric contents that can leak from around the tube. Document the fluid volume, the amount of volume to be replaced (if any), the date and time.
• Wait 10-20 minutes and repeat the procedure. The balloon is leaking if it has lost fluid, and the tube should be replaced. A deflated or ruptured balloon could cause the tube to dislodge or be displaced. If the balloon is ruptured, it will need to be replaced. Secure the tube into position using tape, then follow facility protocol and/or call the physician for instructions.
Note: Refill the balloon using sterile or distilled water, not air or saline. Saline can crystallize and clog the balloon valve or lumen, and air may seep out and cause the balloon to collapse. Be sure to use the recommended amount of water as over-inflation can obstruct the lumen or decrease balloon life and under-inflation will not secure the tube properly.
Tube OcclusionTube occlusion is generally caused by:
• Poor flushing techniques
• Failure to flush after measurement of gastric residuals
• Inappropriate administration of medication
• Pill fragments
• Viscous medications
• Thick formulas, such as concentrated or enriched formulas that are generally thicker and more likely to obstruct tubes
• Formula contamination that leads to coagulation
• Reflux of gastric or intestinal contents up the tube
To Unclog A Tube• Make sure that the feeding tube is not kinked or clamped off.
• If the clog is visible above the skin surface, gently massage or milk the tube between fingers to break up the clog.
• Next, place a catheter tip syringe filled with warm water into the appropriate adaptor or lumen of the tube and gently pull back on then depress the plunger to dislodge the clog.
• If the clog remains, repeat step #3. Gentle suction alternating with syringe pressure will relieve most obstructions.
• If this fails, consult with the physician and consider trying a solution of pancreatic enzymes and sodium bicarbonate (1 crushed Viokase tablet or 1 teaspoon Viokase powder mixed with 1 nonenteric-coated sodium bicarbonate tablet, or 1⁄8 teaspoon baking soda dissolved in 5 ml warm water) instilled through a catheter tip syringe. Allow to remain in the tube for 30 minutes. Do not use cranberry juice, cola drinks, meat tenderizer or chymotrypsin, as they can actually cause clogs or create adverse reactions in some patients. Diet sodas (non-cola) and carbonated/seltzer water may prove successful in removing some clogs. If the clog is stubborn and cannot be removed, the tube will have to be replaced.
Endoscopic Replacement Procedure1. Refer to the Tube Preparation section above.
2. Perform standard Endoscopic Gastroduodenoscopy. Insufflation of the stomach facilitates tube placement.
3. Withdraw the endoscope until the indwelling gastrostomy tube is in the visual field.
4. Remove the tube.
(Continued next page)

5. Grasp the end of the tube with an atraumatic forceps. If needed, use a floppy tip guidewire or stylet to stiffen the tube. Protect the anti-reflux valve by placing the Introducer Cannula into the jejunal port prior to inserting the guidewire or stylet.
6. Refer to step 3 in the Endoscopic Placement section above and continue with the procedure listed.
Radiologic Replacement ProcedureTo perform this procedure, obtain the following supplies
• .035” Floppy-Tipped (atraumatic) guidewire
1. Under fluoroscopic guidance, insert a floppy-tipped guidewire through the indwelling gastrostomy tube.
2. Remove the tube over the guidewire.
3. Advance the guidewire until the tip is at the pylorus. Negotiate the pylorus and advance the guidewire into the duodenum.
4. Advance the guidewire tip to a point 10-15 cm beyond the Ligament of Treitz.
5. Refer to step 2 in the Radiologic Placement section above and continue with the procedure listed.
Balloon LongevityPrecise balloon life cannot be predicted. Silicone balloons generally last 1-8 months, but the life span of the balloon varies according to several factors. These factors may include medications, volume of water used to inflate the balloon, gastric pH and tube care.
Warning: For enteral nutrition and/or medication only.
Single use only
For additional information please contact Customer Care at the following numbers:
In the United States:
International:
Educational Booklets: “A guide to Proper Care” and a Stoma Site and Enteral Feeding Tube Troubleshooting Guide is available upon request. Please contact your local representative or contact Customer Care.
Kimberly-ClarK* MIC-KEY* Low-Profile Transgastric-Jejunal Feeding Tube
FOR ENTERAL NUTRITION ONLY
* Registered Trademark or Trademark of Kimberly-Clark Worldwide, Inc. or its affiliates. © 2003 KCWW. All rights reserved.