Embed Size (px)
Citation preview

KILOTECH
KRS 1000-1530 Series
KRS 1000 & KRS1000RS KRS 1000PRS
Price computing Scale
Operation Manual
Version 3.1 Last Modified: May. 2011
Ce manuel est disponible en français à www.kilotech.com ou auprès de notre service à la clientèle au 1-800- 694-4445.
Specification 2
Display Panel & Outline 3
Key function 6
Weighing operation 7
How to program PLU 8
LED brightness setting 9
Auto-off time setting 9
Display A/D inner code and working voltage 10
RS232 communication 10
Date and time setting 11
ID setting 11
Business name setting 11
Key functions in setting mode 12 Display of special characters 13
Printer: Connecting the power supply 14 Printer: Parts and Features 15
Printer: Loading Media 16
Printer: Troubleshooting & Caring for your printer 21
Software for the KRS1000PRS 22
Error codes 26
Appendix 27

Thank you for purchasing the KRS Retail Scale. Please read all operating instructions carefully before using and note the following points:
Avoid using in extreme heat, cold or wet as well as an environment which has intensive change in temperature, humidity and pressure. Do not operate near an in-use cell phone, radio, computer or other electronic device as these devices emit RF and maybe cause unstable scale readings.
1. Specification:
Model No
KRS1000 KRS1000RS KRS1000PRS
Item # 851300 851302 851304
RS232 N Y Y
Display In scale body LED display In scale body LED display Separate Post LED display
Max
PLU
215 including 5 direct PLU(Add: 1-5)210 indirect PLU(Add: 001-210)
215 including 5 direct PLU(Add: 1-5) 210 indirect PLU(Add: 001-210)
265 including 55 direct PLU(Add: 1-55)210 indirect PLU(Add: 001-210)
Ingredients No No Yes
Capacity 15kg/30lb
Division 0-6kg:2g/0-15.000lb:0.005lb
6-15kg:5g/15.000-30.000lb:0.010lb
LED display 18 digits:6 digit for weight reading,6 digit for unit price,6 digit for total price
Unit price range 0.00 – 9999.99 $/kg or $/lb
Total price range
0-9999.99$
Working temp. 0℃-40℃
50F~104F
<60%RH
Non Condensing
Power supply 12Vdc,500mA with positive center, AC adaptor or 6Vdc4AH lead-acid battery.
Rechargeable
battery life more than 12 hours
Platter size: LxD: 288x210
11 ¼ x 8 ¼ in
Housing size LxDxH 300 x 350 x 115mm
11 ¾ x 13 ¾ x 6 in
Software: N Y Y
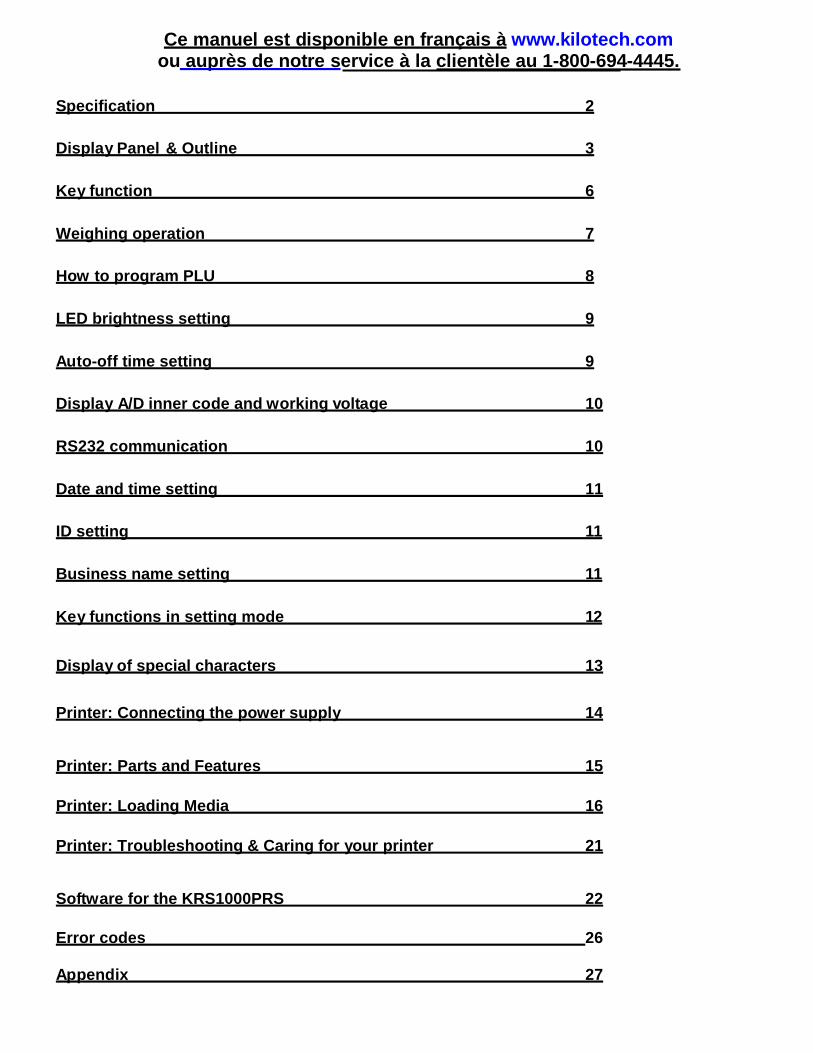
2. Display Panel & Outline: 2.1 KRS1000-1530RS and KRS1000-1530
2.1.1 Outline:
1 : Seals and calibration switch 4 : 12Vdc 500mA power socket 2 : Battery compartment 5 : RS232 interface - Not applicable for the KRS1000-1530 3 : Power Switch
2.1.2 Front Display Panel:
2.1.3 Rear Display Panel:
4
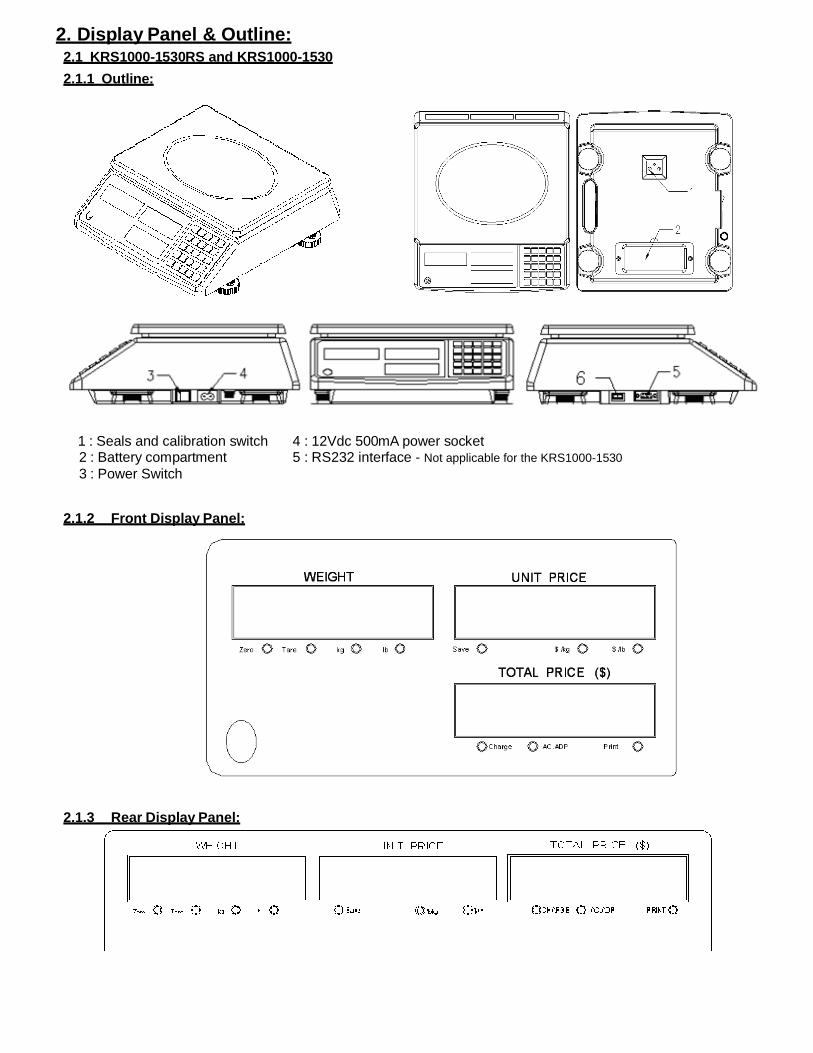
2.1.4 Keypad:
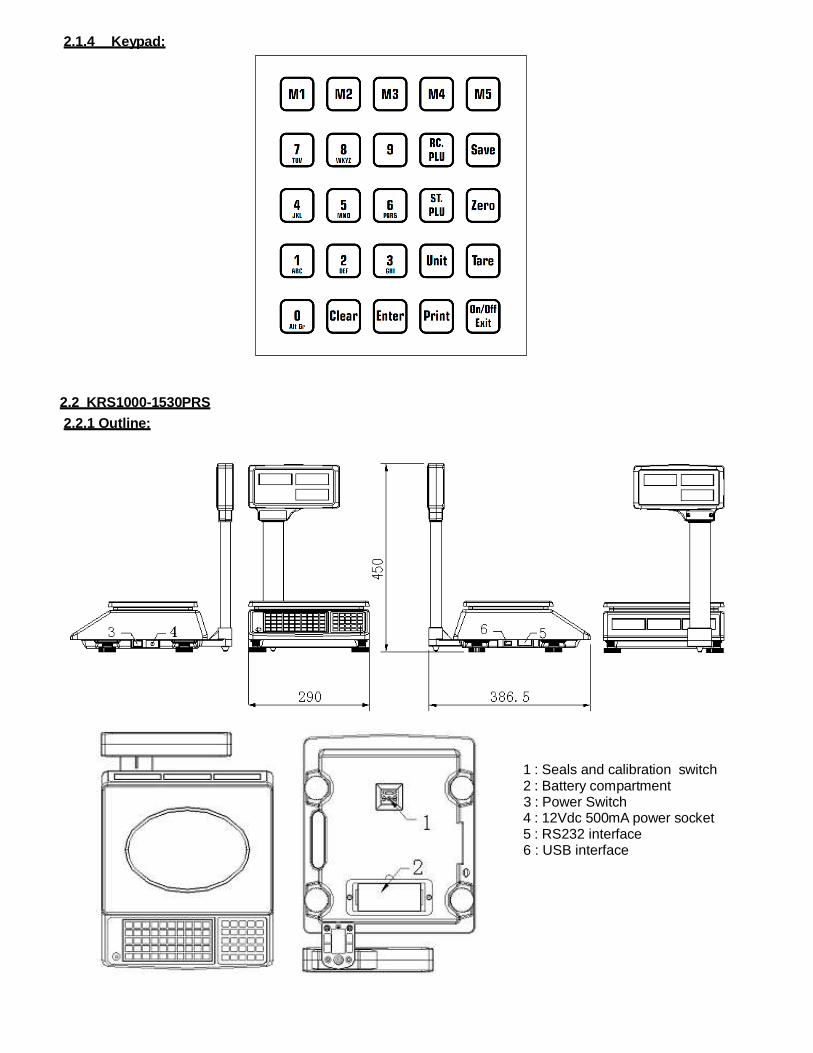
2.2 KRS1000-1530PRS
2.2.1 Outline:
1 : Seals and calibration switch 2 : Battery compartment 3 : Power Switch 4 : 12Vdc 500mA power socket 5 : RS232 interface 6 : USB interface
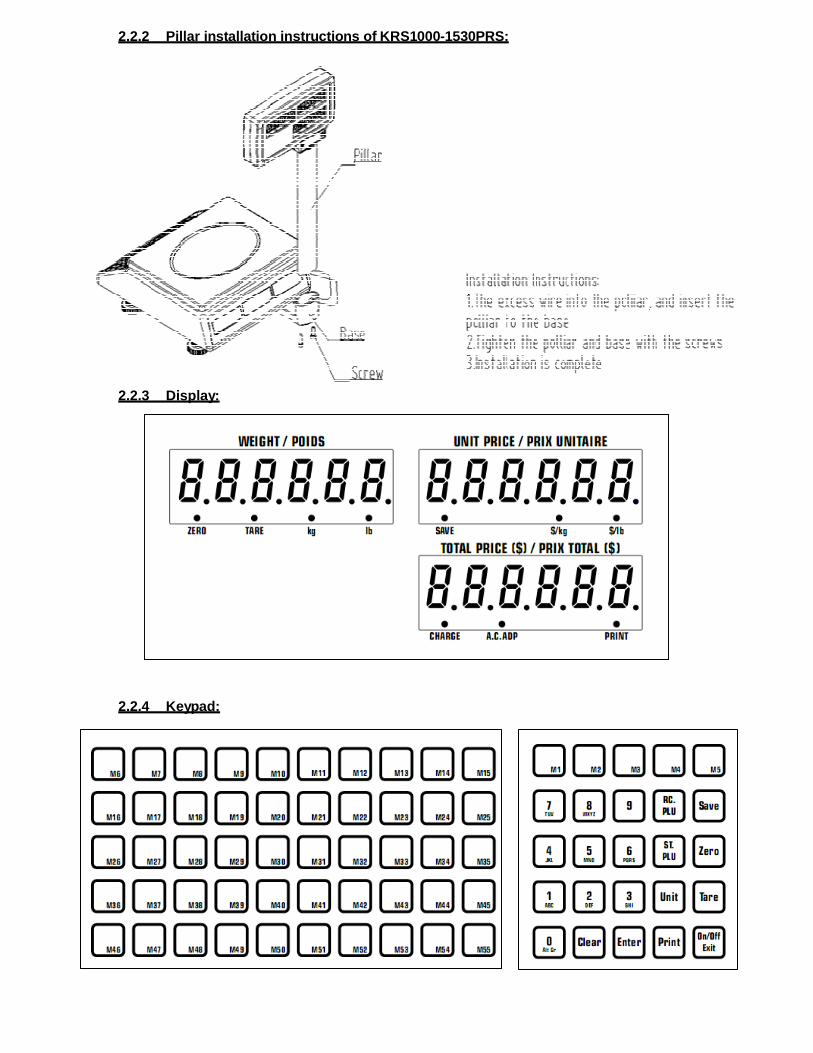
2.2.2 Pillar installation instructions of KRS100 0-1530PRS:
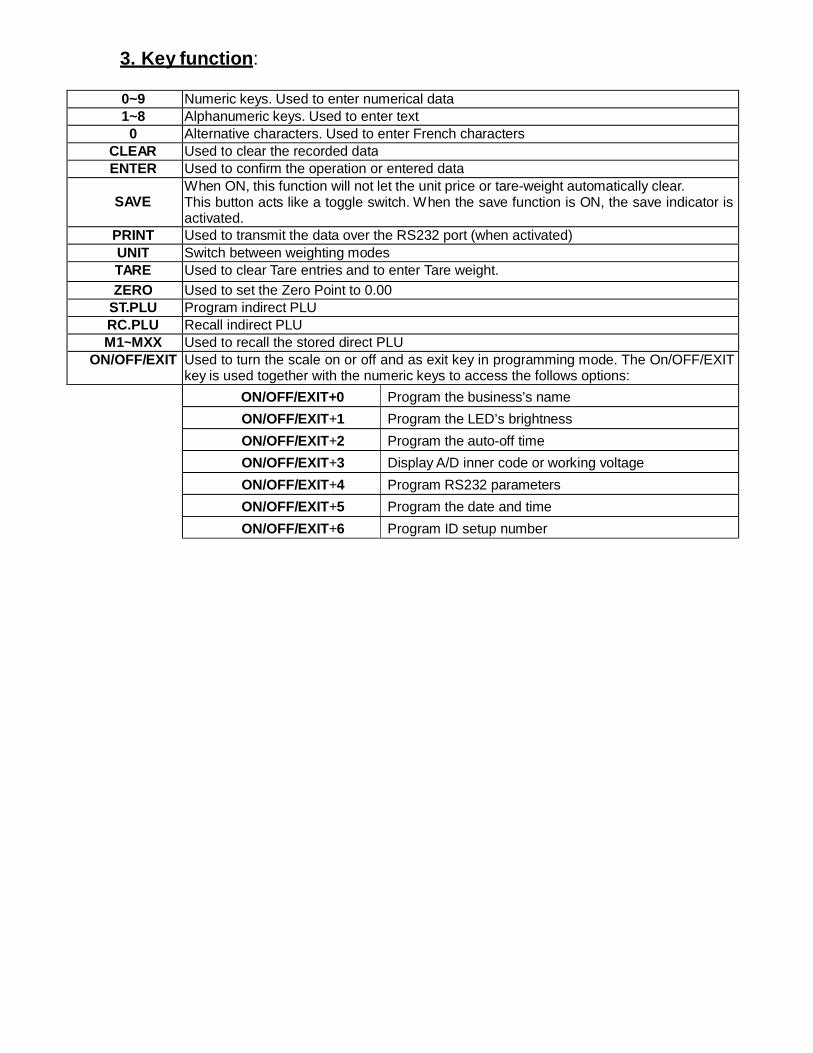
2.2.3 Display:
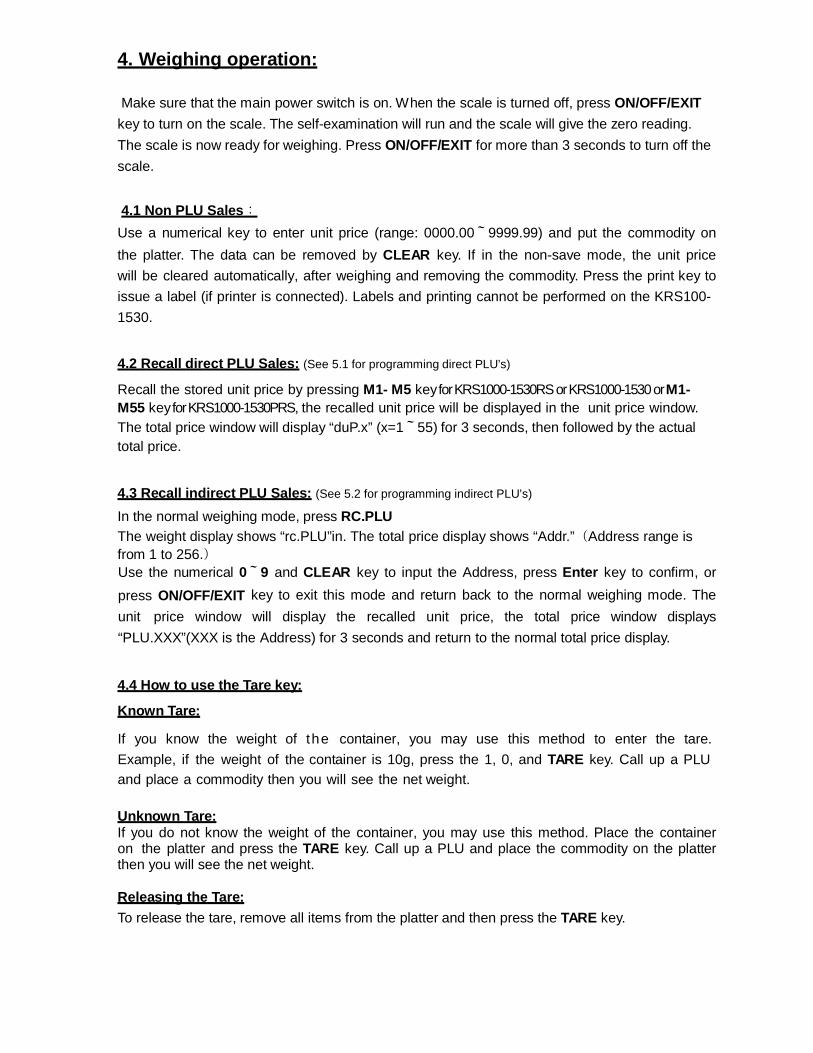
2.2.4 Keypad:
3. Key function :
0~9 Numeric keys. Used to enter numerical data 1~8 Alphanumeric keys. Used to enter text
0 Alternative characters. Used to enter French characters CLEAR Used to clear the recorded data ENTER Used to confirm the operation or entered data
SAVE
When ON, this function will not let the unit price or tare-weight automatically clear. This button acts like a toggle switch. W hen the save function is ON, the save indicator is activated.
PRINT Used to transmit the data over the RS232 port (when activated) UNIT Switch between weighting modes TARE Used to clear Tare entries and to enter Tare weight. ZERO Used to set the Zero Point to 0.00
ST.PLU Program indirect PLU RC.PLU Recall indirect PLU M1~MXX Used to recall the stored direct PLU
ON/OFF/EXIT Used to turn the scale on or off and as exit key in programming mode. The On/OFF/EXIT key is used together with the numeric keys to access the follows options:
ON/OFF/EXIT+0 Program the business’s name ON/OFF/EXIT+1 Program the LED’s brightness ON/OFF/EXIT+2 Program the auto-off time ON/OFF/EXIT+3 Display A/D inner code or working voltage ON/OFF/EXIT+4 Program RS232 parameters ON/OFF/EXIT+5 Program the date and time ON/OFF/EXIT+6 Program ID setup number
4. Weighing operation:
Make sure that the main power switch is on. When the scale is turned off, press ON/OFF/EXIT
key to turn on the scale. The self-examination will run and the scale will give the zero reading.
The scale is now ready for weighing. Press ON/OFF/EXIT for more than 3 seconds to turn off the
scale.
4.1 Non PLU Sales :
Use a numerical key to enter unit price (range: 0000.00~9999.99) and put the commodity on
the platter. The data can be removed by CLEAR key. If in the non-save mode, the unit price
will be cleared automatically, after weighing and removing the commodity. Press the print key to
issue a label (if printer is connected). Labels and printing cannot be performed on the KRS100-
1530. 4.2 Recall direct PLU Sales: (See 5.1 for programming direct PLU’s)
Recall the stored unit price by pressing M1- M5 key for KRS1000-1530RS or KRS1000-1530 or M1- M55 key for KRS1000-1530PRS, the recalled unit price will be displayed in the unit price window. The total price window will display “duP.x” (x=1~55) for 3 seconds, then followed by the actual total price.
4.3 Recall indirect PLU Sales: (See 5.2 for programming indirect PLU’s)
In the normal weighing mode, press RC.PLU The weight display shows “rc.PLU”in. The total price display shows “Addr.”(Address range is from 1 to 256.)
Use the numerical 0~9 and CLEAR key to input the Address, press Enter key to confirm, or
press ON/OFF/EXIT key to exit this mode and return back to the normal weighing mode. The
unit price window will display the recalled unit price, the total price window displays
“PLU.XXX”(XXX is the Address) for 3 seconds and return to the normal total price display. 4.4 How to use the Tare key:
Known Tare:
If you know the weight of t h e container, you may use this method to enter the tare. Example, if the weight of the container is 10g, press the 1, 0, and TARE key. Call up a PLU and place a commodity then you will see the net weight. Unknown Tare: If you do not know the weight of the container, you may use this method. Place the container on the platter and press the TARE key. Call up a PLU and place the commodity on the platter then you will see the net weight. Releasing the Tare:
To release the tare, remove all items from the platter and then press the TARE key.
4.5 How to use the Save key:
In regular mode, tare and unit price will disappear automatically after a completed transaction.
To enter the save mode, press the SAVE key. In the save mode, tare and unit price will
not disappear automatically after a transaction is completed. To exit the save mode, press the
SAVE key again. 4.6 How to use the Zero Key:
The ZERO key is used to return the scale to zero. The scale will display “Err04”or “Err05” when the scale is beyond zero range. W hen using a tare, the ZERO key is invalid.
4.7 How to use the kg/lb key:
Use UNIT key to shift between “kg” and “lb”, and clear the unit price. When in tare mode, UNIT key is disabled.
4.8 How to use the print key:
The print key is used to transmit the data when the scale reading is stable (The weighing unit will display a non-flashing light)
5. How to program PLU:
5.1 Program direct PLU (M1 – M5 or M1-M55): (See 4.2 for recall of direct PLU’s)
Use the numerical keys to enter the unit price and display in unit price window, then press M1-
M5 key for KRS1000-1530RS or KRS1000-1530 or M1- M55 key for KRS1000-1530PRS within 3
seconds. The total price window displays “NANNE” (Name), the unit price window displays
the last six characters of the commodity name. Using the Clear key and keypad, enter the
commodity name (max 16 characters) and press ENTER to confirm the character on flashed
position or confirm the trade name, or use ON/OFF/EXIT key to exit this mode and return back
to the normal weighing mode. After confirming the trade name, the total price window shows
“INGRDT”(Ingredients), the unit price window shows the last six characters of the ingredients.
Using the Clear key and keypad, enter the ingredient text (max 80 characters) and press
ENTER to confirm the character on flashed position or confirm the ingredient text, or use
ON/OFF/EXIT key to exit this mode and return back to the normal weighing mode. After
confirming the ingredient text, the total price window shows “LIFE”, use t h e numerical keys to
enter LIFE (shell life). After confirming the LIFE, the total price window displays “Tare”. Use
numerical keys to enter the tare weight and confirm with ENTER.
(Note:“ INGRDT” will only be displayed when“232.out” is set to PRTd60 or PRTND6) 5.2 Program Indirect PLU: (See 4.3 for recall of indirect PLU’s)
In the normal weighing mode, press ST.PLU key, “St.PLU” will be shown in weighing window and “Addr.” will be shown in unit price window.(The address range is from 1 to 210.)
The unit price window displays the input address. Input the Address by numerical keys 0~9 and CLEAR key. Press ENTER key to confirm to go to the next step, or press ON/OFF/EXIT key to exit this mode and return back to the normal weighing mode.
Name:
When the total price window displays “NANNE”(commodity name), the unit price window shows
the last six characters of the commodity name.
Use numerical keys and CLEAR key to input the commodity name (max. length 16
characters), use ENTER key to confirm the character in the flashed position or confirm the
comodity name, or use ON/OFF/EXIT key to exit this mode and return back to the normal
weighing mode.
Ingredient:
When the total price window displays “INGRDT”(Ingredients), the unit price window shows the
last six characters of the ingredients.
Use numerical keys and CLEAR key to input the ingredients (max length 80 characters),
use ENTER key to confirm the character in the flashed position or confirm the ingredient
text, or use ON/OFF/EXIT key to exit this mode and return back to the normal weighing mode.
(Note:“ INGRDT” will only be displayed when“232.out” is set to PRTd60 or PRTND6)
Best before Date:
When the total price window displays “LIFE”(Best before Date) the unit price shows the input data.
Use numerical keys and CLEAR key to input the LIFE (<=253), use ENTER key to confirm, or press ON/OFF/EXIT key to exit this mode and return back to the normal weighing mode. Units:
Use UNIT key to toggle between $/kg or $/lb. Press ENTER to confirm and go to the next step, or press ON/OFF/EXIT to exit the input and return back to the normal weighing mode.
Unit price :
The total price window displays “Unit.P”, the unit price window shows the input data.
Press 0~9 and CLEAR key to input the unit price, press ENTER key to store and confirm, or press ON/OFF/EXIT key to exit this mode and return back to the normal weighing mode.
Tare:
The total price window displays “Tare”. The unit price window displays the input data.
Use the numerical keys 0-9, CLEAR key to input the tare weight, use ENTER key to store and confirm, or press ON/OFF/EXIT to exit this mode and return back to the normal weighing mode;
6.LED brightness setting:
In the normal weighing mode, press and hold down ON/OFF/EXIT and the 1 key at the same time until the weighing display window shows “Setup”, unit weighing display window shows
“LEd.brt” and the total price display window shows the brightness grade x(x=1.2.3). Use
the numerical keys to input the brightness grade, and press ENTER key to confirm. Press ON/OFF/EXIT key to exit this mode and the scale will automatically reset.
7. Auto-off time setting:
In the normal weighing mode, press and hold ON/OFF/EXIT and the 2 key at the same time, until the scale displays “Setup” in weighing unit window, “A.OFF.t” in unit price window and
auto-off time xx(xx=00~30) in total price window. Use numerical keys to input the auto-off

time and press ENTER key to confirm. Press ON/OFF/EXIT key to exit this mode and the scale will automatically reset.
8. Display A/D inner code and working voltage: In the normal weighing mode, press ON/OFF/EXIT and the 3 key at the same time till the
weighing window shows “code” to enter this mode. Now WEIGHT window will show “UoL.x.x”
(Voltage x.x V), this means the inner working voltage is x.x V. If the scale uses the AC power
adaptor, the voltage is the power adaptor voltage after regulating. A/D internal code will be
displayed in total price. If the scale is not powered by the adaptor, the displayed voltage is the
battery voltage.
9. RS232 communication : In the normal weighing mode, press and hold ON/OFF/EXIT and the 4 key at the same time until
the weight window shows “Setup”. In this mode, you can set the RS232 baud rate, data format
and communication format.
When entered in this mode, the weight window will show “Setup”, the unit price window will show
“232.out”(print mode) and the total price window shows HOST, PRT d(print date) or PRT Nd(print
no date). Use numerical keys 0~4 to choose the print mode
0-HOST,
1-PRTD40
2-PRTD60
3-PRTND4
4-PRTND6
Use the ENTER key to confirm to go to the next step, or the ON/OFF/EXIT key to exit this mode. Next step, the weight window will show “Setup”, the unit price window will show “232.bPS”(bit per
second) and the total price window shows baud rate xxxxx.
Use keys 1,2,3,4,5 to choose baud rate:
1--1200bps
2--2400bps
3--4800bps
4--9600bps
5--19200bps
Press Enter key to confirm to go to the next step, or ON/OFF/EXIT key to exit this mode. The weight window will display “232.dFt”(data format), the total price window will display data format xxx
Use 1,2,3 key to select data format:
1—8N1 8 bits data, no odd or even 1 start bit, 1stop bit
2—7O1 7 bits data, 1 even 1 start bit, 1stop bit
3—7E1 7 bits data, 1 odd 1 start bit, 1stop bit,
Press the Enter key to confirm the input and go to the next step, or use the ON/OFF/EXIT key to exit this mode.
PRTd40 = 58mm × 40mm with date PRTd60 = 58mm × 60mm with date PRTNd4 = 58mm × 40mm without date PRTNd6 = 58mm × 60mm without date
Next, the unit price window shows “USb.oUt” (USB output) and the total price window display data format xxx. Use keys 0,1 to select data format:
0—NoNE (USB on KRS1000 is not used)
1—HOST (KRS1000’s USB is connected to a host device, e.g. a PC),
Press the Enter key to confirm the input and go to the next step, or use the ON/OFF/EXIT key to exit this mode
The, the weight window will show “Setup”, the unit price window will show “USb.bPS” (Virtual RS232 on USB band rate: bit per second) and the total price window shows baud rate xxxxx. Use keys 1,2,3,4,5 to choose baud rate:
1--1200bps
2--2400bps
3--4800bps
4--9600bps
5--19200bps
Press the Enter key to confirm the input and go to the next step, or use the ON/OFF/EXIT key to exit this mode
The unit price window will display “USb.dFt” (Virtual RS232 on USB data format), the total price window will display data format xxx.
Use 1,2,3 key to select data format:
1—8N1 8 bits data, no odd or even 1 start bit, 1stop bit
2—7O1 7 bits data, 1 even 1 start bit, 1stop bit
3—7E1 7 bits data, 1 odd 1 start bit, 1stop bit,
Press the Enter key to confirm the input and go to the next step, or use the ON/OFF/EXIT key to exit this mode.
The unit price window shows “Urt.cFt”(communication format), the total price window shows
communication format xxx.
Use the numerical keys 0 or 2 to select the communication format:
0
Non communication
2
When the scale becomes stable, the data will be output after pressing PRINT key
10. Date and time setting:
1. In the normal weighing mode, press and hold 5 and ON/OFF/EXIT key for more than 3 seconds to enter into this mode. In this mode, you can set the system date and time.
2. After entering into this mode, the weight window will display “Setup”, the unit price window will display “Date”(date) and the total unit price will display the current date (the default date is 08.09.08)xx.xx.xx.
3. Use the numerical keys to input the date(format:YY.MM.DD),use ENTER key to confirm and go to the time setting mode.
4. Then the weight window displays “Setup”,the unit price displays “time”(time) and the total price window displays the current time xx.xx.xx.
5. Use the numerical keys to input the time(Format:hh.mm.ss),press Enter to confirm the input and exit this mode.
11. ID setting:
1. In the normal weighing mode, press and hold 6 and ON/OFF key for more than 3 seconds to enter this mode. In this mode, you can set ID code. (Note: the data will be lost after the scale reset)
2. The weight window displays “Setup”, the unit price window displays “Id” and the total price window displays Id code(the default Id code is 000000)xxxxxx.
3. Use the numerical keys to input ID code, then press the ENTER key to confirm the input and exit this mode.
12. Business name setting:
1. In the normal weighing mode, press and hold 0 and ON/OFF key for more than 3 seconds to enter this mode. In this mode, you can set the business name.
2. The weight window displays “bUSI.N1”(business name), the unit price window and the
total price window display the last 12 char of the business name.
3. Use numerical keys and CLEAR key to input the business name (the length of the business name is 20 characters),use the ENTER key to confirm the business name and exit this mode.
4. The weight window displays “bUSI.N2”(business name), the unit price window and the
total price window display the last 12 characters of the business name.
5. Use numerical keys and the CLEAR key to input the business name (the length of the business name is 20 characters). Use the ENTER key to confirm the business name and exit this mode.
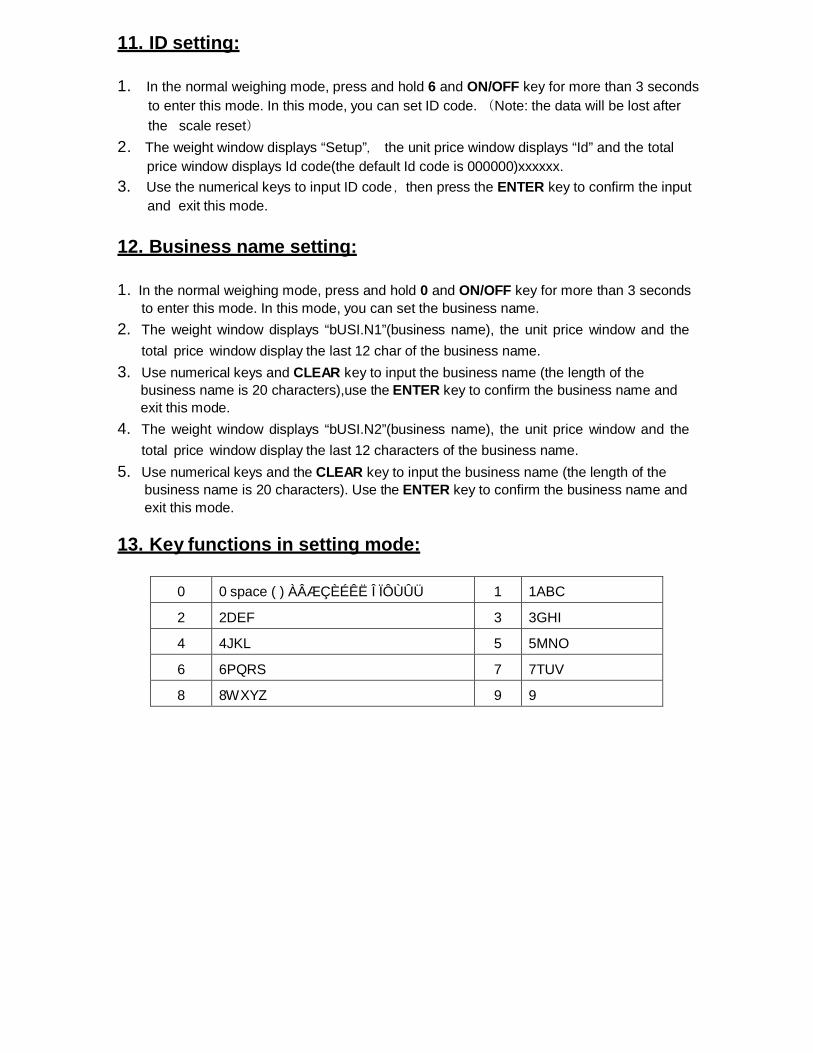
13. Key functions in setting mode:
0
0 space ( ) ÀÂÆÇÈÉÊË Î ÏÔÙÛÜ
1
1ABC
2
2DEF
3
3GHI
4
4JKL
5
5MNO
6
6PQRS
7
7TUV
8
8W XYZ
9
9
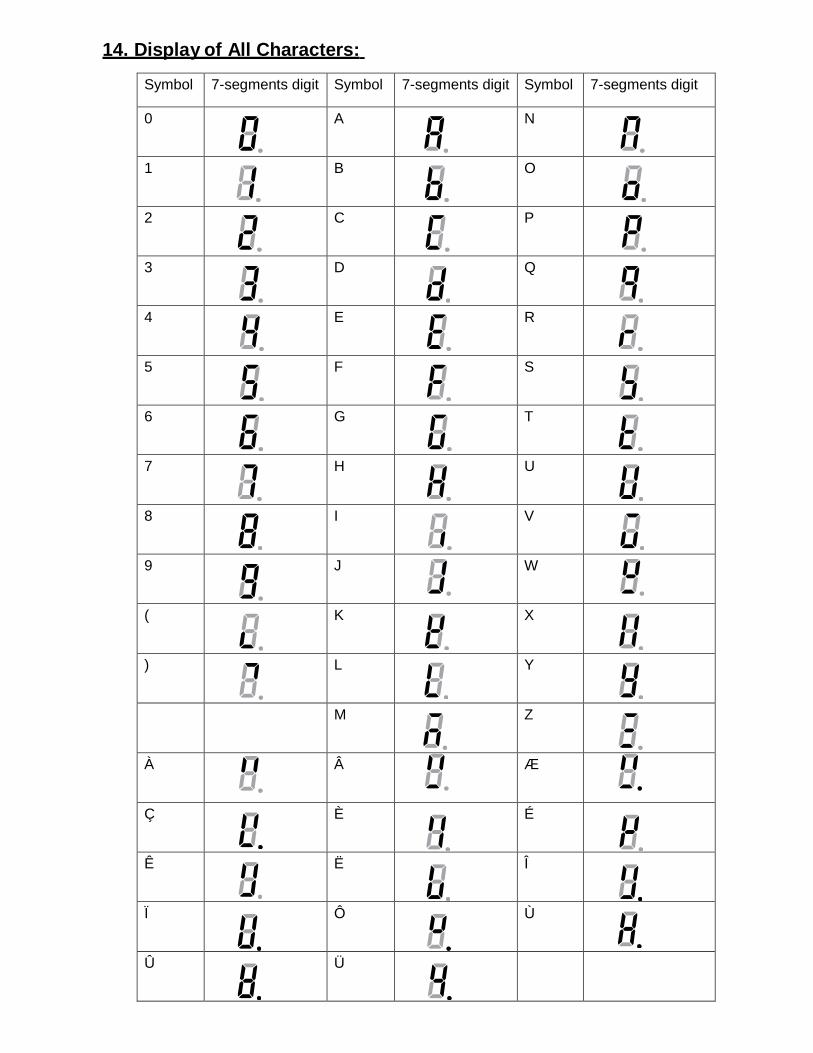
14. Display of All Characters:
Symbol 7-segments digit Symbol 7-segments digit Symbol 7-segments digit
0 A N
1 B O
2 C P
3 D Q
4 E R
5 F S
6 G T
7 H U
8 I V
9 J W
( K X
) L Y
M Z
À Â Æ
Ç È É
Ê Ë Î
Ï Ô Ù
Û Ü
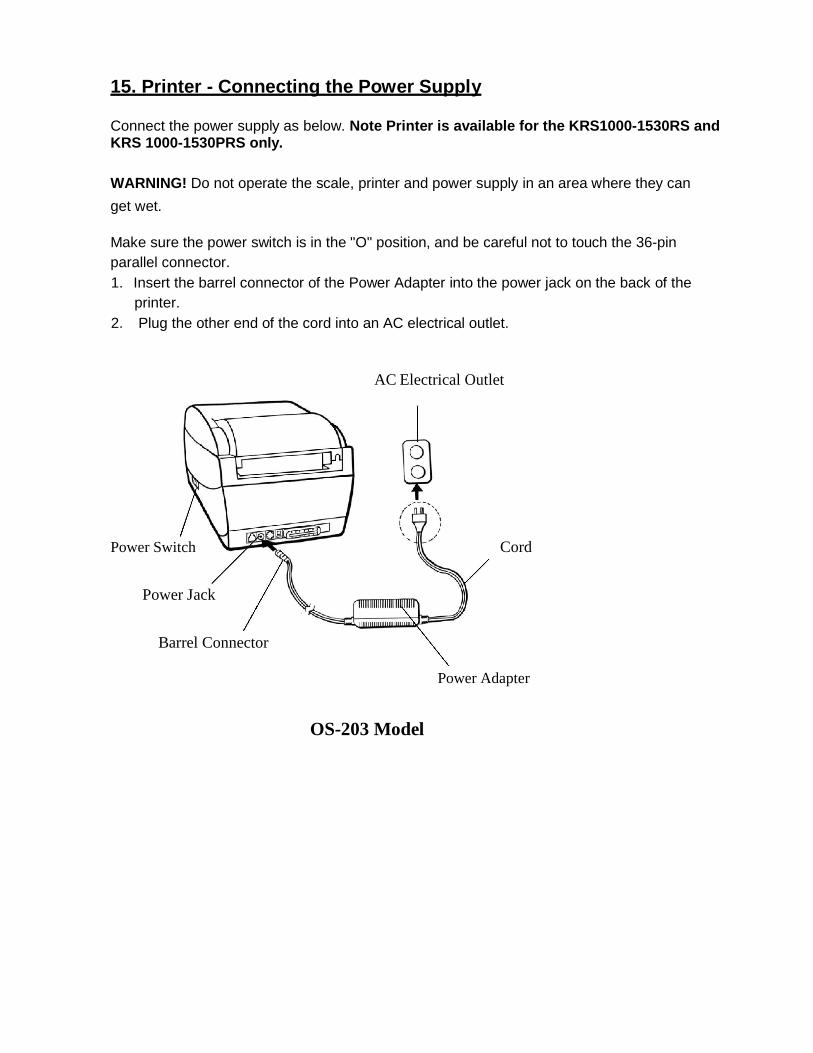
15. Printer - Connecting the Power Supply Connect the power supply as below. Note Printer is available for the KRS1000-1530RS an d KRS 1000-1530PRS only.
WARNING! Do not operate the scale, printer and power supply in an area where they can
get wet. Make sure the power switch is in the "O" position, and be careful not to touch the 36-pin parallel connector. 1. Insert the barrel connector of the Power Adapter into the power jack on the back of the
printer. 2. Plug the other end of the cord into an AC electrical outlet.
AC Electrical Outlet Power Switch Cord
Power Jack
Barrel Connector
Power Adapter
OS-203 Model
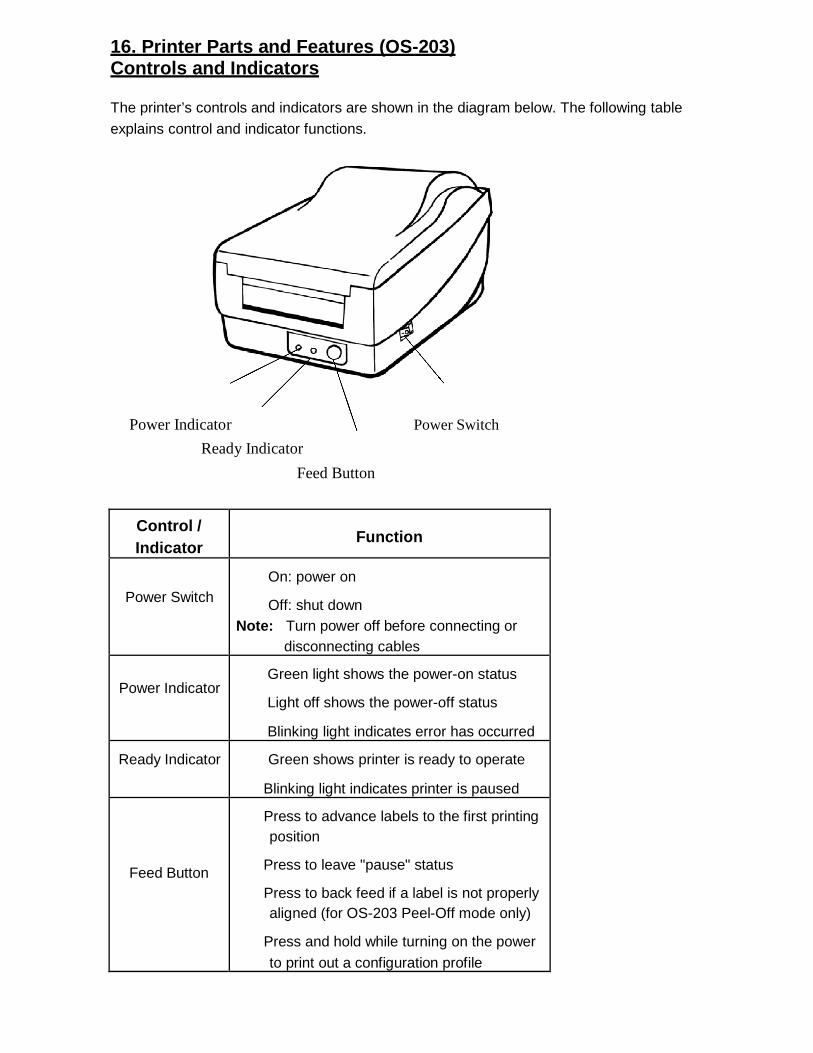
16. Printer Parts and Features (OS-203) Controls and Indicators
The printer’s controls and indicators are shown in the diagram below. The following table
explains control and indicator functions.
Power Indicator Power Switch
Ready Indicator
Feed Button
Control / Indicator
Funct ion
Power Switch
On: power on
Off: shut down Note: Turn power off before connecting or
disconnecting cables
Power Indicator
Green light shows the power-on status
Light off shows the power-off status
Blinking light indicates error has occurred
Ready Indicator
Green shows printer is ready to operate
Blinking light indicates printer is paused
Feed Button
Press to advance labels to the first printing position
Press to leave "pause" status
Press to back feed if a label is not properly aligned (for OS-203 Peel-Off mode only)
Press and hold while turning on the power
to print out a configuration profile
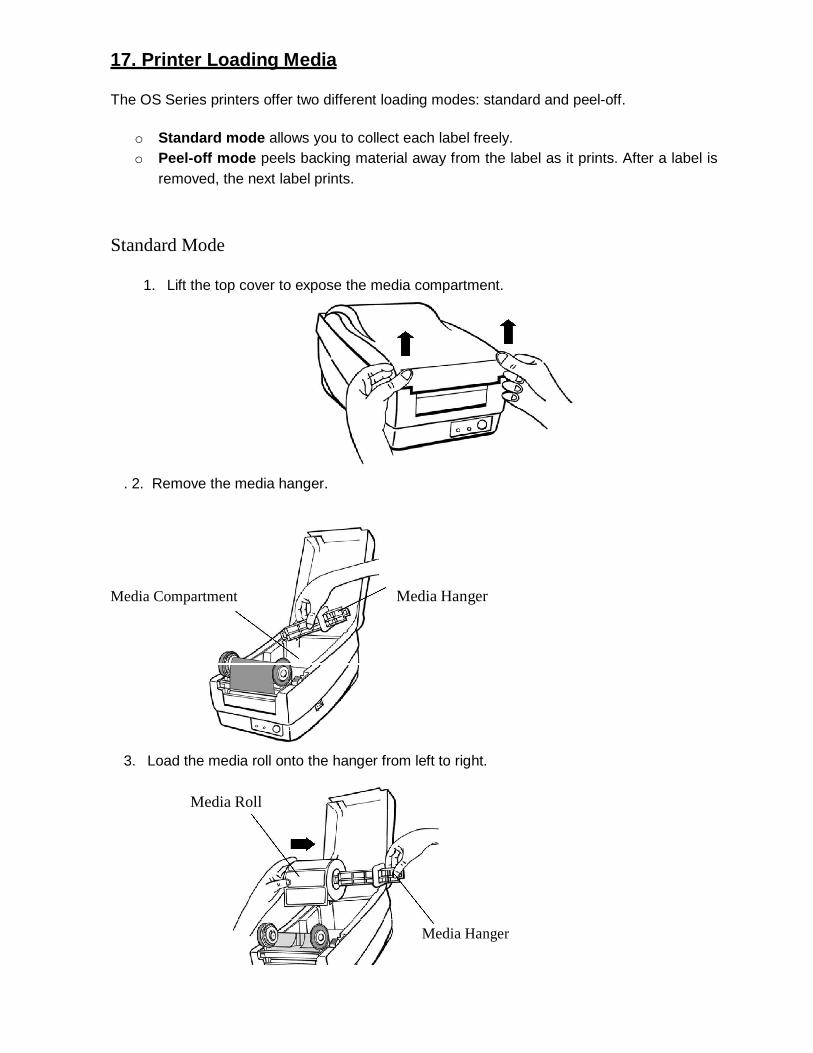
17. Printer Loading Media The OS Series printers offer two different loading modes: standard and peel-off.
o Standard mode allows you to collect each label freely. o Peel-off mode peels backing material away from the label as it prints. After a label is
removed, the next label prints. Standard Mode
1. Lift the top cover to expose the media compartment.
. 2. Remove the media hanger. Media Compartment Media Hanger
3. Load the media roll onto the hanger from left to right.
Media Roll
Media Hanger
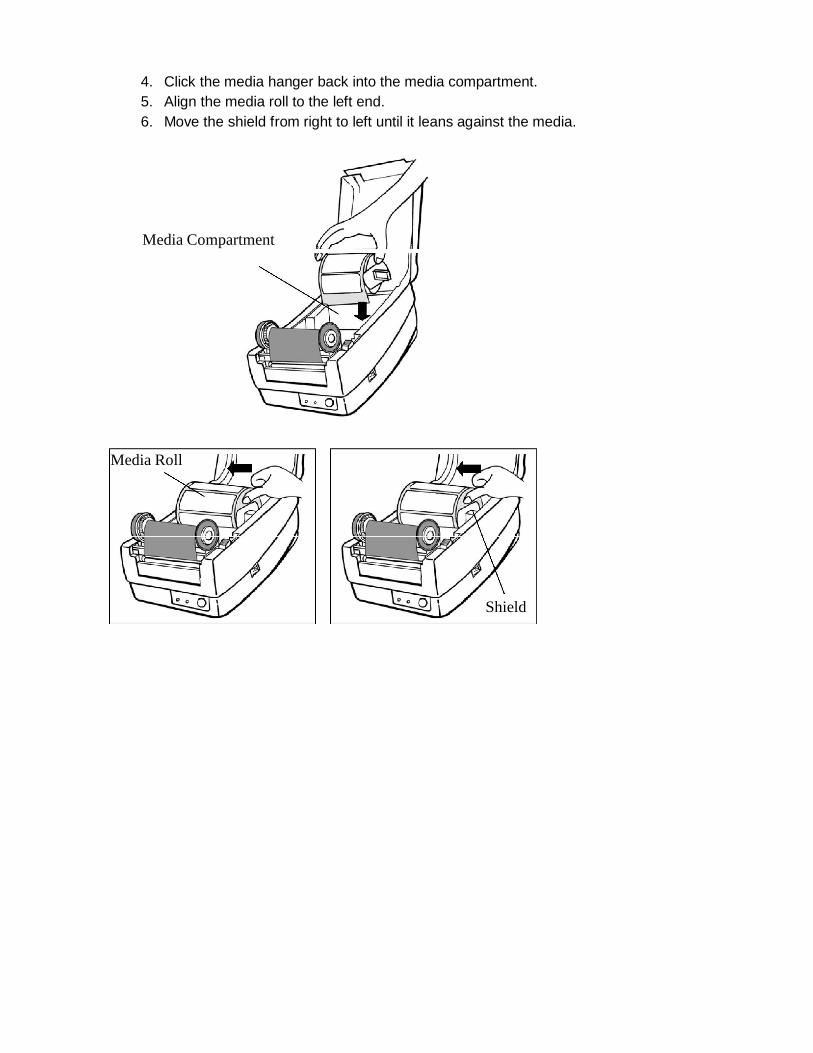
4. Click the media hanger back into the media compartment. 5. Align the media roll to the left end. 6. Move the shield from right to left until it leans against the media.
Media Compartment Media Roll
Shield
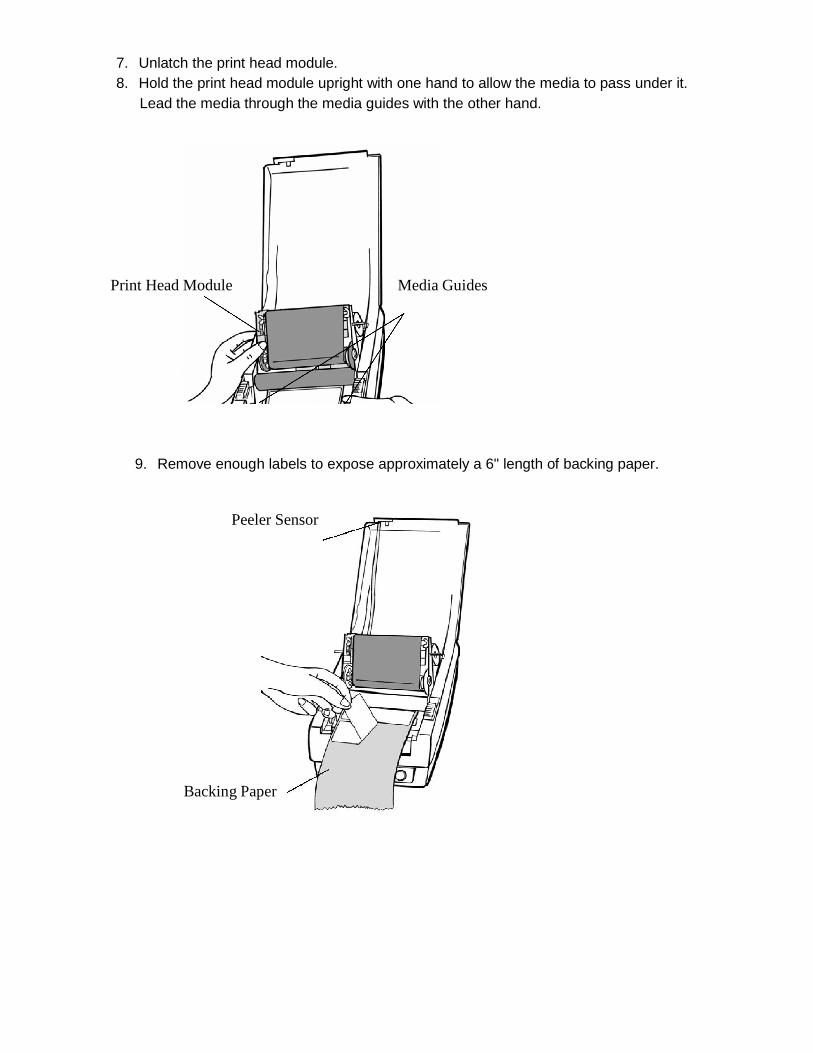
7. Unlatch the print head module. 8. Hold the print head module upright with one hand to allow the media to pass under it.
Lead the media through the media guides with the other hand. Print Head Module Media Guides
9. Remove enough labels to expose approximately a 6" length of backing paper.
Peeler Sensor
Backing Paper
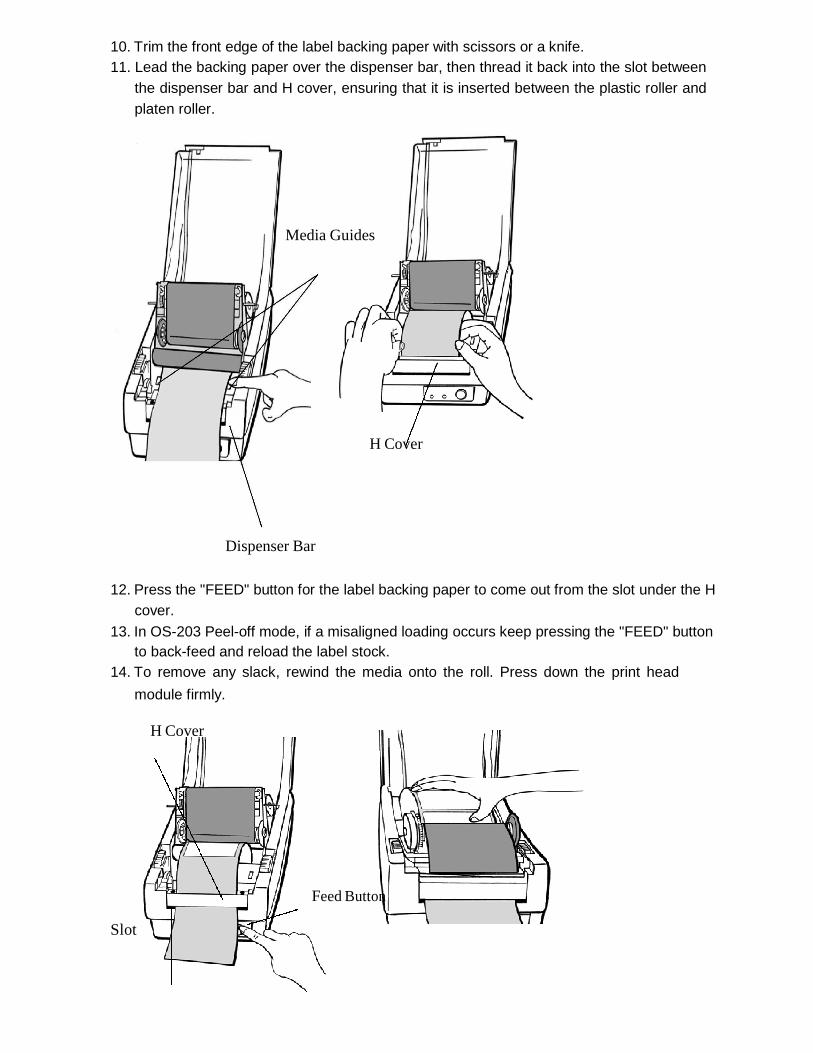
10. Trim the front edge of the label backing paper with scissors or a knife. 11. Lead the backing paper over the dispenser bar, then thread it back into the slot between
the dispenser bar and H cover, ensuring that it is inserted between the plastic roller and platen roller.
Media Guides
H Cover
Dispenser Bar 12. Press the "FEED" button for the label backing paper to come out from the slot under the H
cover.
13. In OS-203 Peel-off mode, if a misaligned loading occurs keep pressing the "FEED" button to back-feed and reload the label stock.
14. To remove any slack, rewind the media onto the roll. Press down the print head
module firmly.
H Cover
Feed Button Slot
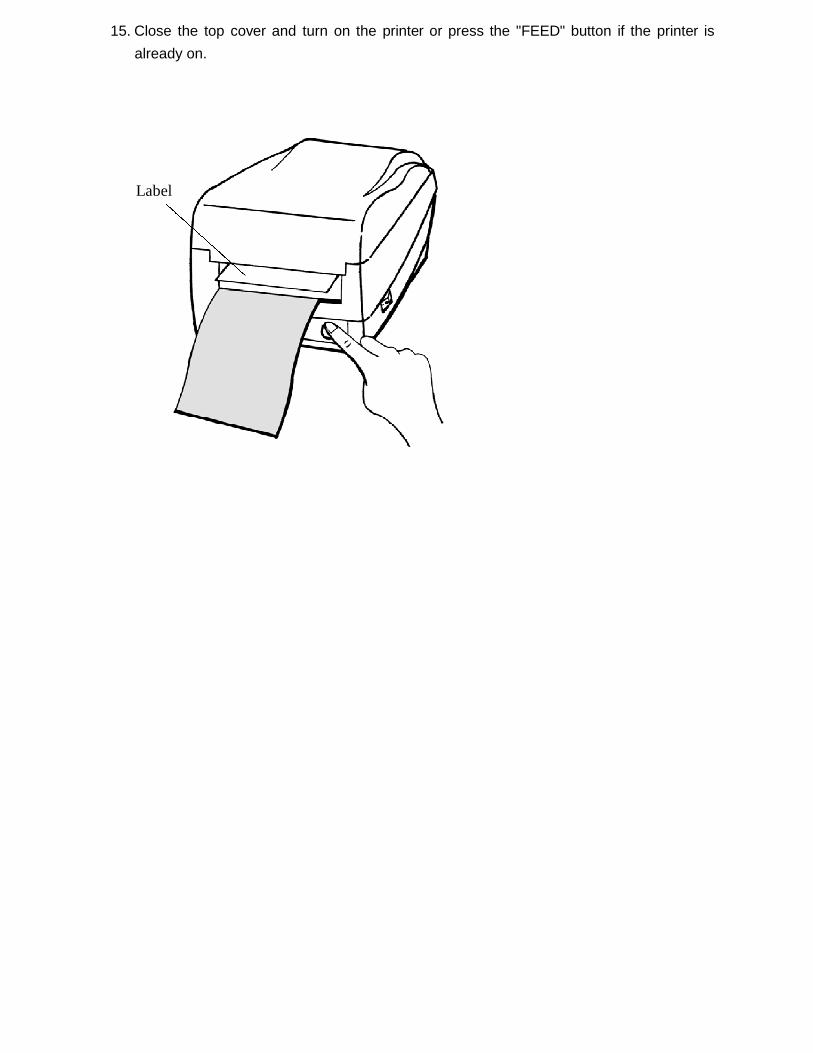
15. Close the top cover and turn on the printer or press the "FEED" button if the printer is
already on.
Label

18. Printer Troubleshooting
When the printer is not working properly, the "Power" LED blinks continuously.
LED Diagnosis
Power and Ready LEDs blinking continuously indicates printer errors. To understand
the problem, please observe the Power and Ready LEDs and refer to the following
solutions:
LED Indicators: Power and Ready LEDs blink at the same tempo
Power LED Ready LED ON ON OFF OFF
Possible Problems Solutions
Miss-detect gap Check the label path Check the label sensor
Label stock out Supply the label roll Label stock not installed
Install the label roll
Label jam Recover the jam
19. Caring for Your Printer After using eight rolls of label stock, clean the following areas of the printer.
Note: Always switch off the power before cleaning.
Cleaning
Clean the following components of the printer using a cotton bud dampened with alcohol. Do
not soak the cotton bud excessively. Thermal Print Head Thermal paper stock and the ribbon release debris on the print head, which degrades printing quality. Clean the print head with methanol or isopropyl alcohol and a cotton bud. Do not touch the heater element with your fingers. Debris or dirt on the roller should be cleaned with alcohol.
Paper Sensor Debris or dirt on the paper sensor can cause a miss-read or unstable detection of the label gap. Clean with a cotton bud dampened with alcohol.
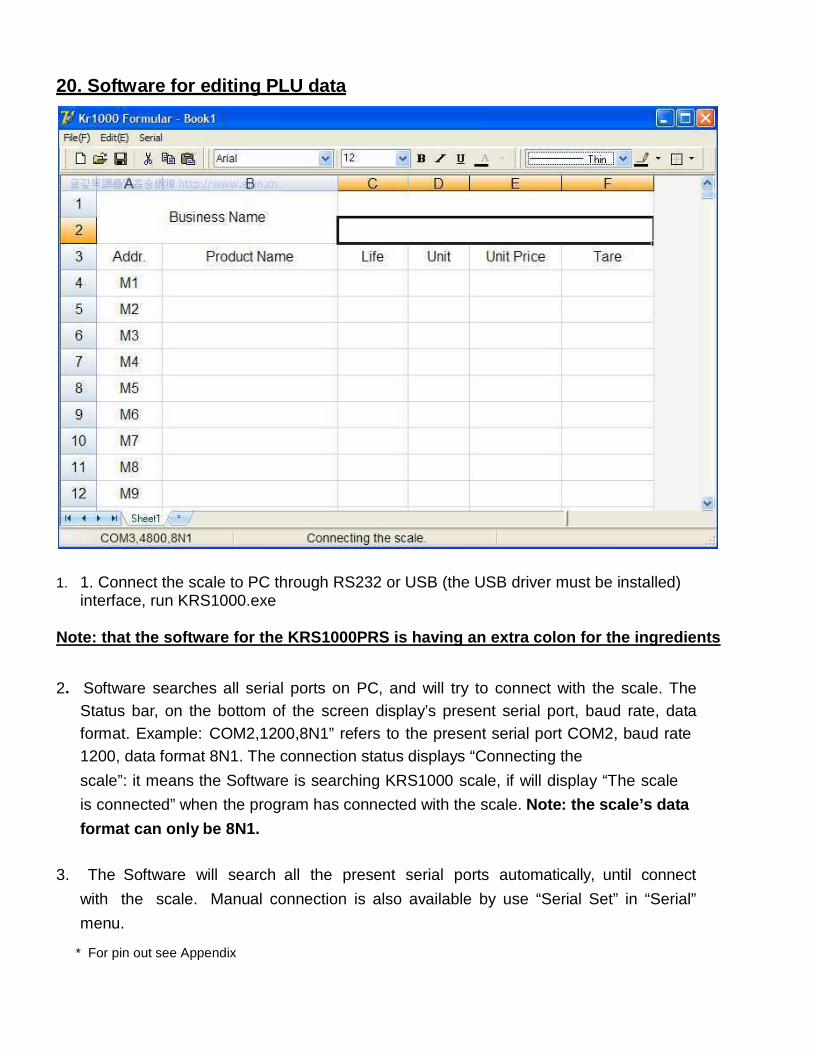
20. Software for editing PLU data
1. 1. Connect the scale to PC through RS232 or USB (the USB driver must be installed) interface, run KRS1000.exe
Note: that the software for the KRS1000PRS is havin g an extra colon for the ingredients
2. Software searches all serial ports on PC, and will try to connect with the scale. The Status bar, on the bottom of the screen display’s present serial port, baud rate, data format. Example: COM2,1200,8N1” refers to the present serial port COM2, baud rate 1200, data format 8N1. The connection status displays “Connecting the
scale”: it means the Software is searching KRS1000 scale, if will display “The scale
is connected” when the program has connected with the scale. Note: the scale’s data
format can only be 8N1.
3. The Software will search all the present serial ports automatically, until connect
with the scale. Manual connection is also available by use “Serial Set” in “Serial”
menu.
* For pin out see Appendix
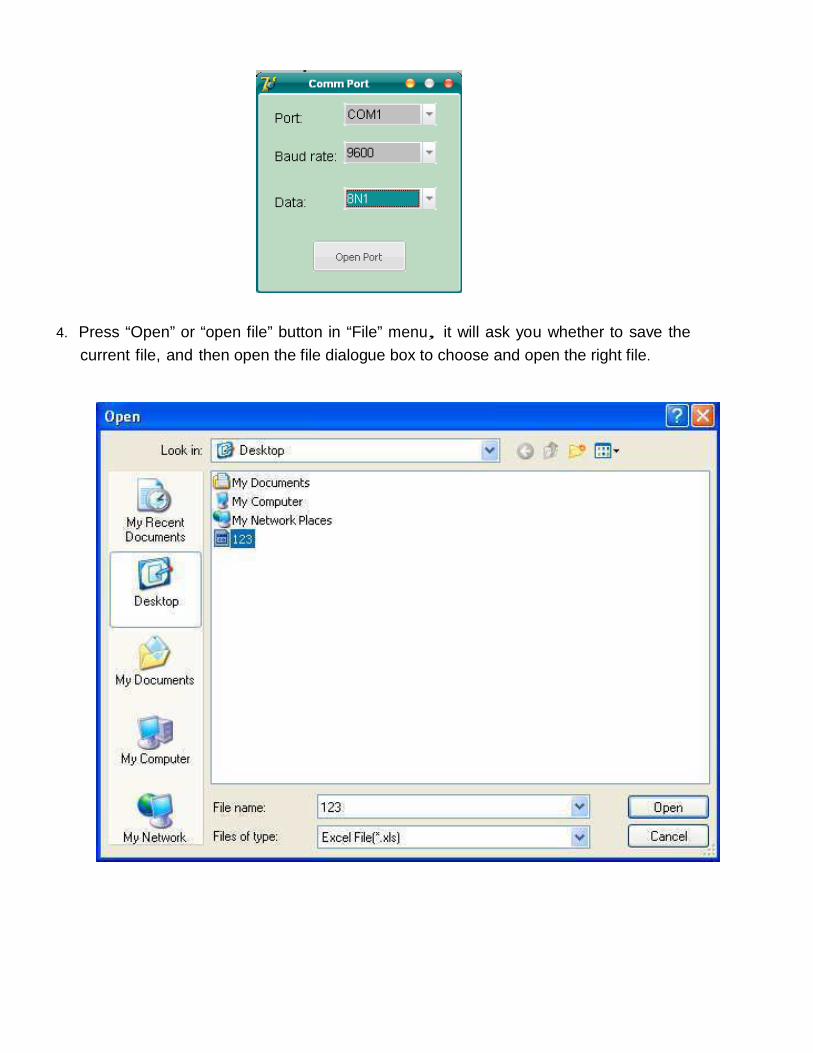
4. Press “Open” or “open file” button in “File” menu, it will ask you whether to save the
current file, and then open the file dialogue box to choose and open the right file.
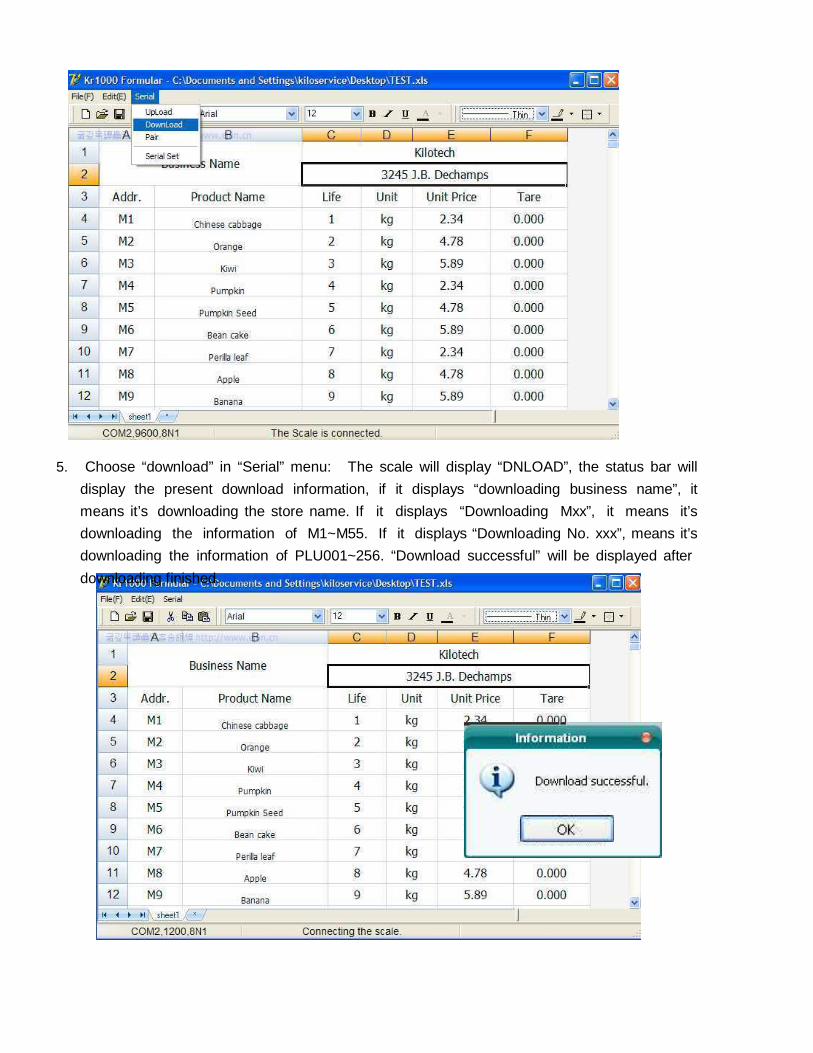
5. Choose “download” in “Serial” menu: The scale will display “DNLOAD”, the status bar will
display the present download information, if it displays “downloading business name”, it
means it’s downloading the store name. If it displays “Downloading Mxx”, it means it’s
downloading the information of M1~M55. If it displays “Downloading No. xxx”, means it’s
downloading the information of PLU001~256. “Download successful” will be displayed after
downloading finished.
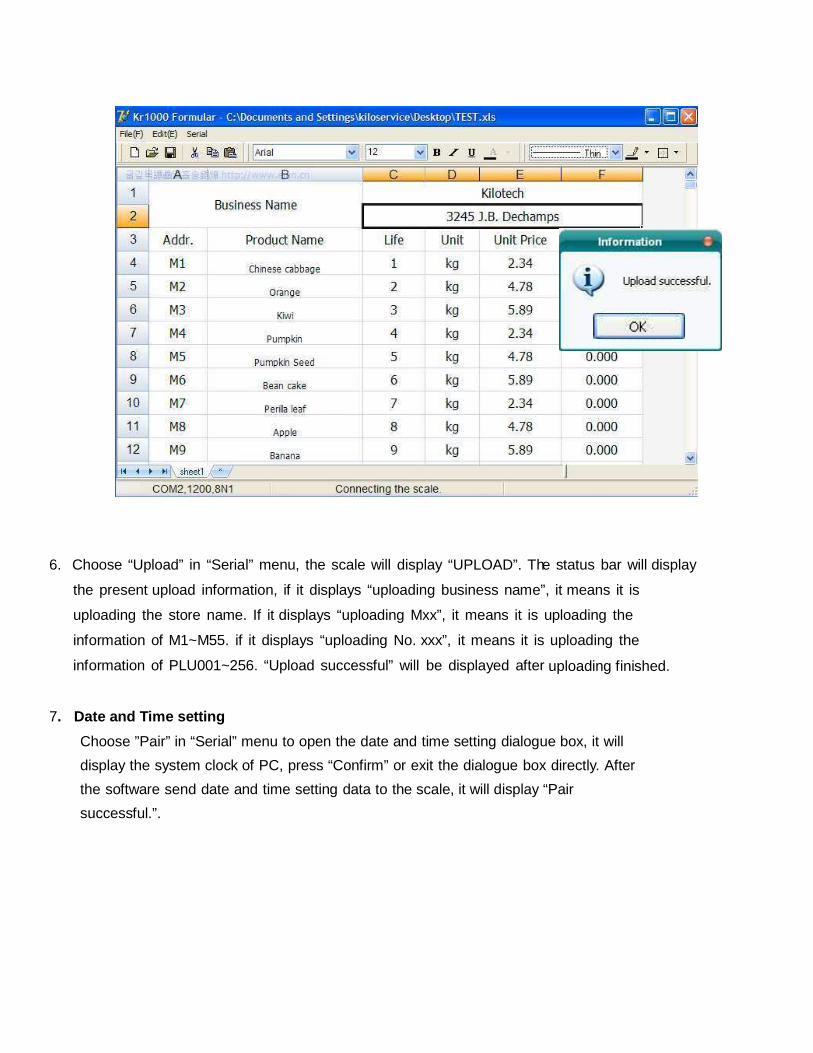
6. Choose “Upload” in “Serial” menu, the scale will display “UPLOAD”. The status bar will display
the present upload information, if it displays “uploading business name”, it means it is
uploading the store name. If it displays “uploading Mxx”, it means it is uploading the
information of M1~M55. if it displays “uploading No. xxx”, it means it is uploading the
information of PLU001~256. “Upload successful” will be displayed after uploading finished.
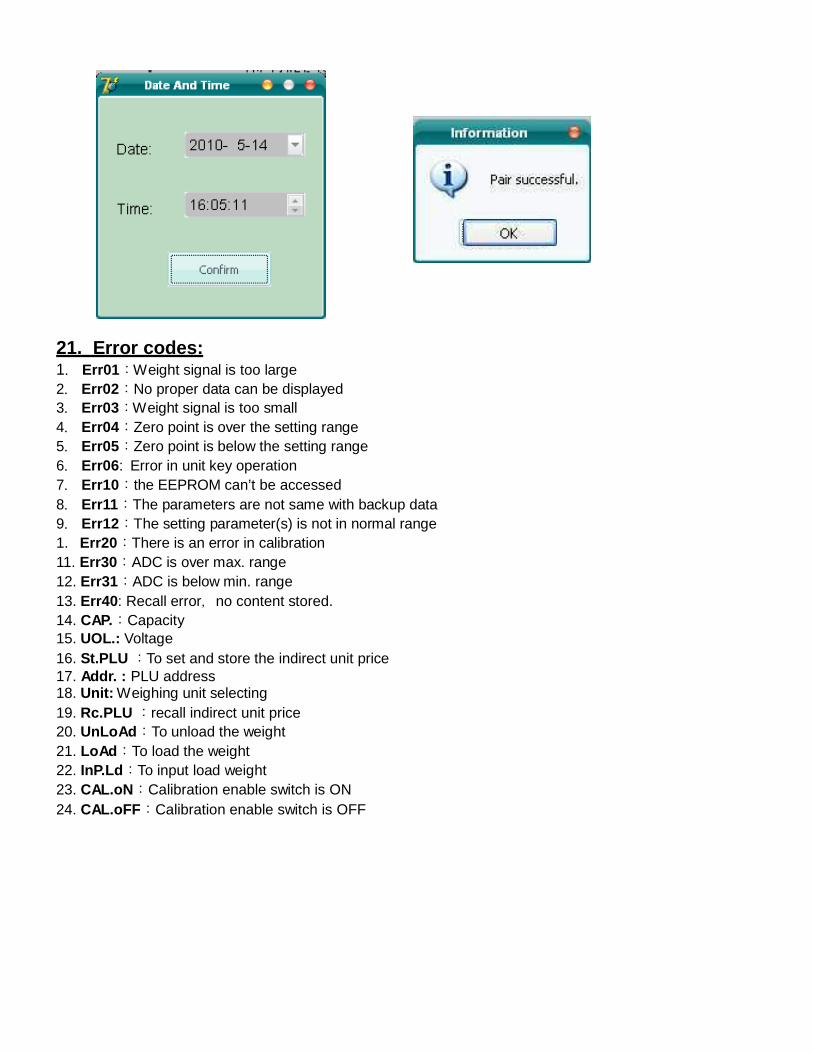
7. Date and Time setting
Choose ”Pair” in “Serial” menu to open the date and time setting dialogue box, it will
display the system clock of PC, press “Confirm” or exit the dialogue box directly. After
the software send date and time setting data to the scale, it will display “Pair
successful.”.
21. Error codes: 1. Err01:Weight signal is too large 2. Err02:No proper data can be displayed 3. Err03:Weight signal is too small 4. Err04:Zero point is over the setting range 5. Err05:Zero point is below the setting range 6. Err06 : Error in unit key operation 7. Err10:the EEPROM can’t be accessed 8. Err11:The parameters are not same with backup data 9. Err12:The setting parameter(s) is not in normal range 1. Err20:There is an error in calibration 11. Err30:ADC is over max. range 12. Err31:ADC is below min. range 13. Err40 : Recall error,no content stored. 14. CAP.:Capacity 15. UOL.: Voltage 16. St.PLU :To set and store the indirect unit price 17. Addr. : PLU address 18. Unit: Weighing unit selecting 19. Rc.PLU :recall indirect unit price 20. UnLoAd :To unload the weight 21. LoAd :To load the weight 22. InP.Ld:To input load weight 23. CAL.oN:Calibration enable switch is ON 24. CAL.oFF:Calibration enable switch is OFF
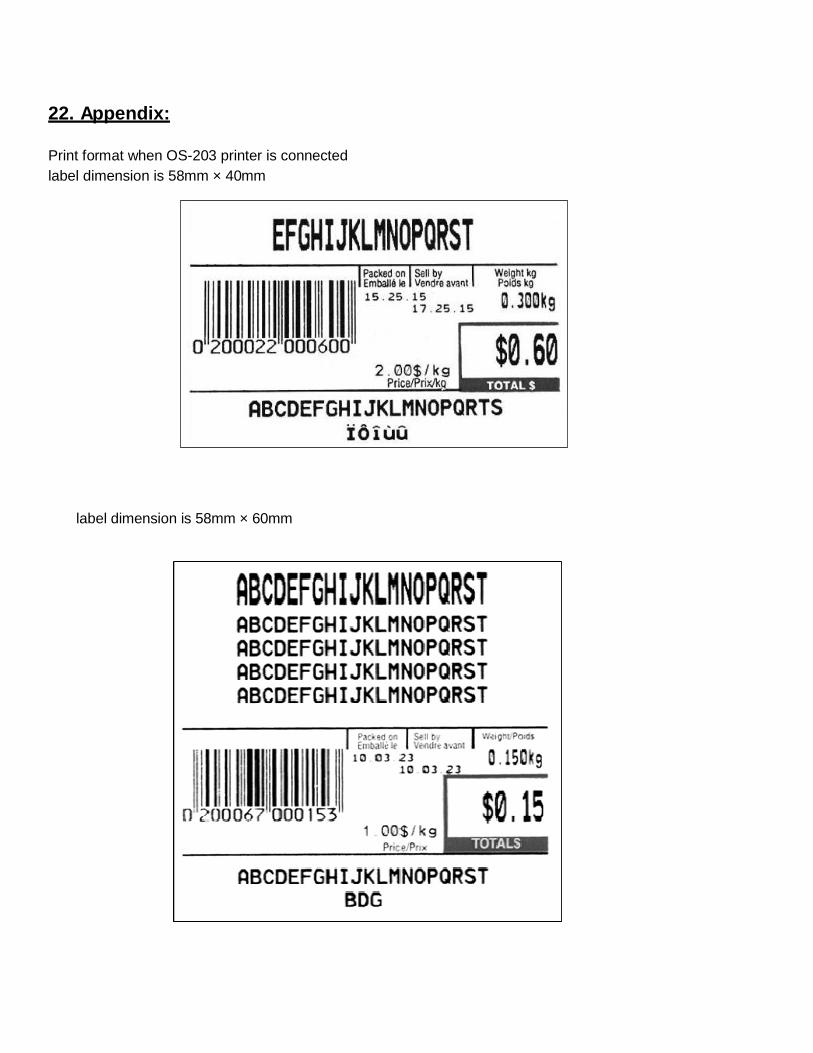
22. Appendix:
Print format when OS-203 printer is connected label dimension is 58mm × 40mm
label dimension is 58mm × 60mm
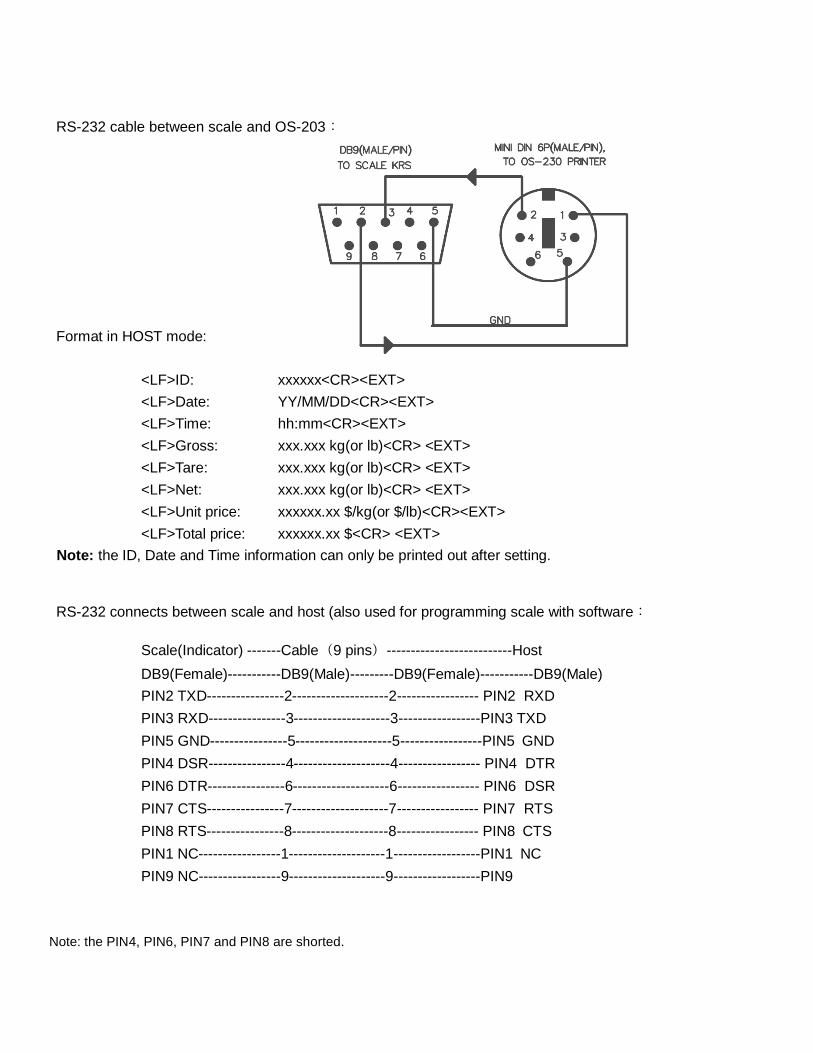
RS-232 cable between scale and OS-203: Format in HOST mode:
<LF>ID: xxxxxx<CR><EXT>
<LF>Date: YY/MM/DD<CR><EXT>
<LF>Time: hh:mm<CR><EXT>
<LF>Gross: xxx.xxx kg(or lb)<CR> <EXT>
<LF>Tare: xxx.xxx kg(or lb)<CR> <EXT>
<LF>Net: xxx.xxx kg(or lb)<CR> <EXT>
<LF>Unit price: xxxxxx.xx $/kg(or $/lb)<CR><EXT>
<LF>Total price: xxxxxx.xx $<CR> <EXT>
Note: the ID, Date and Time information can only be printed out after setting.
RS-232 connects between scale and host (also used for programming scale with software:
Scale(Indicator) -------Cable(9 pins)--------------------------Host
DB9(Female)-----------DB9(Male)---------DB9(Female)-----------DB9(Male)
PIN2 TXD----------------2--------------------2----------------- PIN2 RXD
PIN3 RXD----------------3--------------------3-----------------PIN3 TXD
PIN5 GND----------------5--------------------5-----------------PIN5 GND
PIN4 DSR----------------4--------------------4----------------- PIN4 DTR
PIN6 DTR----------------6--------------------6----------------- PIN6 DSR
PIN7 CTS----------------7--------------------7----------------- PIN7 RTS
PIN8 RTS----------------8--------------------8----------------- PIN8 CTS
PIN1 NC-----------------1--------------------1------------------PIN1 NC
PIN9 NC-----------------9--------------------9------------------PIN9
Note: the PIN4, PIN6, PIN7 and PIN8 are shorted.