Embed Size (px)
Citation preview
KidTraks Child Welfare Financial System
Request for Proposal (RFP) User Guide
Last Updated: 12/15/2010

KidTraks – RFP User Guide, Rev. 1 i
KidTraks – RFP User Guide Table of Contents
1.0 Introduction ..................................................................................... 1-1
2.0 View Listing of Contract Opportunities ............................................ 2-1
3.0 Attain Authorization to Create a Proposal ....................................... 3-1
3.1 Authorization for Existing KidTraks Vendors ................................................... 3-1
3.2 Authorization for Prospective KidTraks Vendors ............................................. 3-3
3.2.1 Prospective KidTraks Vendor Registration ............................................... 3-4
3.2.2 Update Registration Profile ....................................................................... 3-6
4.0 Online Proposal Forms and Attachments ........................................ 4-1
4.1 RFP Information Page ..................................................................................... 4-2
4.2 Proposal Information Page .............................................................................. 4-3
4.2.1 Basic Information Form ............................................................................. 4-4
4.2.1.1 Upload Provider/Basic Information Attachments ................................ 4-6
4.3 Selecting Applicable Services for Proposal ..................................................... 4-9
4.3.1 Proposed Services Form ........................................................................ 4-10
4.3.1.1 Component Code Table ................................................................... 4-11
4.3.1.2 County/Contact Table ...................................................................... 4-12
4.3.1.3 Upload Service Narrative Attachments ............................................ 4-16
4.3.1.4 Upload Budget Document Attachments ........................................... 4-18
4.3.1.5 Selecting Additional Services for Proposal ....................................... 4-21
4.4 Attachments Section of the Proposal Information Page ................................ 4-22
4.4.1 Deleting Supporting Documentation Attachments .................................. 4-25
5.0 Proposal Submission ...................................................................... 5-1
5.1 Eligible to Submit icon ..................................................................................... 5-2
5.2 Submission Errors ........................................................................................... 5-4
5.3 Successful Proposal Submission .................................................................... 5-6
5.4 Review Proposal Submission(s) ...................................................................... 5-7
6.0 Deleting Proposals .......................................................................... 6-1
7.0 Printing Proposals ........................................................................... 7-1
8.0 Tips and Tricks ............................................................................... 8-1
KidTraks – RFP User Guide, Rev. 1 1-1
1.0 INTRODUCTION
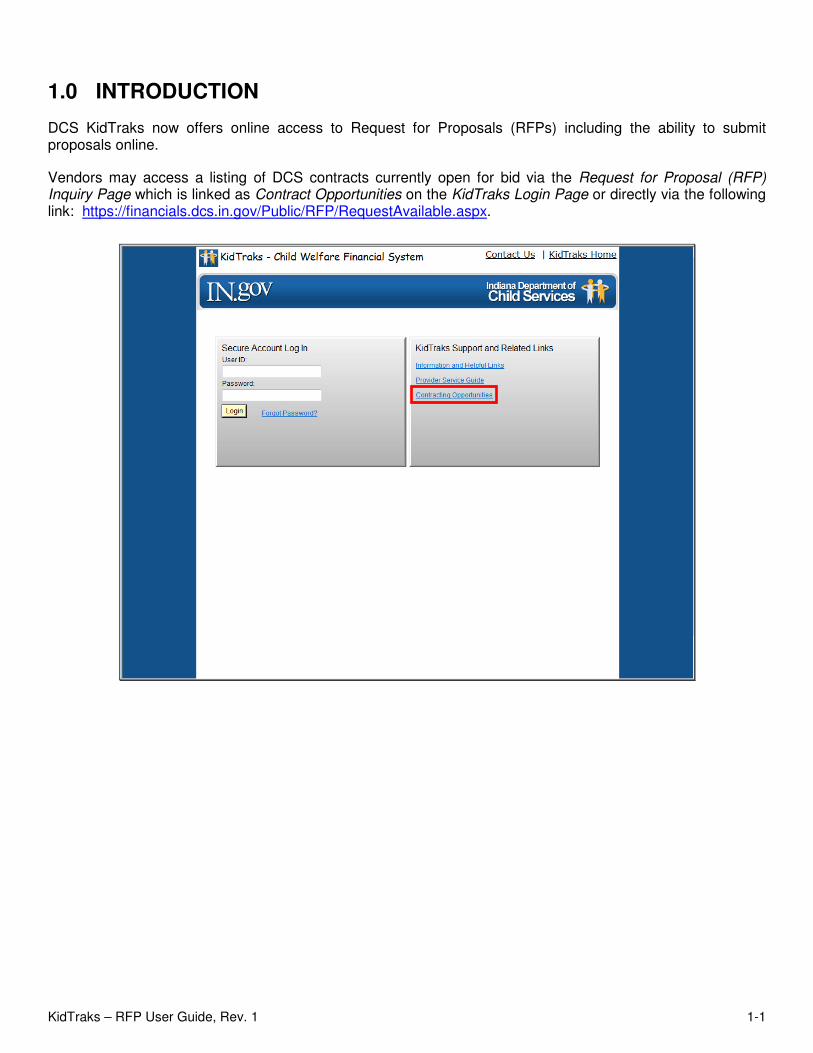
DCS KidTraks now offers online access to Request for Proposals (RFPs) including the ability to submit proposals online.
Vendors may access a listing of DCS contracts currently open for bid via the Request for Proposal (RFP) Inquiry Page which is linked as Contract Opportunities on the KidTraks Login Page or directly via the following link: https://financials.dcs.in.gov/Public/RFP/RequestAvailable.aspx.

KidTraks – RFP User Guide, Rev. 1 2-1
2.0 VIEW LISTING OF CONTRACT OPPORTUNITIES
To view the individual details for each RFP and to begin the online proposal submission process, click on the RFP ID which corresponds with the Title of interest. Also included in the RFP Table are contract Start Date, End Date, and Proposal Due Date columns. Note that each RFP has a Status indicating whether the RFP is Open for Bidding or Closed. Proposals may only be submitted for those RFPs that are designated as Open for Bidding.
KidTraks – RFP User Guide, Rev. 1 2-2
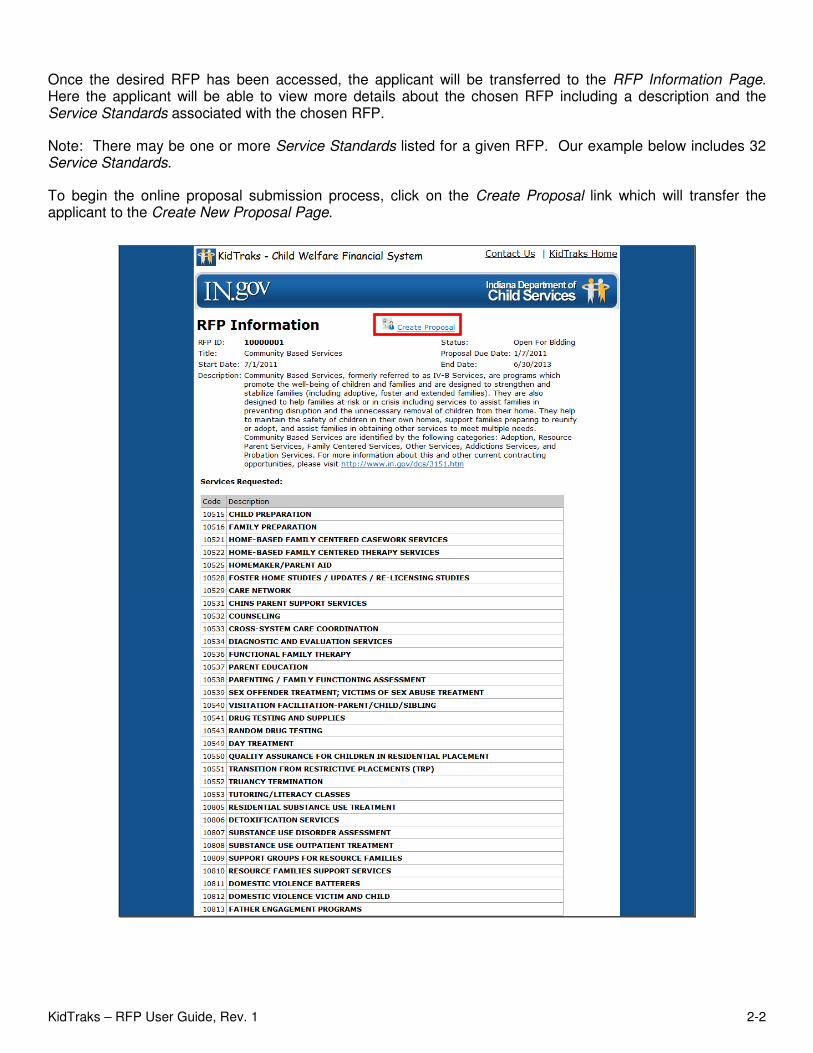
Once the desired RFP has been accessed, the applicant will be transferred to the RFP Information Page. Here the applicant will be able to view more details about the chosen RFP including a description and the Service Standards associated with the chosen RFP.
Note: There may be one or more Service Standards listed for a given RFP. Our example below includes 32 Service Standards.
To begin the online proposal submission process, click on the Create Proposal link which will transfer the applicant to the Create New Proposal Page.

KidTraks – RFP User Guide, Rev. 1 3-1
3.0 ATTAIN AUTHORIZATION TO CREATE A PROPOSAL
3.1 AUTHORIZATION FOR EXISTING KIDTRAKS VENDORS
From the Create New Proposal Page, applicants are required to identify whether they are an existing online KidTraks vendor, or if they need to register as a new user. In the below example, we illustrate the selection of an existing online KidTraks vendor.
KidTraks – RFP User Guide, Rev. 1 3-2
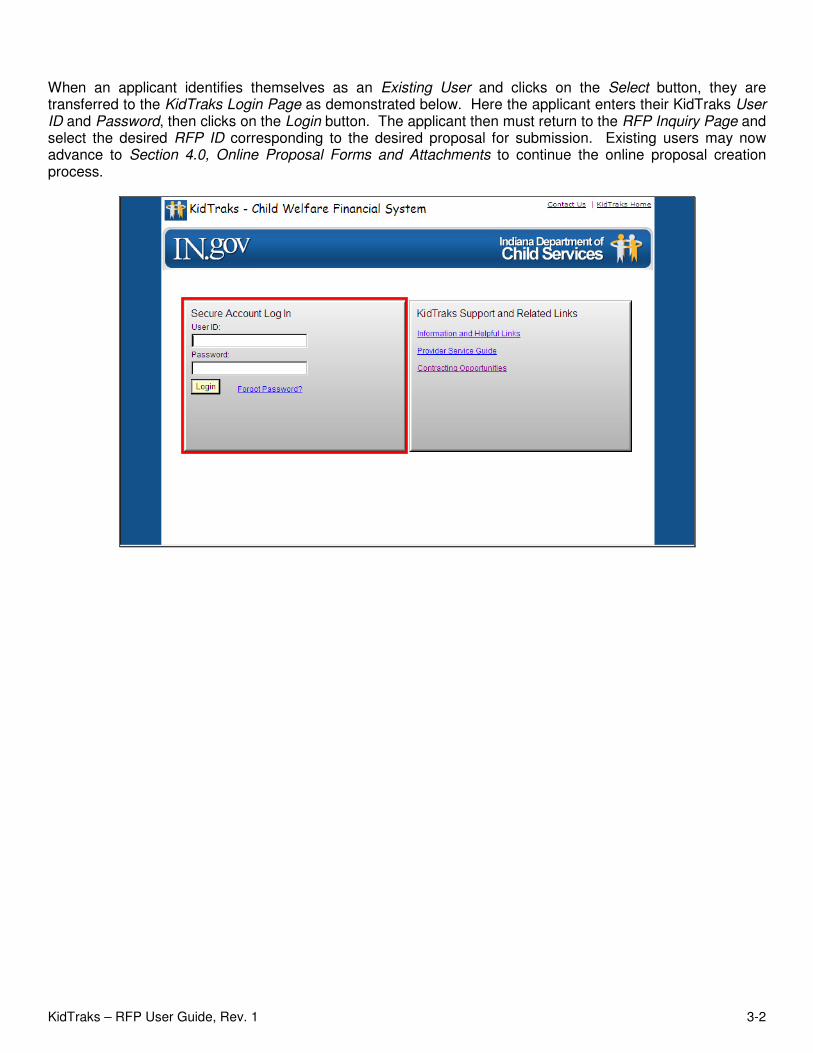
When an applicant identifies themselves as an Existing User and clicks on the Select button, they are transferred to the KidTraks Login Page as demonstrated below. Here the applicant enters their KidTraks User ID and Password, then clicks on the Login button. The applicant then must return to the RFP Inquiry Page and select the desired RFP ID corresponding to the desired proposal for submission. Existing users may now advance to Section 4.0, Online Proposal Forms and Attachments to continue the online proposal creation process.
KidTraks – RFP User Guide, Rev. 1 3-3
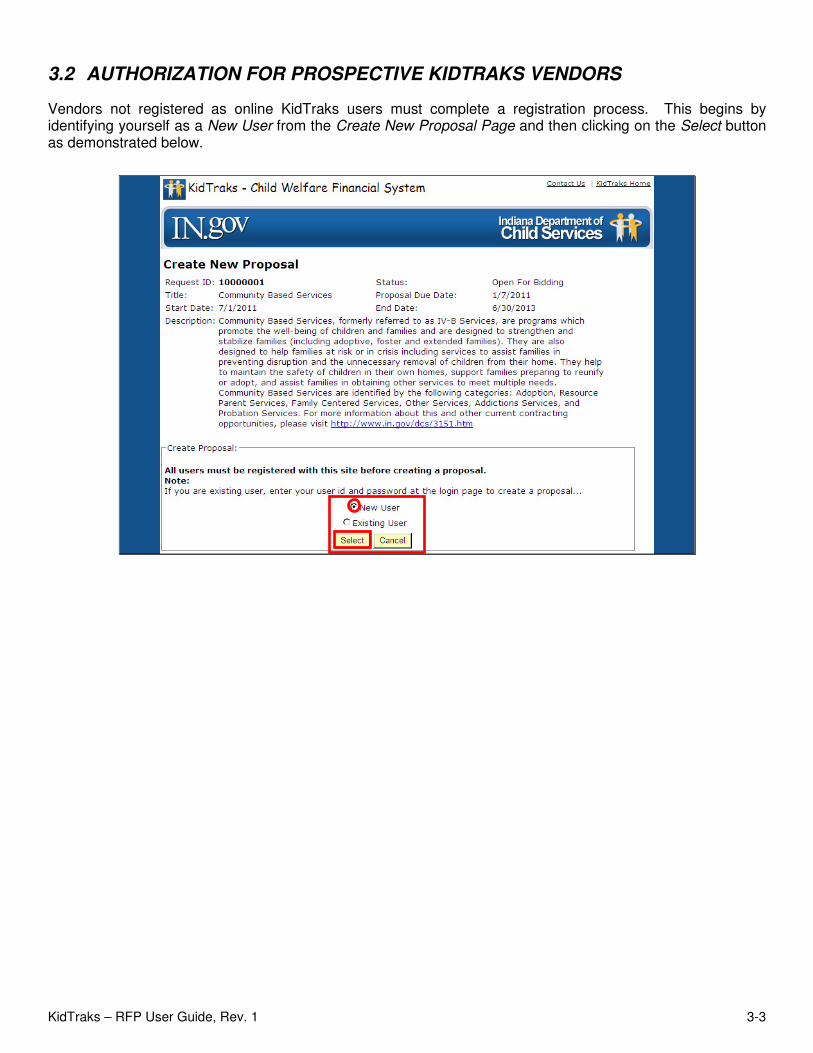
3.2 AUTHORIZATION FOR PROSPECTIVE KIDTRAKS VENDORS
Vendors not registered as online KidTraks users must complete a registration process. This begins by identifying yourself as a New User from the Create New Proposal Page and then clicking on the Select button as demonstrated below.
KidTraks – RFP User Guide, Rev. 1 3-4
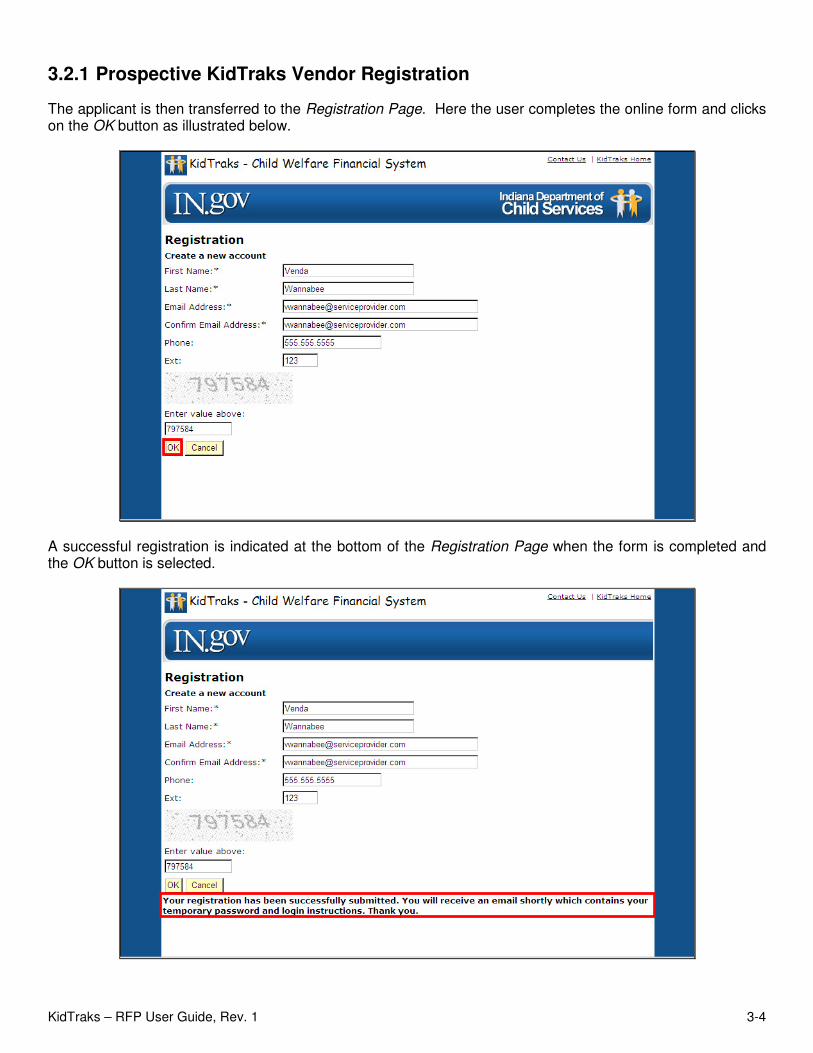
3.2.1 Prospective KidTraks Vendor Registration
The applicant is then transferred to the Registration Page. Here the user completes the online form and clicks on the OK button as illustrated below.
A successful registration is indicated at the bottom of the Registration Page when the form is completed and the OK button is selected.
KidTraks – RFP User Guide, Rev. 1 3-5
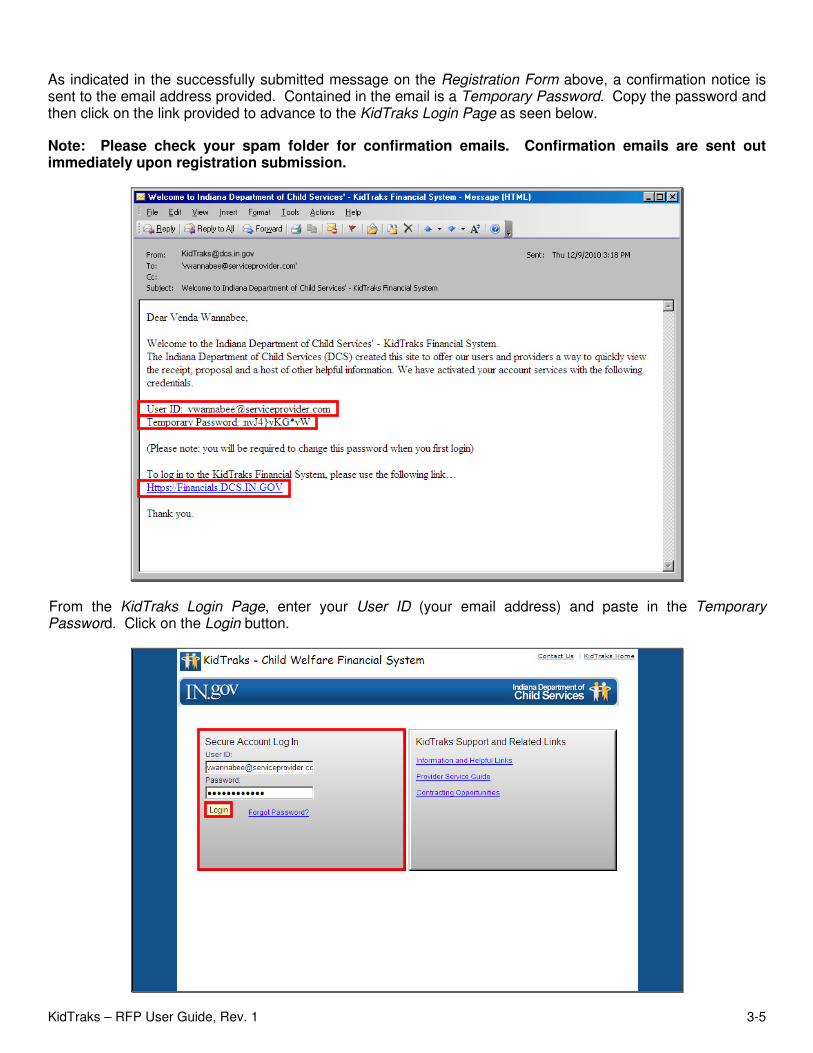
As indicated in the successfully submitted message on the Registration Form above, a confirmation notice is sent to the email address provided. Contained in the email is a Temporary Password. Copy the password and then click on the link provided to advance to the KidTraks Login Page as seen below.
Note: Please check your spam folder for confirmation emails. Confirmation emails are sent out immediately upon registration submission.
From the KidTraks Login Page, enter your User ID (your email address) and paste in the Temporary Password. Click on the Login button.
KidTraks – RFP User Guide, Rev. 1 3-6
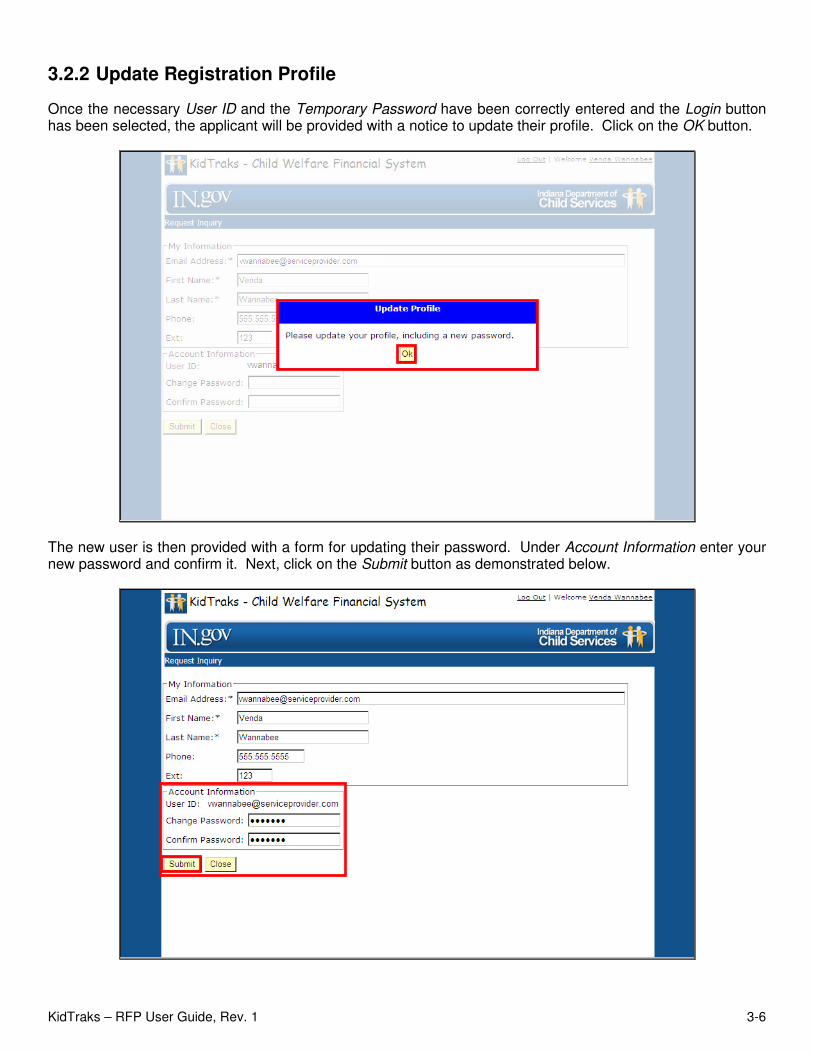
3.2.2 Update Registration Profile
Once the necessary User ID and the Temporary Password have been correctly entered and the Login button has been selected, the applicant will be provided with a notice to update their profile. Click on the OK button.
The new user is then provided with a form for updating their password. Under Account Information enter your new password and confirm it. Next, click on the Submit button as demonstrated below.
KidTraks – RFP User Guide, Rev. 1 3-7
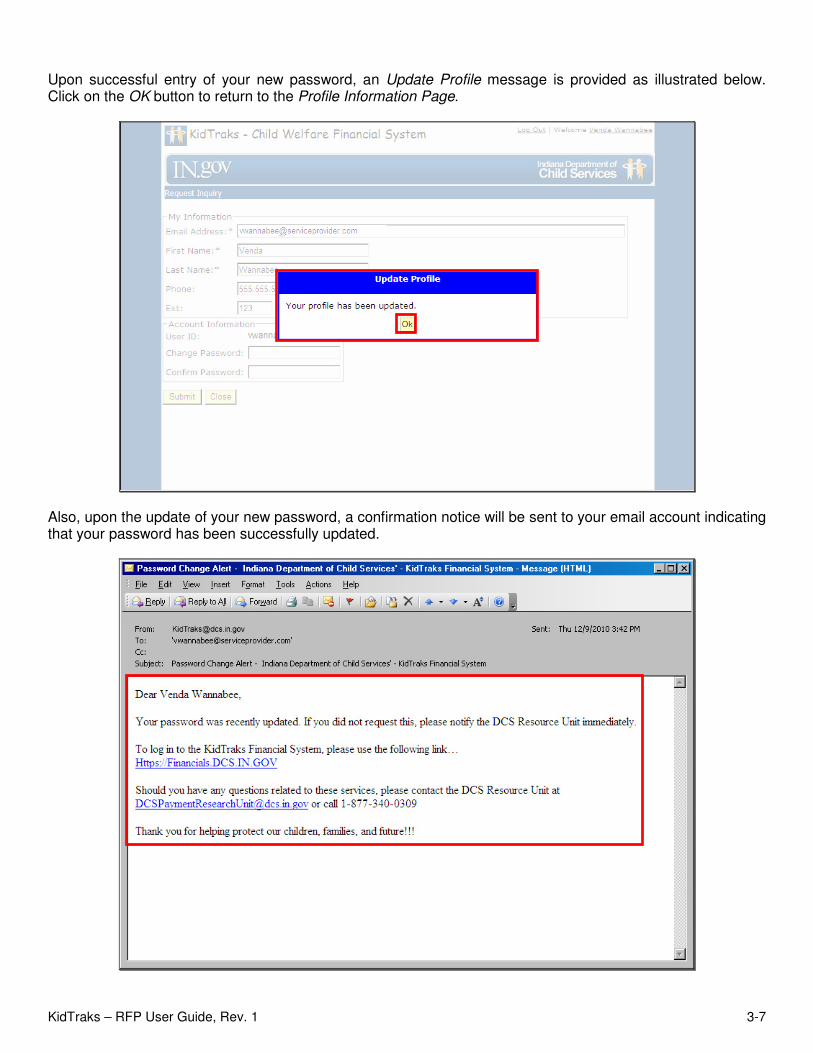
Upon successful entry of your new password, an Update Profile message is provided as illustrated below. Click on the OK button to return to the Profile Information Page.
Also, upon the update of your new password, a confirmation notice will be sent to your email account indicating that your password has been successfully updated.
KidTraks – RFP User Guide, Rev. 1 3-8
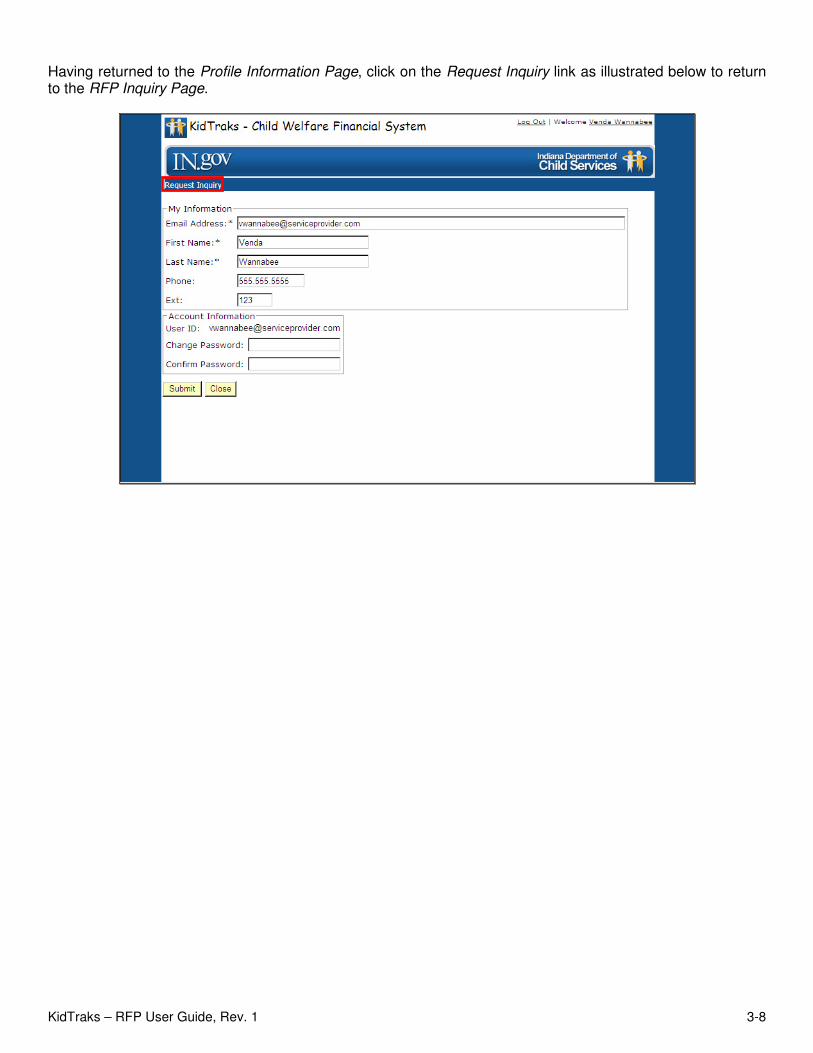
Having returned to the Profile Information Page, click on the Request Inquiry link as illustrated below to return to the RFP Inquiry Page.
KidTraks – RFP User Guide, Rev. 1 4-1
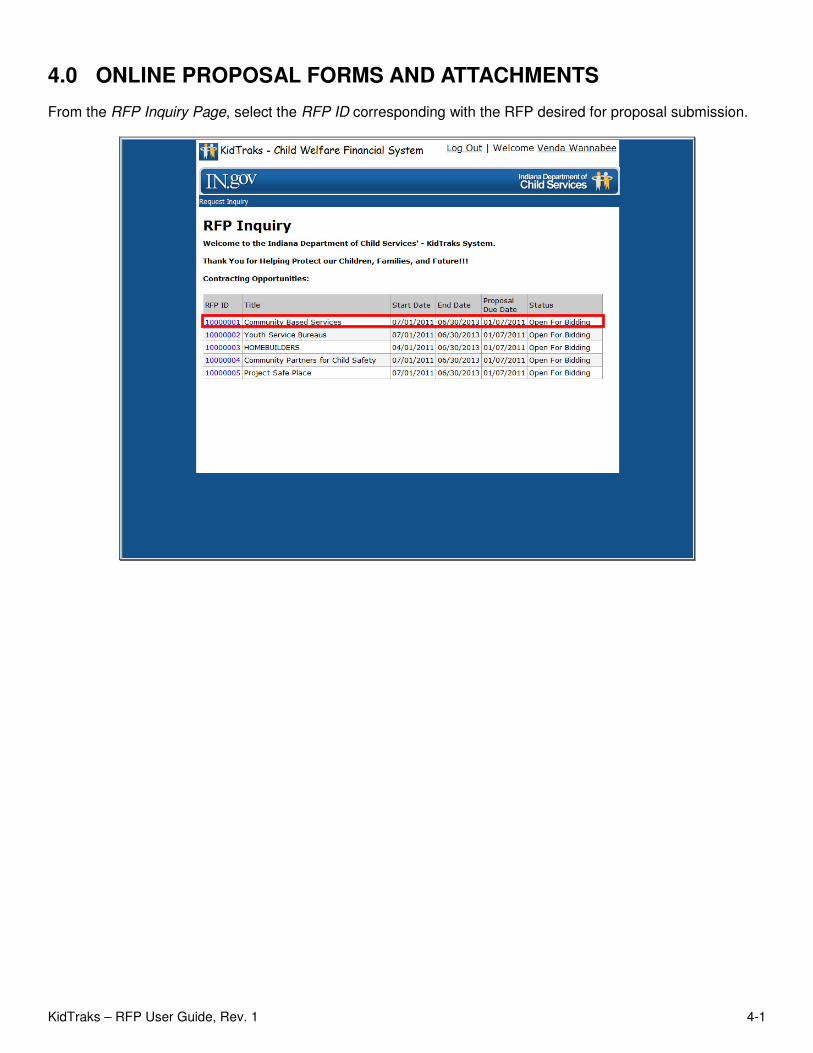
4.0 ONLINE PROPOSAL FORMS AND ATTACHMENTS
From the RFP Inquiry Page, select the RFP ID corresponding with the RFP desired for proposal submission.

KidTraks – RFP User Guide, Rev. 1 4-2
4.1 RFP INFORMATION PAGE
Having now logged on as a prospective vendor for the selected RFP, you will note that the RFP Information Page provides some additional information. There are two links provided: the RFP Inquiry and Create Proposal links. Also, the Service Standard(s) for the selected RFP are itemized. Please verify that the selected RFP is the one intended for proposal submission. If not, the RFP Inquiry link will return you to the previous RFP Inquiry Page. In the provided example of Community Based Services, we will begin to create the online proposal by clicking on the Create Proposal link.
KidTraks – RFP User Guide, Rev. 1 4-3
4.2 PROPOSAL INFORMATION PAGE
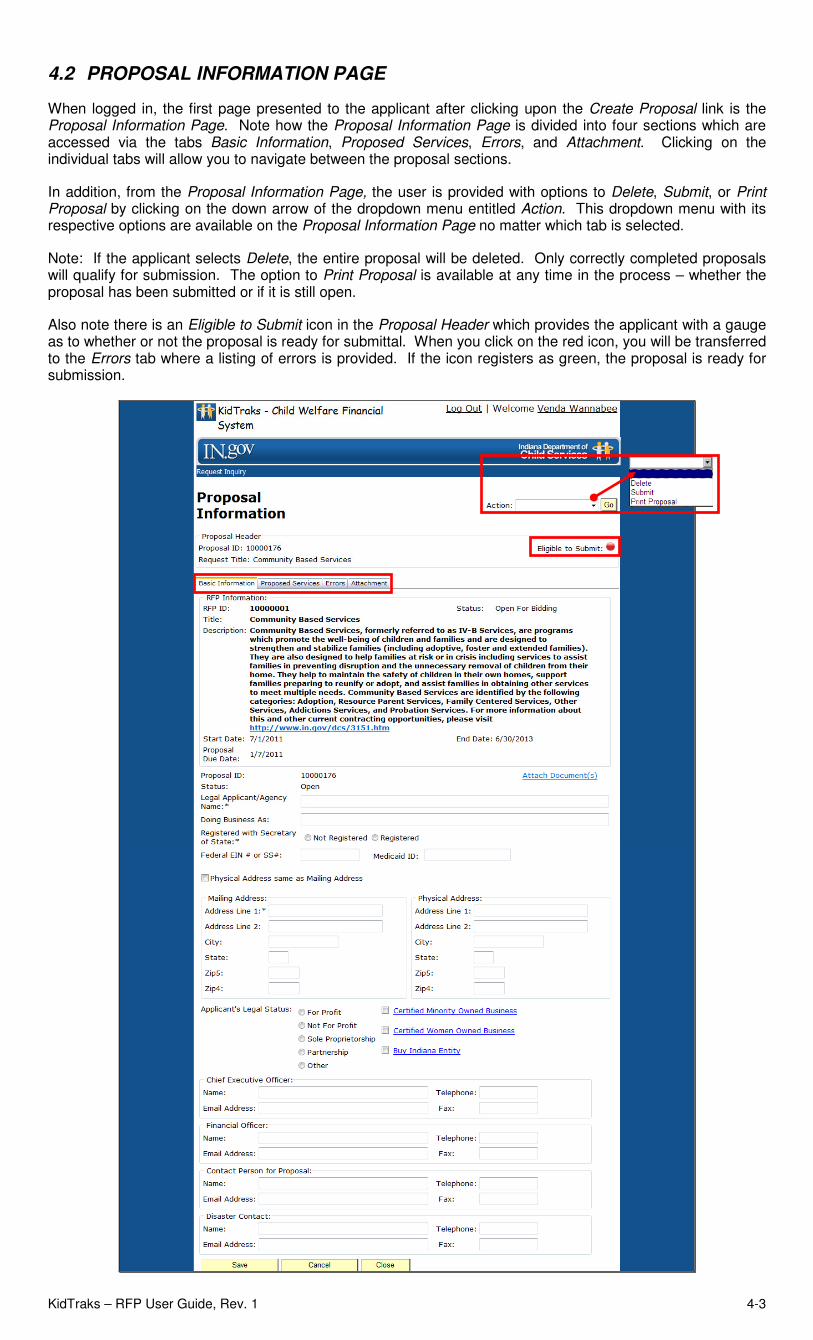
When logged in, the first page presented to the applicant after clicking upon the Create Proposal link is the Proposal Information Page. Note how the Proposal Information Page is divided into four sections which are accessed via the tabs Basic Information, Proposed Services, Errors, and Attachment. Clicking on the individual tabs will allow you to navigate between the proposal sections.
In addition, from the Proposal Information Page, the user is provided with options to Delete, Submit, or Print Proposal by clicking on the down arrow of the dropdown menu entitled Action. This dropdown menu with its respective options are available on the Proposal Information Page no matter which tab is selected.
Note: If the applicant selects Delete, the entire proposal will be deleted. Only correctly completed proposals will qualify for submission. The option to Print Proposal is available at any time in the process – whether the proposal has been submitted or if it is still open.
Also note there is an Eligible to Submit icon in the Proposal Header which provides the applicant with a gauge as to whether or not the proposal is ready for submittal. When you click on the red icon, you will be transferred to the Errors tab where a listing of errors is provided. If the icon registers as green, the proposal is ready for submission.
KidTraks – RFP User Guide, Rev. 1 4-4
4.2.1 Basic Information Form
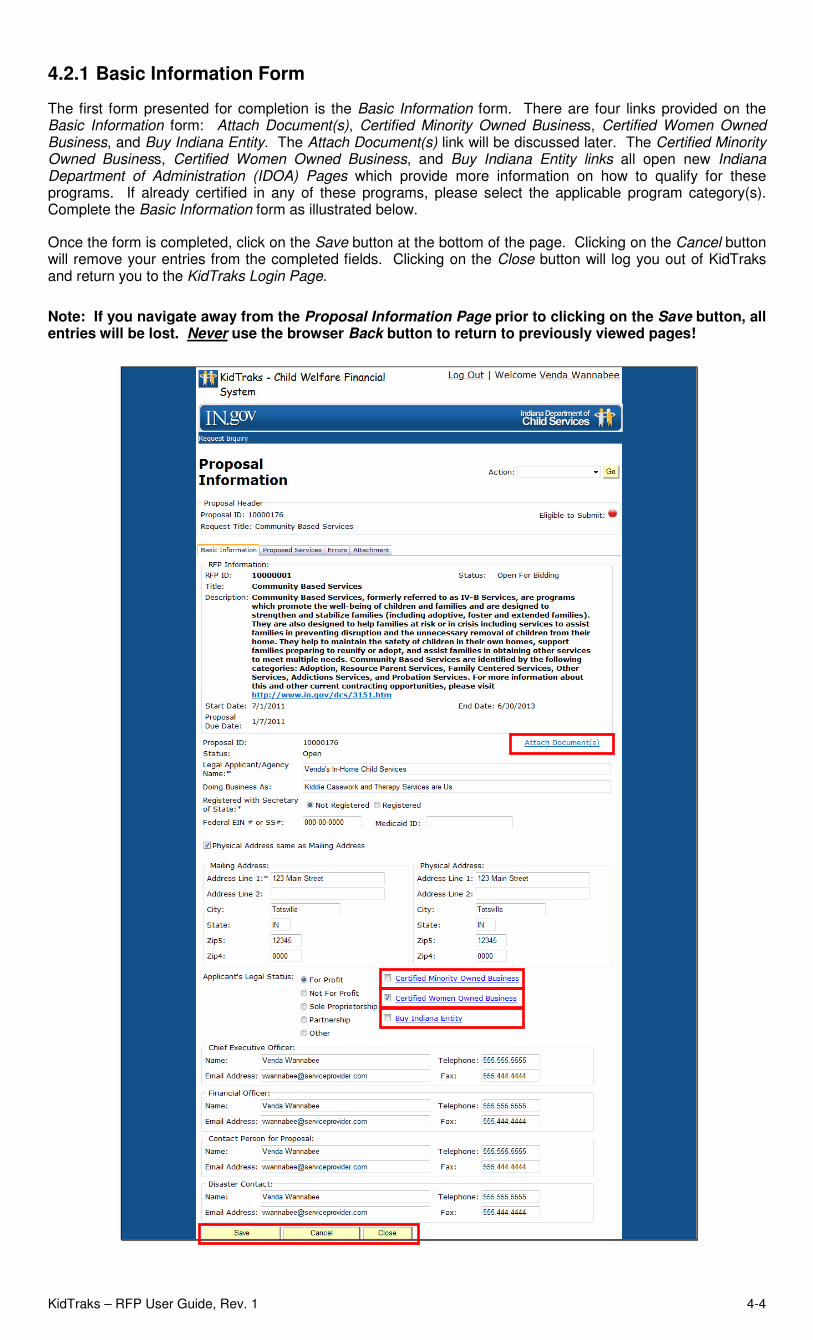
The first form presented for completion is the Basic Information form. There are four links provided on the Basic Information form: Attach Document(s), Certified Minority Owned Business, Certified Women Owned Business, and Buy Indiana Entity. The Attach Document(s) link will be discussed later. The Certified Minority Owned Business, Certified Women Owned Business, and Buy Indiana Entity links all open new Indiana Department of Administration (IDOA) Pages which provide more information on how to qualify for these programs. If already certified in any of these programs, please select the applicable program category(s). Complete the Basic Information form as illustrated below.
Once the form is completed, click on the Save button at the bottom of the page. Clicking on the Cancel button will remove your entries from the completed fields. Clicking on the Close button will log you out of KidTraks and return you to the KidTraks Login Page.
Note: If you navigate away from the Proposal Information Page prior to clicking on the Save button, all entries will be lost. Never use the browser Back button to return to previously viewed pages!
KidTraks – RFP User Guide, Rev. 1 4-5
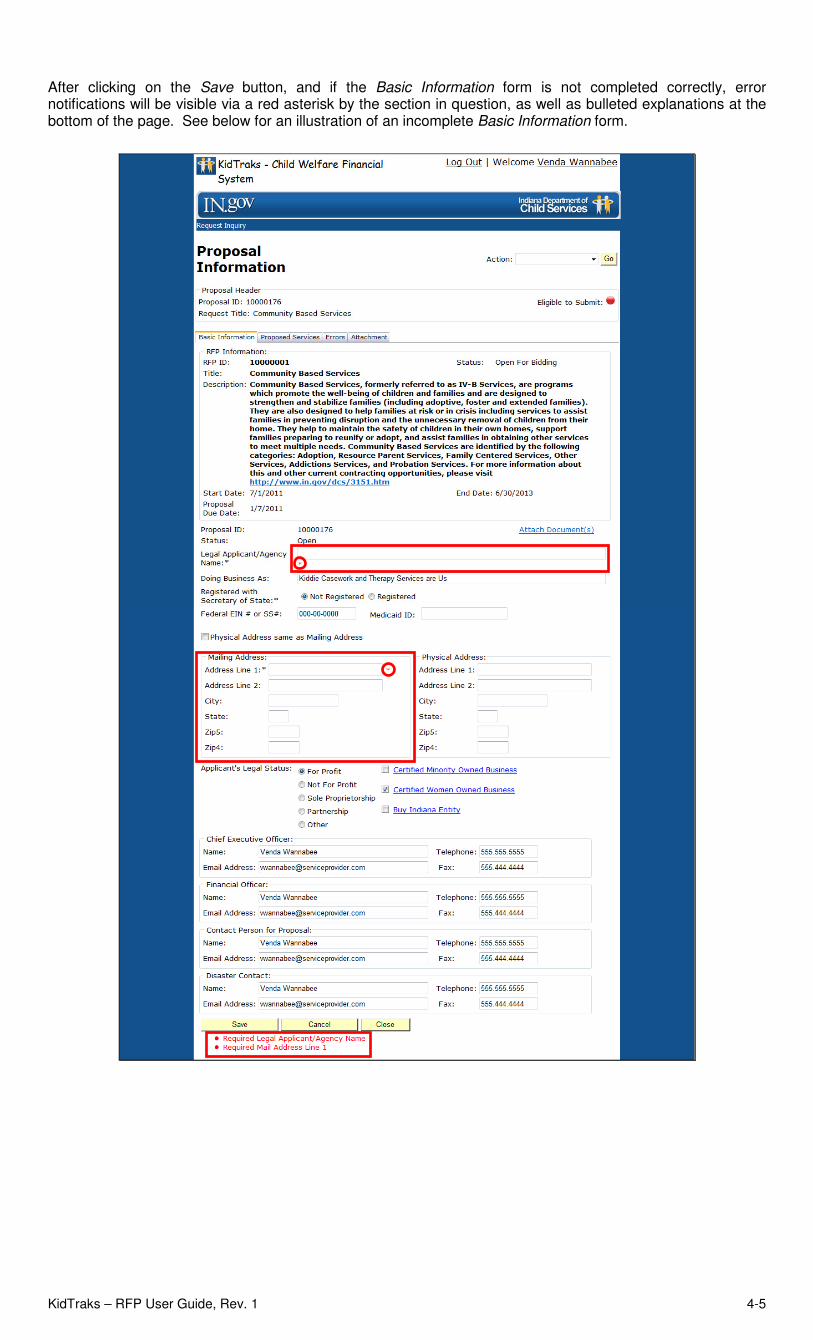
After clicking on the Save button, and if the Basic Information form is not completed correctly, error notifications will be visible via a red asterisk by the section in question, as well as bulleted explanations at the bottom of the page. See below for an illustration of an incomplete Basic Information form.
KidTraks – RFP User Guide, Rev. 1 4-6
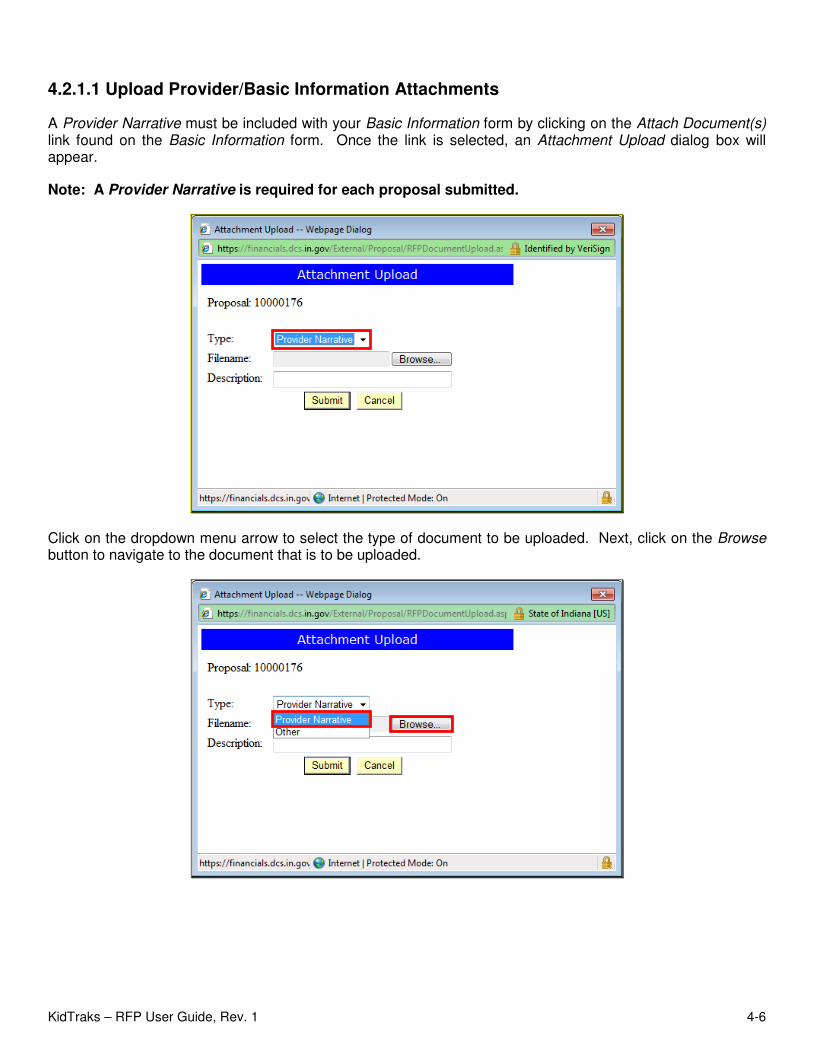
4.2.1.1 Upload Provider/Basic Information Attachments
A Provider Narrative must be included with your Basic Information form by clicking on the Attach Document(s) link found on the Basic Information form. Once the link is selected, an Attachment Upload dialog box will appear.
Note: A Provider Narrative is required for each proposal submitted.
Click on the dropdown menu arrow to select the type of document to be uploaded. Next, click on the Browse button to navigate to the document that is to be uploaded.
KidTraks – RFP User Guide, Rev. 1 4-7
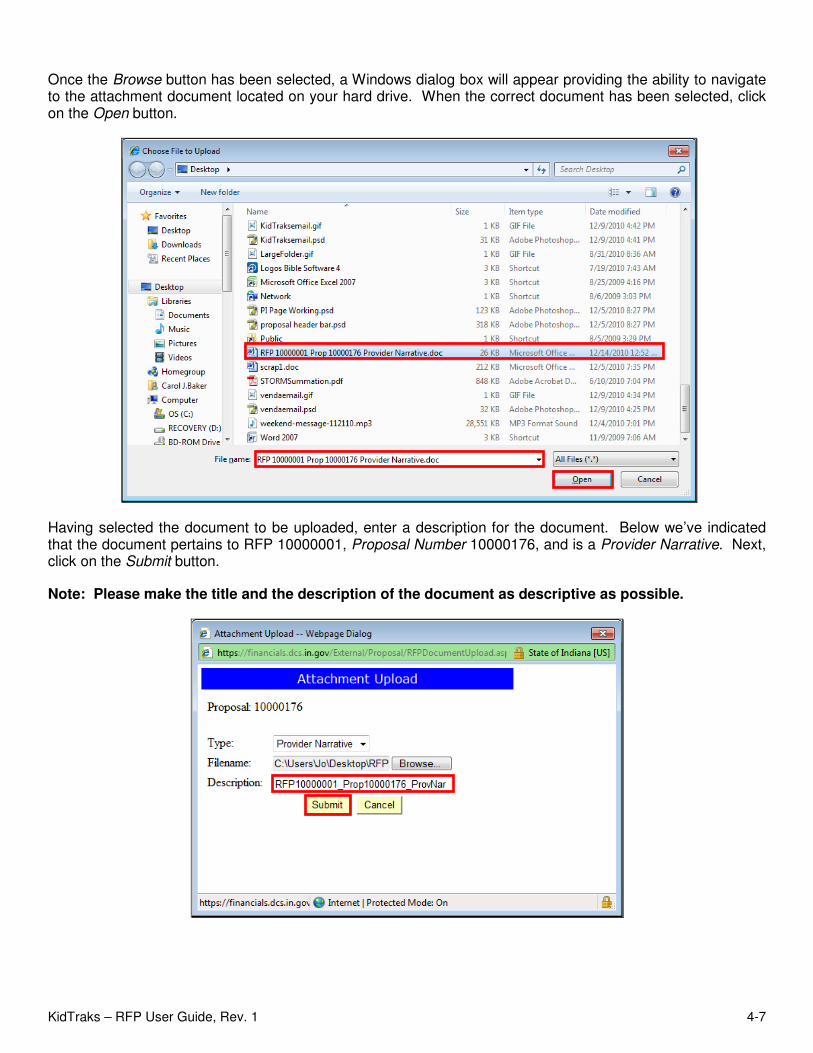
Once the Browse button has been selected, a Windows dialog box will appear providing the ability to navigate to the attachment document located on your hard drive. When the correct document has been selected, click on the Open button.
Having selected the document to be uploaded, enter a description for the document. Below we’ve indicated that the document pertains to RFP 10000001, Proposal Number 10000176, and is a Provider Narrative. Next, click on the Submit button.
Note: Please make the title and the description of the document as descriptive as possible.
KidTraks – RFP User Guide, Rev. 1 4-8
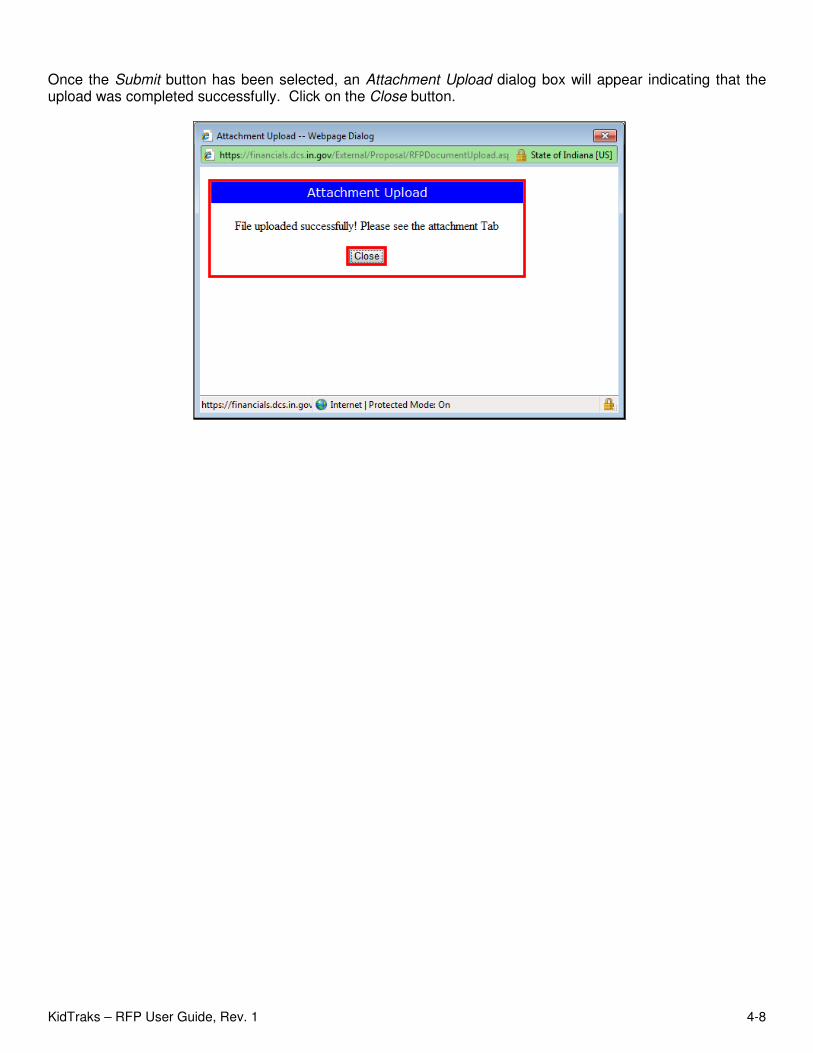
Once the Submit button has been selected, an Attachment Upload dialog box will appear indicating that the upload was completed successfully. Click on the Close button.
KidTraks – RFP User Guide, Rev. 1 4-9
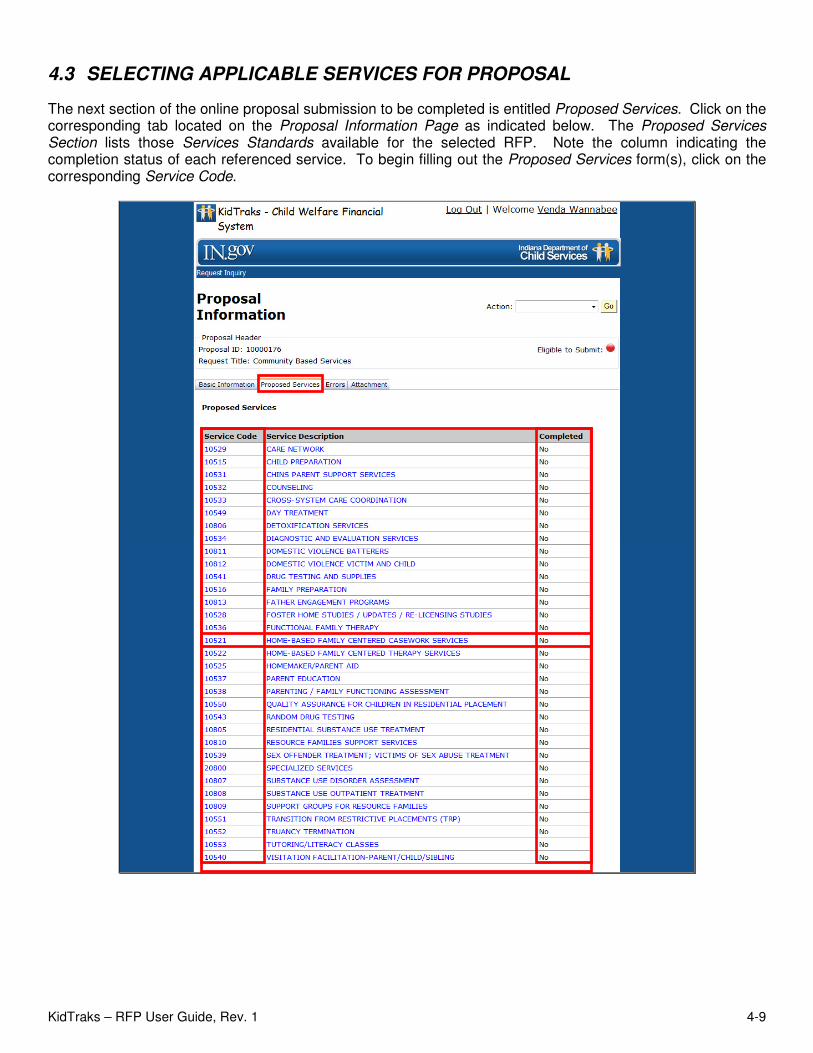
4.3 SELECTING APPLICABLE SERVICES FOR PROPOSAL
The next section of the online proposal submission to be completed is entitled Proposed Services. Click on the corresponding tab located on the Proposal Information Page as indicated below. The Proposed Services Section lists those Services Standards available for the selected RFP. Note the column indicating the completion status of each referenced service. To begin filling out the Proposed Services form(s), click on the corresponding Service Code.
KidTraks – RFP User Guide, Rev. 1 4-10
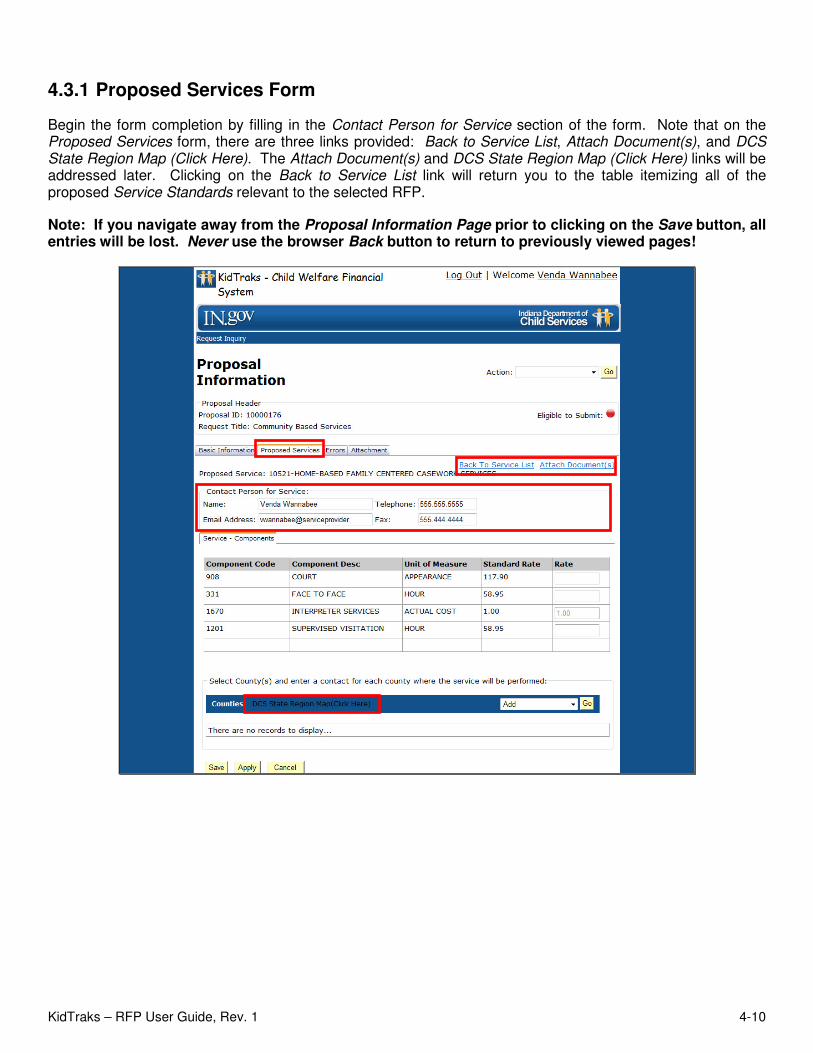
4.3.1 Proposed Services Form
Begin the form completion by filling in the Contact Person for Service section of the form. Note that on the Proposed Services form, there are three links provided: Back to Service List, Attach Document(s), and DCS State Region Map (Click Here). The Attach Document(s) and DCS State Region Map (Click Here) links will be addressed later. Clicking on the Back to Service List link will return you to the table itemizing all of the proposed Service Standards relevant to the selected RFP.
Note: If you navigate away from the Proposal Information Page prior to clicking on the Save button, all entries will be lost. Never use the browser Back button to return to previously viewed pages!
KidTraks – RFP User Guide, Rev. 1 4-11
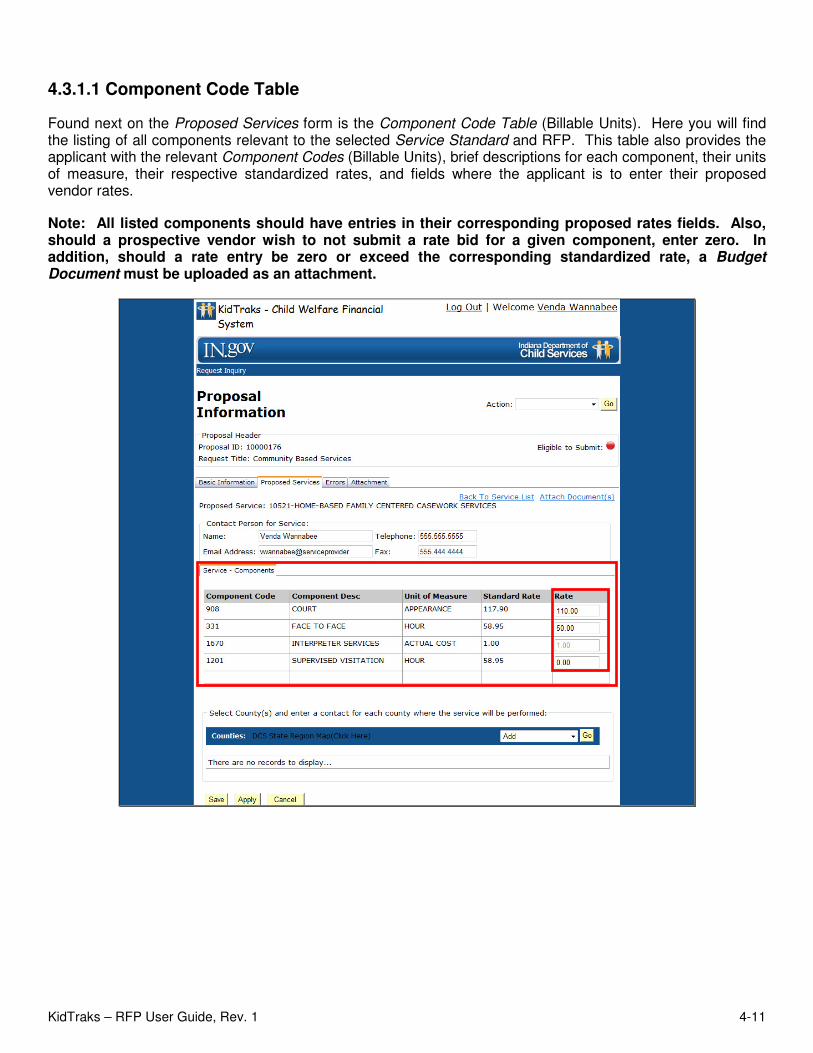
4.3.1.1 Component Code Table
Found next on the Proposed Services form is the Component Code Table (Billable Units). Here you will find the listing of all components relevant to the selected Service Standard and RFP. This table also provides the applicant with the relevant Component Codes (Billable Units), brief descriptions for each component, their units of measure, their respective standardized rates, and fields where the applicant is to enter their proposed vendor rates.
Note: All listed components should have entries in their corresponding proposed rates fields. Also, should a prospective vendor wish to not submit a rate bid for a given component, enter zero. In addition, should a rate entry be zero or exceed the corresponding standardized rate, a Budget Document must be uploaded as an attachment.
KidTraks – RFP User Guide, Rev. 1 4-12
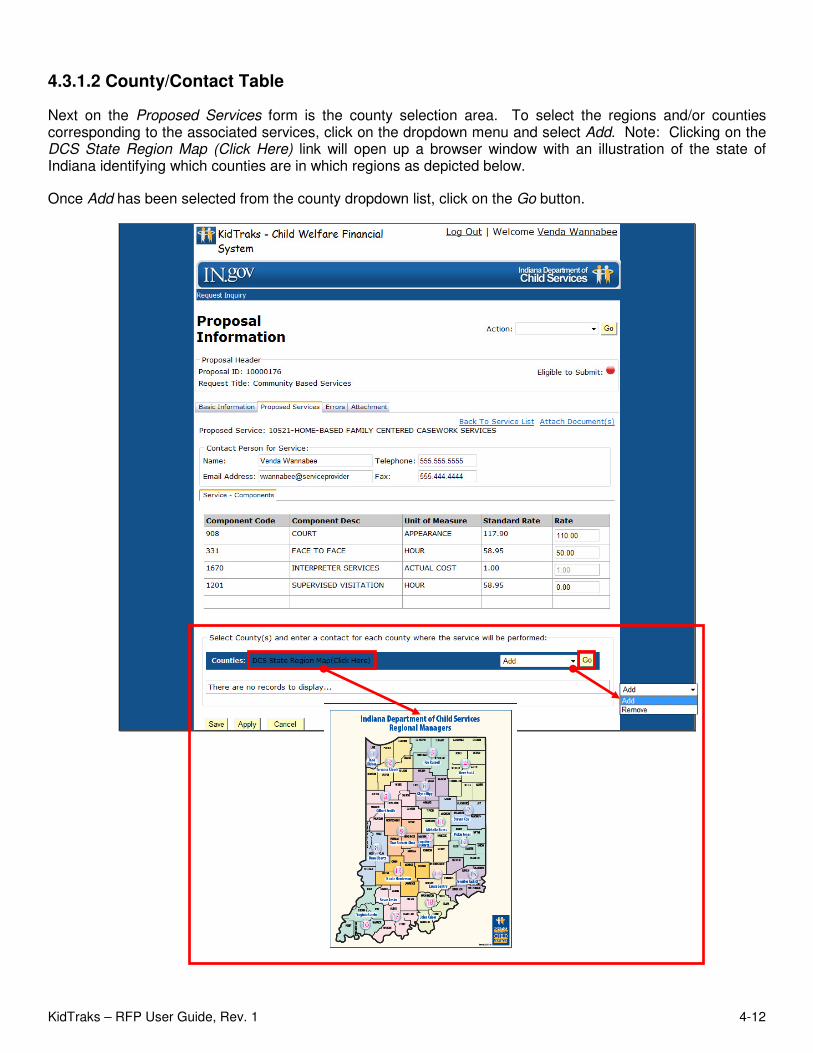
4.3.1.2 County/Contact Table
Next on the Proposed Services form is the county selection area. To select the regions and/or counties corresponding to the associated services, click on the dropdown menu and select Add. Note: Clicking on the DCS State Region Map (Click Here) link will open up a browser window with an illustration of the state of Indiana identifying which counties are in which regions as depicted below.
Once Add has been selected from the county dropdown list, click on the Go button.
KidTraks – RFP User Guide, Rev. 1 4-13
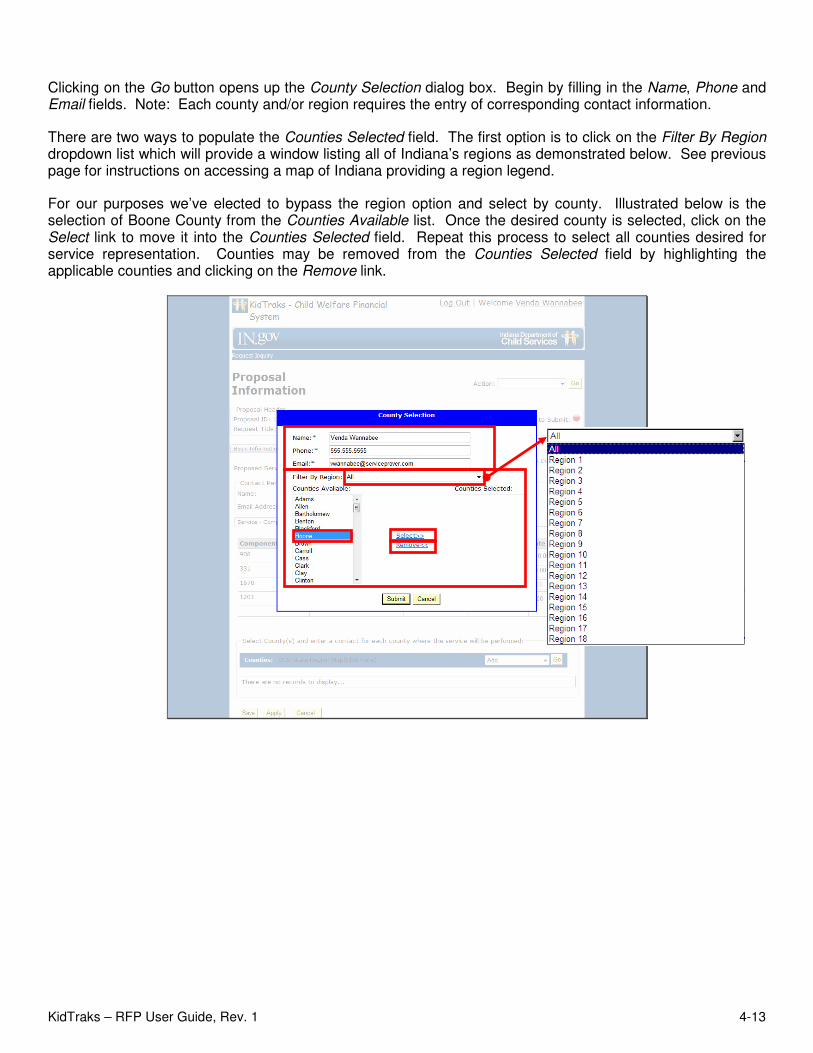
Clicking on the Go button opens up the County Selection dialog box. Begin by filling in the Name, Phone and Email fields. Note: Each county and/or region requires the entry of corresponding contact information.
There are two ways to populate the Counties Selected field. The first option is to click on the Filter By Region dropdown list which will provide a window listing all of Indiana’s regions as demonstrated below. See previous page for instructions on accessing a map of Indiana providing a region legend.
For our purposes we’ve elected to bypass the region option and select by county. Illustrated below is the selection of Boone County from the Counties Available list. Once the desired county is selected, click on the Select link to move it into the Counties Selected field. Repeat this process to select all counties desired for service representation. Counties may be removed from the Counties Selected field by highlighting the applicable counties and clicking on the Remove link.
KidTraks – RFP User Guide, Rev. 1 4-14
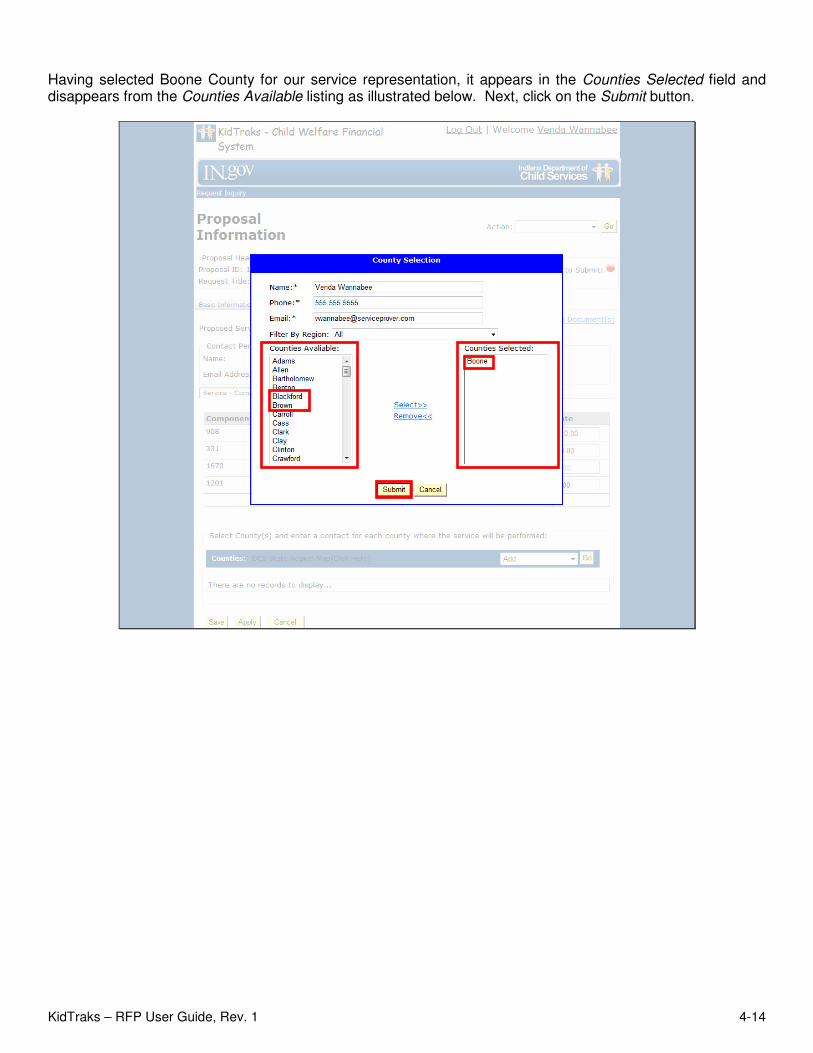
Having selected Boone County for our service representation, it appears in the Counties Selected field and disappears from the Counties Available listing as illustrated below. Next, click on the Submit button.
KidTraks – RFP User Guide, Rev. 1 4-15
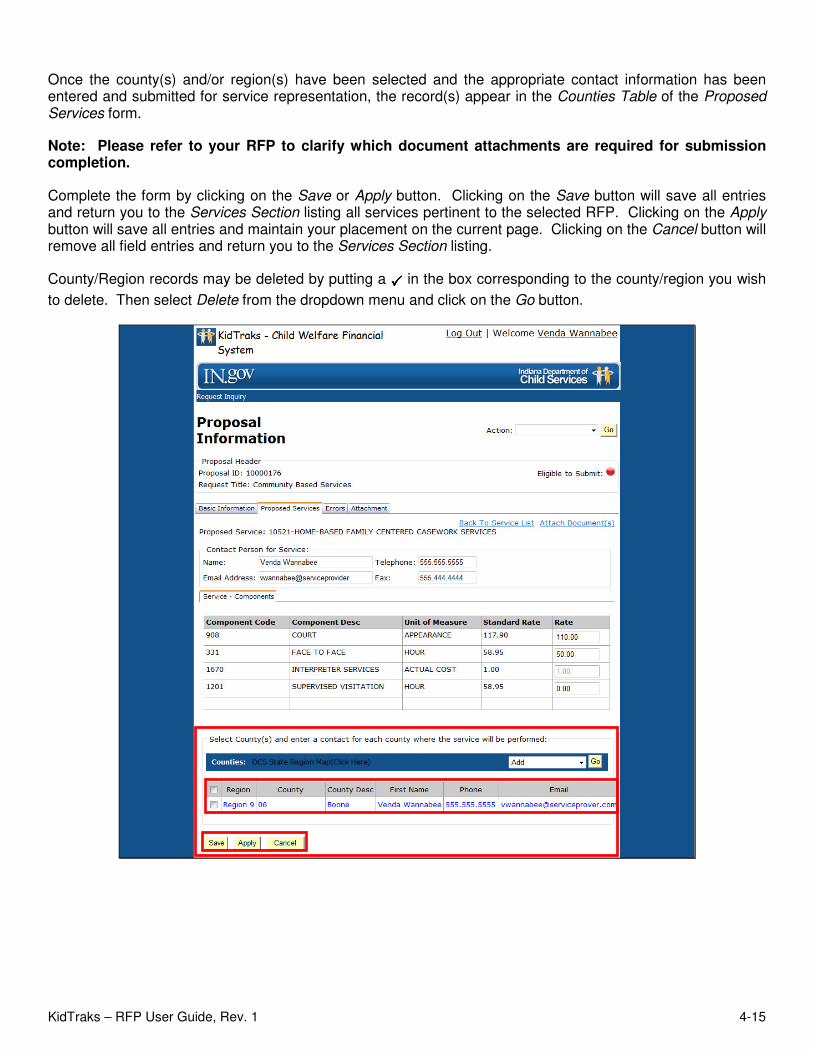
Once the county(s) and/or region(s) have been selected and the appropriate contact information has been entered and submitted for service representation, the record(s) appear in the Counties Table of the Proposed Services form.
Note: Please refer to your RFP to clarify which document attachments are required for submission completion.
Complete the form by clicking on the Save or Apply button. Clicking on the Save button will save all entries and return you to the Services Section listing all services pertinent to the selected RFP. Clicking on the Apply button will save all entries and maintain your placement on the current page. Clicking on the Cancel button will remove all field entries and return you to the Services Section listing.
County/Region records may be deleted by putting a ���� in the box corresponding to the county/region you wish
to delete. Then select Delete from the dropdown menu and click on the Go button.
KidTraks – RFP User Guide, Rev. 1 4-16
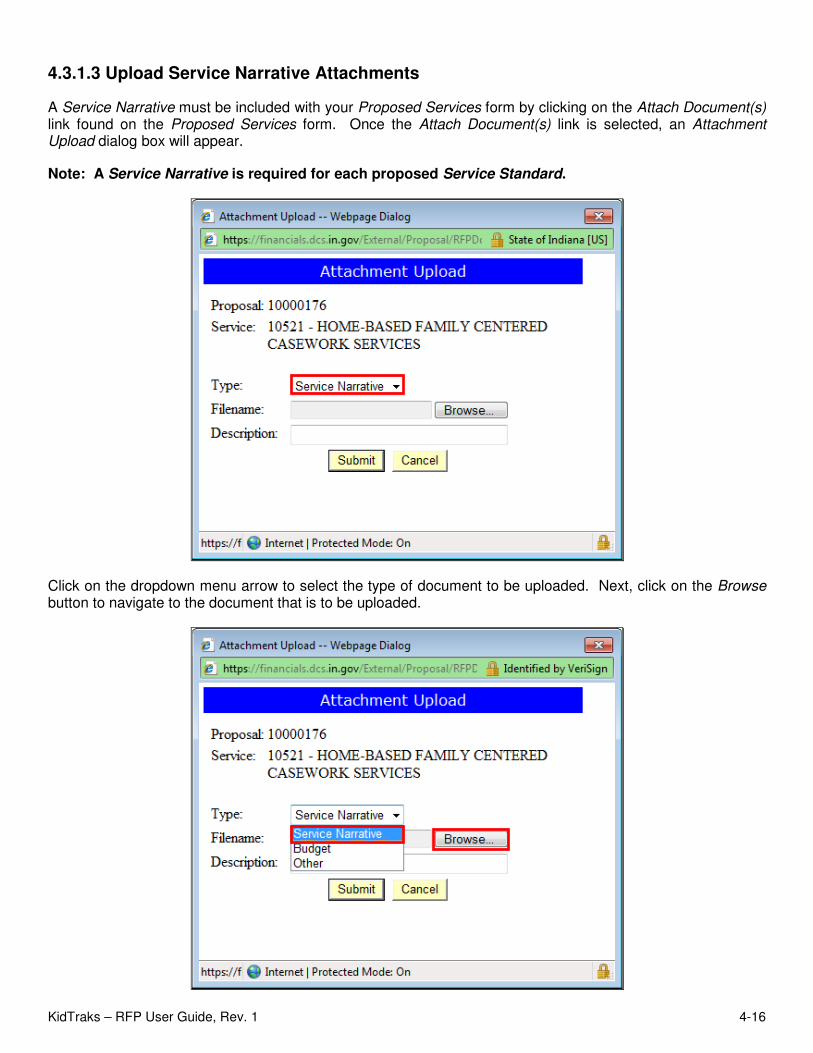
4.3.1.3 Upload Service Narrative Attachments
A Service Narrative must be included with your Proposed Services form by clicking on the Attach Document(s) link found on the Proposed Services form. Once the Attach Document(s) link is selected, an Attachment Upload dialog box will appear.
Note: A Service Narrative is required for each proposed Service Standard.
Click on the dropdown menu arrow to select the type of document to be uploaded. Next, click on the Browse button to navigate to the document that is to be uploaded.
KidTraks – RFP User Guide, Rev. 1 4-17
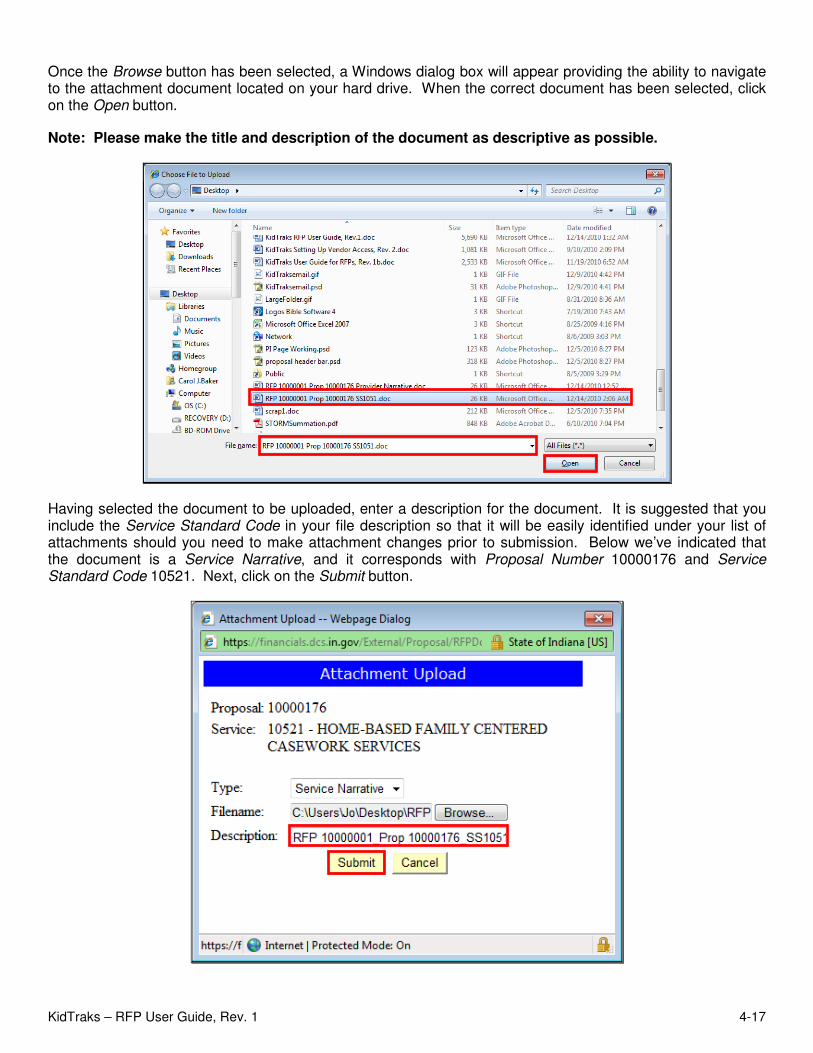
Once the Browse button has been selected, a Windows dialog box will appear providing the ability to navigate to the attachment document located on your hard drive. When the correct document has been selected, click on the Open button.
Note: Please make the title and description of the document as descriptive as possible.
Having selected the document to be uploaded, enter a description for the document. It is suggested that you include the Service Standard Code in your file description so that it will be easily identified under your list of attachments should you need to make attachment changes prior to submission. Below we’ve indicated that the document is a Service Narrative, and it corresponds with Proposal Number 10000176 and Service Standard Code 10521. Next, click on the Submit button.
KidTraks – RFP User Guide, Rev. 1 4-18
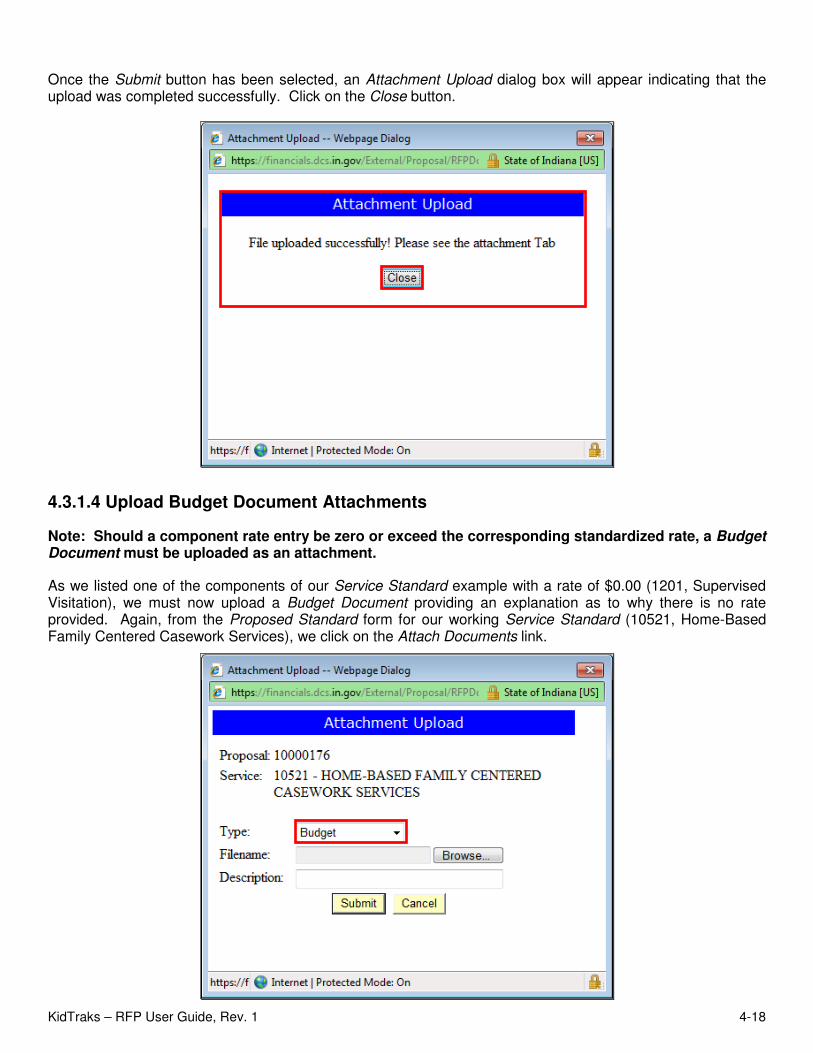
Once the Submit button has been selected, an Attachment Upload dialog box will appear indicating that the upload was completed successfully. Click on the Close button.
4.3.1.4 Upload Budget Document Attachments
Note: Should a component rate entry be zero or exceed the corresponding standardized rate, a Budget Document must be uploaded as an attachment.
As we listed one of the components of our Service Standard example with a rate of $0.00 (1201, Supervised Visitation), we must now upload a Budget Document providing an explanation as to why there is no rate provided. Again, from the Proposed Standard form for our working Service Standard (10521, Home-Based Family Centered Casework Services), we click on the Attach Documents link.
KidTraks – RFP User Guide, Rev. 1 4-19
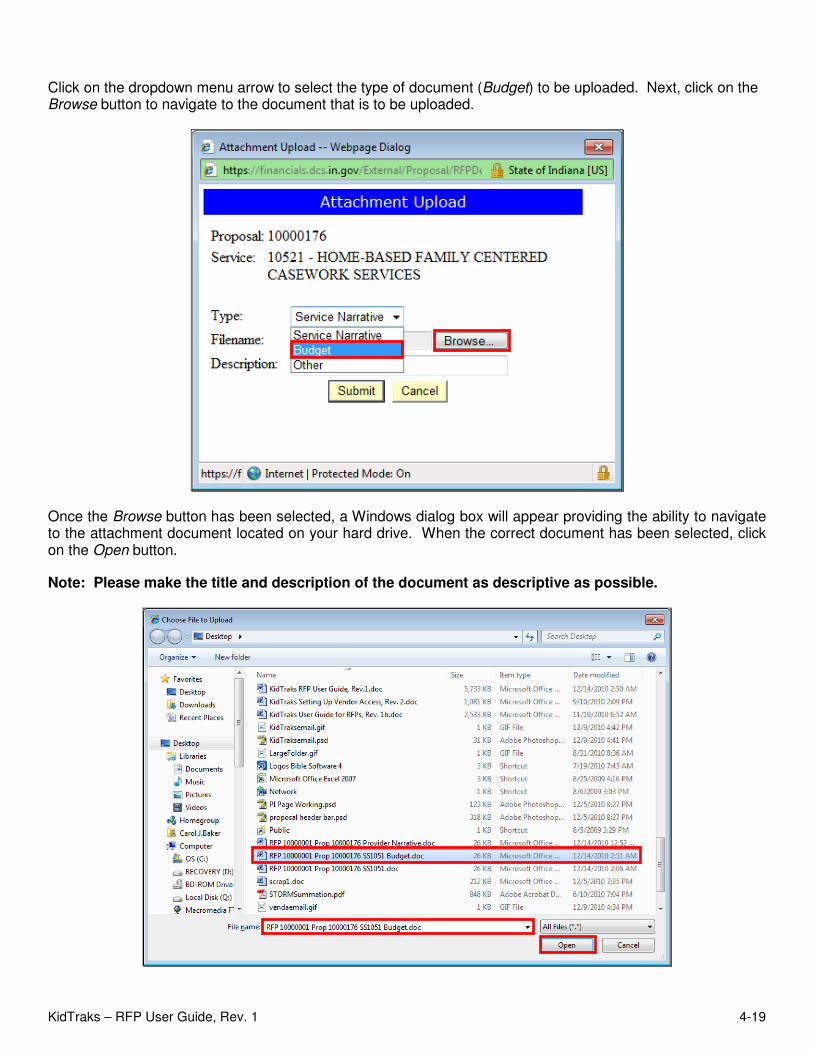
Click on the dropdown menu arrow to select the type of document (Budget) to be uploaded. Next, click on the Browse button to navigate to the document that is to be uploaded.
Once the Browse button has been selected, a Windows dialog box will appear providing the ability to navigate to the attachment document located on your hard drive. When the correct document has been selected, click on the Open button.
Note: Please make the title and description of the document as descriptive as possible.
KidTraks – RFP User Guide, Rev. 1 4-20
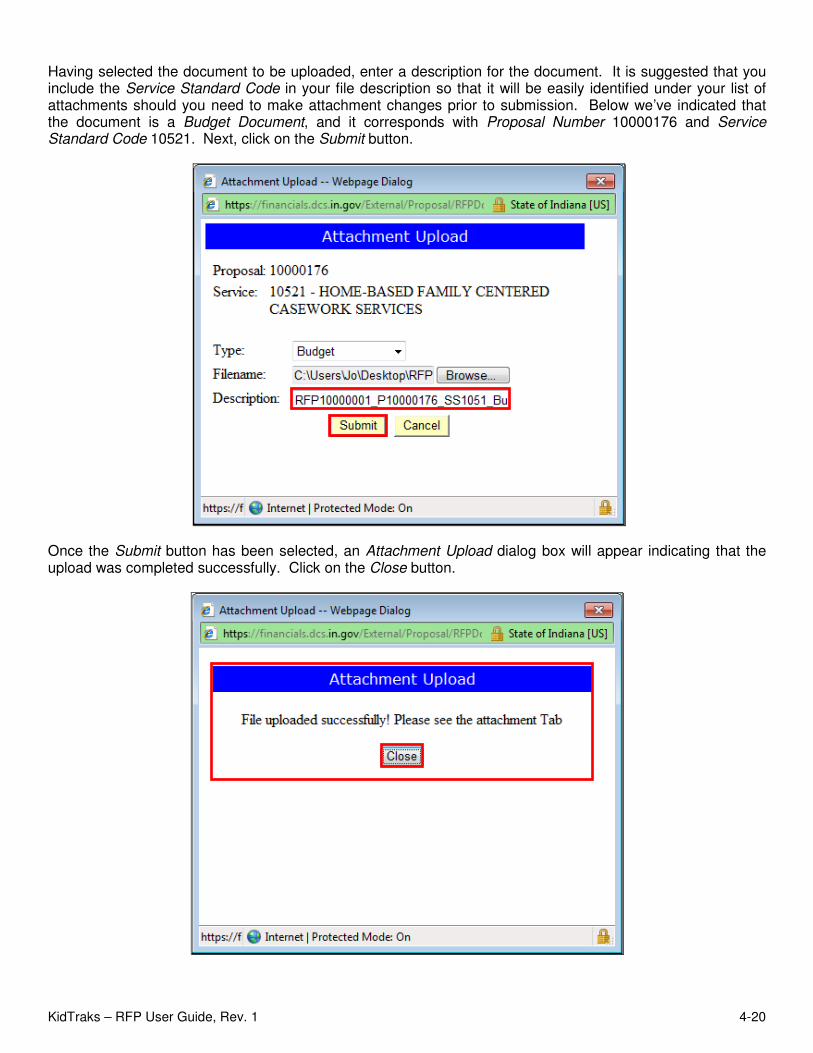
Having selected the document to be uploaded, enter a description for the document. It is suggested that you include the Service Standard Code in your file description so that it will be easily identified under your list of attachments should you need to make attachment changes prior to submission. Below we’ve indicated that the document is a Budget Document, and it corresponds with Proposal Number 10000176 and Service Standard Code 10521. Next, click on the Submit button.
Once the Submit button has been selected, an Attachment Upload dialog box will appear indicating that the upload was completed successfully. Click on the Close button.
KidTraks – RFP User Guide, Rev. 1 4-21
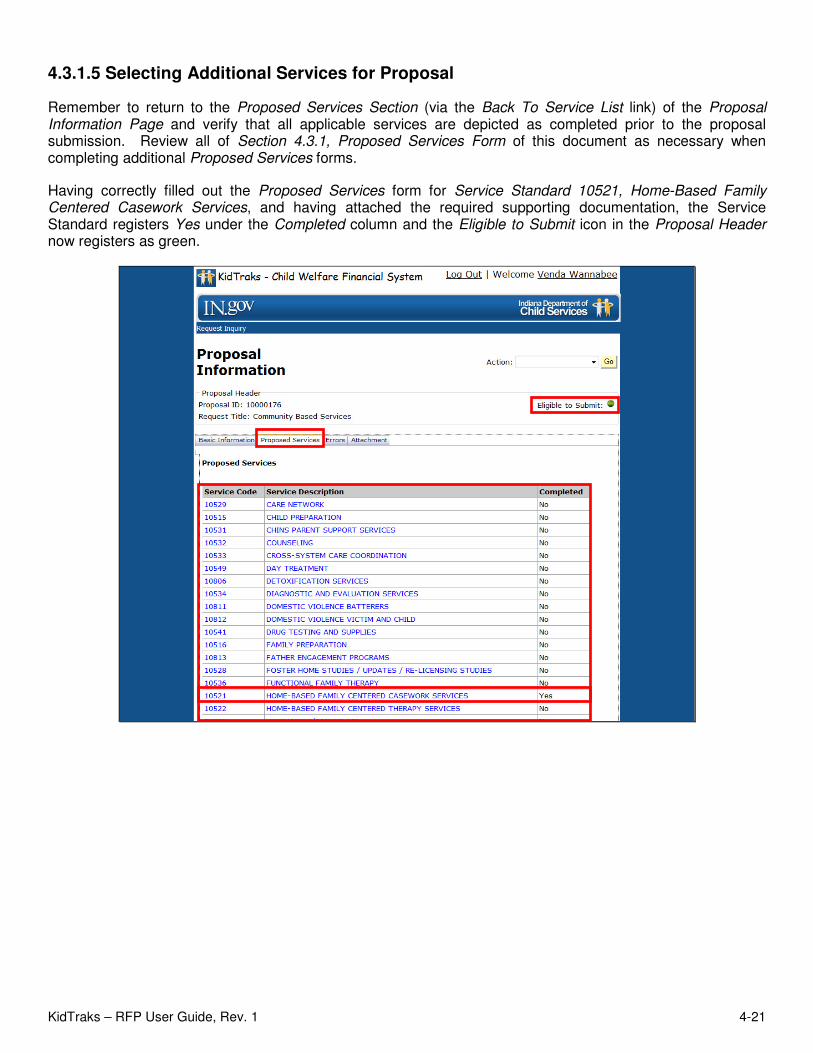
4.3.1.5 Selecting Additional Services for Proposal
Remember to return to the Proposed Services Section (via the Back To Service List link) of the Proposal Information Page and verify that all applicable services are depicted as completed prior to the proposal submission. Review all of Section 4.3.1, Proposed Services Form of this document as necessary when completing additional Proposed Services forms.
Having correctly filled out the Proposed Services form for Service Standard 10521, Home-Based Family Centered Casework Services, and having attached the required supporting documentation, the Service Standard registers Yes under the Completed column and the Eligible to Submit icon in the Proposal Header now registers as green.
KidTraks – RFP User Guide, Rev. 1 4-22
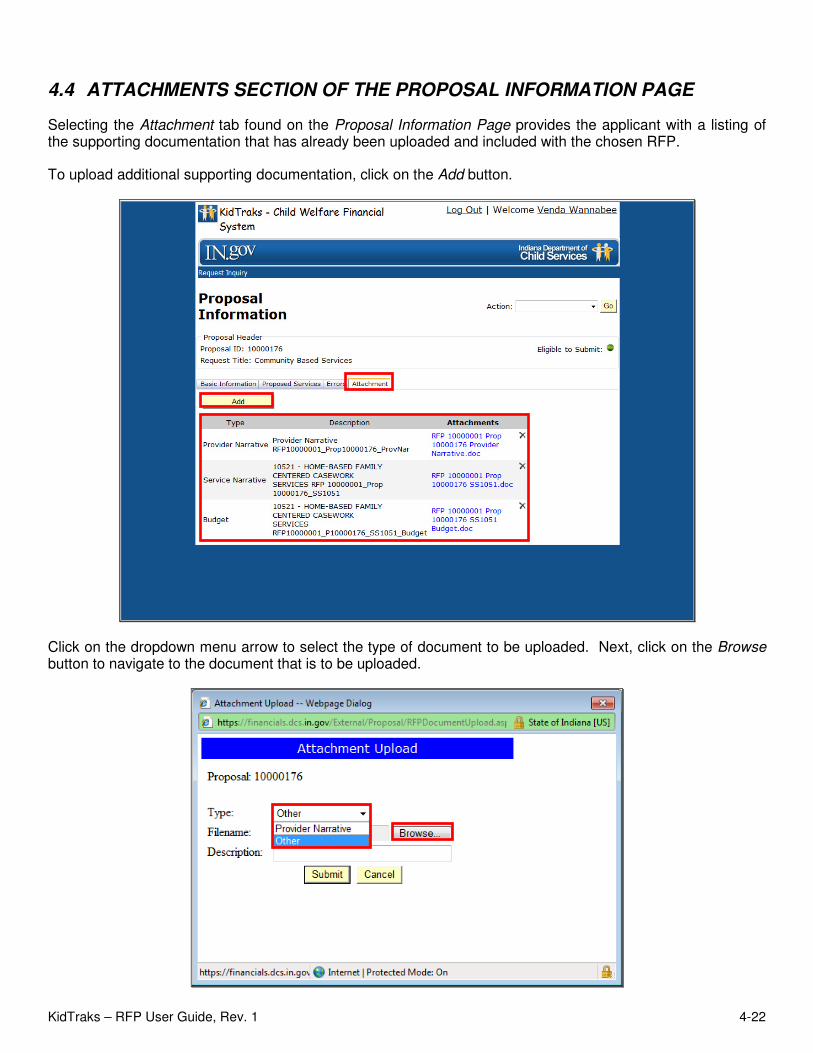
4.4 ATTACHMENTS SECTION OF THE PROPOSAL INFORMATION PAGE
Selecting the Attachment tab found on the Proposal Information Page provides the applicant with a listing of the supporting documentation that has already been uploaded and included with the chosen RFP.
To upload additional supporting documentation, click on the Add button.
Click on the dropdown menu arrow to select the type of document to be uploaded. Next, click on the Browse button to navigate to the document that is to be uploaded.
KidTraks – RFP User Guide, Rev. 1 4-23
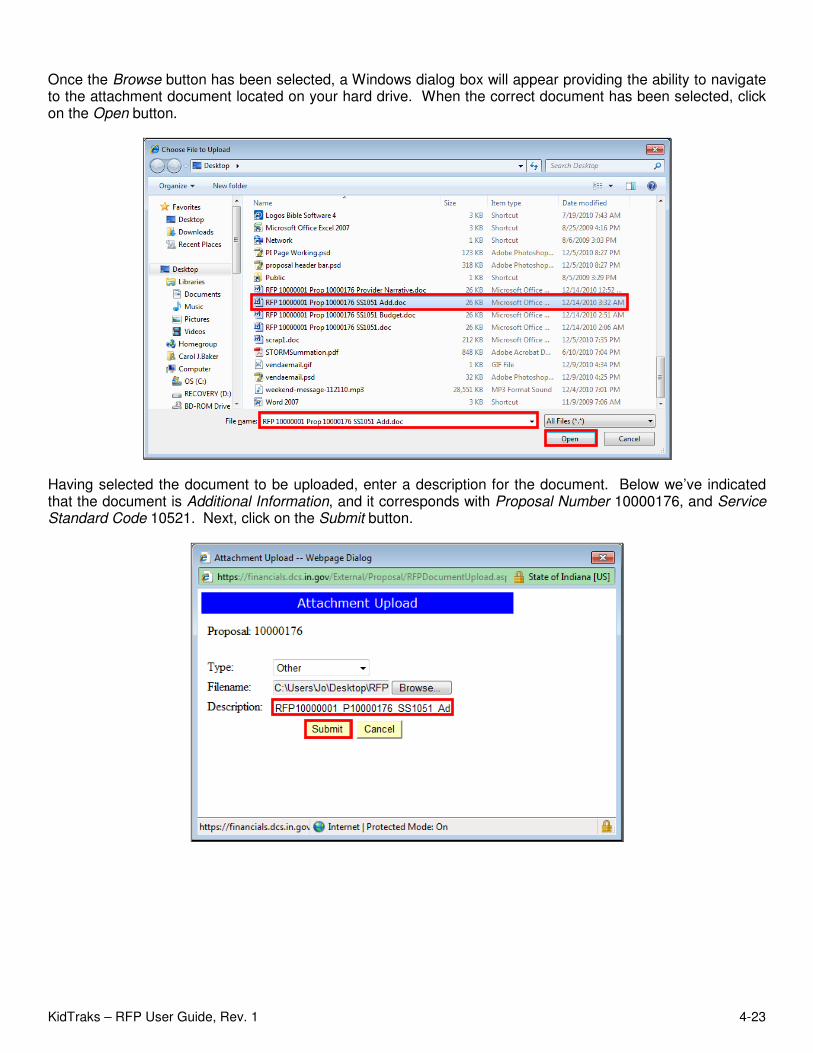
Once the Browse button has been selected, a Windows dialog box will appear providing the ability to navigate to the attachment document located on your hard drive. When the correct document has been selected, click on the Open button.
Having selected the document to be uploaded, enter a description for the document. Below we’ve indicated that the document is Additional Information, and it corresponds with Proposal Number 10000176, and Service Standard Code 10521. Next, click on the Submit button.
KidTraks – RFP User Guide, Rev. 1 4-24
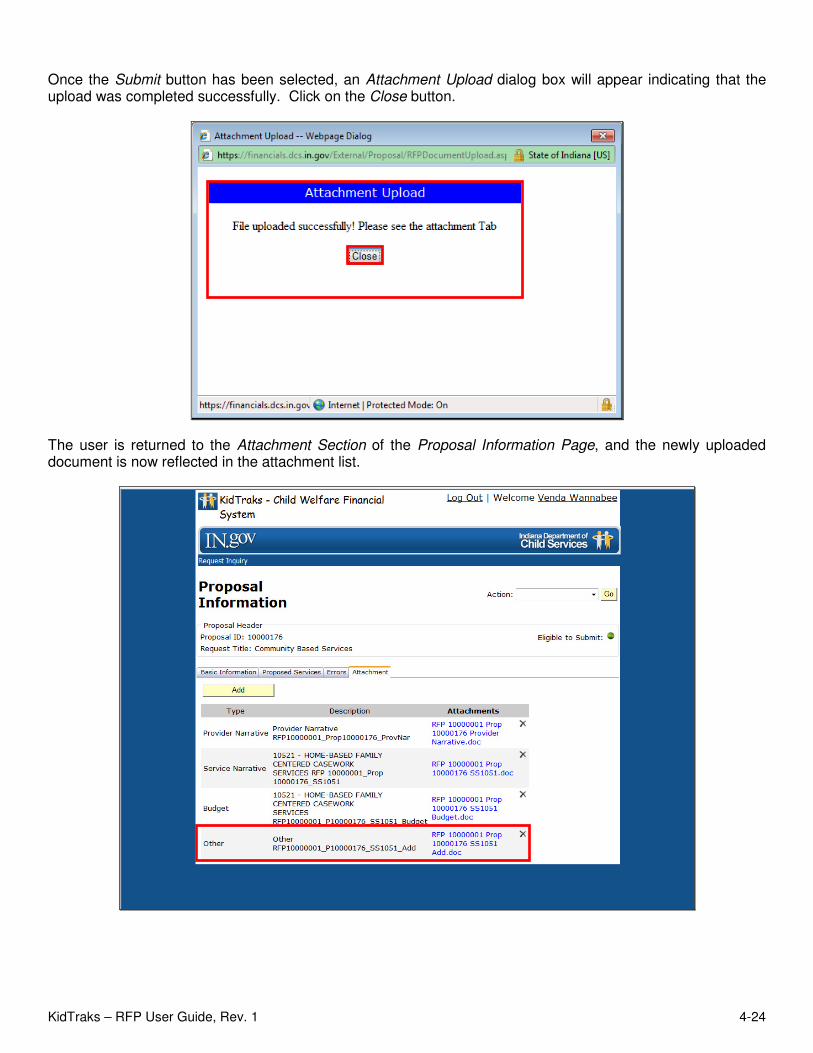
Once the Submit button has been selected, an Attachment Upload dialog box will appear indicating that the upload was completed successfully. Click on the Close button.
The user is returned to the Attachment Section of the Proposal Information Page, and the newly uploaded document is now reflected in the attachment list.
KidTraks – RFP User Guide, Rev. 1 4-25
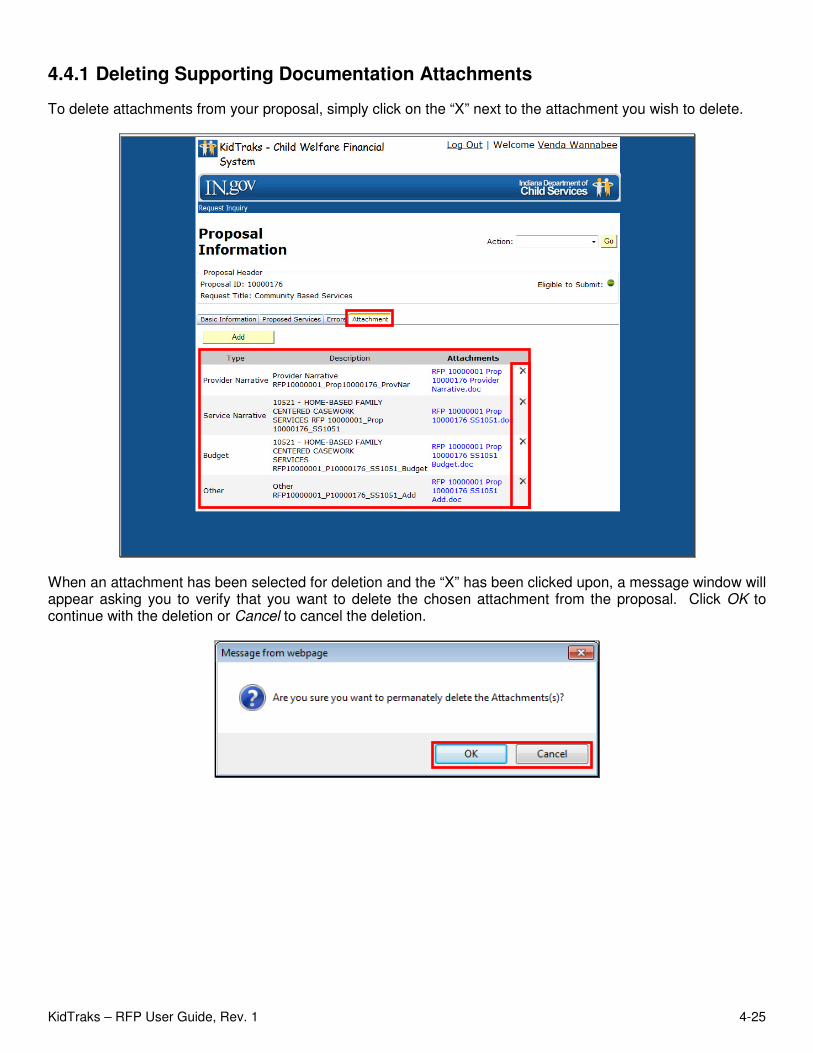
4.4.1 Deleting Supporting Documentation Attachments
To delete attachments from your proposal, simply click on the “X” next to the attachment you wish to delete.
When an attachment has been selected for deletion and the “X” has been clicked upon, a message window will appear asking you to verify that you want to delete the chosen attachment from the proposal. Click OK to continue with the deletion or Cancel to cancel the deletion.

KidTraks – RFP User Guide, Rev. 1 5-1
5.0 PROPOSAL SUBMISSION
Once all sections of the proposal have been completed, select Submit from the Action dropdown list located on the Proposal Information Page and click on the Go button.
Note: Verify the proposal is ready for submission by confirming that the Eligible to Submit icon is green.
Note: The Action dropdown list is available from any of the sections (tabs) located on the Proposal Information Page.
Note: It is not possible to edit or delete a proposal once it has been successfully submitted.
KidTraks – RFP User Guide, Rev. 1 5-2
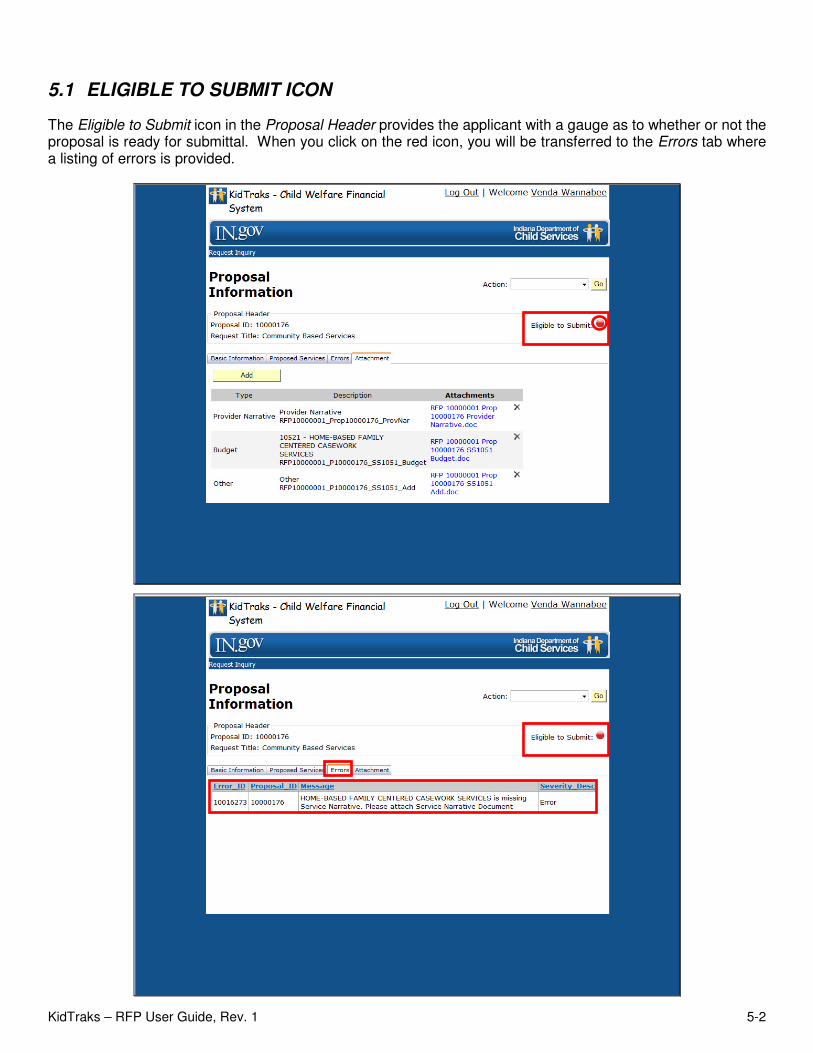
5.1 ELIGIBLE TO SUBMIT ICON
The Eligible to Submit icon in the Proposal Header provides the applicant with a gauge as to whether or not the proposal is ready for submittal. When you click on the red icon, you will be transferred to the Errors tab where a listing of errors is provided.
KidTraks – RFP User Guide, Rev. 1 5-3
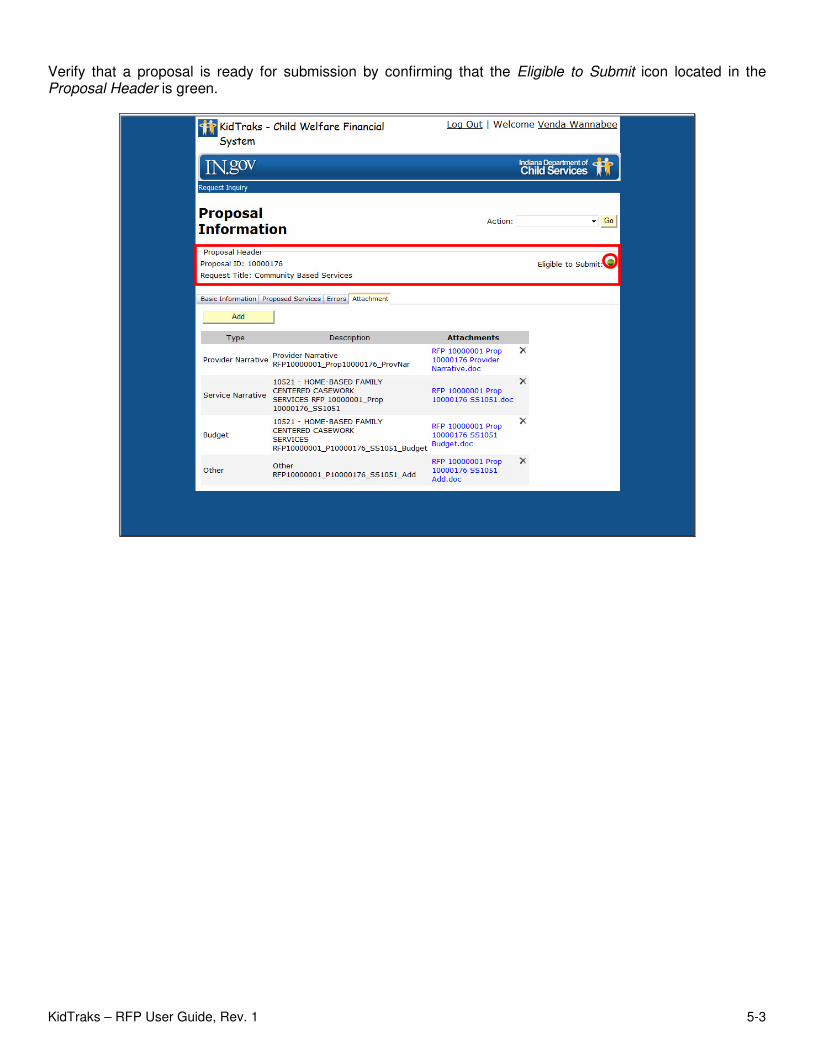
Verify that a proposal is ready for submission by confirming that the Eligible to Submit icon located in the Proposal Header is green.
KidTraks – RFP User Guide, Rev. 1 5-4
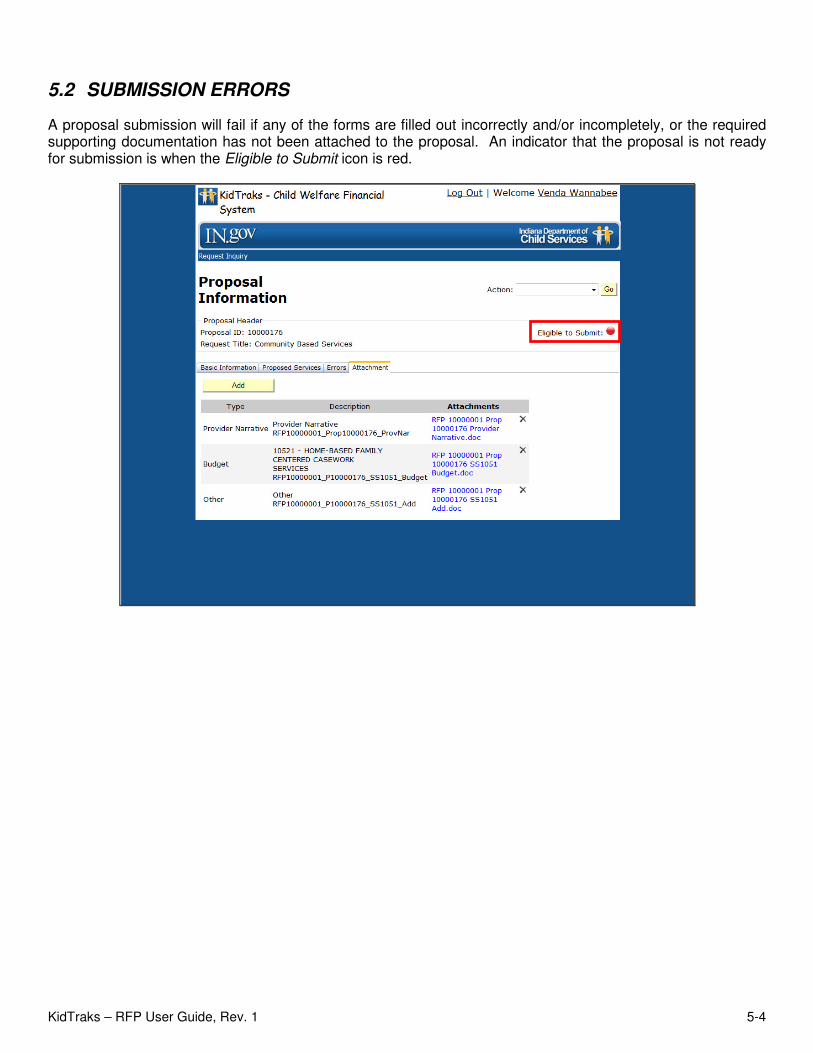
5.2 SUBMISSION ERRORS
A proposal submission will fail if any of the forms are filled out incorrectly and/or incompletely, or the required supporting documentation has not been attached to the proposal. An indicator that the proposal is not ready for submission is when the Eligible to Submit icon is red.
KidTraks – RFP User Guide, Rev. 1 5-5
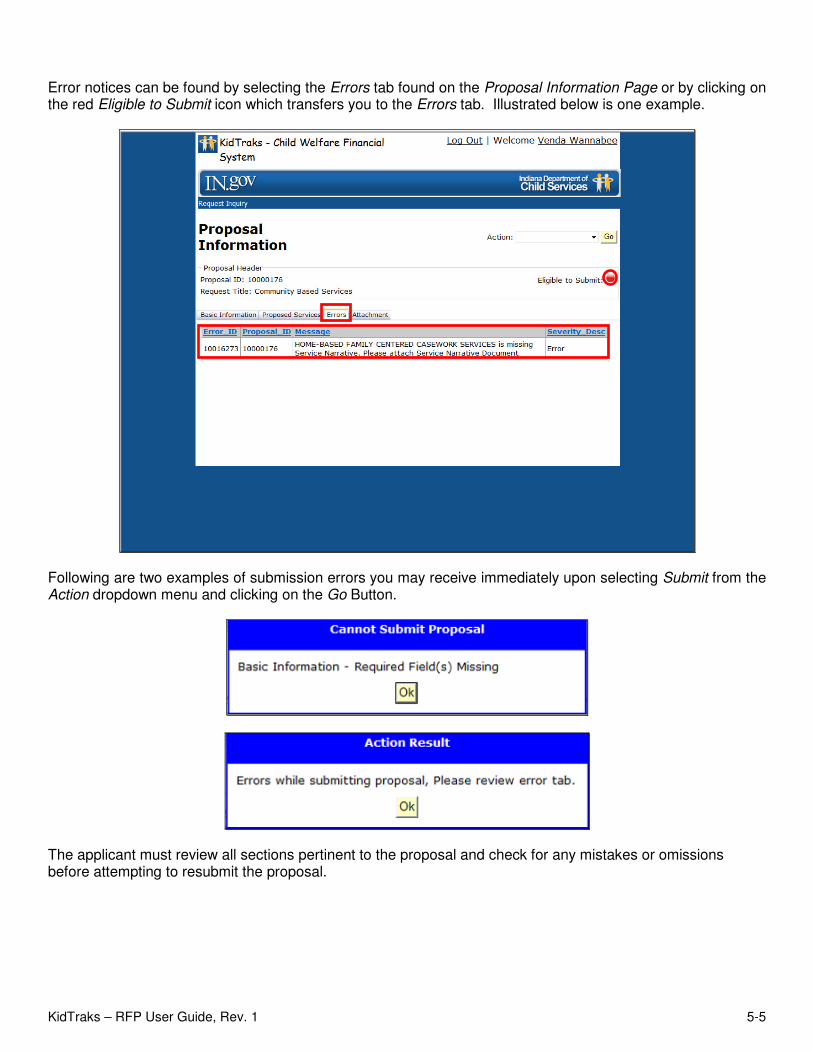
Error notices can be found by selecting the Errors tab found on the Proposal Information Page or by clicking on the red Eligible to Submit icon which transfers you to the Errors tab. Illustrated below is one example.
Following are two examples of submission errors you may receive immediately upon selecting Submit from the Action dropdown menu and clicking on the Go Button.
The applicant must review all sections pertinent to the proposal and check for any mistakes or omissions before attempting to resubmit the proposal.
KidTraks – RFP User Guide, Rev. 1 5-6
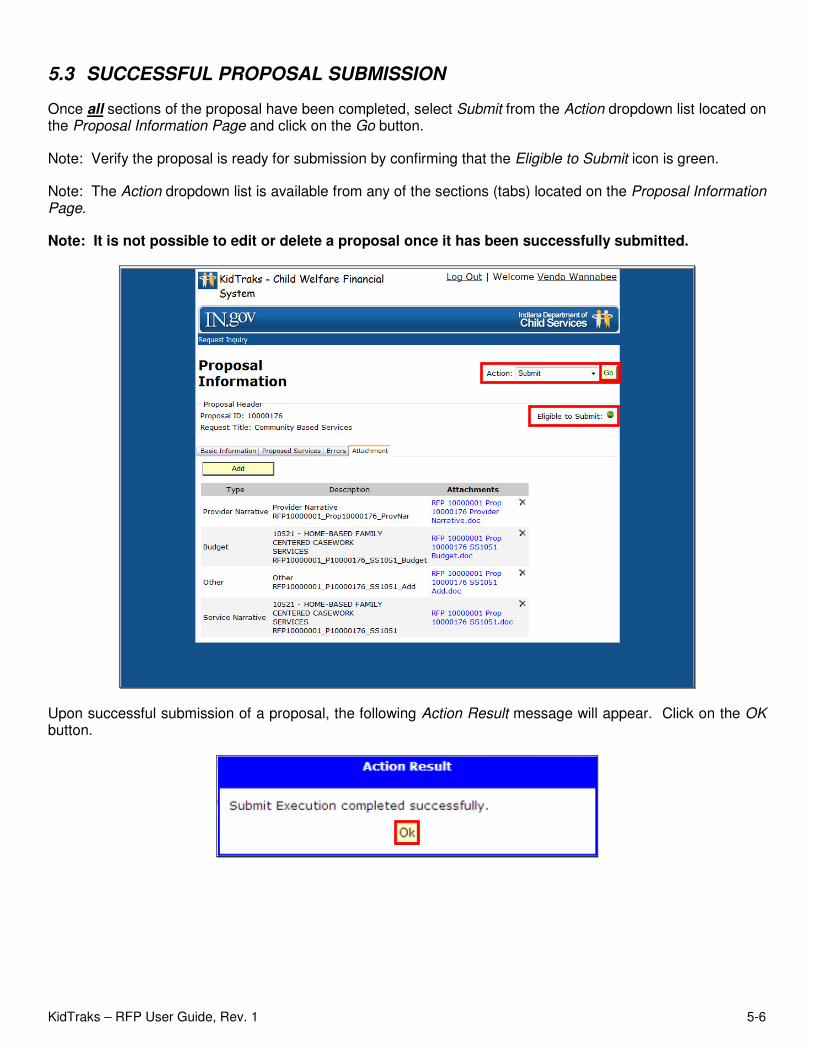
5.3 SUCCESSFUL PROPOSAL SUBMISSION
Once all sections of the proposal have been completed, select Submit from the Action dropdown list located on the Proposal Information Page and click on the Go button.
Note: Verify the proposal is ready for submission by confirming that the Eligible to Submit icon is green.
Note: The Action dropdown list is available from any of the sections (tabs) located on the Proposal Information Page.
Note: It is not possible to edit or delete a proposal once it has been successfully submitted.
Upon successful submission of a proposal, the following Action Result message will appear. Click on the OK button.
KidTraks – RFP User Guide, Rev. 1 5-7
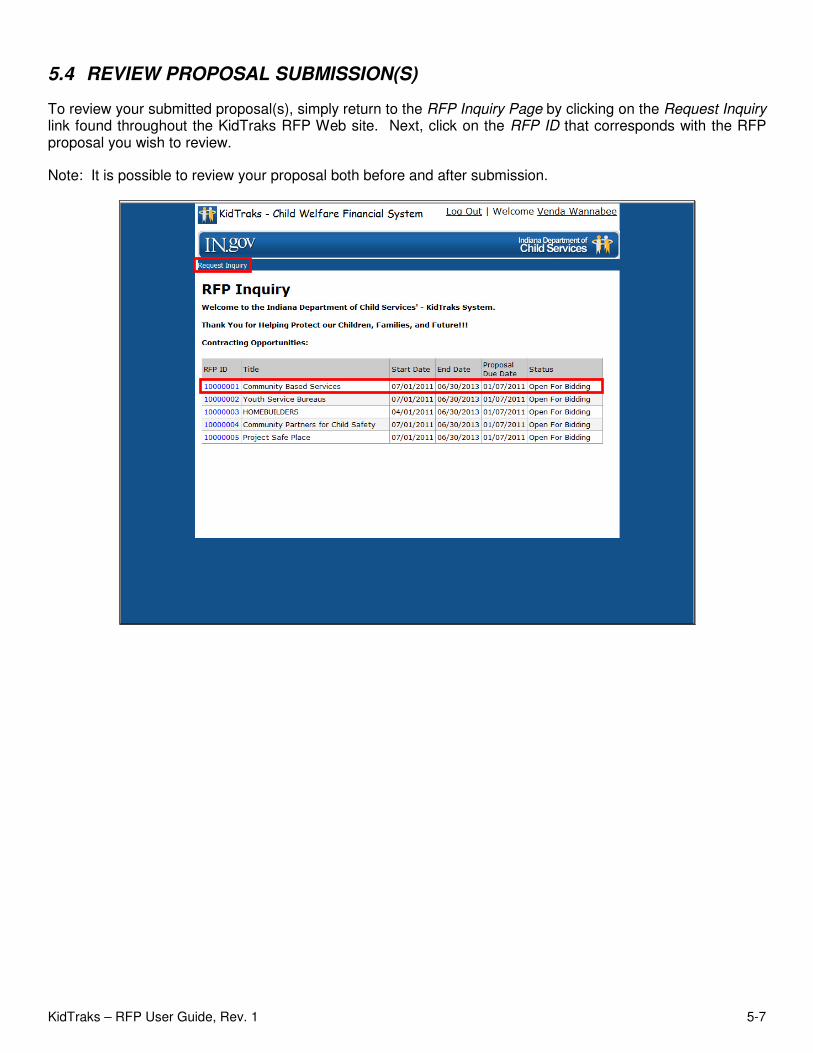
5.4 REVIEW PROPOSAL SUBMISSION(S)
To review your submitted proposal(s), simply return to the RFP Inquiry Page by clicking on the Request Inquiry link found throughout the KidTraks RFP Web site. Next, click on the RFP ID that corresponds with the RFP proposal you wish to review.
Note: It is possible to review your proposal both before and after submission.
KidTraks – RFP User Guide, Rev. 1 5-8
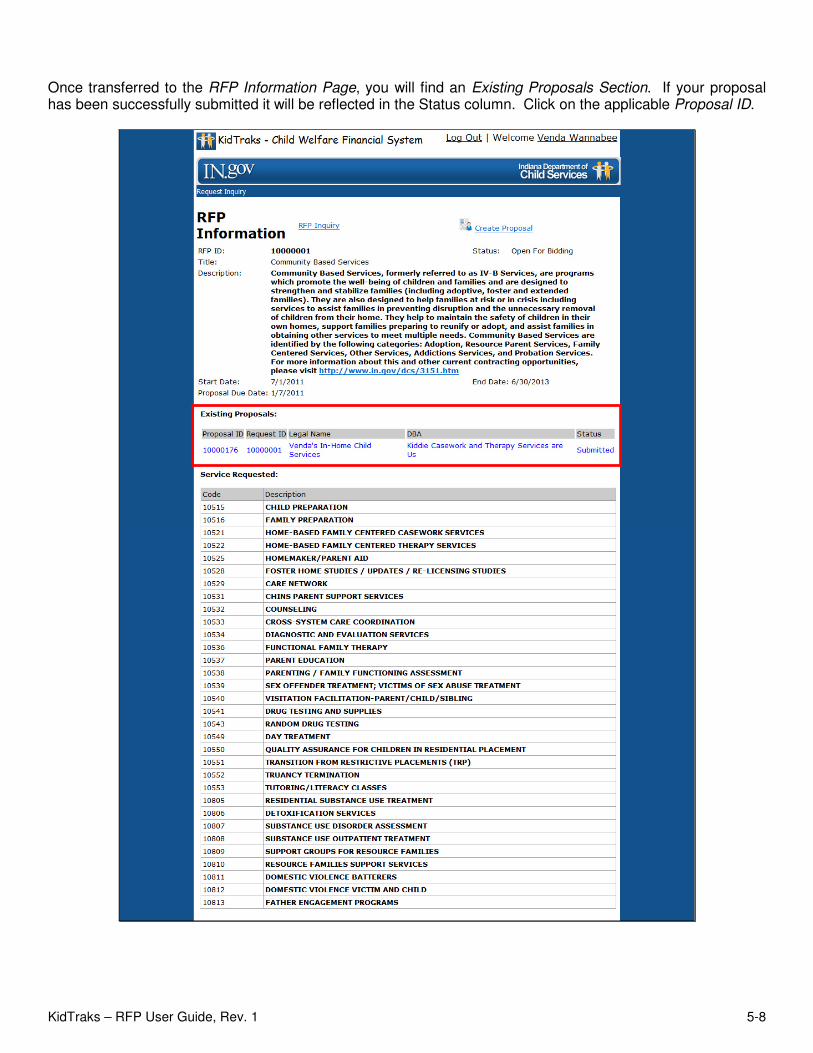
Once transferred to the RFP Information Page, you will find an Existing Proposals Section. If your proposal has been successfully submitted it will be reflected in the Status column. Click on the applicable Proposal ID.
KidTraks – RFP User Guide, Rev. 1 5-9
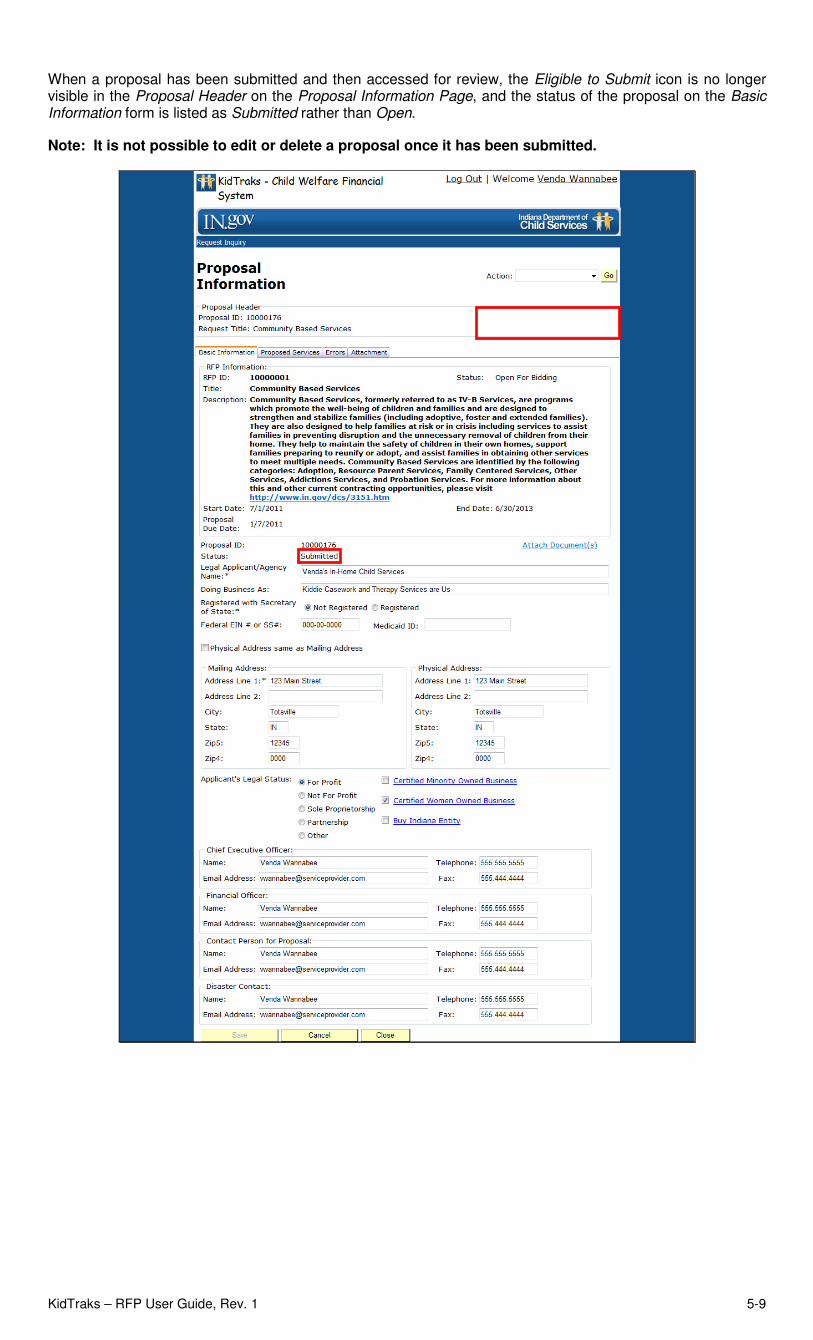
When a proposal has been submitted and then accessed for review, the Eligible to Submit icon is no longer visible in the Proposal Header on the Proposal Information Page, and the status of the proposal on the Basic Information form is listed as Submitted rather than Open.
Note: It is not possible to edit or delete a proposal once it has been submitted.
KidTraks – RFP User Guide, Rev. 1 6-1
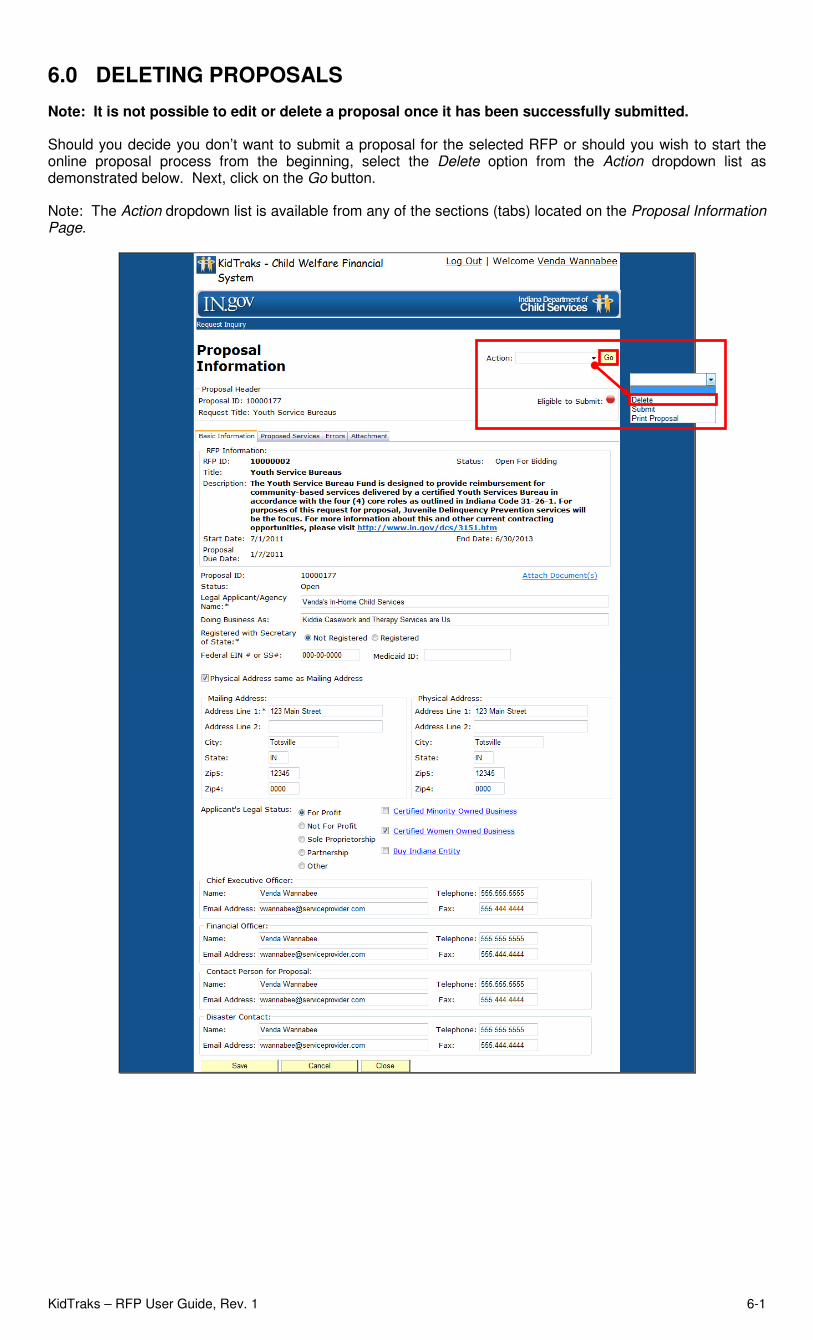
6.0 DELETING PROPOSALS
Note: It is not possible to edit or delete a proposal once it has been successfully submitted.
Should you decide you don’t want to submit a proposal for the selected RFP or should you wish to start the online proposal process from the beginning, select the Delete option from the Action dropdown list as demonstrated below. Next, click on the Go button.
Note: The Action dropdown list is available from any of the sections (tabs) located on the Proposal Information Page.
KidTraks – RFP User Guide, Rev. 1 6-2
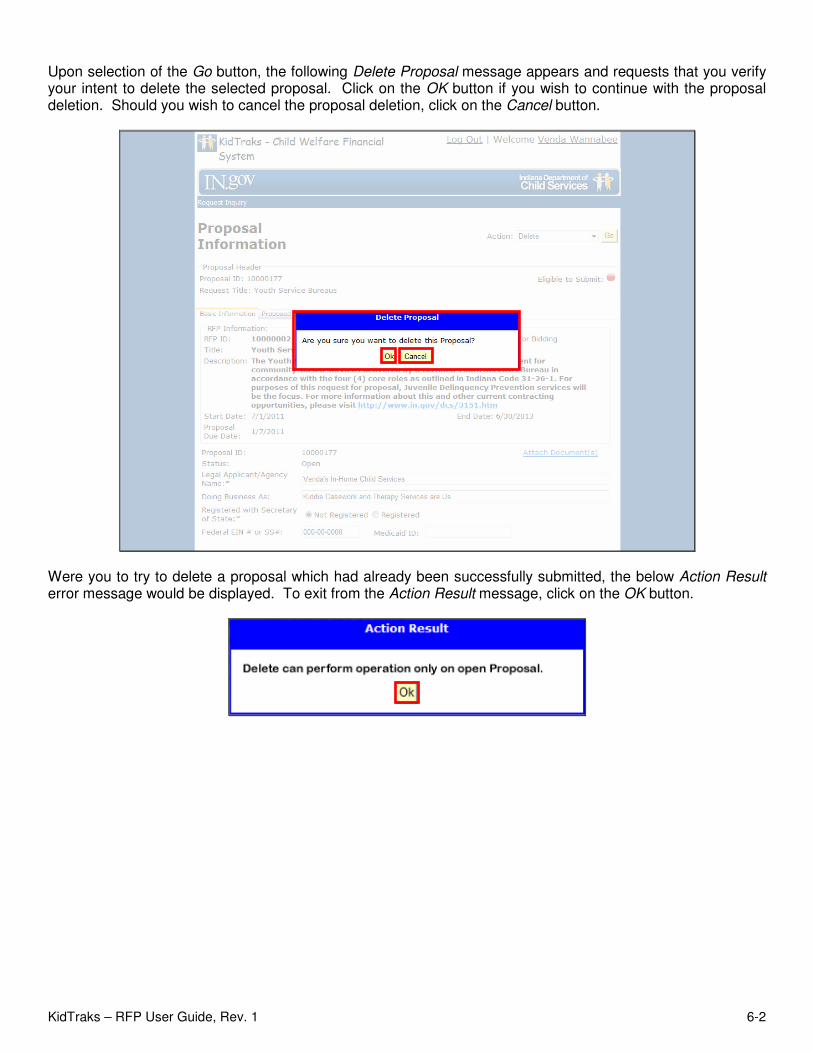
Upon selection of the Go button, the following Delete Proposal message appears and requests that you verify your intent to delete the selected proposal. Click on the OK button if you wish to continue with the proposal deletion. Should you wish to cancel the proposal deletion, click on the Cancel button.
Were you to try to delete a proposal which had already been successfully submitted, the below Action Result error message would be displayed. To exit from the Action Result message, click on the OK button.

KidTraks – RFP User Guide, Rev. 1 7-1
7.0 PRINTING PROPOSALS
To print a proposal (submitted or open), select the Print Proposal option from the Action dropdown list as demonstrated below. Next, click on the Go button.
Note: The Action dropdown list is available from any of the sections (tabs) located on the Proposal Information Page.
Clicking on the Go button will launch a separate Internet Explorer window providing the selected proposal in its entirety depicted in Adobe Acrobat for printing.
KidTraks – RFP User Guide, Rev. 1 8-1
8.0 TIPS AND TRICKS
• This guide is best viewed in the screen resolutions of 1024 x 768 or 800 x 600.
• It is recommended that applicants use Internet Explorer as their browser.
• Those vendors using IE browsers which include the “Compatibility View” feature should have it deselected when viewing KidTraks sites.
• Some of the pages in this guide are legal size (8.5”x14”) rather than letter size (8.5”x11) in order to accommodate the graphics.
• For new users requesting authorization, please check your spam folder for password emails. Confirmation emails are sent out immediately upon registration submission.
• Do Not use the browser Back button to return to previously viewed pages!
• If you navigate away from the Proposal Information Page forms prior to clicking on the Save button, all entries will be lost.
• For most proposal submissions, it is requested that all referenced service forms pertaining to a given RFP be completed. If not, please include an explanation in the corresponding Services Narrative uploaded attachment.
• All listed components for a given Service Standard should have entries in their corresponding proposed rates fields. Also, should a prospective vendor wish to not submit a rate bid for a given component, enter zero.
• Service Code refers to the number assigned to a Service Standard.
• Component Code refers to the number assigned to a Component (Business Unit).
• Both Service Codes and Component Codes are used in the billing for services and will appear in Attachment A if a contract is entered into.
• A Provider Narrative is required for each proposal submission. A Service Narrative is required for each Service Standard proposed.
• A Budget Document must be uploaded as an attachment when a rate entry of zero is entered, or when the rate entry exceeds the standardized rate.
• Please refer to your RFP to clarify which document attachments are required for submission completion.
• When uploading attachments, file formats are restricted to Word documents (.doc), Excel documents (.xls), and Adobe Acrobat documents (.pdf).
• When naming document attachments and entering their descriptions, please be as descriptive as possible.
• If an applicant elects to delete an open proposal, the entire proposal will be deleted. Only open proposals may be deleted or edited.
• Only completed proposals will qualify for submission.
• Proposals can be edited after they have been saved. They can not be edited after they have been submitted.
• The option to Print Proposal is available at any time in the process.
The Department of Child Services (DCS) has legal limitations in answering questions regarding the RFP process. All questions/inquiries regarding an RFP should have been submitted in writing by the deadline listed in the RFP. To access a list of responses to submitted questions please refer to the DCS Web site. Only answers posted on the DCS Web site, (http://www.in.gov/dcs/3151.htm), will be considered official and valid by the State. Inquiries are not to be directed to any staff member of DCS. Such action may disqualify the respondent from further consideration for a contract resulting from an RFP. However, for questions regarding technical issues with the online application, please email [email protected].


![RFP for Commodities Template · Web view2020. 11. 6. · RFP No. ICTEC-2016-003. Page 25 of 25. RFP No. . [enter RFP number] Page 4 of 31. FO.PROC.FT.009, Rev.001, 12/17/2012](https://img.pdfslide.us/doc/110x75/613c83ed4c23507cb6356ee4/rfp-for-commodities-template-web-view-2020-11-6-rfp-no-ictec-2016-003-page.jpg)