Embed Size (px)
Citation preview

© D
EU
TE
R U
SA
IN
C.
20
14
Kid Comfort (KC) Air, 1, 2 & 3
German EngineeredSince 1898
KID COMFORT INSTRUCTIONS

pg. 1
The following Deuter frame child carriers Kid Comfort 1, Air, 2 and 3 sold by Deuter USA Inc. all comply with the following standard: ASTM F2549 - 09a Standard Consumer Safety Specification for Frame Child Carriers. To learn more about ASTM American Society for Testing and Materials please see below or visit: www.astm.org.
ASTM International, formerly known as the American Society for Testing and Materials (ASTM), is a globally recognized leader in the development and delivery of international voluntary consensus standards. Today, some 12,000 ASTM standards are used around the world to improve product quality, enhance safety, facilitate market access and trade, and build consumer confidence.
ASTM’s leadership in international standards development is driven by the contributions of its members: more than 30,000 of the world’s top technical experts and business professionals representing 150 countries. Working in an open and transparent process and using ASTM’s advanced electronic infrastructure, ASTM members deliver the test methods, specifications, guides, and practices that support industries and governments worldwide.
The JPMA Certification Seal on a product tells consumers this product has been verified as conforming to the requirements established by ASTM, through annual independent laboratory testing.
JPMA’s very prestigious certification program has spread its message of safety for more than 30 years guiding retailers and parents. Voluntary Standards for JPMA Certified Products are developed by ASTM International, a highly regarded non-profit organization and the largest standard setting organization in the world (www.astm.org). Industry members, consumer groups and U.S. Consumer Product Safety Commission(CPSC) staff are involved with developing these standards. When a product passes its lab test, the manufacturer is allowed to label it with the JPMA Certification Seal, ensuring retail buyers and parents that the product was built with the highest safety standards in mind. When your product is JPMA certified you can take great pride in knowing your product is among an elite class of the safest products in the industry.
For Your Child’s Safety
www.deuter.com / pg. 2
© D
EU
TE
R U
SA
IN
C.
20
14
IMPORTANT SAFETY INFORMATION
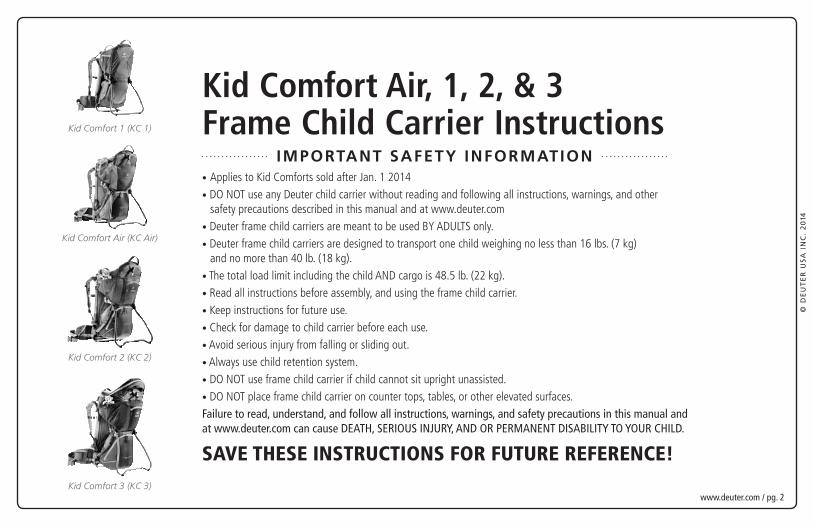
Kid Comfort Air, 1, 2, & 3 Frame Child Carrier Instructions•Applies to Kid Comforts sold after Jan. 1 2014 • DO NOT use any Deuter child carrier without reading and following all instructions, warnings, and other safety precautions described in this manual and at www.deuter.com• Deuter frame child carriers are meant to be used BY ADULTS only. • Deuter frame child carriers are designed to transport one child weighing no less than 16 lbs. (7 kg) and no more than 40 lb. (18 kg). • The total load limit including the child AND cargo is 48.5 lb. (22 kg). • Read all instructions before assembly, and using the frame child carrier. • Keep instructions for future use.• Check for damage to child carrier before each use.• Avoid serious injury from falling or sliding out. • Always use child retention system.• DO NOT use frame child carrier if child cannot sit upright unassisted.• DO NOT place frame child carrier on counter tops, tables, or other elevated surfaces.Failure to read, understand, and follow all instructions, warnings, and safety precautions in this manual and at www.deuter.com can cause DEATH, SERIOUS INJURY, AND OR PERMANENT DISABILITY TO YOUR CHILD.
Save theSe inStruCtionS For Future reFerenCe!
Kid Comfort Air (KC Air)
Kid Comfort 1 (KC 1)
Kid Comfort 2 (KC 2)
Kid Comfort 3 (KC 3)
pg. 2
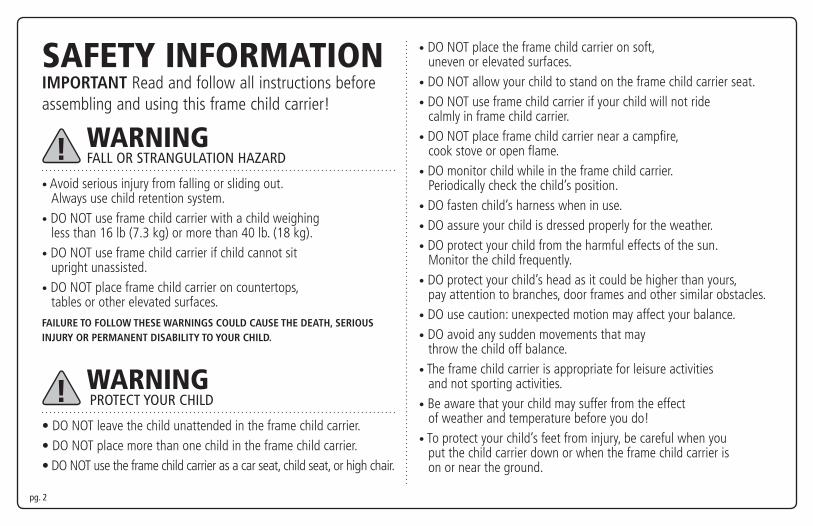
SaFetY inForMationIMPORTANT Read and follow all instructions before assembling and using this frame child carrier!
WarninG FALL OR STRANGULATION HAZARD
• Avoid serious injury from falling or sliding out. Always use child retention system.• DO NOT use frame child carrier with a child weighing less than 16 lb (7.3 kg) or more than 40 lb. (18 kg).• DO NOT use frame child carrier if child cannot sit upright unassisted.• DO NOT place frame child carrier on countertops, tables or other elevated surfaces.FAIlURe TO FOllOw TheSe wARNINgS COUlD CAUSe The DeATh, SeRIOUS INJURy OR PeRMANeNT DISAbIlITy TO yOUR ChIlD.
WarninG PROTECT YOUR CHILD
•DONOTleavethechildunattendedintheframechildcarrier.•DONOTplacemorethanonechildintheframechildcarrier.•DONOTusetheframechildcarrierasacarseat,childseat,orhighchair.
• DO NOT place the frame child carrier on soft, uneven or elevated surfaces.• DO NOT allow your child to stand on the frame child carrier seat.• DO NOT use frame child carrier if your child will not ride calmly in frame child carrier.• DO NOT place frame child carrier near a campfire, cook stove or open flame.• DO monitor child while in the frame child carrier. Periodically check the child’s position.• DO fasten child’s harness when in use.• DO assure your child is dressed properly for the weather. • DO protect your child from the harmful effects of the sun. Monitor the child frequently.• DO protect your child’s head as it could be higher than yours, pay attention to branches, door frames and other similar obstacles.• DO use caution: unexpected motion may affect your balance. • DO avoid any sudden movements that may throw the child off balance. • The frame child carrier is appropriate for leisure activities and not sporting activities. • Be aware that your child may suffer from the effect of weather and temperature before you do! • To protect your child’s feet from injury, be careful when you put the child carrier down or when the frame child carrier is on or near the ground.
www.deuter.com / pg. 3
© D
EU
TE
R U
SA
IN
C.
20
14
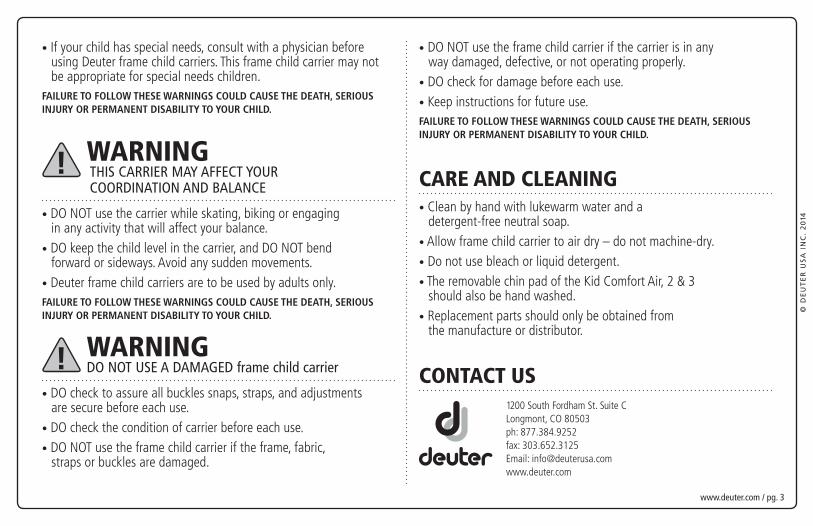
• If your child has special needs, consult with a physician before using Deuter frame child carriers. This frame child carrier may not be appropriate for special needs children.FAIlURe TO FOllOw TheSe wARNINgS COUlD CAUSe The DeATh, SeRIOUS INJURy OR PeRMANeNT DISAbIlITy TO yOUR ChIlD.
WarninG THIS CARRIER MAY AFFECT YOUR COORDINATION AND BALANCE
• DO NOT use the carrier while skating, biking or engaging in any activity that will affect your balance.• DO keep the child level in the carrier, and DO NOT bend forward or sideways. Avoid any sudden movements.• Deuter frame child carriers are to be used by adults only.FAIlURe TO FOllOw TheSe wARNINgS COUlD CAUSe The DeATh, SeRIOUS INJURy OR PeRMANeNT DISAbIlITy TO yOUR ChIlD.
WarninG DO NOT USE A DAMAGED frame child carrier
• DO check to assure all buckles snaps, straps, and adjustments are secure before each use.• DO check the condition of carrier before each use.• DO NOT use the frame child carrier if the frame, fabric, straps or buckles are damaged.
• DO NOT use the frame child carrier if the carrier is in any way damaged, defective, or not operating properly.• DO check for damage before each use. • Keep instructions for future use. FAIlURe TO FOllOw TheSe wARNINgS COUlD CAUSe The DeATh, SeRIOUS INJURy OR PeRMANeNT DISAbIlITy TO yOUR ChIlD.
Care anD CLeaninG• Clean by hand with lukewarm water and a detergent-free neutral soap.• Allow frame child carrier to air dry – do not machine-dry.• Do not use bleach or liquid detergent.• The removable chin pad of the Kid Comfort Air, 2 & 3 should also be hand washed.• Replacement parts should only be obtained from the manufacture or distributor.
ContaCt uS1200 South Fordham St. Suite CLongmont, CO 80503ph: 877.384.9252fax: 303.652.3125 Email: [email protected] www.deuter.com
pg. 4
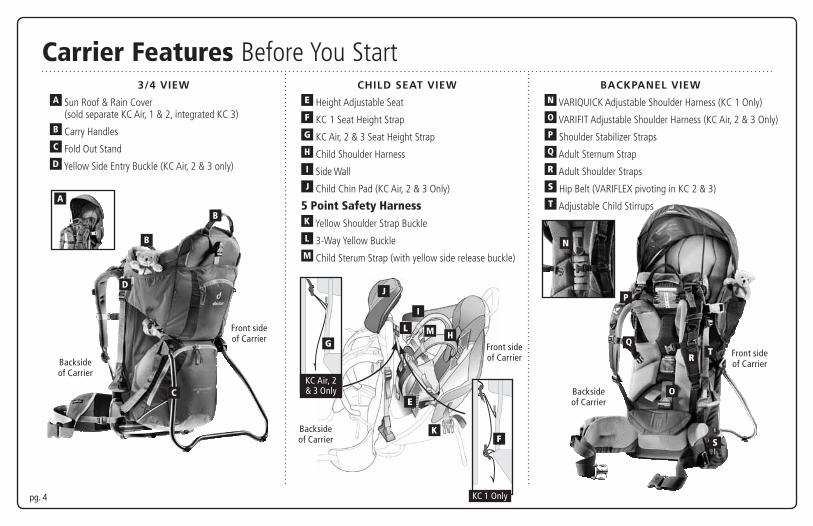
Carrier Features Before You StartChIld SEAT VIEw3/4 VIEw
Front side of Carrier Front side
of Carrier
Backside of Carrier
Backside of Carrier
Backside of Carrier
BACkPANEl VIEw
Height Adjustable Seat
KC 1 Seat Height Strap
KC Air, 2 & 3 Seat Height Strap
Child Shoulder Harness
Side Wall
Child Chin Pad (KC Air, 2 & 3 Only)
5 Point Safety harness Yellow Shoulder Strap Buckle
3-Way Yellow Buckle
Child Sterum Strap (with yellow side release buckle)
VARIQUICK Adjustable Shoulder Harness (KC 1 Only)
VARIFIT Adjustable Shoulder Harness (KC Air, 2 & 3 Only)
Shoulder Stabilizer Straps
Adult Sternum Strap
Adult Shoulder Straps
Hip Belt (VARIFLEX pivoting in KC 2 & 3)
Adjustable Child Stirrups
Sun Roof & Rain Cover (sold separate KC Air, 1 & 2, integrated KC 3)
Carry Handles
Fold Out Stand
Yellow Side Entry Buckle (KC Air, 2 & 3 only)
Front side of Carrier
KC 1 Only
KC Air, 2& 3 Only
www.deuter.com / pg. 5
© D
EU
TE
R U
SA
IN
C.
20
14
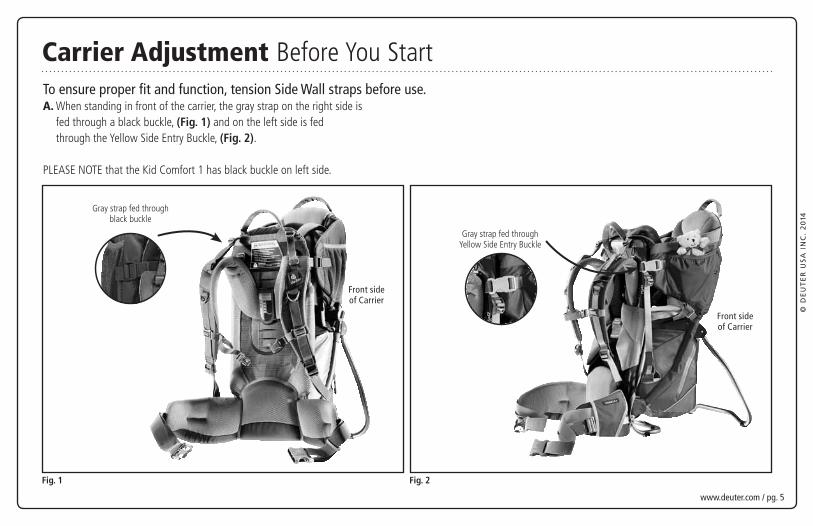
Carrier adjustment Before You Start
Front side of Carrier
Front side of Carrier
To ensure proper fit and function, tension Side Wall straps before use.a. When standing in front of the carrier, the gray strap on the right side is fed through a black buckle, (Fig. 1) and on the left side is fed through the Yellow Side Entry Buckle, (Fig. 2). PLEASE NOTE that the Kid Comfort 1 has black buckle on left side.
Gray strap fed through black buckle
Gray strap fed through Yellow Side Entry Buckle
Fig. 2Fig. 1
pg. 6
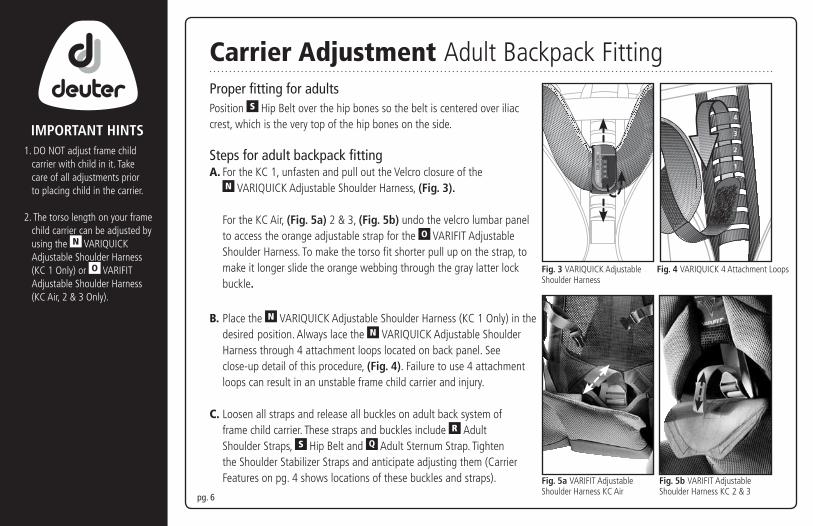
Carrier adjustment Adult Backpack FittingProper fitting for adults
Position Hip Belt over the hip bones so the belt is centered over iliac crest, which is the very top of the hip bones on the side.
Steps for adult backpack fittinga. For the KC 1, unfasten and pull out the Velcro closure of the VARIQUICK Adjustable Shoulder Harness, (Fig. 3).
For the KC Air, (Fig. 5a) 2 & 3, (Fig. 5b) undo the velcro lumbar panel to access the orange adjustable strap for the VARIFIT Adjustable Shoulder Harness. To make the torso fit shorter pull up on the strap, to make it longer slide the orange webbing through the gray latter lock buckle.
B. Place the VARIQUICK Adjustable Shoulder Harness (KC 1 Only) in the desired position. Always lace the VARIQUICK Adjustable Shoulder Harness through 4 attachment loops located on back panel. See close-up detail of this procedure, (Fig. 4). Failure to use 4 attachment loops can result in an unstable frame child carrier and injury.
C. Loosen all straps and release all buckles on adult back system of frame child carrier. These straps and buckles include Adult Shoulder Straps, Hip Belt and Adult Sternum Strap. Tighten the Shoulder Stabilizer Straps and anticipate adjusting them (Carrier Features on pg. 4 shows locations of these buckles and straps).
Fig. 3 VARIQUICK AdjustableShoulder Harness
Fig. 5a VARIFIT Adjustable Shoulder Harness KC Air
Fig. 5b VARIFIT Adjustable Shoulder Harness KC 2 & 3
1. DO NOT adjust frame child carrier with child in it. Take care of all adjustments prior to placing child in the carrier. 2. The torso length on your frame child carrier can be adjusted by using the VARIQUICK Adjustable Shoulder Harness (KC 1 Only) or VARIFIT Adjustable Shoulder Harness (KC Air, 2 & 3 Only).
IMPORTANT hINTS
1
2
3
4
Fig. 4 VARIQUICK 4 Attachment Loops
KC Air
www.deuter.com / pg. 7
© D
EU
TE
R U
SA
IN
C.
20
14
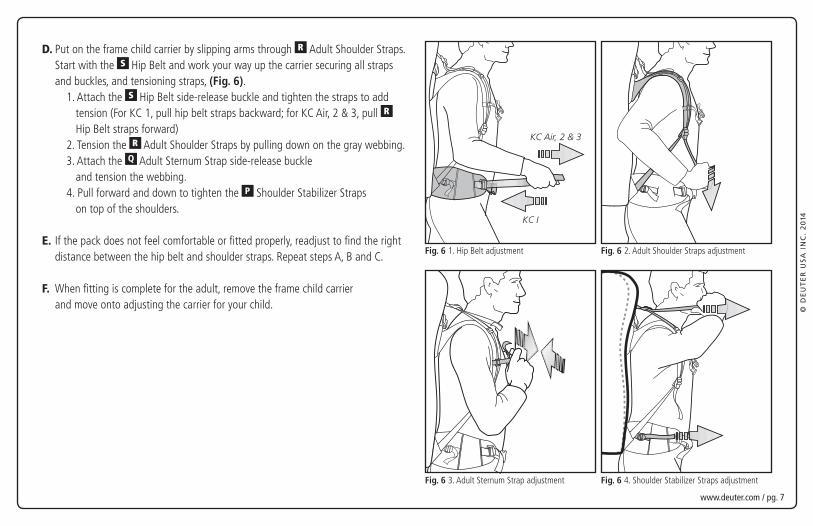
D. Put on the frame child carrier by slipping arms through Adult Shoulder Straps. Start with the Hip Belt and work your way up the carrier securing all straps and buckles, and tensioning straps, (Fig. 6). 1. Attach the Hip Belt side-release buckle and tighten the straps to add tension (For KC 1, pull hip belt straps backward; for KC Air, 2 & 3, pull Hip Belt straps forward) 2. Tension the Adult Shoulder Straps by pulling down on the gray webbing. 3. Attach the Adult Sternum Strap side-release buckle and tension the webbing. 4. Pull forward and down to tighten the Shoulder Stabilizer Straps on top of the shoulders.
e. If the pack does not feel comfortable or fitted properly, readjust to find the right distance between the hip belt and shoulder straps. Repeat steps A, B and C.
F. When fitting is complete for the adult, remove the frame child carrier and move onto adjusting the carrier for your child.
Fig. 6 1. Hip Belt adjustment
Fig. 6 3. Adult Sternum Strap adjustment
Fig. 6 2. Adult Shoulder Straps adjustment
Fig. 6 4. Shoulder Stabilizer Straps adjustment
KC Air, 2 & 3
KC I
pg. 8
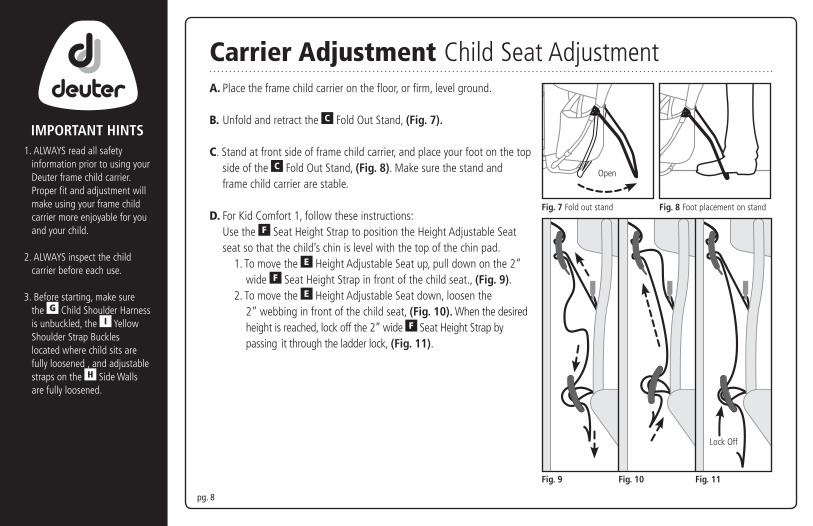
Carrier adjustment Child Seat Adjustmenta. Place the frame child carrier on the floor, or firm, level ground.
B. Unfold and retract the Fold Out Stand, (Fig. 7).
C. Stand at front side of frame child carrier, and place your foot on the top side of the Fold Out Stand, (Fig. 8). Make sure the stand and frame child carrier are stable.
D. For Kid Comfort 1, follow these instructions: Use the Seat Height Strap to position the Height Adjustable Seat seat so that the child’s chin is level with the top of the chin pad. 1. To move the Height Adjustable Seat up, pull down on the 2” wide Seat Height Strap in front of the child seat., (Fig. 9). 2. To move the Height Adjustable Seat down, loosen the 2” webbing in front of the child seat, (Fig. 10). When the desired height is reached, lock off the 2” wide Seat Height Strap by passing it through the ladder lock, (Fig. 11).
1. ALWAYS read all safety information prior to using your Deuter frame child carrier. Proper fit and adjustment will make using your frame child carrier more enjoyable for you and your child.
2. ALWAYS inspect the child carrier before each use.
3. Before starting, make sure the Child Shoulder Harness is unbuckled, the Yellow Shoulder Strap Buckles located where child sits are fully loosened , and adjustable straps on the Side Walls are fully loosened.
Fig. 7 Fold out stand Fig. 8 Foot placement on stand
Open
IMPORTANT hINTS
Fig. 9 Fig. 10 Fig. 11
Lock Off
www.deuter.com / pg. 9
© D
EU
TE
R U
SA
IN
C.
20
14
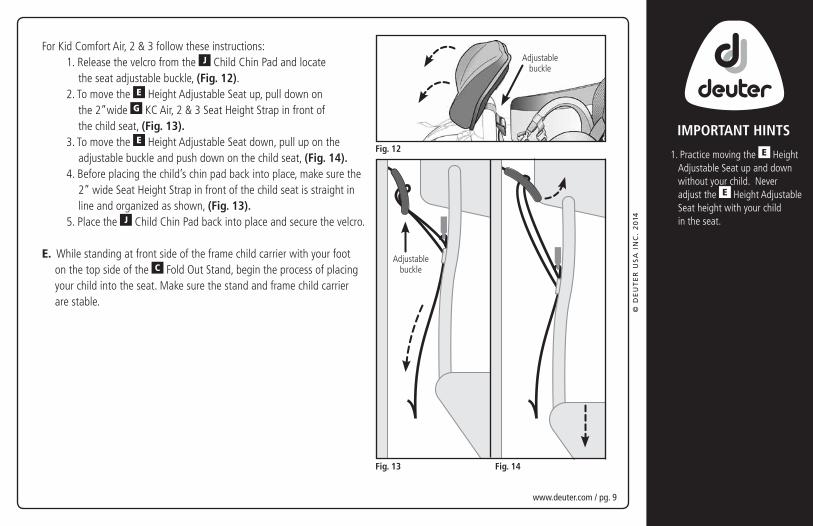
For Kid Comfort Air, 2 & 3 follow these instructions: 1. Release the velcro from the Child Chin Pad and locate the seat adjustable buckle, (Fig. 12). 2. To move the Height Adjustable Seat up, pull down on the 2”wide KC Air, 2 & 3 Seat Height Strap in front of the child seat, (Fig. 13). 3. To move the Height Adjustable Seat down, pull up on the adjustable buckle and push down on the child seat, (Fig. 14). 4. Before placing the child’s chin pad back into place, make sure the 2” wide Seat Height Strap in front of the child seat is straight in line and organized as shown, (Fig. 13). 5. Place the Child Chin Pad back into place and secure the velcro.
e. While standing at front side of the frame child carrier with your foot on the top side of the Fold Out Stand, begin the process of placing your child into the seat. Make sure the stand and frame child carrier are stable.
Fig. 13
Fig. 12
Fig. 14
Adjustablebuckle
Adjustablebuckle
1. Practice moving the Height Adjustable Seat up and down without your child. Never adjust the Height Adjustable Seat height with your child in the seat.
IMPORTANT hINTS

pg. 10
F. Optional Use Adjustable Child Stirrups for Older children-located on left and right side of carriers (KC Air, 2 & 3). 1. If you choose to not use the Ajustable Child Stirrups, please feed the 1” gray webbing through the adjustable ladder lock, (Fig. 15).
2. If you choose to use the Adjustable Child Stirrups, please approximate where the child’s feet will be based on their height and adjust the webbing Adjustable Child Stirrups straps to where the child’s feet will be comfortable, (Fig. 16).
1. Our team of experts includes Dr. Micha Bahr, Medical Director of the paediatric surgical ward at the Ruhr University Hospital in Bochum Germany. Dr. Bahr outlines that: “The rocking movement reminds kids of the movement they felt in their mother’s womb.” Brain research has further shown that the swaying, three-dimensional movement has a positive stimulating effect on the child’s equilibrium organ, “which is very important for the development of the child! You can even say that the transport in a child carrier fosters childrens’ perceptions and senses – compared to kids who are carried around in a car.”
IMPORTANT hINTS
Fig. 16
Fig. 15
Adjustableladder lock
www.deuter.com / pg. 11
© D
EU
TE
R U
SA
IN
C.
20
14
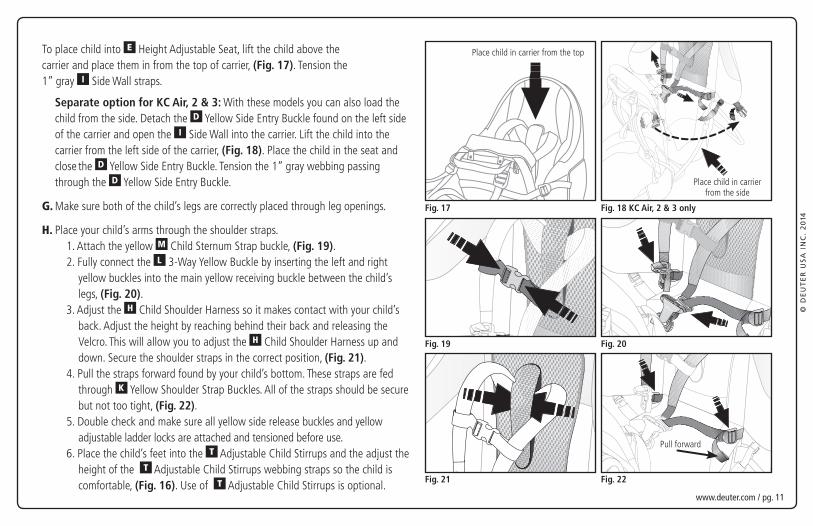
To place child into Height Adjustable Seat, lift the child above the carrier and place them in from the top of carrier, (Fig. 17). Tension the 1” gray Side Wall straps. Separate option for KC Air, 2 & 3: With these models you can also load the child from the side. Detach the Yellow Side Entry Buckle found on the left side of the carrier and open the Side Wall into the carrier. Lift the child into the carrier from the left side of the carrier, (Fig. 18). Place the child in the seat and close the Yellow Side Entry Buckle. Tension the 1” gray webbing passing through the Yellow Side Entry Buckle.
G. Make sure both of the child’s legs are correctly placed through leg openings.
h. Place your child’s arms through the shoulder straps. 1. Attach the yellow Child Sternum Strap buckle, (Fig. 19). 2. Fully connect the 3-Way Yellow Buckle by inserting the left and right yellow buckles into the main yellow receiving buckle between the child’s legs, (Fig. 20). 3. Adjust the Child Shoulder Harness so it makes contact with your child’s back. Adjust the height by reaching behind their back and releasing the Velcro. This will allow you to adjust the Child Shoulder Harness up and down. Secure the shoulder straps in the correct position, (Fig. 21). 4. Pull the straps forward found by your child’s bottom. These straps are fed through Yellow Shoulder Strap Buckles. All of the straps should be secure but not too tight, (Fig. 22). 5. Double check and make sure all yellow side release buckles and yellow adjustable ladder locks are attached and tensioned before use. 6. Place the child’s feet into the Adjustable Child Stirrups and the adjust the height of the Adjustable Child Stirrups webbing straps so the child is comfortable, (Fig. 16). Use of Adjustable Child Stirrups is optional. Fig. 21 Fig. 22
Fig. 19 Fig. 20
Fig. 17 Fig. 18 KC Air, 2 & 3 only
Place child in carrier from the top
Place child in carrierfrom the side
Pull forward
pg. 12
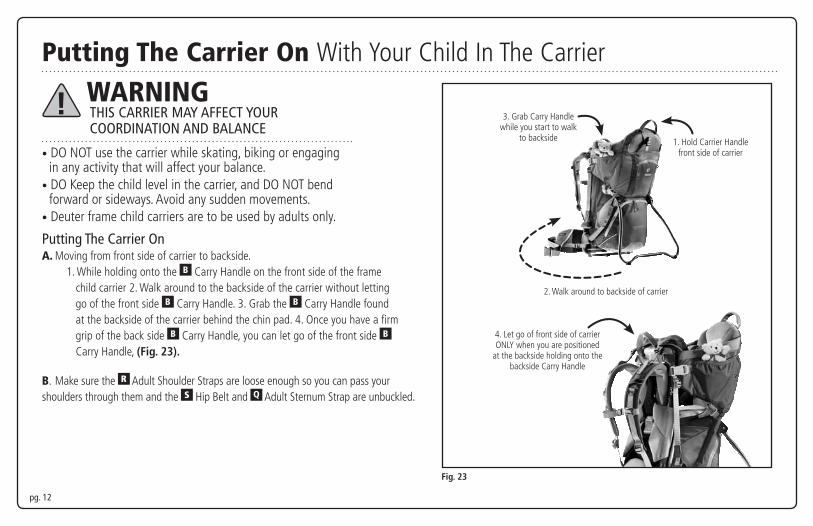
Putting The Carrier Ona. Moving from front side of carrier to backside. 1. While holding onto the Carry Handle on the front side of the frame child carrier 2. Walk around to the backside of the carrier without letting go of the front side Carry Handle. 3. Grab the Carry Handle found at the backside of the carrier behind the chin pad. 4. Once you have a firm grip of the back side Carry Handle, you can let go of the front side Carry Handle, (Fig. 23).
B. Make sure the Adult Shoulder Straps are loose enough so you can pass your shoulders through them and the Hip Belt and Adult Sternum Strap are unbuckled.
Putting the Carrier on With Your Child In The Carrier
WarninG THIS CARRIER MAY AFFECT YOUR COORDINATION AND BALANCE
• DO NOT use the carrier while skating, biking or engaging in any activity that will affect your balance.• DO Keep the child level in the carrier, and DO NOT bend forward or sideways. Avoid any sudden movements.• Deuter frame child carriers are to be used by adults only.
1. Hold Carrier Handle front side of carrier
3. Grab Carry Handle while you start to walk
to backside
2. Walk around to backside of carrier
4. Let go of front side of carrier ONLY when you are positioned
at the backside holding onto the backside Carry Handle
Fig. 23
www.deuter.com / pg. 13
© D
EU
TE
R U
SA
IN
C.
20
14
1. DO practice putting carrier on and taking carrier off without the child in the carrier.
2. Doing several practice runs will make you more comfortable with this process.
3. Before putting carrier on, make sure the Height Adjustable Seat has been adjusted correctly, and that all buckles and straps of the 5 Point Safety Harness are fastened and tightened.
4. Before putting the carrier on or taking it off, look around you to be sure there is no obstacle nearby that the child could strike or the carrier could catch on.
5. DO NOT shake or jar the child unnecessarily.
6. DO lift and lower the carrier gently.
IMPORTANT hINTS
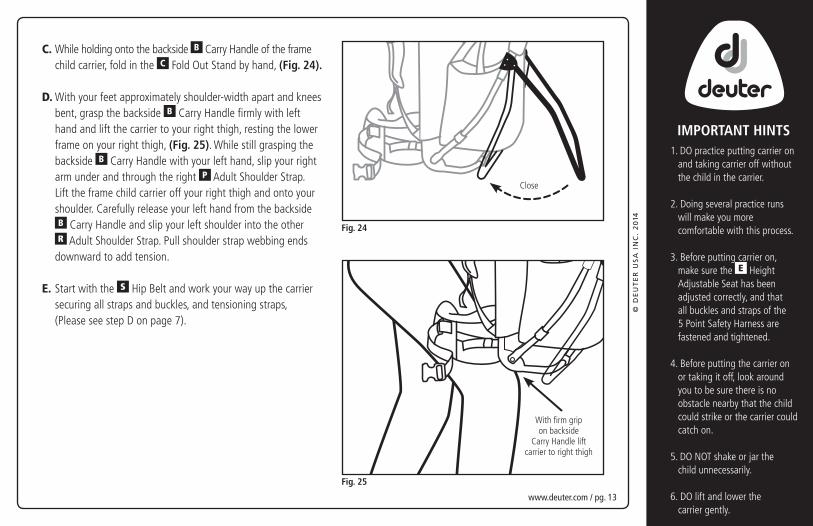
C. While holding onto the backside Carry Handle of the frame child carrier, fold in the Fold Out Stand by hand, (Fig. 24). D. With your feet approximately shoulder-width apart and knees bent, grasp the backside Carry Handle firmly with left hand and lift the carrier to your right thigh, resting the lower frame on your right thigh, (Fig. 25). While still grasping the backside Carry Handle with your left hand, slip your right arm under and through the right Adult Shoulder Strap. Lift the frame child carrier off your right thigh and onto your shoulder. Carefully release your left hand from the backside Carry Handle and slip your left shoulder into the other Adult Shoulder Strap. Pull shoulder strap webbing ends downward to add tension.
e. Start with the Hip Belt and work your way up the carrier securing all straps and buckles, and tensioning straps, (Please see step D on page 7).
Close
With firm grip on backside
Carry Handle lift carrier to right thigh
Fig. 24
Fig. 25
pg. 14
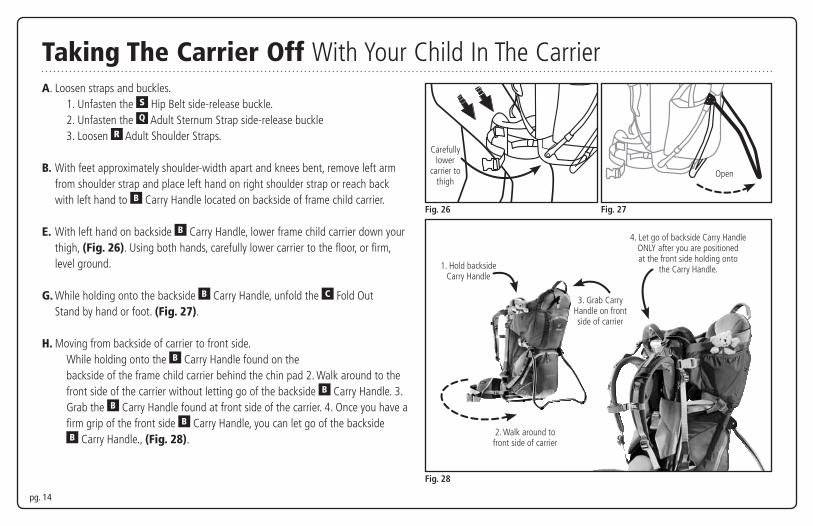
a. Loosen straps and buckles. 1. Unfasten the Hip Belt side-release buckle. 2. Unfasten the Adult Sternum Strap side-release buckle 3. Loosen Adult Shoulder Straps.
B. With feet approximately shoulder-width apart and knees bent, remove left arm from shoulder strap and place left hand on right shoulder strap or reach back with left hand to Carry Handle located on backside of frame child carrier. e. With left hand on backside Carry Handle, lower frame child carrier down your thigh, (Fig. 26). Using both hands, carefully lower carrier to the floor, or firm, level ground.
G. While holding onto the backside Carry Handle, unfold the Fold Out Stand by hand or foot. (Fig. 27).
h. Moving from backside of carrier to front side. While holding onto the Carry Handle found on the backside of the frame child carrier behind the chin pad 2. Walk around to the front side of the carrier without letting go of the backside Carry Handle. 3. Grab the Carry Handle found at front side of the carrier. 4. Once you have a firm grip of the front side Carry Handle, you can let go of the backside Carry Handle., (Fig. 28).
taking the Carrier off With Your Child In The Carrier
Fig. 26 Fig. 27
Fig. 28
Open
Carefully lower
carrier to thigh
3. Grab Carry Handle on front side of carrier
1. Hold backside Carry Handle
2. Walk around to front side of carrier
4. Let go of backside Carry Handle ONLY after you are positioned at the front side holding onto
the Carry Handle.
www.deuter.com / pg. 15
© D
EU
TE
R U
SA
IN
C.
20
14
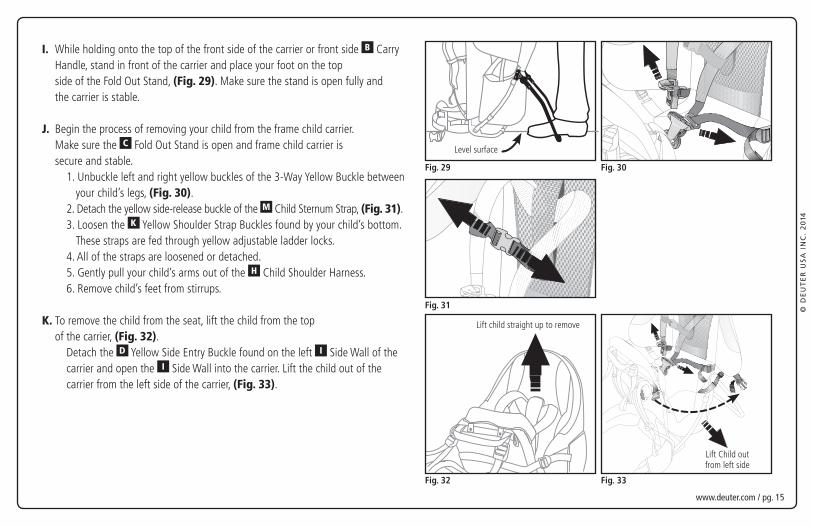
i. While holding onto the top of the front side of the carrier or front side Carry Handle, stand in front of the carrier and place your foot on the top side of the Fold Out Stand, (Fig. 29). Make sure the stand is open fully and the carrier is stable.
J. Begin the process of removing your child from the frame child carrier. Make sure the Fold Out Stand is open and frame child carrier is secure and stable. 1. Unbuckle left and right yellow buckles of the 3-Way Yellow Buckle between your child’s legs, (Fig. 30). 2. Detach the yellow side-release buckle of the Child Sternum Strap, (Fig. 31). 3. Loosen the Yellow Shoulder Strap Buckles found by your child’s bottom. These straps are fed through yellow adjustable ladder locks. 4. All of the straps are loosened or detached. 5. Gently pull your child’s arms out of the Child Shoulder Harness. 6. Remove child’s feet from stirrups.
K. To remove the child from the seat, lift the child from the top of the carrier, (Fig. 32). Detach the Yellow Side Entry Buckle found on the left Side Wall of the carrier and open the Side Wall into the carrier. Lift the child out of the carrier from the left side of the carrier, (Fig. 33).
Fig. 29 Fig. 30
Fig. 31
Fig. 32 Fig. 33
Lift child straight up to remove
Lift Child out from left side
Level surface
pg. 16
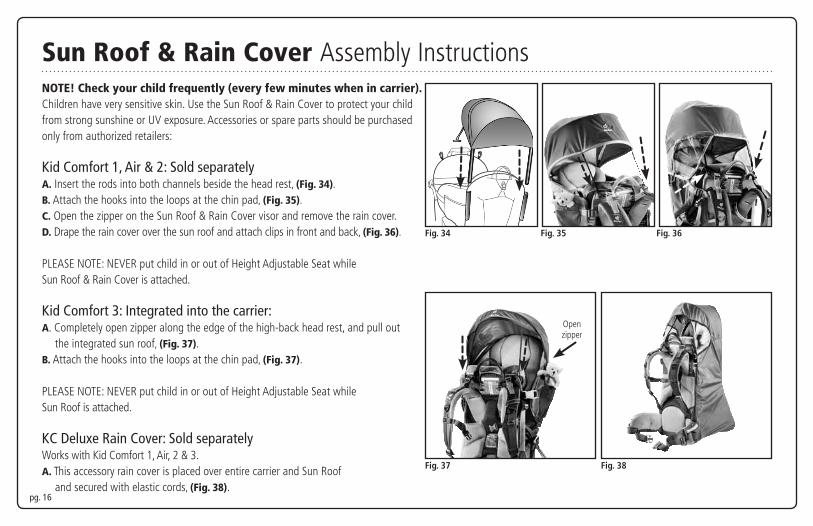
note! Check your child frequently (every few minutes when in carrier). Children have very sensitive skin. Use the Sun Roof & Rain Cover to protect your child from strong sunshine or UV exposure. Accessories or spare parts should be purchased only from authorized retailers:
Kid Comfort 1, Air & 2: Sold separatelya. Insert the rods into both channels beside the head rest, (Fig. 34). B. Attach the hooks into the loops at the chin pad, (Fig. 35).
C. Open the zipper on the Sun Roof & Rain Cover visor and remove the rain cover.D. Drape the rain cover over the sun roof and attach clips in front and back, (Fig. 36).
PLEASE NOTE: NEVER put child in or out of Height Adjustable Seat whileSun Roof & Rain Cover is attached.
Kid Comfort 3: Integrated into the carrier: a. Completely open zipper along the edge of the high-back head rest, and pull out the integrated sun roof, (Fig. 37). B. Attach the hooks into the loops at the chin pad, (Fig. 37).
PLEASE NOTE: NEVER put child in or out of Height Adjustable Seat whileSun Roof is attached.
KC Deluxe Rain Cover: Sold separatelyWorks with Kid Comfort 1, Air, 2 & 3.a. This accessory rain cover is placed over entire carrier and Sun Roof and secured with elastic cords, (Fig. 38).
Sun roof & rain Cover Assembly Instructions
Fig. 34
Fig. 37 Fig. 38
Fig. 36Fig. 35
Openzipper
www.deuter.com / pg. 17
© D
EU
TE
R U
SA
IN
C.
20
14
Register Your Deuter Frame Child Carrier
Deuter’s Limited Lifetime Warranty
Deuter USA, Inc. would like to keep you informed of any product information regarding your Deuter frame child carrier. Please register your Deuter frame child carrier at http://blog.deuterusa.com/deuter-kid-carrier-registration so we can keep you informed or fill out and return the included registration card.
Deuter USA, Inc. warrants its products against defects in materials and workmanship for the lifetime of the product. This warranty does not cover the damage caused by extreme use, improper care, or the natural breakdown of material over time. If a product is deemed defective, Deuter will repair or replace it. Because Deuter does not sell direct to consumers, monetary refund or credit is not possible. If damages are not covered under warranty, Deuter offers repair services. Charges for repairs will be figured at time of evaluation. Depending on availability, Deuter can accommodate requests for spare parts. **Please note that Deuter USA, Inc. does not warrant or offer repair service on any products that are sold and purchased through online auction sites.
Contact Us1200 South Fordham St. Suite CLongmont, CO 80503phone 877.384.9252 / fax 303.652.3125 Email: [email protected]

1200 South Fordham St. Suite CLongmont, CO 80503phone 877.384.9252 / fax 303.652.3125 Email: [email protected]