Embed Size (px)
Citation preview

Overview .................................................................................................................................. 2 Quick Reference ........................................................................................................................ 4 KI Functions.............................................................................................................................. 5 Chat Features............................................................................................................................ 6 Marker Game‘Send To’ View ....................................................................................................... 7 ‘Send To’ View .......................................................................................................................... 8 Age/Journal View....................................................................................................................... 9 Player List Views.......................................................................................................................10 Setting/Age Description View.....................................................................................................11 Settings/Audio View..................................................................................................................11 Neighborhood Rules..................................................................................................................12 Neighborhood Tasks .................................................................................................................13 Placing a KI Image on an Imager...............................................................................................14 Terminology.............................................................................................................................15 Change Record.........................................................................................................................16
KI USER GUIDE
(supporting Uru pre-release .11)
June 4, 2003
D’ni Restoration Council · KI User Guide, supporting Uru pre-release .11 2
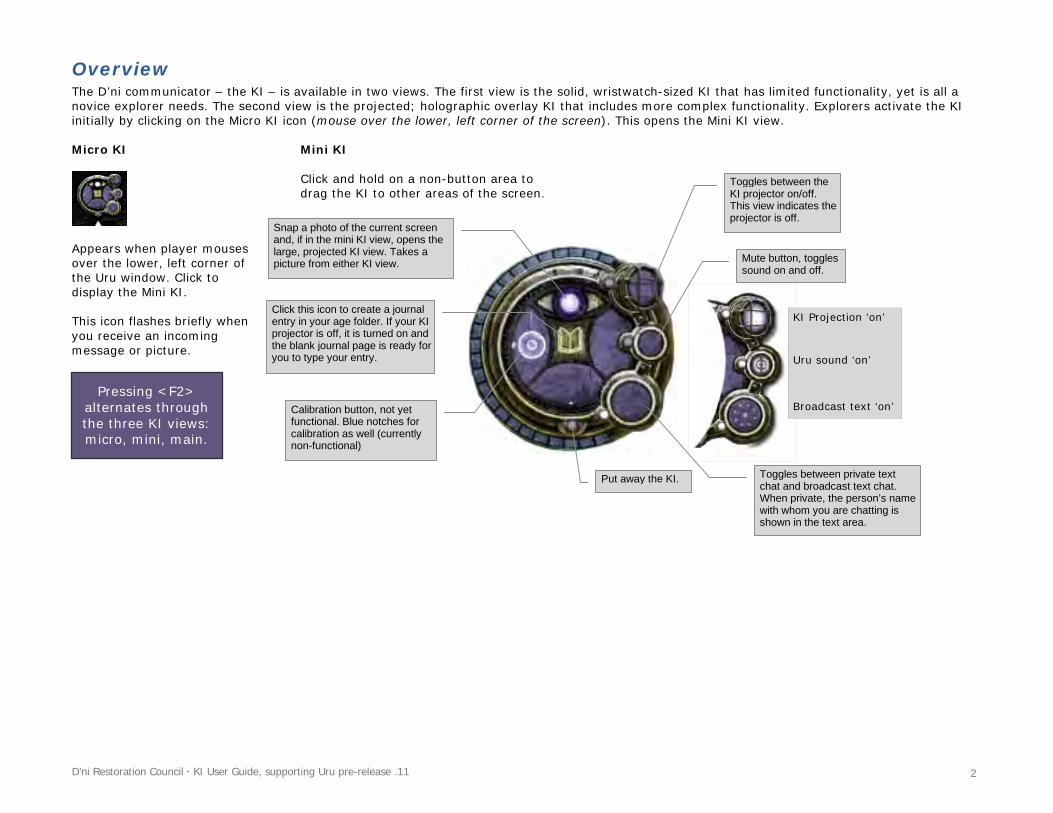
Overview The D’ni communicator – the KI – is available in two views. The first view is the solid, wristwatch-sized KI that has limited functionality, yet is all a novice explorer needs. The second view is the projected; holographic overlay KI that includes more complex functionality. Explorers activate the KI initially by clicking on the Micro KI icon (mouse over the lower, left corner of the screen). This opens the Mini KI view. Micro KI
Appears when player mouses over the lower, left corner of the Uru window. Click to display the Mini KI. This icon flashes briefly when you receive an incoming message or picture.
Mini KI Click and hold on a non-button area to drag the KI to other areas of the screen.
Toggles between private text chat and broadcast text chat. When private, the person’s name with whom you are chatting is shown in the text area.
Put away the KI.
Snap a photo of the current screen and, if in the mini KI view, opens the large, projected KI view. Takes a picture from either KI view.
Click this icon to create a journal entry in your age folder. If your KI projector is off, it is turned on and the blank journal page is ready for you to type your entry.
Mute button, toggles sound on and off.
Toggles between the KI projector on/off. This view indicates the projector is off.
KI Projection ‘on’
Uru sound ‘on’
Broadcast text ‘on’Pressing <F2>
alternates through the three KI views: micro, mini, main.
Calibration button, not yet functional. Blue notches for calibration as well (currently non-functional)
D’ni Restoration Council · KI User Guide, supporting Uru pre-release .11 3
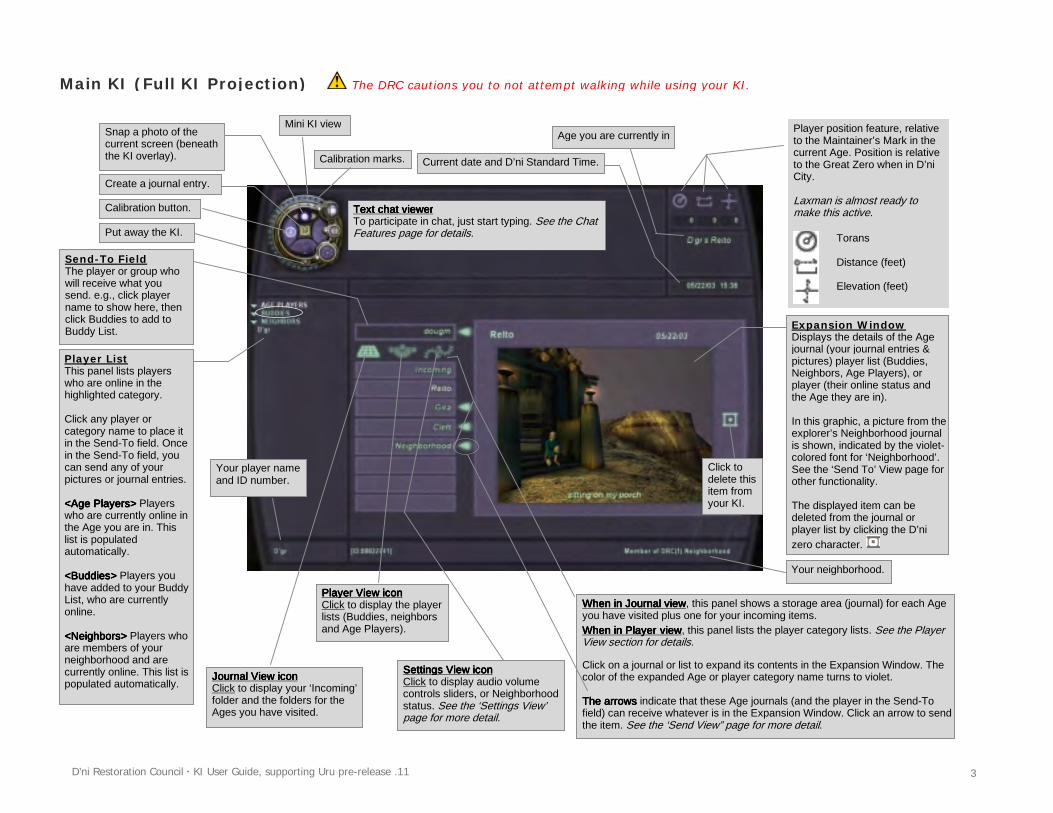
Current date and D’ni Standard Time.
Player List This panel lists players who are online in the highlighted category. Click any player or category name to place it in the Send-To field. Once in the Send-To field, you can send any of your pictures or journal entries. <Age Players><Age Players><Age Players><Age Players> Players who are currently online in the Age you are in. This list is populated automatically. <Buddies><Buddies><Buddies><Buddies> Players you have added to your Buddy List, who are currently online. <Neighbors><Neighbors><Neighbors><Neighbors> Players who are members of your neighborhood and are currently online. This list is populated automatically.
Expansion WindowDisplays the details of the Age journal (your journal entries & pictures) player list (Buddies, Neighbors, Age Players), or player (their online status and the Age they are in). In this graphic, a picture from the explorer’s Neighborhood journal is shown, indicated by the violet-colored font for ‘Neighborhood’. See the ‘Send To’ View page for other functionality. The displayed item can be deleted from the journal or player list by clicking the D’ni zero character.
Send-To Field The player or group who will receive what you send. e.g., click player name to show here, then click Buddies to add to Buddy List.
Your player name and ID number.
Player View iconPlayer View iconPlayer View iconPlayer View iconClick to display the player lists (Buddies, neighbors and Age Players).
Journal View iconJournal View iconJournal View iconJournal View icon Click to display your ‘Incoming’ folder and the folders for the Ages you have visited.
When in Journal viewWhen in Journal viewWhen in Journal viewWhen in Journal view, this panel shows a storage area (journal) for each Age you have visited plus one for your incoming items. When in PlWhen in PlWhen in PlWhen in Playerayerayerayer
viewviewviewview, this panel lists the player category lists. See the Player View section for details.
Click on a journal or list to expand its contents in the Expansion Window. The color of the expanded Age or player category name turns to violet. The arrowsThe arrowsThe arrowsThe arrows indicate that these Age journals (and the player in the Send-To field) can receive whatever is in the Expansion Window. Click an arrow to send the item. See the ‘Send View” page for more detail.
Snap a photo of the current screen (beneath the KI overlay).
Mini KI view
Create a journal entry.
Put away the KI.
Settings View iconSettings View iconSettings View iconSettings View iconClick to display audio volume controls sliders, or Neighborhood status. See the ‘Settings View’ page for more detail.
Text chat viewerText chat viewerText chat viewerText chat viewer To participate in chat, just start typing. See the Chat Features page for details.
Age you are currently in
Click to delete this item from your KI.
Main KI (Full KI Projection) The DRC cautions you to not attempt walking while using your KI.
Calibration marks.
Calibration button.
Your neighborhood.
Player position feature, relative to the Maintainer’s Mark in the current Age. Position is relative to the Great Zero when in D’ni City. Laxman is almost ready to make this active.
Torans Distance (feet) Elevation (feet)
D’ni Restoration Council · KI User Guide, supporting Uru pre-release .11 4
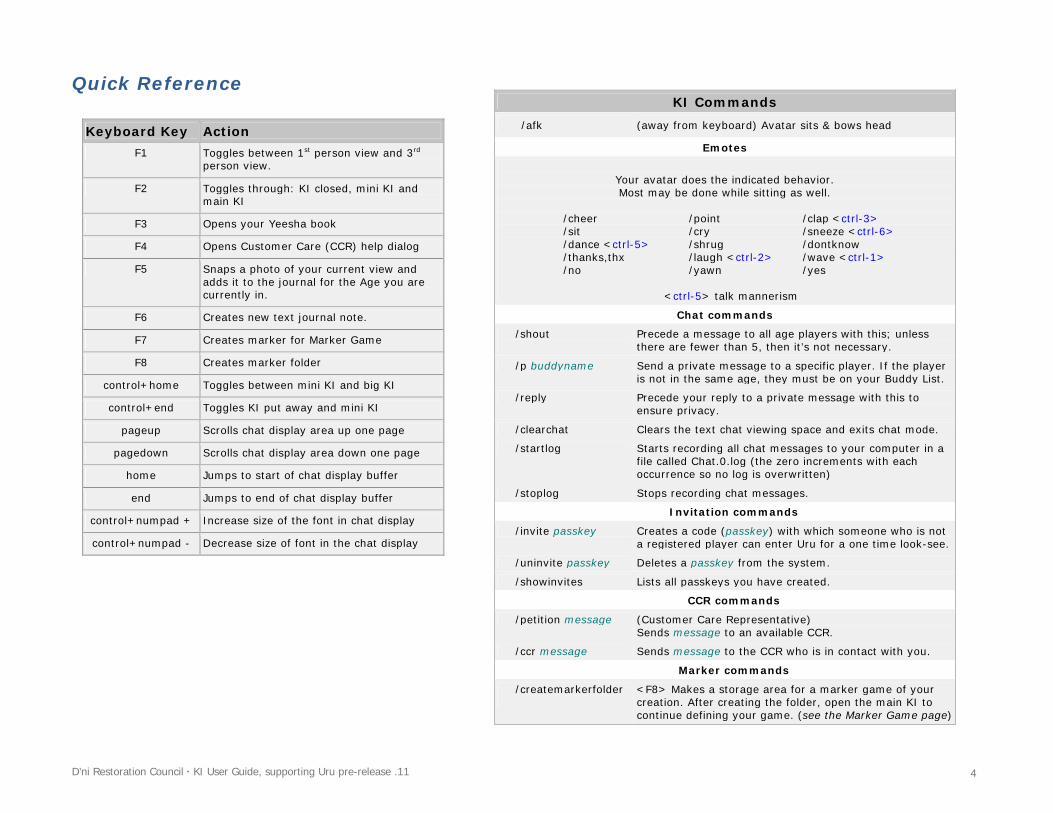
Quick Reference
Keyboard Key Action F1 Toggles between 1st person view and 3rd
person view.
F2 Toggles through: KI closed, mini KI and main KI
F3 Opens your Yeesha book
F4 Opens Customer Care (CCR) help dialog
F5 Snaps a photo of your current view and adds it to the journal for the Age you are currently in.
F6 Creates new text journal note.
F7 Creates marker for Marker Game
F8 Creates marker folder
control+home Toggles between mini KI and big KI
control+end Toggles KI put away and mini KI
pageup Scrolls chat display area up one page
pagedown Scrolls chat display area down one page
home Jumps to start of chat display buffer
end Jumps to end of chat display buffer
control+numpad + Increase size of the font in chat display
control+numpad - Decrease size of font in the chat display
KI Commands
/afk (away from keyboard) Avatar sits & bows head
Emotes
Your avatar does the indicated behavior. Most may be done while sitting as well.
/cheer /point /clap <ctrl-3> /sit /cry /sneeze <ctrl-6> /dance <ctrl-5> /shrug /dontknow /thanks,thx /laugh <ctrl-2> /wave <ctrl-1> /no /yawn /yes
<ctrl-5> talk mannerism
Chat commands
/shout
Precede a message to all age players with this; unless there are fewer than 5, then it’s not necessary.
/p buddyname Send a private message to a specific player. If the player is not in the same age, they must be on your Buddy List.
/reply Precede your reply to a private message with this to ensure privacy.
/clearchat Clears the text chat viewing space and exits chat mode.
/startlog Starts recording all chat messages to your computer in a file called Chat.0.log (the zero increments with each occurrence so no log is overwritten)
/stoplog Stops recording chat messages.
Invitation commands
/invite passkey Creates a code (passkey) with which someone who is not a registered player can enter Uru for a one time look-see.
/uninvite passkey Deletes a passkey from the system.
/showinvites Lists all passkeys you have created.
CCR commands
/petition message (Customer Care Representative) Sends message to an available CCR.
/ccr message Sends message to the CCR who is in contact with you.
Marker commands
/createmarkerfolder
<F8> Makes a storage area for a marker game of your creation. After creating the folder, open the main KI to continue defining your game. (see the Marker Game page)
D’ni Restoration Council · KI User Guide, supporting Uru pre-release .11 5
KI Functions
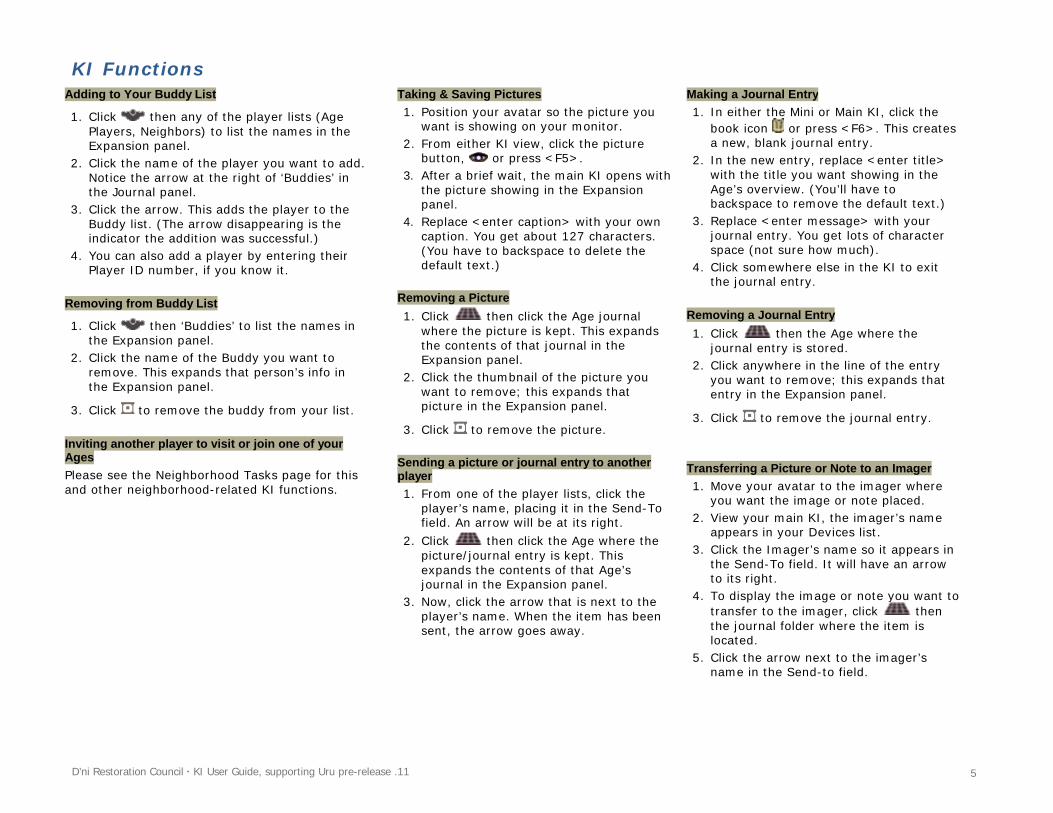
Adding to Your Buddy List
1. Click then any of the player lists (Age Players, Neighbors) to list the names in the Expansion panel.
2. Click the name of the player you want to add. Notice the arrow at the right of ‘Buddies’ in the Journal panel.
3. Click the arrow. This adds the player to the Buddy list. (The arrow disappearing is the indicator the addition was successful.)
4. You can also add a player by entering their Player ID number, if you know it.
Removing from Buddy List
1. Click then ‘Buddies’ to list the names in the Expansion panel.
2. Click the name of the Buddy you want to remove. This expands that person’s info in the Expansion panel.
3. Click to remove the buddy from your list. Inviting another player to visit or join one of your Ages Please see the Neighborhood Tasks page for this and other neighborhood-related KI functions.
Taking & Saving Pictures1. Position your avatar so the picture you
want is showing on your monitor. 2. From either KI view, click the picture
button, or press <F5>. 3. After a brief wait, the main KI opens with
the picture showing in the Expansion panel.
4. Replace <enter caption> with your own caption. You get about 127 characters. (You have to backspace to delete the default text.)
Removing a Picture
1. Click then click the Age journal where the picture is kept. This expands the contents of that journal in the Expansion panel.
2. Click the thumbnail of the picture you want to remove; this expands that picture in the Expansion panel.
3. Click to remove the picture. Sending a picture or journal entry to another player 1. From one of the player lists, click the
player’s name, placing it in the Send-To field. An arrow will be at its right.
2. Click then click the Age where the picture/journal entry is kept. This expands the contents of that Age’s journal in the Expansion panel.
3. Now, click the arrow that is next to the player’s name. When the item has been sent, the arrow goes away.
Making a Journal Entry1. In either the Mini or Main KI, click the
book icon or press <F6>. This creates a new, blank journal entry.
2. In the new entry, replace <enter title> with the title you want showing in the Age’s overview. (You’ll have to backspace to remove the default text.)
3. Replace <enter message> with your journal entry. You get lots of character space (not sure how much).
4. Click somewhere else in the KI to exit the journal entry.
Removing a Journal Entry
1. Click then the Age where the journal entry is stored.
2. Click anywhere in the line of the entry you want to remove; this expands that entry in the Expansion panel.
3. Click to remove the journal entry. Transferring a Picture or Note to an Imager 1. Move your avatar to the imager where
you want the image or note placed. 2. View your main KI, the imager’s name
appears in your Devices list. 3. Click the Imager’s name so it appears in
the Send-To field. It will have an arrow to its right.
4. To display the image or note you want to transfer to the imager, click then the journal folder where the item is located.
5. Click the arrow next to the imager’s name in the Send-to field.
D’ni Restoration Council · KI User Guide, supporting Uru pre-release .11 6
Chat Features
Voice Chat • Press and hold the Tab key on your keyboard, be
sure the talk light is green, then speak into your headset microphone.
• Release the Tab key to end your verbal message. • It is sometimes necessary to hold the Tab key down a moment
before starting to speak, to avoid cutting off the beginning of your message.
Text Chat
1. Start text chatting by simply typing your message. The mini KI opens and the text chat viewing area is displayed and the players who are currently within range of you are listed. Note: If you remap your keyboard keys, you may run into some conflicts with text chatting.
2. Click on a player to send a private message. Their name will be shown in dark pink.
3. Click ‘Age Players’ to send a broadcast message to all the listed players.
4. Type <Esc> to exit text chat mode, which you must do before you can move your avatar.
Text Chat & Emote Commands You can give your avatar chat and emote commands by typing them into the text chat space. This lets you control your avatar’s behavior while also chatting. Here’s how: At the text chat prompt (>), type a slash (/) then the command, then a space followed by your text message. For example: /wave Hi Everyone The message “Hi Everyone.” Is displayed to all who are near and your avatar is seen waving. /shout Hi Everyone Everyone in the Age, regardless of distance from you, can see your message if you type ‘/shout’ first. /p IMForeman Hi IMF, where are you? By typing ‘/p buddyname’ you can send a private message to only that person. (Must be on your buddy list.)
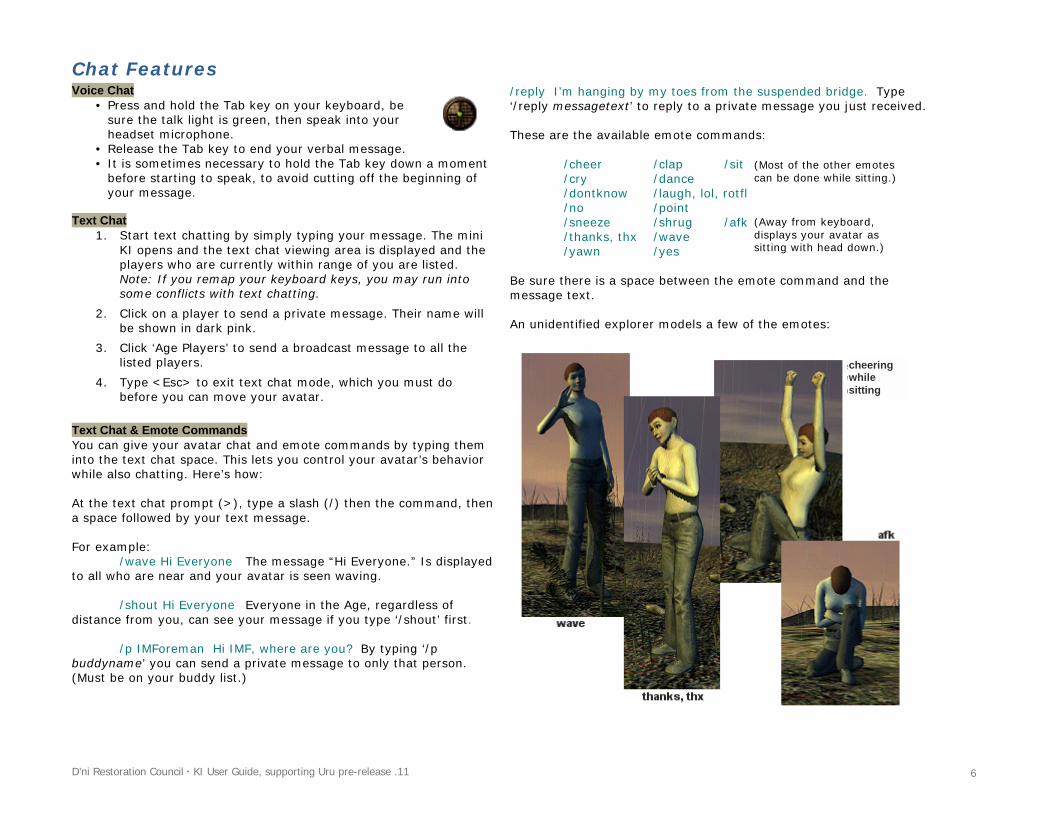
/reply I’m hanging by my toes from the suspended bridge. Type ‘/reply messagetext’ to reply to a private message you just received. These are the available emote commands: /cheer /clap /sit /cry /dance /dontknow /laugh, lol, rotfl /no /point /sneeze /shrug /afk /thanks, thx /wave /yawn /yes Be sure there is a space between the emote command and the message text. An unidentified explorer models a few of the emotes:
(Most of the other emotes can be done while sitting.)
(Away from keyboard, displays your avatar as sitting with head down.)
cheeringwhile sitting
D’ni Restoration Council · KI User Guide, supporting Uru pre-release .11 7
Marker GameThe Marker Game is a game created by KI users that have calibrated their KI. The games can be used to challenge their fellow KI users. It can be a fast paced multi-player game of "capturing markers" or a puzzle/exploration "quest" game that is played alone. The creator of the game can place markers that are easy or hard to find. The creator can also set the text of a marker as a hint for the next marker. There are three types of marker games:
Capture This is a team-based game. The object is for each team member to capture a marker by colliding with it. The team that captures the most markers before all the markers are gone or a time limit is reached wins. Teams are automatically balanced as the invited players join the game. All the markers must be in the same Age. Hold This is also a team-based game. The object is for team members to capture and hold markers. Once a marker has been captured, it can be re-capture by an opposing team member, adding it to their team’s marker tally. The game continues until the time limit expires. At the end of the game, the team that has the most markers wins. Teams are automatically balanced as the invited players join the game. All the markers must be in the same Age. Quest This is a single player game where the object is to find (and capture) all the marks. The text associated with each marker can be used as a hint to the next marker. There is no time limit and the player can play the game, stop playing for a while and resume playing at a later time. The markers can be in as many different Ages as you want. A creator of a Quest game can send a game (via KImail) to another player for them to play.
Sending a Game to Another Player Each game you create is listed in your Age journal, just like a picture or a journal entry. You can send a game to someone the same way you would send the picture or journal entry, by selecting the person to put their name in the Send-To field, then display your Age journal, click the game, then click the arrow that’s next to the person’s name. The person receiving the game will be able to play the game you sent them, but will not be able to edit (change) it. If you are the creator, you can change your copy and everyone that has a copy should see the changes reflected in their copy.
Basic KI Marker GameNote: In Uru’s released form, a player must calibrate his or her KI before any of the Marker Game features can be used.
1. Create a Marker Game Folder by either of these methods: type ‘/createmarkerfolder’ press <F8>
2. The main KI opens to the Marker creation view. Click ‘Edit Game’.
3. Choose the game type.
4. Choose the game duration (Hold or Capture games only)
5. Staying in Edit mode, close the KI (F2, F2).
6. Move your avatar to the locations where you want to place markers. At each location press <F7>.
7. Reopen the KI to the Marker Edit view. (F2, F2)
8. Click on Marker List. This displays all of your markers. Click on one to change its default text, or to remove it completely.
9. Click ‘Done Editing’.
10. Click ‘Play Game’. If this is a Capture or a Hold game, you will be in Invite mode. You can now invite all players currently in the same Age where you are, or click individuals and invite them one at a time. When other players join, their name is added to a team list and displayed on all game participants’ KIs. If this is a Quest game, clicking ‘Play Game’ starts (or restarts) the game. And on the game screen the status line will tell you whether you have found all the markers or not. Also, a list of the markers that you have already found is displayed.
D’ni Restoration Council · KI User Guide, supporting Uru pre-release .11 8
‘Send To’ View
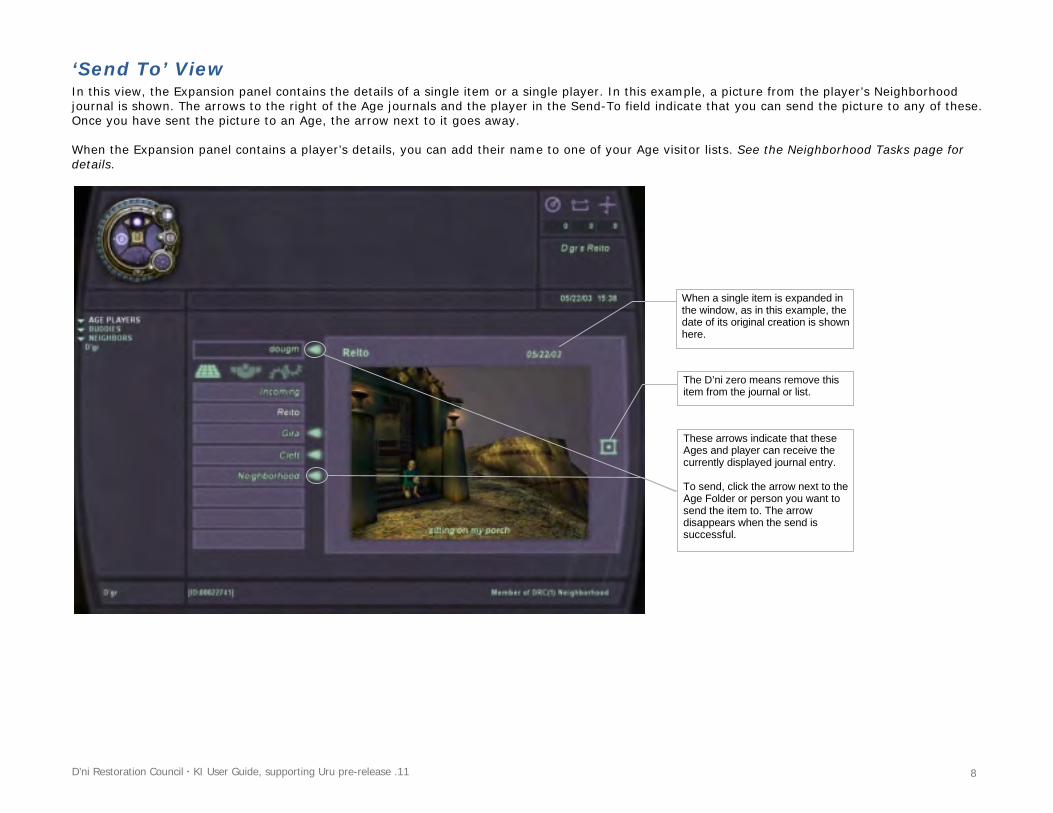
In this view, the Expansion panel contains the details of a single item or a single player. In this example, a picture from the player’s Neighborhood journal is shown. The arrows to the right of the Age journals and the player in the Send-To field indicate that you can send the picture to any of these. Once you have sent the picture to an Age, the arrow next to it goes away. When the Expansion panel contains a player’s details, you can add their name to one of your Age visitor lists. See the Neighborhood Tasks page for details.
The D’ni zero means remove this item from the journal or list.
When a single item is expanded in the window, as in this example, the date of its original creation is shown here.
These arrows indicate that these Ages and player can receive the currently displayed journal entry. To send, click the arrow next to the Age Folder or person you want to send the item to. The arrow disappears when the send is successful.
D’ni Restoration Council · KI User Guide, supporting Uru pre-release .11 9
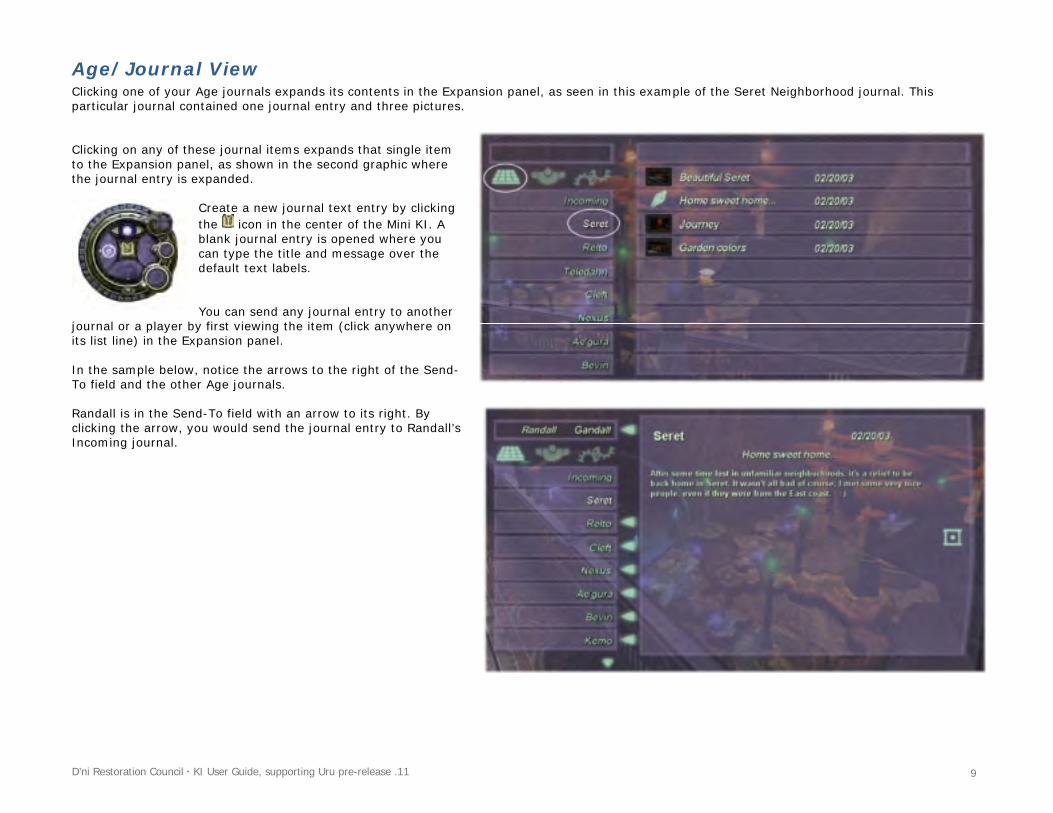
Age/Journal View Clicking one of your Age journals expands its contents in the Expansion panel, as seen in this example of the Seret Neighborhood journal. This particular journal contained one journal entry and three pictures. Clicking on any of these journal items expands that single item to the Expansion panel, as shown in the second graphic where the journal entry is expanded.
Create a new journal text entry by clicking the icon in the center of the Mini KI. A blank journal entry is opened where you can type the title and message over the default text labels. You can send any journal entry to another
journal or a player by first viewing the item (click anywhere on its list line) in the Expansion panel. In the sample below, notice the arrows to the right of the Send-To field and the other Age journals. Randall is in the Send-To field with an arrow to its right. By clicking the arrow, you would send the journal entry to Randall’s Incoming journal.
D’ni Restoration Council · KI User Guide, supporting Uru pre-release .11 10
Player List Views
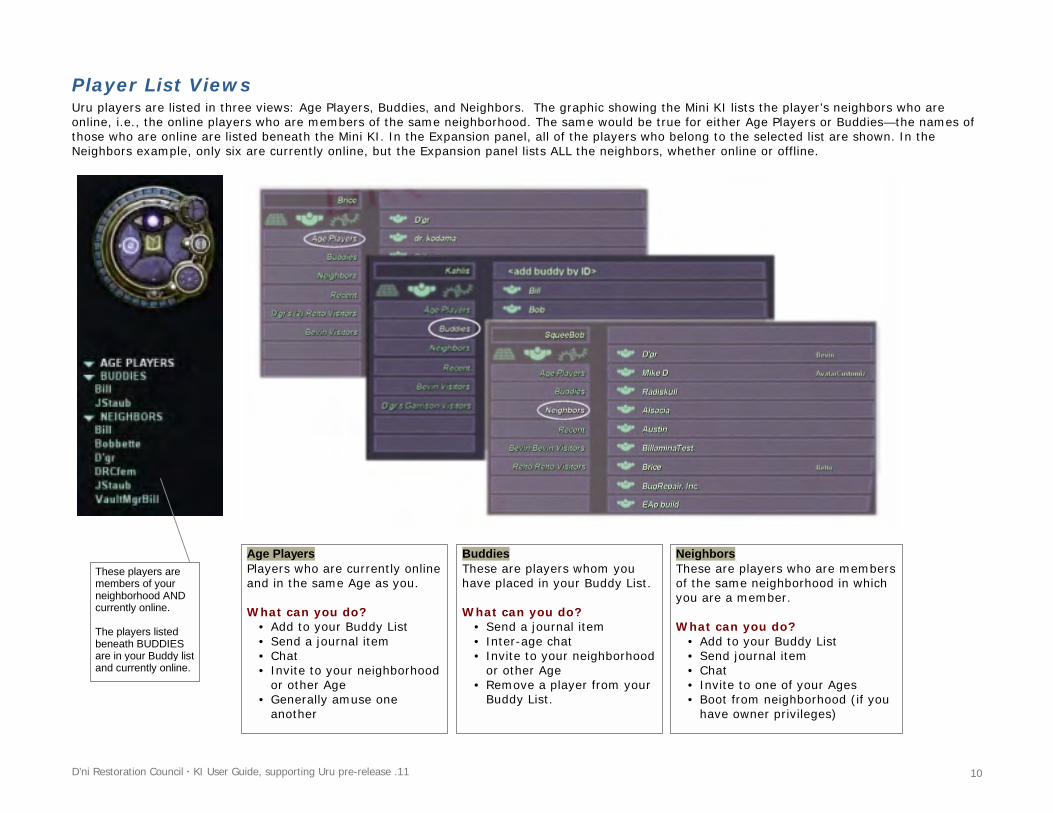
Uru players are listed in three views: Age Players, Buddies, and Neighbors. The graphic showing the Mini KI lists the player’s neighbors who are online, i.e., the online players who are members of the same neighborhood. The same would be true for either Age Players or Buddies—the names of those who are online are listed beneath the Mini KI. In the Expansion panel, all of the players who belong to the selected list are shown. In the Neighbors example, only six are currently online, but the Expansion panel lists ALL the neighbors, whether online or offline.
Age Players Players who are currently online and in the same Age as you. What can you do?
• Add to your Buddy List • Send a journal item • Chat • Invite to your neighborhood
or other Age • Generally amuse one
another
BuddiesThese are players whom you have placed in your Buddy List. What can you do?
• Send a journal item • Inter-age chat • Invite to your neighborhood
or other Age • Remove a player from your
Buddy List.
NeighborsThese are players who are members of the same neighborhood in which you are a member. What can you do?
• Add to your Buddy List • Send journal item • Chat • Invite to one of your Ages • Boot from neighborhood (if you
have owner privileges)
These players are members of your neighborhood AND currently online. The players listed beneath BUDDIES are in your Buddy list and currently online.
D’ni Restoration Council · KI User Guide, supporting Uru pre-release .11 11
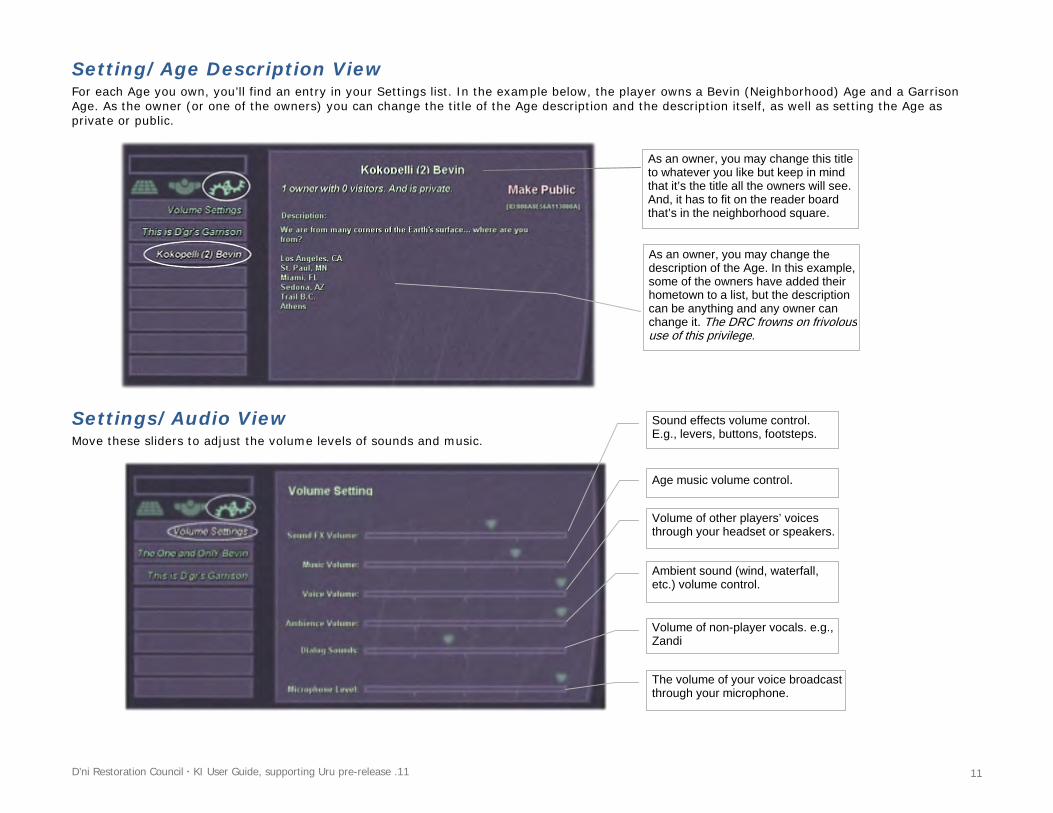
Setting/Age Description View For each Age you own, you’ll find an entry in your Settings list. In the example below, the player owns a Bevin (Neighborhood) Age and a Garrison Age. As the owner (or one of the owners) you can change the title of the Age description and the description itself, as well as setting the Age as private or public.
Settings/Audio View Move these sliders to adjust the volume levels of sounds and music.
As an owner, you may change the description of the Age. In this example, some of the owners have added their hometown to a list, but the description can be anything and any owner can change it. The DRC frowns on frivoloususe of this privilege.
As an owner, you may change this title to whatever you like but keep in mind that it’s the title all the owners will see. And, it has to fit on the reader board that’s in the neighborhood square.
Sound effects volume control. E.g., levers, buttons, footsteps.
Age music volume control.
Volume of other players’ voices through your headset or speakers.
Ambient sound (wind, waterfall, etc.) volume control.
Volume of non-player vocals. e.g., Zandi
The volume of your voice broadcast through your microphone.
D’ni Restoration Council · KI User Guide, supporting Uru pre-release .11 12
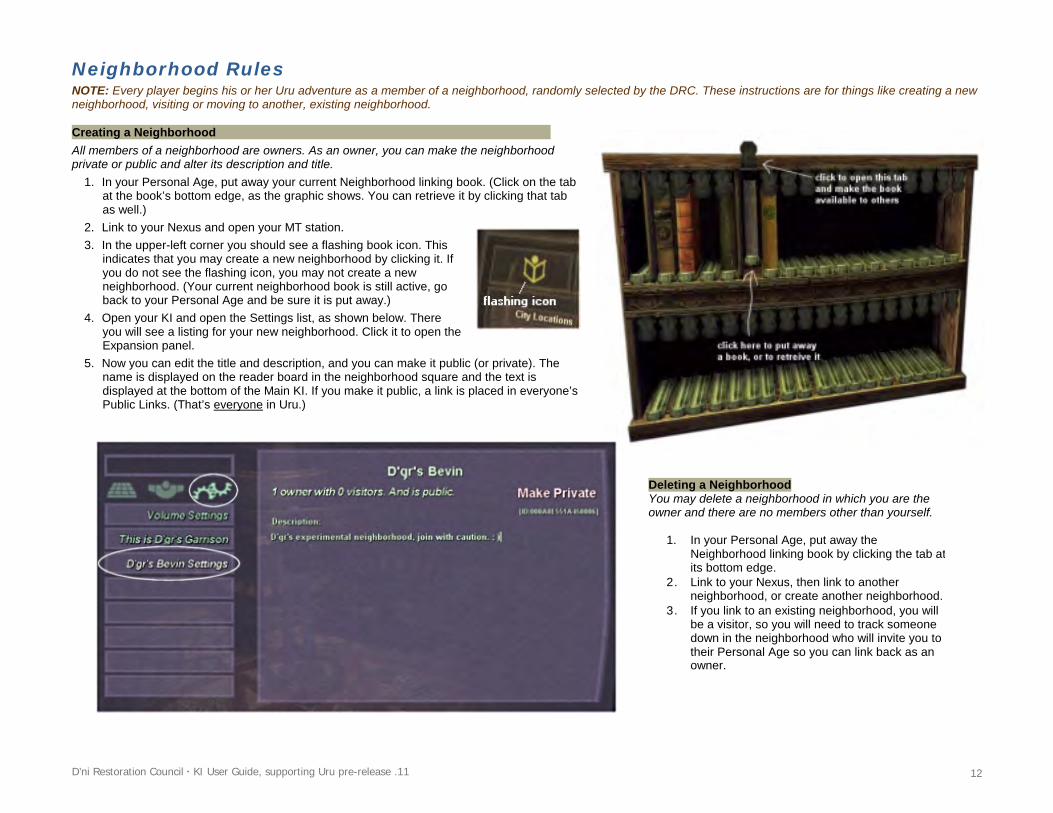
Neighborhood Rules NOTE: Every player begins his or her Uru adventure as a member of a neighborhood, randomly selected by the DRC. These instructions are for things like creating a new neighborhood, visiting or moving to another, existing neighborhood. Creating a Neighborhood All members of a neighborhood are owners. As an owner, you can make the neighborhood private or public and alter its description and title.
1. In your Personal Age, put away your current Neighborhood linking book. (Click on the tab at the book’s bottom edge, as the graphic shows. You can retrieve it by clicking that tab as well.)
2. Link to your Nexus and open your MT station. 3. In the upper-left corner you should see a flashing book icon. This
indicates that you may create a new neighborhood by clicking it. If you do not see the flashing icon, you may not create a new neighborhood. (Your current neighborhood book is still active, go back to your Personal Age and be sure it is put away.)
4. Open your KI and open the Settings list, as shown below. There you will see a listing for your new neighborhood. Click it to open the Expansion panel.
5. Now you can edit the title and description, and you can make it public (or private). The name is displayed on the reader board in the neighborhood square and the text is displayed at the bottom of the Main KI. If you make it public, a link is placed in everyone’s Public Links. (That’s everyone in Uru.)
Deleting a Neighborhood You may delete a neighborhood in which you are the owner and there are no members other than yourself.
1. In your Personal Age, put away the Neighborhood linking book by clicking the tab atits bottom edge.
2. Link to your Nexus, then link to another neighborhood, or create another neighborhood.
3. If you link to an existing neighborhood, you will be a visitor, so you will need to track someone down in the neighborhood who will invite you to their Personal Age so you can link back as an owner.
D’ni Restoration Council · KI User Guide, supporting Uru pre-release .11 13
Neighborhood Tasks Making Your Neighborhood Private or Public You must be an owner to do this.
1. In your KI’s Settings view, click on your neighborhood’s settings. 2. In this view, you can click the Make Private raised words to change the neighborhood to a
Public one, or to a Private one if it’s already public. 3. You can also change the text of the neighborhood description or its name.
Inviting Someone to Join your Neighborhood A player may join a neighborhood only via another member’s Personal Age linking book. You may help another player join your neighborhood by inviting them to your Personal Age and letting them link to the neighborhood with your linking book.
1. Move your avatar to within range of the player who wants to join the neighborhood, click on their avatar. 2. Now open your Yeesha book and click on ‘share book’. This opens a dialog to the person you are
inviting to link to your age. 3. You might want to link there too; to be sure you have opened your neighborhood book so the other
person can access it. Click the UPPER tab of the book slot to make it available. Now when they use your book, they will link back the neighborhood as a full member.
Inviting Someone to Visit your Neighborhood Any neighborhood member can invite someone for a one-time visit.
1. In your KI’s Player view, locate in one of your player lists, the player you want to invite. 2. Click his or her name. 3. Now click the arrow to the right of the Neighborhood Name Visitors list. This places the invitation in
that player’s Incoming folder and places a link in their Nexus private links. 4. Once the invited player actually visits your neighborhood, the invitation and private Nexus link are
removed.
Joining a Neighborhood You may join a neighborhood only via another member’s Personal Age linking book.
1. The Neighborhood linking book in your own Personal Age must be put away (click the bottom tab to slide the book to the back of the shelf). 2. Locate a player who belongs to the neighborhood you wish to join and ask them to invite you to their Personal Age. 3. A dialog will appear with the invitation. Click ‘Yes’. You will immediately link to that person’s Personal Age. 4. Enter the host’s hut and click on their Neighborhood linking book. (The host must open the top tab of their Neighborhood book before you can link with it.)
Visiting a Neighborhood (or other Age) Neighborhood members may invite a non-member for a one-time visit (for a special event perhaps).
1. Any invitations you have received will be in your KI’s Incoming list. Click on the invitation to read any details that may have been sent along with it. 2. Go to your Nexus and access your private/public links (depends on whether the invitation was for a private or public neighborhood (or Age). Link to the neighborhood. 3. You are a visitor only, not a member of this neighborhood or Age. (Membership requires that you join via another player’s Personal Age.) If you arrived via a Private
link, you cannot return without another invitation. If you arrived via a Public link, you can return as long as the link remains in your Nexus.
D’ni Restoration Council · KI User Guide, supporting Uru pre-release .11 14
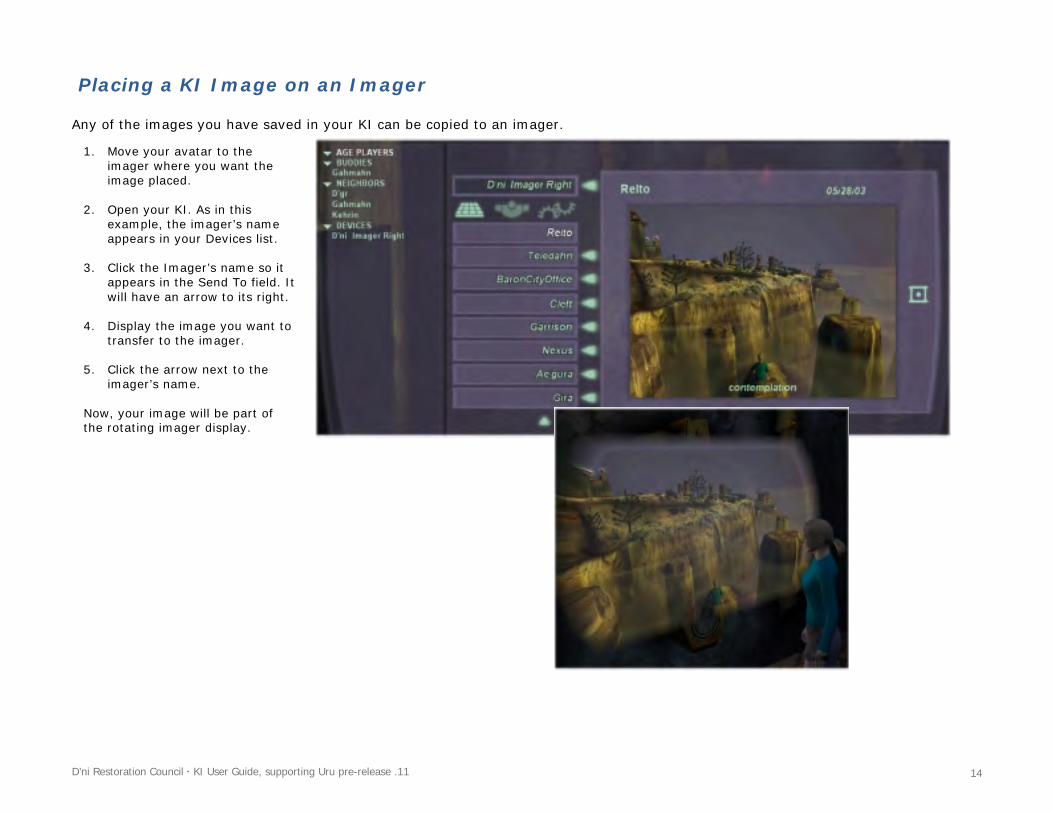
Placing a KI Image on an Imager Any of the images you have saved in your KI can be copied to an imager. 1. Move your avatar to the
imager where you want the image placed.
2. Open your KI. As in this example, the imager’s name appears in your Devices list.
3. Click the Imager’s name so it appears in the Send To field. It will have an arrow to its right.
4. Display the image you want to transfer to the imager.
5. Click the arrow next to the imager’s name.
Now, your image will be part of the rotating imager display.
D’ni Restoration Council · KI User Guide, supporting Uru pre-release .11 15
Terminology
Age Players: Players that are in the same Age as you, which may include players that are in your Buddy list (in which case, you’ll see their name on both the Age Members list and your Buddy list). Buddies: Players you want to keep tabs on, to see if they are online or offline. You must manually add players to your Buddy List. You can send a private KI message to someone on your buddy list, even if they are not currently in your Neighborhood or Age Players lists. Incoming: This is like an inbox. Click this to view any messages, invitations, or pictures sent to you. Age Location: The large KI displays the avatar’s three coordinate positions, relative to the Age’s Maintainer’s Mark, or the Great Zero while in D’ni City. (Laxman is still working this out.)
Angle offset from Maintainer’s Mark.
Distance from Maintainer’s Mark.
Elevation (above or below) from Maintainer’s Mark. Sending: When an arrow is at the right of an Age name or a player’s name (in the Send-To field), you can send whatever is in the Expansion panel to that Age journal or person. There is a difference however, if it is an Age journal, the item is moved to that Age journal. If you click the arrow next to a player’s name, the item is copied to that person’s Incoming journal.
Scrolling: Pairs of arrows appear near a window when it contains more entries than are shown. The panels where you’ll see this, are: The text chat panel, the Player lists, and the Expansion panel when it lists buddies or Age journal entries. Click the up or down arrow to scroll through the list. Owner/Member – The players who have linked to the neighborhood or age via a Personal Age linking book. Owner/Members can change the neighborhood or Age from public to private, or vise versa, and change the description and part of the Age name (add an extension to the default name). Neighbors – Other members of the neighborhood in which you are a member. You can view these at any time by expanding the Neighbors list in your KI. Visitor/Guests – Players who may visit your neighborhood or age. They have a link to your neighborhood in their Nexus private or public links. The link got there when someone invited them to either visit or join. If the player visits via a Private link, they can visit one time. If they visit via a Public link, they can visit as many times as they like but their privileges are limited. (For example, a neighborhood visitor cannot open the Linking Room door or transfer pictures to the imagers.)
D’ni Restoration Council · KI User Guide, supporting Uru pre-release .11 16
Change Record version .00 Original
(previously v. 1)
version .01 Improved definition of “Age Members” and addition of Change Record page. (previously v. 1.1)
version .02 Addition of Imager and Audio functions and Neighborhood Management (previously v. 1.2)
version .03 Addition of table of contents and chat features. Some doc restructuring. (previously v. 1.3)
version .04 Major re-design of the KI and this help guide. Be sure to read it thoroughly as functions have (previously v. 1.4) changed and many new ones have been added.
version .05 Minor changes to match the minor KI changes for Uru version .83. Additional KI Chat commands. Revision to the Neighborhood Tasks page. Also adjusted the version numbering of this document to reflect pre-release status.
version .06 Addition of KI shortcuts, marker notches,
Uru ver. .11 New KI style. Additional ‘F’ key mapping (KI shortcuts). Quick reference page for KI commands added. Marker Game.