Embed Size (px)
DESCRIPTION
Sample Chapter
Citation preview
Click Here to Buy the Book
Sample Chapter
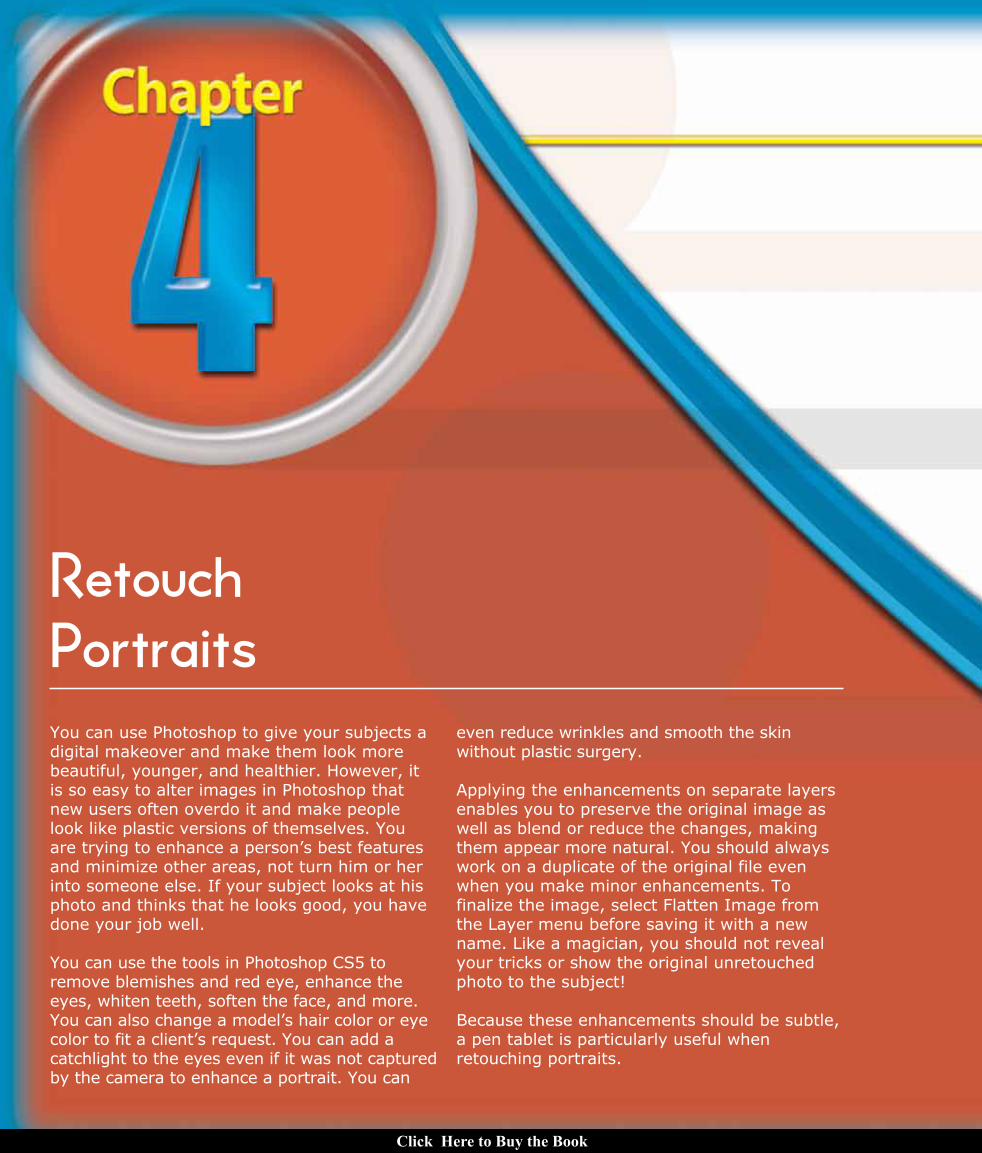
Retouch PortraitsYou can use Photoshop to give your subjects a digital makeover and make them look more beautiful, younger, and healthier. However, it is so easy to alter images in Photoshop that new users often overdo it and make people look like plastic versions of themselves. You are trying to enhance a person’s best features and minimize other areas, not turn him or her into someone else. If your subject looks at his photo and thinks that he looks good, you have done your job well.
You can use the tools in Photoshop CS5 to remove blemishes and red eye, enhance the eyes, whiten teeth, soften the face, and more. You can also change a model’s hair color or eye color to fit a client’s request. You can add a catchlight to the eyes even if it was not captured by the camera to enhance a portrait. You can
even reduce wrinkles and smooth the skin without plastic surgery.
Applying the enhancements on separate layers enables you to preserve the original image as well as blend or reduce the changes, making them appear more natural. You should always work on a duplicate of the original file even when you make minor enhancements. To finalize the image, select Flatten Image from the Layer menu before saving it with a new name. Like a magician, you should not reveal your tricks or show the original unretouched photo to the subject!
Because these enhancements should be subtle, a pen tablet is particularly useful when retouching portraits.
06_612651-ch04.indd 76 6/2/10 3:17 PM
Click Here to Buy the Book
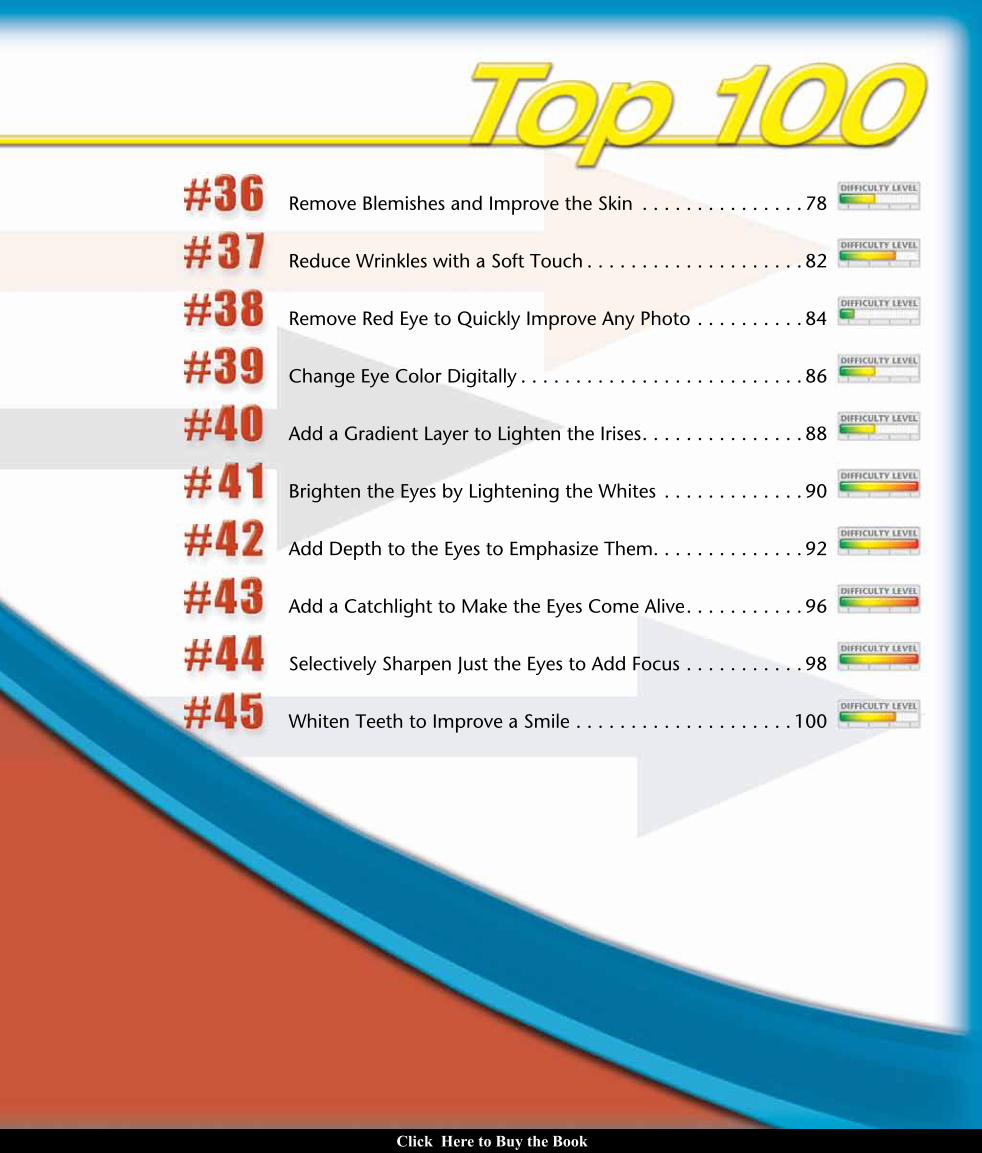
Remove Blemishes and Improve the Skin . . . . . . . . . . . . . . . 78
Reduce Wrinkles with a Soft Touch . . . . . . . . . . . . . . . . . . . . 82
Remove Red Eye to Quickly Improve Any Photo . . . . . . . . . . 84
Change Eye Color Digitally . . . . . . . . . . . . . . . . . . . . . . . . . . 86
Add a Gradient Layer to Lighten the Irises . . . . . . . . . . . . . . . 88
Brighten the Eyes by Lightening the Whites . . . . . . . . . . . . . 90
Add Depth to the Eyes to Emphasize Them . . . . . . . . . . . . . . 92
Add a Catchlight to Make the Eyes Come Alive . . . . . . . . . . . 96
Selectively Sharpen Just the Eyes to Add Focus . . . . . . . . . . . 98
Whiten Teeth to Improve a Smile . . . . . . . . . . . . . . . . . . . . 100
06_612651-ch04.indd 77 6/2/10 3:17 PM
Click Here to Buy the Book
78
66
44
11
55
88 77
3322
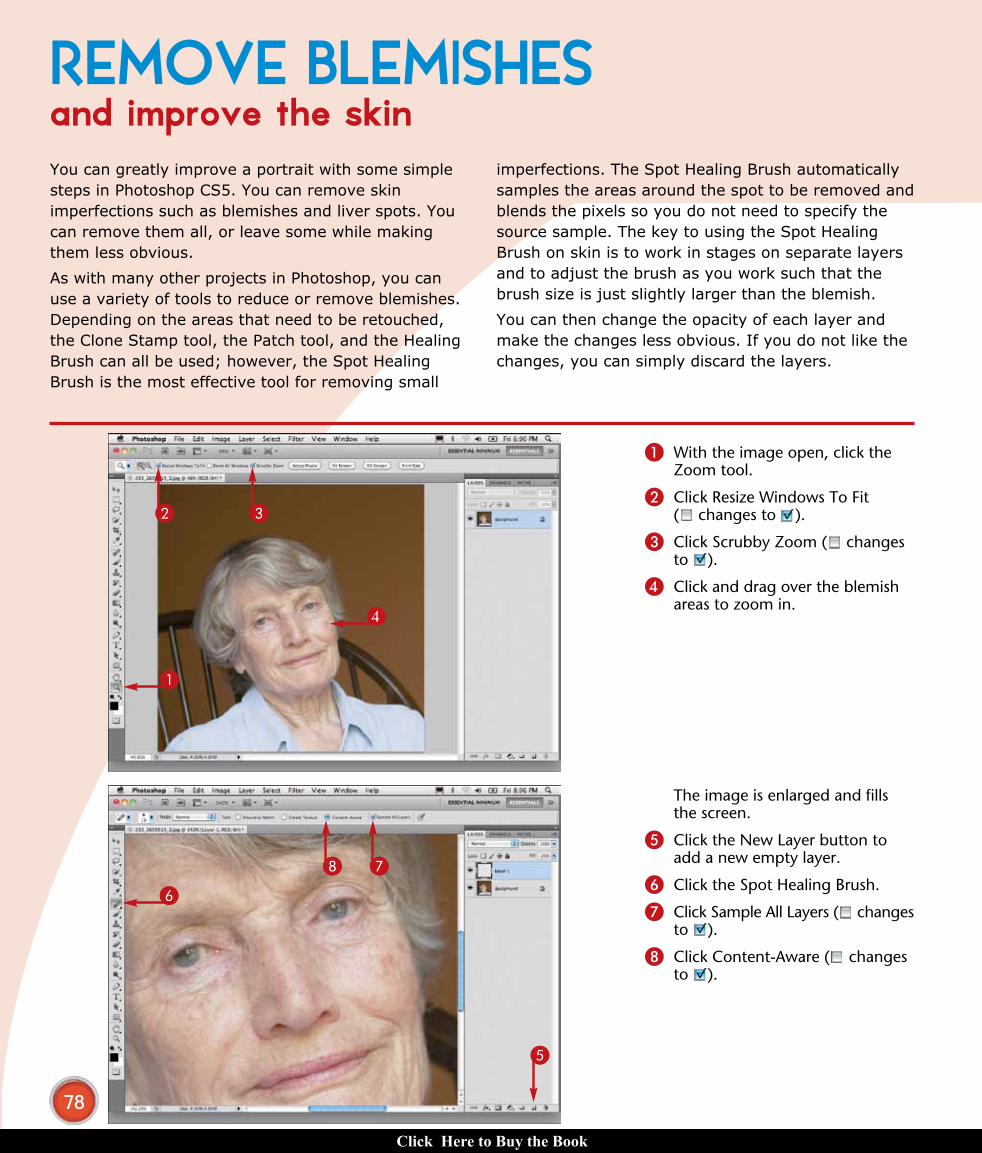
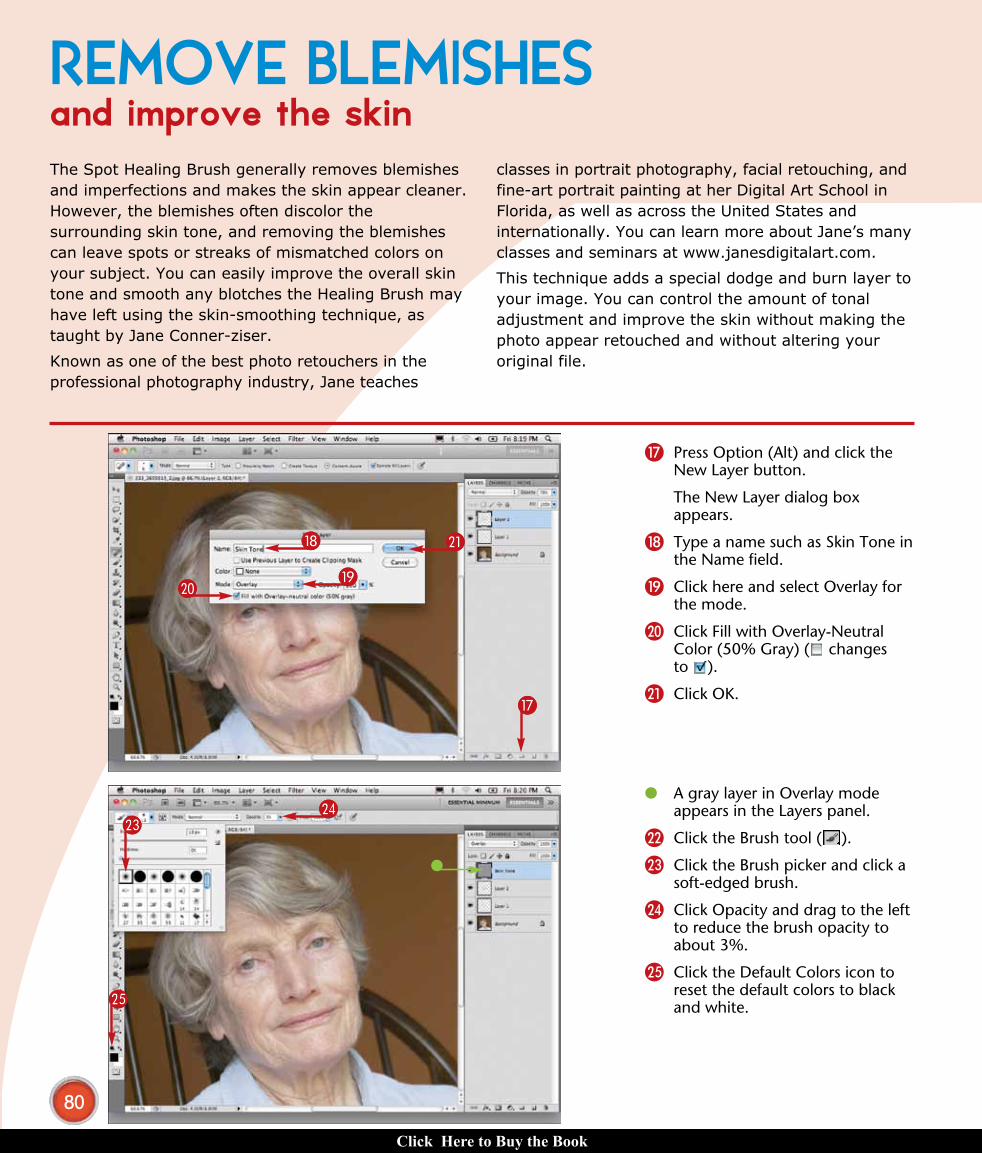
The image is enlarged and fills the screen.
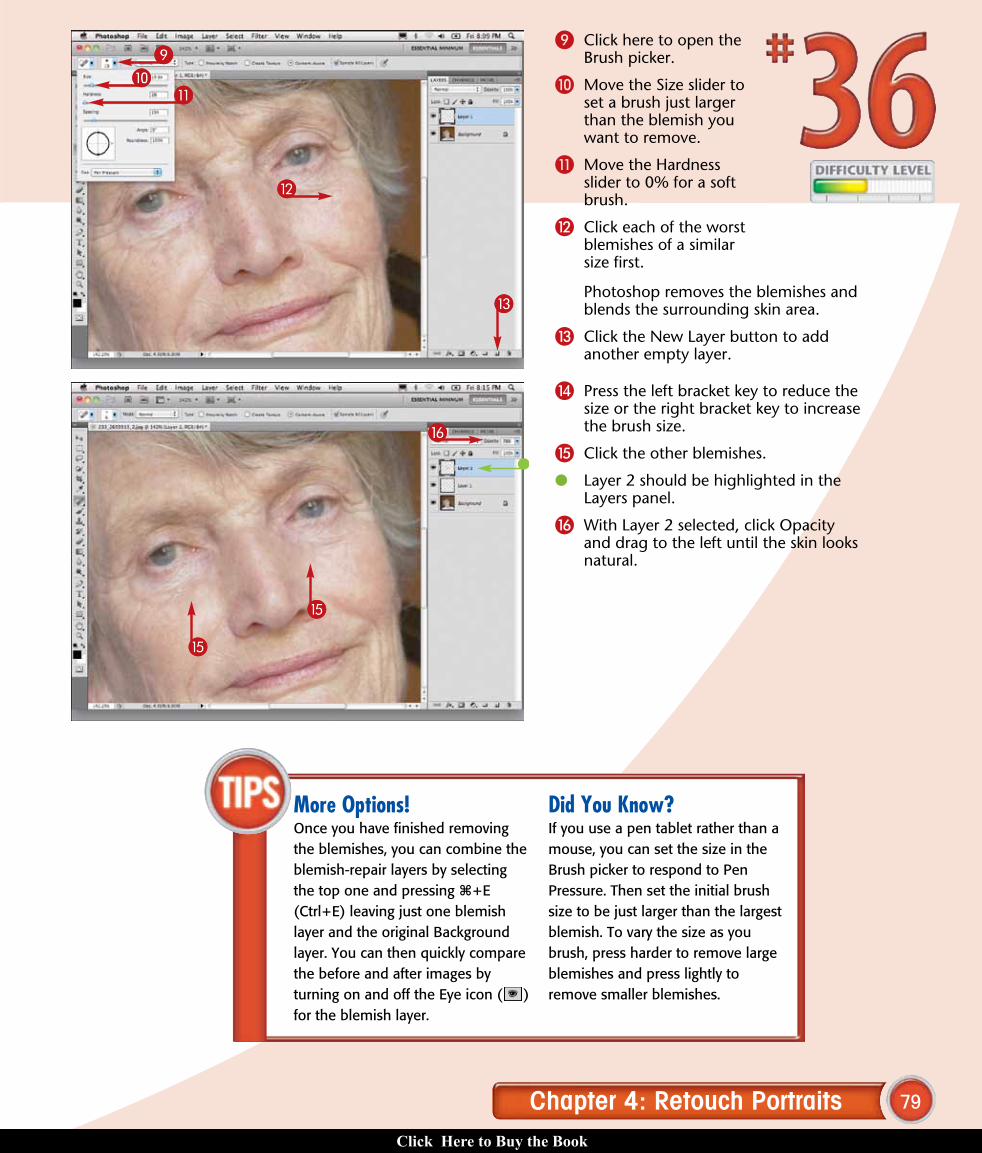
5 Click the New Layer button to add a new empty layer.
6 Click the Spot Healing Brush.
7 Click Sample All Layers ( changes to ).
8 Click Content-Aware ( changes to ).
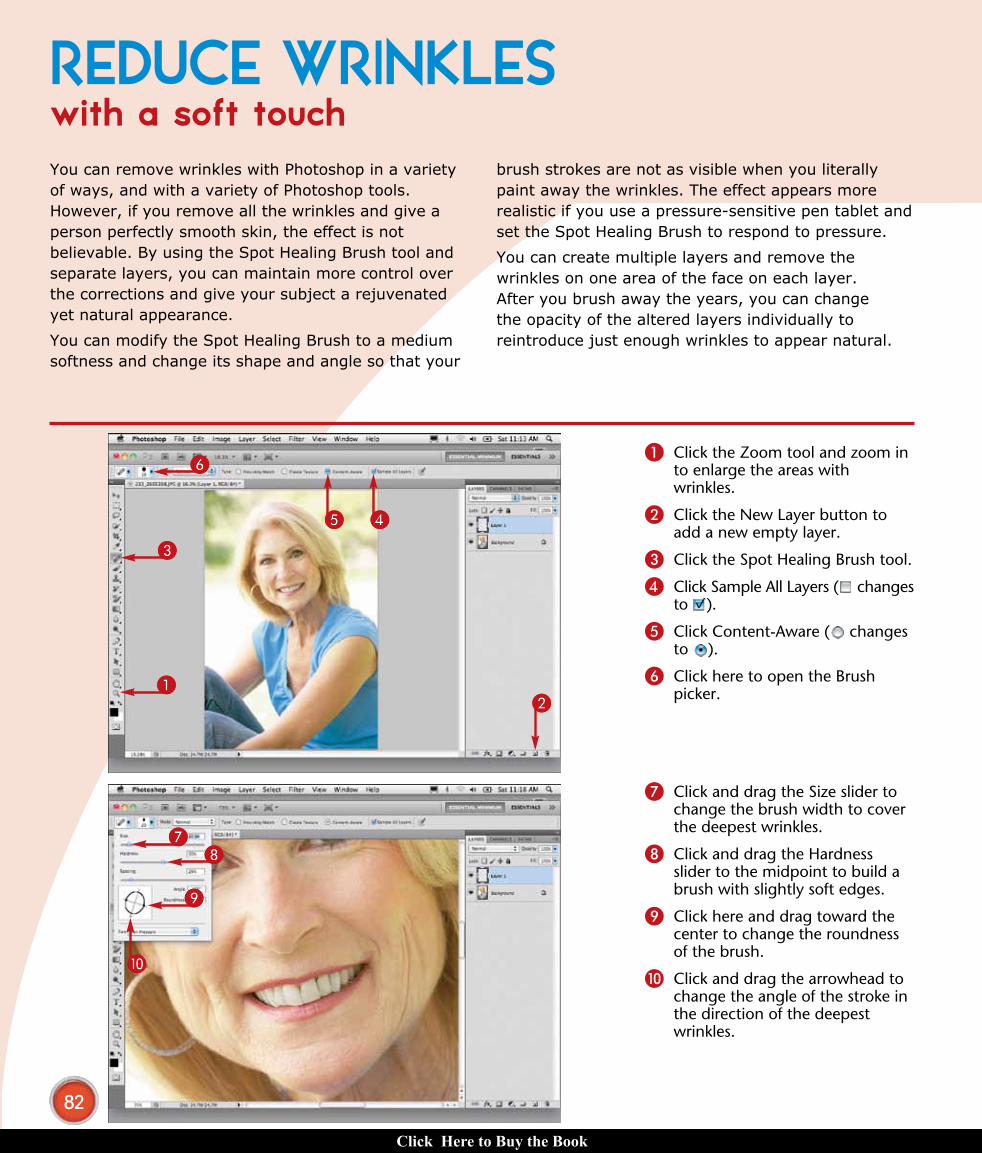
1 With the image open, click the Zoom tool.
2 Click Resize Windows To Fit ( changes to ).
3 Click Scrubby Zoom ( changes to ).
4 Click and drag over the blemish areas to zoom in.
You can greatly improve a portrait with some simple steps in Photoshop CS5. You can remove skin imperfections such as blemishes and liver spots. You can remove them all, or leave some while making them less obvious.
As with many other projects in Photoshop, you can use a variety of tools to reduce or remove blemishes. Depending on the areas that need to be retouched, the Clone Stamp tool, the Patch tool, and the Healing Brush can all be used; however, the Spot Healing Brush is the most effective tool for removing small
imperfections. The Spot Healing Brush automatically samples the areas around the spot to be removed and blends the pixels so you do not need to specify the source sample. The key to using the Spot Healing Brush on skin is to work in stages on separate layers and to adjust the brush as you work such that the brush size is just slightly larger than the blemish.
You can then change the opacity of each layer and make the changes less obvious. If you do not like the changes, you can simply discard the layers.
REMOVE BLEMISHESand improve the skin
06_612651-ch04.indd 78 6/2/10 3:17 PM
Click Here to Buy the Book
79Chapter 4: Retouch Portraits
!!00
99
^̂
@@
##
%%
%%
More Options!Once you have finished removing the blemishes, you can combine the blemish-repair layers by selecting the top one and pressing Ô+E (Ctrl+E) leaving just one blemish layer and the original Background layer. You can then quickly compare the before and after images by turning on and off the Eye icon ( ) for the blemish layer.
Did You Know?If you use a pen tablet rather than a mouse, you can set the size in the Brush picker to respond to Pen Pressure. Then set the initial brush size to be just larger than the largest blemish. To vary the size as you brush, press harder to remove large blemishes and press lightly to remove smaller blemishes.
Photoshop removes the blemishes and blends the surrounding skin area.
# Click the New Layer button to add another empty layer.
$ Press the left bracket key to reduce the size or the right bracket key to increase the brush size.
% Click the other blemishes.
● Layer 2 should be highlighted in the Layers panel.
^ With Layer 2 selected, click Opacity and drag to the left until the skin looks natural.
9 Click here to open the Brush picker.
0 Move the Size slider to set a brush just larger than the blemish you want to remove.
! Move the Hardness slider to 0% for a soft brush.
@ Click each of the worst blemishes of a similar size first.
06_612651-ch04.indd 79 6/2/10 3:17 PM
Click Here to Buy the Book
80
rr
(())
ee
tt
&&
● A gray layer in Overlay mode appears in the Layers panel.
w Click the Brush tool ( ).
e Click the Brush picker and click a soft-edged brush.
r Click Opacity and drag to the left to reduce the brush opacity to about 3%.
t Click the Default Colors icon to reset the default colors to black and white.
& Press Option (Alt) and click the New Layer button.
The New Layer dialog box appears.
* Type a name such as Skin Tone in the Name field.
( Click here and select Overlay for the mode.
) Click Fill with Overlay-Neutral Color (50% Gray) ( changes to ).
q Click OK.
The Spot Healing Brush generally removes blemishes and imperfections and makes the skin appear cleaner. However, the blemishes often discolor the surrounding skin tone, and removing the blemishes can leave spots or streaks of mismatched colors on your subject. You can easily improve the overall skin tone and smooth any blotches the Healing Brush may have left using the skin-smoothing technique, as taught by Jane Conner-ziser.
Known as one of the best photo retouchers in the professional photography industry, Jane teaches
classes in portrait photography, facial retouching, and fine-art portrait painting at her Digital Art School in Florida, as well as across the United States and internationally. You can learn more about Jane’s many classes and seminars at www.janesdigitalart.com.
This technique adds a special dodge and burn layer to your image. You can control the amount of tonal adjustment and improve the skin without making the photo appear retouched and without altering your original file.
REMOVE BLEMISHESand improve the skin
06_612651-ch04.indd 80 6/2/10 3:17 PM
Click Here to Buy the Book
81Chapter 4: Retouch Portraits
uu
ii
yy
oo
pp
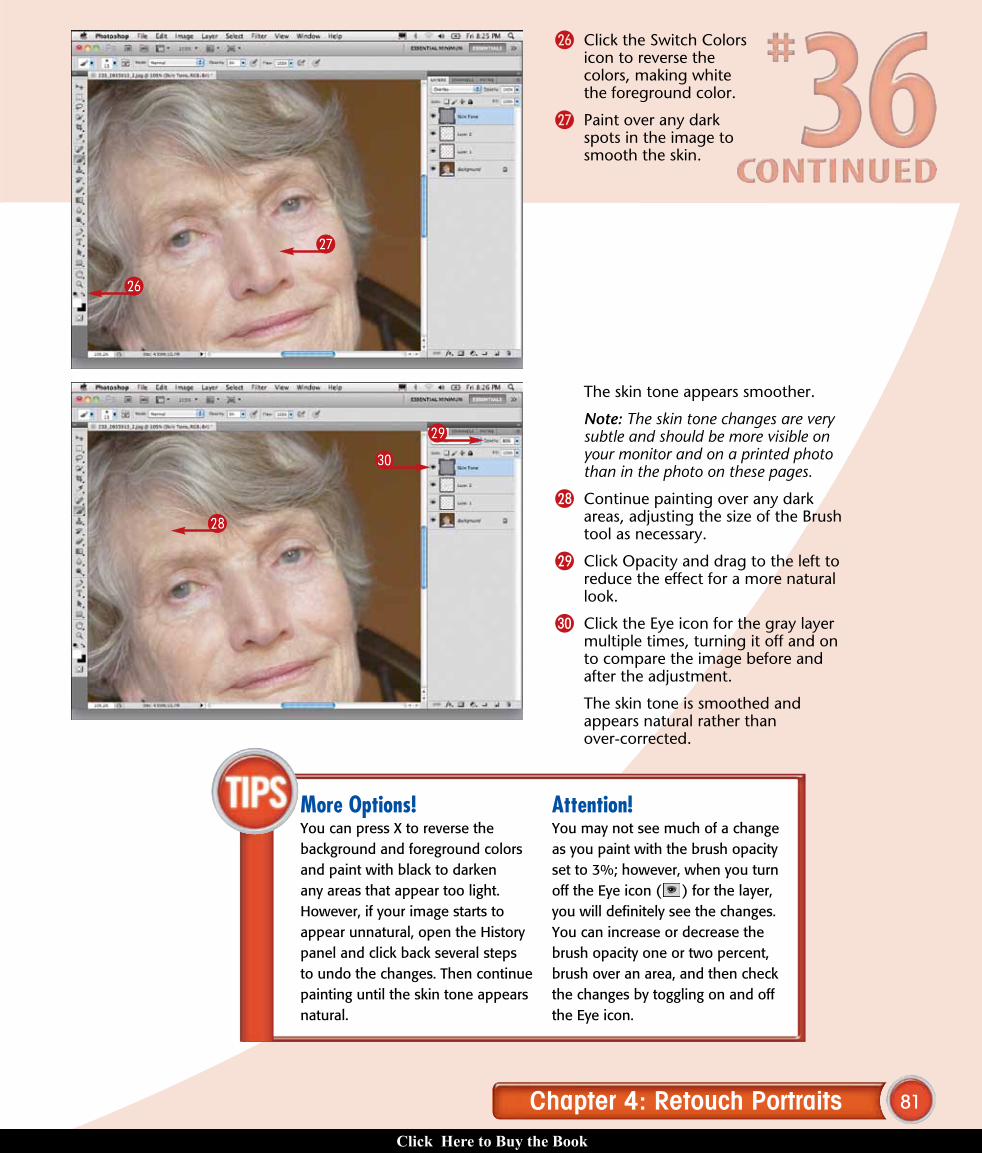
More Options!You can press X to reverse the background and foreground colors and paint with black to darken any areas that appear too light. However, if your image starts to appear unnatural, open the History panel and click back several steps to undo the changes. Then continue painting until the skin tone appears natural.
Attention!You may not see much of a change as you paint with the brush opacity set to 3%; however, when you turn off the Eye icon ( ) for the layer, you will definitely see the changes. You can increase or decrease the brush opacity one or two percent, brush over an area, and then check the changes by toggling on and off the Eye icon.
The skin tone appears smoother.
Note: The skin tone changes are very subtle and should be more visible on your monitor and on a printed photo than in the photo on these pages.
i Continue painting over any dark areas, adjusting the size of the Brush tool as necessary.
o Click Opacity and drag to the left to reduce the effect for a more natural look.
p Click the Eye icon for the gray layer multiple times, turning it off and on to compare the image before and after the adjustment.
The skin tone is smoothed and appears natural rather than over-corrected.
y Click the Switch Colors icon to reverse the colors, making white the foreground color.
u Paint over any dark spots in the image to smooth the skin.
06_612651-ch04.indd 81 6/2/10 3:17 PM
Click Here to Buy the Book
82
99
8877
33
11
66
22
00
55 44
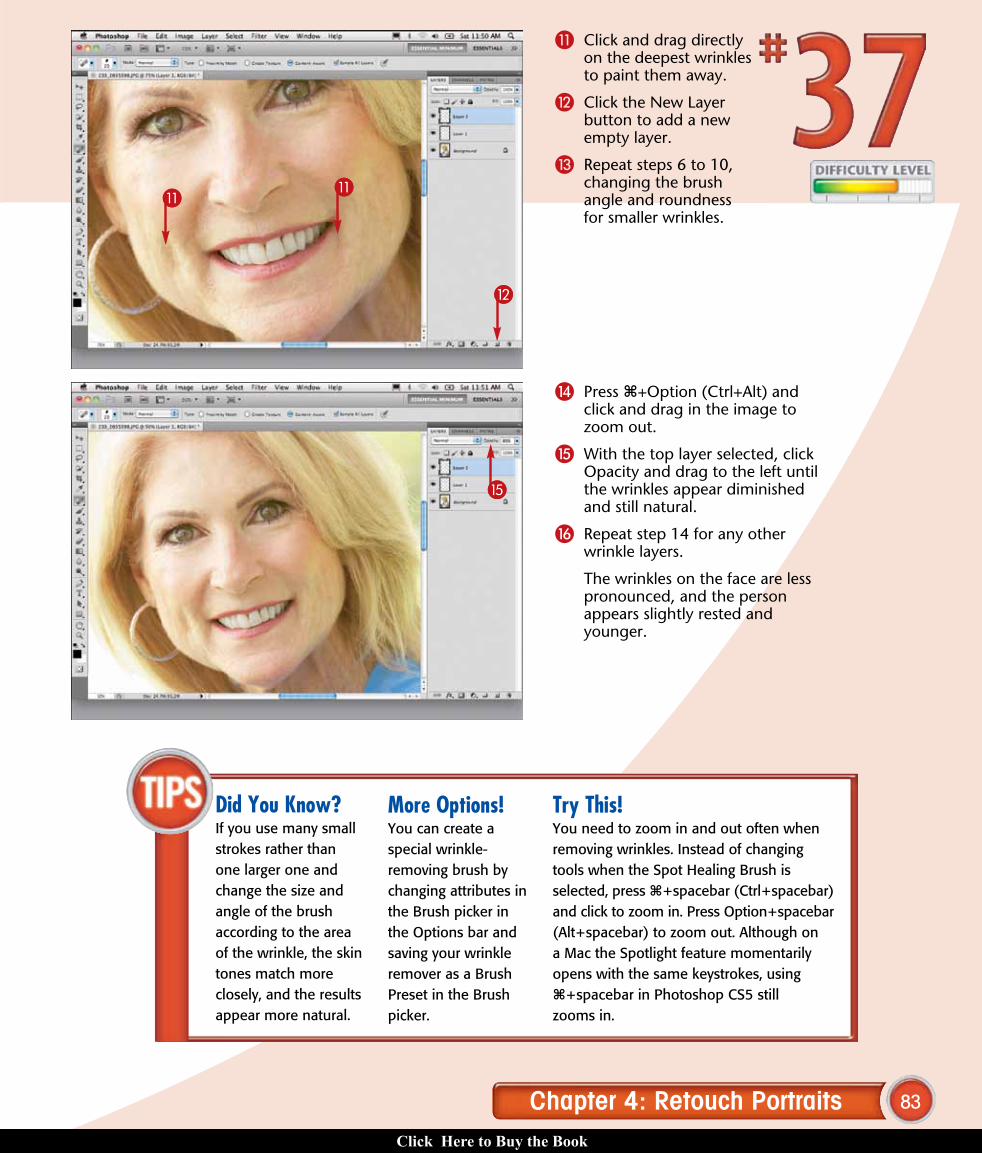
7 Click and drag the Size slider to change the brush width to cover the deepest wrinkles.
8 Click and drag the Hardness slider to the midpoint to build a brush with slightly soft edges.
9 Click here and drag toward the center to change the roundness of the brush.
0 Click and drag the arrowhead to change the angle of the stroke in the direction of the deepest wrinkles.
1 Click the Zoom tool and zoom in to enlarge the areas with wrinkles.
2 Click the New Layer button to add a new empty layer.
3 Click the Spot Healing Brush tool.
4 Click Sample All Layers ( changes to ).
5 Click Content-Aware ( changes to ).
6 Click here to open the Brush picker.
You can remove wrinkles with Photoshop in a variety of ways, and with a variety of Photoshop tools. However, if you remove all the wrinkles and give a person perfectly smooth skin, the effect is not believable. By using the Spot Healing Brush tool and separate layers, you can maintain more control over the corrections and give your subject a rejuvenated yet natural appearance.
You can modify the Spot Healing Brush to a medium softness and change its shape and angle so that your
brush strokes are not as visible when you literally paint away the wrinkles. The effect appears more realistic if you use a pressure-sensitive pen tablet and set the Spot Healing Brush to respond to pressure.
You can create multiple layers and remove the wrinkles on one area of the face on each layer. After you brush away the years, you can change the opacity of the altered layers individually to reintroduce just enough wrinkles to appear natural.
REDUCE WRINKLESwith a soft touch
06_612651-ch04.indd 82 6/2/10 3:17 PM
Click Here to Buy the Book
83Chapter 4: Retouch Portraits
@@
!!!!
%%
Did You Know?If you use many small strokes rather than one larger one and change the size and angle of the brush according to the area of the wrinkle, the skin tones match more closely, and the results appear more natural.
$ Press Ô+Option (Ctrl+Alt) and click and drag in the image to zoom out.
% With the top layer selected, click Opacity and drag to the left until the wrinkles appear diminished and still natural.
^ Repeat step 14 for any other wrinkle layers.
The wrinkles on the face are less pronounced, and the person appears slightly rested and younger.
! Click and drag directly on the deepest wrinkles to paint them away.
@ Click the New Layer button to add a new empty layer.
# Repeat steps 6 to 10, changing the brush angle and roundness for smaller wrinkles.
More Options!You can create a special wrinkle-removing brush by changing attributes in the Brush picker in the Options bar and saving your wrinkle remover as a Brush Preset in the Brush picker.
Try This!You need to zoom in and out often when removing wrinkles. Instead of changing tools when the Spot Healing Brush is selected, press Ô+spacebar (Ctrl+spacebar) and click to zoom in. Press Option+spacebar (Alt+spacebar) to zoom out. Although on a Mac the Spotlight feature momentarily opens with the same keystrokes, using Ô+spacebar in Photoshop CS5 still zooms in.
06_612651-ch04.indd 83 6/2/10 3:17 PM
Click Here to Buy the Book
84
33
55
44
6677
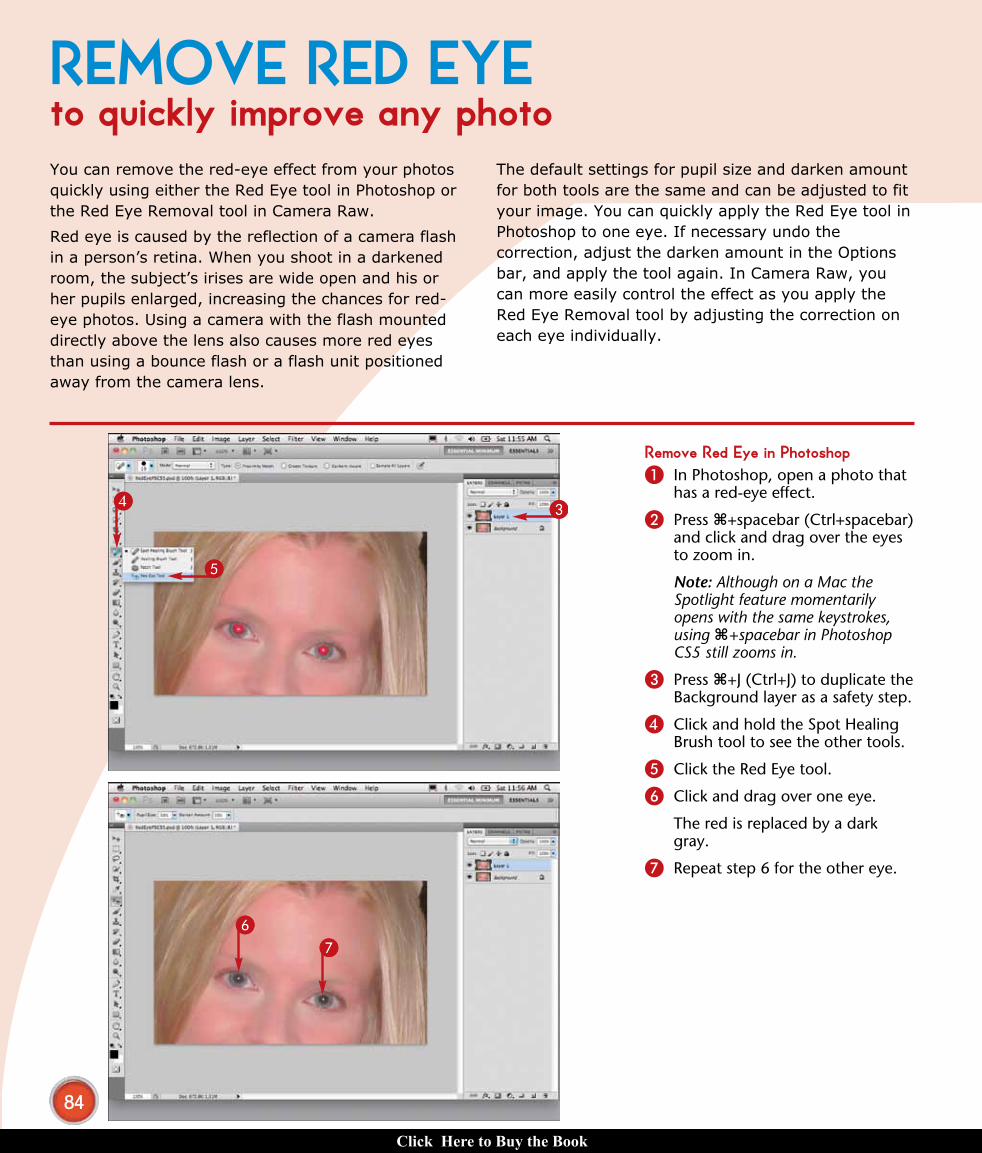
Remove Red Eye in Photoshop1 In Photoshop, open a photo that
has a red-eye effect.
2 Press Ô+spacebar (Ctrl+spacebar) and click and drag over the eyes to zoom in.
Note: Although on a Mac the Spotlight feature momentarily opens with the same keystrokes, using Ô+spacebar in Photoshop CS5 still zooms in.
3 Press Ô+J (Ctrl+J) to duplicate the Background layer as a safety step.
4 Click and hold the Spot Healing Brush tool to see the other tools.
5 Click the Red Eye tool.
6 Click and drag over one eye.
The red is replaced by a dark gray.
7 Repeat step 6 for the other eye.
You can remove the red-eye effect from your photos quickly using either the Red Eye tool in Photoshop or the Red Eye Removal tool in Camera Raw.
Red eye is caused by the reflection of a camera flash in a person’s retina. When you shoot in a darkened room, the subject’s irises are wide open and his or her pupils enlarged, increasing the chances for red-eye photos. Using a camera with the flash mounted directly above the lens also causes more red eyes than using a bounce flash or a flash unit positioned away from the camera lens.
The default settings for pupil size and darken amount for both tools are the same and can be adjusted to fit your image. You can quickly apply the Red Eye tool in Photoshop to one eye. If necessary undo the correction, adjust the darken amount in the Options bar, and apply the tool again. In Camera Raw, you can more easily control the effect as you apply the Red Eye Removal tool by adjusting the correction on each eye individually.
REMOVE RED EYEto quickly improve any photo
06_612651-ch04.indd 84 6/2/10 3:17 PM
Click Here to Buy the Book

85Chapter 4: Retouch Portraits
@@
44
33
1122
55
88
99
77!!
00
66
Try This!In Photoshop, press J to select the Spot Healing Brush tool ( ). Then press Shift as you press J again three times to select the Red Eye tool ( ).
The photo opens in the Camera Raw dialog box.
6 Click the Red Eye Removal tool.
7 Click and drag an area across one eye, including some of the surrounding face in the selection rectangle.
The red is replaced by a neutral gray.
8 Click Show Overlay to deselect it ( changes to ).
9 Click and drag the Pupil Size slider to adjust the size of the gray area covering the pupil.
0 Click and drag the Darken slider to adjust the strength of the gray area.
! Repeat steps 7 to 10 for the other eye.
@ Click Open Image to open the image in Photoshop.
Remove Red Eye in Camera Raw1 In Photoshop, click File.
2 Click Open.
3 Navigate to the red-eye photo in the Open dialog box.
4 Click here and select Camera Raw.
5 Click Open.
More Options!You can remove the red-eye effect from all photographs, whether they are scanned from film or prints or start out as digital files.
Did You Know?You can often avoid red eye by using the red-eye reduction feature included with some cameras. This feature minimizes the red-eye effect by firing several flashes an instant before the photo is taken, forcing the pupils to close slightly just as the final flash and shutter are released.
06_612651-ch04.indd 85 6/2/10 3:17 PM
Click Here to Buy the Book
86
8899
77
22
3366
55
44
!!
00
11
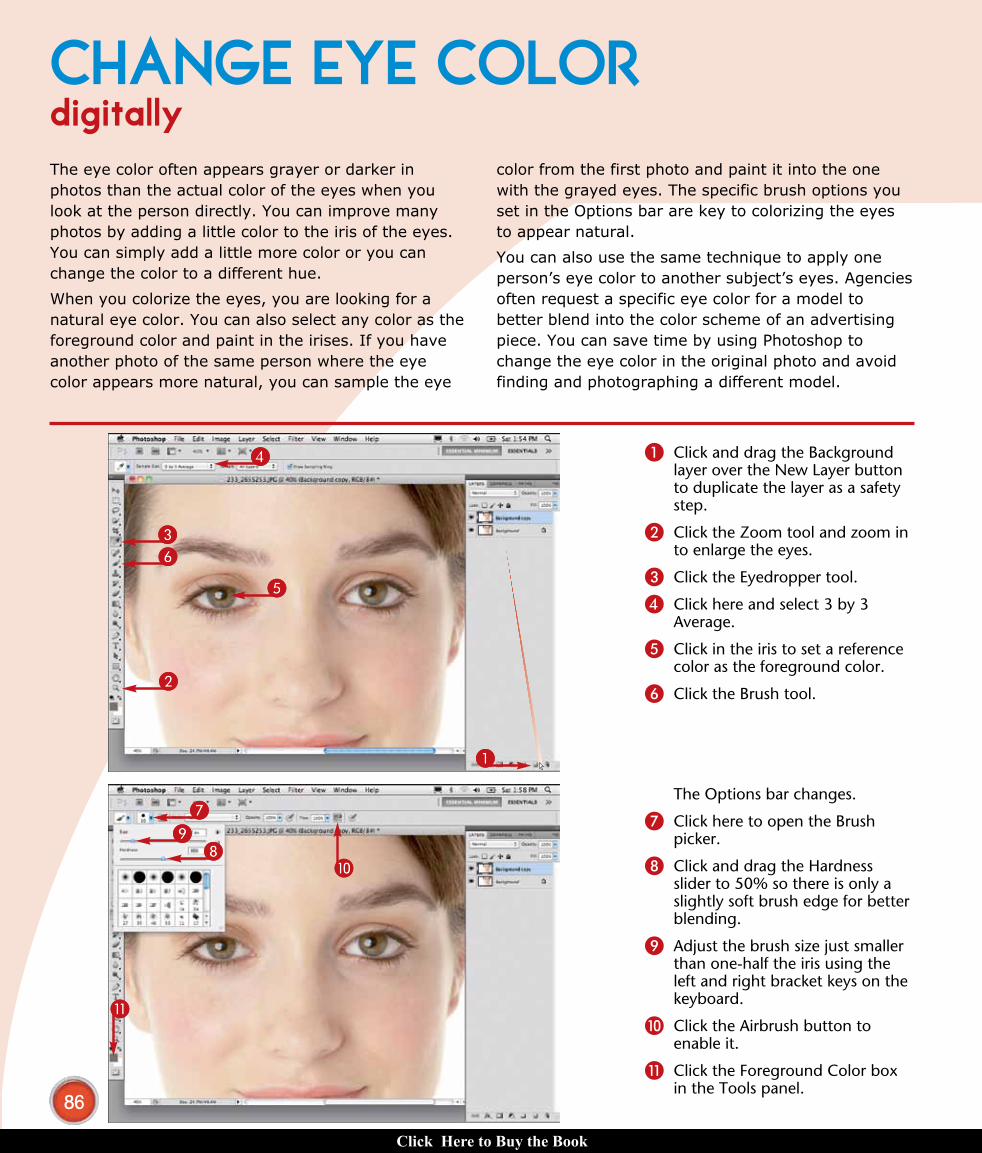
The Options bar changes.
7 Click here to open the Brush picker.
8 Click and drag the Hardness slider to 50% so there is only a slightly soft brush edge for better blending.
9 Adjust the brush size just smaller than one-half the iris using the left and right bracket keys on the keyboard.
0 Click the Airbrush button to enable it.
! Click the Foreground Color box in the Tools panel.
1 Click and drag the Background layer over the New Layer button to duplicate the layer as a safety step.
2 Click the Zoom tool and zoom in to enlarge the eyes.
3 Click the Eyedropper tool.
4 Click here and select 3 by 3 Average.
5 Click in the iris to set a reference color as the foreground color.
6 Click the Brush tool.
The eye color often appears grayer or darker in photos than the actual color of the eyes when you look at the person directly. You can improve many photos by adding a little color to the iris of the eyes. You can simply add a little more color or you can change the color to a different hue.
When you colorize the eyes, you are looking for a natural eye color. You can also select any color as the foreground color and paint in the irises. If you have another photo of the same person where the eye color appears more natural, you can sample the eye
color from the first photo and paint it into the one with the grayed eyes. The specific brush options you set in the Options bar are key to colorizing the eyes to appear natural.
You can also use the same technique to apply one person’s eye color to another subject’s eyes. Agencies often request a specific eye color for a model to better blend into the color scheme of an advertising piece. You can save time by using Photoshop to change the eye color in the original photo and avoid finding and photographing a different model.
CHANGE EYE COLORdigitally
06_612651-ch04.indd 86 6/2/10 3:17 PM
Click Here to Buy the Book
87Chapter 4: Retouch Portraits
&&
^̂
##
$$
%%
**
@@
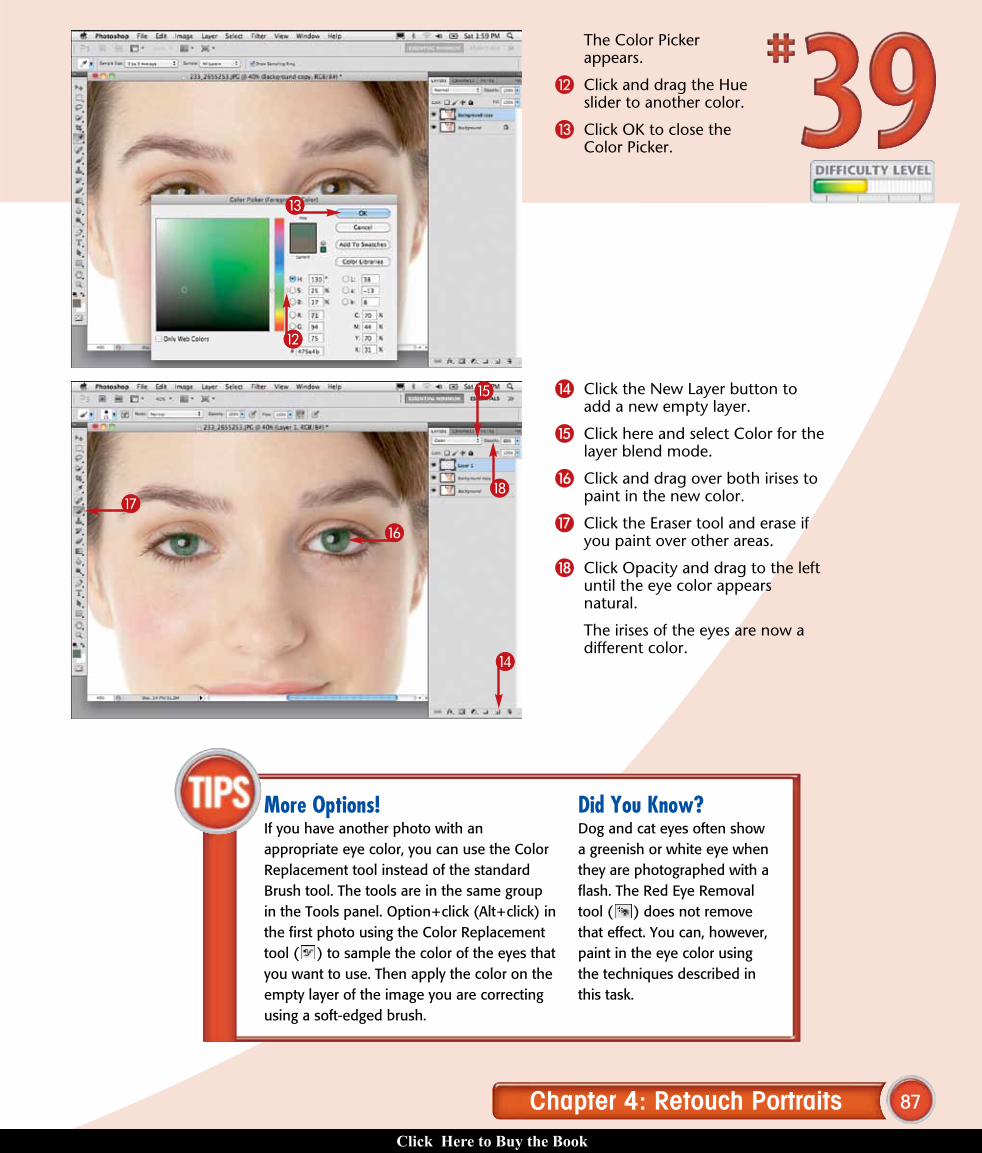
$ Click the New Layer button to add a new empty layer.
% Click here and select Color for the layer blend mode.
^ Click and drag over both irises to paint in the new color.
& Click the Eraser tool and erase if you paint over other areas.
* Click Opacity and drag to the left until the eye color appears natural.
The irises of the eyes are now a different color.
The Color Picker appears.
@ Click and drag the Hue slider to another color.
# Click OK to close the Color Picker.
More Options!If you have another photo with an appropriate eye color, you can use the Color Replacement tool instead of the standard Brush tool. The tools are in the same group in the Tools panel. Option+click (Alt+click) in the first photo using the Color Replacement tool ( ) to sample the color of the eyes that you want to use. Then apply the color on the empty layer of the image you are correcting using a soft-edged brush.
Did You Know?Dog and cat eyes often show a greenish or white eye when they are photographed with a flash. The Red Eye Removal tool ( ) does not remove that effect. You can, however, paint in the eye color using the techniques described in this task.
06_612651-ch04.indd 87 6/2/10 3:17 PM
Click Here to Buy the Book
88
66
55
22
88
99
11
44
77
33
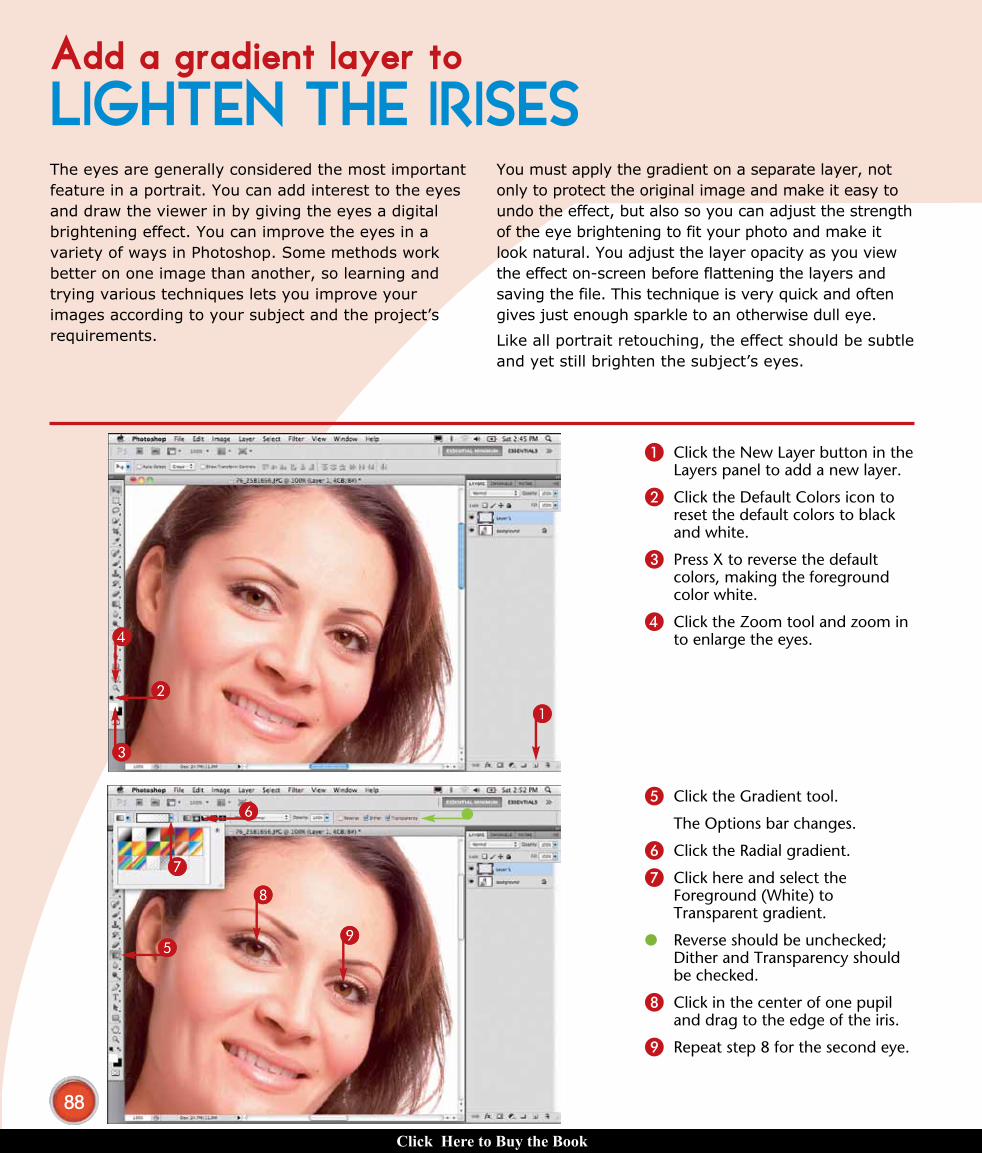
5 Click the Gradient tool.
The Options bar changes.
6 Click the Radial gradient.
7 Click here and select the Foreground (White) to Transparent gradient.
● Reverse should be unchecked; Dither and Transparency should be checked.
8 Click in the center of one pupil and drag to the edge of the iris.
9 Repeat step 8 for the second eye.
1 Click the New Layer button in the Layers panel to add a new layer.
2 Click the Default Colors icon to reset the default colors to black and white.
3 Press X to reverse the default colors, making the foreground color white.
4 Click the Zoom tool and zoom in to enlarge the eyes.
The eyes are generally considered the most important feature in a portrait. You can add interest to the eyes and draw the viewer in by giving the eyes a digital brightening effect. You can improve the eyes in a variety of ways in Photoshop. Some methods work better on one image than another, so learning and trying various techniques lets you improve your images according to your subject and the project’s requirements.
You must apply the gradient on a separate layer, not only to protect the original image and make it easy to undo the effect, but also so you can adjust the strength of the eye brightening to fit your photo and make it look natural. You adjust the layer opacity as you view the effect on-screen before flattening the layers and saving the file. This technique is very quick and often gives just enough sparkle to an otherwise dull eye.
Like all portrait retouching, the effect should be subtle and yet still brighten the subject’s eyes.
Add a gradient layer toLIGHTEN THE IRISES
06_612651-ch04.indd 88 6/2/10 3:17 PM
Click Here to Buy the Book
89Chapter 4: Retouch Portraits
@@
!!
00
Did You Know?The default gradient always uses the current foreground and background colors in the toolbar. Set the foreground color before you select the Gradient tool and then press G to quickly select the Gradient tool. You can also access the other tools in the Tools panel by pressing a specific letter, such as V for the Move tool or Z for the Zoom tool. When multiple tools are grouped together, like the Spot Healing Brush, the Healing Brush, the Patch tool, and the Red Eye tool, you can press the one-letter keyboard shortcut to access the first tool and then repeatedly Shift+press the letter to cycle through all the grouped tools.
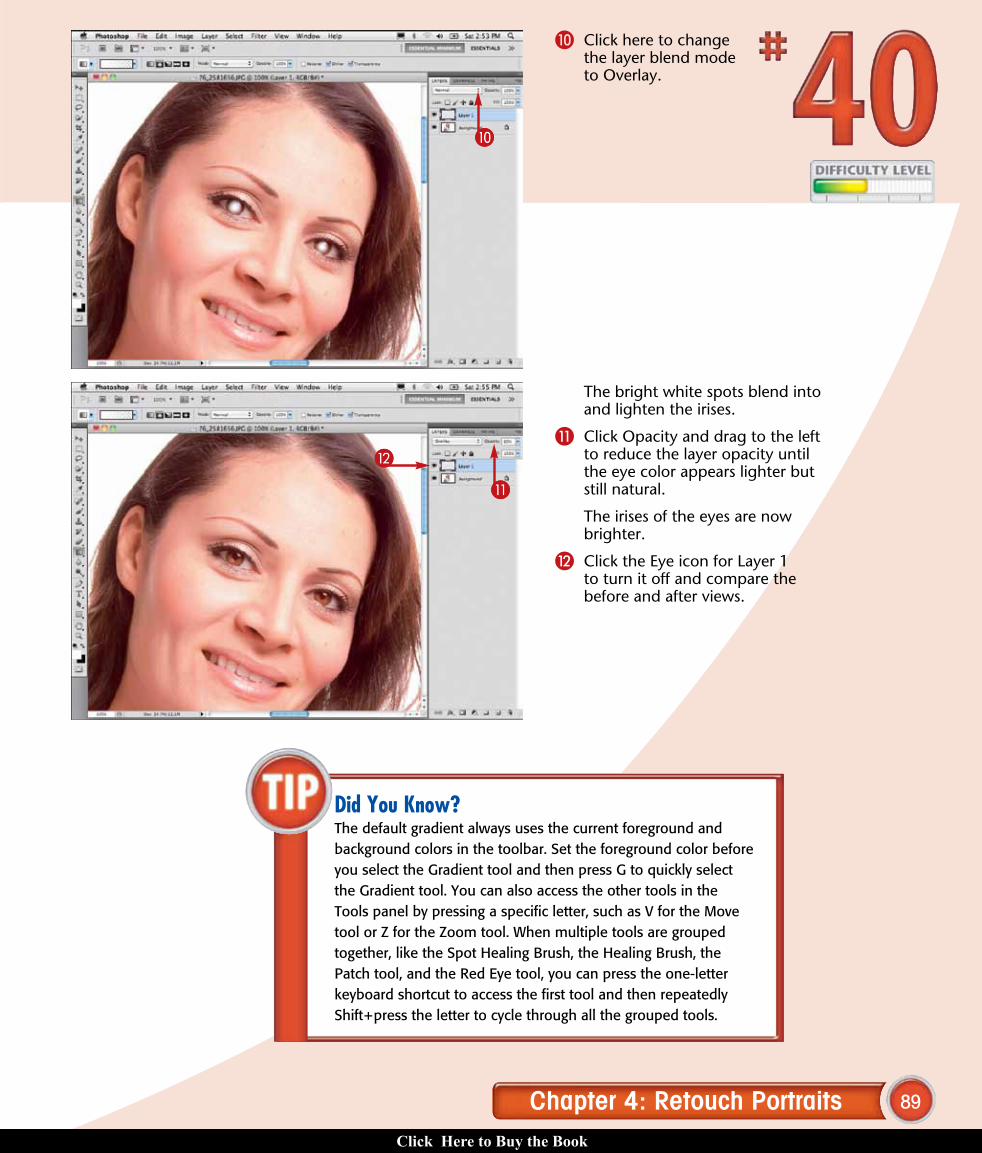
The bright white spots blend into and lighten the irises.
! Click Opacity and drag to the left to reduce the layer opacity until the eye color appears lighter but still natural.
The irises of the eyes are now brighter.
@ Click the Eye icon for Layer 1 to turn it off and compare the before and after views.
0 Click here to change the layer blend mode to Overlay.
06_612651-ch04.indd 89 6/2/10 3:17 PM
Click Here to Buy the Book
90
77
55
44
33
11
22
66
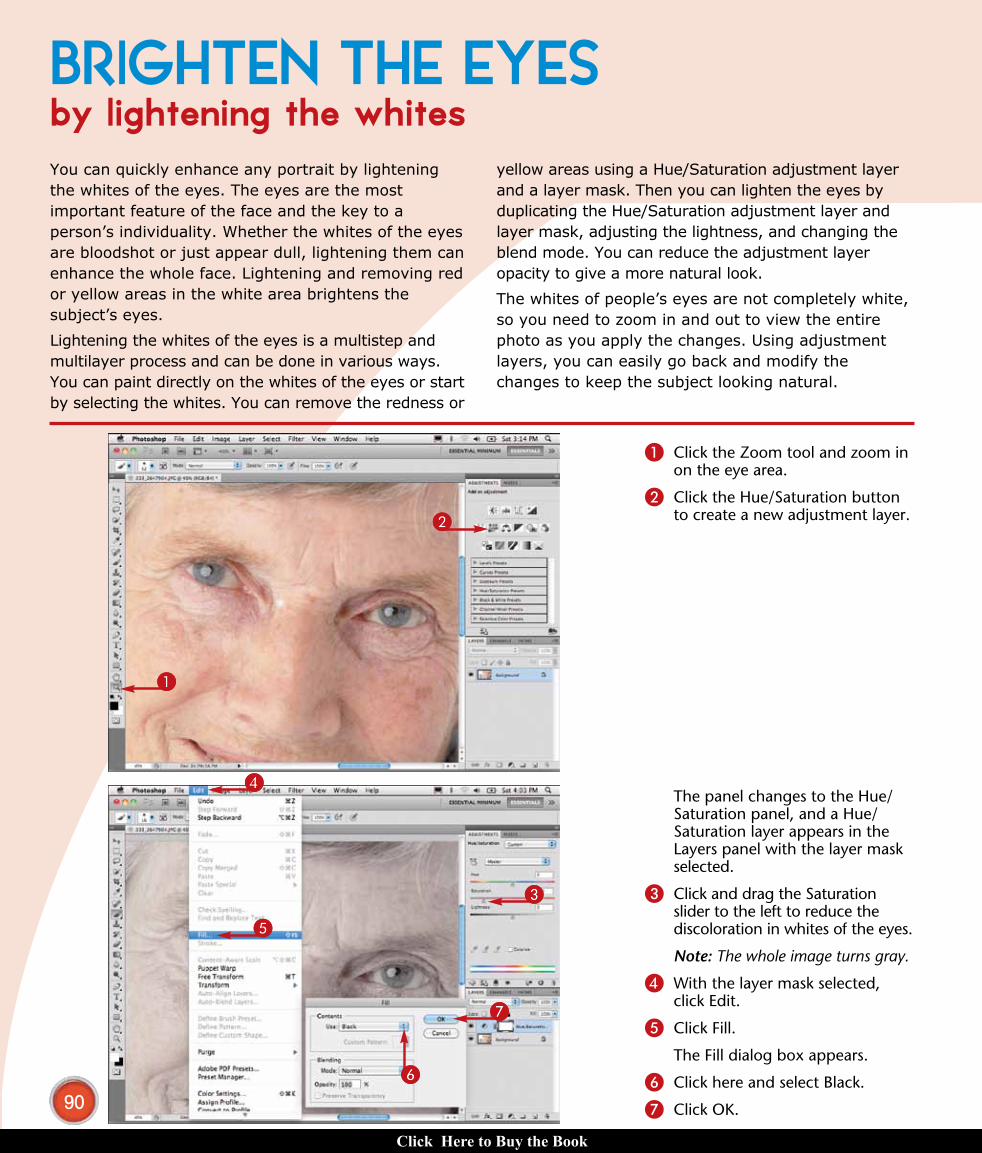
The panel changes to the Hue/Saturation panel, and a Hue/Saturation layer appears in the Layers panel with the layer mask selected.
3 Click and drag the Saturation slider to the left to reduce the discoloration in whites of the eyes.
Note: The whole image turns gray.
4 With the layer mask selected, click Edit.
5 Click Fill.
The Fill dialog box appears.
6 Click here and select Black.
7 Click OK.
1 Click the Zoom tool and zoom in on the eye area.
2 Click the Hue/Saturation button to create a new adjustment layer.
You can quickly enhance any portrait by lightening the whites of the eyes. The eyes are the most important feature of the face and the key to a person’s individuality. Whether the whites of the eyes are bloodshot or just appear dull, lightening them can enhance the whole face. Lightening and removing red or yellow areas in the white area brightens the subject’s eyes.
Lightening the whites of the eyes is a multistep and multilayer process and can be done in various ways. You can paint directly on the whites of the eyes or start by selecting the whites. You can remove the redness or
yellow areas using a Hue/Saturation adjustment layer and a layer mask. Then you can lighten the eyes by duplicating the Hue/Saturation adjustment layer and layer mask, adjusting the lightness, and changing the blend mode. You can reduce the adjustment layer opacity to give a more natural look.
The whites of people’s eyes are not completely white, so you need to zoom in and out to view the entire photo as you apply the changes. Using adjustment layers, you can easily go back and modify the changes to keep the subject looking natural.
BRIGHTEN THE EYESby lightening the whites
06_612651-ch04.indd 90 6/2/10 3:17 PM
Click Here to Buy the Book
91Chapter 4: Retouch Portraits
88
##
00
99
$$
!!
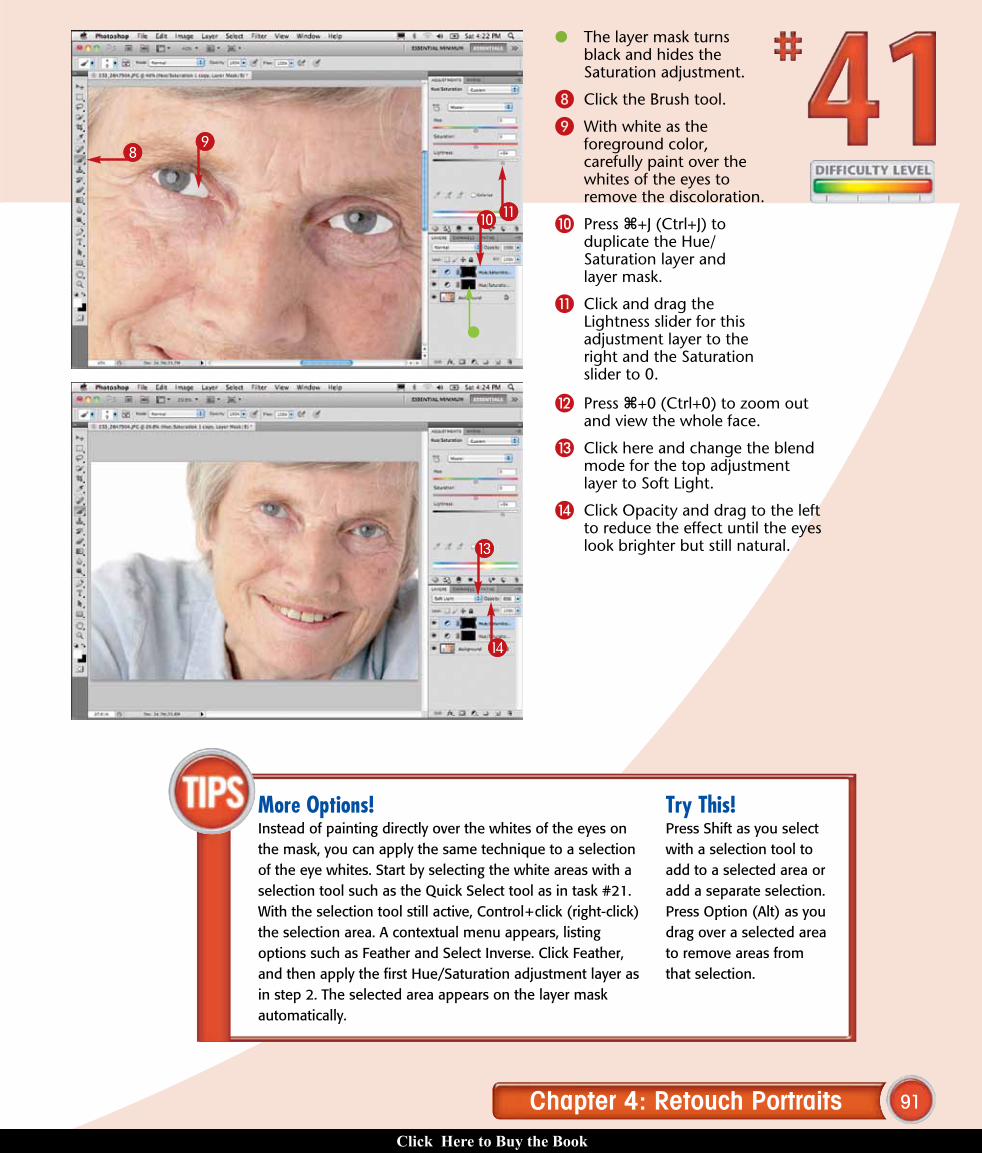
@ Press Ô+0 (Ctrl+0) to zoom out and view the whole face.
# Click here and change the blend mode for the top adjustment layer to Soft Light.
$ Click Opacity and drag to the left to reduce the effect until the eyes look brighter but still natural.
● The layer mask turns black and hides the Saturation adjustment.
8 Click the Brush tool.
9 With white as the foreground color, carefully paint over the whites of the eyes to remove the discoloration.
0 Press Ô+J (Ctrl+J) to duplicate the Hue/Saturation layer and layer mask.
! Click and drag the Lightness slider for this adjustment layer to the right and the Saturation slider to 0.
More Options!Instead of painting directly over the whites of the eyes on the mask, you can apply the same technique to a selection of the eye whites. Start by selecting the white areas with a selection tool such as the Quick Select tool as in task #21. With the selection tool still active, Control+click (right-click) the selection area. A contextual menu appears, listing options such as Feather and Select Inverse. Click Feather, and then apply the first Hue/Saturation adjustment layer as in step 2. The selected area appears on the layer mask automatically.
Try This!Press Shift as you select with a selection tool to add to a selected area or add a separate selection. Press Option (Alt) as you drag over a selected area to remove areas from that selection.
06_612651-ch04.indd 91 6/2/10 3:17 PM
Click Here to Buy the Book
92
66
55
33
44
11
22
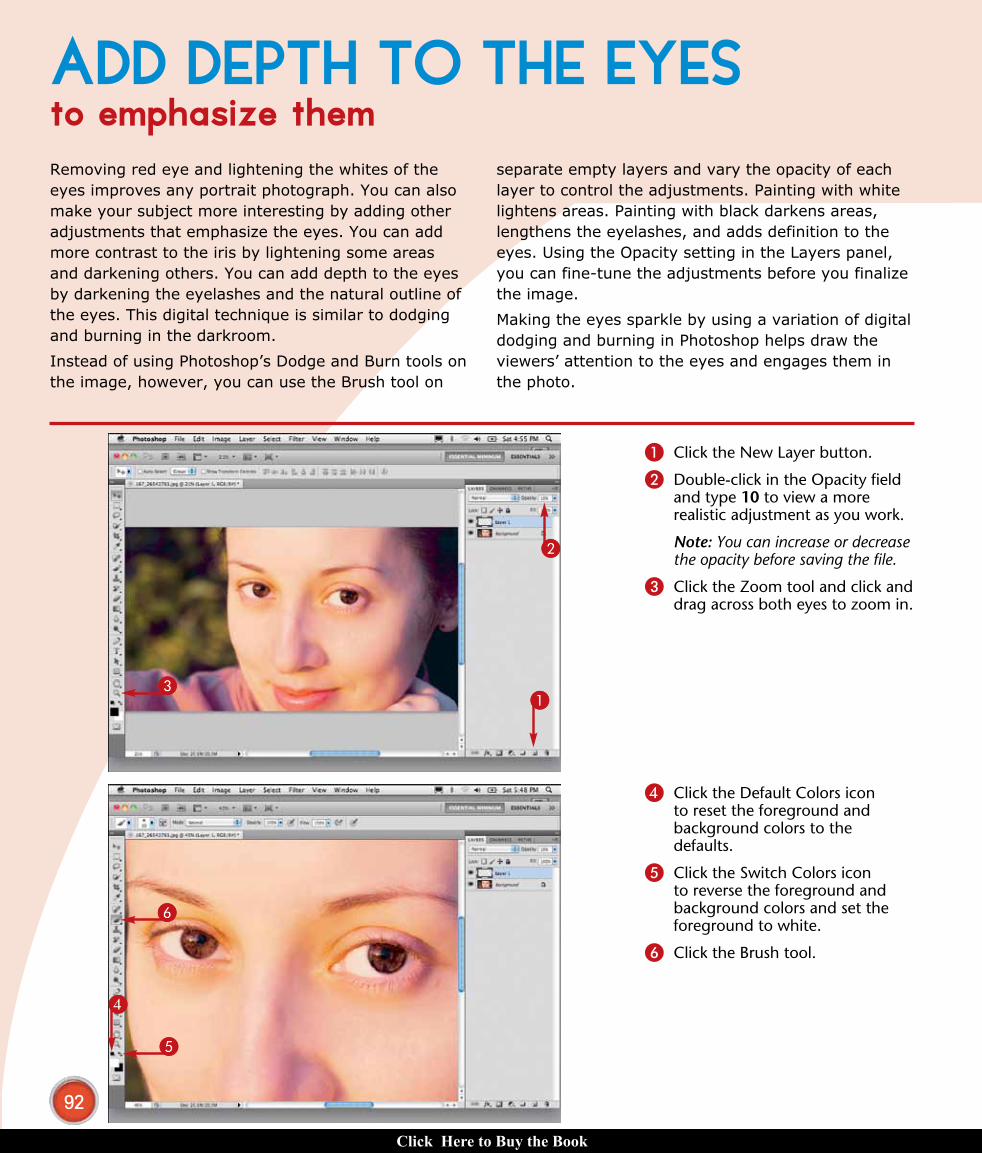
4 Click the Default Colors icon to reset the foreground and background colors to the defaults.
5 Click the Switch Colors icon to reverse the foreground and background colors and set the foreground to white.
6 Click the Brush tool.
1 Click the New Layer button.
2 Double-click in the Opacity field and type 10 to view a more realistic adjustment as you work.
Note: You can increase or decrease the opacity before saving the file.
3 Click the Zoom tool and click and drag across both eyes to zoom in.
Removing red eye and lightening the whites of the eyes improves any portrait photograph. You can also make your subject more interesting by adding other adjustments that emphasize the eyes. You can add more contrast to the iris by lightening some areas and darkening others. You can add depth to the eyes by darkening the eyelashes and the natural outline of the eyes. This digital technique is similar to dodging and burning in the darkroom.
Instead of using Photoshop’s Dodge and Burn tools on the image, however, you can use the Brush tool on
separate empty layers and vary the opacity of each layer to control the adjustments. Painting with white lightens areas. Painting with black darkens areas, lengthens the eyelashes, and adds definition to the eyes. Using the Opacity setting in the Layers panel, you can fine-tune the adjustments before you finalize the image.
Making the eyes sparkle by using a variation of digital dodging and burning in Photoshop helps draw the viewers’ attention to the eyes and engages them in the photo.
ADD DEPTH TO THE EYESto emphasize them
06_612651-ch04.indd 92 6/2/10 3:18 PM
Click Here to Buy the Book
93Chapter 4: Retouch Portraits
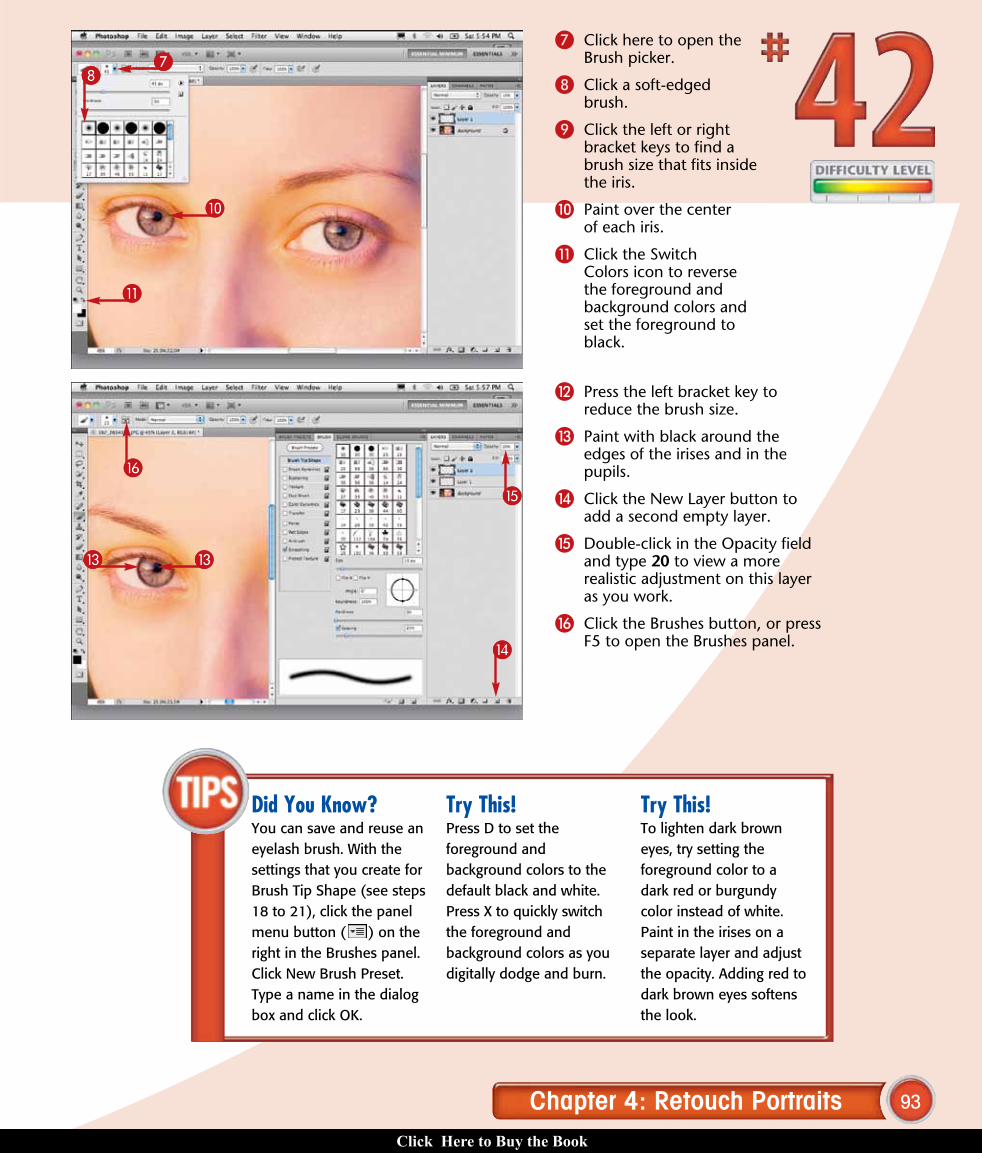
##
77
!!
00
##
$$
88
%%
^̂
Did You Know?You can save and reuse an eyelash brush. With the settings that you create for Brush Tip Shape (see steps 18 to 21), click the panel menu button ( ) on the right in the Brushes panel. Click New Brush Preset. Type a name in the dialog box and click OK.
Try This!Press D to set the foreground and background colors to the default black and white. Press X to quickly switch the foreground and background colors as you digitally dodge and burn.
Try This!To lighten dark brown eyes, try setting the foreground color to a dark red or burgundy color instead of white. Paint in the irises on a separate layer and adjust the opacity. Adding red to dark brown eyes softens the look.
@ Press the left bracket key to reduce the brush size.
# Paint with black around the edges of the irises and in the pupils.
$ Click the New Layer button to add a second empty layer.
% Double-click in the Opacity field and type 20 to view a more realistic adjustment on this layer as you work.
^ Click the Brushes button, or press F5 to open the Brushes panel.
7 Click here to open the Brush picker.
8 Click a soft-edged brush.
9 Click the left or right bracket keys to find a brush size that fits inside the iris.
0 Paint over the center of each iris.
! Click the Switch Colors icon to reverse the foreground and background colors and set the foreground to black.
06_612651-ch04.indd 93 6/2/10 3:18 PM
Click Here to Buy the Book
94
))
**
ww
((
yy
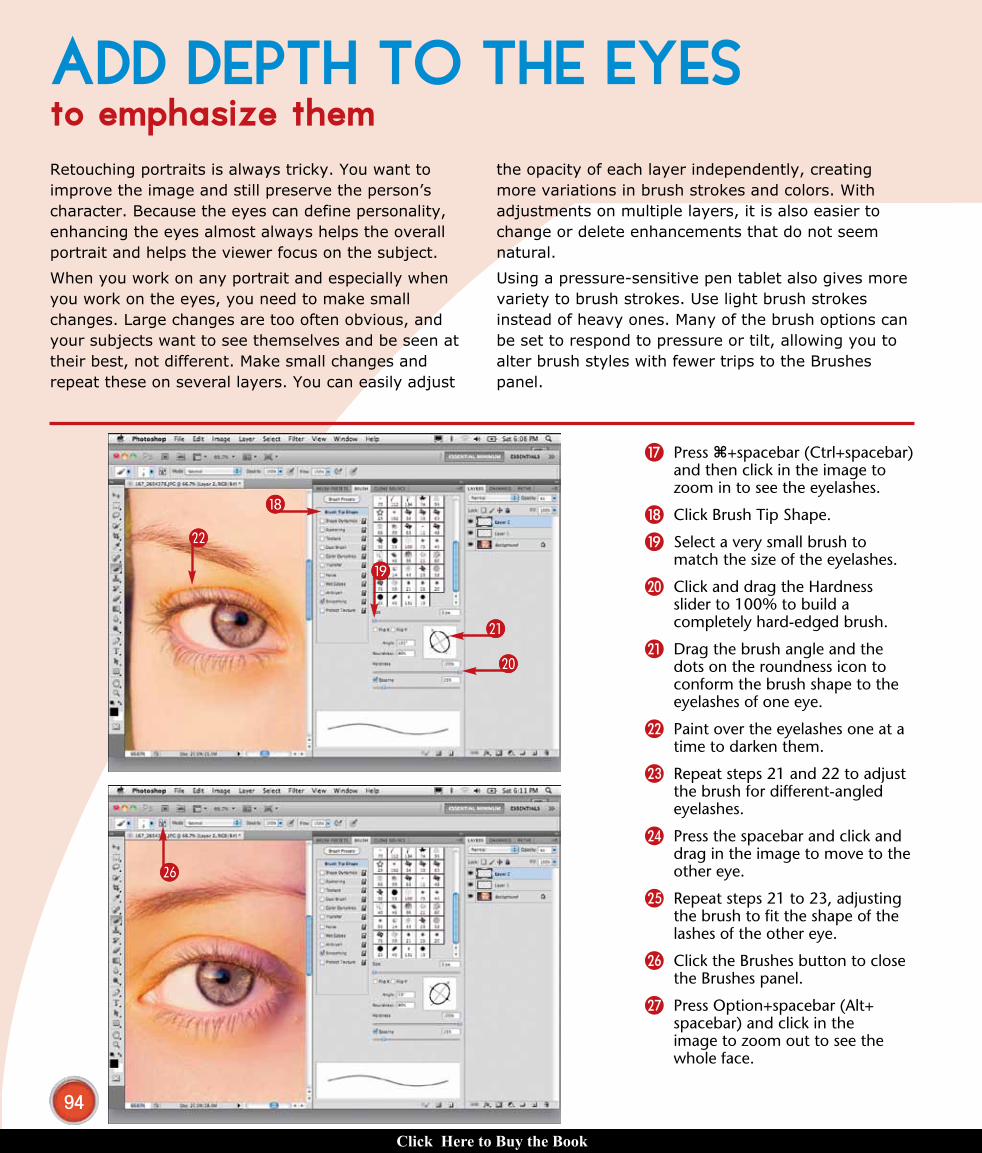
& Press Ô+spacebar (Ctrl+spacebar) and then click in the image to zoom in to see the eyelashes.
* Click Brush Tip Shape.
( Select a very small brush to match the size of the eyelashes.
) Click and drag the Hardness slider to 100% to build a completely hard-edged brush.
q Drag the brush angle and the dots on the roundness icon to conform the brush shape to the eyelashes of one eye.
w Paint over the eyelashes one at a time to darken them.
e Repeat steps 21 and 22 to adjust the brush for different-angled eyelashes.
r Press the spacebar and click and drag in the image to move to the other eye.
t Repeat steps 21 to 23, adjusting the brush to fit the shape of the lashes of the other eye.
y Click the Brushes button to close the Brushes panel.
u Press Option+spacebar (Alt+spacebar) and click in the image to zoom out to see the whole face.
Retouching portraits is always tricky. You want to improve the image and still preserve the person’s character. Because the eyes can define personality, enhancing the eyes almost always helps the overall portrait and helps the viewer focus on the subject.
When you work on any portrait and especially when you work on the eyes, you need to make small changes. Large changes are too often obvious, and your subjects want to see themselves and be seen at their best, not different. Make small changes and repeat these on several layers. You can easily adjust
the opacity of each layer independently, creating more variations in brush strokes and colors. With adjustments on multiple layers, it is also easier to change or delete enhancements that do not seem natural.
Using a pressure-sensitive pen tablet also gives more variety to brush strokes. Use light brush strokes instead of heavy ones. Many of the brush options can be set to respond to pressure or tilt, allowing you to alter brush styles with fewer trips to the Brushes panel.
ADD DEPTH TO THE EYESto emphasize them
06_612651-ch04.indd 94 6/2/10 3:18 PM
Click Here to Buy the Book
95Chapter 4: Retouch Portraits
ii
WW
RR
oo
More Options!You can add eyeliner to the eyes in a photograph. First add another layer. Click Opacity and drag to the left to lower the opacity to about 18%. Paint with black at the edge of the eyelashes on each eye. Click in the Opacity field and use the keyboard up and down arrows to increase or reduce the opacity of the layer until the eyeliner looks natural.
Did You Know?You can use the same technique shown in this task to enhance light eyebrows. Add a layer and reduce the opacity to 8%. Open the Brushes panel and click Brush Tip Shape. Set the hardness to 0% and change the size, angle, and roundness to match the shape of the eyebrows. Paint a few smooth strokes over both eyebrows using black. Change the layer’s opacity as needed.
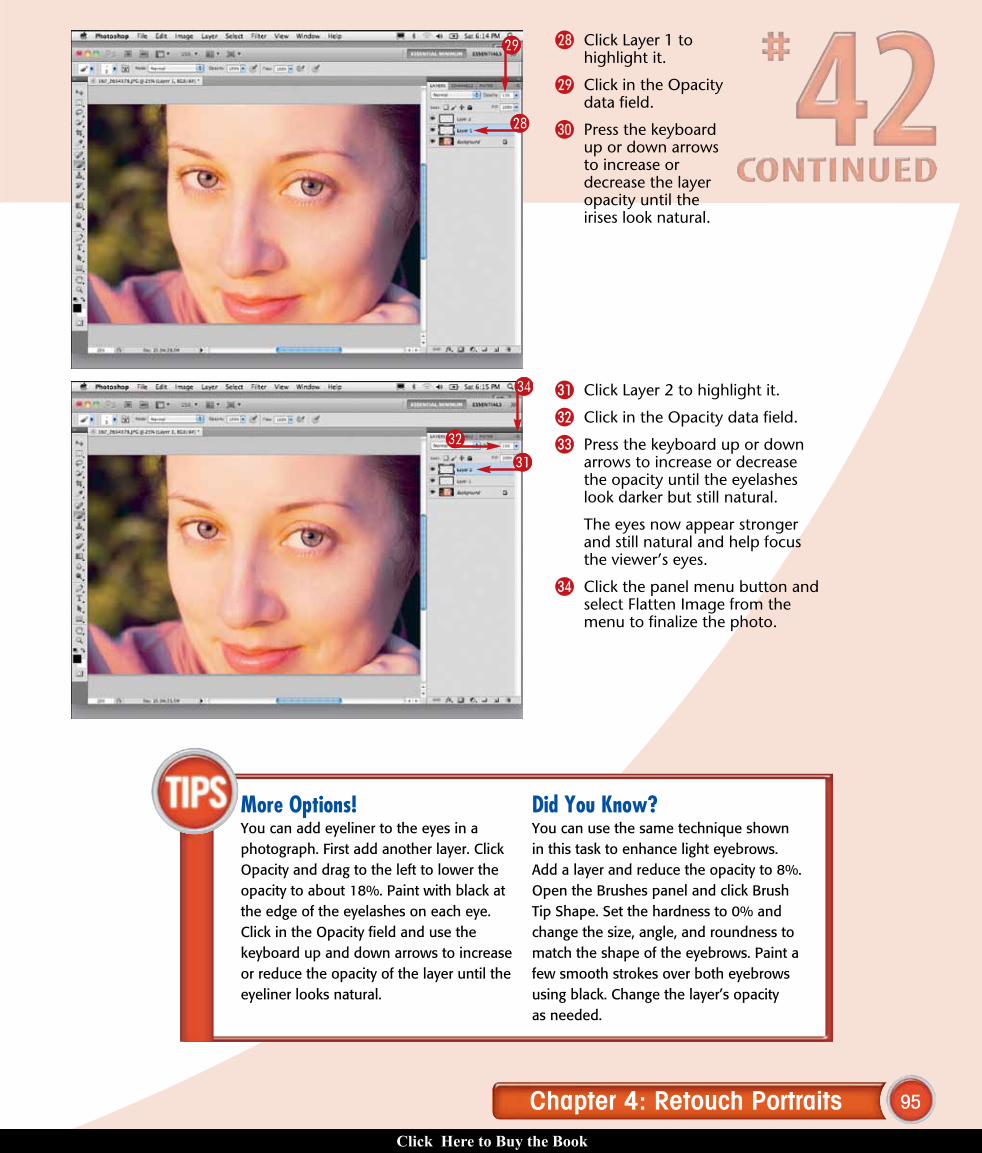
Q Click Layer 2 to highlight it.
W Click in the Opacity data field.
E Press the keyboard up or down arrows to increase or decrease the opacity until the eyelashes look darker but still natural.
The eyes now appear stronger and still natural and help focus the viewer’s eyes.
R Click the panel menu button and select Flatten Image from the menu to finalize the photo.
i Click Layer 1 to highlight it.
o Click in the Opacity data field.
p Press the keyboard up or down arrows to increase or decrease the layer opacity until the irises look natural.
06_612651-ch04.indd 95 6/2/10 3:18 PM
Click Here to Buy the Book
96
6611
@@ 88
00
99
!!
99
44
33
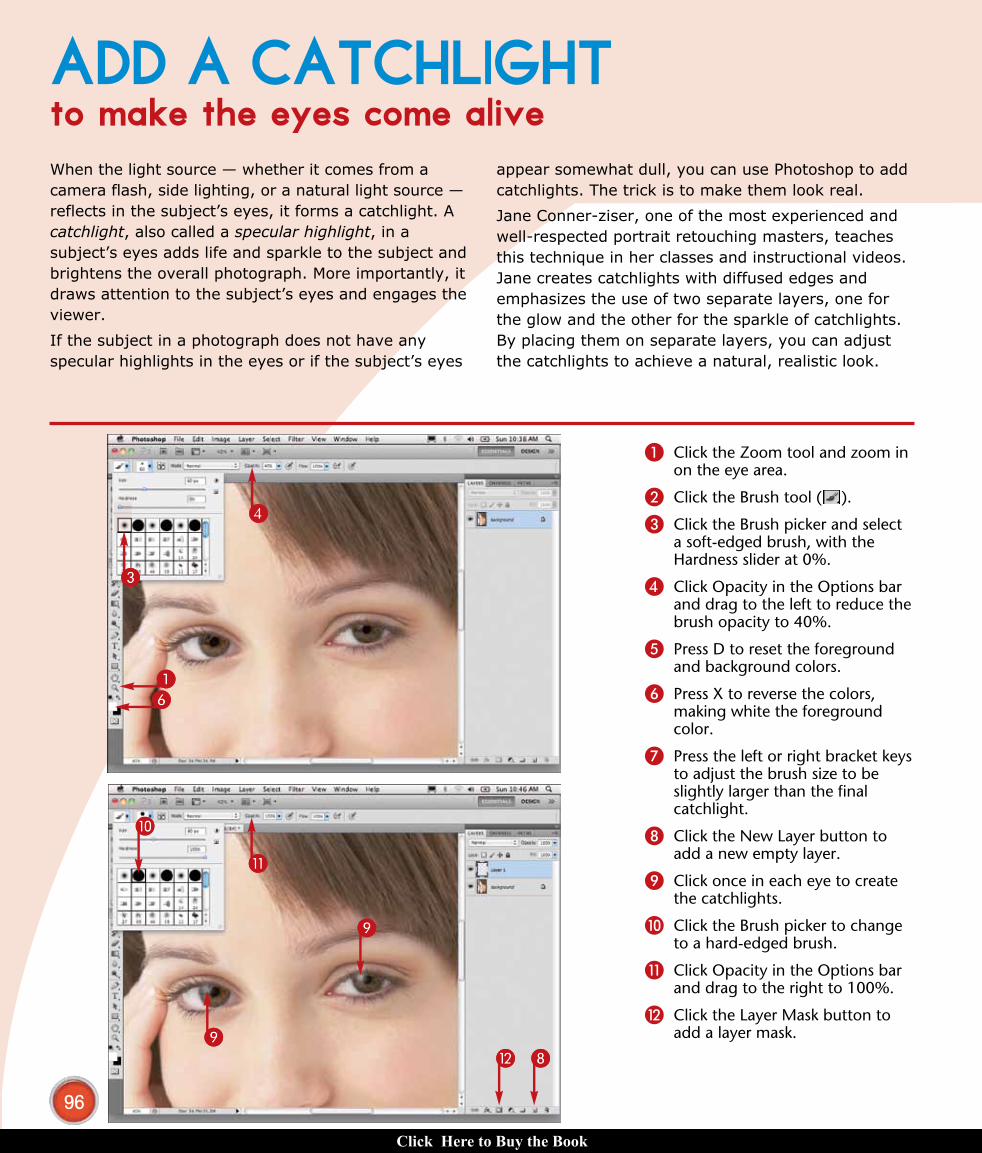
1 Click the Zoom tool and zoom in on the eye area.
2 Click the Brush tool ( ).
3 Click the Brush picker and select a soft-edged brush, with the Hardness slider at 0%.
4 Click Opacity in the Options bar and drag to the left to reduce the brush opacity to 40%.
5 Press D to reset the foreground and background colors.
6 Press X to reverse the colors, making white the foreground color.
7 Press the left or right bracket keys to adjust the brush size to be slightly larger than the final catchlight.
8 Click the New Layer button to add a new empty layer.
9 Click once in each eye to create the catchlights.
0 Click the Brush picker to change to a hard-edged brush.
! Click Opacity in the Options bar and drag to the right to 100%.
@ Click the Layer Mask button to add a layer mask.
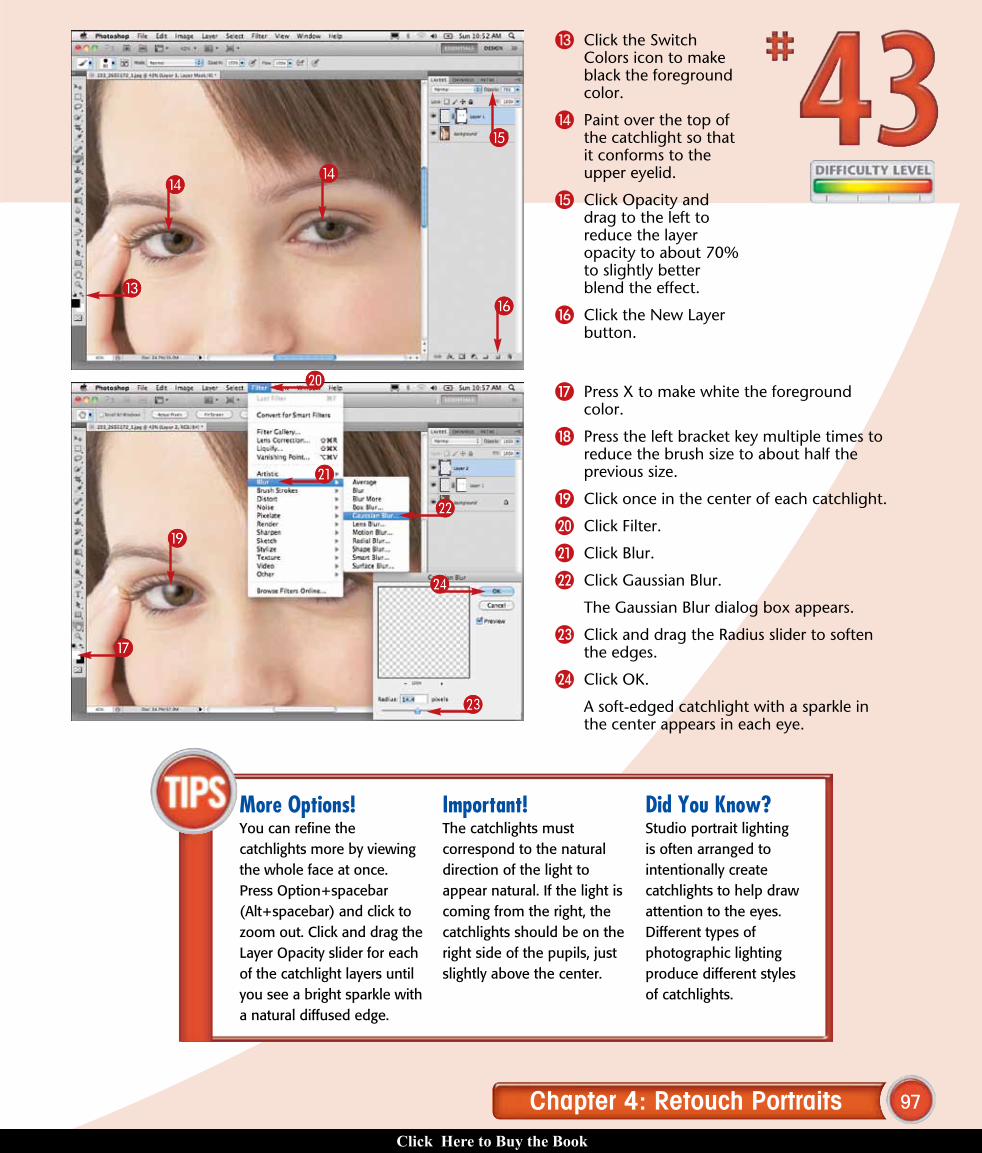
When the light source — whether it comes from a camera flash, side lighting, or a natural light source — reflects in the subject’s eyes, it forms a catchlight. A catchlight, also called a specular highlight, in a subject’s eyes adds life and sparkle to the subject and brightens the overall photograph. More importantly, it draws attention to the subject’s eyes and engages the viewer.
If the subject in a photograph does not have any specular highlights in the eyes or if the subject’s eyes
appear somewhat dull, you can use Photoshop to add catchlights. The trick is to make them look real.
Jane Conner-ziser, one of the most experienced and well-respected portrait retouching masters, teaches this technique in her classes and instructional videos. Jane creates catchlights with diffused edges and emphasizes the use of two separate layers, one for the glow and the other for the sparkle of catchlights. By placing them on separate layers, you can adjust the catchlights to achieve a natural, realistic look.
ADD A CATCHLIGHTto make the eyes come alive
06_612651-ch04.indd 96 6/2/10 3:18 PM
Click Here to Buy the Book
97Chapter 4: Retouch Portraits
ee
ww
))
&&
##
rr
$$$$
((
^̂
%%
More Options!You can refine the catchlights more by viewing the whole face at once. Press Option+spacebar (Alt+spacebar) and click to zoom out. Click and drag the Layer Opacity slider for each of the catchlight layers until you see a bright sparkle with a natural diffused edge.
Important!The catchlights must correspond to the natural direction of the light to appear natural. If the light is coming from the right, the catchlights should be on the right side of the pupils, just slightly above the center.
Did You Know?Studio portrait lighting is often arranged to intentionally create catchlights to help draw attention to the eyes. Different types of photographic lighting produce different styles of catchlights.
& Press X to make white the foreground color.
* Press the left bracket key multiple times to reduce the brush size to about half the previous size.
( Click once in the center of each catchlight.
) Click Filter.
q Click Blur.
w Click Gaussian Blur.
The Gaussian Blur dialog box appears.
e Click and drag the Radius slider to soften the edges.
r Click OK.
A soft-edged catchlight with a sparkle in the center appears in each eye.
# Click the Switch Colors icon to make black the foreground color.
$ Paint over the top of the catchlight so that it conforms to the upper eyelid.
% Click Opacity and drag to the left to reduce the layer opacity to about 70% to slightly better blend the effect.
^ Click the New Layer button.
06_612651-ch04.indd 97 6/2/10 3:18 PM
Click Here to Buy the Book
98
!!
##
99
55
66
7722
33
@@
0088
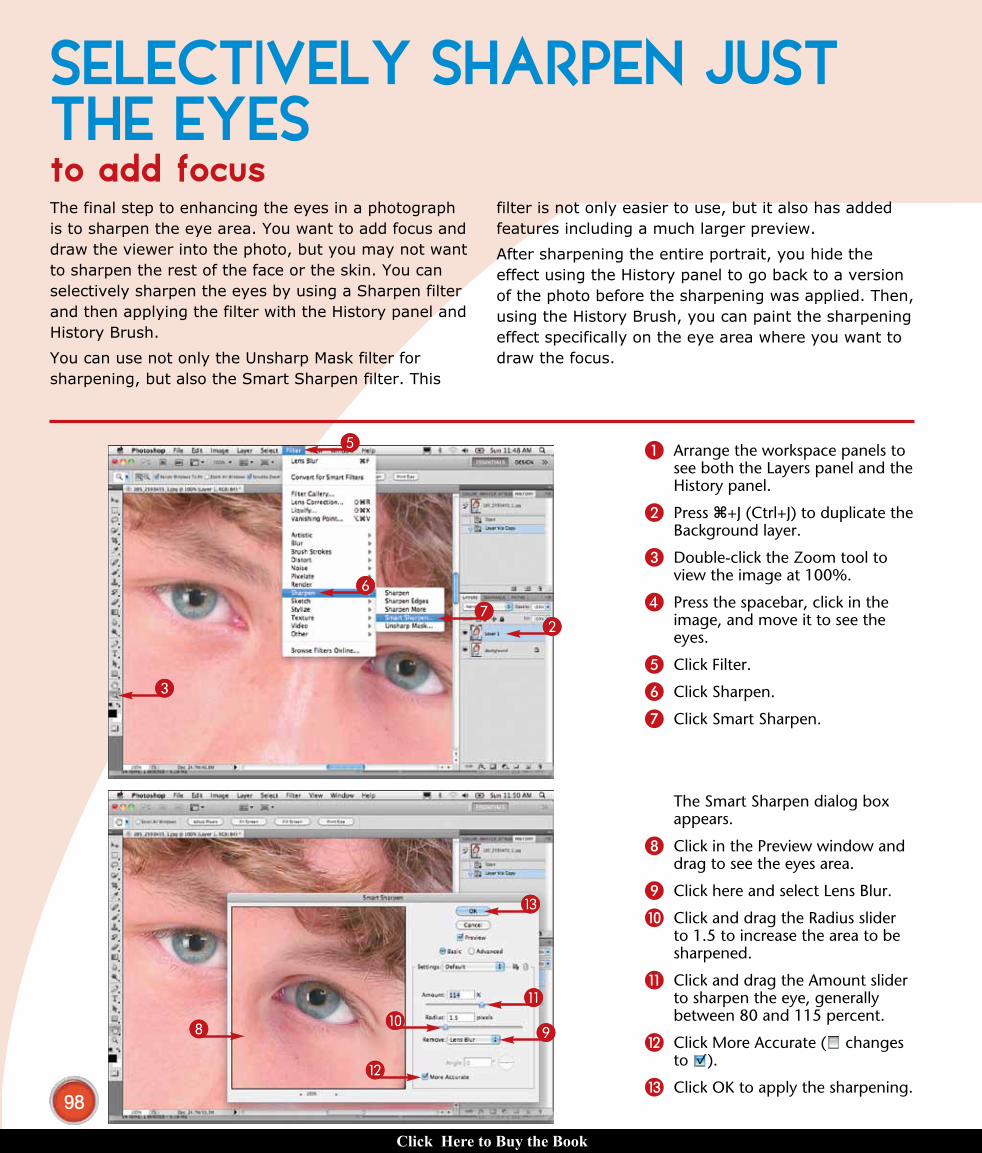
The Smart Sharpen dialog box appears.
8 Click in the Preview window and drag to see the eyes area.
9 Click here and select Lens Blur.
0 Click and drag the Radius slider to 1.5 to increase the area to be sharpened.
! Click and drag the Amount slider to sharpen the eye, generally between 80 and 115 percent.
@ Click More Accurate ( changes to ).
# Click OK to apply the sharpening.
1 Arrange the workspace panels to see both the Layers panel and the History panel.
2 Press Ô+J (Ctrl+J) to duplicate the Background layer.
3 Double-click the Zoom tool to view the image at 100%.
4 Press the spacebar, click in the image, and move it to see the eyes.
5 Click Filter.
6 Click Sharpen.
7 Click Smart Sharpen.
The final step to enhancing the eyes in a photograph is to sharpen the eye area. You want to add focus and draw the viewer into the photo, but you may not want to sharpen the rest of the face or the skin. You can selectively sharpen the eyes by using a Sharpen filter and then applying the filter with the History panel and History Brush.
You can use not only the Unsharp Mask filter for sharpening, but also the Smart Sharpen filter. This
filter is not only easier to use, but it also has added features including a much larger preview.
After sharpening the entire portrait, you hide the effect using the History panel to go back to a version of the photo before the sharpening was applied. Then, using the History Brush, you can paint the sharpening effect specifically on the eye area where you want to draw the focus.
SELECTIVELY SHARPEN JUST THE EYESto add focus
06_612651-ch04.indd 98 6/2/10 3:18 PM
Click Here to Buy the Book
99Chapter 4: Retouch Portraits
))
))
%%
^̂
$$
&&
**
))
Attention!The Smart Sharpen filter applies only to one layer. If you have made other adjustment layers, you must merge them before applying the sharpening. Press Ô+Option+Shift+E (Ctrl+Alt+Shift+E). The adjustment layers and the Background layers merge in the new layer. All the adjustment layers, Background copy or Layer 1, and original Background layers remain unchanged.
Did You Know?Always view the image at 100% magnification when you use a sharpening filter to get the most accurate view on-screen of your changes. Still, the amount of detail visible in a print may be slightly different than what you see on the screen. The amount of detail can vary depending on the type of printer and paper used.
& Click the Brush picker.
* Click to select a soft-edged brush (0%).
( Press the left or right bracket keys to adjust the brush size to be large enough to cover the edge of the eyes.
) Paint over the eyes, eyelashes, and eyebrows with the History Brush to apply the sharpening.
q Click the Eye icon for Layer 1 on and off to compare before and after sharpening.
The sharpening is applied only to the eye areas.
The sharpening is applied to Layer 1.
$ In the History panel, click the box to the left of the Smart Sharpen step to set the source for the History Brush.
% In the History panel, click the previous state named Layer Via Copy.
^ Click the History Brush tool.
06_612651-ch04.indd 99 6/2/10 3:18 PM
Click Here to Buy the Book
100
66
77
11
22
33
44
99
11
55
Note: Arrange the panels to see both the Layers and the Adjustments panels.
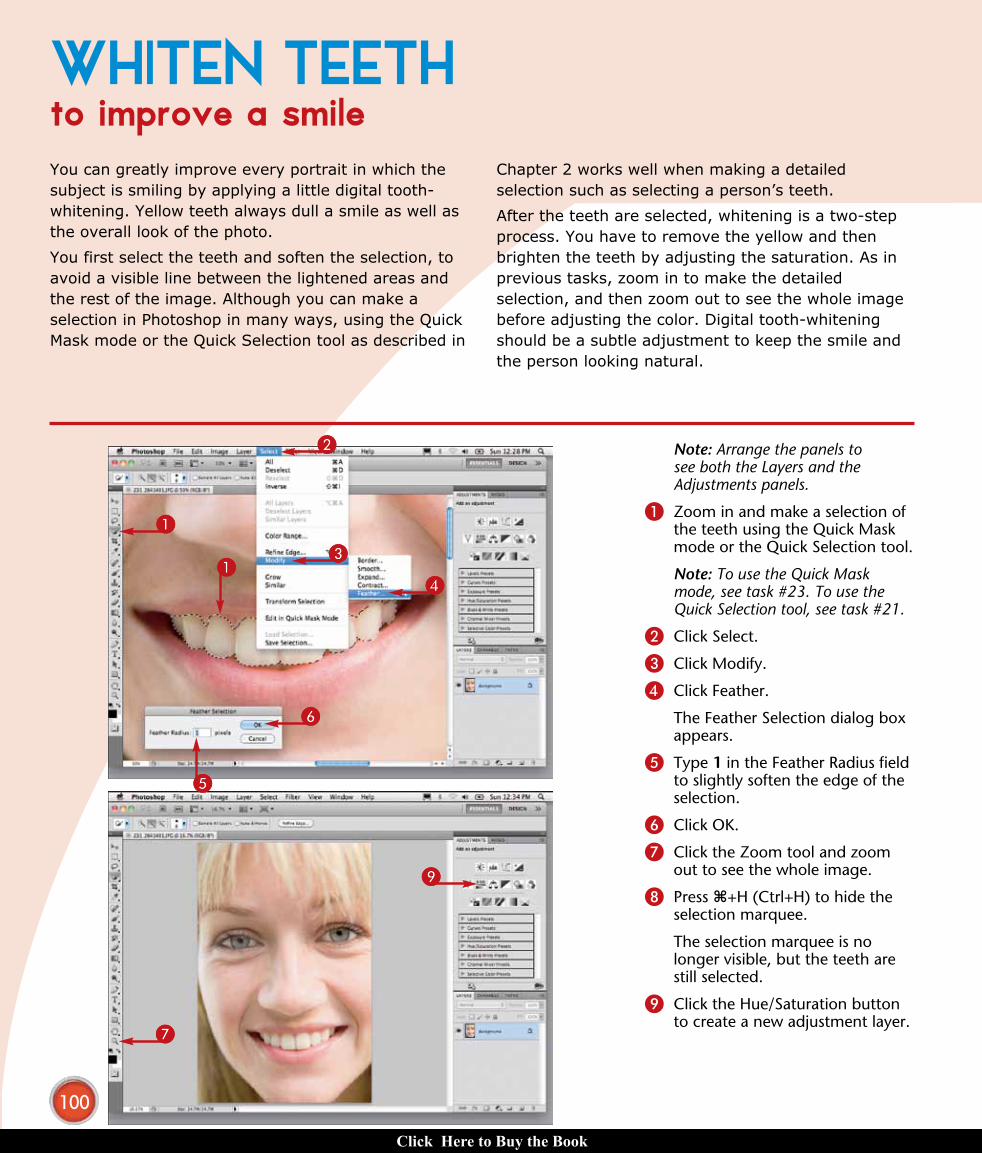
1 Zoom in and make a selection of the teeth using the Quick Mask mode or the Quick Selection tool.
Note: To use the Quick Mask mode, see task #23. To use the Quick Selection tool, see task #21.
2 Click Select.
3 Click Modify.
4 Click Feather.
The Feather Selection dialog box appears.
5 Type 1 in the Feather Radius field to slightly soften the edge of the selection.
6 Click OK.
7 Click the Zoom tool and zoom out to see the whole image.
8 Press Ô+H (Ctrl+H) to hide the selection marquee.
The selection marquee is no longer visible, but the teeth are still selected.
9 Click the Hue/Saturation button to create a new adjustment layer.
You can greatly improve every portrait in which the subject is smiling by applying a little digital tooth-whitening. Yellow teeth always dull a smile as well as the overall look of the photo.
You first select the teeth and soften the selection, to avoid a visible line between the lightened areas and the rest of the image. Although you can make a selection in Photoshop in many ways, using the Quick Mask mode or the Quick Selection tool as described in
Chapter 2 works well when making a detailed selection such as selecting a person’s teeth.
After the teeth are selected, whitening is a two-step process. You have to remove the yellow and then brighten the teeth by adjusting the saturation. As in previous tasks, zoom in to make the detailed selection, and then zoom out to see the whole image before adjusting the color. Digital tooth-whitening should be a subtle adjustment to keep the smile and the person looking natural.
WHITEN TEETHto improve a smile
06_612651-ch04.indd 100 6/2/10 3:18 PM
Click Here to Buy the Book
101Chapter 4: Retouch Portraits
!!
00
@@
##
Try This!When zooming in on an image, press and hold the spacebar; the pointer temporarily changes to the Hand tool. You can click and drag around your image with the Hand tool and easily move to the area that needs to be adjusted. When you release the spacebar, you change back to the tool that was previously selected.
Did You Know?Feathering softens the edge of a selection and smoothes the transition between two distinct areas. You can also click Select and click Refine Edge to feather the selection edge. The default settings of the Refine Edge dialog box include a one-pixel feather. Click OK in the dialog box and continue lightening the teeth as shown here.
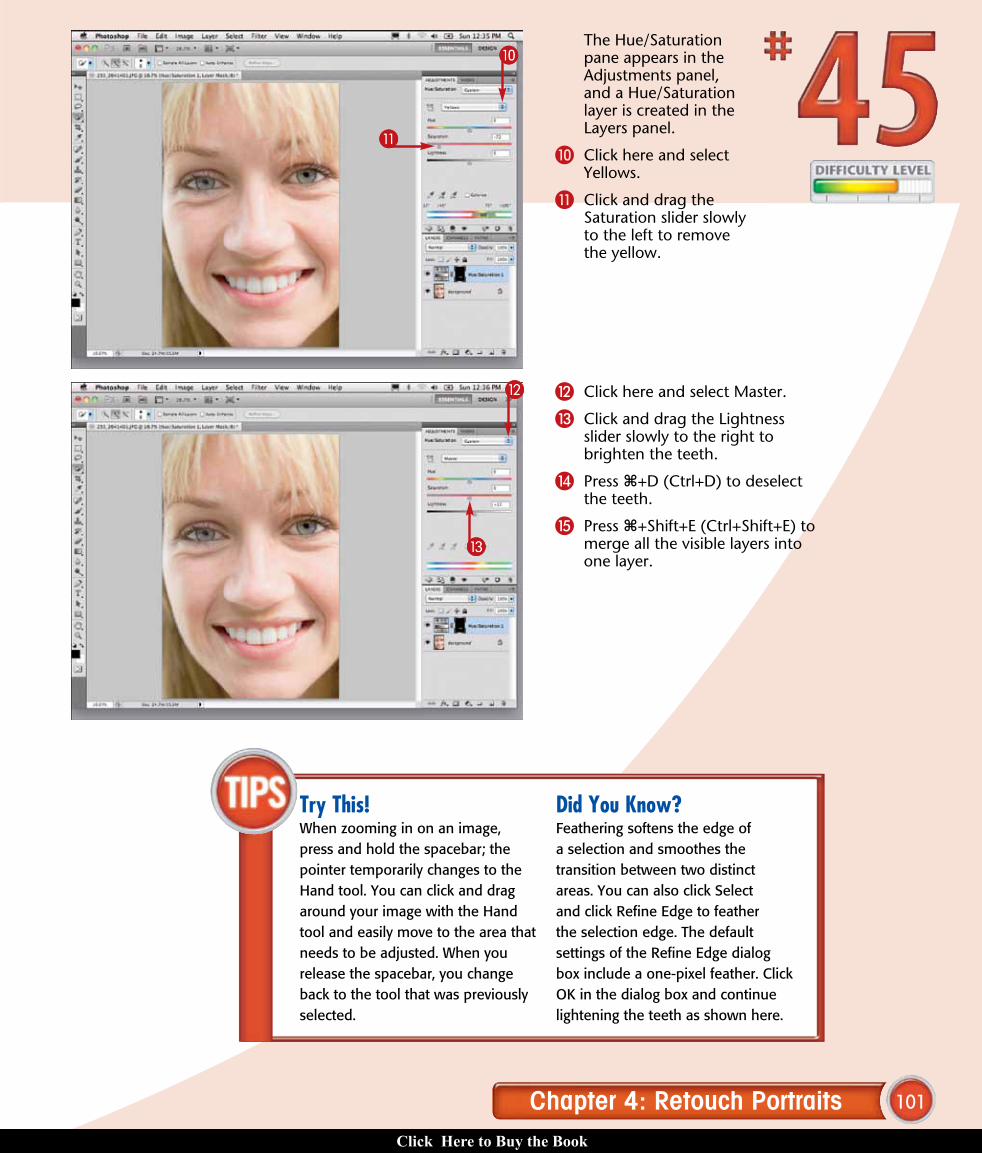
@ Click here and select Master.
# Click and drag the Lightness slider slowly to the right to brighten the teeth.
$ Press Ô+D (Ctrl+D) to deselect the teeth.
% Press Ô+Shift+E (Ctrl+Shift+E) to merge all the visible layers into one layer.
The Hue/Saturation pane appears in the Adjustments panel, and a Hue/Saturation layer is created in the Layers panel.
0 Click here and select Yellows.
! Click and drag the Saturation slider slowly to the left to remove the yellow.
06_612651-ch04.indd 101 6/2/10 3:18 PM
Click Here to Buy the Book