Embed Size (px)
DESCRIPTION
Equipment Manual
Citation preview
Owner's Manual
Manual Del Propietario
Vacuum Cleaner
AspiradoraModel, Modelo 116.33912
116.33913
CAUTION:Read and follow all
safety and operatinginstructions before first
use of this product.
CUIDADO:
Lea y siguatodas lasinstruccionesde operaci6ny seguridad antes del uso deeste producto.
Sears, Roebuck and Co., Hoffman Estates, IL 60179 U.S.A.www.sears.com
Irnpreso en MexicoPart No. CO1ZBZU1_UOO-8192540 Printed in Mexico
Before Using Your NewVacuum ...... 2Kenmore Vacuum Cleaner Warranty... 2
Important Safety Instructions ......... 3Parts and Features .................. 4
Assembly Instructions ............. 6-6
Operating Instructions ............... 7Getting Started ...................... 7Pile Height Selection and Setting ........ 7Off/Floor/Carpet Switch ............... 8Releasing the Handle ................. 8Attachments ..................... 9-11Attachment Use Chart ............... 11
Vacuuming Tips .................... 11Performance Features ............. 12-13
Vacuum Cleaner Care ............... 14
Vacuum Storage .................... 14Cleaning Exterior and Attachments ...... 14Dust Bin Cleaning ................ 15-16Secondary Screen Cleaning ........... 16Filter Changing/Cleaning ............. 17Clog Removal ..................... 18Light Bulb Changing ................. 19Agitator Cleaning ................... 20Valve Cleaning ..................... 20
Troubleshooting .................... 21
Requesting service ........ (back page)
Please read this guide. It will help you assemble and operate your new Kenmore vacuum inthe safest and most effective way.
For more information about vacuum cleaner care and operation, call your nearest Searsstore. You will need the complete model and serial numbers when requesting information.Your vacuum's model and serial numbers are located on the Model and Serial Number Plate.
Use the space below to record the model number and serial number of your new Kenmorevacuum.
Model No.
Serial No.
Date of Purchase
Keep this book and your sales check (receipt) in a safe place for future reference.
LIMITED ONE YEAR WARRANTY ON KENMORE VACUUM CLEANER
This warranty is for one year from the date of purchase, and includes only private householdvacuum cleaner use. During the warranty year, when this vacuum cleaner is operated andmaintained according to the owner's manual instructions, Sears will repair any defects inmaterial or workmanship free of charge.
This warranty excludes vacuum bags, belts, light bulbs, and filters, which are expendable partsand become worn during normal use.
For warranty service, return this vacuum cleaner to the nearest Sears Service Center inthe United States.
This warranty applies only while this product is in use in the United States. This warranty givesyou specific legal rights, and you may also have other rights which vary from state to state.
Sears, Roebuck and Co., D/817 WA, Hoffman Estates, IL 60179
Yoursafety is importantto us. Toreducethe risk of fire, electrical shock, injuryto personsor damagewhen usingyour vacuumcleaner,follow basic safetyprecautions including the following:
Read this manual before assembling orusing your vacuum cleaner.
Use your cleaner only as described inthis manual. Use only with Sears recom-mended attachments.
To reduce the risk of electrical shock -Do not use outdoors or on wet surfaces.
Disconnect electrical supply before anyservicing or cleaning. Failure to do socould result in electrical shock or person-al injury.
Always turn cleaner off before unplug-ging.
Do not unplug by pulling on cord. Tounplug, grasp the plug, not the cord.
Do not use with damaged cord or plug.If cleaner is not working as it should, hasbeen dropped, damaged, left outdoors,or dropped into water, return it to aSears Service Center.
Do not pull or carry by cord, use cord asa handle, close door on cord, or pullcord around sharp edges or corners. Donot run cleaner over cord. Keep cordaway from heated surfaces.
Do not leave cleaner when plugged in.Unplug from outlet when not in use andbefore servicing.
Do not allow to be used as a toy. Closeattention is necessary when used by ornear children.
Do not handle plug or cleaner with wethands.
Agitator Brush may suddenly restart,disconnect from power supply beforeservicing.
Do not put any objects into openings.Do not use with any opening blocked;keep free of dust, lint, hair and anythingthat may reduce air flow.
Keep hair, loose clothing, fingers, and allparts of body away from openings andmoving parts.
Do not use cleaner without dust bin
and/or filters in place.
Always clean the dust bin after vacuum-ing carpet cleaners or freshener, pow-ders and fine dust. These products clogthe filters, reduce airflow and can causedamage to the cleaner. Failure to cleanthe dust bin could cause permanentdamage to the cleaner.
Do not use the cleaner to pick up sharphard objects, small toys, pins, paperclips, etc. They may damage the clean-er or dust bin.
Do not pick up anything that is burningor smoking, such as cigarettes, matches,or hot ashes.
Do not use cleaner to pick up flammableor combustible liquids (gasoline, clean-ing fluids, perfumes, etc.), or use inareas where they may be present. Thefumes from these substances can createa fire hazard or explosion.
Use extra care when cleaning on stairs.Do not put on chairs, tables, etc. Keepon floor.
You are responsible for making sure thatyour vacuum cleaner is not used by any-one unable to operate it properly.
SAVE THESE INSTRUCTIONSProper assembly and safe use of your vacuum cleaner are your responsibilities. Your deaner isintended only for household use. Read this Owner's Manual carefully for important use and safetyinformation. This guide contains safety statements under warning and caution symbols. Pleasepay special attention to these boxes and follow any instructions given. WARNING statements alert,ou to such dangers as fire, electrical shock, bums and personal injury. CAUTION statements alertou to such dangers as personal injury and/or property damage.
3
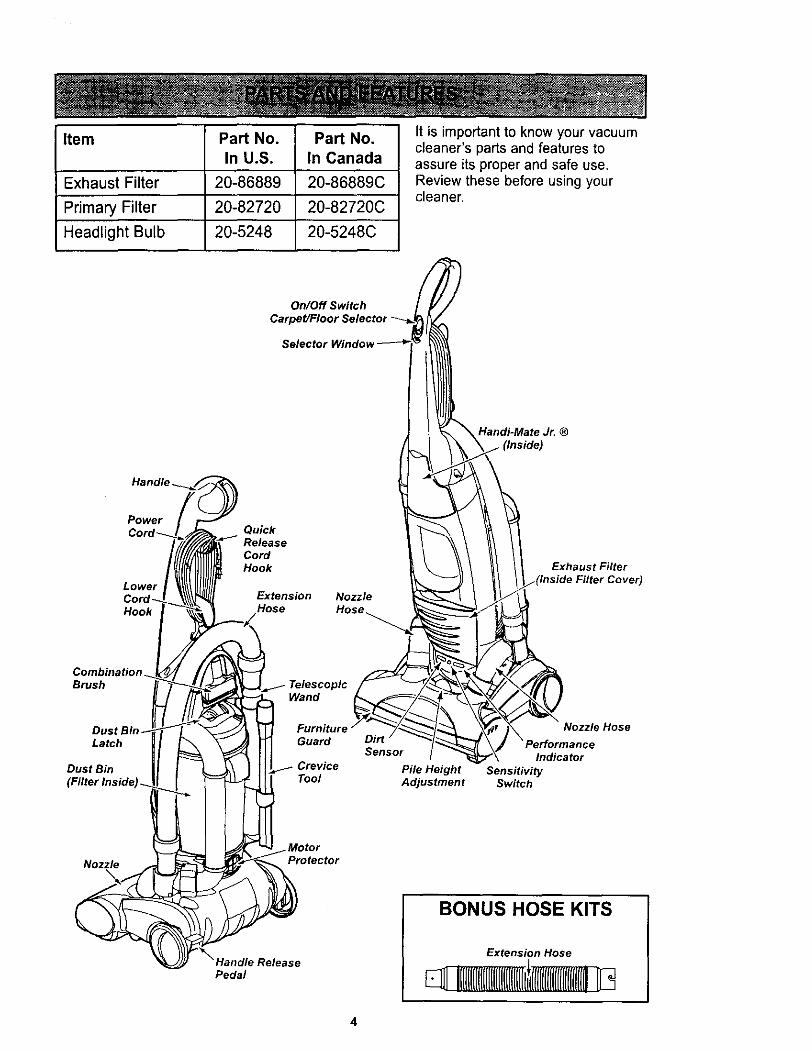
Item Part No. Part No.In U.S. In Canada
Exhaust Filter 20-86889 20-86889C
Primary Filter 20-82720 20-82720C
Headlight Bulb 20-5248 20-5248C
It is important to know your vacuumcleaner's parts and features toassure its proper and safe use.Review these before using yourcleaner.
On/Off Switch
Handi-Mate Jr. ®
PowerCon
Lower
Hook
Qu_kReleaseCordHook
HoseNozzle
Exhaust Filter
Combination.Brush
Latch
Dust BinTool
Sensor
Pile HeightAdjustment
Nozzl_
Indicator
SensitivitySwitch
Nozzle\
Pedal
Protector
ease
BONUS HOSE KITS
Extension Hose
I{(l{ll[([[UIIl[illll[(l{llfl/f[{llll[l[{llll{/i
4
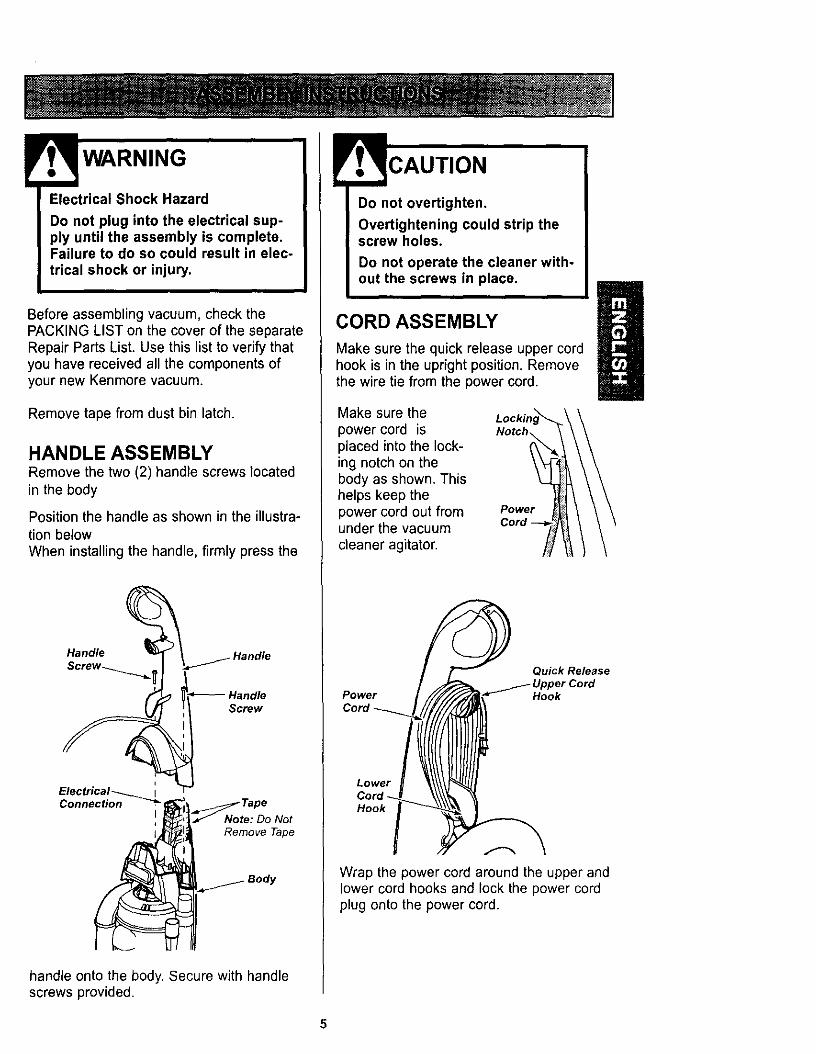
WARNING
Electrical Shock Hazard
Do not plug into the electrical sup-ply until the assembly is complete.Failure to do so could result in elec-trical shock or injury.
Before assembling vacuum, check thePACKING LIST on the cover of the separateRepair Parts List. Use this list to verify thatyou have received all the components ofyour new Kenmore vacuum.
Remove tape from dust bin latch.
HANDLE ASSEMBLYRemove the two (2) handle screws located
in the body
Position the handle as shown in the illustra-tion below
When installing the handle, firmly press the
Handle
Screw_,
HandleScrew
Electrical_ IConnection _'_ _l_._,_ Tape
handle onto the body. Secure with handlescrews provided,
Do not overtighten.
Overtightening could strip thescrew holes.
Do not operate the cleaner with-out the screws in place.
CORD ASSEMBLY
Make sure the quick release upper cordhook is in the upright position. Removethe wire tie from the power cord.
Make sure the
power cord isplaced into the lock-ing notch on thebody as shown. Thishelps keep thepower cord out fromunder the vacuum
cleaner agitator.
Power
Quick Release
Hook
Wrap the power cord around the upper andlower cord hooks and lock the power cordplug onto the power cord.
5
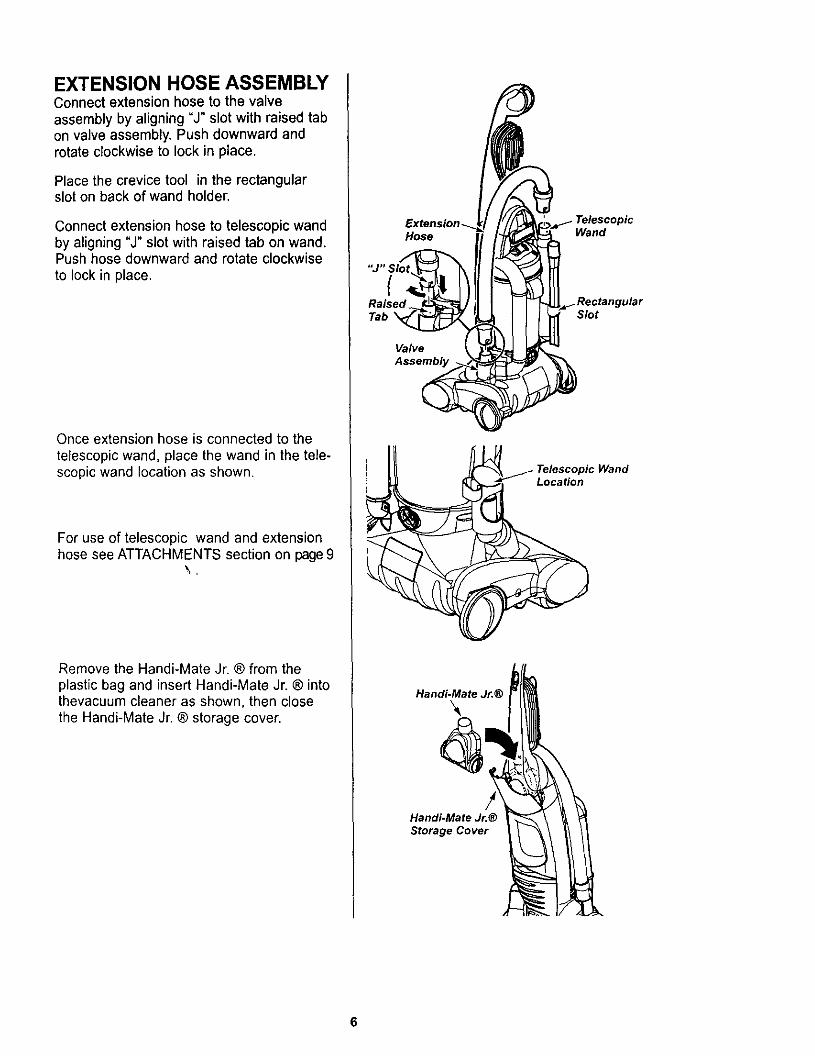
EXTENSION HOSE ASSEMBLYConnect extension hose to the valve
assembly by aligning "J" slot with raised tabon valve assembly. Push downward androtate clockwise to lock in place.
Place the crevice tool in the rectangularslot on back of wand holder.
Connect extension hose to telescopic wandby aligning "J" slot with raised tab on wand.Push hose downward and rotate clockwiseto lock in place.
Once extension hose is connected to the
telescopic wand, place the wand in the tele-scopic wand location as shown.
For use of telescopic wand and extensionhose see ATTACHMENTS section on page 9
\,
Remove the Handi-Mate Jr. ® from the
plastic bag and insert Handi-Mate Jr. ® intothevacuum cleaner as shown, then closethe Handi-Mate Jr. ® storage cover.
Extension _Hose Wand
Slot
Valve
Assembly
Telescopic Wand
ion
Handi-Mate Jr.®
Handi-Mate Jr.®
Storage Cover
6
OPERATING INSTRUCTIONS
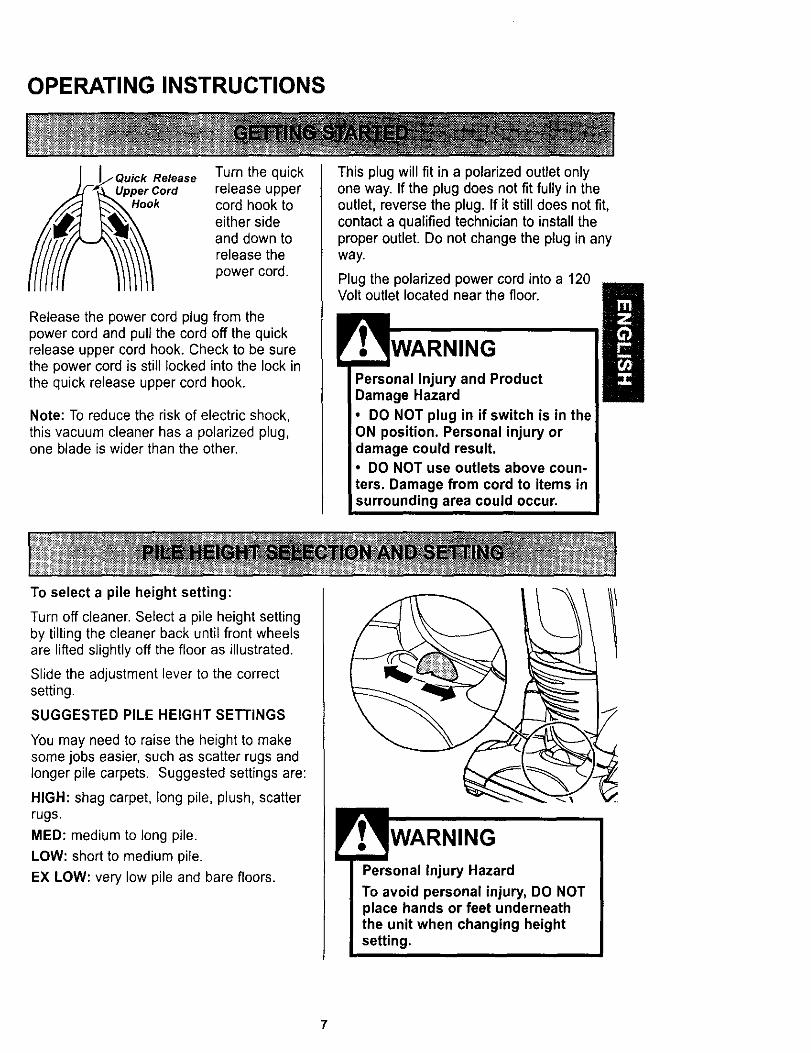
Quick Release
Upper Cord_. Hook
Turn the quickrelease uppercord hook toeither sideand down torelease thepower cord.
Release the power cord plug from thepower cord and pull the cord off the quickrelease upper cord hook. Check to be surethe power cord is still locked into the lock inthe quick release upper cord hook.
Note: To reduce the risk of electric shock,
this vacuum cleaner has a polarized plug,one blade is wider than the other.
This plug will fit in a polarized outlet onlyone way. If the plug does not fit fully in theoutlet, reverse the plug. If it still does not fit,contact a qualified technician to install theproper outlet. Do not change the plug in anyway.
Plug the polarized power cord into a 120Volt outlet located near the floor.
Personal Injury and ProductDamage Hazard
• DO NOT plug in if switch is in theON position. Personal injury ordamage could result.• DO NOT use outlets above coun-
ters. Damage from cord to items insurrounding area could occur.
To select a pile height setting:
Turn off cleaner. Select a pile height settingby tilting the cleaner back until front wheelsare lifted siighUy off the floor as illustrated.
Slide the adjustment lever to the correctsetting.
SUGGESTED PILE HEIGHT SETTINGS
You may need to raise the height to makesome jobs easier, such as scatter rugs andlonger pile carpets. Suggested settings are:
HIGH: shag carpet, long pile, plush, scatterrugs.
MED: medium to long pile.
LOW: short to medium pile.
EX LOW: very low pile and bare floors. Personal Injury Hazard
To avoid personal injury, DO NOTplace hands or feet underneaththe unit when changing heightsetting.
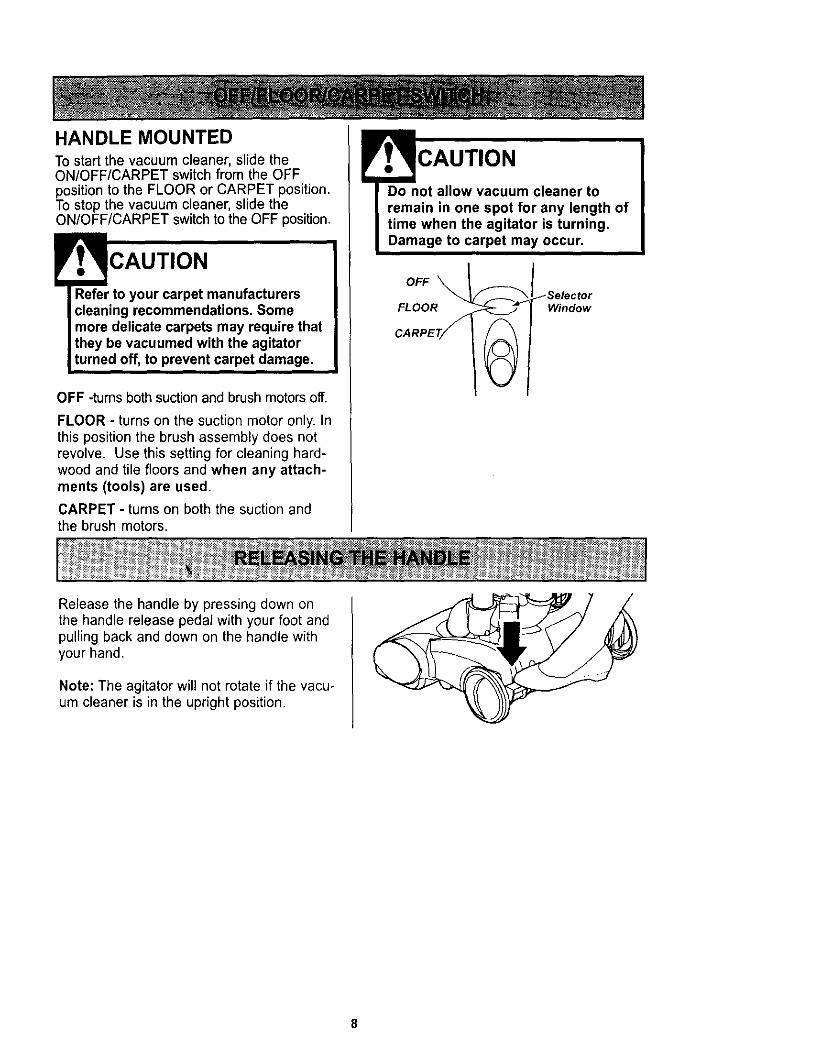
HANDLE MOUNTEDTo start the vacuum cleaner, slide theON/OFF/CARPET switch from the OFFposition to the FLOOR or CARPET position.To stop the vacuum cleaner, slide theON/OFF/CARPET switch to the OFF position.
CAUTION
Refer to your carpet manufacturerscleaning recommendations. Somemore delicate carpets may require thatthey be vacuumed with the agitatorturned off, to prevent carpet damage.
OFF -turns both suction and brush motors off.
FLOOR - turns on the suction motor only. Inthis position the brush assembly does notrevolve. Use this setting for cleaning hard-wood and tile floors and when any attach-ments (tools) are used.
CARPET - turns on both the suction andthe brush motors.
!r.V CAUTIONDo not allow vacuum cleaner to
remain in one spot for any length oftime when the agitator is turning.Damage to carpet may occur.
I
OFF
FLOOR Window
Release the handle by pressing down onthe handle release pedal with your foot andpulling back and down on the handle withyour hand.
Note: The agitator will not rotate if the vacu-um cleaner is in the upright position.
8
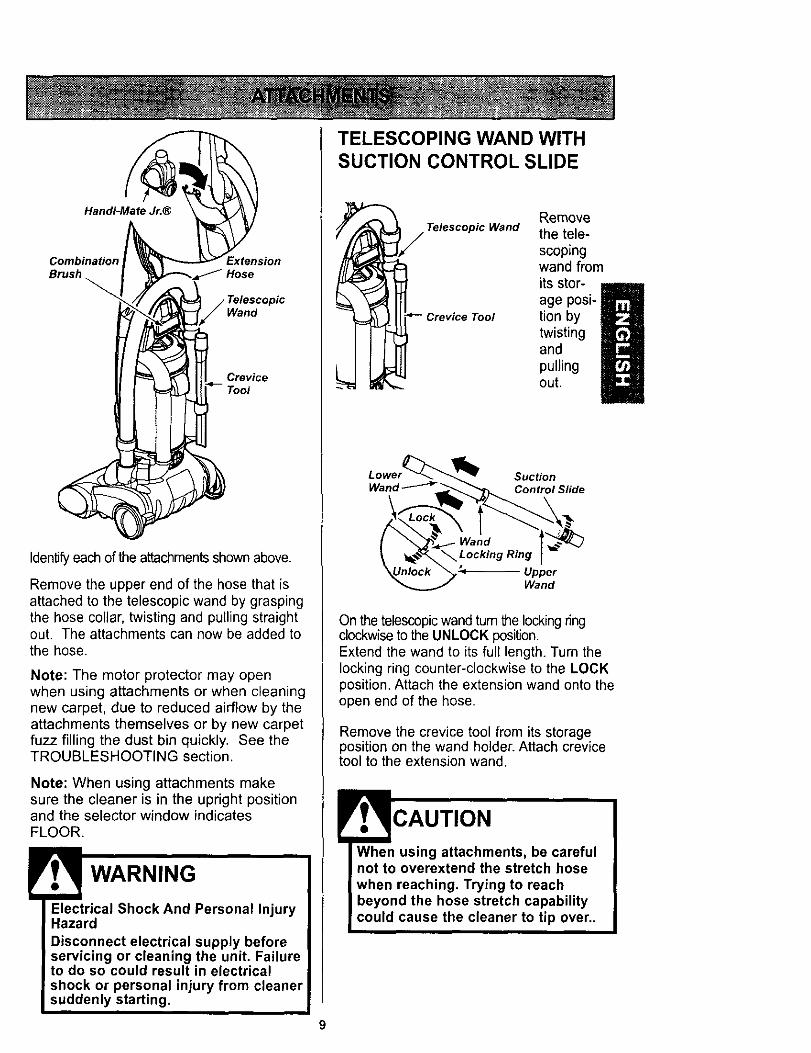
Handi-Mate Jr._
Combination ExtensionBrush
Wand
Crevice
Identify each of the attachments shown above.
Remove the upper end of the hose that isattached to the telescopic wand by graspingthe hose collar, twisting and pulling straightout. The attachments can now be added tothe hose.
Note: The motor protector may openwhen using attachments or when cleaningnew carpet, due to reduced airflow by theattachments themselves or by new carpetfuzz filling the dust bin quickly. See theTROUBLESHOOTING section.
Note: When using attachments makesure the cleaner is in the upright positionand the selector window indicatesFLOOR.
Electrical Shock And Personal InjuryHazard
Disconnect electrical supply beforeservicing or cleaning the unit. Failureto do so could result in electricalshock or personal injury from cleanersuddenly starting.
9
TELESCOPING WAND WITHSUCTION CONTROL SLIDE
FTelescopic Wand
_-" Crevice Tool
Removethe tele-
scopingwand from
its stor- _
age posi-tion bytwistingand
pullingout.
SuctionWand _ Control Slide
Wand
,_ UpperWand
On the telescopic wand tum the locking ringclockwise to the UNLOCK position.Extend the wand to its full length. Turn thelocking ring counter-clockwise to the LOCKposition. Attach the extension wand onto theopen end of the hose.
Remove the crevice tool from its storageposition on the wand holder. Attach crevicetool to the extension wand.
CAUTION
When using attachments, be carefulnot to overextend the stretch hosewhen reaching. Trying to reachbeyond the hose stretch capabilitycould cause the cleaner to tip over..
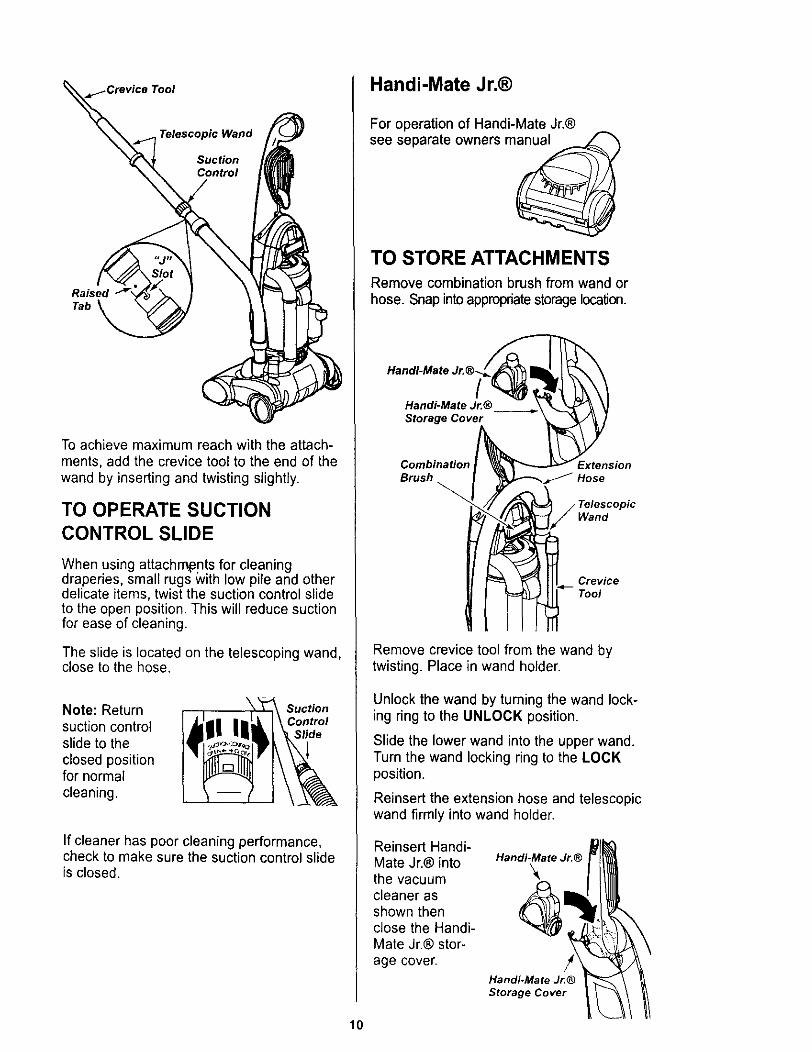
_.Crevice Tool
Telescopic Wand
SuctionControl
Ra_ed_b
To achieve maximum reach with the attach-ments, add the crevice toot to the end of thewand by inserting and twisting slightly.
TO OPERATE SUCTIONCONTROLSLIDE
When using attachmpnts for cleaningdraperies, small rugs _vith low pile and otherdelicate items, twist the suction control slideto the open position. This will reduce suctionfor ease of cleaning.
The slide is located on the telescoping wand,close to the hose.
Note: Returnsuction controlslide to the
closed positionfor normal
cleaning.
SuctionControl
Slide
If cleaner has poor cleaning performance,check to make sure the suction control slideis closed.
Handi-Mate Jr.®
For operation of Handi-Mate Jr.®
see separate owners m_ _
TO STORE ATTACHMENTSRemove combination brush from wand or
hose. Snap into appropriate storage location.
Handi-Mate Jr.®Storage Cover
Combination ExtensionBrush
Wand
CreviceTool
Remove crevice tool from the wand bytwisting. Place in wand holder.
Unlock the wand by turning the wand lock-ing ring to the UNLOCK position.
Slide the lower wand into the upper wand.Turn the wand locking ring to the LOCKposition.
Reinsert the extension hose and telescopicwand firmly into wand holder.
Reinsert Handi-Mate Jr.® intothe vacuumcleaner asshown thenclose the Handi-Mate Jr.® stor-
age cover.
Handi.Mate Jr.®
Handi-Mate J_®Storage Cover
10
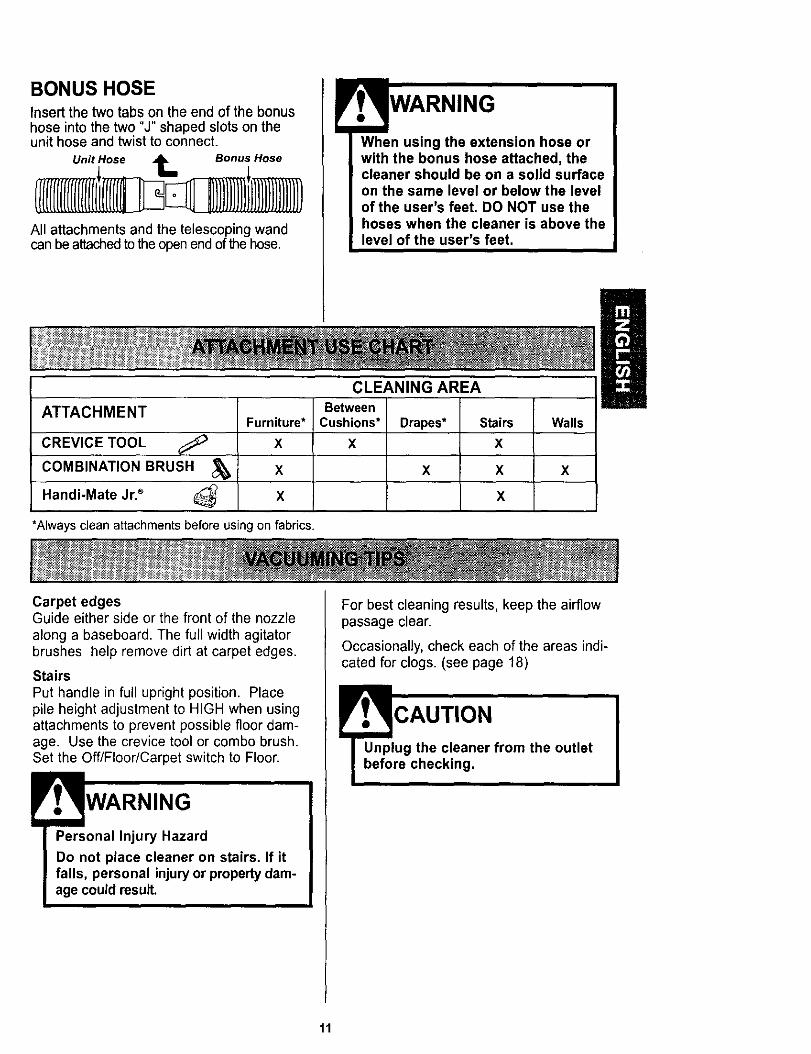
BONUS HOSEInsert the two tabs on the end of the bonushose into the two "J" shaped slots on theunit hose and twist to connect.
Unit Hose _ Bonus Hose
All attachments and the telescoping wandcan be attached to the open end of the hose.
When using the extension hose orwith the bonus hose attached, thecleaner should be on a solid surfaceon the same level or below the levelof the user's feet, DO NOT use thehoses when the cleaner is above thelevel of the user's feet,
ATTACHMENT
CREVICE TOOL
COMBINATION BRUSH
Handi-Mate Jr.®
Furniture*
X
X
X
CLEANING AREABetween
Cushions*
X
Drapes*
X
Stairs
X
X
X
*Always clean attachments before usingon fabrics.
Walls
X
Carpet edgesGuide either side or the front of the nozzle
along a baseboard. The full width agitatorbrushes help remove dirt at carpet edges.
Stairs
Put handle in full upright position. Placepile height adjustment to HIGH when usingattachments to prevent possible floor dam-age. Use the crevice tool or combo brush.Set the Off/Floor/Carpet switch to Floor.
Personal Injury Hazard
Do not place cleaner on stairs. If itfalls, personal injury or property dam-age could result.
For best cleaning results, keep the airflowpassage clear.
Occasionally, check each of the areas indi-cated for clogs. (see page 18)
CAUTIONug the cleaner from the outlet
re checking,
tl

MOTOR PROTECTORThis vacuum has a motor protector by-pass valve which automatically opens toprovide cooling air to the motor when aclog prevents the normal flow of air to themotor. If the by-pass valve opens toprevent motor overheating and possibledamage to the vacuum, you will notice achange of sound as air rushes through thevalve opening.
Note: Do notblock motor
protector,
MotorProtector
To correct problem: See the TROUBLE-SHOOTING chart.
Note: The motor protector may openwhen using attachments or when cleaningnew carpet, due to reduced airflow by theattachments themselves or by new carpetfuzz filling the dust bin quickly. See the
TROUBLESHOOTING section.
PERFORMANCE INDICATOR
When the unit is
running withnormal air flow,the light on theperformanceindicator is off.
The light comeson where \Performance
airflow becomes Indicator
blocked. If that occurs, check the dustbin, clean/replace clogged filters, andcheck other possible clog locations shownin CLOG REMOVAL (see page 18).
To correct problem: See the TROUBLE-SHOOTING chart.
Note: The light may also come on whenusing attachments, due to reduced airflowthrough the attachment.
Note: In some cases, the performanceindicator light may not come on if themotor protector has opened.
AGITATOR THERMAL PROTECTOR
This agitator has a thermal protector whichautomatically trips to protect the agitatormotor from overheating. If a clog preventsthe normal flow of air to the motor, the
thermal protector turns the motor off
automatically to allow the motor to cool inorder to prevent possible damage to thevacuum. During this time the headlight andsuction motor will remain on.
To correct problem: If this occurs, turn the
vacuum off and unplug the power cord fromthe outlet to allow the agitator to cool andthe thermal protector to reset. Check for
and remove clogs, if necessary. Also
check and replace any clogged filters.Wait approximately thirty (30) minutesand plug the vacuum in and turn back onto see if the motor protector has reset.
The motor protector will not reset if thevacuum is not turned off even if the
vacuum has cooled down.
AGITATOR OVERLOADPROTECTOR
The agitator has built-in protection againstmotor damage should the agitator jam. If theagitator slows down or stops, the agitatoroverload protector shuts off the agitator. Thesuction motor will continue to run.
To correct
problem:Turn off and
unplugvacuum,remove
obstruction,
then pressreset button.
To reset: Push in the agitator overloadprotector button.
12
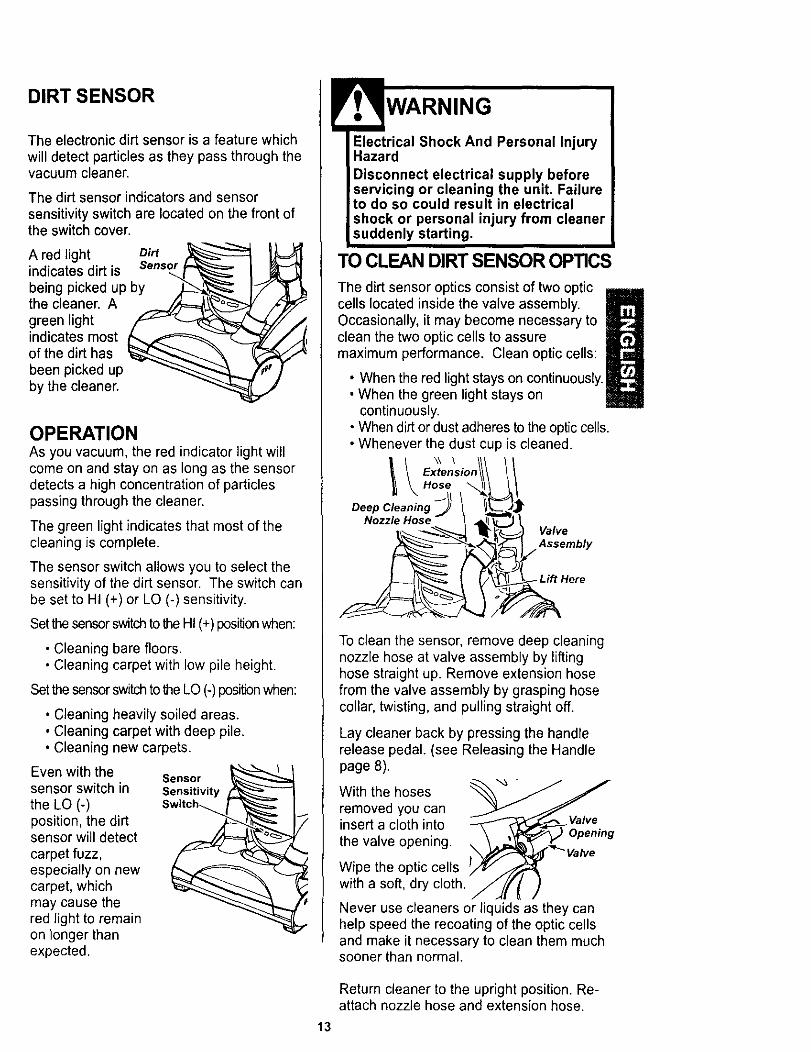
DIRT SENSOR
The electronic dirt sensor is a feature which
will detect particles as they pass through thevacuum cleaner.
The dirt sensor indicators and sensor
sensitivity switch are located on the front ofthe switch cover.
A red light Dirtindicates dirt is Sensor
being picked up bythe cleaner. A
green lightindicates mostof the dirt hasbeen picked upby the cleaner.
OPERATIONAs you vacuum, the red indicator light willcome on and stay on as long as the sensordetects a high concentration of particlespassing through the cleaner.
The green light indicates that most of thecleaning is complete.
The sensor switch allows you to select thesensitivity of the dirt sensor. The switch canbe set to HI (+) or LO (-) sensitivity.
Set the sensor switch to the HI (+) position when:
• Cleaning bare floors.• Cleaning carpet with low pile height.
Set the sensor switch to the LO (-) position when:
• Cleaning heavily soiled areas.• Cleaning carpet with deep pile.• Cleaning new carpets.
Even with thesensor switch in
the LO (-)position, the dirtsensor will detect
carpet fuzz,especially on newcarpet, whichmay cause thered light to remainon longer thanexpected.
SensorSensitivity j___-- _
Electrical Shock And Personal InjuryHazard
Disconnect electrical supply beforeservicing or cleaning the unit. Failureto do so could result in electricalshock or personal injury from cleanersuddenly starting.
TO CLEAN DIRTSENSOR OPTICS
The dirt sensor optics consist of two opticcells located inside the valve assembly.Occasionally, it may become necessary toclean the two optic cells to assuremaximum performance. Clean optic cells:
• When the red light stays on continuously.• When the green light stays on
continuously.• When dirt or dust adheres to the optic cells.• Whenever the dust cup is cleaned.
l \ Ext\ken_sion
OeepC,ooo'ng l
I Valve
/,Assembly
• _Here
To clean the sensor, remove deep cleaningnozzle hose at valve assembly by liftinghose straight up. Remove extension hosefrom the valve assembly by grasping hosecollar, twisting, and pulling straight off.
Lay cleaner back by pressing the handlerelease pedal. (see Releasing the Handlepage 8).
With the hosesremoved you caninsert a cloth into Valve
) Openingthe valve opening.
"_ Valve
Wipe the optic cellswith a soft, dry cloth.
Never use cleaners or liquids as they canhelp speed the recoating of the optic cellsand make it necessary to clean them muchsooner than normal.
Return cleaner to the upright position. Re-attach nozzle hose and extension hose.
13
VACUUM CLEANER CARE
Always follow all safety precautions whencleaning and servicing the vacuumcleaner.
Electrical Shock And Personal InjuryHazard
Disconnect electrical supply beforeservicing or cleaning the unit,Failure to do so could result in elec-
trical shock or personal injury fromcleaner suddenly starting.
Gather the cord and wrap it loosely aroundthe upper and lower cord hooks.
Store the cleaner
in a dry, indoorarea, on the floorwith the handlelocked in the
uprightposition.
WARNING
Electrical Shock And Personal InjuryHazard
Wrapping the cord too tightly putsstress on the cord and can cause
cord damage. A damaged cord is anelectrical shock hazard and could
cause personal injury or damage.
Unplug cord from wall outlet.
Clean exterior using a clean, soft cloth thathas been dipped in a solution of mild liquiddetergent and water, then wrung dry. Wipedry after cleaning. DO NOT drip water oncleaner.
Wash attachments in warm soapy water,rinse and air dry. Do not clean in dish-washer.
Do not use attachments if they arewet. Attachments used in dirty areas,such as under a refrigerator, shouldnot be used on other surfaces until
they are washed. They could leavemarks.
14
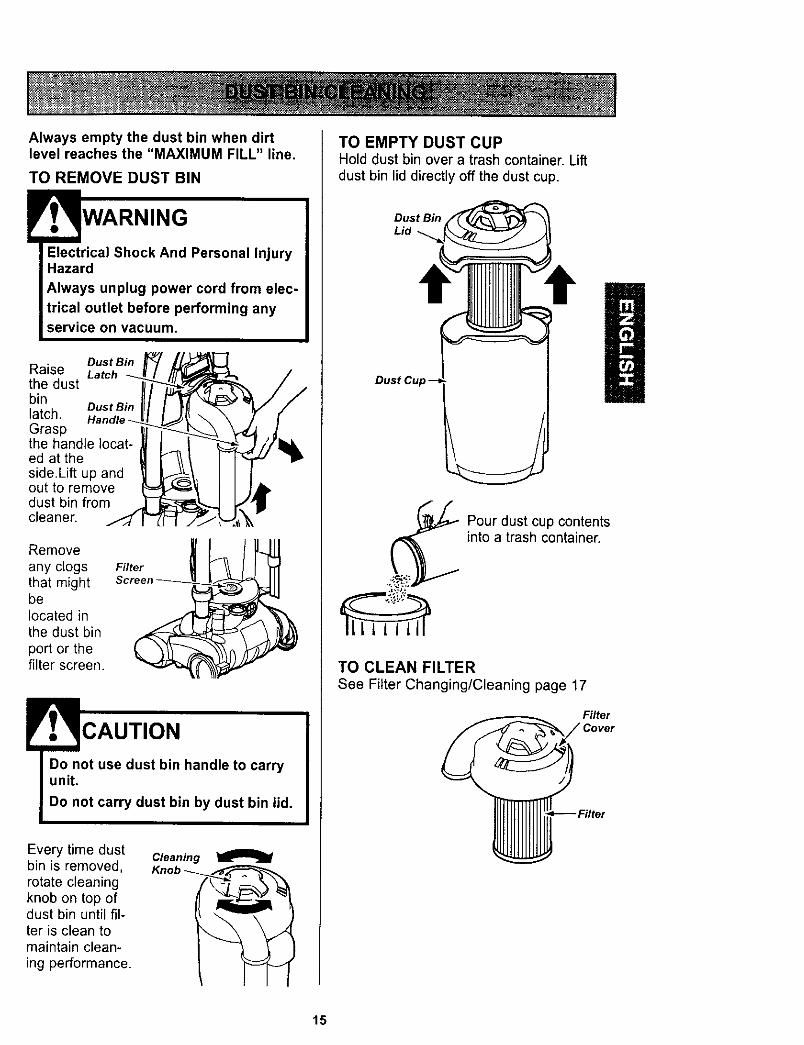
Always empty the dust bin when dirtlevel reaches the "MAXIMUM FILL" line.
TO REMOVE DUST BIN
Electrical Shock And Personal InjuryHazard
Always unplug power cord from elec-
trical outlet before performing anyservice on vacuum.
Dust BinRaise Latchthe dustbin
Dust Binlatch. HandleGraspthe handle locat-ed at theside.Lift up andout to removedust bin fromcleaner. _
Remove
any clogs Filterthat mightbelocated inthe dust bin
port or thefilter screen.
CAUTION
Do not use dust bin handle to carryunit.
Do not carry dust bin by dust bin lid.
Every time dust Cleaningbin is removed,rotate cleaningknob on top ofdust bin until fil-ter is clean tomaintain clean-ing performance.
TO EMPTY DUST CUPHold dust bin over a trash container. Liftdust bin lid directly off the dust cup.
Dust Bin
Lid
Dust Cup -
Pour dust cup contentsinto a trash container.
TO CLEAN FILTERSee Filter Changing/Cleaning page 17
Filter
15
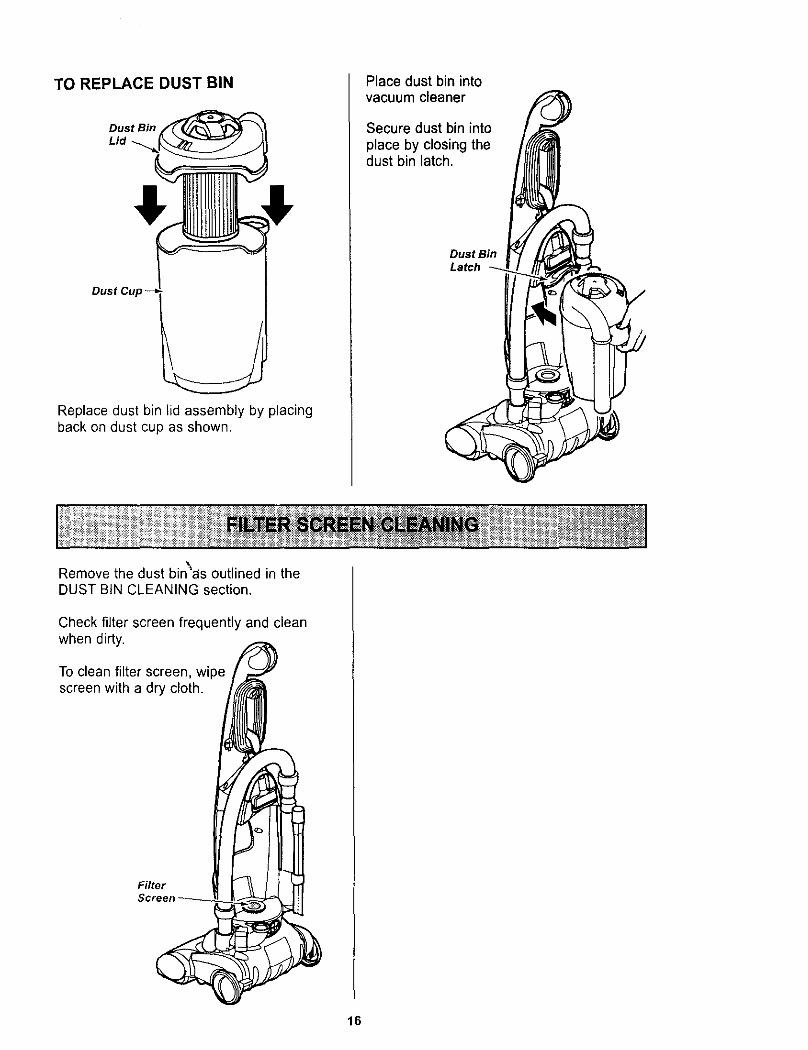
TO REPLACE DUST BIN
Dust Bin
Lid
Dust Cup
Replace dust bin lid assembly by placingback on dust cup as shown.
Remove the dust bin'as outlined in theDUST BIN CLEANING section.
Place dust bin intovacuum cleaner
Secure dust bin into
place by closing thedust bin latch.
Dust BinLatch
Check filter screen frequently and cleanwhen dirty.
To clean filter screen, wipescreen with a dry cloth.
Filter
16
Electrical Shock Hazard
Unplug power cord from electricaloutlet. Do not operate the cleanerwithout the primary or exhaust filters.Be sure the filters are properlyinstalled to prevent motor failureand/or electrical shock.
PRIMARY FILTER
Check primary filter frequently and cleanwhen dirty.
TO REMOVE PRIMARY FILTERRemove the dust bin and dust bin lidassembly as outlined in the DUST BINCLEANING section.
While holdingprimary filterover a trash con-
tainer grasp fil-ter, rotate and liftoff.
Cleaning Cam
SlotFilter
Locking TabFilter Cover
Clean primary filter by gently tapping over atrash container. Tap on several sides toensure best cleaning. Rinse with wateronly as needed, do not use any detergentor soap. Allow the filter to dry for 24 hoursbefore putting it back into the vacuum.
When cleaning the filter no longer restoresvacuum suction to full power you need toreplace the filter.
Note: See PARTS AND FEATURESfor the filter number.
TO REPLACE PRIMARY FILTER
With slot side on CleaningCam
filter towards the Slotfilter cover slide Filter
cleaning caminside opening,rotate filter clock-
wise until slots Locking Tablock onto tabs in Filter Covercover.
Note: Under normal use and care, your fil-ter can be expected to last up to 5 years.
Re-assemble dust bin lid to dust bin. Insertinto cleaner and secure with dust bin latch. 17
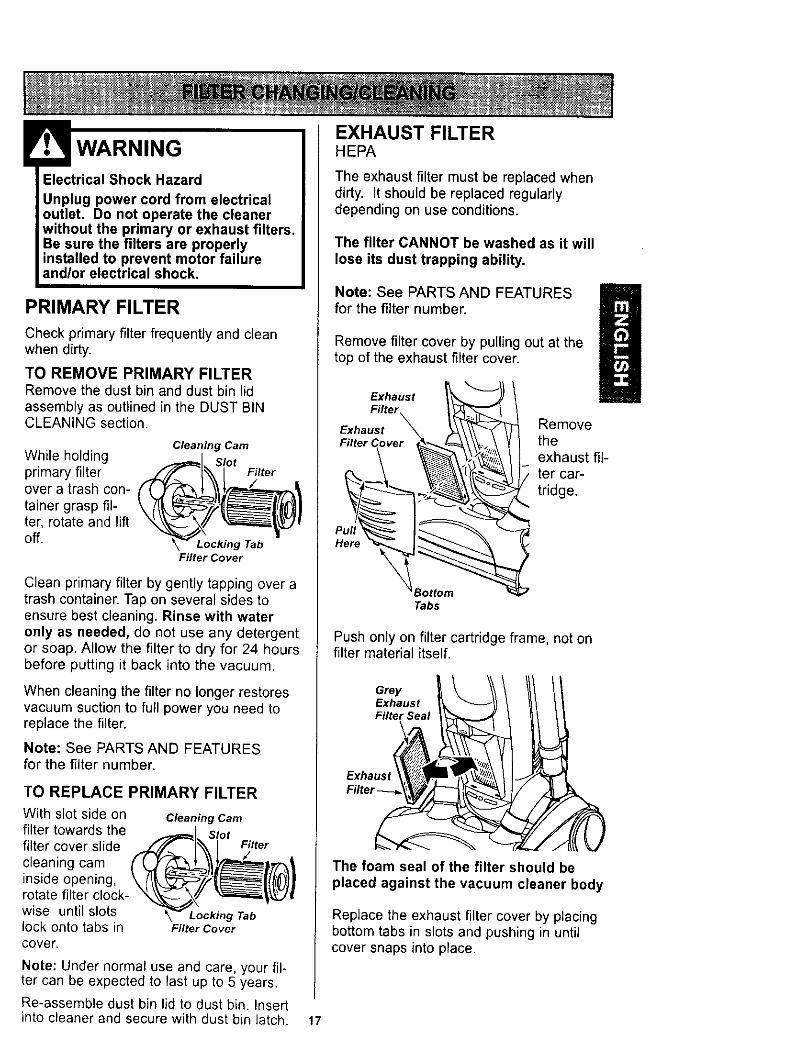
EXHAUST FILTERHEPA
The exhaust filter must be replaced whendirty. It should be replaced regularlydepending on use conditions.
The filter CANNOT be washed as it willlose its dust trapping ability.
Note: See PARTS AND FEATURESfor the filter number.
Remove filter cover by pulling out at thetop of the exhaust filter cover.
Exhaust_
Filter
ExhaustFilter Cover ,,'_
Pull_Here _
BottomTabs
Removetheexhaust fil-ter car-
tridge.
Push only on filter cartridge frame, not onfilter material itself.
GreyExhaustFilter Seal
The foam seal of the filter should be
placed against the vacuum cleaner body
Replace the exhaust filter cover by placingbottom tabs in slots and pushing in untilcover snaps into place.
........................................................................................ w
Always follow all safety precautions whencleaning and servicing the vacuum cleaner.
Electrical Shock Or Personal InjuryHazard
Disconnect electrical supply beforeservicing or cleaning the unit.Failure to do so could result in elec-trical shock or personal injury fromcleaner suddenly starting.
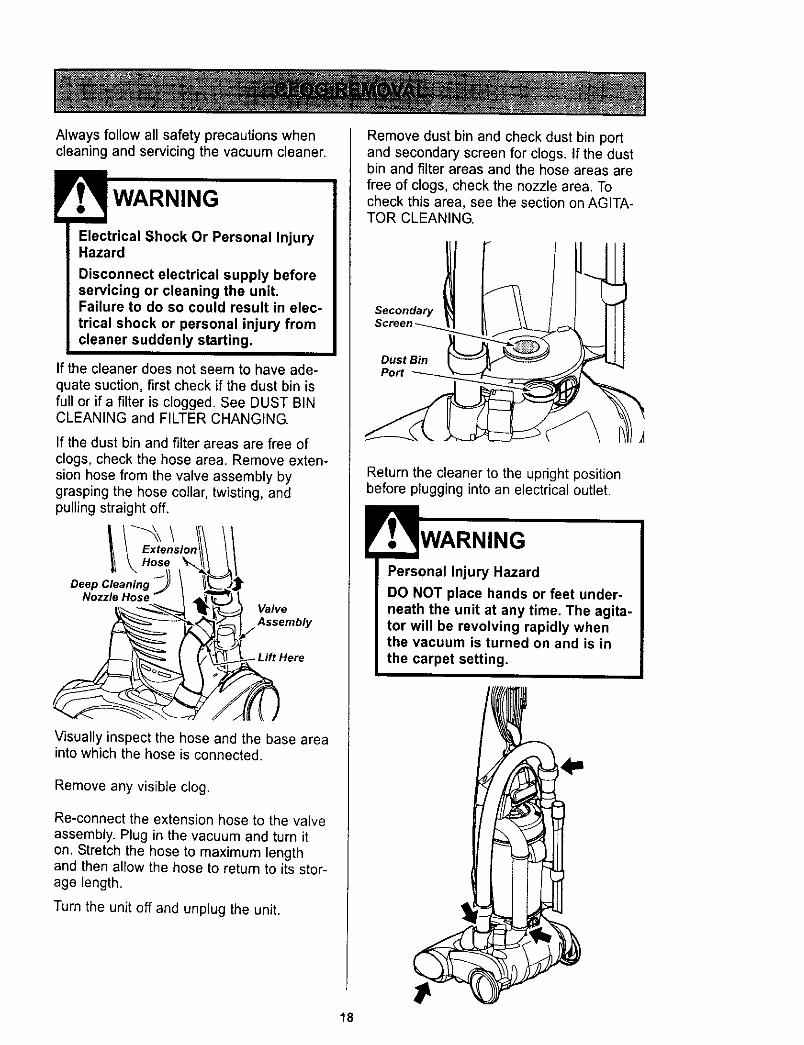
If the cleaner does not seem to have ade-quate suction, first check if the dust bin isfull or if a filter is clogged. See DUST BINCLEANING and FILTER CHANGING.
If the dust bin and filter areas are free ofclogs, check the hose area. Remove exten-sion hose from the valve assembly bygrasping the hose collar, twisting, andpulling straight off.
N vo,vo
Visually inspect the hose and the base areainto which the hose is connected.
Remove any visible clog.
Re-connect the extension hose to the valveassembly. Plug in the vacuum and turn iton. Stretch the hose to maximum lengthand then allow the hose to return to its stor-age length.
Turn the unit off and unplug the unit.
Remove dust bin and check dust bin portand secondary screen for clogs. If the dustbin and filter areas and the hose areas arefree of clogs, check the nozzle area. Tocheck this area, see the section on AGITA-TOR CLEANING.
Secondary
Dust BinPort
Return the cleaner to the upright positionbefore plugging into an electrical outlet.
Personal Injury Hazard
DO NOT place hands or feet under-neath the unit at any time. The agita-tor will be revolving rapidly whenthe vacuum is turned on and is in
the carpet setting.
!I-18
Electrical Shock Or Personal InjuryHazard
Disconnect electrical supply beforeservicing or cleaning the unit.Failure to do so could result in elec-
trical shock or personal injury fromcleaner suddenly starting.
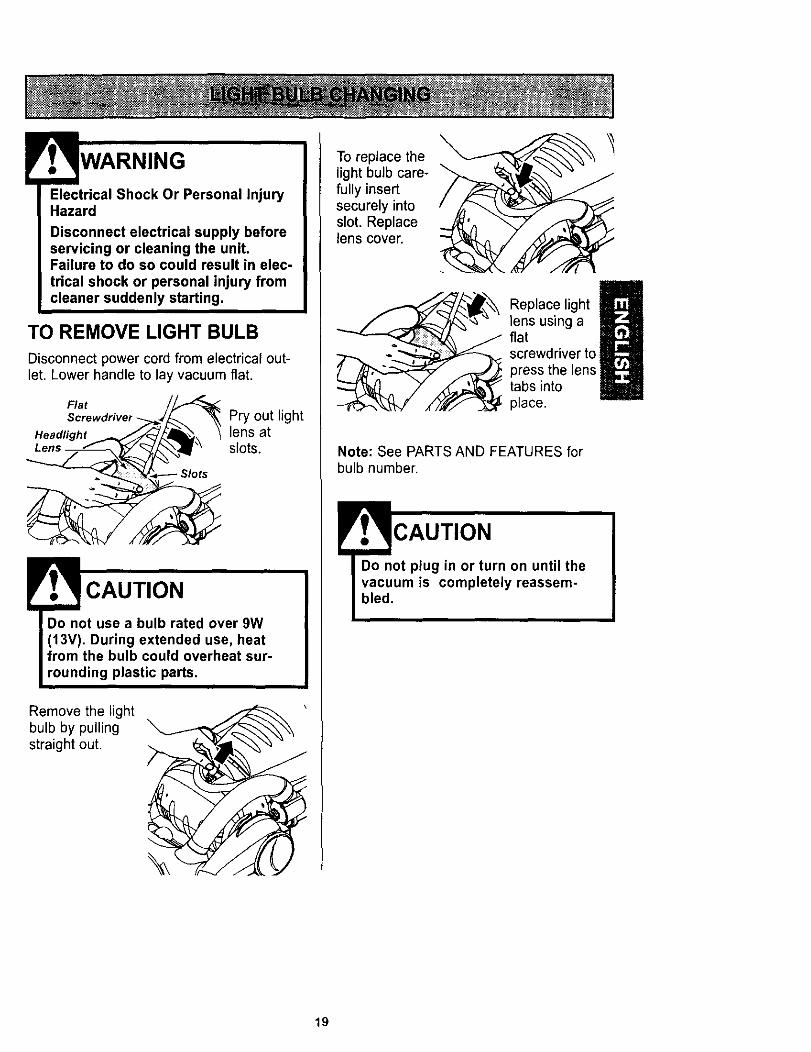
TO REMOVE LIGHT BULB
Disconnect power cord from electrical out-let. Lower handle to lay vacuum flat.
Screwdriver _/_-_ "_ Pry out lightlens atslots.
Do not use a bulb rated over 9W
(13V). During extended use, heatfrom the bulb could overheat sur-
rounding plastic parts.
Remove the lightbulb by pullingstraight out.
To replace thelight bulb care-fully insertsecurely intoslot. Replacelens cover.
Replace light
lens using aflatscrewdriver to
press the lenstabs intoplace.
Note: See PARTS AND FEATURES forbulb number.
Y. . CAUTIONDo not plug in or turn on until thevacuum is completely reassem-bled.
19
Electrical Shock Or Personal InjuryHazard
Disconnect electrical supply beforeservicing or cleaning the unit. Failureto do so could result in electrical
shock or personal injury from clean-er or agitator suddenly starting.
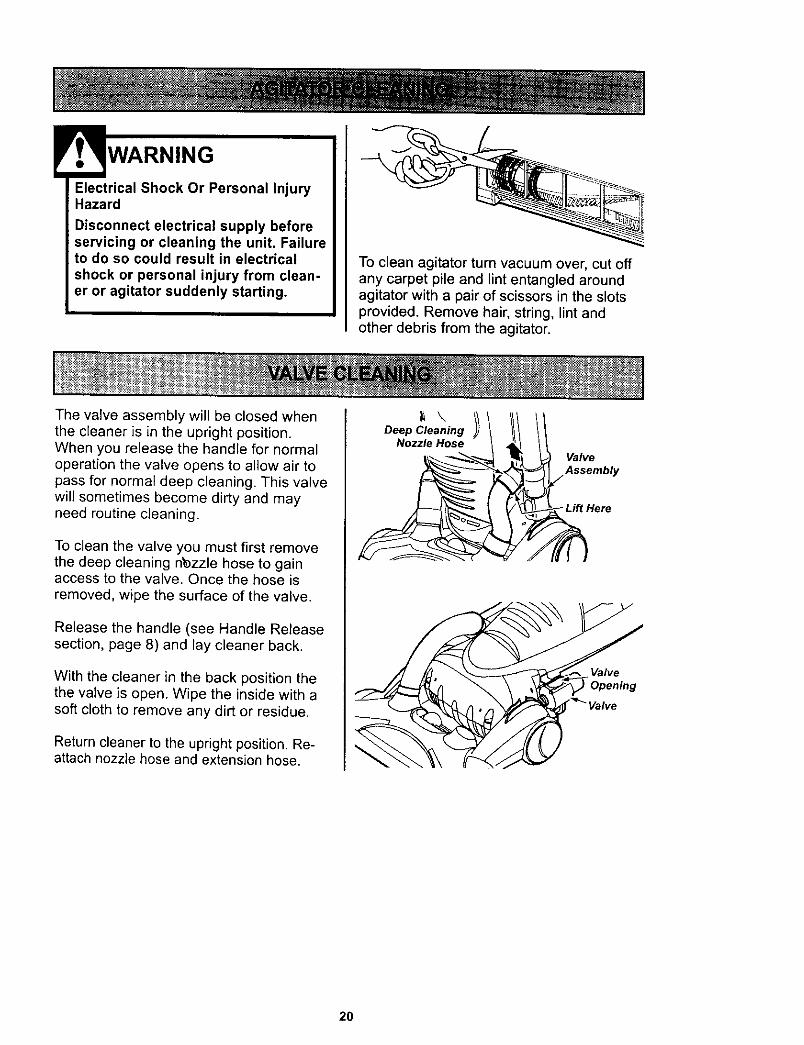
To clean agitator turn vacuum over, cut offany carpet pile and lint entangled aroundagitator with a pair of scissors in the slotsprovided. Remove hair, string, lint andother debris from the agitator.
The valve assembly will be closed whenthe cleaner is in the upright position.When you release the handle for normaloperation the valve opens to allow air topass for normal deep cleaning. This valvewill sometimes become dirty and mayneed routine cleaning.
To clean the valve you must first removethe deep cleaning n'ezzle hose to gainaccess to the valve. Once the hose isremoved, wipe the surface of the valve.
Release the handle (see Handle Releasesection, page 8) and lay cleaner back.
With the cleaner in the back position thethe valve is open. Wipe the inside with asoft cloth to remove any dirt or residue.
Return cleaner to the upright position. Re-attach nozzle hose and extension hose.
DeepC_lea_ing I I III II
Nozzle Hose _ _ I _• ,L_.:_._-..._ _ _) Valve
F/ Lift Here
Valve
Opening
20
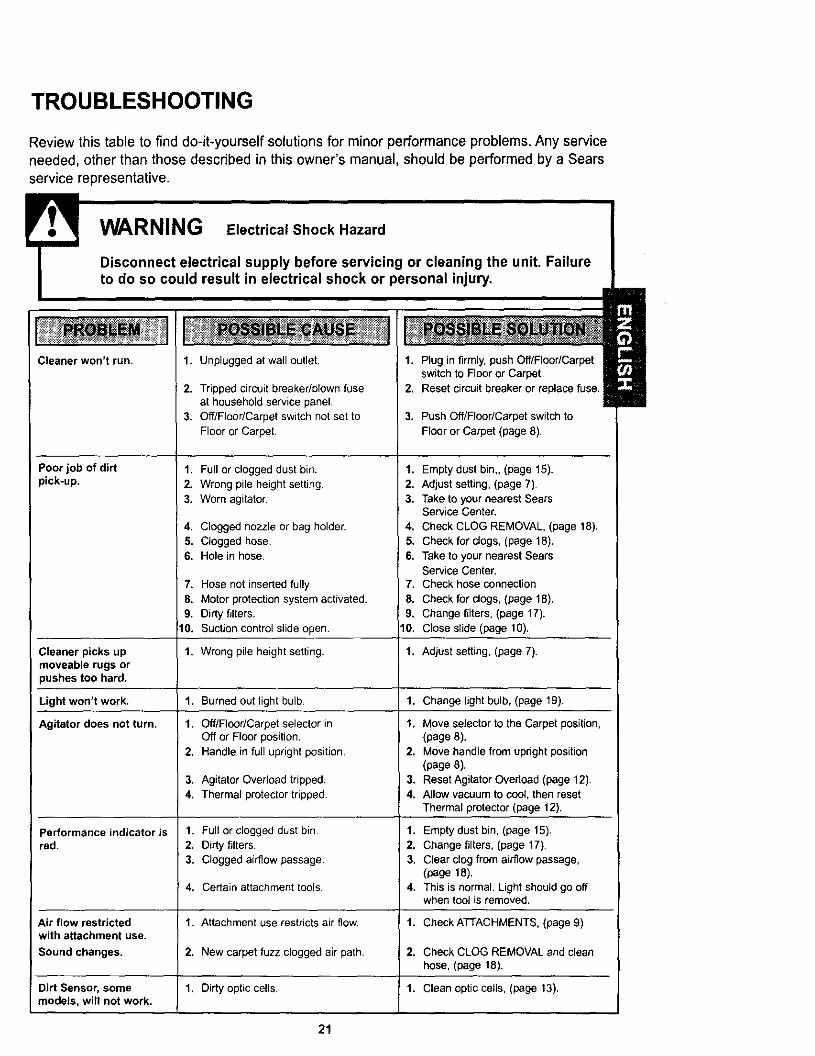
TROUBLESHOOTING
Review this table to find do-it-yourself solutions for minor performance problems. Any serviceneeded, other than those described in this owner's manual, should be performed by a Sears
service representative.
WARNING Electrical Shock Hazard
Disconnect electrical supply before servicing or cleaning the unit. Failureto do so could result in electrical shock or personal injury.
Cleaner won't run.
Poor job of dirtpick-up.
1,
2.
3.
Unplugged at wall outlet.
Tripped circuit breaker/blown fuseat household service panel.
Off/Floor/Carpet switch not set to
Floor or Carpet.
1. Full orclogged dust bin.
2. Wrong pile height setting.3. Worn agitator.
4. Clogged nozzle or bag holder.
5. Clogged hose,6. Hole in hose.
7,
8.
9.10.
Hose not inserted fully
2.
3.
Motor protection system activated. 8.Dirty filters. 9.Suction control slide open. 10.
Plug in firmly, push Off/Floor/Carpetswitch to Floor or CarpetReset circuit breaker or replace fuse.
Push Off/Floor/Carpet switch toFloor or Carpet (page 8).
1. Emptydust bin,, (page 15).2. Adjust setting, (page 7).3. Take to your nearest Sears
Service Center.
4. Check CLOG REMOVAL, (page 18).5. Check for dogs, (page 18).6. Take to your nearest Sears
Service Center.7. Check hose connection
Check for dogs, (page 18).Change filters, (page 17).
Close slide (page 10).
Cleaner picks up 1. Wrong pile height setting. 1. Adjust setting, (page 7).moveable rugs orJushes too hard,
Light won't work, 1. Burned out lightbulb. 1. Change lightbulb, (page 19).
Agitator does not turn. 1. Off/Floor/Carpetselector in 1. Move selector to the Carpet position,Off or Floorposition. (page 8).
2. Handle in full upright position. 2. Move handle from upright position(page 8).
3. Agitator Overload tripped. 3. Reset Agitator Overload (page 12),4. Thermal protector tripped. 4. Allow vacuum to cool, then reset
Thermal protector(page 12).
Performance indicator is 1. Full or clogged dust bin 1. Empty dust bin, (page 15)+red. 2. Dirty filters. 2. Change filters, (page 17).
3. Clogged airflow passage. 3. Clear clog from airflow passage,(page 18).
4. Certain attachment tools. 4. This is normal. Light should go offwhen tool is removed.
Air flow restricted 1. Attachment use restricts air flow. 1. Check ATTACHMENTS, (page 9)with attachment use.
Sound changes. 2. New carpet fuzz clogged air path. 2. Check CLOG REMOVALand cleanhose, (page 18).
Dirt Sensor, some 1. Dirtyopticcells. 1. Clean optic ceils, (page 13).models, will not work.
21

22
Antes de usar su aspiradora nueva ..... 1Garantia de la aspiradora de Kenmore ... 1Instrucciones importantes dessguridad ............................ 2Caracteristicas de aspiradora ........... 3Instrucciones de ensamble ........... 4-5
Instrucciones de operacibn ............ 6Para comenzar ........................ 6
Ajuste y selecci6n de nivel de pelo de laalfombra ............................ 5
Interruptor OFF/PISO/ALFOMBRA ......... 7Desprendimiento del mango .............. 6Accesorios ........................ 8-10Cuadro de uso de los accesorios ......... 10
Sugerencias para aspirar ............... 10Caracteristicas de rendimiento ........ 11-12
Cuidado de la aspiradora .............. 13Almacenamiento de la aspiradora ........ 13Limpiezadel exteriory de losaccesofios... 13Limpiezadella cubode la basura ...... 14-15Limpiezade la mallasecundaria.......... 15Cambio/limpieza de los ................ 16C6mo eliminar los residuos de basuraen los conductos ..................... 17Cambio de la bombilla ................. 18
Limpieza del agitador .................. 19Limpieza de la valvu la ................. 19
Reconocimiento de problemas ......... 20
Informaci6n de assistancia
o servicio .................. (back page)
Por favor lea esta guiaque le ayudara a ensamblar y operar su aspiradora nueva de Kenmore en una maneram_s segura y efectiva.
Para mas informaci6nacerca del cuidado y operaci6n de esta aspiradora, ]lamea su tienda Sears mas cer-can& Cuando prequnte por informaci6n usted necesitara el nt)mero completo de serie y modelo de la aspi-radora que esta colocado en la placa de los nQmerosde modelo y serie.
Use el espacio de abajo para registrar el numero de modelo y ser]e para su nueva aspiradora de Kenmore.
N0merode Modelo
N0mero de Serie
Fecha de Compra
Matenga este libro y su recibo en un lugar seguro para referencias futuras.
GARANTiA LIMITADADE UNANO DE LAASPIRADORA KENMORE
Estagarantia es por un afio desde la fecha de compra, e incluye solamente el uso de la aspiradora enhogares privados. Durante el afio de garantia, cuando la aspiradora es operada y mantenidade acuerdo almanual de instrucciones del duefio, Sears reparar_lcualquier defecto en materiales o fabricaci6n libre de cargo.
Esta garantia excluye las bolsas de coleccion, correas, lamparillas, y filtros, las cuales son partesgastables quese deterioran con el usa normal.
Para el servicio de garantia, retorne esta aspiradora al Centro de Servicio Sears m_s cercano en losEstados Unidos.
Esta garantia se aplica solamente mientras este producto est., en uso en los Estados Unidos. Esta garantia leda a usted derechos legales especificos, y usted puede tener tambien otros derechos los cuales varian deestado a estado.
Sears, Roebuck and Co., DI817WA, Hoffman Estates, IL 60179
Suseguridades muy importante para nosotros. Para reducir el riesgo de incendio, choqueel_ctrico, lesion corporal o da_os al utilizar su aspiradora, act_e de acuerdo con precaucionesb_sicas de seguridad, entre elias:
Lea este manual antes de armar o utilizar suaspiradora.
Use su aspiradora enicamente en la formadescdta en este manual. Use _,nicamenteconaccesoriosrecomendados pot Sears.Para reducir el riesgo de choque el_ctrico, nouse su aspiradora al aire libre ni sobre superficiesmojadas.Desconectela fuente de electricdad antes dedar servicio o limpiar. De Io contrario podriacausar un choque electdco o lesion corporal.
Siempre debe apagar su aspiradora antes dedesconectada.
No desconecte la aspiradora tirandodel cordonelectrico. Para desconectarla, hale el enchufe, noelcordon.
No use la aspiradora si el cordon o el enchufeesta daOado.Si la aspiradora no estafuncionando adecuadamente o si se ha dejadocaer,est&dar_ada,se ha dejado expuesta a laintemperieo se ha d_jado caer en agua, devuel-vala a un Centro/Departamento de servicio deSears.
No hale ni transporte la aspiradora por el cordon;no use el cordon como mango; no cierre puertassobre el cordon; no hale el cordon sobre rebor-des agudos ni esquinas. No pase la aspiradorasobre el cordon. Mantenga el cordon alejado desuperficiescalientes.No abandone la aspiradora cuando este conec-tada. Desconectela cuando no la este usando yantes de darle servicio.
No permita que sea utilizada como juguete. Serequiere tener mayor cuidado cuando seautilizada en la proximidad de nitros o por niOos.
No toque la aspiradora ni el enchufe con lasmanos mojadas.
El cepillo agitador puede arrancar nueva-mente de pronto, desconecte de la fuente depoder antes de hacer el servicio.
No coloque objetos en las aberturas.
No utilicela aspiradora si alguna aberturaest._bloqueada; mantengala libre de polvo, pelusa,cabellos y cualquiera cosa que podria disminuirel flujo de aire.
Mantenga el cabello, ropa suelta, dedos y todaslas partes del cuerpo alejados de las aberturasypiezas mecanicas.No use la aspiradora sin tenet instaladoel a cubode la basura y/o los filtros.
Limpie siempre el cubo de la basura despuesde aspirar la alfombra limpiadoreso refrescant-es, polvos y depOsitosfinos. Estos productostapan los filtros, reducen el flujo de aire y puedencausar dar_oa la aspiradora.
No use la aspiradora para levantar objetosagu-dos, juguetes pequeOos,alfileres,sujetapapeles,etc. Podrian daOarla aspiradora o el cubo de labasura.
No levante ninguna cosa que se este quemandoo emitiendo humo, como cigarrillos, cerillos ocenizas calientes.
No use la aspiradora para aspirar liquidosinflamables o combustibles (gasolina, Iiquidospara limpieza, perfumes, etc.) ni la use enlugares donde estos podrian estar presentes.Losvapores de estas sustancias pueden crear unpeligro de incendio o explosion.Tenga cuidado especial al utilizar la aspiradoraen escalones. No la coloque sobre sillas, mesas,etc. Mantengala en el piso.Usted es responsablede asegurar que su aspi-radora no sea utilizada pot ninguna persona queno pueda manejarla correctamente.
GUARDE ESTAS INSTRUCCIONESElarmado y usoseguro de su aspiradora son su responsabilidad. Estaaspiradora ha sido diseOadaexclusivamente para uso dom_stico. La aspiradora debera almacenarse en un lugar secoy en el interior.Lea este Manual del propietario detenidamente, pues contiene informacibn irnportantesobre seguridad yuso. Estaquia contiene informaci6n sobre seguridad debajo de simbolos de advertiencia cuidado. Potfavor ponga atenci6n especial a estas instrucciones dadas. Advertencia: Este informaciOnle alertaracon el poligro de fuego, choques electricos, quemadas y lesiones. Cuidado: Este informacibnlealertara a peligros como lesiones y daOosde propiedad.
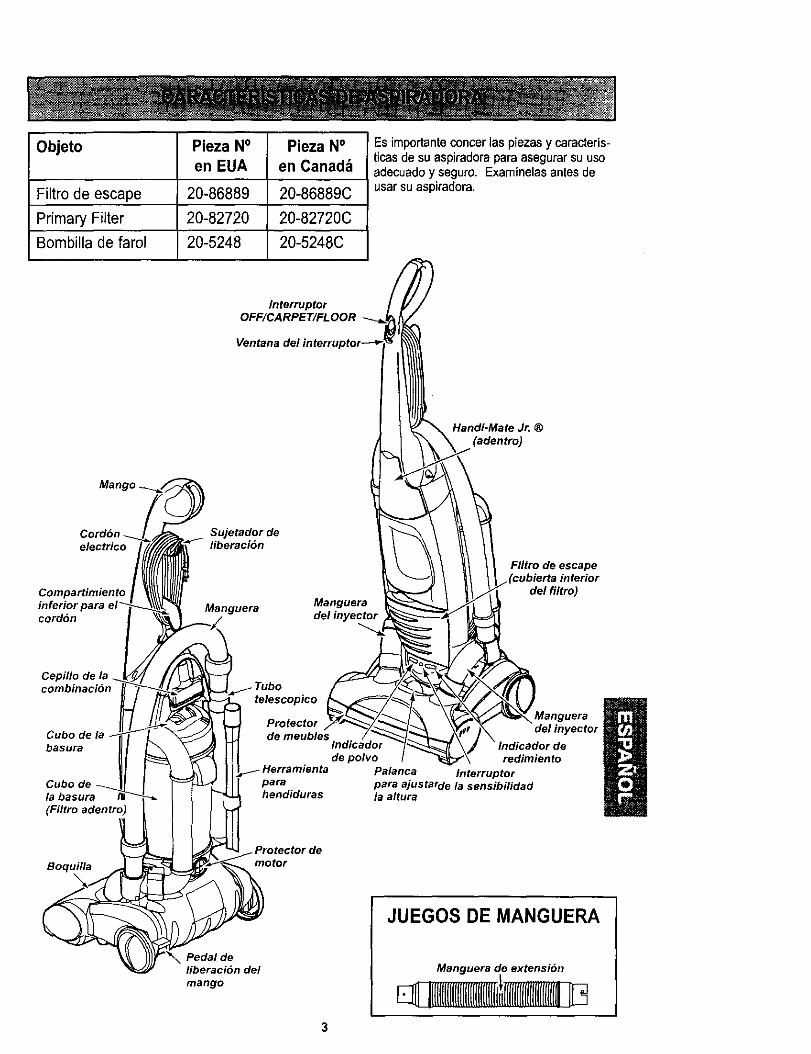
Objeto
Filtro de escape
Primary Filter
Bombilla de farol
Pieza NOen EUA
20-86889
20-82720
20-5248
Pieza N°en Canad_
20-86889C
20-82720C
20-5248C
Es importante concer las piezas y caracteris-tJcasde su aspiradora para asegurarsu useadecuado y seguro. Examinelas antes deusar su aspiradora.
Mao
electrico
Compartimientoinferioreord6n
combinaci6n
basura
Cubo dela basura
(Filtro adentro)
Interruptor
Sujetador de g
liberaci6n
Manguera Ma_guera
Tubo
,e,o,cop,oo
de meubleS lndpCol:o/,Ov_/_
Palancaparahendiduras
Handi.Mate Jr. ®(adentro)
Filtro de escape
del filtro)
Manguera
pyector
redimiento
Interrupterpara ajustarde la sensibilidad/a altura
Boquilla
tor demotor
Pedal deliberaci6n del
mango
JUEGOS DE MANGUERA
Manguera de extensi6n
!(ll{[l(ll[ll[l[{lIUlll[flti
Peligro de choque el6ctrico
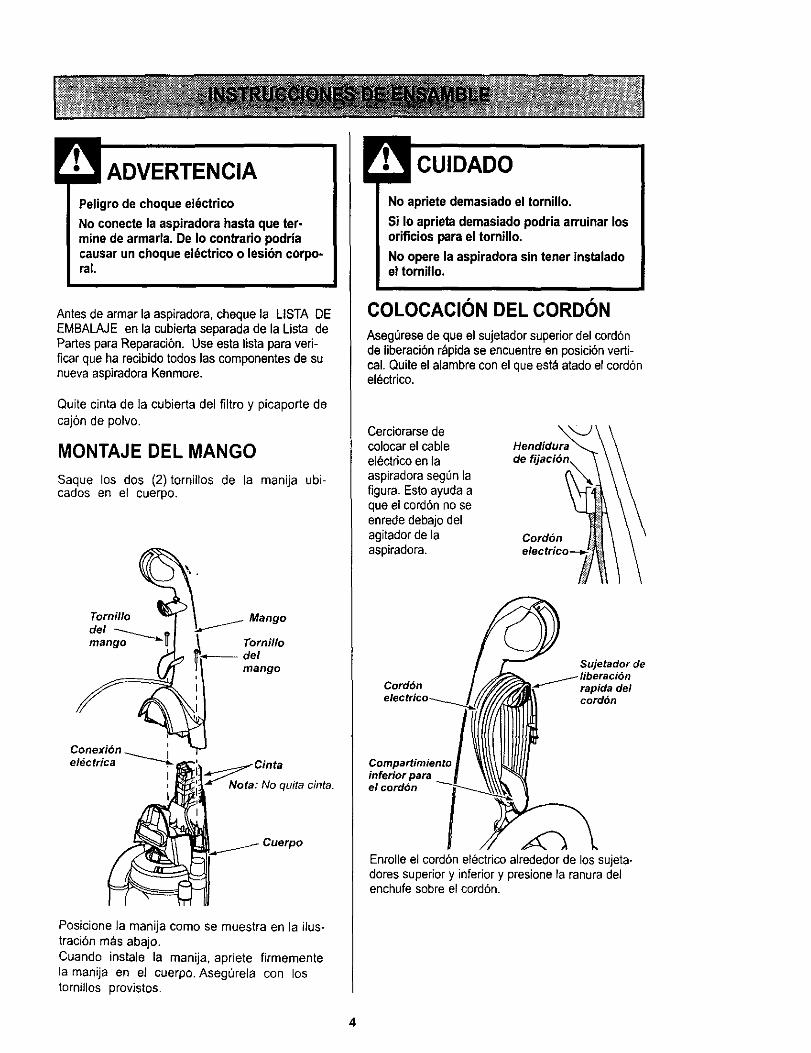
No conecte la aspiradora hasta que ter-mine de armada. De Io contrario podriacausar un choque el,_ctricoo lesibn corpo-raL
Antes de armar la aspiradora, cheque la LISTA DEEMBALAJE en la cubiertaseparada de la Lista dePartes para Reparacibn. Use esta lista para veri-ficar que ha recibido todos las componentes de sunueva aspiradora Kenmore.
Quite cinta de la cubierta del filtro y picaporte decaj6n de polvo.
MONTAJE DEL MANGO
Saque los dos (2)tornillos de la manija ubi-cados en el cuerpo.
Tornillodelmango _
Mango
Tornillo
_ delmango
Conexion
electrica _ i Cinta_'t_Nota" No uita cinta
___l_ Cuerpo
Posicione la manija como se muestra en la ilus-tracibn mas abajo.Cuando instale la manija, apriete firmementela manija en el cuerpo. AsegOrela con lostornillos provistos.
No apriete demasiado el tornillo.
$i Io aprieta demasiado podria arruinar losorificios para el tomillo.
No opere la aspiradora sin tener instaladoel tornillo.
COLOCACION DEL CORD()N
AsegL_resede que el sujetador superior del cord6nde liberacibn r._pidase encuentreen posici6nverti-cal. Quite el alambreconel queest_ atadoel cord6nelectrico.
Cerciorarse decolocarel cableel_ctdco en laaspiradora seg0n lafigura. Esto ayuda aque el cord6n no seenrede debajo delagitador de laaspiradora.
de fijaci6n
Cordon
cor,,nC°mpartimient° ;i _ r_
inferior para |el cordbn _ i'_
Enrolleel cordbn electrico alrededor de los sujeta-dores superior y inferior y presione la ranura delenchufe sobre el cord6n.
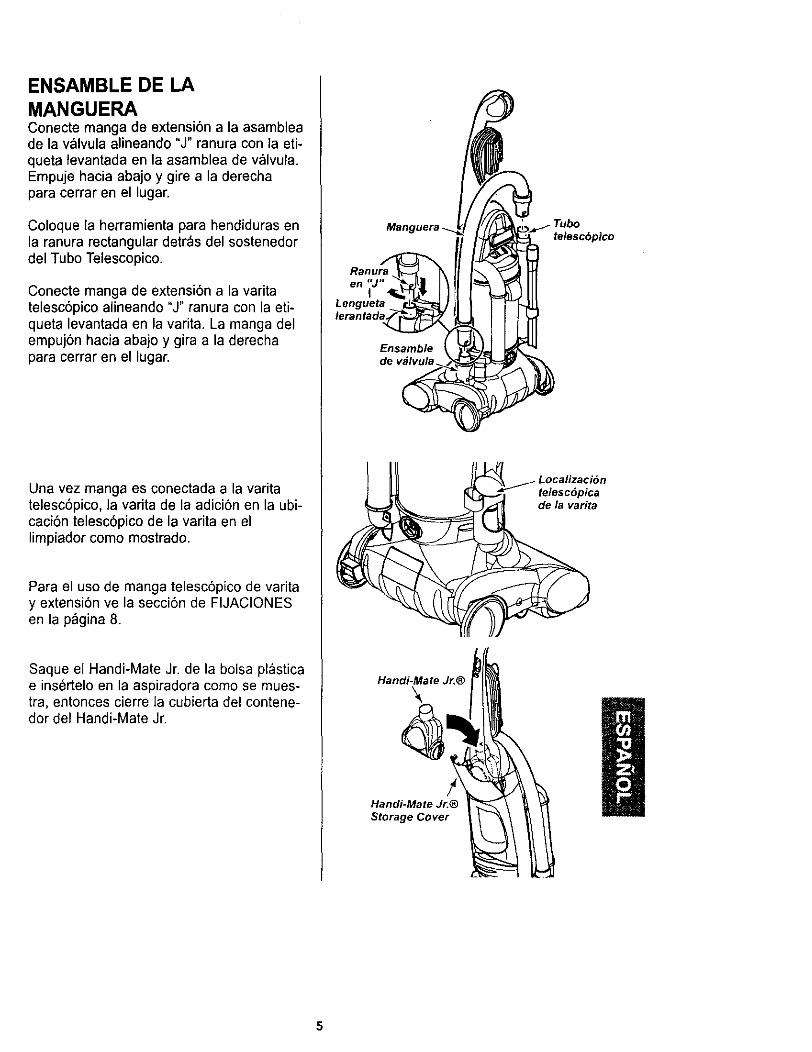
ENSAMBLE DE LAMANGUERAConecte rnanga de extensi6n a la asambleade la v_lvula alineando "J" ranura con la eti-
queta levantada en la asamblea de v_llvula.Empuje hacia abajo y gire a la derechapara cerrar en el lugar.
Coloque ta herramienta para hendiduras enla ranura rectangular detr_s del sestenedordel Tube Telescopico.
Conecte manga de extensi6n a la varitatelesc6pico alineando "J" ranura con la eti-queta levantada en la varita. La manga delempuj6n hacia abajo y gira a la derechapara cerrar en el lugar.
Una vez manga es conectada a la varitatelesc6pico, la varita de la adici6n en la ubi-caci6n telesc6pico de la varita en ellimpiador come mostrado.
Para el use de manga telesc6pico de varitay extensi6n ve la secci6n de FIJACIONESen la p_gina 8.
Saque el Handi-Mate Jr. de la bolsa pl_tsticae insertelo en la aspiradera come se mues-tra, entonces cierre la cubierta del contene-dor del Handi-Mate Jr.
en "J"I
Lenguetalerantada
Ensamble
Handi-Mate Jr.®
!Handi-Mate Jr.®
Storage Cover
telescbpico
telesc6picade la varita
I
5
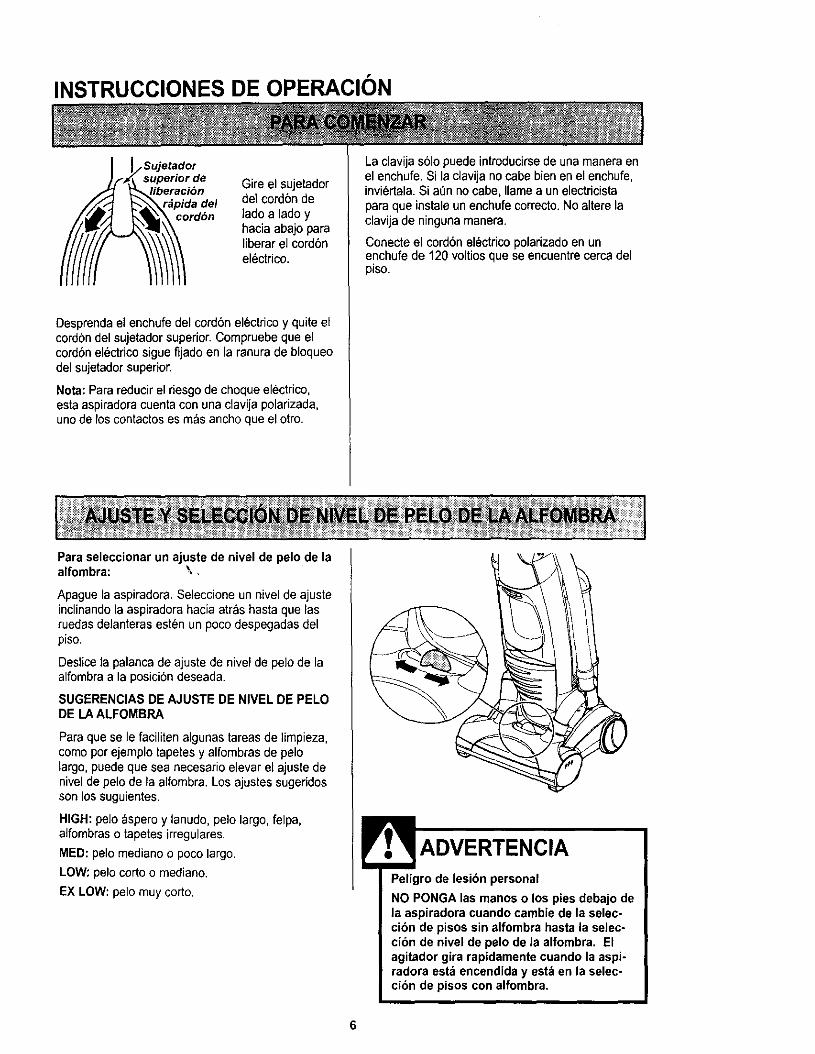
INSTRUCCIONES DE OPERACION
tSujetadorsuperior de
cord6n
Gireel sujetadordel cord6n delado a lado yhaciaabajo paraliberar el cord6nelectrico.
Desprendael enchufe del cord6n electrico y quite elcord6n del sujetador superior. Compruebe que elcordbn electrico sigue fijado en la ranura de bloqueodel sujetador superior.
Nota: Para reducir el riesgo de choque electrico,esta aspiradora cuenta con una clavija polarizada,unode los contactos es m_s ancho que el otro.
Para seleccionar un ajuste de nivel de pelo de la
La clavija solo puede introducirsede una manera enel enchufe. Si la clavija no cabe bien en el enchufe,inviertala. Si a0n no cabe, Ilamea un electricistapara que instale un enchufe correcto. No altere laclavija de ninguna manera.
Conecte el cord6n electrico polarizado en unenchufe de 120 voltios que se encuentre cerca clelpiso.
alfombra: \,
Apague la aspiradora. Seleccione un nivel de ajusteinclinando la aspiradora hacia atras hasta que lasruedas delanteras esten un poco despegadas delpiso.
Deslice la palaoca de ajuste de nivel de pe]o de laalfombra a la posiciSndeseada.
SUGERENCIASDE AJUSTE DE NIVEL DE PELODE LAALFOMBRA
Paraque se le faciliten algunas tareas de limpieza,comoporejemplo tapetesy alfombrasde peloLargo,puedeque sea necesario elevarel ajustedenivelde pelo de la alfombra.Losajustessugeridossonlossuguientes.
HIGH: pelo:_speroy lanudo,pelo largo, felpa,alfombras o tapetes irregulares.
MED:pelo mediano o poco largo.
LOW: pelo corto o mediano.
EX LOW: pelo muy corto.Peligro de lesibn personal
NO PONGA las manos o los pies debajo dela aspiradora cuando cambie de la selec-cibn de pisos sin alfombra hasta la selec-cibn de nivel de pelo de la alfombra. Elagitador gira rapidamente cuando la aspi-radora estb encendida y est:_en la selec-cibn de pisos con alfombra.
6

n ....
MANIJA MONTADAPara arrancar la aspiradora, deslice el interruptorOFF/PISO/ALFOMBRA desde la posici6n OFF ala posici6n PISO o ALFOMBRA. Para parar laaspiradora, deslice el interruptorOFF/PISO/ALFOMBRA a la posicibn OFF.
CUIDADORefi6rase a las recomendaciones de los fab-ricantes de su alfombra parasu limpieza.Algunas alfombras m_s delicadas puedenrequerirque sean aspiradas con el agitadorapagado, para prevenir da_o a la alfombra.
OFF (Apagado)
FLOOR (Piso) - hace andar el motor de succi6nsolamente. En esta posici6n el montaje del cepil-Io no da vueltas. Esta posici6n debe set usadapara limpiar pisos de madera dura y azulejos ycuando se usan accesorios (herramientas).
!rf,. CUIDADO
No deje permanecer la aspiradora en unsolo lugar durante ning_n tiempo cuandoel agitador est_ rotando. Se puede dar_arlaalfombra.
OFFFLOOR
Ventama del
CARPET (Alfombra) - hace andar ambosmotores, el de succi6n y el del cepillo.
Desprenda el mango pisando el pedal de liberaci6ny tiranda del mango hacia abajo con la mano.
Nora: El agitador no girara si la aspiradora esta enposici6n vertical.
/
Handi-Mate Jr.@
Cepillo para ueracombinaci6n
Tubo
parahendiduras
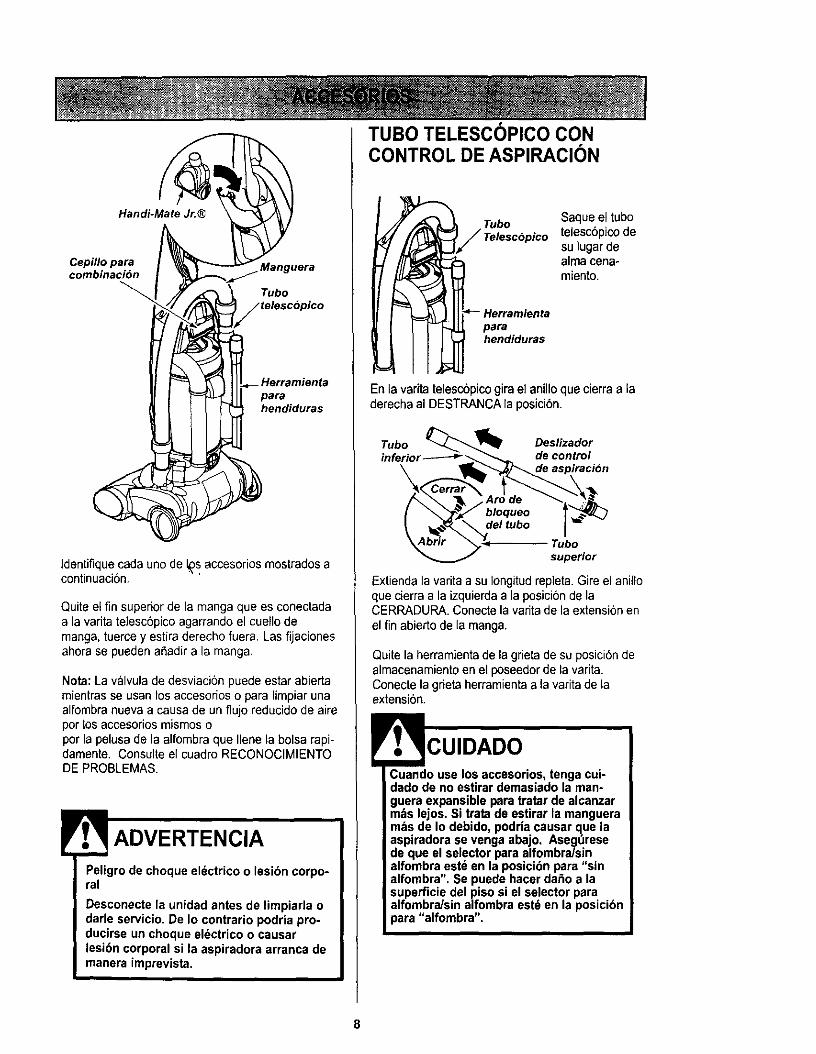
Identifiquecada uno de _s accesorios mostrados acontinuaci6n.
Quite el fin superior de la manga que es conectadaa la varita telesc6pico agarrando el cuello demanga, tuerce y estira derecho fuera. Las fijacionesahora se pueden afiadir a la manga,
Nora: La v_lvula de desviaci6n puede estar abiertamientras se usan los accesorios o para limpiar unaalfombranueva a causa de un flujo reducido de airepor Losaccesorios mismos opor la pelusa de la alfombra que Ilene la bolsa rapi-damente. Consulte el cuadro RECONOCIMIENTODE PROBLEMAS.
! ADVERTENCIA
Peligro de choque eldctrico o lesibn corpo-ral
Desconecte la unidad antes de limpiarla odarle servicio. De Io contrario podria pro-ducirse unchoque eldctrico o causarlesi6n corporal si la aspiradora arranca demanera imprevista.
TUBOTELESCOPICOCONCONTROLDEASPIRACION
_ Tubo
Telesc6plco
.%o,.,e.,ohendiduras
Saque el tubotelesc6pico desu lugar dealma cena-miento.
En la varita telesc6picogira el anillo que cierra a laderecha al DESTRANCA la posicibn.
Tube Deslizadorinferior
Tubo
superior
Extienda la varita a su Iongitudrepleta. Gire el anilloque cierra a la izquierda a la posici6n de laCERRADURA. Conecte la varita de la extensi6n enel fin abierto de la manga.
Quite la herramientade la grieta de su posici6n dealmacenamientoen el poseedor de la varita.Conecte la grieta herramienta a la varita de laextension.
Cuando use los accesorios, tenga cui-dado de no estirar demasiado la man-guera expansible paratratar de alcanzarm_s lejos. Si trata de estirar la mangueram_s de Io debido, podria causar q,ue laaspiradora se venga abajo. Aseguresede que el selector para alfombraJsinalfombra est_ en la posicibn para "sinalfombra". Se puede hacer dafio a lasuperficie del piso si el selector paraalfombra/sin alfombra est_ en la posicibnpara "alfombra".
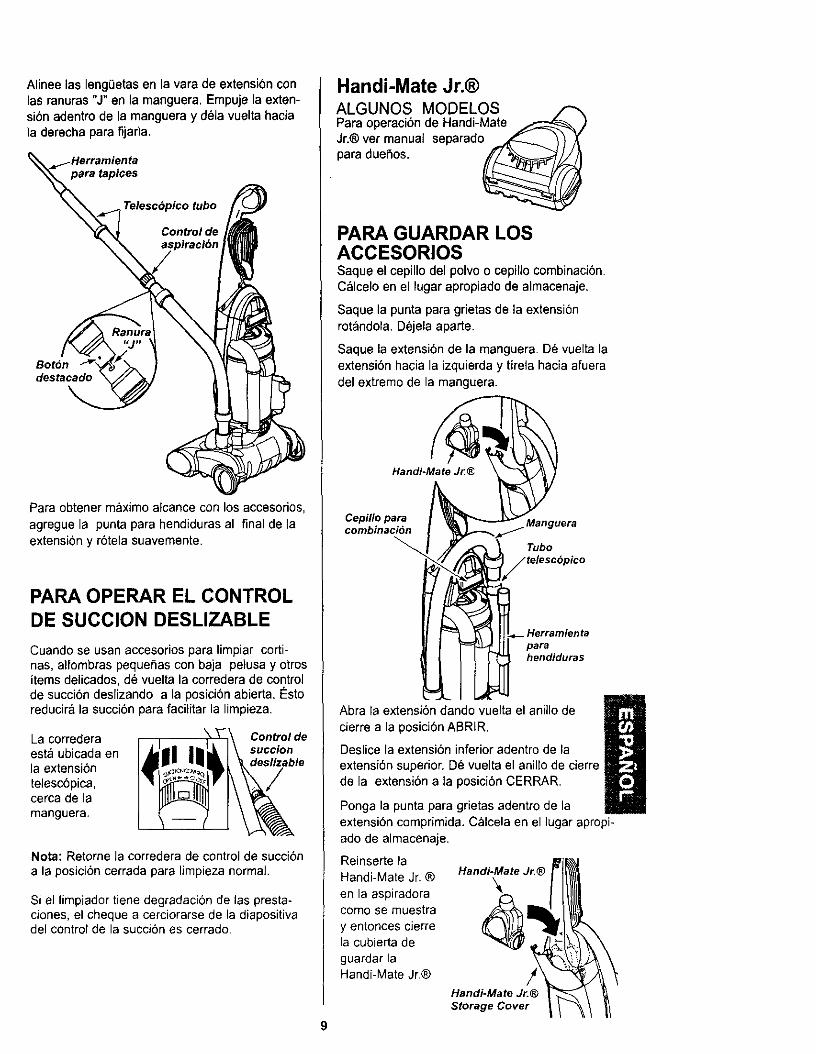
Alineelasleng0etasenlavara de extensi6n conlas ranuras "J" en la manguera, Empuje la exten-si6n adentro de la manguera y dela vuelta haciala derecha para fijafla.
para tapices
Control de
Bot6ndestacado
Para obtener maximo alcance con los accesorios,agregue la punta para hendiduras al final de laextension y r6tela suavemente.
PARA OPERAR EL CONTROLDE SUCCION DESLIZABLE
Cuando se usan accesorios para limpiar corti-nas, alfombras pequefias con baja pelusa y otrositems delicados, de vuelta la corredera de controlde succi6n deslizando a la posici6n abierta. I_storeducira la succi6n para facilitar la limpieza.
La corredera Controldeesta ubicada en succionla extensi6n deslizable
telescbpica,cerca de lamanguera,
Nota: Retorne la corredera de control de succibna la posici6n cerrada para limpieza normal.
Si el limpiador tiene degradaci6n de las presta-ciones, el cheque a cerciorarse de la diapositivadel control de la succi6n es cerrado
Handi-Mate Jr.®ALGUNOS MODELOS /"Para operacibnde Handi-MateJr.® ver manual separado _ _)
para duefios.
)
PARA GUARDAR LOSACCESORIOSSaque el cepillo del polvoo cepillocombinaci6n.C&lcelo en el lugar apropiadode almacenaje.
Saque la punta para grietas de la extensi6nrotandola. Dejela aparte.
Saque la extensi6n de la manguera. De vuelta laextensi6n hacia la izquierda y tirela hacia afueradel extremo de la manguera.
Handi-Mate Jr._
Cepillo paracombinacion
Tubo
parahendiduras
mAbra la extensibn dando vuelta el anillo de
Ucierre a la posici6n ABRIR.
Deslice la extensibn inferior adentro de la
extensi6n superior. De vuelta el anillo de cierrede la extensi6n a la posici6n CERRAR.
Ponga la punta para grietas adentro de laextensi6n comprimida. C&lcela en el ]ugarapropi-ado de almacenaje.
Reinserte laHandi-Mate Jr. ®
en la aspiradoracomo se muestray entonces cierrela cubierta deguardar laHandi-Mate Jr.®
Handi-Mate Jr,®
\
!Handi-Mate Jr.®Storage Cover
9
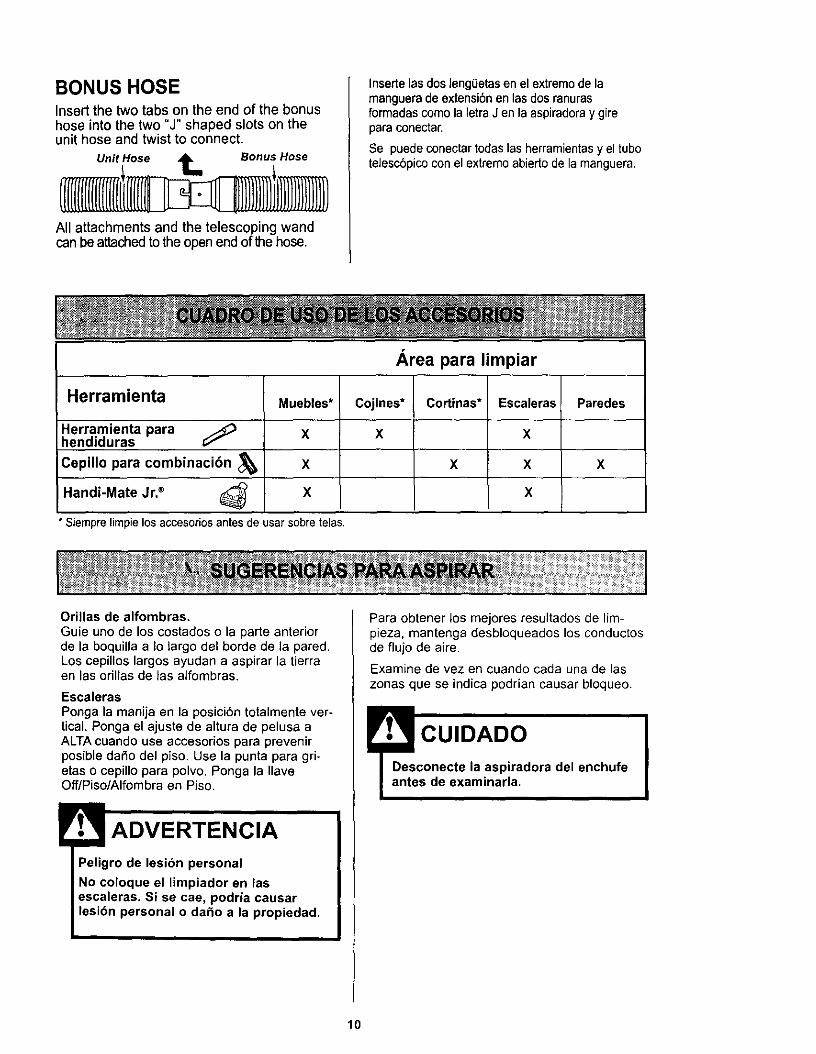
BONUS HOSEInsert the two tabs on the end of the bonushose into the two "J" shaped slots on theunit hose and twist to connect.
Unit Hose _ Bonus Hose
All attachments and the telescoping wandcan be attached to the open end of the hose.
Inserte las dos lengOetasen el extremo de lamanguera de extensidn en las dos ranurasformadas como la letraJ en la aspiradora y girepara conectar.
Se puede conectar todas las herramientas y el tubotelescdpico con el extremo abierto de la manguera.
Area para limpiar
Herramienta Muebles* Cojines* Cortinas* Escaleras Paredes
Herramienta para _> X X Xhendiduras
Cepillo para combinaci6n _ x x x x
Handi-Mate Jr. ® _ X X
* Siemprelimpielosaccesoriosantesde usarsobre telas.
Orillas de alfombras.Guie uno de los costados o la parte anteriorde la boquilla a lo largo del borde de la pared.Los cepillos largos ayudan a aspirar la tierraen las orillas de las alfombras.
EscalerasPonga la manija en la posicidn totalmente ver-tical. Ponga el ajuste de altura de pelusa aALTAcuando use accesorios para prevenirposible dafio del piso. Use la punta para gri-eras o cepillo para polvo. Ponga la IlaveOff/Piso/Alfombra en Piso.
ADVERTENCIA
Peligro de lesibn personal
No coloque el Iimpiador en lasescaleras. Si se cae, podria causarlesibn personal o dafio a la propiedad.
Para obtener los mejores resultados de lim-pieza, mantenga desbloqueados los conductosde flujo de aire.
Examine de vez en cuando carla una de laszonas que se indica podrian causar bloqueo.
CUIDADOconecte la aspiradora del enchufe
s de examinarla.
10
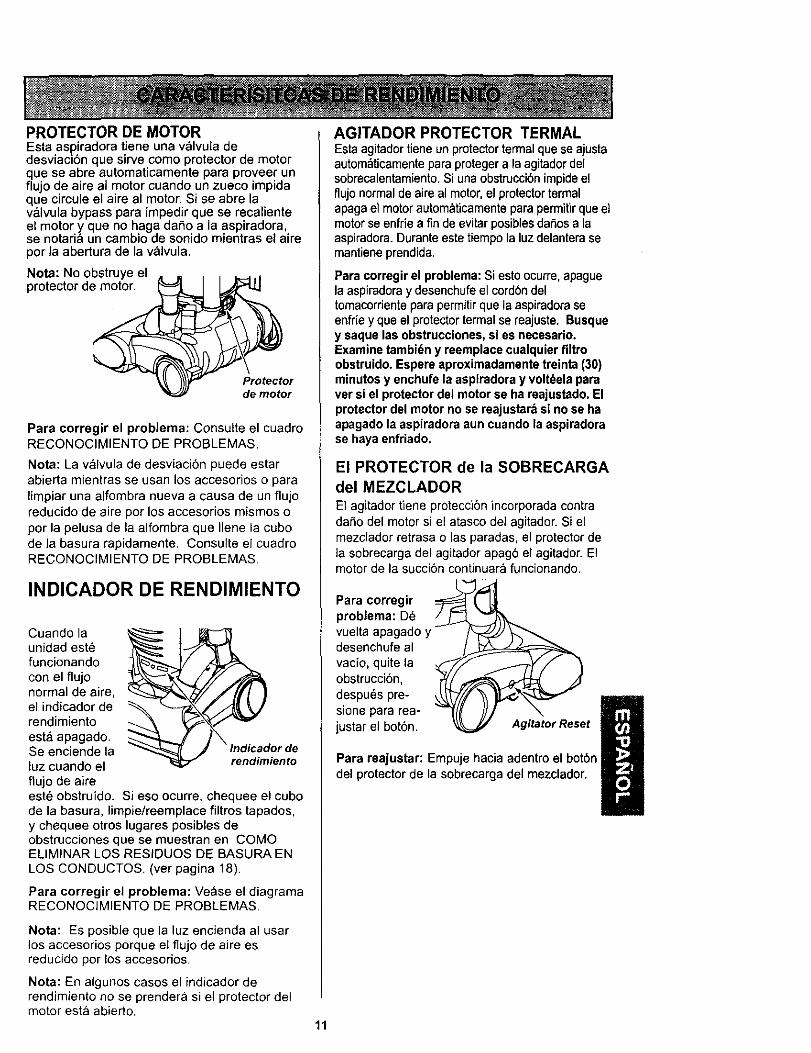
PROTECTOR DE MOTOREsta aepiradora tiene una v_lvula dedesviaci6n que sirve como protector de motorque se abre automaticamente para proveer unflujo de aire al motor ouando un zueco impidaque circule el aire al motor. Si se abre lavalvula bypass para impedir que se recalienteel motor y que no haga dafio a la aepiradora,se notari& un cambio de eonido mientras el airepot la abertura de la v_lvula.
Not.a: No obstruye elprotector de motor.
Protectorde motor
Para corregir el problema: Consulte el cuadroRECONOCIMIENTO DE PROBLEMAS.
Nora: La v&lvula de desviaci6n puede estarabierta mientras se usan los accesorios o paraIimpiar una alfombra nueva a causa de un flujoreducido de aire pot los accesorios mismos opor la pelusa de la alfombra que Ilene la cubode la basura rapidamente. Consulte el cuadroRECONOCIMIENTO DE PROBLEMAS.
INDICADOR DE RENDIMIENTO
Cuando launidad estefuncionandocon el flujonormal de aire,el indicador derendimientoesta apagado.Se enciende laluz cuando elflujo de aire
_dio r de
ento
est6 obstruido. Si eso ocurre, chequee el cubode la basura, limpie/reemplace filtros tapados,y chequee otros lugares posibies deobstrucciones que se muestran en COMOELIMINAR LOS RESIDUOS DE BASURA ENLOS CONDUCTOS. (ver pagina 18).
Para corregir el problema: Vease el diagramaRECONOCIMIENTO DE PROBLEMAS.
Nota: Es posible que la luz encienda al usarlos accesorios porque el flujo de aire esreducido por los accesorios.
Nota: En algunos casos el indicador derendimiento no se prendera si el protector delmotor esta abierto.
AGITADOR PROTECTOR TERMALEstaagitadortieneun protectortermalquese ajustaautom_ticamentepara protegera la agitadordelsobrecalentamiento.Si unaobstrucci6nimpideelflujo normalde aim al motor,el protectortermalapagael motor automaticamenteparapermitirqueelmotorseenfrie a fin de evitarposiblesdafiosa laaspiradora.Duranteeste tiempola luz delanterasemantieneprendida.
Para oorregir el problema: Si esto ocurre, apaguela aspiradoray desenchufeel cord6ndeltomacorrienteparapermitirque la aspiradoraseenffiey queel protector termalse reajuste. Busquey saque las obstruccionea, si es necesario.Examinetambi_n y reemplace cualquier filtroobstruido. Espere aproximadamentetreinta (30)minutos y enchufe la aspiradoray voltdelaparaver si el protector del motor se ha reajustado.Elprotector del motor no se reajustar_ si no se haapagado la aspiradora aun cuando la aspiradorase haya enfriado.
EIPROTECTORdelaSOBRECARGA
del MEZCLADOR
El agitador tiene protecci6n incorporada contradafio del motor si el atasco del agitador. Si elmezclador retrasa o las paradas, el protector dela sobrecarga del agitador apag6 el agitador. Elmotor de la succi6n continuara funcionando.
Para corregirproblema: Devuelta apagado ydesenchufe alvacio, quite laobstrucci6n,despu_s pre-sione para rea-justar el bot6n.
Para reajustar: Empuje hacia adentro el bot6ndel protectorde la sobrecarga del mezclador.
11
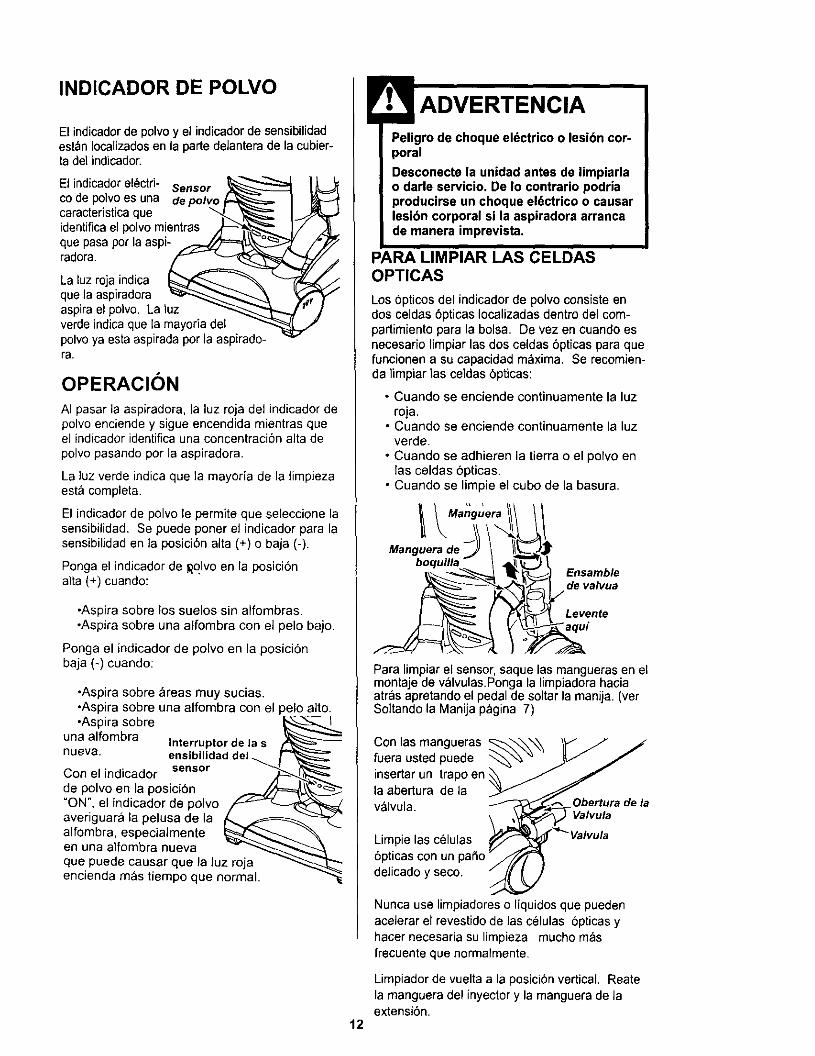
INDICADOR DE POLVO
El indicador de polvo y el indicador de sensibilidadest_,nIocalizadosen la parte delantera de la cubier-ta del indicador.
El indicador electri- Sensor
co de polvoesuna,. de polv_._ lcaracterlstlca queidentificael polvomientras____..._i/_'_l_'_---._ Ique pasa por la aspi-" _'_.._-_
radora, j/'-'- ===,=_'_La luz roja indica _"_ "_que la aspiradora '_",,-,,.,,_-'_._ 'aspira el polvo. La luz _verde indicaque la mayoria delpolvo ya esta aspirada porla aspirado-
!ra.
OPERACION
AI pasar la aspiradora, la luz roja del indicador depolvo enciende y sigue encendida mientras queel indicador identifica una concentraci6n alta depolvo pasando por la aspiradora.
La luz verde indicaque la mayoria de la limpiezaesta completa.
El indicador de polvo le permite que seleccione lasensibilidad. Se puede poner el indicador para lasensibilidad en la posici6n alta (+) o baja (-).
Ponga el indicador de Rolvo en la posici6nalta (+) cuando:
•Aspira sobre los suelos sin alfombras.•Aspira sobre una alfombra con el pelo bajo.
Ponga el indicador de polvo en la posici6nbaja (-) cuando:
°Aspira sobre &reas muy sucias.•Aspira sobre una alfombra con el pelo alto.
•Aspira sobre
una alfombra .__._1
Interruptor de la snueva. ensibilidad del
Con el indicador sensorde polvo en la posici6n"ON", el indicador de polvoaveriguara la pelusa de laalfombra, especialmenteen una alfombra nuevaque puede causar que la luz rojaencienda mas tiempo que normal.
Peligro de choque eldctrico o lesibn cor-poral
Desconecte la unidad antes de limpiarlao darle servicio. De Io contrario podriaproducirse un choque el_ctrico o causarlesibn corporal si la aspiradora arrancade manera imprevista.
PARA LIMPIAR LAS CELDASOPTICAS
Los 6pticos del indicador de polvo consiste endos celdas 6pticas Iocalizadas dentro del com-partimiento para la bolsa. De vez en cuando esnecesario limpiar las dos celdas 6pticas para quefuncionen a su capacidad m&xima. Se recomien-da limpiar las celdas bpticas:
• Cuando se enciende continuamente la luzroja.
• Cuando se enciende continuamente la luzverde.
• Cuando se adhieren la tierra o el polvo enlas celdas 6pticas.
• Cuando se limpie el cubo de la basura.
Manguera
Manguera de __ 1boquifla - I
Para limpiar el sensor, saque las mangueras en elmontaje de v._lvulas.Ponga la limpiadora haciaatr_,s apretando el pedal de soltar la manija. (verSoltando la Manija p&gina 7)
Con las manguerasfuera usted puedeinsertar un trapo enla abertura de lav&lvula. Obertura de la
Valvula
Limpie las c61ulas6pticas con un patiodelicado y seco.
12
Nunca use limpiadores o liquidos que puedenacelerar el revestido de las celulas 6pticas yhacer necesaria su limpieza mucho masfrecuente que normalmente.
Limpiador de vuelta a la posici6n vertical. Reatela manguera del inyector y la manguera de laextensi6n.
Sigasiempretodaslasinstruccionesdeseguridadallimpiarydarleservicioasuaspiradora.
Peligro de cheque el_ctrico o lesibn corpo-ral
Desconecte la unidad antes de limpiarla odade servicio. De lo contrario podria produ-cirse un choque el_ctrico o causar lesi6ncorporal si la aspiradora arranca de maneraimprevista.
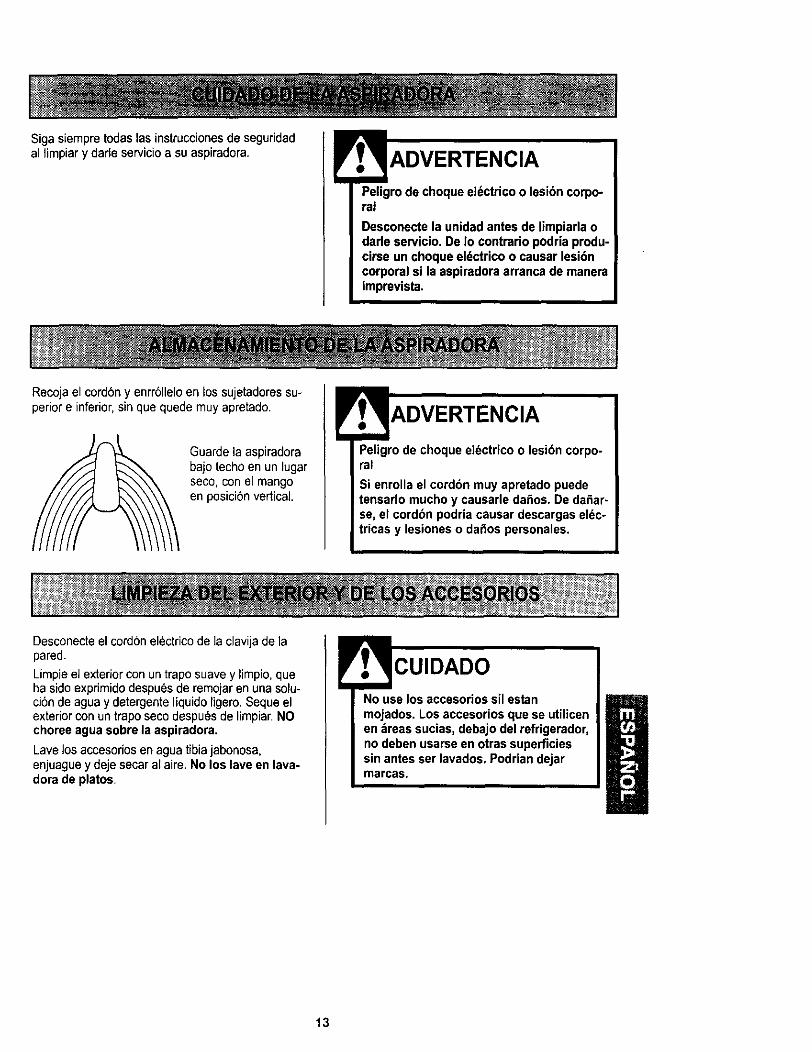
Recoja el cord6ny enrr611eloen los sujetadores su-perior e inferior,sin que quede muy apretado.
Guarde la aspiradorabajo techo en un lugarseco, con el mangoen posici6n vertical
Peligro de choque eldctrico o lesibn corpo-ral
Si enrolla el cordbn muy apretado puedetensarlo mucho y causarle daises. De dafiar-se, el cordbn podria causar descargas eldc-tricas y lesiones o da_os personales.
Desconecte el cord6n electrico de ]aclavija de lapared.
Limpie el exterior con untrapo suave y limpio,queha sido exprimidodespues de remojar en una solu-ci6n de agua y detergente liquido ligero. Sequeelexterior con un trapo seco despu6s de limpiar.NOchoree agua sobre la aspiradora.
Lave los accesodos en agua tibiajabonosa,enjuague y deje secar al aire. No los lave en lava-dora de platos. Nouseosaccesorosses nIImojados. Los accesorios que se utilicen
en _reas sucias, debajo del refrigerador,no deben usarseen otras superficiessin antes ser lavados, Podrian dejarmarcas.
13
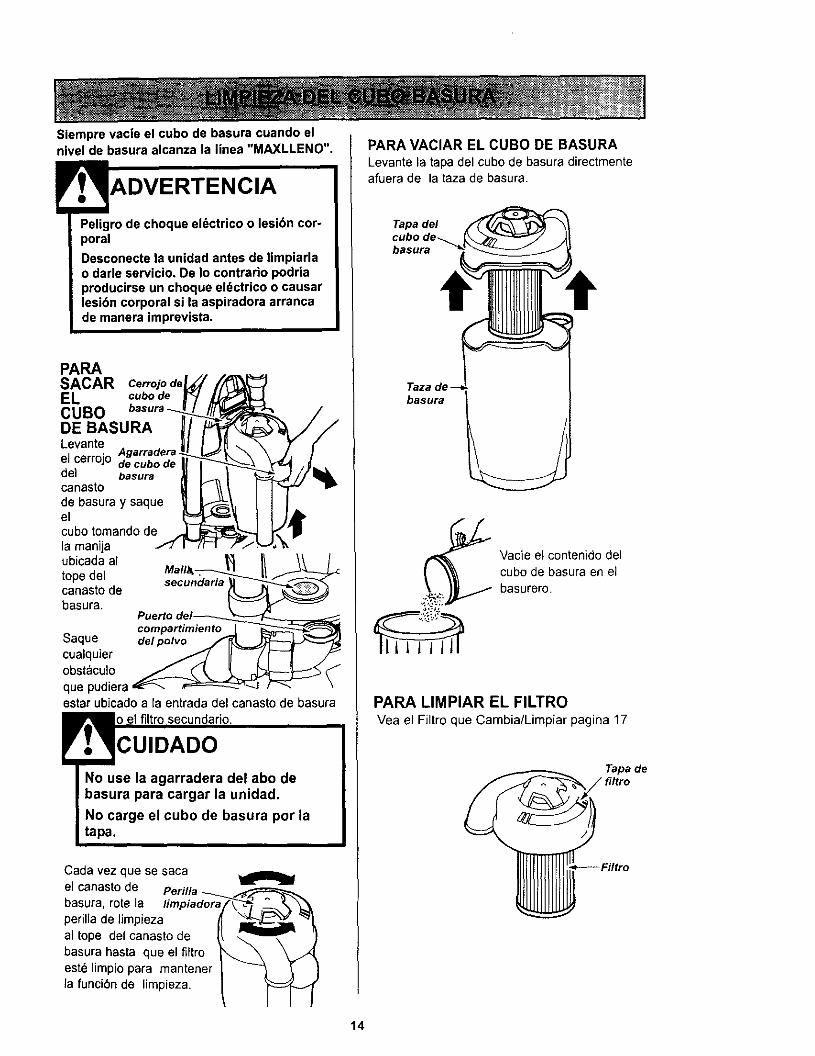
Siemprevacieel cubodebasuracuandoelniveldebasuraalcanzala linea"MAXLLENO".
VERTENCIA
Peligro de choque el_ctrico o lesibn cor-poral
Desconecte la unidad antes de limpiarlao darle servicio. De Io contrario podriaproducirse un choque el_ctrico o causarlesibn corporal si la aspiradora arrancade manera imprevista.
PARASACAR Cerrojo de
EL cubo de
CUBODE BASURALevanteel cerrojo Agarraderade cubo dedel basuracanastode basura y saqueelcubo tomandodela manijaubicada al _1 I! \\ /tope del Mall& _ l_ _.cu.,,o.,.canasto de L._"_"_basura. __ _
Puerto del__compartimiento J __
$aque del polvo
cualquier /_/ I!--/_-_
que pudiera _ _'--.J f _--estar ubicado a la entrada del canasto de basura
[ YQI_ CeUl;rD'AC;; riO"
No use la agarradera del abo debasura para cargar la unidad.
No carge el cubo de basura por latapa.
Cada vez que se sacael canasto de
basura, rote la limpiadoraperilla de limpiezaal tope del canasto debasura hasta que el filtroest_ limpio para mantenerla funcibn de limpieza.
PARA VACIAR EL CUBO DE BASURALevante la tapa del cubo de basura directmenteafuera de la taza de basura.
Tapa del
basura
Tazade-basura
"Vacieel contenido delcubo de basura en elbasurero.
PARA LIMPIAR EL FILTROVea el Filtro que Cambia/Limpiar pagina 17
Tapa de
14
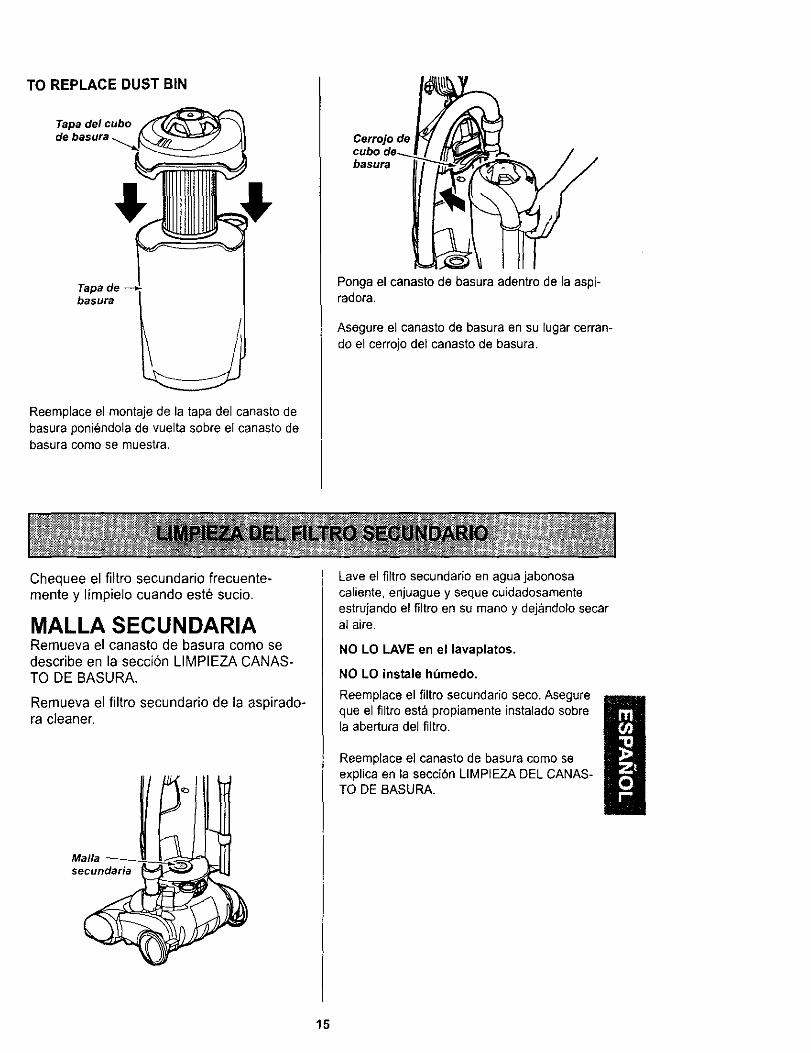
TO REPLACE DUST BIN
Tapa del cubo
Tapa debasura
Reemplace el montaje de la tapa del canasto debasura poni_ndola de vuelta sobre el canasto debasura como se muestra.
Cerrojo de
basura
Ponga el canasto de basura adentro de la aspi-radora.
Asegure el canasto de basura en su lugar cerran-do el cerrojo del canasto de basura.
Chequee el filtro secundario frecuente-mente y limpielo cuando este sucio.
MALLA SECUNDARIARemueva el canasto de basura como sedescribe en la secci6n LIMPIEZA CANAS-TO DE BASURA.
Remueva el filtro secundario de la aspirado-ra cleaner.
Mallasecundaria
Lave el filtro secundario en agua jabonosacaliente, enjuague y seque cuidadosamenteestrujando el filtro en su mano y dejandolo secaral aire.
NO LO LAVE en el lavaplatos.
NO LO instale hdmedo.
Reemplace el filtrosecundario seco. Asegureque el flltro est_ propiamente instalado sobrela abertura del filtro.
Reemplace el canasto de basura como seexplica en la secci6n LIMPIEZA DEL CANAS-TO DE BASURA.
15
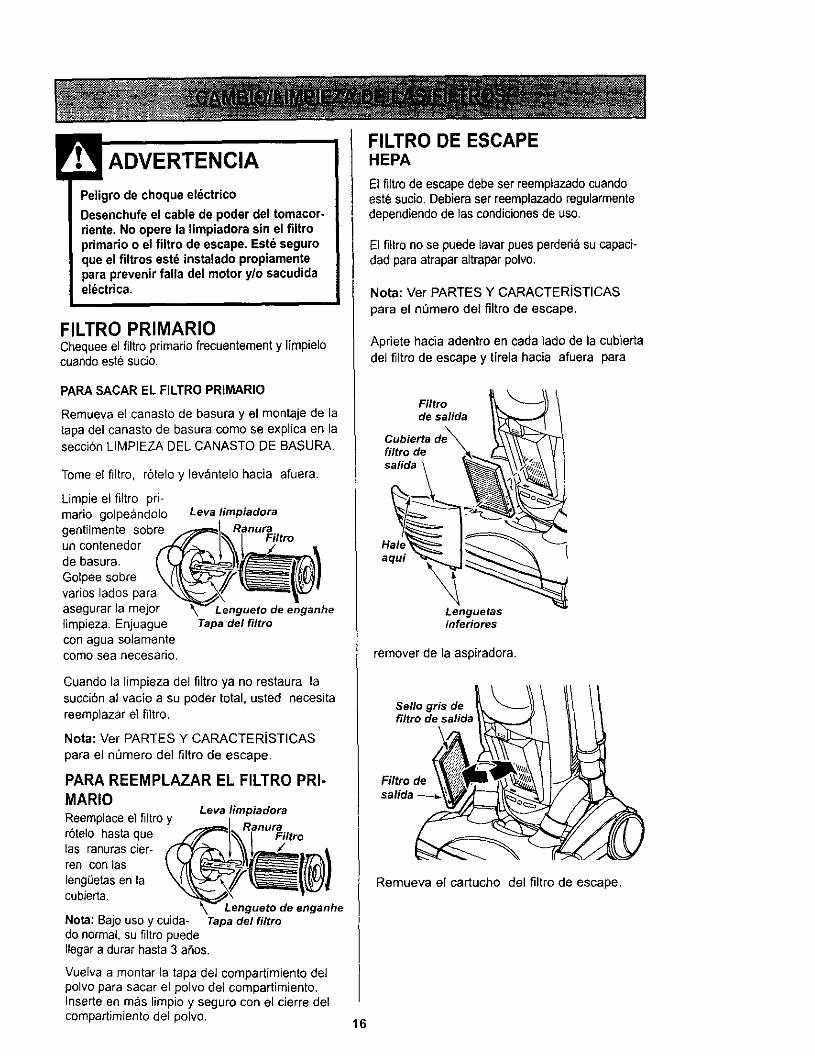
Peligro de choque electrico
Desenchufeel cable de poder del tomacor-riente. No opere la limpiadora sin el fiitroprimario o el filtro de escape. Est_ seguroque el filtros estd instalado propiamentepara prevenir falla del motor y/o sacudidael_ctrica.
FILTRO PRIMARIOChequee el filtro primario frecuentement y limpielocuando este sucio.
PARA SACAR EL FILTRO PRIMARIO
Remueva el canasto de basura y el montaje de latapa del canasto de basura como se explica en lasecci6n LIMPIEZA DEL CANASTO DE BASURA.
Tome el filtro, r6telo y levantelo hacia afuera.
Limpie el filtro pri-mario golpeandologentilmente sobreun contenedorde basura.Golpee sobrevarios lados paraasegurar la mejorlimpieza. Enjuaguecon agua solamentecomo sea necesario.
Leva limpiadora
RanuraFiltro
Lengueto de enganheTapa del filtro
Cuando la limpieza del filtro ya no restaura lasucci6n al vacio a su poder total, usted necesitareemplazar el filtro.
Nota: Ver PARTES Y CARACTER[STICAS
para el n_mero del filtro de escape.
PARA REEMPLAZAR EL FILTRO PRI-
MARIOLeva lirnpiadora
Reemplaceel filtro y R rar6telo hasta que _[_" _nu Filtro
las ranuras cier-_'_'_ 1 / "ren con las / t_ _ll_'_t_
lengeetas en la X,_\_f _t_[_i"' - "..._N_--.,_\ v --cuoJerta. ",,.._._ \
Lengueto de enganheNota: Bajousoy cuida- Tapadel filtrodo normal, su filtro puedeIlegar a durar hasta 3 afios.
Vuelva a montar la tapa del compartimiento delpolvo para sacar el polvo del compartimiento.Inserte en m_s limpio y seguro con el cierre delcompartimiento del polvo.
FILTRO DE ESCAPEHEPA
El filtro de escape debe ser reemplazadocuandoest6 sucio. Debiera ser reemplazado regularmentedependiendo de las condiciones de uso.
El filtro no se puede lavar pues perderia su capaci-dad para atrapar altrapar polvo.
Nota: Ver PARTES Y CARACTERISTICAS
para el nQmero del filtro de escape.
Apriete hacia adentro en cada lado de la cubiertadel filtro de escape y tirela hacia afuera para
Filtrode safida
filtro desalida
aqui
Lenguetasinferiores
remover de la aspiradora.
Sello gris defiltro de salida
Filtro desalida
Remueva el cartucho del flltro de escape.
16

Proceda siempre con precauciones de seguri-dad al limpiar y dar servicio la aspiradora.
Peligro de choque el_ctrico o lesi6ncorporal
Desconecte la unidad antes de lim-piarla o darle servicio. De Io contrariopodria producirse un choque el_ctricoo causar lesibn corporal si la aspira-dora arranca de manera imprevista.
Si el limpiadorno se parece tener succi6n ade-cuada, primer cheque si el compartimiento delpolvo es Ileno o si se estorba un filtro. Vea laLIMPIEZA del COMPARTIMIENTO del POLVO yFILTRE CAMBIAR.
Si las areas del compartimiento y del filtro delpolvo estan libres de estorbos, compruebe el_,rea de la manguera. Quite la manguera de laextensi6n del montaje de valvula agarrando elcollar de la manguera, torciendo, y tirando rectohacia fuera.
Examine visualmente la manguera y el area bajaen las cuales la manguera esta conectada.
Quite cualquier estorbo visible.
Vuelva a conectar la manguera de la extensi6n almontaje de v&lvula. Enchufe el vacio y girelo.Estire la manguera a la Iongitud m&xima ydespues permita que la manguera vuelva a suIongitud del almacenaje.
De vuelta a la unidad apagado y desenchufe launidad.
Quite el compartimiento del polvo y compruebe elpuerto del compartimiento del polvo y el filtrosecundario para saber si hay estorbos. Si lasareas del compartimiento y del filtro del polvo ylas ._reasde la manguera est_n libres de estor-bos, compruebe el _lreadel inyector. Para com-probar esta &rea, vea la secci6n en la LIMPIEZAel CAMBIAR Y del MEZCLADOR de la CORREA.
Mallasecundaria -
Puerto del
compartimientodel polvo
Peligro de lesi6n personal
NO coloque nunca las manos ni lospies debajo de la unidad, El agitadordar& vueltas r&pidamente cuanda laaspiradora estd encendida y est_ en laposicibn "carpet setting" (con alfom-bra),
Vuelva el Iimpiador a la posici6n vertical antes detapar en un enchufe el6ctrico. /
17
;: ro0ec.oquee..c,ricoo,e+i+ncor-Desconecte la unidad antes de limpiarlao darle servicio. De Io contrario podriaproducirse un choque el_ctrico o causarlesibn corporal si la aspiradora arrancade manera imprevista,
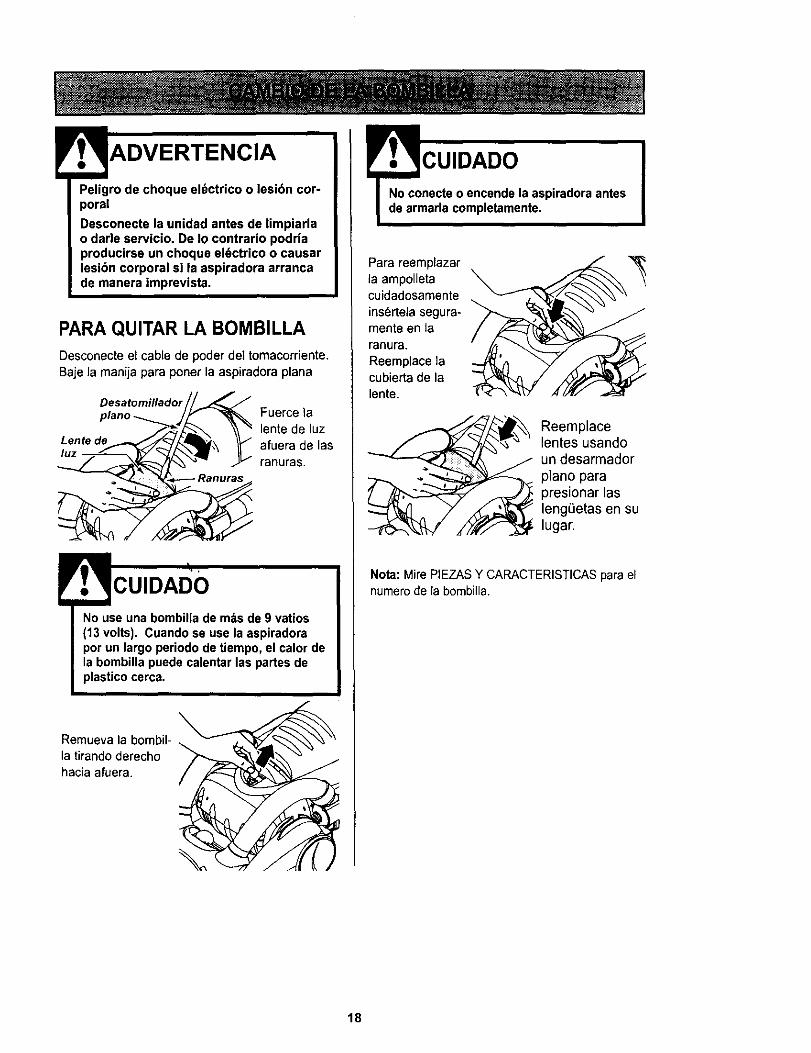
PARA QUITAR LA BOMBILLA
Desconecte el cable de poder del tomacorriente.Baje la manija para poner la aspiradora plana
Desatomillador
Lente deIuz
Fuerce la
lente de luz
afuera de las
ranuras.
:)No use una bombilla de m_s de 9 vatios(13 volts). Cuando se use la aspiradorapor un largo periodo de tiempo, el calor dela bombilla puede calentar las partes deplastico cerca.
\Remueva la bombil-la tirando derechohacia afuera.
_r. UIDADOnacre o encende la aspiradora antes
aria completamente.
Para reemplazarla ampolletacuidadosamente
insertela segura-mente en laranura.Reemplace lacubierta de lalente.
Reemplacelentes usandoun desarmador
piano parapresionar lasleng(_etas en sulugar.
Nota: Mire PIEZASY CARACTERISTICAS para elnumero de la bombilla.
18
Peligrodechoqueeldctricoo lesibncor-poralDesconectelaunidadantesdelimpiarlao darleservicio.DeIocontrariopodriaproducirseunchoqueel6ctricoo causarlesibncorporalsi laaspiradoraarrancademaneraimprevista.
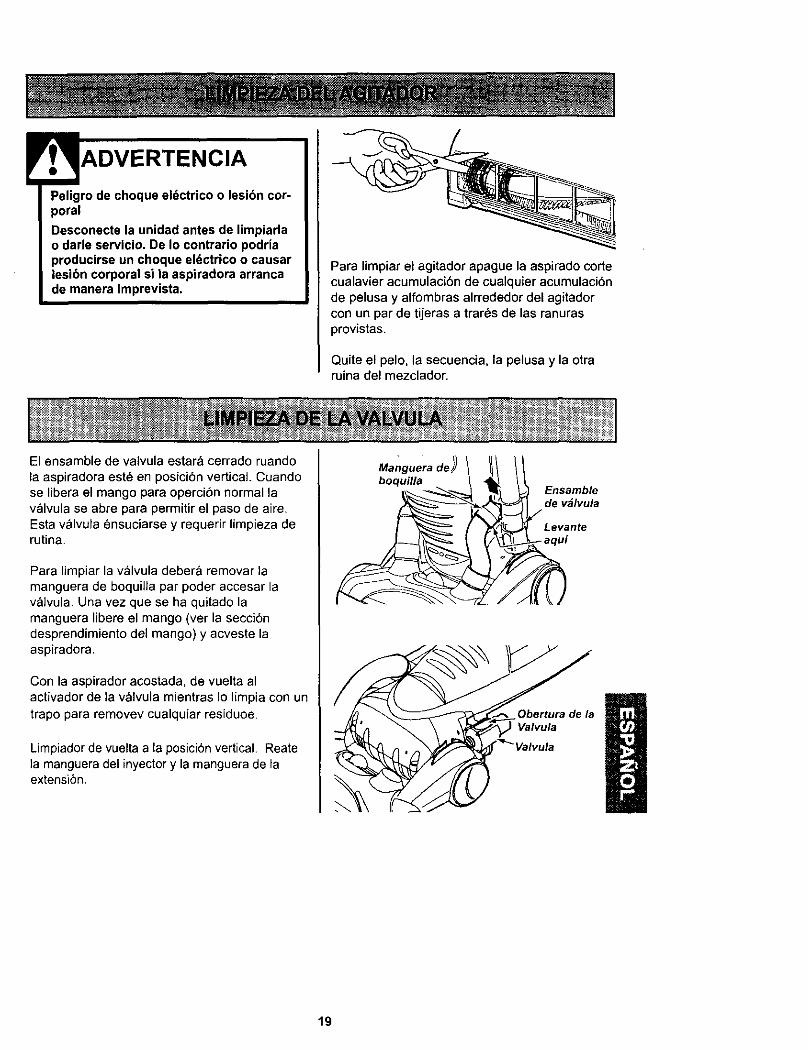
Para limpiar el agitador apague la aspirado cortecualavier acumulaci6n de cualquier acumulaci6nde pelusa y alfombras alrrededor del agitadorcon un par de tijeras a trar_s de las ranurasprovistas.
Quite el pelo, la secuencia, la pelusa y la otraruina del mezclador.
El ensamble de valvula estar_ cerrado ruandola aspiradora este en posici6n vertical. Cuandose libera el mango para operci6n normal lavalvula se abre para permitir el paso de aire.Esta v_lvula ensuciarse y requerir limpieza derutina.
Para limpiar la v&lvula deber& removar lamanguera de boquilla par poder accesar lav&lvula. Una vez que se ha quitado lamanguera libere el mango (ver la secciSndesprendimiento del mango) y acveste laaspiradora.
Con la aspirador acostada, de vuelta alactivador de la valvula mientras Io limpia con untrapo para remover cualquiar residuoe.
Limpiador de vuelta a la posici6n vertical. Reatela manguera del inyector y la manguera de laextensibn.
Manguera de )
boquiUa
Obertura de laValvula
19
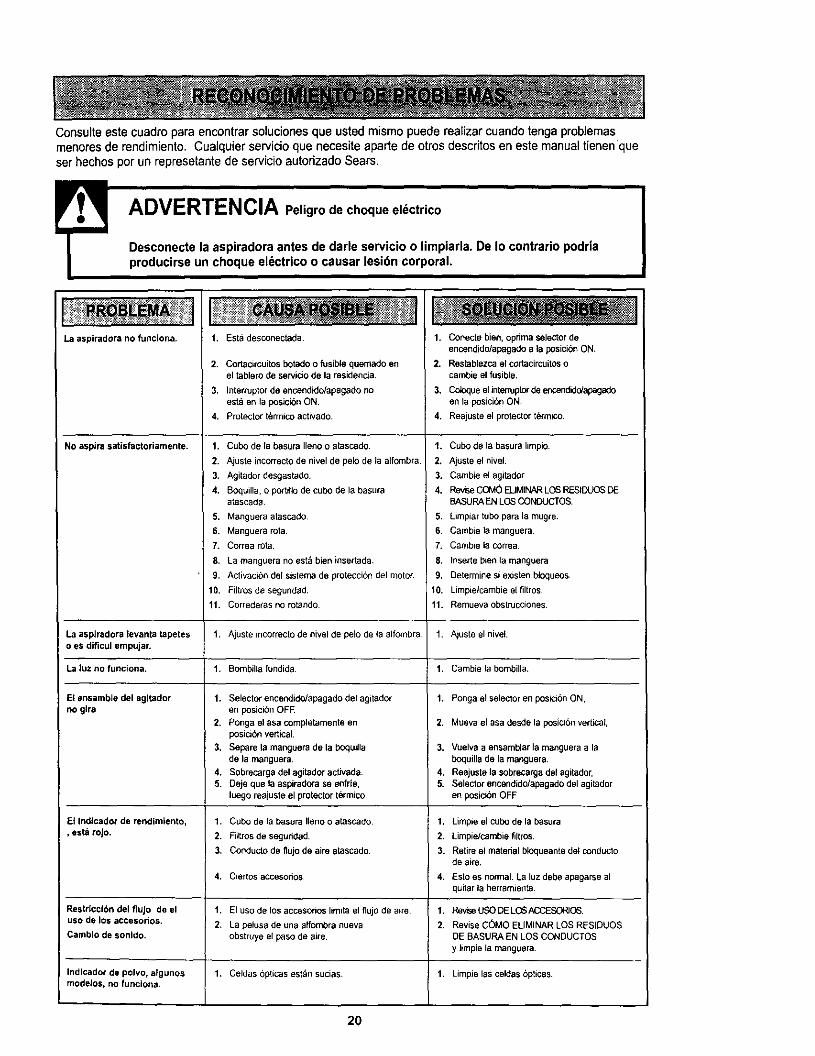
Consulte este cuadro para encontrar soluciones que ustedmismo puede realizar cuando tenga problemasmenores de rendimiento. Cualquier servicio que necesite aparte de otros descritos en este manual tienen queser hechos por un represetante de servicio autorizado Sears.
E ADVERTENCIA de el6ctricoPeligro choque
Desconecte la aspiradora antes de darle servicio o limpiarla. De Io contrario podriaproducirse un choque el6ctrico o causar lesi6n corporal.
La aspiradora no funciona.
No aspira satisfactoriamente.
1, Esta desconectada.
2. Cortaorcuitos botado o fusible quemado enel tablero de servicio de la residencia
3. Interruptor de encendido/apagado noest_ en la posici6n ON.
4. Protector termico activado.
1, Cubo de la basura Ileno o atascado.
2, Ajuste incorrecto de nivel de palo de la alfombra.
3. Agitador desgastado,
4. Bmtuilla, o portillo de cubo de la basuraatascada.
5. Manguera atascado
6, Manguera rota.
7. Correa rota.
8. La manguera no est_ bien insertada.
9. Activac_n del sistema de p-otecci6n del motor.
10. Filtrosdeseguddad,
11. Correde(as no rotando
1. Conecte bien, opdma selector de
encendido/apagado a la posicibn ON.
2. Restablezca el cortacircuitos ocarnbie el fusible.
3. Co_que el interrupl_ de encendido/apagadoen la posici6n ON.
4. Reajuste el protector termico.
1. Cub<) de la basura limpio.
2. Ajuste el nivel.
3. Cambie el agitador
4. RewseCOMO EUMINAR LOS P_SIDUOS DEBASURA EN LOS _CTOS.
5. Limpiar tubo para la mugre.
6. Cambiela manguera.
7. Cambte la correa
8. Inserte bien la manguera
9, Determine si existen bloqueos
10. Limpie/cambie el filtros
11. Remueva obstrucc_ones
La aspiradora levanta tapetes f. Ajuste incorrecto de nivel de pelo de la alfombra 1, A_uste el niveL
o es diflcul empujar.
La]uznofunciona. 1. Bombillafundida 1. Cambielabombilla.
1. Ponga el selector en posicibn ON,El ensamble del agitador
no gira1. Selector encendido/apagado del agitador
en posick_n OFE
2. Ponga el asa completamente enposic_bn vertical.
3. Separe la manguera de la I:)oquilla
de la manguera.
4. Sobrecarga del agitador activada.5. Deje que la aspiradora se enfrie,
luego reajuste el protector termico.
2. Mueva el asa desde la posio6n vertical,
3. Vuelva a ensamblar la manguera a la
boquilla de la manguera.
4. Reajuste la sobrecarga del agitador,
5. Selector encendido/apagado del agitadoren posic_n OFF
Et indicador de rendimlento, 1. Cubo de la basura Ileno o atascado 1. Limpie el cubo de la basura
, esta rojo. 2. Fiitrosde ssguddad. 2. Limpie/cambie flltros.
3. Conducto de fiujo de aire atascado. 3. Retire el material bloqueante del conductode aire.
4. Ciertos accesorios 4. Esto es normal. La luz debe apagarse alquitar la herramienta
RestdccibndelfluJo deel 1. Elusodelosaccesonoslimitaelflujodeaire 1. ReviseUSODELC_ACCESORIO6.
usodelosaccesortos. 2. Lapelusadeunaalfombranueva 2. ReviseC(_MOELIMINARLOSRESIDUOS
Camblo de sonido, obstrwe el paso de aire. DE BASURA EN LOS CONDUCTOS
y limpie la manguera.
Indicador de polvo, algunos 1. Celdas bpticas estan sucias 1. Limpie las celdas bpticas.modelos, no funciona.
20
21
Your Home
For repair - in your home - of all major brand appliances,lawn and garden equipment, or heating and cooling systems,
no matter who made it, no matter who sold it!
For the replacement parts, accessories andowner's manuals that you need to do-it-yourself.
For Sears professional installation of home appliancesand items like garage door openers and water heaters.
1-800-4-MY-HOME _ Anytime, day or night
(1-800-469-4663) (U.S.A. and Canada)www.sears.com www.sears.ca
Our Home
For repair of carry-in products like vacuums, lawn equipment,and electronics, call or go on-line for the nearest
Sears Parts and Repair Center.
1-800-488-1222 Anytime, day or night (U.S.A. only)
www.sears.com
To purchase a protectionagreement (U.S.A.)or maintenance agreement (Canada) on a product serviced by Sears:
1-800-827-6655 (u.s._) 1-800-361-6665 (Canada)
Para pedir servicio de reparadbna domicilio, y para ordenar piezas:
1-888-SU-HOGAR sM
(1-888-784-6427)
Au Canada pourservice en frarK:ais:1-800-LE-FOYER Mc
www.sears.ca
SEAR8© See_,P,cebu_ endCO.
® Registered Trademark / TMTrademark / sMService Mark of Seats, Roebuck and Co.
® Marce Registrada / TMMarca de Fabdca / s_ Marca de Servicio de Sears, Roebuck and Co._c Marque de cornrnerce t MeMarque d6pos_e de Sears, Roebuck and Co.