Embed Size (px)
Citation preview
Ken-Royce Engine Handbook 1
KEN ROYCE Engine Handbook
To be used in servicing Models 5E, 5F, 7F, 5G, and 7G. Also for use with LeBlond aircraft engines.
January, 1941
REARWIN AIRCRAFT & ENGINES, INC.
KANSAS CITY, KANSAS, U. S. A.
(Successor to the LeBlond Aircraft Engine Corporation)
Ken-Royce Engine Handbook 2
Index Warranty................................................................................................4 Introductory Note ...................................................................................5 H.P. and Fuel Consumption Curves........................................................6 Specifications .........................................................................................7 General Description................................................................................8 Operation Instructions ...........................................................................9 Starting Preparations......................................................................9 Starting Instructions.....................................................................10 Flying Instructions........................................................................12 Landing Instructions.....................................................................12 Fuel Specifications........................................................................13 Oil Specifications ..........................................................................13 Cold Weather Suggestions ....................................................................14 Troubles...............................................................................................14 Failure to Start .............................................................................15 Low Oil Pressure...........................................................................16 Over-oiling....................................................................................16 Faulty Operation and Low Power...................................................17 Excessive Oil Temperature ............................................................18 Leaking Carburetor.......................................................................19 Routine Inspection ...............................................................................19 Daily Flight Inspection ..................................................................19 Twenty-Hour Check ......................................................................20 One Hundred-Hour Check ............................................................23 General Description of Parts .................................................................26 Crankshaft ...................................................................................26 Piston ...........................................................................................27 Connecting Rods...........................................................................28 Crankcase ....................................................................................28 Crankcase Cover Assembly ...........................................................30 Cylinders ......................................................................................30 Propeller Hub................................................................................31 Gear Case.....................................................................................32 Gear Case Cover ...........................................................................33 Oil Pump ......................................................................................33 Installation Instructions .......................................................................34 Lubrication System ..............................................................................35 Rocker Box Lubrication.................................................................36 Fuel System .........................................................................................37 Tachometer ..........................................................................................37 Ignition – Magneto................................................................................38 Overhaul and Service Instructions........................................................39 Disassembly .................................................................................39
Ken-Royce Engine Handbook 3
Cylinder........................................................................................41 Crankshaft ...................................................................................43 Connecting Rods...........................................................................43 Piston ...........................................................................................44 Crankcase ....................................................................................45 Gear Case.....................................................................................46 Oil Pump ......................................................................................46 Crankcase Cover...........................................................................47 Gear Case Cover ...........................................................................47 Propeller Hub................................................................................48 Push Rods ....................................................................................48 Assembly Instructions ..................................................................49 Final Assembly .............................................................................50 Compression Ratio........................................................................52 Description and Service Rocker Box Pressure Lubrication.....................55 Clearance Chart ...................................................................................58 Engine Cross Section Illustrations........................................................63
Ken-Royce Engine Handbook 4
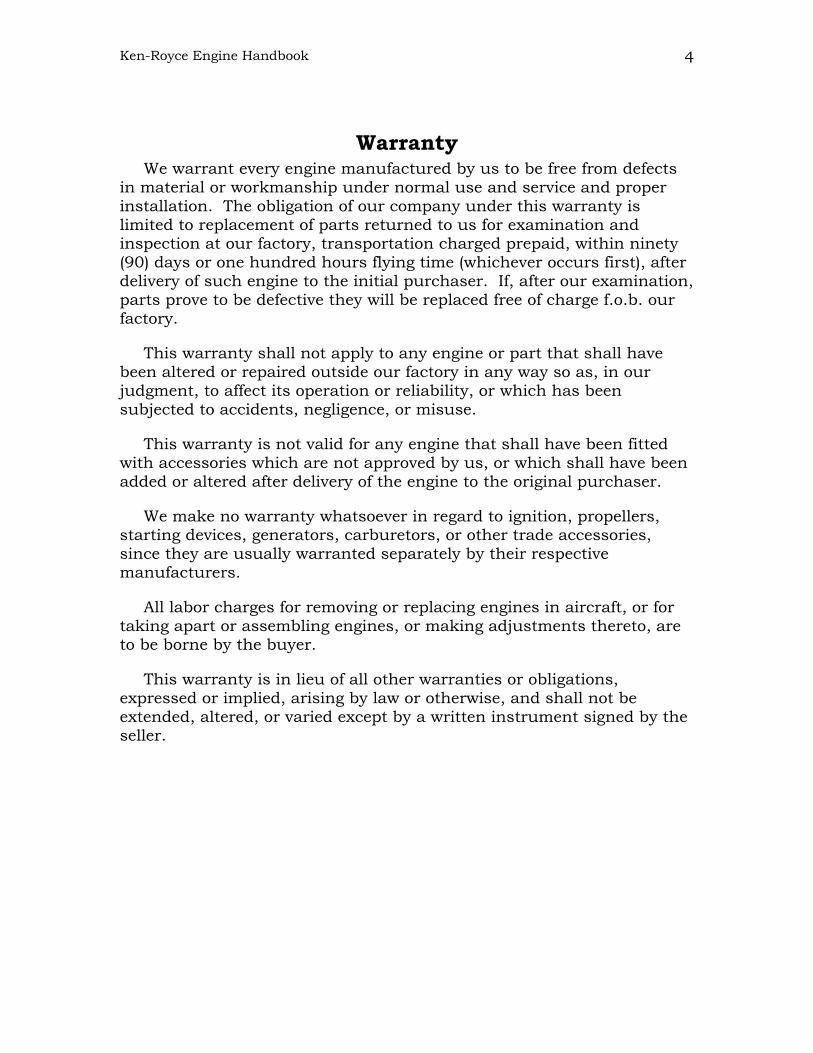
Warranty We warrant every engine manufactured by us to be free from defects
in material or workmanship under normal use and service and proper installation. The obligation of our company under this warranty is limited to replacement of parts returned to us for examination and inspection at our factory, transportation charged prepaid, within ninety (90) days or one hundred hours flying time (whichever occurs first), after delivery of such engine to the initial purchaser. If, after our examination, parts prove to be defective they will be replaced free of charge f.o.b. our factory.
This warranty shall not apply to any engine or part that shall have been altered or repaired outside our factory in any way so as, in our judgment, to affect its operation or reliability, or which has been subjected to accidents, negligence, or misuse.
This warranty is not valid for any engine that shall have been fitted with accessories which are not approved by us, or which shall have been added or altered after delivery of the engine to the original purchaser.
We make no warranty whatsoever in regard to ignition, propellers, starting devices, generators, carburetors, or other trade accessories, since they are usually warranted separately by their respective manufacturers.
All labor charges for removing or replacing engines in aircraft, or for taking apart or assembling engines, or making adjustments thereto, are to be borne by the buyer.
This warranty is in lieu of all other warranties or obligations, expressed or implied, arising by law or otherwise, and shall not be extended, altered, or varied except by a written instrument signed by the seller.

Ken-Royce Engine Handbook 5
Introductory Note Considerable time and care have been put into the preparation of the
Ken-Royce Service Manual. Its purpose is to give helpful and necessary information to the users of the Ken-Royce engines. This manual represents the results of factory and field experience and is designed to help you in securing the maximum amount of service and satisfaction from your Ken-Royce engine.
We strongly urge that the instructions given in this service manual be followed carefully in the operation and overhaul of our engines. It is highly important that skilled mechanics perform any work necessary on your Ken-Royce engine; and that major repairs and overhauls be performed by authorized Ken-Royce service stations or by our factory.
Suggestions or constructive criticism from owners or operators which will assist us in improving this manual will be appreciated at all times. Revised and additional sheets when available will be supplied by the manufacturer. Please keep this manual up to date and do not lose it, as a charge must be made for a replacement copy.
Our aim is to build aircraft engines of the best possible quality which will give economical, dependable, and trouble-free service. Excellent records on our engines throughout the world are proof that we are achieving this end.
REARWIN AIRCRAFT & ENGINES, INC.
Kansas City, Kansas
U. S. A.

Ken-Royce Engine Handbook 6
Fuel Consumption Curves

Ken-Royce Engine Handbook 7
Specifications

Ken-Royce Engine Handbook 8
General Description of the Ken-Royce The Ken-Royce engines are a later development of the well-known
LeBlond engines which may be rightfully claimed to be the first design produced in this country for commercial use without the assistance of the military services. Naturally an engine developed under these circumstances should be featured by such essential characteristics as simplicity, interchangeability, low cost of maintenance, ruggedness, and reliability.
The Ken-Royce probably has fewer parts than any aircraft engine in its particular class that has been produced to date. This simplicity is furthered by the particular arrangement which permits the various units to be made up in individual assemblies. Each unit can, therefore, be properly assembled and inspected before it becomes a part of a complete engine. These simple design features naturally reflect most favorably on manufacturing costs, and also on the low cost with which each engine may be maintained in service. In the matter of manufacturing costs and service, considerable advantage has been gained in the efforts towards standardization. Nearly 90 per cent of the parts are interchangeable on the various models.
Weight in a commercial aircraft engine is very important, but not so important that it is necessary to endanger the strength and durability of the product. The low weight of the Ken-Royce engines is due entirely to the simple and compact nature of the design, and not by any determined effort to make them so at a sacrifice to strength and reliability by the user of lighter materials. No part in a Ken-Royce engine is excessively loaded or highly stressed.
The small overall diameter resulting from such a simple and compact arrangement practically eliminates the objections so frequently raised in connection with aircooled radial engines – namely head resistance, and possibly poor visibility. And in this compact arrangement, due regard has been given to accessibility. It has also been considered that a skilled mechanic may not always be available for making adjustments or repairs, and the design, therefore, incorporates several “fool-proof” features.
Improvement of the valve operating mechanism incorporates pressure lubrication to all points. Heretofore rocker boxes, vales, and push rod assemblies have been hand lubricated by heavy grease. While it is very necessary that these parts have proper lubrication, a number of instances have been found where lubrication has been neglected and excessive wear resulted. Oil is now automatically conveyed from the oil pump directly to the push rod ball ends, rocker boxes, bearings, and
Ken-Royce Engine Handbook 9
valves, thus insuring constant lubrication with practically no attention or adjustments.
The assembly of a Ken-Royce Engine starts with the crankcase assembly mounted upon the engine support. The crankshaft and connecting rod assembly is first inserted through the large opening at the front of the crankcase. This is most conveniently done when the crank axis is vertical. The link connecting rods can then be placed opposite their respective openings for the cylinders. The crankcase cover assembly, which contains the ball thrust bearing, may be attached and the crankshaft located end-wise by the thrust bearing nut. The wiring manifold is now attached to engine ring. Pistons and piston pins are attached to each connecting rod and everything is then ready for the individual cylinder assemblies. The gear case is assembled as a unit from the rear, and after adjusting the push rods and timing the valves and magnetos, the gear case cover is put in place, thus leaving only the carburetor, and controls to be assembled before the engine is complete. This in brief covers the procedure of assembly and illustrates the extreme simplicity of the design. Individual units such as the oil pump can be removed independently, and furthermore, once an engine is assembled, the removal of the gear case assembly, the crankshaft assembly, or both, does not require retiming the valves while putting the engine back together. These points will be explained in more detail in other sections of the manual.
Operation Instructions
Starting Preparations When the engine is installed in an airplane, the following items should
be carefully checked before starting the engine for the first time:
1. Make sure that the ground wires are connected to the magnetos.
2. Go over all nuts and bolts, both on the engine and engine mount, to be sure that they are tight and properly locked.
3. See that the propeller is in balance and tracks within on sixteenth (1/16) inch after installing.
4. Draw up propeller hub nut as tightly as possible with a bar at a radius of three (3) feet.
5. See that all propeller hub bolt nuts are tight and properly cottered.
Ken-Royce Engine Handbook 10
6. Lubricate the valve gear using a Zerk gun filled with a heavy grease. (Texaco Marfak #2 or equivalent) (Applies to all engines not having automatic rocker box pressure lubrication.)
7. Fill the oil tank with sufficient amount of oil of recommended grade, and determine if all the lines are open.
8. See that the tanks are filled with proper grade of gasoline.
9. Check the tachometer, oil pressure gauge and oil temperature thermometer to see that each has been properly connected.
10. Operate all engine controls to see if full and free movement is permitted.
11. Inspect all carburetor, fuel and oil lines to be sure that there are no leaks.
12. Swing propeller, with switches off, to make sure everything is clear.
The above instructions, which particularly apply in the case of starting an engine for the first time, are also applicable for the most part at any time of starting. They need only be regarded however, at frequent intervals, depending upon the amount of operation and the time elapsed between starts.
Starting Instructions Do not start the engine until the recommended preparations have
received full attention.
The best method to use in starting will depend somewhat upon weather conditions. In very cold weather it may be necessary to pre-heat the oil in order to get proper circulation at the start. ENGINES EQUIPPED WITH THE ROCKER BOX OIL PRESSURE LUBRICATION SYSTEM SHOULD NEVER BE STARTED WITHOUT FIRST ROTATING THE PROPELLER BY HAND THROUGH AT LEAST TWO REVOLUTIONS WITH SWITCHES OFF in order to drain out any excess oil that may have collected in the lower rocker boxes.
Under any conditions, it is necessary to get sufficient gasoline in the carburetor so that some vapor may be sucked up into the manifold while turning the propeller by hand with switches off. In hot weather one revolution of the propeller with throttle half open and switch off should fill the carburetor. In extremely cold weather it may be necessary to pull the propeller through as many as three or four revolutions. A small
Ken-Royce Engine Handbook 11
amount of gas will drip from the carburetor when it is adequately filled. If too much is drawn into the manifold, this can be relieved by turning the propeller in the opposite direction with the throttle wide open, again with the switches off. When the right amount of vapor has been drawn into the cylinders and manifold, the engine should start easily.
If the carburetor is equipped with an air heater, this should be on especially in cold weather. Have the ignition switch in the off position. Close the throttle tight, and with the altitude control in the full rich position, turn the engine over rapidly with the propeller, approximately three times. Then with the ignition switch on and the throttle in a slightly open position, the engine should start easily in one or two swings of the propeller.
Ken-Royce engines are equipped with fixed spark magnetos set to 30° advance position. It has been found that there is no appreciable increase in power with the spark set further ahead, and as this position makes it relatively safe from kick-backs with any manner of starting, the spark has been fixed in this position, with the further advantage of eliminating the cumbersome control mechanism.
If the engine fails to start after a few attempts in which attention has been given to the foregoing suggestions, it is perhaps well to consult this manual with a view of tracing the trouble.
After the engine has started, it is best to open the throttle slowly until the tachometer reads 900 R.P.M. Let the engine run at this speed for one or two minutes while observing if all plugs are firing and if the pump has picked up oil pressure. Should the oil gauge show no pressure at the end of one minute, the engine should be stopped and an investigation made as to the possible source of trouble. When the engine has run about two minutes and the oil pressure is 25 pounds or more, the throttle can then be opened up to 1100 R.P.M. and the engine allowed to run until the oil temperature reaches 60°F. It is important to note that the oil pressure will indicate a higher reading when cold than when warm. In warm weather the oil may reach the required temperature in a short time while running the engine at not more than 100 R.P.M., while in extremely cold weather it may be necessary to prolong the warm-up period.
When the engine has been properly warmed up, the throttle should be opened wide to observe R.P.M., oil pressure, and temperature. The magnetos can now be checked by switching from one to the other, and the speed should not drop over 75 R.P.M. as compared to both magnetos

Ken-Royce Engine Handbook 12
on. The acceleration of the engine with mixture control set at “Full Rich” position should also be checked to make sure it is smooth and rapid.
If everything appears normal and the operation is smooth, the engine is ready for flight. The mixture control lever should be placed in “Full Rich” position before taking off, and immediately before landing. It is recommended to always head the airplane into the wind while running the engine on the ground preparatory for flight. Prolonged running on the ground at full throttle may be harmful as the engine may not receive the amount of blast which it requires for proper cooling in certain types of enclosed cowlings.
Flying Instructions When the desired altitude is obtained and the engine throttled down
to cruising speed, the mixture control and air heater may be adjusted to positions giving best fuel economy. We recommend not using the altitude mixture control unless 5000 feet or more above sea level. The air heater may then be adjusted to best position for atmospheric conditions. In hot, dry weather the heater control may be left pushed in, while in cold or moderate damp weather it should be adjusted to give maximum R.P.M. without formation of ice. Engine roughness at partial throttle may be an indication of lack of heat. Once the best position of the heater valve is determined, it may be possible to further lean the carburetor mixture.
Frequent readings should be taken from the instruments to ascertain that the engine is functioning properly. The oil pressure should register between 40 to 60 lbs. per square inch, although higher pressures are permissible. Any time the pressure drops below 30 pounds, a landing should be made to determine the cause. The oil temperature should not exceed 180°F, although it may go to 200°F in extremely hot weather before it is necessary to make a landing to investigate the cause; provided, of course, that the oil used meets with our recommendations. When a fuel pump is used on the engine, the fuel pressure should range from two to four pounds per square inch.
Whenever the engine shows a greater variation than can usually occur through changes in atmospheric conditions, continued flight is not recommended. Trouble is evidently indicated and an immediate correction of whatever it may be will not only make for safety, but save the engine from developing anything of a serious nature, or undue wear.
Landing Instructions The mixture control should always be set at “Full Rich” when the
throttle is closed for landing, in order to insure good engine acceleration
Ken-Royce Engine Handbook 13
in case it becomes necessary to again open the throttle. When the airplane comes to a final stop, after being taxied to its position, the engine should be allowed to run for a few minutes before shutting off the ignition. The recommended practice is to shut off the fuel supply and let the engine run until it has consumed all the fuel in the carburetor and feed lines. In this way the harmful effects of suddenly cooling off the engine can be avoided, and thereby lengthen the period of operation between engine overhauls.
Fuel Specifications Ken-Royce engines are made to operate on fuel with the following
specifications:
Engine Model Minimum Octane Engine Model Minimum Octane 5E 70 7DF 74 5F 70 7F 74 5G 74 7G 74
An inferior grade of fuel may give very unsatisfactory operation and lead to serious difficulties; therefore the engine manufacturer cannot be held responsible for any troubles which may arise therefrom. Under severe operating conditions, the above recommended grade of fuel with two c.c. of ethyl fluid per gallon may be found to improve the life and performance of the engine.
Oil Specifications As it is impossible to run conclusive tests on all the various
lubricating oils on the market as to their suitability for use in Ken-Royce Aircraft Engines, a set of specifications are given to enable the user to select a grade of oil that should give satisfactory results. These specifications are drawn from experience with a number of different oils, and will include all found to be satisfactory and will bar some which have not proven so good. The user is urgently requested to determine if the oil most readily available will meet with these specifications before starting to use it, and certainly not to use it if it falls below the specifications. Practically all the better grades of lubricating oils will meet these requirements and some are available in all parts of the country. The engine manufacturer waives all responsibility when cheaper or inferior grades are employed.
Ken-Royce Aircraft Engines are no more sensitive to different lubricants that any other engine, but the manufacturer is sufficiently interested in obtaining a maximum of service as to be rather particular in this regard. The user should bear in mind that, in general, the smallest

Ken-Royce Engine Handbook 14
losses in viscosity with temperature change are to be found in oils made from Pennsylvania crudes, and next to these come the Mid-Continent paraffin base crudes. There may be quite a marked difference in oils made from the same class of crudes due to the method of refining. The maximum value given in the pour test will eliminate those which have not been highly dewaxed during refining. Rearwin Aircraft & Engines, Inc. will supply, on request, the names of oils which they know to meet these specifications, and endeavor to determine the characteristics of any oil that has not come to their attention about which the user may seek information.
The following grades of oil are recommended by the manufacturer:
Below 30°F – S.A.E. 40 oil
30°F to 100°F – S.A.E. 50 oil
Above 100°F – S.A.E. 60 oil
Cold Weather Suggestions In areas where the temperature falls below freezing, it is necessary to
devise means of heating the oil prior to flight, unless the airplane is stored in a warm hangar. Electric oil heaters may be purchased from any reliable aircraft supply house. All that is necessary with these electric heaters is to remove the oil cap and place the heated rod into the tank. This will heat the oil to a high temperature in about half the time that the motor can heat it and will prevent any injury to the motor resulting from poor oil lubrication.
If the airplane is flown consistently in temperatures below 20°F or -6°C, it will be found very desirable to cover the oil lines and oil tank with some form of asbestos or similar insulating material. One system of wrapping the oil lines is to use asbestos rope of about 3/8 inch diameter, and to wrap it around the lines, shellac it and enclose it in some wind-tight substance such as black friction tape. A method of covering the tank is to mix powdered asbestos with water and cover the tank to a depth of about ¼ inch of this material. After allowing the asbestos to dry the tank should then be covered with canvas or other wind-tight material to keep the asbestos in place, and then shellac the canvas.
Troubles It is not always easy to determine the exact cause of improper engine
functioning, as it may come from two or more sources. The best way is to take into account all the possible sources to which the trouble may be
Ken-Royce Engine Handbook 15
attributed, and start in to investigate them in the order of their logical importance. There follows a list of the most common troubles for the benefit of the person who is responsible for the proper functioning of the engine. It is urged that this part of the manual be consulted whenever the occasion warrants, ass it will undoubtedly contribute to increasing the reliability and life of the engine.
Failure to Start If the engine does not start readily, it may be due to one or more of
the following conditions:
1. Lack of Fuel – Examine the supply of fuel and all shut-off cocks, strainers, traps and hose connections.
2. Under Priming or Over Priming – Refer to instructions on starting.
3. Incorrect Throttle Opening – Check to see that “throttle stop” does not prevent the throttle from closing.
4. Water in Carburetor – Remove strainer and plugs in accelerating well to drain water.
5. Cold Oil – Turn engine over by hand with ignition switches off, and if the engine seems too stiff, the oil should be heated before starting the engine.
6. Defective Magneto – Test spark delivered by magneto. See that the magneto breaker points are clean and have the right gap.
7. Dirty Spark Plugs – Remove plugs, clean and set gaps.
8. Defective Ignition Wire – Carefully examine ignition wire for cracks or breaks, and make sure that all the connections are correct.
9. Incorrect Valve Tappet Clearance – Check tappet clearance and adjust to recommended clearance, should it vary more than .003 inch from the amount specified.
10. Incorrect Ignition Timing – Check both magnetos for synchronization and timing.
11. Miscellaneous – Turn the engine over slowly by hand with the ignition switches off and note any unusual conditions, particularly compression.
Ken-Royce Engine Handbook 16
Low Oil Pressure When the recorded oil pressure does not come up to normal or when
no oil pressure shows when starting the engine, the trouble may be due to any of the following causes:
1. Cold Oil – The oil may be too cold to flow and it should, in this case, be heated.
2. Lack of Prime – If not due to cold oil, check the supply and any shut-off cocks to determine the reason for the pump failing to prime itself. Sometimes dry pump gears will be responsible for failure to prime, in which case disconnect the suction line and feed oil into it while turning the engine over by hand.
3. Leaking Oil Lines – Carefully examine the suction line and all connections for leaks, as the pump cannot suck sluggish oil if all the connections are not tight.
4. Clogged Screen – If the pressure is low or is slowly dropping for not other apparent reason, remove the pump or the pressure screen for cleaning, as it has probably become clogged with dirt. Motors equipped with finger screens (oil pressure lubricated engines) may be readily examined and cleaned if necessary.
5. Improper Relief Valve Setting – The oil pressure relief valve is correctly set when the engine leaves the factory and should not be changed unless considered necessary. Loosen the jam nut, and screw the adjuster in if it is desired to raise the pressure. With the engine idling, the pressure should register 20 to 40 pounds per square inch under normal conditions. Open the throttle to determine if the pressure is satisfactory at higher engine speeds. When the desired position of the adjuster is found, the jam nut should again be made tight.
6. Excessive Bearing Clearance – After all other means to increase the oil pressure have failed, it indicates that some bearings must be badly worn or loosened, or that something is seriously wrong and the engine should be removed from the airplane for overhaul.
Over-oiling If the engine appears to be receiving too much oil without a noticeable
drop in oil pressure, it may be due to failure of the scavenging pump to prime itself. The pump can be primed by disconnecting the outlet
Ken-Royce Engine Handbook 17
connections and oil fed into it by turning the engine backward by hand. Ordinarily the pump will prime itself after the engine has run a short while.
If too much oil appears through the exhaust or there is frequent fouling of spark plugs, it would normally be due to over oiling caused from excessive bearing clearances or too high an oil pressure. However, if this is not the case, it must be due to lack of seal on the piston rings or a broken ring, and the offending cylinder should be removed and the trouble determined.
Faulty Operation and Low Power Engine revolutions will vary under different atmospheric conditions
and quite often they can vary with the direction of the wind with respect to the position of the airplane. The operator should, therefore, take these matters into account for variations of up to 100 R.P.M. For a greater drop from normal speed it would be well to look into the causes. This may be traced to any of the following:
1. Spark Plugs – Note if all plugs are firing, and if not, they should be inspected to see that they are clean, have proper gaps, and are not burned.
2. Mixture – Make sure the mixture control lever is correctly positioned as too lean a mixture may cause faulty operation. If the airplane is equipped with primer valve it must be closed tightly as a leak will cause too rich a mixture.
3. Induction System Leaks – Examine all joints for leaks after it has been satisfactorily determined that there is not a leaking valve. To examine the latter, pull the propeller over by hand to feel the compression, and be sure the switches are off.
4. Fuel – Make sure the fuel used is not an inferior grade. This may be checked by adding benzoil or ethyl fluid and noting the degree of improvement. Refer to page 13 for fuel recommendations.
5. Magneto – Check the operation of the magneto and make sure the breaker points are clean and have the proper gap.
6. Valve and Valve Gear – Check the valve tappet clearance and inspect for sticking valves or troubles of any kind with the valve mechanism.

Ken-Royce Engine Handbook 18
7. Overheating Engine – If the engine overheats the power will drop. Overheating may be due to a lean mixture, air leaks in the induction system, bad plugs or poor fuel. This is indicated by a dropping off in R.P.M. after the engine is opened up to normal speed after idling. Do not run an engine continuously after this tendency has developed, as it may lead to serious difficulties. Investigate the trouble at once, taking into account the fact that it may also be due to excessive air temperature, poor cowling, thin oil, lack of oil cooling, or restricted exhaust manifold.
8. Icing Carburetor – The carburetor air heater must be carefully adjusted to prevent icing in carburetor venture. An icing carburetor produces a gradual loss in R.P.M. followed by sudden increase in R.P.M. as the ice dislodges itself.
Excessive Oil Temperature When the temperature of the oil registers higher than it should, an
investigation should be made as to the cause. After due allowance is made for atmospheric conditions, the trouble can be attributed to any of the following causes:
1. Insufficient Cooling: It may be found that there is not enough circulation of cooling air around the engine crankcase or the oil tank.
2. Oil Supply – If the supply of oil in the tank gets very low, the oil is consequently circulated through the engine at such a rate that it is not given an opportunity to become cooled.
3. Grade of Oil – An inferior grade of oil, or one which has lower properties than recommended, will possibly break down and show an excessive rise in temperature.
4. Lack of Circulation – Unless the scavenging pump picks the oil and returns it continuously to the tank, the temperature of the oil in the sump, where the thermometer is located, will show a gradual rise.
5. Bearings – If the oil temperature rise is not due to any of the foregoing causes, it may be an indication of an overheated bearing and it then requires the removal of the engine from the airplane for overhaul.

Ken-Royce Engine Handbook 19
Leaking Carburetor An engine should not be run if fuel leaks from the carburetor, because
of the fire hazard. Remove the carburetor at once and ascertain the cause, which may be any of the following:
1. Needle Valve Seat – Should it be found that the needle valve is not seating properly, look for dirt lodged on the seat; and if this is not found, tap the needle valve in position on its seat by means of a small hammer.
2. Stuck Float – This can sometimes be remedied by rapping lightly against the float chamber, but when the carburetor is removed, it is best to permanently correct the trouble if possible. Look for foreign particles, such as metal or loose jets, which can become lodged between the float and the float chamber. See if the float fulcrum pin permits the float to work freely. If the pin is worn, it should be replaced to permit correct float action.
3. Leaky Float – If gasoline is found inside the float when removed, it should be thoroughly drained and the holes soldered. Test the float for tightness by immersing it in hot water.
Routine Inspection It is difficult to lay down a definite set of instructions for routine
inspection on any engine. We have on hand many service reports extending over a number of years which includes data from engines operated under a variety of conditions. It is proposed to outline a schedule that will insure the maximum of reliability and service, if carefully observed, and the operator can only have himself to blame if any serious trouble arises due to lack of observing the instructions given. It will only take a few minutes to check over the various items, and in the long run the extended service obtained will more than compensate for these efforts.
Inspection before starting is outlined under Starting Preparations, page 9.
Inspection to be Made Each Flying Day 1. See that the spark plugs are tight.
2. See that terminals are secured to the wire and to the spark plug, and that there are no breaks in the insulation.
Ken-Royce Engine Handbook 20
3. Check the compression on all cylinders by swinging the propeller by hand with ignition switches off.
4. See that the tank contains sufficient fuel for the flight.
5. See that the oil tank is filled with the required amount of oil for best operation.
6. Make sure the magneto ground wires are secure.
7. See that the carburetor flange is tight and there are no leaks in the fuel lines; also check the air heater.
8. See that the throttle and mixture controls are free throughout their full range.
9. Check full throttle R.P.M.
10. Check oil pressure, oil temperature, and also the gasoline pressure when fuel pump is used.
11. Check operation of engine on each magneto.
20-Hour Check The following items constitute a 20-hour check as recommended by
Rearwin Aircraft & Engines, Inc., for 70 h.p. 5E, 90 h.p. 5F, and 120 h.p. 7F Ken-Royce (or LeBlond) Engines.
1. Check compression.
2. Check engine support nuts for tightness.
3. Drain the oil tank and refill with clean aero or first-grade automobile oil. (70 h.p. and 90 h.p. engines require 8 quarts, 120 h.p. engines require 12 quarts.)
4. Clean the fuel strainer and check fuel connections to engine.
5. Examine the condition of the magneto coupling discs.
6. Check magneto breaker gap (either Bendix or Scintilla) to .012” and see that the points are clean. If necessary to change timing, engine should be retimed as follows: Propeller keyway is on the same side of crankshaft as the crank. Line up keyway with the top (#1) cylinder on compression stroke. Then back propeller 30° and magneto points should break at
Ken-Royce Engine Handbook 21
that place. If points do not break, loosen nuts (3 on each magneto) on magneto disc and slip each magneto drive until they do break. Tighten one nut, check, and tighten other two nuts.
7. Lubricate the magneto according to the magneto manufacturer’s instructions. (2 drops every 50 hours.)
8. Lubricate all visible engine controls where there is friction in operation, and check for proper operation.
9. Check the tappet clearances with the engine cold and reset both the exhaust and intake clearance to .010 inches. Reset the tappets before removing the push rods from the rocker boxes.
10. Remove the valve push rods and cover tubes, check the straightness of the rods and the condition of the upper and lower ball ends and push rod sockets, keeping push rods in order so they are sure to be returned to the same position in the same rocker boxes. Lubricate the valve push rods by dipping both ends of the rod in Texaco Marfak No. 2 lubricant. Replace valve push rods and cover tubes.
11. After the reassembly of the valve push rods, etc., lubricate the rocker boxes as follows:
a. Use Texaco Marfak No. 2 grease in a Zerke or similar pressure grease gun and lubricate that part of the rocker box which has a pressure gun fitting with ten strokes of the Zerke gun after air has been cleared from the gun and grease is flowing.
b. Use Texaco Marfak No. 2 lubricant in any clean grease gun (pressure or non-pressure) and after removing the ¾ inch metal disc in the top front of each rocker box, fill with Marfak No. 2.
12. Inspect propeller for nicks, dents, loose tips and track. Check propeller hub nut for tightness and safety and the long hub bolts in the propeller for a tight drive fit in the propeller holes. Bolts should be soaped when driven.
13. Wash down motor and motor cowling thoroughly.

Ken-Royce Engine Handbook 22
14. Replace all engine parts, connections, and wiring that show evidence of wear.
20-Hour Check The following items will constitute a 20-hour check as recommended
by Rearwin Aircraft & Engines, Inc., for 90 h.p. 5G and 120 h.p. 7G Ken-Royce engines and for those 5F and 7F engines which have been converted to rocker box pressure oil lubrication system by the factory.
1. Check compression.
2. Check engine support nuts for tightness.
3. Drain the oil tank and refill with clean aero or first-grade automobile oil. (90 h.p. engines require 8 quarts) (120 h.p. engines require 12 quarts.)
4. Clean the fuel strainer and check all fuel connections to engine.
5. Examine the condition of the magneto coupling discs.
6. Check magneto breaker gap (either Bendix or Scintilla) to .012” and see that the points are clean. If necessary to change timing, engine should be retimed as follows: Propeller keyway is on the same side of crankshaft as the crank. Line up keyway with the top (#1) cylinder on compression stroke. Then back propeller 30° and magneto points should break at that place. If points do not break, loosen nuts (3 on each magneto) on magneto disc and slip each magneto drive until they do break. Tighten one nut, check, and tighten other two nuts.
7. Lubricate the magneto according to the magneto manufacturer’s instructions. (2 drops every 50 hours.)
8. Lubricate all visible engine controls where there is friction in operation, and check for proper operation.
9. Check the tappet clearances with the engine cold and reset both the exhaust and intake tappet clearances to .010” whenever necessary, which will probably be about every 100 hours.
10. Remove and clean oil “finger” screens in oil sump and oil pump connection each time oil is changed.
Ken-Royce Engine Handbook 23
11. On motors beginning with #1299, and on those earlier motors which have been converted to the rocker box pressure oil system by the factory, remove oil pump every 150 to 200 hours, disassemble, clean, inspect, and reassemble.
12. Inspect propeller for nicks, dents, loose tips and track. Check propeller hub nut for tightness and safety and the long hub bolts in the propeller for a tight drive fit in the propeller holes. Bolts should be soaped when driven.
13. Wash down motor and motor cowling thoroughly.
14. Replace all engine parts, connections and wiring that shows evidence of wear.
The following items are work which is addition to that included in a 20-hour check, and may be done if a more complete check is desired.
1. Wash out oil tank and lines.
2. Remove rocker boxes and examine valve mechanism, correcting any conditions of wear that may be observed.
3. Remove spark plugs, clean, reset the gap, and test under pressure. Necessary wrenches consist of: Either 1” 12 point socket for Champion plugs, or 11/16” 12 point socket for mica plugs, out from 3” length to 2-1/2” length.
4. Remove and recondition the oil pump, clean screens and replace. (After first 40 hours, thereafter each 100 hours operation on motors before #1299.)
5. Carburetor disassembly and inspection.
100-Hour Check The following items constitute a 100-hour check as recommended by
Rearwin Aircraft & Engines, Inc., for 70 h.p. 5E, 90 h.p. 5F and 120 h.p. 7F Ken-Royce, and also LeBlond engines. (Engines which have rocker box oil pressure lubrication omit #10 and #11.)
1. Check compression.
2. Check engine support nuts for tightness.

Ken-Royce Engine Handbook 24
3. Drain the oil tank and refill with clean aero or first-grade automobile oil. (70 h.p. and 90 h.p. engines require 8 quarts.) (120 h.p. engines require 12 quarts.)
4. Clean the fuel strainer and check all fuel connections to engine.
5. Examine the condition of the magneto coupling discs.
6. Check magneto breaker gap (either Bendix or Scintilla) to .012” and see that the points are clean. If necessary to change timing, engine should be retimed as follows: Propeller keyway is on the same side of crankshaft as the crank. Line up keyway with the top (#1) cylinder on compression stroke. Then back propeller 30° and magneto points should break at that place. If points do not break, loosen nuts (3 on each magneto) on magneto disc and slip each magneto drive until they do break. Tighten one nut, check, and tighten other two nuts.
7. Lubricate the magneto according to the magneto manufacturer’s instructions. (2 drops every 50 hours.)
8. Lubricate all visible engine controls where there is friction in operation, and check for proper operation.
9. Check the tappet clearances with the engine cold and reset both the exhaust and intake tappet clearances to .010 inches. Reset the tappets before removing the push rods from the rocker boxes.
10. Remove the valve push rods and cover tubes, check the straightness of the rods and the condition of the upper and lower ball ends and push rod sockets, keeping push rods in order so they are sure to be returned to the same position in the same rocker boxes. Lubricate the valve push rods by dipping both ends of the rod in Texaco Marfak No. 2 lubricant. Replace valve push rods and cover tubes.
11. After the reassembly of the valve push rods, etc., lubricate the rocker boxes as follows:
a. Use Texaco Marfak No. 2 grease in a Zerke or similar pressure grease gun and lubricate that part of the rocker box which has a pressure gun fitting with ten strokes of the

Ken-Royce Engine Handbook 25
Zerke gun after air has been cleared from the gun and the grease is flowing.
b. Use Texaco Marfak No. 2 lubricant in any clean grease gun (pressure or non-pressure) and after removing the ¾ inch metal disc in the top front of each rocker box, fill with Marfak No. 2.
12. Inspect propeller for nicks, dents, loose tips and track. Check propeller hub nut for tightness and safety and the long hub bolts in the propeller for a tight drive fit in the propeller holes. Bolts should be soaped when driven.
13. Wash down motor and motor cowling thoroughly.
14. Replace oil for the crankcase and all pars which may require additional oil.
15. Remove spark plugs, clean, reset the gap, and test under pressure.
16. Remove and recondition oil pump, clean screens and replace. (After first 40 hours, therefore each 100 hours operation on motors without oil pressure lubrication to rocker boxes.)
17. Carburetor disassembly and repair.
18. Check and set timing in accordance with all of Paragraph 6.
19. Replace all engine parts, connections, and fuel lines that show evidence of wear.
All exterior steel parts of Ken-Royce Aircraft Engines are treated for protection against rust and other corrosive actions. The interior parts, however, are not so treated, and if an engine which has been run is allowed to remain idle for any length of time, it is possible for rust to start from the condensation of crankcase vapor. It is, therefore, recommended that an engine be run for 15 or 30 minutes about every four or five days to flush all parts with fresh oil.
Overhaul: Whenever an engine shows signs of needing attention, it should be taken care of immediately, regardless of the amount of flying time. It may prove to be something that can be readily repaired, and will probably prevent unnecessary wear or damage to other parts. If there is a question as to the convenience of making the repairs while the engine
Ken-Royce Engine Handbook 26
is in the airplane, it is best to remove the engine to a suitable shop for overhaul.
If the compression is very weak on one or more cylinders, these cylinders should be removed and the valves re-seated if they are leaking. However, as it may be due to a piece of dirt or carbon under the valve seat, it is best to run the engine for a short period to see if the condition improves before being too hasty about removing a cylinder. If the loss in the compression is due to bad rings, new rings purchased from the factory or authorized service stations should be installed, and the engine run slowly for several hours to work them into a good seal. If these matters are given attention, the engine should then maintain its normal output.
No specified time limit is given for complete disassembling and overhaul. Although we believe that Ken-Royce engines can be safely operated for many hundreds of hours between complete overhauls if instructions are carefully observed, we have found the average engine overhaul to occur between 400 and 600 hours, although some owners report considerably more hours before an overhaul. The user may obtain greater satisfaction, and service his engine at less expense, if he doesn’t wait until an overhaul is obviously essential.
Wherever conditions are warranted, Ken-Royce Aircraft Engines should be sent to the factory for overhaul. The charges for this work are reasonable and obviously and entirely satisfactory job can be guaranteed. Unless the user has purchased a station tool kit and has suitable facilities for overhauling an engine, it will prove more satisfactory to have the engine attended to by the factory or a recognized Ken-Royce representative which in many instances may be the manufacturer of the airplane. However, for those who prefer to do their own service work, it is strongly urged that the instructions contained herein be closely followed. The engine manufacturer cannot be held responsible for any damage or trouble developed as a result of not observing these recommendations or for any work outside the factory.
General Description of Parts
Crankshaft The single throw crankshaft is drop forged in one piece from SAE
3240 steel. It is machine finished all over and counter-balanced by bronze weights. These weights are located and held by three screws which are permanently locked. The crankshaft for the 90 H.P. and 120 H.P. are identical, except counter-weights.
Ken-Royce Engine Handbook 27
The crankshaft is supported upon three ball bearings. The front bearing is assembled and locked endwise in the crankcase cover in such a manner as to take the propeller thrust in either direction. The engine may, therefore, be used equally as well whether installed as tractor or pusher. The inner race of each bearing is locked on the shaft by a nut and shoulders against a ring spacer at the rear bearing and an extension of the crank-cheek at the front end. The bearings are lubricated by splash.
For mounting the propeller hub, the crankshaft is provided with a tapered end in which there is a key. The cam drive shaft, which forms a part of the gear case assembly, pilots into the end of the rear journal and is driven by the lugs which fit into the slot at the end of the crankshaft. These lugs are off center so it is impossible to assemble either crankshaft or gear case, except in the correct position, once the valve timing is adjusted. Oil enters the crankshaft under pressure through the hollow cam drive shaft. It then flows to the hollow crank-pin by means of a hole drilled through the rear crank-cheek.
The crank-pin is provided with two holes for feeding oil to the connecting rod bearing. The one smaller hole near the end of the crank-pin is so located as to match each revolution with holes in the rod bearing that lead to the link rod wrist pins. All the oil being fed to the bearings must first pass through a special case aluminum oil plug which is regarded as one of the interesting features of the design. This plug is so arranged that any heavy particles of dirt in the oil, which are naturally thrown to the outside by centrifugal force, become permanently trapped and are thereby prevented from passing through the bearing. Undoubtedly, this is an important factor in the unusual long life of the connecting rod bearing. The oil plug is held in position by a cotter pin and it can be quickly remove at any time for cleaning.
Piston The piston is an aluminum alloy cast in permanent moulds and heat-
treated to give the desired hardness. It has a full skirt and three rings above the piston pin, the lower ring functioning as an oil scraper. The head of the piston is of ample thickness for cooling and is supplied as well with ribs underneath.
The piston pin is hollow, the outer surface being carburized and ground to exact dimensions. In each end is pressed a dur-aluminum plug to prevent the piston pin from scoring the cylinder walls.
Ken-Royce Engine Handbook 28
Connecting Rods Articulated type connecting rods of an extremely simple design are
employed. The rods are made from nickel chromium steel drop-forgings, being finished where necessary or for the special purpose of removing excess weight and preventing stress concentrations.
The master connecting rod and cap have a full bearing upon the crank-pin. The connecting rod bearing is a split shell type lined with a cadmium silver copper alloy. The shell is held in place by a pressed out lip that fits into a slot in the rod and cap. The cap is closely fitted to the master rod with a stepped joint and they are held together and doweled by four nickel steel bolts. These bolts also securely lock the wrist pins in place, thus eliminate numerous small parts that are so frequently used. The bolts have thin square heads which rest against shoulders to prevent turning and they are made tight by long hexagon nuts locked by cotters.
The link rods are interchangeable, and would otherwise be reversible if it were not for the necessity of placing the end which has the oil hole to the outside to permit splash lubrication of the bearing. The bronze bushings which are pressed into each end of the link rod and into the upper end of the master rod are alike.
The wrist pins are hollow and the ends are closed by Welch plugs that are permanently secured by corking in. The half-round slots in the wrist pins fit fairly close around the bolts, the undercut steps in the bolt being used in conjunction with drilled holes which line up with holes in the master rod and cap to supply oil under pressure to the interior of the hollow wrist pins. Midway on the wrist pin is a hole which leads oil to the link rod bushing. All wrist pins are interchangeable. The outer surface is carburized, and exact dimensions, together with a near-perfect finish, are obtained by grinding.
Crankcase The crankcase is a heat-treated aluminum alloy casting of high tensile
strength. It has a large opening in front through which the crankshaft and connecting rods may be inserted as an assembly. This opening also services as a pilot for the crankcase cover, the latter being held in place by fifteen studs. A similar opening with ten studs at the fear is the provision for attaching the gear case assembly, and the hollow dowel through which the oil passes to the scavenging pump serves as a locator.
The integral inlet manifold is a separately bored passage in the form of a ring with openings to receive the inlet pipes and one which connects to the carburetor through the crankcase oil sump. Hence, there are few

Ken-Royce Engine Handbook 29
joints which might possible develop leaks, and the oil is cooled by the incoming gasses.
The wall central with this inlet manifold ring provides a support for the rear crankshaft bearing. The ball bearing is supported direction on a steel sleeve which is pressed into the crankcase and held in place by three countersunk head screws permanently locked from turning.
Cast-iron bushings with holes ground to close limits are pressed into the crankcase to serve as guides for the cam followers. These cam followers are in the same transverse plane, this being made possible by the use of the single cam ring described later on.
The cam followers are made from an alloy steel and heat treated to give both hardness and toughness. The followers are drilled for lightness and receive at the outer ends a push rod ball socket which is pressed into place. A special lock screw serves to keep the follower from turning about its axis and prevents any possibility of its dropping out when the push rods are not in place. The inner end of the cam follower is drilled and ground to receive the ground pin which holds the cam follower roller in place, and the pin itself is held in place by two circlets.
On the lower side of the crankcase, the finished pad with its studs provides a means of attaching the oil sump. Excess oil drains into this sump from the crankcase both front and rear, and from there the oil is drawn through the hollow dowel, locating the oil sump, as it is being returned to the scavenging pump.
The pressure lubricated engine has an oil channel machines around the rear flange of the crankcase for conveying oil to the cam following assemblies. The cam follower bushings are especially machines to serve as a guide for the roller and the outer end for attaching hose to cover tubes. All cam follower bushings above a horizontal line have drilled passages connecting oil channel to cam follower. The cam followers are hollow and the push rod sockets are fitted so as to allow free movement exerted by pressure of spring inside cam follower. A metering jet is so located in cam follower to coincide with passage in cam follower bushing at timed intervals.
Grooves for returning oil are machines in outer surfaces of cam follower bushings. Drilled passages through crankcase return the oil to inside of the engine.
The oil sump has been improved. The passages inside the sump have been changed in order to force all returning oil to pass through one passage. A finger screen has been inserted at this point to strain all
Ken-Royce Engine Handbook 30
foreign particles from oil before entering oil pump on way to oil tank. This screen may be identified by a square brass plug at rear of sump and should be cleaned at each oil change.
Crankcase Cover Assembly The opening at the front of the crankcase is closed by a forged
duralumin cover which is heat-treated to obtain high tensile strength. This cover pilots into the crankcase and is held in place by fifteen studs.
The front crankshaft ball bearing is supported by the crankcase cover in a steel sleeve that is held in place by six studs and the thrust bearing cover. The studs are set in the crankcase cover and the steel sleeve and thrust bearing cover are threaded over them and clamped by six nuts. The thrust bearing is, therefore, held securely in place between the steel sleeve and thrust bearing cover on the outer ball race to locate the crankshaft endwise, and to carry the thrust load of the propeller. Between the bearing and the crankshaft nut is an oil thrower which, together with threads in the front of the thrust bearing cover, prevents oil seepage to the outside. The nut on the crankshaft which screws up against the inner race of the ball bearing is locked in place by the propeller hub key since it extends into one of the turning slots on the nut. The front crankshaft main bearing is supported by a steel sleeve in the crankcase cover and is free to move endwise in the sleeve to compensate for thermal expansion of the crankshaft.
On the front of the crankcase cover is a name plate and four studs which are to be used for attaching a support for the forward end of the cowling.
Cylinders The individual cylinders are of a composite construction, the barrels
being machined with integral upper and lower flanges together with cooling fins from steel forgings, and the heads, which are attached to the barrels with a special joint, are heat-treated aluminum “Y” alloy castings. The two are held together by twelve studs and need not be separated except for replacement of one or the other. There is no gasket between the two as the design is such that no leakage can occur when the joint is properly fitted. Each cylinder assembly is held to the crankcase by eight studs which pass through holes in the lower flange of the barrel. The inner end of the cylinder barrel extends into the crankcase a distance sufficient to prevent over-oiling of the lower cylinders.
The spherical shaped combustion chamber is finished machined after the aluminum-bronze rings for the valve seats are shrunk into place. The axes of the interchangeable valves are inclined at an angle of 30
Ken-Royce Engine Handbook 31
degrees to the cylinder axis, the valve seats being 45 degrees. Removable bronze guides are pressed into the cylinder. Interchangeable valve springs are of the volute ribbon type holding about 60 pounds at valve open position. Each valve is held by a split retainer seating with a taper in the valve spring collar, and a wire safety clip circles the valve stem below the collar to prevent the valve from dropping into the cylinder.
The cooling fins on the cylinder head are generously and efficiently arranged. This pompadour type, as it is commonly called, originated with LeBlond and has been adopted in several other designs. The outer surface of the barrel and head is covered with glossy black enamel, baked on after the two are jointed. This not only adds greatly to the appearance of the cylinder, but to the heat dissipating qualities as well. The cylinder bore is held to close limits and given an excellent finish by honing.
Concentric with the axis of each valve is a pad arranged to receive the interchangeable enclosed rocker boxes. This is an exclusive Ken-Royce feature, and the construction has a special advantage in permitting the end of the valve stem and the axis of the rocker arm to be held in correct relationship at all times by the proper selection of shims for the join between the two. The hollow rocker arm shaft is carried on ball bearings provided with special seals for retaining the lubricant. A fitting on one side provides means for lubricating both bearings. (Engines without rocker box pressure lubrication system). Between the enclosed rocker boxes and the cam follower bushings in the crankcase are telescopic tubes which fully enclose the push rods. The tubes are held in position by a spring which may be compressed whenever it is necessary to adjust the length of the push rod for proper tappet clearance. (Engines without rocker box pressure lubrication system).
Two spark plugs are provided at opposite positions, front and rear. The inlet and exhaust ports face the rear, thus making the arrangement simple for the attachment of an exhaust collector ring. Threaded sleeves are screwed into each port and protrude sufficiently to receive an annular packing nut. The inlet pipe need not be disturbed while removing the cylinder.
Propeller Hub The propeller hub is driven through a key on the tapered end of the
crankshaft. A special nut with holes for a turning bar draws the hub up tightly on the taper. At the outer end of the hub is a puller nut against which the back face of the flange on the propeller hub nut bears when removing the hub from the crankshaft. These two nuts are provided with means for locking against turning when the hub is once in place. The
Ken-Royce Engine Handbook 32
propeller hub flange pilots on the front of the hub and the propeller pilots on both hub and flange and is held between the two by six special bolts and nuts.
Gear Case The gear case is assembled as a unit before it is incorporated into the
final assembly of the engine. The case itself is an aluminum casting, having a round flange and pilot where it attaches to the crankcase. In the central wall are two bosses, each receiving bronze shoulder bushings pressed in from the ends. On top is a pad for supporting the magneto drive shaft housing, and in line with it at each side is a bracket for supporting a magneto. Below is a flange for attaching the oil pump, the cylindrical opening the case serving as the outer housing for the oil pump when the latter is in place. Below the left magneto bracket a pad is provided for a fuel pump take-off. Sufficient space is provided for assembly and adjustments by the opening at the rear.
The central boss supports the cam drive shaft. Oil enters the interiors of this shaft through a hole which is in line with the space between the ends of the bushings, and it passes directly through into the end of the crankshaft. It has already been explained that the end of the cam drive shaft pilots into the end of the crankshaft and the offset lugs engage with the slot as a means of drive. The cam is provided with a bronze bushing since it floats on the cam drive shaft. Oil is fed directly to the bushing through holes in the wall of the cam drive shaft. The cam ring operates all valves and when the gear case is in place these cams are in line with the cam follower rollers.
At the rear end of the cam drive shaft is a spiral gear driven through a key. The cam shaft collar which holds the gear up against the shoulder on the shaft is in turn held in place by a special washer and 3/8 in. S.A.E. cap screw. A special 3-jaw clutch can be provided for a starter.
An oil passage is drilled through the gear case directly in front of the oil pressure gauge fitting. This oil passage furnishes oil direct from oil pump to valve operating mechanism. (Engines with rocker box pressure lubrication system.)
This spiral gear drives at half engine speed another spiral gear which pilots on the hub of the cam timing flange. The latter is keyed to the idler shaft and driven by four special screws which set the valve timing through the selection of differential serious of holes in the two pieces. When the timing is set, the hub of this flange is clamped against a hardened washer which rests against a shoulder on the idler shaft and also takes the gear thrust on the flange of the bronze bushing in the gear

Ken-Royce Engine Handbook 33
case. The clamping is done by a special nut provided with a drive for a tachometer cable. At the opposite end of the idler shaft is a gear meshing with the gear which is an integral part of the cam. The idler shaft bushings are lubricated by a pressure line in communication with the annular space between the cam drive shaft bushings.
Above and at right angles to the cam drive shaft lies the magneto drive shaft. Central on this shaft is a gear driven by the spiral gear which is located at the rear end of the cam drive shaft. Shoulder bushings are slipped upon the magneto drive shaft from each end. They are located between the two halves of the housing and prevented from turning by dowels. These bushings are fed with oil under pressure, and at each end of the shaft is an oil thrower as well as threads in the housing to return the excess oil to the gear case.
A fuel pump pad has been added to the gear case for convenient installation of fuel pump in cases where needed. A case which covers the screen has a fitting to which a pipe may be attached to throw any fumes outside the cowling. The tachometer connection stud has been replaced with an oil seal assembly to prevent oil from passing up the tachometer drive cable.
Gear Case Cover The case aluminum cover which closes the opening at the rear of the
gear case is located by two dowels and held in place by eight studs. In addition to the three long studs in the gear case, three other studs are fixed in the cover to permit either the mounting of an electrical starter or the cover which closes the opening central with the crank axis.
In line with the idler shaft axis, a special stud is screwed and locked in the gear case cover to provide a means of attaching a standard tachometer connection. The breather, which is cast integral with the cover, has baffles to retain oil spray and a conical screen at the outside opening to keep out dirt.
Oil Pump The oil pump is built up of three main units: a lower body, and an
upper body and a plate. These parts are all aluminum castings. In the upper body are the pressure gears, the driver being integral with the oil pump shaft at whose upper end is mounted a spiral gear which meshes with the large half engine speed gear. The idler pressure gear is bronze and it turns about a bolt which is used to tie the pump together. Oil enters the pressure pump through an opening the plate and the lower pump body. As it leaves the pressure pump, the oil must pass through a cylindrical screen of fine mesh, which is held between the upper body

Ken-Royce Engine Handbook 34
and plate. Once through the screen, the oil can enter the drilled openings in the gear case which lead to the bearings or to the pressure relief valve.
Below the plate in the lower housing are the wider gears for scavenging. The driver is steel and it fits over a square on the drive shaft. The driven gear is bronze and it centers on the same tie bolt as the pressure given gear above. Oil enters the cylindrical opening the gear case surrounding the pump through hollow dowel which is used to locate the gear case. It must pass through a coarse mesh brass screen before entering the gears.
The pressure and scavenging oil connections for the lines to the outside oil tank are alike. A hollow stud draws the bronze connection up against the lower body, a copper asbestos gasket being used above and below. These connections may be turned in any convenient position for the oil lines.
Excess oil from the pressure pump passes through a relief valve and re-enters the inlet side of the gears. The desired oil pressure may be obtained by screwing in or out the adjuster located at the lower rear of the lower pump body. The adjuster guides the relief valve, the latter being hollow to serve as guide for the coil spring. The two oil connections, studs, the adjuster, as well as the two long screws, which help hold the three sections of the pump in a single unit, are all safetied by lock wires.
Pressure connection from the oil tank encloses a finger screen which should be cleaned each time the oil is changed. If external screens are cleaned each oil change, the oil pump will not need to be removed except about every 150 to 200 hour intervals. (On engine #1299 and all thereafter.)
Installation Instructions Unpacking Engine: Ken-Royce Aircraft Engines are shipped in
wooden boxes, being securely fastened to the bottom of the box so that no damage is liable to occur during shipment. Only in the cases of special metal supports need any parts be returned to the factory for credit.
At the time of removing the engine from the box, it should be washed externally with gasoline, using either a brush or a spray gun. When wiped off clean and dry again, the spark plugs and any coverings found over the exhaust ports, oil connections, etc., should be removed and the engine turned over at least a dozen times by hand to expel any excess oil
Ken-Royce Engine Handbook 35
that was left in the engine before shipping. The spark plugs should then be washed in gasoline and immediately put back into place in order to prevent any extraneous matter getting into the engine.
Whenever possible, lift the engine by means of its support. If a chain fall is available, the most convenient way to lift the engine is by a loop of rope slipped through the holes in the propeller hub nut after the later has been screwed well onto the crankshaft. In other cases, a loop of strong rope can be used about the skirts of at least three cylinders, but care should be taken not to let the rope rest against the inlet pipes or push rods. Whenever desirable, the engine can be rested propeller end down on the edge of a square wooden box which is deeper than the extension of the crankshaft and no larger than the crankcase.
Cowling: Since the success of an air-cooled engine installation depends to a considerable extent upon the type of cowling employed, it is urgently recommended that the aircraft builder give this matter more than passing attention. Rather than limit the scope of the airplane designer by suggesting designs, our engineers prefer to comment upon designs submitted. This service is free to users of Key-Royce Aircraft Engines; consequently, there are no reasons why advantage should not be taken of the experience available. Certain information regarding the airplane and its estimated performance should accompany the sketches so as to enable us to render an effective study.
No part of the cowling should be attached to the engine by means of either the cylinder or crankcase cover studs and nuts. Four studs are provided on the crankcase cover for the purpose of attaching a special spider which may be employed to support the front end of the cowling.
Lubrication System The oil tank should have at least two gallons capacity and should be
located in such a manner as to insure some air circulation around it during warm weather. It is best to locate the bottom of the tank just above the inlet to the pump although oil circulation may be maintained with the tank in a lower position, once the pump is primed.
The line to the pressure pump should be located near the bottom of the tank, and some sort of a trap or screen should be provided if possible to prevent particles of dirt or metal from reaching the pump. The scavenging or return line should prove more convenient to make the connection at the bottom. A standard ¼ in. pipe tap is provided in the gear case to attach a pipe for venting the oil tank into the engine. This will insure against loss of oil from the tank either in maneuvers or through expansion.
Ken-Royce Engine Handbook 36
Both pressure and scavenging oil lines should be 5/8-in. I.D., being attached to the connections on the pump through a flexible hose and clamps. At least one or more such flexible connections should be placed between the pump and tank at suitable positions if a metal pipe is used. Better still is an approved flexible pipe line which requires no joints and has even less possibility of breaking. This is something that demands careful attention, as a broken oil line is not only unpleasant but may prove to be extremely serious at times.
The pressure line to the gauge is ¼-in. O.D., a 1/8 pipe thread for a standard S.A.E. pipe connection being provided at the rear of the gear case. The gauge should be able to register pressures up to 120 pounds per square inch. The usual care should be exercised in eliminating the possibility of a broken line.
All oil connections should be made tight to prevent any possible leaks as the pump will otherwise not function properly. When the connections on the pump are placed in a desirable position and the oil pressure is found satisfactory, everything should be safetied by lock wires.
There is no necessity to install an oil cooler or radiator as the heat given to the oil by the engine is not excessive. The oil will cool itself in the engine and return line or in a tank of sufficient capacity if the required amount of air circulation is permitted. Every air-cooled engine should be equipped with an oil thermometer as this is the only simple means by which the engine temperature can be recorded in an airplane. Care should be used when installing the oil thermometer as it is usually a delicate instrument. The bulb of the thermometer is inserted into the oil line, and the tubing should be clipped or taped for support at several convenient points. The dial should have graduations from 60 to 212 degrees Fahrenheit. Prices and recommendations on these instruments will be furnished upon request.
Oil Recommendations for use in Ken-Royce Engines. We suggest using:
SAE 40 oil when the outside temperature is below 30°F. SAE 40 oil when the outside temperature is from 30°F to 100°F. SAE 60 oil when the outside temperature is above 100°F.
Rocker Box Lubrication On engines not equipped with pressure lubrication to the rocker
boxes, it is absolutely necessary that grease be introduced into rocker arm boxes through the small hole in the front, as serious difficulties will result from lack of this important grease operation. Enough grease

Ken-Royce Engine Handbook 37
should be injected to maintain a supply during the interval between applications, not to exceed 20 hours. Any suitable pressure gun, with a small piece of curved pipe attached for a nozzle may be used. Use a good rocker arm grease, Marfak #2, or a grease of similar grade. Insert nozzle through hole in valve spring washer, and complete fill valve spring. Install special disk in rocker box slot in order to prevent leakage of grease. The pressure lubrication operates direct from the oil pump. Do not use Marfak #2, or any other grease, on pressure lubricated engines.
Fuel System Provision is made on all current model Ken-Royce engines for driving
a fuel pump. Fuel tanks on gravity feed installations should be located not less than 18” above the point where the fuel line attaches to the carburetor in order to insure the required fuel head for gravity feed.
The fuel line may be a 3/8” O.D. tubing it is should be arranges so as to not invite a fatigue failure from vibration and to avoid air traps. Some approved type of gasoline strainer between the fuel tank and the carburetor may be employed to advantage, since too much care cannot be exercised in eliminating water and dirt. It is also recommended to flow the lines occasionally to prevent the accumulation of any foreign substances.
The capacity of the tanks should always be calculated from the guaranteed fuel consumption curve as a matter of safety. When fuel for more than the average length of flight is being considered, a reserve tank with hand pump near the pilot’s seat can often be arranged for refilling the main gravity tanks.
Tachometer The tachometer drive shaft turns in an anti-clockwise direction at half
engine speed, and the stud on the gear case cover receives a 7/8 inch, 18 thread S.A.E. standard tachometer fitting. Excessive force should not be used on the wrench when tightening or loosening the tachometer nut as it might either loosen the stud or shear the lock screw which holds the stud in position.
The tachometer shaft should not be installed with any abrupt bends as this will eventually lead to a broken shaft. If it is impossible to bring the shaft directly back to the instrument because of tanks or any other part of the airplane, then a right angle adapter should be employed. The adapter should have the correct ratio so that the instrument will read engine revolutions direct. Any other system is confusing and oftentimes leads to trouble.
Ken-Royce Engine Handbook 38
Ignition – Magneto Ken-Royce engines ordinarily employ two independent Scintilla or
Bendix magentos as standard ignition equipment. The magneto driveshaft runs in a clockwise direction as viewed from the right side of the airplane. Therefore, the left-hand magneto, which serves the front plugs, is a clockwise type and the right-hand magneto, which serves the rear plugs, is an anti-clockwise type. The magnetos are set to fire simultaneously 30 degrees in advance of top piston position. No spark control mechanism need therefore be used when starting either by swinging the propeller or by means of some approved type of starter.
Insulated ignition wire should be used in joining the ground connection on each magneto to points on the switch marked “R. Mag.” And “L. Mag.”, respectively. Another wire should connect the point on the switch marked “Gnd.” To the engine crankcase, care being used to clip the wires so that they will not chafe or burn.
When an electric starter is not used, it is often desirable to employ a booster magneto for starting. At least one magneto with booster terminal connection is furnished on Ken-Royce “120”. These magnetos have an extra terminal marked “H” to which is connected the high tension lead from the booster magneto, the body of which must be grounded to a point marked “Start” on the switch, but if used outside, both the ground wire and the high tension wire to terminal “H” on the running magneto should be easily removable just as soon as the engine starts.

Ken-Royce Engine Handbook 39
Overhaul and Service Instructions
Disassembly After the engine has been properly secured to the assembly or
overhaul stand, it should be thoroughly washed externally with gasoline or naptha, using either a brush or spray gun. Remove exhaust manifold or exhaust stacks if this has not already been done. Remove all baffles and loosen spark plugs, placing them on the bench or in a rack in such a manner that their location in the cylinders can be determined in case this information might later prove useful. Tip the assembly stand so that the propeller hub is at the top of the engine.
Compress the valve springs, when the engine is turned to a position near top center and the cam is not opening the valve, and remove each push rod and cover tube. Place the push rods in a rack with their respective locations identified so they may be returned to their original positions. The reason for this is quite obvious if one takes into account the fact that some ball ends may show slightly greater wear than others, and a better seat will naturally be found in the sockets in which those have previously been operated.
Remove cylinder base nuts and washers, along with intake pipe flange nuts and washers. Slowly lift or pull each cylinder directly out from the crank axis after the crankshaft is turned so that the piston is approximately at top center position. CAUTION – Always remove #1 cylinder last to prevent damage to remaining cylinders and pistons when master rod is free to turn. Place the cylinders upright on the inspection bench. The locations may be identified by marks stamped on the front of cylinder flange.
Remove the pistons immediately following the removal of the cylinders so that the pistons will not become damaged. Drive the piston pin out far enough to lift the piston from the rod. Use a fibre or wooden drift and exercise extreme care in order to prevent flattening the end of the piston pin plug. Should the pins be exceptionally tight, heat may be applied to the head of the piston within a reasonable degree. Push the pins back in place and set the pistons upright on the inspection bench.
The assembly stand may now be tipped to bring the gear case on top and the magnetos removed. The nuts and washers which hold it to the crankcase should be removed and the gear case lifted straight up, tapped with a soft hammer if necessary to relieve any tendency to stick in the pilot or on the dowel. It is recommended to pull all the cam followers out as far as possible before lifting off the gear case.

Ken-Royce Engine Handbook 40
Reverse the engine so that the crankshaft propeller end is up and remove the hub key. Remove nuts and washers that hold thrust bearing plate and lift off. Attach plates to cylinder pad to protect crankcase against damage, using pin in upper end of master rod in #1 cylinder and resting it tightly against the plate for unscrewing the thrust bearing nut. See that the tool is properly engaged in the slots of the nut and, if necessary, use a piece of gas pipe over the end of the wrench for greater leverage.
Remove the nuts and washers on the crankcase cover and attach the puller to the four studs after the propeller hub nut has been screwed in place. It is preferred to use an extra nut, which should be kept on hand especially for this purpose and for lifting the engine so that it will be unnecessary to disassemble the propeller hub. While backing off the nut for pulling the cover it may help to strike the end of the nut a few times with a soft hammer. Do not pry under the cover flange as this will mar or dent the join surfaces. After removing the gasket and bearing spacer, it is now time to remove the crankshaft and connecting rod assembly.
Rotate the crankshaft to get link rods of #2 and #5 (on 70 h.p. and 90 h.p. engines) or #2 and #7 cylinders (on 120 h.p. engines) along the side of the master rod in the opening for #1 cylinder. Arrange the link rods of remaining cylinders, toward the #1 cylinder opening. Turn the counter weights, on 5 cylinder engine only, toward top or #1 cylinder and by tipping upper end of crankshaft. Assembly can be lifted through opening in front of the crankcase. On 7 cylinder engines left #4 and #5 links remain in respective openings and turn counterweights down. Move assembly so as to extend master rod and #2 and #7 link rods out of #1 cylinder opening as far as possible. Work #4 and #5 links up past the front flange of crankcase opening by tipping end of crankshaft lift assembly out through opening. Force should not be used as a little effort will locate the exact position where assembly is free and prevent damage.
At this stage the wiring harness may be removed with distributor blocks attached. The engine is now disassembled in units and frequently it is not possible to determine the condition of a part quite as well in the unit assembly as when the unit is completely torn down.
The person in charge of this work may reduce the time and cost of overhauling an engine by tearing down only such units and need attention. Whenever a piece is galled or worn beyond limits, prescribed on the tolerance chart, it should be replaced, as further running would only lead to more trouble.
Ken-Royce Engine Handbook 41
Cylinder Remove the rocker boxes and arrange them in such a manner that
their position on the engine can be readily determined when it comes time for reassembly. For engines with pressure lubrication refer to page 55. Scrape the carbon deposits from the combustion chamber, using care not to mar or scratch the cylinder bore. Wash the cylinder thoroughly in gasoline and inspect carefully for any abnormal condition. Tap the ends of the valves to determine if they are free and seated properly. Lay the cylinder in a horizontal position on the bench and pour gasoline in the exhaust port, then look inside the cylinder and observe if the valve is leaking. If the gasoline runs through at a fairly rapid rate, the valve seat will undoubtedly have to be recut, as this usually indicates warpage. If only a sweating condition is observed, then it may be possible to seat the valve by the use of a small amount of grinding compound. The same procedure should be followed on the inlet valve, but if the inlet pipes are still attached, the cylinders will have to be turned upside down in order to pour gasoline into the ends of the pipes.
The cylinder should be slipped over a cylindrical wooden block whose upper end is approximately the shape of the combustion chamber before the operation of removing the valves is begun. Use tool to remove the valve spring washer retainers. Carefully inspect the springs, washers, and retainers for any abnormal condition. The wire clip which prevents the valve from dropping into the cylinder should be removed by pushing it off the end of the valve. If the ends are unduly opened it will probably be impossible to use the clip the second time, but regardless of the care used, it is recommended to install new clips each time a valve is removed and assembled.
Lift the cylinder from the block and reverse the position of each valve in its respective guide. An examination may not be conducted as to the condition of the valve, guide, and valve seat. If the valve stem is galled to the extent that it cannot be satisfactorily polished with crocus cloth, then the valve should be replaced. If the guide is badly scratched or worn to the extent that the clearance exceeds the amount specified, then it should be replace and the new one reamed with an expansion reamer to the desired size. Whenever guides are replaced, the work should precede recutting or regrinding valve seats, as the latter must be square with the hole in the guide. The cylinder should be flange mounted on the plate, for such operations as reaming valve guides, and recutting valve seats or grinding valves.
Use tool for recutting valve seats. The cutter should first be used, cutting no more than is necessary to clean up the valve seat. Use cutter to obtain the correct width of valve seat, referring to the sectional view of
Ken-Royce Engine Handbook 42
the cylinder for this information. Very often it is best to slightly grind in a valve after the seat has been recut to make sure of a good seat. In every case see that the valve is true and free from any hard or uneven spots before attempting to obtain a good seat in the cylinder. Clean and polish the valve stem before the valve is reseated. If it is warped or has hard and uneven spots on the seat, a new valve should be installed. Test the valves with gasoline for tightness again after the seats are recut or reground, or when installing a new valve.
Carefully inspect the rocker boxes for any abnormal condition. Determine if the bearings are in satisfactory condition, and inspect the rocker arm for any possible flaws or cracks. Inspect the tappet rollers, and if they are worn at any spot as much as .005 in., replacement should be made, as the roller will not junction properly and will remain in the same position.
Unless a noticeable leak occurs at the joint between the cylinder head and barrel, it is unnecessary and highly inadvisable to separate the two. In the event that a leak is discovered, it is best to return the cylinder to the factory for servicing because it is a matter of fitting the joint, which the average service station is not equipped to handle. Likewise, when a new cylinder head or new cylinder barrel must be installed it becomes necessary to hone the taper out of the cylinder caused by the clamping fit between cylinder head and barrel.
The cylinder bores should be measured with a suitable cylinder gauge for diameter, out of roundness, and taper. Should it be advisable to refinish the bore to obtain a straight round hole or to remove scoring, the cylinder should be returned to the factory where the bore can be honed to a standard oversize dimension. Cylinders, pistons, and rings are held to five standard oversize dimensions, namely, .005, .010, .015, .020, and .025, the marks for identification being placed on the front of the inlet valve cover flange of each cylinder and on the head of the piston as +5, +10, +15, +20, and +25 respectively.
Unless there is evidence of the need of repacking the inlet pipe nut, it is best not to disturb the join while the cylinder is off the engine. If the join is not disturbed, it is possible to replace the cylinder assembly without trouble with the pipe attached. In any event the inlet pipe nuts should be made tight just as soon as all the cylinder and inlet pipe flange stud nuts are tight. Use spanner wrench for the purpose.
The spark plugs should be taken apart and cleaned. Do not use emery cloth as emery is a good conductor of electricity. If B.G. plugs are used, the gaps should be set at .015 inches by tapping the outer

Ken-Royce Engine Handbook 43
electrode at the outside end with a center punch and hammer. The gaps on the Champion 13 plugs should be set at .019 inches. These plugs should be thoroughly washed in gasoline and cleaned with an air blast.
Crankshaft After removing the connecting rods, the crank-pin oil plug should be
removed by tapping at the rear and with a wooden or fibre drift. Both crankshaft and oil plug should be thoroughly washed in gasoline. Spin the ball bearing by hand, once it is clean, and determine if the balls and races are all in good condition. Also feel of the end play. If everything appears to be in good condition there is no need for removing the bearing.
However, if it is considered necessary to remove or replace the bearing, remove the lock wire by prying the locking end out of the hole by means of a screw driver, and then back off the nut. Clamp the crankshaft along the sides of the rear cheeks in a vise having soft metal shields. Remove the bearing. When replacing the bearing, first be sure that there are no rough spots on the crankshaft journals. The bearing should be started on the shaft squarely, and lightly tapped at various stations on the inner race until it is practically tight against the bearing spacer. It is not difficult to cramp the bearing if tapped too often at one spot, nor to injure the balls or races if this is done on the sides of the outer race.
The entire shaft should be closely examined for seams, cracks or flaws in the material. The crank-pin, journals, and the tapered end for the propeller hub should be polished to remove any scratches or rough spots. If there is the slightest indication that the crankshaft might not give continued good service, it should no longer be used. The crankshaft is the backbone of an engine and the best is none too good. A questionable crankshaft should be returned to the factory at once.
Under no circumstances remove the counterweights. Also do not remove the Welch plug which closes the forward end of the hole in the rear journal. Make sure that the oil holes are not plugged. Stone the surfaces of the driving slot at the rear if these faces are not smooth. Do not fail to lock the crank-pin plug with a cotter pin after the plug is again in place.
Connecting Rods After removing the cotter pins, the connecting rod bolt nuts can best
be loosened with a socket wrench. Slight tapping will usually break the joint between the master rod and cap, and then the bolts can be
Ken-Royce Engine Handbook 44
removed. Never try to remove the wrist pins or link rods until the rod assembly has been separated from the crankshaft.
Thoroughly wash each section by dousing it several times in a bucket of gasoline. Dry the parts with an air blast and first inspect the cadmium silver bearing. Examine the surface for cracks and for indications of the silver separating from the steel. Examine the joints and at points where a dark line can be seen between the silver and steel, the bond may be questioned. When pressing against the bearing at these points with the thumb nail, the absence of a good bond between the Babbitt and steel may be determined by deflection which is easily detected by oil oozing in and out from under the silver. If the silver is found to be cracked or not bonded, the master rod and shaft should be returned to the factory for bearing installation.
Remove the connecting rod bolts and the wrist pins. Carefully examine the bolts and wrist pins for any abnormal condition. The wrist pins should be washed in gasoline once more in order to insure the removal of any dirt which might have become deposited inside.
Examine the bronze bushings in both ends of the link rods and the upper end of the master rod for scratches, and also determine that the bushing has not become loose in the rod. Try each piston pin and wrist pin in its respective hole for hand push fit. If the pins are too loose, or the bushings appear to be badly scratched, it should be replaced. However, this is unlikely to happen during many hours of service.
Examine all of the rods for scratches or flaws. If one should be found, it should be polished out, as such a condition might eventually lead to a fatigue failure. Examine the fit between the rod and cap, and not if there has been any working between the surfaces. Make sure in assembly that the numbers on the master rod and cap as well as the wrist pin all appear on the front side.
Piston After the piston has been thoroughly washed in gasoline, scrape the
carbon off the top of the piston and off the lands between the rings, using great care not to put any deep scratches in the metal. Inspect the head of the piston and the pin bosses for cracks, and if one should be found the piston should no longer be used.
Remove any scratches on the thrust surfaces of the piston, and then polish to be sure the surfaces are as smooth as it is possible to make them without removing metal. Inspect the fit of the piston pin in the boss. This should be a light tapping or tight hand push fit. If the pin
Ken-Royce Engine Handbook 45
can be pushed in and out too freely by hand, a new pin or a new piston should be installed. Polish the pin with crocus cloth to insure a smooth surface. See that the buttons at the ends of the piston pins are polished evenly and have no become flattened during disassembly.
Carefully inspect the rings to see that none are broken, stuck in the groove, or have lost their tension. Use a feeler gauge to measure the clearance in the groove, and if greater than the maximum specified on the tolerance chart, new rings should be installed. Do not install rings purchased from anyone but an authorized Ken-Royce Service Station or from the factory. The manufacturers of an engine cannot be responsible for the results with equipment which they do not furnish. Slip the piston rings in the end of the cylinder to which they belong and measure the ring gaps with a feeler gauge. In every case where this exceeds the maximum permissible as shown on the tolerance charts, a new ring should be installed. See that the ring grooves are free from carbon, but extreme care should be exercised in scraping so as not to remove any metal.
Crankcase The crankcase should be examined for possible cracks or defects after
it has been thoroughly cleaned. Test all the studs for tightness and any that are slightly loose may be reset with white lead or better with a suitable mixture of litharge and glycerin. Replace any studs which are bent or have damaged threads.
The oil sump should be removed and carefully washed internally with gasoline. Use an air blast afterward as it is very important to eliminate any deposits of dirt before the engine is reassembled.
Examine the fit of the cam followers. If these can be pushed in and out freely by hand, there is little need for further disassembly. However, if one appears too loose or has previously been found to leak oil, it should be removed and examined. Inspect the follower for wear and scratches, and polish the follower unless it is considered necessary to make a replacement.
Determine if the bushing is worn, and if it should be replaced. Use care while removing the bushing so as not to damage the hole in the crankcase. The holes in these bushings are ground to close limits and if a new one is properly inserted it may not be necessary to ream the hole to obtain the desired fit for the cam follower. The small hole in the bushing should point to the rear so as to receive the cam follower lock screw. Examine the roller, and before replacing the cam follower, check the fit of the roller journals.
Ken-Royce Engine Handbook 46
Inspect rear bearing sleeve and if it is found to be loose or galled, replace after first preheating crankcase to 250° F.
Gear Case It is seldom that a complete tear down for inspection is necessary,
except after a long period of operation. The cam and all gears can be easily inspected in the assembly. It is essential to determine by feel the diametrical clearance on the cam and all shafts, as well as the end clearances with a feeler gauge, each time the gear assembly is removed after a period of operation. Should these determinations exceed the maximum recommended, then, of course, the gear case should be completely torn down and the worn parts replaced.
The oil pump, gear case cover, and magnetos should always be removed for an independent tear down or inspection. The first step in the disassembly of the gear case is to remove the magneto drive shaft cap. This can be lifted off the studs and the diametrical and end clearances measured.
The cam drive shaft should be removed first. Take out the cotter pin and remove the cap screw which holds the collar on the shaft. Using a fiber drift, drive the shaft out the front end. Then remove the timing gear which is now loose.
To remove the idler shaft, first take the cotter pin out of the nut and remove the latter. Remove the gear and flange as an assembly, take out the key and then the thrust washer, and the shaft can be pushed out the forward end.
All the parts should again be washed in gasoline and dried with an air blast before further inspection. Examine all the bearing surfaces, and stone and polish any rough spots on the shafts and on the cam. See that the bushings are all tight in the gear case, and replace any that have the slightest amount of looseness. Clean out all the oil passages, using gasoline, followed with an air blast. Determine if any studs have become loosened, bent, or have damaged threads, replacing them whenever necessary. If it is desired to replace all bushings, a much better job can be accomplished at the factory with the jig for line reaming the holes to exact center distances. There is no need to separate the gear and timing flange, but the screws will probably have to be removed at assembly in order to retime the valves.
Oil Pump The oil pump should be submerged in a bucket of gasoline and dried
with an air blast just as soon as it has been separated from the gear
Ken-Royce Engine Handbook 47
case. Always take the pump apart at every overhaul period of the engine, because it is essential to clean the screens as well as all parts of the pump.
Remove the wire locking the two screws, and the cotter pin locking the nut on the idler shaft; the pump will come apart. Wash all parts thoroughly and lay them out for inspection. Inspect the pump gears for wear on the teeth, and check the side and end clearance with a feeler gauge. Remove all scratches and polish the shafts wherever any rough spots are found.
The oil connections should be removed and thoroughly cleaned. Replace the copper gaskets if there is any question as to their tightness. The pressure relief valve and spring should also be removed and cleaned. Check the relief valve with reference to contract on its seat. The drive gear need not be removed unless worn or if there is too much end play.
When the oil pump is again assembled, care should be exercised in keeping everything clean and making sure that the pump can be turned freely before finally locking the screws on the nut on the idler shaft. See that the gears are well covered with clean oil, such as is used in service, before the pump assembly is finally put back into the gear case. Considerable care must be used in removing or replacing the pump so as not to damage the pump or oil sealing rings. Never use a hard hammer or pry on the pump flange.
Crankcase Cover It is not recommended to remove the bearings and sleeve in the
crankcase cover unless the bearings actually need replacement. Before this investigation, the bearings should be washed in gasoline and cleaned with an air blast, as any dirt remaining will possibly be somewhat deceiving as to the real condition. In the event that a new bearing is installed, make certain that the sleeves in the cover are not loose or galled. Should the sleeves need replacing, the cover assembly should be returned to the factory as these sleeves are installed in perfect alignment by use of a special lining jig. Also the three dowels in the thrust bearing sleeve are very exact as to location.
The cover forging should be carefully examined for flaws or cracks. Do not drop the cover or treat it in any manner that may spring it out of shape.
Gearcase Cover The breather screen should be removed and washed in gasoline
independently. After the cover is clean it should be given the usual

Ken-Royce Engine Handbook 48
inspection. Do not remove the stud for tachometer unless it is necessary to replace the oil seal. A cap is provided over breather screen to which a pipe may be attached to remove fumes from inside of cowling.
Propeller Hub There is seldom need to remove the propeller hub from the propeller
unless a new propeller is to be installed. The work of inspection can be carried out about as well with the hub in place, so it is not recommended to remove it for this purpose. The usual inspection to be conducted before starting the engine for the first time and after every twenty hours should be in order. In addition, examine the condition of the surface in the tapered hole. If there is any indication of galling, the rough spots should be removed and the hub lapped into the tapered end of the crankshaft. This will insure sufficient surface contact to check further galling during continued operations.
When installing or removing the puller nut which screws into the front end of the propeller hub, use spanner wrench. Always clean the threads well with a wire brush before screwing this nut in place, as grit, or the sediment that is sometimes left after rust proofing, may prevent the flange in the nut from being screwed down to the hub as intended. Do not force the nut too hard if it has a tendency to stick, as this may damage the threads. Do not use a hammer and punch on the lugs of the puller nut because there is danger of breaking them. The propeller hub nut should always be assembled first and left in the hub assembly unless needed for some other purpose.
It is recommended to set the hub in the propeller so that the keyway does not line up with the blades. The propeller should be located perpendicular to the crankshaft throw. For reference purposes, note that crankshaft keyway is in line with crankshaft throw. The propeller should be perpendicular to this. This puts the propeller blades out of line with the crankshaft counterweights and may make for a smoother running engine. See that the bolts are a snug fit in the propeller and that the holes are square with the front and rear face. The propeller hub nuts should be drawn up evenly to avoid distortion. The propeller should be balanced on the hub, using the mandrel and the tips of the blades should track within 1/16 inch.
Push Rods Each push rod should be given a careful examination at every
overhaul period. These parts are necessarily of light weight, therefore extra care should be exercised in handling them so as not to cause any damage.

Ken-Royce Engine Handbook 49
Examine the ball ends for wear, and if found to be worn excessively, they should immediately be replaced. Observe if the wear is even, because uneven wear may indicate eccentric threads, either on the threaded ball end or in the push rod adjusting sleeve. Wear may be the result of the material being too soft, but it is generally caused by lack of lubrication. Lubricate by dipping both ends in heavy grease Marfak #2.
Roll the push rods on a small surface plate to determine if they are straight. Never use a bent push rod and always obtain a new push rod assembly from an authorized Ken-Royce Service Station when making substitutions. It is not satisfactory to attempt repairs in the field; moreover the manufacturers cannot guarantee satisfactory engine operation with make-shift or handmade substitutes.
Both the plan ball end and the adjusting sleeve have a press fit in the sleeves, and they should no longer be used if found to have become loosened. A ball end should be carefully polished if it has any rough or uneven spots. Do not attempt this work with a file.
Assembly Instructions If an engine is to function successfully after an overhaul, the
inspection and assembly must be carried out thoroughly and completely. There is no detail of such minor importance that is may be neglected. It should be constantly kept in mind that neglecting to do the work right may result in engine failure and the possible loss of life.
There are a few general rules to follow at all times. Never leave an engine uncovered in the assembly or overhaul shop, except when work is being done on it. There is always a certain quantity of dust and lint in the atmosphere which adheres to the oil parts. This causes wear and can clog the oil lines and oil screens. Do not permit nuts, washers, lock wires, cotter pins or similar small parts to be dropped inside during assembly. Serious damage might result if such parts, dropped through accident, are not recovered immediately before they are forgotten. All parts should be carefully washed before assembly, and do not use waste or dusty or tattered rags.
If steel parts are left in a partly assembled condition for several days, they should be smeared with oil to prevent rust. In assembly, all parts should be covered with regular engine oil for the same reason, and moreover, when the engine is started up for the first time, it may turn over several times before the oil pump starts to circulate the oil.
Never use wire or cotter pins the second time if they have become bent. Every step in the process of assembly should be completed before
Ken-Royce Engine Handbook 50
leaving it, and never back off a nut which has been made tight and leave it before it is made tight again. If a notch in a nut does not line up with the cotter pin hole, use another nut that will line up instead of slackening the one first tried.
Do not use gaskets that are torn, or have become dried and warped. If there seems to be any question of the joint being oil tight, a soft soap can sometimes be used to good advantage.
The engine numbers appears only on the name plate. If more than one engine is being overhauled at a time, it is suggested that further removable means of marking be used on other parts to avoid getting them mixed. The cylinder numbers are stamped on the crankcase in front by the cylinder pads, on the cylinders in front on the flange and on the head of the piston on the forward side. The master rod is, of course, for cylinder number one and the numbers of the wrist pins and their respective positions are to appear on the side facing the front or propeller end of the engine. The number of each link rod is stamped on the boss for the piston pin. The piston pin numbers are stamped on the plugs at the end, which should face the front.
It is recommended that each unit assembly be completed before starting the final assembly of the engine. Considerable time and inconvenience can be saved if this procedure is followed.
Final Assembly The crankcase assembly should first be secured to its supporting
members on the assembly stand. The stand should be placed in a position where the front opening of the crankcase is on top. The crankshaft and connecting rod assembly may be inserted by reversing the operations for disassembly – use care while inserting this assembly so as not to scratch or damage the finished surfaces of the crankcase. The crankshaft may rest vertically with the rear cheek supported upon the boss for the rear bearing retainer.
Attach the crankcase cover assembly. The name plate should appear in line with cylinder number one. Tap on the cover with a soft hammer to drive it in place once it is lined up, and see that the pilot enters the hole in crankcase without any trouble before the cover is forced too far. If no substitution of parts which might affect the endwise location of the crankshaft has been made, then the crankshaft should locate correctly as originally assembled at the factory when the thrust bearing nut is drawn up tight. If a slot in the nut does not line up centrally with the propeller hub keyway, it may be necessary to remove the nut and squarely grind a small amount off the end. Never force the key into place
Ken-Royce Engine Handbook 51
against the slots of the nut, or back the nut off and leave it slightly loose to make it line up with the keyway. See that the crankshaft may be rotated freely. To determine if the shaft is correctly located endwise, measure from the ends of the piston pin bosses on the rod to the edge of the cylinder opening in the crankcase on each side with a pair of calipers.
This distance should not very more than 1/32 inch. To tighten nut, use a wrench and have pin in the piston pin hole of the master rod and resting against the plate. It is more satisfactory to finally tighten the nuts which hold the crankcase cover assembly to the crankcase after the thrust bearing nut is made tight. Be sure to use a plain washer under the lockwasher for each nut. Then remove plates.
The stand should be turned through 180 degrees so that the rear opening is on top. The gear case assembly can now be attached, but before doing so see that all cam followers are pushed to the outside as far as possible. If one of the rollers should come in line with a lobe on the cam when attaching the gear case assembly, it might become damaged or a cam follower bent while the gear case assembled is being forced in place. See that the gear case is lined up with the dowel and pilot, and also turn the cam drive shaft so the lugs will end the slot in the end of the crankshaft. If the later does not line up perfectly, a slight rotation of the gear case assembly will usually permit ready engagement. Do not use a defective gasket under the gear case, and tighten all nuts with a plain and lock washer underneath them before proceeding any further.
The pistons can now be attached in their respective positions, and in each case the numbers must appear at the front. Use plenty of regular engine oil on the piston pins when pushing or tapping them in place. The numbers on the pins must also appear in front. Arrange rings so that the ring gaps do not fall in line. Be sure everything is clean and apply a generous amount of engine oil over the piston, spreading it evenly over the surface by hand. Apply the ring clamp before attaching the cylinders.
Turn the crankshaft so that the piston is clear of the crankcase and push the cylinder over the piston. This operation should be done slowly, using care not to break or jam a piston ring. Remove the ring clamp just as soon as all rings have entered the cylinder. There can be no spark plugs in place when attaching the cylinders, but due to the possibility of dirt getting into cylinder, it is urged that ventilated dummy plugs be used until the engine is finally ready to start. These dummy plugs can be quickly and cheaply made by soldering a screen or wire gauze over the ends of some shells taken from worn out or defective spark plugs. Use

Ken-Royce Engine Handbook 52
tool for turning the crankshaft while placing the pistons in proper position for attaching the cylinders. When the crankshaft is being turned, see that the rods or pistons are not allowed to strike against the crankcase.
The cylinder nuts are most conveniently tightened with wrench SE-1, and for the nuts on the inlet pipe flange use wrench SE-2. The packing nut at the inlet port should be tightened with spanner wrench SE-5. Do not use cylinder gaskets that are torn or otherwise defective.
If it is desired to check the compression ratio, the cylinders should be temporarily attached with the front spark plug at the top, which means rotating the cylinder about is axis to the next stud. Only two nuts are necessary to hold the cylinder while measuring the compression. Mix a sufficient quantity of engine oil with kerosene of equal parts.
Rotate the crankshaft until the piston is at top center and insert the rear spark plug. From a graduated glass of 250 CC capacity, pour the mixture into the combustion chamber slowly through the front spark plug opening until the oil reaches the bottom of the threads. Record the difference between the oil remaining in the glass and the amount at the start. Make due allowances for the capillary action of the oil on the walls of the glass. Take these readings on all cylinders, draining the oil in a pan after each reading by removing the rear plug. If any measurement varies appreciably from the rest, the operations on that particularly cylinder should be repeated for check. However, before doing so, the oil remaining in the combustion chamber from the previous operation should be fully expelled with an air blast, otherwise there would be an error in the second measurement.
The following shows the corresponding compression ratio at various readings as obtained above.
Compression Ratio
90 H.P. and 120 H.P. Ken-Royce Engines
164........................ 6.31 165........................ 6.28 166........................ 6.25 167........................ 6.22 168........................ 6.19 169........................ 6.16 170........................ 6.13 171........................ 6.09 172........................ 6.07
Ken-Royce Engine Handbook 53
173........................ 6.04 174........................ 6.01 175........................ 6.98 176........................ 5.95 177........................ 5.93 178........................ 5.90 179........................ 5.87 180........................ 5.84 181........................ 5.82 182........................ 5.79 183........................ 5.76 184........................ 5.74
The change of 1 CC in combustion chamber volume is obtained with a difference in cylinder gasket thickness of .0034 inch. Increase the gasket thickness to lower the compression ratio or lower it to increase the ratio. It is desired to obtain readings which do not vary more than 2 CC on the cylinders of one engine, but is not essential to change the gaskets unless this variation exceeds 4 CC. Naturally the lesser variation should result in smoother operation.
If the gear case assembly has not been torn down, the valve timing will remain as before and there will be no need for retiming or checking the same. All that remains is to make sure the four lock screws engaging with the idler gear and timing flange are safetied with lock wire.
However, if the gear case has been torn down, it will be necessary to set the position of the cam to give proper valve timing. In this case, the nut which also contains the drive for the tachometer should be backed off slightly and the four lock screws removed. The push rods should be put in place and the tappets on No. 1 cylinder set at hot tappet clearance.
The cam should be moved to place one lobe in line with cylinder No. 1, and this is most conveniently done by leaving at least one lock screw in place and turning the crankshaft until the exhaust valve is just closing and the inlet valve just opening. When the central point is found, remove the lock screw and see that the timing flange does not move while turning the crankshaft until the pointer falls at top center or zero position on the protractor, which has been attached to the four studs in the crankcase cover. It should be possible to engage one of the screws, but if not, the crankshaft can be moved sufficiently to permit it.
Ken-Royce Engine Handbook 54
At this stage the valve timing should be checked on No. 1 cylinder. Turn the crankshaft so as to slip a feeler gauge set at hot tappet clearance under the tappet. Now turn the crankshaft very slowly or tap it around to the point where the feller becomes snug or free, depending on whether it is the opening or closing position of the valve. At each point read the protractor. If there seems to be too great a variation between inlet and exhaust timing, it will probably be due to a difference in tappet clearance setting, as both work on the same cam. If the whole timing varies from the proper angular position of the crankshaft, the procedure should be repeated with a slight better relationship between crankshaft and cam. When the best position is found, the four lock screws should be made tight and each pair locked together with wire. The nut should be tightened and locked with the proper cotter pin.
It is only necessary to check the timing on No. 1 cylinder, although it may be checked, if desired, on all cylinders in a similar manner. Moreover, all cams may be checked by obtaining as many progressive readings as there are lobes on the cam ring if it is desired to obtain this information, but it is really unnecessary as the variation between the lobes on any one cam is negligible. All the tappets should now be set to the desired cold clearance, and for every tappet setting operation, the crankshaft should be turned to a position that there can be no possibility of the roller riding on any part of a lobe of the cam.
Make sure the jam nut is tight after setting each target. It is best to check the clearance afterward as it is possible to change this slightly when tightening the jam nut.
The remaining work on the gear case may now be completed. This includes attaching the oil pump if this was not already done in building up the gear assembly. The magnetos may be mounted on their supporting flanges and fastened with screws which are safeties with lock wire. Turn the armature shaft until the timing marks on the large gear correspond with those on the inside of the front end plate. Loosen the magneto couplings and turn the crankshaft to a point 30 degrees before top center position of No. 1 piston. Set one nut in each coupling and back the crankshaft until the magneto breakers can receive a slip of paper of approximately .001″ thickness. Move the crankshaft slowly or tap it around until these slips of paper are released as a second party stands at the rear pulling slightly on both at the same time. Read the protractor at each release and adjust the position of the magnetos to synchronize with each other, and break at not more than one degree from the desired position. Recheck the timing after each adjustment. All the nuts on the coupling should be carefully tightened at once, as the
Ken-Royce Engine Handbook 55
setting would be destroyed if the crankshaft were turned with these nuts loose.
The gear case cover may now be attached, and also the starter cover flange if the engine is not, or is not to be equipped with a starter. The wiring manifold may be attached next, and each distributor block slipped into position. Replace all wires that appear defective or have been cut or damaged to the extent of developing trouble later on. Attach the wires leading to the cylinders by the clips provided, and fasten the terminals after a new or clean set of spark plugs are installed.
With the oil sump in place, this leaves only the carburetor to be attached before the engine is ready to be given a check run either on a stand provided for this purpose or in the airplane after installation.
An overhauled engine should be run slowly at partial throttle for at least two hours before it is ever brought up to normal operating speeds. In the case where new piston rings or new bearings have to be broken in, this running period at partial throttle should be extended to three hours or more. The speed should be around 1000 R.P.M. at the start, and increased about 200 R.P.M. every 20 to 40 minutes, depending upon conditions and how rapidly the engine appears to be improving in operation. Do not rush an engine through this running in period as the greatest damage can be done at this time.
The propeller used for absorbing the engine power should provide sufficient cooling blast under any climatic condition. Suitable propellers for running in engines can be procured from the engine manufacturer. It is recommended that these propellers be used since the ordinary flying propeller does not give sufficient blast over the cylinders to cool them properly for full throttle running before it is used in flight.
Description and Service Instructions for Rocker Box Pressure Lubrication System on Models 5G and 7G
Rearwin Aircraft & Engines, Inc. have completed the most practical change in the Ken-Royce engines since the origin of the LeBlond Engine. This change is known as “full oil pressure lubrication” to the valve operating mechanism. After a long period of experimentation and expense, Rearwin Aircraft & Engines, Inc., have designed a highly successful mechanism which does away with the use of a heavy grease and periodical greasing by hand of the rocker boxes. It also eliminates leakage of grease from the rocker boxes which detracts from the appearances of both engine and airplane after a short period of operation. Moreover, the oil pressure lubrication system eliminates the fire hazard, and lowers by a great margin periodical service expense.
Ken-Royce Engine Handbook 56
The basic structure of the reliable Ken-Royce has not been altered. An already adequate oiling system has merely been perfected to distribute a portion of the oil to the valve operating mechanism. This has been accomplished by opening a passage from the main oil line at the oil pump through the gear case, into a distribution channel on the rear flange of the crankcase. This oil distributing channel connects the camfollower and bushing replaces the one formerly used in the grease lubricated engines, and the camfollower bushing has an extension on the outer end for attaching the cover tube hose. The inner end is machined with guide slots to receive the camfollower roller and act as a guide for the roller. A drilled passage coincides with the passage from the oil distributing channel and is so located that pressure is supplied to the camfollower while in the act of operating the valve pushrod. An oil return groove is cut in the outer end of the bushing and is opened through the crankcase to permit return oil to re-enter crankcase.
The camfollower is hollow to near the roller end, and is fitted with a push rod socket using a light spring to keep socket and push rod in contact when valve is closed. It is essential that this socket be free in camfollower so that the spring will hold the two in contact and will not lose oil pressure at either end of the push rod. A drilled passage allows oil to be sprayed on rocker arm roller and end of the valve stem. The rocker box is designed to permit the rocker arm, with bearings in place, to slide between the two ears and when the rocker arm shaft is inserted with nut and drawn tight, the bearing cones are held stationary by a clamping action. All camfollower guides, push rods, and rocker arm bearings are interchangeable. Rocker arms and rocker boxes are not interchangeable, being exhaust and intake. This position may be determined by the location of the push rod cone connection on the rocker box. The adjusting socket on the rocker arm has an inclination toward the camfollower when in correct position. Camfollower and camfollower guides have the passages drilled straight through to prevent error in installation. The camfollower roller remains the same, but the roller shaft is shorter so that it will pass inside of camfollower guide which holds it in position.
Oil enters the cam follower through a jet at a specific point and the quantity is sufficient for each valve operating mechanism. As the timing of this jet permits oil pressure to enter only when the valve is completely open, the pressure is continuous up through the push rod, then through the rocker arm to bearings and rocker arm roller. Excess oil collects in the rocker box and flows back through push rod cover tube to cam follower guide into crankcase. The push rods are cadmium plated and have similar ball ends and are not adjustable. Adjustment is
Ken-Royce Engine Handbook 57
accomplished by the adjustable socket in the end of the rocker arm. A lock nut secures the adjustable socket after adjustment.
The rocker arm contains two ball bearings which are pressed into it. Each bearing has an oil retainer and when assembled the retainers should be on the outside. A spacer separates the two bearings allowing oil passage. The rocker box will still use shims as before to take care of proper location when installing new valves or cutting of the valve seats. The rocker box is of two piece construction, the cap being removable and held in place by four studs. The cap has extensions which may be used for the installation of cowling. Instructions for mounting of cowling are gladly furnished by our engineering department.
Adjustment of valve is made by removing the cap which permits access to both ends of rocker arms. At no time should adjusting socket be screwed in or out so far as to permit the oil passage, machined around the adjusting socket, to leak oil.
Valve springs on the pressure lubrication engines have more tension than on the old type engines; namely 70 and 75 pounds when compressed to 39/32 of an inch. Particular attention should be paid to the valve springs as this tension is important.
Push rod cover tubes are one piece shell tubing, cadmium plated and interchangeable. Special oil resisting hose is used at both ends of push rod cover tube. Clamps should be tightened sufficiently to prevent any oil leak.
This oil pressure system is adaptable to any 5F or 7F engine through the factory. The price on conversion to oil pressure lubrication may be had on application to the factory, giving model and serial number of the engine.

Ken-Royce Engine Handbook 58
Clearance Chart 5DF, 7DF, 5F, 5G, 7F, 7G
Cylinder MIN. DESIRED MAX. Valve stem (Intake) in guide............................................... .002 .002 .003 Standard Valve stem (Exhaust) in guide ............................ .004 .004 .005 Valve seat width ................................................................ 1/8″ 5/32″ 3/16″ Valve spring load when compressed to 29/32.................... 70 – 75 lbs. Valve guide in cylinder ...................................................... .001T .001T .002T Valve guide clearance for exhaust austenitic valves ........... .005 .005 .006 Rocker Box Bearings in box ................................................................. .0008T .0003T .0007 Arm on shaft ..................................................................... .0005T .0005 .001 Bearings on shaft .............................................................. .0002T .000 .0007 Rocker box location on cylinder Select correct number and thickness of shims to locate rocker box joint face 7/8″ below end of valve stem. Piston Top Land 5DF 7DF............... .0235 .026 .0285 5F 7F ................. .0395 .042 .0445 2nd Land 5DF 7DF............... .0195 .022 .0245 5F 7F ................. .0335 .036 .0385 3rd Land 5DF 7DF............... .0155 .018 .0205 5F 7F ................. .0255 .028 .0305 Top skirt ........................................................................... .014 .016 .018 Bottom skirt ...................................................................... .009 .011 .013 Piston pin in piston ........................................................... .0000 .0002 .0005 Piston pin in all rods ......................................................... .001 .001 .002 Rings Side clearance in groove Top Compression Ring...................................... .004 .004 .0055 2nd Compression Ring....................................... .003 .003 .0045 Oil Ring............................................................ .002 .002 .0035 Gap Top Compression Ring...................................... .012 .015 .025 2nd Compression Ring....................................... .012 .015 .025 Oil Ring............................................................ .012 .015 .025

Ken-Royce Engine Handbook 59
Rod and Shaft Assembly MIN. DESIRED MAX. Master rod on crankpin Diametrical Clearance ...................................... .002 .002 .003 End Clearance.................................................. .003 .006 .009 Wrist pin master rod ......................................................... .0002T .000 .0002 Link Rod Clearance on wrist pin...................................... .001 .001 .002 End clearance .................................................. .001 .005 .007 Clearance between piston bosses...................... 1/16 Bearing shell in master rod .............................. .000 .0003T .0006T Crankcase Cam follower in guide........................................................ .0005 .0005 .001 Cam follower guide in case ................................................ .0015T .0015T .002T Rear bearing sleeve in case................................................ .002T .003T .004T Rear crank bearing in sleeve.............................................. .0005T .000 .001 Crankcase Cover Front bearing sleeve ......................................... .004T .005T .006T Thrust bearing sleeve ....................................... .004T .005T .006T Thrust bearing (5F – 7F) Pinch in sleeve by thrust bearing cover............. .002 .004 .006 Thrust bearing (5DF – 7DF). Bearing to be pinched in cover by the bearing sleeve. With sleeve in place and pulled down tight with screws, clearance should exist between cover and the bosses under screws. Gear Case Cam drive shaft in case Diametrical clearance....................................... .001 .001 .002 End clearance .................................................. .007 .009 .011 Cam drive idler shaft Diametrical clearance....................................... .001 .001 .002 End clearance .................................................. .007 .009 .011 Cam on cam drive shaft Diametrical clearance....................................... .001 .001 .002 End clearance .................................................. .003 .005 .007 Oil Pump Drive shaft in body ........................................... .001 .001 .002 Gears End clearance .................................................. .003 .004 .006 Diametrical clearance....................................... .0015 .002 .0025 Tappet Clearance For timing valves .050 for 7F and 7DF .035 for 5F and 5DF For running (Cold) .010 Ignition Advance 30° BTC
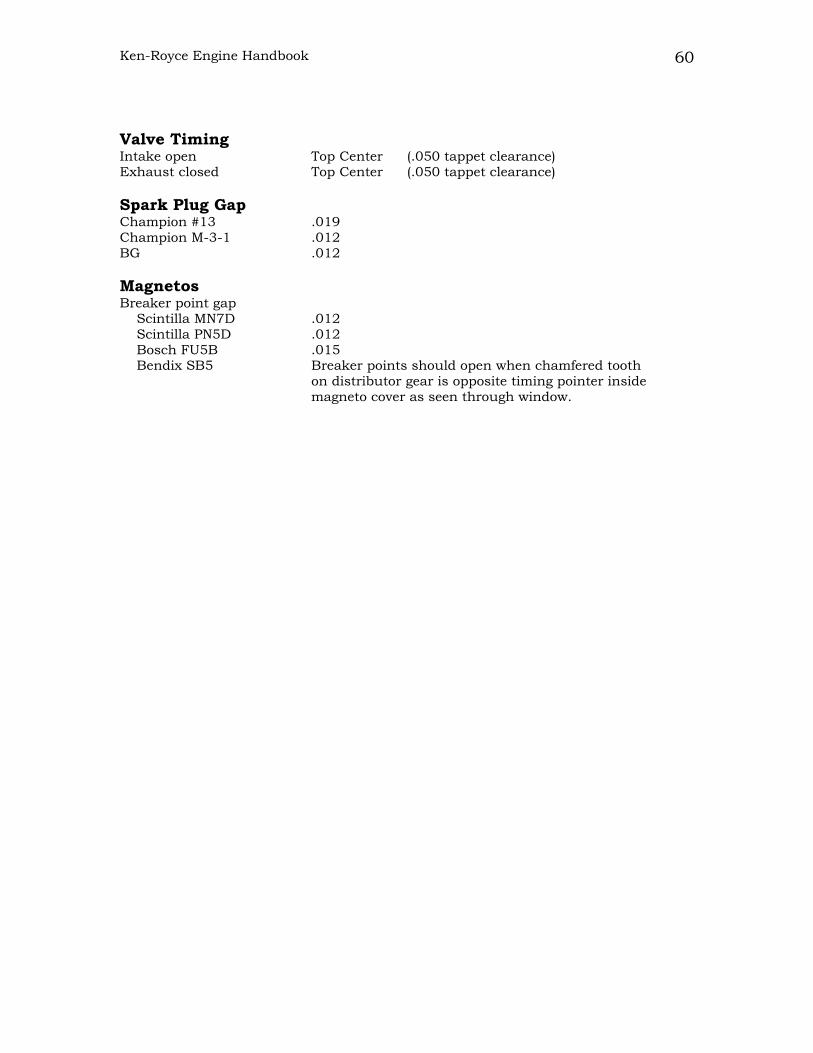
Ken-Royce Engine Handbook 60
Valve Timing Intake open Top Center (.050 tappet clearance) Exhaust closed Top Center (.050 tappet clearance) Spark Plug Gap Champion #13 .019 Champion M-3-1 .012 BG .012 Magnetos Breaker point gap Scintilla MN7D .012 Scintilla PN5D .012 Bosch FU5B .015 Bendix SB5 Breaker points should open when chamfered tooth on distributor gear is opposite timing pointer inside magneto cover as seen through window.

Ken-Royce Engine Handbook 61
Clearance Chart 5DE 5E
Cylinder MIN. DESIRED MAX. Valve stem (Intake) in guide............................................... .002 .002 .003 Valve stem (Exhaust) in guide ........................................... .004 .004 .005 Valve seat width ................................................................ 1/8″ 5/32″ 3/16″ Valve spring load when compressed to 29/32.................... 70 – 75 lbs. Valve guide in cylinder ...................................................... .001T .001T .002T Rocker Box Bearings in box ................................................................. .0008T .0003T .0007 Arm on shaft ..................................................................... .0005T .0005 .001 Bearings on shaft .............................................................. .0002T .000 .0007 Rocker box location on cylinder Select correct number and thickness of shims to locate rocker box joint face 7/8″ below end of valve stem. Piston Top land in cylinder .......................................................... .0275 .030 .0325 2nd land in cylinder............................................................ .0225 .025 .0275 3rd land in cylinder ............................................................ .0175 .020 .0225 Top skirt ........................................................................... .017 .019 .021 Bottom skirt ...................................................................... .010 .012 .014 Piston pin in piston ........................................................... .0000 .000 .0003 Piston pin in all rods ......................................................... .001 .001 .002 Rings Side clearance in groove Top Compression Ring...................................... .002 .003 .004 2nd Compression Ring....................................... .002 .002 .003 Oil Ring............................................................ .002 .002 .003 Gap Top Compression Ring...................................... .012 .015 .025 2nd Compression Ring....................................... .012 .015 .025 Oil Ring............................................................ .012 .015 .025 Rod and Shaft Assembly Master rod on crankpin Diametrical Clearance ...................................... .002 .002 .003 End Clearance.................................................. .003 .006 .009 Wrist pin master rod ......................................................... .0002T .000 .0002 Link Rod Clearance on wrist pin...................................... .001 .001 .002 End clearance .................................................. .001 .005 .007 Clearance between piston bosses...................... 1/16 Bearing shell in master rod .............................. .000 .0003T .0006T
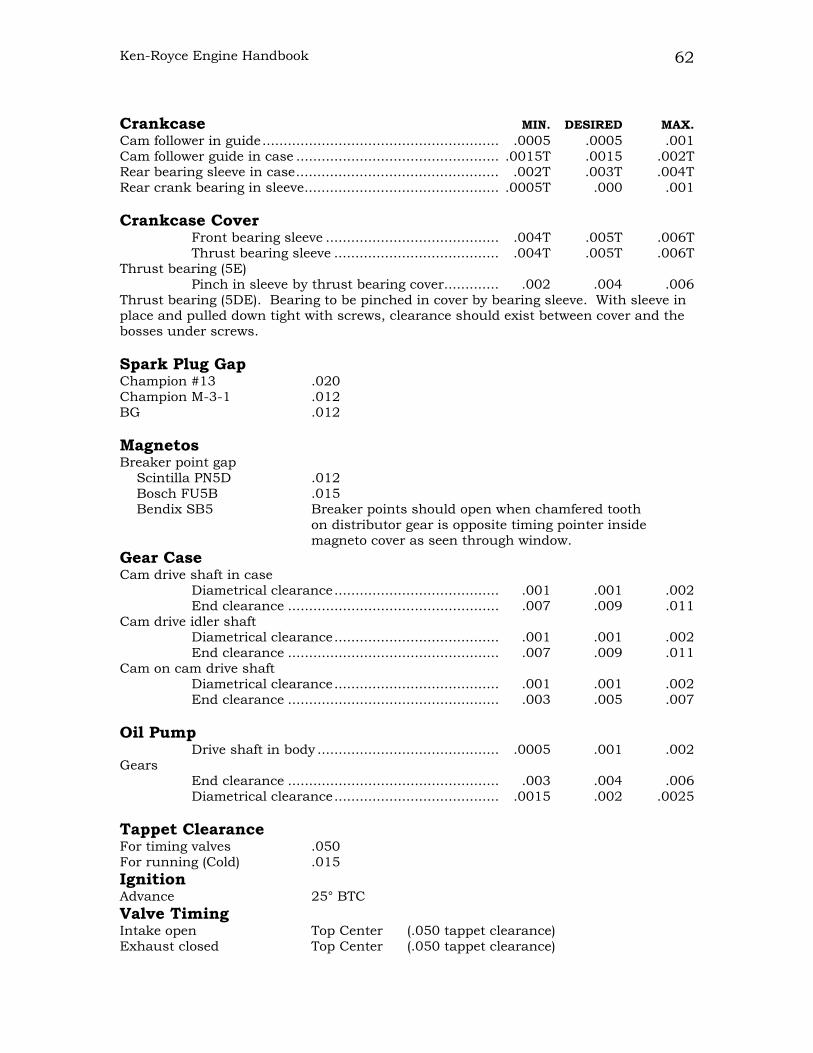
Ken-Royce Engine Handbook 62
Crankcase MIN. DESIRED MAX. Cam follower in guide........................................................ .0005 .0005 .001 Cam follower guide in case ................................................ .0015T .0015 .002T Rear bearing sleeve in case................................................ .002T .003T .004T Rear crank bearing in sleeve.............................................. .0005T .000 .001 Crankcase Cover Front bearing sleeve ......................................... .004T .005T .006T Thrust bearing sleeve ....................................... .004T .005T .006T Thrust bearing (5E) Pinch in sleeve by thrust bearing cover............. .002 .004 .006 Thrust bearing (5DE). Bearing to be pinched in cover by bearing sleeve. With sleeve in place and pulled down tight with screws, clearance should exist between cover and the bosses under screws. Spark Plug Gap Champion #13 .020 Champion M-3-1 .012 BG .012 Magnetos Breaker point gap Scintilla PN5D .012 Bosch FU5B .015 Bendix SB5 Breaker points should open when chamfered tooth on distributor gear is opposite timing pointer inside magneto cover as seen through window. Gear Case Cam drive shaft in case Diametrical clearance....................................... .001 .001 .002 End clearance .................................................. .007 .009 .011 Cam drive idler shaft Diametrical clearance....................................... .001 .001 .002 End clearance .................................................. .007 .009 .011 Cam on cam drive shaft Diametrical clearance....................................... .001 .001 .002 End clearance .................................................. .003 .005 .007 Oil Pump Drive shaft in body ........................................... .0005 .001 .002 Gears End clearance .................................................. .003 .004 .006 Diametrical clearance....................................... .0015 .002 .0025 Tappet Clearance For timing valves .050 For running (Cold) .015 Ignition Advance 25° BTC Valve Timing Intake open Top Center (.050 tappet clearance) Exhaust closed Top Center (.050 tappet clearance)

Ken-Royce Engine Handbook 63
Engine Cross Section Illustrations