Embed Size (px)
Citation preview

K8A
C-H
Dig
ital Heater E
lemen
t Bu
rno
ut D
etector
User’s M
anu
alN
159-E1-02
N159-E1-02Cat. No.
K8AC-HDigital Heater Element Burnout Detector
User’s Manual
Authorized Distributor:
In the interest of product improvement, specifications are subject to change without notice.
Cat. No. N159-E1-02
© OMRON Corporation 2013-2016 All Rights Reserved.
OMRON Corporation Industrial Automation Company
OMRON ELECTRONICS LLCOne Commerce Drive Schaumburg,IL 60173-5302 U.S.A.Tel: (1) 847-843-7900/Fax: (1) 847-843-7787
Regional HeadquartersOMRON EUROPE B.V.Wegalaan 67-69-2132 JD HoofddorpThe NetherlandsTel: (31)2356-81-300/Fax: (31)2356-81-388
Contact: www.ia.omron.comTokyo, JAPAN
OMRON ASIA PACIFIC PTE. LTD.No. 438A Alexandra Road # 05-05/08 (Lobby 2), Alexandra Technopark, Singapore 119967Tel: (65) 6835-3011/Fax: (65) 6835-2711
OMRON (CHINA) CO., LTD.Room 2211, Bank of China Tower, 200 Yin Cheng Zhong Road, PuDong New Area, Shanghai, 200120, ChinaTel: (86) 21-5037-2222/Fax: (86) 21-5037-2200

I
OMRON products are manufactured for use according to proper procedures by a qualified operator
and only for the purposes described in this manual.
This manual describes the functions, performance, and application methods needed for optimum
use of the K8AC-H.
Please observe the following items when using the K8AC-H.
• This product is designed for use by qualified personnel with a knowledge of electrical systems.
• Read this manual carefully and make sure you understand it well to ensure that you are using the
K8AC-H correctly.
• Keep this manual in a safe location so that it is available for reference when required.
Preface

Read and understand this catalog.Please read and understand this catalog before purchasing the products. Please consult your OMRON representative
if you have any questions or comments.
Warranties.(a) Exclusive Warranty. Omron's exclusive warranty is that the Products will be free from defects in materials and
workmanship for a period of twelve months from the date of sale by Omron (or such other period expressed in
writing by Omron). Omron disclaims all other warranties, express or implied.
(b) Limitations. OMRON MAKES NO WARRANTY OR REPRESENTATION, EXPRESS OR IMPLIED, ABOUT NON-
INFRINGEMENT, MERCHANTABILITY OR FITNESS FOR A PARTICULAR PURPOSE OF THE PRODUCTS.
BUYER ACKNOWLEDGES THAT IT ALONE HAS DETERMINED THAT THE PRODUCTS WILL SUITABLY
MEET THE REQUIREMENTS OF THEIR INTENDED USE.
Omron further disclaims all warranties and responsibility of any type for claims or expenses based on infringement by
the Products or otherwise of any intellectual property right. (c) Buyer Remedy. Omron's sole obligation hereunder shall
be, at Omron's election, to (i) replace (in the form originally shipped with Buyer responsible for labor charges for
removal or replacement thereof) the non-complying Product, (ii) repair the non-complying Product, or (iii) repay or
credit Buyer an amount equal to the purchase price of the non-complying Product; provided that in no event shall
Omron be responsible for warranty, repair, indemnity or any other claims or expenses regarding the Products unless
Omron's analysis confirms that the Products were properly handled, stored, installed and maintained and not subject
to contamination, abuse, misuse or inappropriate modification. Return of any Products by Buyer must be approved in
writing by Omron before shipment. Omron Companies shall not be liable for the suitability or unsuitability or the results
from the use of Products in combination with any electrical or electronic components, circuits, system assemblies or
any other materials or substances or environments. Any advice, recommendations or information given orally or in
writing, are not to be construed as an amendment or addition to the above warranty.
See http://www.omron.com/global/ or contact your Omron representative for published information.
Limitation on Liability; Etc.OMRON COMPANIES SHALL NOT BE LIABLE FOR SPECIAL, INDIRECT, INCIDENTAL, OR CONSEQUENTIAL
DAMAGES, LOSS OF PROFITS OR PRODUCTION OR COMMERCIAL LOSS IN ANY WAY CONNECTED WITH
THE PRODUCTS, WHETHER SUCH CLAIM IS BASED IN CONTRACT, WARRANTY, NEGLIGENCE OR STRICT
LIABILITY.
Further, in no event shall liability of Omron Companies exceed the individual price of the Product on which liability is
asserted.
Suitability of Use.Omron Companies shall not be responsible for conformity with any standards, codes or regulations which apply to the
combination of the Product in the Buyer's application or use of the Product. At Buyer's request, Omron will provide
applicable third party certification documents identifying ratings and limitations of use which apply to the Product. This
information by itself is not sufficient for a complete determination of the suitability of the Product in combination with the
end product, machine, system, or other application or use. Buyer shall be solely responsible for determining
appropriateness of the particular Product with respect to Buyer's application, product or system. Buyer shall take
application responsibility in all cases.
NEVER USE THE PRODUCT FOR AN APPLICATION INVOLVING SERIOUS RISK TO LIFE OR PROPERTY
WITHOUT ENSURING THAT THE SYSTEM AS A WHOLE HAS BEEN DESIGNED TO ADDRESS THE RISKS, AND
THAT THE OMRON PRODUCT(S) IS PROPERLY RATED AND INSTALLED FOR THE INTENDED USE WITHIN
THE OVERALL EQUIPMENT OR SYSTEM.
Terms and Conditions Agreement
II

Programmable Products.Omron Companies shall not be responsible for the user's programming of a programmable Product, or any
consequence thereof.
Performance Data.Data presented in Omron Company websites, catalogs and other materials is provided as a guide for the user in
determining suitability and does not constitute a warranty. It may represent the result of Omron's test conditions, and
the user must correlate it to actual application requirements. Actual performance is subject to the Omron's Warranty
and Limitations of Liability.
Change in Specifications.Product specifications and accessories may be changed at any time based on improvements and other reasons. It is
our practice to change part numbers when published ratings or features are changed, or when significant construction
changes are made. However, some specifications of the Product may be changed without any notice. When in doubt,
special part numbers may be assigned to fix or establish key specifications for your application. Please consult with
your Omron's representative at any time to confirm actual specifications of purchased Product.
Errors and Omissions.Information presented by Omron Companies has been checked and is believed to be accurate; however, no
responsibility is assumed for clerical, typographical or proofreading errors or omissions.
III
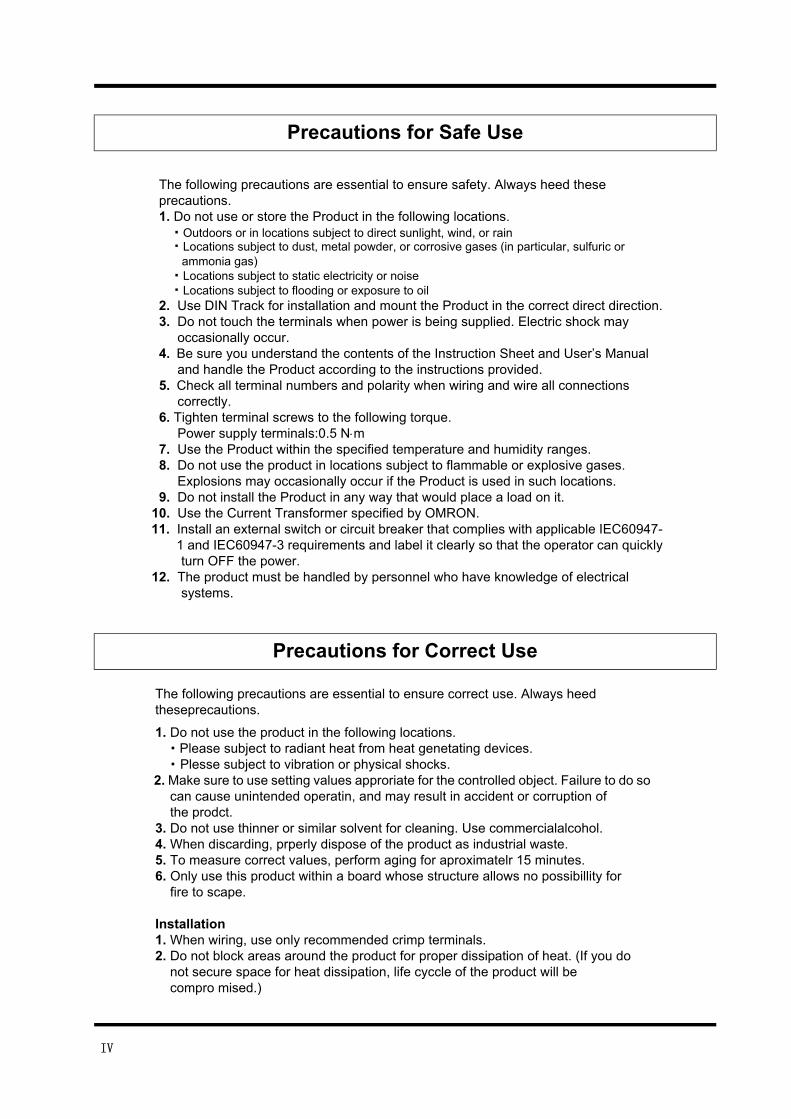
Precautions for Safe Use
Precautions for Correct Use
The following precautions are essential to ensure safety. Always heed these precautions. 1. Do not use or store the Product in the following locations. ・ Outdoors or in locations subject to direct sunlight, wind, or rain ・ Locations subject to dust, metal powder, or corrosive gases (in particular, sulfuric or ammonia gas) ・ Locations subject to static electricity or noise ・ Locations subject to flooding or exposure to oil 2. Use DIN Track for installation and mount the Product in the correct direct direction. 3. Do not touch the terminals when power is being supplied. Electric shock may occasionally occur. 4. Be sure you understand the contents of the Instruction Sheet and User’s Manual and handle the Product according to the instructions provided. 5. Check all terminal numbers and polarity when wiring and wire all connections correctly. 6. Tighten terminal screws to the following torque. Power supply terminals:0.5 Nm 7. Use the Product within the specified temperature and humidity ranges. 8. Do not use the product in locations subject to flammable or explosive gases. Explosions may occasionally occur if the Product is used in such locations. 9. Do not install the Product in any way that would place a load on it. 10. Use the Current Transformer specified by OMRON. 11. Install an external switch or circuit breaker that complies with applicable IEC60947- 1 and IEC60947-3 requirements and label it clearly so that the operator can quickly turn OFF the power. 12. The product must be handled by personnel who have knowledge of electrical systems.
The following precautions are essential to ensure correct use. Always heed theseprecautions.
1. Do not use the product in the following locations. ・ Please subject to radiant heat from heat genetating devices. ・ Plesse subject to vibration or physical shocks. 2. Make sure to use setting values approriate for the controlled object. Failure to do so can cause unintended operatin, and may result in accident or corruption of the prodct. 3. Do not use thinner or similar solvent for cleaning. Use commercialalcohol. 4. When discarding, prperly dispose of the product as industrial waste. 5. To measure correct values, perform aging for aproximatelr 15 minutes. 6. Only use this product within a board whose structure allows no possibillity for fire to scape.
Installation 1. When wiring, use only recommended crimp terminals. 2. Do not block areas around the product for proper dissipation of heat. (If you do not secure space for heat dissipation, life cyccle of the product will be compro mised.)
IV

Noise Countermeasures1. Do not install the product near devices generating strong high frequency waves or surges.2. When using a noise filter, check the voltage and current and install it as close to the product as possible.3. In order to prevent inductive noise, wire the lines connected to the product separa tely from power lines callying high voltges or currents. Do not wire in parallel with or currents. Do not wire in parallel with or on the same cable as power lines. Other measures for reducing noise incude running lines along separate ducts and sing shield lines.
V

Setting Date Notation
The letters of the alphabet in settings data are displayed as shown below.
a b c d e f g h i j k l m
A B C D E F G H I J K L M
n o p q r s t u v w x y z
N O P Q R S T U V W X Y Z
VI
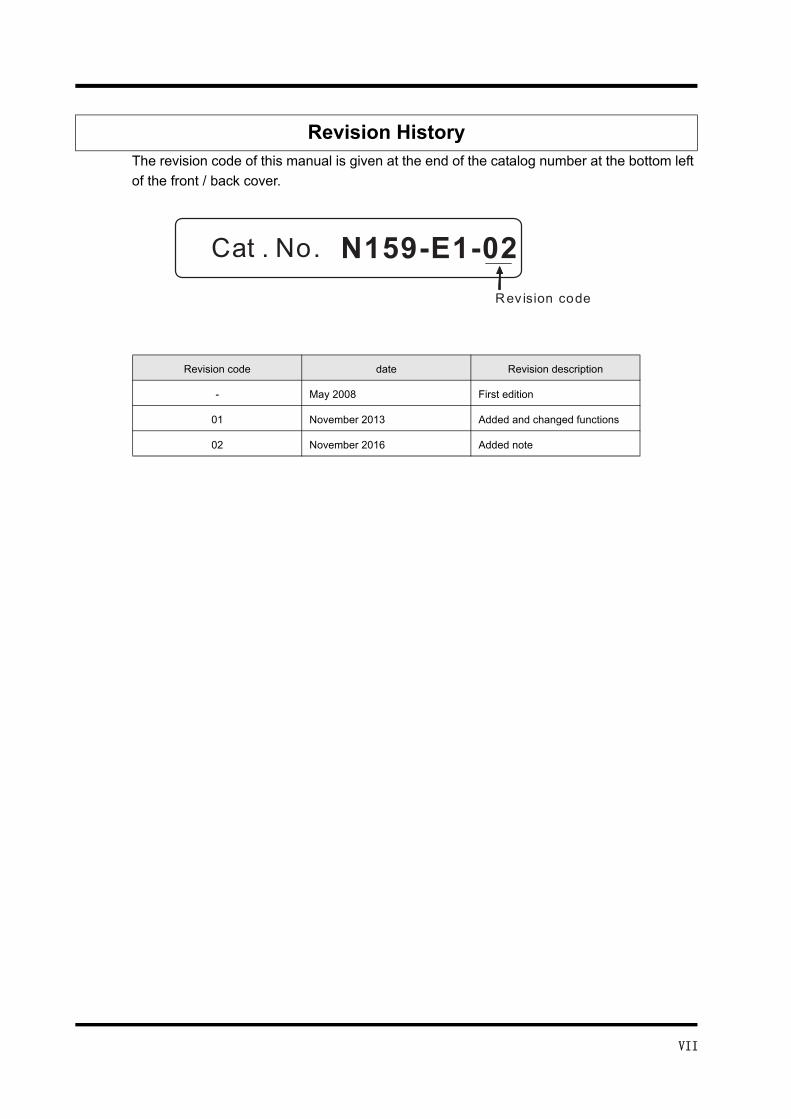
The revision code of this manual is given at the end of the catalog number at the bottom left
of the front / back cover.
Revision History
Revision code date Revision description
- May 2008 First edition
01 November 2013 Added and changed functions
02 November 2016 Added note
Rev ision code
N159-E1-02Cat . No.
VII
The structure of the manuals related to the K8AC-H is as follows. Please use them for your refer-
ence.
■ K8AC-H
■ PLC-related (CJ2 Series)
Related Manuals
Man.No. Model Manual Name Use Description
N159-E1 (this Manual)
K8AC-H21_ _K8AC-H22_ _K8AC-H23_ _
User's Manual for K8AC-H Digital Heater Element Burnout Detector
Useful for information on the basic specifications such as overview/design/mounting/maintenance of the K8AC-H
The following details about K8AC-H are described.• Outline/features• Design of system con-
figuration• Mounting/wiring• Setting of serial commu-
nications• Troubleshooting
Man.No. Model Manual Name Use Description
SBCA-349 CJ2H-CPU_ _-EIP User’s Manual - Hardware – for CJ2 Series
Useful for information on the basic specifications such as overview/design/mounting/maintenance of CJ2 Series
The following details about the PLC unit of CJ2 Series are described.• Outline/features• Design of system configuration• Mounting/wiring• I/O memory allocation• TroubleshootingUse in conjunction with the User’s Manual - Soft-ware - (SBCA-350).
SBCA-350 CJ2H-CPU_ _-EIP User’s Manual - Software- for CJ2 Series
Useful for information on the functions of CJ2 Series
The following details about the PLC unit of CJ2 Series are described.• Programming• Task function• File memory function• Various functionsUse in conjunction with the User’s Manual - Hard-ware - (SBCA-349).
SBCA-351 CJ2H-CPU_ _-EIPCS1G/H-CPU_ _HCS1G/H-CPU_ _-V1CS1D-CPU_ _HCS1D-CPU_ _SCJ1G/H-CPU_ _HCJ1M-CPU_ _CJ1G-CPU_ _
Command Refer-ence Manual for CJ2 Series/CS/CJ SeriesCS/CJ
Useful for information about instruc-tion words
The details about instruc-tion words are described. Use in programming in conjunction with the fol-lowing User’s Manuals.• CJ2 SeriesUser’s Manual - Hard-ware - (SBCA-349), User’s Manual - Software - (SBCA-350)• CS Series
User’s Manual - Setup - (SBCA-301), User’s Man-ual - Programming - (SBCA-313)• CJ SeriesUser’s Manual - Setup - (SBCA-312), User’s Man-ual - Programming - (SBCA-313)
VIII

■ PLC-related CS/CJ Series)
Man.No. Model Manual Name Use Description
SBCA-301 CS1G/H-CPU_ _HCS1G/H-CPU_ _-V1CS1D-CPU_ _HCS1D-CPU_ _S
User’s Manual - Setup - for CS Series
Useful for information on the basic specifications such as overview/design/mounting/maintenance of CS Series
The following details about the PLC unit of CS Series are described.• Outline/features• Design of system configu-
ration• Mounting/wiring• I/O memory allocation• TroubleshootingUse in conjunction with the User’s Manual - Program-ming - (SBCA-313).
SBCA-312 CJ1G/H-CPU_ _HCJ1M-CPU_ _CJ1G-CPU_ _
User’s Manual - Setup – for CJ Series
Useful for information on the basic specifications such as overview/design/mounting/maintenance of CJ Series
The following details about the PLC unit of CJ Series are described.• Outline/features• Design of system configu-
ration• Mounting/wiring• I/O memory allocation• TroubleshootingUse in conjunction with the User’s Manual - Program-ming - (SBCA-313).
SBCA-313 CS1G/H-CPU_ _HCS1G/H-CPU_ _-V1CS1D-CPU_ _HCS1D-CPU_ _SCJ1G/H-CPU_ _HCJ1M-CPU_ _CJ1G-CPU_ _
User’s Manual Programming for CS/CJ Series
Useful for information on the func-tions of CS/CJ Series
The following details about the PLC unit of CS/CJ Series are described.• Programming• Task function• File memory function• Various functionsUse in conjunction with User’s Manual - Setup (CS Series: SBCA-301, CJ Series: SBCA-312).
SBCA-302 CS1G/H-CPU_ _HCS1G/H-CPU_ _ -V1CS1D-CPU_ _HCS1D-CPU_ _ SCJ1G/H-CPU_ _HCJ1M-CPU_ _CJ1G-CPU_ _
Command refer-ence Manual for CS/CJ Series
Useful for detailed information on instruction words
The details about instruction words are described.Use in programming in con-junction with User’s Manual - Setup- (CS Series: SBCA-301, CJ Series: SBCA-312), User’s Manual - Program-ming - (SBCA-313).
SBCA-304 CS1G/H-CPU_ _HCS1G/H-CPU_ _ -V1CS1D-CPU_ _HCS1D-CPU_ _SCS1W-SCB_ _-V1CS1W-SCU_ _-V1CJ1G/H-CPU_ _HCJ1M-CPU_ _CJ1G-CPU_ _CJ1W-SCU_ _-V1
Communication Command Refer-ence Manual for CS/CJ Series
Useful for detailed information on communication commands addressed to the CPU unit of CS/CJ Series
The details about 1) C mode commands and 2) FINS commands are described. Refer to this manual for detailed information on com-munication commands addressed to the CPU unit (C mode commands or FINS commands). Note: Commu-nication commands listed in this Manual are communica-tion commands addressed to the CPU unit, regardless of their communication routes. (Serial communication port for the CPU unit, communi-cation port for serial commu-nication board/unit, or via communication unit, etc.)For commands addressed to the high-performance I/O unit or high-performance CPU unit, please refer to the User’s Manual of each unit.
IX
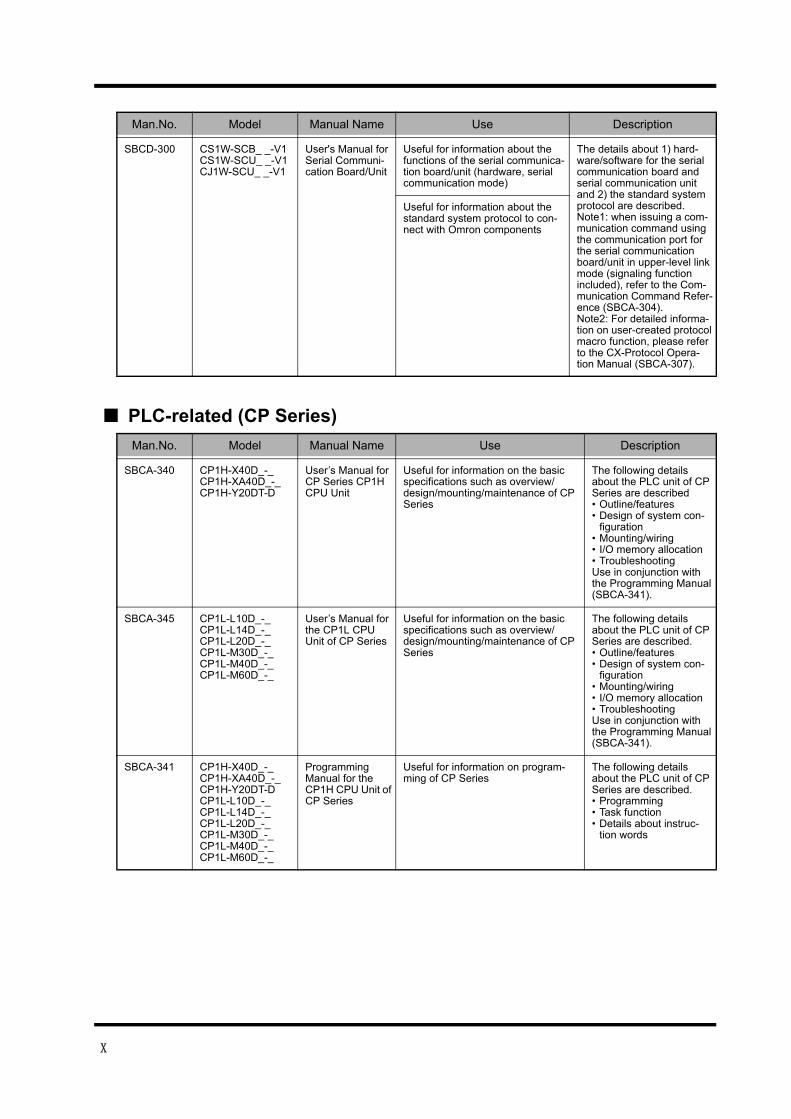
■ PLC-related (CP Series)
SBCD-300 CS1W-SCB_ _-V1CS1W-SCU_ _-V1CJ1W-SCU_ _-V1
User's Manual for Serial Communi-cation Board/Unit
Useful for information about the functions of the serial communica-tion board/unit (hardware, serial communication mode)
The details about 1) hard-ware/software for the serial communication board and serial communication unit and 2) the standard system protocol are described.Note1: when issuing a com-munication command using the communication port for the serial communication board/unit in upper-level link mode (signaling function included), refer to the Com-munication Command Refer-ence (SBCA-304).Note2: For detailed informa-tion on user-created protocol macro function, please refer to the CX-Protocol Opera-tion Manual (SBCA-307).
Useful for information about the standard system protocol to con-nect with Omron components
Man.No. Model Manual Name Use Description
SBCA-340 CP1H-X40D_-_CP1H-XA40D_-_CP1H-Y20DT-D
User’s Manual for CP Series CP1H CPU Unit
Useful for information on the basic specifications such as overview/design/mounting/maintenance of CP Series
The following details about the PLC unit of CP Series are described• Outline/features• Design of system con-
figuration• Mounting/wiring• I/O memory allocation• TroubleshootingUse in conjunction with the Programming Manual (SBCA-341).
SBCA-345 CP1L-L10D_-_CP1L-L14D_-_CP1L-L20D_-_CP1L-M30D_-_CP1L-M40D_-_CP1L-M60D_-_
User’s Manual for the CP1L CPU Unit of CP Series
Useful for information on the basic specifications such as overview/design/mounting/maintenance of CP Series
The following details about the PLC unit of CP Series are described.• Outline/features• Design of system con-
figuration• Mounting/wiring• I/O memory allocation• TroubleshootingUse in conjunction with the Programming Manual (SBCA-341).
SBCA-341 CP1H-X40D_-_CP1H-XA40D_-_CP1H-Y20DT-DCP1L-L10D_-_CP1L-L14D_-_CP1L-L20D_-_CP1L-M30D_-_CP1L-M40D_-_CP1L-M60D_-_
Programming Manual for the CP1H CPU Unit of CP Series
Useful for information on program-ming of CP Series
The following details about the PLC unit of CP Series are described.• Programming• Task function• Details about instruc-
tion words
Man.No. Model Manual Name Use Description
X

Table of Contents
Preface ........................................................................................................... I
Terms and Conditions Agreement................................................................. II
Precautions for Safe Use ............................................................................. IV
Precautions for Correct Use ......................................................................... IV
Revision History .......................................................................................... VII
Related Manuals ........................................................................................ VIII
Section 1 Overview .................................................................................1-11.1 Main K8AC-H Functions..............................................................................1-2
1.2 Model Number Structure .............................................................................1-7
1.3 Input/Output Circuit .....................................................................................1-8
1.4 Nomenclature and Operations ..................................................................1-12
Section 2 Preparation .............................................................................2-12.1 Mounting......................................................................................................2-2
2.2 Terminal Arrangement .................................................................................2-4
Section 3 Usage Example.......................................................................3-13.1 External Connection Example .....................................................................3-2
3.2 Heater Connection Methods and Current....................................................3-7
3.3 Rate of Change for Currents with Parallel Heaters .....................................3-8
Section 4 Initial Setup .............................................................................4-14.1 ON/OFF Control ..........................................................................................4-2
4.2 Phase Control..............................................................................................4-4
4.3 Cyclic Control ..............................................................................................4-6
Section 5 Operation ................................................................................5-15.1 Modes..........................................................................................................5-3
5.2 Moving between Modes ..............................................................................5-4
5.3 Parameters..................................................................................................5-6
5.4 Setting the Parameter ............................................................................... 5-11
5.5 Measurement Display................................................................................5-12
5.6 Compensation of Processing Value Display..............................................5-18
5.7 Reset of Measurement Monitor Values .....................................................5-20
5.8 Alarm Indicators ........................................................................................5-22
5.9 Test Function .............................................................................................5-23
5.10 Setting Protection Function .......................................................................5-25
5.11 Selecting Burnout Alarm Set Values .........................................................5-27
5.12 Selecting Voltage Fluctuation Compensation Standard Value...................5-30
5.13 All Initialization...........................................................................................5-32
5.14 Set Value Initialization ...............................................................................5-34
5.15 Processing Value Initialization...................................................................5-36
5.16 Setting of Alarm Hysteresis .......................................................................5-38
XI

5.17 Setting of Gate Input Function...................................................................5-40
5.18 Setting of Voltage Fluctuation Compensation Function.............................5-42
5.19 Setting of Startup Lock Time .....................................................................5-44
5.20 Setting of Output ON Delay Time..............................................................5-46
5.21 Setting of Soft Startup Time.......................................................................5-48
5.22 Setting of SSR Short Circuit Detection Function .......................................5-50
5.23 Setting of SSR Open Circuit Detection Function.......................................5-52
5.24 Setting of Heater Layer Short Circuit Detection Function..........................5-54
5.25 Setting of Heater Layer Short Circuit Alarm Level.....................................5-56
5.26 Selection of Heater Control Method(Only for phase and cyclic control type K8AC-H2_ _P_)...........................5-58
5.27 Setting of Switch Display...........................................................................5-60
5.28 Setting of Power Save Mode.....................................................................5-62
5.29 Setting of Power Save Mode Standby Time..............................................5-64
5.30 Setting of Display Mode ............................................................................5-66
5.31 Setting of Display Refresh Time................................................................5-69
5.32 Setting of Unit Number ..............................................................................5-71
5.33 Setting of Baud Rate .................................................................................5-73
5.34 Setting of Data Length...............................................................................5-75
5.35 Setting of Stop Bits ....................................................................................5-77
5.36 Setting of Parity Bit....................................................................................5-79
5.37 Setting of Gate OFF Alarm Output Hold Time (Only for ON/OFF control type heaters ; K8AC-H2_ _C_) ........................5-81
5.38 Setting of Operation Gate Current Level(Only for phase or cyclic control type heaters: K8AC-H2_ _P_) ...............5-83
5.39 Setting of Number of CT Passes...............................................................5-85
5.40 Setting of CT Ratio ....................................................................................5-87
5.41 Setting of Number of Effective Digits to be Displayed after the Decimal Point.
..................................................................................................................5-89
5.42 Setting SSR ON Delay ..............................................................................5-91
5.43 Setting SSR Operation Gate Current Level(Only for phase or cyclic control type heaters: K8AC-H2_ _P_) ...............5-93
5.44 Setting Cycle Time(Only for cyclic control type heaters: K8AC-H2_ _P_) ..............................5-95
Section 6 Serial Communications Function ............................................6-16.1 Communications Method.............................................................................6-2
6.2 Frames ........................................................................................................6-4
6.3 FINS-mini Text.............................................................................................6-7
6.4 Variable Areas .............................................................................................6-9
6.5 Reading the Variable Area ........................................................................6-10
6.6 Writing to the Variable Area.......................................................................6-12
6.7 Operation Commands ...............................................................................6-14
6.8 Setting Areas.............................................................................................6-16
6.9 Commands and Responses ......................................................................6-17
6.10 Variable Area Map.....................................................................................6-21
6.11 Program Examples....................................................................................6-23
Section 7 Troubleshooting ......................................................................7-1
XII

7.1 Error Display................................................................................................7-2
7.2 Troubleshooting...........................................................................................7-3
Appendices ............................................................................ A-1Specifications ............................................................................................. A-2
Parameter List ............................................................................................ A-6
XIII

XIV

1-1
Section 1 Overview
This Section introduces the overview of the distinctive functions and
names of each component of the K8AC-H.
1.1 Main K8AC-H Functions .................................................1-2
1.2 Model Number Structure .................................................1-7
1.3 Input/Output Circuit .........................................................1-8
Input Circuit/Output Circuit/Internal Block Diagram1.4 Nomenclature and Operations ......................................1-12

Section 1 Overview
1.1 Main K8AC-H Functions
■Main functionsThe K8AC-H is a digital heater element burnout detector that detects heater burnout by measuring
the heater current from various power supply systems.
Check for normal operation by using actual power supply units with the actual load before installing
the K8AC-H in the environment.
The K8AC-H provides the following functions.
Applicable heater control methodsThe following heater control methods can be used.
・ ON/OFF Control (Contactor/SSR)
・ Cyclic Control
・ Phase Control (Applicable to three-arm power regulators controlled by 4 to 20 mA input)
Heater Burnout AlarmThe preset burnout detection value is compared with the heater current and an alarm is output accordingly.
1 to 99s
OFFON
0.2 to 3.0s
OFFON
OFF
2.Half CyCle
ON
500 ms 100 ms
Transistor output models: ALM indicator lit, ALM transistor outputRelay output models: ALM indicator lit, OR of all detection statusoutput.
Burnout alarm set value Current
Alarm
1-2
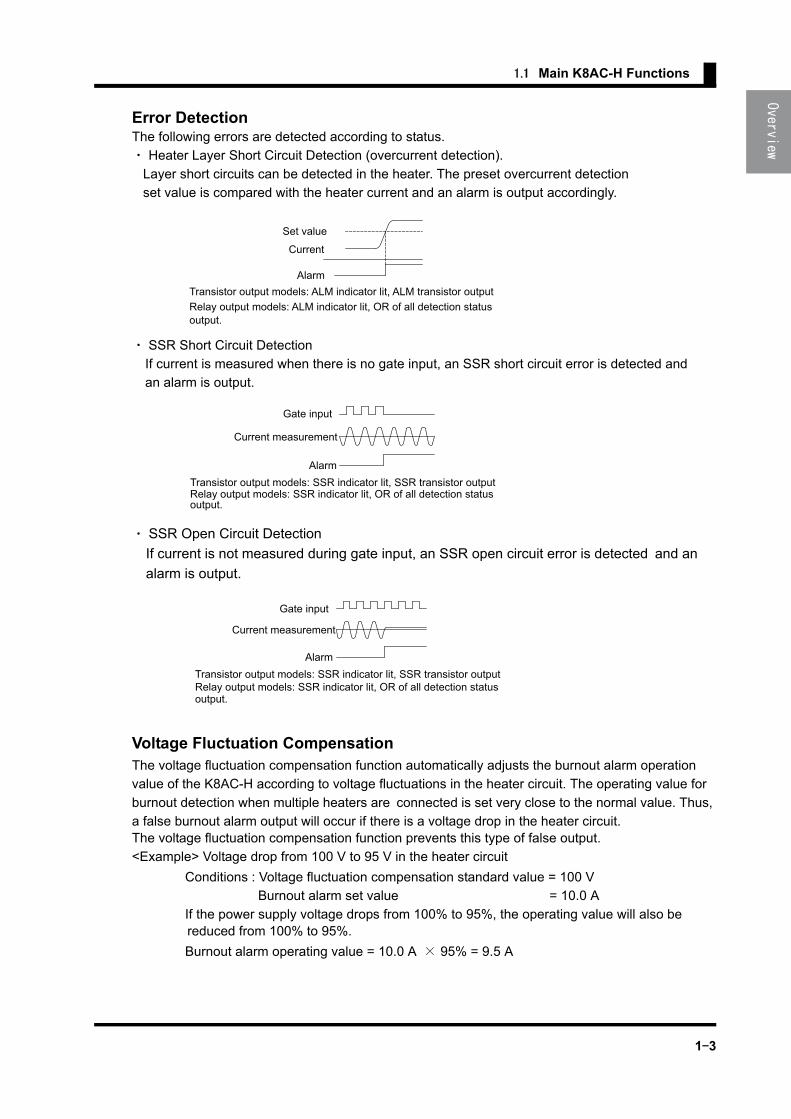
1.1 Main K8AC-H Functions
Error DetectionThe following errors are detected according to status.
・ Heater Layer Short Circuit Detection (overcurrent detection).
Layer short circuits can be detected in the heater. The preset overcurrent detection
set value is compared with the heater current and an alarm is output accordingly.
・ SSR Short Circuit Detection
If current is measured when there is no gate input, an SSR short circuit error is detected and
an alarm is output.
・ SSR Open Circuit Detection
If current is not measured during gate input, an SSR open circuit error is detected and an
alarm is output.
Voltage Fluctuation CompensationThe voltage fluctuation compensation function automatically adjusts the burnout alarm operation
value of the K8AC-H according to voltage fluctuations in the heater circuit. The operating value for
burnout detection when multiple heaters are connected is set very close to the normal value. Thus,
a false burnout alarm output will occur if there is a voltage drop in the heater circuit.The voltage fluctuation compensation function prevents this type of false output.
<Example> Voltage drop from 100 V to 95 V in the heater circuit
Conditions : Voltage fluctuation compensation standard value = 100 V
Burnout alarm set value = 10.0 A
If the power supply voltage drops from 100% to 95%, the operating value will also be reduced from 100% to 95%.
Burnout alarm operating value = 10.0 A × 95% = 9.5 A
Transistor output models: ALM indicator lit, ALM transistor outputRelay output models: ALM indicator lit, OR of all detection statusoutput.
Alarm
Current
Set value
Transistor output models: SSR indicator lit, SSR transistor outputRelay output models: SSR indicator lit, OR of all detection statusoutput.
Alarm
Current measurement
Gate input
Transistor output models: SSR indicator lit, SSR transistor outputRelay output models: SSR indicator lit, OR of all detection statusoutput.
Current measurement
Gate input
Alarm
1-3
Section 1 Overview
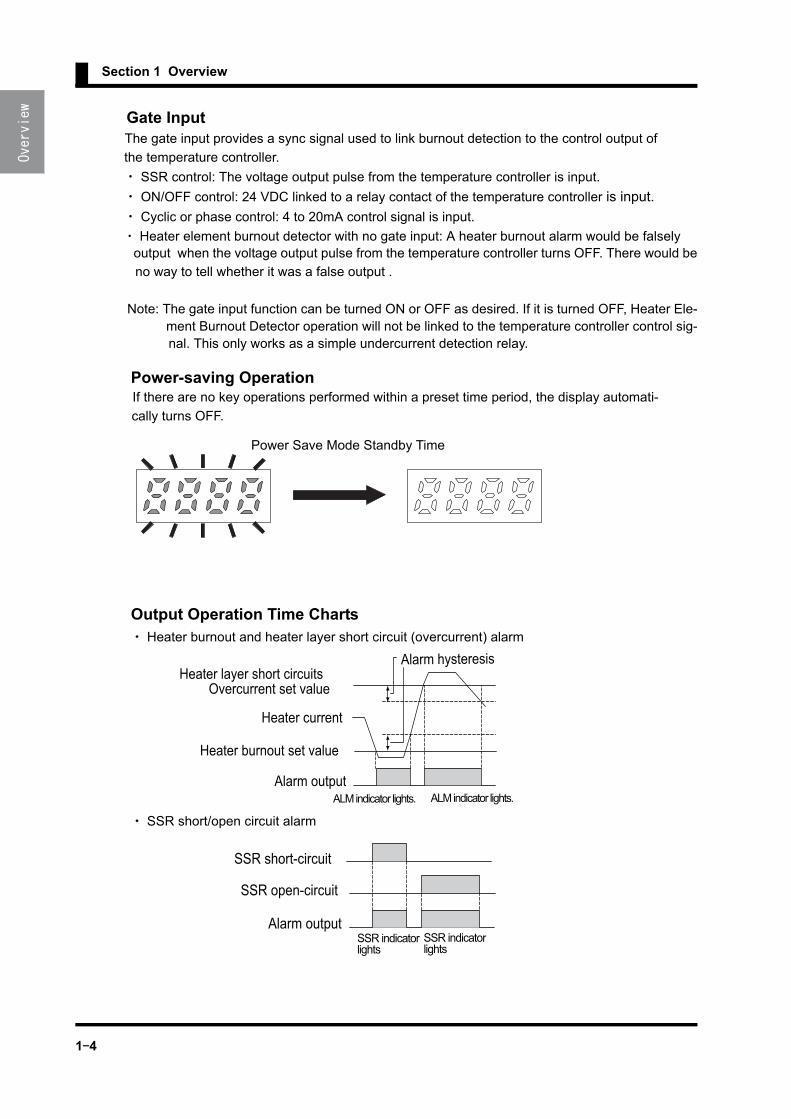
Gate Input The gate input provides a sync signal used to link burnout detection to the control output of
the temperature controller.
・ SSR control: The voltage output pulse from the temperature controller is input.
・ ON/OFF control: 24 VDC linked to a relay contact of the temperature controller is input.
・ Cyclic or phase control: 4 to 20mA control signal is input.
・ Heater element burnout detector with no gate input: A heater burnout alarm would be falsely output when the voltage output pulse from the temperature controller turns OFF. There would be
no way to tell whether it was a false output .
Note: The gate input function can be turned ON or OFF as desired. If it is turned OFF, Heater Ele- ment Burnout Detector operation will not be linked to the temperature controller control sig- nal. This only works as a simple undercurrent detection relay.
Power-saving Operation If there are no key operations performed within a preset time period, the display automati-
cally turns OFF.
Output Operation Time Charts ・ Heater burnout and heater layer short circuit (overcurrent) alarm
・ SSR short/open circuit alarm
Power Save Mode Standby Time
Alarm hysteresis
Heater burnout set value
Alarm outputALM indicator lights.
Heater layer short circuitsOvercurrent set value
Heater current
ALM indicator lights.
SSR open-circuit
SSR short-circuit
Alarm outputSSR indicatorlights
SSR indicatorlights
1-4

1.1 Main K8AC-H Functions
Operation Gate Current LevelThe operation gate current level is a function to set the gate current value for which detection is dis-
abled.
When performing the gradient setting for the power conditioner, the operation gate current level can
be set to prevent false operation involving the gradient setting for the power conditioner. The rela-
tionship between the gradient settings and output current depends on the power regulator manufac-
turer and model, so be sure to check the characteristics of the power regulator being used before
setting.
* Setting Example
Initial setting (7 mA)
When the power regulator’s gradient settings are changed, the operation gate current level
is set to so that the output current is within the measurement range.(In the following diagram,
14mA is set.)
Note: When halogen heaters or other pure metal heaters are phase-controlled using a heater
with varying resistance values such as halogen heater in phase / cyclicontrol, the heater
resistance fluctuates according to the control level.
As a result, high-precision detection of heater burnout is not possible. The effect on the
heater and setting methods depends on the heater being used.
Therefore, consult with your OMRON representative before using a heater with varying
resistance values.
* Halogen heater resistance fluctuation example
In the following example, burnout of one element in a six-element heater can be detected at
a control level of 20 mA, but detection is not possible due to effect of fluctuating resistance
if the control level is any lower.
Output currentGradient setting 100%
Control signal
DetectedNot detected20mA7mA4mA
100%
0%
Measurement range
Output current Gradient setting 100%Gradient setting 50%
Control signal
Not detected Detected20mA14mA4mA
100% Measurement range
1-5

Section 1 Overview
Note: The K8AC-H is designed to detect the disconnection of a load close to a pure resistance (e.g.
electric wire heater).
4mA 7mA 20mAControl signal
Normal (Six elements in parallel)
One element burned out
Three elements burned outDetectable range
Threshold
Heater resistance
1-6

1.2 Model Number Structure
1.2 Model Number Structure
1 2 3 4 5 6 7 K8AC-H 2 1 C N - FLK 100 240VAC
Basic Model
CodeK8AC-H
SeriesDigital Heater Element Burnout Detector
Code
Product Type
Product Type2 Screw-less clamp terminals (power input: screw terminals)
Code12
Current Input Range
Current range (special CT)
3
0.200 to 2.200 K8AC CT20S,CT20L2.00 to 22.00 K8AC CT20S,CT20L20.0 to 200.0 K8AC CT200
Code
Heater Control Type
Output Type
Control type
Output Type
ON/OFF control (SSR or contactor)Phase control or Cyclic control
CodeCommunications Specifications
Communications specificationsRS-485 (Two-wire half duplex transmission)
Code100 to 240 VAC 50/60
Power Specifications
Power specifications
CP
N
C
FLK
100 240 VAC
Code
Transistor outputs (Two outputs: either NPN open-collectoroutput or PNP equivalent output can be used.)Contact output (one SPDT relay contact output)
1-7
Section 1 Overview
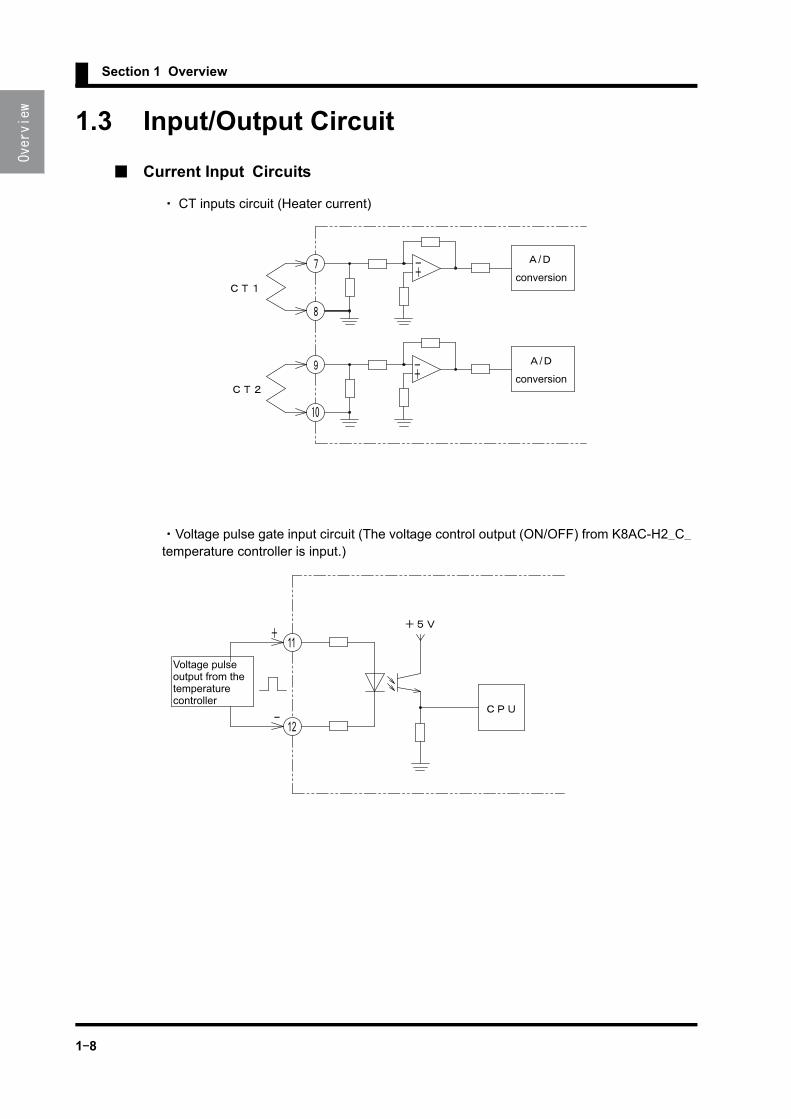
1.3 Input/Output Circuit
■ Current Input Circuits
・ CT inputs circuit (Heater current)
・Voltage pulse gate input circuit (The voltage control output (ON/OFF) from K8AC-H2_C_
temperature controller is input.)
/
conversion
/
conversion
Voltage pulseoutput from thetemperaturecontroller
12
11
1-8
1.3 Input/Output Circuit
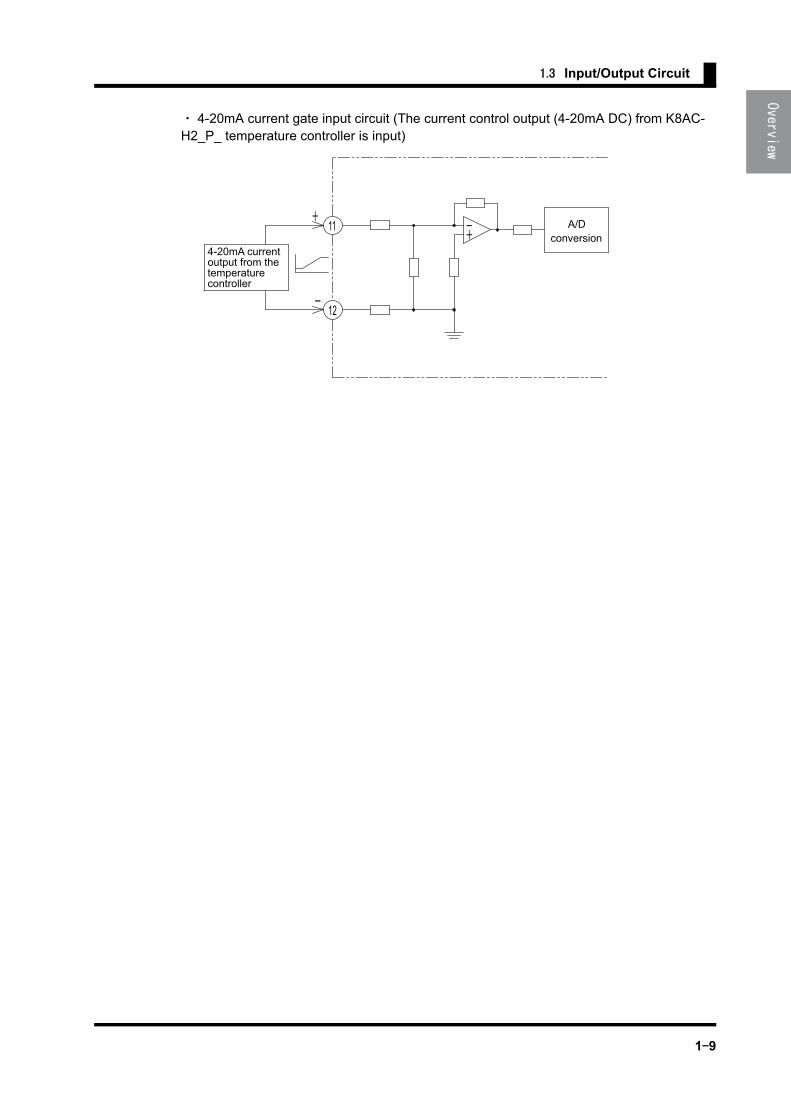
・ 4-20mA current gate input circuit (The current control output (4-20mA DC) from K8AC-H2_P_ temperature controller is input)
A/D
4-20mA currentoutput from thetemperaturecontroller
12
11conversion
1-9

Section 1 Overview
■ Output Circuit
・ Transistor output
・ Contact outputs
・ Communications
SSR alarm output
Heater burnout,heaterlayer short circuit,overcurrent alarmoutput
Transistor drive circuit
Transistor drive circuit
4
5
6
COM
N.C contact
N.O contact
drive circuit
Relay
For contact outputs, the same outputs are used for SSR error and for heater burnouts and heater layer short circuit alarm outputs.
Note:
+12V
RS-485driver
CPU RXDO
13
14
A (-)
B (+)
RS-485
CPU RE_DE
CPU TXDO
+5V
+5V
1-10

1.3 Input/Output Circuit
■ Internal Block Diagram
CT inputcircuit
EEPROM
Power supplyfluctuationcompensation
ProtectionZ-circuit
Microcomputer
Constant voltagecircuit 1
Constant voltagecircuit 2
12V 5V
Key
Display
Outputcircuit
Communication
circuit
Controlcircuit
Contact output
Only for models with
relay outputs
Power supply circuit
1-11

Section 1 Overview
1.4 Nomenclature and Operations
Name Operation
Main display Displays processing values, parameter characters, and set
values.
Operation
indicators
RUN
(Measurement
operation)
Lights when the power is turned ON and the measurement
operation is in progress.
OFF at all other times.
ADJ
(Adjust)
Lights while in Adjust Mode.
Flashes while in Test Mode.
OFF at all other times.
SET
(Set)
Lights while in SET Mode.
OFF at all other times.
GATE
(Gate)
Lights or turns OFF according to gate input status.
Gate pulse : Lights for high voltage pulse; OFF for low volt-
age pulse.
Gate signal (4 to 20 mA) : Lights for 4 mA or over; OFF for
less than 4 mA.
SSR
(SSR error)*Lights when an SSR error occurs (open or short circuit).
OFF when SSR is normal.
ALM
(Alarm)*Lights for heater burnout or overcurrent.
OFF at all other times.
UP keyIncrements a set value when the set value is in change
status.
DOWN keyDecrements a set value when the set value is in change
status.
Up key
Down key
Operationindicators
Main display area
Shift key
Level key
Mode key
K8AC-H2_ _ _-FLK
1-12

1.4 Nomenclature and Operations
* Check the specific status using the alarm display parameters on the main display.
SHIFT key
Used to check set values while parameters are displayed,
and to put set values in change status.
Used to shift the set value digit when the set value is in
change status.
MODE key Used to switch displyed parameter.
LEVEL key Used to change the level.
Name Operation
1-13

Section 1 Overview
1-14

2-1
Section 2 Preparation
This Chapter describes tasks performed prior to turning the power
on such as mounting or wiring.
2.1 Mounting .........................................................................2-2
External Dimension/Mounting Method/FixingBracket/Mounting Direction
2.2 Terminal Arrangement.....................................................2-4
Terminal Arrangement/Wiring

Section 2 Preparation
2.1 Mounting
■ External Dimension
K8AC-H2_ _ _-FLK
■ Mounting Method
・ Mounting the K8AC-HPull down the hook the bottom of the K8AC-H, and then catch the hook on the tpo of the
K8AC-H onto the DIN Track and press the K8AC-H onto the DIN Track until it locks into
place.
35 2.1
1.76
100
4.5
90
To remova a wire, insert the recomendedflat-blade screwdriver straight into thehole under the screw-less clamp terminalof the wire, and simply release the wire.
Catch the hook the top of the K8AC-H.
Press the K8AC-Honto the DIN Track.
Pull down the bottom. Lock it.
2-2

2.1 Mounting
・ RemovingPull down on the hook with a flat-blade screwdriver and lift up on the K8AC-H
■ Fixing bracket
Use a DIN rail for mounting the K8AC.
DIN rail: PFP-100N (1,000mm)
PFP-50N (500m)
■ Mounting direction
Wrong mounting may deteriorate heat dissipation, resulting in damaged or broken internal
elements. Do not use the K8AC-H if not mounted using the standard mounting procedure.
Top
Vertical mounting(standard)
Top
Horizontal mounting
2-3

Section 2 Preparation
2.2 Terminal Arrangement
K8AC-H2_ _ _-FLK
Terminal Name Description Applicable model
1 to 2Power sup-ply voltage
Connect to the operating power supply. All models
3 to 4, 5 to 6 Outputs
Outputs SSR open or short circuit detection results.Outputs heater burnout or layer short circuit detection results.
K8AC-H2_ _N(transistor out-put)
5/6 to 4 Outputs an OR of the status of all alarms. K8AC-H2_ _ _C
7 to 8Current inputs
Connect to CT1. Current input from CT1 secondary-side output.
All models
9 to 10Connect to CT2. Current input from CT2 secondary-side output.
11 to 12 Gate inputConnect to gate signal (voltage pulse). K8AC-H2_ _C_
Connect to a 4 to 20-mA gate signal. K8AC-H2_ _P_
13 to14Communi-cations
Connect to host device for RS-485 communications. All models
RS-485
7 9
+ - + -13
100 to 240 VAC
A(-) B(+)
COM
125 VAC0.3A AC30 VDC1A DC
12 to 24 VDC,50mA DC
5
12 to 24 VDC,50mA DC
Current inputsGate input
K8AC-H2_C_ K8AC-H2_P_ Communications
Voltage pulse12 VDC or 24 VDC
Linear current4 to 20 mA DC
Power supply voltage OutputsK8AC-H2_ _N K8AC-H2_ _C
2-4

2.2 Terminal Arrangement
■ Wirng
・ Power supply
Supply power to terminal number (1) and (2). The power supply specifications are outlined
below.
100 to 240 VAC, 50 / 60Hz, 35 VA max.
Turning the power on requires the rated power supply capacity or more. Please take extra
care when using multiple units.
・ Output
Alarm outputs are output from the terminal number (3) to (6).
The output configuration is shown below.
K8AC-H2_ _N: 2 outputs, open collector 24VDC 50mA
The transistor output of the K8AC-H2_ _ N uses a photocoupler for isolation with the inter-
nal circuits, and so either an NPN opencollector output or a PNP equivalent output can be
used.
Load Load
NPN Output PNP Equivalent Output
Load power supply Load power supply
2-5

Section 2 Preparation
K8AC-H2_ _C: 1c output 125 VAC 0. 3A / 30 VDC 1A.
Use the load that is within the range of the specification. The electrical life expectancy the
relay is 100,000 orerations.
・ Current input
Connect to a special CT (current sensor) for current detection.
The special CT should be as follows.
Select an appropriate CT suitable for the current range of your model.
Model(Rated current)
Through-hole
diameterInstallation method
K8AC-CT20S(0.200 to 22.00A )
5.8-mm dia.
Surface-mounted with screws
K8AC-CT20L(0.200 to 22.00A )
12-mm dia.
Rear-surface mounted with screws Binding band
K8AC-CT200(20.0 to 200.OA)
12-mm dia.
Rear-surface mounted with screws Binding band
K8AC-CT200L(20.0 to 200.OA)
30-mm dia.
Surface-mounted with screws
125 VAC max.
1A DC max. A
30 VDC max.
Load
K8AC-H2_ _C
COM
Load1A DC max. A
The special CT has no polarity
2-6
2.2 Terminal Arrangement
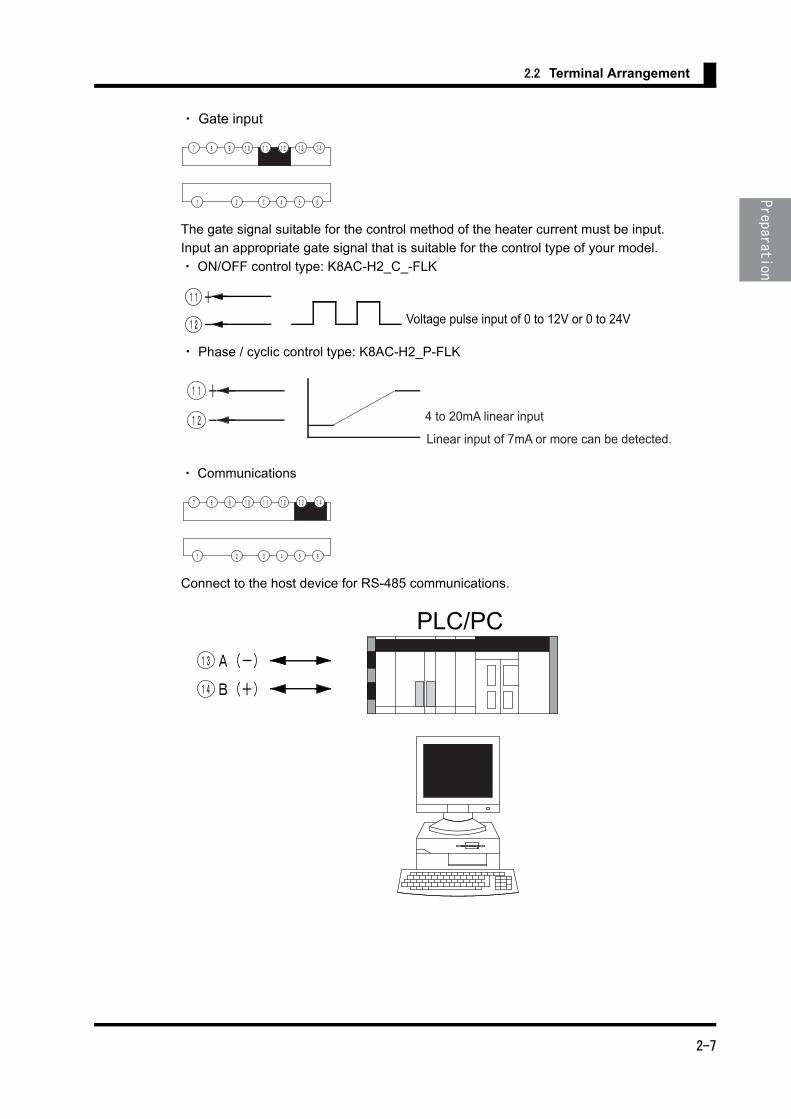
・ Gate input
The gate signal suitable for the control method of the heater current must be input.
Input an appropriate gate signal that is suitable for the control type of your model.
・ ON/OFF control type: K8AC-H2_C_-FLK
・ Phase / cyclic control type: K8AC-H2_P-FLK
・ Communications
Connect to the host device for RS-485 communications.
Voltage pulse input of 0 to 12V or 0 to 24V
4 to 20mA linear input
Linear input of 7mA or more can be detected.
PLC/PC
2-7

Section 2 Preparation
■Recommended Crimp Terminals
Note:Securely tighten the terminal screws to the following torque. Power supply terminals: 0.5 N ・ m
I/O terminals: 0.23N ・ m
■Recommended tools・ Recommended Flat-blade Screwdriver Manufacturer: Phoenix Contact
Model number: SZF0.4 ×2.5・ Crimper for Bar Terminals (Crimping tool)
Manufacturer: Phoenix Contact
Model number: CRIMPF0X UD6 Recommended power line diameters: AWG10 to AWG 24
Wiring・ Do not touch terminals or perform wiring while power is supplied to the product. Doing so may result in injury or malfunction.・ Wire to the correct terminal number. Incorrect wiring may result in damage to or burning of components.
Terminals Recommended crimp terminalsRecom-mended wire gauge
1 and 2
M3 crimp terminals (Width: 5.8 mm max.)
AWG16 toAWG18
4 to 14
M2 bar terminals: AI 0.34-8TQ (Phoenix Contact) AWG22
M2 bar terminals: AI 0.5-8WH (Phoenix Contact) AWG20
M2 bar terminals: AI 0.75-8GY (Phoenix Contact) AWG18
max.
max.
2-8
2.2 Terminal Arrangement
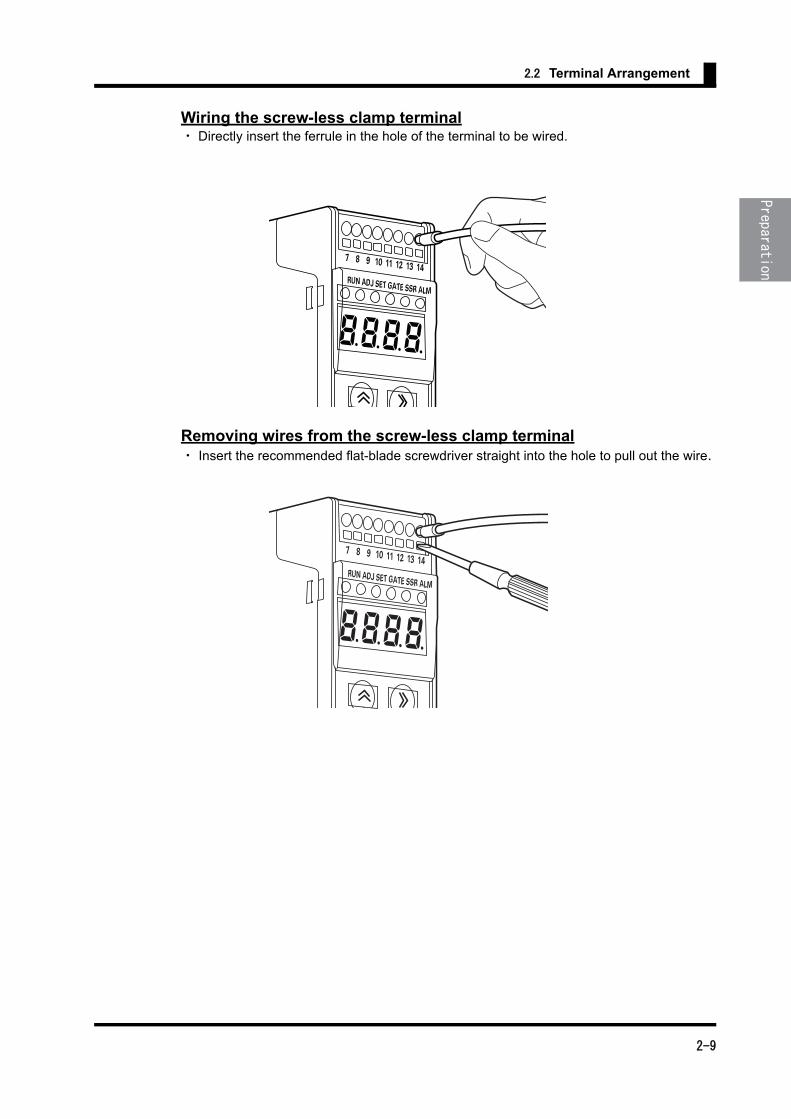
Wiring the screw-less clamp terminal・ Directly insert the ferrule in the hole of the terminal to be wired.
Removing wires from the screw-less clamp terminal・ Insert the recommended flat-blade screwdriver straight into the hole to pull out the wire.
7 8 9 10 11 12 13 14
RUN ADJ SET GATE SSR ALM
8.8.8.8.
RUN ADJ SEt GAtE SSR ALM
U
7 8 9 10 11 12 13 14
8.8.8.8.
2-9

Section 2 Preparation
2-10

3-1
Section 3 Usage Example
This Chapter introduces the usage examples of the K8AC-H.
3.1 External Connection Example.........................................3-2
3.2 Heater Connection Methods and Current .......................3-7
3.3 Rate of Change for Currents with Parallel Heaters.........3-8

Section 3 Usage Example
3.1 External Connection Example
■ Wiring Method When Using the K8AC-H with Phase Control Heaters
Operation Description・ If the heater current detected at either CT1 or CT2 falls below the burnout alarm set value, an alarm is output.The burnout alarm set value can be set separately for CT1 and CT2.
No burnout alarm is output, however, when the temperature controller control output is OFF.
Burnouts are detected only while the temperature controller control output is being input to the gate input terminals (11 and 12). Burnout is detected with no errors because the automatic
adjustment of burnout alarm level is linked to the temperature controller control output (4 to 20mA).
・ Burnout is detected when control outputs from the temperature controller are 7 mA min.
Correct Usage
・ Always take the power supply voltage from the primary side of the contactor.
・ Use a temperature controller with a 4 to 20mA current output.
・ The K8AC-H adjusts power regulator outputs controlled by 4 to 20mA input, based on the stan-
dard value recorded when the regulator is at 100% output.
・Make sure that the power regulator is at 100% output when adjusting the set burnout alarm value.
・ Adjust the burnout alarm set value at a 100% output for gradient setting as well. When using the
power regulator’s gradient settings, change the operation gate curret level so that the heater cur-
rent value is within the measurement range. (The initial value is 7 mA. )
・ If using the soft startup funcution with a power regulator, set the soft startup function on the
K8AC-H as well, to prevent malfunctions.・ CT1 and CT2 are special products. Use K8AC-CT-_ _.
・ The CTs do not have polarity.・ Connect only one CT for a single-phase heaters.
Connect two CTs for three-phase heaters.
・ For three-phase heaters, always set the burnout alarm set values for both CT1 and CT2.
CT2
CT1
3
7 8 9 10 12 11
13 141 2
RS-485
4
5
65
6
3
4
Transistor Output K8AC-H2_ _N-FLK
Consult with your OMRON representative if multiple heaters are connectedin parallel different heater capacities, or if a heater with varying heaterresistance is used.
Heater *
Power supply
Power Regulator
Temperature Controller
4 to 20 mA current output
3-2
3.1 External Connection Example
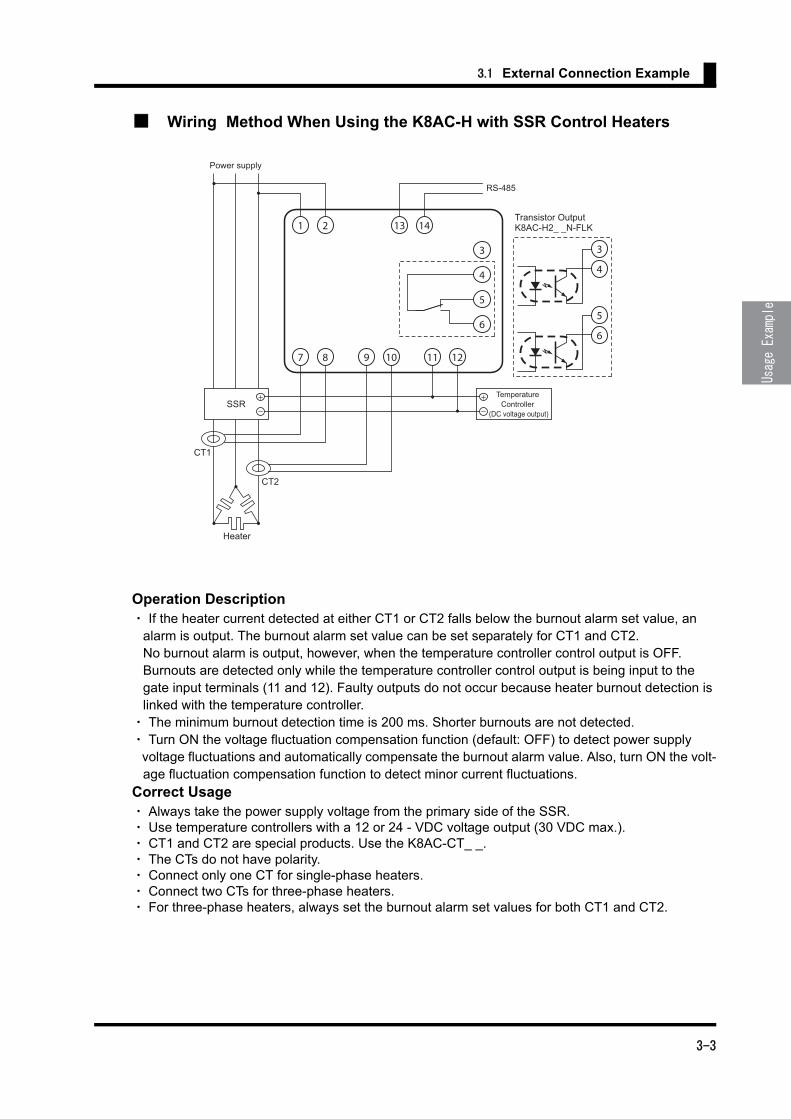
■ Wiring Method When Using the K8AC-H with SSR Control Heaters
Operation Description・ If the heater current detected at either CT1 or CT2 falls below the burnout alarm set value, an alarm is output. The burnout alarm set value can be set separately for CT1 and CT2. No burnout alarm is output, however, when the temperature controller control output is OFF. Burnouts are detected only while the temperature controller control output is being input to the gate input terminals (11 and 12). Faulty outputs do not occur because heater burnout detection is linked with the temperature controller.・ The minimum burnout detection time is 200 ms. Shorter burnouts are not detected.・ Turn ON the voltage fluctuation compensation function (default: OFF) to detect power supply voltage fluctuations and automatically compensate the burnout alarm value. Also, turn ON the volt- age fluctuation compensation function to detect minor current fluctuations.Correct Usage・ Always take the power supply voltage from the primary side of the SSR.・ Use temperature controllers with a 12 or 24 - VDC voltage output (30 VDC max.).・ CT1 and CT2 are special products. Use the K8AC-CT_ _.・ The CTs do not have polarity.・ Connect only one CT for single-phase heaters.・ Connect two CTs for three-phase heaters.・ For three-phase heaters, always set the burnout alarm set values for both CT1 and CT2.
5
6
3
4
Transistor Output K8AC-H2_ _N-FLK
SSR
CT2
CT1
4
3
5
6
7 8 9 10 11 12
13 141 2
RS-485
Heater
Power supply
Temperature Controller
(DC voltage output)
3-3
Section 3 Usage Example
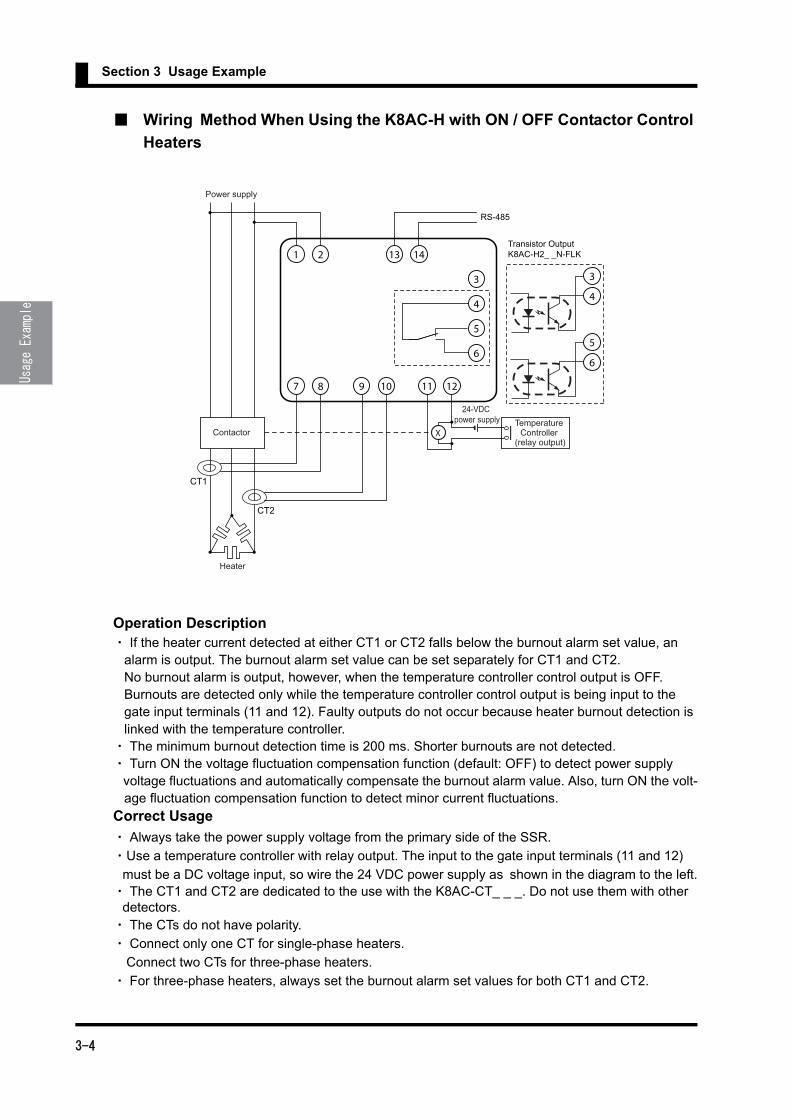
■ Wiring Method When Using the K8AC-H with ON / OFF Contactor Control
Heaters
Operation Description・ If the heater current detected at either CT1 or CT2 falls below the burnout alarm set value, an alarm is output. The burnout alarm set value can be set separately for CT1 and CT2. No burnout alarm is output, however, when the temperature controller control output is OFF. Burnouts are detected only while the temperature controller control output is being input to the gate input terminals (11 and 12). Faulty outputs do not occur because heater burnout detection is linked with the temperature controller.・ The minimum burnout detection time is 200 ms. Shorter burnouts are not detected.・ Turn ON the voltage fluctuation compensation function (default: OFF) to detect power supply voltage fluctuations and automatically compensate the burnout alarm value. Also, turn ON the volt- age fluctuation compensation function to detect minor current fluctuations.Correct Usage
・ Always take the power supply voltage from the primary side of the SSR.
・Use a temperature controller with relay output. The input to the gate input terminals (11 and 12)
must be a DC voltage input, so wire the 24 VDC power supply as shown in the diagram to the left.・ The CT1 and CT2 are dedicated to the use with the K8AC-CT_ _ _. Do not use them with other
detectors.・ The CTs do not have polarity.
・ Connect only one CT for single-phase heaters.
Connect two CTs for three-phase heaters.
・ For three-phase heaters, always set the burnout alarm set values for both CT1 and CT2.
5
6
3
4
Transistor Output K8AC-H2_ _N-FLK
CT2
CT1
3
7 8 9 10 11 12
13 141 2
RS-485
X
4
5
6
Heater
Power supply
ContactorTemperature
Controller (relay output)
24-VDC power supply
3-4
3.1 External Connection Example
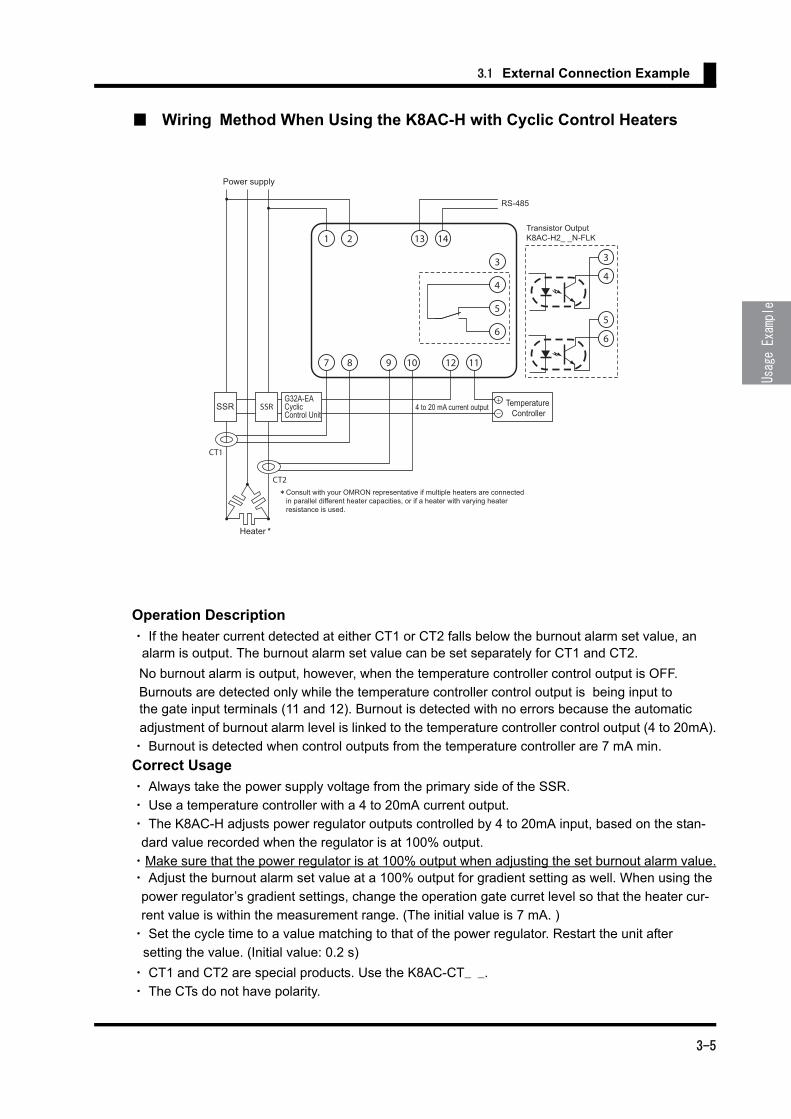
■ Wiring Method When Using the K8AC-H with Cyclic Control Heaters
Operation Description
・ If the heater current detected at either CT1 or CT2 falls below the burnout alarm set value, an alarm is output. The burnout alarm set value can be set separately for CT1 and CT2.
No burnout alarm is output, however, when the temperature controller control output is OFF.
Burnouts are detected only while the temperature controller control output is being input to the gate input terminals (11 and 12). Burnout is detected with no errors because the automatic
adjustment of burnout alarm level is linked to the temperature controller control output (4 to 20mA).
・ Burnout is detected when control outputs from the temperature controller are 7 mA min.
Correct Usage
・ Always take the power supply voltage from the primary side of the SSR.
・ Use a temperature controller with a 4 to 20mA current output.
・ The K8AC-H adjusts power regulator outputs controlled by 4 to 20mA input, based on the stan-
dard value recorded when the regulator is at 100% output.
・Make sure that the power regulator is at 100% output when adjusting the set burnout alarm value.・ Adjust the burnout alarm set value at a 100% output for gradient setting as well. When using the
power regulator’s gradient settings, change the operation gate curret level so that the heater cur-
rent value is within the measurement range. (The initial value is 7 mA. )
・ Set the cycle time to a value matching to that of the power regulator. Restart the unit after
setting the value. (Initial value: 0.2 s)
・ CT1 and CT2 are special products. Use the K8AC-CT_ _.
・ The CTs do not have polarity.
SSR SSR
CT2
CT1
3
7 8 9 10 12 11
13 141 2
RS-485
4
5
65
6
3
4
Transistor Output K8AC-H2_ _N-FLK
Heater *
Power supply
G32A-EACyclic Control Unit
Temperature Controller
4 to 20 mA current output
Consult with your OMRON representative if multiple heaters are connectedin parallel different heater capacities, or if a heater with varying heaterresistance is used.
3-5

Section 3 Usage Example
・ Connect only one CT for single-phase heaters.
Connect two CTs for three-phase heaters.
・ For three-phase heaters, always set the burnout alarm set values for both CT1 and CT2.
3-6
3.2 Heater Connection Methods and Current
3.2 Heater Connection Methods and Current
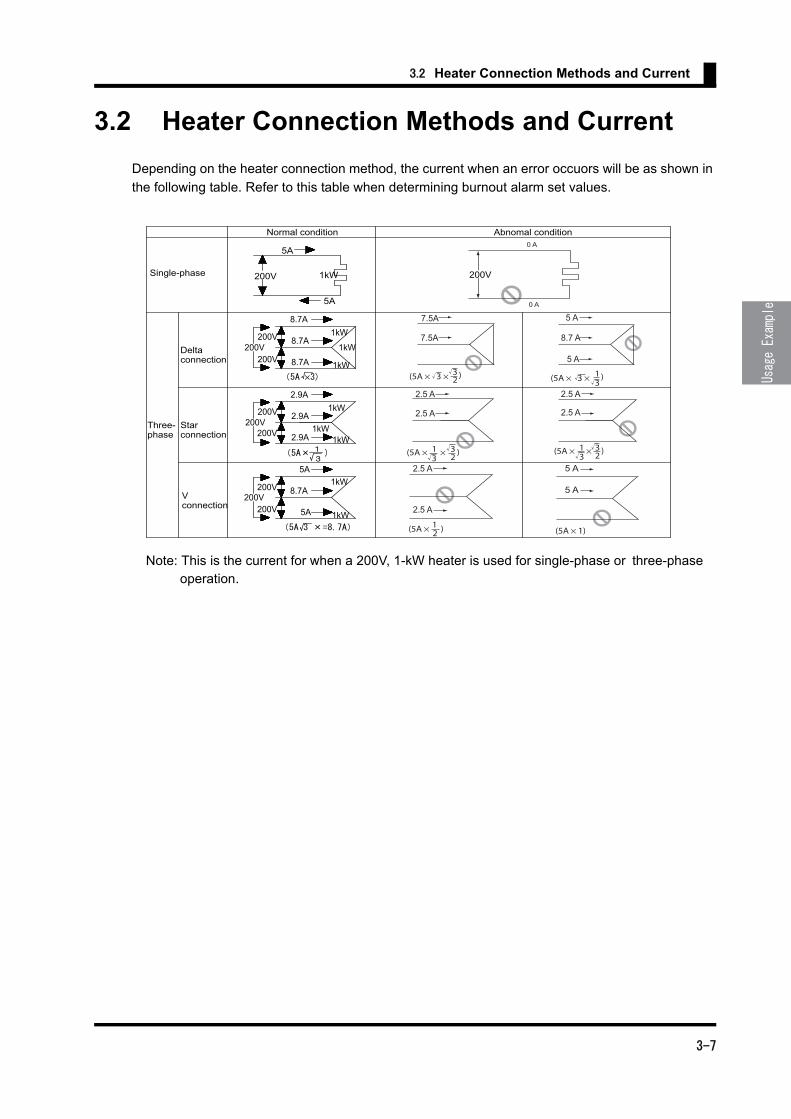
Depending on the heater connection method, the current when an error occuors will be as shown in
the following table. Refer to this table when determining burnout alarm set values.
Note: This is the current for when a 200V, 1-kW heater is used for single-phase or three-phase operation.
Three-phase
Deltaconnection
Starconnection
V connection
Single-phase
Normal condition Abnomal condition
200V 1kW
5A
1kW
1kW
1kW
8.7A
8.7A
8.7A
200V200V
200V
×
2.9A
5A
8.7A
5A
5 A
5 A
8.7 A
)31(5A × 3 ×
2.5 A
2.5 A
)23(5A ×
31 ×
2.5 A
2.5 A
)23(5A ×
31 ×
1
2.5 A
2.5 A
(5A × )2 (5A × 1)
5 A
5 A
5A
200V200V
200V
2.9A
2.9A
1kW
1kW1kW
200V200V
200V
1kW
1kW
0 A
0 A
200V
7.5A
)23(5A × 3 ×
7.5A
3-7

Section 3 Usage Example
3.3 Rate of Change for Currents with Parallel Heaters
The following table shows the current change ratios when multiple heaters of the same capacity are
connected in parallel and one of the heater elements burns out. Use this table for reference when
making corrections.
If five single-phase heaters are connected in parallel, the current change when burnout occures is
20% per heater.
For example, if the current for a single heater is low and the change ratio is very slight, it may not be
detected. Therefore take into account the detection accuracy for the total current when selecting the
number of heaters to be connected in parallel.
Note 1: The figures in the above table show the current change ratios when burnout occurs for one heater connected in parallel.
2: The numbers represent the current ratio after one heater burns out, with the current prior to the burnout (i.e., the normal current) taken as 1.
3: In actual operation there may be effects from factors such as load (heater) imbal- ances, so conduct an actual test for confirmation before making adjustments if the cur-
rent change ratio between normal and abnomal operation is slight.
4: Consult with your OMRON representative if multiple heaters are used with different
heater capacities.
Current inother phases
Current in linesnear burned-outphase (Same as 2-phase.)
Current inother phases
Current in burned-out phase
0.91
0.97
0.86
0.8
0.88
0.96
0.82
0.75
0.84
0.95
0.75
0.67
0.77
0.92
0.6
0.5
111
0.58
0.87
With one heaterburned out,I is 0
n=1Connection
Single-phase
Starconnection
Deltaconnection
n heaters
Number ofheatersper phase= n
Number of heatersper phase = n
n=2 n=3 n=4 n=5
With one heaterburned out,I is 0
1 1
3-8
4-1
Section 4 Initial Setup
This Section describes the flow of the initial settings for the K8AC-H.
4.1 ON/OFF Control..............................................................4-2
4.2 Phase Control .................................................................4-4
4.3 Cyclic Control..................................................................4-6

Section 4 Initial Setup
4.1 ON/OFF Control
The initial setting flow for the K8AC-H22CC-FLK (2 to 22A input, ON/OFF control, relay output type)
is described below based on the following setting conditions.
* Burnout alarm value = (Normal current + current at malfunction) / 2
Initial setting flow
<Setting Conditions>The assumption of this method is that ten 300-W rated heaters are connected in parallel to a sin-gle-phase 200-V power supply.・ The burnout alarm value 1 is set in such a way that a heater burnout alarm can be output when the current measured at CT1 is 14.25A or less.・ The burnout alarm value 2 is set in such a way that any heater burnout alarm will not be output by the current measured at CT2.
A. Check the wiring and turn the power on.
The gate input function is turned on (enabled) at the initial factory setting, so a burnout alarm is not output unless an input is applied to the pulse voltage input terminal.Connect a temperature controller with appropriate voltage pulse output specifications and apply a gate input.
B. Set “Burnout Alarm 1” to “14.25 A”
1. When the heater 1 current monitor value is displayed (RUN Mode), press the L (Level)
Key for at least 3 seconds to change to ADJ Mode.
2. Set the parameter “al-1” to “14. 25”.
C. Set the least significant digit of the “Burnout Alarm 2” to “*.**-”.
1. Set the least significant digit of the parameter “al-2” to “-” to disable the burnout alarm 2.
2. Setting the least significant digit to “-” and confirming it will automatically result in zero
suppression “-” .
D. Change to the actual operation.
1. Change to RUN Mode by pressing the L(Level) Key for at least 1 second or waiting for 300
seconds (5 minutes) without pressing any key while the parameter is displayed in ADJ Mode.
All clear function of set values
If you encounter a problem with your initial setting from whichyou cannot recover, you can start over from the beginning by only resetting to the initial values. For how to reset to the initial values, please refer to “5-14 Initialization of Set Values”. The initial values are values at the initial factory setting.
4-2

4.1 ON/OFF Control
* For the parameter list or details on how to set parameters, please see “Section 5 Operation”.Note:
The setting for “alarm hysteresis”, “setting of gate input function”, “voltage fluctuation compensa-tion”, “startup lock timer” and “output ON-delay time” can be changed as required.When the heater ON time is 200ms or less, set the ”soft startup time” to avoid detecting an inputsignal of 200ms or less.These parameters are set in SET Mode.
4-3
Section 4 Initial Setup
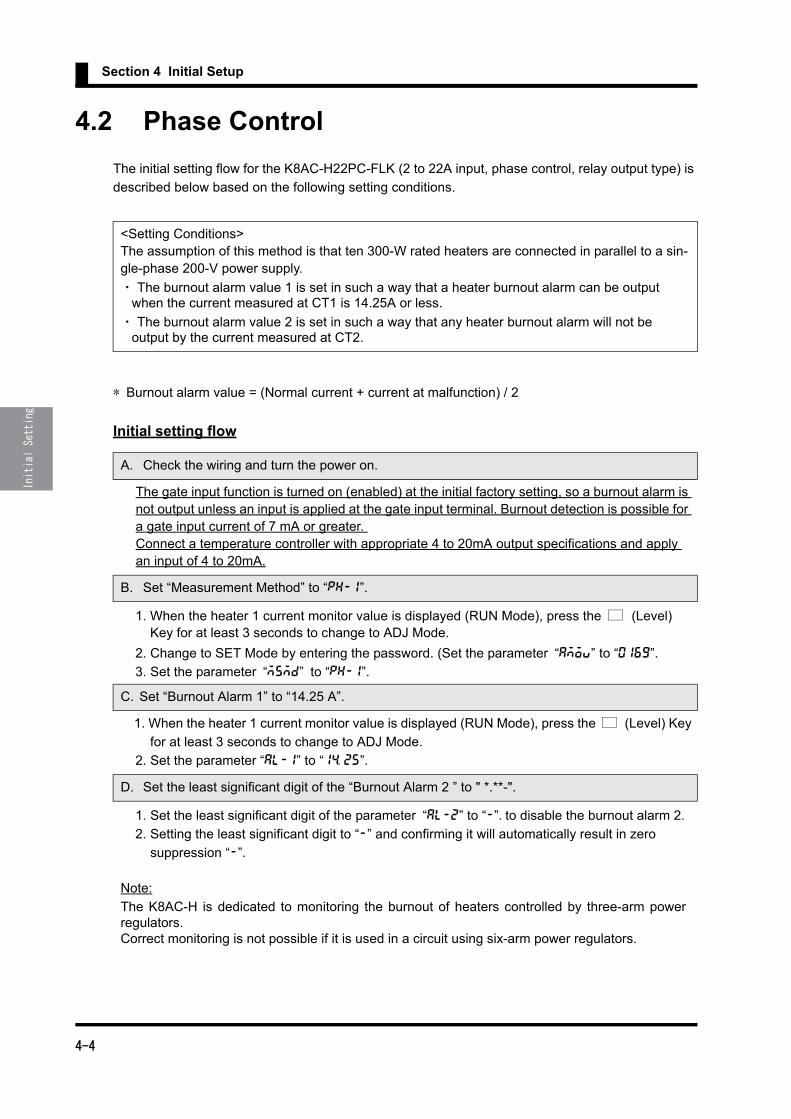
4.2 Phase Control
The initial setting flow for the K8AC-H22PC-FLK (2 to 22A input, phase control, relay output type) is
described below based on the following setting conditions.
* Burnout alarm value = (Normal current + current at malfunction) / 2
Initial setting flow
<Setting Conditions>The assumption of this method is that ten 300-W rated heaters are connected in parallel to a sin-gle-phase 200-V power supply.
・ The burnout alarm value 1 is set in such a way that a heater burnout alarm can be output when the current measured at CT1 is 14.25A or less.
・ The burnout alarm value 2 is set in such a way that any heater burnout alarm will not be output by the current measured at CT2.
A. Check the wiring and turn the power on.
The gate input function is turned on (enabled) at the initial factory setting, so a burnout alarm is not output unless an input is applied at the gate input terminal. Burnout detection is possible for a gate input current of 7 mA or greater. Connect a temperature controller with appropriate 4 to 20mA output specifications and apply an input of 4 to 20mA.
B. Set “Measurement Method” to “ph-1”.
1. When the heater 1 current monitor value is displayed (RUN Mode), press the L (Level) Key for at least 3 seconds to change to ADJ Mode.
2. Change to SET Mode by entering the password. (Set the parameter “amov” to “0169”.
3. Set the parameter “msmd” to “ph-1”.
C. Set “Burnout Alarm 1” to “14.25 A”.
1. When the heater 1 current monitor value is displayed (RUN Mode), press the L (Level) Key
for at least 3 seconds to change to ADJ Mode.
2. Set the parameter “al-1” to “14. 25”.
D. Set the least significant digit of the “Burnout Alarm 2 ” to " *.**-".
1. Set the least significant digit of the parameter “al-2” to “-”.to disable the burnout alarm 2.
2. Setting the least significant digit to “-” and confirming it will automatically result in zero
suppression “-”.
Note:
The K8AC-H is dedicated to monitoring the burnout of heaters controlled by three-arm powerregulators.Correct monitoring is not possible if it is used in a circuit using six-arm power regulators.
4-4

4.2 Phase Control
E. Change to the actual operation.
1. Change to RUN Mode by pressing the L (Level) Key for at least 1 second or waiting for
300 seconds (5 minutes) without pressing any key while the parameter is displayed in ADJ
Mode.
* For the parameter list or details on how to set parameters, please see “Section 5 Operation”.
Note:
The setting for “alarm hysteresis”, “setting of gate input function”, “gvoltage fluctuation compen-sation”, “startup lock timer” and “output ON-delay time” can be changed as required.These parameters are set in SET Mode.When using gradient settings with a power controller, change the operation gate current level insuch a way that the heater current value falls within the measurement range. (Initial value: 7mA)This parameter is set in GATE mode.
All clear function of set values
If you encounter a problem with your initial setting from whichyou cannot recover, you can start over from the beginning by only resetting to the initial values. For how to reset to the initial values, please refer to “5-14 Initialization of Set Values”. The initial values are values at the initial factory setting.
4-5
Section 4 Initial Setup
4.3 Cyclic Control
The initial setting flow for the K8AC-H22PC-FLK (2 to 22A input, phase/cyclic control, relay output type) is described below based on the following setting conditions.
* Burnout alarm value = (Normal current + current malfunction) / 2
Initial setting flow
<Setting Conditions>The assumption of this method is that ten 300-W rated heaters are connected in parallel to a sin-gle-phase 200-V power supply.The power regulator cycle is set to 0.5 s.The burnout alarm value 1 is set in such a way that a heater burnout alarm can be output when the current measured at CT1 is 14.25A or less.The burnout alarm value 2 is set in such a way that any heater burnout alarm will not be output by the current measured at CT2.
A. Check the wiring and turn the power on.
The gate input function is turned on (enabled) at the initial factory setting, so a burnout alarm is not output unless an input is applied at the gate input terminal. Burnout detection is possible for a gate input current of 7mA or greater. Connect a temperature controller with appropriate 4 to 20mA output specifications and apply an input of 4 to 20mA.
B. Set “Measurement Method” to “cycl”.
1. When the heater 1 current monitor value is displayed (RUN Mode), press the L (Level) Key
for at least 3 seconds to change to ADJ Mode.
2. Change to SET Mode by entering the password. (Set the parameter “amov” to “0169”).
3. Set the parameter “msmd” to “cycl”.
C. Set the cycle time to "0.5".
1. When the heater 1 current monitor value is displayed (RUN Mode), press the L (Level) Key
for at least 3 seconds to change to ADJ Mode.
2. Change to SET Mode by entering the password. (Set the parameter “amov” to “0169”).
3. Set the parameter “cyct” to “0. .5”.
D. Set “Burnout Alarm 1” to “14.25 A”.
1. When the heater 1 current monitor value is displayed (RUN Mode), press the L (Level) Key
for at least 3 seconds to change to ADJ Mode.
2. Set the parameter “al-1” to “14. 25”.
E. Set the least significant digit of the “Burnout Alarm 2” to "*.**-".
1. Set the least significant digit of the parameter “al-2” to “-” to disable the burnout alarm 2.
2. Setting the least significant digit to “-” and confirming it will automatically result in zero
suppression “-”.
F. Restart the unit.
4-6

4.3 Cyclic Control
■Setting Method<Setting Method for SSR and ON/OFF Control Heaters> Setting Conditions
Detecting burnouts in just one heater when ten 300-W rated heaters are connected in parallel to a single-phase 200-V power supply. The heater is SSR controlled.
Normal heater Current and Heater Current with One Heater Element Burnout
Normal current = (300 W ×10 (heaters) / 200 V = 15.0 A
Current with one burnout = 15A×0.9 = 13.5 A Heater burnout alarm set value =
(Normal current + current at malfunction) /2 = (15.0 + 13.5) /2 = 14.3A Selecting Heater Element Burnout Detector Models
For the above example, K8AC-H22C_-FLK would be selected.
The burnout alarm set value is 14.3 A, so the current input range 2.00 to 22.00 A should be selected.
SSR control is used, so type C should be selected. (Type C is also selected for ON/OFF con trol.)
Select the approriate realy or transistor output specifications, depending on the application.
K8AC-H Parameter Setting Procedure
(Only the minimum settings are shown here. Refer to “Section 5 Operation” for information on
how to set parameters.)
1. Turn ON the power to the K8AC-H. The initial status when power is turned ON is called RUN Mode.
2. Press the □ Key for at least 3 s to change from RUN Mode to ADJ Mode (the mode for adjusting burnout alarm set values.)
* For details on how to set parameters, please see “Section 5 Operation”.
Note:
The setting for “alarm hysteresis”, “setting of gate input function”, “voltage fluctuation compensa-tion”, “startup lock timer” and “output ON-delay time” can be changed as required. These parameters are set in SET Mode.When using gradient settings with a power controller, change the operation gate current level insuch a way that the heater current value falls within the measurement range. (Initial value: 7mA)This parameter is set in GATE mode.
All clear function of set values
If you encounter a problem with your initial setting from whichyou cannot recover, you can start over from the beginning by only resetting to the initial values. For how to reset to the initial values, please refer to “5-14 Initialization of Set Values”. The initial values are values at the initial factory setting.
4-7
Section 4 Initial Setup
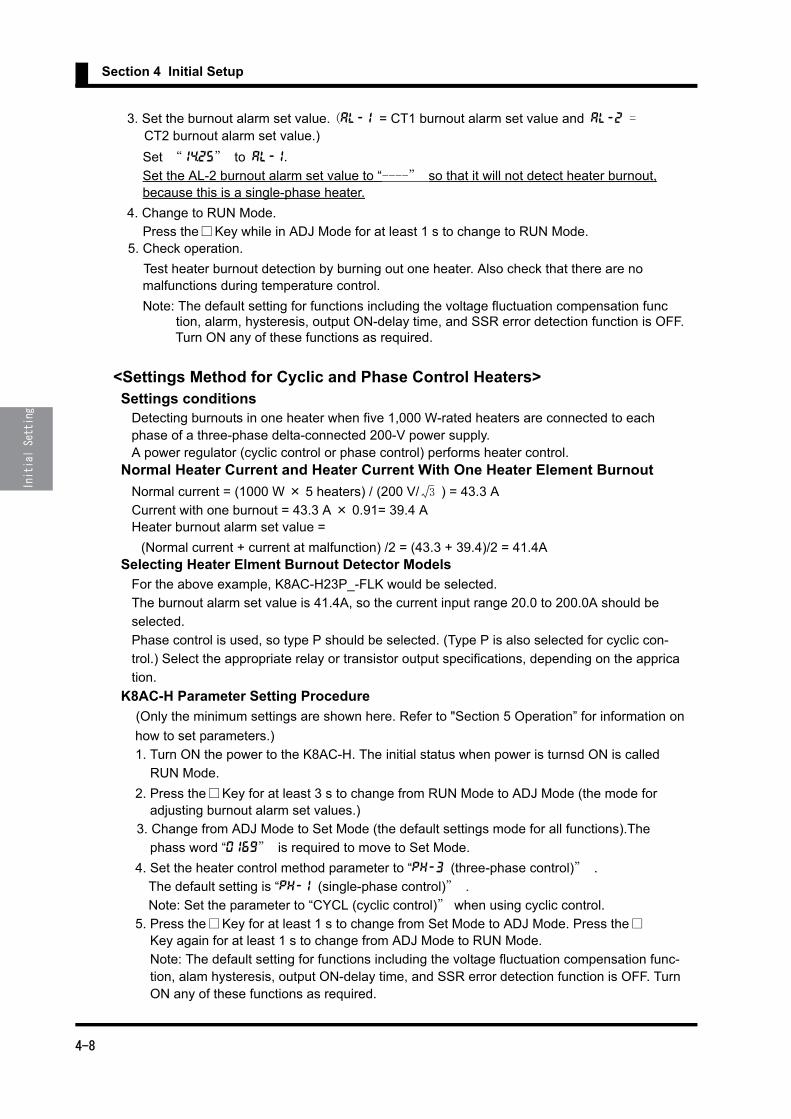
3. Set the burnout alarm set value. (al-1 = CT1 burnout alarm set value and al-2 = CT2 burnout alarm set value.)
Set “1$25” to al-1.
Set the AL-2 burnout alarm set value to “----” so that it will not detect heater burnout, because this is a single-phase heater.
4. Change to RUN Mode.
Press the□Key while in ADJ Mode for at least 1 s to change to RUN Mode. 5. Check operation.
Test heater burnout detection by burning out one heater. Also check that there are no malfunctions during temperature control.
Note: The default setting for functions including the voltage fluctuation compensation func tion, alarm, hysteresis, output ON-delay time, and SSR error detection function is OFF. Turn ON any of these functions as required.
<Settings Method for Cyclic and Phase Control Heaters> Settings conditions Detecting burnouts in one heater when five 1,000 W-rated heaters are connected to each phase of a three-phase delta-connected 200-V power supply. A power regulator (cyclic control or phase control) performs heater control. Normal Heater Current and Heater Current With One Heater Element Burnout
Normal current = (1000 W × 5 heaters) / (200 V/ ) = 43.3 A
Current with one burnout = 43.3 A × 0.91= 39.4 A Heater burnout alarm set value =
(Normal current + current at malfunction) /2 = (43.3 + 39.4)/2 = 41.4A Selecting Heater Elment Burnout Detector Models
For the above example, K8AC-H23P_-FLK would be selected.
The burnout alarm set value is 41.4A, so the current input range 20.0 to 200.0A should be
selected.
Phase control is used, so type P should be selected. (Type P is also selected for cyclic con-
trol.) Select the appropriate relay or transistor output specifications, depending on the apprica
tion.
K8AC-H Parameter Setting Procedure
(Only the minimum settings are shown here. Refer to "Section 5 Operation” for information on
how to set parameters.)
1. Turn ON the power to the K8AC-H. The initial status when power is turnsd ON is called
RUN Mode.
2. Press the□Key for at least 3 s to change from RUN Mode to ADJ Mode (the mode for adjusting burnout alarm set values.)
3. Change from ADJ Mode to Set Mode (the default settings mode for all functions).The
phass word “0169” is required to move to Set Mode.
4. Set the heater control method parameter to “ph-3 (three-phase control)” .
The default setting is “ph-1 (single-phase control)” .
Note: Set the parameter to “CYCL (cyclic control)” when using cyclic control.
5. Press the□Key for at least 1 s to change from Set Mode to ADJ Mode. Press the□ Key again for at least 1 s to change from ADJ Mode to RUN Mode.
Note: The default setting for functions including the voltage fluctuation compensation func- tion, alam hysteresis, output ON-delay time, and SSR error detection function is OFF. Turn ON any of these functions as required.
3
4-8

4.3 Cyclic Control
Burnout Alarm Set Value Setting Method Setting Method
1. Wire the K8AC-H, temperature controller (4 to 20mA current output type), and power regulator.
2. Press the□ Key on the K8AC-H for at least 3 s to change from RUN Mode to ADJ Mode
3. “ al-1 (CT1 burnout alarm set value)” will be displayed when the mode is changed to
ADJ Mode. Press the S key once when al-1 is displayed. Next, press the U Key once.
The present heater current value will be displayed on the main display, so note this as the normal current value. Always have the temperature controller output at 20.0mA at this time. (See note 1)
Note: 1. The K8AC-H automatically adjusts burnout alarm levels to compensate based on the power regulator output controlled by the 4 to 20 mA input from a temperature controller.The output must be kept at 20 mA as the burnout alarm set value needs to be set with the temperature controller output at 100% (20 mA output).
4. Next, disconnect one heater and note the heater current in this burnout state. Alterna tively, use the current when one heater is burned out (calculated earlier) as the current during malfunction. It is recommended that the current at an actual burnout is confirmed.5. Set the K8AC-H burnout alarm set value based on the results. The burnout alarm set value is set
at the mid-point between the normal current and the current at malfunction, taking errors and
variations in heater capacitiy into considerration.
6. In this setting example, the set value for “al-2” (CT2 burnout alarm setting) is the same
as the set value for “al-1”. (See note 2)
Note: 2. If the heater capacity is unbalanced, the burnout alarm values for CT1 and CT2 may not be the same. 3. When using gradient settings with a power controller, change the operation gate current level in such a way that the heater current value falls within the measurement range. This parameter is set in GATE mode.
4-9

Section 4 Initial Setup
4-10

Section 5 Operation
This Section describes operations from the front panel such as how to move
between modes or change parameters.
5.1 Modes ........................................................................... ..5-3
5.2 Moving between Modes ..................................................5-4
5.3 Parameters .....................................................................5-6
5.4 Setting the Parameter ................................................... 5-11
5.5 Measurement Display ...................................................5-12
5.6 Compensation of Processing Value Display .................5-18
5.7 Reset of Measurement Monitor Values.........................5-20
5.8 Alarm Indicators ............................................................5-22
5.9 Test Function.................................................................5-23
5.10 Setting Protection Function.........................................5-25
5.11 Selecting Burnout Alarm Set Values ...........................5-27
5.12 Selecting Voltage Fluctuation Compensation Standard
Value.........................................................................5-30
5.13 All Initialization ............................................................5-32
5.14 Set Value Initialization.................................................5-34
5.15 Processing Value Initialization ....................................5-36
5.16 Setting of Alarm Hysteresis.........................................5-38
5.17 Setting of Gate Input Function ....................................5-40
5.18 Setting of Voltage Fluctuation Compensation Function ...5-42
5.19 Setting of Startup Lock Time.......................................5-44
5.20 Setting of Output ON Delay Time ...............................5-46
5.21 Setting of Soft Startup Time ........................................5-48
5.22 Setting of SSR Short Circuit Detection Function.........5-50
5.23 Setting of SSR Open Circuit Detection Function ........5-52
5.24 Setting of Heater Layer Short Circuit Detection Function
..................................................................................5-54
5.25 Setting of Heater Layer Short Circuit Alarm Level ......5-56
5-1

Section 5 Operation
5.26 Selection of Heater Control Method (Only for phase and
cyclic control type K8AC-H2_ _P_)...........................5-58
5.27 Setting of Switch Display ............................................5-60
5.28 Setting of Power Save Mode ......................................5-62
5.29 Setting of Power Save Mode Standby Time................5-64
5.30 Setting of Display Mode ..............................................5-66
5.31 Setting of Display Refresh Time..................................5-69
5.32 Setting of Unit Number................................................5-71
5.33 Setting of Baud Rate...................................................5-73
5.34 Setting of Data Length ................................................5-75
5.35 Setting of Stop Bits......................................................5-77
5.36 Setting of Parity Bit .....................................................5-79
5.37 Setting of Gate OFF Alarm Output Hold Time (Only for
ON/OFF control type heaters ; K8AC-H2_ _C_) ......5-81
5.38 Setting of Operation Gate Current Level (Only for phase
or cyclic control type heaters: K8AC-H2_ _P_) .......5-83
5.39 Setting of Number of CT Passes ................................5-85
5.40 Setting of CT Ratio......................................................5-87
5.41 Setting of Number of Effective Digits to be Displayed after
the Decimal Point......................................................5-89
5.42 Setting SSR ON Delay................................................5-91
5.43 Setting SSR Operation Gate Current Level (Only for
phase or cyclic control type heaters: K8AC-H2_ _P_)
........................................................................................... 5-93
5.44 Setting Cycle Time (Only for cyclic control type heaters:
K8AC-H2_ _P_) .......................................................5-95
5-2
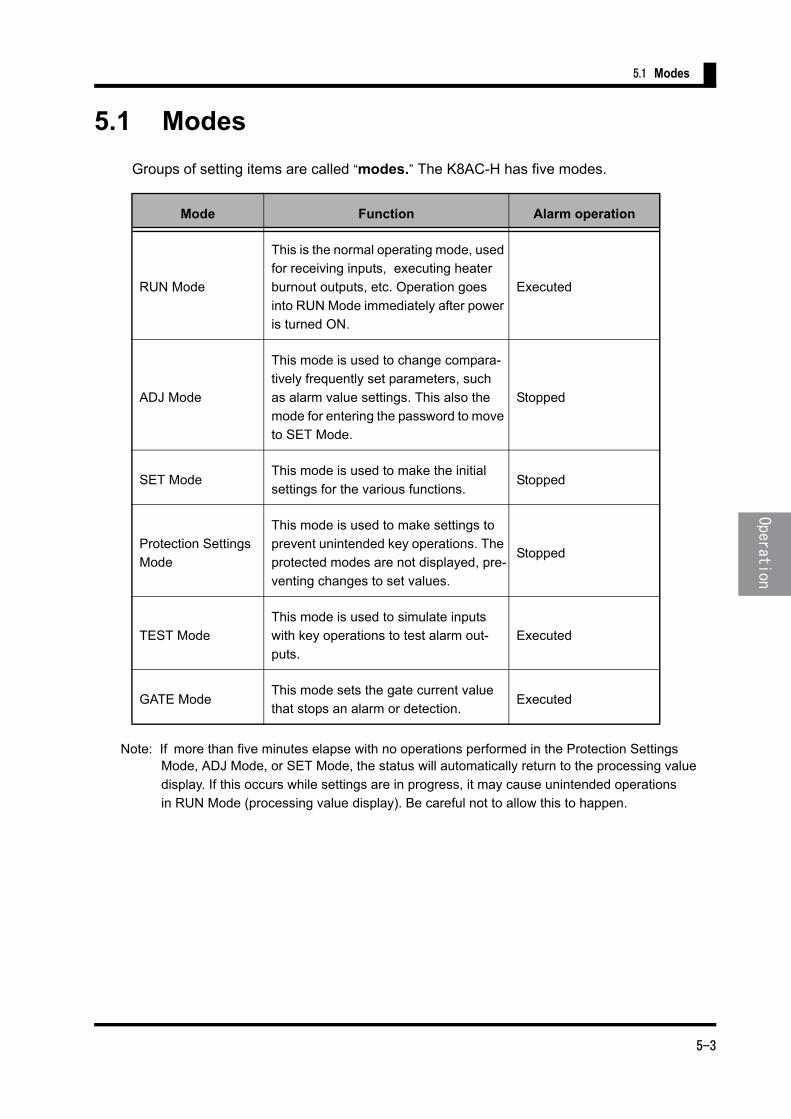
5.1 Modes
5.1 Modes
Groups of setting items are called “modes.” The K8AC-H has five modes.
Note: If more than five minutes elapse with no operations performed in the Protection Settings Mode, ADJ Mode, or SET Mode, the status will automatically return to the processing value
display. If this occurs while settings are in progress, it may cause unintended operations
in RUN Mode (processing value display). Be careful not to allow this to happen.
Mode Function Alarm operation
RUN Mode
This is the normal operating mode, used
for receiving inputs, executing heater
burnout outputs, etc. Operation goes
into RUN Mode immediately after power
is turned ON.
Executed
ADJ Mode
This mode is used to change compara-
tively frequently set parameters, such
as alarm value settings. This also the
mode for entering the password to move
to SET Mode.
Stopped
SET ModeThis mode is used to make the initial
settings for the various functions.Stopped
Protection Settings
Mode
This mode is used to make settings to
prevent unintended key operations. The
protected modes are not displayed, pre-
venting changes to set values.
Stopped
TEST Mode
This mode is used to simulate inputs
with key operations to test alarm out-
puts.
Executed
GATE ModeThis mode sets the gate current value
that stops an alarm or detection.Executed
5-3

Section 5 Operation
5.2 Moving between Modes
To ADJ ModeWhen the L key is pressed for one second in RUN Mode, the 7-segment display will begin to flash.
If the key is held down for another two seconds, the mode will be switched to ADJ Mode. To return to
RUN Mode from ADJ Mode, press the L key for at least one second.
To Protection Setting ModeWhen the L and M keys are pressed for one second in RUN Mode, the 7-segment display will
begin to flash. If the keys are held down for another five seconds, the mode will be switched to Pro-
tection Settings Mode. To return to RUN Mode from Protection Setting Mode, press the L and M
keys for at least one second.
To Test Mode
When the S key is pressed for at least one second in RUN Mode, the mode will be switched to
TEST Mode. To return to RUN Mode from TEST Mode, press the S key for at least one second.
Hold down for at leastanother 2 s.
Press the andkeys for 5 s.
When the key isreleased
Press the key for at least 1 s.
Power ON
RUN Mode TEST Mode
GATE Mode
ADJ Mode
SET Mode
Protection Settings Mode Press the and
keys for at least 1 s.
Password:0169
Press the keyfor at least 1 s.
Press the key forat least 1 s.
Press the key forat least 1 s.
Press the keys forat least 1 s.
When the key is released
Press the key forat least 1 s.
Press the key forat least 1 sec.
Press the andkeys.
5-4
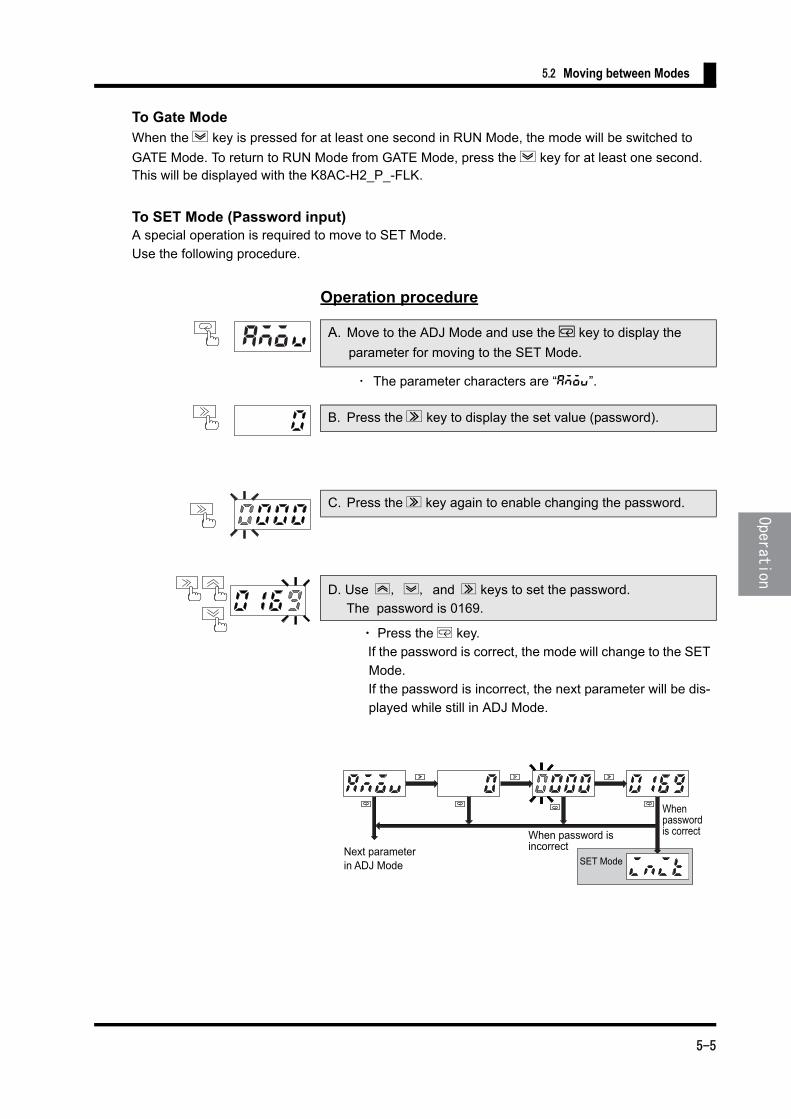
5.2 Moving between Modes
To Gate ModeWhen the D key is pressed for at least one second in RUN Mode, the mode will be switched to
GATE Mode. To return to RUN Mode from GATE Mode, press the D key for at least one second.This will be displayed with the K8AC-H2_P_-FLK.
To SET Mode (Password input)A special operation is required to move to SET Mode.
Use the following procedure.
Operation procedure
A. Move to the ADJ Mode and use the M key to display the
parameter for moving to the SET Mode.
・ The parameter characters are “amov”.
B. Press the S key to display the set value (password).
C. Press the S key again to enable changing the password.
D. Use U, D, and S keys to set the password.
The password is 0169.
・ Press the M key.
If the password is correct, the mode will change to the SET
Mode.
If the password is incorrect, the next parameter will be dis-
played while still in ADJ Mode.
amo
Next parameterin ADJ Mode
When password isincorrect
SET Mode
When passwordis correct
5-5

Section 5 Operation
5.3 Parameters
The setting items in each mode are called “parameters”. Parameters can be switched by using the M key.
Protection Mode
Heater 1 current
Heater 2 current
Power supplyvoltage processvalue
Heater 1 maximumcurrent
Maximum powersupply voltage
Processing value display status
Heater 2 input shiftdisplay curent
Minimum powersupply voltage
Number ofalarm outputs
Processing valuefor alarm output
Run time
Burnout alarm settingvalue 2
Voltage fluctuationcompensation standardvalue
Password for movingto SET Mode: 0169
Burnout alarmsettingvalue 1
ADJ MODE
Measurementparameters
SET MODE
Setting Change Protection
Setting Change Protection
1 s min.
++
Po
we
r ON
5 s min. 1 s min.
RUN Mode
Heater 1 minimumcurrent
Heater 2 maximumcurrent
Heater 2 minimumcurrent
3 s min.
1 s min.
1 s min.
1. Displayed when the Serectable Protection Levelparameter is set to 0.2. Displayed by the K8AC-H2_P_-FLK.3. If more than five minutes elapse with no operations performed in Protection Setting
Mode,ADJ Mode,SET Mode,or for a measurement parameter, the status will return autmatically to the processing value display. If this occurs while settings are in progress,it may cause unintended operations to be performed in RUN Mode(i.e., with measurement values displayed).Be careful,not to allow this to happen.4. Displayed by the K8AC-H2_C_-FLK.
Parameter Display
Displayed for all models and settings.
at least 1 sec
Heater 1 input shiftdisplay curent
al-1
al-2
ct 1
ct 2
sce
max1
min1
max2
min2
maxs
isc2
isc1
otim
memo
acnt
min5
1234
VfcV
amoV
aspt
wtpt
An alarm is output if thetest value falls below the burnout alarm value 1 setting.
TEST MODE
test
GATE Setting Mode
g-lV1 s min.
1 s min.
Alarm or detection is stopped ifthe gate current value fallsbelow the set value.
May not be displayed depending on the model or settings.
SSR short circuitdetection function
Output ON-delay time
Soft startup time
Startup lock time
Voltage fluctuationcompensation standard value
Gate input function
Alarm hysteresis 1
Processing valueinitialization
All initialization
Set valueinitialization
Data length
Parity bit
CT ratio 2
Alarm hysteresis 2
SSR open circuit detection function
Heater layer short circuitdetection function
Heater layer short circuitalarm set value
Power savemode syandbytime
Display mode
Displayrefresh time
Unit number
Baud rate
Stop bit
Gate OFF outputhold time
Number ofCT passes 1
CT ratio 1
Setting 1 for number of effective digits to bedisplayed after the decimal point
Number ofCT passes 2
Setting 2 for number of effective digits to bedisplayed after the decimal point
init
sini
pini
hys1
hys2
gate
comp
stim
odly
soft
ssht
sopn
hrst
hral
pstm
dsmd
dsrf
u no
bps
len
sbit
nct1
ctr1
ndp1
nct2
ctr2
ndp2
prty
goht
Heater controlmethod
Switcabledisplay
Power save mode
msmd
dsel
psmd SSR on delay
SSR operation gate current level
Cycle time
sdly
sglV
cyct
5-6

5.3 Parameters
■Parameter Defaults and DescriptionNote: Shaded parameters must always be set regardless of the measurement method.
Item Mode
Parameter name DescriptionParame-
ter Setting range
Dafault
Protec-tion-Mode
Setting Value Change Protec-tion
Restricts access to ADJ Mode or SET-Mode from RUN Mode.0: Access enabled to both ADJ Mode and SET Mode.1: Access enabled to ADJ Mode and disabled to SET Mode.2: Access disabled to both ADJ Mode and SET Mode.
aspt 0 to 2 0
Prohibits changes to set values. wtpt ON/OFF OFF
ADJ Mode
Burnout Alarm Value 1
K8AC-H21
Sets the output operation value for the burnout alarm.The burnout alarm function can be dis-abled by setting the value to “-”.
al-1
0.200 to 2.200A
1.000A
K8AC-H222.00 to 22.00A
10.00A
K8AC-H2320.0 to 200.0A
100.0A
Burnout Alarm Value 2
K8AC-H21
Sets the output operation value for the burnout alarm.The burnout alarm function can by dis-abled by setting the value to “-”.
al-2
0.200 to 2.200A
1.000A
K8AC-H222.00 to 22.00A
10.00A
K8AC-H2320.0 to 200.0A
100.0A
Voltage Fluctuation Compen-sation Standard Value
Sets the standard voltage used by the voltage fluctuation compensation function. The fluctuation compensation function operates in respect to this set value.
vfcv100 to 240 VAC
100V
5-7
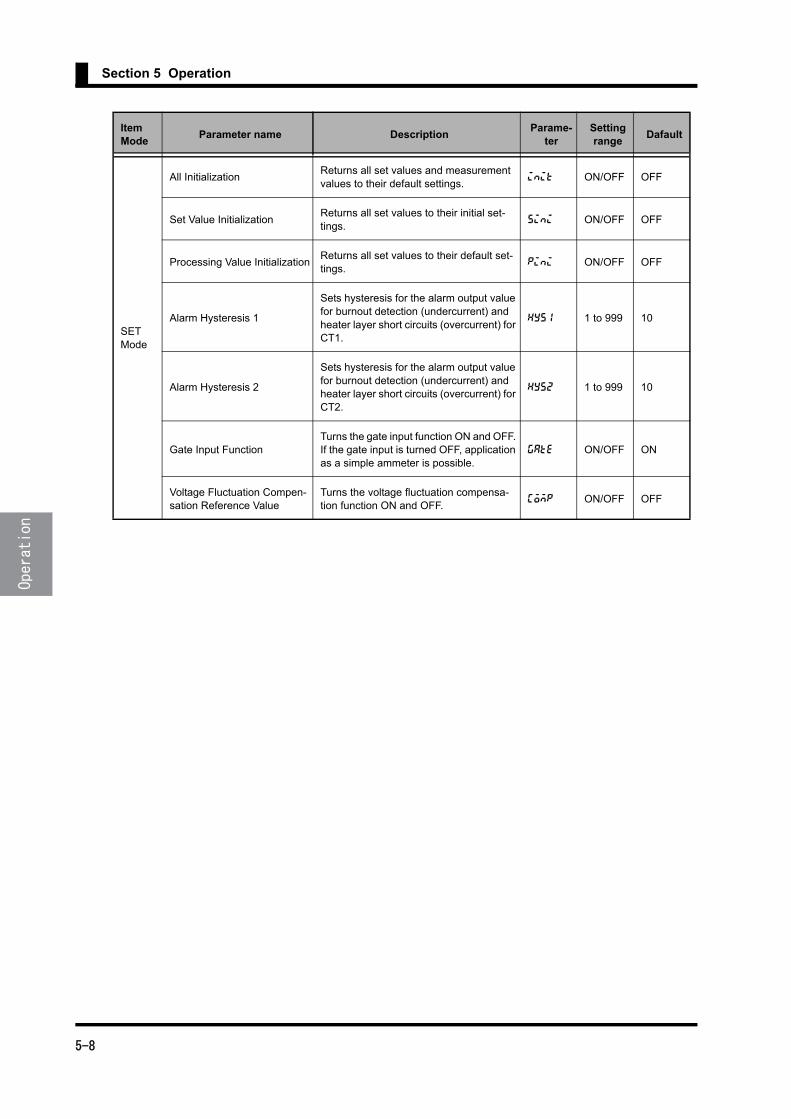
Section 5 Operation
SET Mode
All InitializationReturns all set values and measurement values to their default settings.
init ON/OFF OFF
Set Value Initialization Returns all set values to their initial set-tings.
sini ON/OFF OFF
Processing Value InitializationReturns all set values to their default set-tings.
pini ON/OFF OFF
Alarm Hysteresis 1
Sets hysteresis for the alarm output value for burnout detection (undercurrent) and heater layer short circuits (overcurrent) for CT1.
hys1 1 to 999 10
Alarm Hysteresis 2
Sets hysteresis for the alarm output value for burnout detection (undercurrent) and heater layer short circuits (overcurrent) for CT2.
hys2 1 to 999 10
Gate Input FunctionTurns the gate input function ON and OFF. If the gate input is turned OFF, application as a simple ammeter is possible.
gate ON/OFF ON
Voltage Fluctuation Compen-sation Reference Value
Turns the voltage fluctuation compensa-tion function ON and OFF.
comp ON/OFF OFF
Item Mode
Parameter name DescriptionParame-
ter Setting range
Dafault
5-8
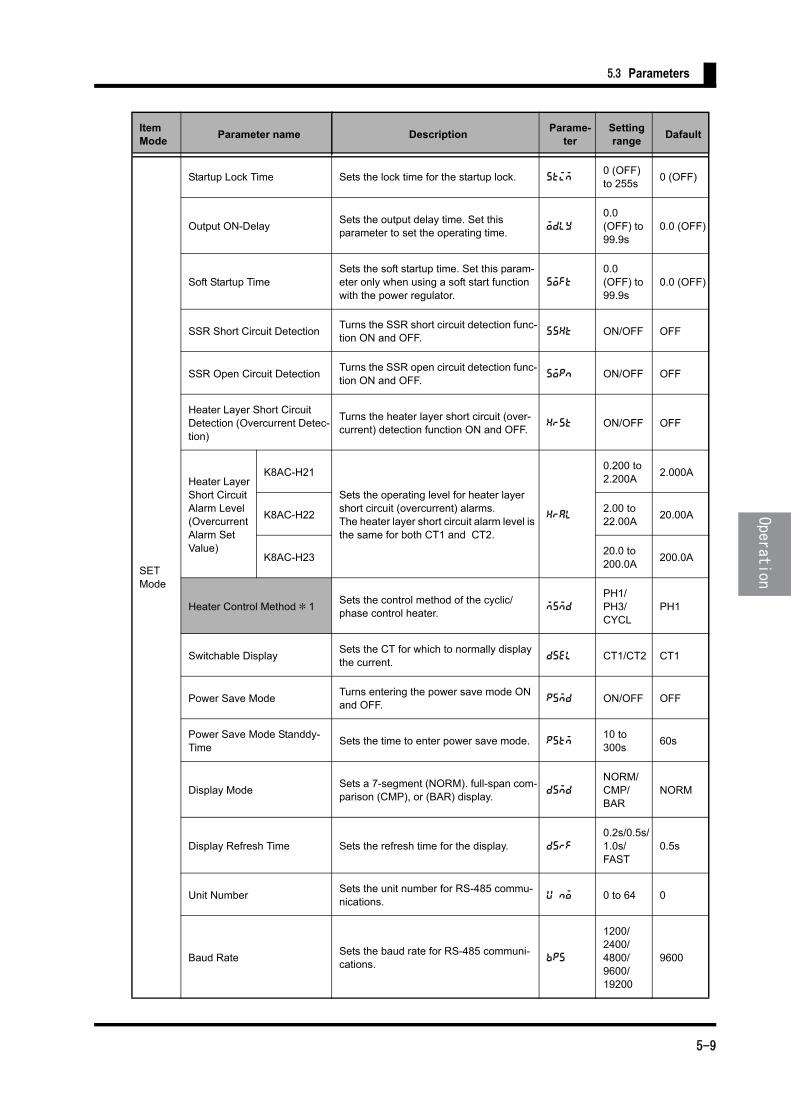
5.3 Parameters
SET Mode
Startup Lock Time Sets the lock time for the startup lock. stim0 (OFF) to 255s
0 (OFF)
Output ON-DelaySets the output delay time. Set this parameter to set the operating time.
odly
0.0(OFF) to 99.9s
0.0 (OFF)
Soft Startup TimeSets the soft startup time. Set this param-eter only when using a soft start function with the power regulator.
soft
0.0(OFF) to 99.9s
0.0 (OFF)
SSR Short Circuit DetectionTurns the SSR short circuit detection func-tion ON and OFF.
ssht ON/OFF OFF
SSR Open Circuit DetectionTurns the SSR open circuit detection func-tion ON and OFF.
sopn ON/OFF OFF
Heater Layer Short Circuit Detection (Overcurrent Detec-tion)
Turns the heater layer short circuit (over-current) detection function ON and OFF.
hrst ON/OFF OFF
Heater Layer Short Circuit Alarm Level (Overcurrent Alarm Set Value)
K8AC-H21
Sets the operating level for heater layer short circuit (overcurrent) alarms.The heater layer short circuit alarm level is the same for both CT1 and CT2.
hral
0.200 to 2.200A
2.000A
K8AC-H222.00 to 22.00A
20.00A
K8AC-H2320.0 to 200.0A
200.0A
Heater Control Method*1Sets the control method of the cyclic/phase control heater.
msmd
PH1/PH3/CYCL
PH1
Switchable DisplaySets the CT for which to normally display the current.
dsel CT1/CT2 CT1
Power Save ModeTurns entering the power save mode ON and OFF.
psmd ON/OFF OFF
Power Save Mode Standdy-Time
Sets the time to enter power save mode. pstm10 to 300s
60s
Display ModeSets a 7-segment (NORM). full-span com-parison (CMP), or (BAR) display.
dsmd
NORM/CMP/BAR
NORM
Display Refresh Time Sets the refresh time for the display. dsrf
0.2s/0.5s/1.0s/FAST
0.5s
Unit NumberSets the unit number for RS-485 commu-nications.
u no 0 to 64 0
Baud RateSets the baud rate for RS-485 communi-cations.
bps
1200/2400/4800/9600/19200
9600
Item Mode
Parameter name DescriptionParame-
ter Setting range
Dafault
5-9

Section 5 Operation
*1. This can be set only for K8AC-H2_P_-FLK (cyclic control/phase control).*2. The parameter of Gate OFF Output Hold Time can be set only for K8AC-H2_C_-FLK (ON/OFF control/SSR control).*3. The setting range varies depending on the setting of the scaling parameters (nct1,2 ctr1,2 ndp1,2). See 5-12 for details.*4. The setting range varies depending on the model. K8AC-H21_ _-FLK:*000/0*00/00*0/0000. K8AC-H22_ _-FLK:0*00/00*0/0000. K8AC-H23C-FLK:00*0/0000.*5. The initial value varies depending on the model. K8AC-H21_ _-FLK:*000 K8AC-H22_ _-FLK:0*00 K8AC-H23_ _-FLK:00*0*6. Can be set only for the K8AC-H2_P_-FLK (cyclic control). The unit must be restarted after changing the setting.
SET Mode
Data LengthSets the data length for RS-485 communi-cations.
len 7, 8 7
Stop BitsSets the number of stop bits for RS-485 communications.
sbit 1, 2 2
Parity BitSets the parity for RS-485 communica-tions.
prty
EVEN,ODD,NONE
EVEN
Gate OFF output hold time *2Sets the time from when the gate signal gose OFF until the burnout alarm output turns OFF.
goht 0 to 999s 2s
Number of CT passes 1tSets the number of times the conductor for CT1 is passed through the current transformer.
nct11 to 99 times
1 time
CT Ratio 1 Sets the CT ratio for CT1. ctr1 1 to 999 1
Setting 1 for number of effec-tive digits to be displayed after the decimal point
Sets the number of effective digits to be displayed after the decimal point for the CT1 current display.
ndp1 *4 *5
Number of CT passes 2Sets the number of times the conductor for CT2 is passed through the current transformer.
nct21 to 99 times
1 time
CT Ratio 2 Sets the CT ratio for CT2. ctr2 1 to 999 1
Setting 2 for number of effec-tive digits to be displayed after the decimal point.
Sets the number of effective digits to be displayed after the decimal point for the CT2 current display.
ndp2 *4 *5
SSR ON delay Sets the SSR ON delay. sdly0.0 to 99.9s
0.2s
SSR operation gate current level *1
Sets the SSR operation gate current level. sglv4.0 to 20.0mA
7.0mA
Cycle time *6 Sets the cycle time. cyct0.2 to 3.0s
0.2s
GATE Setting Mode
Gate Current Level *1
Sets the gate current value that stops an alarm, detection, or output. (This setting is only valid when phase control is selected as the heater controlmethod.)
g-lv7.0 to 20.0mA
7.0mA
Item Mode
Parameter name DescriptionParame-
ter Setting range
Dafault
5-10
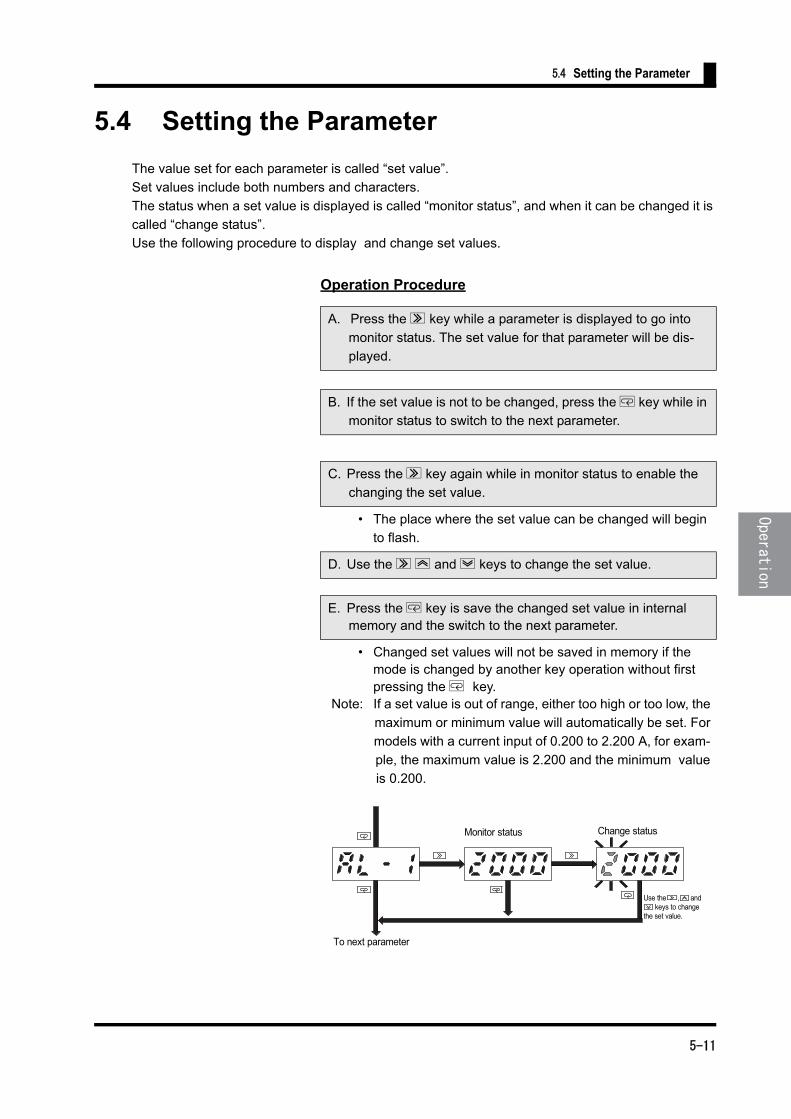
5.4 Setting the Parameter
5.4 Setting the Parameter
The value set for each parameter is called “set value”.
Set values include both numbers and characters.
The status when a set value is displayed is called “monitor status”, and when it can be changed it is
called “change status”.
Use the following procedure to display and change set values.
Operation Procedure
A. Press the S key while a parameter is displayed to go into
monitor status. The set value for that parameter will be dis-
played.
B. If the set value is not to be changed, press the M key while in
monitor status to switch to the next parameter.
C. Press the S key again while in monitor status to enable the
changing the set value.
• The place where the set value can be changed will begin
to flash.
D. Use the S U and D keys to change the set value.
E. Press the M key is save the changed set value in internal memory and the switch to the next parameter.
• Changed set values will not be saved in memory if the mode is changed by another key operation without first pressing the M key.
Note: If a set value is out of range, either too high or too low, the
maximum or minimum value will automatically be set. For
models with a current input of 0.200 to 2.200 A, for exam-
ple, the maximum value is 2.200 and the minimum value
is 0.200.
Monitor status Change status
Use the , and keys to changethe set value.
To next parameter
5-11
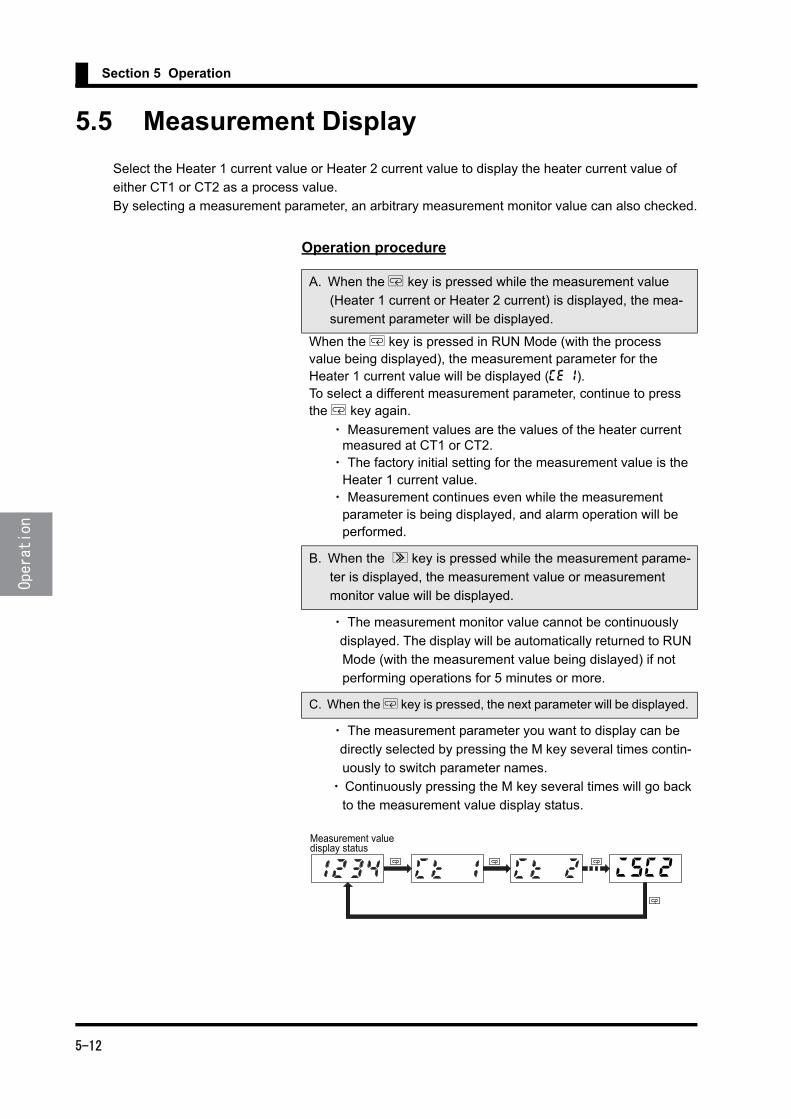
Section 5 Operation
5.5 Measurement Display
Select the Heater 1 current value or Heater 2 current value to display the heater current value of
either CT1 or CT2 as a process value.
By selecting a measurement parameter, an arbitrary measurement monitor value can also checked.
Operation procedure
A. When the M key is pressed while the measurement value
(Heater 1 current or Heater 2 current) is displayed, the mea-
surement parameter will be displayed.
When the M key is pressed in RUN Mode (with the process value being displayed), the measurement parameter for the Heater 1 current value will be displayed (ce 1). To select a different measurement parameter, continue to press the M key again.
・ Measurement values are the values of the heater current measured at CT1 or CT2. ・ The factory initial setting for the measurement value is the Heater 1 current value. ・ Measurement continues even while the measurement parameter is being displayed, and alarm operation will be performed.
B. When the S key is pressed while the measurement parame-
ter is displayed, the measurement value or measurement
monitor value will be displayed.
・ The measurement monitor value cannot be continuously
displayed. The display will be automatically returned to RUN
Mode (with the measurement value being dislayed) if not
performing operations for 5 minutes or more.
C. When the M key is pressed, the next parameter will be displayed.
・ The measurement parameter you want to display can be
directly selected by pressing the M key several times contin-
uously to switch parameter names.
・Continuously pressing the M key several times will go back
to the measurement value display status.
Measurement valuedisplay status
isc2
5-12
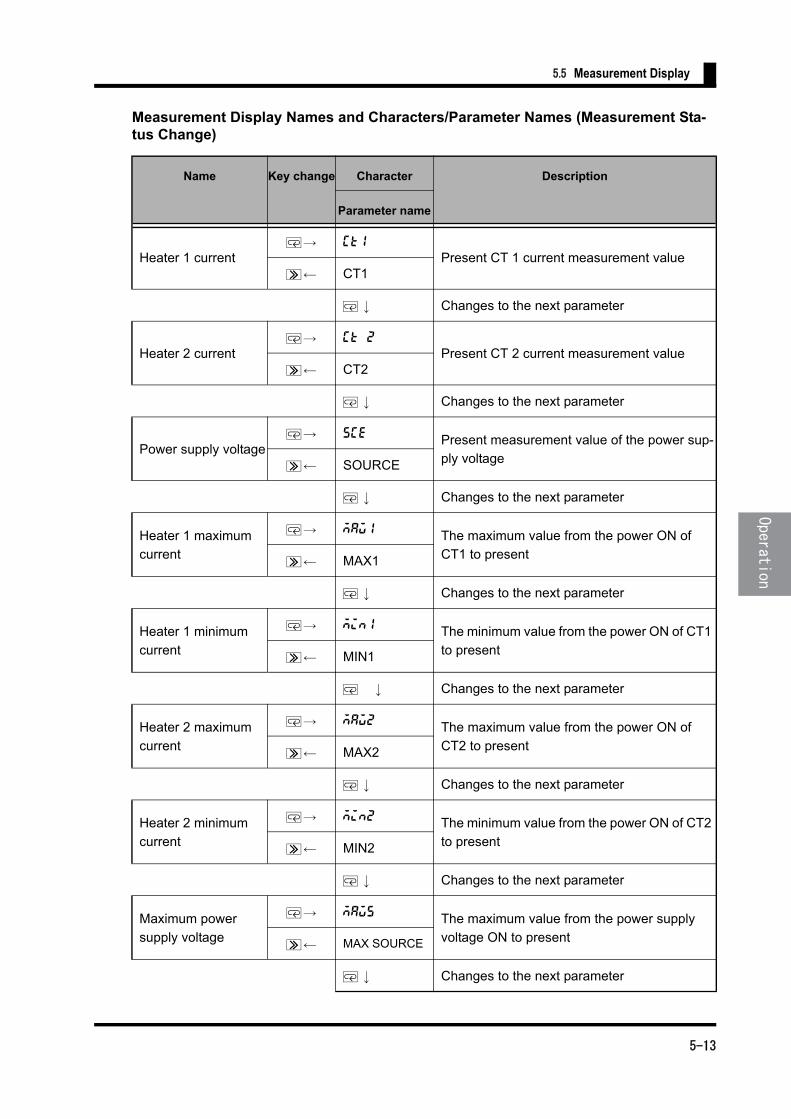
5.5 Measurement Display
Measurement Display Names and Characters/Parameter Names (Measurement Sta-tus Change)
Name Key change Character Description
Parameter name
Heater 1 currentM→ ct1
Present CT 1 current measurement valueS← CT1
M↓ Changes to the next parameter
Heater 2 currentM→ ct 2
Present CT 2 current measurement valueS← CT2
M↓ Changes to the next parameter
Power supply voltageM→ sce Present measurement value of the power sup-
ply voltageS← SOURCE
M↓ Changes to the next parameter
Heater 1 maximum
current
M→ max1 The maximum value from the power ON of
CT1 to presentS← MAX1
M↓ Changes to the next parameter
Heater 1 minimum
current
M→ min1 The minimum value from the power ON of CT1
to presentS← MIN1
M ↓ Changes to the next parameter
Heater 2 maximum
current
M→ max2 The maximum value from the power ON of
CT2 to presentS← MAX2
M↓ Changes to the next parameter
Heater 2 minimum
current
M→ min2 The minimum value from the power ON of CT2
to presentS← MIN2
M↓ Changes to the next parameter
Maximum power
supply voltage
M→ maxs The maximum value from the power supply
voltage ON to presentS← MAX SOURCE
M↓ Changes to the next parameter
5-13

Section 5 Operation
Memo
*1. If more than five minutes elapse with no operations performed while the measurement parameter is displayed, the status will automatically return to RUN Mode (measurement value
display status: Heater 1 current or Heater 2 current).
*2. The above measurement values will be reset upon all initialization and measurement value initialization.
Minimum power sup-
ply voltage
M→ mins The minimum value from the power supply
voltage ON to presentS← MIN SOURCE
M↓ Changes to the next parameter
Number of alarm out-
puts
M→ acnt
The total number of alarm outputsS← ALM COUNT
M↓ Changes to the next parameter
Processing value for
alarm output
M→ memo
CT1 or CT2 processing value for alarm outputS← MEMO
M↓ Changes to the next parameter
Run timeM→ otim
The total run time valueS← RUN TIME
M↓ Changes to the next parameter
Heater 1 input shift
display current
M→ isc1
The shift value for the measurement of CT1
heater currentS← INPUT SHIFT
CURRENT1
M↓ Changes to the next parameter
Heater 2 input shift
display current
M→ isc2
The shift value for the measurement of CT2
heater currentS← INPUT SHIFT
CURRENT2
M↓ Changes to the next parameter
Returns to the processing value display.
Name Key change Character Description
Parameter name
5-14
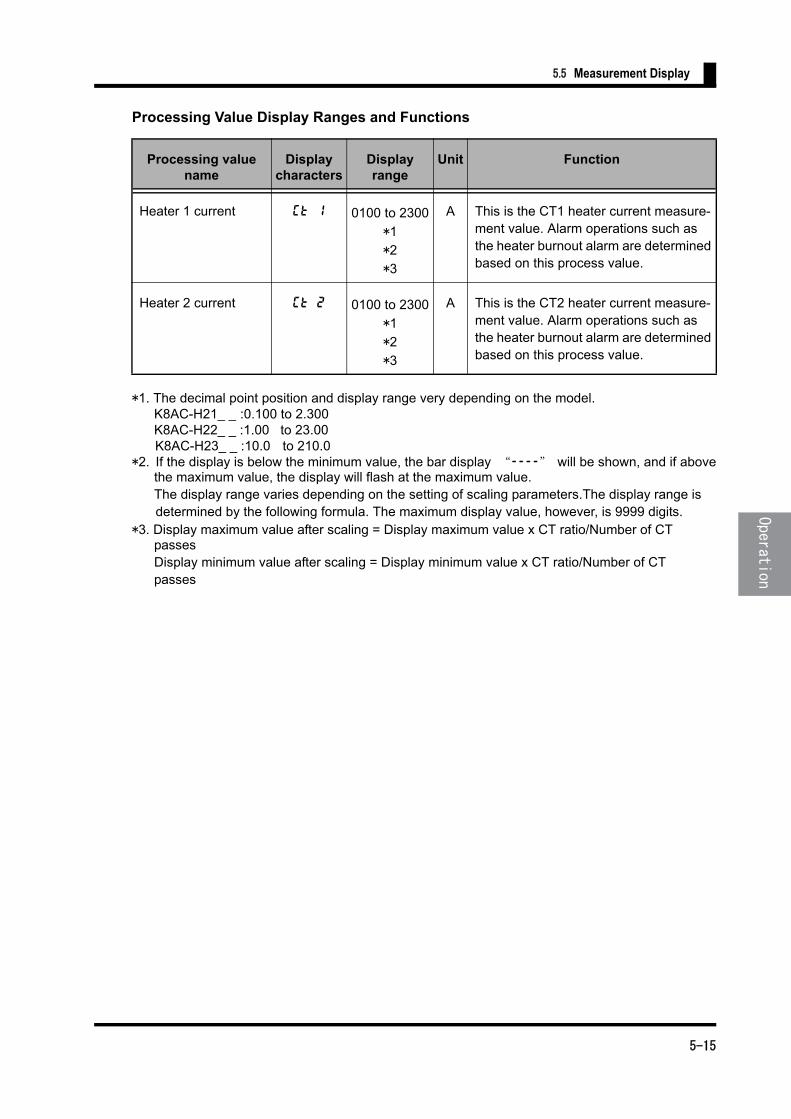
5.5 Measurement Display
Processing Value Display Ranges and Functions
*1. The decimal point position and display range very depending on the model. K8AC-H21_ _ :0.100 to 2.300 K8AC-H22_ _ :1.00 to 23.00 K8AC-H23_ _ :10.0 to 210.0*2. If the display is below the minimum value, the bar display “----” will be shown, and if above the maximum value, the display will flash at the maximum value. The display range varies depending on the setting of scaling parameters.The display range is determined by the following formula. The maximum display value, however, is 9999 digits.*3. Display maximum value after scaling = Display maximum value x CT ratio/Number of CT passes Display minimum value after scaling = Display minimum value x CT ratio/Number of CT passes
Processing value name
Display characters
Display range
Unit Function
Heater 1 current ct 1 0100 to 2300
*1
*2
*3
A This is the CT1 heater current measure-ment value. Alarm operations such as the heater burnout alarm are determined based on this process value.
Heater 2 current ct 2 0100 to 2300
*1
*2
*3
A This is the CT2 heater current measure-ment value. Alarm operations such as the heater burnout alarm are determined based on this process value.
5-15

Section 5 Operation
Measurement Monitor Value Display Ranges and Functions
Measurement monitor value nme
Display characters
Display range
Unit Function
Power supply voltage sce 0085 to 0264 V This is the measurement value of the K8AC-H power supply voltage. When the voltage fluctuation compensation function is enabled, the heater burn-out determination based on this volt-age is automatically compensated.
Heater 1 maximum cur-rent *1
max1 0100 to 2300 A These hold the maximum and mini-mum values for each processing value.• The maximum and minimum
heater currents after the power is turned ON or after a maximum or minimum reset are displayed.
• The values are not saved when power is interrupted.
• The current values are not
refreshed when startup lock is in
effect and when the gate input is
enabled but the gate input is OFF.
• Measurement values for power
supply voltage are always
refreshed.
Heater 1 minimum cur-rent *1
min1 0100 to 2300 A
Heater 2 maximum cur-rent *1
max2 0100 to 2300 A
Heater 2 minimum cur-rent *1
min2 0100 to 2300 A
Maximum power supply voltage *1
maxs 0085 to 0264 V
Minimum power supply voltage *1
mins 0085 to 0264 V
Number of alarm outputs acnt 0000 to 9999 out-
puts
This value counts the total number of alarms output for heater burnout, SSR open and short circuit, and heater layershorts.• The count is refreshed each time
an alarm is output, and it is saved in non-volatile memory.
• The value is saved when power is interrupted.
• The number of outputs is not counted for the test function.
Processing value for
alarm output
memo 0100 to 2300 A This holds the CT1 or CT2 process-ing value when a heater burnout alarm is output.• This is the most recent processing
value, and it is refreshed each time a heater burnout alarm occurs.
• The value is not saved when power is interrupted.
5-16

5.5 Measurement Display
Note:
*1. Each measurement value can be individually reset. For operation procedures, please refer to “5.7 Reset of Measurement Monitor Values.”
*2. The display range varies depending on the setting of scaling parameters. The display range is determined by the following formula. The maximum display value, however,
is 9999 digits.
Display maximum value after scaling = Display maximum value x CT ratio/Number of CT
passes
Display minimum value after scaling = Display minimum value x CT ratio/Number of CT
passes
Run time otim 0000 to 9999 ×10h This is the total run time value from when power is turned ON or the pro-cessing value is reset until an alarm occurs.• The total time is recorded in non-
volatile memory approximately once per hour. If power is inter-rupted within the hour, however, the data since the beginning of the hour is lost and the total starts over from when the time was last saved.
• The total is stopped during heater burnout alarm output. When the alarm is cleared, the total resumes from the time just before the alarm occurred.
Heater 1 input shift dis-play current*2
isc1 -999 to 999 digit This is the value for displaying the CT1 heater current measurement set in measurement parameter CT1.• The value is saved when power is
interrupted.
Heater 2 input shift dis-play current*2
isc2 -999 to 999 digit This is the value for displaying the CT2 heater current measurement set in measurement parameter CT2.• The value is saved when power is
interrupted.
Measurement monitor value nme
Display characters
Display range
Unit Function
5-17

Section 5 Operation
5.6 Compensation of Processing Value Display
This function is used to compensate the measurement value of the Heater 1 current at CT1(or the Heater 2 current at CT2) to an arbitrary display value. Use the following procedurefor compensation.
Operation procedure
A. When the M key is pressed while the measurement value is displayed, the measurement parameter will be displayed. Press the M key several times to display the measurement parameter “ct 1” (or”ct 2”).
B. When the S key is pressed while the measurement parameter “ct 1” (or”ct 2”) is displayed, the status will enter the monitor status and the measurement value for the measurement parameter will be displayed.
C. When the U key is pressed for at least three seconds in mon-itor status, the display will be in the change status, enabling changing to an arbitrary display value.
・The measurement value at the time of pressing the U key
will be held.
D. The display value can be changed by the U,D and S keys.
・The display value can be compensated within the range
between -999 and 999.
E. When the M key is pressed, the compensated value will be
registered.
・Compensated value for CT1 can be checked by the mea-
surement parameter “isc1” (“isc2” for CT2). For details on how to check, please see “5-5 Measurement Display”.
・Compensated value for CT1 can be reset by the measure- ment parameter “isc1” (“isc2” for CT2). For details on
how toreset, please see “5-7 Reset of Measurement
Monitor Values”.
・When using the scaling function, if the magnification (= CT
ratio/number of CT passes) is larger than 1, a setting error
will occur due to rounding off.
・Ex) Magnification = 3, Compensated value = 100
The digits after the decimal point are rounded off and the
result is obtained as 33. This is multiplied by the magnifica-
tion 3. Real compensation value = 33 × 3 = 99
5-18

5.6 Compensation of Processing Value Display
Monitor status Change status Change status
Measurement value displaybefore compensation
Press the keyseveral times
Measurement value displayafter compensation
Go to the next measurementvalue without registering the compensated value
3 s min.
Compensated value registered 0.009
5-19
Section 5 Operation
5.7 Reset of Measurement Monitor Values
This function resets various kinds of maximum values and minimum values to the present values. The number of alarm outputs, measurement values at alarm output and run time are reset to “0”.
Operation procedure
A. When the M key is pressed while the measurement value is
displayed, the measurement parameter will be displayed.
Press the M key several times to display the measurement
parameter.
B. When the S key is pressed while the measurement parame ter name is displayed, the status will enter the monitor status
and the measurement value for that parameter will be displa-
yed.
C. When the D key is pressed for at least one second in the monitor status, the memasurement value being displayed will
be reset.
• Each maximum value or minimum value is reset to its present
value.
• The number of alarm outputs, process values at alarm output
and run time are reset to “0”.
• When the Heater 1 current, Heater 2 current or power supply
voltage is displayed, the reset operation does not reset the
value.
• Measurement restarts immediately after the execution of the
reset operation.
• Reset is only valid for the measurement monitor value of the
parameter being displayed.
• To reset all parameters, the function “Processing value initial-
ization” in SET Mode is helpful.
• (See 5-33)
5-20
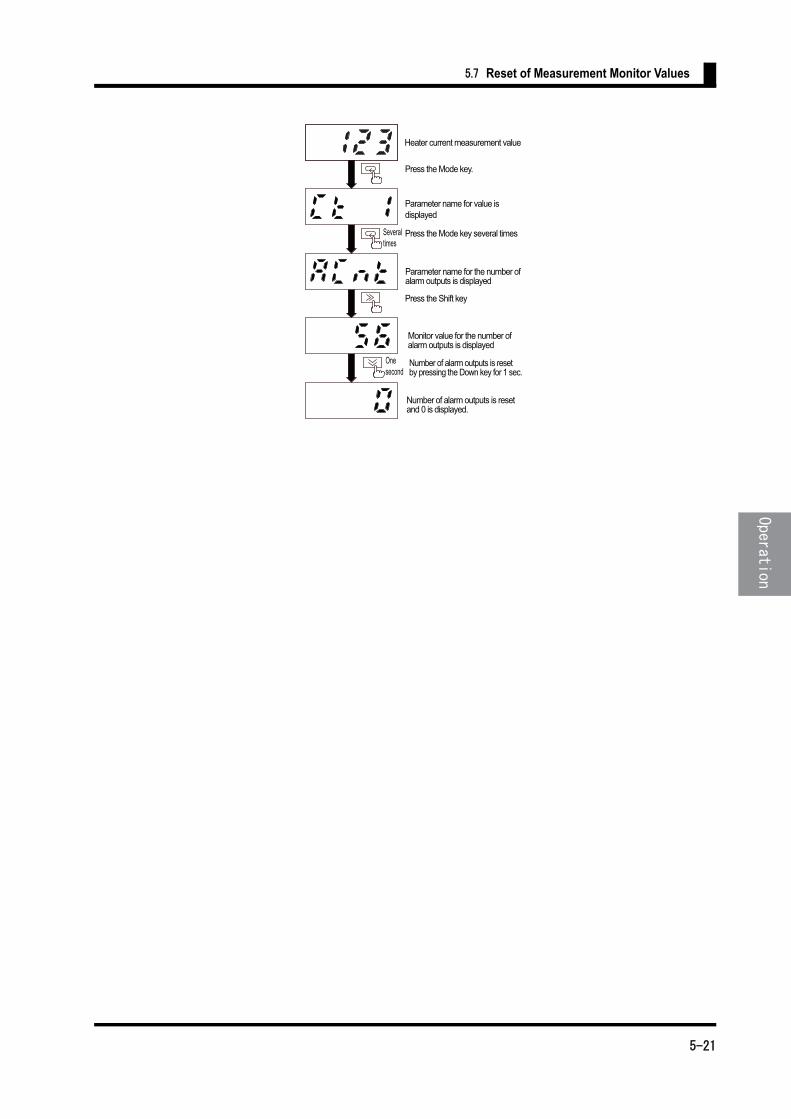
5.7 Reset of Measurement Monitor Values
Severaltimes
Onesecond
Heater current measurement value
Press the Mode key.
Parameter name for value isdisplayed
Press the Mode key several times
Parameter name for the number ofalarm outputs is displayed
Press the Shift key
Monitor value for the number ofalarm outputs is displayed
Number of alarm outputs is reset by pressing the Down key for 1 sec.
Number of alarm outputs is resetand 0 is displayed.
5-21
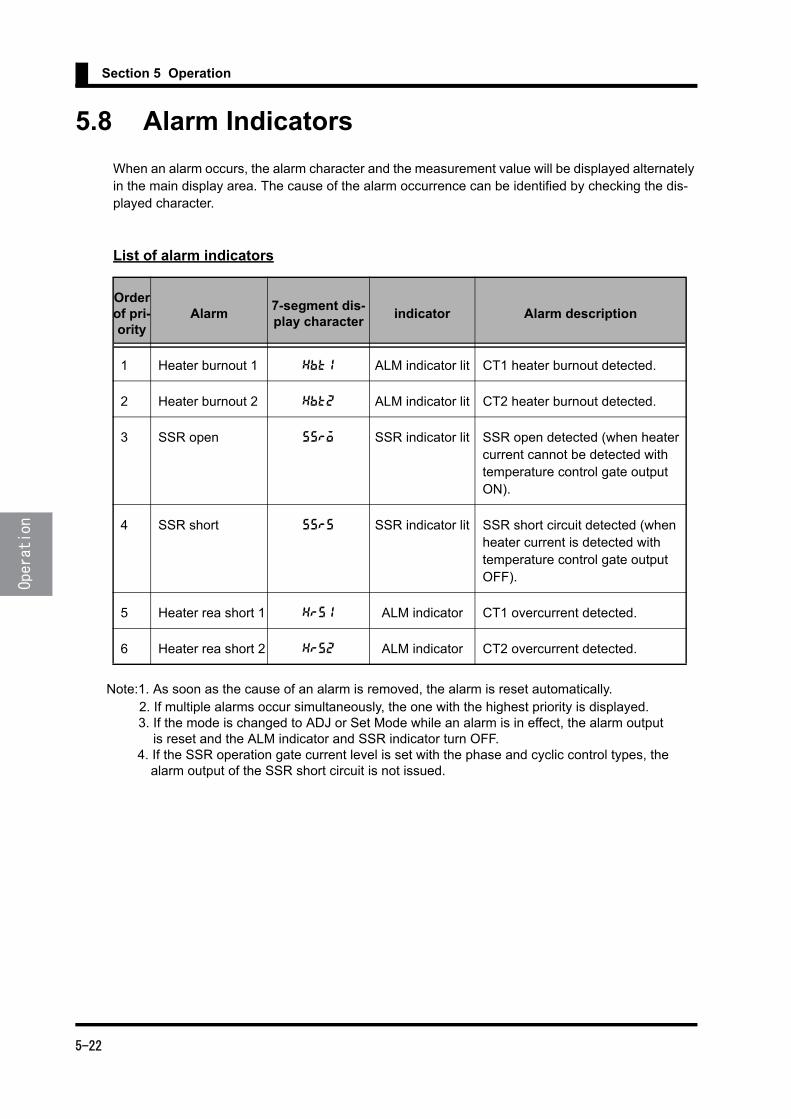
Section 5 Operation
5.8 Alarm IndicatorsWhen an alarm occurs, the alarm character and the measurement value will be displayed alternately in the main display area. The cause of the alarm occurrence can be identified by checking the dis-played character.
List of alarm indicators
Note:1. As soon as the cause of an alarm is removed, the alarm is reset automatically. 2. If multiple alarms occur simultaneously, the one with the highest priority is displayed. 3. If the mode is changed to ADJ or Set Mode while an alarm is in effect, the alarm output is reset and the ALM indicator and SSR indicator turn OFF.
4. If the SSR operation gate current level is set with the phase and cyclic control types, the alarm output of the SSR short circuit is not issued.
Order of pri-ority
Alarm 7-segment dis-play character indicator Alarm description
1 Heater burnout 1 hbt1 ALM indicator lit CT1 heater burnout detected.
2 Heater burnout 2 hbt2 ALM indicator lit CT2 heater burnout detected.
3 SSR open ssro SSR indicator lit SSR open detected (when heater current cannot be detected with temperature control gate output ON).
4 SSR short ssrs SSR indicator lit SSR short circuit detected (when heater current is detected with temperature control gate output OFF).
5 Heater rea short 1 hrs1 ALM indicator CT1 overcurrent detected.
6 Heater rea short 2 hrs2 ALM indicator CT2 overcurrent detected.
5-22

5.9 Test Function
5.9 Test Function
The test function is used to change the measurement value at CT1 as a simulation using keys to check the output operation. Current input or gate signal (with the gate input enabled) are not required. The default for the test value is the present value.
Operation procedure
A. Press the S key for at least one second during RUN Mode to change to the test mode.
• The initial display “test” will be shown and ADJ indicator
will flash.
B. Press the S key again.
• The test value will be displayed. (The latest measurement
value before change will be displayed.)
C. Press the S key again.
• The status will enter the change status and the set value will start to flash.
D. Use the U, D and S keys to change the test value to the burnout alarm value or smaller.
• If set below the burnout alarm value, an alarm output will be issued after the output time elapses.
*If more than 120 seconds elapse with no operations performed, the status will return to the initial display for test mode “test”.
• This does not work when the burnout alarm value “al-1” is set to “-”.
E. Use the U,D and S key to change the test value to the return threshold value or greater.
• After changed to the return threshold value, the output will recover.
• The return threshold value is the burnout alarm value with the hysteresis added.
F. Press the M key to return to the initial status for TEST mode “test”.
• When returning to the initial status while the alarm output is issued in test mode, alarm output will automatically recover.
1 sec min.
5-23
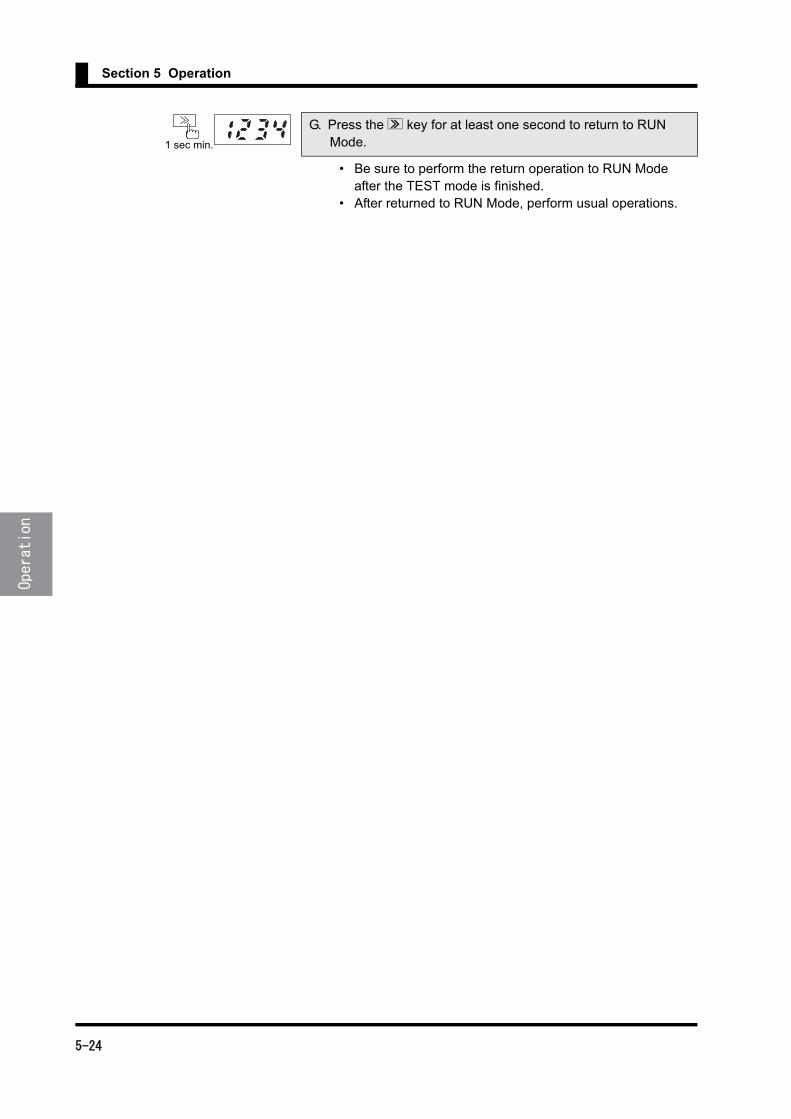
Section 5 Operation
G. Press the S key for at least one second to return to RUN Mode.
• Be sure to perform the return operation to RUN Mode after the TEST mode is finished.
• After returned to RUN Mode, perform usual operations.
1 sec min.
5-24

5.10 Setting Protection Function
5.10 Setting Protection Function
The setting protection function can prevent set levels and values from being changed.
This restricts the move to ADJ Mode or SET Mode.
*1. Only available for cycle control or phase control K8AC-H2_P_-FLK types.
When this protection is enabled, the change status for set values cannot be accessed. However, the following parameters can be changed.
・All parameters at protection level
・Move to SET Mode
Operation Procedure
aspt
Parameter Set value Move to ADJ Mode Move to SET Mode Move to GATE Mode *1
aspt
(ASPT)
0 Permitted Permitted Permitted
1 Permitted Forbidden Permitted
2 Forbidden Forbidden Forbidden
wtpt
Parameter Set value Setting change via key operation
wtpt
(WTPT)
OFF Permitted
ON Forbidden
A. Press the L and M keys for at least five seconds during RUN Mode to change to the Protection Setting mode.
• The parameter will be displayed.
B. Press the M key several times to display the required param-eter.
5 sec min.
5-25

Section 5 Operation
C. Press the the S key to display the set value.
• The protection set value will be displayed.
D. Press the S key again.
• The status will enter the change status and the set value will start to flash.
E. The set value can be changed by the U and D keys.
F. Press the M key to switch to the next parameter.
• The set value changed will be registered to the internal memory.
G. Press the L and M keys for at least one second to return to RUN Mode.three sec min.
al-11 sec min.
5-26
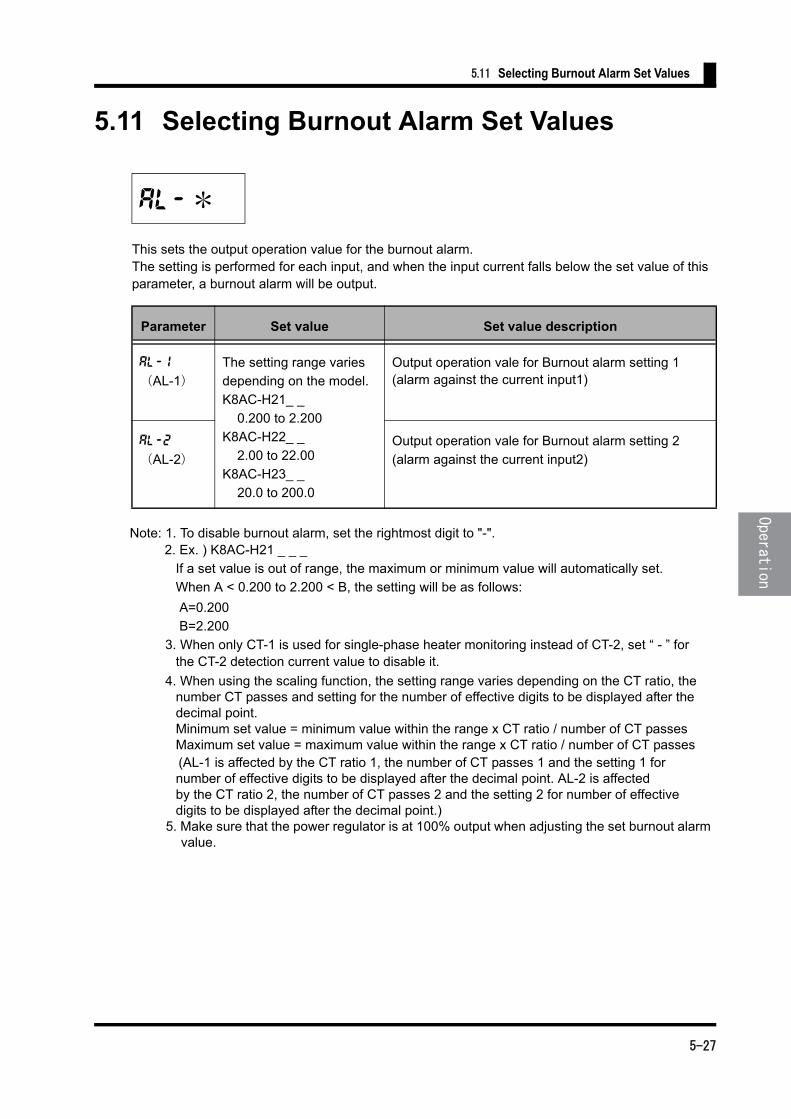
5.11 Selecting Burnout Alarm Set Values
5.11 Selecting Burnout Alarm Set Values
This sets the output operation value for the burnout alarm.The setting is performed for each input, and when the input current falls below the set value of this parameter, a burnout alarm will be output.
Note: 1. To disable burnout alarm, set the rightmost digit to "-". 2. Ex. ) K8AC-H21 _ _ _
If a set value is out of range, the maximum or minimum value will automatically set.
When A < 0.200 to 2.200 < B, the setting will be as follows:
A=0.200
B=2.200
3. When only CT-1 is used for single-phase heater monitoring instead of CT-2, set “ - ” for the CT-2 detection current value to disable it.
4. When using the scaling function, the setting range varies depending on the CT ratio, the number CT passes and setting for the number of effective digits to be displayed after the decimal point. Minimum set value = minimum value within the range x CT ratio / number of CT passes Maximum set value = maximum value within the range x CT ratio / number of CT passes (AL-1 is affected by the CT ratio 1, the number of CT passes 1 and the setting 1 for number of effective digits to be displayed after the decimal point. AL-2 is affected by the CT ratio 2, the number of CT passes 2 and the setting 2 for number of effective digits to be displayed after the decimal point.)
5. Make sure that the power regulator is at 100% output when adjusting the set burnout alarm value.
al-*
Parameter Set value Set value description
al-1
(AL-1)
The setting range varies
depending on the model.
K8AC-H21_ _
0.200 to 2.200
K8AC-H22_ _
2.00 to 22.00
K8AC-H23_ _
20.0 to 200.0
Output operation vale for Burnout alarm setting 1 (alarm against the current input1)
al-2
(AL-2)
Output operation vale for Burnout alarm setting 2
(alarm against the current input2)
5-27
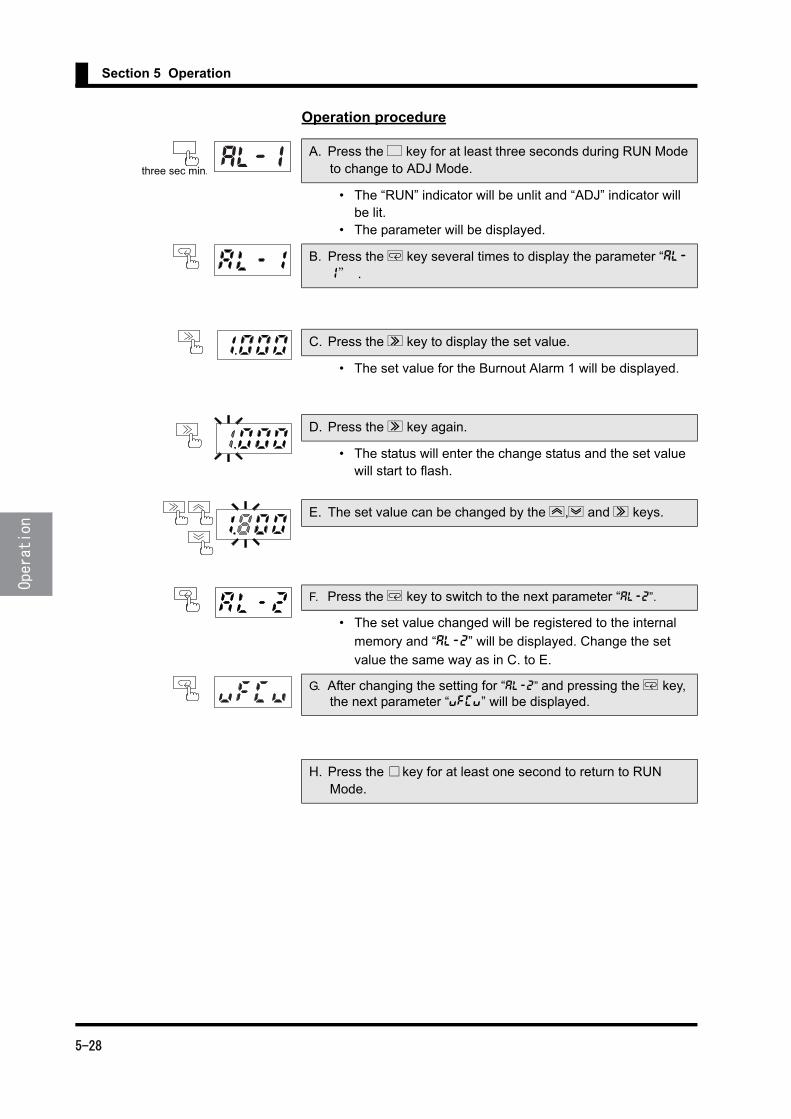
Section 5 Operation
Operation procedure
A. Press the L key for at least three seconds during RUN Mode to change to ADJ Mode.
• The “RUN” indicator will be unlit and “ADJ” indicator will be lit.
• The parameter will be displayed.
B. Press the M key several times to display the parameter “al-1” .
C. Press the S key to display the set value.
• The set value for the Burnout Alarm 1 will be displayed.
D. Press the S key again.
• The status will enter the change status and the set value will start to flash.
E. The set value can be changed by the U,D and S keys.
F. Press the M key to switch to the next parameter “al-2”.
• The set value changed will be registered to the internal
memory and “al-2” will be displayed. Change the set
value the same way as in C. to E.
G. After changing the setting for “al-2” and pressing the M key, the next parameter “vfcv” will be displayed.
H. Press the □key for at least one second to return to RUN Mode.
three sec min.al-1
5-28
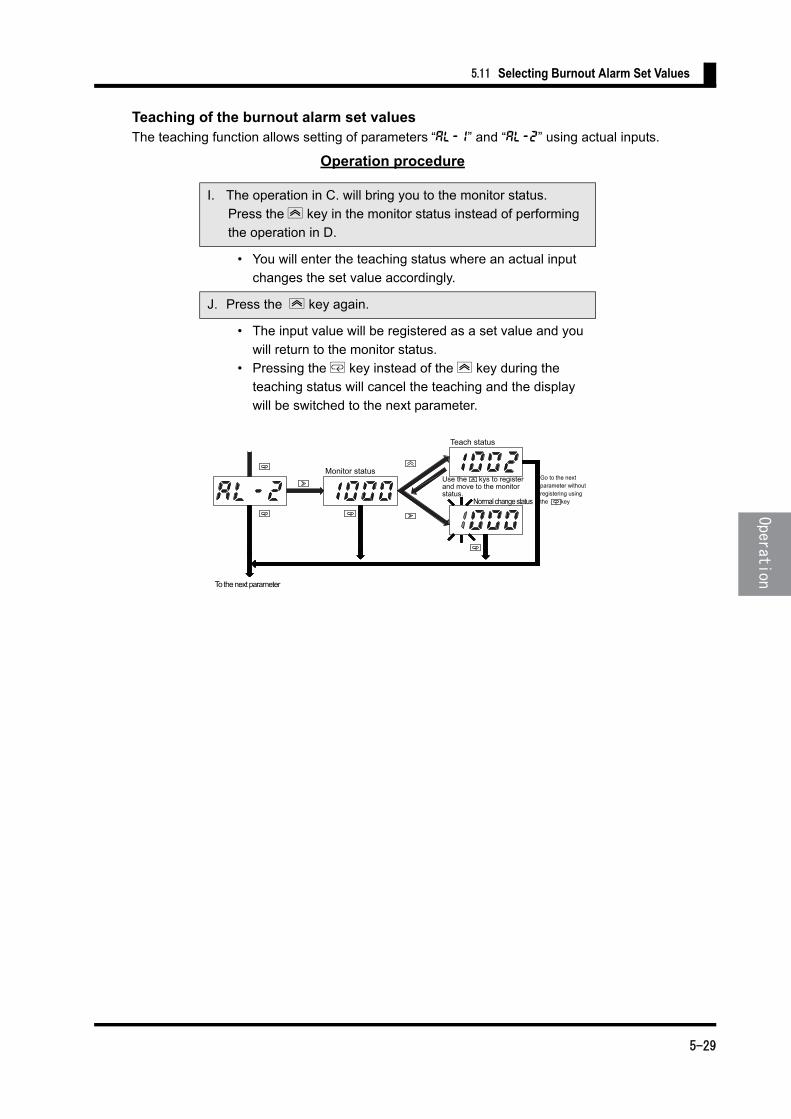
5.11 Selecting Burnout Alarm Set Values
Teaching of the burnout alarm set valuesThe teaching function allows setting of parameters “al-1” and “al-2” using actual inputs.
Operation procedure
I. The operation in C. will bring you to the monitor status.
Press the U key in the monitor status instead of performing
the operation in D.
• You will enter the teaching status where an actual input
changes the set value accordingly.
J. Press the U key again.
• The input value will be registered as a set value and you
will return to the monitor status.
• Pressing the M key instead of the U key during the
teaching status will cancel the teaching and the display
will be switched to the next parameter.
Teach status
Go to the nextparameter withoutregistering usingthe key
Use the kys to registerand move to the monitorstatus.
Monitor status
Normal change status
To the next parameter
5-29

Section 5 Operation
5.12 Selecting Voltage Fluctuation Compensation Standard Value
This sets the standard value for voltage fluctuation compensation.Based on the set value for this parameter, the actual fluctuation ratio of power supply voltage will be reflected to the alarm output value.
Operation procedure
vfcv
Parameter Set value Set value description
vfcv
(VFCV)100 to 240 Standard value for voltage fluctuation compensation
A. Press the L key for at least three seconds during RUN Mode to change to ADJ Mode.
• The “RUN” indicator will be unlit and “ADJ” indicator will be lit.
• The parameter will be displayed.
B. Press the M key several times to display the parameter
“vfcv”.
C. Press the S key to display the set value.
• The set value for the voltage fluctuation compensation will be displayed.
D. Press the S key again.
• The status will enter the change status and the set value will start to flash.
E. The set value can be changed by the U, D and S keys.
three sec min.al-1
5-30

5.12 Selecting Voltage Fluctuation Compensation Standard Value
Teaching of the standard value for voltage fluctuation compensation standerd value.The teaching function allows setting of the parameter “vfcv” using actual inputs.
Operation procedure
F. Press the M key to switch to the next parameter “amov”.
・ The set value changed will be registered to the internal
memory and “amov” will be displayed.
G. Press the L key for at least one second to return to RUN Mode.
H. The operation in C. will bring you to the monitor status.Press the U key instead of performing the operation in D.
・ You will enter the teaching status where an actual input
changes the set value accordingly.
I. Press the U key again.
・ The input value will be registered as a set value and you
will return to the monitor status.
・ Pressing the M key instead of the U key during the
teach-
ing status will cancel the teaching and the display will be
switched to the next parameter.
amo
Teach status
Go to the next parameter withoutregistering usingthe key.
Monitor status
Normal changestatus
To the next parameter
Use the key to register and move to the monitor status.
5-31

Section 5 Operation
5.13 All Initialization
This function returns all set values and measurement values to their default settings.
This is useful when needing to redo the setting from the initial factory setting.For the values at the initial factory setting, please see the “Parameter List” in the back of this man-ual.
Operation procedure
init
Parameter Set value Set value description
init
(INIT)
OFF ---
ON Initializes set values and processing values
A. Press the L key for at least three seconds during RUN Mode to change to ADJ Mode.
・ The “RUN” indicator will be unlit and “ADJ” indicator will
be
lit.
・ The parameter will be displayed.
B. Press the M key several times to display the parameter
“amov”.
Set the password “0169” for the parameter “amov” to move to SET Mode.
For details on how to move between modes, please see “5.2
Moving between Modes”.
・ The “ADJ” indicator will be unlit and “SET” indicator will
be
lit.
・ The first parameter “init” will be displayed.
C. Press the S key to display the set value.
・ The set value “OFF” will be displayed.
D. Press the S key again.
・ The status will enter the change status and the set value
will start to flash.
three sec min.al-1
Password formoving to SETMode: 0169
5-32
5.13 All Initialization
E. Set the value as “ON” using the U and D keys.
F. Press the M key to switch to the next parameter.
・ Set values and measurement values will be all cleared.
・ The parameter “init” will also be set to “OFF”.
・ After the setting is complete, the next parameter “sini”
will be displayed.
G. Press the L key for at least one second to return to ADJ
Mode.
H. Press the L key for at least one second to return to RUN
Mode.
5-33
Section 5 Operation
5.14 Set Value Initialization
This function returns all set values to their default settings.
This is useful when needing to redo the setting from the initial factory setting.For the values at the initial factory setting, please see the “Parameter List” in the back of this man-ual.• Target parameters
All parameters in ADJ Mode All parameters in SET Mode Operation gate current level All parameters excluding “number of alarm outputs” and “run time”.
Operation procedure
sini
Parameter Set value Set value description
sini
(SINI)
OFF No initialization
ON Executes initialization of set values
A. Press the L key for at least three seconds during RUN Mode to change to ADJ Mode.
• The “RUN” indicator will be unlit and “ADJ” indicator will be lit.
• The parameter will be displayed.
B. Press the M key several times to display the parameter “amov”.Set the password “0169” for the parameter ”amov" to move to SET Mode.For details on how to move between modes, please see “5.2 Moving between Modes”.
• The “ADJ” indicator will be unlit and “SET” indicator will be lit.
C. Press the M key several times to display the parameter “sini”.
three sec min.al-1
amo
5-34
5.14 Set Value Initialization
D. Press the S key to display the set value.
• The set value “OFF” will be displayed.
E. Press the S key again.
• The status will enter the change status and the set value will start to flash.
F. Set the value as “ON” using the U and D keys.
G. Press the M key to switch to the next parameter.
• Set values will be all cleared.• The parameter “sini” will also be set to “OFF”.• After the setting is complete, the next parameter “pini”
will be displayed.
H. Press the L key for at least one second to return to ADJ Mode.
I. Press the L key for at least one second to return to RUN Mode.
5-35

Section 5 Operation
5.15 Processing Value Initialization
This function returns all process values to their default settings.
This is useful when needing to monitor various measurement data held by K8AC from the initial sta-tus.・ Target parameters Heater 1 maximum current value Heater 1 minimum current value Heater 2 maximum current value Heater 2 minimum current value Maximum power supply voltage value Minimum power supply voltage value Number of alarm outputs Measurement value at alarm output Run time
Operation procedure
pini
Parameter Set value Set value description
pini
(PINI)
OFF ---
ON Executes initialization of process data.
A. Press the L key for at least three seconds during RUN Mode to change to ADJ Mode.
• The “RUN” indicator will be unlit and “ADJ” indicator will be lit.
• The parameter will be displayed.
B. Press the M key several times to display the parameter
“amov”.
Set the password “0169” for the parameter “amov” to move to SET Mode.
For details on please see “5.2 Moving between Modes”.
• The “ADJ” LED will be unlit and “SET” indicator will be lit.
C. Press the M key several times to display the parameter
“pini”.
three sec min.al-1
amo
5-36

5.15 Processing Value Initialization
B. Press the S key to display the set value.
• The set value “OFF” will be displayed.
C. Press the S key again.
• The status will enter the change status and the set value will start to flash.
D. Set the value to “ON” using the U and D keys.
E. Press the M key to switch to the next parameter.
• Set values will be all cleared.• The parameter “pini” will also be set to “OFF”.• After the setting is complete, the next parameter “hys1”
will be displayed.
F. Press the L key for at least one second to return to ADJ Mode.
G. Press the L key for at least one second to return to RUN Mode.
5-37
Section 5 Operation
5.16 Setting of Alarm Hysteresis
This function sets the hysteresis for the alarm output value.The hysteresis values can be individually set for Input 1 and Input 2.
Note: 1.When using the scaling function, if the magnification is set to larger than 1, a setting error will occur due to rounding off. So please set multiple numbers. Method calculating the setting error Ex) Magnification = 2, hysteresis = 11 11 ÷ 2 = 5.5 The digits after the decimal point are rounded off and the result is obtained as 5. This is multiplied by the magnification 2. Real hysteresis = 5 × 2 = 10
Operation procedure
hys*
Parameter Set value Set value description
hys1
(HYS1)
001 to 999 Sets hysteresis for the burnout alarm set value 1 and heater layer short circuits alarm level (Input 1).
hys2
(HYS2)
001 to 999 Sets hysteresis for the burnout alarm set value 2 and heater layer short circuits alarm level (Input 2).
A. Press the L key for at least three seconds during RUN Mode
to change to ADJ Mode.
・The “RUN” indicator will be unlit and “ADJ” indicatoe will
be lit.
・ The parameter will be displayed.
B. Press the M key several times to display the parameter
“amov”.
Set the password “0169” for the parameter “amov” to move to
SET Mode. For details, please see “5.2 Moving between
Modes”.
・ The “ADJ” indicator will be unlit and “SET” indicator will
be lit.
C. Press the M key several times to display the parameter
“hys1”.
three sec min.al-1
amo
5-38

5.16 Setting of Alarm Hysteresis
D. Press the S key to display the set value.
・ The set value for Hysteresis 1 will be displayed.
E. Press the S key again.
・ The status will enter the change status and the set value
will start to flash.
F. The set value can be changed by the U, D and S keys.
G. Press the M key to switch to the next parameter.
・ The set value changed will be registered to the internal
memory an “hys2” will be displayed.
H. Repeat D. to G. to set “hys2”.
・ After changing the setting and pressing the M key, the
next
parameter “gate” will be displayed.
I. Press the L key for at least one second to return to ADJ
Mode.
J. Press the L key for at least one second to return to RUN
Mode.
5-39

Section 5 Operation
5.17 Setting of Gate Input Function
This turns the gate input function ON anf OFF.
The gate input function is used to determine the correlation between the gate input and the alarm operation.The correlation between the gate setting/gate input and the alarm operation is as follows:
Note: To detect burnout correctly, the gate function must be turned ON. When the gate function is
turned OFF, its measurement accuracy cannot be guaranteed. So, be sure to always turn ON
the gate function except for cases such as maintenance or output check during mounting.
Operation procedure
gate
Parameter Set value Set value description
gate
(GATE)
OFF Turns OFF the gate input function(always detect burnout)
ON Turns ON the gate input function(detect burnout only when the gate input is turned on)
Gate input function setting
Gate input
Available alarm operation
Burnout detection
SSR short circuit detec-
tion
SSR open detection
Heater layer short circuit
detection
OFF Disabled ○ × × ○
ON Enabled ○ ○ ○ ○
A. Press the L key for at least three seconds during RUN Mode to change to ADJ Mode.
・ The "RUN” indicator will be unlit and “ADJ” indicator will
be lit.
・ The parameter will be displayed.
three sec min.al-1
5-40

5.17 Setting of Gate Input Function
B. Press the M key several times to display the parameter amov. Set the password “0169” for the parameter “amov” to move to SET Mode.For details on how to move between modes, please see “5.2
Moving between Modes”.
・ The “ADJ” indicator will be unlit and “SET” indicator will be
lit.
C. Press the M key several times to display the parameter
“gate”
D. Press the S key to display the set value.
・ The set value for the gate function will be displayed.
E. Press the S key again.
・ The status will enter the change status and the set value
will start to flash.
F. The set value can be changed by the U and D keys.
G. Press the M key to switch to the next parameter.
・ The set value changed will be registered to the internal
memory and ”comp” will be displayed.
H. Press the L key for at least one second to return to ADJ
Mode.
I. Press the L key for at least one second to return to RUN
Mode.
amo
5-41
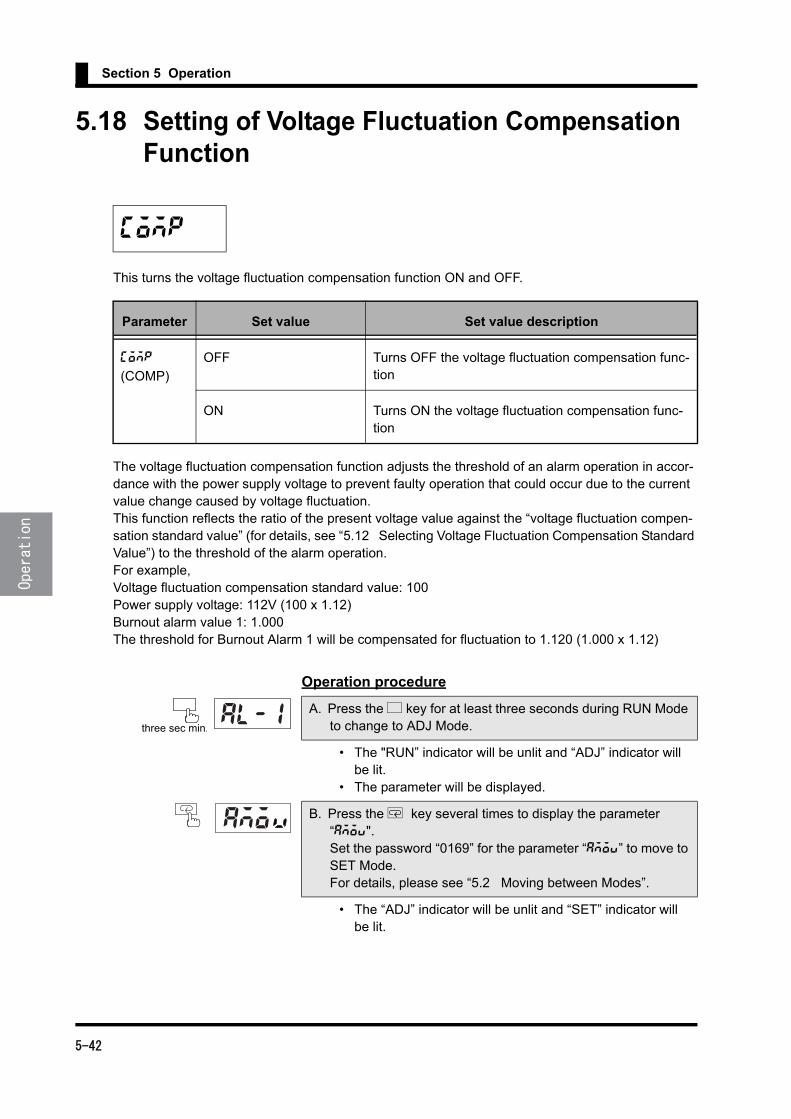
Section 5 Operation
5.18 Setting of Voltage Fluctuation Compensation Function
This turns the voltage fluctuation compensation function ON and OFF.
The voltage fluctuation compensation function adjusts the threshold of an alarm operation in accor-dance with the power supply voltage to prevent faulty operation that could occur due to the current value change caused by voltage fluctuation. This function reflects the ratio of the present voltage value against the “voltage fluctuation compen-sation standard value” (for details, see “5.12 Selecting Voltage Fluctuation Compensation Standard Value”) to the threshold of the alarm operation.For example,Voltage fluctuation compensation standard value: 100Power supply voltage: 112V (100 x 1.12)Burnout alarm value 1: 1.000The threshold for Burnout Alarm 1 will be compensated for fluctuation to 1.120 (1.000 x 1.12)
Operation procedure
comp
Parameter Set value Set value description
comp
(COMP)
OFF Turns OFF the voltage fluctuation compensation func-tion
ON Turns ON the voltage fluctuation compensation func-tion
A. Press the L key for at least three seconds during RUN Mode to change to ADJ Mode.
• The "RUN” indicator will be unlit and “ADJ” indicator will be lit.
• The parameter will be displayed.
B. Press the M key several times to display the parameter “amov".Set the password “0169” for the parameter “amov” to move to SET Mode.For details, please see “5.2 Moving between Modes”.
• The “ADJ” indicator will be unlit and “SET” indicator will be lit.
three sec min.al-1
amo
5-42

5.18 Setting of Voltage Fluctuation Compensation Function
C. Press the M key several times to display the parameter
“comp” .
D. Press the S key to display the set value.
• The set value for the voltage fluctuation compensation function will be displayed.
E. Press the S key again.
• The status will enter the change status and the set value will start to flash.
F. The set value can be changed by the U and D keys.
G. Press the M key to switch to the next parameter.
• The set value changed will be registered to the internal memory and “stim” will be displayed.
H. Press the L key for at least one second to return to ADJ Mode.
I. Press the L key for at least one second to return to RUN Mode.
5-43
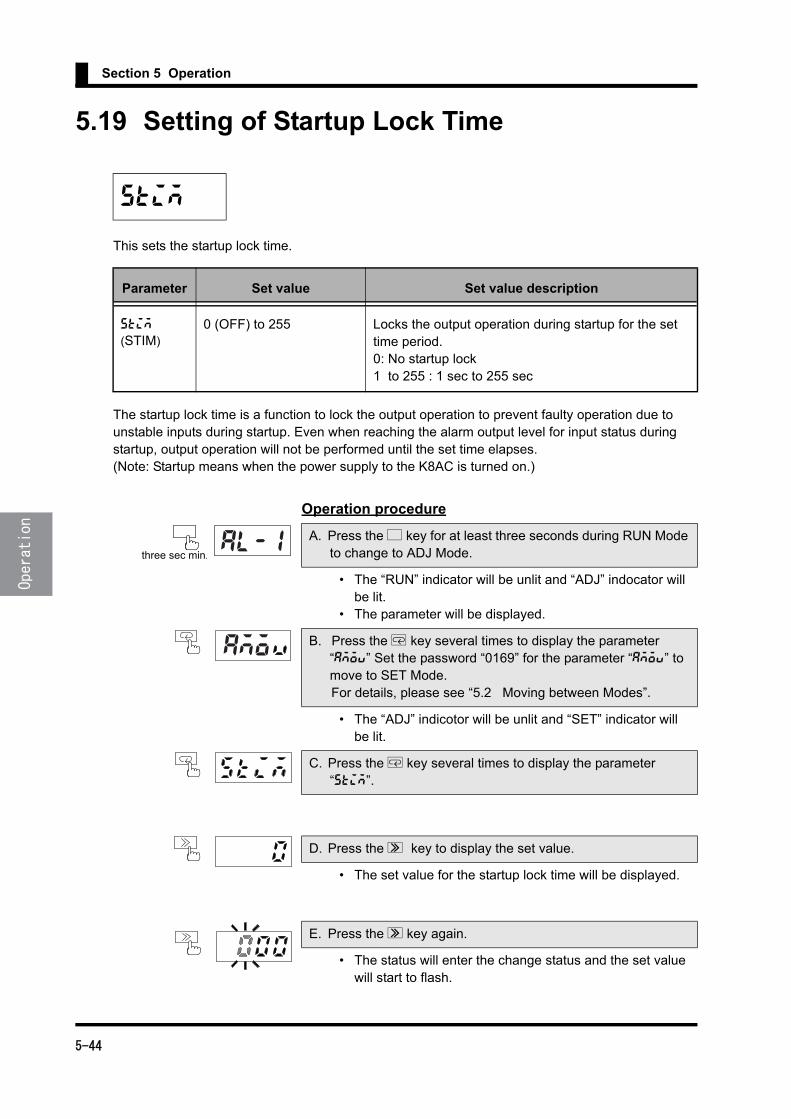
Section 5 Operation
5.19 Setting of Startup Lock Time
This sets the startup lock time.
The startup lock time is a function to lock the output operation to prevent faulty operation due to unstable inputs during startup. Even when reaching the alarm output level for input status during startup, output operation will not be performed until the set time elapses. (Note: Startup means when the power supply to the K8AC is turned on.)
Operation procedure
stim
Parameter Set value Set value description
stim
(STIM)0 (OFF) to 255 Locks the output operation during startup for the set
time period. 0: No startup lock1 to 255 : 1 sec to 255 sec
A. Press the L key for at least three seconds during RUN Mode to change to ADJ Mode.
• The “RUN” indicator will be unlit and “ADJ” indocator will be lit.
• The parameter will be displayed.
B. Press the M key several times to display the parameter “amov” Set the password “0169” for the parameter “amov” to move to SET Mode.
For details, please see “5.2 Moving between Modes”.
• The “ADJ” indicotor will be unlit and “SET” indicator will be lit.
C. Press the M key several times to display the parameter “stim”.
D. Press the S key to display the set value.
• The set value for the startup lock time will be displayed.
E. Press the S key again.
• The status will enter the change status and the set value will start to flash.
three sec min.al-1
amo
5-44

5.19 Setting of Startup Lock Time
F. The set value can be changed by the U, D and S keys.
G. Press the M key to switch to the next parameter.
• The set value changed will be registered to the internal
memory and “odly” will be displayed.
H. Press the L key for at least one second to return to ADJ
Mode.
I. Press the L key for at least one second to return to RUN
Mode.
5-45
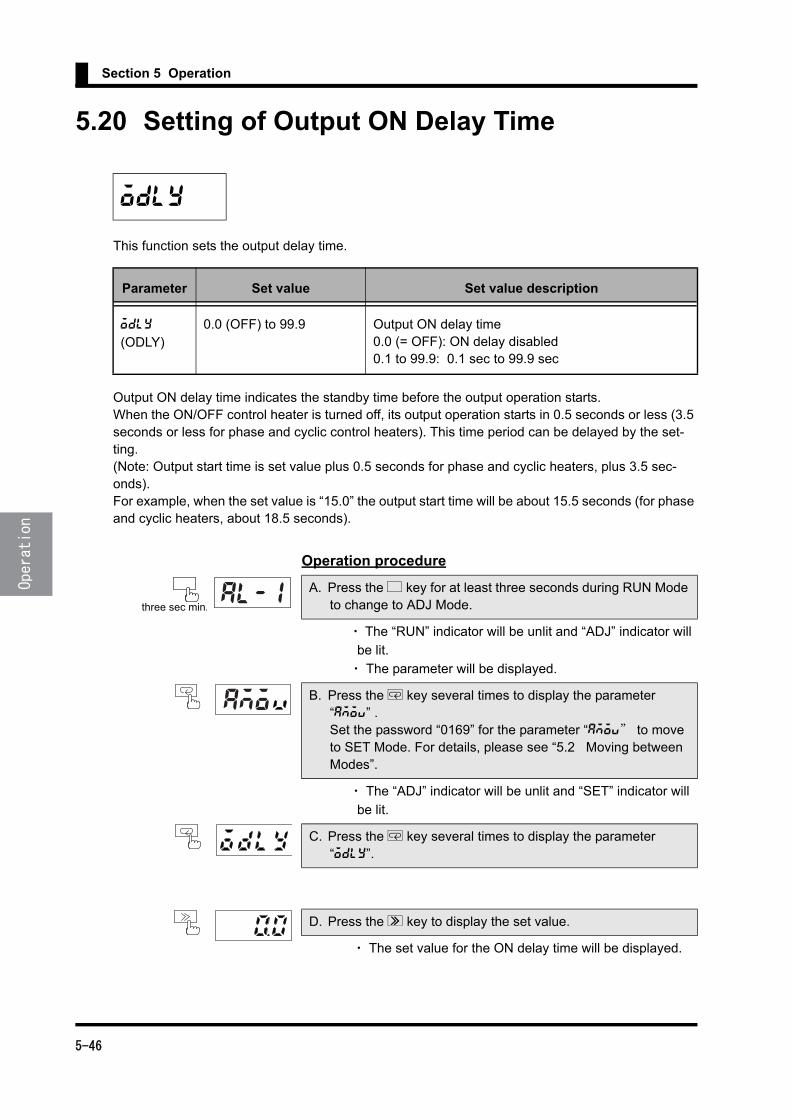
Section 5 Operation
5.20 Setting of Output ON Delay Time
This function sets the output delay time.
Output ON delay time indicates the standby time before the output operation starts. When the ON/OFF control heater is turned off, its output operation starts in 0.5 seconds or less (3.5 seconds or less for phase and cyclic control heaters). This time period can be delayed by the set-ting. (Note: Output start time is set value plus 0.5 seconds for phase and cyclic heaters, plus 3.5 sec-onds).For example, when the set value is “15.0” the output start time will be about 15.5 seconds (for phase and cyclic heaters, about 18.5 seconds).
Operation procedure
odly
Parameter Set value Set value description
odly
(ODLY)0.0 (OFF) to 99.9 Output ON delay time
0.0 (= OFF): ON delay disabled0.1 to 99.9: 0.1 sec to 99.9 sec
A. Press the L key for at least three seconds during RUN Mode to change to ADJ Mode.
・ The “RUN” indicator will be unlit and “ADJ” indicator will
be lit.
・ The parameter will be displayed.
B. Press the M key several times to display the parameter “amov” .Set the password “0169” for the parameter “amov” to move to SET Mode. For details, please see “5.2 Moving between Modes”.
・ The “ADJ” indicator will be unlit and “SET” indicator will
be lit.
C. Press the M key several times to display the parameter “odly”.
D. Press the S key to display the set value.
・ The set value for the ON delay time will be displayed.
three sec min.al-1
amo
5-46

5.20 Setting of Output ON Delay Time
E. Press the S key again.
・ The status will enter the change status and the set value
will start to flash.
F. The set value can be changed by the U,D and S keys.
G. Press the M key to switch to the next parameter.
・ The set value changed will be registered to the internal
memory and ”soft” will be displayed.
H. Press the L key for at least one second to return to ADJ
Mode.
I. Press the L key for at least one second to return to RUN Mode.
5-47
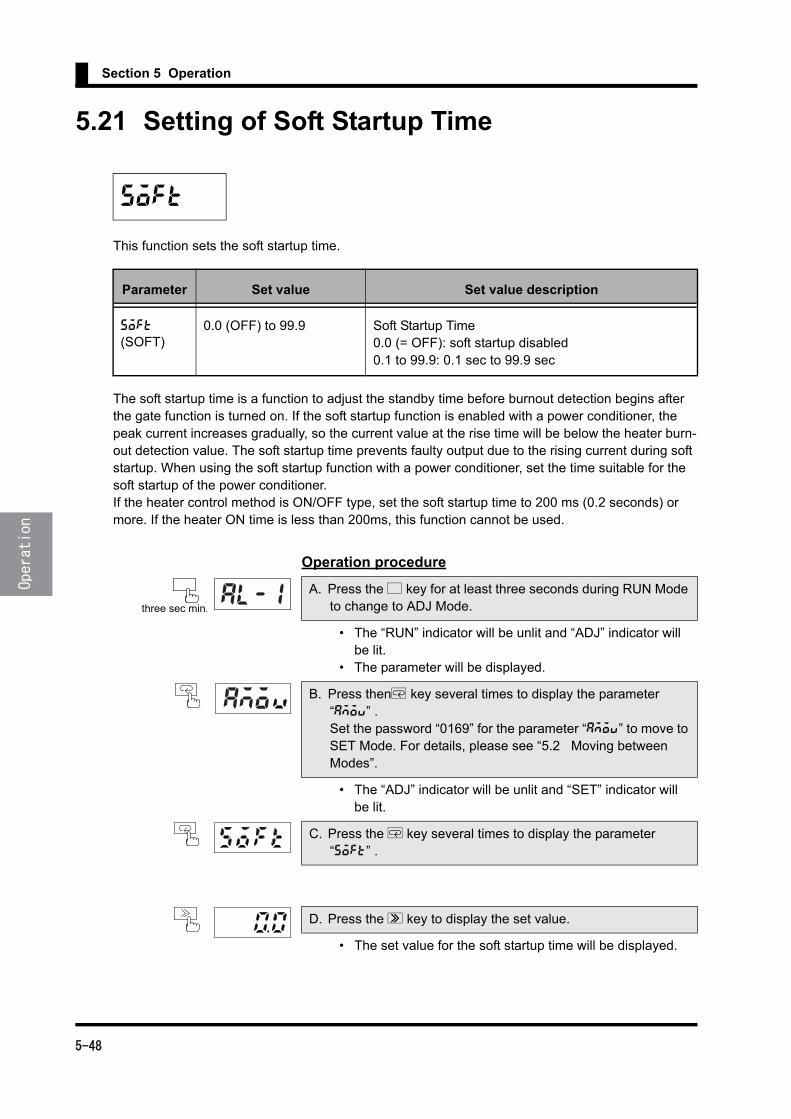
Section 5 Operation
5.21 Setting of Soft Startup Time
This function sets the soft startup time.
The soft startup time is a function to adjust the standby time before burnout detection begins after the gate function is turned on. If the soft startup function is enabled with a power conditioner, the peak current increases gradually, so the current value at the rise time will be below the heater burn-out detection value. The soft startup time prevents faulty output due to the rising current during soft startup. When using the soft startup function with a power conditioner, set the time suitable for the soft startup of the power conditioner. If the heater control method is ON/OFF type, set the soft startup time to 200 ms (0.2 seconds) or more. If the heater ON time is less than 200ms, this function cannot be used.
Operation procedure
soft
Parameter Set value Set value description
soft
(SOFT)0.0 (OFF) to 99.9 Soft Startup Time
0.0 (= OFF): soft startup disabled0.1 to 99.9: 0.1 sec to 99.9 sec
A. Press the L key for at least three seconds during RUN Mode to change to ADJ Mode.
• The “RUN” indicator will be unlit and “ADJ” indicator will be lit.
• The parameter will be displayed.
B. Press thenM key several times to display the parameter “amov” .Set the password “0169” for the parameter “amov” to move to SET Mode. For details, please see “5.2 Moving between Modes”.
• The “ADJ” indicator will be unlit and “SET” indicator will be lit.
C. Press the M key several times to display the parameter “soft” .
D. Press the S key to display the set value.
• The set value for the soft startup time will be displayed.
three sec min.al-1
amo
5-48

5.21 Setting of Soft Startup Time
E. Press the S key again.
• The status will enter the change status and the set value will start to flash.
F. The set value can be changed by the U, D and S keys.
G. Press the M key to switch to the next parameter.
• The set value changed will be registered to the internal memory and "ssht" will be displayed.
H. Press the L key for at least one second to return to ADJ Mode.
I. Press the L key for at least one second to return to RUN Mode.
5-49

Section 5 Operation
5.22 Setting of SSR Short Circuit Detection Function
This function turns the SSR short circuit detection function ON and OFF.
The SSR short circuit detection function is used to determine the status that the heater current input is exceeding the criteria as SSR short circuit (SSR is short-circuited) and output an alarm. The criteria for the current input level is as follows.
Note: If the gate input is set to OFF, an alarm will not be output even when turning the SSR short
circuit detection function ON. (For information on the gate input function, please refer to “5.17 Setting of Gate Input Function”.
Operation procedure
ssht
Parameter Set value Set value description
ssht
(SSHT)
OFF SSR Short Circuit Detection is turned OFF
ON SSR Short Circuit Detection is turned ON
SSR control method
Gate OFF criteria Current input level criteria
ON/OFF con-trol
Gate pulse OFF The current input is more than 45 percent of the min-imum value in the range.
Phase control Gate input current 4mA or less
The current input is more than 45 percent of the min-imum value in the range.
Cyclic control Gate input current 4mA or less
The current input is more than 45 percent of the min-imum value in the range.
A. Press the L key for at least three seconds during RUN Mode to change to ADJ Mode.
• The “RUN” indicator will be unlit and “ADJ” indicator will be lit.
• The parameter will be displayed.
three sec min.al-1
5-50

5.22 Setting of SSR Short Circuit Detection Function
B. Press the M key several times to display the parameter
“amov”. Set the password “0169” for the parameter “amov” to
move to SET Mode. For details, please see “5.2 Moving
between Modes”.
• The “ADJ” indicator will be unlit and “SET” indicator will be lit.
C. Press the M key several times to display the parameter “ssht”.
D. Press the S key to display the set value.
• The set value for the SSR short circuit detection will be displayed.
E. Press the S key again.
• The status will enter the change status and the set value will start to flash.
F. The set value can be changed by the U and D keys.
G. Press the M key to switch to the next parameter.
• The set value changed will be registered to the internal memory and “sopn” will be displayed.
H. Press the L key for at least one second to return to ADJ Mode.
I. Press the L key for at least one second to return to RUN Mode.
amo
5-51

Section 5 Operation
5.23 Setting of SSR Open Circuit Detection Function
This function turns the SSR open circuit detection function ON and OFF.
SSR Open Detection function is turned ON.The SSR short open detection function is used to determine the status that the heater current input is below the criteria as SSR open (SSR is burned out) and output an alarm. The current input criteria are as follows. Note: If the gate input function is set to OFF, an alarm will not be output even when turning the SSR open detection function ON. (For information on the gate input function, please refer to “5.17 Setting of Gate Input Function”.)
Note 1: For phase control and cyclic control heaters, the setting of the operation gate current level must be observed.
Operation procedure
sopn
Parameter Set value Set value description
sopn
(SOPN)OFF SSR Open Detection function is turned OFF
ON SSR Open Detection function is turned ON
SSR control method
Gate ON criteria Current input level criteria
ON/OFF con-trol
Gate pulse ON The current input is more than 45 percent of the min-imum value in the range.
Phase control Exceeding the gate input current 7mA *1
The current input is more than 45 percent of the min-imum value in the range.
Cyclic control Exceeding the gate input current 7mA *1
The current input is more than 45 percent of the min-imum value in the range.
A. Press the L key for at least three seconds during RUN Mode
to change to ADJ Mode.
• The ”RUN” indicator will be unlit and “ADJ” indicator will
be lit.
• The parameter will be displayed.
three sec min.al-1
5-52

5.23 Setting of SSR Open Circuit Detection Function
B. Press the M key several times to display the parameter “amov”.Set the password “0169” for the parameter “amov” to move to SET Mode. For details, please see “5.2 Moving between Modes”.
• The “ADJ” indicator will be unlit and “SET” indicator LED will be lit.
C. Press the M key several times to display the parameter
“sopn”.
D. Press the S key to display the set value.
• The set value for the SSR open detection will be dis-
played.
E. Press the S key again.
• The status will enter the change status and the set value
will start to flash.
F. The set value can be changed by the U and D keys.
G. Press the M key to switch to the next parameter.
• The set value changed will be registered to the internal
memory and “hrst” will be displayed.
H. Press the L key for at least one second to return to ADJ
Mode.
I. Press the L key for at least one second to return to RUN
Mode.
amo
5-53

Section 5 Operation
5.24 Setting of Heater Layer Short Circuit Detec-tion Function
This turns the heater layer short circuit detection function ON and OFF.
The Heater Layer Short Circuit Detection function is used to detect an overcurrent status of the heater current inputs. The threshold value for the alarm output can be arbitrarily set using the “heater layer short circuit alarm value”. (Please refer to “5.25 Setting of Heater Layer Short Circuit Alarm Level” for details.)
Operation procedure
hrst
Parameter Set value Set value description
hrst
(HRST)OFF Heater Layer Short Circuit Detection Function is turned
OFF
ON Heater Layer Short Circuit Detection Function is turned ON
A. Press the L key for at least three seconds during RUN Mode to change to ADJ Mode.
• The “RUN” indicator will be unlit “ADJ” indicator will be lit. • The parameter will be displayed.
B. Press the M key several times to display the parameter “amov”. Set the password “0169” for the parameter “amov” to move to SET Mode. For ditails, please see “5.2 Moving between Modes.”
• The “ADJ” LED will be unlit and “SET” indicator will be lit.
C. Press the M key several times to display the parameter “hrst”.
D. Press the S key to display the set value.
• The set value for the heater layer short circuit detection will be displayed.
three sec min.al-1
amo
5-54
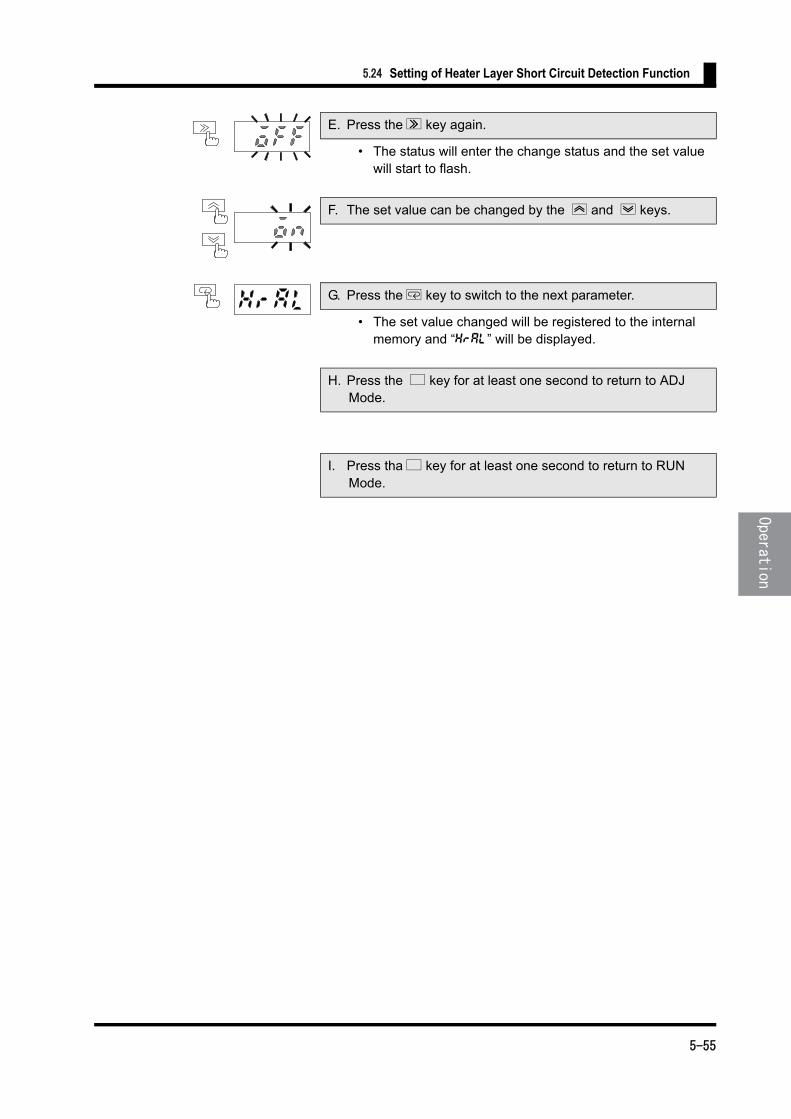
5.24 Setting of Heater Layer Short Circuit Detection Function
E. Press the S key again.
• The status will enter the change status and the set value will start to flash.
F. The set value can be changed by the U and D keys.
G. Press the M key to switch to the next parameter.
• The set value changed will be registered to the internal memory and “hral” will be displayed.
H. Press the L key for at least one second to return to ADJ Mode.
I. Press tha L key for at least one second to return to RUN Mode.
5-55
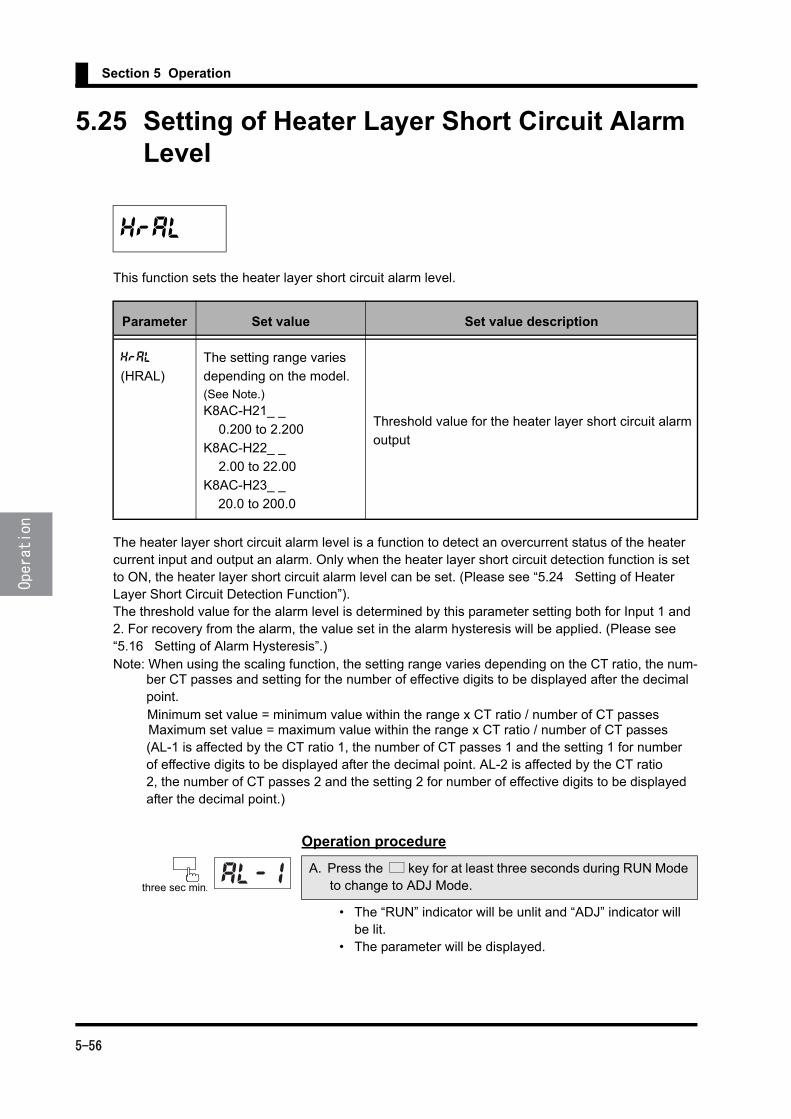
Section 5 Operation
5.25 Setting of Heater Layer Short Circuit Alarm Level
This function sets the heater layer short circuit alarm level.
The heater layer short circuit alarm level is a function to detect an overcurrent status of the heater current input and output an alarm. Only when the heater layer short circuit detection function is set to ON, the heater layer short circuit alarm level can be set. (Please see “5.24 Setting of Heater Layer Short Circuit Detection Function”).The threshold value for the alarm level is determined by this parameter setting both for Input 1 and 2. For recovery from the alarm, the value set in the alarm hysteresis will be applied. (Please see “5.16 Setting of Alarm Hysteresis”.)Note: When using the scaling function, the setting range varies depending on the CT ratio, the num- ber CT passes and setting for the number of effective digits to be displayed after the decimal point. Minimum set value = minimum value within the range x CT ratio / number of CT passes Maximum set value = maximum value within the range x CT ratio / number of CT passes (AL-1 is affected by the CT ratio 1, the number of CT passes 1 and the setting 1 for number of effective digits to be displayed after the decimal point. AL-2 is affected by the CT ratio 2, the number of CT passes 2 and the setting 2 for number of effective digits to be displayed after the decimal point.)
Operation procedure
hral
Parameter Set value Set value description
hral
(HRAL)
The setting range varies
depending on the model.(See Note.)
K8AC-H21_ _
0.200 to 2.200
K8AC-H22_ _
2.00 to 22.00
K8AC-H23_ _
20.0 to 200.0
Threshold value for the heater layer short circuit alarm
output
A. Press the L key for at least three seconds during RUN Mode to change to ADJ Mode.
• The “RUN” indicator will be unlit and “ADJ” indicator will be lit.
• The parameter will be displayed.
three sec min.al-1
5-56

5.25 Setting of Heater Layer Short Circuit Alarm Level
B. Press the M key several times to display the parameter “amov”. Set the password “0169” for the parameter “amov” to move to SET Mode. For details, please see “5.2 Moving between Modes”.
• The “ADJ” indicator will be unlit and “SET” indicator will be lit.
C. Press the M key several times to display the parameter “hral”.
D. Press the S key to display the set value.
• The set value for the heater layer short circuit alarm will be displayed.
E. Press the S key again.
• The status will enter the change status and the set value will start to flash.
F. The set value can be changed by the U and S keys.
G. Press the M key to switch to the next parameter.
• The set value changed will be registered to the internal memory and “msmd” will be displayed for phase or cyclic control heaters and “dsel” for ON/OFF control heaters.
H. Press the key for at least one second to return to ADJ Mode.
I. Press the L key for at least one second to return to RUN Mode.
amo
This is the case ofH21_ _.
Phase or cyclic control type
ON/OFF control heaters
5-57
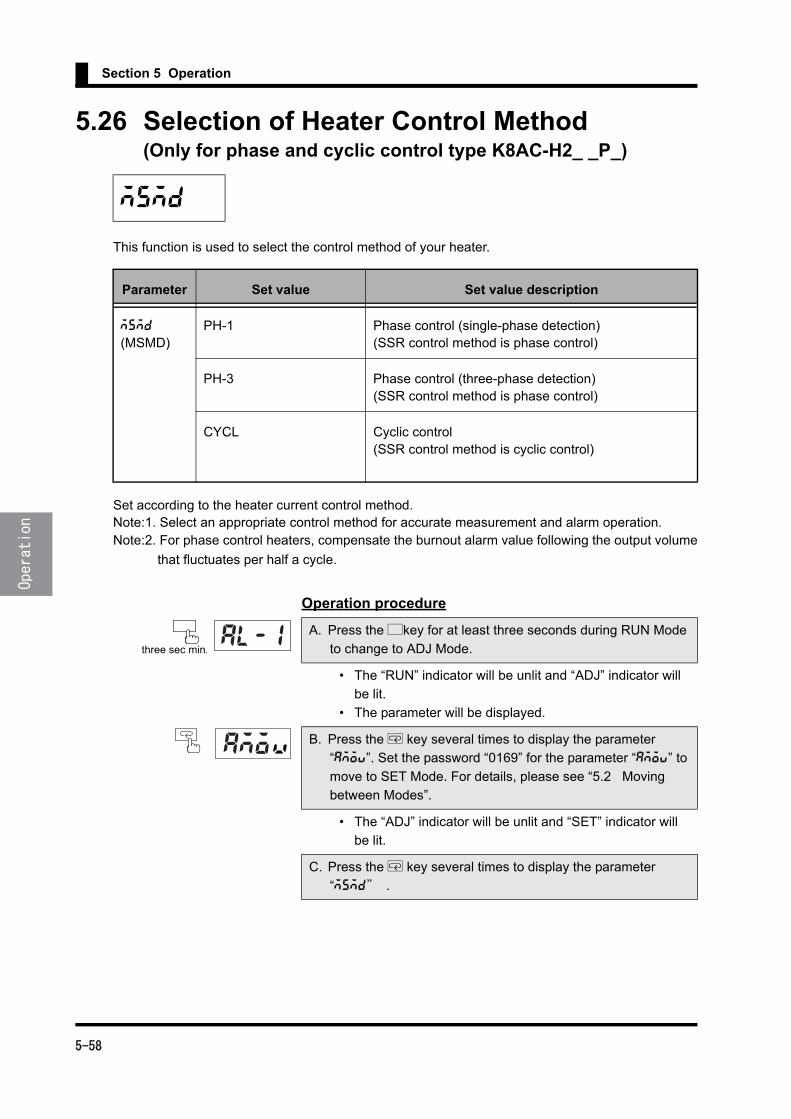
Section 5 Operation
5.26 Selection of Heater Control Method(Only for phase and cyclic control type K8AC-H2_ _P_)
This function is used to select the control method of your heater.
Set according to the heater current control method.Note:1. Select an appropriate control method for accurate measurement and alarm operation.Note:2. For phase control heaters, compensate the burnout alarm value following the output volume
that fluctuates per half a cycle.
Operation procedure
msmd
Parameter Set value Set value description
msmd
(MSMD)PH-1 Phase control (single-phase detection)
(SSR control method is phase control)
PH-3 Phase control (three-phase detection)(SSR control method is phase control)
CYCL Cyclic control(SSR control method is cyclic control)
A. Press the Lkey for at least three seconds during RUN Mode
to change to ADJ Mode.
• The “RUN” indicator will be unlit and “ADJ” indicator will
be lit.
• The parameter will be displayed.
B. Press the M key several times to display the parameter
“amov”. Set the password “0169” for the parameter “amov” to
move to SET Mode. For details, please see “5.2 Moving
between Modes”.
• The “ADJ” indicator will be unlit and “SET” indicator will
be lit.
C. Press the M key several times to display the parameter
“msmd” .
three sec min.al-1
amo
5-58

5.26 Selection of Heater Control Method (Only for phase and cyclic control type K8AC-H2_ _P_)
D. Press the S key to display the set value.
• The set value for the heater layer short circuit detection
will be displayed.
E. Press the S key again.
• The status will enter the change status and the set value
will start to flash.
F. The set value can be changed by the U and D keys.
G. Press the M key to switch to the next parameter.
• The set value changed will be registered to the internal
memory and “dsel” will be displayed.
H. Press the L key for at least one second to return to ADJ
Mode.
I. Press the L key for at least one second to return to RUN
Mode.
5-59
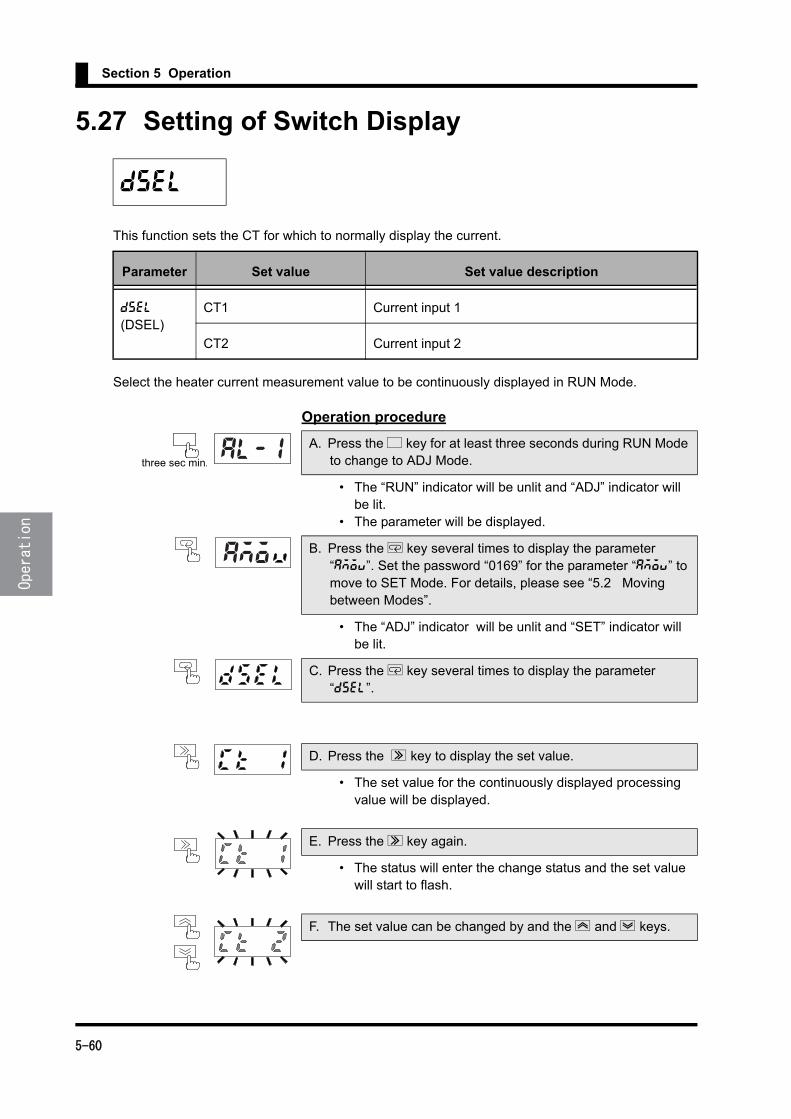
Section 5 Operation
5.27 Setting of Switch Display
This function sets the CT for which to normally display the current.
Select the heater current measurement value to be continuously displayed in RUN Mode.
Operation procedure
dsel
Parameter Set value Set value description
dsel
(DSEL)CT1 Current input 1
CT2 Current input 2
A. Press the L key for at least three seconds during RUN Mode to change to ADJ Mode.
• The “RUN” indicator will be unlit and “ADJ” indicator will be lit.
• The parameter will be displayed.
B. Press the M key several times to display the parameter “amov”. Set the password “0169” for the parameter “amov” to move to SET Mode. For details, please see “5.2 Moving between Modes”.
• The “ADJ” indicator will be unlit and “SET” indicator will be lit.
C. Press the M key several times to display the parameter “dsel”.
D. Press the S key to display the set value.
• The set value for the continuously displayed processing value will be displayed.
E. Press the S key again.
• The status will enter the change status and the set value will start to flash.
F. The set value can be changed by and the U and D keys.
three sec min.al-1
amo
5-60

5.27 Setting of Switch Display
G. Press the M key to switch to the next parameter.
• The set value changed will be registered to the internal memory and “psmd” will be displayed.
H. Press the L key for at least one second to return to ADJ Mode.
I. Press the L key for at least one second to return to RUN Mode.
5-61

Section 5 Operation
5.28 Setting of Power Save Mode
This turns entering the power save mode ON and OFF .
The power save operation is a function to turn off the light of the main display if no operation is per-formed for a certain time period. The operation time is set in “5.29 Setting of Power Save Operation Time”. The display light turned off by the power save operation can be lit again by pressing any key.
Operation procedure
psmd
Parameter Set value Set value description
psmd
(PSMD)
ON Power Save Operation is turned ON.
OFF Power Save Operation is turned OFF.
A. Press the L key for at least three seconds during RUN Mode
to change to ADJ Mode.
• The “RUN” indicator will be unlit and “ADJ” indicator will
be lit.
• The parameter will be displayed.
B. Press the M key several times to display the parameter “amov”. Set the password “0169” for the parameter “amov” to move to SET Mode. For details, please see 5.2 Moving between Modes”.
• The “ADJ” indicator will be unlit and “SET” indicator will
be lit.
C. Press the M key several times to display the parameter
“psmd” .
D. Press the S key to display the set value.
• The set value for the power save operation will be dis-
played.
E. Press the S key again.
• The status will enter the change status and the set value
will start to flash.
three sec min.al-1
amo
5-62

5.28 Setting of Power Save Mode
F. The set value can be changed by the U and D keys.
G. Press the M key to switch to the next parameter.
• The set value changed will be registered to the internal
memory and “pstm” will be displayed.
H. Press the L key for at least one second to return to ADJ
Mode.
I. Press the L key for at least one second to return to RUN
Mode.
5-63

Section 5 Operation
5.29 Setting of Power Save Mode Standby Time
This function sets the time enter power save mode.
The power save operation time is the time period during which only the light of the main display is turned off after the set time elapses. The power save operation can be enabled / disabled in “5.28 Setting of Power Save Mode Standby”.
Operation procedure
pstm
Parameter Set value Set value description
pstm
(PSTM)
10 to 300 Power Save Operation time10 to 300 :10 sec to 300 sec
A. Press the L key for at least three seconds during RUN Mode to change to ADJ Mode.
• The “RUN” indicator will be unlit and “ADJ” indicator will be lit.
• The parameter will be displayed.
B. Press the M key several times to display the parameter “amov”. Set the password “0169” for the parameter “amov” to move to SET Mode. For details, please see “5.2 Moving between Modes”.
• The “ADJ” indicator will be unlit and “SET” indicator will be lit.
C. Press the M key several times to display the parameter “pstm”.
D. Press the S key to display the set value.
• The set value for the power save operation time will be displayed.
E. Press the S key again.
• The status will enter the change status and the set value will start to flash.
three sec min.al-1
amo
5-64

5.29 Setting of Power Save Mode Standby Time
F. The set value can be changed by the U , D and S keys.
G. Press the M key to switch to the next parameter.
• The set value changed will be registered to the internal memory and “dsmd” will be displayed.
H. Press the L key for at least one second to return to ADJ Mode.
I. Press the L key for at least one second to return to RUN Mode.
5-65

Section 5 Operation
5.30 Setting of Display Mode
This function is used to select the display mode.
This selects the display method for the measurement value displayed in the basic display status of
RUN Mode.
Each display method is described below.
・ Processing value display method
Displays the measurement value as it is. For example, when the measurement value is 1.234 (A),
the display is shown as in the following figure. (Note: The position of the decimal point is fixed
depending on the model.)
・ Ratio display method Displays the measurement value in the ratio (%) against the heater burnout alarm set value.
When the heater burnout alarm set value is 2.000 (A) and the measurement value is 1.234 (A),
the display will be shown as in the following figure.
dsmd
Parameter Set value Set value description
dsmd
(DSMD)
NORM Processing value display
(Displays the measurement value as it is)
CMP Ratio display
(Displays the ratio (%) of the measurement value
against the burnout alarm value)
BAR Bar display
(Displays the bar representing the ratio of the mea-
surement value against the burnout alarm value)
5-66

5.30 Setting of Display Mode
・ Bar display method
Displays the measurment value in the ratio (%) against the heater burnout alarm set value using a
bar representation.
As shown in the following figure, how large or small the value is shown with the ratio 100% at the
center.
With the value at the center as a standard value, when the “set value is smaller than the measure-
ment value”, the indicator moves to the left from the center, and when the “set value is larger than
the measurement value”, the indicator moves to the right.
The farther from the center value, the more number of the bars, and when the ratio is in the display
range smaller than the measurement value, the bars at the left from the canter will all flash. When
the ratio is in the display range larger than the measurement value, the bars at the right from the
center will all flash.
When the heater burnout alarm set value is 2.000 (A) and the measurement value is 1.534 (A), the
display will be shown as in the following figure. (Ratio = 76.7%)
Operation procedure
A. Press the L key for at least three seconds during RUN Mode
to change to ADJ Mode.
• The “RUN” indicator will be unlit and “ADJ” indicator will
be lit.
• The parameter will be displayed.
B. Press the M key several times to display the parameter
“amov”. Set the password “0169” for the parameter “amov” to
move to SET Mode. For details, please see “5.2 Moving
between Modes”.
• The “ADJ” indicator will be unlit and “SET” indicator will
be lit.
C. Press the M key several times to display the parameter
“dsmd”.
Center position
This part is lit.
three sec min.al-1
amo
5-67

Section 5 Operation
D. Press the S key to display the set value.
• The set value for the display method will be displayed.
E. Press the S key again.
• The status will enter the change status and the set value
will start to flash.
F. The set value can be changed by the U and D keys.
G. Press the M key to switch to the next parameter.
• The set value changed will be registered to the internal
memory and “dsrf” will be displayed.
H. Press the L key for at least one second to return to ADJ
Mode.
I. Press the L key for at least one second to return to RUN
Mode.
5-68
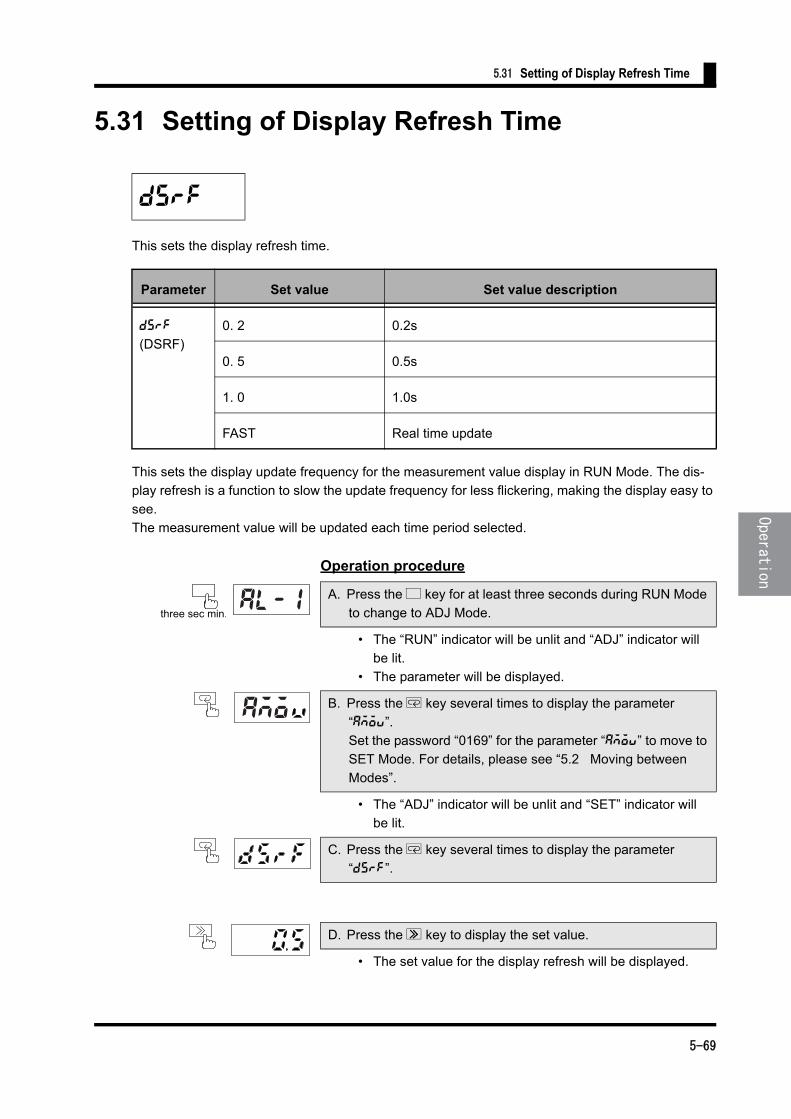
5.31 Setting of Display Refresh Time
5.31 Setting of Display Refresh Time
This sets the display refresh time.
This sets the display update frequency for the measurement value display in RUN Mode. The dis-
play refresh is a function to slow the update frequency for less flickering, making the display easy to
see.
The measurement value will be updated each time period selected.
Operation procedure
dsrf
Parameter Set value Set value description
dsrf
(DSRF)
0. 2 0.2s
0. 5 0.5s
1. 0 1.0s
FAST Real time update
A. Press the L key for at least three seconds during RUN Mode
to change to ADJ Mode.
• The “RUN” indicator will be unlit and “ADJ” indicator will
be lit.
• The parameter will be displayed.
B. Press the M key several times to display the parameter
“amov”.
Set the password “0169” for the parameter “amov” to move to
SET Mode. For details, please see “5.2 Moving between
Modes”.
• The “ADJ” indicator will be unlit and “SET” indicator will
be lit.
C. Press the M key several times to display the parameter
“dsrf”.
D. Press the S key to display the set value.
• The set value for the display refresh will be displayed.
three sec min.al-1
amo
5-69
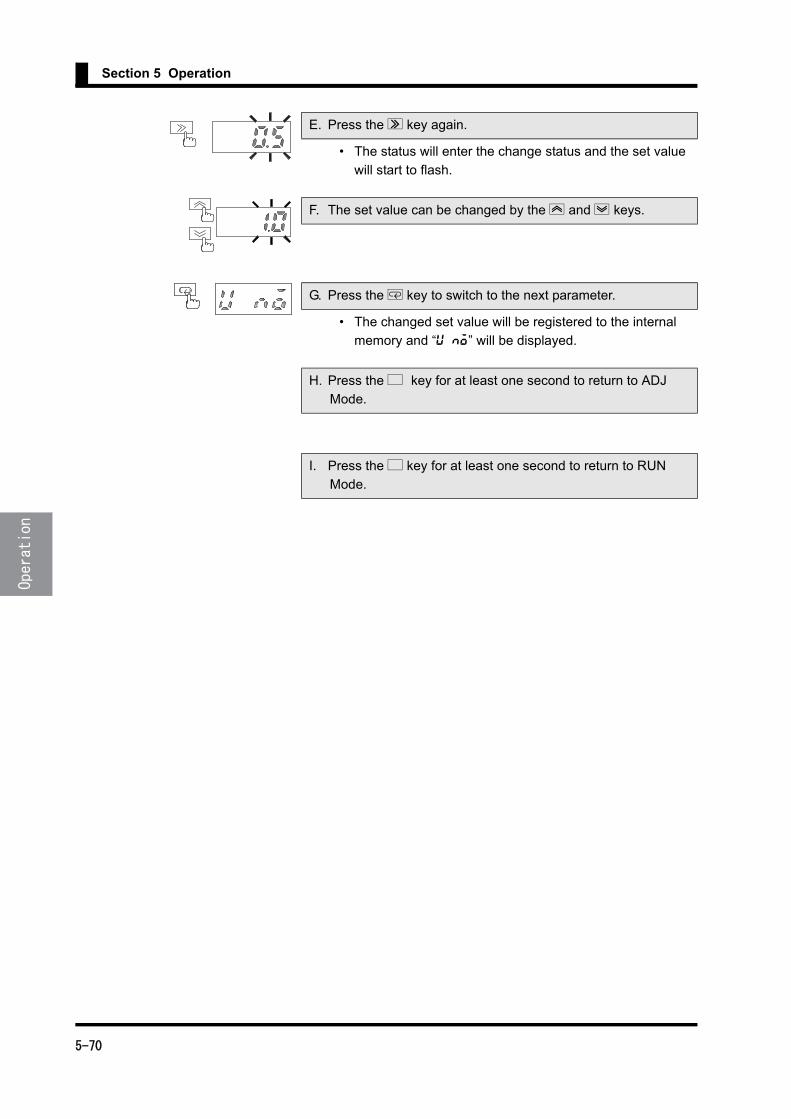
Section 5 Operation
E. Press the S key again.
• The status will enter the change status and the set value
will start to flash.
F. The set value can be changed by the U and D keys.
G. Press the M key to switch to the next parameter.
• The changed set value will be registered to the internal
memory and “u no” will be displayed.
H. Press the L key for at least one second to return to ADJ
Mode.
I. Press the L key for at least one second to return to RUN
Mode.
5-70
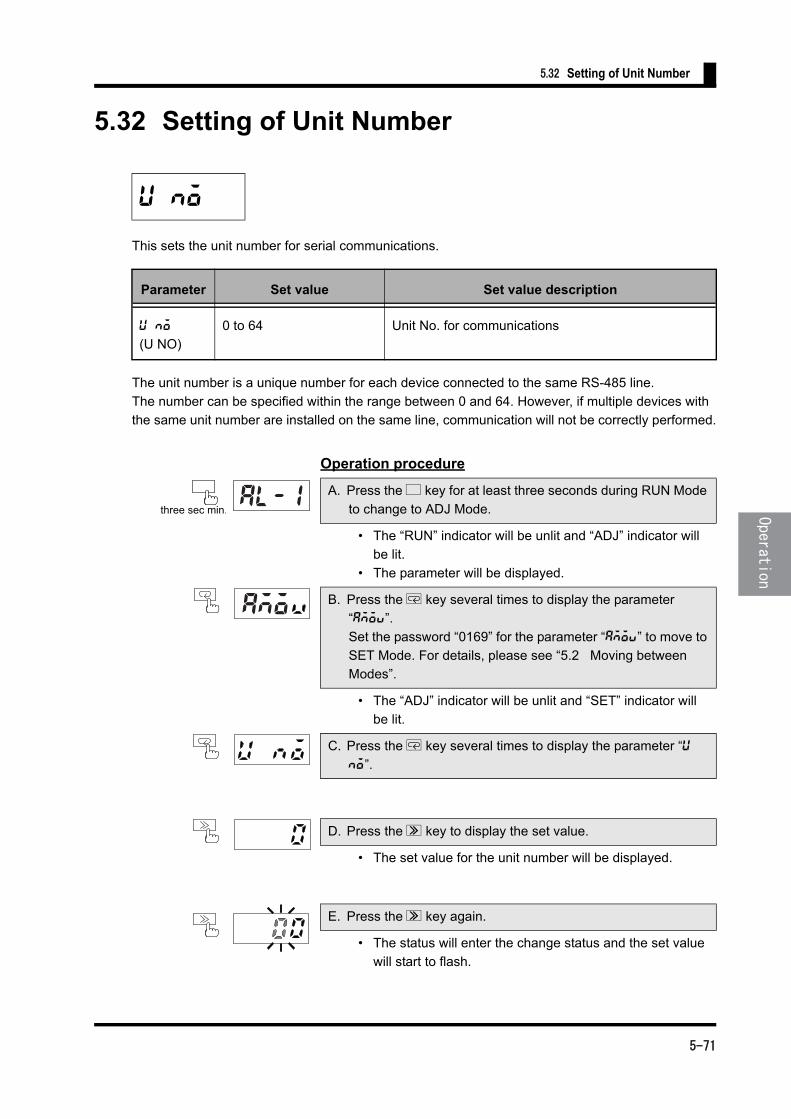
5.32 Setting of Unit Number
5.32 Setting of Unit Number
This sets the unit number for serial communications.
The unit number is a unique number for each device connected to the same RS-485 line.
The number can be specified within the range between 0 and 64. However, if multiple devices with
the same unit number are installed on the same line, communication will not be correctly performed.
Operation procedure
u no
Parameter Set value Set value description
u no
(U NO)
0 to 64 Unit No. for communications
A. Press the L key for at least three seconds during RUN Mode
to change to ADJ Mode.
• The “RUN” indicator will be unlit and “ADJ” indicator will
be lit.
• The parameter will be displayed.
B. Press the M key several times to display the parameter
“amov”.
Set the password “0169” for the parameter “amov” to move to
SET Mode. For details, please see “5.2 Moving between
Modes”.
• The “ADJ” indicator will be unlit and “SET” indicator will
be lit.
C. Press the M key several times to display the parameter “u
no”.
D. Press the S key to display the set value.
• The set value for the unit number will be displayed.
E. Press the S key again.
• The status will enter the change status and the set value
will start to flash.
three sec min.al-1
amo
5-71

Section 5 Operation
F. The set value can be changed by the U , D and S keys.
G. Press the M key to switch to the next parameter.
• The set value changed will be registered to the internal
memory and “bps” will be displayed.
H. Press the L key for at least one second to return to ADJ
Mode.
I. Press the L key for at least one second to return to RUN
Mode.
5-72
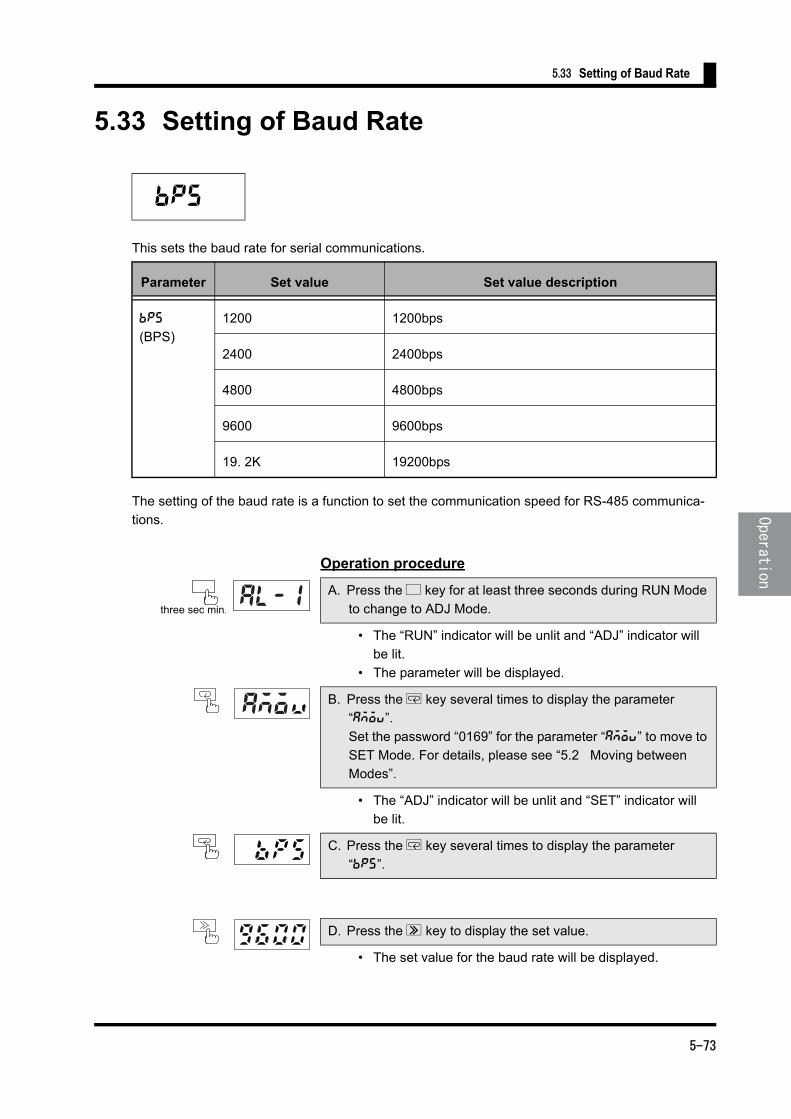
5.33 Setting of Baud Rate
5.33 Setting of Baud Rate
This sets the baud rate for serial communications.
The setting of the baud rate is a function to set the communication speed for RS-485 communica-
tions.
Operation procedure
bps
Parameter Set value Set value description
bps
(BPS)
1200 1200bps
2400 2400bps
4800 4800bps
9600 9600bps
19. 2K 19200bps
A. Press the L key for at least three seconds during RUN Mode
to change to ADJ Mode.
• The “RUN” indicator will be unlit and “ADJ” indicator will
be lit.
• The parameter will be displayed.
B. Press the M key several times to display the parameter
“amov”.
Set the password “0169” for the parameter “amov” to move to
SET Mode. For details, please see “5.2 Moving between
Modes”.
• The “ADJ” indicator will be unlit and “SET” indicator will
be lit.
C. Press the M key several times to display the parameter
“bps”.
D. Press the S key to display the set value.
• The set value for the baud rate will be displayed.
three sec min.al-1
amo
5-73
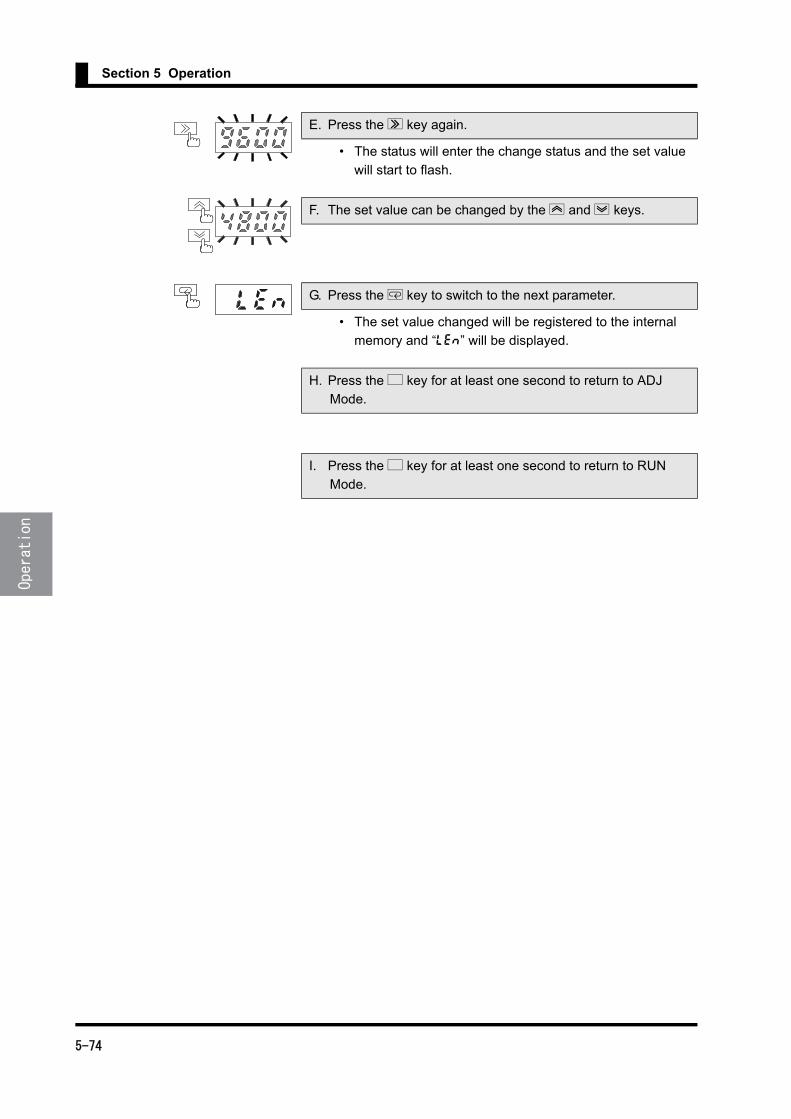
Section 5 Operation
E. Press the S key again.
• The status will enter the change status and the set value
will start to flash.
F. The set value can be changed by the U and D keys.
G. Press the M key to switch to the next parameter.
• The set value changed will be registered to the internal
memory and “len” will be displayed.
H. Press the L key for at least one second to return to ADJ
Mode.
I. Press the L key for at least one second to return to RUN
Mode.
5-74
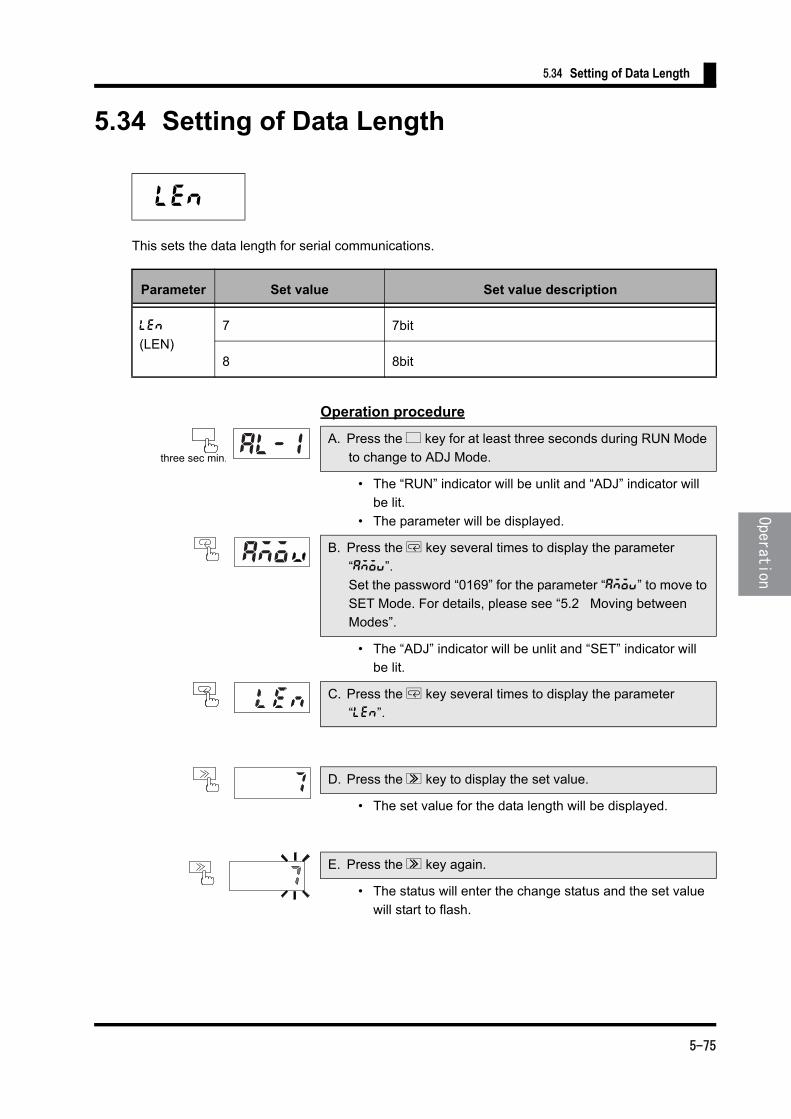
5.34 Setting of Data Length
5.34 Setting of Data Length
This sets the data length for serial communications.
Operation procedure
len
Parameter Set value Set value description
len
(LEN)
7 7bit
8 8bit
A. Press the L key for at least three seconds during RUN Mode
to change to ADJ Mode.
• The “RUN” indicator will be unlit and “ADJ” indicator will
be lit.
• The parameter will be displayed.
B. Press the M key several times to display the parameter
“amov”.
Set the password “0169” for the parameter “amov” to move to
SET Mode. For details, please see “5.2 Moving between
Modes”.
• The “ADJ” indicator will be unlit and “SET” indicator will
be lit.
C. Press the M key several times to display the parameter
“len”.
D. Press the S key to display the set value.
• The set value for the data length will be displayed.
E. Press the S key again.
• The status will enter the change status and the set value
will start to flash.
three sec min.al-1
amo
5-75

Section 5 Operation
F. The set value can be changed by the U and D keys.
G. Press the M key to switch to the next parameter.
• The set value changed will be registered to the internal
memory and “sbit” will be displayed.
H. Press the L key for at least one second to return to ADJ
Mode.
I. Press the L key for at least one second to return to RUN
Mode.
5-76
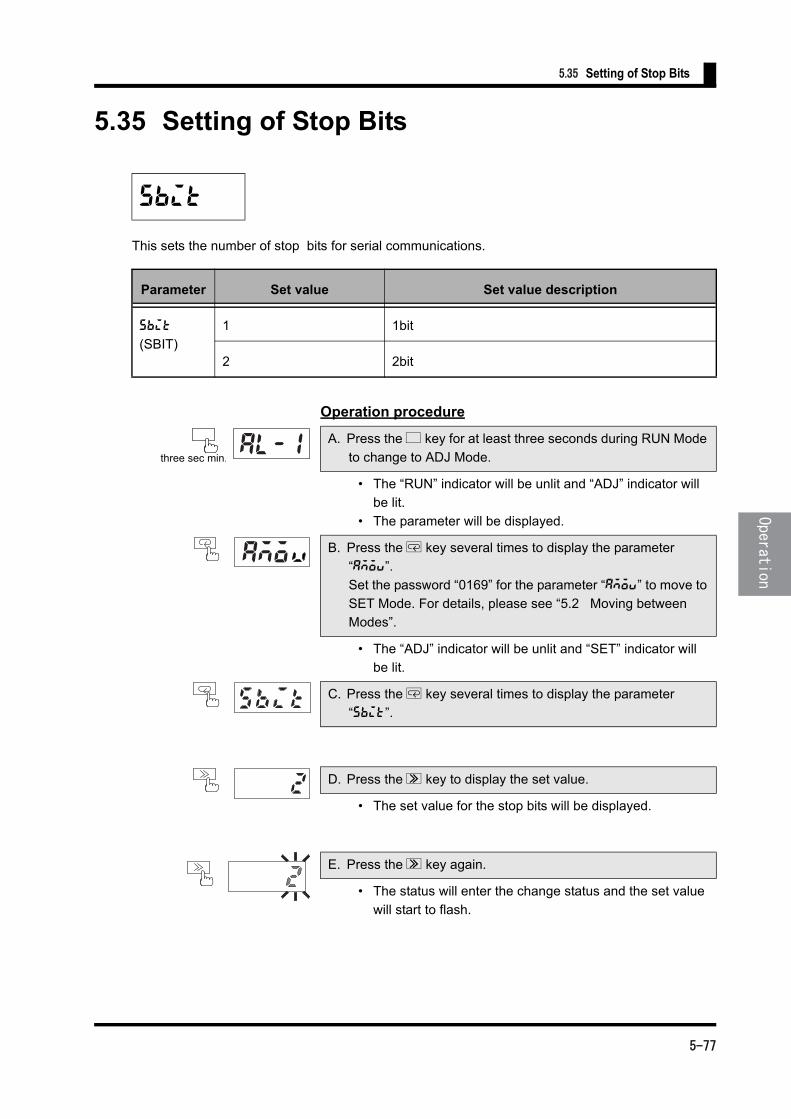
5.35 Setting of Stop Bits
5.35 Setting of Stop Bits
This sets the number of stop bits for serial communications.
Operation procedure
sbit
Parameter Set value Set value description
sbit
(SBIT)
1 1bit
2 2bit
A. Press the L key for at least three seconds during RUN Mode
to change to ADJ Mode.
• The “RUN” indicator will be unlit and “ADJ” indicator will
be lit.
• The parameter will be displayed.
B. Press the M key several times to display the parameter
“amov”.
Set the password “0169” for the parameter “amov” to move to
SET Mode. For details, please see “5.2 Moving between
Modes”.
• The “ADJ” indicator will be unlit and “SET” indicator will
be lit.
C. Press the M key several times to display the parameter
“sbit”.
D. Press the S key to display the set value.
• The set value for the stop bits will be displayed.
E. Press the S key again.
• The status will enter the change status and the set value
will start to flash.
three sec min.al-1
amo
5-77

Section 5 Operation
F. The set value can be changed by the U and D keys.
G. Press the M key to switch to the next parameter.
• The set value changed will be registered to the internal
memory and “prty” will be displayed.
H. Press the L key for at least one second to return to ADJ
Mode.
I. Press the L key for at least one second to return to RUN
Mode.
5-78
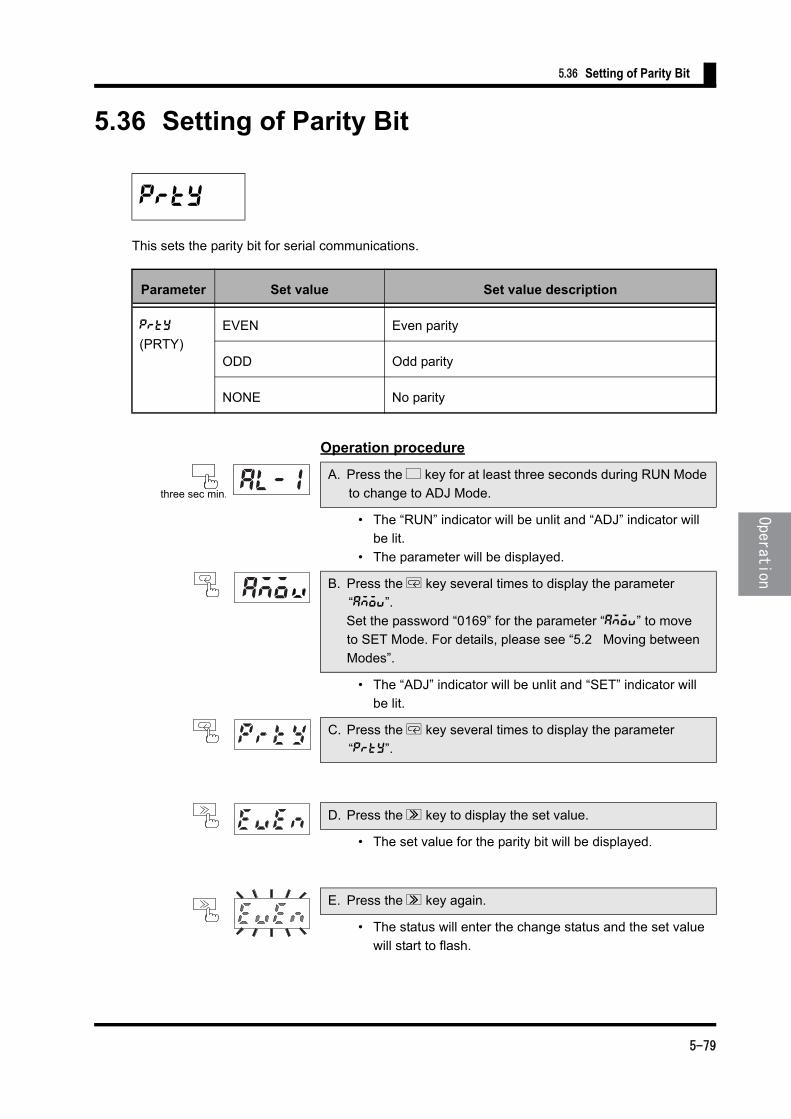
5.36 Setting of Parity Bit
5.36 Setting of Parity Bit
This sets the parity bit for serial communications.
Operation procedure
prty
Parameter Set value Set value description
prty
(PRTY)
EVEN Even parity
ODD Odd parity
NONE No parity
A. Press the L key for at least three seconds during RUN Mode
to change to ADJ Mode.
• The “RUN” indicator will be unlit and “ADJ” indicator will
be lit.
• The parameter will be displayed.
B. Press the M key several times to display the parameter
“amov”.
Set the password “0169” for the parameter “amov” to move
to SET Mode. For details, please see “5.2 Moving between
Modes”.
• The “ADJ” indicator will be unlit and “SET” indicator will
be lit.
C. Press the M key several times to display the parameter
“prty”.
D. Press the S key to display the set value.
• The set value for the parity bit will be displayed.
E. Press the S key again.
• The status will enter the change status and the set value
will start to flash.
three sec min.al-1
amo
5-79

Section 5 Operation
F. The set value can be changed by the U and D keys.
G. Press the M key to switch to the next parameter.
• The set value changed will be registered to the internal
memory and “nct1” will be displayed for phase or cyclic
control heaters and “goht” for ON/OFF control heaters.
H. Press the L key for at least one second to return to ADJ
Mode.
I. Press the L key for at least one second to return to RUN
Mode.
nct1
5-80

5.37 Setting of Gate OFF Alarm Output Hold Time (Only for ON/OFF control type heaters ; K8AC-H2_ _C_)
5.37 Setting of Gate OFF Alarm Output Hold Time (Only for ON/OFF control type heaters ; K8AC-H2_ _C_)
This sets the burnout alarm output hold time.
Operation procedure
goht
Parameter Set value Set value description
goht
(GOHT)
0 to 999 This function is used to set the output hold time period
after the gate signal goes OFF until the burnout alarm
output turns OFF.
0 to 999 : 0 sec to 999 sec Initial value = 2 sec
A. Press the L key for at least three seconds during RUN Mode
to change to ADJ Mode.
• The “RUN” indicator will be unlit and “ADJ” indicator will
be lit.
• The parameter will be displayed.
B. Press the M key several times to display the parameter
“amov”.
Set the password “0169” for the parameter “amov” to move to
SET Mode. For details, please see “5.2 Moving between
Modes”.
• The “ADJ” indicator will be unlit and “SET” indicator will
be lit.
C. Press the M key several times to display the parameter
“goht”.
D. Press the S key to display the set value.
• The set value for the alarm output hold time will be dis-
played.
E. Press the S key again.
• The status will enter the change status and the set value
will start to flash.
three sec min.al-1
amo
goht
5-81

Section 5 Operation
F. The set value can be changed by the U , D and S keys.
G. Press the M key to switch to the next parameter.
• The set value changed will be registered to the internal
memory and “nct1” will be displayed.
H. Press the L key for at least one second to return to ADJ
Mode.
I. Press the L key for at least one second to return to RUN
Mode.
5-82

5.38 Setting of Operation Gate Current Level (Only for phase or cyclic control type heaters: K8AC-H2_ _P_)
5.38 Setting of Operation Gate Current Level(Only for phase or cyclic control type heaters: K8AC-H2_ _P_)
This sets the gate current value for stopping an alarm or detection.
Operation procedure
g-lv
Parameter Set value Set value description
g-lv
(G-LV)
7.0 to 20.0 If the gate current value falls below the set value,
detection will be disabled.
7.0 to 20.0: 7.0mA to 20.0mA
Initial value = 7.0mA
A. Press the D key for at least one second during RUN Mode to
change to the GATE Mode.
B. Press the S key to display the set value.
C. Press the S key again.
• The status will enter the change status and the set value
will start to flash.
D. The set value can be changed by the U, D and S keys.
E. Press the M key to finalize it.
• The set value changed will be registered to the internal
memory and “g-lv” will be displayed.
F. Press the D key for at least one second to return to RUN
Mode.
1 sec min.g-l
7.0
07.0
09.0
g-l
5-83

Section 5 Operation
Memo*1. Even during this setting, alarm detection, output relay/output transistor and indicator
display are available.
*2. During this setting, the ADJ indicator will flash.
Teaching at the Operation Gate Current LevelThe teaching function allows the setting with real inputs.
Operation procedure
G. The operation in C will bring you to the monitor status. Press
the U key in the monitor status instead of the operation in D.
• You will enter the teaching status where the gate inputs
change the set value accordingly.
H. Press the U key again.
• The input value will be registered as a set value and you
will return to the monitor status.
• Pressing the U key in the teaching status instead of M
key will cancel the teaching.
Teaching status
Register with the key andgoes to monitor status
Monitor status
Normal changestatusg-l 7.0
10.0
07.0
5-84
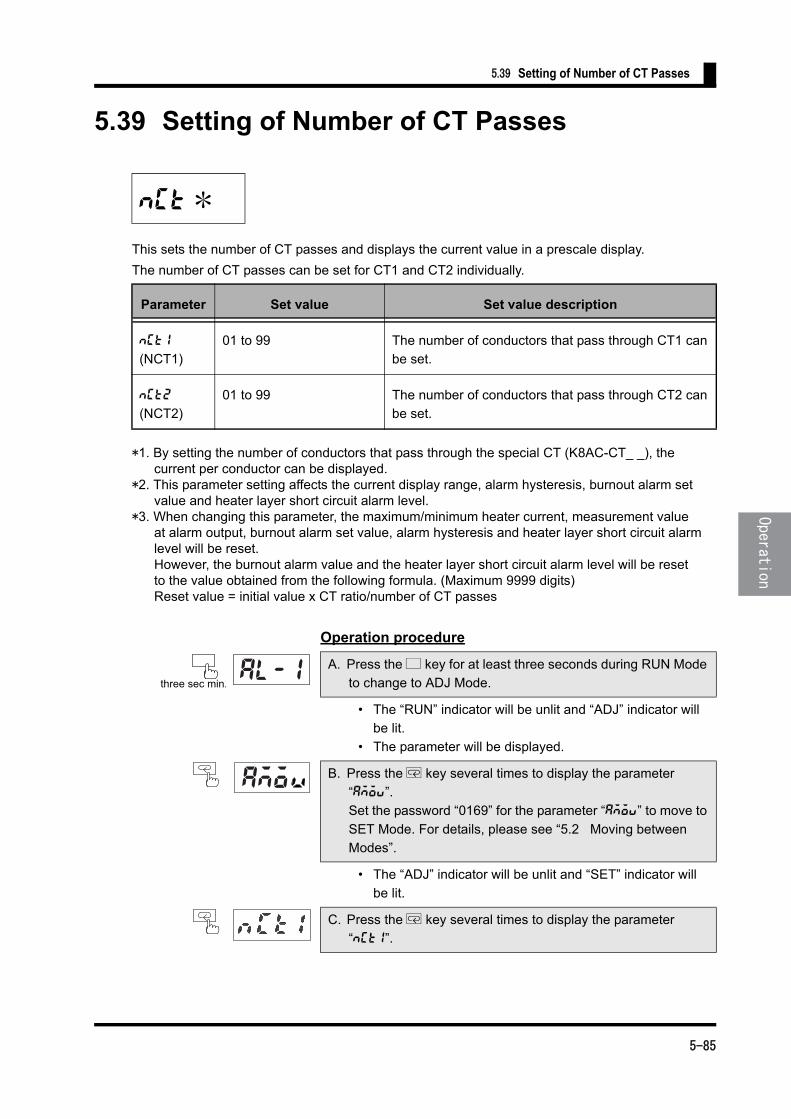
5.39 Setting of Number of CT Passes
5.39 Setting of Number of CT Passes
This sets the number of CT passes and displays the current value in a prescale display.
The number of CT passes can be set for CT1 and CT2 individually.
*1. By setting the number of conductors that pass through the special CT (K8AC-CT_ _), the current per conductor can be displayed.*2. This parameter setting affects the current display range, alarm hysteresis, burnout alarm set value and heater layer short circuit alarm level.*3. When changing this parameter, the maximum/minimum heater current, measurement value at alarm output, burnout alarm set value, alarm hysteresis and heater layer short circuit alarm level will be reset. However, the burnout alarm value and the heater layer short circuit alarm level will be reset to the value obtained from the following formula. (Maximum 9999 digits) Reset value = initial value x CT ratio/number of CT passes
Operation procedure
nct*
Parameter Set value Set value description
nct1
(NCT1)
01 to 99 The number of conductors that pass through CT1 can
be set.
nct2
(NCT2)
01 to 99 The number of conductors that pass through CT2 can
be set.
A. Press the L key for at least three seconds during RUN Mode
to change to ADJ Mode.
• The “RUN” indicator will be unlit and “ADJ” indicator will
be lit.
• The parameter will be displayed.
B. Press the M key several times to display the parameter
“amov”.
Set the password “0169” for the parameter “amov” to move to
SET Mode. For details, please see “5.2 Moving between
Modes”.
• The “ADJ” indicator will be unlit and “SET” indicator will
be lit.
C. Press the M key several times to display the parameter
“nct1”.
three sec min.al-1
amo
5-85
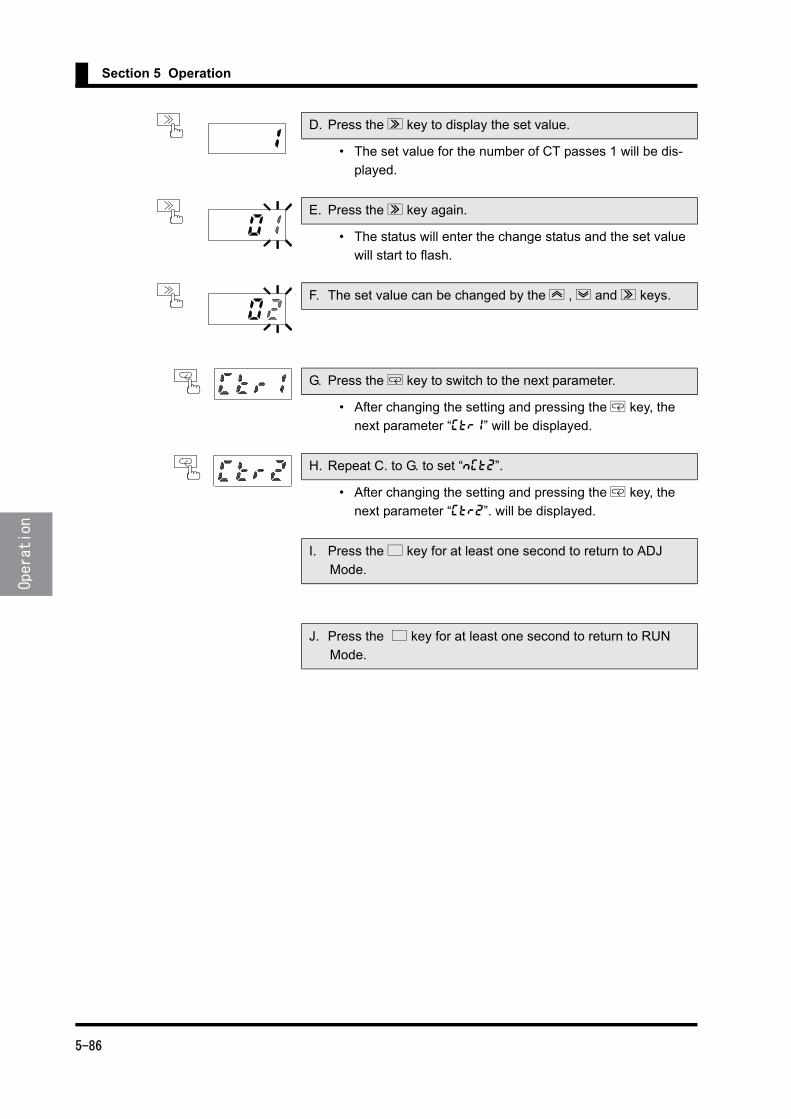
Section 5 Operation
D. Press the S key to display the set value.
• The set value for the number of CT passes 1 will be dis-
played.
E. Press the S key again.
• The status will enter the change status and the set value
will start to flash.
F. The set value can be changed by the U , D and S keys.
G. Press the M key to switch to the next parameter.
• After changing the setting and pressing the M key, the
next parameter “ctr1” will be displayed.
H. Repeat C. to G. to set “nct2”.
• After changing the setting and pressing the M key, the
next parameter “ctr2”. will be displayed.
I. Press the L key for at least one second to return to ADJ
Mode.
J. Press the L key for at least one second to return to RUN
Mode.
5-86

5.40 Setting of CT Ratio
5.40 Setting of CT Ratio
This sets the CT ratio and displays the current value in a prescale display.The CT ratio can be set for CT1 and CT2 individually.
*1. When installing a general-purpose CT at the primary side of the special CT (K8AC-CT_ _), the current value at the primary side of the general-purpose CT can be displayed by setting X (where the CT ratio for the CT is 1/X).*2. If this parameter setting goes beyond the range (exceeding 9999 digits), the setting in “5-41 Setting for Number of Effective Digits to be Displayed after the Decimal Point” can extend the display range.*3. This parameter setting affects the current display range, alarm hysteresis, burnout alarm set value and heater layer short circuit alarm level.*4. When changing this parameter, the maximum/minimum heater current, process value at alarm output, burnout alarm set value, alarm hysteresis and heater layer short circuit alarm level will be reset. However, the burnout alarm value and the heater layer short circuit alarm level will be reset to the value obtained from the following formula. (Maximum 9999 digits) Reset value = initial value x CT ratio/number of CT passes
Operation procedure
ctr*
Parameter Set value Set value description
ctr1
(CTR1)
001 to 999 The ratio between the primary side and secondary side
of CT1 can be set.
ctr2
(CTR2)
001 to 999 The ratio between the primary side and secondary side
of CT2 can be set.
A. Press the L key for at least three seconds during RUN Mode
to change to ADJ Mode.
• The “RUN” indicator will be unlit and “ADJ” indicator will
be lit.
• The parameter will be displayed.
B. Press the M key several times to display the parameter
“amov”.
Set the password “0169” for the parameter “amov” to move to
SET Mode. For details, please see “5.2 Moving between
Modes”.
• The “ADJ” indicator will be unlit and “SET” indicator will
be lit.
three sec min.al-1
amo
5-87
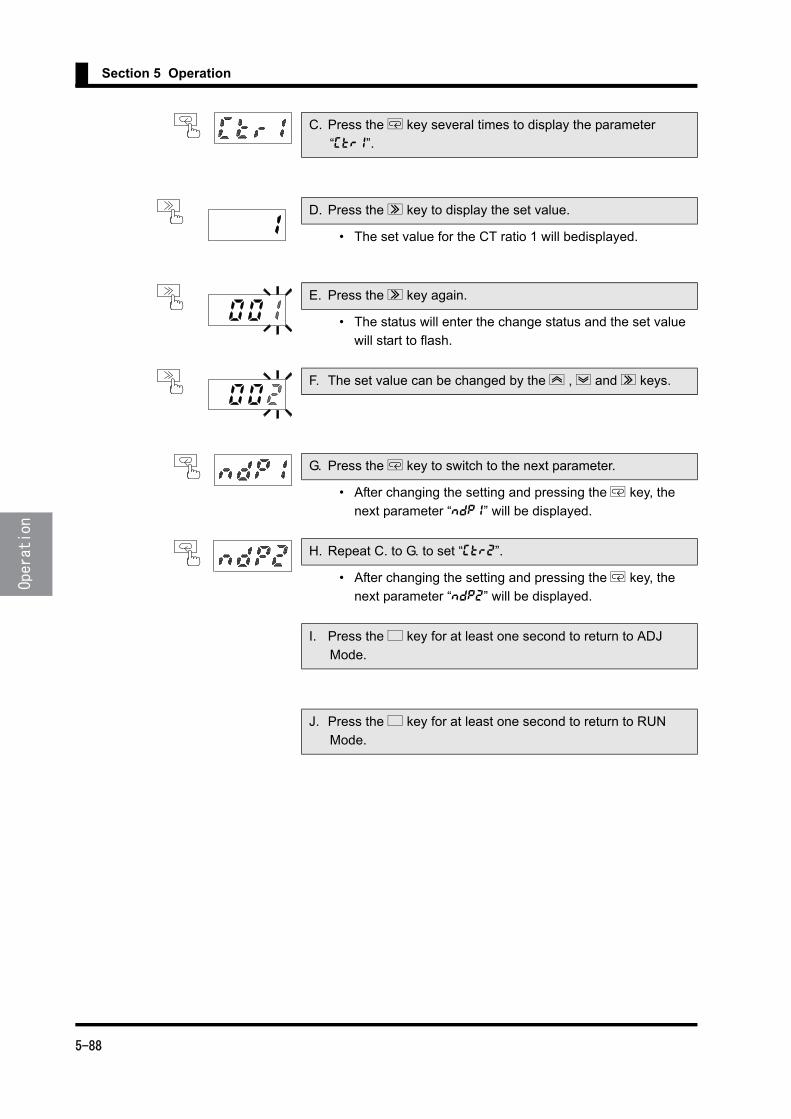
Section 5 Operation
C. Press the M key several times to display the parameter
“ctr1”.
D. Press the S key to display the set value.
• The set value for the CT ratio 1 will bedisplayed.
E. Press the S key again.
• The status will enter the change status and the set value
will start to flash.
F. The set value can be changed by the U , D and S keys.
G. Press the M key to switch to the next parameter.
• After changing the setting and pressing the M key, the
next parameter “ndp1” will be displayed.
H. Repeat C. to G. to set “ctr2”.
• After changing the setting and pressing the M key, the
next parameter “ndp2” will be displayed.
I. Press the L key for at least one second to return to ADJ
Mode.
J. Press the L key for at least one second to return to RUN
Mode.
5-88

5.41 Setting of Number of Effective Digits to be Displayed after the Decimal Point
5.41 Setting of Number of Effective Digits to be Displayed after the Decimal Point
This sets the number of effective digits to be displayed after the decimal point and displays the cur-
rent value in a prescale display. The number of effective digits to be displayed after the decimal point
can be set for CT1 and CT2 individually.
*1. The setting range varies depending on the model. K8AC-H21_ _-FLK : *000/0*00/00*0/0000. K8AC-H22_ _-FLK : 0*00/00*0/0000. K8AC-H23_ _-FLK : 00*0/0000.*2. In this parameter, selecting the decimal point position can set the effective digits and change the display range. The digits outside the display range will be rounded off. Ex.) For K8AC-H21_ _-FLK NDP1=*000. Display 1.459 NDP1=0*00. Display 1.45 NDP1=00*0 Display 1.4 NDP1=0000. Display 1*3. This parameter setting affects the current display range, alarm hysteresis, burnout alarm set value and heater layer short circuit alarm level.*4. When changing this parameter, the maximum/minimum heater current, process value at alarm output, burnout alarm set value, alarm hysteresis and heater layer short circuit alarm level will be reset. However, the burnout alarm value and the heater layer short circuit alarm level will be reset to the value obtained from the following formula. (Maximum 9999 digits) Reset value = initial value x CT ratio/number of CT passes
Operation procedure
ndp*
Parameter Set value Set value description
ndp1
(NDP1)
0 to 3 *1 The number of effective digits to be displayed after the decimal point for the CT1 current display can be set.
ndp2
(NDP2)
0 to 3 *1 The number of effective digits to be displayed after the decimal point for the CT2 current display can be set.
A. Press the L key for at least three seconds during RUN Mode to change to ADJ Mode.
• The “RUN” indicator will be unlit and “ADJ” indicator will be lit.
• The parameter will be displayed.
three sec min.al-1
5-89
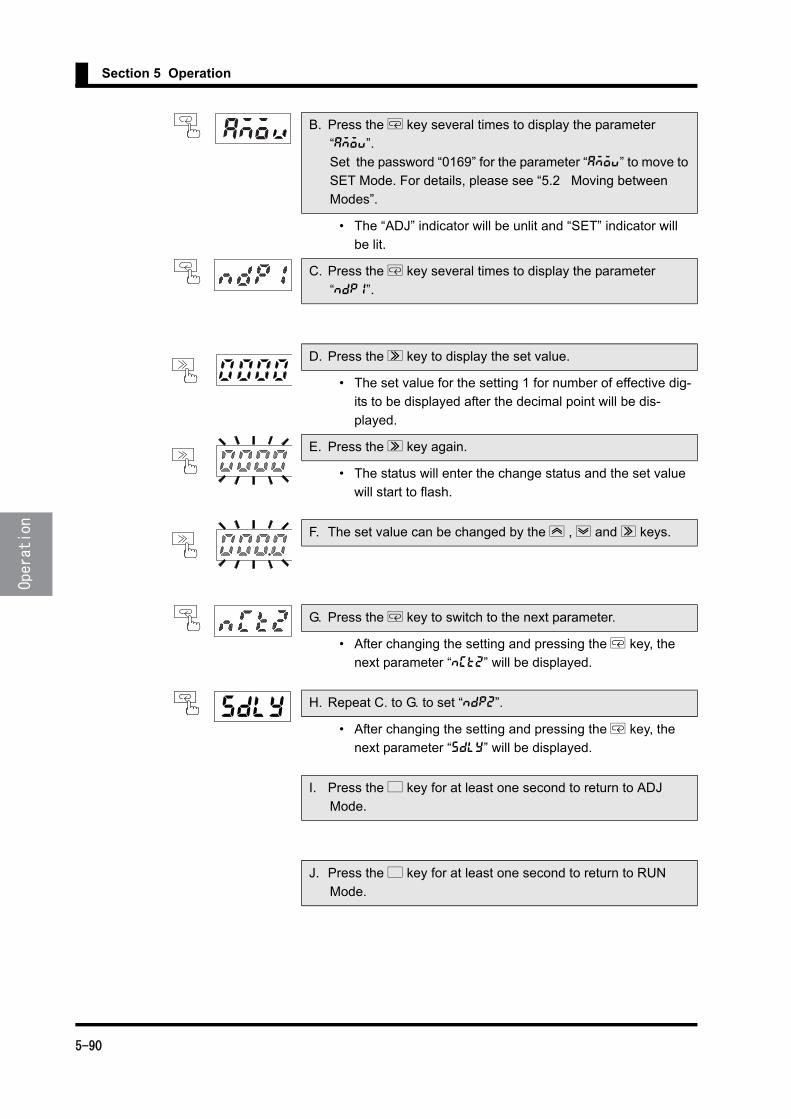
Section 5 Operation
B. Press the M key several times to display the parameter
“amov”.
Set the password “0169” for the parameter “amov” to move to
SET Mode. For details, please see “5.2 Moving between
Modes”.
• The “ADJ” indicator will be unlit and “SET” indicator will
be lit.
C. Press the M key several times to display the parameter
“ndp1”.
D. Press the S key to display the set value.
• The set value for the setting 1 for number of effective dig-
its to be displayed after the decimal point will be dis-
played.
E. Press the S key again.
• The status will enter the change status and the set value
will start to flash.
F. The set value can be changed by the U , D and S keys.
G. Press the M key to switch to the next parameter.
• After changing the setting and pressing the M key, the
next parameter “nct2” will be displayed.
H. Repeat C. to G. to set “ndp2”.
• After changing the setting and pressing the M key, the
next parameter “sdly” will be displayed.
I. Press the L key for at least one second to return to ADJ
Mode.
J. Press the L key for at least one second to return to RUN
Mode.
amo
sdly
5-90
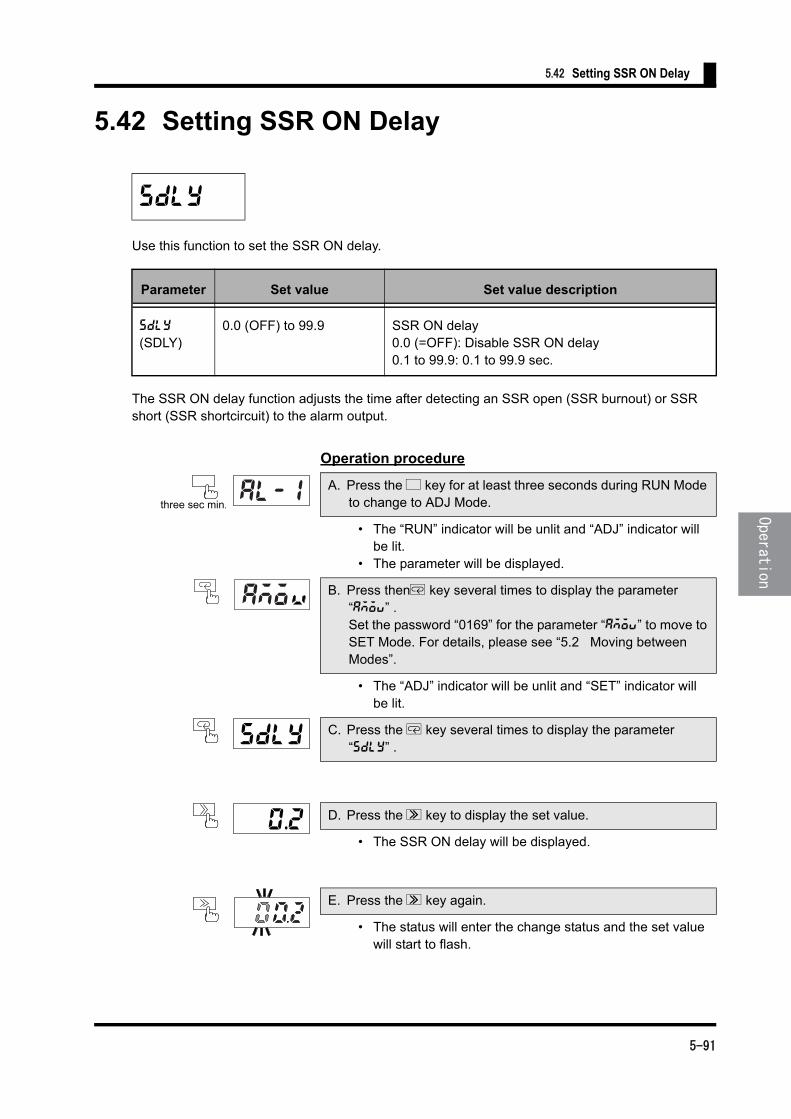
5.42 Setting SSR ON Delay
5.42 Setting SSR ON Delay
Use this function to set the SSR ON delay.
The SSR ON delay function adjusts the time after detecting an SSR open (SSR burnout) or SSR short (SSR shortcircuit) to the alarm output.
Operation procedure
sdly
Parameter Set value Set value description
sdly
(SDLY)0.0 (OFF) to 99.9 SSR ON delay
0.0 (=OFF): Disable SSR ON delay0.1 to 99.9: 0.1 to 99.9 sec.
A. Press the L key for at least three seconds during RUN Mode to change to ADJ Mode.
• The “RUN” indicator will be unlit and “ADJ” indicator will be lit.
• The parameter will be displayed.
B. Press thenM key several times to display the parameter “amov” .Set the password “0169” for the parameter “amov” to move to SET Mode. For details, please see “5.2 Moving between Modes”.
• The “ADJ” indicator will be unlit and “SET” indicator will be lit.
C. Press the M key several times to display the parameter “sdly” .
D. Press the S key to display the set value.
• The SSR ON delay will be displayed.
E. Press the S key again.
• The status will enter the change status and the set value will start to flash.
three sec min.al-1
amo
sdly
0.2
5-91
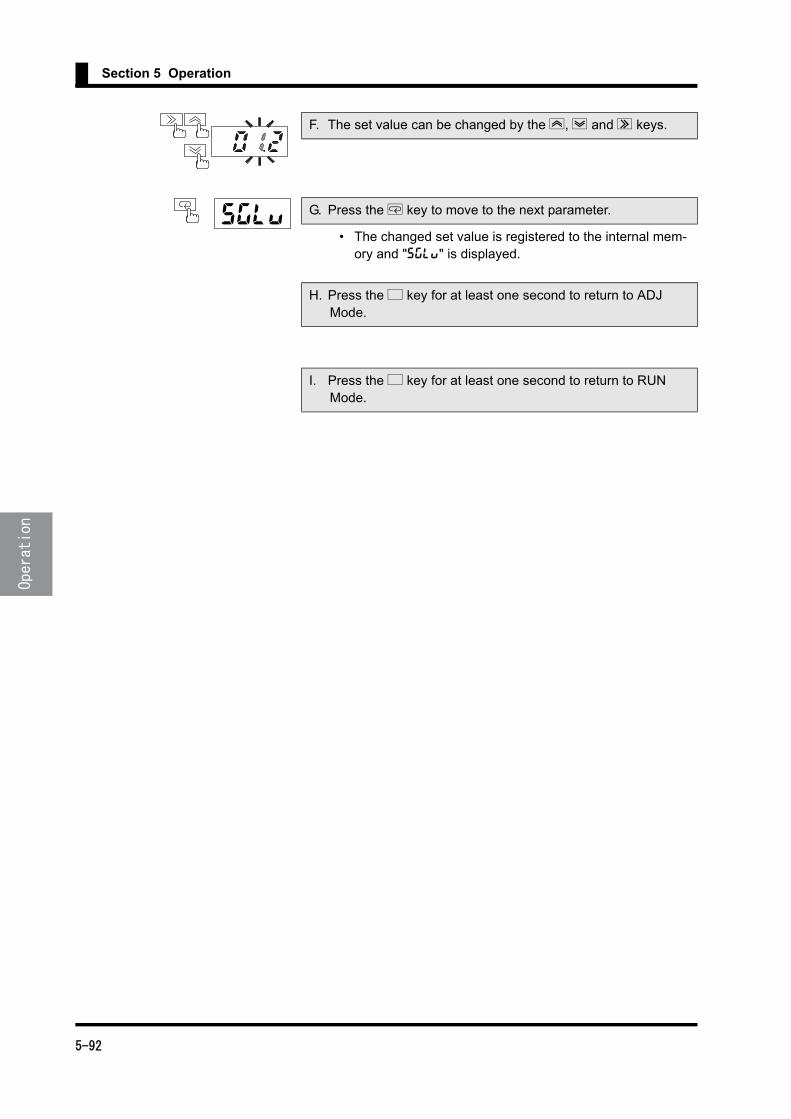
Section 5 Operation
F. The set value can be changed by the U, D and S keys.
G. Press the M key to move to the next parameter.
• The changed set value is registered to the internal mem-ory and "sglv" is displayed.
H. Press the L key for at least one second to return to ADJ Mode.
I. Press the L key for at least one second to return to RUN Mode.
sglV
5-92

5.43 Setting SSR Operation Gate Current Level (Only for phase or cyclic control type heaters: K8AC-H2_ _P_)
5.43 Setting SSR Operation Gate Current Level(Only for phase or cyclic control type heaters: K8AC-H2_ _P_)
Use this function to set the gate current level to disable the SSR open and SSR short alarm judg-
ments.
Operation procedure
sglv
Parameter Set value Set value description
sglv
(SGLV)4.0 to 20.0 SSR open and SSR short alarm judgments are not
available if the gate current level reaches below the set value.4.0 to 20.0: 4.0 mA to 20.0 mA; initial value: 7.0 mA
A. Press the L key for at least three seconds during RUN Mode to change to ADJ Mode.
• The “RUN” indicator will be unlit and “ADJ” indicator will be lit.
• The parameter will be displayed.
B. Press thenM key several times to display the parameter “amov” .Set the password “0169” for the parameter “amov” to move to SET Mode. For details, please see “5.2 Moving between Modes”.
• The “ADJ” indicator will be unlit and “SET” indicator will be lit.
C. Press the M key several times to display the parameter “sglv” .
D. Press the S key to display the set value.
E. Press the S key again.
• The status will enter the change status and the set value will start to flash.
three sec min.al-1
amo
sglV
5-93

Section 5 Operation
F. The set value can be changed by the U, D and S keys.
G. Press the M key to move to the next parameter.
• The changed set value is registered to the internal mem-ory and "cyct" is displayed.
H. Press the L key for at least one second to return to ADJ Mode.
I. Press the L key for at least one second to return to RUN Mode.
cyct
5-94

5.44 Setting Cycle Time (Only for cyclic control type heaters: K8AC-H2_ _P_)
5.44 Setting Cycle Time(Only for cyclic control type heaters: K8AC-H2_ _P_)
Use this function to set the cycle time.
Set the cycle time to a value matching to that of the power regulator.
Operation procedure
cyct
Parameter Set value Set value description
cyct
(CYCT)0.2 to 3.0 Cycle time
0.2 to 3.0: 0.2 to 3.0 sec.
A. Press the L key for at least three seconds during RUN Mode to change to ADJ Mode.
• The “RUN” indicator will be unlit and “ADJ” indicator will be lit.
• The parameter will be displayed.
B. Press thenM key several times to display the parameter “amov” .Set the password “0169” for the parameter “amov” to move to SET Mode. For details, please see “5.2 Moving between Modes”.
• The “ADJ” indicator will be unlit and “SET” indicator will be lit.
C. Press the M key several times to display the parameter “cyct” .
D. Press the S key to display the set value.
• The cycle time setting will be displayed.
E. Press the S key again.
• The status will enter the change status and the set value will start to flash.
three sec min.al-1
amo
cyct
0.2
5-95

Section 5 Operation
F. The set value can be changed by the U, D and S keys.
G. Press the M key to switch to the next parameter.
• The set value changed will be registered to the internal memory and "init" will be displayed.
H. Press the L key for at least one second to return to ADJ Mode.
I. Press the L key for at least one second to return to RUN Mode.
J. Restart the unit.
The unit reflects the set value after restart.
init
5-96

Section 6 Serial Communications Function
This Section describes command responses that comply with the CompoWay/F
communication protocol and operation procedures from a host computer via
communication.
6.1 Communications Method ................................................6-2
6.2 Frames............................................................................6-4
6.3 FINS-mini Text ................................................................6-7
6.4 Variable Areas.................................................................6-9
6.5 Reading the Variable Area ............................................6-10
6.6 Writing to the Variable Area ..........................................6-12
6.7 Operation Commands...................................................6-14
6.8 Setting Areas ................................................................6-16
6.9 Commands and Responses..........................................6-17
6.10 Variable Area Map ......................................................6-21
6.11 Program Examples......................................................6-23
6-1
Section 6 Serial Communications Function
6.1 Communications Method
■ CompoWay / F Communications Protocol
CompoWay/F is OMRON’s unified protocol for general purpose serial communications.
Featuring a unified frame format and commands that are compliant with FINS, which has a
record of successful use with OMRON programmable controllers, CompoWay/F makes
communications easy between multiple components and a computer.
FINS (Factory Interface Network Service)
This is a protocol for message communications between controllers on an OMRON fact-
ory automation network.
Note: The communications function is used by creating a program on the host computer.
As such, the explanations in this chapter are from the perspective of the host com-
puter. For example, “Read/Write” refers to the host computer reading or writing to
the K8AC.
■ Communications Specifications
■ Transfer Protocol
The host computer sends a command frame and the K8AC sends back a response
frame based on the content of the command frame. A single response frame is return-
ed for each command frame. The following diagram shows the transfer of command
and response frames.
Transfer connection: Point-to-point
Communications method:
RS-485
Synchronization method:
Start-stop synchronization
Transmission speed: 1200, 2400, 4800, 9600, 19200 bps
Send code: ASCII
Data length: 7/8 bits
Stop bit length: 1/2 bits
Error detection: Vertical parity (None/Even/Odd)
BCC (Block Check Character)
Start-stop synchronization data configuration
Flow control: None
Interface: RS-485
Retry function: None
6-2
6.1 Communications Method
Host computer
K8AC
Comm
and
frame
Resp
onse
fram
eCom
mand
frame
Resp
onse
fram
e
6-3
Section 6 Serial Communications Function
6.2 Frames
Based on CompoWay/F protocol, commands from the host computer and responses from the K8AC take the from of frames. The data comprising command frames and response frames are explained below.
In the following explanation, an "H" following a numeric value (for example 02H) indicates that the value is a hexadecimal number. A numbers or letters enclosed in quotation marks (for example "00") is an ASCII characters.
■ Command Frame
Note : How to calculate BCC: The calculation result of exclusive OR of the data
from the BCC node number to ETX will be set as BCC.
STX Code that indicates the beginning of the communications frame (02H). Be sure to set this code in the first byte.
Node No. This number specifies the destination. Specify the Unit No.of the K8AC.
Sub-address Not used for K8AC. Be sure to set to “00”.
SID (service ID) Not used for K8AC. Be sure to set to “0”.
FINS-mini Command text
The body of the command.
ETX Code that indicates the end of text (03H).
BCC Block Check Character. This stores the result of the BCC calculation from Node No. to ETX.
STX
02H
1 1 1 1 byte2 2
03H“00” “0”
SID ETX BCCNode No. Sub - address
BCC calculation range
FINS-minicommand text
STX
02H 03H30H 30H 30H 30H 30H 30H 30H 30H 36H35H
SID ETX BCCNode No. Sub-addressFINS-minicommand text
BCC=30H 30H 30H 30H 30H 30H 30H 30H 03H=36H 35H
XOR exclusive OR operation
6-4
6.2 Frames
■ Response Frame
Note: It does not respond to the command frame that has not completed ETX and BCC character.
● End code
STX Code that indicates the beginning of the communications frame (02H).
Node No.The number that was specified in the command frame is repeated here. This is the Unit No.of the responding K8AC.
Sub address Not used for K8AC. Set to “00”.
End codeReturns the result of the command executed as instructed by the command frame.
FINS-mini response text
Text of the response
ETX Code that indicates the end of text (03H).
BCCBlock Check Character. Stores the result of the BCC calculation from Node No. to ETX.
End code Name Description
"OF" FINS command error Could not execute the specified FINS command.
"10" Parity error Sum of bits that are “1” in received date dose not agree with the set communuca- tions parity value.
"11" Framing error Stop bit of command frame characters is “0”.
"12" Overrun error Attemted to transfer new data because received date buffer is already full.
"13" BCC error Calculated BCC different from received BCC.
"14" Format error Characters other than “0” to ”9” or ”A“ to ”F” in FINS-mini command text. In the case of an echo-back test, when date other than the test date is sent. No SID and FINS-mini command text, or no FINS-mini command text. “MRC/SRC” not correct in FINS-mini command text.
STX
02H
1 1 1 byte2 2 2
03H“00”
End code ETX BCCNode No. Sub-addressFINS-miniresponse text
6-5

Section 6 Serial Communications Function
"16" Sub-address error No sub-address, SID, or FINS-mini command text; or sub-address less than 2 characters and no SID and FINS-mini command text.
"18" Frame length error The received frame exceeds the required number of bytes.
"00" Normal end Command was executed normallr without error.
6-6
6.3 FINS-mini Text
6.3 FINS-mini Text
The FINS-mini command text and FINS-mini response text form the body of command/ response communications.
FINS-mini command text and FINS-mini response text are configured as follows.
■ Command Text
FINS-mini command text consists of an MRC (main request code) and an SRC (sub request code), followed by the required data.
■ Response Text
FINS-mini response text consists of the MRC and SRC, followed by an MRES (main response code) and SRES (sub-response code), and then the required data.
If the specified FINS-mini command was not successfully executed, the response will
only contain the MRC, SRC, MRES and SRES.
■ List of FINS-mini Service Commands
MRC SRC Service name Description
"01" "01" Measurement value read
Reads measurement value date.
STX
02H 03H“00” “0”
SID ETX BCCNode No. Sub-addressFINS-minicommand text
MRC SRC Data
2 2 bytes
STX
02H
1 1 1 byte2 2 203H
“00”
End code ETX BCCNode No. Sub addressFINS-miniResponse text
MRC SRC MRES SRES
2 2 2 2 bytes
Data
6-7
Section 6 Serial Communications Function
"01" "02" Set value write Writes set value date.
"05" "03" Machine attribute read Reads the model and other attributes.
"06" "01" Controller status read Reads the operation status
"08" "01" Echo-back test Performs an echo-back test.
"30" "05" Operation command Commands such as Run/Stop, AT Execute/Cancel, and “Move to setting area 1”.
6-8

6.4 Variable Areas
6.4 Variable Areas
The area used for data exchange when communicating with the K8AC is called the
“variable area. ”The PV is read and various setting data are read and written using
the variable area of K8AC.
Operation commands and reding of machine attributes do not use the variable area.
A variable area is accessed by specifying the position of a variable within the
variable area using the variable type and address.
The address is expressed in 4-digit hexadecimal format.
The variable is an 8-digit numerical value in hexadecimal format. The decimal point is removed and the result is converted to hexadecimal. For example, when the load current value for the K8AC is shown as “10. 5” in the 7-digit display, the load current will be readas 00000069H (10.5→ 105 → 00000069H).
The K8AC uses the variable area as follows.
Variable type C0: Read-only parameters for the measurement value (load current, trip count, etc.)
Variable type C1: ADJ Mode
Variable type C2: SET Mode
Microcomputer
Read/write
Operation
instructionVariable area
K8AC
0000
C0
C1/C2
Address
Variabletype
Variable
0001 0002 0003 001B 001C 001D
C0
0000
0001
0002
0003
0004
0005
0006
0007
0008
0009
000A
000B
000C
000D
000E
000F
0010
0011
0012
0013
0014
0015
0065
C1/C2
Measurementvalue Not used
Set value
6-9

Section 6 Serial Communications Function
6.5 Reading the Variable Area
The date area is read by setting the required data to the following FINS-mini command text format.
FINS-mini command text
Data name Description
MRC/SRC The FINS-mini command text appears hear.
Variable type For K8AC, specify either “C0”, ”C1” or “C2”.
Read start address Specify the address for the beginning of the read.
Bit position Not used for K8AC. Specify “00”.
Number of elements
The number of elements is limited to 1 for K8AC. Specify “0001”.
FINS-mini response text
Data name Description
MRC/SRC The FINS-mini command text appears here.
Response code Result of execution of the command.
Read data Value for variables that were read.
Command
MRC SRC
2 2 4 bytes2 2 4
“01” “00”“01”
Variable type Bit position Number of elementsRead start address
Response
MRC SRC
2 Number of elements x 8 bytes2 4
“01”“01”
Response codeMRES/SRES Read data
6-10

6.5 Reading the Variable Area
Response codes
Response code
Error name Description
"1001" Long command length Command length is too long.
"1002" Short command length Command length is too short.
"1101" Area type error Variable type is wrong.
"1103" Start address outside of range error
Read start address is out of range.
"110B" Long response length If the command is executed, the data amount of the response will exceed the transferable level.
"1100" Parameter error Specified bit position is other than “00”.
"2203" Operation error Internal nonvolatile memory error.
"0000" Normal end
6-11

Section 6 Serial Communications Function
6.6 Writing to the Variable Area
Write to the date area by setting the required data to the following FINS-mini command text format.
FINS-mini command text
Data name Description
MRC/SRC Specifies the write to the variable area for the FINS-mini command.
Variable type For K8AC, specify either “C1” or ”C2”.
Read start address Specifies the write start address.
Bit position Not used for K8AC. Specify “00”.
Number of elements
The number of elements is limited to 1 for K8AC. Specify “0001”.
Write data Enter date to be written.
FINS-mini response text
Data name Description
MRC/SRC FINS-mini command text appears here.
Response code Result of execution of the command.
Command
MRC SRC
2 2 4 bytes2 2 4
“02” “00”“01”
Variable type Bit position Number of elements
Number of elements x 8 bytes
Write dataStarting address
of write
Response
MRC SRC
2 2 4
“02”“01”
Response codeMRES/SRES
6-12

6.6 Writing to the Variable Area
Response Code
Response Code
Error name Description
"1002" Short command length Command length is too short.
"1101" Area type error Incorrect variable type.
"1103" Start address outside of range error
Read start address is out of range.
"1104" End address outside of range error
Read end address is out of range.
"1003" Number of elements/Date number do not agree
The specified number of elements dose not agree with the actual number of date elements.
"1100" Parameter error Bit position specification other than “00”.
Written data is outside of setting range.
"3003" Read only Data was written to the variable type “C0”.
"2203" Operation error Write via communications is disabled. Internal nonvolatile memory error.
"0000" Normal end
6-13

Section 6 Serial Communications Function
6.7 Operation Commands
Operation commands are sent using the following FINS-mini command text format.
Operation for the K8AC are as follows.
FINS-mini command text
Data name Explanation
MRC/SRC Specifiy the FINS-mini operation command.
Operation code Specifiy an operation code.
Related information Specifiy information related to the command.
Code Related information Description
00 00 Switching to RUN Mode
01 Switching to SET Mode
01 00 Initialization of all settings
Command
MRC SRC
2 2 2 2 bytes
“05”“30”
Instructioncode
Relatedinformation
6-14

6.7 Operation Commands
FINS-mini response text
Data name Description
MRC/SRC FINS-mini command text appears here.
Response code Result of execution of the command.
Response Code
Error name Description
"1001" Long command length Command length is too long.
"1002" Short command length Command length is too short.
"1100" Parameter error Operation code or related information is not correct.
"2203" Opration error Unable to execute because write via communications is disabled.Unable to execute operation command.
"0000" Normal end
Response
MRC SRC
2 2 4 bytes
“05”“30”
Response codeMRES/SRES
Response Code
6-15
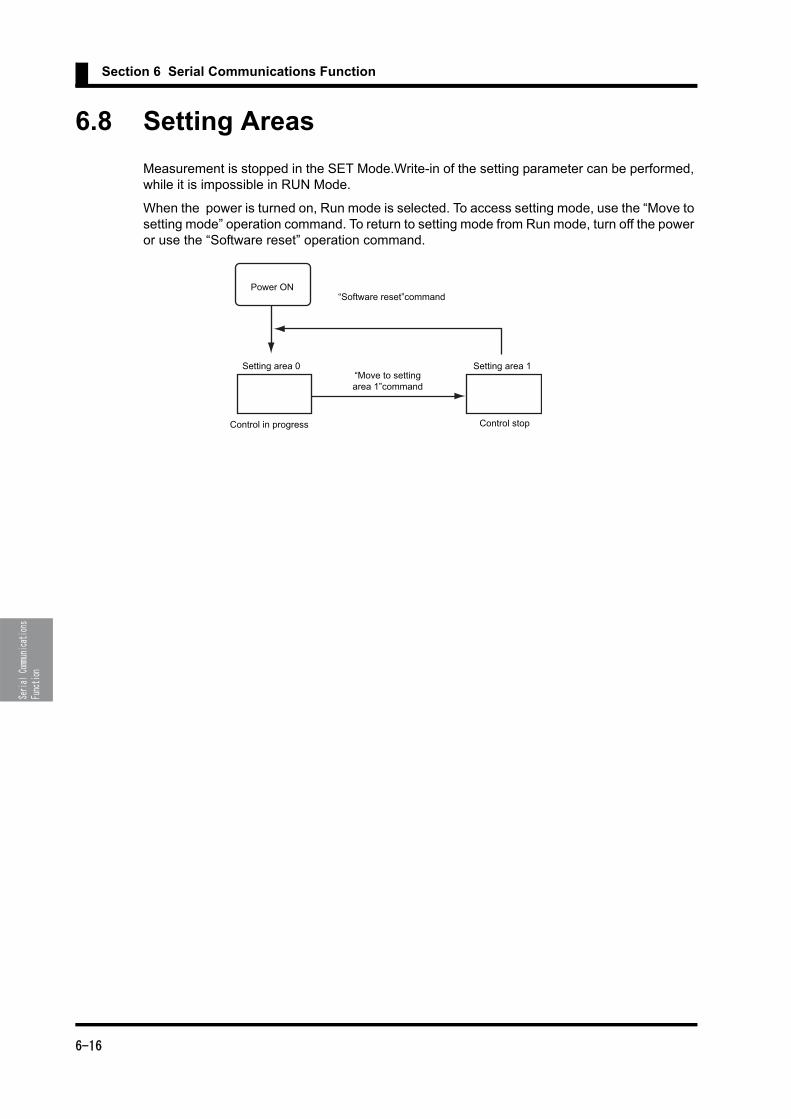
Section 6 Serial Communications Function
6.8 Setting Areas
Measurement is stopped in the SET Mode.Write-in of the setting parameter can be performed, while it is impossible in RUN Mode.
When the power is turned on, Run mode is selected. To access setting mode, use the “Move to setting mode” operation command. To return to setting mode from Run mode, turn off the power or use the “Software reset” operation command.
Power ON
Setting area 1“Move to settingarea 1”command
“Software reset”command
Setting area 0
Control in progress Control stop
6-16
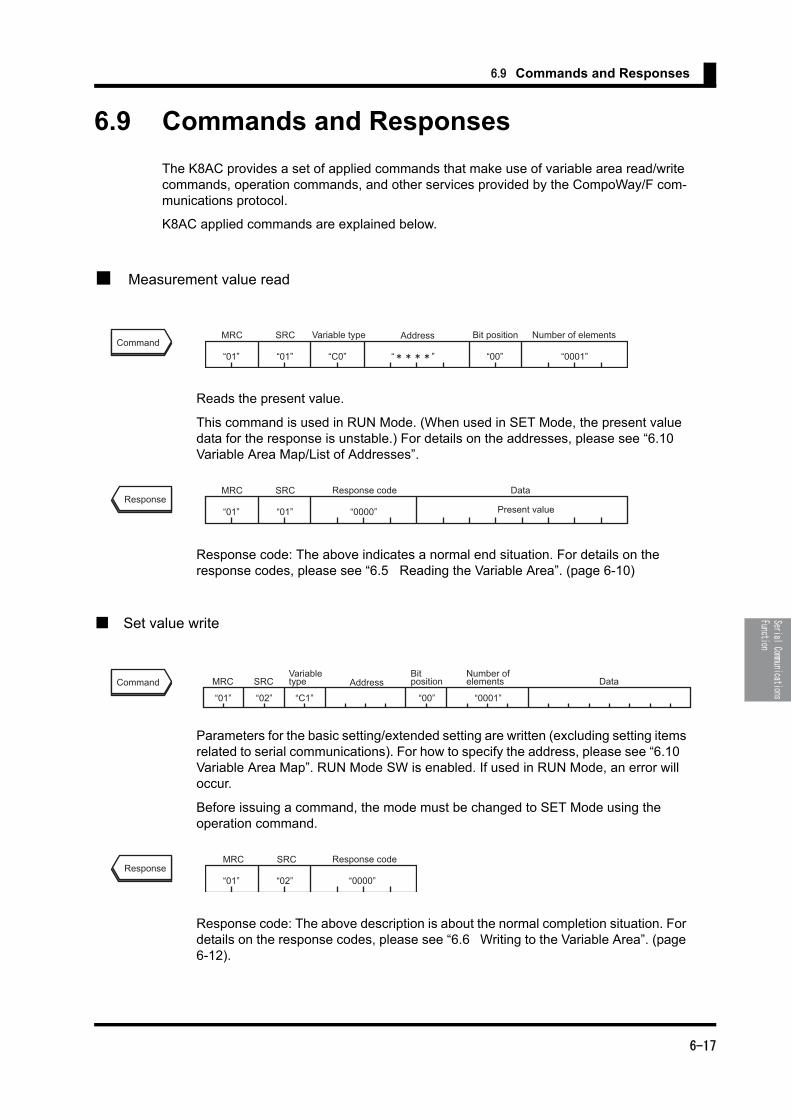
6.9 Commands and Responses
6.9 Commands and Responses
The K8AC provides a set of applied commands that make use of variable area read/write commands, operation commands, and other services provided by the CompoWay/F com- munications protocol.
K8AC applied commands are explained below.
■ Measurement value read
■ Set value write
Reads the present value.
This command is used in RUN Mode. (When used in SET Mode, the present value data for the response is unstable.) For details on the addresses, please see “6.10 Variable Area Map/List of Addresses”.
Response code: The above indicates a normal end situation. For details on the response codes, please see “6.5 Reading the Variable Area”. (page 6-10)
Parameters for the basic setting/extended setting are written (excluding setting items related to serial communications). For how to specify the address, please see “6.10 Variable Area Map”. RUN Mode SW is enabled. If used in RUN Mode, an error will occur.
Before issuing a command, the mode must be changed to SET Mode using the operation command.
Response code: The above description is about the normal completion situation. For details on the response codes, please see “6.6 Writing to the Variable Area”. (page 6-12).
CommandMRC SRC
“01” “C0” “ ” “00” “0001”“01”
Variable type Bit position Number of elementsAddress
ResponseMRC SRC
“01” “0000” Present value“01”
Response code Data
Command MRC SRC
“02” “C1” “00” “0001”“01”
Variabletype
Bitposition
Number of elements DataAddress
ResponseMRC SRC
“02” “0000”“01”
Response code
6-17

Section 6 Serial Communications Function
■ Read Machine Attributes
Response code
■ Controller Status Read
Response code: The above indicates a normal end. For the response codes, please see
“ 6.5 Reading the Variable Area“. (page 6-10)
This command reads the K8AC model and communications buffer size. Thiscommand is available both in RUN Mode and SET Mode
This is expressed in the ten-byte format. If less than ten bytes, the remaining portions will be filled with spaces. As a buffer size, the fixed value of 0068H bytes (104 bytes) will be returned.
Response code
Error name Description
"1001" Long command length Command length is too long
"2203" Operation error Internal nonvolatile memory error
"0000" Normal end
This command reads the K8AC model and communications buffer size.
The commannd can be used in any state of the K8AC.
CommandMRC SRC
“03”“05”
Response MRC SRC
“03”“05”
Response code Model
CommandMRC SRC
“03”“05”
Response
MRC SRC
“01”“06”
Response code Related infomation
“0000”
Operation state
6-18
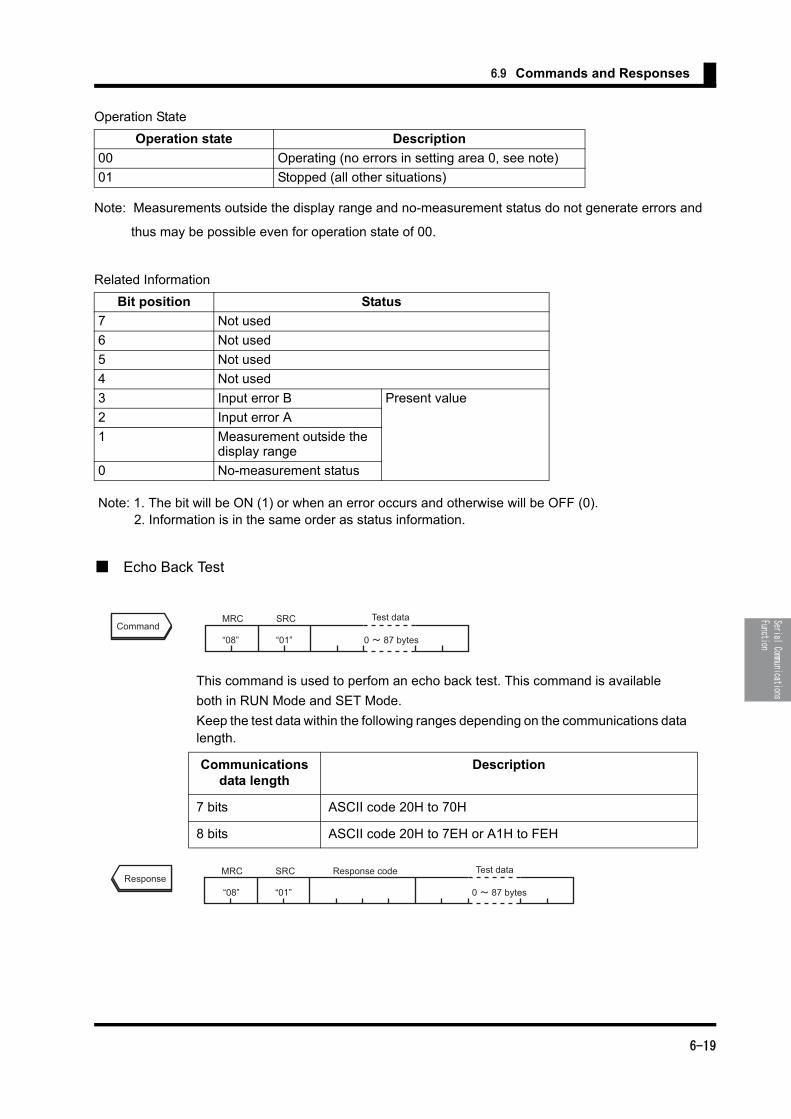
6.9 Commands and Responses
Operation State
Note: Measurements outside the display range and no-measurement status do not generate errors and
thus may be possible even for operation state of 00.
Related Information
Note: 1. The bit will be ON (1) or when an error occurs and otherwise will be OFF (0). 2. Information is in the same order as status information.
■ Echo Back Test
Operation state Description
00 Operating (no errors in setting area 0, see note)
01 Stopped (all other situations)
Bit position Status
7 Not used
6 Not used
5 Not used
4 Not used
3 Input error B Present value
2 Input error A
1 Measurement outside the display range
0 No-measurement status
This command is used to perfom an echo back test. This command is available
both in RUN Mode and SET Mode.
Keep the test data within the following ranges depending on the communications data length.
Communications data length
Description
7 bits ASCII code 20H to 70H
8 bits ASCII code 20H to 7EH or A1H to FEH
CommandMRC SRC
“01” 0 87 bytes“08”
Test data
ResponseMRC SRC
“01” 0 87 bytes“08”
Response code Test data
6-19

Section 6 Serial Communications Function
Response code
Response code
Error name Description
"1001" Long command length Command length is too long.
"2203" Operation error Internal nonvolatile memory error
"0000" Normal end
6-20

6.10 Variable Area Map
6.10 Variable Area Map
In K8AC, the variable area is used as follows.
Variable type C0: Read-only parameters for the measurement values.
Variable type C1: ADJ Mode
Variable type C2: SET Mode
Note1: When using the scaling function, the setting range varies depending on the CT
ratio, the number CT passes and setting for the number of effective digits to be
displayed after the decimal point.
Minimum set value = minimum value within the range x CT ratio / number of CT
passes
Maximum set value = maximum value within the range x CT ratio / number of
CT passes (AL-1 is affected by the CT ratio 1, the number of CT passes 1 and the
setting 1 for number of effective digits to be displayed after the decimal point.
AL-2 is affected by the CT ratio 2, the number of CT passes 2 and the setting 2
for number of effective digits to be displayed after the decimal point.)
Variable type
Address Parameter name Setting range Remarks
0000 Heater 1 current value Read only0001 Heater 2 current value Read only0002 Power supply voltage Read only0003 Heater 1 maximum current value Read only0004 Heater 1 minimum current value Read only0005 Heater 2 maximum current value Read only0006 Heater 2 minimum current value Read only0007 Maximum power supply voltage value Read only0008 Minimum power supply voltage value Read only0009 Number of alarm outputs Read only000A Processing value at alarm output Read only000B Run time Read only0000 Burnout alarm set value 1 H21,22
C8 to 898H23C8 to7D0 1
0001 Burnout alarm set value 2 H21,22C8 to 898H23C8 to7D0 1
0002 Voltage fluctuation compensation function 64 to F0 100 to 240V
C0
C1
6-21

Section 6 Serial Communications Function
Note1: When using the scaling function, the setting range varies depending on the CT ratio,
the number CT passes and setting for the number of effective digits to be displayed
after the decimal point.
Minimum set value = minimum value within the range x CT ratio / number of CT passes
Maximum set value = maximum value within the range x CT ratio / number of CT passes
(AL-1 is affected by the CT ratio 1, the number of CT passes 1 and the setting 1 for number of
effective digits to be displayed after the decimal poin. AL-2 is affected by the CT ratio 2, the num- ber of CT passes 2 and the setting 2 for number of effective digits to be displayed after the decimal point.)
0000 Alarm hysteresis 1 1 to 3E7 1 to 999digit0001 Alarm hysteresis 2 1 to 3E7 1 to 999digit0002 Gate input function 0 ON
1 OFF0003 Voltage fluctuation compensation
function0 ON1 OFF
0004 Startup lock time 0 to FF 0 to 255s0005 Output ON-delay time 0 to 3E7 0 to 99.9s0006 Soft startup time 0 to 3E7 0 to 99.9s0007 SSR short circuit detection function 0 ON
1 OFF0008 SSR open detection function 0 ON
1 OFF0009 Heater layer short circuit detection
function0 ON1 OFF
000A Heater layer short circuit alarm level H21,22C8 to 898H23C8 to 7D0
1
000B Heater control method 0 PH11 PH32 CYCL
000C Continuously displayed measurement value 0 CT11 CT2
000D Power save operation 0 ON1 OFF
000E Power save operation time A to 12C 10 to 300s000F Display method 0 NORM
1 CMP2 BAR
0010 Display refresh 0 0.2s1 0.5s2 1.0s3 FAST
0011 Gate OFF output hold time 0 to 3E7 0 to 999s0012 Number of CT passes 1 1 to 63 1 to 990013 CT ratio 1 1 to 3E7 1 to 9990014 Setting 1 for number of effective digits to be
displayed after the decimal point0 0000.1 000.02 00.003 0.000
C2
6-22

6.11 Program Examples
6.11 Program Examples
■ Protocol Macro
What is the protocol macro function ?
The protocol macro is a ladder routine that, using a PMCR command, provides control to the
sequence (protocol) of data transmission between various communication devices such as
generapurpose components connected via RS-232C or RS-422A/485 interface.
The serial communication board/unit comes standard with a standard system protocol that
allows control of OMRON’s components (regulator, temperature controller unit, etc).
For details on the protocol macro, please refer to the “Users Manual for CS1W-SCB21/41/
-SCU21” (Cat. No. SBCD-300C).
Connection
The port 2 of the serial communication board CS1W-SCB41 allows connection via RS
-232C line.
0015 Number of CT passes 2 1 to 63 1 to 990016 CT ratio 2 1 to 3E7 1 to 9990017 Setting 2 for number of effective digits to be
displayed after the decimal point0 0000.1 000.02 00.003 0.000
0018 SSR ON delay 0 to 3E7 0 to 99.9s
C2
0019 SSR operation gate current level 28 to C8 4.0 to 20.0mA001A Cycle time 2 to 1E 0.2 to 3.0sA000 Operation gate current level 46 to C8 7.0 to 20.0mA
CPU unitCS1H
Serial communication board
Port
K8ACRS-232C
CS1W-SCB41
6-23
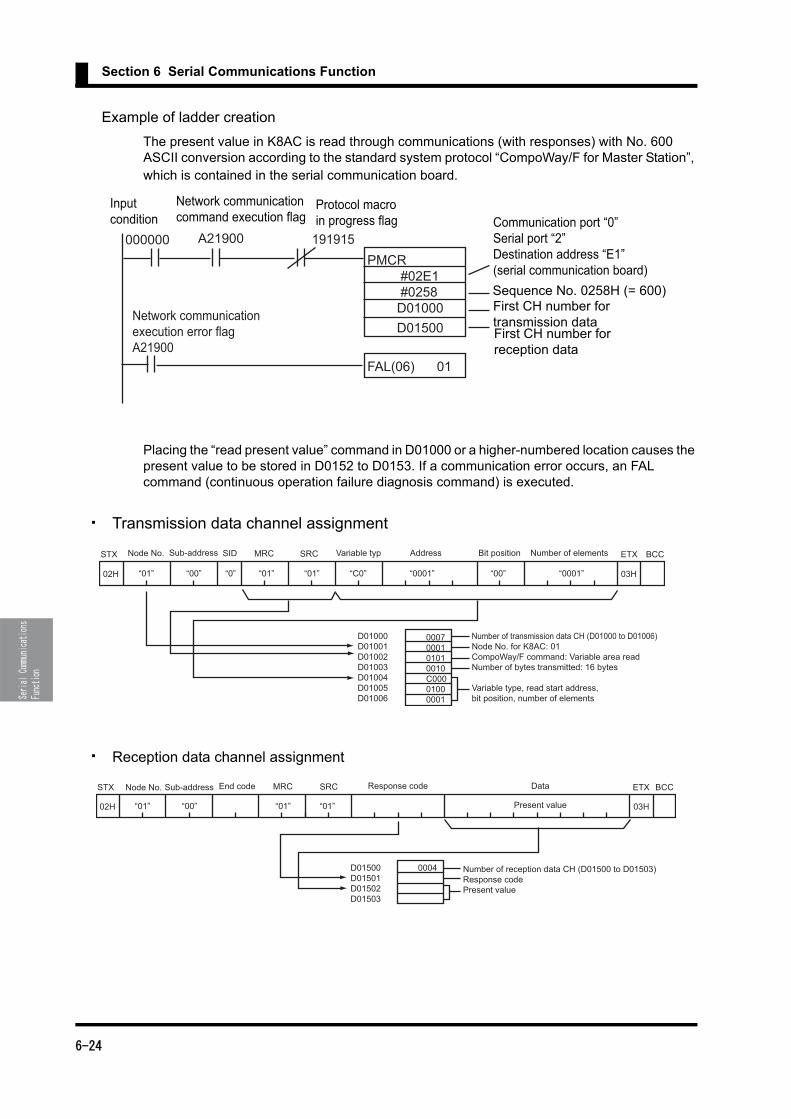
Section 6 Serial Communications Function
Example of ladder creation
The present value in K8AC is read through communications (with responses) with No. 600 ASCII conversion according to the standard system protocol “CompoWay/F for Master Station”, which is contained in the serial communication board.
Placing the “read present value” command in D01000 or a higher-numbered location causes the present value to be stored in D0152 to D0153. If a communication error occurs, an FAL command (continuous operation failure diagnosis command) is executed.
・ Transmission data channel assignment
・ Reception data channel assignment
PMCR #02E1 #0258 D01000
FAL(06) 01
Network communicationexecution error flagA21900
A21900000000
Inputcondition
Network communicationcommand execution flag
Protocol macroin progress flag
191915Communication port “0”Serial port “2”Destination address “E1”(serial communication board)Sequence No. 0258H (= 600)First CH number fortransmission dataFirst CH number forreception data
D01500
MRC
D01000D01001D01002D01003D01004D01005D01006
Number of transmission data CH (D01000 to D01006)Node No. for K8AC: 01CompoWay/F command: Variable area readNumber of bytes transmitted: 16 bytes
Variable type, read start address,bit position, number of elements
0007000101010010C00001000001
STX ETX BCCSRC Variable typ Address Bit position Number of elementsSID
02H 03H“01” “01” “01” “C0” “0001” “0001”“00” “00”“0”
Node No. Sub-address
MRC
D01500D01501D01502D01503
Number of reception data CH (D01500 to D01503)Response codePresent value
0004
STX ETX BCCSRC Response code Data
Present value
End code
02H 03H“01” “01” “01”“00”
Node No. Sub-address
6-24

7-1
Section 7 Troubleshooting
This Section describes errors such as failure and their countermeasures as well as how to troubleshoot problems.
7.1 Error Display ...................................................................7-2
7.2 Troubleshooting ..............................................................7-3
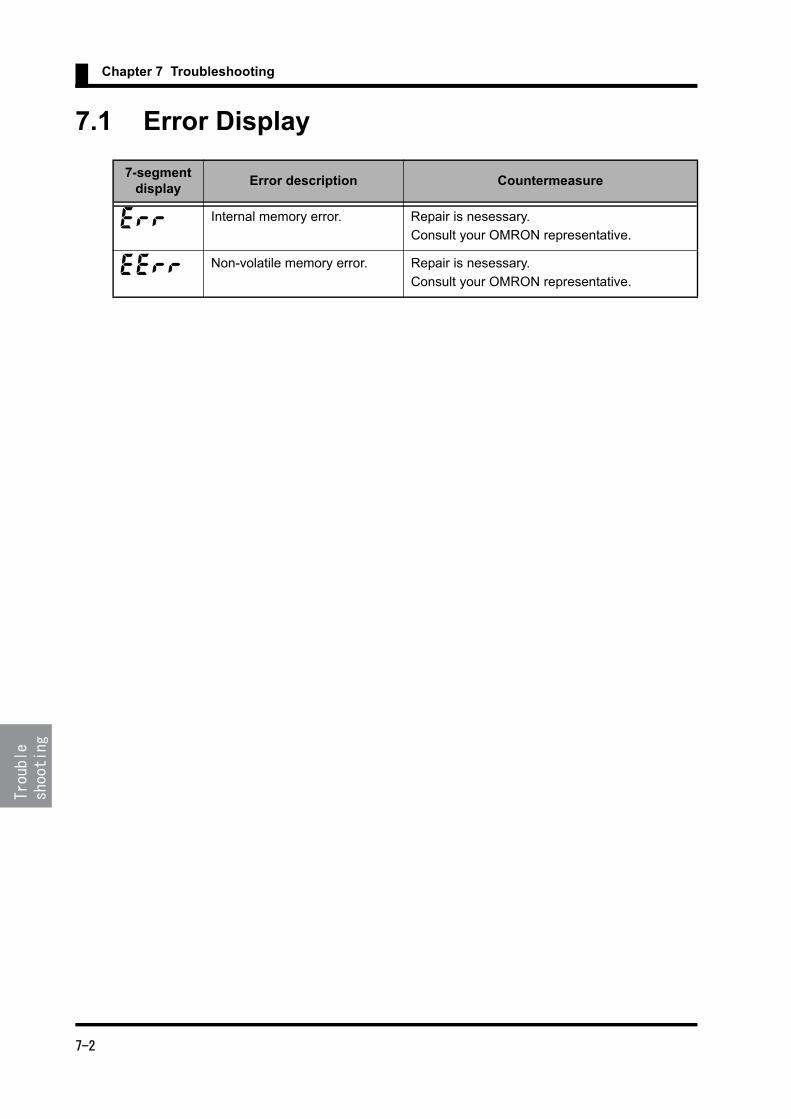
Chapter 7 Troubleshooting
7.1 Error Display
7-segment display
Error description Countermeasure
err Internal memory error. Repair is nesessary.
Consult your OMRON representative.
eerr Non-volatile memory error. Repair is nesessary.
Consult your OMRON representative.
7-2

7.2 Troubleshooting
7.2 Troubleshooting
Symptoms Inspection details CountermeasureReference
page
Pressing the L key for at least one second does not move to ADJ Mode.
Is the setting protection function disabled?
Disable the setting protec-tion to "enable" changes.
5-25
Pressing the S key during setting change does not change the parameter change status.
Is the setting change pro-tection not enabled?
Disable the setting protec-tion to "enable" changes.
5-25
Immediately after the power-on, a heater burnout alarm is not output.
• Is the heater burnout alarm value not too small?
• Is the gate setting turned on? Or, is the gate input in accordance with the control specifications?
• Is the standard value for voltage fluctuation com-pensation function con-sistent with the power supply voltage?
• Is the set value for startup lock time not too large?
Set the set value for these parameters to an appropri-ate value.
5-27
5-40
5-42
5-44
Even when the heater cur-rent goes beyond the heater burnout alarm threshold value, a heater burnout alarm is not returned.
Is the set value for hystere-sis not too large?
Set the set value for hys-teresis to an appropriate value. The K8AC-H allows setting of the hysteresis per current input. Set these two inputs.
5-38
When only using a single CT, a heater burnout alarm is always output.
Is the “Burnout alarm set value” for an unused CT not set to other than “-”.
Set the set value for the unused CT input to “-”.
5-27
7-3

Chapter 7 Troubleshooting
A heater burnout alarm is not output.
Even when no burnout occurs, a burnout alarm is output.
The current passing thought the special CT is significantly different from the displayed current value.
• Is the heater burnout alarm value not too small?
• Is the gate setting turned on? Or, is the gate input in accordance with the control specifications?
• Is the standard value for voltage fluctuation com-pensation function con-sistent with the power supply voltage?
• Is the set value for startup lock time not too large?
• Is the difference between the normal cur-rent value and the burn-out set value not too small?
• In ON/OFF control, is ON time not set below 200ms?
• Is the model or heater control method selected that is suitable for the heaterÅfs control method?
• Is the scaling parameter not enabled?
• Is an excessive input beyond the current input range not applied?
When using the voltage fluctuation compensation function, match the power supply voltage with the set value.
Use the power supply volt-age compensation func-tion.Set the soft startup time to at least 0.2 seconds.
Select the model or heater control method that is suit-able for the heaterÅfs con-trol method.
When displaying the cur-rent at the primary side of the special CT, set the scaling parameter to the initial value.The display may not be shown correctly if exceed-ing the input range. Make measurement within the input range.
5-27
5-40
5-42
5-44
5-305-42
5-48
5-56
5-855-875-89
Symptoms Inspection details CountermeasureReference
page
7-4

A-1
Appendices
Specifications..................................................................A-2 Parameter List ................................................................A-6

Specifications
Ratings
Supply voltage 100 to 240VAC (50/60Hz)
Operating voltage 85% to 110% of supply voltage (85 to 264V)
Power consumption 35VA max (max. load)
Insulation resistance 20 MΩmin (at 500V mega) between external terminals and case
Dielectric strength 2,000V for 1 min between external terminals and case
Noise immunity±1,500 V on power supply terminals in normal or common mode
(Pulse width 1μ/100ns for square-wave noise with 1 ns rise time)
Vibration resistance Vibration: 10 to 55Hz, Acceleration: 50m/s2, X, Y and Z directions: 5 min x 10 wipes
Shock resistance 150m/s2 (100m/s2 for relay contact) 3 times in 3 axes in 6 directions each
Over load resistance
Primary side current for detection CT
K8AC-H21_ _ 4A, 30s and 12A,1s
K8AC-H22_ _ 40A, 30s and 20A,1s
K8AC-H23_ _ 400A, 30 and 1200A,1s
4 to 20mA gate input Continuous load of DC40mA
Voltage pulse gate input Continuous load of 30VDC
Input impedance4 to 20mA gate input 50Ω max.
Voltage pulse gate input 4kΩ min.
Ambient temperature for use
-10 to 55℃ (with no icing or condensation)
Ambient humidity for use
25 to 85%RH
Storage temperature -25 to +65℃ (with no icing or condensation)
Storage humidity 25 to 85%RH
Altitude 2000m max.
External dimension W35×D90×H100mm
Case material PC
Exterior color Body: N1.5 (clear black)
Mounting method Mounting to a DIN rail
Weight Approx. 200g
A-2

Specifications
* Curent sensor is an optional.
Output ratings
Curent detection CT
K8AC-H21_ _ 0.200 to 2.200A K8AC-CT20S (φ5.8) * K8AC-CT20L (φ12) *K8AC-H22_ _ 2.00 to 22.00A
K8AC-H23_ _ 20.0 to 200.0AK8AC-CT200 (φ12) * K8AC-CT200L (φ30) *
Relay output
Rated load Resistive load: 125VAC 0.3A, 30VDC 1A
Max. value of contact voltage
125VAC, 60VDC
Max. value of contact current
1A
Max. value of switching capacity
37.5VA, 30W
Minimum applicable load (P standard)
5VDC, 10mA (Reference value)
Mechanical life 50,000,000 operations min. (at a switching frequency of 18,000 times / h)
Electrical life (Ambient temperature condition: +20℃ )
100,000 operations min. (with rated load, at a switching frequency of 1,800 times / h)
Transistor output
Rated voltage load 12 to 24VAC (+10%,-15%)
Max. load current 50mA
OFF leakage current 100μA max.
ON residual voltage 1.5V max.
A-3

Characteristics
Output return
method
Automatic return
Hysteresis 1 to 999 digits
Output response
time
ON/OFF control type (K8AC-H2_C_) 500ms max.
Phase or Cyclic control type (K8AC-
H2_P_)
3.5s max.
Output typeRelay output (K8AC-H2_ _C) 1c contact 1 output
Transistor output (K8AC-H2_ _N) Two open collector 2 outputs
Measuring type Root-mean-square value operation method by measurement at moment
Heater current input
(at 10 to 30℃ ) CAT II
Input range K8AC-H21_ _ 0.200 to 2.200A
K8AC-H22_ _ 2.00 to 22.00A
K8AC-H23_ _ 20.0 to 200.0A
Measurement
accuracy
K8AC-H2_C_ ±3% rdg ±10 digits *
K8AC-H2_P_ ±6% rdg ±10 digits *
Voltage fluctuation
compensation CAT II
Input range 85 to 264VAC
Measuring accu-
racy
Max, ±3% rdg ±10 digits
Gate input
Input range for
K8AC-H2_P_
4 to 20mA DC
Input range for
K8AC-H2_C_
0 to12 VDC or 0 to 24 VDC
ON level: 9.6 VDC max. OFF level: 1 VDC min.
Specification Com-
munications
Baud rate 1200, 2400, 4800, 9600, 19200bps
Connection type Multi-point
Error detection Parity check
Communication
method
RS-485 compliant
Communication
protocol
Compoway / F
Display refresh Serection of Fast- 0.2sec- 0.5sec - 1.0sec
Memory protection Non-volatile memory (possible to rewrire: 100,000 times)
* The measurement accuracy is a guaranteed value when you use a current CT, whitch is exclu-
sively desigated for K8AC-H.
A-4

Specifications
Applicable standards
Installa-tion envi-ronment
Overvoltage Category 2, Pollution Class 2
Safety Standard
UL61010-1, CAN / CSA C22.2 No.61010-1-04EN61010-1 (IEC61010-1) (Evaluated by TUV)
EMC EMI: EN61326 industrial applications
Electromagnetic radiation interference EN 55011 Group1, Class A: Terminal interference voltageEN 55011 Group1, Class A:
EMS: EN61326 industrial applications
Electrostatic Discharge Immunity
EN61000-4-2: 4kV (contact), 8kV (in air)
Radiated Electomagnetic Field Immunity
EN61000-4-3: 10V/m 1kHz sine wave amplitude mod-ulation (80 MHz to 1GHz)
Erectrical Fast Transient/Burst Immunity
EN61000-4-4: 2kV (power line), 1kV (I / O signal line)
Surge immunity EN61000-4-5: 1 kV with line (power line), 2 kV with grpund (power line)
Conducted Disturbance Immunity
EN61000-4-6: 3V (0.15 to 80 MHz)
Voltage Dips and Interrup-tions Immunity
EN61000-4-11: 0.5 cycle, 0゜/180°,100% (rated voltage)
A-5

Parameter List
Enter the set values before using.
Please refer to the next page for SET Mode.
Mode Parameter name Parameter Setting range Initial value UnitSet
value
Pro-tect
Setting change protect aspt 0 to 2 0
wtpt OFF/ON OFF
ADJ Burnout alarm value set-ting 1
al-1 Varies depending on the model.K8AC-H21_ _ 0.200 to 2.200K8AC-H22_ _ 2.00 to 22.00K8AC-H23_ _ 20.0 to 200.0
The initial value var-ies depending on the model. *3K8AC-H21_ _ 1.000AK8AC-H22_ _ 10.00AK8AC-H23_ _ 100.0A
A
Burnout alarm value set-ting 2
al-2 Varies depending on the model.K8AC-H21_ _ 0.200 to 2.200K8AC-H22_ _ 2.00 to 22.00K8AC-H23_ _ 20.0 to 200.0
The initial value var-ies depending on the model. *3K8AC-H21_ _ 1.000AK8AC-H22_ _ 10.00AK8AC-H23_ _ 100.0A
A
Voltage fluctuation com-pensation standard value
vfcv 100 to 240 100 V
A-6

Parameter List
Mode Parameter name Parameter Setting range Initial value unitSet
value
SET All initialization init OFF/ON OFF
Set value initialization sini OFF/ON OFF
Measurement value initial-ization
pini OFF/ON OFF
Alarm hysteresis 1 hys 1 1 to 999 10
Alarm hysteresis 2 hys 2 1 to 999 10
Gate input function gate OFF/ON ON
Voltage fluctuation com-pensation function
comp OFF/ON OFF
Startup lock time stim 0 (OFF) to 255s 0 s
Output ON-delay time odly 0.0 (OFF) to 99.9s 0.0 s
Soft startup time soft 0.0 (OFF) to 99.9s 0.0 s
SSR short circuit detection function
ssht OFF/ON OFF
SSR open detection func-tion
sopn OFF/ON OFF
Heater layer short circuit detection function
hrst OFF/ON OFF
A-7
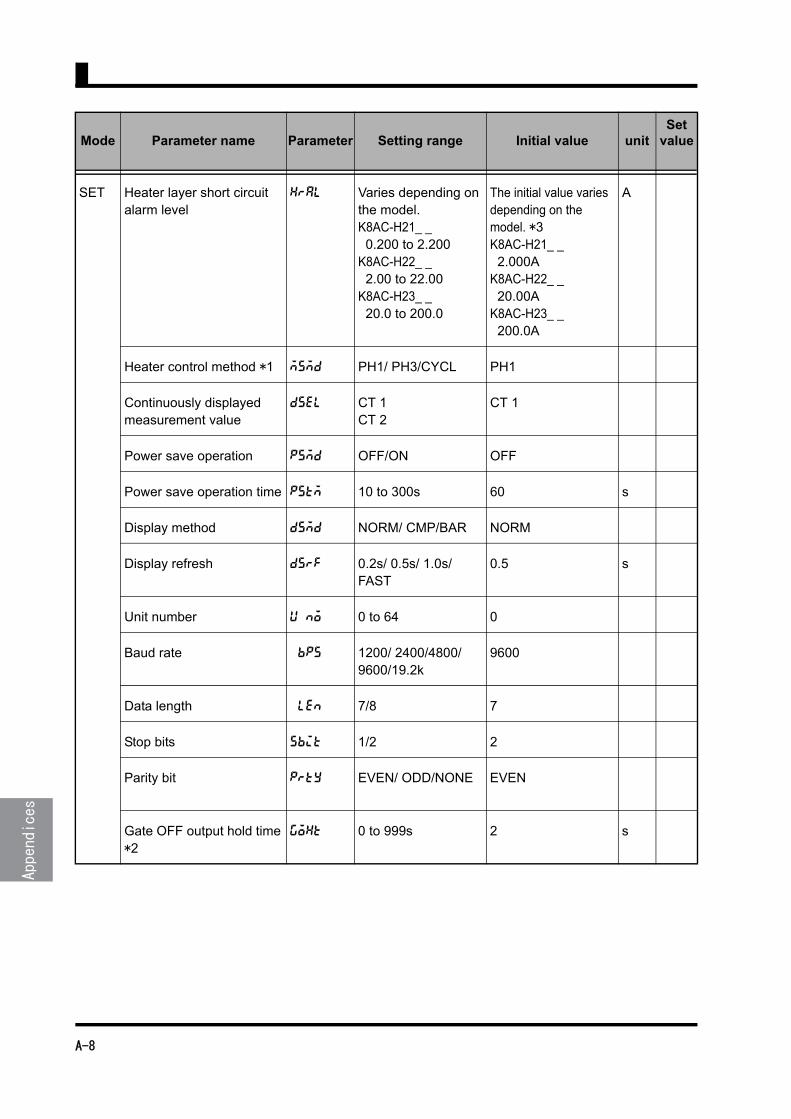
SET Heater layer short circuit alarm level
hral Varies depending on the model.K8AC-H21_ _ 0.200 to 2.200K8AC-H22_ _ 2.00 to 22.00K8AC-H23_ _ 20.0 to 200.0
The initial value varies depending on the model. *3K8AC-H21_ _ 2.000AK8AC-H22_ _ 20.00AK8AC-H23_ _ 200.0A
A
Heater control method *1 msmd PH1/ PH3/CYCL PH1
Continuously displayed measurement value
dsel CT 1CT 2
CT 1
Power save operation psmd OFF/ON OFF
Power save operation time pstm 10 to 300s 60 s
Display method dsmd NORM/ CMP/BAR NORM
Display refresh dsrf 0.2s/ 0.5s/ 1.0s/FAST
0.5 s
Unit number u no 0 to 64 0
Baud rate bps 1200/ 2400/4800/ 9600/19.2k
9600
Data length len 7/8 7
Stop bits sbit 1/2 2
Parity bit prty EVEN/ ODD/NONE EVEN
Gate OFF output hold time *2
goht 0 to 999s 2 s
Mode Parameter name Parameter Setting range Initial value unitSet
value
A-8

Parameter List
*1. K8AC-H2_P_-FLK only
*2. K8AC-H2_C_-FLK only
*3. See 5-86
SET Number of CT passes 1 nct 1 1 to 99 1
CT ratio 1 ctr 1 1 to 999 1
Setting 1 for number of effective digits to be dis-played after the decimal point
ndp1 1 to 3 3
Number of CT passes 2 nct 2 1 to 99 1
CT ratio 2 ctr 2 1 to 999 1
Setting 2 for number of effective digits to be dis-played after the decimal point
ndp 2 1 to 3 3
SSR ON delay sdly 0.0(OFF) to 99.9s 0.2 s
SSR operation gate current level
sglv 4.0 to 20.0mA 7.0 mA
Cycle time cyct 0.2 to 3.0s 0.2 s
GATE Operation gate current level *1
g-lv 7.0 to 20.0mA 7.0 mA
Mode Parameter name Parameter Setting range Initial value unitSet
value
A-9

A-10

Authorized Distributor:
In the interest of product improvement, specifications are subject to change without notice.
Cat. No. N159-E1-02
© OMRON Corporation 2013-2016 All Rights Reserved.
OMRON Corporation Industrial Automation Company
OMRON ELECTRONICS LLCOne Commerce Drive Schaumburg,IL 60173-5302 U.S.A.Tel: (1) 847-843-7900/Fax: (1) 847-843-7787
Regional HeadquartersOMRON EUROPE B.V.Wegalaan 67-69-2132 JD HoofddorpThe NetherlandsTel: (31)2356-81-300/Fax: (31)2356-81-388
Contact: www.ia.omron.comTokyo, JAPAN
OMRON ASIA PACIFIC PTE. LTD.No. 438A Alexandra Road # 05-05/08 (Lobby 2), Alexandra Technopark, Singapore 119967Tel: (65) 6835-3011/Fax: (65) 6835-2711
OMRON (CHINA) CO., LTD.Room 2211, Bank of China Tower, 200 Yin Cheng Zhong Road, PuDong New Area, Shanghai, 200120, ChinaTel: (86) 21-5037-2222/Fax: (86) 21-5037-2200 1116(-)