Embed Size (px)
Citation preview
CONTENTS
1 Important information ................................................................................................................ 4
1.1 Safety instructions .............................................................................................................. 4
1.2 Notes on storage and cleaning ............................................................................................ 4
1.3 Notes on the power supply.................................................................................................. 4
1.4 Package contents ................................................................................................................ 4
2 Getting started ........................................................................................................................... 5
2.1 Connecting the adaptor ...................................................................................................... 5
2.2 Selecting the language ........................................................................................................ 5
2.3 Adjusting the backlight ....................................................................................................... 5
2.4 Preparing for a game .......................................................................................................... 5
2.5 Switching on and off ........................................................................................................... 6
2.6 Reset .................................................................................................................................. 6
2.7 The buttons and their functions (summary) ......................................................................... 6
3 Playing against the computer ...................................................................................................... 7
3.1 Your move .......................................................................................................................... 7
3.1.1 Ordinary moves ........................................................................................................... 7
3.1.2 Special moves ............................................................................................................. 7
3.2 The computer’s move ......................................................................................................... 8
3.3 Errors ................................................................................................................................. 8
3.4 Symbols displayed in the bottom line during play ................................................................ 8
3.5 Retracting and replaying moves .......................................................................................... 9
3.6 Result of the game .............................................................................................................. 9
3.7 Starting a new game ........................................................................................................... 9
4 The info screens ....................................................................................................................... 10
4.1 Info screen: Large clock .................................................................................................... 10
4.2 Info screen: Game score .................................................................................................... 10
4.3 Info screen: Analysis ......................................................................................................... 11
4.4 Info screen: Opening name and code ................................................................................ 12
4.5 Info screen: Permanent brain ............................................................................................ 12
4.6 Info screen: Small clock .................................................................................................... 12
5 Special functions ...................................................................................................................... 13
5.1 The menu ......................................................................................................................... 13
5.2 Menu: Move ...................................................................................................................... 13
5.3 Menu: Hint ........................................................................................................................ 13
5.4 Menu: Level ...................................................................................................................... 14
2
5.4.1 Normal levels ............................................................................................................ 14
5.4.2 Easy levels ................................................................................................................ 14
5.4.3 Fun levels.................................................................................................................. 14
5.4.4 Blitz levels ................................................................................................................ 14
5.4.5 Tournament levels..................................................................................................... 15
5.4.6 User level .................................................................................................................. 15
5.4.7 ‘Fixed depth’ levels ................................................................................................... 16
5.4.8 ‘Find mate’ level ........................................................................................................ 16
5.5 Menu: Nextb (Next best) ................................................................................................... 16
5.6 Menu: Start ....................................................................................................................... 16
5.7 Menu: End ........................................................................................................................ 16
5.8 Menu: Analy (Analysis) ...................................................................................................... 17
5.9 Menu: 2Play (Two Players) ................................................................................................. 17
5.10 Menu: CLink (ChessLink) ............................................................................................... 17
5.11 Menu: Opts (advanced Options) ..................................................................................... 18
5.11.1 Overview of the advanced options ............................................................................. 18
5.11.2 Altering an option ..................................................................................................... 18
5.11.3 Opts: Invert Board ..................................................................................................... 18
5.11.4 Opts: Tutor ............................................................................................................... 18
5.11.5 Opts: Book1 .............................................................................................................. 19
5.11.6 Opts: Book2 .............................................................................................................. 19
5.11.7 Opts: Permanent Brain ............................................................................................... 19
5.11.8 Opts: Randomness .................................................................................................... 19
5.11.9 Opts: Contempt ........................................................................................................ 19
5.11.10 Opts: CPU speed ....................................................................................................... 20
5.11.11 Opts: Style ................................................................................................................ 20
5.11.12 Opts: Sound .............................................................................................................. 21
5.11.13 Opts: Contrast .......................................................................................................... 21
5.11.14 Opts: Language ......................................................................................................... 21
5.12 Menu: SetUp ................................................................................................................. 21
5.13 Menu: Verfy (Verify) ...................................................................................................... 23
6 USB mode – Communicating with a PC ...................................................................................... 23
6.1 Connecting to the PC ........................................................................................................ 23
6.2 Saving and loading games................................................................................................. 23
6.2.1 Saving the current game ............................................................................................ 23
6.2.2 Loading a game ........................................................................................................ 24
6.2.3 Loading a PGN file ..................................................................................................... 24
3
6.2.4 Creating a PGN file .................................................................................................... 25
6.2.5 Saving a game from a ‘set up’ position ...................................................................... 25
6.3 Further downloads ............................................................................................................ 26
6.3.1 Installing a new version of the chess program ........................................................... 26
6.3.2 Installing a new openings book ................................................................................. 26
7 FAQ and troubleshooting .......................................................................................................... 26
7.1 My board does not work as intended ................................................................................. 26
7.2 I need spare chess pieces .................................................................................................. 26
7.3 Can I save games? ............................................................................................................. 26
7.4 Can I load games onto the King? ....................................................................................... 26
7.5 Is there a firmware update? ............................................................................................... 26
7.6 Can I go back to older firmware? ....................................................................................... 27
7.7 The Update or PGN Tool does not recognize the chess computer unit ................................ 27
7.7.1 Driver update ............................................................................................................ 27
7.7.2 Cable and connection ................................................................................................ 27
7.7.3 USB mode ................................................................................................................. 27
7.8 The TKP_Udate Tool cannot acquire the latest firmware ..................................................... 27
7.9 How long does the update take? When is the update complete? ......................................... 27
7.10 Feedback and questions ................................................................................................ 27
8 Disposal ................................................................................................................................... 27
9 Warranty, servicing and contact with manufacturers .................................................................. 28
10 Technical specifications ............................................................................................................ 28
4
1 Important information Before using this device, please read the following safety notes and operating instructions completely, and pay careful attention to them. Please store this user manual with the device, so that you can refer to it later if needed. If you later give this device to another user, please also give them this manual.
1.1 Safety instructions
Please note that this product is not a child’s toy within the meaning of Directive 2009/48/EC. If you let your children use the device, instruct them accordingly and ensure that the device is used only as intended.
• Keep the packaging bags and film away from babies and small children, as there is danger of suffocation!
• In order to avoid damage, do not expose the device to heat, e.g. from radiators or from direct sunlight, and do not expose it to any kind of moisture.
• In order to avoid malfunctions, do not operate the device on or near devices that create magnetic fields or electromagnetic radiation, such as for example televisions, loudspeakers, mobile and cordless telephones, WiFi devices etc.
• Do not open the device under any circumstances. It does not contain any serviceable parts. In the event of malfunction, contact the service address or your local shop.
1.2 Notes on storage and cleaning
• Please note that real wood needs extra care. Handle the wood carefully, always store the device where it is dry and do not expose it to strong sunlight.
• When required, only clean the device’s surface with a slightly damp cloth, and ensure that no moisture can penetrate into the device.
• Do not use solvents or other aggressive or abrasive cleaning agents, as these can damage the device’s surfaces.
1.3 Notes on the power supply
Only operate this product with the AC adaptor supplied. Input 100–240 V 50/60 Hz, 0.45A max; Output 9V DC 1A
When using the AC adaptor, please observe the following:
• The power socket should be located close to the device and should be easily accessible. • The device should not be connected to more power sources than recommended. • The electrical contacts must not be short-circuited. • Before cleaning the device, ensure you disconnect the adaptor from the mains. • Regularly check the product and the AC adaptor for damage, and do not use either of them if they
are damaged. Never open them up. • Please observe any safety information printed on the AC adaptor.
1.4 Package contents
The package contains the following components:
• 1 King Performance computer unit M830 with liquid crystal display (LCD) • 17 white chess pieces (including additional queen) • 17 black chess pieces (including additional queen) • 1 AC adaptor • 1 cable with 2 identical connectors (to connect the computer with the ChessLink) • 1 user manual
5
2 Getting started
2.1 Connecting the adaptor
At the rear of the computer unit there are three sockets.
1. Take the AC adaptor (supplied in the package) and insert the small connector on the end of the cable into the right-hand socket on the rear of the computer unit.
2. Connect the AC adaptor to a power socket. A sound is emitted.
2.2 Selecting the language
The chess computer’s LCD display can show its text in any of the following 7 languages:
Language Shown on display English English German Deutsch French Français Dutch Nederlands Italian Italiano Spanish Español Russian Pусский
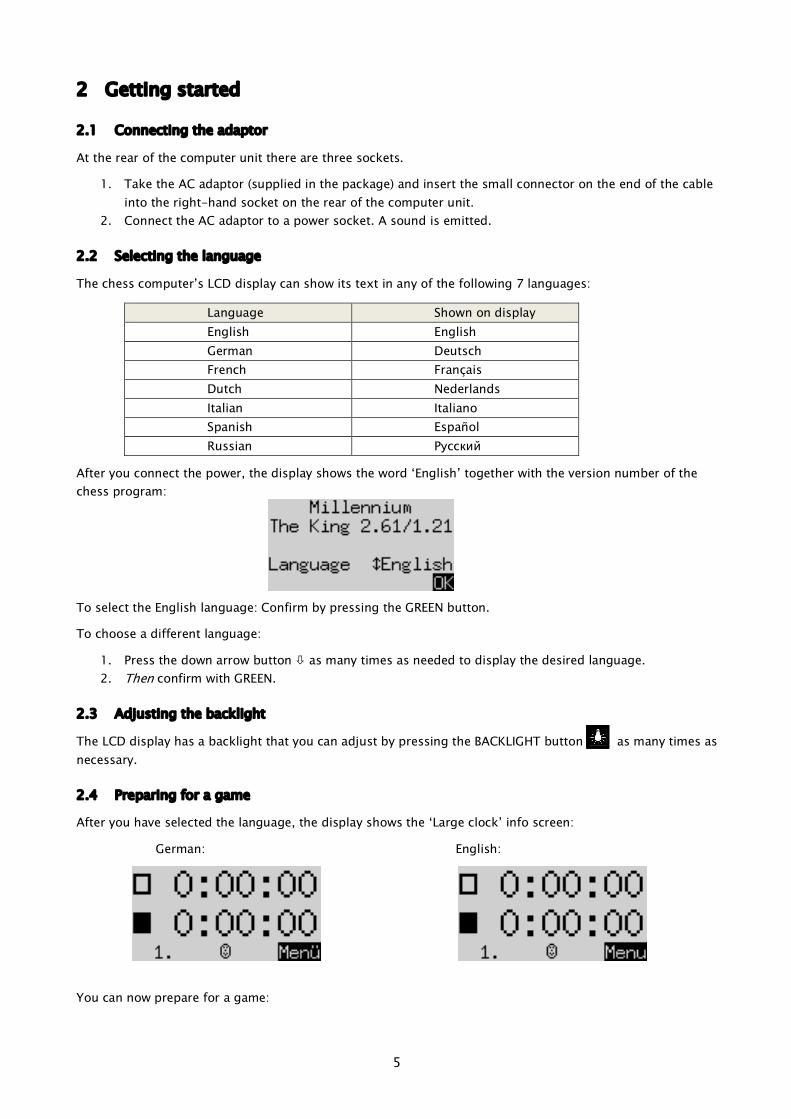
After you connect the power, the display shows the word ‘English’ together with the version number of the chess program:
To select the English language: Confirm by pressing the GREEN button.
To choose a different language:
1. Press the down arrow button ò as many times as needed to display the desired language. 2. Then confirm with GREEN.
2.3 Adjusting the backlight
The LCD display has a backlight that you can adjust by pressing the BACKLIGHT button as many times as necessary.
2.4 Preparing for a game
After you have selected the language, the display shows the ‘Large clock’ info screen:
German: English:
You can now prepare for a game:
6
1. Place the chess pieces on their starting squares. Initially the computer assumes that White is playing ‘up the board’, i.e. the white pieces start from the 2 rows next to the control panel. If you want Black to play ‘up’, give the ‘Invert board’ command as described in Sections 5.11 and 5.11.1.
2. You can now start play against the computer on its ‘Easy’ level 4. (If you want to select a different level of play, see Section 5.4.)
3. If you want the computer to play White, give the ‘Move’ command as described in Section 5.2.
2.5 Switching on and off
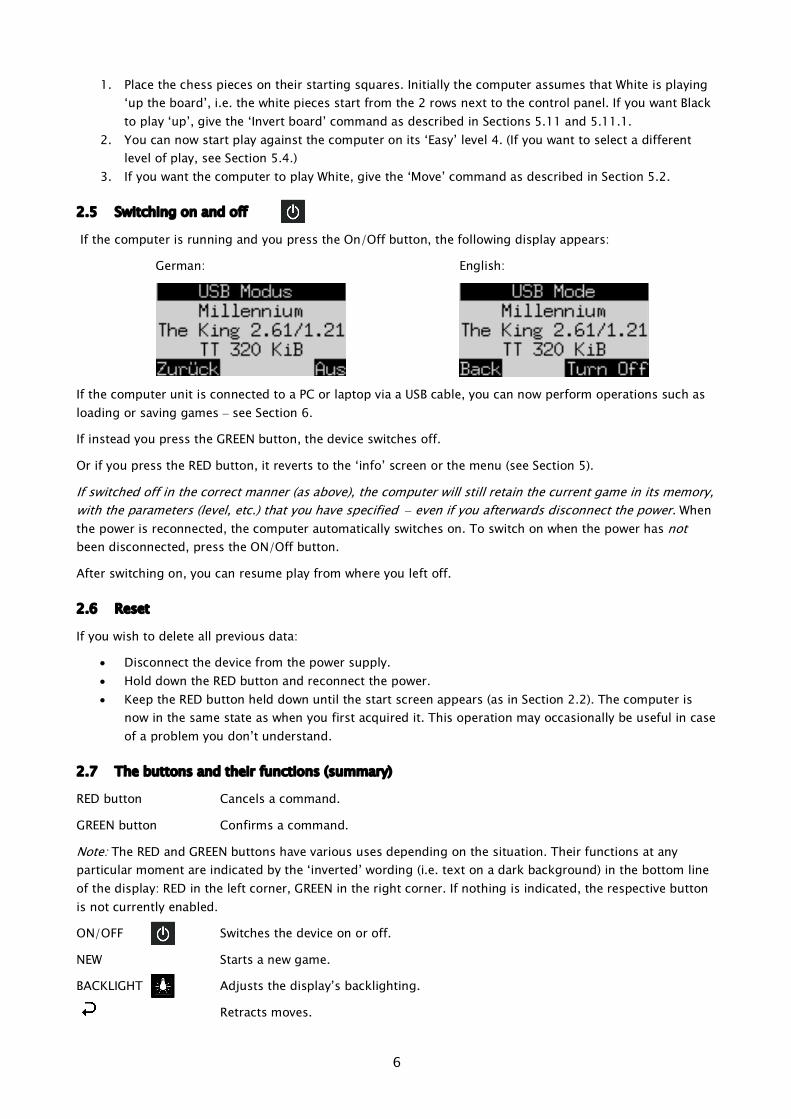
If the computer is running and you press the On/Off button, the following display appears:
German: English:
If the computer unit is connected to a PC or laptop via a USB cable, you can now perform operations such as loading or saving games – see Section 6.
If instead you press the GREEN button, the device switches off.
Or if you press the RED button, it reverts to the ‘info’ screen or the menu (see Section 5).
If switched off in the correct manner (as above), the computer will still retain the current game in its memory, with the parameters (level, etc.) that you have specified – even if you afterwards disconnect the power. When the power is reconnected, the computer automatically switches on. To switch on when the power has not been disconnected, press the ON/Off button.
After switching on, you can resume play from where you left off.
2.6 Reset
If you wish to delete all previous data:
• Disconnect the device from the power supply. • Hold down the RED button and reconnect the power. • Keep the RED button held down until the start screen appears (as in Section 2.2). The computer is
now in the same state as when you first acquired it. This operation may occasionally be useful in case of a problem you don’t understand.
2.7 The buttons and their functions (summary)
RED button Cancels a command.
GREEN button Confirms a command.
Note: The RED and GREEN buttons have various uses depending on the situation. Their functions at any particular moment are indicated by the ‘inverted’ wording (i.e. text on a dark background) in the bottom line of the display: RED in the left corner, GREEN in the right corner. If nothing is indicated, the respective button is not currently enabled.
ON/OFF Switches the device on or off.
NEW Starts a new game.
BACKLIGHT Adjusts the display’s backlighting.
Retracts moves.

7
Replays moves.
ï Returns to the previous screen. Moves the cursor left.
ð Proceeds to the next screen. Moves the cursor right.
ñ Moves the cursor up.
ò Moves the cursor down.
If held down, the buttons will ‘auto-repeat’.
3 Playing against the computer
3.1 Your move
3.1.1 Ordinary moves
Press on the departure square of the piece you want to move. There is a ‘beep’, and the red lights at the corners of the square come on.
To complete your move, press the piece down on its destination square after taking away any piece that you are capturing.
3.1.2 Special moves
• ‘En passant’ capture: First move your own pawn, then press on the square of the captured pawn as you take it off the board.
• Pawn promotion: Move the pawn to the promotion square. The bottom line of the display will show (e.g.): This invites you to promote to a queen. If you want, you can switch to a different piece by pressing ï or ð. When the desired piece is shown, press GREEN and replace the pawn with the piece.
• Castling: Move the king first. Then move the rook in the same way, i.e. pressing on the ‘from’ and ‘to’ squares.
In normal (i.e. ‘classical’) chess, the above method is always recommended. In ‘Chess960’ (see Section 3.7), an alternative method is sometimes necessary: –
(1) Press the departure square of the king. (2) Press the departure square of the rook with which you want to castle. (3) Move the king, pressing its destination square. (4) Move the rook, pressing its destination square.
This is essential when the king castles by moving just one square:
To castle, press b1 – a1 – c1 – d1.
The procedure sometimes involves pressing the same square twice:
To castle, press d1 – g1 – g1 – f1.
8
In the next example, two squares are pressed twice:
To castle, press f1 – g1 – g1 – f1.
If the king or rook is already on its destination square, castling is effected by simply moving the other piece:
To castle queenside, press a1 then d1. To castle kingside, press c1 then g1.
3.2 The computer’s move
The computer announces its move with a ‘beep’, and the red lights ‘blink’ to indicate the ‘from’ and ‘to’ squares alternately. Press down on the squares as you move the piece.
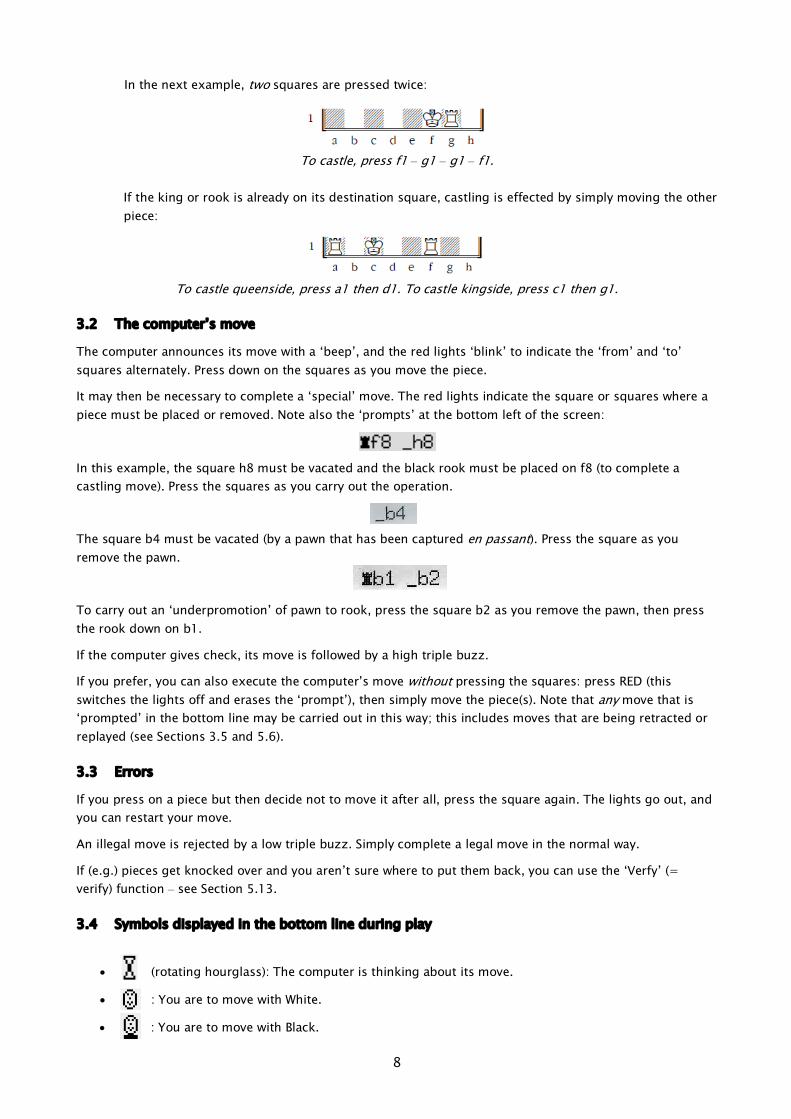
It may then be necessary to complete a ‘special’ move. The red lights indicate the square or squares where a piece must be placed or removed. Note also the ‘prompts’ at the bottom left of the screen:
In this example, the square h8 must be vacated and the black rook must be placed on f8 (to complete a castling move). Press the squares as you carry out the operation.
The square b4 must be vacated (by a pawn that has been captured en passant). Press the square as you remove the pawn.
To carry out an ‘underpromotion’ of pawn to rook, press the square b2 as you remove the pawn, then press the rook down on b1.
If the computer gives check, its move is followed by a high triple buzz.
If you prefer, you can also execute the computer’s move without pressing the squares: press RED (this switches the lights off and erases the ‘prompt’), then simply move the piece(s). Note that any move that is ‘prompted’ in the bottom line may be carried out in this way; this includes moves that are being retracted or replayed (see Sections 3.5 and 5.6).
3.3 Errors
If you press on a piece but then decide not to move it after all, press the square again. The lights go out, and you can restart your move.
An illegal move is rejected by a low triple buzz. Simply complete a legal move in the normal way.
If (e.g.) pieces get knocked over and you aren’t sure where to put them back, you can use the ‘Verfy’ (= verify) function – see Section 5.13.
3.4 Symbols displayed in the bottom line during play
• (rotating hourglass): The computer is thinking about its move.
• : You are to move with White.
• : You are to move with Black.

9
3.5 Retracting and replaying moves
3.5.1 Retracting a move
If you want to take back the last move played, you may press the clockwise arrow button . The red lights on the chessboard, and the prompts in the bottom line of the screen, direct you to move the piece back, e.g.:
Return the white bishop from h4 to g5, pressing the squares as you do so. (Alternatively press RED and simply move the piece – compare Section 3.2.)
3.5.2 Retracting a sequence of moves
After taking back one move, you may also take back the previous one or a longer sequence.
To do this, you can repeat the same procedure as before. However, in a long sequence you don’t need to retract the moves one by one in a specific order. For example, to retract the last seven moves played, you can simply press seven times and then proceed to reconstruct the position, pressing the squares that are indicated in the bottom line. The VERFY function (see Section 5.1.3), as well as the red lights on the board, can help you.
3.5.3 Replaying moves
A move that you have retracted can be replayed by pressing the anticlockwise arrow button and moving the piece on the board as prompted by the lights and the screen.
To replay a sequence, you may repeat this same procedure to execute each individual move. Alternatively, you may simply press the anticlockwise arrow button several times and then reconstruct the position at the end of the sequence.
3.5.4 Continuing the game
At any time after retracting or replaying moves, you can resume the game from the current position on the board. Carry out a move in the normal way, or give the ‘Move’ command (see Section 5.2) to make the computer play next – you will then be playing for the opposing colour.
3.6 Result of the game
The final move is accompanied by three ‘beeps’, and the result is announced in the bottom line of the display:
• Mate Checkmate • Stale Stalemate • Draw 3x Draw by threefold repetition • Draw 50 Draw by 50-move rule • NoMat Draw due to insufficient material (neither side can mate the opponent) • TooLong The game cannot be continued, as it would exceed the available
memory space (maximum: 256 moves for each side).
3.7 Starting a new game
You can start a new game at any time, except in the middle of some special operations as described in Section 5.
Press the NEW button. The screen shows ‘New Game?’ and either the word ‘Classic’ or an arrangement of pieces to start a game of ‘Chess 960’. To switch between these displays, use ñ or ò.
To begin a game of ordinary (‘classical’) chess, press GREEN when the screen shows ‘Classic’.
10
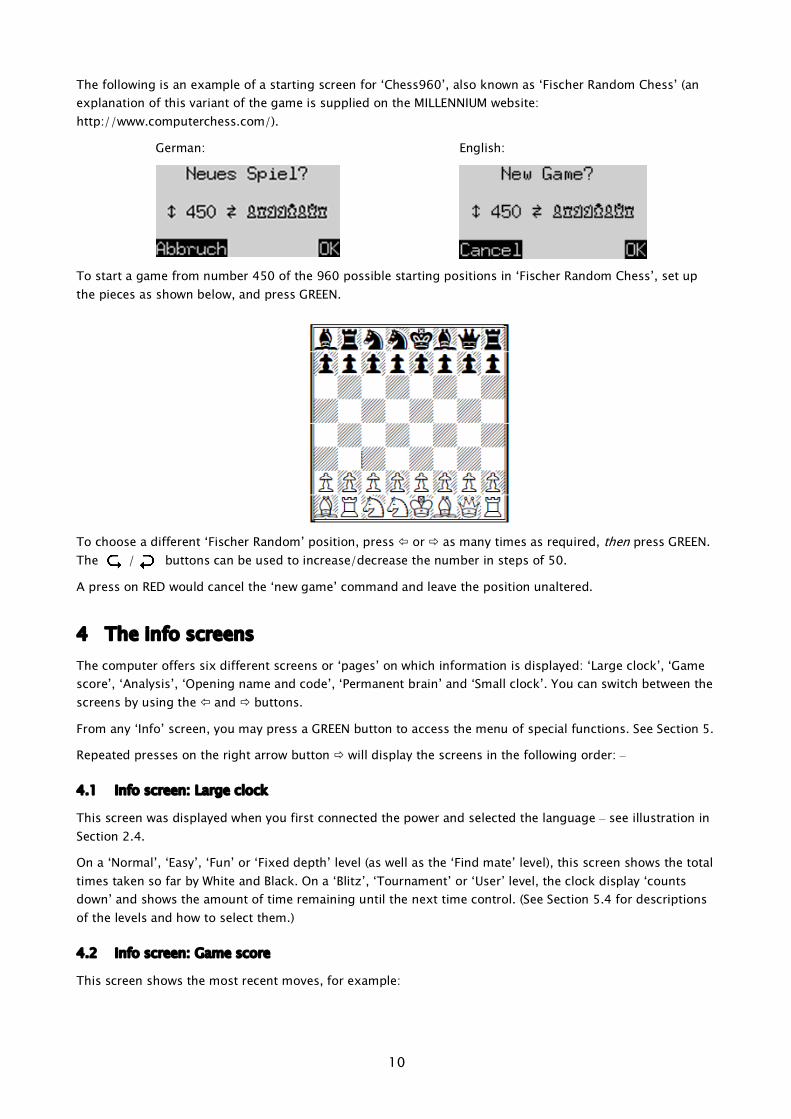
The following is an example of a starting screen for ‘Chess960’, also known as ‘Fischer Random Chess’ (an explanation of this variant of the game is supplied on the MILLENNIUM website: http://www.computerchess.com/).
German: English:
To start a game from number 450 of the 960 possible starting positions in ‘Fischer Random Chess’, set up the pieces as shown below, and press GREEN.
To choose a different ‘Fischer Random’ position, press ï or ð as many times as required, then press GREEN. The / buttons can be used to increase/decrease the number in steps of 50.
A press on RED would cancel the ‘new game’ command and leave the position unaltered.
4 The info screens The computer offers six different screens or ‘pages’ on which information is displayed: ‘Large clock’, ‘Game score’, ‘Analysis’, ‘Opening name and code’, ‘Permanent brain’ and ‘Small clock’. You can switch between the screens by using the ï and ð buttons.
From any ‘Info’ screen, you may press a GREEN button to access the menu of special functions. See Section 5.
Repeated presses on the right arrow button ð will display the screens in the following order: –
4.1 Info screen: Large clock
This screen was displayed when you first connected the power and selected the language – see illustration in Section 2.4.
On a ‘Normal’, ‘Easy’, ‘Fun’ or ‘Fixed depth’ level (as well as the ‘Find mate’ level), this screen shows the total times taken so far by White and Black. On a ‘Blitz’, ‘Tournament’ or ‘User’ level, the clock display ‘counts down’ and shows the amount of time remaining until the next time control. (See Section 5.4 for descriptions of the levels and how to select them.)
4.2 Info screen: Game score
This screen shows the most recent moves, for example:
11
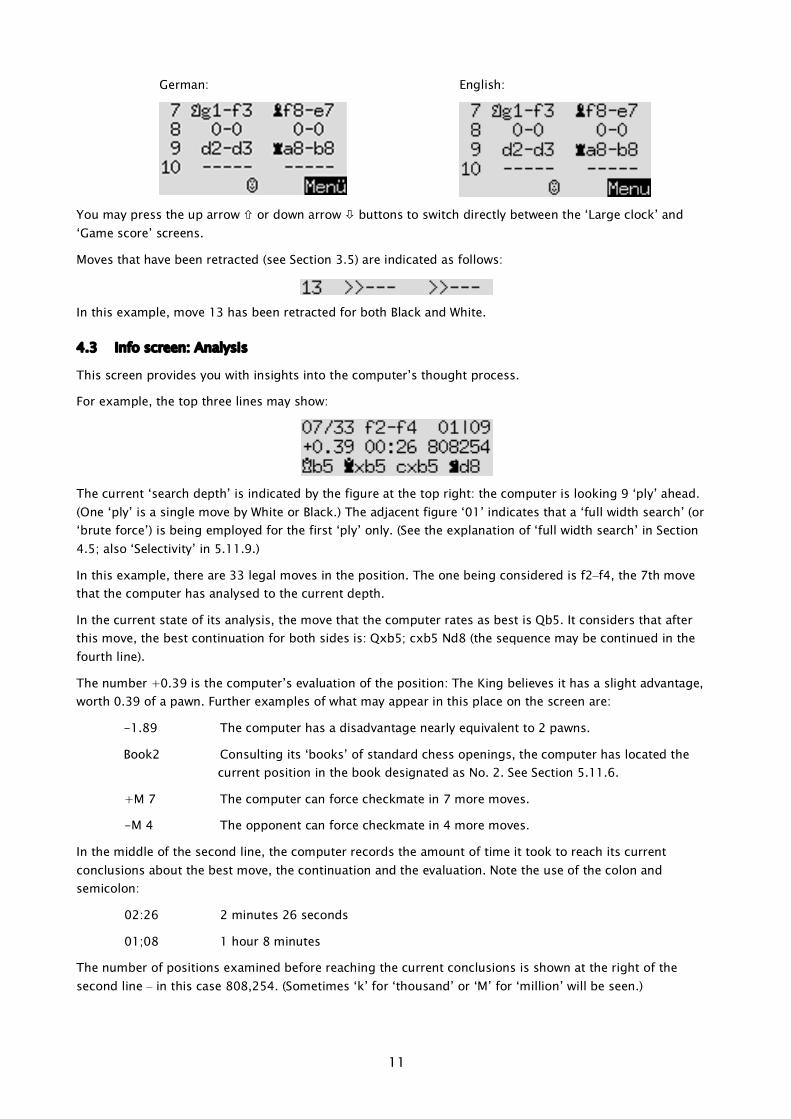
German: English:
You may press the up arrow ñ or down arrow ò buttons to switch directly between the ‘Large clock’ and ‘Game score’ screens.
Moves that have been retracted (see Section 3.5) are indicated as follows:
In this example, move 13 has been retracted for both Black and White.
4.3 Info screen: Analysis
This screen provides you with insights into the computer’s thought process.
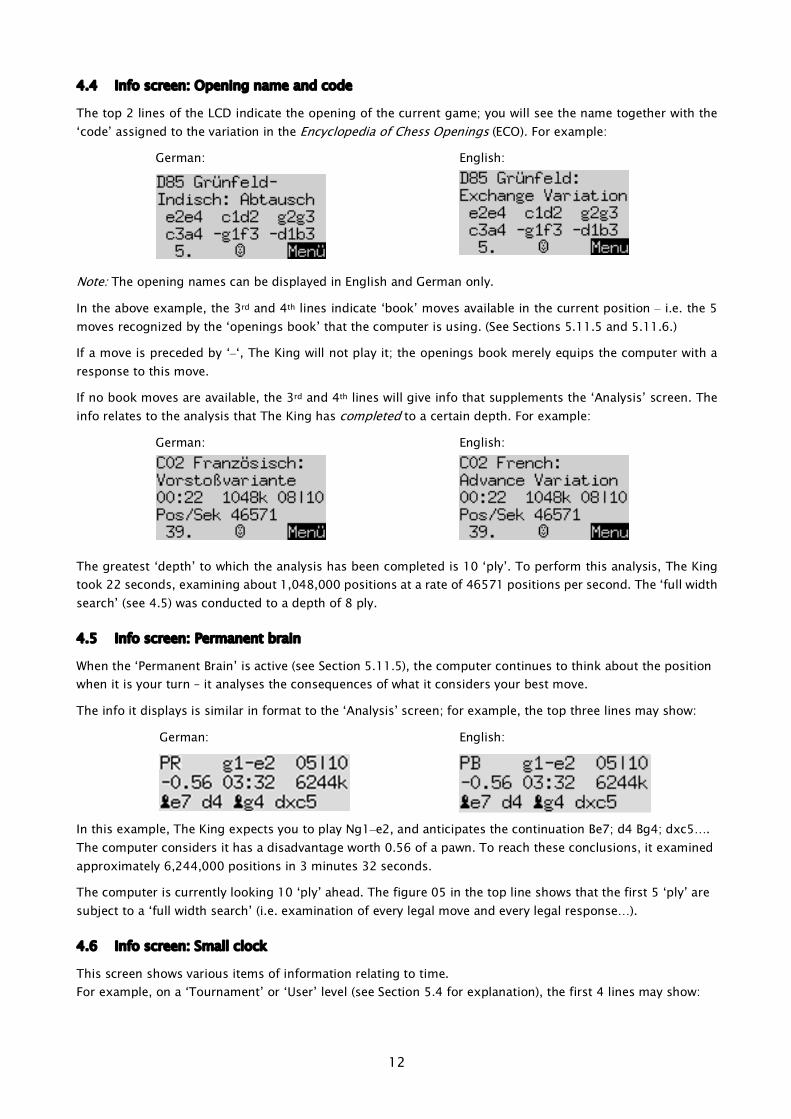
For example, the top three lines may show:
The current ‘search depth’ is indicated by the figure at the top right: the computer is looking 9 ‘ply’ ahead. (One ‘ply’ is a single move by White or Black.) The adjacent figure ‘01’ indicates that a ‘full width search’ (or ‘brute force’) is being employed for the first ‘ply’ only. (See the explanation of ‘full width search’ in Section 4.5; also ‘Selectivity’ in 5.11.9.)
In this example, there are 33 legal moves in the position. The one being considered is f2–f4, the 7th move that the computer has analysed to the current depth.
In the current state of its analysis, the move that the computer rates as best is Qb5. It considers that after this move, the best continuation for both sides is: Qxb5; cxb5 Nd8 (the sequence may be continued in the fourth line).
The number +0.39 is the computer’s evaluation of the position: The King believes it has a slight advantage, worth 0.39 of a pawn. Further examples of what may appear in this place on the screen are:
-1.89 The computer has a disadvantage nearly equivalent to 2 pawns.
Book2 Consulting its ‘books’ of standard chess openings, the computer has located the current position in the book designated as No. 2. See Section 5.11.6.
+M 7 The computer can force checkmate in 7 more moves.
-M 4 The opponent can force checkmate in 4 more moves.
In the middle of the second line, the computer records the amount of time it took to reach its current conclusions about the best move, the continuation and the evaluation. Note the use of the colon and semicolon:
02:26 2 minutes 26 seconds
01;08 1 hour 8 minutes
The number of positions examined before reaching the current conclusions is shown at the right of the second line – in this case 808,254. (Sometimes ‘k’ for ‘thousand’ or ‘M’ for ‘million’ will be seen.)
12
4.4 Info screen: Opening name and code
The top 2 lines of the LCD indicate the opening of the current game; you will see the name together with the ‘code’ assigned to the variation in the Encyclopedia of Chess Openings (ECO). For example:
German: English:
Note: The opening names can be displayed in English and German only.
In the above example, the 3rd and 4th lines indicate ‘book’ moves available in the current position – i.e. the 5 moves recognized by the ‘openings book’ that the computer is using. (See Sections 5.11.5 and 5.11.6.)
If a move is preceded by ‘–‘, The King will not play it; the openings book merely equips the computer with a response to this move.
If no book moves are available, the 3rd and 4th lines will give info that supplements the ‘Analysis’ screen. The info relates to the analysis that The King has completed to a certain depth. For example:
German: English:
The greatest ‘depth’ to which the analysis has been completed is 10 ‘ply’. To perform this analysis, The King took 22 seconds, examining about 1,048,000 positions at a rate of 46571 positions per second. The ‘full width search’ (see 4.5) was conducted to a depth of 8 ply.
4.5 Info screen: Permanent brain
When the ‘Permanent Brain’ is active (see Section 5.11.5), the computer continues to think about the position when it is your turn – it analyses the consequences of what it considers your best move.
The info it displays is similar in format to the ‘Analysis’ screen; for example, the top three lines may show:
German: English:
In this example, The King expects you to play Ng1–e2, and anticipates the continuation Be7; d4 Bg4; dxc5…. The computer considers it has a disadvantage worth 0.56 of a pawn. To reach these conclusions, it examined approximately 6,244,000 positions in 3 minutes 32 seconds.
The computer is currently looking 10 ‘ply’ ahead. The figure 05 in the top line shows that the first 5 ‘ply’ are subject to a ‘full width search’ (i.e. examination of every legal move and every legal response…).
4.6 Info screen: Small clock
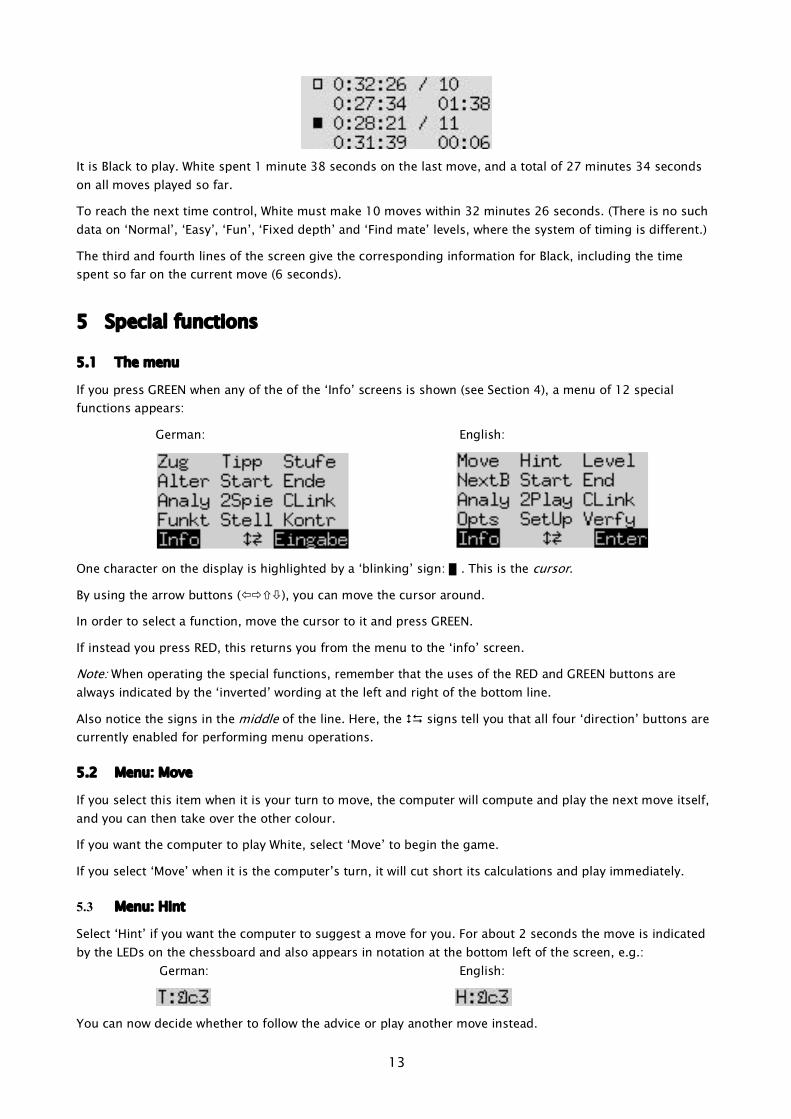
This screen shows various items of information relating to time. For example, on a ‘Tournament’ or ‘User’ level (see Section 5.4 for explanation), the first 4 lines may show:
13
It is Black to play. White spent 1 minute 38 seconds on the last move, and a total of 27 minutes 34 seconds on all moves played so far.
To reach the next time control, White must make 10 moves within 32 minutes 26 seconds. (There is no such data on ‘Normal’, ‘Easy’, ‘Fun’, ‘Fixed depth’ and ‘Find mate’ levels, where the system of timing is different.)
The third and fourth lines of the screen give the corresponding information for Black, including the time spent so far on the current move (6 seconds).
5 Special functions
5.1 The menu
If you press GREEN when any of the of the ‘Info’ screens is shown (see Section 4), a menu of 12 special functions appears:
German: English:
One character on the display is highlighted by a ‘blinking’ sign: ▋. This is the cursor.
By using the arrow buttons (ïðñò), you can move the cursor around.
In order to select a function, move the cursor to it and press GREEN.
If instead you press RED, this returns you from the menu to the ‘info’ screen.
Note: When operating the special functions, remember that the uses of the RED and GREEN buttons are always indicated by the ‘inverted’ wording at the left and right of the bottom line.
Also notice the signs in the middle of the line. Here, the 2D signs tell you that all four ‘direction’ buttons are currently enabled for performing menu operations.
5.2 Menu: Move
If you select this item when it is your turn to move, the computer will compute and play the next move itself, and you can then take over the other colour.
If you want the computer to play White, select ‘Move’ to begin the game.
If you select ‘Move’ when it is the computer’s turn, it will cut short its calculations and play immediately.
5.3 Menu: Hint
Select ‘Hint’ if you want the computer to suggest a move for you. For about 2 seconds the move is indicated by the LEDs on the chessboard and also appears in notation at the bottom left of the screen, e.g.: German: English:
You can now decide whether to follow the advice or play another move instead.
14
5.4 Menu: Level
The computer’s levels of playing strength fall into 8 categories: ‘Normal’, ‘Easy’, ‘Fun’, ‘Blitz’, ‘Tournament’, ‘User’, ‘Fixed depth’ and ‘Find mate’.
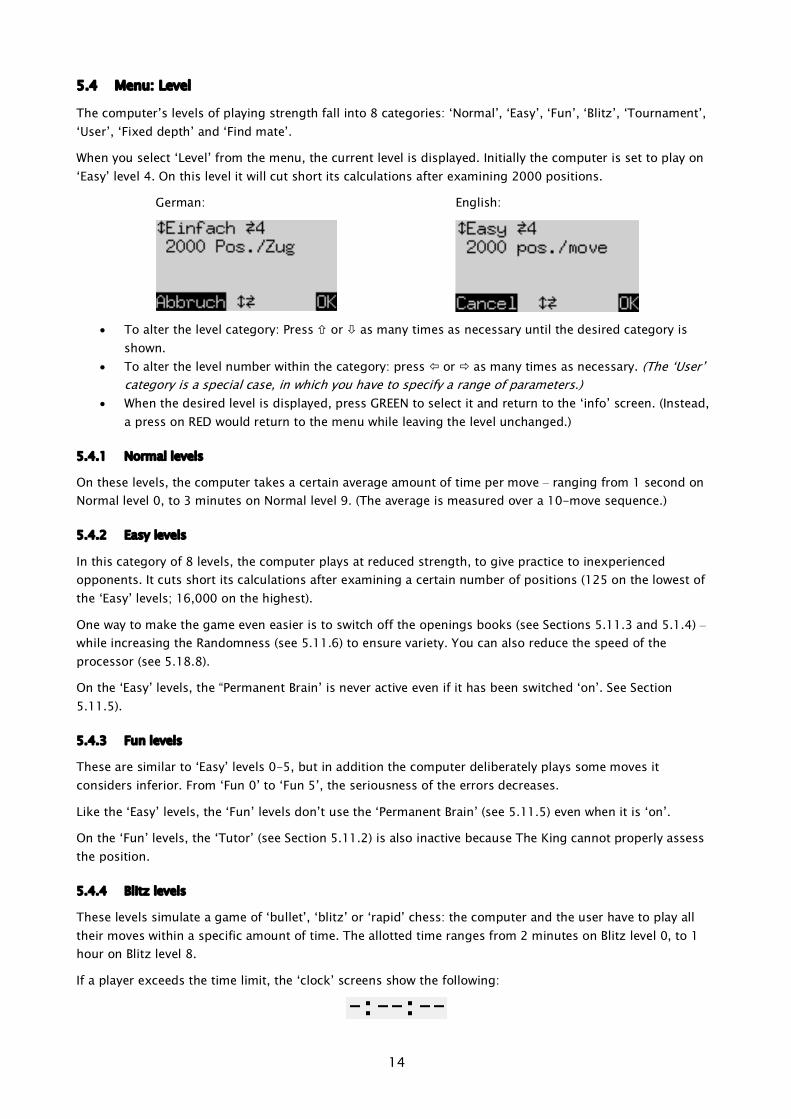
When you select ‘Level’ from the menu, the current level is displayed. Initially the computer is set to play on ‘Easy’ level 4. On this level it will cut short its calculations after examining 2000 positions.
German: English:
• To alter the level category: Press ñ or ò as many times as necessary until the desired category is
shown. • To alter the level number within the category: press ï or ð as many times as necessary. (The ‘User’
category is a special case, in which you have to specify a range of parameters.) • When the desired level is displayed, press GREEN to select it and return to the ‘info’ screen. (Instead,
a press on RED would return to the menu while leaving the level unchanged.)
5.4.1 Normal levels
On these levels, the computer takes a certain average amount of time per move – ranging from 1 second on Normal level 0, to 3 minutes on Normal level 9. (The average is measured over a 10-move sequence.)
5.4.2 Easy levels
In this category of 8 levels, the computer plays at reduced strength, to give practice to inexperienced opponents. It cuts short its calculations after examining a certain number of positions (125 on the lowest of the ‘Easy’ levels; 16,000 on the highest).
One way to make the game even easier is to switch off the openings books (see Sections 5.11.3 and 5.1.4) – while increasing the Randomness (see 5.11.6) to ensure variety. You can also reduce the speed of the processor (see 5.18.8).
On the ‘Easy’ levels, the “Permanent Brain’ is never active even if it has been switched ‘on’. See Section 5.11.5).
5.4.3 Fun levels
These are similar to ‘Easy’ levels 0-5, but in addition the computer deliberately plays some moves it considers inferior. From ‘Fun 0’ to ‘Fun 5’, the seriousness of the errors decreases.
Like the ‘Easy’ levels, the ‘Fun’ levels don’t use the ‘Permanent Brain’ (see 5.11.5) even when it is ‘on’.
On the ‘Fun’ levels, the ‘Tutor’ (see Section 5.11.2) is also inactive because The King cannot properly assess the position.
5.4.4 Blitz levels
These levels simulate a game of ‘bullet’, ‘blitz’ or ‘rapid’ chess: the computer and the user have to play all their moves within a specific amount of time. The allotted time ranges from 2 minutes on Blitz level 0, to 1 hour on Blitz level 8.
If a player exceeds the time limit, the ‘clock’ screens show the following:

15
However, the game may be continued even after the player has ‘lost on time’.
5.4.5 Tournament levels
The tournament levels offer various ‘Fischer’, ‘sudden death’ or ‘classical’ time controls. Just as in games on the ‘Blitz’ levels, play may continue even if one player loses by overstepping the time limit.
‘Fischer’ timings:
Tournament 0 At the start of the game, each player is given 5 minutes’ thinking time. After each move played, the clock time is incremented by 3 seconds.
Tournament 1 25 minutes at the beginning, then an additional 10 seconds per move.
Tournament 2 1 hour at the beginning, then an additional 30 seconds per move.
‘Sudden death’ finish:
Tournament 3 Each player must make the first 30 moves within 1 hour, and then receives 30 minutes to complete the game.
Tournament 4 The first 40 moves within two hours, and then 30 minutes to complete the game.
‘Classical’ time control:
Tournament 5 Each player must make 40 moves in the first two hours, and 20 moves per hour thereafter.
5.4.6 User level
In this category, you can specify your own customized time control.
Example: You want to give the players 1 hour and 30 minutes for their first 42 moves and 15 minutes for every 7 moves thereafter, with an increment of 15 seconds per move.
The display for the ‘User’ category looks like this:
German: English:
If you repeatedly press ð or ï, the cursor (the ‘blinking’ ▋) moves around the screen to visit six items in turn: the five parameters in rows 2-4, and the level category (‘User’) in the top row.
• Bring the cursor to the left-hand parameter in the second row. This is the number of moves for the first time control.
• Press GREEN. The cursor ( ▋) is replaced by the sign . You can now alter the parameter by using the direction buttons. The ï/ð arrows increase/reduce the number by one. The ñ/ò arrows increase/reduce it by ten. The maximum value for the parameter is ‘All’ (this comes after 60).
• Once you have reached 42, press GREEN to confirm. • The ▋reappears in place of , and shifts to the second parameter in the same row. This is the
period (in h:mm:ss) for the first time control. • Press GREEN. The ▋is replaced by , and you can alter the parameter. The ï/ð arrows
increase/reduce the period in steps of one minute. The ñ/ò arrows increase/reduce the period in steps of ten minutes.
• Once you have reached 1:30:00, press GREEN to confirm. The is replaced by ▋, which moves to the third row.
16
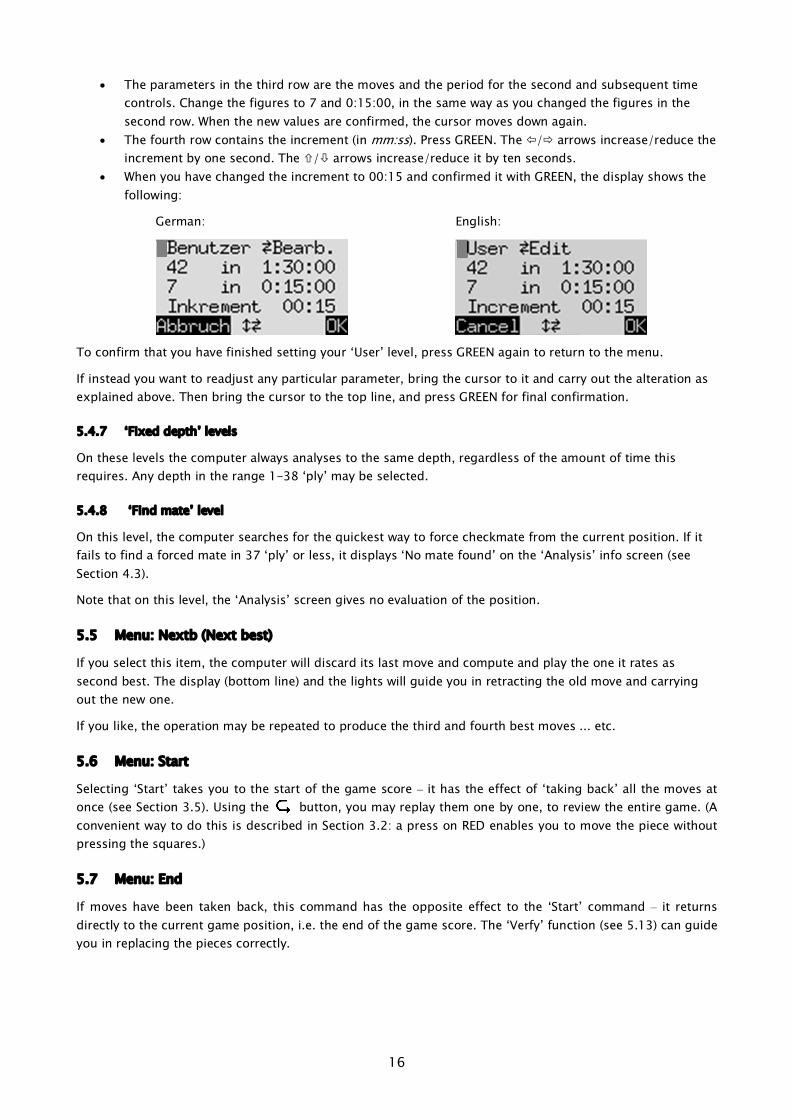
• The parameters in the third row are the moves and the period for the second and subsequent time controls. Change the figures to 7 and 0:15:00, in the same way as you changed the figures in the second row. When the new values are confirmed, the cursor moves down again.
• The fourth row contains the increment (in mm:ss). Press GREEN. The ï/ð arrows increase/reduce the increment by one second. The ñ/ò arrows increase/reduce it by ten seconds.
• When you have changed the increment to 00:15 and confirmed it with GREEN, the display shows the following:
German: English:
To confirm that you have finished setting your ‘User’ level, press GREEN again to return to the menu.
If instead you want to readjust any particular parameter, bring the cursor to it and carry out the alteration as explained above. Then bring the cursor to the top line, and press GREEN for final confirmation.
5.4.7 ‘Fixed depth’ levels
On these levels the computer always analyses to the same depth, regardless of the amount of time this requires. Any depth in the range 1-38 ‘ply’ may be selected.
5.4.8 ‘Find mate’ level
On this level, the computer searches for the quickest way to force checkmate from the current position. If it fails to find a forced mate in 37 ‘ply’ or less, it displays ‘No mate found’ on the ‘Analysis’ info screen (see Section 4.3).
Note that on this level, the ‘Analysis’ screen gives no evaluation of the position.
5.5 Menu: Nextb (Next best)
If you select this item, the computer will discard its last move and compute and play the one it rates as second best. The display (bottom line) and the lights will guide you in retracting the old move and carrying out the new one.
If you like, the operation may be repeated to produce the third and fourth best moves ... etc.
5.6 Menu: Start
Selecting ‘Start’ takes you to the start of the game score – it has the effect of ‘taking back’ all the moves at once (see Section 3.5). Using the button, you may replay them one by one, to review the entire game. (A convenient way to do this is described in Section 3.2: a press on RED enables you to move the piece without pressing the squares.)
5.7 Menu: End
If moves have been taken back, this command has the opposite effect to the ‘Start’ command – it returns directly to the current game position, i.e. the end of the game score. The ‘Verfy’ function (see 5.13) can guide you in replacing the pieces correctly.
17
5.8 Menu: Analy (Analysis)
If this item is selected, the computer will not make any moves of its own but will merely analyse the current position. You can play moves for both White and Black, and inspect the information on the ‘Analysis’ screen (see 4.3).
To show that The King is in ‘Analysis’ mode, the symbol is displayed expanding and contracting. The computer exits from this mode if you re-select the ‘Analy’ item or give the ‘Move’ command.
5.9 Menu: 2Play (Two Players)
In ‘Two Player’ mode, the computer performs no analysis. This allows you to use its special chessboard for a game between two humans. The computer merely checks the legality of the moves, records the score of the game, and performs the functions of a chess clock.
A pair of ‘faces’ in the bottom line of the screen ( ) shows that The King is in ‘2Play’ mode. It exits from this mode if you re-select the ‘2Play’ item or give the ‘Move’ command.
5.10 Menu: CLink (ChessLink)
The King Performance computer can be connected to the MILLENNIUM ChessLink module. This enables you to use the King Performance to play online against human opponents or with chess engines on mobile devices. For this purpose, do the following:
• Plug the small connector at the end of the King Performance adaptor’s cable into the left-hand socket at the rear of the ChessLink unit.
• Take the cable with 2 identical connectors (supplied with the King Performance package). Plug it into the left-hand socket at the rear of the chess computer unit and the middle socket on the ChessLink.
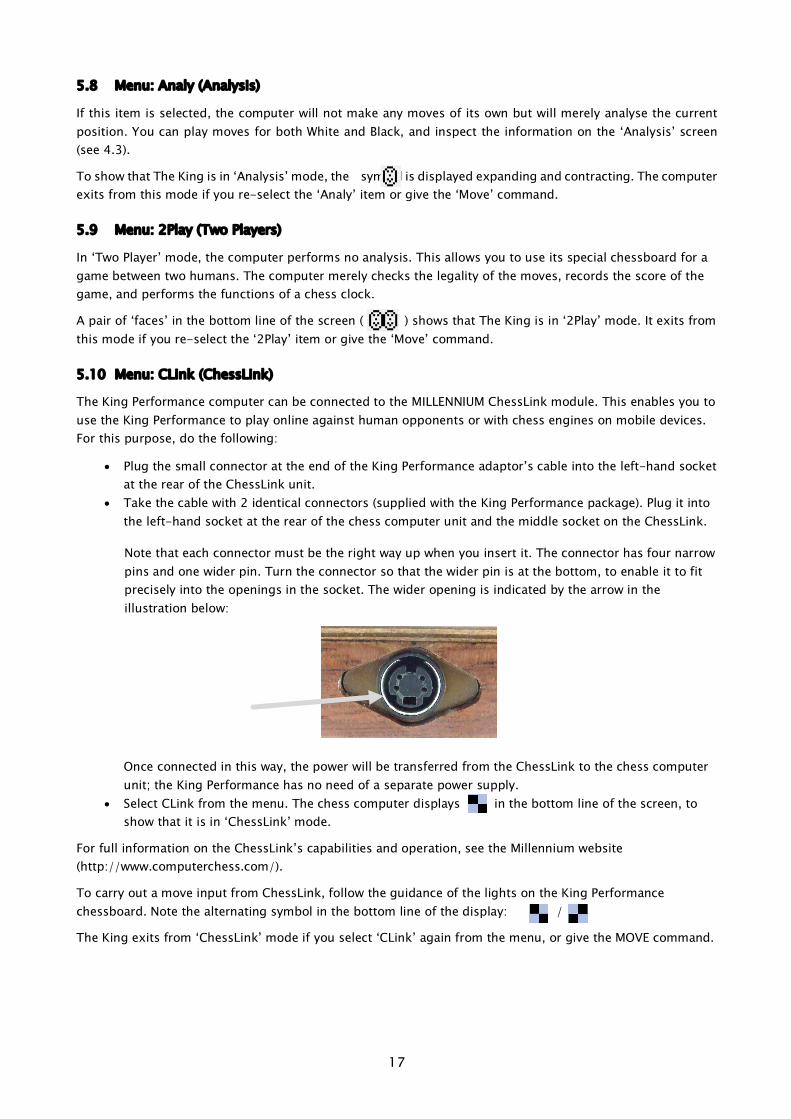
Note that each connector must be the right way up when you insert it. The connector has four narrow pins and one wider pin. Turn the connector so that the wider pin is at the bottom, to enable it to fit precisely into the openings in the socket. The wider opening is indicated by the arrow in the illustration below:
Once connected in this way, the power will be transferred from the ChessLink to the chess computer unit; the King Performance has no need of a separate power supply.
• Select CLink from the menu. The chess computer displays in the bottom line of the screen, to show that it is in ‘ChessLink’ mode.
For full information on the ChessLink’s capabilities and operation, see the Millennium website (http://www.computerchess.com/).
To carry out a move input from ChessLink, follow the guidance of the lights on the King Performance chessboard. Note the alternating symbol in the bottom line of the display: /
The King exits from ‘ChessLink’ mode if you select ‘CLink’ again from the menu, or give the MOVE command.
18
5.11 Menu: Opts (advanced Options)
5.11.1 Overview of the advanced options
The ‘options’ are a set of 12 special features that you have the possibility to modify. To inspect them, select ‘Opts’ from the menu. This displays four options from the list, e.g.:
German: English:
One line of the screen incorporates the cursor (the ‘blinking’ ▋). By repeatedly pressing ñ or ò, you can move the cursor up and down and view all 12 options in rotation.
5.11.2 Altering an option
To alter an option, bring the cursor to the relevant row and use the ï / ð buttons.
Example: you want to switch the ‘Tutor’ feature ‘on’, and you want the ‘Queen’s Gambit’ openings book to be treated as book number 1.
Bring the cursor to the ‘Tutor’ line. For the ‘Tutor’ option, there are just two ‘settings’, i.e. ‘On’ (a) and ‘Off’ ( X ). Press ï or ð to switch between them.
Next, bring the cursor to the ‘Book1’ line. This parameter (described in Section 5.11.5) has nine different settings, which you can display in rotation with ï or ð. In this way, bring ‘Q. Gambit’ onto the screen.
Having finished your alterations to the options, press GREEN to return to the main menu or RED to return to the info page.
We now consider the options in turn. Note: Under the ‘Style’ option, the possibilities are more complex than in the other cases. See Section 5.11.11.
5.11.3 Opts: Invert Board
If this option is set to ‘X’, White plays ‘up the board’, i.e. away from the controls. If you want Black to play ‘up’, use ï or ð to switch the X to a.
5.11.4 Opts: Tutor
Switch the Tutor function ‘on’ if you want the computer to point out your errors.
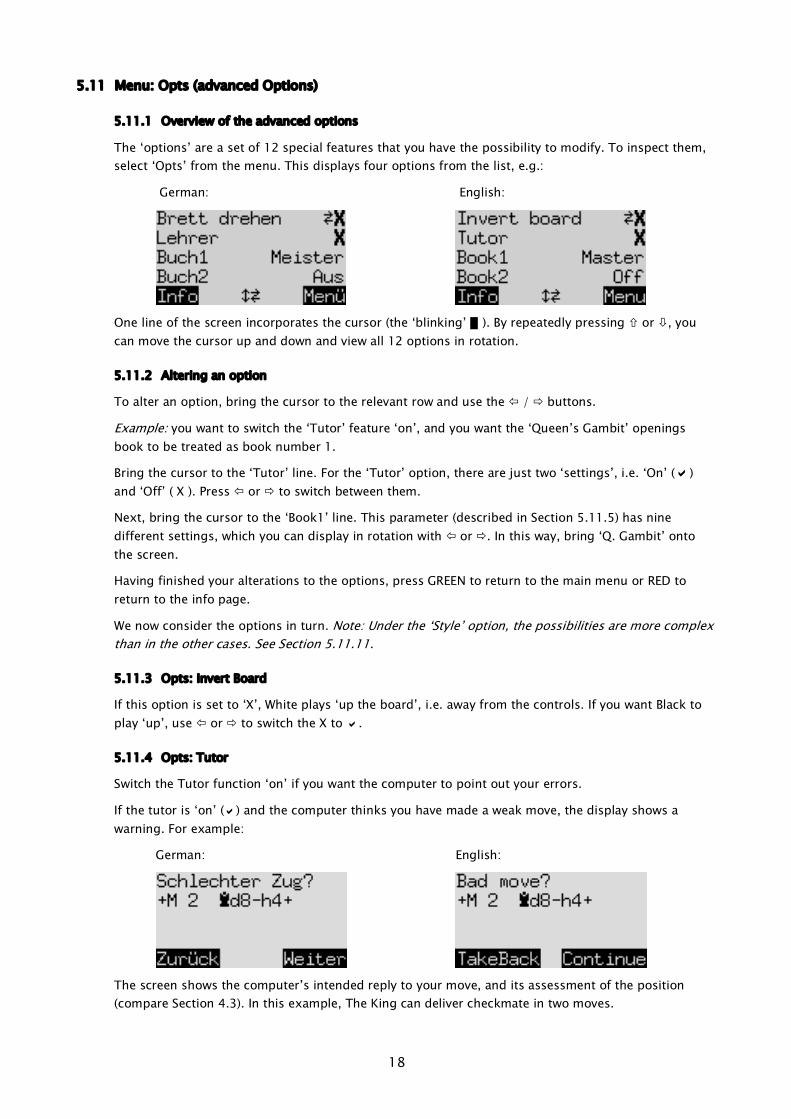
If the tutor is ‘on’ (a) and the computer thinks you have made a weak move, the display shows a warning. For example:
German: English:
The screen shows the computer’s intended reply to your move, and its assessment of the position (compare Section 4.3). In this example, The King can deliver checkmate in two moves.
19
You may now press RED and take your move back, pressing on the squares as indicated by the lights and prompts. Or if you want your move to stand, press GREEN.
5.11.5 Opts: Book1
The King Performance is equipped with 9 ‘books’ (or ‘libraries’) of standard chess openings. Two of the books are comprehensive in scope:
• ‘Master’ Book by M.Uniacke, containing over 300,000 positions • ‘Aegon 1994’ Book by C. de Gorter, with 61,000 moves; it contains many forgotten
and ‘dubious’ lines.
There are also seven specialized books, each dealing with a specific area of chess opening theory:
• Open Games (1. e4 e5, without Spanish) • Spanish (or Ruy Lopez) • Semi-Open (1. e4 without 1…e5 or 1…c5) • Sicilian • Q. Gambit • Indian • Gambits
By setting the ‘Book1’ parameter, you specify which book the computer will use as the first choice for determining its opening moves. In addition to the 9 settings listed above, there are 2 more:
• User The book, if any, that you have installed via a USB connection – see Section 6. • Off If this is chosen, the computer will only consult ‘Book2’ – see 5.11.6.
5.11.6 Opts: Book2
This parameter specifies the openings book of second choice: if ‘Book1’ supplies no move in the current position, The King will if possible play a move from ‘Book2’.
If either of the books is set to ‘Off’, only the other book will be used. If ‘Book1’ and ‘Book2’ are both ‘Off’, The King will compute its moves independently right from the start of the game.
5.11.7 Opts: Permanent Brain
If the computer’s ‘Permanent Brain’ is switched ‘on’, it continues calculating when it is your turn to move (see Section 4.5). One way to lower the computer’s playing strength and give yourself an easier game is to switch this function ‘Off’ ( X ).
Note: On the ‘Easy’ and ‘Fun’ levels (see 5.4.2 and 5.4.3), the computer operates without its ‘Permanent Brain’ even if this option is selected. In that case, if you switch to a level category other than ‘Easy’ or ‘Fun’, The King will revert to thinking in its opponent’s time.
5.11.8 Opts: Randomness
This option introduces a small element of randomness into the computer’s assessment of the moves that are immediately available in the current position.
The random element can be increased on a scale from 0.00 to 0.50. A high value can be helpful if (e.g.) the openings ‘books’ are set to ‘Off’ (see 5.11.5 and 5.11.6): the random element will increase the variety of moves that the computer can play in the opening stage.
5.11.9 Opts: Contempt
This parameter has a scale of values from -2.00 to +2.00. By increasing the value, you increase the program’s aversion (i.e. ‘contempt’) for a drawn result. If the value is negative, The King will show more readiness to accept a drawn or drawish position.
20
5.11.10 Opts: CPU speed
Reducing the computer’s speed of calculation is one way to make it an easier opponent. The ‘CPU speed’ option offers 30 settings, ranging from 10 to 300 MHz.
5.11.11 Opts: Style
To determine The King’s style of play, there are five predefined ‘settings’ to choose from: Defensive, Solid, Normal, Active and Aggressive.
In addition, there are three ‘User’ settings. These are styles that you can create according to your own specifications.
Inspecting the styles
Each style is defined by the significance it attaches to the following components of the position: –
Pawn Space
Knight Mobil (= Mobility)
Bishop Ksafe (= King safety)
Rook PassP (= Passed Pawn)
Queen Pweak (= Pawn weakness)
The style is also influenced by a ‘Selectivity’ factor. A high value for this parameter (maximum: 20) permits the program to analyse certain selected variations more deeply. A value of 1 results in ‘brute force’, i.e. every variation analysed to the same depth.
To inspect (e.g.) the composition of the ‘Aggressive’ style: –
1. Use ï or ð to display the ‘Aggressive’ setting. 2. Press GREEN. The ‘blinking’ cursor ( ▋ ) appears. 3. Repeated presses on ñ or ò bring the cursor to each line in turn and allow all the components
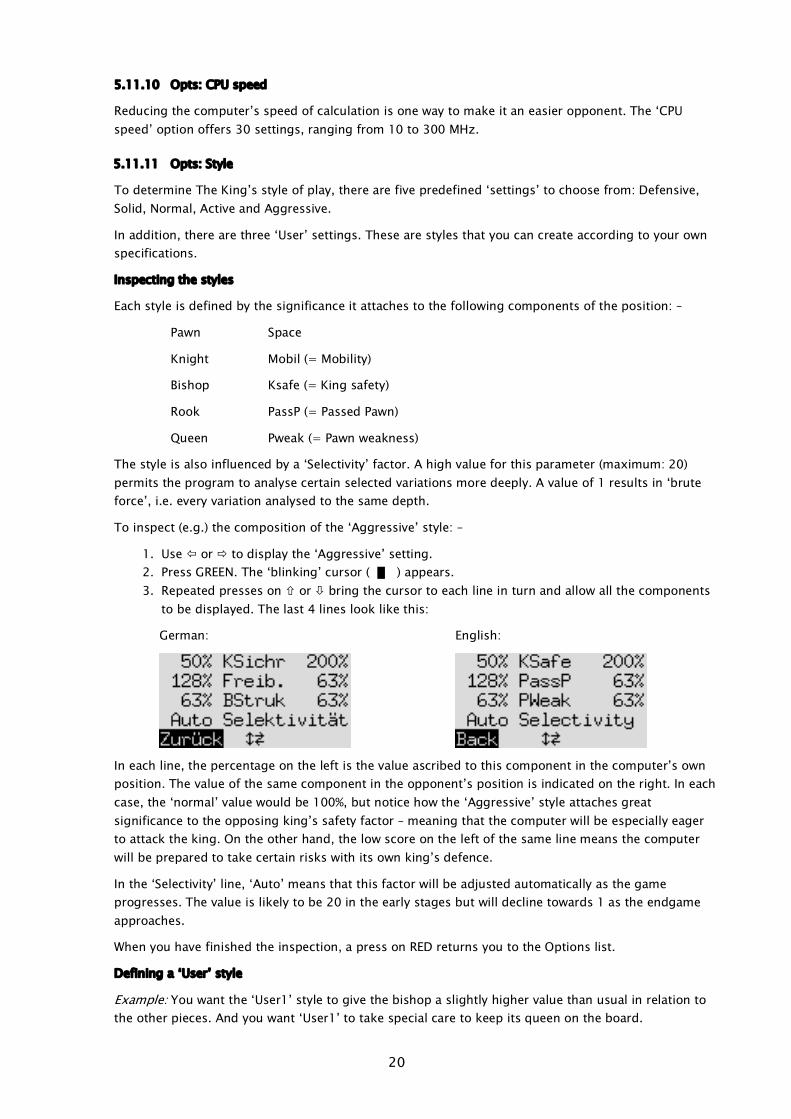
to be displayed. The last 4 lines look like this:
German: English:
In each line, the percentage on the left is the value ascribed to this component in the computer’s own position. The value of the same component in the opponent’s position is indicated on the right. In each case, the ‘normal’ value would be 100%, but notice how the ‘Aggressive’ style attaches great significance to the opposing king’s safety factor – meaning that the computer will be especially eager to attack the king. On the other hand, the low score on the left of the same line means the computer will be prepared to take certain risks with its own king’s defence.
In the ‘Selectivity’ line, ‘Auto’ means that this factor will be adjusted automatically as the game progresses. The value is likely to be 20 in the early stages but will decline towards 1 as the endgame approaches.
When you have finished the inspection, a press on RED returns you to the Options list.
Defining a ‘User’ style
Example: You want the ‘User1’ style to give the bishop a slightly higher value than usual in relation to the other pieces. And you want ‘User1’ to take special care to keep its queen on the board.
21
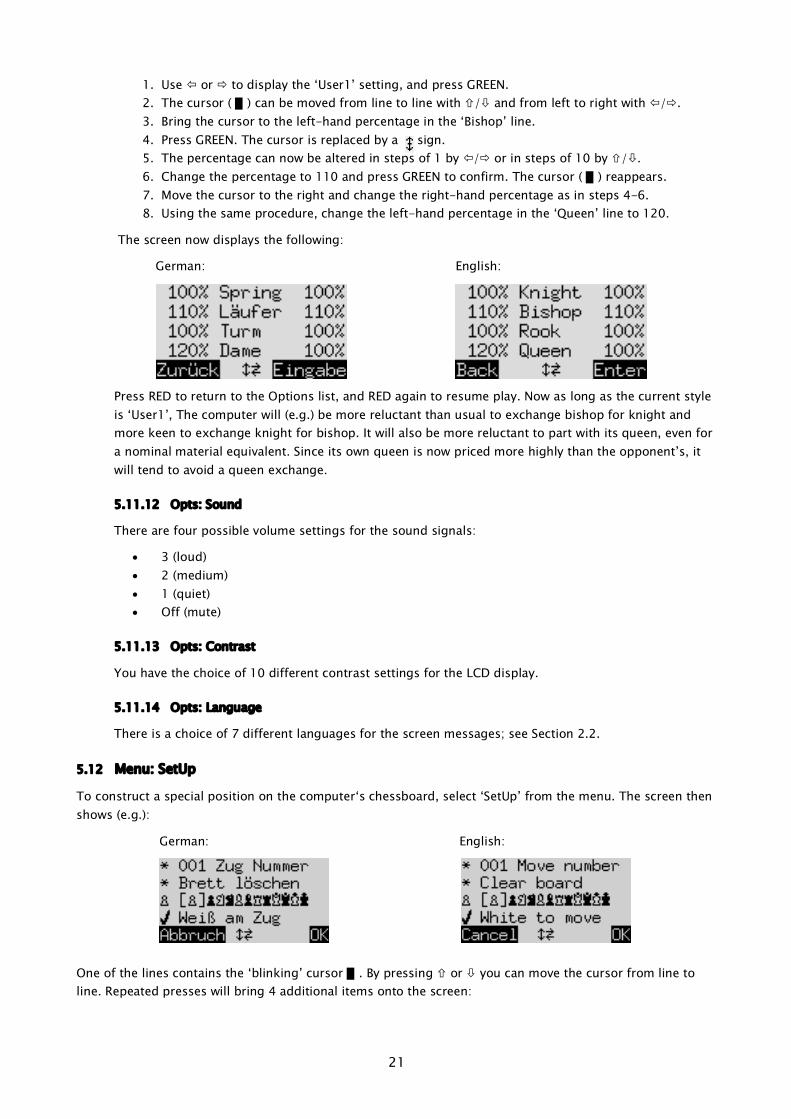
1. Use ï or ð to display the ‘User1’ setting, and press GREEN. 2. The cursor ( ▋) can be moved from line to line with ñ/ò and from left to right with ï/ð. 3. Bring the cursor to the left-hand percentage in the ‘Bishop’ line. 4. Press GREEN. The cursor is replaced by a sign. 5. The percentage can now be altered in steps of 1 by ï/ð or in steps of 10 by ñ/ò. 6. Change the percentage to 110 and press GREEN to confirm. The cursor ( ▋) reappears. 7. Move the cursor to the right and change the right-hand percentage as in steps 4-6. 8. Using the same procedure, change the left-hand percentage in the ‘Queen’ line to 120.
The screen now displays the following:
German: English:
Press RED to return to the Options list, and RED again to resume play. Now as long as the current style is ‘User1’, The computer will (e.g.) be more reluctant than usual to exchange bishop for knight and more keen to exchange knight for bishop. It will also be more reluctant to part with its queen, even for a nominal material equivalent. Since its own queen is now priced more highly than the opponent’s, it will tend to avoid a queen exchange.
5.11.12 Opts: Sound
There are four possible volume settings for the sound signals:
• 3 (loud) • 2 (medium) • 1 (quiet) • Off (mute)
5.11.13 Opts: Contrast
You have the choice of 10 different contrast settings for the LCD display.
5.11.14 Opts: Language
There is a choice of 7 different languages for the screen messages; see Section 2.2.
5.12 Menu: SetUp
To construct a special position on the computer‘s chessboard, select ‘SetUp’ from the menu. The screen then shows (e.g.):
German: English:
One of the lines contains the ‘blinking’ cursor ▋. By pressing ñ or ò you can move the cursor from line to line. Repeated presses will bring 4 additional items onto the screen:
22
German: English:
You can now do any of the following:
To clear the entire chessboard: bring the cursor to the ‘Clear Board’ line, and press GREEN.
To insert pieces or remove them individually:
• Bring the cursor to the line containing chess piece symbols: One symbol in the row is enclosed in brackets and also displayed on the left. This is the current piece for insertion or removal. The location of every piece of this type and colour is indicated by the red light at the bottom left of the square.
• To insert a piece of the current type: press the desired square. • To switch to a different type/colour of piece: use ï / ð to change the position of the brackets. • To clear an individual square: move the brackets to enclose the piece type/colour by which this
square is currently occupied; then press the square.
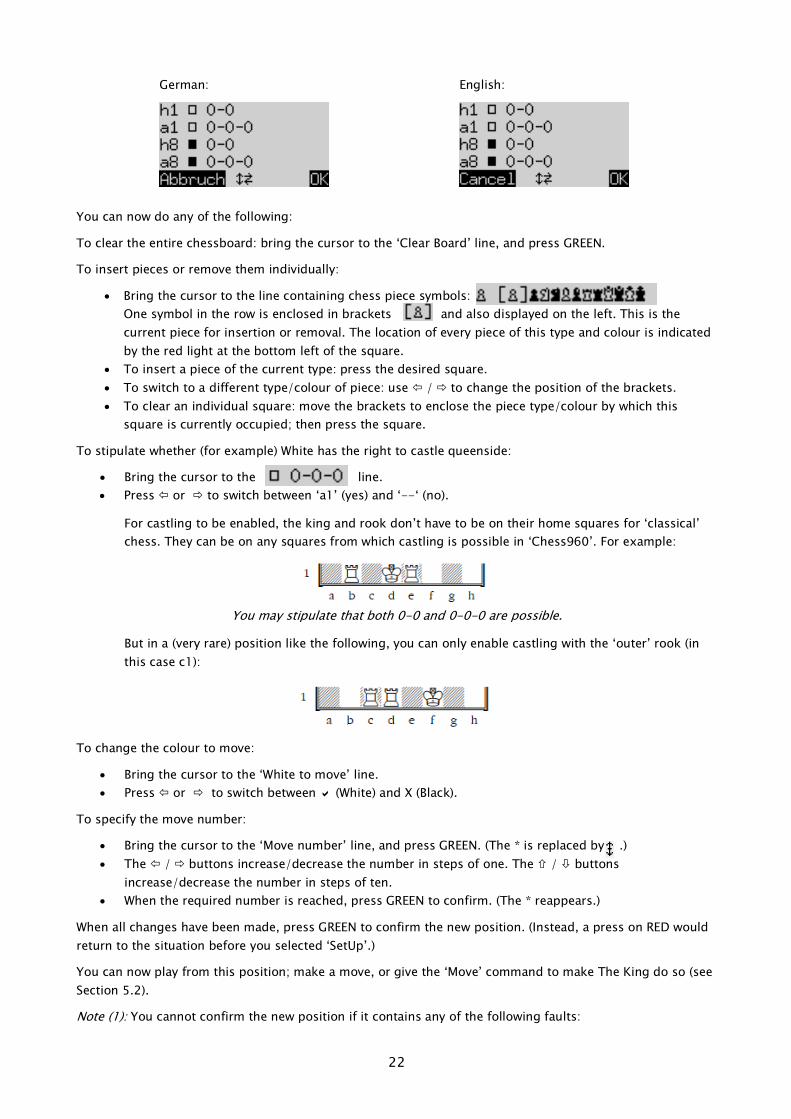
To stipulate whether (for example) White has the right to castle queenside:
• Bring the cursor to the line. • Press ï or ð to switch between ‘a1’ (yes) and ‘--‘ (no).
For castling to be enabled, the king and rook don’t have to be on their home squares for ‘classical’ chess. They can be on any squares from which castling is possible in ‘Chess960’. For example:
You may stipulate that both 0-0 and 0-0-0 are possible.
But in a (very rare) position like the following, you can only enable castling with the ‘outer’ rook (in this case c1):
To change the colour to move:
• Bring the cursor to the ‘White to move’ line. • Press ï or ð to switch between a (White) and X (Black).
To specify the move number:
• Bring the cursor to the ‘Move number’ line, and press GREEN. (The * is replaced by .) • The ï / ð buttons increase/decrease the number in steps of one. The ñ / ò buttons
increase/decrease the number in steps of ten. • When the required number is reached, press GREEN to confirm. (The * reappears.)
When all changes have been made, press GREEN to confirm the new position. (Instead, a press on RED would return to the situation before you selected ‘SetUp’.)
You can now play from this position; make a move, or give the ‘Move’ command to make The King do so (see Section 5.2).
Note (1): You cannot confirm the new position if it contains any of the following faults:
23
• A king is missing. This is indicated in the bottom line by
• A pawn is on the 1st or 8th rank – indicated by (e.g.)
• There are too many pieces of the same type/colour – indicated by (e.g.)
• The side to move is giving check – indicated by or
Note (2): The first move from the position you have constructed cannot be a capture en passant. To create a position where such a move is possible, set up the immediately preceding position, then carry out the move that allows the capture.
5.13 Menu: Verfy (Verify)
The ‘Verfy’ function displays half the chessboard in diagrammatic form, with the pieces in the correct current positions. To switch between the two halves of the board, press ñ or ò.
This function can help you adjust the pieces on the chessboard in case of confusion. To return to the ‘info’ screen, press RED.
6 USB mode – Communicating with a PC
6.1 Connecting to the PC
If you wish to use the functions described below, please register with MILLENNIUM 2000 (see http://computerchess.com/) so that we can inform you of changes and/or software upgrades relating to your computer.
To connect the computer unit to a PC or laptop, you will need an A to B USB cable (not included in the delivery). This is the type that is used (e.g.) for printers. Plug the cable into the centre socket at the rear of the computer unit and into a suitable port on your PC/laptop.
You can then: • Install an updated chess program in your chess computer. • Install a new openings book (see Section 5.11.5). • Import and export games in ‘PGN’ (Portable Game Notation) format.
6.2 Saving and loading games
These operations are performed with the ‘PGN Tool’ application that can be obtained from the Millennium website: http://www.computerchess.com/. Download it to your PC or laptop, and also download and run its Installer program. Then:
• Open the PGN Tool. • Press the button on the chess computer unit, to display ‘USB Mode’.
A game can now be saved or loaded.
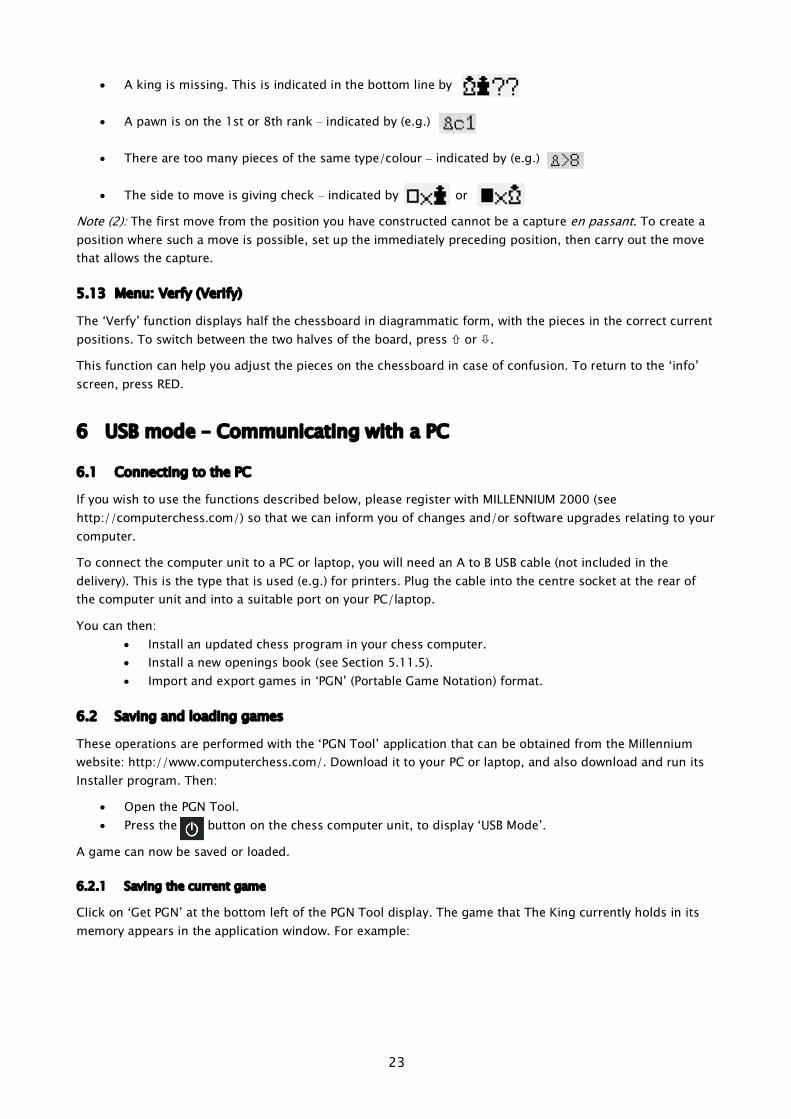
6.2.1 Saving the current game
Click on ‘Get PGN’ at the bottom left of the PGN Tool display. The game that The King currently holds in its memory appears in the application window. For example:
24
You can now copy and paste the game into a document or text file.
Note the ‘Event’ header. This or another suitable header must precede the game score if the game is to be incorporated in a composite PGN file.
6.2.2 Loading a game
You can simply copy a game into the PGN Tool window, then click on ‘Send PGN’. This loads the game into The King’s memory, replacing the data of any other game. The ‘Game score’ screen (see Section 4.2) will display the final moves of the game you have downloaded. You can step back and forward through the moves as described in Section 3.5.
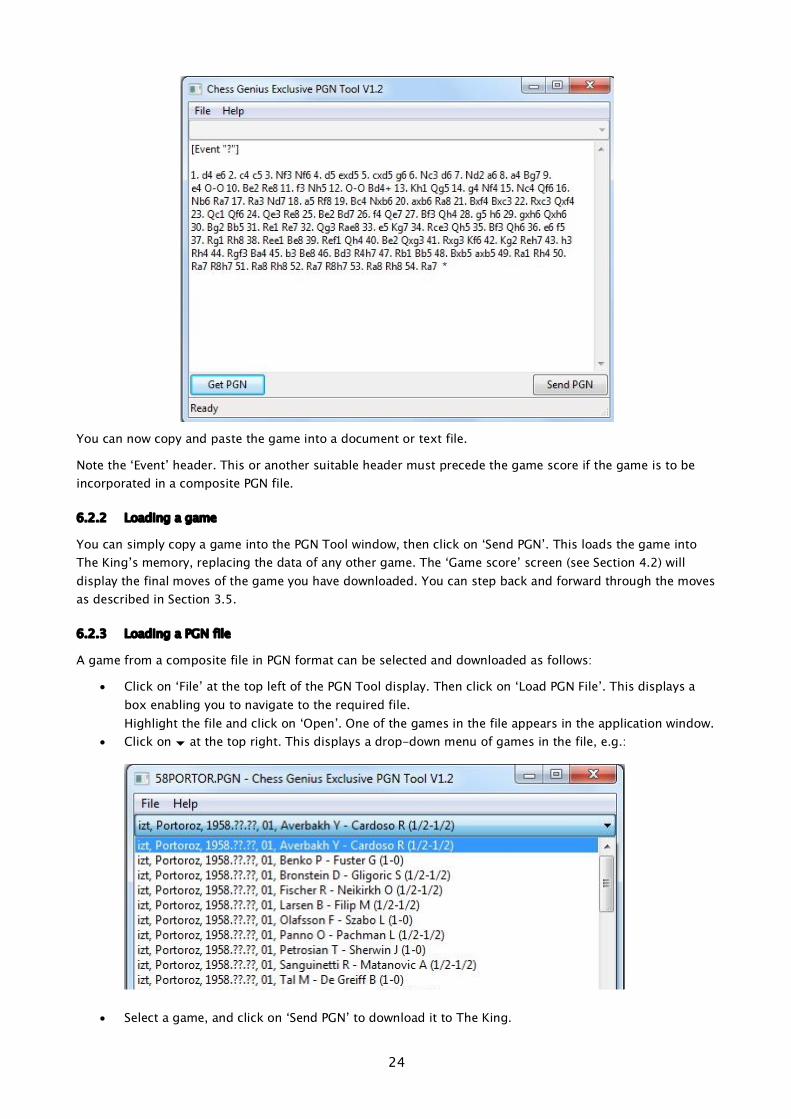
6.2.3 Loading a PGN file
A game from a composite file in PGN format can be selected and downloaded as follows:
• Click on ‘File’ at the top left of the PGN Tool display. Then click on ‘Load PGN File’. This displays a box enabling you to navigate to the required file. Highlight the file and click on ‘Open’. One of the games in the file appears in the application window.
• Click on � at the top right. This displays a drop-down menu of games in the file, e.g.:
• Select a game, and click on ‘Send PGN’ to download it to The King.

25
6.2.4 Creating a PGN file
A file where multiple games can be stored and handled as in Section 6.2.3 can be created as follows:
• Open a blank document or text file. • Save the file in Plain Text (*.txt) format. • Change the ‘txt’ suffix to ‘pgn’.
Each game copied into the PGN file must be preceded by one or more ‘headers’. A header is enclosed in square brackets and consists of a label followed by a string in double quotation marks. The PGN tool requires each game to have at least one header with any of these three labels:
• Event • White • Black
A template for the ‘Event’ header is automatically supplied by the PGN Tool when a game is acquired from The King. The string in quotation marks can be edited in the PGN Tool window, e.g.:
[Event "25-minute Rapid game"]
Then when the game is stored in the PGN file, the drop-down menu will display the string as an identification for this game:
The fields denoted here by ‘???’ and ‘()’ are available to be filled by data from headers labelled ‘White’, ‘Black’ and ‘Result’. Other standard headers that can supply data for the drop-down menu are ‘Site’, ‘Date’ and ‘Round’. For example, you could equip a game with this set of headers:
[Event "Rapid chess match"] [Site "Hastings, England"] [Date "2018.07.17"] [Round "2"] [White "User"] [Black "The King"] [Result "1/2-1/2"]
Then the menu would identify the game like this:
Note: To ensure correct formating (with quotation marks in the requisite style), the game data is more conveniently edited in the PGN Tool window than in the PGN file itself.
6.2.5 Saving a game from a ‘set up’ position
If a game acquired from The King begins from a ‘set up’ position (see Section 5.12), the PGN Tool records that position in ‘Forsyth-Edwards notation’. For example:
[Event "?"]
[SetUp "1"]
[FEN "1k1K4/1p5P/1P6/8/8/8/p7/8 w - - 0 1"]
1. h8=Q a1=Q 2. Qg8 Qa2 3. Qe8 Qa4 4. Qe5+ Ka8 5. Qh8 Qf4 6. Ke7+ Qb8 7. Qa1+ Qa7 8. Qxa7+ *
(If the PGN file is only to be used in conjunction with the PGN Tool, it is unnecessary to preserve the header labelled ‘SetUp’. This header may be required if the file is to be read by other applications.)

26
6.3 Further downloads
With the tool ‘TKP_Udate.exe’, obtainable from the Millennium website (http://www.computerchess.com/), it is possible to load updated versions of the chess program into the chess computer unit. New openings books may also be loaded (see 5.11.5). To install the Update Tool on your PC or laptop, follow the on-screen instructions.
6.3.1 Installing a new version of the chess program
1. With the PC/laptop connected to the Internet, open the Update Tool. 2. Press the button on the computer unit, to display ‘USB Mode’. 3. Click on ‘Connect’ in the Update Tool window. 4. Click on � in the ‘Available Firmware’ line of the Update Tool. From the drop-down menu,
select the desired version of the chess program. 5. Click on ‘Send-> Clock’. While the program is being installed, the message ‘Programming’
is shown in the Update Tool display and on The King’s LCD screen. The process is likely to take several minutes.
6.3.2 Installing a new openings book
Open the Update Tool, press the On/Off button and click on ‘Connect’ – just as in Section 6.3.1. Then click on � in the ‘Available books’ line, select the desired book from the drop-down menu, and click on ‘Send-> Clock’.
7 FAQ and troubleshooting
7.1 My board does not work as intended
A lot of work goes into The King Performance, and we do our utmost to get the best product to you. Sometimes the board does not work as intended – for example, when it gets damaged during transport. This should not happen. For help and/or a replacement, please contact the shop where you purchased the board.
7.2 I need spare chess pieces
We included a spare queen for pawn promotion. If you want other additional pieces, or a spare set, you can contact the shop where you purchased the board. Most shops sell spare sets.
7.3 Can I save games?
You can save a game as a PGN file on your computer. For this purpose, your computer needs to have the PGN Tool installed; see Section 6.2.1.
7.4 Can I load games onto the King?
You can load an existing PGN file to The King by using the PGN Tool; see 6.2.2.
7.5 Is there a firmware update?
We release firmware updates. These updates remove bugs and add additional features. We suggest you use the latest firmware for best playing experience.
You can either check if there is a newer firmware version available by using the Update Tool (see Section 6.3.1), or you can subscribe to our newsletter on our website: http://www.computerchess.com/.
If you have subscribed, you will receive an email once there is an update available.
27
7.6 Can I go back to older firmware?
Some users want to have the option of playing with an older firmware version. If we release an update that changes the engine, we put both versions (the old and the new one) on our server. You can update The King to the new one – and if you want the older one back, you just need to use the TKP_Udate Tool again, select the older firmware and give the command ‘Send-> Clock’. There can only be one firmware version installed on your chess computer unit – not two different ones at the same time.
7.7 The Update or PGN Tool does not recognize the chess computer unit
7.7.1 Driver update
Depending on your computer, you might need to update a driver on your computer. Check for driver updates online.
7.7.2 Cable and connection
Check that you have the right cable. It must be connected to your computer, as well as to The King. See Section 6.1.
7.7.3 USB mode
If The King is not in ‘USB Mode’, the Update or PGN Tool will not recognize it. Press the ON/OFF button on the chess computer unit to display ‘USB Mode’ – see Sections 2.5 and 6 for more details.
7.8 The TKP_Udate Tool cannot acquire the latest firmware
To download the firmware, your computer needs to access the Internet. Check if you have Internet access. Check also if you might have blocked the Update Tool – for example, access might be denied by your firewall.
7.9 How long does the update take? When is the update complete?
Depending on your Internet speed, it might take several minutes for the Update Tool to download the firmware from our server. Please just wait patiently until the download is complete. Once the Update Tool displays ‘Programming Complete’ in the bottom line, you can click on ‘Restart’ at the top right. If you do not click on ‘Restart’ for several minutes, The King will restart itself. Once restart is complete, the clock shows the usual start screen (see Section 2.2).
In total, this may take up to 20 minutes. Make yourself a cup of tea or coffee. It does not help if you press any buttons or click repeatedly on the Tool – really. We can tell you from experience.
7.10 Feedback and questions
We are always happy to receive your feedback, and we are curious to receive your questions. Email us at [email protected]
8 Disposal Dispose of packing materials in an environmentally friendly manner by using the relevant collection containers provided for the purpose.
Within the European Union, the device must be disposed of properly at the end of its service life, according to EC Directive 2012/19/EU. Suitable parts of the device will then be recycled, reducing environmental pollution. For more information, please contact your local waste disposal company or your municipal administration.
28
9 Warranty, servicing and contact with manufacturers For Germany/Austria/Switzerland: Please contact our office in Germany, either by telephone +49 (0) 2773 7441 222 or at [email protected].
If you purchased the product in a country other than Germany, Austria or Switzerland, and need service, please contact the shop where you purchased the product.
For any questions or feedback, you can also email us at [email protected].
10 Technical specifications PRODUCT: Millennium King Performance
ITEM NO: M830
HARDWARE: ARM Cortex M7
CPU configurable from 10–300 MHz
SOFTWARE: Chess Program © Johan de Koning (NL)
OPENING BOOKS: ‘Master’ book by M.Uniacke © Applied Computer Concepts Ltd (UK) – approx. 300,000 positions
‘Aegon 1994’ book © C. de Gorter (NL) – approx. 61,000 positions
NOTE: This product is not protected against the effects of electrostatic charges, strong electromagnetic radiation or other electrical interference, as malfunctioning as a result of these conditions is not critical.
Modification of specifications (especially in respect of technical advances) reserved and errors excepted.
This user manual was carefully compiled, and its contents carefully checked for accuracy. If, despite all expectation, these instructions nevertheless contain errors, this shall not constitute grounds for any claims. This user manual, including excerpts thereof, may not be reproduced without prior written permission.
Product development by:
MILLENNIUM 2000 GmbH Heisenbergbogen 1, 85609 Aschheim, Germany www.computerchess.com
Copyright © 2019, MILLENNIUM 2000 GmbH, Aschheim, Germany.