Embed Size (px)
Citation preview
For your music collection • Para su colección de música • Pour votre collection musicale
©2009 Bose Corporation, The Mountain,Framingham, MA 01701-9168 USAAM314482 Rev.00
LAUNCHING YOUR UMUSIC®+ EXPERIENCE
A simple step-by-step approach
You can use the complementary uMusic®+ MP3 CD, containing 25 MP3s, for this quick
and easy start to storing and enjoying musical tracks.
Follow Launch Steps 1 - 4 and in less than an hour you’ll have a good feel for how to :
Just lift this page...and begin!
•store music
•play the stored tracks
•locate tracks by category
•create your unique playlist
•enjoy the uMusic+ system experience
uMusic tutorial guide STEPS.fm Page 1 Friday, November 21, 2008 11:02 AM
Fold
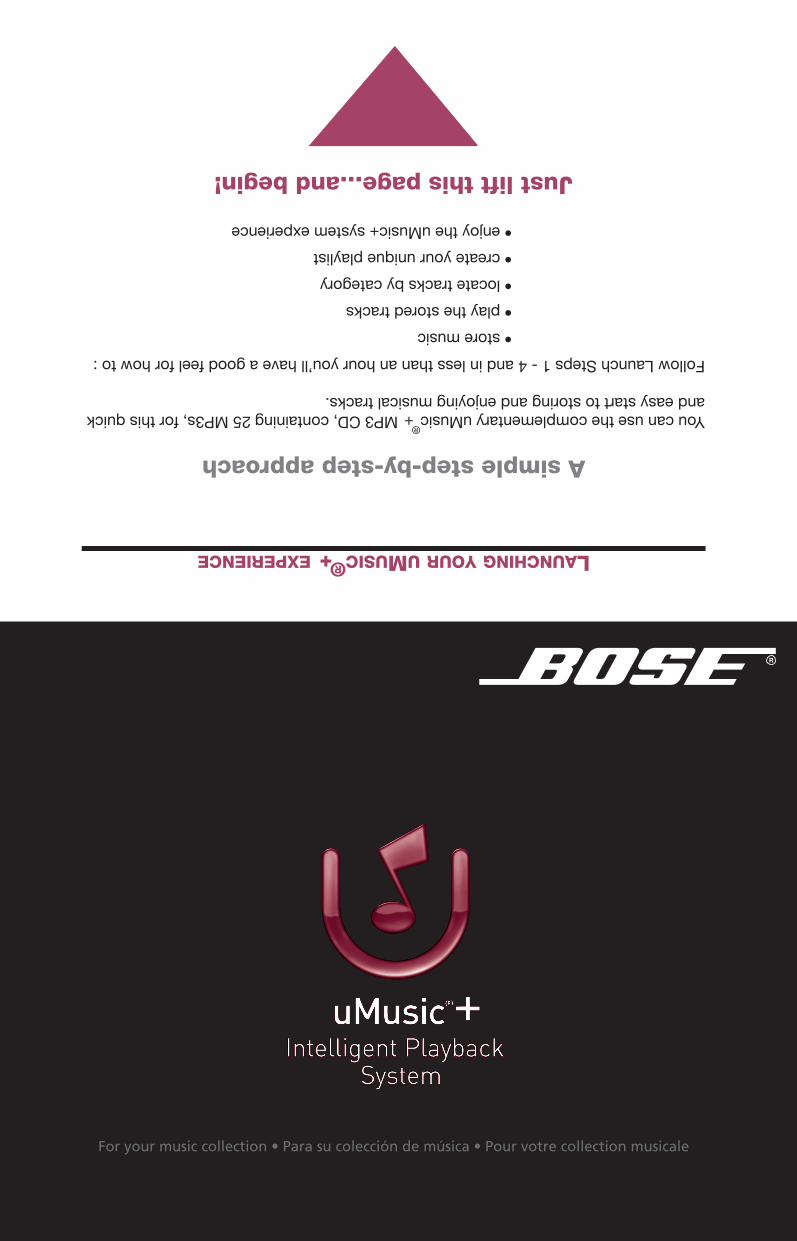
Step 1: Store the discUse the supplied disc to store your complementary MP3 tracks....................... page 3
When this is done you’ll have 25 tracks to try out.
Step 2: Create a playlistSelect the Classical genre and add all of those tracks to Playlist 1. ................ page 11
When this is done you can play this list and check the contents.
Step 3: Name your playlistUse the Edit Screen to give your playlist the title “Evening”. ........................... page 13
When this is done you can distinguish this list from the other 8.
Step 4: Edit your playlistDelete the Light Cavalry Overture from your Evening playlist........................... page 14
When this is doneyou’ll have your list in custom shape.
uMusic tutorial guide STEPS.fm Page 2 Friday, November 21, 2008 11:02 AM
29
AUTRES POSSIBILITÉS
TAB 5TAB 4 TAB 6 TAB 8TAB 7English FrançaisTAB 2
Plus que de simples accessoires.
Bose propose de nombreux accessoires destinés à vous donner plus de choix pour la configuration et l’utilisation de votre système.
Pour les systèmes LIFESTYLE® uniquementCes produits sophistiqués font appel à des liaisons hertziennes pour vous apporter le confort du sans fil et des commandes à distance.
Pour les systèmes LIFESTYLE® et 3•2•1® Ces accessoires pour enceintes, conçus pour s’intégrer dans tous les décors, sont compatibles avec les enceintes de tous les systèmes Bose.
iTunes est une marque déposée d’Apple Inc., aux États-Unis et dans d’autres pays.
Réseau audio domestique sans fil Bose® Link AL8
music center Personal® II
Enceintes sans fil SL2
Pieds de table
Pieds de sol
Support mural
NuMusic booklet book_FRA.book Page 29 Friday, December 5, 2008 12:08 AMFold
TAB 5TAB 4 TAB 6 TAB 8TAB 7English TAB 3TAB 2
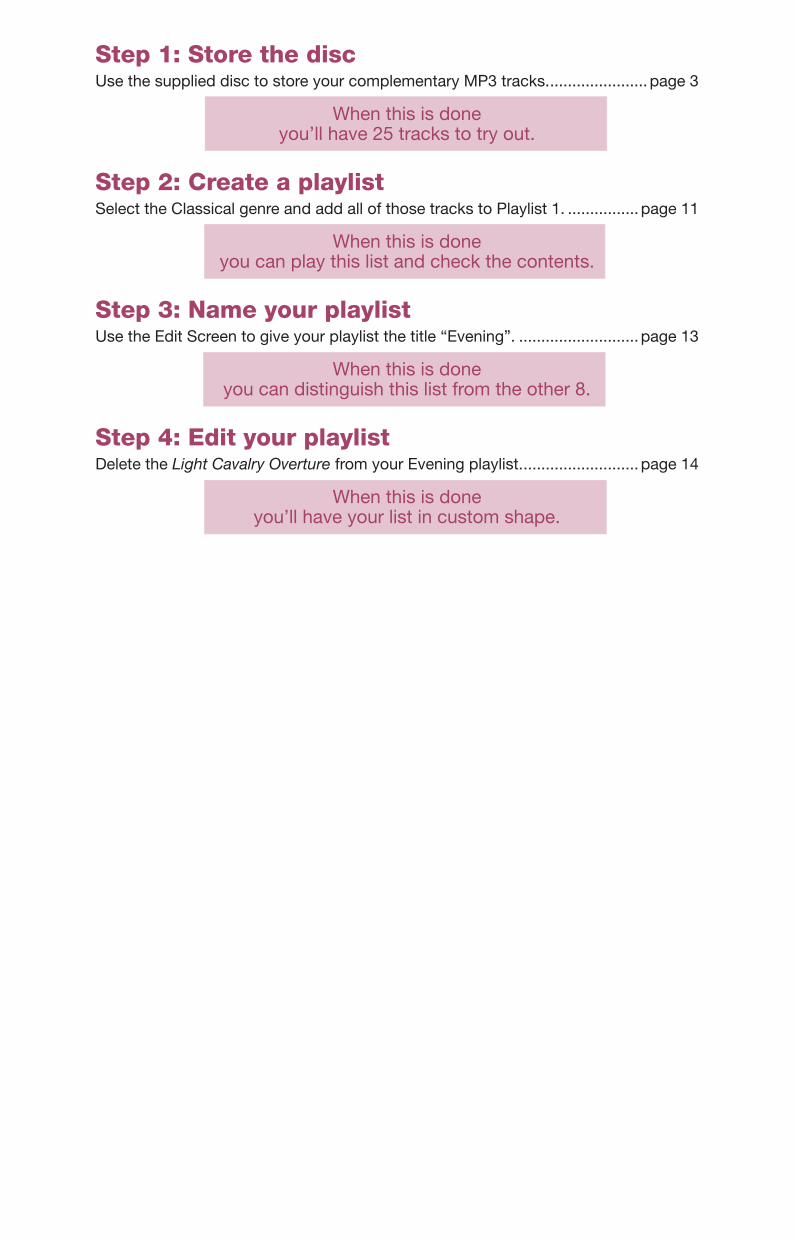
CONTENTS
INTRODUCTION 2Listening made easy . . . . . . . . . . . . . . . . . . . . . . . 2
Specific uMusic+ remote buttons . . . . . . . . . . . 2
GETTING STARTED 3Storing a CD . . . . . . . . . . . . . . . . . . . . . . . . . . . . . 3
Discs you can store . . . . . . . . . . . . . . . . . . . . . . 3Reserving time for storing . . . . . . . . . . . . . . . . . 4Keeping music data up to date . . . . . . . . . . . . . 4
Playing stored music . . . . . . . . . . . . . . . . . . . . . . 5To control the music . . . . . . . . . . . . . . . . . . . . . 5To see more about what’s playing . . . . . . . . . . 6
Choosing play modes . . . . . . . . . . . . . . . . . . . . . . 7Using repeat and shuffle . . . . . . . . . . . . . . . . . . 7
ADDING TO YOUR CONTROL 8Choosing music . . . . . . . . . . . . . . . . . . . . . . . . . . 8
Locating what you want . . . . . . . . . . . . . . . . . . 8Choices in the Music Library . . . . . . . . . . . . . . . 9Changing music titles and genres . . . . . . . . . . . 9Linking or unlinking tracks . . . . . . . . . . . . . . . . . 10
Setting up a playlist . . . . . . . . . . . . . . . . . . . . . . . 11Choosing music for a playlist . . . . . . . . . . . . . . 11Adding the music . . . . . . . . . . . . . . . . . . . . . . . 11Listening to your list . . . . . . . . . . . . . . . . . . . . . 12Naming your list . . . . . . . . . . . . . . . . . . . . . . . . . 13
Adding and editing text . . . . . . . . . . . . . . . . . . . . 14To enter the Edit screen . . . . . . . . . . . . . . . . . . 15Adding letters to the text line . . . . . . . . . . . . . . 15One example of entering a name . . . . . . . . . . . 16Removing tracks from a playlist . . . . . . . . . . . . 17
USING INTELLIGENT PLAYBACK 19Playing your music in a whole new way . . . . . . . 19
Getting the system to listen . . . . . . . . . . . . . . . 19Selecting a uStation preset . . . . . . . . . . . . . . . 19Putting a uStation to work . . . . . . . . . . . . . . . . 20Rating music in a uStation . . . . . . . . . . . . . . . . 20Naming a uStation. . . . . . . . . . . . . . . . . . . . . . . 22
Deleting tracks, edits, and ratings . . . . . . . . . . . . 23Undoing your album edits . . . . . . . . . . . . . . . . 23Clearing your uStation log . . . . . . . . . . . . . . . . 24Deleting stored tracks . . . . . . . . . . . . . . . . . . . 25
REFERENCE 26Details on discs to store . . . . . . . . . . . . . . . . . . . 26
More about compatible discs . . . . . . . . . . . . . . 26Assistance and product details . . . . . . . . . . . . 26
FURTHER OPPORTUNITIES 27Extending your LIFESTYLE® system enjoymentthroughout your home . . . . . . . . . . . . . . . . . . . . . 27
Mix and match to suit your space . . . . . . . . . . 28
Accessories that add convenience . . . . . . . . . . . 29For both LIFESTYLE® and 3•2•1® systems . . . 29
NuMusic booklet book.book Page 1 Monday, November 24, 2008 10:52 AM
2
EnglishTAB 6TAB 8 TAB 7 TAB 3TAB 5 TAB 2TAB 4
INTRODUCTION
Listening made easy
The Bose® uMusic®+ intelligent playback system is an advanced feature that makes it easy to store and enjoy your music collection.
To experience how it does this, you first need to store some music. Then, you can:
• Enjoy a wide selection of your collected music without sorting through a clutter of discs.
• Hear continuous play of your stored music by pressing the Stored button.
• Hear music that is similar to the track now playing by pressing the Encore button.
• Hear the entire album that includes the track now playing by pressing the Whole CD button.
• View your collection organized by genre, artist, album, or track by pressing the Library button.
• Set up playlists (up to 9) with specific music for specific occasions.
• Let the system pick the music you like as you listen to your personal uStationTM selections.
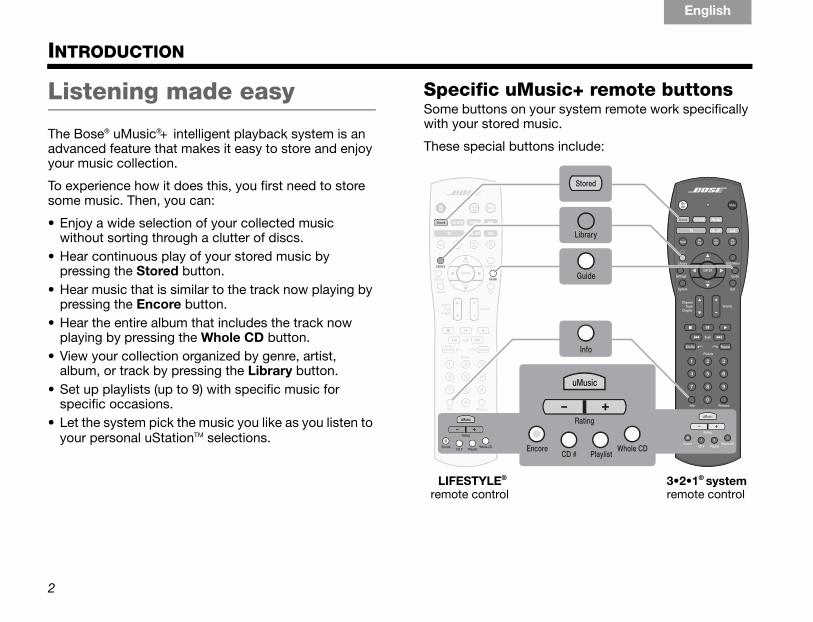
Specific uMusic+ remote buttons Some buttons on your system remote work specifically with your stored music.
These special buttons include:
LIFESTYLE® 3•2•1® system remote control remote control
NuMusic booklet book.book Page 2 Monday, November 24, 2008 10:52 AM

3
TAB 5TAB 4 TAB 6 TAB 8TAB 7English TAB 3TAB 2
Storing a CD
The first step in using the uMusic®+ system is to store some of your collected music. The system does not need to be on for this.
1. Open the disc tray on the media center.
2. Put the disc in and close the tray.
3. Press the Store button on the media center.
ACCESSING GRACENOTE MEDIA DATABASE appears on the display for an Audio CD.
When STORING appears on the lower right of the display, you can check the percentage completed.
4. When you see AUDIO CD (or MP3 DISC) STORED, remove the disc.
Note: While storing an MP3 disc, you may see additional messages (such as SKIPPED when a track on the disc is corrupt or incorrectly formatted) or DUPLICATE (if the same track is already in the system).
Before copying audio material onto your computer or creating an MP3 CD, you should:•Make sure you have the legal right to copy the particular audio content;•Avoid sources of audio material that may be questionable, such as certainfile sharing facilities;
Discs you can storeThere are two types of discs you can store.
Audio CDsCommercially produced CDs are identified by music databases in the system. This data enables the uMusic+ system software to recognize, categorize, and make connections between songs.
If the system does not recognize an album when you start to store it, DISC NOT RECOGNIZED appears on the media center display.
You may prefer to remove the disc to cancel storing. Then, you can use music management software (like iTunes), on a computer connected to the Internet, to provide the album identity.
Or, you can choose to store this unrecognized disc, then use the system Edit screen to add the identity.
MP3s on CD or DVDMP3 tracks that are created on a computer usually include information (called ID3 tags), such as the artist and album for each track.
MP3 tracks include this information when they are burned onto a CD, DVD, or DVD-R (not a DVD+R) and when the tracks are stored in the uMusic+ system.
For details on MP3 preparation, refer to “More about compatible discs” on page 26.
•Not use the copies or CDs as a means to share audio content with others, but confine such copying, where permissible, to your personal use.
C D 4 7 % S T O R E DSTORING
GETTING STARTED
NuMusic booklet book.book Page 3 Monday, November 24, 2008 10:52 AM
4
GETTING STARTED
EnglishTAB 6TAB 8 TAB 7 TAB 3TAB 5 TAB 2TAB 4
Reserving time for storing• For an Audio CD, allow about 10 minutes. For MP3s,
estimate about 10 minutes for a disc of 25 tracks.• When BUSY PROCESSING CDS appears on the
media center display, you need to wait before you store more music.Allow approximately one hour before you resume storing.
• For 10 commercially produced CDs, it takes about 6 hours of processing time with the system turned off. For MP3 tracks, this processing is not necessary.
• Using the system or having it turned on during processing lengthens the time needed.
• Processing stops when your media center is unplugged, turned off at an outlet, or the power fails. Processing resumes when power is available again.
• If storing takes much longer than expected, the disc may be marred or smudged.You can remove the disc and wipe it off as instructed in your Bose® owner’s guide. Then reinsert the disc and resume storing.A damaged or poor-quality disc can take 15 minutes or more to store.
Keeping music data up to dateWhenever you store a CD, the system refers to an internal music catalog for data about the CD. This data includes 30 different musical characteristics, such as style, tone, related artists, key influences, and musicians.
This music catalog of data helps the uMusic®+ intelligent playback system work for you. So, whenever you buy a newly released CD, you want the music catalog to have the latest information about it.
Bose periodically sends a free update disc to registered owners. You can use this disc to refresh the internal music catalog data.
To receive your disc, it is important to mail your completed product registration card to Bose.
If an Internet address is provided on your registration card, you can use it to register online.
Note: If UNRECOGNIZED DISC appears on the media centerdisplay, the identity of this album is not in the database on your system. After using an update disc, the music identity (for a new album in particular) may appear on the display.
NuMusic booklet book.book Page 4 Monday, November 24, 2008 10:52 AM
5
GETTING STARTED
TAB 5TAB 4 TAB 6 TAB 8TAB 7English TAB 3TAB 2
Playing stored music
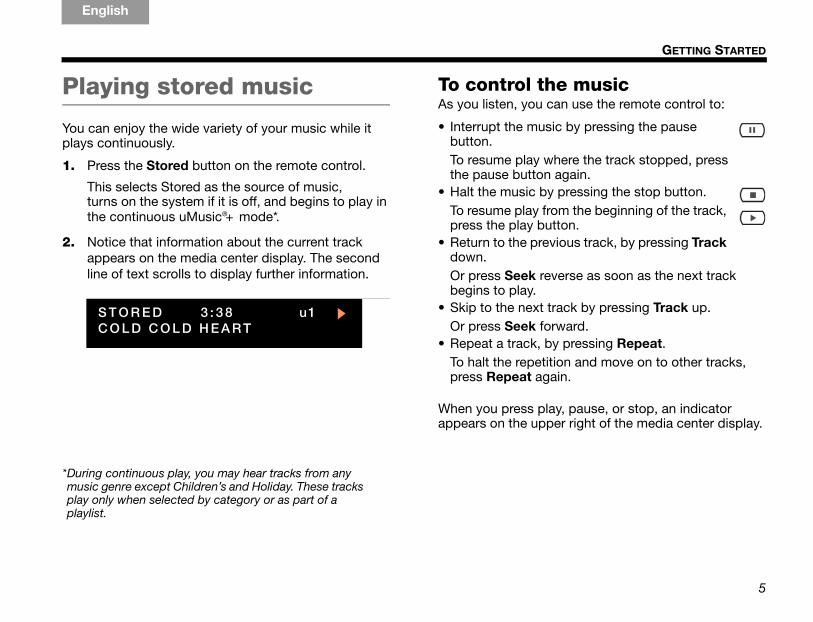
You can enjoy the wide variety of your music while it plays continuously.
1. Press the Stored button on the remote control.
This selects Stored as the source of music, turns on the system if it is off, and begins to play in the continuous uMusic®+ mode*.
2. Notice that information about the current track appears on the media center display. The second line of text scrolls to display further information.
*During continuous play, you may hear tracks from any music genre except Children’s and Holiday. These tracks play only when selected by category or as part of a playlist.
To control the musicAs you listen, you can use the remote control to:
• Interrupt the music by pressing the pause button.To resume play where the track stopped, press the pause button again.
• Halt the music by pressing the stop button.To resume play from the beginning of the track, press the play button.
• Return to the previous track, by pressing Track down.Or press Seek reverse as soon as the next track begins to play.
• Skip to the next track by pressing Track up. Or press Seek forward.
• Repeat a track, by pressing Repeat. To halt the repetition and move on to other tracks, press Repeat again.
When you press play, pause, or stop, an indicator appears on the upper right of the media center display.
S T O R E D 3 : 3 8 u1C O L D C O L D H E A R T
NuMusic booklet book.book Page 5 Monday, November 24, 2008 10:52 AM
6
GETTING STARTED
EnglishTAB 6TAB 8 TAB 7 TAB 3TAB 5 TAB 2TAB 4
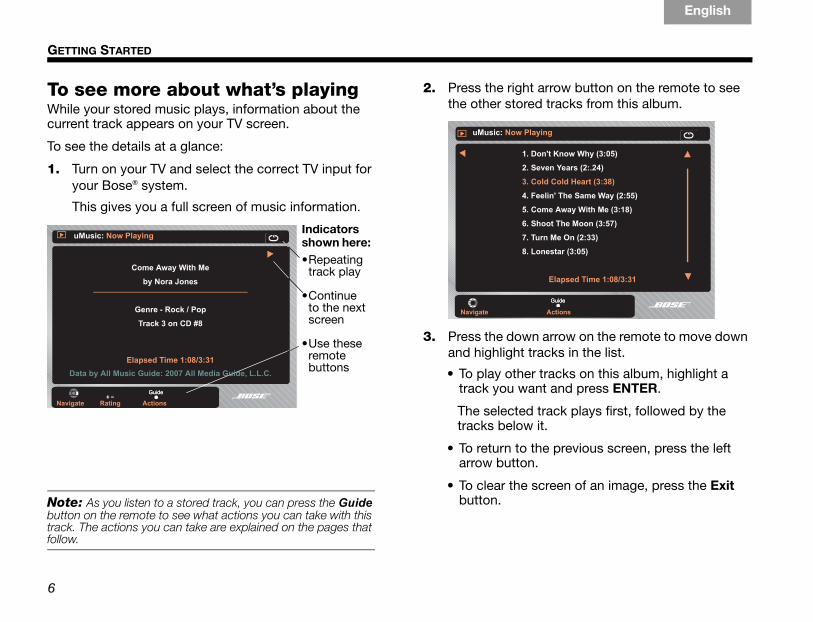
To see more about what’s playingWhile your stored music plays, information about the current track appears on your TV screen.
To see the details at a glance:
1. Turn on your TV and select the correct TV input for your Bose® system.
This gives you a full screen of music information.
Note: As you listen to a stored track, you can press the Guide button on the remote to see what actions you can take with this track. The actions you can take are explained on the pages that follow.
2. Press the right arrow button on the remote to see the other stored tracks from this album.
3. Press the down arrow on the remote to move down and highlight tracks in the list.
• To play other tracks on this album, highlight a track you want and press ENTER.
The selected track plays first, followed by the tracks below it.
• To return to the previous screen, press the left arrow button.
• To clear the screen of an image, press the Exit button.
uMusic: Now Playing
Navigate Rating Actions
Indicatorsshown here: •Repeating
track play
•Continueto the next screen
•Use theseremote buttons
Come Away With Me
by Nora Jones
Genre - Rock / Pop
Track 3 on CD #8
Elapsed Time 1:08/3:31Data by All Music Guide: 2007 All Media Guide, L.L.C.
uMusic: Now Playing
1. Don't Know Why (3:05)
2. Seven Years (2:.24)
3. Cold Cold Heart (3:38)
4. Feelin' The Same Way (2:55)
5. Come Away With Me (3:18)
6. Shoot The Moon (3:57)
7. Turn Me On (2:33)
8. Lonestar (3:05)
Elapsed Time 1:08/3:31
Navigate Actions
NuMusic booklet book.book Page 6 Monday, November 24, 2008 10:52 AM

7
GETTING STARTED
TAB 5TAB 4 TAB 6 TAB 8TAB 7English TAB 3TAB 2
Choosing play modes
While listening to your stored music, you can select a different mode of play.
You can:
• Locate your music by genre, album, artist, or track by pressing Library.
• Hear a playlist you have set up by pressing Playlist and a number button, 1-9, for the list you want.
• Hear more music like the track that is playing by pressing the Encore button.This tells the system to play similar stored music tracks.
• Play all the tracks on the album that includes the current track by pressing Whole CD.
• Select a disc for play by pressing CD # and the number buttons for this disc. The CD number applies to one album from an audio CD or to all tracks from an MP3 disc. This number appears on the media center display when any track from a disc plays.
• Return to continuous play by pressing uMusic.
Using repeat and shuffleYou can apply Repeat and Shuffle play modes when the CD #, Playlist, Whole CD, or selections from the Music Library are playing.
You can:
• Play tracks randomly by pressing Shuffle.To turn off Shuffle, press again.
• Repeat a track by pressing Repeat.To turn off Repeat, press three times.
• Repeat a selected genre, artist, album, CD, or playlist by pressing Repeat twice.To turn off Repeat, press once more.
• Hear the tracks in random order repeatedly by pressing Shuffle, then Repeat*.
When you press Shuffle or Repeat, the word appears on the media center display. On your TV, an icon indicates the style of play, as shown below.
*During continuous uMusic® or Encore play, repeat and shuffle modes do not apply.
Randomly playing
Repeating the track
Repeating selected tracks or a playlist
NuMusic booklet book.book Page 7 Monday, November 24, 2008 10:52 AM
8
EnglishTAB 6TAB 8 TAB 7 TAB 3TAB 5 TAB 2TAB 4
ADDING TO YOUR CONTROL
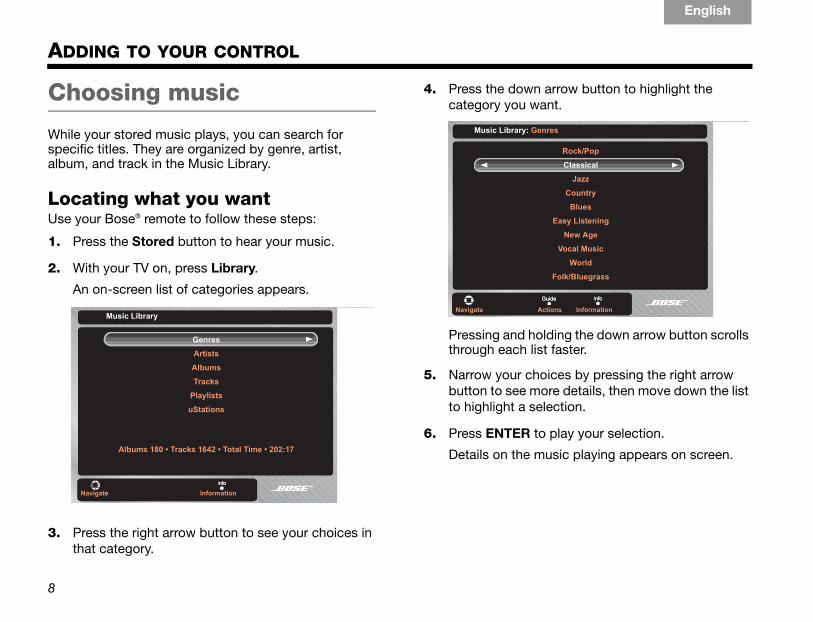
Choosing music
While your stored music plays, you can search for specific titles. They are organized by genre, artist, album, and track in the Music Library.
Locating what you wantUse your Bose® remote to follow these steps:
1. Press the Stored button to hear your music.
2. With your TV on, press Library.
An on-screen list of categories appears.
3. Press the right arrow button to see your choices in that category.
4. Press the down arrow button to highlight the category you want.
Pressing and holding the down arrow button scrolls through each list faster.
5. Narrow your choices by pressing the right arrow button to see more details, then move down the list to highlight a selection.
6. Press ENTER to play your selection.
Details on the music playing appears on screen.
Genres
Artists
Albums
Tracks
Playlists
uStations
Albums 180 • Tracks 1642 • Total Time • 202:17
Music Library
Navigate Information
Music Library: Genres
Navigate Actions Information
Rock/Pop
Classical
Jazz
Country
Blues
Easy Listening
New Age
Vocal Music
World
Folk/Bluegrass
NuMusic booklet book.book Page 8 Monday, November 24, 2008 10:52 AM
9
ADDING TO YOUR CONTROL
TAB 5TAB 4 TAB 6 TAB 8TAB 7English TAB 3TAB 2
Choices in the Music LibraryWhen you locate a specific genre, artist, album, or track, you have a number of options.
You can:
• Play all the tracks in a highlighted genre, album, or artist by pressing ENTER.This returns you to the screen of information about the music now playing.
• See the list of choices in the selected category, by pressing the right arrow button.
• Return to the previous screen by pressing the left arrow button.This is possible only when a left arrow appears in the highlighted selection bar.
• Dismiss the Music Library screen by pressing Exit.• Browse the Music Library while your selection plays,
by pressing Library to return to the main list of categories.
Changing music titles and genresSearching for specific music is easy when it is assigned to the right genre and named as you remember it.
If it is not, you can:
• Choose a different genre for an album• Edit an album name• Edit the name of the artist for a particular album• Edit a name as it appears in the list of artists• Edit the name of a track
To choose an album genre1. In the Music Library, highlight the album that you
want to change.
2. Press the Guide button to see the list of actions you can take.
3. Highlight Choose Genre and press the right arrow button.
4. Highlight the new genre for this album and press the ENTER button.
A request for confirmation appears on screen.
5. Press the ENTER button to confirm your choice.
This returns you to the previous screen.
NuMusic booklet book.book Page 9 Monday, November 24, 2008 10:52 AM
10
ADDING TO YOUR CONTROL
EnglishTAB 6TAB 8 TAB 7 TAB 3TAB 5 TAB 2TAB 4
To change the artist for an album
1. In the Music Library, highlight the album you want to change.
2. Press the Guide button to see the list of actions you can take.
3. Highlight Edit Artist and press the right arrow button.
4. Use the edit screen to enter the artist name or to change the spelling of the artist shown.
See “Adding and editing text” on page 14.
5. Highlight Save and press the ENTER button to complete your edit.
This returns you to the previous screen.
Note: If the same artist name is spelled differently for different albums, you will see both names listed in the Library Artistscategory. If there is only one spelling for the artist name, selecting that name from the Library Artist category will display each album associated with this artist.
To change a name in Artists, Albums, or Tracks
See “To enter the Edit screen” on page 15.
Linking or unlinking tracksYou can change how the tracks from a stored album play – one after another, or interspersed with the tracks from your other albums or discs.
For any classical or comedy/spoken word albums, the uMusic®+ system is set to play the tracks in order, as a linked unit. The system is also set to play the tracks in other genres as unlinked or individual selections.
To change the linking of tracks on an album
1. In the Music Library, highlight the album you want to change.
2. Press the Guide button to see the list of actions you can take.
3. Choose the linking option that appears for this album (Link All Tracks or Don’t Link Tracks) and press ENTER.
A confirmation notice appears on screen.
4. Press ENTER to accept confirmation.
This returns you to a previous screen.
NuMusic booklet book.book Page 10 Monday, November 24, 2008 10:52 AM
11
ADDING TO YOUR CONTROL
TAB 5TAB 4 TAB 6 TAB 8TAB 7English TAB 3TAB 2
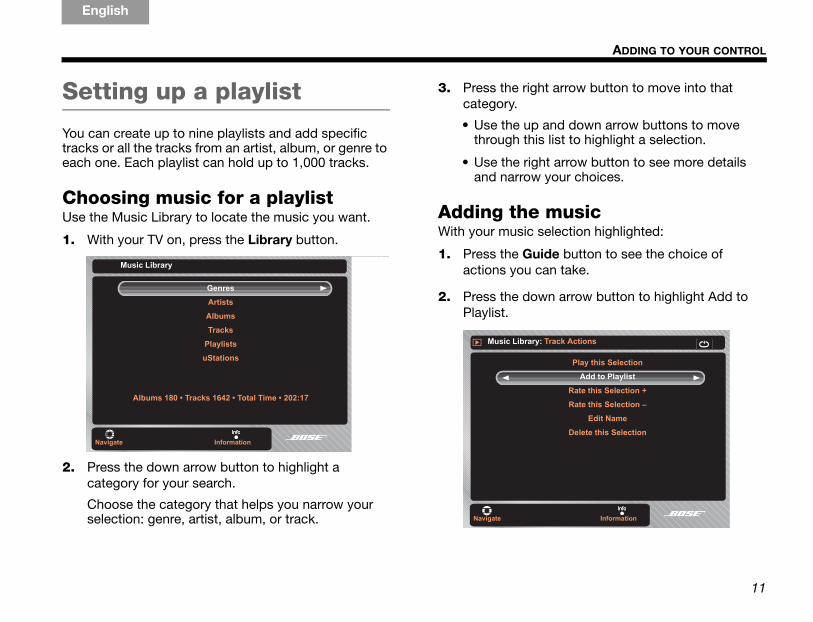
Setting up a playlist
You can create up to nine playlists and add specific tracks or all the tracks from an artist, album, or genre to each one. Each playlist can hold up to 1,000 tracks.
Choosing music for a playlist Use the Music Library to locate the music you want.
1. With your TV on, press the Library button.
2. Press the down arrow button to highlight a category for your search.
Choose the category that helps you narrow your selection: genre, artist, album, or track.
3. Press the right arrow button to move into that category.
• Use the up and down arrow buttons to move through this list to highlight a selection.
• Use the right arrow button to see more details and narrow your choices.
Adding the musicWith your music selection highlighted:
1. Press the Guide button to see the choice of actions you can take.
2. Press the down arrow button to highlight Add to Playlist.
Music Library
Navigate Information
Genres
Artists
Albums
Tracks
Playlists
uStations
Albums 180 • Tracks 1642 • Total Time • 202:17
Music Library: Track Actions
Play this Selection
Add to Playlist
Rate this Selection +
Rate this Selection –
Edit Name
Delete this Selection
Navigate Information
NuMusic booklet book.book Page 11 Monday, November 24, 2008 10:52 AM

12
ADDING TO YOUR CONTROL
EnglishTAB 6TAB 8 TAB 7 TAB 3TAB 5 TAB 2TAB 4
3. Press the right arrow button to see the nine playlists.
4. Press the down arrow button to highlight the playlist you want to use.
5. Press the right arrow button to add the selection to the highlighted playlist.
A notice confirms your addition.
6. Press the ENTER button to return to a previous screen.
Listening to your listThere are two ways to start listening to a playlist:
By using the Music Library
1. In the Music Library, select Playlists and press the right arrow button to enter this category.
2. Select the playlist you want to hear and press the ENTER button to begin play.
Or, you can press the right arrow to see the playlist contents, move down to select the track you want to begin with, and press ENTER to begin play.
Music Library: Track Actions
Add this Selection to a Playlist
P1 Exercise A
P2 Jazz 1
P3 Jazz 2
P4 Jazz 3
P5 Exercise B
P6 Jo’s Blues
P7
P8
P9
Navigate Information
Music Library: Track Actions
Add to Playlist
This Selection has been added to P1 Exercise A
OK
Navigate Information
NuMusic booklet book.book Page 12 Monday, November 24, 2008 10:52 AM
13
ADDING TO YOUR CONTROL
TAB 5TAB 4 TAB 6 TAB 8TAB 7English TAB 3TAB 2
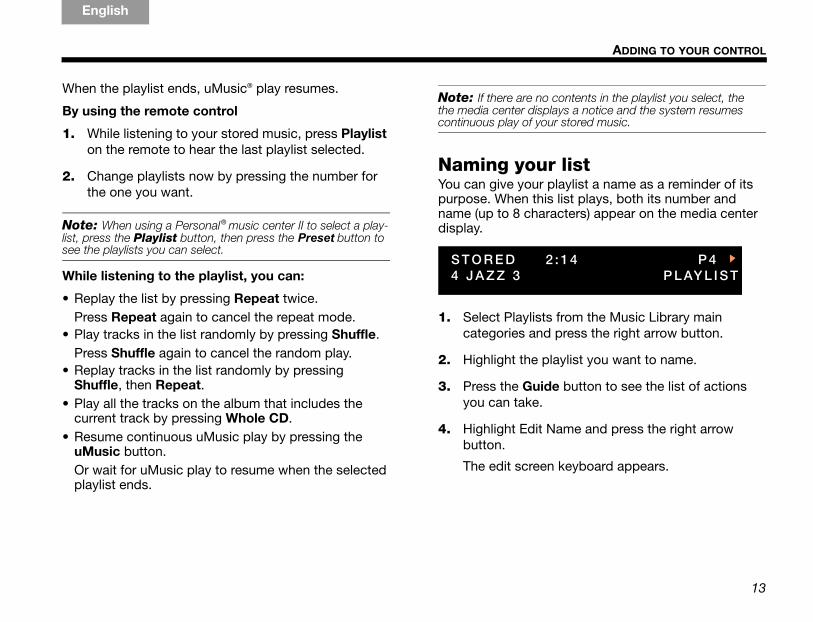
When the playlist ends, uMusic® play resumes.
By using the remote control
1. While listening to your stored music, press Playlist on the remote to hear the last playlist selected.
2. Change playlists now by pressing the number for the one you want.
Note: When using a Personal® music center II to select a play-list, press the Playlist button, then press the Preset button to see the playlists you can select.
While listening to the playlist, you can:
• Replay the list by pressing Repeat twice. Press Repeat again to cancel the repeat mode.
• Play tracks in the list randomly by pressing Shuffle.Press Shuffle again to cancel the random play.
• Replay tracks in the list randomly by pressing Shuffle, then Repeat.
• Play all the tracks on the album that includes the current track by pressing Whole CD.
• Resume continuous uMusic play by pressing the uMusic button.Or wait for uMusic play to resume when the selected playlist ends.
Note: If there are no contents in the playlist you select, the the media center displays a notice and the system resumes continuous play of your stored music.
Naming your listYou can give your playlist a name as a reminder of its purpose. When this list plays, both its number and name (up to 8 characters) appear on the media center display.
1. Select Playlists from the Music Library main categories and press the right arrow button.
2. Highlight the playlist you want to name.
3. Press the Guide button to see the list of actions you can take.
4. Highlight Edit Name and press the right arrow button.
The edit screen keyboard appears.
S T O R E D 2 : 1 4 P 4 4 J A Z Z 3 P L AY L I S T
NuMusic booklet book.book Page 13 Monday, November 24, 2008 10:52 AM
14
ADDING TO YOUR CONTROL
EnglishTAB 6TAB 8 TAB 7 TAB 3TAB 5 TAB 2TAB 4
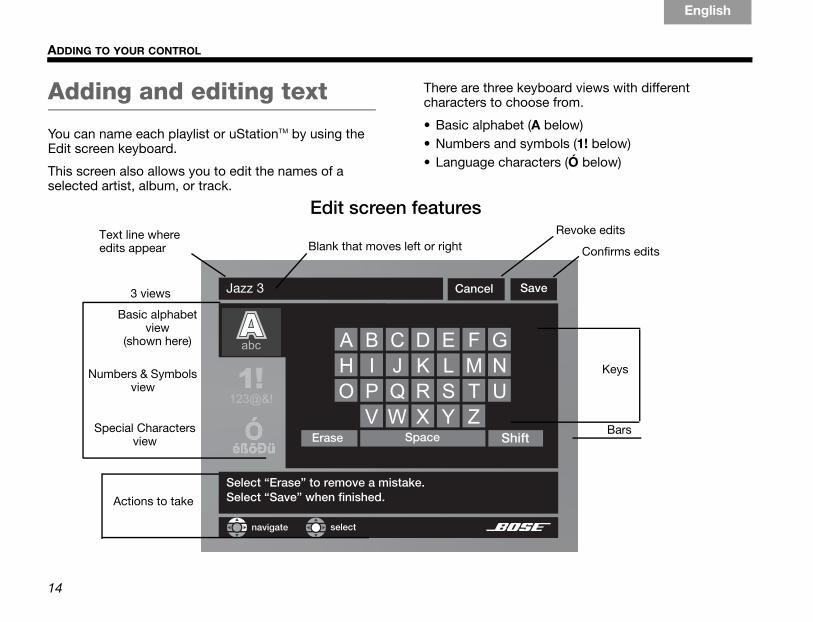
Adding and editing text
You can name each playlist or uStationTM by using the Edit screen keyboard.
This screen also allows you to edit the names of a selected artist, album, or track.
There are three keyboard views with different characters to choose from.
• Basic alphabet (A below)• Numbers and symbols (1! below)• Language characters (Ó below)
Confirms editsText line where edits appear
Save
Erase Space Shift
Select “Erase” to remove a mistake.Select “Save” when finished.
navigate select
Numbers & Symbols view
Special Characters view
Jazz 3
Blank that moves left or right
Basic alphabet view
(shown here)
3 views
Keys
Bars
Actions to take
Cancel
Revoke edits
Edit screen features
NuMusic booklet book.book Page 14 Monday, November 24, 2008 10:52 AM
15
ADDING TO YOUR CONTROL
TAB 5TAB 4 TAB 6 TAB 8TAB 7English TAB 3TAB 2
To enter the Edit screen1. Press the Library button on the remote to see the
list of categories.
2. Highlight the Album, Track, Artist, Playlist, or uStationTM you want to edit.
3. Press the Guide button to see the actions you can take.
4. Highlight Edit Name and press the right arrow button.
The Edit screen appears.
5. Use these buttons on the remote:
• Right, left, up, and down arrows to move around the keyboard and highlight characters.
• ENTER to add the highlighted character to the text line.
• Left and down to move into a different keyboard view.
Adding letters to the text lineNew characters appear to the left of the blank in the top line. The limit for a Playlist or uStation name is 16 characters.
• To add characters to the text line, highlight each letter key and press ENTER.
• To delete the last character from the top line, highlight the Erase bar and press ENTER.The blank moves left and deletes a character for each press of the button.
• To change to capital letters, highlight the Shift bar and press ENTER. Then select a letter and press ENTER. To return to small letters, use the Shift bar again.
• To add a space between words, highlight the Space bar and press ENTER.
• To add a number, move left and down to the Numbers & Symbols keyboard and select the number.
• To add an accented letter, move left and down to the Special Characters keyboard and select the letter.
• To save your additions or edits, move up to Save and press ENTER.
• To exit the edit screen without saving, move up to Cancel and press ENTER.
NuMusic booklet book.book Page 15 Monday, November 24, 2008 10:52 AM
16
ADDING TO YOUR CONTROL
EnglishTAB 6TAB 8 TAB 7 TAB 3TAB 5 TAB 2TAB 4
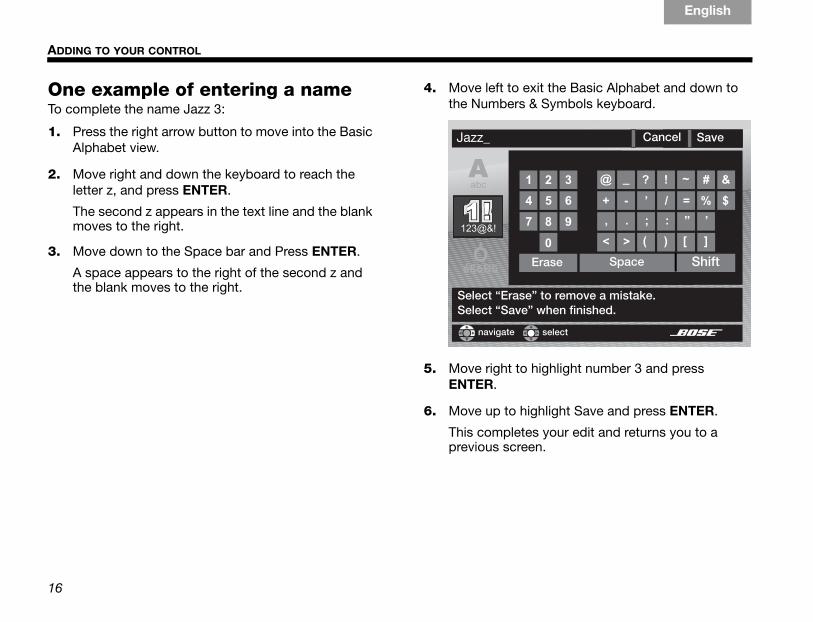
One example of entering a nameTo complete the name Jazz 3:
1. Press the right arrow button to move into the Basic Alphabet view.
2. Move right and down the keyboard to reach the letter z, and press ENTER.
The second z appears in the text line and the blank moves to the right.
3. Move down to the Space bar and Press ENTER.
A space appears to the right of the second z and the blank moves to the right.
4. Move left to exit the Basic Alphabet and down to the Numbers & Symbols keyboard.
5. Move right to highlight number 3 and press ENTER.
6. Move up to highlight Save and press ENTER.
This completes your edit and returns you to a previous screen.
SaveCancelJazz_
Erase Space Shift
Select “Erase” to remove a mistake.Select “Save” when finished.
navigate select
NuMusic booklet book.book Page 16 Monday, November 24, 2008 10:52 AM
17
ADDING TO YOUR CONTROL
TAB 5TAB 4 TAB 6 TAB 8TAB 7English TAB 3TAB 2
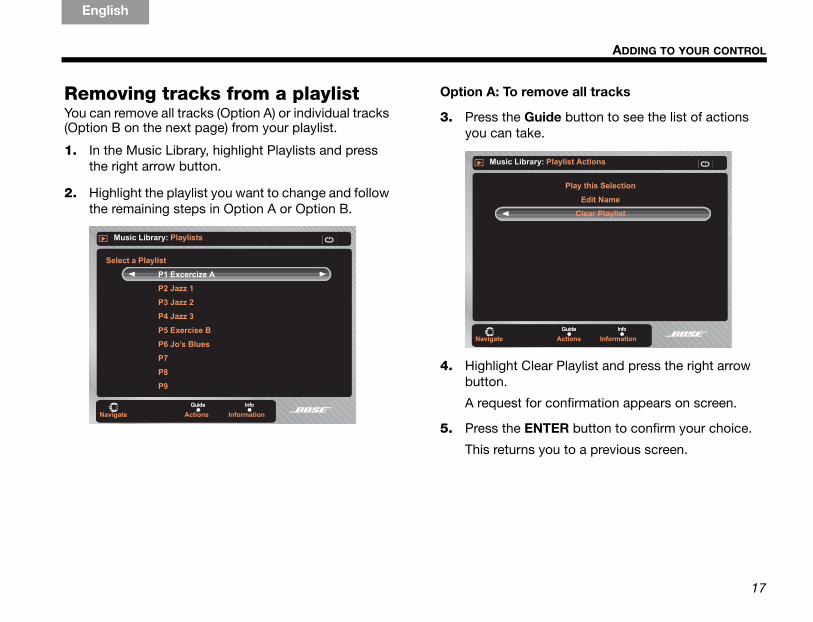
Removing tracks from a playlistYou can remove all tracks (Option A) or individual tracks (Option B on the next page) from your playlist.
1. In the Music Library, highlight Playlists and press the right arrow button.
2. Highlight the playlist you want to change and follow the remaining steps in Option A or Option B.
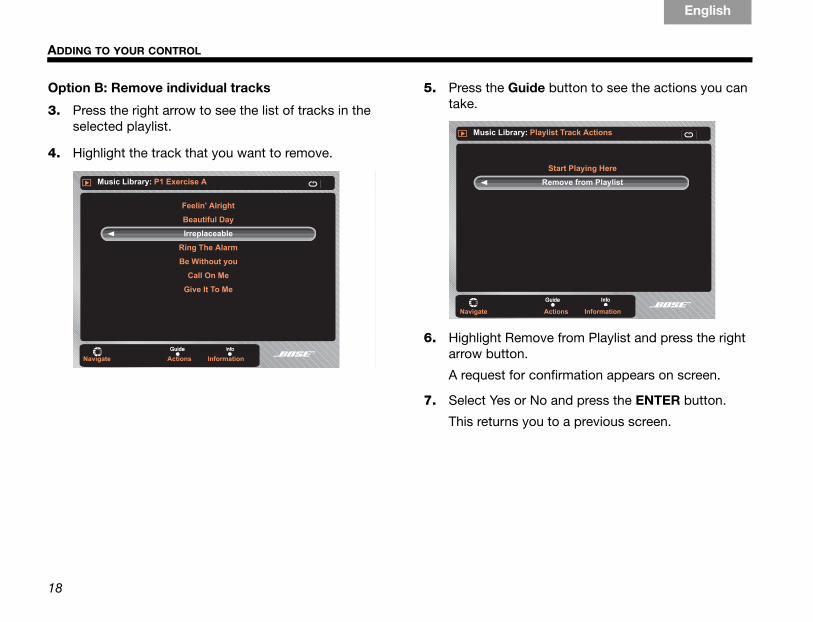
Option A: To remove all tracks
3. Press the Guide button to see the list of actions you can take.
4. Highlight Clear Playlist and press the right arrow button.
A request for confirmation appears on screen.
5. Press the ENTER button to confirm your choice.
This returns you to a previous screen.
Music Library: Playlists
Select a Playlist
P1 Excercize A
P2 Jazz 1
P3 Jazz 2
P4 Jazz 3
P5 Exercise B
P6 Jo’s Blues
P7
P8
P9
Navigate Actions Information
Music Library: Playlist Actions
Navigate Actions Information
Play this Selection
Edit Name
Clear Playlist
NuMusic booklet book.book Page 17 Monday, November 24, 2008 10:52 AM
18
ADDING TO YOUR CONTROL
EnglishTAB 6TAB 8 TAB 7 TAB 3TAB 5 TAB 2TAB 4
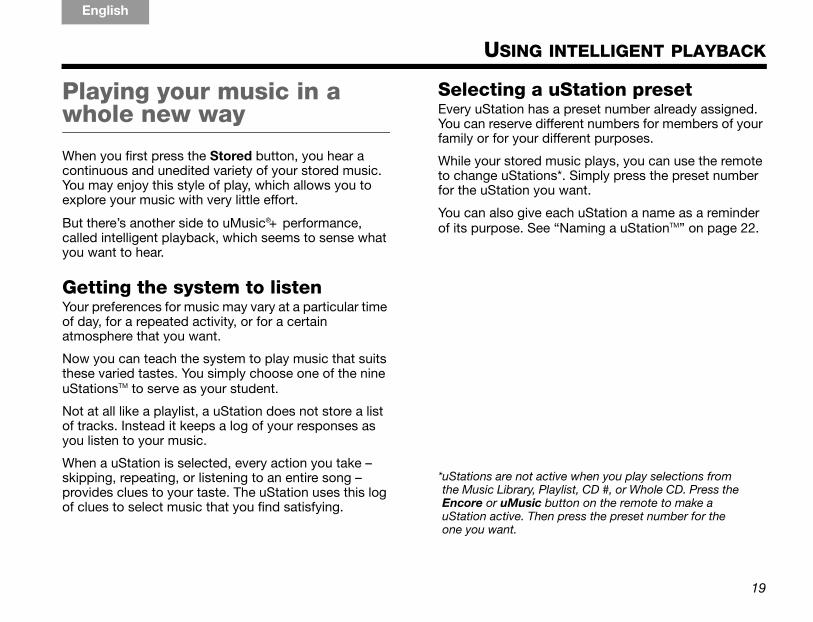
Option B: Remove individual tracks
3. Press the right arrow to see the list of tracks in the selected playlist.
4. Highlight the track that you want to remove.
5. Press the Guide button to see the actions you can take.
6. Highlight Remove from Playlist and press the right arrow button.
A request for confirmation appears on screen.
7. Select Yes or No and press the ENTER button.
This returns you to a previous screen.
Music Library: P1 Exercise A
Navigate Actions Information
Feelin' Alright
Beautiful Day
Irreplaceable
Ring The Alarm
Be Without you
Call On Me
Give It To Me
Music Library: Playlist Track Actions
Navigate Actions Information
Start Playing Here
Remove from Playlist
NuMusic booklet book.book Page 18 Monday, November 24, 2008 10:52 AM
19
TAB 5TAB 4 TAB 6 TAB 8TAB 7English TAB 3TAB 2
USING INTELLIGENT PLAYBACK
Playing your music in a whole new way
When you first press the Stored button, you hear a continuous and unedited variety of your stored music. You may enjoy this style of play, which allows you to explore your music with very little effort.
But there’s another side to uMusic®+ performance, called intelligent playback, which seems to sense what you want to hear.
Getting the system to listenYour preferences for music may vary at a particular time of day, for a repeated activity, or for a certain atmosphere that you want.
Now you can teach the system to play music that suits these varied tastes. You simply choose one of the nine uStationsTM to serve as your student.
Not at all like a playlist, a uStation does not store a list of tracks. Instead it keeps a log of your responses as you listen to your music.
When a uStation is selected, every action you take – skipping, repeating, or listening to an entire song – provides clues to your taste. The uStation uses this log of clues to select music that you find satisfying.
Selecting a uStation preset Every uStation has a preset number already assigned. You can reserve different numbers for members of your family or for your different purposes.
While your stored music plays, you can use the remote to change uStations*. Simply press the preset number for the uStation you want.
You can also give each uStation a name as a reminder of its purpose. See “Naming a uStationTM” on page 22.
*uStations are not active when you play selections from the Music Library, Playlist, CD #, or Whole CD. Press the Encore or uMusic button on the remote to make a uStation active. Then press the preset number for the one you want.
NuMusic booklet book.book Page 19 Monday, November 24, 2008 10:52 AM
20
USING INTELLIGENT PLAYBACK
EnglishTAB 6TAB 8 TAB 7 TAB 3TAB 5 TAB 2TAB 4
Putting a uStationTM to work 1. Press the Stored button on the remote to begin
continuous play.
2. Press a preset number (1* - 9) on the remote for the uStation you want to use.
The preset number, following a small u, appears on the media center display.
3. As your stored music continues, respond to the music in one of these ways:
• Listen to a track all the way through.
• Skip tracks you do not want to hear.
• Repeat a track that you find especially pleasing.
The uStation logs each of these responses, plus any ratings you give the music. Over time, you may notice how the focus of this uStation reflects your preferences.
*When you play stored music for the first time, the system automatically selects Preset 1. This preset is then affected by the reactions of anyone who listens to the music. To tailor a uStation to your tastes, you may want to select a different preset number (2 - 9).
To refresh uStation 1, refer to “Clearing your uStationTM log” on page 24.
Rating music in a uStationWhen a uStation is first selected, it doesn’t yet know your preferences. So it starts by playing tracks from your entire stored music collection.
You can use rating buttons on the remote control to strongly identify what you do or do not want to hear.
• If you dislike a selection, press the – RATING button. The current track stops and the system selects another track. Tracks like those rated – are less likely to play when the current uStation is selected.
• If you really like a selection, press the + RATING button.The current track continues to play. Tracks like those rated + are more likely to play when the current uStation is selected.
NuMusic booklet book.book Page 20 Monday, November 24, 2008 10:52 AM
21
USING INTELLIGENT PLAYBACK
TAB 5TAB 4 TAB 6 TAB 8TAB 7English TAB 3TAB 2
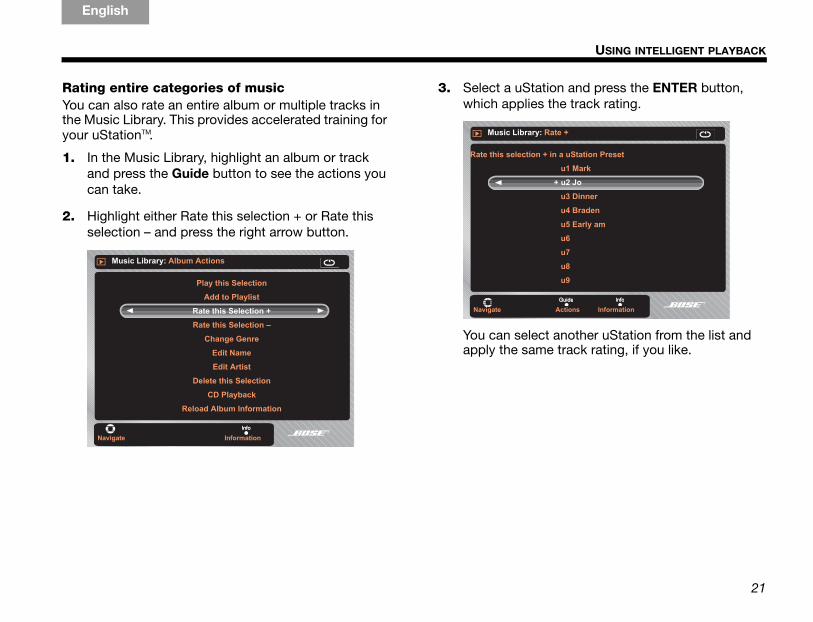
Rating entire categories of musicYou can also rate an entire album or multiple tracks in the Music Library. This provides accelerated training for your uStationTM.
1. In the Music Library, highlight an album or track and press the Guide button to see the actions you can take.
2. Highlight either Rate this selection + or Rate this selection – and press the right arrow button.
3. Select a uStation and press the ENTER button, which applies the track rating.
You can select another uStation from the list and apply the same track rating, if you like.
Music Library: Album Actions
Play this Selection
Add to Playlist
Rate this Selection +
Rate this Selection –
Change Genre
Edit Name
Edit Artist
Delete this Selection
CD Playback
Reload Album Information
Navigate Information
Music Library: Rate +
Navigate Actions Information
Rate this selection + in a uStation Preset
u1 Mark
+ u2 Jo
u3 Dinner
u4 Braden
u5 Early am
u6
u7
u8
u9
NuMusic booklet book.book Page 21 Monday, November 24, 2008 10:52 AM
22
USING INTELLIGENT PLAYBACK
EnglishTAB 6TAB 8 TAB 7 TAB 3TAB 5 TAB 2TAB 4
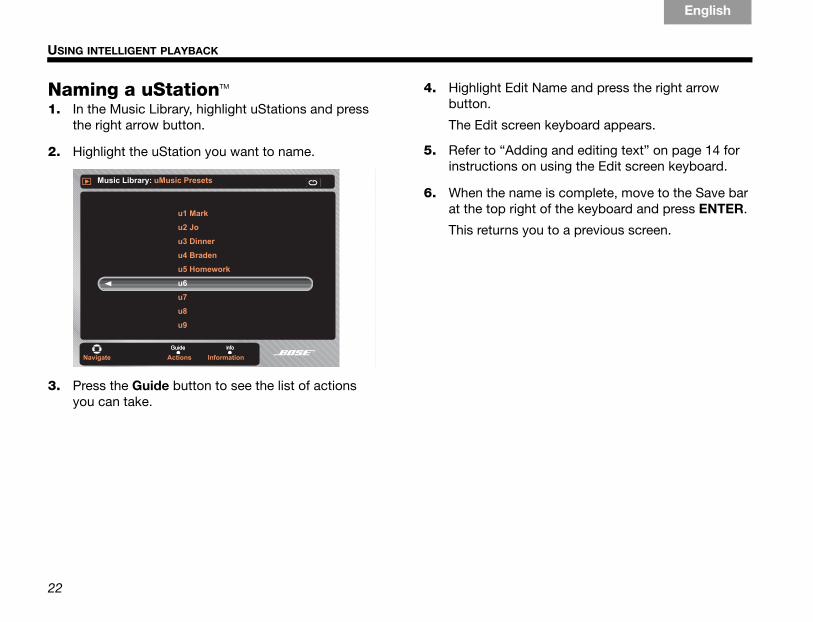
Naming a uStationTM
1. In the Music Library, highlight uStations and press the right arrow button.
2. Highlight the uStation you want to name.
3. Press the Guide button to see the list of actions you can take.
4. Highlight Edit Name and press the right arrow button.
The Edit screen keyboard appears.
5. Refer to “Adding and editing text” on page 14 for instructions on using the Edit screen keyboard.
6. When the name is complete, move to the Save bar at the top right of the keyboard and press ENTER.
This returns you to a previous screen.
Music Library: uMusic Presets
Navigate Actions Information
u1 Mark
u2 Jo
u3 Dinner
u4 Braden
u5 Homework
u6
u7
u8
u9
NuMusic booklet book.book Page 22 Monday, November 24, 2008 10:52 AM
23
USING INTELLIGENT PLAYBACK
TAB 5TAB 4 TAB 6 TAB 8TAB 7English TAB 3TAB 2
Deleting tracks, edits, and ratings
The better you know this system, the better you know what you want from it.
To get it just right, you may want to undo what has already been done.
Your options include:
• Changing the uStationTM influences by clearing its log. • Making sure that some music never plays, even
occasionally.
Undoing your album edits You can choose to undo the edits you have made to any album. Taking this action overwrites your edits with the music information originally provided by the system database.
This does not affect the names of playlists or uStation presets.
To revert to the original information:
1. In the Music Library, highlight the album you want to change.
2. Press the Guide button on the remote to see the list of actions you can take.
3. Move down the list, highlight Reload Album Information, and press ENTER.
A request for confirmation appears on screen.
4. Press the ENTER button to confirm your choice of Yes or No.
This returns you to the previous screen.
NuMusic booklet book.book Page 23 Monday, November 24, 2008 10:52 AM
24
USING INTELLIGENT PLAYBACK
EnglishTAB 6TAB 8 TAB 7 TAB 3TAB 5 TAB 2TAB 4
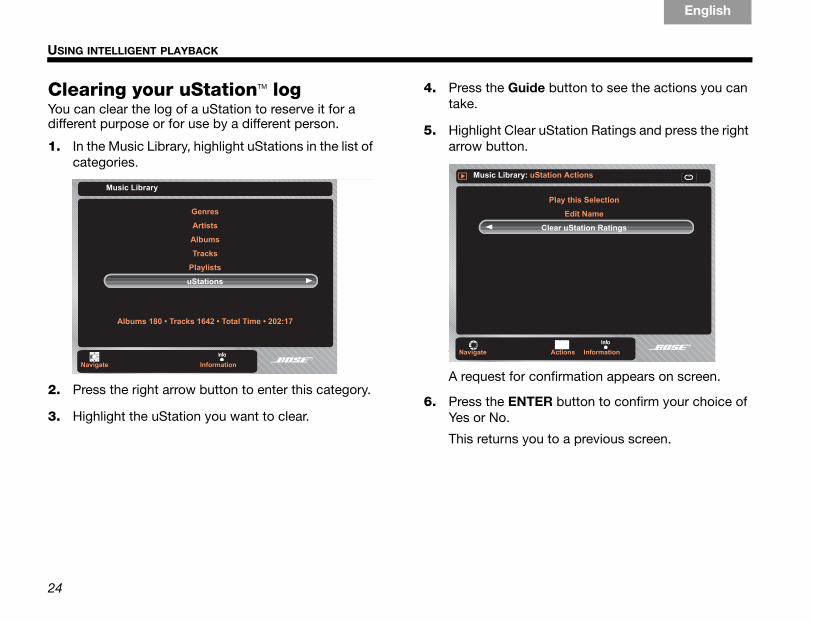
Clearing your uStationTM logYou can clear the log of a uStation to reserve it for a different purpose or for use by a different person.
1. In the Music Library, highlight uStations in the list of categories.
2. Press the right arrow button to enter this category.
3. Highlight the uStation you want to clear.
4. Press the Guide button to see the actions you can take.
5. Highlight Clear uStation Ratings and press the right arrow button.
A A request for confirmation appears on screen.
6. Press the ENTER button to confirm your choice of Yes or No.
This returns you to a previous screen.
Music Library
Navigate Information
Genres
Artists
Albums
Tracks
Playlists
uStations
Albums 180 • Tracks 1642 • Total Time • 202:17
Play this Selection
Edit Name
Clear uStation Ratings
Music Library: uStation Actions
Navigate Actions Information
NuMusic booklet book.book Page 24 Monday, November 24, 2008 10:52 AM
25
USING INTELLIGENT PLAYBACK
TAB 5TAB 4 TAB 6 TAB 8TAB 7English TAB 3TAB 2
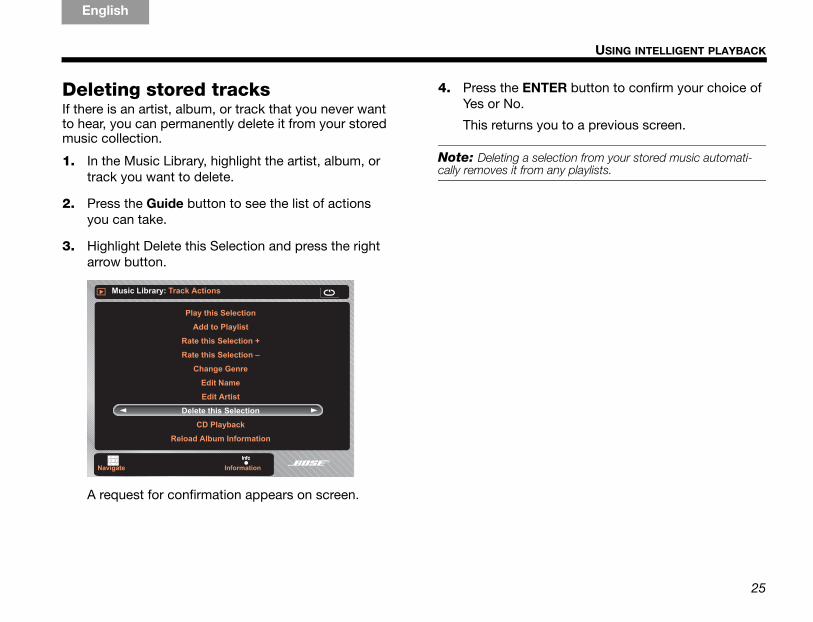
Deleting stored tracksIf there is an artist, album, or track that you never want to hear, you can permanently delete it from your stored music collection.
1. In the Music Library, highlight the artist, album, or track you want to delete.
2. Press the Guide button to see the list of actions you can take.
3. Highlight Delete this Selection and press the right arrow button.
A request for confirmation appears on screen.
4. Press the ENTER button to confirm your choice of Yes or No.
This returns you to a previous screen.
Note: Deleting a selection from your stored music automati-cally removes it from any playlists.
Music Library: Track Actions
Play this Selection
Add to Playlist
Rate this Selection +
Rate this Selection –
Change Genre
Edit Name
Edit Artist
Delete this Selection
CD Playback
Reload Album Information
Navigate Information
NuMusic booklet book.book Page 25 Monday, November 24, 2008 10:52 AM
26
EnglishTAB 6TAB 8 TAB 7 TAB 3TAB 5 TAB 2TAB 4
Details on discs to store
Some additional details may help you use this Bose® home entertainment system to its fullest.
More about compatible discsOther than MP3 you cannot import data disc audio formats such as Windows Media Audio (WMA) and those protected by Digital Rights Management (DRM).
For details on creating MP3 files, refer to the music management system on your computer.
Other details:
• You can store the same song from both an MP3 disc and an audio CD. However, music data that is provided with the MP3 does not apply to this same song from the audio CD.
• If the songs from one album are stored, some from an MP3 disc and others from an audio CD, they will not all be recognized as coming from the same album.
• For any MP3 files to be recognized as songs from the same album, they must be stored from the same MP3 disc. A two-session disc qualifies as one disc.
Before copying audio material onto your computer or creating an MP3 CD, you should:•Make sure you have the legal right to copy the particular audio content;•Avoid sources of audio material that may be questionable, such as certain file sharing facilities;
•Not use the copies or CDs as a means to share audio content with others, but confine such copying, where permissible, to your personal use.
• The same track from two different MP3 discs will be stored only once. When you press the CD # for the disc stored first, the track will play. It will not play, however, when you press CD # for the disc stored later.
• If an album is on an MP3 disc twice, after storing, it shows up just once under Albums. If there are two different artists associated with the album, however, each track appears twice in the Album list.
• If an audio CD and an MP3 disc contain the same album, this album will be stored twice and listed twice in the Albums category of the Music Library. The tracks will be listed once under each album, but twice in the list of all Tracks.
Assistance and product detailsPlease see your Bose owner’s guide, provided in the carton, for the following information:
• maintenance• troubleshooting• warranty coverage• technical product information• instructions on further use of the systemCustomer service information is provided on a separate address list in the carton.
REFERENCE
NuMusic booklet book.book Page 26 Monday, November 24, 2008 10:52 AM
27
TAB 5TAB 4 TAB 6 TAB 8TAB 7English TAB 3TAB 2
FURTHER OPPORTUNITIES
Extending your LIFESTYLE® system enjoymentthroughout your home
You’ve already discovered how your new LIFESTYLE® system can digitally store hundreds of CDs and learn your music tastes. Now it’s time to learn how you can enjoy your favorite music all around your home – with great-sounding homewide expansion options from Bose.
Imagine. You’re enjoying some jazz on the deck, while your kids are in the den watching a DVD. All from the same system. All at the same time. But you don’t have to stop with just two areas around your home. Your LIFESTYLE® system lets you expand your listening enjoyment in up to 14 rooms – even outdoors.
Your system has the capability to deliver music throughout your home, not just your living room.
How can I get great sound and access my stored music collection throughout my home?Bose offers a number of flexible options to help customize a solution that’s perfect for you. Here are some ideas to get you started.
Music in the bedroomImagine having access to all your stored music from your bedroom. Listen to a quiet classical track as you drift off to sleep, or let one of your uStationTM presets deliver more upbeat tunes as you get ready to go out for dinner. While you could wire to your bedroom, this room is often far away from your main system. Rather than run wires from room to room, we suggest you pair an AL8 homewide wireless audio link with a Wave® music system for a simple and easy-to-set-up solution.
Music in the studyAt the end of a long day, you can relax with some soft jazz. Your study may be closer to the main room system, so a wired solution might be more practical. With LIFESTYLE® homewide powered speakers, you can have the highest level of Bose® stereo quality all to yourself.
Music outdoorsSummertime is best spent on the patio, grilling, and entertaining friends. You can listen to the big game on the radio and, during commercials, access your stored music collection. Our Free Space® 51 environmental speakers and an amplifier provide great sound in the great outdoors. Our best-performing, most versatile landscape speakers provide the perfect outdoor solution.
NuMusic booklet book.book Page 27 Monday, November 24, 2008 10:52 AM
28
FURTHER OPPORTUNITIES
EnglishTAB 6TAB 8 TAB 7 TAB 3TAB 5 TAB 2TAB 4
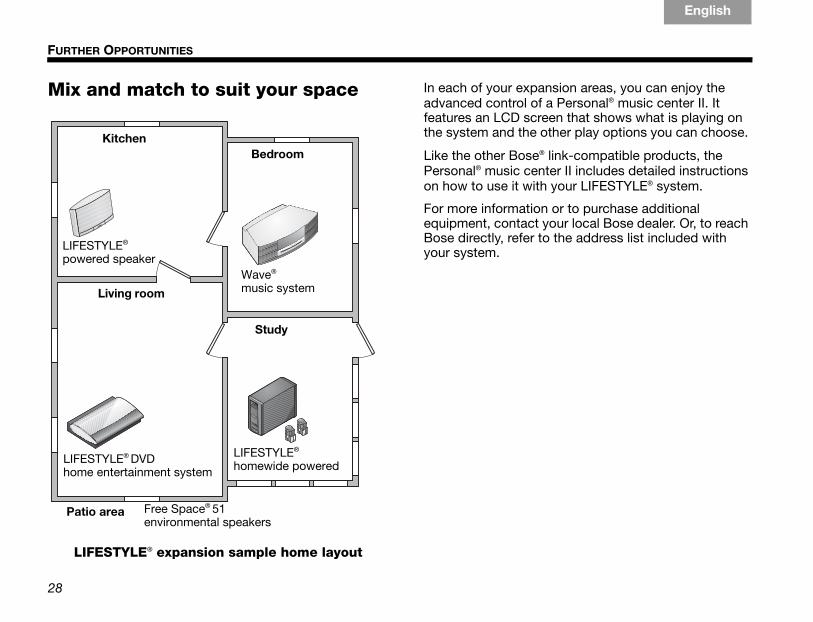
Mix and match to suit your space In each of your expansion areas, you can enjoy the advanced control of a Personal® music center II. It features an LCD screen that shows what is playing on the system and the other play options you can choose.
Like the other Bose® link-compatible products, the Personal® music center II includes detailed instructions on how to use it with your LIFESTYLE® system.
For more information or to purchase additional equipment, contact your local Bose dealer. Or, to reach Bose directly, refer to the address list included with your system.
Living room
LIFESTYLE® DVD home entertainment system
Study
Kitchen Bedroom
Wave® music system
LIFESTYLE®
homewide powered
LIFESTYLE® expansion sample home layout
LIFESTYLE®
powered speaker
Free Space® 51 environmental speakers
Patio area
NuMusic booklet book.book Page 28 Monday, November 24, 2008 10:52 AM
Fold
CÓMO PONER EN MARCHA LA EXPERIENCIA UMUSIC®+
Procedimiento sencillo paso a paso
Puede utilizar el CD de MP3 incluido con uMusic®+, que contiene 25 archivos MP3, para
comenzar rápida y fácilmente a almacenar y disfrutar de pistas de música.
Siga los Pasos 1 - 4 y menos de una hora sabrá a grandes rasgos cómo realizar lo siguiente:
•almacenar música
•reproducir las pistas almacenadas
•localizar pistas por categoría
•crear una lista de reproducción única
•disfrutar de la experiencia del sistema uMusic+
Pase de página y comience.
uMusic tutorial guide STEPS_ESP.fm Page 1 Thursday, November 27, 2008 2:04 AM
29
FURTHER OPPORTUNITIES
TAB 5TAB 4 TAB 6 TAB 8TAB 7English TAB 3TAB 2
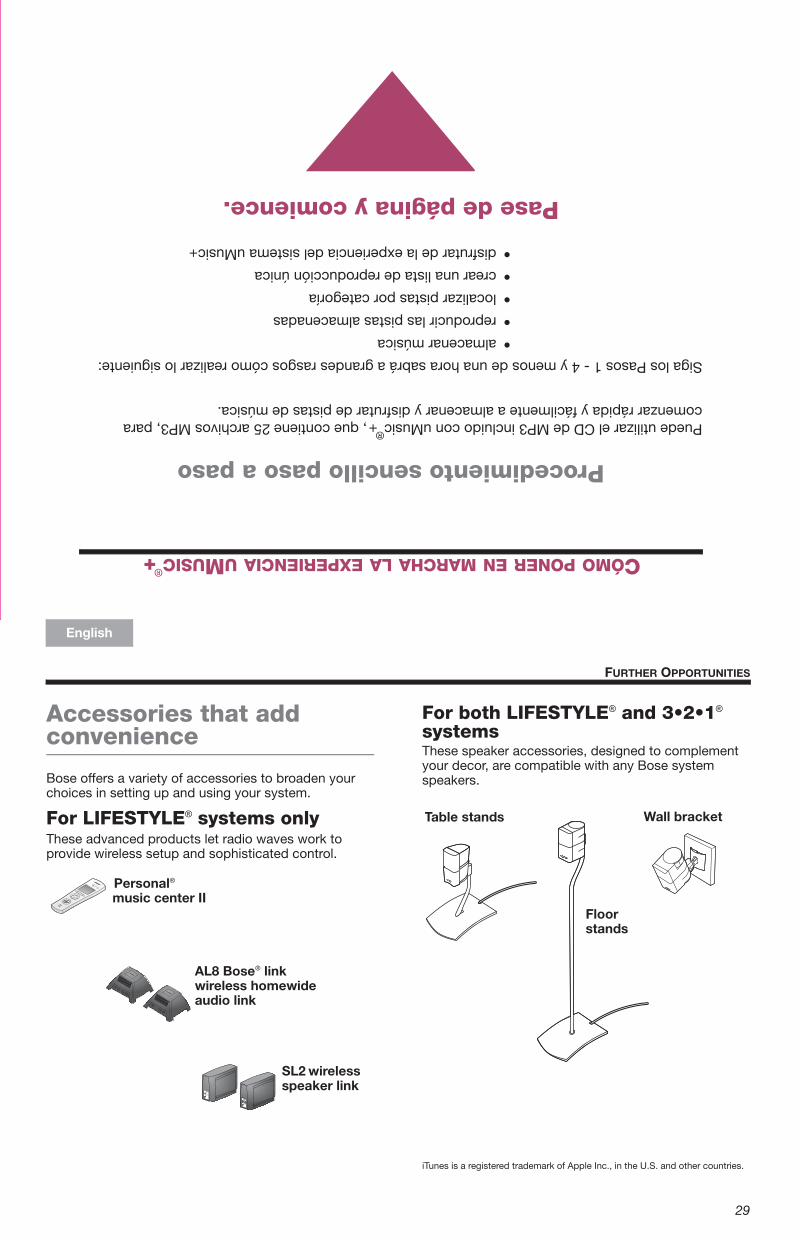
Accessories that add convenience
Bose offers a variety of accessories to broaden your choices in setting up and using your system.
For LIFESTYLE® systems onlyThese advanced products let radio waves work to provide wireless setup and sophisticated control.
For both LIFESTYLE® and 3•2•1® systemsThese speaker accessories, designed to complement your decor, are compatible with any Bose system speakers.
iTunes is a registered trademark of Apple Inc., in the U.S. and other countries.
AL8 Bose® link wireless homewide audio link
Personal® music center II
SL2 wireless speaker link
Table stands
Floor stands
Wall bracket
NuMusic booklet book.book Page 29 Monday, November 24, 2008 10:52 AM
For your music collection • Para su colección de música • Pour votre collection musicale
©2009 Bose Corporation, The Mountain,Framingham, MA 01701-9168 USAAM314482 Rev.00
LAUNCHING YOUR UMUSIC®+ EXPERIENCE
A simple step-by-step approach
You can use the complementary uMusic®+ MP3 CD, containing 25 MP3s, for this quick
and easy start to storing and enjoying musical tracks.
Follow Launch Steps 1 - 4 and in less than an hour you’ll have a good feel for how to :
Just lift this page...and begin!
•store music
•play the stored tracks
•locate tracks by category
•create your unique playlist
•enjoy the uMusic+ system experience
uMusic tutorial guide STEPS.fm Page 1 Friday, November 21, 2008 11:02 AM
Fold