Embed Size (px)
Citation preview

Just KissesDesigned by Robert Kaufman Fabricswww.robertkaufman.com
Featuring
CABIN TRAILS
For questions about this pattern, please email [email protected].
Finished quilt measures: 64-1/2” x 80-1/2”Quilt shown in “GREY AND BLUE” colorstory.
For alternate “RED AND TAN” colorstory see pages 6-7.
page 2
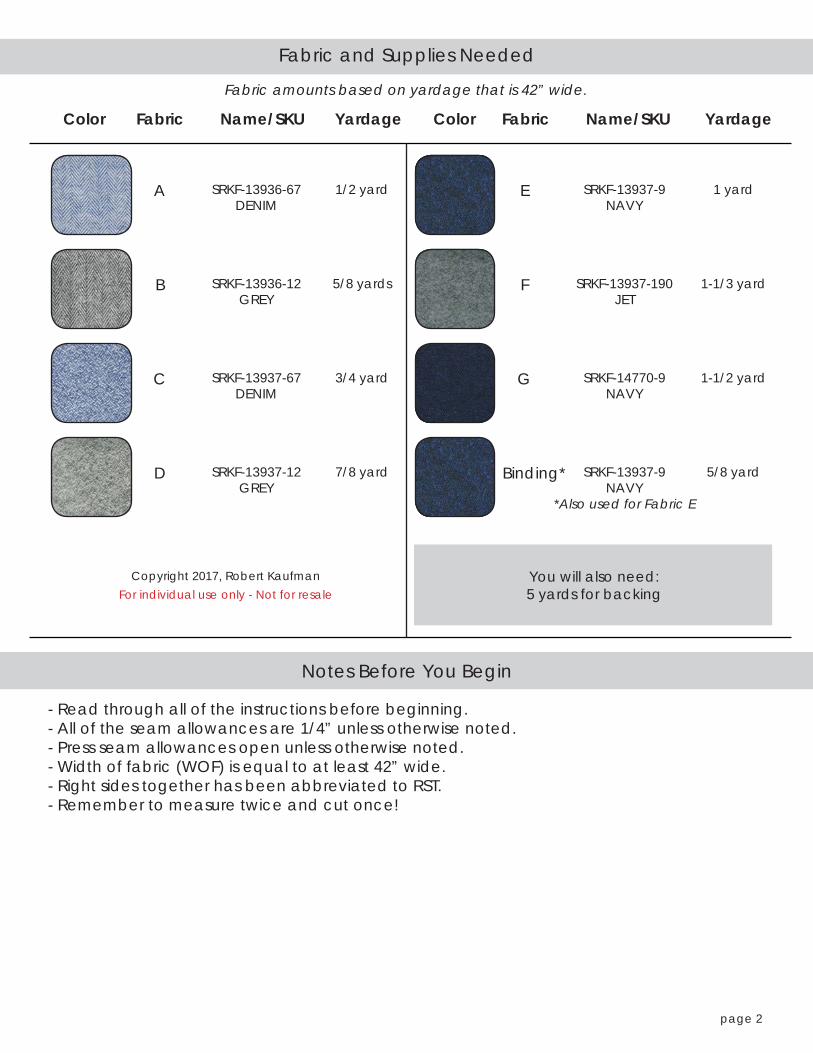
Fabric and Supplies Needed
Color Fabric Name/SKU Yardage
SRKF-13937-9 NAVY
SRKF-13937-190 JET
SRKF-14770-9 NAVY
SRKF-13937-9 NAVY
*Also used for Fabric E
SRKF-13936-67 DENIM
SRKF-13936-12 GREY
SRKF-13937-67 DENIM
SRKF-13937-12 GREY
Color Fabric Name/SKU Yardage
Fabric amounts based on yardage that is 42” wide.
A
B
C
D
E
F
G
Binding*
1/2 yard
5/8 yards
3/4 yard
7/8 yard
1 yard
1-1/3 yard
1-1/2 yard
5/8 yard
Copyright 2017, Robert KaufmanFor individual use only - Not for resale
You will also need:5 yards for backing
- Read through all of the instructions before beginning.- All of the seam allowances are 1/4” unless otherwise noted.- Press seam allowances open unless otherwise noted. - Width of fabric (WOF) is equal to at least 42” wide.- Right sides together has been abbreviated to RST.- Remember to measure twice and cut once!
Notes Before You Begin

page 3
Tip: For ease of piecing, stack the fabrics by piece number and label each stack. Example: “Piece 1”, “Piece 2”, etc.
From Fabric A, cut:three 4-1/2” x WOF strips. Subcut: twenty 4-1/2” squares From Fabric B, cut:seven 2-1/2” x WOF strips. Subcut: twenty 2-1/2” x 4-1/2” rectangles for piece 2 twenty 2-1/2” x 6-1/2” rectangles for piece 3
From Fabric C, cut:nine 2-1/2” x WOF strips. Subcut: twenty 2-1/2” x 6-1/2” rectangles for piece 4 twenty 2-1/2” x 8-1/2” rectangles for piece 5
From Fabric D, cut:ten 2-1/2” x WOF strips. Subcut: twenty 2-1/2” x 8-1/2” rectangles for piece 6 twenty 2-1/2” x 10-1/2” rectangles for piece 7
From Fabric E, cut:eleven 2-1/2” x WOF strips. Subcut: twenty 2-1/2” x 10-1/2” rectangles for piece 8 twenty 2-1/2” x 12-1/2” rectangles for piece 9
From Fabric F, cut:one 12-1/2” x WOF strip. Subcut: sixteen 2-1/2” x 12-1/2” rectangles for piece 10two 14-1/2” x WOF strips. Subcut: twenty 2-1/2” x 14-1/2” rectangles for piece 11 Trim the reminder of the second strip to 12-1/2” wide and cut: four 2-1/2” x 12-1/2” rectangles for piece 10
From Fabric G, cut:one 14-1/2” x WOF strip. Subcut: sixteen 2-1/2” x 14-1/2” rectangles for piece 12two 16-1/2” x WOF strips. Subcut: twenty 2-1/2” x 16-1/2” rectangles for piece 13 Trim the reminder of the second strip to 14-1/2” wide and cut: four 2-1/2” x 14-1/2” rectangles for piece 12
From the binding fabric, cut:eight 2-1/2” x WOF strips
Cutting Instructions

page 4
Pressing note: Press all seams away from the center square.
Step 1: Sew a Fabric B, Piece 2 rectangle to the bottom edge of a Fabric A, Piece 1 square. Press.
Step 2: Sew a Fabric B, Piece 3 rectangle to the right edge of the Fabric A, Piece 1 square. Press.
Step 3: Sew a Fabric C, Piece 4 rectangle to the top edge of the Fabric A, Piece 1 square. Press.
Step 4: Sew a Fabric C, Piece 5 rectangle to the left edge of the Fabric A, Piece 1 square. Press.
Step 5: Sew a Fabric D, Piece 6 rectangle to the bottom edge of the the block. Press.
Step 6: Sew a Fabric D, Piece 7 rectangle to the right edge of the the block. Press.
Step 7: Sew a Fabric E, Piece 8 rectangle to the top edge of the the block. Press.
Step 8: Sew a Fabric E, Piece 9 rectangle to the left edge of the the block. Press.
Step 9: Sew a Fabric F, Piece 10 rectangle to the bottom edge of the the block. Press.
Step 10: Sew a Fabric F, Piece 11 rectangle to the right edge of the the block. Press.
Step 11: Sew a Fabric G, Piece 12 rectangle to the top edge of the the block. Press.
Step 12: Sew a Fabric G, Piece 13 rectangle to the left edge of the the block. Press.
The resulting block should measure 16-1/2” square. Repeat Steps 1-12 to make a total of twenty blocks.
Assemble the Blocks

page 5
Step 13: Arrange the blocks into fi ve rows of four blocks. Note the fabric placement and block orientation in the Quilt Assembly Diagram.
Step 14: Sew the blocks together to form rows. Press the rows to the left in the odd numbered rows and to the right in the even numbered rows.
Step 15: Sew the rows together to form the quilt center. Press the row seams open.
Your quilt top is now complete! Baste, quilt, bind and enjoy!
Assemble the Quilt

page 6
CABIN TRAILS - Red and Tan Colorstory

page 7
Fabric and Supplies Needed
CABIN TRAILS - Red and Tan Colorstory
Color Fabric Name/SKU Yardage
SRKF-15617-3 RED
SRKF-15611-34 SAGE
SRKF-13936-222 REDWOOD
SRKF-15617-3 RED
SRKF-15616-342 CHESTNUT
SRKF-14769-13 TAN
SRKF-14769-3 RED
SRKF-15610-58 CACTUS
Color Fabric Name/SKU Yardage
Fabric amounts based on yardage that is 42” wide.
Copyright 2017, Robert KaufmanFor individual use only - Not for resale
A
B
C
D
E
F
G
Binding*
1/2 yard
5/8 yards
3/4 yard
7/8 yard
1 yard
1-1/3 yard
1-1/2 yard
5/8 yard
You will also need:5 yards for backing