Embed Size (px)
Citation preview
ArtLink 7 BasicsJust EMBROIDER It!
~ Basic features
~ Open and view designs
~ Modify designs
~ Print a template
~ Send designs to machine
~ Frequently asked questions
eBookSERIES

ArtLink 7 is a basic software program that allows you to open an embroidery design, make basic adjustments, and write the design directly to your embroidery machine or to a removable device, such as a USB stick.
What ArtLink can do:
• Open embroidery designs• Convert embroidery designs• Send embroidery designs with the proper
format to your BERNINA embroidery machine using a direct connection or USB stick
• Rotate• Scale (Re-size)• Mirror Horizontal• Mirror Vertical• Assign thread colors• Print a paper template
What ArtLink can’t do:
• Create an embroidery design• Combine embroidery designs• Digitize artwork (such as a picture or logo) into
an embroidery design• Digitize fonts or lettering• Add lettering to an existing design
Installation Instructions
Download and follow the most current ArtLink installation instructions on the BERNINA consumer web site:
bernina.com/ArtLink7
Open ArtLink 7
• Double click the desktop icon to open BERNINA ArtLink 7
For more software
features, check out
BERNINA Embroidery
Software EditorPlus
and DesignerPlus at
bernina.com
Open an Embroidery Design
• Click the Open icon (File Folder), or click on File > Open from the menu
• Files of Type defaults to .ART. To open a different file type, drop down the Files of Type box to All Files (*.*)
• Browse to the drive, folder, CD or USB stick that contains the embroidery design you wish to open
• Select the design, then click Open• Note: ArtLink 7 comes with 40 built-in
embroidery designs. You may use any of these designs by browsing to: C:\My Designs - Embroidery Software 7\ARTlink
Files of Type Open
Browse
2
Calibrate the Screen
The first time you open ArtLink, it is recommended that you calibrate the screen. This is found by clicking Settings > Calibrate screen from the menu.
Measure the dimensions of the dialog box, and enter your values. Click OK.

Modify the Design
Once the design is selected, the icons will be activated and appear in color (if the design is not selected, these icons will appear grayed out)
Mouse scroll wheel: You can zoom in and out using the center scroll wheel on your mouse.
To Fit: The design will fill the screen.
To Hoop: The hoop will fill the screen.
100: Select 100 from the list and the design will be shown onscreen at it’s actual size (100%).
Magnifying Glass: The cursor turns into a magnifying glass. Click and drag a box around the area you want to focus on. When you release the mouse, that area will fill the screen.
Selecting the Design
• To make any adjustments to the design, first select it by clicking anywhere within the design. Black “handles” will now appear around the design.
• Deselect the design by pressing the Esc key, or by clicking anywhere on the screen away from the design.
Black handles indicate the design is selected.
Design is not selected; icons appear grayed out
Design is selected; icons appear in color
3
Viewing the Design
You can view the design in two ways – either in Design View (below, left) or in Artistic View (below, right). The first time the software opens, it will open the design in Artistic View. De-activate the icon to see the Design View. Whatever view is active when you close the software is the view that will show the next time you open the software.
Note: Please remember that Artistic View is an approximation of how the design will look when stitched out – it is not an exact rendering.
Artistic ViewDesign View
Zooming
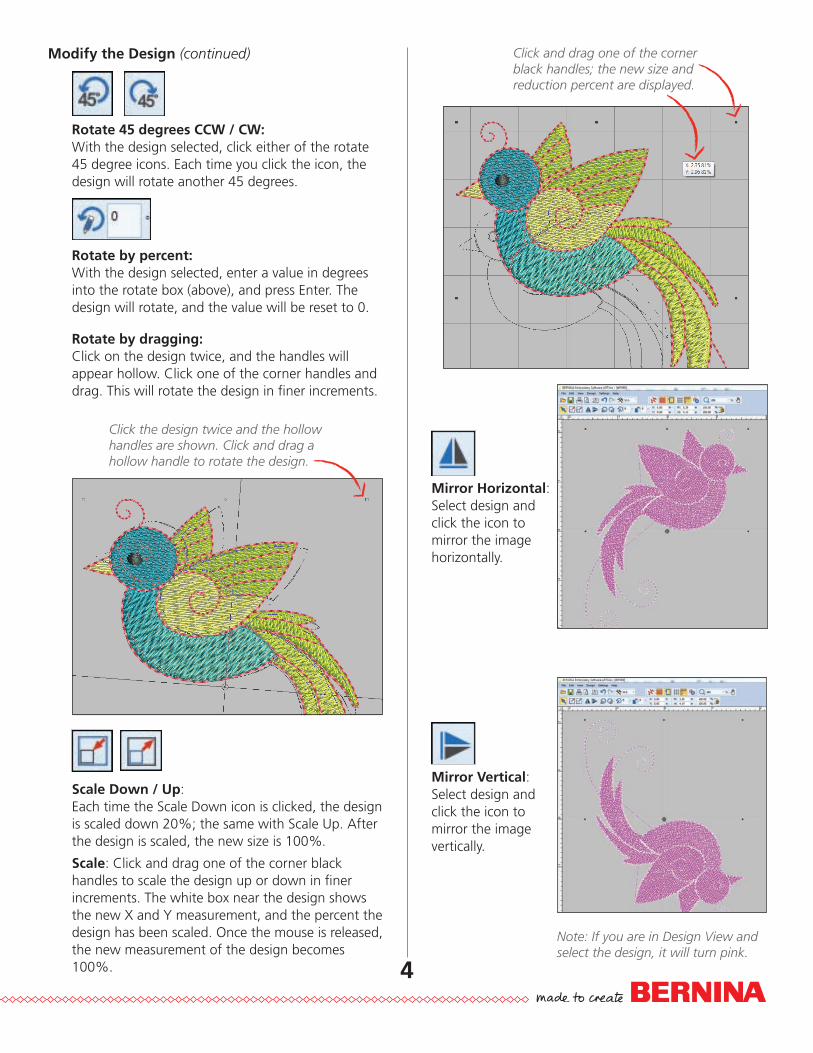
Modify the Design (continued)
Rotate 45 degrees CCW / CW: With the design selected, click either of the rotate 45 degree icons. Each time you click the icon, the design will rotate another 45 degrees.
Rotate by percent: With the design selected, enter a value in degrees into the rotate box (above), and press Enter. The design will rotate, and the value will be reset to 0.
Rotate by dragging: Click on the design twice, and the handles will appear hollow. Click one of the corner handles and drag. This will rotate the design in finer increments.
Click and drag one of the corner black handles; the new size and reduction percent are displayed.
Scale Down / Up: Each time the Scale Down icon is clicked, the design is scaled down 20%; the same with Scale Up. After the design is scaled, the new size is 100%.
Scale: Click and drag one of the corner black handles to scale the design up or down in finer increments. The white box near the design shows the new X and Y measurement, and the percent the design has been scaled. Once the mouse is released, the new measurement of the design becomes 100%.
Click the design twice and the hollow handles are shown. Click and drag a hollow handle to rotate the design.
4
Mirror Horizontal: Select design and click the icon to mirror the image horizontally.
Mirror Vertical: Select design and click the icon to mirror the image vertically.
Note: If you are in Design View and select the design, it will turn pink.
5
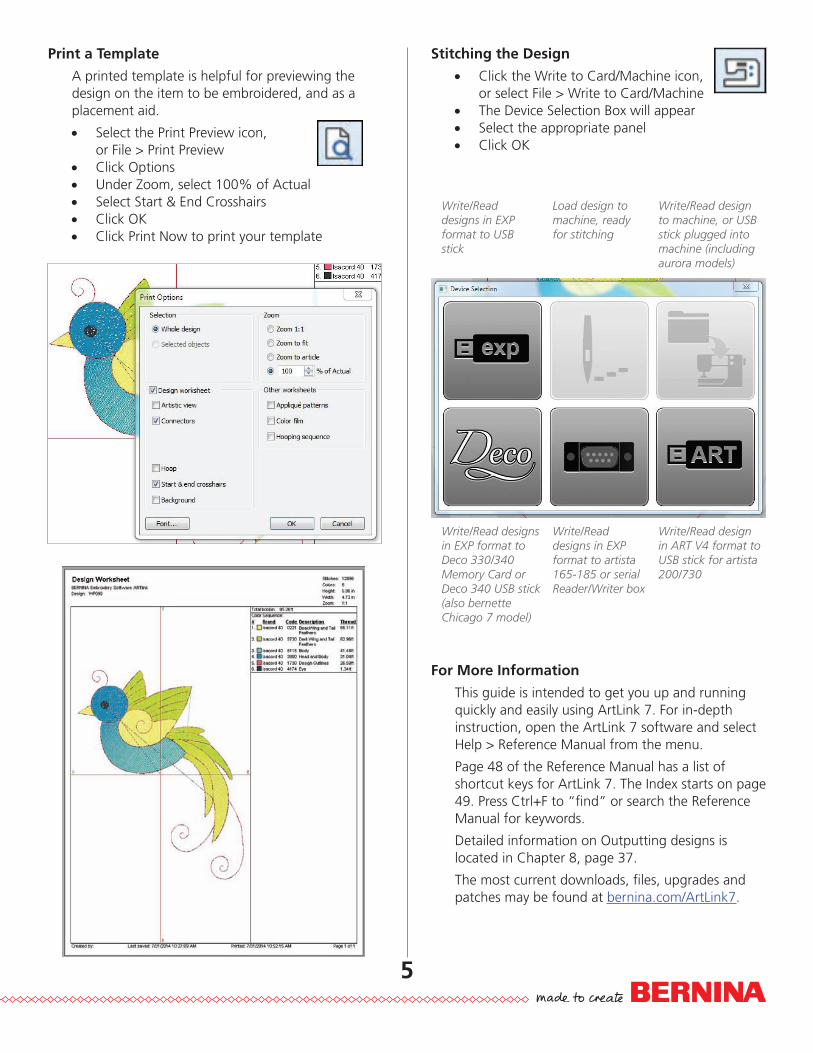
Print a Template
A printed template is helpful for previewing the design on the item to be embroidered, and as a placement aid.
• Select the Print Preview icon, or File > Print Preview
• Click Options• Under Zoom, select 100% of Actual• Select Start & End Crosshairs• Click OK• Click Print Now to print your template
Stitching the Design
• Click the Write to Card/Machine icon, or select File > Write to Card/Machine
• The Device Selection Box will appear• Select the appropriate panel• Click OK
For More Information
This guide is intended to get you up and running quickly and easily using ArtLink 7. For in-depth instruction, open the ArtLink 7 software and select Help > Reference Manual from the menu.
Page 48 of the Reference Manual has a list of shortcut keys for ArtLink 7. The Index starts on page 49. Press Ctrl+F to “find” or search the Reference Manual for keywords.
Detailed information on Outputting designs is located in Chapter 8, page 37.
The most current downloads, files, upgrades and patches may be found at bernina.com/ArtLink7.
Write/Read designs in EXP format to USB stick
Write/Read designs in EXP format to Deco 330/340 Memory Card or Deco 340 USB stick (also bernette Chicago 7 model)
Write/Read designs in EXP format to artista 165-185 or serial Reader/Writer box
Write/Read design to machine, or USB stick plugged into machine (including aurora models)
Write/Read design in ART V4 format to USB stick for artista 200/730
Load design to machine, ready for stitching
6
Frequently Asked Questions
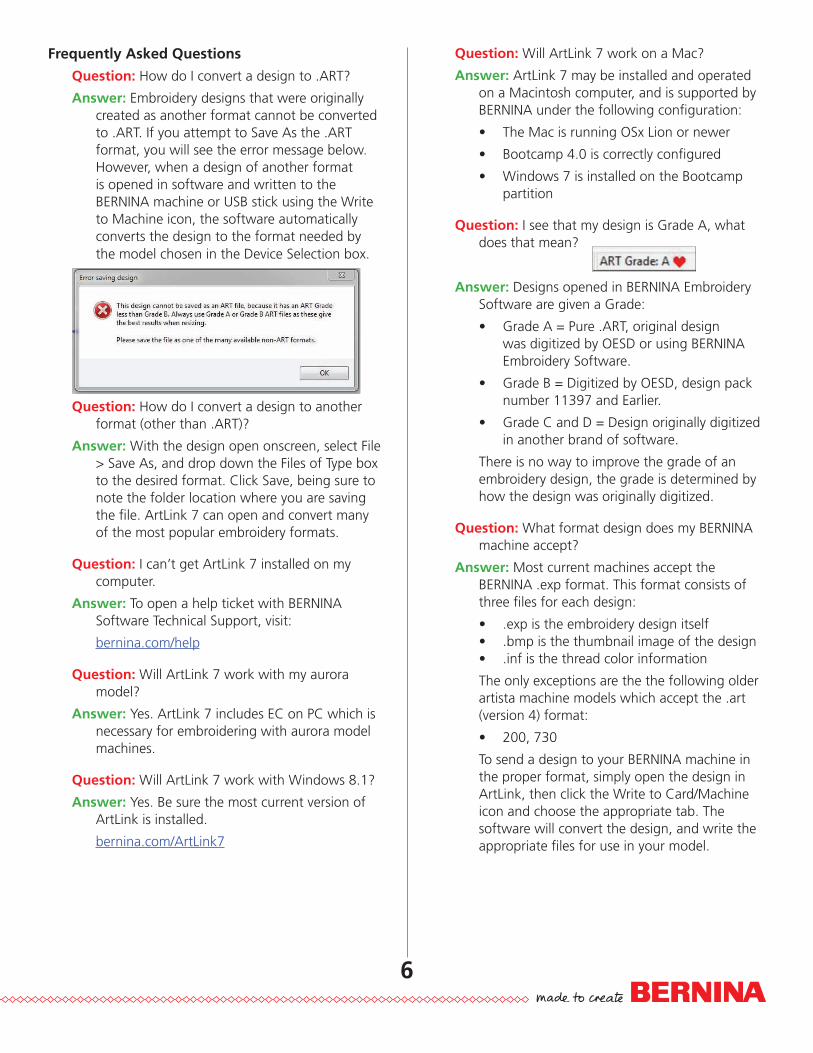
Question: How do I convert a design to .ART?
Answer: Embroidery designs that were originally created as another format cannot be converted to .ART. If you attempt to Save As the .ART format, you will see the error message below. However, when a design of another format is opened in software and written to the BERNINA machine or USB stick using the Write to Machine icon, the software automatically converts the design to the format needed by the model chosen in the Device Selection box.
Question: How do I convert a design to another format (other than .ART)?
Answer: With the design open onscreen, select File > Save As, and drop down the Files of Type box to the desired format. Click Save, being sure to note the folder location where you are saving the file. ArtLink 7 can open and convert many of the most popular embroidery formats.
Question: I can’t get ArtLink 7 installed on my computer.
Answer: To open a help ticket with BERNINA Software Technical Support, visit:
bernina.com/help
Question: Will ArtLink 7 work with my aurora model?
Answer: Yes. ArtLink 7 includes EC on PC which is necessary for embroidering with aurora model machines.
Question: Will ArtLink 7 work with Windows 8.1?
Answer: Yes. Be sure the most current version of ArtLink is installed.
bernina.com/ArtLink7
Question: Will ArtLink 7 work on a Mac?
Answer: ArtLink 7 may be installed and operated on a Macintosh computer, and is supported by BERNINA under the following configuration:
• The Mac is running OSx Lion or newer
• Bootcamp 4.0 is correctly configured
• Windows 7 is installed on the Bootcamp partition
Question: I see that my design is Grade A, what does that mean?
Answer: Designs opened in BERNINA Embroidery Software are given a Grade:
• Grade A = Pure .ART, original design was digitized by OESD or using BERNINA Embroidery Software.
• Grade B = Digitized by OESD, design pack number 11397 and Earlier.
• Grade C and D = Design originally digitized in another brand of software.
There is no way to improve the grade of an embroidery design, the grade is determined by how the design was originally digitized.
Question: What format design does my BERNINA machine accept?
Answer: Most current machines accept the BERNINA .exp format. This format consists of three files for each design:
• .exp is the embroidery design itself• .bmp is the thumbnail image of the design• .inf is the thread color information
The only exceptions are the the following older artista machine models which accept the .art (version 4) format:
• 200, 730
To send a design to your BERNINA machine in the proper format, simply open the design in ArtLink, then click the Write to Card/Machine icon and choose the appropriate tab. The software will convert the design, and write the appropriate files for use in your model.

7
Frequently Asked Questions
Question: How do I get designs to my bernette Chicago 7 model?
Answer: After clicking the Write to Card/Machine icon, select the Deco tab.
Question: My Chicago 7 machine is not reading the design from the USB stick. What could be wrong?
Answer: Remember the Chicago 7 has the following embroidery motif limitations:
• Maximum number of stitches is 65,000• Maximum number of colors is 30• Maximum size 110 mm x 170 mm
(or 4.4” x 6.7”)• File name must not exceed 17 characters• USB stick must be 2 GB or less, and USB 2• The file name of the design may include
these letters, characters and numbers only:
A B C D E F G H I J K L M N O P Q R S T U V W X Y Z 1 2 3 4 5 6 7 8 9 0 & ! _ . – ( )
Notes