Embed Size (px)
Citation preview

Juniper vLabs User Guide v1.6
Juniper Networks, the Juniper Networks logo, Juniper, and Junos are registered trademarks of Juniper Networks, Inc. and/or its affiliates in the United States and other countries. All other trademarks may be property of their respective owners. Juniper Networks assumes no responsibility for any inaccuracies in this document. Juniper Networks reserves the right to change, modify, transfer, or otherwise revise this publication without notice. The information in this document is current as of the date on the title page.
END USER LICENSE AGREEMENT The Juniper Networks product that is the subject of this technical documentation consists of (or is intended for use with) Juniper Networks software. Use of such software is subject to the terms and conditions of the End User License Agreement (“EULA”) posted at https://www.juniper.net/support/eula/. By downloading, installing or using such software, you agree to the terms and conditions of that EULA.
YEAR 2000 NOTICE Juniper Networks hardware and software products are Year 2000 compliant. Junos OS has no known time-related limitations through the year 2038. However, the NTP application is known to have some difficulty in the year 2036.
Juniper Networks, Inc. 1133 Innovation Way Sunnyvale, California 94089 USA 408-745-2000 www.juniper.net Juniper vLabs User Guide Copyright © 2018 Juniper Networks, Inc. All rights reserved.
1

Juniper vLabs User Guide
Table of Contents Table of Contents 2
Juniper vLabs Overview 3 Introduction 3 Prerequisites 3
Starting a Session 3 Launch a Topology 3 Verify your Time Zone 4 Reserve a Session 5 Verify the Sandbox is Ready to Use 5 Access The Sandbox 6
Accessing Resources (Devices) in a Sandbox 6 Accessing a Device via SSH Using a Web Browser 6 Accessing a Device via SSH Using Local SSH/RDP Tools 7 Accessing a Device via HTTPS 9 Accessing a Device Through its Console Port 11
Managing Active Sandbox Reservations 13 Extending a Sandbox Reservation 13 Ending a Sandbox Reservation 14
Monitoring/Troubleshooting Sandbox Resources 15 Monitoring Resource Health 15 Restarting a Single Resource 15
Usage Notes 17 Restarting a Sandbox 17
Support 17
© 2018 Juniper Networks, Inc. [email protected] 2

Juniper vLabs User Guide
Juniper vLabs Overview
Introduction Juniper vLabs is a web-based platform that provides a place to test drive use cases and features at any time and at no risk to production environments. Leveraging several Juniper product lines, vLabs provides a variety of pre-configured topologies in routing, switching, security, automation, telemetry, and network management. Reservable both in advance and on-demand, vLabs sessions are free and open to everyone with a Juniper account.
vLabs topologies were created by assembling resources (virtual devices, etc.) into blueprints. When you reserve and start up a blueprint topology, it becomes an active topology—or sandbox—in which resources can be accessed, configured, send traffic, etc. The automated setup procedure typically takes 15-30 minutes.
Prerequisites
The Juniper vLabs environment has the following prerequisites:
● A Juniper account (sign-up instructions are here) ● A Web browser. Juniper vLabs was tested using Mozilla Firefox and Google Chrome, but should
generally work with any web browser. There is no need for any plug-ins, etc. ● Local SSH, VNC, and RDP clients. You can use these tools to access sandbox resources directly
(when enabled)
Starting a Session This section describes the steps to start a sandbox session.
Launch a Topology
On the Topology catalog page, browse the list and click Launch for the desired topology.
© 2018 Juniper Networks, Inc. [email protected] 3

Juniper vLabs User Guide
You should now see the topology in the vLabs UI as a blueprint.
Verify your Time Zone By default, your time zone is set to UTC. Change time zone by clicking your username at the upper right of the vLabs UI.
Once you select your timezone, any reservations you make will be based on this timezone.
NOTE: If you clear your browser cache, this setting will be reset to UTC.
© 2018 Juniper Networks, Inc. [email protected] 4

Juniper vLabs User Guide
Reserve a Session
In the vLabs UI, you start a session by making a reservation. Click the RESERVE button at the upper right of the UI.
In the Reserve window that appears, only the first section—SCHEDULE—requires your attention. By default, the session will start immediately and run for three hours. If you wish to change the start date, start time, or session length, alter them as needed. Then click Reserve at the bottom of the window.
NOTE: Do not change any fields related to a device’s software version. While these are text-editable fields, changing them will cause the devices to have issues on startup.
The sandbox setup process then begins. There are several indicators to confirm that your sandbox is being setup:
● A status icon in the upper right corner of the interface indicates the status as Setup. Roll your mouse over this icon to receive the estimated amount of time needed to complete the setup process.
● The Sandbox header changes to a striped pattern. ● The resources in the sandbox have a moving circle around them. ● You receive an email indicating the setup process has started.
Verify the Sandbox is Ready to Use
There are several indicators to confirm that your sandbox is setup and ready to use:
● The status icon in the top right corner changes from Setup to Active.
© 2018 Juniper Networks, Inc. [email protected] 5

Juniper vLabs User Guide
● You receive an email indicating the sandbox is ready for use. ● The resources have a small green circle at their bottom-right corner.
Access The Sandbox
If you are currently in the sandbox page, you are all set! If not, you can access the sandbox/topology through the email you receive when the sandbox is ready to use.
Accessing Resources (Devices) in a Sandbox
Accessing a Device via SSH Using a Web Browser
You can open an SSH session to devices in your vLab sandbox (once it is active) through a Web browser.
To access a resource through a browser:
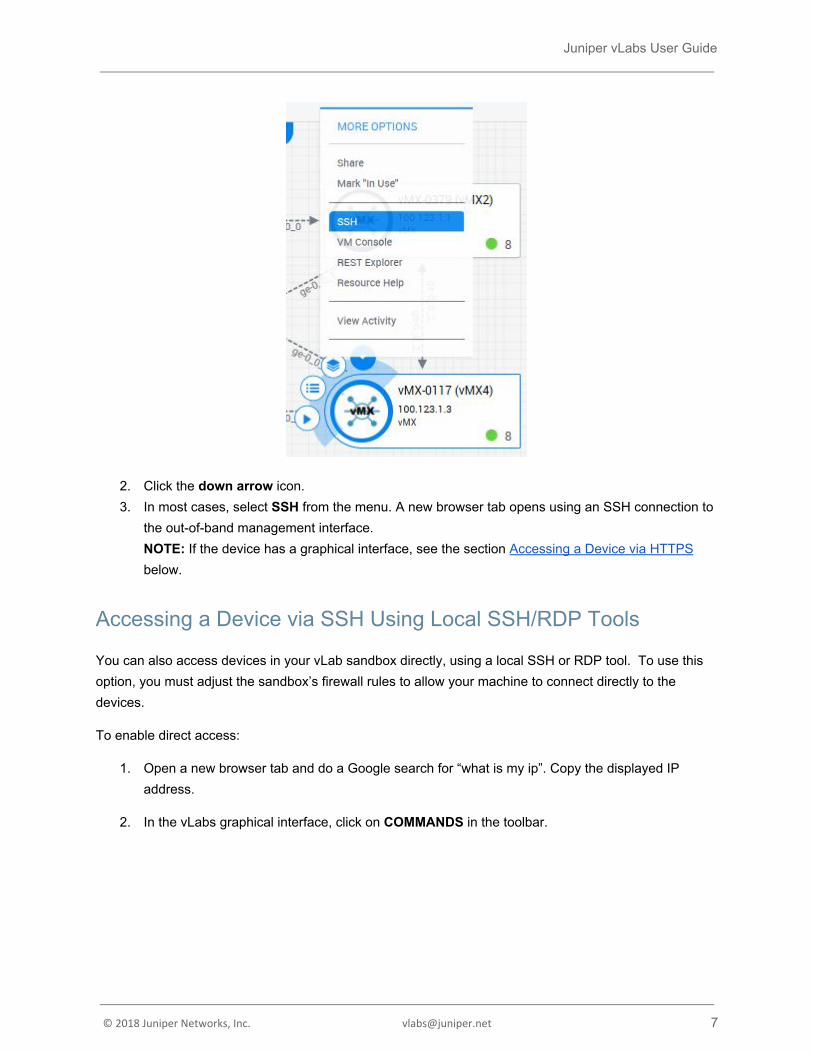
1. Mouse over the icon for the resource. Multiple icons appear.
© 2018 Juniper Networks, Inc. [email protected] 6
Juniper vLabs User Guide
2. Click the down arrow icon. 3. In most cases, select SSH from the menu. A new browser tab opens using an SSH connection to
the out-of-band management interface. NOTE: If the device has a graphical interface, see the section Accessing a Device via HTTPS below.
Accessing a Device via SSH Using Local SSH/RDP Tools
You can also access devices in your vLab sandbox directly, using a local SSH or RDP tool. To use this option, you must adjust the sandbox’s firewall rules to allow your machine to connect directly to the devices.
To enable direct access:
1. Open a new browser tab and do a Google search for “what is my ip”. Copy the displayed IP address.
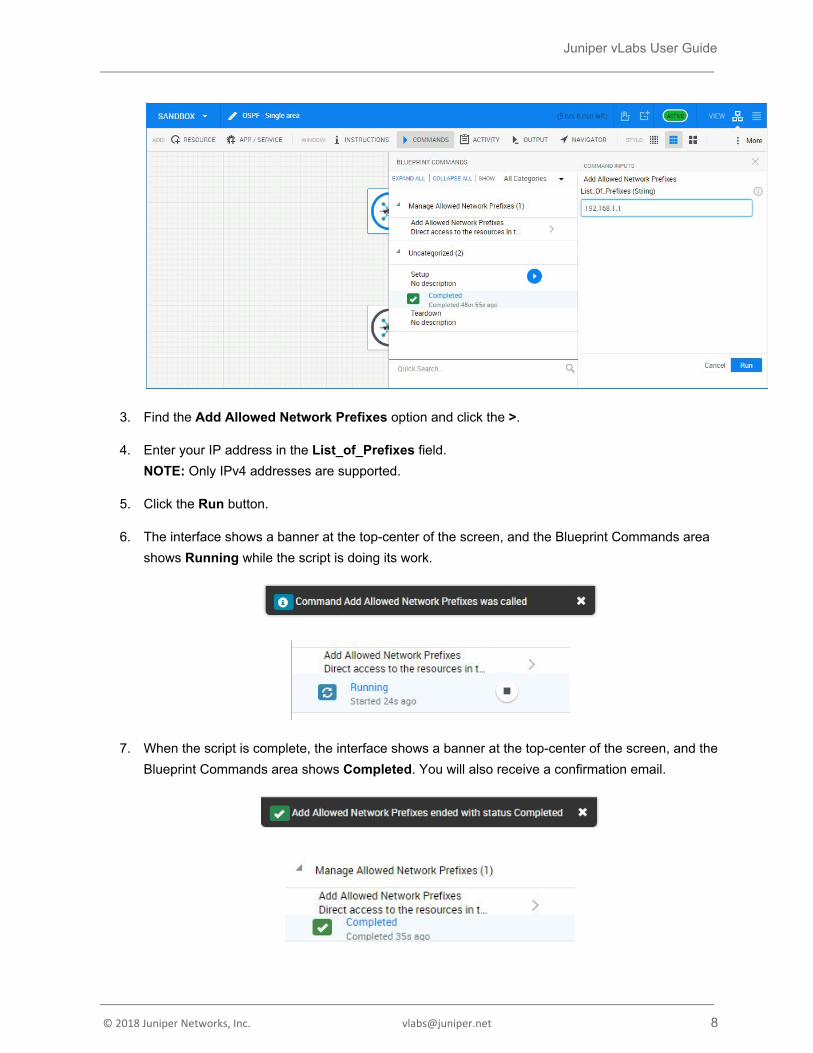
2. In the vLabs graphical interface, click on COMMANDS in the toolbar.
© 2018 Juniper Networks, Inc. [email protected] 7
Juniper vLabs User Guide
3. Find the Add Allowed Network Prefixes option and click the >.
4. Enter your IP address in the List_of_Prefixes field. NOTE: Only IPv4 addresses are supported.
5. Click the Run button.
6. The interface shows a banner at the top-center of the screen, and the Blueprint Commands area shows Running while the script is doing its work.
7. When the script is complete, the interface shows a banner at the top-center of the screen, and the Blueprint Commands area shows Completed. You will also receive a confirmation email.
© 2018 Juniper Networks, Inc. [email protected] 8

Juniper vLabs User Guide
You can now access the devices:
1. In the vLabs graphical interface, choose a device and hover your mouse over the green circle. Copy down the SSH (or RDP) IP address and port information for the next step.
2. In your local SSH (or RDP) tool, add a new connection to this address/port. 3. Open a connection and enter the device login credentials. You should gain access to the device.
4. Repeat these steps for each device in the sandbox.
Accessing a Device via HTTPS
You can also use HTTPS to access some devices. For example, most Junos devices have J-Web browser access, To use this option, you must adjust the sandbox’s firewall rules to allow your machine to connect directly to the devices.
To enable direct access:
1. Open a new browser tab and do a Google search for “what is my ip”. Copy the displayed IP address.
2. In the vLabs graphical interface, click on COMMANDS in the toolbar.
© 2018 Juniper Networks, Inc. [email protected] 9

Juniper vLabs User Guide
3. Find the Add Allowed Network Prefixes option and click the >.
4. Enter your IP address in the List_of_Prefixes field. NOTE: Only IPv4 addresses are supported.
5. Click the Run button.
6. The interface shows a banner at the top-center of the screen, and the Blueprint Commands area shows Running while the script is doing its work.
7. When the script is complete, the interface shows a banner at the top-center of the screen, and the Blueprint Commands area shows Completed. You will also receive a confirmation email.
© 2018 Juniper Networks, Inc. [email protected]
10

Juniper vLabs User Guide
You can now access the devices:
1. Mouse over the icon for the resource. Multiple icons appear.
2. Click the down arrow icon. 3. In most cases, select HTTPS from the menu. A new browser tab opens using an HTTPS
connection to the out-of-band management interface.
Accessing a Device Through its Console Port
While not typically needed, you can enable console port access to a device. This option can be especially useful if you accidentally delete or overwrite a device’s management interface configuration.
In the vLabs environment, a token is needed to enable console access; if you try to log in to a VM console before generating this token, a new browser tab will open with a message indicating your login attempt is invalid.
To create VM console access to a resource:
1. Mouse over a resource to select it.
© 2018 Juniper Networks, Inc. [email protected]
11

Juniper vLabs User Guide
2. Click the Right arrow Commands button. The Resource Commands box appears on the right side of the vLabs UI.
3. Click the run button next to Generate VM Console Access and embed in URL. 4. Wait a few seconds to ensure the token is generated, then access the VM console login by
selecting VM Console from the resource’s drop-down menu.
5. In the new browser tab that opens, press the Enter key once or twice to get a device login prompt. Login credentials are the same as used for SSH access.
© 2018 Juniper Networks, Inc. [email protected]
12

Juniper vLabs User Guide
Managing Active Sandbox Reservations
Extending a Sandbox Reservation
To extend a sandbox reservation:
1. Select Extend from the SANDBOX drop-down menu at the upper left of the interface. Or..
2. Click the Extend icon in the upper right corner of the interface.
3. In the window that appears, click the blue text fields and select the amount of time that you wish to extend the reservation and click Extend. Note that the maximum session time is currently six hours.
© 2018 Juniper Networks, Inc. [email protected]
13

Juniper vLabs User Guide
Ending a Sandbox Reservation
A sandbox session will automatically shut down at the reservation end time, or you can manually end it.
To manually end a sandbox reservation:
1. Select End from the SANDBOX drop-down menu at the upper left of the interface. Or..
2. Click the End icon in the upper right corner of the interface.
3. In the window that appears, click OK.
The following elements confirm the teardown procedure is in progress:
● The sandbox ending process has started message is visible in the middle of the interface. ● The status icon in the top right corner indicates Teardown. ● You receive an email indicating the sandbox session is ending.
© 2018 Juniper Networks, Inc. [email protected]
14

Juniper vLabs User Guide
NOTE: You can close the browser after confirming the teardown procedure has started; you do not need to wait for the process to finish.
Monitoring/Troubleshooting Sandbox Resources
Monitoring Resource Health
The health status of each individual resource in any sandbox can be monitored using the health status icon. The health status icon is in the bottom right corner of every resource in a sandbox.
The colors of the health status icon include:
● Green: resource is up and running normally ● Partial green: resource is up, but not all access ports (SSH, HTTPS, etc.) are enabled ● Red or grey: resource has a problem
Restarting a Single Resource
On occasion, a sandbox resource may not start up properly. While the fix is typically to end and restart the entire sandbox, for sandboxes with a single device (and therefore no starting configs), sometimes restarting just the device can solve the problem.
Resources in a sandbox can be power cycled using the power management commands. A resource can be re-initialized—completely torn down and restarted as a new resource—using a resource management resource command.
© 2018 Juniper Networks, Inc. [email protected]
15

Juniper vLabs User Guide
The power management and resource management commands can be accessed by hovering your mouse over the resource and clicking the right arrow (Commands) button.
In the Commands section, select the appropriate Run button to power on, power down, power cycle, or re-initialize a resource.
© 2018 Juniper Networks, Inc. [email protected]
16

Juniper vLabs User Guide
Usage Notes
● Restarting a device will not reload any starting configs, therefore this option is most appropriate for use with the standalone topologies. You are welcome to use this option with multi-device topologies, however you will need to build that device’s configuration yourself.
● Do not click Run for a device you have already configured. The Run action will start immediately, and will destroy any existing setup or configuration on the device.
Restarting a Sandbox
As noted above, on occasion a sandbox may not start up properly. For sandboxes with multiple devices and starting configs, restarting the affected device does not fully resolve the problem as the restart will not include loading the device’s proper starting configuration for the topology.
For multi-device topologies that have an issue on start-up, typically the fix is to simply end the current session and reserve a new session.
Support Juniper vLabs is intended as a self-serve offering, therefore we do not offer real-time support.
If you are having issues, feel free to contact us:
● By email, at [email protected] ● By replying to any of the ‘vLabs Support’ emails you receive as part of the sandbox setup and
teardown process.
Note that we are generally not able to support active back-and-forth communication with users, however we do read every email that comes in.
To help us resolve your issue, please as include as much information as possible, including:
● Description of the problem ● Sandbox URL ● Frequency - single occurrence or persistent issue ● Screenshots, if appropriate ● Any other information that could help troubleshoot the problem
© 2018 Juniper Networks, Inc. [email protected]
17