Embed Size (px)
Citation preview

©Canadian Sport Parachuting Association, 2010
JUMP MASTER
REFERENCE MANUAL
CSPA Role: Jump Master
Section A – Course Introduction Section B – Coaching Techniques Section C – Technical Knowledge Section D – Safety and Unusuals
Version 2010 Last Saved: 24 January 2010

Page 2 of 138 Jump Master Reference Manual
© Canadian Sport Parachuting Association, 2010
Foreword THE CANADIAN SPORT PARACHUTING ASSOCIATION (CSPA) is pleased to provide this Jump Master Reference Manual as part of the overall development for Sport Parachuting in Canada. This manual is based on experience from programs across Canada. The content and format of the manual and the instructors’ clinic are to ensure that the clinic participant receives the most effective learning experience possible.
Disclaimer The CANADIAN SPORT PARACHUTING ASSOCIATION (CSPA) and its personnel wish their readers to note that this publication has been prepared for general information only. The publication of the information contained herein is not intended as a representation or warranty that this information has been approved or tested by the CSPA and is suitable for any general or particular use by its readers. Readers are advised that the information published herein should not be relied upon unless competent advice has been obtained with respect to its suitability for a particular application. The use and/or reproduction of the information printed herein is prohibited without the written consent of the CANADIAN SPORT PARACHUTING ASSOCIATION. Anyone who uses and/or reproduces the information published herein without the written consent of the CSPA assumes liability and is responsible for any loss or damages, however caused, arising from such use and/or reproduction. Acquisition of the skills necessary for the safe performance of sport parachuting activities is not a process where self-instruction is either recommended or considered satisfactory. The same holds true for a skydiving instructor. The CSPA recommends that progression in skydiving should be mentored by a CSPA certified instructor and that individuals interested in coaching should take a CSPA coach course. Special Note: the role of a Jump Master, as with any skydiving activity, is a serious and potentially dangerous activity which could lead to serious injury or death for the Jump Master, during the course of training or even after the training.
Acknowledgements The CANADIAN SPORT PARACHUTING ASSOCIATION would like to thank several people for their contributions to the development of this edition of the Jump Master Reference Manual, based on the Instructor A manual (pre 2004). Without them, this edition would not be possible. The 2003 edition was compiled by John Moore and edited by Tom Pfeifer. Special thanks to Aura Lee Flaman who compiled and entered edits on the computer. The content was re-organized and updated in 2008 for publication on the web through the volunteer efforts of Scott McEown, with reviews by Tony Mercer, Andy Morris, Derek Orr and Mario Prevost. Additional Contributors: The CSPA also wishes to acknowledge those individuals who have contributed to the information in past manuals. Gary Butchart Bill Hardman Kevin O’Brian Nesta Chapman Rob Laidlaw Tom Pfeifer Joe Chow Bob Magee Eileen Vaughan Ches Dauphinee Tony Mercer Duncan Grant John Moore

Jump Master Reference Manual Page 3 of 138
© Canadian Sport Parachuting Association, 2010
Safety Slogans CSPA Motto: “Knowledge Dispels Fear” “Safety is No Accident” “No Safety, Know Pain – Know Safety, No Pain” “The sport is only as safe as you make it.” About the Manual The Jump Master Reference Manual is one of a series of manuals that supports the instructional programs of the CSPA. It cannot be used effectively without the knowledge and / or contents of the Coach 1 Reference Manual and course, nor without the participation in the CSPA Jump Master technical course (formerly know as Instructor A pre-2004). In the coming years, as techniques are improved and information is brought up to date, it will be possible to provide you with additions to your manual; these additions can be inserted into the appropriate sections of the manual. These manuals in English are produced by volunteers, the unpaid efforts of people who are committed to promoting instruction and development of instructors in Canada. No money was paid to anyone for the re-development of this manual in English. The Coaching Working Committee (CWC) of the CSPA welcomes your comments pertaining to the content and layout of this manual. The CWC is responsible for its development. Please address your remarks, suggestions for improvements and questions to [email protected] .

Page 4 of 138 Jump Master Reference Manual
© Canadian Sport Parachuting Association, 2010
Table of Contents
Foreword.................................................................................................................................................................. 2
Disclaimer................................................................................................................................................................ 2
Acknowledgements ................................................................................................................................................. 2
Table of Contents .................................................................................................................................................... 4
Jump Master Training & Certification Pathway ..................................................................................................... 7
Modules for Jump Master........................................................................................................................................ 8
Jump Master Course Schedule ................................................................................................................................ 9
Section A – Course Introduction ........................................................................................................................... 11
1.1 Introduction to the Jump Master (JM) Rating .........................................................................................................11 1.1.1 Jump Master Prerequisites ...............................................................................................................................12 1.1.2 Evaluation and Performance Requirements.....................................................................................................12 1.1.3 Privileges of a Jump Master.............................................................................................................................13 1.1.4 Practical Requirements ....................................................................................................................................13 1.1.5 Course Skill Activities .....................................................................................................................................14
1.2 CSPA Ratings Model................................................................................................................................................14
Section B – Instructing Techniques....................................................................................................................... 16
2.0 Instructor Techniques ....................................................................................................................................................16 2.1 The Role of the Jump Master (privileges)................................................................................................................17
2.1.1 Jump Master Tasks ..........................................................................................................................................18 2.2 Coach 1 Review and Application to the Jump Master ...................................................................................................20 2.3 Gear Checks for Students...............................................................................................................................................21 2.4 Instructor Assisted Climb-out (IAC): Theory and Practice...........................................................................................23 2.5 Ground Control Techniques ..........................................................................................................................................24
2.5.1 Getting the Ground Control Instructor (GCI) certified Rating ...............................................................................31 2.6 2.6 Student Supervision – Normal ...........................................................................................................................32
2.6.1 Student Supervision Checklist ................................................................................................................................38 2.7 Spotting for Students ......................................................................................................................................................39
2.7.1 Spotting Progression for the Students..............................................................................................................40 2.7.3 In-flight Skills for the Student .........................................................................................................................41
2.8 Student Equipment .......................................................................................................................................................42 2.8.1 AAD – Automatic Activation Device.....................................................................................................................42 2.8.2 RSL – Reserve Static Line......................................................................................................................................44 2.8.3 Containers/Canopies ...............................................................................................................................................45 2.8.4 Activation of the Reserve Canopy ..........................................................................................................................46

Jump Master Reference Manual Page 5 of 138
© Canadian Sport Parachuting Association, 2010
2.8.5 Equipment Changes — Procedure Changes ...........................................................................................................47 2.9 Dispatching Theory........................................................................................................................................................50
2.9.1 Deployment system preparation .............................................................................................................................51 2.9.2 Assisting the Student's Exit.....................................................................................................................................52 2.9.3 Deployment System Control...................................................................................................................................53 2.9.4 Gradual Freefall (GFF) progression........................................................................................................................55
2.10 After Dispatching .........................................................................................................................................................56 2.10.1 Canopy Control and Landing................................................................................................................................56 2.10.2 Equipment .............................................................................................................................................................57 2.10.3 Student Feedback ..................................................................................................................................................57 2.10.4 Jump Records - Paperwork ...................................................................................................................................58 2.10.5 Video or Pictures...................................................................................................................................................59
2.11 Stress Assessment and Control ..................................................................................................................................60
Section C – Technical Knowledge ........................................................................................................................ 65
3.1 Aircraft Knowledge, Loading and Safety.......................................................................................................................65 3.2 Rules and Recommendations .........................................................................................................................................69 3.3 The First Jump Course...................................................................................................................................................70 3.4 Athlete Development – Gradual Freefall Progression (GFP).......................................................................................76
3.4.1 Spotting Progression ...............................................................................................................................................77 3.4.2 Canopy Progression ................................................................................................................................................77 3.4.3 First Freefall............................................................................................................................................................77 3.4.4 Currency / Activity Level .......................................................................................................................................82 3.4.5 Second Try Procedures ...........................................................................................................................................83
3.5 Endorsements.................................................................................................................................................................85 3.5.1 Solo Check Out Jump .............................................................................................................................................86 3.5.2 Emergency Procedures Review (EPR) ...................................................................................................................92 3.5.3 Main Packing Endorsement (MPE) ........................................................................................................................93
Section D – Safety and Unusuals .......................................................................................................................... 98
4.1 Student Supervision — Unusual Situations....................................................................................................................98 4.1.1 Unusual Preparation Situations...............................................................................................................................98 4.1.2 Student Related Unusual Situations........................................................................................................................99 4.1.3 Climb out Situations .............................................................................................................................................101 4.1.4 IAD Unusual Situations ........................................................................................................................................103 4.1.5 Climb-out Types ...................................................................................................................................................104 4.1.6 Unusual Freefall Situations...................................................................................................................................106 4.1.7 Unusual Canopy Control Situations......................................................................................................................106 4.1.8 Unusual Equipment Situations..............................................................................................................................108 4.1.9 Problems Under Canopy - Obstacles ....................................................................................................................109 4.1.10 Technical Knowledge for the Student.................................................................................................................113
4.2 Aircraft Emergencies -- Unusual In-flight Situations.................................................................................................115 4.3 Accidents and Safety Routines .....................................................................................................................................117
Appendix ............................................................................................................................................................. 120
Appendix - IAD Dispatching Techniques for Specific Aircraft..........................................................................................121 IAD – Flying or Hanging - C-182 Type (C-205P / C-206P) .........................................................................................121 IAD - Dynamic - C-182 Type (C-205 / C-206P)...........................................................................................................126 Climb-out Procedure – Dynamic Exit C182 .............................................................................................................126

Page 6 of 138 Jump Master Reference Manual
© Canadian Sport Parachuting Association, 2010
IAD - Dynamic - C- 206U (cargo right rear door).........................................................................................................129 Unusual Situations:............................................................................................................................................................133 SL Dispatching Techniques for Specific Aircraft...............................................................................................................134
SL - Poised - C-182 Type (C-205 / C-206P) .................................................................................................................134 SL - Poised - C-180 Type (C-185).................................................................................................................................134 SL - Dynamic - C-206U (right rear door) ......................................................................................................................135 SL - Hanging - C-180 Type (C-185)..............................................................................................................................136
2. Appendix - JM Reference Manual Change Log....................................................................................... 138

Jump Master Reference Manual Page 7 of 138
© Canadian Sport Parachuting Association, 2010
Jump Master Training & Certification Pathway
Prerequisite Coach 1 Trained (Certified strongly recommended) Observe an experienced JM dispatching students Observe GCI with minimum 25 student landings
Jump Master Workshop During the 3-Day Workshop 1. Instructing skills: teaching the clear-and-pull, etc. 2. Equipment Skills: safety checks 3. Dispatching Skills (IAD/SL and free fall) 4. Spotting ability 5. GCI: Radio handling 6. BSR Test, Final Exam
Portfolio 6 IAD or SL dispatch under supervision of a certified and highly experienced Jump Master 25 Documented Student dispatches using IAD or SL for JM
(or 25 Freefall student dispatches for JM-Restricted) Coach 1 Certified Due 1 Year from date of course GCI: See separate portfolio requirements
Preparation for the course: See the JM study guide as well as within the latest version of PIM 1 online at www.cspa.ca Review the Coach 1 Reference Manual; in point form answer the items taken from the "Review Questions" at the end of each chapter in the manual.

Page 8 of 138 Jump Master Reference Manual
© Canadian Sport Parachuting Association, 2010
Modules for Jump Master 1. Course Introduction
1.1. Introduction and Overview 1.2. The CSPA Coaching and Instructing model
2. Coaching Techniques
2.1. Role of the Jump Master 2.2. Coach 1 Review and Application to Jump Master 2.3. FF Pin Checks 2.4. IAC Theory and Practice 2.5. Canopy Guidance 2.6. Student Supervision – Normal 2.7. Spotting for Students 2.8. Student Equipment 2.9. Dispatching Theory and Demo 2.10. Stress Assessment and Control
3. Technical Knowledge
3.1 Aircraft Knowledge, Loading and Safety 3.2 Rules and Recommendations for Students 3.3 The First Jump Course 3.4 GFP 3.5 Endorsements
4. Safety and Unusual Situations 4.1 Student Unusual 4.2 Aircraft Emergencies 4.3 Accidents and Safety Routines
5. Course Summary 5.1 Course Review 5.2 Jump Master Exam 5.3 Interviews
6. Jump Phase 6.1 JM Jump #1(with stretching) - IAC 6.2 JM Jump #2 - Canopy Guidance Exercise 6.3 JM Jump #3 - Canopy Guidance Exercise

Jump Master Reference Manual Page 9 of 138
© Canadian Sport Parachuting Association, 2010
Jump Master Course Schedule (May be modified as appropriate to the class and time, and is only intended as a guide)
Day 1 Time Content Activity Evaluation 9:00 to 9:15 1.1 Introduction and Overview Not evaluated 9:15 to 9:30 1.2 CSPA model Quiz 9:30 to 10:30 2.1 Role of the Jump Master
2.2 Coach 1 Review and Application to Jump Master
Coaching Jumps
10:30 to 10:45 BREAK 10:45 to 11:00 3.1 Aircraft Knowledge, Loading
and Safety
11:00 to 12:00 2.3 FF Pin Checks 2.4 IAC Theory and Practice
12:00 to 4:00 Jump Master Jump #1 – IAC (Includes Lunch)
LUNCH Jumps by candidates, including warm-ups
Jump #1 – ability to climb out and back into the aircraft
4:00 to 4:30 3.2 Rules and Recommendations for Students
4:30 to 5:00 3.3 The First Jump Course 5:00 to 5:30 2.5 Canopy Guidance 5:30 to 6:00 2.6 Student Supervision – Normal 6:00 to 6:15 Assignment of Teaching Task Practice throw, Clear & Pull, 5-
10 second delays, etc. Day 2 Time Content Activity Evaluation 8:30 to 8:45 Review of Day 1 8:45 to 9:00 BSR Exam Exam by Candidates Must get 100% correct 9:00 to 9:15 2.7 Spotting for Students 9:15 to 9:30 BREAK 9:30 to 10:00 2.8 Student Equipment 10:00 to 10:45 2.9 Dispatching Theory and Demo 10:45 to 11:45 PAF
Ground Dispatching Practice
11:45 to 5:00 Jump Master Jump #2 Canopy Guidance Exercise (Includes Lunch)
LUNCH Jumps by candidates, including warm-ups
Jump #2: safe deployment of a pilot chute; student supervision
5:00 to 5:30 3.4 GFP 5:30 to 6:00 3.5 Endorsements 6:00 to 6:15 Provide “Log Book entries” for
Jump #3
Day 3 Time Content Activity Evaluation 8:30 to 9:00 2.10 Stress Assessment, Control 9:00 to 10:00 4.1 Student Unusual
4.2 Aircraft Emergencies
10:00 to 3:00
Jump Master Jump #3 Canopy Guidance Exercise (Includes Lunch)
LUNCH - Jumps by candidates, including warm-ups
Jump #3 - Complete supervision from “hello to goodbye”
3:00 to 3:30 4.3 Accidents and Safety Routines
3:30 to 3:45 5.1 Course Review 3:45 to 5:00 5.2 Jump Master Exam Exam by candidates Quiz

Page 10 of 138 Jump Master Reference Manual
© Canadian Sport Parachuting Association, 2010
5:00 to 6:00 5.3 Interviews

Section A – Course Introduction Page 11 of 138
©Canadian Sport Parachuting Association, 2010
Section A – Course Introduction
1.1 Introduction to the Jump Master (JM) Rating Many people see the skydiving Jump Master as the person who tosses pilot chutes or connects up the static line. But there is a lot more to the Jump Master than simply dispatching. A major requirement to becoming a skydiving instructor is active participation in the sport as a Coach. You must have a genuine and sincere interest in working with student parachutists to help them achieve their Solo certification. Course Schedule The course is normally held over a three day period. In order to complete the course you are required to attend the entire course, arriving and leaving on time. Missing any part of this course constitutes an automatic repeat of the course. The Course Facilitator has the final say on course schedule design; it is flexible to meet the needs of the Facilitator, drop zone and the candidates. Some Ground Rules
• Team work is Important! You may be asked to: • Pack for each other and the Course Facilitator • Go for food • Share tips and experiences developed during the course. Participate actively in all discussions
and exercises. • *** Cooperate fully with the Facilitator’s Instructions. Any deviation outside of the instructions
given by the Facilitator while you are playing the part of a student or Jump Master, any unsafe moves in the aircraft, outside of the aircraft, under canopy, or on the ground, will constitute an immediate removal from the course.
• Be on time. Be prepared. Being late or missing sections may result in immediate removal from the course.
• This JM Reference Manual, Coach 1, PIM 1 and PIM 2A manuals are necessary aids. • Use your initiative; the course requires your participation, including Morning warm-ups: Be there! • Give every “student” you supervise / dispatch a safety check prior to boarding or exiting from the
aircraft; missing a safety check (which is a BSR) is an automatic grade of fail on any supervised jump. • Have the necessary equipment and resource materials:
• Your own equipment • Notebook, pens, paper • Highest CoP card • current CSPA membership card • logbook • Coach 1 Certificate (strongly recommended) • Coach 1 manual • JM manual • PIM 1 (current edition) • PIM 2A (current edition

Page 12 of 138 Section A – Course Introduction
© Canadian Sport Parachuting Association, 2010
JM Course Overview
1.1.1 Jump Master Prerequisites • Minimum of 125 controlled freefall jumps since your self-supervision (Solo) jump • B CoP (required), C CoP (recommended) • Coach 1 certified strongly recommended • View a minimum of 2 loads of student dispatches PRIOR to attending the course. Have this
experience signed off in your Log Book by a certified Jump Master. • CSPA Membership, current • age of majority of the province
1.1.2 Evaluation and Performance Requirements The following are requirements needed to pass this course: Dispatching • The candidate must pass a minimum of two complete student dispatch loads for a minimum of six
(6) “students” (using course candidates or facilitator evaluators), using the IAD (Instructor Assisted Deployment) or SL (Static Line) method, where the “students” have major and minor problems. This includes performing supervision, dispatching and providing skill analysis to a level of 80% or higher in each area.
• Note: an individual course may require more loads • Correctly dispatch a minimum of two (2) individuals acting as freefall students, providing skill
analysis to a level of 80% or higher in each area. • Able to select the spot and guide the aircraft to the spot for each dispatched student • Ground Control: provide ground control (radio) for the other course candidates simulating
students; prior exposure is required before taking on the role of a Ground Control Instructor (GCI) Teaching • Demonstrate and teach an assigned skill during the conduct of a supervised jump using the PAF
method from Coach 1. Jump Masters should be aware of the climb-out, count, practice pull, transition training to clear-and-pull (first free fall), and transition to 5-second and 10-second delays.
Supervision • Perform student supervision role during evaluation jumps to a level of 80% or higher • Perform student pre-jump briefings to a level of 80% or higher • Safety check all supervised students • Skill Analysis: during debriefing perform skill analysis and make correct decisions pertaining to
progression Technical Skills and Knowledge • Participate actively in all discussions and exercises; when acting as a “student” candidates will
behave in a safe and responsible manner and do nothing beyond what has been asked of them by the Course Facilitator; acting in an unsafe manner or beyond what has been asked by the Course Facilitator will result in an automatic failure and immediate removal from the course.
• Prior to the start of the course complete the Pre-Course Exam consisting of Coach 1 Review and Basic Safety Rules, obtaining a mark of 80% minimum in each section.
• Complete the BSR exam, obtaining a mark of 100%

Section A – Course Introduction Page 13 of 138
© Canadian Sport Parachuting Association, 2010
• Complete a final written JM exam which consists of a series of true / false, multiple choice, and short answer and fill in the blank questions. You must achieve a minimum of 80% in each section.
On all jumps performed, you will be evaluated on your ability to analyze the student's actions and apply the skill analysis principles from Coach 1. The following marking standards are provided for your information:
Excellent = accurate observation and recall, applied appropriate principles Good = accurate observation and recall, knows why things happened Satisfactory = some observation and recall, knows what generically happened Needs Improvement = inaccurate observation and / or poor recall, does not know what happened
Remember that one objective is to show your competence with the PAF method, including each of the three steps. Technical content should approximate the information contained in the PIM 1 (2008 version), PIM 2A, Coach 1 Reference Manual (2008 version) and this JM Reference Manual (2008 version) under the relevant skill heading. The Jump Master candidate is expected to have a comprehensive knowledge of material in these manuals. Success on the evaluations requires this knowledge plus a reasonable knowledge of the content of this JM Reference Manual and the material covered in class. Recommendation: As an aid to preparing for the evaluations, list the key points for jump mastering students on a piece of paper. Write it from the point of view of your own actions as a Jump Master; when you are dispatching, you can use it as a reference.
1.1.3 Privileges of a Jump Master • Supervise student parachutists during their jumps from stages Pre-level through Stage 4 of the
Skills Grid in their progression through the Gradual Freefall (GFF) program to achieve the Solo Certification.
• Dispatch students from an aircraft using IAD or SL method, as well as supervising freefall students
• Certify: administer and sign off the Main Packing Endorsement and Solo Check-out Jump endorsements, and participate in the training for the Emergency Procedures Review – Solo and A CoP
• Assist: teaching portions of the First Jump Course, when under the direct supervision of a Certified SSI (required experience for entrance to the SSI course)
• Qualify For: the JM is a prerequisite for the Instructor PFF and Skydiving School Examiner (SSE)
1.1.4 Practical Requirements • After completing the 6 observed dispatches, supervise and dispatch 25 students, using either the
IAD or SL method; for the JM certified rating, you must dispatch a total of 25 IAD or SL students; for the JMR certified rating, 25 freefall students must be supervised (NOTE: must be pre-Solo students, not novices)
• After the course, once the candidate has received their portfolio, but Prior to beginning dispatching alone, the candidate must first dispatch 6 IAD/SL students under the direct supervision of a highly experienced and certified Jump Master.

Page 14 of 138 Section A – Course Introduction
© Canadian Sport Parachuting Association, 2010
• Submit a properly completed Portfolio to CSPA • All to be completed within 1 Year from the date of the Jump Master Course; (an extension may be
requested by the candidate within 1 year from the date of the course, and only for exceptional circumstances)
• Ground Control Instructor (GCI) rating: In the Jump Master course you will also be trained for
the GCI rating, specifically on radio control. To get the GCI rating you are required to: a) Directly observe 25 student controls by an experienced, certified instructor (recommended as
a pre-course task) b) take the GCI Module (as part of the JM course, or SSI course, or as a stand-alone module
after completion of the C1 training course), and c) AFTER the training and observation above are completed and signed off, perform 25 self-
supervised radio ground controls to complete certification while under the direct supervision of a Certified GCI.
1.1.5 Course Skill Activities You may wish to prepare for the evaluations by practicing the skills of spotting, safety checks, etc. prior to the course. It is suggested that you become familiar with the technical information associated with those skills. In the course you will participate in the role of the "student", providing feedback to your fellow candidates after the practice or jump. a) Teach a Skill: Correctly teach two different skydiving skills, as assigned, to a student skydiver or
candidate on the course relevant to their level (e.g. First Jump, Practice Pull, Clear and Pull, 5 second delay, etc.), using appropriate aids and following the PAF teaching method from the Coach 1 course.
b) Supervise: This is a practice of your ability to prepare students during a typical CSPA Skills Grid
Pre-Stage to Stage 2 jump; you will face a normal student who makes minor errors; this is a practice of your preparation and handling of the student in-flight. You will prepare, dispatch and debrief each student.
c) The Evaluation Jumps: Each jump is graded in an increasing fashion. Instructor Assisted Climb out
(free fall students), IAD normal, and IAD unusual situations.
1.2 CSPA Ratings Model As with all CSPA courses, the Coach 1 rating is the foundation for this rating. While certification is not a requirement for the Jump Master course, it is highly recommended that one become fully certified in the Coach 1 prior to taking any other ratings courses. This will allow the participant to put the knowledge and skills gained in Coach 1 to practical use to ensure greater awareness and understanding prior to taking on a new rating role. The JM certified rating can be used as a prerequisite for PFFI. You also need the Coach 2 certified rating.

Section A – Course Introduction Page 15 of 138
© Canadian Sport Parachuting Association, 2010
- Tandem Rating Administered by Equipment Manufacturers NOT through CSPA (the manufactures require an instructional rating from your national association though) - Dashed Boxes are positions that are completed through an apprentice based approach in the field and do not have an associated classroom course. * Indicates Major course perquisites (see PIM1 for complete and up-to-date info) Review Questions:
1. What skills will you being evaluated on in this course? 2. What are the practical requirements needed to become a fully certified Jump Master? 3. What can you do after achieving the Jump Master rating?
Coach 1 (C1) *(B CoP)
Jump Master (JM) *(C1 certified & 125 free fall jumps)
Coach 2 (C2) *(C1 Certified & C CoP)
Skydiving School Instructor (SSI) *(C1 certified & 200 jumps)
Tandem (Via Manufacturers NOT CSPA)
Progressive Free Fall Instructor (PFFI) *(C CoP, C2 certified & JM certified OR SSI certified)
Skydiving School Examiner (SSE) *(C CoP, SSI, GCI plus JM OR PFFI or C2, all certified)
Course Facilitator/Course Conductor *(D CoP, 1000 jumps, SSE certified & C2 certified)
Ground Control Instructor (GCI) *(JM or SSI or GCI module)

2.0 Instructor Techniques - 16 -
©Canadian Sport Parachuting Association, 2010
Section B – Instructing Techniques
2.0 Instructor Techniques Introduction So you want to be a Skydiving Instructor?! What is a Jump Master and what does this Instructor do? What are the necessary skills, what is the necessary knowledge and what are the qualities to be an effective instructor? What responsibilities does an instructor have toward their students and toward the CSPA? How do an Instructor’s activities and responsibilities differ from those of a coach? Skills, Knowledge and Qualities In the CSPA Instructor / Coach System overview an Instructor can Supervise and Dispatch student parachutists, Certify certain endorsements, and Assist on the first jump course under the direct supervision of a Skydiving School Instructor (SSI) . What types of skills and knowledge are suggested by these privileges? Clearly an instructor must have a thorough knowledge of the First Jump Course, the progression sequence and the relevant endorsements. As well, they should have instructional ability in order to effectively brief, train and debrief students, to assist students to progress and to assist in teaching the First Jump Course. They also require a high skill level in the practical aspects of dispatching students, even if their drop zone’s progression program does not use the IAD or SL technique. What other qualities are desirable in an instructor? The instructor must be a skilled and competent parachutist, able to do what they talk about. They must be responsible leaders, setting good examples in their own high standards of personal safety. Finally, they should have a sincere interest in working with student parachutists. This takes a special person who is empathetic and cares about his or her students overall well being, both as a person and as a sport participant. An Instructor’s role can be divided into three sections: Leadership and Management • supervision overview • aircraft knowledge and safety • student equipment • spotting for students • canopy guidance techniques • supervision: unusual
situations
Process of Instructing • dispatching theory • IAD techniques • SL techniques • student and DZ paperwork • PAF • tips for teaching on the DZ • assisting the FJC
Athlete Development • skydiving skills progression
grid • stress assessment • relaxation techniques • freefall transition • endorsements • Certificates of Proficiency
tests and reviews These are areas of specialization extending from the CSPA Coach’s Skills Grid. In comparison, the Coach requires a general knowledge of the whole range of progression, whereas the Instructor has a narrowly defined role, but with a greater depth of expertise. Some specific examples of specialized subject knowledge you require, as an Instructor, are: • student parachute equipment (large ram-air main, student rig, etc.) • progression through the Skills Grid from Pre-level through Stage 4 (suggested Gradual Freefall Program) • content of the First Jump Course and preparation activities (DZ specific) • alternate progression programs (PFF, TAFF, Tunnel-PFF)

Section A – Course Introduction Page 17 of 138
© Canadian Sport Parachuting Association, 2010
It has been said that as an instructor, you must be a responsible leader. Your primary responsibility is toward your students. An instructor must try at all times to make the experience enjoyable for each student without compromising the student’s safety. This is best done by ensuring your student has clear and realistic goals and has acquired an awareness of both their abilities and limitations. You must be able and willing to help your students to identify their objectives and to design a progression program that will achieve their goals. It is your responsibility to maximize each student’s learning experience by making accurate observation and conscientious critique of each performance. It should be remembered that the student is paying for an instructed jump; they have the right to expect a quality product. An instructor, as part of the CSPA technical system, is in fact a representative of CSPA. You have a responsibility toward the CSPA to support and abide by the rules and recommended procedures of the Association and to encourage others to do the same. (See PIM 1) When a student comes to a Drop Zone, they are assuming that society has enforced some sort of specific rules or regulations upon the DZO. Also assumed is that the instructor has been properly trained and is competent at the task. The student is willing to accept some risk as long as we reasonably educate them about it and help them to manage the risk. Our moral and ethical responsibility as instructors begins at this point. The DZO needs to know that we are imparting the correct information. We need to assess the student’s abilities throughout. The other instructors need to know that the students acknowledge that they are willing to accept ALL of the potential risks. In the legal system, judges and lawyers “test” what has been presented to them with a concept called the “reasonable man test”. Essentially, does what you tell the student make common sense? Morally and ethically, if we have presented the appropriate information to the student and the student is in your assessment capable of jumping, you have done your job and would pass the reasonable man test. By this same reasoning, it is unethical to let someone jump who you believe should stay on the ground. This extends to all sorts of decisions: high winds, poor progression, consistent lack of altitude awareness, and many more. You must make your decisions based upon the student’s educational needs, not their want. Every student wants to be cleared to 10,000 ft. For the first freefall, what they need is a short delay. To summarize, the Jump Maser has moral and ethical responsibilities to: • Students – ensuring that proper procedures have been taught and that you are properly rated to perform
your duties • Themself – keeping up to date with techniques and the rules and regulations of CSPA • Fellow Instructors – ensuring that student progression programs are adhered to and problems are noted in
logbooks • DZ Operators – in delivering the ‘skydiving program’ and providing a positive environment • skydiving in general – promoting the sport by displaying a mature and responsible attitude
2.1 The Role of the Jump Master (privileges) The Jump Master instructor holds the following privileges: • Perform
• Dispatch IAD / SL students • Assist SSI in teaching FJC
• Supervise • all levels of student (Pre stage to Stage 4 as Jump Master) – the grids are excellent “cheat sheets”
when goal setting • New Jump Masters after you have experience
• Sign off • Solo check out jump endorsement
The Coach teaches new skills and helps to refine existing skills for the novice. The Jump Master or Instructor teaches basic, life-saving skills to students.

Page 18 of 138 2.0 Instructor Techniques
© Canadian Sport Parachuting Association, 2010
• Main Packing (for A) endorsement • Emergency procedures review Solo and “A” • Practical requirements for the Solo certification
i. Freefall delay > 30 seconds ii. Freefall delay of 5 seconds from 4000’ iii. 3 self-spotted (unassisted) jumps with canopy landing < 50 m of target iv. Freefall, belly-to-earth Figure 8 (LT 360 RT 360) v. Unstable Exit and Recovery (ride-the-slide) for 5 seconds vi. Canopy stall and recovery (stall point, not a full stall)
• Qualify for o Instructor Progressive Free Fall (IPFF) with C2 rating o Ground Control Instructor
2.1.1 Jump Master Tasks Some of the Tasks of a Jump Master on a typical jump may include the following: Pre Jump Briefing:
1. Introduction 2. Assess skill level (e.g. first jump? Second? Practice throws? Freefall student?) Where are you now? 3. Set goal (what to do on the jump). Where do you want to go? 4. Instruction of the next step (PPAF). How do you get there? 5. Check with manifest. 6. Arrange for ground control. 7. Assess weather (ceiling, visibility, wind <15 mph, the spot 8. Equipment selection 9. Climb-out and Canopy practice 10. Gear up (first pin/gear check) 11. Pre-Jump stress assessment 12. Check with ground control for a radio check before moving to the plane
In-flight:
1. Control of student outside of plane, helmet on, walking around Tail of aircraft 2. Aircraft Loading (2nd gear check), seating position, seat belt on, handles covered 3. Pilot briefing 4. Student control - positive 5. Gear preparation pre-exit (3rd and final gear check) 6. Final review of key points and encouragement 7. Spotting 8. Climb out
Freefall:
1. Say GO and safely deploy pilot chute AFTER the student’s hands leave the strut 2. Observe the student, and remember what you saw for debrief skill analysis 4. Safely climb back into the plane
Canopy control:
2. Try to observe opening, try to see where student lands 3. Ask the ground controller when you land
Landing control - GCI:
1. Guide student through 2-3 practice landings on high 2. Penetration check at 1000’ 4. Guide student through landing pattern: 800 Downwind, 500 Crosswind, 200-300 final 5. Flare 10-15 feet above the ground

Section A – Course Introduction Page 19 of 138
© Canadian Sport Parachuting Association, 2010
Debriefing:
4. Student Version: cover all parts of the skydive using the Skills Grid – not just freefall, i.e. how did you feel in the plane, describe your climb out, etc.
5. Instructor version 6. 3 good points and 1-3 areas for improvement 7. Goal setting for next jump 8. Practice improvement points or new skills 9. Log the jump, hand out First Jump certificates
In addition, ensure the equipment is returned to the right place and the radios are shut off or placed onto the battery charger Review Questions:
1. What are the five areas of responsibility for a Jump Master? 2. Briefly outline the role of a Jump Master in the in-flight phase of an IAD/SL jump.

- 20 - 2.0 Instructor Techniques
© Canadian Sport Parachuting Association, 2010
2.2 Coach 1 Review and Application to the Jump Master In this section we will review the aspects of teaching, goal setting, skill analysis, and debriefing that you learned in the C1 course and explain how they fit into your role as a Jump Master Coach 1 Review Summary Coach vs. Instructor Overall Role • Coach refines the novice • Instructor teaches new / survival skills Goal Setting: Characteristics of Goals SMART Goals for the next jump • Specific • Measurable • Achievable • Relevant • Time bound Short Term Goals - specific / immediate 1. State and describe the performance 2. Describe the end result 3. State the conditions of performance 4. State the Standard / criteria for pass Identification of Goals 1. Identify current skill level: where are they
now? 2. Determine long term goal: where do they
want to go? 3. Identify next 2 - 3 steps towards the long
term goal: How do they get there? Teaching Process P-PAF • Preparation - parts, practice, skill analysis,
views, training aids, technical knowledge • Presentation - WPW, no negatives, no
theory • Application - PPW, giving feedback • Feedback - positive, specific, immediate Skill Analysis Pre-Observation Plan • Know where you want to
Observation Plan • Centre outward, Hips and Extremities plus
special areas, remember by using cue words
Pre-Analyzing • Correct version of skill • Results of jump • External factors • Skill Analysis Principles Analyzing: Check the following • Start position, Initiation, Coast, Recovery,
End position • Timing / coordination of movements • Apply the principles and identify three
items done well and three to improve (for the debrief)
Principles of Skill Analysis (first four)
2. Stability 3. Summation of Joint Forces 4. Continuity of Joint Forces 5. Impulse
Debrief Format 3. Student’s version of the complete jump 4. JM’s complete version and analysis 5. Three items done well, three to improve 6. Reset the goal for the next jump 7. Improvement practice or show next jump 7. Log book entry Five Phases of the Skills Grid • Preparation • In-flight • Freefall • Canopy • Equipment Plus Technical Knowledge

2.3 Gear Checks for Students Page 21 of 138
© Canadian Sport Parachuting Association, 2010
2.3 Gear Checks for Students In this section we will discuss the importance of gear checks and in-flight pin checks, when they should be introduced to our students and the procedures to be followed. You will be evaluated on your use of in-flight pin checks during the dispatching section of the course. The first gear check should be done before gearing up your students. This is to ensure that the gear you are putting onto your student is fully functional as well as compatible for the student; that is, it is the correct size of gear for the size and build of the student. It will also save you much embarrassment and the student’s confidence in the gear if you do not have to remove the gear because of a problem or make a correction after they are already geared up. In any case, should you need to make any adjustments, assure the student that it is perfectly normal to adjust the side-adjusters, lift webs, bridle, etc. Generally, a logical order to follow for a gear check begins with the front–top to bottom, and then the back–top to bottom. Below is a list of the key elements of a gear check. If you have any doubts about a particular system, get advice from someone who is very familiar with the equipment. Although everything is to be checked, certain items are crucial. These are: • The harness must be properly attached and properly fitted for comfort, with no loose strap ends showing;
chest strap; leg straps • Deployment devices must be functional and the 3 handles (pilot chute, main cutaway and the reserve
handle) are secure in their pockets • AAD must be calibrated and functional • RSL is correctly attached • Main canopy attachment (3-rings and cable) must be properly routed and functional • Accessories such as radio, altimeter, etc. properly mounted and checked • Helmet, goggles, jumpsuit and footwear must fit and be functional A second gear safety check must be done prior to boarding the aircraft. It is another all-around check, front to back, top to bottom, to make sure nothing has moved, making sure all of the straps are tight and tucked away, the pins and the Pilot Chute or Static Line bridle are contained.
The third and final check is done just prior to exit. More advanced information is discussed in Section 2.9 Dispatching Theory, page 50. What are the main components of an in-flight gear check? • Handles check X 3
o (pilot chute – Jump Master if Student, Student if in free fall, main cutaway & reserve handle -- Student)
• 3-ring system • Chest strap and leg straps • Reserve pin and Main pin • AAD Check? Is it on? • Radio is turned on • Altimeter, goggles, helmet, general fit Evaluations
No matter who gears up the students – be it the Jump Master or an assistant – the Final responsibility to check a student’s gear rests with the Jump Master and no one else!!
Remember, for you as a Jump Master, the gear check is a BSR!

Page 22 of 138 2.3 Gear Checks for Students
© Canadian Sport Parachuting Association, 2010
1) When are the three times a gear check is performed?
2) Why is it important to check equipment prior to boarding?
3) When is the in-flight pin check done?
4) Is the in-flight pin check and gear check only for Freefall students?
NOTE re: dispatching of FJC students If this is a first jump student you would simply perform these gear checks without emphasizing them as well as checking all accessories – helmet, goggles, radio, AAD. In addition you have to deal with the bridle and pilot chute on an IAD. As the student progresses, gradually teach them about what you are doing and teach them to perform these checks on their own under your supervision. Summary/Key points: The goal of the Jump Master is to instill a lifelong habit into the student by teaching and providing a positive role model of the benefits of gear checks.

2.5 Ground Control Techniques Page 23 of 138
© Canadian Sport Parachuting Association, 2010
2.4 Instructor Assisted Climb-out (IAC): Theory and Practice For the IAD system to work the Jump Master has to ensure that they can climb out and can maintain a stable, controlled position so that they can deal with the behaviour of the student. During the course, the candidate will be evaluated on the ability to climb out and back into the aircraft in a controlled fashion. Due to the fact that poor performance in this area may lead to serious consequences this is a must-pass area. Note that the Pilot Chute remains in the BOC pouch and that the “student” will extract their own PC during the evaluation jump. This is also a good opportunity for the candidates to practice and perform skill analysis on free fall students, e.g. practice throw out, clear-and-pull, 5 second delay, etc. For further information, see 3.4 Athlete Development – Gradual Freefall Progression (GFP) on page 76. Key points are: • Student gear check prior to climb out (see Section 2.3 Gear Checks for Students on Page 20) • During the climb out
1. Check the spot and direct the aircraft if necessary 2. Monitor your own gear during the climb out (and also when coming back in) 3. Monitor and control the student’s gear:
a. Reserve flap not scraping against door frame/door b. Bridle not catching on anything c. Pilot chute safely inside the BOC pouch
4. Controlling student’s speed, assisting with moving appendages It is worth noting that the Jump Master merely assists the student with the climb out. It is the student’s responsibility to carry themself out to the wing strut; it is not expected nor recommended that the Jump Master “carry” the student out of the airplane.
Jump Master Student
• Overhand grip on side adjustment (two fingers behind connector)
• Knees close to door (Jump Master and student both at 45 degree angle)
• Open door • Left leg out to spot – puts you ahead of the curve • Cut and break command to the Pilot • Protect your handles: Left arm covers your chest • Yell “GET READY” or “CLIMB OUT” (DZ-specific
commands)
Waiting, calm breathing, listening
• As they climb out it is important to get up on your right knee to prevent getting pulled out of the plane and ending up being late.
• Follow them out and get your left foot on the step. • Be at 90 to them (don’t put your back into the
prop blast) • Avoid laying on the strut; stand balanced on your
leg, knee bent • Make sure your rig does not get caught in the V • Yell GO and look into their eyes.
On command GET READY or CLIMB OUT: • Both hands on door frame • Right foot out and slide down strut • Left hand on strut and transfer weight to right foot
(Less wind resistance using Left hand first) • Reach out with right hand to strut • Use shuffle or cross over move depending on the
plane • Hands as far out on strut as possible • Step off wheel to move to hanging position • Look at the jump master
• When they Go, place your hand in a Downward motion by the wheel
• To get back in the plane go straight backwards and remain at center until pilot has closed door or as per drop zone procedures
On command GO!: • Arch and count

Page 24 of 138 2.4 Instructor Assisted Climb-out (IAC): Theory and Practice
© Canadian Sport Parachuting Association, 2010
2.5 Ground Control Techniques Although the Ground Control Instructor (GCI) is a separate rating, this course provides training in the activity of guiding students safely to the landing area. The rating requires as a pre-requisite the observation of 25 student landings by a qualified and experienced GCI, and subsequent to the training module the candidate is required to perform mentored control of 25 students. You will be expected to provide canopy guidance using the radio for your fellow candidates during the Jump Master course. Recognized signalling methods are
• radio • arrow • designated point system • arm panels and signals
Further, the student should be provided the appropriate equipment and be trained to respond to two (2) recognized signalling methods, one of which shall be a radio. Guidance will cease at the direction of the Instructor. See PIM 1 Section 3.13 under Technical Recommendations. Each of the above methods requires a method to be used as backup. Radio is required in any case, whether used as the primary or backup method. Recommended Canopy Guidance Equipment: • Student radio • Binoculars - aid in viewing the canopy, identify line twists, malfunctions, etc. • Aircraft radio - permits ground controller to convey directions to the JM to alter the spot or of
changing conditions, etc. Note that a radio operator’s license from MOT is required. • Ground arrow (mounted or a cut-out sheet) - in event of radio problems, permits visual steering
direction instructions. • Bullhorn - in event of radio failure, permits verbal communication for final landing. • Target panels - ground to Jump Master Communication if ground to aircraft radio has failed or
ground to student radio. I = intermediate, T = turns at altitude, V = wind drift, no target = land aircraft, one panel pulled out longer than others = extend spot in this direction.
• Smoke generator or highway flare - to be used if radio or target panel signal not received; warning that something is wrong! Stop dispatching!
Radio Techniques Briefing on the approach pattern and a landmark to set up over to fly into the wind towards the landing area should always be included in the pre-jump preparation. When using the radio, talk across the mic (perpendicular to the unit) rather than speaking directly into it to avoid the “pah, pah” sound; alternatively a piece of light foam over the mouthpiece works well too to cut wind noise. Students can rehearse by listening to the ground controller giving guidance to other students. If using a radio as the primary ground control assistance an appropriate back-up method MUST be used. Operation and Care of the Equipment To give reliable ground control with a radio, you should become familiar with the operation of the transmitter and the receiver. You should know how to turn them on, perform a battery test, set the frequency or squelch if necessary and check the antenna. You must also know the maintenance

2.5 Ground Control Techniques Page 25 of 138
© Canadian Sport Parachuting Association, 2010
practices necessary to keep the system operational. The system being used may require special recharging or may need its batteries replaced periodically. Preparation Prior to loading the aircraft establish what everyone’s identifying name will be. The identifying name can be there own name or their exit number or the colors of their main providing no two are the same. If the DZ uses the student’s name as their identifying name then make sure that you know their canopy colors. This will help to ensure you have positive communication with them if for some reason the exit order was switched (i.e. a refusal or “no go” or rig opened in the aircraft). The radio receiver should be checked as part of the safety check and communication between the operator and student confirmed just prior to loading the aircraft. Bring an assistant with you to monitor other canopies, especially if the DZ uses quick circuits and has more than 1 student in the air at any given time. Communication Suggestions
• “Speak slowly!” KISS. The commands used should be simple and clear, consistent with terms used in the FJC.
• Use words that will be clearly understood and positive. • Remain calm while giving commands. No matter what. • Avoid words that can be mistaken for other meanings, such as “no” or “go”. Use “Stop” or
“Hands up” instead of “no” or “don't”. • When giving a command, always begin the command with the jumper’s identifying name or
jumper #. • Repeat commands as necessary, but pause for a response first. Be aware that the student
may have trouble hearing during a turn due to the increased wind speed noise. • Do not chatter at the student, let them have time to think and enjoy the ride. • Back up turn commands with physical landmarks. Some people get right and left confused.
E.g. turn left toward the hangar. • Have your students fly a pattern. Always use a consistent approach method. • Use an approach where you only have to give the student 90° turns as they get lower. Low
erratic turns could over excite the student. • If there are obstacles on one side of the target, use a pattern that will not take them over top
of these. • Let go of the transmitter button when you are not speaking.
Initial Contact
• Give radio control from the middle of the field, not at the spectator area • make sure student radio works on the ground – radio check on way to plane • confirm contact – give student a command to confirm they can hear you • Jumper designation when more than one in the air, e.g. jumper #1, jumper #2, etc. • Remind the student to perform their Canopy Control Check (or Flight Check) • After they finish the control check, have them turn to confirm they are listening. • Try two or three practice flares at altitude. Watch their flare response.
Note: A suggestion for during First Jump Course ground training is to have the students wear radios, move some distance away from the ground instructor (out of hearing), then have them listen to the radio and respond to commands.

Page 26 of 138 2.5 Ground Control Techniques
© Canadian Sport Parachuting Association, 2010
Typical commands are: (Make sure they are consistent with what they were taught in FJC)
• turn right, turn right…Stop or Hands Up • left turn 90 degrees, left turn 90… • maintain that heading….hands all the way up • stop (turning)….(hands up) • stand-by • flare…… (2 seconds)
Unusual situations • If they do not respond to the first system after 2-3 attempts – go to the back up. • The student must deal with unusual situations – use phrases such as “check canopy” or
“do your emergency procedures”. Do not say “cutaway” or “you are having a malfunction • Keep 2nd backup radio nearby; backup battery • If the student is experiencing a malfunction, use the identifying name first, and then tell
them to check their canopy. If the student gets very low direct him to prepare for landing. Never say "don't cutaway". The student might only hear the word "cutaway", and there may be other students in the air thus causing multiple reserve rides.
Additional tips • keep them upwind as long as possible (1000-1200 ft) • use a conservative downwind pattern • stay away from any no fly zone • land them in front of you or so you have a side view • give the flare command early (takes time for them to react)
Communication example: After the student has exited and is under parachute, the radio operator should confirm that the student is receiving the commands. A typical introduction after the flight control check has been performed by the student would be (substitute your DZ FJC terms as appropriate): • “Hello jumper #1 (or their actual name), make sure you do your canopy control check
• (after you see the Brakes pulled or Control check) turn right, right stop. • Jumper #1 hands up, hands up • Jumper #1 turn right 180° towards the (ground reference). . . stop. • Jumper #1 hands all the way up • Jumper #1 turn right face the target (DP). • Jumper #1 practice your flare: Feet and knees together, Hands all the way up, ready, flare!
Good, (after couple of seconds) now put your hands back up. • Jumper #1 turn 90° right to face . . . • Jumper #1 hands up • Jumper #1 turn left 90° face the target. • Jumper #1 hands up • Jumper #1 hold heading on target, face the target. • Jumper #1 toggles all the way up. You are now on final approach. • Jumper #1 feet and knees together. • Jumper #1 relax,
Note: Give student the opportunity to perform the flight control check first. If they have not done so after about 15 seconds from canopy opening, you can then remind them.

2.5 Ground Control Techniques Page 27 of 138
© Canadian Sport Parachuting Association, 2010
• Jumper 31 stand by…..Flare (spoken over 2 seconds, calmly) • Jumper #1 pull down on one toggle and run towards your canopy (if windy and being dragged) • Jumper #1 congratulations; good jump and landing, pick-up equipment and turn the radio off.
KISS == Keep it Short and Simple. Your students should know the commands that they are going to receive and how to respond to them. Commands such as flight control check, hold heading, flare and recover are a few. If the radio system permits, they should know how to test the radio and perhaps even check the antenna connection or the battery closing plate or door. Most importantly they should know what backup system is being used and how to locate it (e.g. arrow, DP) and how to respond to it. Students waiting for their load should listen to the Ground Control Instructor while they talk to other students under canopy.
Note: The Radio is used as a ground control method; not as a method of backing up survival skills taught in the FJC.
Avoid saying “cutaway” or “reserve” to prevent others from reacting to those commands too low to the ground to survive. Instead ask student to evaluate the canopy or do their flight control check…or ask leading questions like, “is your canopy square?”, or “are you in control of your canopy?”

Page 28 of 138 2.5 Ground Control Techniques
© Canadian Sport Parachuting Association, 2010
The Arrow This is an effective system to use. Once the student has located it, they should face the same direction that the arrow indicates to them and turn in the same direction as the arrow does. While providing directions with the arrow try and avoid having the student face directly away from you. If facing away from the arrow, the student should know to continue to look over their shoulder for their next direction. If they find this difficult, they can turn the canopy slightly to one side and take a look then return to the original heading if necessary. The disadvantage to using an arrow with ram air canopies is that it is difficult to assist the student flare and to possibly recover if necessary. Final approach can be backed up with arm panels and semaphore-like-movements that would be copied by the students. For these to be used the student must land in front of the ground controller. Radio can also be used to assist with landings. Another disadvantage is that only one student can be in the air at a time. Designated Point The DP system assigns most of the responsibility to the students to get themselves back to the target. The student must locate the target (after canopy and flight control checks), fly directly to the DP in the DZ area (landmark or brightly coloured tarp), face the target (X or bowl), assess penetration, gently "S" turn as necessary so as not to overshoot the target, fly directly into the wind for the final few hundred feet and flare at 10-15’ (see diagram under Canopy Skills). Tips to use this method are as follows:
1. The student must wear an altimeter. 2. The student must know the following prior to take-off: location of DP (aerial photo), wind
direction and which way to face for landing. The DP is best identified if a bright coloured marker is placed out in the field prior to the jump.
3. The student must know the difference between the DP and the target. 4. The canopy being used should be a type that has a ground skimming nature, trimmed not to
stall. The students are better off flaring high and sinking in than flaring late. 5. Have student clearly identify the DP and which way to face for landing from the aircraft during
the ascent. 6. Following the flight control check the student will fly directly to the DP. This ensures they get
back to the DZ area in event of a slow climb-out. When spotting try to time the climb-out so the student is not spotted long.
7. The student, if overshooting the target at a high altitude, should make an "S" turn away from any obstacles and back to the DP to re-assess the approach to the target. The student should have received target approach perception in their first jump course.
8. Students should land in the PLF position with their feet and knees together. 9. A ground instructor should be at the target area and can assist the final approach and landing
with radio or arm panels and semaphore with actions that are to be copied by the student. 10. Student should be aware that if the marker is moved that the wind direction and therefore the
approach direction for landing has changed. The student should always fly to where the marker is even if its location varies from the ground briefing.
11. In high wind situations, the S-turns should be small. In low wind situations, the S-turns should be long and wide.

2.5 Ground Control Techniques Page 29 of 138
© Canadian Sport Parachuting Association, 2010
This system is great except for the difficulty in landing on the DZ if the upper winds exceed the canopy’s forward speed. The upper winds at 3000’ should be assessed prior to dispatching students. A radio and/or arm panels are also needed if assisting the student to land. DP is marked with a mat positioned an appropriate distance downwind of the target on wind line, distance downwind is based on canopy performance and actual wind conditions. Preparation Phase • student must distinguish between target and DP • student must locate wind sock, and other wind indicators • use an airport diagram or aerial photo prior to loading • Just after take off, the altitudes of 300’ and 500’ (for size of objects on the ground) need to be
shown to the student to assist in their decision making about when to stop all S-turns and turn on to final approach.
• confirm orientation points, having the student identify them during the orientation / observation pass
• confirm landing direction with the students • provide an altimeter Canopy Control Phase • student to perform flight control check • student to fly directly to the DP • once arriving at the DP, student is to turn canopy to face the target and perform an approach
perception test • if overshooting, student is to do a figure 8 back to the DP, (not on the wind line) then face target
and resume approach • no turns below 200 - 300 feet (estimated altitude) • assist final approach and landing using radio and/or paddles Note: Designated Point with radio back up is a good method for teaching independent canopy skills.

Page 30 of 138 2.5 Ground Control Techniques
© Canadian Sport Parachuting Association, 2010
Arm Panels and Signals These can be used to assist a student’s landing approach once they have flown into the DZ area and are facing the target. The student would simply mirror-image any commands given by the ground controller. An arm dropped would mean to pull down that toggle, both arms up would mean “fly ahead at full glide”, both arms down would mean “flare”, etc. This system works well from 1000’ and down. Bullhorn The same as arm panels except the student must be in a range to hear the commands. The bullhorn needs power to operate and there is always a chance of equipment failure. This is best used as a back-up device. This system works from 500’ and down. A bullhorn may be used to assist the student to get into the proper wind direction and flare at the proper time. A bullhorn is fine if the student gets into the general vicinity of the target but useless when they are at higher altitude and going the wrong way. Combination Methods For the best learning on a jump use the DP system with the radio as a back up for steering control and landing pattern set up. Having arm panels or a bullhorn available for landing assistance would provide complete communication regardless of whatever situation might arise.
It is recommended that the following combinations be used. No matter what combination is used the student must always be taught what type of canopy pattern should be used for their jump. DP and Radio backup This method is great to assist landing especially if there are changes to the landing pattern. This method has the highest learning potential as well as having the best back-up communication in case problems arise. If the radio fails the student is already flying the back-up system. They are taught to go away and come back to DP if they will overshoot or stay if they will undershoot. Arm panels should be available to the ground controller. Radio and Arrow or Arm Panels This method puts the student totally in the ground controller’s hands. Not great if they are off the DZ and do not really know a pattern themselves. Student Canopy Progression With successive jumps the student progressively takes on the responsibility from the ground controller. If you break the areas of control into:
• canopy turning • landing approach • flare
A possible progression sequence is listed below • jump 1 – ground has full control • jump 2 – let student do canopy turning, ground controller does landing pattern and flare
10-15 feet above ground; student should be looking forward to the horizon to see what this height looks like
There must be two methods of canopy guidance used, of which one must be radio (PIM 1 Section 3.13).

2.5 Ground Control Techniques Page 31 of 138
© Canadian Sport Parachuting Association, 2010
• jump 3 – let student do canopy turning and partial approach (requires altimeter) using designated points, ground controller does lower approach and flare, etc.
• jump 4 – student should fly pattern all the way for landing; stand by to flare Review your DZ’s radio progression methods. To get students off as radio as soon as possible, encourage and train them to fly the pattern and not build a reliance on the “radio guy
2.5.1 Getting the Ground Control Instructor (GCI) certified Rating Within 1 year from the GCI Module from an approved Course Facilitator, and after observing 25 student landings by a certified, experienced Certified GCI, the GCI candidate is to provide 25 student landings using the approved drop zone method while being Directly Observed by a Certified GCI. Complete the GCI Portfolio, attaining all necessary signatures, and submit to the CSPA. Summary: In this section we dealt with ground control. It is very important that the student is guided back to a safe landing on the drop zone so take this responsibility seriously. It is a skill that needs practice to be able to put yourself in the position of the student. In this course we will evaluate your ability to do this. Remember to pass on the responsibility to the student as they gain experience. Review Questions What is the purpose of a flight control check? What type of turns should a first jump student perform on their first jump? If using a radio for ground control and the radio has failed, what are the three methods of backup systems that the student should know one of? What is the DP that a student should use when guiding themself into the landing area?

Page 32 of 138 2.6 Student Supervision – Normal
© Canadian Sport Parachuting Association, 2010
2.6 Student Supervision – Normal Leadership and Management Introduction Student supervision is considered to be the central role of the Jump Master. As such, it is the starting point for discussing your leadership responsibilities. Our discussion follows the Skydiving Skills Grid model, looking at what your actions would be during each of the six phases:
Preparation Equipment In-flight Freefall Canopy Control Technical Knowledge
At each step during the process of making a jump with one or more students, you have four distinct categories of responsibilities. These four categories are: • Your students: are they prepared? Mentally? Physically? Equipment? • Facilities: is everything in place? • Support staff: do they know what to do and when? • Yourself: are you ready? Preparation Phase Conduct a Pre-Jump Briefing Your first task is to meet and brief the students who will be on your load. Once you have introduced yourself and learned the students' names, you will cover the following items. Identify Each Student's Present Skill Level: Make an assessment of the student’s capabilities and experience. Questions to ask include: • What is their current experience level? • What is the goal of this jump? • Review their Log Book for previous Instructor’s comments • What skill level they have reached in all areas of the Skills Grid • What is the date of the last jump • Awareness and relaxation levels • Any problems they may have encountered When inspecting the logbook, look for any problems over the recent past jumps. Doing this may help you identify any habits that may be forming, hence the importance of you filling in the logbook correctly for the next instructor. If the logbook has not been filled out constructively, you should discuss their status with the previous Instructors. Discussion with the previous instructor is always beneficial whenever possible. Confirm skills and knowledge of the student by requesting for demonstrations to prove skills, and asking questions to prove technical knowledge. Ask for demonstrations of:

2.6 Student Supervision – Normal Page 33 of 138
© Canadian Sport Parachuting Association, 2010
• climb-out • arch and count • walk or describe canopy pattern and landing • emergency procedures (the React portion of Assess-Think-React)
Setting Goals for this Jump Refer to the Skills Grid in PIM 1 for a reasonable standardized progression and to guarantee that all skill areas are being covered. Refer to goal setting in your Coach 1 Technical manual (Section 2.3.2 Goal Setting with Novice Skydivers). When setting goals for students, it is essential to cover all areas of the Skills Grid to ensure that they have knowledge of the entire skydiving process. There should be tasks from each of the six skill areas. Pick no more than two new skills from different areas on the grid to challenge them with, and ensure that you have reinforced skills which the student may or may not have had difficulty with on the last jump. Try to make the skydive challenging and achievable for the particular student, and ensure that you have set SMART goals (see Coach 1 manual, Section 2.3.2.3 The Process of Goal Setting in Skydiving). Rehearse the Skills for the New Jump Have your students review skills that are to be repeated. You should introduce and teach the new skills that they are expected to perform using PAF. The main points to cover are: • Equipment skills, e.g. donning and fitting or safety checks • In-flight procedures, e.g. exit and spotting, aircraft familiarization • Freefall skills to be performed • Canopy control and landing • Unusual situations DZ Orientation Before boarding the aircraft, ensure that your students know when and where they are going to exit, the wind direction for canopy flight and landing and the expected landing point. Point out the landmarks on the ground. An aerial photograph or diagram is a necessary and invaluable visual aid. Students should understand their approximate paths across the ground and the direction to face for landing (into wind). Make them walk the pattern as they describe it to you. Key wind direction indicators should be identified. Conclude the ground orientation by pointing out the obstacles surrounding the landing area. A DZ orientation can be repeated in the aircraft on a pass over or near the area (~1000’ while ascending) Aircraft Familiarization Review seating arrangements, the positioning of the Jump Master and students, the loading and exit procedures, including how to open the door (in case of an aircraft emergency). In particular, they should practice the exit procedures. This is best done at the mock-up. Freefall students should be introduced to spotting procedures. Select the Student’s Equipment A support team may conduct the selection and donning of equipment, but it is still the Jump Master’s responsibility to ensure that the equipment is suitable for the student and is properly adjusted. Considerations for equipment selection are:
• Accessories • Students physical characteristics (weight, size, age) • Type of jump • Equipment adjustment

Page 34 of 138 2.6 Student Supervision – Normal
© Canadian Sport Parachuting Association, 2010
Accessories Gear selection starts with finding a properly sized jumpsuit, checking to see whether the student has adequate footwear that provides for protection and support, and finding a helmet that fits. The student should be asked if they have ever had any ankle problems or known weak ankles. A boot with ankle reinforcement or ankle taping may be necessary. Also check for shoulder problems that may affect their ability to do a hanging exit or a pull. The student should also be provided with a glasses strap if they need glasses or goggles if wearing contact lenses. Always ask your student if they are wearing contacts. Contacts will blow out quite easily while attempting to exit the aircraft. Goggles are required for delays over 10 seconds and should be provided to all freefall students. Gear Requirements: Student skydiving equipment today has been assembled by gear manufacturers and due to the typical ‘one size fits all’ rig; several items should be evaluated for each individual student. Main pilot chute/activation handle and emergency handles must be easily accessible. Main should be a 9 cell, have ground skim capabilities and be trimmed such that a complete stall is not possible. Reserve must be the proper size for the person. Ensure that you know the loading capabilities of your students rigs reserve parachute. Consult your Rigger or DZ Operator. Student's Weight Ensure the student is neither too light (110 lb. or less) nor too heavy (more than 220 lb. or as set by your DZ) for the size of main AND reserve available. A lightweight jumper needs a canopy that will have some performance while the heavier jumper needs a main and reserve that will land them softly. Check with manufacturer recommendations for canopy sizes versus jumper weights, field elevation above sea level and density altitude also need to be considered. Student's Size The student’s physical size may require a different size harness. The harness should be able to adjust enough so that the leg straps do not slip, giving the student an uncomfortable experience upon opening. Conversely, a harness should be available to fit larger students well enough to be able to get the leg and chest straps done up with enough strap left over to stow. A proper fitting harness also permits the student to move more freely, allowing them to perform. Ensure that student size does not inhibit them from climbing out of the aircraft or performing an arch. Type of Jump The experience level and the type of jump a student is doing will require certain other accessory equipment. A more experienced student will possibly need items like goggles, an altimeter, a practice pilot chute for training pilot chute throws, and perhaps an audible altimeter. Always offer goggles to someone with glasses or contact lens. Conditions, Facilities and Support Assess Weather Conditions: How windy is it? How high is the cloud ceiling? How good is the visibility from jump altitude? Are the upper winds strong? It is unacceptable to drop heavier students who may have drive in wind speeds over the recommended wind limit. These questions should be answered before boarding the aircraft. Normally, your load of students will not be the first load of the day. Take your time; be certain that you and the students are ready, physically and mentally. Postpone the load if the weather conditions are not suitable or the students are not ready. Remember to consider the student’s size in relation to the canopy size and performance; a light jumper under a large 9 cell will not get the drive achieved by a heavier jumper.

2.6 Student Supervision – Normal Page 35 of 138
© Canadian Sport Parachuting Association, 2010
Before loading the aircraft, the JM must ensure that a certified Ground Control Instructor will monitor and handle any student canopy guidance. The Ground Control Instructor and Jump Master MUST request a student radio check prior to the students boarding the aircraft. Each individual student must acknowledge that they can hear their own radio. In-flight Aircraft Loading There is quite a variety of aircraft used for sport parachuting and hence a variety of loading schemes. Even the same type of aircraft may be loaded differently, due to some structural or operational feature, such as the presence of the rear seat. See more on this in Section 3.1 Aircraft Knowledge, Loading and Safety on Page 41 Pilot Briefing As the JM, you will have to include a few extra points during the pilot briefing: • Is there a Wind Drift pass? • If a DZ orientation pass is required (first jump students and newcomers) • Whether you plan to jump or to land with the aircraft • What Quadrant do you wish to drop the first student. This is critical if more than one student is in
the air at the same time, there are significant obstacles close to the landing area, or there are multiple drop aircraft.
Rapport with the Student Maintaining communication with your students is very important. Your communication skills will improve with practice. You will have to deal with all sorts of different personalities from day to day. The following is a guideline of in-flight communication tasks: • Basic Instructions • DZ and Situation Orientation / Observation • Stress Assessment • Relaxation Techniques • Mental Rehearsal • Verbal Review • Final words of encouragement Basic Instructions These are used to advise your students of what they must do, and when, during the climb to altitude and exit. Instructions use both verbal and physical (visual) signals and should be conveyed in a very clear, concise manner. The basic instructions and signals are: • Keep CofG forward on take-off; do not have students sit up to lean forward; students should be
positioned for proper CoG based on their seating position. • “Door” or "Door Opening" stated calmly to everyone with the pilot’s hand on the door handle. • "Stand-by", thumbs up and smile. • "Cut / Brake", called to the pilot if necessary. • "Get Ready" or “Climb out”, point to student and then point out the door. • "Go!" or “Look Up!” called loudly with a smile or initiated with a large nod and a smile!

Page 36 of 138 2.6 Student Supervision – Normal
© Canadian Sport Parachuting Association, 2010
DZ and Situation Orientation / Observation After take-off, point out the window at 300’ and 500’ for reference to canopy turns. If a DZ orientation is required, the pilot will bring the aircraft back around above and to one side of the DZ at approximately 1000’ so that the students may see it. Get your students' attention and have them locate and examine their landing area. They should be able to point out the target, identify wind direction and landmarks. Rather than assume they understand, ask each of them to locate these features. Realize that students who are seated may not be able to see these landmarks. Inform them that they will be pointed out at altitude. If necessary, point out the “hard to see” obstacles they should avoid. Keep it positive by emphasizing “where to land”. Avoid emphasizing obstacles and where not to land. Stress Assessment Once your students have boarded the aircraft it is necessary to continually assess them for stress. Look at them, talk to them and watch for body language that would indicate excessive stress levels. Twitching or bouncing around, shifting or glazed eyes are examples of stress indicators. Relaxation Techniques To maintain student stress levels at acceptable levels and to enhance skill performance, it is advisable that the student be exposed to some type of relaxation technique. This becomes particularly relevant for progression. Typical relaxation techniques include a few slow breaths (in through the nose and out through the mouth), closed eyes and thinking of a relaxed place. Verbal Review A verbal review is recommended and should be relevant to the task being performed. Keep it Short and Simple. The student should emphasize key points during the verbal review and should list them flawlessly. If required, a bit of prompting can be used. Mental Rehearsal Students should be taught to perform a mental rehearsal on all skill areas of the skydive before they get into the aircraft and again before jump run for freefall and canopy control skills. On the ground, mental rehearsal should be performed in a quiet area (if possible) to allow the student to focus on the tasks without distraction. In the aircraft, mental rehearsal should be performed on the climb to altitude. Instructors should encourage mental rehearsal as it reduces stress levels and dramatically improves performance. Control of Students and Equipment In-flight You have several tasks to perform during the take-off and the climb to altitude. These include: • Remain still with seat belts on. Helmets on for take-off. NOTE: All instructors should wear their
helmets for takeoff – be a good role model. • "Protect reserve handles!" Students must be closely monitored to ensure that they do not expose
the reserve during the ascent. • Remove the seat belts once at safe altitude for an emergency exit (e.g. above 1500’). • Minimize student movement. This helps to prevent an accidental activation of the students’
equipment and also allows the pilot to have maximum control of the aircraft (refer to Emergency Routines).
• Make eye contact and communicate with the entire load, at appropriate times on ascent. Final Gear Check Visually inspect the student’s front first. Check the AAD (if possible), radio function (adjust to 90% maximum volume as 100% causes audio distortions, handle(s), RSL and that the harness

2.6 Student Supervision – Normal Page 37 of 138
© Canadian Sport Parachuting Association, 2010
connection points are secure. You can prepare the deployment system while you check the reserve and main pins. Pre-Exit Preparation Just prior to reaching the exit altitude you should make the final preparations for the student to exit. Make sure to check your own gear (pilot chute, main pin, flaps) prior to preparing the students’ gear. The points are: • Deployment system preparation is discussed in Section 2.9 Dispatching Theory page 50. • pilot chute or SL preparation, start after 1500’, finish by around 2500’ • Verbal Review Final Communications Prior to the door opening and/or exit, state the next few key points of the jump followed with some reassuring comments about how well they will do or how much fun they are going to have. When the pilot consents to, or reaches to open the door, calmly advise all students that the door will be opening, so that the students may psychologically prepare themselves as well as protect their handles. Skydiving is a head’s-up sport; remind students to observe the situation and act accordingly.

Page 38 of 138 2.6 Student Supervision – Normal
© Canadian Sport Parachuting Association, 2010
2.6.1 Student Supervision Checklist Your Student(s) Facilities and Support Staff
1. Preparation (Student’s) 1. Preparation • check skill level, set goals for jump Pre-jump briefing: • aircraft familiarization • fit and adjust equipment • final rehearsal, pre-jump safety check
• assess weather • manifest and coordinate support • brief/confirm ground control • select student equipment and accessories
(appropriate to physical size and ability) • air photo, aids for briefing and rehearsal
2. In-flight 2. In-flight Climb to Altitude: • aircraft loading, review in-flight rules • helmets and seat belts on • keep C of G forward on take-off, but do not
have students sit up to lean forward; students should be positioned for CoG already
• monitor students and equipment on climb • minimum movement, kneel and face forward • protect activation handles and pins • DZ orientation and stress assessment • relaxation techniques and mental review Pre-exit preparation: • gear safety check • pilot chute or SL preparation • verbal review by student (specific) • spot for student (specific: size, weight, etc.) • observe target and other aircraft • assist climb-out, check set-up, smile • protect your gear and pilot chute
• remind ground controller as you board aircraft • brief pilot (altitude, direction, speed, #passes,
how soon to open door) • keep pilot informed of any changes • watch cloud movement, canopies, aircraft • adjust spot if necessary, advise pilot, • keep your movement to minimum • keep your rig clear of aircraft controls and
switches (fuel mix, yoke, fuel switch on floor) • prepare student equipment (radio, pilot chute
or SL) • pilot will monitor airspeed (opening door and at
exit)
3. Freefall 3. Freefall • observe student; repeat key points to self • following students: stay to one side • skill analysis
• watch for aircraft, freefall drift, canopies • following student: stay to one side • skill analysis
4. Canopy Control 4. Canopy Control • observe from the aircraft • observe and assist from under canopy • observe landing and recovery
• ground controller guiding students • skill analysis • someone to aid with picking up gear • driver to pick-up student if far away
5. Equipment 5. Equipment • observe and assist student’s actions (i.e.
removal of gear, layout of main, etc.) • assist student to recover and return gear (may
be packer’s job) • arrange equipment skill for student
6. Post jump 6. Post jump • test student’s awareness • debrief: strengths, then weaknesses • conduct fault correction (practice) • set new goals; rehearse next jump
• recover and return equipment • get performance input from ground control • record jump • DZ or club's paperwork

2.7 Spotting for Students Page 39 of 138
© Canadian Sport Parachuting Association, 2010
2.7 Spotting for Students The Instructor's task of spotting for students is a complex one. Most experienced jumpers can determine the spot for an opening point and direct the aircraft to it. Students complicate the task for the Jump Master enormously by climbing out slowly, hesitating to exit and steering incorrectly. They are less able to adapt to a poor spot. It is the responsibility of an instructor to try to dispatch the students where they are least likely to get in trouble, even if they ignore ground control. Sometime prior to checking the spot, ensure that the altitude is correct, then check that the area below is clear and that ground control is available. If using Designated Point, spot slightly short if wind conditions dictate. You should have selected the quadrant for the spot prior to boarding. The Instructor will need to be aware of the following: • Wind Drift or Rate One Turn Observation • Tailoring the Spot • Target Observation, Other Traffic, Wind and Altitude • Canopy Observation • Spotting with Freefall Students Wind Drift Indicator Observation See PIM 2A In-flight Technical Knowledge, Section 3.11, Throwing a Wind Drift Indicator (WDI), page 15. Tailoring the Exit Point for the Individual See PIM 2A, Section 3.12.1, Theory Model for Spotting, page 16. • Weight • Wind • Obstacles • Speed of climb out • Level of stress When choosing the spot for each student, remember that lighter people descend more slowly, so in stronger wind conditions, they will tend to drift farther downwind. Hence a longer spot is sometimes required.
Students will generally take longer to climb out of the aircraft than an experienced jumper. Therefore, anticipate this and give the climb out command a little early.

Page 40 of 138 2.7 Spotting for Students
© Canadian Sport Parachuting Association, 2010
Examples: Favour the quadrants of the spotting circle shown: • Obstacles shown downwind of target: use quadrants B and C away from the target • Obstacles upwind of target: use quadrants A and D closer to the target • Obstacles left of target: use quadrants A and B to the right of the target. • Obstacles right of target: use quadrants C and D to the left of the target. Target Observation — Other Traffic As the aircraft approaches jump-run, you should get a confirmation (visual or by radio) that someone is at the ground control station (target area). This may be a pick-up vehicle, a target panel or even bright coloured clothing. If no indication of ground control is spotted, have the pilot do a circuit and check again. A great method, but seldom available, is to have the ground controller take an aircraft radio with them to communicate directly to the aircraft. If there is no one at the target area, the pilot can call down to arrange it. The Canadian Aviation Regulations (CAR’s) require ground to air communications (1997). Operators of aircraft frequency radios must have a DOT Radio Operators license. Ground to air communications can also be performed by using the arrow. E.g. • A fully exposed arrow – go ahead • No arrow – stop jumping • A short arrow – shorten up the spot • Arrow moving along the ground in one direction (not rotating) – lengthen spot this way Canopy Observation Another aid to the Instructor in determining the spot is the previous student. If their canopy is observed carefully, it is often possible to differentiate between the student who has steered themselves into the wrong landing area and the one who has followed instructions but was mis-spotted. It is hence necessary to observe whether the canopy is running, holding, or crabbing, all the while preparing the next student for exit.
2.7.1 Spotting Progression for the Students The actual spotting techniques and theory are detailed in the PIM 2A manual and will not be explained here. However, spotting progression should follow the sequence of observed/assisted/self. By the time the student is performing their second or third jump, they should be observing the spot.

2.7 Spotting for Students Page 41 of 138
© Canadian Sport Parachuting Association, 2010
Observed: Observed spotting is as simple as telling your student how spotting is done and have them observe you including sticking their head out of the aircraft and identifying when you are over an object, This should start early in the progression.
Assisted: This is the process of team spotting with your student. It includes help in selection, locating
and correction actions. Generally the student relays commands to the Jump Master, who relays commands to the pilot, if they are required; and calls the climb out. Several assisted spots may be needed before your student is comfortable to move on to self-spotting.
Self-spotting: Self-spotting is where the student does the selection and actions required to get the
aircraft to the exit point as the instructor observes for critique later. Safety: If the student is considerably wrong in the selection or guidance to the spot, the Jump
Master must intervene and provide corrective feedback. This will prevent students from exiting in the wrong place, which decreases the chance of landing in unfamiliar areas and possibly being injured. However minor deviations that will not affect the safety of the student are useful in helping a student learn to spot.
2.7.2 Spotting with Freefall Students When students are at low delays, spotting is much the same as that for an IAD except that the climb out is generally faster. By 10 sec delays, the student should be spotting for themselves. Teaching spotting at lower altitudes is easier for the student. As free fall delays increase the instructor must spend some time on the ground talking about upper drift considerations, ensuring that the student understands the concepts. This is especially important when dealing with multiple groups and strong upper winds that are opposite of ground winds. In all cases let the student spot and correct only if the students’ spot places them in an unsafe situation.
2.7.3 In-flight Skills for the Student The basic In-flight skills are: • seating and movement • assisted exit • pre-exit handles check • verbal review • orientation
• spotting observed • heading control • spotting assisted • pilot briefing • spotting unassisted
• exits • intentional unstable exit • throwing a WDI
For additional skill descriptions, additional information applicable in this section, supplementing the content is found in PIM 2A pages 12 – 19. Further details and descriptions regarding Jump Master and Student Climb outs, Exit Orders and Weight Loading Diagrams for Static Line and IAD methods, for a variety of Exit Techniques and Aircraft Types are found in the Dispatching Section of this manual, Section 2.4 Instructor Assisted Climb out on page 23 and Section 2.9 Dispatching theory found on page 50. Review Questions 1. List five considerations (in order of importance) for loading aircraft. 2. What are three things to consider when moving on-board an aircraft? 3. List 10 safety routines near and on-board a jump aircraft.

Page 42 of 138 2.8 Student Equipment
© Canadian Sport Parachuting Association, 2010
2.8 Student Equipment
2.8.1 AAD – Automatic Activation Device FXC 12000 Characteristics The FXC 12000 is a 3-part assembly consisting of a completely mechanical altitude control assembly - not dependent upon batteries, squibs, or pyrotechnic devices (no electrical parts) - a main body assembly and the pin puller assembly. The device relies on a double aneroid device that detects both altitude and rate of descent. The Model 12000 can be used on both the main and/or reserve of a tandem (2-canopy) system, as well as a chest mounted reserve. The unit is armed by ascent and will fire if the rate of descent exceeds 45 mph (65 ft/sec) under a preset altitude that is adjusted on the ground. When fired, the pin puller retracts 2 inches (5 cm) with a force of 80 lb. It is recommended that the altitude control assembly be mounted on the shoulder. Ensure that the end loop on the puller, attached to the pin, is finger tight. The steel cables must be covered to prevent snagging and the pulling wire has a direct clear path to the pin. The white plug seated between the wire as it comes out of the cable must be present and not cracked. The unit is installed as per manufacturer’s instructions by a Rigger A if the gear is set up for it, or Rigger B or FAA Master Rigger if installation requires fabrication. The FXC altitude settings must be PRESET on the ground at the Drop Zone BEFORE EACH JUMP. Never calibrate the Model 12000 in an aircraft in flight. Serious injury and/or fatality can result. The Model 12000's altitude control may be set from 1,000 to 4,000 ft. above ground level (AGL). Ground level may be anywhere from sea level to 10,000 ft. elevation. The altitude control, while on the ground, reads directly in feet ground level (AGL) at which it has been set to operate. Knowledge of field elevation and/or barometric pressure is not required. The Model 12000 has a "Safety Lockout Knob." The Jumper, before climbing into the aircraft, must turn the knob to "JUMP." If the Jump is aborted for any reason, the "Safety Lockout Knob" must be turned to "OFF." This is done to avoid any possibility of the unit firing in the rapidly descending aircraft when below the release altitude setting. Under normal conditions the Model 12000 would not operate, due to the parachutist having deployed his main chute, thus slowing his rate-of-fall below 40 feet per second, prior to reaching the Model 12000's release altitude setting. Beginning with serial #4000, the release trigger mechanism rate-of-descent has been preset during manufacture at 40 feet per second NO FIRE and 65 feet per second ALWAYS FIRE. The Model 12000 WILL NOT OPERATE when the parachutist is above the unit's altitude setting, regardless of his rate-of-descent. The Model 12000 WILL NOT OPERATE when the parachutist reaches the unit's altitude setting and his rate-of-descent is less than 40 feet per second. The Model 12000 WILL OPERATE when the parachutist reaches the unit's altitude setting and his rate-of-descent is greater than 65 feet per second.
Note: If you have any questions regarding skydiving gear, check with a qualified, certified rigger.

2.8 Student Equipment Page 43 of 138
© Canadian Sport Parachuting Association, 2010
The Model 12000 WILL OPERATE IF the parachutist is at, or below, the altitude setting and his rate-of-fall increases from less than 40 to more than 65 feet per second. Typical Example: If the Model 12000 has been set to operate at 1,000 ft. above ground level (AGL) and the parachutist opened his main canopy at 2,500 ft. above ground level (AGL), the Model 12000 would NOT OPERATE at 1,000 ft. because the parachutist's rate-of-decent would not be great enough to trigger the unit into operation. An example can be illustrated by the following incident: A jumper has the Model 12000, which has been preset at 1,500 ft. above ground level (AGL), attached to his reserve parachute. The jumper opens his main parachute at 3,000 ft. above ground level (AGL) and descends under an open canopy to an altitude of 1,500 ft. At this slow rate-of-descent, the Model 12000 will not fire. HOWEVER, at 1,200 ft. above ground level (AGL) a mid -air collision occurs collapsing the jumper's canopy. As soon as the jumper's rate-of-descent is increased to greater than 65 feet per second, the Model 12000 will trigger, pulling his reserve ripcord pin. Setting • Turn unit ON, on the ground • Set altitude, usually about 1200 ft.
• Note: The manufacturer recommends the unit be set to 1500' below intended activation altitude
• Minimum setting is 1000' Once turned on and set, the unit can remain on for the duration of the day. Regulations • Civilian use only • Tested every repack cycle in an altitude chamber • Must have J modification • Re-calibrated every 2 years by FXC • When testing must fire with a load on the cable as a no-load fire will damage the unit. Maintenance Send back to service center if the unit: • Misfires • Has mud/dirt obstructing the air vents • Has been submerged in water (unless waterproof) • Has been dropped or fired without a load • Has sustained physical damage or the needle sticks or is broken. • Requires its re-calibration period/schedule * You are not allowed to open the unit yourself. On/Off — exercise caution when arming an AAD in the aircraft at altitude. Cypres and Astra Type AAD’s should never be turned on or off in the aircraft. Electronic AAD: Cypres (Cybernetic Parachute RElease System by SSK), Vigil, Argus For details about each of these types of AAD’s, please check with either the manufacturer’s website or your local Rigger. Some of the common features are:
• Self-test when turned on • Automatically Zero out at ground level when turned on • Cypres and Argus are water-proof; Vigil is not

Page 44 of 138 2.8 Student Equipment
© Canadian Sport Parachuting Association, 2010
• Different models for Student, Tandem or Expert with different descent rates • Cypres and XX have automatic shut off between 14 and YY hours • Cypres has a 4-year maintenance cycle • Cypres has a 12 year life; Vigil a 20 year life; • Battery life: they lose about 1% per year, and last about 700 jumps or 4 years • Speed Example: The Vigil activates at 317 meters (1040 Ft) If the freefall speed is equal or
superior than 20m/sec. (72km/h - 45 mph) Skyhook, etc. ***
2.8.2 RSL – Reserve Static Line What is an RSL? The RSL is a back-up system which will activate the reserve upon the release/jettison of the main parachute. It usually takes the form of a lanyard connected from one riser of the main parachute to the reserve activation system and as you fall away the lanyard activates the reserve system. Methods of Reserve Activation The RSL may run off of one riser, both risers linked by a cross connector or from both risers with two pins. The other end can be attached to the reserve ripcord, ripcord housing or reserve pins. General Inspection / Check Any reserve activation system should be retained and concealed so as not to create a snagging problem or allow a premature activation of the reserve. The RSL should be positively attached to its release point and the riser. The main canopy release system (3-ring) must be maintained and operable. See manufacturer’s instructions on proper routings and connections for each system you encounter. Note that manufacturer’s install specific systems on their rigs. Modifications in regards to the RSL can only be done by a CSPA Rigger B or an FAA Master Rigger One Riser Systems. The proper cutaway handle must be installed. Most manufacturers set the cutaway cables to different lengths so that the side with the RSL releases last. If changing cutaway handles, be certain that the cable lengths are correct for the RSL release. Although highly unlikely, one concern regarding this system is that if the non-RSL riser remains attached, for whatever reason, then the RSL attached riser would activate the reserve when a clean cutaway has not been achieved. Two Risers — Cross Connector Check the proper routing of the cross connector as the manufacturer specifies. A concern with this type of system occurs if the jumper experiences deployment of the reserve prior to or simultaneous with main deployment. In this circumstance, the reserve has deployed between the main risers, finishing in front of the main canopy. The RSL cross connector, extending between the main risers, is now wrapped around the front of the reserve lines; this means that the cross-connector, main risers, lines and canopy fully enclose the deployed reserve. A cutaway of the main could cause choking off and collapsing of the reserve canopy. Both Risers with Two RSL's This system is designed to deal with the problems of a one riser cutaway activating the reserve prior to the other side releasing and due to the problem of the cross connector interfering with cutaway on a two canopy situation. With this system, both risers must release prior to the RSL activating the reserve. The inspection procedures would be the same as the single riser RSL but performed for

2.8 Student Equipment Page 45 of 138
© Canadian Sport Parachuting Association, 2010
each side of the system. The cutaway cable lengths should be the same length. If the rig is equipped with an RSL, the RSL side should be slightly longer. Implications for Teaching Students should never be taught to undo RSL’s under canopy. This can be very dangerous. It is far better to have the odd reserve activated due to a cutaway in high winds than a low cutaway with the RSL disconnected. For interest sake, the reserve will most likely never inflate unless the ground winds were strong enough (40 + mph) for inflation and in this case we should never have been in the air. Many centers use a riser connector that cannot be released in air. However, if jumping is being conducted within the limits of a water hazard then the RSL should be released if a water landing is imminent and this procedure must be taught as part of the emergency water landing procedure. If a center is using a tightened Rapide link or carabineer, then the aircraft should have a wrench on board for disconnection in event of an accidental main activation prior to exit. These RSL types should not be used near water, as they cannot be disconnected in air. Lastly, if a cross connector RSL system is being used, the students must be taught not to cutaway in the event of a two canopy situation. They will have to land with both canopies or release the cross connector prior to cutting away the main canopy.
2.8.3 Containers/Canopies General: CSPA does not endorse any specific manufacturer, but recognizes that sport parachuting equipment manufactured in accordance with the FAA TSO C23c (USA) has been subjected to extensive testing and is manufactured in compliance with quality control standards. Standardization of all DZ’s student rigs can avoid conversion confusion and potential accidents1. Preferred student rigs will be compatible with common training techniques (i.e. SL, IAD)2. All students must use Ram-air main canopies: See the PIM 1 manual. Equipment Skills for the Students The "Basic" series for Equipment Skills is as follows: references PIM 2A pages 56 – 62 • equipment components and function • activation of reserve • setting and mounting the altimeter • gearing up procedures • safety checks 1 Student logbook and / or training record must indicate the type of student training system used, including reserve type, main activation method and canopy type for conversion training guidance at another DZ. 2 IAD pilot chute pouches are more convenient when mounted on the inboard side of the STS; this can be an IAD pouch, secondary to the normal pouch as used in the freefall configuration.

Page 46 of 138 2.8 Student Equipment
© Canadian Sport Parachuting Association, 2010
• setting audible altimeter • packing • clearing entanglements • equipment inspection
2.8.4 Activation of the Reserve Canopy The reserve procedures used by your student will vary according to the type of cutaway system. For most students in Canada, the individual will wear a container system fitted with either a Two Action System (TAS) or a Single Operation System (SOS). These procedures are described in the text that follows. • Two Action System (TAS) • Single Operation System (SOS) Two Action Systems (TAS) There are two methods recommended for using the TAS. The drill for both is as follows: • Look - Locate – Peel-and-Punch Right – Peel-and-Punch Left – Arch TAS Method 1: The directions in detail for your student, presented from their point of view are as follows:
• Check the main canopy; decide to take action (i.e. initiate reserve procedures). • Arch • Look and identify the Cutaway and Reserve ripcord handles. • Simultaneously, grasp the Cutaway handle with the right hand and the Reserve handle with
the left hand, thumb through the Reserve handle with fingers closed around it. • Activate the cutaway by twisting the handle inward with the right hand to separate the Velcro
(Peel) and punch downward and slightly across until the right arm is fully extended, and the cables are free and hanging loose.
• Remove the Reserve handle from the pocket by twisting the handle inward with the left hand to separate the Velcro (Peel) and punch downward and slightly across until the left arm is fully extended, and the cable is free and hanging loose.
• From the punching strokes, bring arms up and outward into arch. • Maintain arch position as reserve canopy deploys. • Place handles either down the front of the jump suit or hold on if possible.
TAS Method 2: The directions in detail for your student, presented from their point of view are as follows:
• Check the main canopy; decide to take action (i.e. initiate reserve procedures). • Arch • Look and identify the Cutaway and Reserve ripcord handles. • Simultaneously, grasp the Cutaway handle with the right hand and the Reserve handle with
the left hand, thumb through the handle with fingers closed around it. • Activate the cutaway by twisting the handle inward with the right hand to separate the Velcro
(Peel) and punch downward and slightly across to the left until the right arm is fully extended, and the cable is free and hanging loose. Discard the cutaway handle.
• Place your right hand on your left hand and remove the Reserve handle from the pocket. With both hands, punch downward and slightly across to the right until the arms are fully extended, and the cable is free and hanging loose.
• From this punching stroke, bring arms up and outward into arch. • Maintain arch position as reserve canopy deploys.

2.8 Student Equipment Page 47 of 138
© Canadian Sport Parachuting Association, 2010
• Hold onto the Reserve handle by placing over your hand, or down the front of your jump suit. Single Operation System (SOS) The drill for emergency procedures on a SOS is as follows: • Look - Locate - Pull - Clear - Arch The directions for your student, presented from their point of view are as follows: • Check the main canopy; decide to take action (i.e. initiate reserve procedures). • Arch • Look and identify the Reserve handle. • Simultaneously, grasp the Reserve handle with the left hand, thumb through the handle and
fingers closed around it; your right hand is placed on top of your left hand. • Remove the Reserve handle from the pocket and with both hands, punch downward and slightly
across to the right until the arms are fully extended and the cable is free and hanging loose. • Use the right hand to hook the cables followed by bringing the arms up and outward into the arch
clearing the cables from the housings. • Maintain arch position as reserve canopy deploys.
2.8.5 Equipment Changes — Procedure Changes Procedure changes result primarily from changing harness/container systems as this affects reserve procedures and main deployment methods. Any change in reserve procedures (from a SOS to a TAS or vice versa) must be performed by a Skydiving School Instructor. Changes in main activation (from a throw out belly band to a leg mount throw out or a pull out pilot chute, or vice versa) can be performed by an Jump Master who is familiar with the system. Before discussing methods of training for system changes, it is first necessary to understand why transition training is important. The primacy effect of learning basically states that what is first learned will be first remembered (Murdock, 1960). Reserve and main deployment techniques that are first learned become a formed habit and the skill can approach the autonomous stage of motor learning so that the jumper can react "instinctively" (Fitts and Posner, 1959). Under a stressful or emergency situation, people react instinctively to the procedures that they know. This is a mechanism to combat sensory overload or panic. In this situation, handles in different places or different emergency procedures can prove fatal. History has shown that "Transition can kill”. Proper transition training can prevent this. Transition Training Transition starts with the Instructor having a clear, logical presentation (whole-part-whole) of correct technical information for the person who is to undergo transition training. Introduce new procedures to be taught and explain the importance of doing it right (i.e. new main deployment location). Emphasize positive identification or think first prior to execution. Conduct practice with many repetitions and with realistic training aids. The procedures must be detrained by retraining with the new procedure. The training must be clearly sufficient enough to have the learner in the autonomous stage of motor learning with that skill in order for the transition to be safe and effective (Fitts and Posner, 1959). Include any new sensations that may be experienced and extra procedures for pin checks or safety information concerning normal and emergency situations (e.g. pilot chute wrapped on body parts or in the burble, letting go the pilot chute immediately instead of holding it, total malfunction, pilot chute in tow, etc.). The transition must be practiced under pressure of emergency scenarios of movement, distraction, disorientation and time constraints. Once this is complete to

Page 48 of 138 2.8 Student Equipment
© Canadian Sport Parachuting Association, 2010
standard, the evaluation then comes to test to see if the learning process has advanced to the autonomous stage. Create a drill for testing and repeat using different emergency scenarios involving all of the previous types of situations with the high stress of time constraints. The only acceptable standard for passing is 100% perfection. If it is not to standard, then train more and re-test the entire procedure until the standard is met. It is not uncommon for good transition training to include as many dozens of repetitions. Remember to practice, practice, and practice. Once the transition has successfully taken place, procedures should be continually practiced to maintain currency on them. Ways to do this are by short ground practice sessions, in-flight handles check on every jump, hanging harness practice, freefall handles check, freefall practice pulls and under canopy handles check. A suggested method of using a different main deployment device after transition training is by doing a long freefall delay with multiple practice pulls, such as a PFF Level 1 with Practice Pulls only, a held practice pull to adjust the top hand to eliminate a possible heading change, no exercises to distract the jumper, and stop to think about the pull and pull higher than normal. Several similar or identical types of jumps should be completed prior to resuming a normal jumping routine. A hop ‘n’ pop is insufficient in all respects. Safety
BSR #1 states:
"No jumper will engage in parachuting activities or use equipment unless properly trained, and endorsed if required, for the same."
When borrowing or purchasing gear, new or used, it is your responsibility and a BSR to be properly qualified, briefed and trained on that gear, its uniqueness, main and reserve deployment procedures and characteristics. By the same token, if you are lending or selling your gear to someone else, it is also your responsibility to see that the previous training and safety standards are met. For the person borrowing or purchasing the gear, following these recommendations are preventative measures from getting hurt. For the person lending or selling the gear, following these recommendations are preventative measures from a lawsuit, a coroner’s inquest, or both. Borrowing and/or changing gear and systems regularly is not recommended regardless of experience level. Similarly, supposedly knowing several reserve procedures and several main deployment procedures is not recommended as well. When the time to pull arrives or the emergency happens, valuable time is wasted deciding which system that is being worn at that time. There is no guarantee that the momentary state of confusion will be overcome in time to be able to deal correctly with the stressful situation at hand. This has been mentioned because of cases of student jumpers moving randomly between DZ's with varied gear, for a couple of jumps here and a couple of jumps there. The previous hazard combined with less awareness and low experience could lead to disaster. To make things worse, many times the student doing this is a problem student who has
Never borrow gear when attempting something new, complicated or potentially distracting. This especially applies to the novice/intermediates who just might have acquired new gear at the same time as they are involved in beginning RW, sit flying or other disciplines. History clearly indicates that the "borrowed gear syndrome" can lead to serious injury or even death.

2.8 Student Equipment Page 49 of 138
© Canadian Sport Parachuting Association, 2010
taken there own initiative to find a solution by moving from DZ to DZ in hopes of finding it. Overconfidence may be a problem too, as they may want to find the solution by themselves, not from anyone else. Be aware of this potential problem. Review Questions 1. Name the points of adjustment on typical student equipment. 2. What are the first points (two) taught on a safety check to your student?

Page 50 of 138 2.9 Dispatching Theory
© Canadian Sport Parachuting Association, 2010
2.9 Dispatching Theory In the CSPA there are two accepted methods of dispatching non-freefall students. 1. Instructor Assisted Deployment (IAD) 2. Static Line (SL) Deployment - Direct bag or pilot chute assist There are two main objectives that must be considered when dispatching students. 1) Unimpeded deployment and 2) Low malfunction rate. Both the deployment methods can have different exit types. 1. IAD: Hanging or Flying exit or Dynamic 3. SL: Poised, Hanging or Dynamic We will focus on the IAD Flying/Hanging exit as it is the most prevalent and modern method for dispatching students in the CSPA. You will find Static Line information in the appendix Instructor Assisted Deployment – IAD Flying Exit This method uses a throw out pilot chute that is placed into the wind to the side of the student and below the door of the aircraft where the relative wind deploys the parachute assembly. IAD gets the parachute assembly away from the jumper and the rig as it deploys with the relative wind reducing the possibility of malfunctions. These advantages are only true if the IAD method is done properly. The system must utilize a curved or flexible pin, and a deployment bag. The system is operated as follows: 1. The jumper exits the aircraft 2. pilot chute is placed below the aircraft simultaneously with the jumper release 3. pilot chute inflates in the relative wind behind the jumper and pulls the curved pin 4. pilot chute pulls the bag out of the container 5. deployment follows a natural sequence in the relative wind Advantages of this system are: 1. no extra equipment necessary (no SL) 2. logical/normal deployment of the canopy 3. student is presented into the relative wind upon release; easier to get a clean arch 4. rig transferable between IAD and freefall (same container set up for both) 5. when done properly the parachute assembly (pilot chute and bridle) is away from the jumper
faster than they can interfere with deployment 6. more time for practice pulls Note: pilot chute is not held to pull the pin and proper air speed must be maintained for a positive, fast deployment (minimum 78 MPH) Disadvantages of this system are:

2.9 Dispatching Theory Page 51 of 138
© Canadian Sport Parachuting Association, 2010
1. increased chances of aircraft and parachute assembly entanglements (pilot chute/parachute
over the tail) if done improperly 2. increased possibility of parachute assembly / jumper entanglement if done improperly 3. can be a challenge for a light or heavy person to climb out to the end of the wing strut 4. bag drop can happen more easily of care of the bridle/pin is not maintained
2.9.1 Deployment system preparation IAD - Pilot chute preparation: Pilot chute preparation should be done prior to opening the door, starting after 1500’, and finishing by 2500’. Check the equipment front-to-back, top-to-bottom. Make sure the chest strap and leg straps are secure and tight. Turn on the Radio and confirm it is operating correctly. Have the student lean forward to your side hip so you can check the reserve and main pins, remove pilot chute from the pouch or retainer, reroute the bridle if necessary and stow excess bridle under the left side main closing flap to act as a buffer; check that the main pin is secure and well seated. Prior to the door opening, the pilot chute should be removed from the pouch or retainer and if necessary refolded unless it is properly packed on the ground. As you un-stow the pilot chute, ensure that the bridle has no twists in it and that it has not been wrapped around the pilot chute or the pilot chute handle. If necessary, take the pilot chute over the student’s left shoulder and refold it. Fold the pilot chute so that the bridle is not wrapped in the inside. Fold the pilot chute so that your hand can close completely around the pilot chute providing maximum control of the pilot chute. If Pilot chute is pre-folded at your DZ then the pilot chute can be held at side adjuster without removing excess bridle.
Hold the pilot chute so that the 4th and 5th fingers of the hand can close completely around it to obtain maximum control. This allows the thumb and first two fingers to maintain an overhand grip on the student’s side adjustor while waiting to open the door.
Route the bridle to the side adjuster, grip the pilot chute with your right, and then take hold of the side adjuster with an overhand grip. Note: If there is an AAD mounted on the left side adjuster, this grip cannot be used as a pilot chute bridle/AAD entanglement could occur. For the shoulder grip method, route the bridle or SL over the students left shoulder and then refold the pilot chute if necessary. Pilot Chute Folding Methods There are three methods of folding the pilot chute in preparation for dispatching. The bridle cord preparation is the same for all three methods.
The Pilot Chute handle is held out the top of the thumb/index finger and the bridle comes out the bottom of the hand below the pinky. The handle will help hold during the snatch
and the bridle out the bottom avoids entanglement in the JM’s hand.
Leaving the door open is not recommended; close the door for each go around during pilot chute preparation to eliminate the possibility of a pilot chute going out the door.

Page 52 of 138 2.9 Dispatching Theory
© Canadian Sport Parachuting Association, 2010
Bridle cord - extract and refold all of the bridle, the bridle is S folded on the side length of the pilot chute, the bridle must not stick out more than 2 cm from the top of the hand and 4 cm from the bottom of the hand when held. 1. Three fold - the pilot chute is shook out and folded neatly into thirds, prepare the bridle as
instructed above, hand grasps the entire package with the bridle facing the palm of the hand 2. Two fold - the pilot chute is shook out and folded neatly into half, prepare the bridle as instructed
above, hand grasps the entire package with the bridle facing the palm of the hand 3. Pre fold - prior to boarding the aircraft, the pilot chute and bridle is folded properly, when ready to
dispatch the right hand grasps the entire package with the bridle facing the palm of the hand Final communications Just prior to the door being opened, review the key points of the jump followed by a few reassuring comments about how much fun this will be and how great they will perform. When the pilot consents to, or reaches to open the door, state calmly to everyone in the aircraft that the door is about to open so that the students may psychologically prepare themselves for it as well as protect their handles. Do not yell for the door, just state it calmly.
2.9.2 Assisting the Student's Exit Once you are satisfied with the aircraft jump run and have reached the climb out point, communicate to the pilot if necessary (cut, brake), and then tell the student to "Get ready" or “Climb out”. As the student climbs out to the hanging set-up position you must:
• assist the student’s climb-out (both verbally and physically) while performing skill analysis; • observe / control the student’s gear deployment system (pilot chute, bridle, and flaps) during
the climb-out (priority #1); • protect your own gear by placing your Left Arm across your chest, covering your Reserve
and Cutaway handles, to ensure that the student cannot grab them. Assist the Student's Climb-Out The goal is to have the student ready to go over or before the exit or drop point. Prior to the student’s climb-out, ensure that your grip is solid on the side connector and that the student is as far forward as possible and slightly turned towards the door. For the hanging exit, it is a good idea for the student to bring their right foot up under themself as this makes climb out easier and quicker. Assist the student to move forward into the prop wash with your left hand so that they may get a firm grip on the wing strut. Once they have the strut then the assisting grip may be released and a new grip on the door or strut taken so that you are steadied to throw the pilot chute. Be prepared to place the pilot chute at any time in the event that your student slips or decides to launch before your command. Observe / Control the Student's Gear during Climb-Out (Priority #1) As you assist with the student’s climb-out, move the student so that their gear will not brush or snag upon any part of the back or upper door frame. It is the JM’s responsibility to ensure that the student gets to the set-up position with out an accidental activation. Pay close attention to the main activation system (i.e. pilot chute and bridle) and watch that the top of the rig and risers do not contact the in-flight door’s handle. Utilize your harness grip to assist/control the student. HOLD onto this grip!

2.9 Dispatching Theory Page 53 of 138
© Canadian Sport Parachuting Association, 2010
Skill Analysis of the Climb-Out As your student climbs out, you must observe the sequence of the student’s climb-out as well as the placement of their hands and feet. You may have to communicate corrections to the student if necessary. Allowing your student to set up wrong will likely cause them to do an unstable jump. A stable jump starts with a good set-up and launch. Protect your Own Gear It is wise to cover your own reserve and cutaway handles as your student initiates climb out. This is easily done, bringing your left arm across your chest as you take an assisting grip on the student. This will protect your handles nicely. There have been incidents in which a student has slipped, or grabbed and pulled the JM's reserve handle while searching for a good grip on the front door frame. An alternate strategy is to place the students’ left hand on the door frame for them by taking hold of their wrist, thus eliminating potential handle snagging at this step. The JM must also be aware of their gear and ensure that rubbing of the rig on the aircraft does not cause an accidental deployment of their own gear. Make sure your own Pilot Chute has not been caught by the brake handle on the floor or by another piece of aircraft equipment. Always be conscious of the aircraft control panel, particularly if instruments are in the vicinity, such as the fuel mix knob or a secondary yoke.
2.9.3 Deployment System Control More details about pilot chute and SL control can be found in the Appendix on Exit Techniques found starting on Page 121. When the student is set up, eye contact has been made and you are over the spot give the command "Go" or “Lookup”. Go/Look up command
• Over the spot, give them the command and watch their actions carefully and smile! • as the student clears the aircraft, place the pilot chute properly by following them down with
the arm, placing the pilot chute below or at wheel level for the hanging exit and releasing it into the wind beside the student.
• Using your Coach 1 skill observation techniques, observe from the center of the students body out to the extremities.
• Remember the student’s performance for skill analysis on the ground. After Go • Climb back into the aircraft • either close the door or allow the pilot to do so, smile, be positive and direct your attention to
the next student • observe the flight of your previous student's canopy to verify the accuracy of your spot
Operation Rules There are certain operation rules that should never be broken when dispatching with the IAD method. These rules are: 1. The airspeed at the point of release should not be any slower than 78 mph (70 knots). The
positive and quick speed of the container opening and bag departure is most important in preventing the interference with the deploying parachute assembly by the student. Good airspeed also helps prevent any hesitation of the pilot chute to release the curved main pin. While a higher airspeed is also okay, be aware of the increased difficulty it may have on your students’ climb out. And yours too!

Page 54 of 138 2.9 Dispatching Theory
© Canadian Sport Parachuting Association, 2010
2. If the hanging/flying exit is being used the pilot chute bridle tension must be controlled by
a side harness grip. As the student prepares to get set-up to exit, the JM must remain close to the student controlling the bridle tension as they do so. If the bridle tension is slack, then the bridle will flap in the wind and possibly work the pin out causing a bag drop (a narrow bridle will help prevent this). On the other hand, if the JM does not allow some slippage of the bridle from their grip then they may actually pull the pin causing a bag drop. Make sure that enough excess bridle is stowed well under the closing flap so that it will not come out, or to avoid the possibility of the Jump Master pulling the pin accidentally.
3. Pilot chutes are placed, not thrown. The pilot chute must be placed below the bottom level of
the aircraft’s wheel/door prior to release, even if the student falls off the aircraft. 4. The pilot chute should be placed into the relative wind after the jumper has released from
the aircraft. The jumper must leave the aircraft prior to the release of the pilot chute. If the pilot chute is released prior to the launch by the student, there is an increased possibility that the parachute assembly may become entangled with the tail section of the aircraft.
5. The pilot chute should not be held after the jumper has released from the aircraft (see
unusual situations). Holding the pilot chute after the jumper has left exposes the parachute assembly to being interfered with as it pulls over the jumper’s shoulder. The best timing to release the pilot chute is to let go just after confirming (just above head level) that the student has separated from the aircraft. The timing should be so that the bag is off of the student’s back faster than they can flip over and grab it.
6. The pilot chute should not be placed on the center of the student’s container where the
pilot chute may hesitate due to the "burble" behind the jumper’s back. The pilot chute should be held just off to the student’s left side so the pilot chute is not blanketed when released. This is important due to the added possibility of deployment interference with an unstable situation.
IAD Dispatch Method
Note: different body types, both Jump Master and Student, may require slightly different techniques. Consult with your Course Facilitator or a highly experienced Jump Master on how to work best with your students.
Instructor Student Gives the Climb Out command, Has PC folded in right hand with right hand grip on Student’s side connector. Left Foot outside on the step or trailing underneath
Both Hands on Door Frame
Assist with verbal commands while controlling PC Right Foot out and slide down to step
Assist student with left hand to place hand on strut if needed. Verbally give commands. Place left hand on strut following the student
Left Hand on strut, transfer weight to right foot
Maintain PC control
Drop Right hand grip on door frame and reach for strut beyond left hand. Brings left foot in front of right onto step or wheel (or side-by-side)
Place left foot on step, and follow student out, slide left hand along strut.
Puts weight onto left leg brings right foot past to hang. Slides hands up as high as possible on strut - Lowers themselves into the airflow - Assumes flying arch position: Toes – Hips - Head - Student looks up at Instructor and waits for GO command
Give the GO command (Loud, wide mouth, head nod at same time) and proceed with IAD dispatch (see separate section)
- Head Up, Arch hard, hips forward, count
Observe student’s performance - reverse climb out procedures to climb back in

2.9 Dispatching Theory Page 55 of 138
© Canadian Sport Parachuting Association, 2010
Observation of Student's Performance Observation: When dispatching a student, you must provide them with an accurate and useful summary of their performance including activities in the aircraft, climb out, set up, launch and air work. The key is to watch the student, rather than the deploying canopy. Work from the large body parts (i.e. torso) to detail areas (i.e. fingers) as you gain experience. It is generally helpful to picture a correct performance of the skill in your mind and then compare what you see to what should have occurred. This is easier than trying to remember what they should be doing at the same time that you are trying to see what they are doing. Here are some tips for specific points to check during the student's jump: Climb-out • Verify their starting position in the doorway. • Did they begin with the correct foot and hand? • Is your assistance required, how much force is the student exerting, how assertive are they? • Are the actions performed those that were taught and practiced? Set-up and Exit Observe hand and foot placement in the set-up, and the manner in which the student leaves. Later these points can be raised in the debriefing and the practice for subsequent jumps. • Observe hand and foot position. • Do they look balanced, in control and prepared? • Note their “look up” position and verify eye contact after exit • Note condition of the equipment. • How relaxed do they appear? • How aware are they? Give them a signal and see if they can give the sign back as they are
falling.
2.9.4 Gradual Freefall (GFF) progression Launch, Body Position and Count Using the skill analysis principles watch the student launch into the arch while paying close attention to the hips first and the arm and leg symmetry second. A very common error is to be distracted by the opening sequence, thereby being unable to give a fair critique of performance. Was the performance acceptable for progression? • look at the torso's curve and attitude • check the extension and spread of the arms and legs • is the head up and eyes open? • can you hear and see the count? • Is the student aware? If you give a signal (e.g. thumps up, wave) can the student return the
same? • for a practice pull, are the actions in sequence, smooth, deliberate and precise? • Are freefall students on time, if not how many seconds + or -, are they stable, smooth?
During climb out, the Jump Master must control: • The spot • JM’s gear (also when coming back in) • Student’s gear
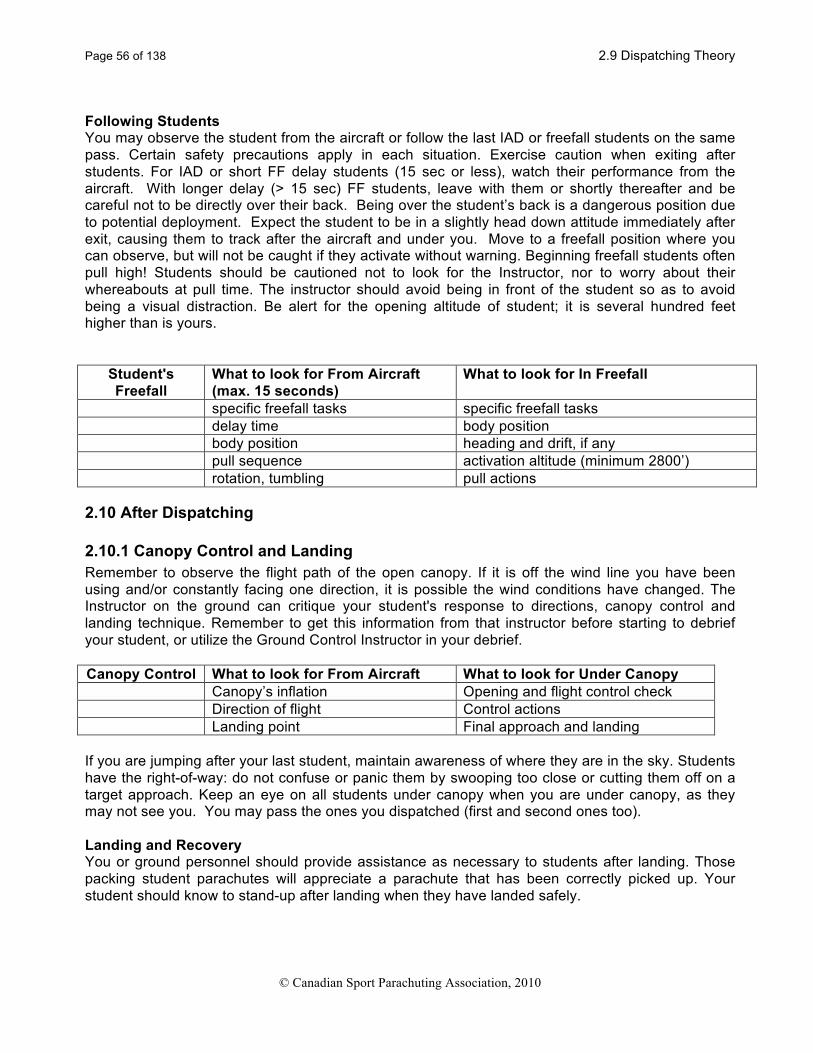
Page 56 of 138 2.9 Dispatching Theory
© Canadian Sport Parachuting Association, 2010
Following Students You may observe the student from the aircraft or follow the last IAD or freefall students on the same pass. Certain safety precautions apply in each situation. Exercise caution when exiting after students. For IAD or short FF delay students (15 sec or less), watch their performance from the aircraft. With longer delay (> 15 sec) FF students, leave with them or shortly thereafter and be careful not to be directly over their back. Being over the student’s back is a dangerous position due to potential deployment. Expect the student to be in a slightly head down attitude immediately after exit, causing them to track after the aircraft and under you. Move to a freefall position where you can observe, but will not be caught if they activate without warning. Beginning freefall students often pull high! Students should be cautioned not to look for the Instructor, nor to worry about their whereabouts at pull time. The instructor should avoid being in front of the student so as to avoid being a visual distraction. Be alert for the opening altitude of student; it is several hundred feet higher than is yours.
Student's Freefall
What to look for From Aircraft (max. 15 seconds)
What to look for In Freefall
specific freefall tasks specific freefall tasks delay time body position body position heading and drift, if any pull sequence activation altitude (minimum 2800’) rotation, tumbling pull actions
2.10 After Dispatching
2.10.1 Canopy Control and Landing Remember to observe the flight path of the open canopy. If it is off the wind line you have been using and/or constantly facing one direction, it is possible the wind conditions have changed. The Instructor on the ground can critique your student's response to directions, canopy control and landing technique. Remember to get this information from that instructor before starting to debrief your student, or utilize the Ground Control Instructor in your debrief. Canopy Control What to look for From Aircraft What to look for Under Canopy Canopy’s inflation Opening and flight control check Direction of flight Control actions Landing point Final approach and landing If you are jumping after your last student, maintain awareness of where they are in the sky. Students have the right-of-way: do not confuse or panic them by swooping too close or cutting them off on a target approach. Keep an eye on all students under canopy when you are under canopy, as they may not see you. You may pass the ones you dispatched (first and second ones too). Landing and Recovery You or ground personnel should provide assistance as necessary to students after landing. Those packing student parachutes will appreciate a parachute that has been correctly picked up. Your student should know to stand-up after landing when they have landed safely.

2.9 Dispatching Theory Page 57 of 138
© Canadian Sport Parachuting Association, 2010
2.10.2 Equipment Either the Ground Control Instructor or another person should help the student collect up their gear and return to the packing area safely, keeping a head up for other incoming canopies. This is expected in any operation and ensures that none of the equipment goes astray. This includes returning jumpsuits, helmets and goggles so that the next students can use them. Ensure radios are shut off to save the batteries.
2.10.3 Student Feedback Once the students' performances are firmly fixed in your mind and/or on your note sheet, you must debrief each student. Prepare your thoughts; select points that will contribute to their performance improvement. A proper debriefing has several aims. Ideally, you will determine their impressions of the jump, inform them of the good and the improvable aspects of their performance, suggest methods of improvement, and record details in their logbook. Debrief Format from Coach 1: 1. Student version 2. Jump Master version 3. Two or three things done well, one or two points to improve (prioritized for the student) 4. Goal set: next jump? 5. Practice – immediate corrections, or something new for next jump 6. Logbook (first jump certificate) Student Version: The student should be asked for their step by step analysis of their jump and their opinion of their own performance. This allows the Instructor to determine the student's presence of mind, which is always a useful indicator of progress and awareness. Also, the student's comments might remind you of points which you may have forgot to mention. If the student has problems remembering, give cues and prompting questions. How did it feel when you were climbing out? Did you enjoy hanging off the strut? Do you recall seeing the instructor after you let go? How was your canopy opening? Did you have any line twists? How did you enjoy flying the canopy? How was your landing? First jump students frequently have difficulty remembering anything from "Go" until opening. If this should happen, they should be assured that this is quite typical that will cure itself, likely on their next jump. They also may downplay how much they do remember. Keeping sight of the JM and/or aircraft helps. Jump Master Version. You need to state and describe clearly what occurred from start to finish – aircraft to landing. Use a show and tell approach. Keep it short and simple (KISS). A constructive critique does not leave the student discouraged, no matter how poor their performance. An Instructor's task is to instruct, not to criticize. Your students should walk away exited and thrilled about their skydive. Draw their attention to strong points before delving into the poorer aspects that may be on the student's mind. Downplay their weaker areas particularly if they are being hard on themselves. Emphasize safety. Fill in some of the details as to why what happened. Connect your observations to the sensations that the student remembers. The summary critique should progress in the following order: two or three points which the student did well, one to three points which the student can improve for the next jump. It is important to encourage your student by accentuating their strengths and constructively correcting their weaknesses. Be positive about their ability to get it right the next time. Also, this is a summary in point form; avoid repeating the entire dive all over again.

Page 58 of 138 2.9 Dispatching Theory
© Canadian Sport Parachuting Association, 2010
Goal Set: State and describe the goals for the next jump regardless of whether it is a new jump, a repeat jump, or if the jump will not be until next weekend Logbook: See Jump Records - Paperwork below, Section 0 2.10.4 Jump Records - Paperwork Practice: After the critique, the Instructor should verbally correct faults and physically direct practice using training aids as necessary. This should be done as soon as possible after the jump to ensure positive learning. During the practice session, stress should be placed on specific corrective methods and their reasons, rather than incorrect attempts. Remember, “DO this”; avoid telling a student “Don’t” at any time. Introduce new skills – PAF them! Safety first! Reinforce survival habits. Practice the skills using appropriate training aids. If a new skill is to be learned for the next jump, teach it before the student leaves the drop zone. It will ensure that they come back to the DZ ready to jump and will make the instructors job easier.
2.10.4 Jump Records - Paperwork Student Logbook: Comments and details of the jump should be recorded on the student's log sheet or in their logbook. If they do not have one, use a blank sheet or the back of their first jump certificate. The student will feel that you want them to return and are interested in recording details for subsequent Instructors' reference. This act alone may help them feel like trying our sport at least once more. This should be done as soon as possible after the jump in order to provide immediate feedback, service and to feed off of the excitement that is still occurring. The CSPA logbook contains a set of code symbols, etc. for use in abbreviating comments and description in the log. Here are some tips for entering information about a student’s jump: • Welcome first jumpers to the sport, welcome back returnees who have had a long time away • Keep it lighter for first time jumpers; every first jump is a good jump! • Be more analytical for second jump and beyond
• Include arch, count, arm, leg and head positions • Include rotation in relation to aircraft heading if applicable (e.g. turn away from heading) • Include pitch in relation to relative air if applicable (e.g. are they keeping the head up, or
trying to get “down” flat too early?) • Include relaxation and awareness levels • Include climb-out technique and speed, especially if there is a concern for the next Jump
Master • Include canopy control and landing, including accuracy and flaring technique (10-15 feet) • Include what is their next jump how to go about it
• Sign the logbook with your JM rating after the signature First Jump Certificate: If it is a first jump or first freefall, ensure that a certificate is properly prepared.
You will be expected to sign and date the certificate; someone else may type or write their name on the document.
DZ paperwork: Do not forget to complete the DZ's student progression records or any other
paperwork required. This includes an AIM report if anything dangerous or potentially dangerous occurred.

2.9 Dispatching Theory Page 59 of 138
© Canadian Sport Parachuting Association, 2010
Your own records: You should keep track of the number of students you dispatched, especially for
certification purpose. Even beyond certification, keep track of who you dispatched in your logbook for historical records, how they did. Keep a spreadsheet or track the number of students you dealt with each year so you can prove currency and fill in your annual PED form (Practical Experience Documentation).
2.10.5 Video or Pictures Note Sheet: After the students leave the airplane, it may be several minutes before you meet to debrief the jump. Some Instructors use a small note pad or clipboard to jot down a few notes about each student's performance as an aid to their memories. It saves the later embarrassment of trying to sort out all the jumps and guarantees the student a more thorough and useful critique. If you decide to use this technique, it is suggested that you start preparing your notes on the ground or during the climb to altitude. Record the names of your students, in exit order, when preparing your notes. Video: Recording the student’s exit with a wing mounted camera is an excellent aid for the student to gain an accurate image of their performance. However, remember to start with a verbal review of the jump, encouraging the student to recall their jump first before letting them look at the tape. Their memories of the jump will help you to make an assessment of their awareness. Once they have seen the video this opportunity is lost. Still Photos: These provide excellent souvenirs for the students of their jumps, but are seldom
available quickly enough after the jump to be introduced during the jump evaluation and feedback. It is a good idea to select the best examples of student exits from the photos taken and use these during the preparation for the jumps.
Review Questions What would the key points be for a physical rehearsal of a training throw or pull? What is a simple relaxation method that can be used with first jump students?
Note: The well-being of the students has priority over getting the video or still.
Keep track of the number of Coach and Instructor jumps. Annually submit a P.E.D. to the CSPA.

Page 60 of 138 2.11 Stress Assessment and Control
© Canadian Sport Parachuting Association, 2010
2.11 Stress Assessment and Control Students will always have some degree of stress. It is your job to monitor all of your students and assess their level of stress and how it may affect each individual’s performance. Origins of Stress The definition of stress is an emotional or intellectual strain or tension. In the first jump situation, fear of the unknown and a lack of perceived control over the activity bring about stress. Never having performed a parachute jump imparts a definite degree of uncertainty within a first jump student. Common thoughts are: • Will I live? • Will my parachute open? • Will I be able to reach the steering toggles? • What if I have a malfunction? Thoughts such as these, if left unanswered, induce great anxiety and stress. An individual responding to their JM's command "Get Ready!" and individual moving into their position in the exit line-up for an 8-way team jump are both facing a considerable degree of stress. The student is probably wondering if they will be able to follow through with the jump and what chance there is of being seriously injured. The experienced jumper will likely be concerned with the physical arrangement of the line-up and the coming freefall performance. Thoughts of equipment failure or personal injury will be far from their present concerns. Why do their concerns differ? What has the skydiver learned during their accumulation of experience? Perhaps the first question to consider is "Why do they subject themselves to this stress?" Several articles have been written considering the motivation of both novice and expert parachutists. Of particular interest are the articles by 1) M. Zuckerman, 2) B. Ogilvie, 3) Johnsgard, Ogilvie and Merritt and 4) Arnold. While their studies differ in methodology, the conclusions are similar. All of the studies describe positive gains for the participant in return for their voluntary exposure to the stress situation. M. Zuckerman states "As a group, they (sensation-seekers/skydivers) rate the dangers of such activities lower than those who generally seek less stimulation”. Even when high and low sensation-seekers appraise risk in the same way, the highs contemplate the activity with more pleasure than anxiety, while the low sensation-seekers experience nothing but anxiety. B. Ogilvie states that, "Non-participants tend to view risk-taking behaviour [skydiving] as foolhardy, reckless, daredevil and, in the extreme, suicidal. By interpreting patently risky pastimes in light of their own personal needs, the non-participants project a wide range of negative images." In short, the participant, novice or expert, satisfies their personal emotional needs through their voluntary exposure to the stress. These articles follow with characterizations of the sensation-seekers identifying such traits as independence, verbal aggression and above average intelligence. Possible reasons for the existence of these emotional needs include a desire for escape, fulfillment of a biological pressure and a reaction to an unexciting society. The second question, that of why the experienced skydiver does not focus on the danger of the jump but rather on the planned events at hand, is a result of his learning to cope with the situation. The experienced skydiver will have a clear picture of their impending jump in their mind. They will

2.11 Stress Assessment and Control Page 61 of 138
© Canadian Sport Parachuting Association, 2010
probably review each step of the jump two or three times prior to exit. The novice jumper only knows what someone has told them; they do not have a clear picture of the jump. As a result, they are unable to review the steps they will follow without guidance. They may use those moments prior to their jump to recall malfunction stories which they have heard or to assess their ability to make the jump or to wonder what their friends will think. None of these thoughts will aid their performance nor will they assist them to be relaxed. Signs of Stress As you are going to work with first jump students, then you may be faced with the extreme condition of over stress, panic. You may find it helpful to know how to recognize its symptoms. Some symptoms of severe stress (panic) are:
• sweaty, sweating bullets • rapid breath, difficulty breathing • discoloration, pale clammy skin • silence, withdrawal into themselves • excessive / constant talk • questioning everything • glazed eyes, blank staring • loss of strength and coordination • white knuckle grips, death grips • vibrating, twitching, very jittery movements • over reacting • not aware, not listening to you • feeling faint, nausea • dramatic behaviour change when the door opens
If you suspect that your student is approaching a level of anxiety that is going to impede their performance, then your first response is to try and calm the student. If this fails then you should cancel the jump. If you think the student may have a rough time doing the jump, what will happen if they have a malfunction and must react to it? If you are in doubt as to the student’s performance in this situation then do not let the student exit. Slurred speech and coordination loss is a clear indicator of heightened anxiety. Helping Students to Manage Stress Stress does have its positive side. Without it we would be very relaxed and slow to assess and react to situations. The term often associated with “useful” stress is arousal level. If we are too calm, thinking processes and reaction times are too slow. If, the level is too high, then decision making and action become impossible and people tend to freeze.
Individuals perform at their best if they are at their optimum arousal level. Factors that help to create the optimal arousal level in the student during the course include:
• Confidence. The student must be confident in the training and in their ability to deal with all eventualities,

Page 62 of 138 2.11 Stress Assessment and Control
© Canadian Sport Parachuting Association, 2010
• Role Model. You, as the instructor, should be calm and in control at all times. Acting as a role model will help the students reduce their stress,
• Training. Provide quality training as "Training and Knowledge dispel Fear", • Focus. Keep the course short and simple. Emphasize the must know material and use good
training aids, • Feedback. Make sure that the student feels knowledgeable. Confirm this knowledge through
periodic and timely review, and • Muscle Memory. Ensure that a student's reflexes are autonomous when you say "GO!" or
describe an emergency situation. Levels of stress can be lowered with an awareness of prevention. To help lower a student’s stress level:
• Find out why are they jumping? • Provide positive talk, energy and environment • Help set realistic/attainable goals • Make sure the gear fits • Give regular short breaks • Make certain they have eaten, drank water today
Developing relaxation techniques for the first jump student is fairly difficult due to fact that it takes time to practice the various techniques sufficiently for them to be effective. There are a few simple techniques that could be applied. These are:
• Have your student think “relax”. • Have your students think about something that they did lately that was very relaxing and
enjoyable. • Have your student take three very deep breaths and exhale slowly through their nose.
These simple techniques can help make the difference and not only improve their performance but also make the jump more enjoyable. The following are some other subtle techniques that can be practiced on every load. These are: • Distraction: Take the student’s mind off of the jump itself. This can be done by striking up a
casual conversation about some of the latest events or something that they may have done that is positive. Try and take the person away from what is going on and this will help break the tension. Students tend to dwell on the negative on their first jumps, so distraction will help them to avoid these negative thoughts.
• Your mannerisms while supervising the load can help build or break stress. Subtle gestures such as a calm smile, a final touch such as tucking in their chin strap on their helmet, taking a personal interest in the individual by inquiring about what motivated them to jump and providing a few words of encouragement are only a few. Look confident; you should never show that you are nervous or flustered; your student will sense and start to wonder what there is to be nervous about.
You may find some of these useful techniques: • talk to them, face to face (listen too) • take mind off their jump • talk with them about something they enjoy or are good at e.g. their hobbies and job

2.11 Stress Assessment and Control Page 63 of 138
© Canadian Sport Parachuting Association, 2010
• appropriate jokes, smile; use only positive humour • appropriate touch; hand shake, shoulder pat • press the thumb in the middle of the other palm and massage • visualize being centered in the abdomen • be positive, confident in your style • show empathy, personalized interest • reminder of successful training • equipment check; reassure everything is in place • keep them comfortable • be physically close to them • short positive mental rehearsal • stick to the plan if at all possible • verbal review (stress key points only, KISS) The reason for using one or more stress reduction techniques is to obtain a higher quality performance. A person who is relaxed performs to the best of their ability; a person who is highly stressed (i.e. fear) does not perform to their capabilities. You can help your student to be more relaxed while skydiving, if you do the following things: A clear picture of the events is developed through the use of illustrations such as video, photos or graphics and other training aids (i.e. mock-up, mats, prone or suspended harness). During the actual jump your student should recognize that the jump is proceeding normally, step by step, event after event. To do this they must know what "normal" looks like; they must recognize each event as it occurs. Keep your student involved in the events. Ask them to do things such as locating the airport, determining the wind direction and such. Ask them about their equipment (snug, checked), your gear (pins), the next step (i.e. exit, freefall). Give them a task (i.e. spot/assist) which will involve them in the events of the jump. Do not allow them to sit undisturbed (uninvolved) from take-off until jump-run; you are then providing them too much opportunity to review what might go wrong. Work with your student at each step of the jump; ensure that they are participating (here and now) rather than observing or reflecting. Sequence the events of the jump. Teach the skills as units with the overall jump (i.e. the skydive model). Your student can keep track of their progress. Example: They can mentally tick each unit as it is completed: gear check (OK), aircraft climb (OK), jump run (OK) etc. They can be ready for the next event when it occurs. Example: On jump run, they can review the exit rather than their landing technique. Keep it short and simple! Present the knowledge in bite size chunks. From your considerable knowledge of skydiving techniques plus an analysis of your student's present ability (skills), you will identify the key points for his performance to ensure success of their jump. The key points you select will be appropriate to their current level of skill, to the task(s) planned and to the criteria for evaluation. Example: If you are teaching a basic turn, key points are: keeping the body square, tilting the shoulders and maintaining visual contact with the heading. Do not get caught up in what to do if something goes wrong or the minor details of hand/finger, knee, foot positioning; those come later if at all. The critique/feedback should be done in the same way. Demonstrate a positive enthusiasm for the jump. You are a role model for your student; your actions should convey the message that skydiving is fun. You will assist your student in their effort to focus on the task at hand, while displaying an appropriate level of energy. Examples: A student who is

Page 64 of 138 2.11 Stress Assessment and Control
© Canadian Sport Parachuting Association, 2010
worrying about refusing (not jumping or not pulling) is not focused on the task at hand. A student who is sleeping in the rear of the aircraft is perhaps too low on the energy level scale; one who is bouncing around the interior (will not sit still) is perhaps slightly hyper. You should be able to help adjust the energy level somewhat. Connect the jump to your student's other experiences. Use you student's experience as a skier, wind surfer, tennis player, etc., to illustrate ideas related to learning new skills or practicing skills through an exercise (drill). Learning or teaching skydiving is not different from learning or teaching any other skill except that most people know less about it and it is harder to see the action.

3.1 Aircraft Knowledge, Loading and Safety Page 65 of 138
© Canadian Sport Parachuting Association, 2010
Section C – Technical Knowledge
3.1 Aircraft Knowledge, Loading and Safety Although the pilot is in command of the aircraft, the JM should have some knowledge about aircraft characteristics and operation concerning loading and safety. Before discussing these points a few basic terms should be defined. Weight and Balance This is a calculation performed by the pilot to determine if the aircraft's load and the load distribution is within the aircraft’s operating limits for take-off and safe flight. The load consists of not only jumpers or passengers, but also the amount of fuel, oil, gear and anything else that may be on board. An aircraft’s operating limits are specified on the Certificate of Air-worthiness (issued by the manufacturer) or a Supplemental Type Certificate that has been issued by the Department of Transportation of Canada. Center of Gravity (C of G) This is that point on the aircraft, where, if suspended at that point, the aircraft would be in balance. This point is determined with respect to the aircraft’s fuselage length. The center of gravity must be within a pre-determined area for safe operation of the aircraft. Generally speaking the C of G should be in the center of the wing. Trim This is a control adjustment that allows the pilot to balance the load so that constant pressure does not have to be applied on the flight controls. Fuel system The fuel system consists of two fuel tanks in the wings (generally) with gauges either on the wing support or on the dash, and a fuel selector that controls which tank feeds the engine. The Jump Master can monitor the fuel available for the flight by quickly checking the gauges. The Jump Master must also be careful in regards to the fuel selector. If this selector moves to the off position, the engine will stop due to fuel starvation. If the selector has been moved, hit, or scraped; let the pilot know immediately! Aircraft Operation and Loading A weight and balance calculation has been done by the pilot to establish seating arrangements and to determine the C of G location. It is part of their responsibility to familiarize themselves with the various aspects of flight. They know (or are briefed on) the exit procedure and will know the load shifts involved and the resulting changes in the C of G location, stability and control. To prevent potentially dangerous situations involving loading and C of G location the pilot should: • Prepare one accurate weight and balance calculations for the type of aircraft used considering
oil, fuel and a standard seating arrangement. • Establish for each type of aircraft an emergency procedure (evacuation) that will involve minimal
C of G shifts caused by jumpers moving about. • An aft C of G can result in a flat spin, which is an unrecoverable manoeuvre.

Page 66 of 138 3.1 Aircraft Knowledge, Loading and Safety
© Canadian Sport Parachuting Association, 2010
Seating and Movement Seating and movement is covered in the PIM 2A manual. When dispatching students, have them take a kneeling position upon entering the aircraft and face forward. This will enable you to maintain communication and keep an eye on their equipment. If students must get on their knees from a sitting position, the chance of a bag drop is increased. However the sitting position is generally used for the students behind the pilot seat as they usually are in the plane the longest; and when using a C-206U rear door exit. Loading must always be done with consideration to the aircraft’s weight and balance. The heaviest jumpers should be boarded at the front of the aircraft except in the case where exits at different altitudes may result in some variation to this requirement. Aircraft Flight Characteristics The type of aircraft used have an inherent characteristic to return to a stable flying attitude (nose down) if the engine were to fail, assuming the load's weight and positioning is within the aircraft’s operational limits. If the load weight or placement exceeds the aircraft’s control limits then the aircraft will not return to a stable, flying attitude and will become uncontrollable and stall if the engine fails. As the aircraft stalls, the aircraft will pitch up nose high, nose over sideways and dive at the ground. The aircraft may or may not be recoverable depending on altitude. The sensations prior to an aircraft stalling from the jumpers’ viewpoint are:
• stall warning buzzer is sounding • airspeed sound becomes more quiet • if looking out of the window, the horizon line will indicate that the aircraft's nose is very high
or the tail very low • you would feel a zero gravity sensation • aircraft mushes through the air; bucking feeling of the aircraft tail
Operation Variables The operating conditions in which an aircraft is flown vary from DZ to DZ and from day to day. As a jumper moves from one DZ to the next the altitude above sea level and therefore the air density changes. This will affect the way the aircraft performs. The variation of air density is referred to as "density altitude". Density altitude can affect the efficiency of the aircraft's wing to produce lift. This will affect the distance the aircraft takes to get off the ground as well as the aircraft’s ability to climb. The density altitude also will change with temperature. The hotter the day, the less dense the air will become. This will create an effect similar to that of going to a DZ at a higher altitude. As the JM, you should be aware of these facts. This is so that you understand that what you may have been doing at a DZ at sea level or how much weight was put on the aircraft in the spring may not be wise or possible at higher altitudes or during hotter weather. Safety Practices The following is a list of every day precautions that should be followed. Ground • no cars or bikes on the runway • keep control of kids and dogs tied up • check before crossing the runways • no smoking near the aircraft • engine off for boarding • avoid the propeller
• physically escort the observers off of the aircraft
• check pilot’s experience • standard loading procedure and zone • signs for the areas • spectator areas / control

3.1 Aircraft Knowledge, Loading and Safety Page 67 of 138
© Canadian Sport Parachuting Association, 2010
Aircraft • no sharp edges around the door • check the fuel and altimeter • load the aircraft with weight and balance in
mind • C of G considerations may dictate that
number 1 or number 5 be the heaviest if in a rear exit C-206
• do not block the controls • use the seat belts • helmets on for take-off • move weight forward for take-off, but DO
NOT stand on knees and lean over people • keep movement to a minimum in the
aircraft
• protect handles and pilot chutes • advise pilot of high pulls • be aware of equipment during exit set-ups
(refer to the Equipment Doctrine section in your PIM 1)
• sit still and quiet for take-off • Communication with and monitoring of
student behaviour during the climb is important information for the instructor
• Required by CARS: warning posted in aircraft that there is no insurance for skydivers (check with drop zone Operations Manage)
Jump Door Recommendations • recessed or flush handle • internal wing door latch • front and back latches in closed (during
flight) position
• latch mechanism in open (during climb-out) position
• warnings, dangerous aspects • exposed or T-handle • support bar for open position
Jump Step Recommendations • not too high above the wheel • not too wide • anti skid tape on step • warnings, dangerous aspects • too high causing rig scrapes against door • too big risking body strikes when leaving

Page 68 of 138 3.1 Aircraft Knowledge, Loading and Safety
© Canadian Sport Parachuting Association, 2010
Other considerations regarding the aircraft include: • as students enter the aircraft, reinforce protection of the emergency or deployment handles
or the SL • wear seat belts • Ensure that WDI's are available in case the wind increases significantly or shifts direction.
Note that a rate one turn can also be used in these situations. • a knife on board is recommended (and required for SL operations in order to deal with
potential SL hang-ups). • If a center is using a tightened Rapide link or carabineer for RSL attachment then the aircraft
should have a wrench on board for disconnection in event of an accidental main activation prior to exit.
• An 8 x 10 aerial photo of DZ is useful for describing the spot to students, especially if it has changed from the time of take-off. It can be taped to the roof of the aircraft for easy viewing by everyone.
• A placard in clear view stating that this aircraft and its operator have NO insurance for those participating in skydiving. See the CARs for more information.
Exit Order Positions and Weight Loading Arrangements Each student should be seated in the aircraft for proper weight distribution: heavy under the wings or towards the front, medium and light students toward the tail. [NOTE: As different types of aircraft have different seating configurations, based on the location of the door frame (under wing vs. rear cargo) and the side of the aircraft (right vs. left), it is left to your home drop zone to educate you on their prescribed seating configuration for students and Jump Master.]

3.2 Rules and Recommendations Page 69 of 138
© Canadian Sport Parachuting Association, 2010
3.2 Rules and Recommendations CSPA Basic Safety Rules (BSR’s), Technical Recommendations and Guidelines in conjunction with applicable Technical Information and Safety Bulletins and the appropriate CSPA manuals apply to this section.
What is the difference between a Basic Safety Rule and a Technical Recommendation? A Recommendation can be waivered by written application to CSPA Technical and Safety Committee. However, if a BSR is not followed then there is NO access to the CSPA Defence Fund.
Basic Safety Rules (BSR) (See latest PIM 1 for updated BSR’s)
General 1. Must be trained and endorsed 2. Reserve repack (180 days) 3. Flotation device (if less than 1 km) 4. Helmet (shock absorbing) 5. Must activate by specific altitude 2500’ for
Solo & A; 2200’ all other CoP; 4000’ Tandem
6. No Drugs or alcohol 7. Obey the CARs
Students and Instructors 8. Must have a CSPA Instructor accompany.
Instructor must wear a helmet. 9. AAD (gear) 10. RSL (gear) 11. 2800’ 12. Altimeter >10sec (gear) 13. pin check (gear) 14. Ram-air canopy (gear) 15. Rigid Helmet (gear) 16. Tandem certification
Technical Recommendations (see the latest PIM 1 for the most updated information)
• Clearances: Student, Solo: 100m (325 ft) • Winds: Student: 15mph, Solo, A, B, 18 mph • Wind Drift: should be used to determine winds under 3 possible conditions: 1st jump of the
day, when there has been no jumping after 90 minutes, or a significant change in the winds • Sunset – Students should land before official sunset; that is, the sun is still visible over the
horizon • Dispatch through IAD or SL • Transition to Freefall: Two controlled practice pulls / must make last freefall training jump and
first freefall on SAME the day, otherwise they must make another practice-pull • Currency – if no jumps in last 60days need a check-out jump with instructor before going
back to freefall • Two signalling methods must be used radio / arrow • Progression through skills grid: for students, coaches and instructors • Must use parachute that is packed by someone with packing rating
The key here as a Jump Master is to educate and get the student to see the safety issues. Set goals or tasks that are safe and appropriate; use of the Skills Grid will provide them with challenge and achievement
The Rules and Recommendations of CSPA need to be known and followed by Jump Masters, as with all Instructors and Coaches. This is fundamentally a safety issue but also has some legal and financial consequences

Page 70 of 138 3.3 The First Jump Course
© Canadian Sport Parachuting Association, 2010
3.3 The First Jump Course It is recommended that all Jump Masters and Coaches be fully familiar with the content and structure of the first jump course of their home DZ. This allows for consistent terminology and techniques to be used on a students first jump and subsequent jumps. As a Jump Master, your understanding exactly what is taught on the First Jump Course (FJC) is critical to knowing what you are dealing with when you first meet one of your students. It will help you to understand the “starting point” of students in their technical knowledge and experience. You can learn to teach the First Jump Course by participating in a Skydiving School Instructor (SSI) Course, offered by the CSPA. Indeed it is one of your privileges to be able to assist in teaching the FJC while supervised by a certified SSI. The First Jump Course Why do you need to know what is in the FJC at your Drop Zone?
• Tends to be very drop zone specific • Terminology (pillow vs. handle, toggles vs. steering loops) • Procedures (aircraft, BOC, Emergency altitudes and commands) • DZ specific details (right hand patterns, landing areas to be avoided)
• Provides a starting Point of your students progression This material is presented as a reference only. It is the outline of the content of a first jump course. This outline is indicative of the content of the standard course, in the logical sequence of presentation. Although the privileges of the JM only allow the assisting, not the teaching of a first jump course, this material is presented as a guide to the level of knowledge of a student upon completion of the First Jump Course. With this as a starting point, the material can be built on in accordance with the individual student’s progression. None of the classroom training technique is included, nor the lesson plans, for they are DZ specific. The first two sections of the first jump course are Introduction and Overview. However, the course content sections that you will have to be most familiar with are:
1. Introduction / Outline / Overview 2. Equipment 3. Aircraft Procedures – including exit 4. Body Position and Count 5. Canopy Control 6. Landing 7. Unusual Situations (Aircraft, canopy and landing)
Introduction and Overview:
• The day’s program. • Perform an IAD jump from a minimum of 3000 ft. It is about 3 sec before the parachute fully
opens. Equipment:
• Toggles (loops), Risers, Handles, Canopy, Lines, Pilot Chute, Radio, Helmet, Footwear, AAD
Aircraft Procedures: • Safety rules
• In plane: movement, handles, forward

3.3 The First Jump Course Page 71 of 138
© Canadian Sport Parachuting Association, 2009
• Outside plane: No smoking, approach from rear • Seating, seat belts, observation pass, separate pass with door closing in-between • Commands (Door, Get Ready, Go), climb out.
Body Position and Count:
• Arch position. Look up at aircraft. • Count: Arch-000, 2000, 3000, 4000, (5000), Check 000.
Canopy Control:
• Check Canopy looking for 1) Is it rectangular? 2) Are the lines straight? 3) Is it flying straight? 4) Can I control it - through a Flight Control Check?
• How to steer - Leads to annoyances: End cell closures, slider hang up, line twists • Ground Control - Commands: Right turn, stop. What is the backup to the radio? Designated
Points / Arrow / Paddles / bullhorn. Orient them to a picture.
Landing: • Body Position: Feet and Knees together, legs slightly bent, hands up, looking out in front of
you. • Flare Command (radio or student initiated): Pull all the way down. - When to flare if they can’t
hear or see you? • How to collapse the canopy.
Unusual Situations
• Aircraft: Chain of Command. Emergency Exit Procedure. Crash Positions. • Canopy: Review Nuisances? Malfunctions - Sensations need to act decisively. Procedures
(pull handles down rather than out) Must practice (training vests) ASSESS AND REACT • Landings: Off field landings, Obstacles (building, power lines, trees, and water) Avoid! Avoid!
Avoid!. Flaring to kill off forward speed is always a good idea. Assisting with a FJC To assist in a first jump course, you must be directly supervised by a certified Skydiving School Instructor. That individual must be present in the classroom throughout the time when you are teaching or working with the first jump students. As well, that individual must be present at the location where the outdoor student activities are taking place; this means at the aircraft mock-up or near the PLF platform, not on the other side of the DZ. There is no sign off or endorsement to teach class or exemption to needing a Skydiving School Instructor present. Tips for Teaching at the DZ Proper training aids should be selected and used to enhance the learning experience. The more realistic the skill rehearsal is, the more successful the student's jump will be. Repeat the rehearsals until each student's performance is flawless. If the ground practice is not correct, whatever mistakes are being made on the ground will be repeated in the air, especially with the added stress. It is for this reason that you should start preparing your students early to allow sufficient time to learn, practice and do a mental rehearsal prior to rigging up. While your students are rehearsing their tasks you should observe their ground performance closely analyzing their performance with constructive feedback.

Page 72 of 138 3.3 The First Jump Course
© Canadian Sport Parachuting Association, 2010
Emphasis should be placed on the Normal (positive) aspects of the jump. These are best covered prior to rigging up rather than at the final briefing at the aircraft. A briefing is a concise refresher, focusing on the actions the student is about to perform. Leave theory for the classroom; remember, this is not the first jump course. Ensure all skill and drills are required for progression. Use jumps in progress as examples to illustrate the content of your presentations, such as how to make an approach on the target or how to practice an exit and launch. The only valid reason for selecting a teaching method is its effectiveness in meeting specific objectives in your program. Our purpose in this module is not to cover all instruction methods. Instead, we will focus on the following things: • a formula for all instructional methods • common methods likely to be used in your activities • physical arrangements that aid learning • criteria for selecting instruction methods • the various learning styles of students An instructional method is a strategy used to assure that your students will be able to meet instructional objectives. An instructional aid or medium is usually a device of some kind that carries a message. Instructional content is the teaching points that will be conveyed via the methods, aids and media. For example: • content - how to make a turn in freefall • method - demonstration or lecture • medium – demonstration, videotape Content is covered in the Student's Skills section. Methods are the subject of this module. Media is reserved for the latter half of the section. Techniques for skill demonstrations and presentations, training aid use, skill analysis and proper feedback techniques are also found in your Coach 1 Theory and Technical manuals as well as the Skydiving School Instructor manual. The Formula (P-PAF) Your instruction should use all phases of PPAF. Prepare yourself with a written outline and training aids. Presentation must be followed up with Application and Feedback. When this happens, most of the content is learned and remembered. Presentation: New facts, concepts, procedures, information, skills, etc. are presented to the learner on the ground. For example, the complete preparation or dirt dive of the skydive. Application: The learner applies the new information or responds in some way to the information presented on the ground. The learner can make use of application by going on the skydive. Feedback: The learner receives feedback about the quality or adequacy of the responses made in the application on the ground. Feedback of a post jump debrief should include all the skill areas of the skills grid. The learner receives feedback about the quality or adequacy of the responses as per
Instruction must include Presentation, Application and Feedback.

3.3 The First Jump Course Page 73 of 138
© Canadian Sport Parachuting Association, 2009
the debrief format. Feedback should always be Positive and Specific. However, as a slight variation, post-jump, the feedback does not always need to be Immediate; some time for the learner to process the information and self-critique is beneficial for their learning process. Common Presentation Methods There is a choice of methods to use for the Presentation. These are: • the lecture (seminar) • demonstration • assigned reading (articles and manuals) • structured discussion Your choice will be made on the basis of topic (content), size of group, time and resources available. Each method is appropriate for some topics; it depends on the situation. In the Application phase, the methods from which you can select are: • an exercise or drill • a practice session • a competition-type task • a game (fun-variety task) • a case study (i.e. film or tape analysis) • a role play (i.e. dirt dive) In the Feedback phase, the most often used method is verbal confirmation of corrections. Feedback is always to be delivered in a positive, specific manner. It should be timely, but not immediate, to allow for some reflective contemplation by the student. Other feedback options are: • a review of the model • a group critique • an analysis of the video recording • a checklist of steps • a learner's self-assessment • comparing results to a performance standard • asking the student to write down the events as they remember them Make some marginal notes beside commonly taught Student Skills in your PIM 2A. Identify options for the three phases for each skill. Write notes in pencil; you may want to adjust them. Identify things you would like to try as well as those you do at present. Be imaginative. Effective Demonstrations The demonstration is a very common presentation technique used during pre-jump briefings. It is important to have good clear demonstrations by using the Whole - Part - Whole method. This involves three steps: 1. Show the skill done correctly, at real speed, without interruption or dialogue. The first
demonstration provides the students with a clear image of what the skill should look like; it sets the standard for their subsequent attempts to perform the technique.
2. Show the steps of the skill performance, focusing on major actions, decision points and links between steps. Explain the steps. The step-by-step performance highlights only the major

Page 74 of 138 3.3 The First Jump Course
© Canadian Sport Parachuting Association, 2010
actions, decision points and the links between steps; the details including subtle refinements and things to avoid will be covered at the time the student practices and applies the skill information.
3. Show the skill done correctly, again at real speed, without interruption or dialogue. The final skill demonstration, at real speed and without faults provides the students with a reinforced image of the actual skill, combining the major actions shown in the previous step. Avoiding dialogue causes the students to focus only on the visual sense, increasing the opportunity for receiving a strong image of the actions.
Training Aids Sometimes called the instructional medium or media, training aids are used to increase realism of the preparation and feedback phases. The goal is to provide your student with a clear picture of events during IAD / GFF jumps with emphasis on their point of view and action. A list of these follows: • film / video tape • freefall video / canopy video • ground-to-air video • slides, photos / aerial photo • graphics / diagrams • chalkboard / white board • flip chart • yourself (demonstrating) • watching others • mirror
• mats • prone harness / hanging harness • parachute equipment • aircraft mock-up / aircraft • stick for turns • creeper • swimming pool • belly band pilot chute • training vest
For In-flight skills, the aircraft itself is an excellent aid. It can be used during the teaching of all the skills in this section. Where the aircraft is in use and cannot be made available, a mock-up is a good alternative; the mock-up should be an accurate representation of the jump aircraft. Having an air photo of the DZ at hand is useful for teaching spotting; when practicing seating, exits and emergencies, try it when everyone is fully equipped (gear and clothing). Teaching freefall skills is difficult to do on the ground. For some skills, lying on a mat can help when looking at body movements; examples for this are turns, reverse arch and track. Note: You should be aware that arching from a prone position is a serious strain on the lower back. A prone harness is also useful for turns; it offers the advantage of allowing you to teach loops and rolls as well. Photos of correct position and photo sequences of how it should be done convey a clearer image of what is expected than does talking. A chalkboard, flip chart or prepared graphic can convey a sketch or model of what is expected. A videotape of a demonstration also shows how it is done; review of the tape at normal speed and in slow motion can be of benefit to the student. An in-air tape of the learner's actual performance is useful for feedback so long as you stick to key points and avoid detailed analysis. Avoid the urge to pick a jump apart. For Canopy Control skills, you will find several useful aids at the DZ. Your student has previous experience under a canopy; use this to advantage when presenting new skills. A suspended harness can be helpful when discussing topics such as brake release, control check, manoeuvres and problems. You may want to have an experienced jumper demonstrate an activity under canopy on their next jump. Use the actual equipment at some point for a hands-on approach. A chalkboard or flip chart might be useful in discussion of a controlled approach (line and angle); jumpers making approaches on the bowl may illustrate correct or incorrect technique. An approach can be taught,

Jump Master Reference Manual Page 75 of 138
©Canadian Sport Parachuting Association, 2009
pacing it out on the target area (set markers for this). Have photocopies of the DZ layout and have them draw in the “flight plan” for under canopy. For Equipment Skills, the best aid is the equipment itself. This includes skills such as inspection, adjustment, safety check and packing. When teaching skills like emergency procedures or a different pull technique, you may want to use hanging and prone harnesses or training vests or pilot chute belts.

Page 76 of 138 3.4 ATHLETE Development – Gradual Freefall Progression (GFP)
© Canadian Sport Parachuting Association, 2010
3.4 Athlete Development – Gradual Freefall Progression (GFP)
1. Skydiving Skills Progression Grid for the Student 2. Stress Assessment 3. Relaxation Techniques 4. Progression/Freefall Transition 5. Currency/Activity Level 6. Endorsements 7. Certificates of Proficiency Tests and Reviews 8. Personal Gear Tandem Equipment - Training and Checkouts 9. Gear Transition Training and Checkouts 10. Tips for Stress Reduction 11. Tips about the Adult Learner 12. Altimeter Briefings 13. Training the GFF program
Gradual Freefall Program The CSPA Gradual Freefall (GFF) program is used where the Progressive Freefall (PFF) program is not taught. It represents a "gradual" transition to freefall skydiving.
Freefall Progression STAGE TASK MINIMUM STANDARD Pre-level 2 x IAD Correct Arch, Stable Spread, Head Up, Eye Contact
Pre-level 2 x IAD w/TPCT Correct TPCT Sequence, Identify Hand Signal from JM, First Freefall briefing after Jump
L1 (Stage 1) 1 x 3 Second Delay First Freefall
Correct Arch, Stable Spread, Head Up, awareness, Real Pilot Chute Toss, Minor Heading Drift OK
L2 (Stage 1) 1 x 5 Second Delay Same as previous
L3 (Stage 2) 1 x 10 Second Delay On Heading, Stop Turn if one starts, move to Box position > 4 seconds
L4 (Stage 2) 2 x 15 Second Delay Observation Circle, Activation @ 3,500', prove terminal velocity, altitude awareness with altimeter & task
L5 (Stage 3) 2 x 20 Second Delay Start a Turn (90) and stop, regular altimeter checks, hand wave off and deploy @ 3,500', altitude awareness, smooth freefall
L6 (Stage 4) 2 x 30 Second Delay Figure Eight - 180/360 Turns Notes:
• Remember the other areas of the Skills Grid must be taught: Preparation, In-flight, Canopy, and Equipment.
• Blend in spotting and canopy control • Exit to Stage 4 of the Basic Skills Grid for turn refinement • Progression = Permission of JM + Permission of Student

3.4 ATHLETE Development – Gradual Freefall Progression (GFP) Page 77 of 138
©Canadian Sport Parachuting Association, 2009
3.4.1 Spotting Progression
Spotting training can begin by the time the student is performing their second or third jump.
A student will need to know how to spot for the Solo Checkout Jump Endorsement and Solo Certificate accuracy requirements. The accuracy must be done on self-spotted jumps. The sequence is: • Observe spotting • Assisted
o communicate corrections to pilot from Jumpmaster o spot, know exit point, target, and jump run from Jumpmaster
• Self o spot using WDI
Do not allow major deviations (greater than 30 degrees) of jump run for safety reasons. Minor deviations are okay as it helps the student to learn.
3.4.2 Canopy Progression
Gradual progression of the student in Canopy Control will move the responsibility from the Ground Control Instructor (GCI) to that of the student. The GCI can break up the control into 3 areas: • canopy turning • landing approach • flare In each jump the student is given more responsibility for their actions. An example of progression is: • Jump 1 - ground has full control • Jump 2 - let student do canopy turning, ground controls approach and flare • Jump 3 - let student do canopy turning and partial approach (requires altimeter), ground does
lower approach and flare The student assumes full responsibility for guidance according to PIM 1, Technical Recommendation 3.13 "Guidance will cease at the discretion of the Instructor"
3.4.3 First Freefall Practice Pulls and First Freefall Prerequisites: Prior to being cleared for freefall, your student must have adequately demonstrated the following skills: • stable exit maintaining a stable arch • perform training pulls while maintaining stability • demonstrates awareness after exit (recognizes hand signals from JM)
Once cleared for freefall, brief your student on the new sensations that will be experienced and any extra unusual situations that could occur. Make sure they have PIM 2A as it is meant to be a users manual.
The last Practice Pull and First Freefall (Clear and Pull) must be on the SAME DAY

Page 78 of 138 3.4 ATHLETE Development – Gradual Freefall Progression (GFP)
© Canadian Sport Parachuting Association, 2010
First Freeffsall Briefing to include
• Never Sacrifice Altitude for Stability. Pull Time is Pull Time. Nothing stabilizes you better than a deploying parachute.
• When in doubt…get it out! Reminder – It is their responsibility to pull, no matter what o Rule #1: PULL
• New sensations of Freefall: The sensations that will differ from those of an IAD/SL jump are 1) flattening of the body attitude relative to the ground (relative wind), 2) acceleration, and 3) more noise and wind force.
• FXC’s can fire around 1500 greater than the set altitude • Two canopies out briefing • Emergency procedures are the same. Think, Assess and React
Flattening of the body Your student should be informed that their body will flatten naturally in the arch position. If they should have any doubt about stability, they should have a better arch. Students have a tendency to break their arch at about 3 - 4 seconds away from the aircraft. This is about the time that an IAD canopy would pull the jumper upright. The possible reasons for this are first, the student feels that their legs are not supporting them, second, the student tries to flatten the body faster than it should and last, the student does not hold the arch through the pull and bends forward to look for the pilot chute. Acceleration Your student may sense the increase of speed (this increase can be felt and heard) as they pass the point where the canopy would have usually opened. Again, if any feeling of instability is sensed, then the student should arch more strongly. The "Basic" series of Freefall skills are as follows: Reference PIM 2A pages 20 - 37
• stable arch • activation • observation circle • altimeter use and altitude awareness • box position • heading control • arm exercise
• leg exercise • turns • back loops • front loops • rolls • delta • back slide
Skill Descriptions: Additional information applicable in this section, supplementing the content of the PIM 2A follows. Make sure to introduce your Student to the PIMs for their own learning. Arch and Count - Stable Wide Spread Deployment count: in addition to the body position a deployment count must be taught. The count by the student used for an IAD is: • Arch,000 — 2,000 — 3,000 — 4,000 — Check,000 — Check Canopy. (Extend the count to 5,000 for slower opening canopies.) Practice Pulls - Activation Pull / throw counts: As your students progress towards freefall, they must perform practice pulls prior to being cleared for freefall. The practice pull actions are the same as the pull actions minus the actual toss. The deployment count (above) changes when the training throws are introduced.

3.4 ATHLETE Development – Gradual Freefall Progression (GFP) Page 79 of 138
©Canadian Sport Parachuting Association, 2009
The count used for a BOC mounted pilot chute for a first Clear-And-Pull is:
• Arch – Reach – Throw – Arch – Check Canopy
Note: The practice pull count must match your IAD count in terms of length. Note: The first freefall and count must be identical to your practice pull and count.

Page 80 of 138 3.4 ATHLETE Development – Gradual Freefall Progression (GFP)
© Canadian Sport Parachuting Association, 2010
PAF Plan To teach practice pulls: This uses a mixture of forward chaining as well as shaping each layer. Presentation: Show the Practice Pull from different positions, both Standing and/or Laying, so that the students can see different profiles. Use Whole-Part-Whole to demonstrate what you are doing. Application: Step 1. Feel the handle, using an Open Palm, and closing the grip so that the PC handle is within the entire hand. Evaluation: Make sure the entire hand is grasping the PC, and not just “fingering” the handle. Step 2. From a light arch position (standing or laying down), reach the Right hand down to the Handle. Repeat. Evaluation: Have them practice this locating step repeatedly, correcting arm and hand motion as they continually practice. Add in the spoken command “Reach” and incorporate it into the practice. Step 3. From a light arch position, reach the Left Arm over the head, open palm in order to grab air, while simultaneously reaching for the PC. Incorporate the spoken command “Reach” into the practice. Step 4. The Throw. Isolate just the Right Hand on the PC Handle. Let the Left arm relax. Holding onto the Pilot Chute, but NOT pulling the handle out of the pouch (to simulate practice pulls), extend the right arm in a straight, sweeping motion, back and to the side. Stop the motion no farther than 90 degrees out from their body. Repeat: Grab the PC handle firmly, Throw the arm out smoothly without pulling the PC handle, and stop. Practice Practice Practice! Evaluation: Make sure that the hand is correctly oriented so that the palm is facing backwards. Do not mention this, only correct the position. Remember, positive reinforcement, correct action first! (Avoid any negative description, rather focus on what to Do.). Step 5. Start from a light arch, using both arms, stating the commands out loud, “Reach – Pull”. Repeat this over and over. Move around, monitor from different angles, pay attention to technique, hand placement. Step 6. Putting it all together: Arch – Reach – Pull – Arch – Check. Practice, practice, practice until absolutely perfect and autonomous. Step 7. Now you can discuss the “What If’s”. Explain, very briefly, if the pilot chute goes over the arm or around a leg, how to deal with the situation; or if necessary how to perform Reserve procedures with only one arm. To locate the pilot chute, practice over-reaching down the back of the leg and drawing back up to locate the corner of the container and the PC handle. Alternatively, practice reaching under the container pack and sliding back along the pouch to the corner of the container and locate the PC.

3.4 ATHLETE Development – Gradual Freefall Progression (GFP) Page 81 of 138
©Canadian Sport Parachuting Association, 2009
Once the student is cleared for and progresses in freefall the count will change again. The student must practice this repeatedly on the ground. The count for a 5 second delay and 10 second delay are: • 5 second delay: Arch,000 — 2,000 — 3,000 — Reach — Pull — Arch,000 — Check,000 —
Check Canopy • 10 second: Arch,000 — 2,000 — 3,000 — 4,000 — 5,000 — 6,000 — 7,000 — 8,000 — Reach
— Pull — Arch,000 — Check,000 — Check Canopy. Transition from Stable Wide Spread to Boxman (GFF) • At the 5 second point of a 10 second delay, transition smoothly and deliberately from the wide
spread to the boxman to enhance airflow around body and eliminate “potato chipping.” • Other indicators that can be used to time the transition are: when the aircraft leaves your view or
when you flatten out. • Used for all delays exceeding 5 seconds. • Use motor learning techniques for training on the ground in the horizontal position. Spend a lot of
time on leg awareness! • Have high emphasis on relaxation. Just thinking or saying “relax” helps. Heading Control - 10 Second Delay Teach your student how to stop turns or stop drift prior to going on their first 10 second delay. Since the requirement is a 10 second delay on heading, your student needs to know how to stop drift if drift occurs. Once the drift is stopped, then they would continue falling on the new heading. Terminal Velocity Transition - 15 Second Delay Prior to attempting 15 second delays, the student must be briefed on how to use an altimeter. Explain how the altimeter works, how to set it and how to identify an incorrect reading. Emphasize that the altimeter should only be set on the ground. In addition, the student must be taught how to read the altimeter in freefall. For wrist altimeters, this merely involves rotating the wrist so that the face of the altimeter is in plain view. Emphasize that the box position should not be broken. For chest mount altimeters, only the head is lowered to read the altimeter. Emphasize that the arch must still be maintained. A correctly performed 10 second delay is very important prior to advancement to 15 second delays. The 15 second delay is to be performed like the 10 second delay. The differences are that the student will reach terminal velocity and they will use an altimeter. They do not necessarily need to count anymore; however, counting is actually useful to space altimeter checks and prevent altimeter fixation. They do need to start developing altitude awareness. A 15 second delay should include three regular altimeter checks during the freefall. Make sure the student has received an altimeter briefing for use during in-flight, freefall and canopy phases of the jump. Turn Training Teach the start-coast-stop method. Emphasize that when learning turns that approximate degrees is okay. The precision for exact headings will improve with experience. It is really important to do the turn technique and let the air do the work to turn them. Wobbles/Chipping If the student experiences wobbles or chipping in freefall they are either too tense or they have poor body position. In this case, the student should:

Page 82 of 138 3.4 ATHLETE Development – Gradual Freefall Progression (GFP)
© Canadian Sport Parachuting Association, 2010
Relax and breath Emphasize the arch by lifting the head up, elbows up, knees up and hips down. Relax and breath
Drifting Start laughing, arch and relax, counter, counter harder. After two tries to stop the drift with no success, pull. Remember to stay aware of altitude. Inverted Arch, twist/roll over, or Arch and look over right shoulder. Remember to stay aware of altitude by checking the altimeter every 4 or 5 seconds regardless of what is happening. Tumble Arch hard and relax. Make sure you are in boxman. Remember to stay aware of altitude by checking the altimeter every 4 or 5 seconds regardless of what is happening. Solo Certificate When Level 6 of this program has been completed, the student's goals can be refocused to making up the remaining requirements for the Solo Certificate. (See also , page 94) Requirements for the Solo certificate for the Jump Master
• Freefall > 30 seconds • Freefall of 5 seconds • 3 self-spotted jumps and controlled landings • Ride the Slide • Canopy stall and recovery • Canopy Rear Riser turn • Solo Checkout • Figure 8 belly-to-earth • Emergency Procedures Review (discussion about emergency situations and resolution)
3.4.4 Currency / Activity Level It is important that your student remain current in their skydiving skills. It is part of your job to monitor how long it has been between jumps and whether your student should repeat or be put back for a refresher jump. Advancement is never a wise option. There are some suggested timelines as to when you should put a student back on IAD's or a jumper on a solo delay. The suggested timelines are: • Student parachutists who have not made a jump within the previous 60 days will make a
minimum of one IAD jump, demonstrating stability and the satisfactory execution of one training pull prior to returning to freefall.
• After the successful practice pull, the first re-currency freefall will be a maximum 10 seconds. • Any parachutist with a CoP, who has made less than 12 jumps over the previous year, must be
cleared by a CSPA Instructor prior to making their next jump. • It is recommended that all student, novice and experienced skydivers practice cutaway
procedures frequently, such as before every exit.

3.4 ATHLETE Development – Gradual Freefall Progression (GFP) Page 83 of 138
©Canadian Sport Parachuting Association, 2009
These guidelines are rather general due to the experience levels and capabilities varying from jumper to jumper. An Instructor will be able to judge the jumpers’ anxiety levels better with experience and be able to be a little more flexible from jumper to jumper. A word of caution is to never take anything for granted especially when it has to do with equipment and/or emergency procedures. Any jumper of any level is wise to practice their emergency procedures and should never do their first jump back with different equipment. The decision will either be that the student backs up, stays the same or advances. Err on the side of caution. Personal Gear Equipment - Training and Checkouts The Jump Master has the duty and responsibility to do personal gear equipment training and checkouts for students, novice and intermediate skydivers. When a person changes gear, it is important that a personal gear checkout is completed by an Instructor. Below are suggestions to ensure a safe transition. The two main areas that need to be addressed are normal procedures and emergency procedures. Reference PIM 2A page 61 System Changes. Normal: • Safety checks: as detailed in PIM 2A and to the specifics of the gear. • Donning procedures: points of adjustment, proper fit (3-ring at collar bones and leg pads on
hips), bellyband last over top of everything, check for non-twist of main lift web and bellyband, cutaway and reserve handles in place.
• Main deployment system; throw-out (belly, BOC or ROL), pullout, ripcord (inboard or outboard). Training as per system requirements and changes from prior equipment.
• Second try procedure for the new system. • Pilot chute packing techniques: pull out, throw out (BOC or ROL), ripcord, pack manual specific • Main parachute packing, specifically closing order and bridle routing. Also toggle stowing, line
stowing and riser covers. Emergency: • Reserve / Cutaway System; TAS, SOS. Training as per system requirements and changes from
prior methods. • Body Position for Cutaway: arch back, legs tucked up and behind, head forward. • RSL: see student equipment and specific to the new rig. • Reserve Parachute: identification, steering and landing.
3.4.5 Second Try Procedures ROL Throw Out: With the fingers of your right hand spread as wide as possible, place your hand on the leg strap. Slide up the leg strap to try to choke off the handle. If you get it, great. If you do not, carry out your emergency procedures. BOC Throw Out: With the fingers of your right hand spread as wide as possible, place your hand on side of container and slide down to corner. Slide to the container corner to try to choke off the handle. If you get it, great. If you do not, carry out your emergency procedures. Cutaway Handle: Visually watch yourself place your right hand on the main lift web around your 3-ring and slide down the main lift web until you locate the cables or the handle.

Page 84 of 138 3.4 ATHLETE Development – Gradual Freefall Progression (GFP)
© Canadian Sport Parachuting Association, 2010
Reserve Handle: Visually watch yourself place your left hand on the main lift web around your 3-ring and slide down the main lift web until you locate the cable or the handle. Summary-Key Points: Retention in the sport is directly correlated to keeping students progressing and reaching their goals. The GFP progression moves quickly, you need know the progression program like the back of your hand in order to provide quick and accurate instruction to your students as they move towards their solo certificate Review Questions: Give 2 benefits of using the CSPA Skills Grid?? Give four key points to cover in the first freefall briefing When observing a student practicing a main pilot chute toss, how should they locate the handle? What are two abilities that a student can develop to back up their altitude instruments? List the counts used for a training pull and a 5 second delay.

3.5 Endorsements Page 85 of 138
©Canadian Sport Parachuting Association, 2009
3.5 Endorsements One of your major roles on the DZ aside from dispatching is signing off of various endorsements and requirements for CoP’s. It is critical that you understand what you can sign off and the criteria for success in each endorsement or task to be signed off. You play an important role in getting people through the progression system properly As much as skill progression is covered in the PIM 2A and Coach 1 manuals, there are additional skill and knowledge items that pertain to becoming a Solo or licensed jumper. These additional items are the endorsements, which are covered thoroughly in the PIM 2A. The following points are for presentation and testing of these topics. It is also necessary as a Jump Master that you know who the SSE is on the DZ and/or in the region, and explain their role. Below is a list of all of the Endorsements; take note of those that can be certified by a Jump Master:
Endorsement Required For Signed By Emergency Procedures Solo SSI Solo Checkout Jump Solo JM, PFFI Emergency Procedures Review Solo Solo JM, SSI 2 Way RW A C2 Emergency Procedures Review A A JM, SSI, C2 Main Packing A JM, SSI, C2, RA Sport Canopy A A C2 Emergency Procedures Review B B C2 Group RW B C2 Sport Canopy B B C2 Emergency Procedures Review C C C2 Night Jumps Night Jumps SSE Water Jumps Water Jumps SSE

Page 86 of 138 3.5 Endorsements
© Canadian Sport Parachuting Association, 2010
3.5.1 Solo Check Out Jump The Checkout Jump marks a point where a beginning skydiver can safely and maturely supervise themselves in the basic areas of their skydiving progression. One of the privileges of a JM is to sign off the Checkout Jump. The quality and thoroughness of the checkout of an individual affects directly on the standard of the end product (i.e. the self supervised individual). As a JM, doing a "good job" of a checkout is of critical importance not only to the individual’s knowledge, skills and safety, but also to your reputation and credibility as a professional instructor of CSPA. If you are not familiar with the procedure, it is recommended that you sit through a Checkout jump with an experienced instructor or to even team teach one first. Be prepared to use the skydiving Skills Grid and your PIM 2A manual as you may find an area that has been missed and now must be covered. Remember that correct technical knowledge is equally important as basic skydiving skills. When all areas are covered, practiced and learned, proceed with the final evaluation and the actual checkout jump. If the individual meets or exceeds the minimum standard, then sign them off. If they do not meet the minimums, then take direct leadership action to correct the deficiencies, reassess that area or if necessary, redo the entire checkout. a. The Jump - refer to PIM2A pg 70 It should be emphasized that the student takes the JM on a skydive and the JM observes, only intervening to deal with safety issues if forgotten. Ask the Solo candidate to produce a list which should look something like this:
• Student plans dive • Assess weather • Gives and receives safety checks • Safe practices around the plane / Briefs Pilot • Take off routine; helmets, seat belts • Spots Plane • Executes planned skydive • Altitude aware / pulls on time • Flies the landing pattern and lands safely and accurately, stand-up
Emphasize that how well they do the freefall task is secondary to how well they plan and execute their own skydive b. Solo: Technical Knowledge Don’t forget there is more to a solo than this checkout jump E.g. technical knowledge
• Reserve procedures • Theory model of spotting • Canopy flight • Freefall math (needed for the A-CoP) • Freefall control • Review of unusual in-flight freefall canopy situations • BSR’s related to Solo

3.5 Endorsements Page 87 of 138
©Canadian Sport Parachuting Association, 2009
You should become familiar with the SOLO and A-CoP application; you can use it for goal setting with students. Discuss the various non-endorsement tasks and what constitutes acceptable performance, such as:
• Ride the Slide • 5 sec delay from 4000 AGL • One delay of >30 seconds • Rear riser turn above 2000 feet • Self spotted accuracy jumps • Figure 8
Remember it’s your job as a Jump Master to ensure their logbook is filled out and signed properly for each of these endorsements and tasks Prior to being signed off for the Check out jump, your student should be have been introduced and become competent in the following topics: Reference PIM 2A page 69 and 70.
planning solo dives pilot briefing safety checks self-spotting stable exits
freefall control, figure eight activation control canopy control landing approach rear riser turns, stall practice, recovery checkout jump
Tips for the check-out jump The following is a list of tips and ideas to help in your presentation, application, feedback, quality and thoroughness of the Checkout Jump. General • Divide the process and the content into smaller sections for easier presentation and learning. • Recommend an ongoing process starting at early freefall so that the final checkout is mainly
review. • Starting early ensures they get lots of repetition of the solo skills while under supervision of an
instructor. Waiting until the last jump to teach them solo skills is not recommended. • Teach using PAF, present one area, have them apply on the ground in well-designed exercises,
simulations, etc. and provide feedback. When the time comes for their checkout, they understand and can apply.
• Place the responsibility of learning on the adult and give them time on their own to practice. Return and evaluate after they are confident.
• The Checkout Jump is the place where a student jumper has to demonstrate that they can Jump Master themselves, not anyone else.
• Good lead up progression to the Checkout Jump has the individual completed everything before their freefall figure 8 is done. Once the figure 8 is complete, then the checkout can be done immediately.
• Always have one standard for acceptable performance regardless of friendship, status, sex, etc. • Follow up with proper documentation that includes recording the performance in their logbook and
signing their endorsement card. Preparation • Emphasize self-leadership and mature attitude repeatedly on the lead up to self-supervision.

Page 88 of 138 3.5 Endorsements
©Canadian Sport Parachuting Association, 2009
• Training should include information on what is next for short and long term goals and how to go about achieving them (self directed instruction).
• Planning jumps is a requirement. Teach how they are to use the grid and how to plan jumps with safety and progression in mind.
• Have completed up to and including self-directed instruction from the grid. In-flight • Student should be capable of demonstrating, on their own, seating and movement procedures,
mental rehearsal, apply relaxation techniques and an in-flight handles check during the in-flight portion (a good in-flight routine).
• Aircraft familiarization and pilot briefing can be taught quite early and practiced regularly. Bring in the jump pilot to team-teach with you if you like.
• Recommended spotting progression is 1) observed spotting 2) assisted spotting 3) self-spotting • Spotting should be introduced early, on IAD practice pulls if possible, as 3000' is easier to begin
with rather than 9500'. • Describe spotting as a simple task and not a big deal. Important, but not a complex one. • Demonstrated the ability to self-spot the aircraft. • Demonstrated ability to exit reasonably stable with good consistency with at least one exit type. • Have completed up to and including spotting - unassisted from the grid. Freefall • Demonstrated general awareness, recall and altitude awareness. • Demonstrated ability to fall stable and perform a figure 8 on heading plus / minus 10 degrees. • Demonstrated ability to activate the main parachute in a stable position and on a stationary
heading at the intended altitude. • Recommend that the student be observed directly from air to air. Video is ideal, close visual in air
is good, ground viewing is acceptable, view from the aircraft is usually not effective. Seeing a student in the air should be the minimum for you to properly assess their freefall ability.
• Look but do not touch, be an observer, not a participant. Remember your privileges as a JM. • Be aware that the student can become mesmerized by your presence; therefore use a side
observation position. • Have completed up to and including turns: figure eight from the grid. Canopy • Get them started on the approach pattern piece by piece. Check with a Jump Master on this as
they have received training on the final outcome. It is also part of the sport canopy endorsement. • Assign high up canopy tasks for repeated practice early in the progression. • Teach them flat turns for safety reasons. Reference PIM 2A page 39. • By completing a proper approach pattern, they should be able to do stand up landings within 50
meters of the target most of the time. • Demonstrated knowledge and use of rear riser turns, stall practice and recovery technique. • Teach issues of turbulence. • Have completed up to and including landing approach from the grid. Equipment • Make sure that they can gear up themselves properly. • Have a practical test for safety checks that highlight common and unique problems. • Allow lots of practice of safety checks through games and drills. • Introduce audible altimeters and AAD’s. Recommend they get one regardless of your own
personal view of them. They are excellent back ups and can save lives. • Have completed up to and including safety checks from the grid.

3.5 Endorsements Page 89 of 138
©Canadian Sport Parachuting Association, 2009
Technical Knowledge • Correct technical knowledge is equally important as basic skydiving skills. • Get a Senior Instructor to provide you with information on how novices should be taught to deal
with unusual situations prior to teaching that review portion to them (reserve and main landings, aircraft, freefall, malfunctions, equipment, and preparations).
• Check that they are able to do the “React” portion of emergency procedures properly. Check for proper direction of pull, which is down and slightly across the body center.
• Simplify freefall control and canopy flight theory from the PIM 2A manual into “must knows” versus “nice to knows” before presenting.
• Include rules, recommendations and what they are allowed to do and what they are not allowed to do (i.e. inappropriate FS).
• Simplify your spotting presentation with a spotting chart that relates wind speeds with freefall and canopy drift.
• Try to utilize three dimensional spotting training aids that correspond with your spotting chart. • Have completed up to and including freefall control - 360 turns from the grid. Complete, comprehensive evaluation at this stage is essential; the student must show solid ability of the basics. Too rapid an advancement at this point will only lead to a slower progression later on. The student must also show that they are ready to manage their own progression and development. They must be realistic in their own abilities and weaknesses. They should be safety minded, and have maturity towards the responsibility handed to them. The next pages have a checklist, assessment sheet and a summary of the Jump Master and the CoP’s that you will find useful.

Page 90 of 138 3.5 Endorsements
©Canadian Sport Parachuting Association, 2009
Checklist prior to the Solo Certificate application Gear Safety Check. (Administered by an Instructor, no less 5 than errors to be found)
JM, IPFF
Performed one solo freefall delay greater than 30 seconds. JM,IPFF Jump #:
Performed one 5 second solo freefall delay from 4000 ft (1200 m) JM, IPFF Jump #:
Completed three self-spotted (unassisted) jumps with controlled self-guided canopy landings to within 150 ft (50 m) of the target.
JM, IPFF Jump #'s:
Demonstrated in freefall, belly-to-earth, a figure 8 turn (360 turns in both directions)
JM, IPFF Jump #:
Performed one "ride the slide" exit (sitting exit with back towards propeller) for 5 seconds prior to rotating back to belly-to-earth.
JM, IPFF Jump #:
Under canopy, demonstrated a canopy stall and recovery (above 2000 ft) (600 m)
JM, IPFF Jump #:
Under canopy, demonstrated a rear riser turn (above 2000 ft) (600m) JM, IPFF Jump #:
Complete the Solo Checkout Jump Endorsement (see requirements below)
JM, IPFF Jump #:
Complete (and have signed) the Reserve Procedures Endorsement (RPE) (the practical application of emergency procedures)
SSI
Complete (and have signed) the Emergency Procedures Review (EPR) Solo endorsement (discussion about emergency situations and resolution)
JM, SSI
Accumulated a minimum of 10 jumps and a minimum of 3 minutes of freefall with stable activation at the prescribed altitude on the last 5 jumps.
JM, SSE, IPFF:
Correctly answer all Solo test questions. (To be verified by an SSE).
JM, SSI:
Also, you must have a current CSPA Membership.

3.5 Endorsements Page 91 of 138
©Canadian Sport Parachuting Association, 2009
SOLO CHECK-OUT JUMP
Jump Master: Give this to your student to review prior to the check-out Jump. When ready to begin, you can use this sheet to check if your student is executing everything on the list. Note those which are mandatory to pass, regardless of performance. Always check for safety routines! Student Name: _______________________________ CSPA # ________
Solo Checkout Jump # ________ 1. Plan your dive – you may use a Coach as
reference
2. Practice your dive
3. Get manifested
4. Assess weather conditions (canopy/spotting)
5. Check your equipment
6. Gear up by yourself
7. Arrange for and receive a safety check and give one to another jumper
*
8. Final rehearsal at mock-up/ aircraft
9. Board aircraft safely and brief pilot
10. Take off routine – helmets, seatbelts, conduct
11. In-flight mental rehearsal
12. Pre-exit handles check: PC, Main cutaway, Reserve handles; practice Emergency Procedures
*
13. Arrange for and receive a pin check *
14. Spot the aircraft (includes correctly calculating the spot from the ground pre-boarding)
15. Climb-out/Exit without assistance
16. Stable exit
17. Figure 8, belly-to-earth on heading (may already be completed)
18. Altitude awareness *
19. Activate on heading, stable, at prescribed altitude
*
20. Complete canopy check, flight control check
21. Fly a safe pattern to the landing area
22. Safe landing facing into wind within target area <150 ft (<50 m)
23. Return all gear to appropriate places
24. Demonstrate awareness and recall of jumps events
25. Fill in logbook accurately and completely
Total Mark: Pass = 20 / 25
* Mandatory to pass checkout jump
JM Name: _______________________________ JM Signature: _______________________________

Page 92 of 138 3.5 Endorsements
©Canadian Sport Parachuting Association, 2009
3.5.2 Emergency Procedures Review (EPR)
Reviewing emergency procedures with an appropriately rated Instructor is one of the most critical components of obtaining each CoP. The key here is “Emergency Procedures” not just reserve procedures (e.g. aircraft emergencies, injuries etc).
It used to be that the only time a person received training in emergencies was the first jump course. With the advent of the SOLO, A, B & C CoP, reviews of this valuable information can be refreshed and new layers of sophistication added to the basics. At the "A" CoP level review the basics (buildings, trees, power lines and low obstacles, free fall emergencies) while refining unintentional night and water jumps, basic RW safety, canopy avoidance drills and group landing approaches. Cutaway practice must be performed and a high level of proficiency displayed. Emergency Procedures Review "SOLO" Address the five areas of the Skills Grid: Preparation
• Weather • Forgotten equipment (e.g. find yourself at the plane with no altimetre, develop a gear up
routine) In-flight
• Aircraft emergencies • Emergency exit altitudes for main & reserve • When to shut off AAD's on an unplanned descent in the aircraft • Sickness • Main/reserve deployments in aircraft or on climb out
Freefall
• Malfunctions • Other equipment (altimeter, goggles) • Stability around pull • Traffic problems
Canopy Control
• Correctible situations • Low speed malfunctions • Two canopies out scenarios • Traffic on opening, traffic on landing • Obstacles • Turbulence • Landing in the wrong direction • Who to talk to when you want to learn to ‘swoop'
Equipment
• Poorly fitting gear • Damage on opening
AAD misfire

3.5 Endorsements Page 93 of 138
©Canadian Sport Parachuting Association, 2009
3.5.3 Main Packing Endorsement (MPE) As a Jump Master you can certify the main packing endorsement. The requirements for the endorsement are outlined below along with training strategies that you can use with the novice.
The applicant must satisfy the four listed requirements (PINT) and successfully pass a practical test to get signed off on the endorsement card by an instructor, coach or rigger.
PIM 1 – Technical Recommendations, Section 3.15 PARACHUTE PACKING Main parachutes used by non-CoP holders shall be packed by an individual holding a current main packing endorsement or failing that, a person under direct 1:1 supervision of someone holding, as a minimum, a Coach 1 or CSPA/FAA Rigger rating. Individuals packing equipment for student use must be properly instructed and endorsed (as per PIM 2B-Section 7) for the specific parachute system(s) in use.

Page 94 of 138 3.5 Endorsements
©Canadian Sport Parachuting Association, 2009
Main packing Endorsement
“P” - Pack: ability to pack properly, minimum 10 under supervision demonstrating proper sequence, techniques and neatness (PIM 2A).
“I” - Inspect: ability to do basic inspection while packing (PIM 2B). “N” - Name: ability to identify major components (PIM 2B). “T” - Tangles: ability to clear common minor entanglements (PIM 2A). Packing is best taught in two phases. The first phase is:
• Teach the normal pack. (pack, inspect, name) • Practical experiences of the normal pack, usually 6 - 10 times. • Practical testing demonstrating packing techniques, basic inspection and orally listing the names of
the major components. The second phase would be the unusual packing situation.
• Teach the seven common entanglements and how to recognize them. • Practical experience of clearing entanglements, receiving feedback, while you supervise. • Practical testing demonstrating the ability to recognize and clear minor entanglements.
The Seven Common Entanglements
1. back or front flip through risers, below slider 2. back or front flip through risers, above slider 3. step through one riser, below slider 4. step through one riser, above slider 5. step through a line, below slider 6. step through a line, above slider 7. step through a cascade
Suggestions for the Coach / Instructor / Rigger
1. Make sure that you pack well first, before teaching someone else. 2. Make sure that you are using approved techniques and know the correct reasons for their use 3. Cross check with a rigger to make sure that what you do is correct. 4. Make sure that the person being checked out also knows how to do proper safety checks as well. It is
actually on the skills grid before packing. 5. Teach and practice endorsement parts 1, 2 and 3 together 6. Evaluate part 1 separately, first, orally. 7. Evaluate parts 2 and 3 together, practically. 8. Teach entanglements (part 4) as a separate phase after they have learned the complete normal pack
first. This will make entanglements easy to learn and understand. 9. If unsure about part 4, team-teach first with someone rated who truly knows it. 10. Make sure you teach part 4 and practice it, before you evaluate it. 11. Evaluate part 4 separately, practically, after parts 1, 2 and 3. 12. When evaluating part 4, the person being checked out should demonstrate the ability to clear several
types of entanglements. Clearing one type of entanglement by trial and error is not adequate. 13. Always use PAF when teaching packing, break into lots of small steps. 14. When all 4 parts are passed, sign off the endorsement card. Be ready to stand by your decision. 15. This endorsement is required for the A CoP. 16. All endorsements, etc. are to be treated as a positive educational experience. They are not to be an
opportunity to degrade.

3.5 Endorsements Page 95 of 138
©Canadian Sport Parachuting Association, 2009
CSPA Solo Certificate Questions
While this quiz may be given verbally, it is strongly advisable to hand the questions to the student so that they may write down their answers in a quiet environment, and then taken up the answers verbally together after they have completed their work. Preparation 1. Who is responsible for your safety and well being on the drop zone? [PIM 2A - Sec 2.6 – p10] 2. This is your first time at a new drop zone. Prior to boarding the aircraft, what information should
you have received? [PIM 2B - Sec 11 - p86] 3. If you are under the influence of drugs, alcohol or medication, should you jump? Explain your
answer [PIM 1 - Sec 2.6 - p4] 4. What are your privileges as a solo certificate skydiver? [PIM 1 - Sec 6 - 2001 Addendum] 5. What and who are your resources for further skill development? [PIM 2A - Sec 1 - p1 and Sec 2.6
- p10] In flight 6. Your aircraft has lost engine power and the pilot yells "out everyone out". State the minimum
altitude that you would get out and activate your main canopy? Your reserve? [PIM 2A - Sec 3.12 - p19]
7. On a jump out of a Cessna, you are following a group of three "belly to Earth" flyers, how much
separation, in seconds, should you give the group before leaving the aircraft? [PIM 2B - Sec 3.13 - p23]
8. What handles would you check to ensure they are properly seated prior to exiting the aircraft?
[PIM 2A - Sec 3.3 - p12] 9. If in the aircraft you notice something unusual about someone’s gear, what should you do? [PIM
2A - Sec 3.12 - p19] Freefall 10. What is your minimum activation altitude? [PIM 1 - Sec 2.5 - 2001 Addendum] 11. If you are at 2500 ft with your hand on the main activation handle and you have attempted to pull
the handle twice with no result, what do you do? [PIM 2A - Sec 4.16 - p37] 12. You are in freefall and notice that after checking our altimeter for the second time, that the
reading has remained the same. What should you do? [PIM 2A - Sec 4.16 - p37] 13. In freefall you notice you are at pull altitude but are unable to turn belly to earth. What should
you do? [PIM 2A - Sec 4.16 - p37]

Page 96 of 138 3.5 Endorsements
©Canadian Sport Parachuting Association, 2009
Canopy Control 14. What is the purpose of the flight control check and what decision should you arrive at after the
check? [PIM 2A - Sec 5.3 - p39] 15. Under canopy you have performed your flight check and notice that two of your lines are broken.
What should you do? [PIM 2A - Sec 5.16 - p51] 16. You are under canopy flying back to the drop zone when you notice a canopy flying directly at
you from the opposite direction at your level. What do you do? [PIM 2A - Sec 5.16 - p47] 17. Looking slightly below you on landing approach you notice a lower canopy converging on your
flight path. Which canopy has the right of way? [PIM 2A - Sec 5.16 - p47] 18. What is the best body position for landing a parachute? [PIM 2A - Sec 5.5 - p39] 19. Where does severe air turbulence occur? [PIM 2A - Sec 5.16 - p50] Equipment 20. On what two occasions must you receive a safety check? [PIM 2A - Sec 6.6 - p58 and PIM 2A -
Sec 3.3 - p12] 21. When checking your gear you notice the reserve closing loop is badly frayed. Who is qualified to
fix or repair this problem? [PIM 1 - Sec 8.1 - p26 and PIM 2A - Sec 6.10 - p61] 22. Prior to changing canopies or rigs, what should you do? [PIM 2A - Sec 5.16 - p48 and PIM 2A -
Sec 6.11 - p61] 23. You are asked to perform a pin check on a person who is wearing gear that is unfamiliar to you.
What do you do? 24. How do you know if your reserve is in date? [PIM 1 - Sec 2.2 - p4 and PIM 1 - Sec 4.8 - p8] 25. What is the correct headwear and footwear for a solo certificate holder? [PIM 1 - Sec 2.4 - p4 and PIM 1 - Sec 3.5 - p5]

3.5 Endorsements Page 97 of 138
©Canadian Sport Parachuting Association, 2009
Summary-Key Points: It is important to become very familiar with each endorsement and tasks you can sign off. You are one of the main “cogs” in the wheel of the CSPA progression system. Reference your PIM1 and 2A often (it makes you look more professional too!) and understand it is YOUR responsibility to stay abreast of changes and new manuals. Evaluations: a) State the endorsements you may sign off as an JM b) What constitutes a “pass” for a solo checkout jump? c) Competence in what five areas must be demonstrated to get a Solo certificate? d) What constitutes a “pass” for the ride the slide exit? e) What constitutes a “pass” for a Figure 8? f) Where do you find out the tasks for a solo checkout jump?

Page 98 of 138 4.1 Student Supervision — Unusual Situations
©Canadian Sport Parachuting Association, 2009
Section D – Safety and Unusuals 4.1 Student Supervision — Unusual Situations Situations in which the student's actions are not appropriate to their training or in which the necessary technical or environmental requirements are not suitable for skydiving are termed Unusual Situations. An unusual situation can occur during any of the five phases of the jump, that is:
• Unusual Preparation Situations • Unusual In-flight Situations • Unusual Freefall Situations • Unusual Canopy Control Situations • Unusual Equipment Situations
Each DZ should discuss these guidelines, adjusting them to local conditions, achieving a standard set of procedures for that DZ. Your DZ should develop a chart like this example: Problem Solution high wind check the forecast, wait call aviation weather, Ottawa low cloud ceiling check, experienced verify cloud on mountains to south east refusal and so on circuit, discuss, try again seat in rear of aircraft, bring down
4.1.1 Unusual Preparation Situations Adverse Weather It is recommended that you allow an experienced load to go ahead, while watching the rate of change of conditions. If a large airport is nearby, you can check with aviation weather for an accurate forecast and ask the pilot for an opinion. Remember that poor weather conditions will have a significant detrimental effect on your student’s capacity to perform. Especially if they have to climb out onto a wet wheel strut and hang onto a wet wing strut. Don’t push the weather. If there are storms on their way, stop dispatching students; if it is getting dark, stop dispatching. In skydiving as in other sports, it always takes longer than you think and by the time you are dispatching it will be either dark or real windy; both are bad situations for students. • Wind — Signal to hold or to land. • Cloud — for freefall students, make an IAD below clouds (if above minimum). • Daylight — do not push the situation. The student needs adequate light for perception on
landing; official time of sunset is close of activities for students. Remember it takes time to dress load and make the flight to jump altitude.
Equipment If a reserve is out of date, return it to the equipment room and tell the person in charge of gear; if another type of deficiency is suspected, check with the senior rigger on the DZ or a senior Instructor/Coach.

4.1 Student Supervision — Unusual Situations Page 99 of 138
©Canadian Sport Parachuting Association, 2009
Serious Doubt at Aircraft If at the aircraft, the student expresses the feeling that they are not ready, you may try to positively reassure them, highlighting their satisfactory performance of all required skills. However, it is recommended that you allow them to change to a later load and continue to practice, rather than talk them onto an aircraft ride and then experience a refusal at altitude or worse a sick student. Negative Response to Another Skydiver’s Accident If an accident occurs, it is best to allow the experienced jumpers and those among the students who display more confidence to proceed with their jumps, rather than trying to convince a doubtful student that nothing else will go wrong. Watching subsequent successful jumps is stronger encouragement. Aircraft Breakdown If there is any doubt about the serviceability or reliability of the aircraft, it should be sent for a test flight first, then possibly with a load of experienced jumpers, rather than with a group of student parachutists aboard. See Section 4.2 Aircraft Emergencies on page 115.
4.1.2 Student Related Unusual Situations Student Sick If your student experiences dizziness or light headedness, they should close their eyes, put their head down and/or breathe deeply and deliberately. If the aircraft is performing steep turns, have the pilot fly wings level for a while. There is the chance that your student may actually want to or have to vomit. If this happens, you could have your hands full! It is best to recognize that this is going to happen and take action. Have an airsick bag (or glad kitchen catcher bag) on board your aircraft and use it. If not, zip down the student’s coveralls and pull up their shirt like a bowl. Once they are finished, have them hold up their shirt and zip up the coveralls. (Thanks to Dave Thomson for his real experience contribution and quick thinking.) Sticking their head out of the aircraft will usually result in vomit spraying in their face or even back in the aircraft! The act of opening the door may be the little push that they need to actually vomit if they were close. Student Legs Asleep If your student’s legs go asleep then have them try to stand up on their knees or in a position to facilitate the best circulation of blood to that area. Also check to see if the leg straps are tightened excessively and loosen if necessary. Radio Check under Canopy If your student has not received any communication within 30 seconds after the canopy opens, then they should check their radio receiver to see if there is something that they can correct. Start by checking the test bars/squelch if the radio has one. If no sound is heard, they should clear their ears (e.g. yawn), then check the radio to see if it has been turned on and the volume turned up. If these check out OK, then the battery door snap can be checked and lastly the antenna connection. Your student should understand that they should not waste too much time trying to correct the problem. The checks should be done quickly. If there is no success then they should turn their attention towards getting back to the target. Remind them of the in-air approach to problems: "Try twice, then take an alternate solution." The back up procedures to radio failure should be followed.

Page 100 of 138 4.1 Student Supervision — Unusual Situations
©Canadian Sport Parachuting Association, 2009
Student Refusal Prior to Exit: It is your responsibility to be prepared, if a student refuses to leave the aircraft. Watch for potential indicators on the ground during rehearsals: undue stress, nervousness, uncertainty, a significant change in mannerisms. Provide positive opportunities for the student to express anxiety and receive a sympathetic response. Provide honest replies to student’s concerns; if you feel it is warranted, offer them the opportunity to jump on the next (subsequent) day to allow the training to “sink in overnight”. When loading, try to position a strong performer as the first student. During in-flight, display confidence and ensure your students are able to orient themselves, hear your instructions and that your pilot flies conservatively. At exit, be firm, clear and positive. Be certain to involve the student in the jump activity prior to exit (i.e. where is the DZ, target; do you see the other aircraft; put your hand out in the airflow, what are the next two actions, etc.). If your student refuses, then go around and try again. If still a no go, do the shuffle of positions if possible or if necessary. If possible, dispatch the remainder of the load and then ask the refusal student if they want another try. If still a no go, then seat belts on and land with the student. On the way down reassure their self-confidence. The pilot should not bring the aircraft down as fast with people on board. Once landed, make sure that they get off the aircraft and to the hangar safely and see that the gear is returned. If the shuffle is not possible or necessary, then landing with the load may be the only option. Put seat belts back on and reassure them for the flight back down. Physically escort them off of the aircraft to the DZ. Refusal in the Door: If the student balks inside the aircraft or in the doorway, move them back from the doorway, close the door, direct the pilot to go around and ask them to describe their problem. Respond to/resolve the difficulty where possible, bring the aircraft around on jump run and dispatch that student, then continue with the remainder of the load. If the student refuses to accept your information, replace the pilot chute in the pouch (disconnect the SL) move them to the sitting position behind the pilot’s seat, facing rearward, then dispatch the remainder of the jumpers. Ask the student if they wish to try again and if so prepare the pilot chute or SL. If not, close the door, seat belts on and make the descent with yourself, the refusing student and the pilot on-board the aircraft. Refusal Outside the aircraft: Should the student balk once they are outside the aircraft, your first action is to repeat the Go command and to accompany it with physical contact (e.g. slap on the butt - dynamic, downward harness pressure - hanging). This could be repeated a total of three times. Advise the pilot, requesting a slow turn back towards and circling of the spot. If the student continues to balk, you must assess your ability to bring them back inside the aircraft safely. Remember this means not releasing their main (IAD or SL), and not activating their reserve or either of your canopies as you manoeuvre them back through the doorway.

4.1 Student Supervision — Unusual Situations Page 101 of 138
©Canadian Sport Parachuting Association, 2009
With the dynamic exit bring them back inside. The best method is to grasp their harness at the hip with your non-pilot chute holding hand, and pull them back to the aircraft into a sitting position such that they sit on their butt in the doorway. Once in this position, their arms and legs can be brought inside easily. With a hanging exit, it is not safe to try bringing the student back inside the aircraft, advise the pilot and continue with your DZ procedure. This may require the addition of engine power or ailerons and more pressure by you to ensure the student releases their grip on the aircraft. Your pilot should be acquainted with the procedure and potential situations to deal with.
4.1.3 Climb out Situations Long Student Climb-Out Assess the student’s ability to climb-out in the normal allotted period of time; consider their level of stress, strength, particularly upper body strength, the person’s size-to-weight ratio (is the student overweight?), and the individual’s physical size. You can expect a reasonable increase in the individual’s level of stress when the door opens. Remember that very small and very large persons have more difficulty; you should allow them additional time for their climb-outs. The same is true for someone who is overweight. When using the hanging exit, an additional problem is encountered. Almost all students climb out slowly on their first few jumps due to the distance they must climb. If a student is exceptionally slow, and they are well past the exit point they must climb back in and the JM should request another jump run. The command to "Get Ready" should be given well in advance of the intended exit point. It is better to start early and have them wait on the step, in the door, or hanging on the strut (most students appreciate a chance to collect their thoughts) than to rush them or abort the exit. Exceptionally strong upper winds would allow a later start, as would more experienced students. In low wind conditions, the student may commence climbing out over the target. The more experienced or aggressive student will not require as much time, but may still desire a long lead time to enable concentration on practice pull procedures before the launch.
If the climb out is taking really long, the Jump Master and pilot must teamwork quickly. Advise the pilot, requesting a slow turn back towards and circling of the spot. The pilot should already be aware that the climb out is taking too long. The pilot should angle off to the left of the jump run, then turn the aircraft 90 degrees to the right and start a circle back around towards the DZ. The student can
Note: Do not place the pilot chute until the student releases their grip from the aircraft (i.e. visible separation).
During the FJC, the student should be advised that once they are out on the step/strut, they are considered gone! This can be referred to as a “no return threshold”.
A common error by novice instructors is to give the climb out command too close to the intended exit point, causing long spots. Expect a slow climb-out and call the climb out command early.

Page 102 of 138 4.1 Student Supervision — Unusual Situations
©Canadian Sport Parachuting Association, 2009
leave at any point in this pattern and still have a good chance to land safely. The pattern shape is basically a “light bulb”. While this is occurring, the instructor must hang on! Fast Student Climb-Out If a student is exceptionally fast, their climb-out may have to be slowed. If you can put your hand in front of their face showing a “stop” signal, and shouting “STOP”, hold their harness, offer resistance, cover the eyes, or block the door. If a student climb out is fast, once outside the aircraft, hold them or give them a tug with your harness gripping hand. At this point they will most likely stop and look at you. Once you have caught up, nod yes at them and continue on. Premature Activations Accidental opening of the student's main or reserve parachutes can be serious. Accidental activations can occur either in the aircraft, during climb-out or while making final exit preparations outside on the step. They may occur as a result of snagging or the unintentional firing of an AAD. This later case in particular is possible near an open door or in a descending aircraft. Take the following actions, if the main container is open but the parachute is not heading out the door:
• Contain the canopy • alert the pilot and • close the door.
• Move the student away from the door and disconnect the parachute from the harness by
removing both the RSL and the main canopy release handle in order to secure the situation. Note: If the student’s rig uses a single point release/reserve handle, carefully pull the cutaway cables out of the housing without pulling on the reserve cable. Stuff the pilot chute in the D bag.
• Move the student to the back of the aircraft away from the door and where they can contain the cutaway canopy. The remaining students can then be dispatched.
• You will then remain with the student and prepare to descend with the aircraft. You must secure the seat belts. Both the student and you will then land with the aircraft.
If the reserve container has been opened, immediately contain the canopy while the pilot closes the door. If there is no door then contain the canopy and have the student carefully move to the back of the aircraft. Do not continue to dispatch the students, door or no door. Get everyone’s seat belts on. The whole load is to land with the aircraft.
It should be noted that your gear is also susceptible to accidental deployment, especially as students move past you to climb out, or as you climb out and back into the aircraft. You must be aware of your gear as the student is preparing to get ready. You should try and cover your reserve handle as the student moves past.
If the parachute gets out the door, there is no choice. Get the student out now!!...even if you have to take them with you.

4.1 Student Supervision — Unusual Situations Page 103 of 138
©Canadian Sport Parachuting Association, 2009
4.1.4 IAD Unusual Situations Bag Drop: If the bag drops during the climb out for any reason, the pilot chute must be held until the jumper has released from the aircraft. Scream “GO”, use force get the jumper off the step and then deploy the pilot chute after they are gone. Obvious Unstable: If the jumper has an obvious unstable exit or is in risk of interfering with deployment (back to earth, roll-overs), then short line them by holding onto the pilot chute until the bag is clear or the pilot chute is ripped out of your hands (use the pilot chute and bridle as a SL until the bag has cleared their appendages and then place the pilot chute). Usually this only occurs with a hanging exit and only when the jumper is incurring rotation while still ON the aircraft. The other possible situation is when a student slips while climbing out and then hangs on while the bag drops.
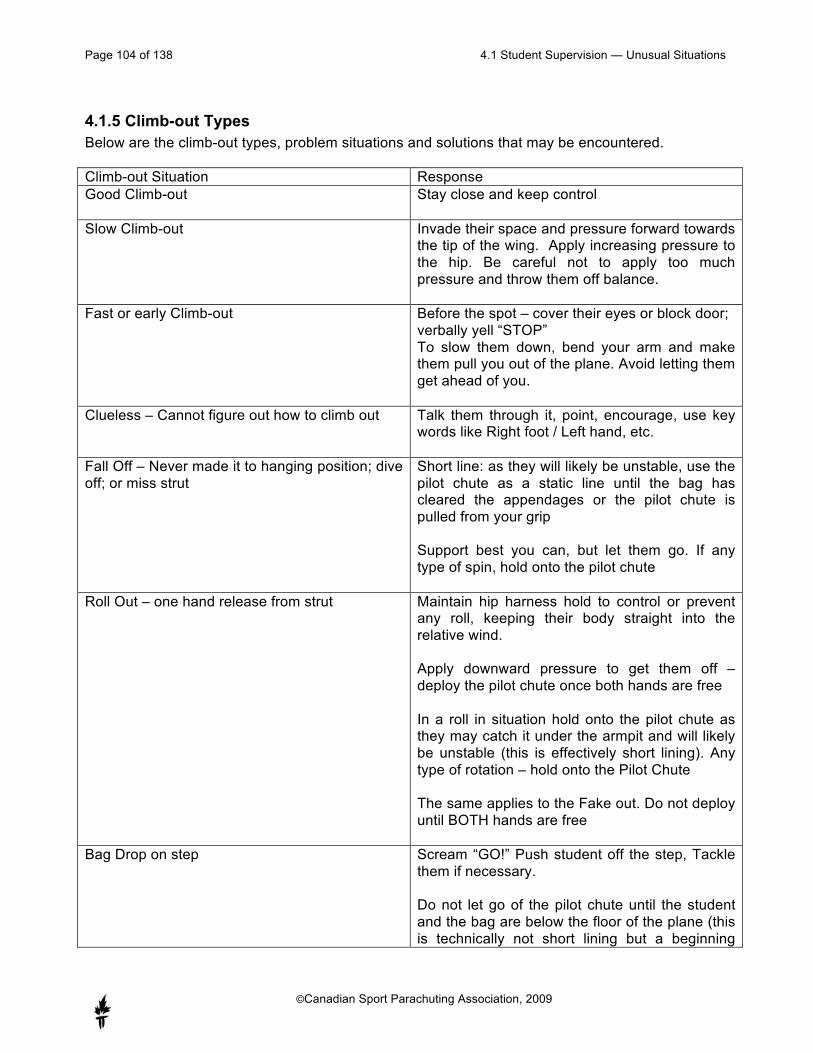
Page 104 of 138 4.1 Student Supervision — Unusual Situations
©Canadian Sport Parachuting Association, 2009
4.1.5 Climb-out Types Below are the climb-out types, problem situations and solutions that may be encountered. Climb-out Situation Response Good Climb-out
Stay close and keep control
Slow Climb-out
Invade their space and pressure forward towards the tip of the wing. Apply increasing pressure to the hip. Be careful not to apply too much pressure and throw them off balance.
Fast or early Climb-out
Before the spot – cover their eyes or block door; verbally yell “STOP” To slow them down, bend your arm and make them pull you out of the plane. Avoid letting them get ahead of you.
Clueless – Cannot figure out how to climb out
Talk them through it, point, encourage, use key words like Right foot / Left hand, etc.
Fall Off – Never made it to hanging position; dive off; or miss strut
Short line: as they will likely be unstable, use the pilot chute as a static line until the bag has cleared the appendages or the pilot chute is pulled from your grip Support best you can, but let them go. If any type of spin, hold onto the pilot chute
Roll Out – one hand release from strut
Maintain hip harness hold to control or prevent any roll, keeping their body straight into the relative wind. Apply downward pressure to get them off – deploy the pilot chute once both hands are free In a roll in situation hold onto the pilot chute as they may catch it under the armpit and will likely be unstable (this is effectively short lining). Any type of rotation – hold onto the Pilot Chute The same applies to the Fake out. Do not deploy until BOTH hands are free
Bag Drop on step
Scream “GO!” Push student off the step, Tackle them if necessary. Do not let go of the pilot chute until the student and the bag are below the floor of the plane (this is technically not short lining but a beginning

4.1 Student Supervision — Unusual Situations Page 105 of 138
©Canadian Sport Parachuting Association, 2009
Jump Master should think “Hold On” like a short line); If losing grip on pilot chute then tackle him off the step
Reserve opens on step
Stuff main pilot chute between back and rig Yell “Go”! Tackle them if necessary.
Fall between strut and wheel
Short line. Extend your arm down in front of wheel as far as possible to avoid possible hang-up. If sitting on the step, push them out past the end of the wheel as far as possible. Short line as they will likely be unstable.
Freeze on step; catatonic outside the aircraft
Push off, tackle if necessary. Be prepared to short line.
Fake out or Psycho out: Holding with bent arms on TOP of strut and drop down; or hanging from strut and fake by bending arms then straighten again.
Apply pressure to get them to straighten arms as they reach the end of the strut. Attempt to get them to a straight-arm hanging position. Hold onto the PC until their hands clear the strut.
Dropped Pilot Chute Yell “GO”! get student off plane as quickly as possible. Apply downward pressure on the harness.
Jump Master falls off of step Yell “GO”! and make sure the Pilot chute is below the tail of the aircraft before you let go of it. Of course, your own safety is paramount; avoid getting caught up in the bridle. Best if you can rotate to face the student/plane so that the bridle is clear from your body.

Page 106 of 138 4.1 Student Supervision — Unusual Situations
©Canadian Sport Parachuting Association, 2009
4.1.6 Unusual Freefall Situations Observation Positions: • From the aircraft, observe the situation and your student’s actions. • From freefall, track and pull on time yourself, observe the situation and your student’s actions.
A list of problems in free fall include:
• add main deployment system change (ripcord, pull-out, throw-away)
• pilot chute in tow • horseshoe - body, equipment • loose pull-out handle or bridle • streamer • bag lock
• total • no handle • confusion • hard pull • hesitation • stability loss • silly turn • feels dizzy
Your student should be briefed on the following unusual situations: hard pulls, lost handle, pilot chute caught on the hand, pilot chute hesitation (in burble), and loss of stability. The fact that time is running out quickly must be emphasized and not to get stubborn about trying to correct the problem. • Hard pulls and lost handle: Try once, Try twice and then follow through with reserve procedures. • Pilot chute/bridle caught on hand: Re-throw or clear hand from the bridle. Point hard at pilot
chute. Try twice and then follow through with reserve procedures. • Pilot chute hesitation: If it happens, it can be cleared by doing a good shoulder check to tip the
body allowing airflow over the back inflating and clearing the pilot chute. Try twice and then follow through with reserve procedures.
• Loss of stability: Strengthen and hold the arch. If stability cannot be regained they must never sacrifice altitude for stability. At pull altitude, get something out. If stability cannot be regained, then the pilot chute should be tossed regardless of altitude. It is better they throw it high, than lose track of altitude altogether. “Freefall Rules!”
Freefall Rules • act on basis of altitude, not presence of stability • if in doubt, activate your parachute (when in doubt, get it out) • in event of problem, try only two times to remedy situation, use the back-up system
4.1.7 Unusual Canopy Control Situations
Note: make sure there is adequate horizontal separation between you and your student; if your student has a malfunction and you are too close, the they will be coming through your canopy shortly.
Rule #1: PULL Rule #2: Pull on time.
Rule #3: Pull on time stable.

4.1 Student Supervision — Unusual Situations Page 107 of 138
©Canadian Sport Parachuting Association, 2009
It is the Jump Master’s responsibility to "land out" with a student if they land far away from the DZ, but only if it is safe to do so. This is important for direction home, retrieval of student equipment and first aid if necessary. A conscientious Jump Master landing close the student can give assistance. Injury upon Landing: If a student is injured on landing, your role as the JM includes physically going to see and reassure the individual, sending someone to call for medical assistance if the injury is serious and having your helper bring the first aid kit. While it is not mandatory that you know how to give first aid treatment, it is certainly recommended that you be familiar with the ABC’s (airway, breathing, circulation) and know how to make the individual secure and comfortable while medical experts are en route. Cannot Locate the DZ or Landmarks For your student to locate the DZ, they should look straight down first. Secondly, while doing a slow 360 turn, in equal increments scan around and outwards in arcs until they find the DZ. Have them look for the landing area or runway first. Once they have located the larger areas they should direct their canopy to them. As they approach, they should begin to locate other points (i.e. DP, landing point etc.). If they cannot locate the DZ after the first 30 seconds to 1 minute, it is time to select an alternate landing area and follow the procedure detailed in Off DZ Landings. If they have found the DZ and are coming back to it, they should monitor their altitude above ground. If they are getting low, they should abandon their DP, turn to face into the wind, pick a clear area and land. They should be praised for their heads up action and not for their determination to reach the DP and crash land. Cannot Find the Toggles If they cannot find the toggles, then they should complete the flight control check by the rear risers and head for the DZ. Once heading in the correct direction, they should look for the toggles again. They are usually located on the back of the back risers. If they still cannot find the toggles, they should continue their approach pattern on the rear risers and land that way. Malfunction Decision Making The decision and action of reserve use is made through the following process: 1. Assess This is your initial decision making phase for whether we carry on with our normal sequence of tasks or the reserve procedure sequence. The reserve procedures are simple but the process of making the decision can be uncertain at times. To make a decision we use the following process:
• Inspect canopy visually. It should appear somewhat square. Ask yourself "Is it open?" Rectangular, flying straight, orderly lines, slider half plus down.
• Perform a flight control check. Do this by flaring the canopy followed by the execution of one turn while asking yourself, "Can it flare, can it turn, and is it flyable/controllable?" Then try the other turn.
Note: check your DZ for “no toggle procedures”
1. Assess — 2. Think — 3. React

Page 108 of 138 4.1 Student Supervision — Unusual Situations
©Canadian Sport Parachuting Association, 2009
If all passes proceed with the normal sequence. During your assessments, the speed at which you are falling can effect your decision. Due to this we spilt the problems into two main categories: low and high speed malfunctions.
High Speed High speed obviously means less time to react but the actual assessment of the problem can be made quickly. The visual check, as well as the speed of the wind, which can be felt and heard, makes the problem rather obvious. Your student should take immediate action to perform the reserve procedure without doubt or further delay. Maximum time 2 seconds.
Low Speed Low speed on the other hand allows us more time to react but unfortunately the assessment is not as straight forward. The visual appearance of the problem can be quite subtle, as our decent speed, so we must rely and trust our flight control check to give us the information we need to arrive at a decision to stay or go. It is true that the flight control check will systematically bring the slider down, open the end cells, and clear a slow turn. But it may not as well. It may reveal that what you think is a minor problem is actually more serious. If the one flight control check does not produce an immediate improvement then you should not hesitate to follow through with reserve procedures. "When in doubt, get it out." We wear reserves for a reason, once that reason presents itself take decisive and quick action. Maximum time is to end of the flight control check or 10 seconds whichever comes first.
2. Think Once the student has arrived at the decision that he/she must use their reserve collect their thoughts and focus on the proper procedure. Remind them to look first. 3. React With their thoughts focused on the procedure; they should look at the handles, reach and grasp handle(s), pull handles as trained in proper sequence. See techniques for TAS or SOS. Once under their reserve, the student should again focus their thoughts on the correct steering and landing technique for that parachute. Problems upon Deployment Discuss the scenarios’ with your DZ First Jump Course Instructor and determine what the DZ is teaching. Following guidelines regarding the appropriate actions for that specific incorrect deployment situation:
• spinning malfunction • slider hang-up • collapsed end cells • broken steering lines • line over/distorted • torn/damaged • two canopies
4.1.8 Unusual Equipment Situations

4.1 Student Supervision — Unusual Situations Page 109 of 138
©Canadian Sport Parachuting Association, 2009
Lost Equipment If a piece of equipment is dropped during the descent or on the walk back, you should assist in organizing a search party and suggest the likely places to look. It is particularly important that large items and those containing metal parts be recovered from farm property. There are recorded instances where livestock have died from ingesting WDI’s and farm machinery was damaged by a ripcord handle and cable. Good neighbour relations depend on you not littering the countryside with lost parachute equipment. Damaged Equipment Any item suspected of being damaged (i.e. AAD which is dropped or immersed in water), should be reported to the DZ operator or senior rigger. Worn fabric, grommets which are pulling out of the support material and frayed closing loops are the warning indicators for potentially very serious equipment failures. Malfunction It is recommended that you encourage the individual to get back in the air, after assessing their response to the stress first. Emphasize the good job they did in responding to the problem and activating the reserve. If the AAD saved the individual’s life see the senior chief instructor on the DZ. Remember to submit an AIM report. This is your responsibility and is a requirement for defence fund access. Unthreaded Hardware Rapide connector links where the barrel closing nut is loose should be tightened by a qualified individual using the correct method (i.e. finger tight plus 1/4 turn). The occurrence should be reported so that other links on that rig can be verified for tightness as well as making random checks of the other rigs used by the students. The individual responsible for regular maintenance of the student equipment must be advised of the problem. Closing Loops Worn fabrics, grommets which are pulling out of the support material and frayed closing loops are the warning indicators for potentially very serious equipment failures. Poor Gear Up by Helpers If you do find a poor gear up then you must fix it without causing alarm to the student. This may take some creativity to do, however it can be done. Then have a calm, private chat with whoever geared the student up (if it wasn’t themselves), or a senior instructor. Wrong Closing Order Write down the closing order of the flaps and bridle routing on a poster above student equipment so that there is no excuse for a wrong closing order. Alternatively, have the flaps numbered. If you do find a wrong closing order then you must fix it without causing alarm to the student. This may take some creativity to do however it can be done. Reserve Canopy Control Once under a reserve the jumper should look down the wind line and identify the probable landing area. The jump should immediately aim the canopy towards the safest quadrant.
4.1.9 Problems Under Canopy - Obstacles

Page 110 of 138 4.1 Student Supervision — Unusual Situations
©Canadian Sport Parachuting Association, 2009
Obstacle Landing Avoidance (How to Avoid) When dealing with obstacles and obstacle landings, follow this process: Avoid, Prepare and Protect. The three key points which you must ensure you student learns are:
• avoid the obstacle by directing the canopy elsewhere • prepare for the landing • if it is unavoidable, protect yourself appropriately
Tell your students: The jump is never over until our feet are safely on the ground. For this to happen it helps us to be aware of existing hazards in the area and do our best to stay clear or avoid them. The following can help you prevent having to deal with any hazards. Know the DZ: Prior to jumping familiarize yourself with the DZ and the hazardous areas. Look for the
not so obvious such as fence and power lines. As well as becoming aware of these hazards also identify your landing area and any alternate landing areas that you can use if needed. The target area may not be the only safe landing area.
Land in the middle of a field instead of near the edges: Edges contain fences, wires, ditches and
roads. If you see a road leading to a house, suspect that there is a power wire along the road. If you see a garage or barn beside a house, suspect that there is a power wire running between them. Land elsewhere.
Know your canopy control: Knowing how to properly steer your parachute back to the landing area is
very important. You should be clear about how to locate the steering toggles, turn the canopy, slow down or speed up the canopies forward speed and target perception for glide angle (DP). Make sure that your student understands and can perform these skills, as they are the actions that will help to avoid.
Look and plan ahead: An obvious piece of advice is to remind your student to look were they are
going. It helps if they understand that where they point there canopy is not necessarily where they are heading. Understand canopy side drift or crabbing can help them decide if they are headed toward something that they may want to avoid. It also helps if they understand that they can run or hold with the wind to clear or miss an obstacle.
An avoidance procedure is Look to the clear area, Steer to the clear area, Land in the clear area. Obstacle Landings - The six common types of obstacle landing originate from the rural setting for most DZ’s. These six types of obstacle landing are listed below. The specific procedures for each follow: • trees • power wires and telephone lines • buildings and roofs • fences, cars and roads • complex/multiple obstacle areas • water - unintentional landing with floatation gear and with no floatation gear Trees for students
Make an effort to avoid the trees or forest. However if the student cannot avoid, the steps for a tree landing are:

4.1 Student Supervision — Unusual Situations Page 111 of 138
©Canadian Sport Parachuting Association, 2009
• face into the wind • aim for a space between two or three trees, not the center of one tree • feet and knees together, feet flat; keep the legs tight together, • flare the canopy just prior to contact with the trees. Lower chin to chest and turn head slightly.
Cross arms and keep elbow in tight to avoid branches going under the arm pits, and legs together, cross toes with knees bent side-by-side while flaring to protect stomach and crotch from branches
• Hold flare until contact with tree or ground is made • protect your eyes, armpits, throat, abdomen, crotch (major arteries) • be prepared to make contact with the ground and roll • if suspended, grab hold of a large limb and stay there • stay in the gear, help is on the way Power Wires and Telephone Lines Make an effort to avoid the wires by turning to one side of the line or the other. Land downwind or cross wind. A flat turn is necessary. However if you cannot avoid, the steps for a wire landing are: • face into the wind • aim for a space between two wires, do not try to grab a wire to slow your descent • feet and knees together, feet flat; keep the legs tight together • keep your arms in front of your face • bring the canopy into 3/4 breaks, just prior to contact with the wires • be prepared to make contact with the ground and roll • if suspended, do not allow anyone to touch you until the power is off If broad siding a power line, chances are you have not seen it until the last moment. The best reaction for a student canopy is to flare immediately and prepare to land. Buildings and Roofs Make an effort to avoid the roof or building. However if you cannot avoid, the steps for a roof or building landing are: • do not broadside. If possible turn slightly prior to hitting. • face into the wind or slightly off if necessary to avoid direct approach feet and knees together,
feet flat; keep the legs tight together • flare the canopy just prior to contact with the obstacle, use your feet to make contact and
aggressively push away, body checking the obstacle may reduce injury • be prepared to make contact with the ground and roll Fences, Cars and Roads Make an effort to avoid these obstacles. However if you cannot avoid, the steps for fence, car or road landings are: • do not approach from perpendicular angle (broadside) • face into the wind or slightly off if necessary to avoid direct approach • feet and knees together, feet flat; keep the legs tight together • flare the canopy just prior to contact with the obstacle, use your feet to make contact and
aggressively push away, body checking the obstacle may reduce injury • be prepared to make contact with the ground and roll Complex/Multiple Obstacle Areas A congested area is one with multiple obstacles of a variety and any one or two landing procedures would potentially not work or create confusion on which had priority. The following is the procedure in dealing with a complicated area:

Page 112 of 138 4.1 Student Supervision — Unusual Situations
©Canadian Sport Parachuting Association, 2009
• find a ram-air runway free of obstacles regardless of wind direction • steer down the runway, preparing to land (feet and knees together) • flare, and roll if necessary • if you can not avoid all obstacles, take the lesser of the dangers Water - Unintentional Landing with floatation gear Make an effort to avoid the water. However if you cannot avoid, the steps for a water landing are: • try to land as close as possible to the shore/land • face into the wind • undo your chest strap and belly band if applicable • loosen your leg straps (do not remove or undo) • Inflate your floatation gear • feet and knees together, feet flat, keep the legs tight together • flare the canopy just prior to contact with the water • get out of your harness and swim away from the canopy and lines Water - Unintentional Landing with no floatation gear Make an effort to avoid the water. However if you cannot avoid, the steps for a water landing are: • try to land as close as possible to the shore/land • face into the wind • undo your chest strap and belly band if applicable, • loosen your leg straps (do not remove or undo) • feet and knees together, feet flat, keep the legs tight together • flare the canopy just prior to contact with the water • get out of harness and stay away from lines and canopy Problems Under Canopy, Near the Ground Downwind Landing If landing downwind, the steps are: • make an effort to turn into wind, using a flat turn (1/2 brakes) technique; do not use full toggle
turn technique • face across or into the wind as much as possible, without making oscillating turn • feet and knees together, feet flat; keep the legs tight together • flare the canopy at the correct height prior to contact with the ground • be prepared to make contact with the ground and roll or butt slide • if too low, feet and knees together, flare to a pike position (fee straight out in front, similar to
tandem landings) and bum slide; avoid PLF roll in a high speed landing High Wind If landing in high winds, the steps are: • turn into wind, let the canopy fly at full speed, toggles raised as high as possible • feet and knees together, feet flat; keep the legs tight together • flare the canopy quickly just prior to contact with the ground • be prepared to make contact with the ground and roll • recover and run around the canopy (downwind) to collapse it, or pull on a steering line and keep
pulling it in which will cause the canopy to face and fly into the ground, then collapse Flared too High If you have flared too high, the steps to recover are:

4.1 Student Supervision — Unusual Situations Page 113 of 138
©Canadian Sport Parachuting Association, 2009
• If way too high, recover to belt or stomach height and flare again at the correct height • If just a little too high, hold it • feet and knees together, prepare to PLF in all cases Injury on Landing If your student is injured, they should stay down as that is the signal for someone to come and help them. If you as an instructor see this, then see that appropriate action is taken immediately. If they are not hurt then they should stand up and signal that they are OK. A thumb up usually suffices. Possible instructor signals: 0 for okay, 1 arm up for bring the truck and the first aid kit, 2 arms waving above the head for call 911 and get immediate help out here Off DZ Landing In preparing for your landing, you should first avoid areas near roads or edges of fields as they usually contain obstacles like power wires, ditches and fences. The student must then take action to: 1. Find a ram-air runway (long/narrow clear area) free of obstacles. 2. Face into the wind and land. In the event of an off-DZ landing, walk to the nearest road with the gear. Wait for help or a pick up vehicle, or start walking slowly in the direction of the DZ. Take care to avoid damage to crops, close gates and be polite to neighbours’, even if they are not. Reserve Canopy Landing If landing under your reserve (round), prepare for a proper parachute landing fall (PLF). You must then take action to: • face into the wind, or slightly cross wind (accents rolling to the side) • place feet and knees together, knees slightly bent, 45 degree angle • jam chin tight to chest • leg muscles should be tensed, but not rigid • arms should be up along the risers, elbows pressed forward and together • eyes must look at the horizon (not down at the ground) • on contact with the ground, you should fall and roll, absorbing the impact with (in order): the balls
of the feet, the side of the calf, the side of the thigh and butt, and diagonally across the back, with legs in a pike or tucked position swinging across to finish on the opposite side of first contact
4.1.10 Technical Knowledge for the Student The "Basic" items of Technical Knowledge are listed below: Part A: Theoretical Model
• theoretical model for spotting: reference PIM 2A page 15 • theoretical model for freefall control: reference PIM 2A page 29 • the mathematics of freefall: reference PIM 2A page 35 • theoretical model for canopy flight: reference PIM 2A page 44
Part B: Unusual Situations
• problems in the aircraft: reference PIM 2A page 19 • problems under canopy: reference PIM 2A page 50

Page 114 of 138 4.1 Student Supervision — Unusual Situations
©Canadian Sport Parachuting Association, 2009
• problems on the ground: reference PIM 2A page 54 • problems in freefall: reference PIM 2A page 37
4.2 Aircraft Emergencies -- Unusual In-flight Situations Page 115 of 138
©Canadian Sport Parachuting Association, 2009
4.2 Aircraft Emergencies -- Unusual In-flight Situations Aircraft Related In dealing with aircraft emergencies, there can be many variations in the severity of the situation. This makes it difficult to present answers to all of them. As a JM, you should always remember that the pilot is in command of the aircraft. Prior to taking any action you should check with them first. If you are suspicious that the pilot has a problem, it does not hurt to ask them if there is a problem or if they would like you to leave. The pilots can sometimes become quite preoccupied with the problem at hand and forget about the jumpers on board. The decision process followed is: • below 1500’, land with the aircraft; • between 1500’ and 2500’, dispatch the students while advising them to use their reserves; • above 2500’, dispatch the students on their main parachutes. These guidelines should be followed unless extreme (*) circumstances dictate another course of action. In every case, you must be conscious of the local terrain. While in the prairies, the ground is relatively flat and there is not much water. Elsewhere in Canada and in other countries, the presence of a hill, mountain or a large lake below can alter your actual height above the ground and/or the minimum safe altitude from which you can make a jump. Why these altitudes? 1500’ is the lowest altitude for a student emergency for a couple of reasons. Students will react slower than experienced jumpers in the situation and thus need more time (more altitude), and the AAD needs time to save them. A reasonable estimate of reserve inflation altitude required if activated by the AAD is 1000 ft. Student attains at least 45 fps down for AAD to activate and reserve to fire -500 ft Reserve inflation at sub-terminal - 500 ft This does not include any room for errors. Needless to say, an altitude of 1500 ft would at least give the student an opportunity to steer their reserve into a clear landing area. In cases where the aircraft either aborts takeoff or needs to make an emergency landing shortly after takeoff, the C of G becomes very critical in order for the pilot to maintain control of the aircraft. This is why it is advisable that for takeoff and the initial climb, everyone is either seated or is kneeling flat on the floor. There should be no standing on knees and leaning forward as this causes a severe shift in the C of G when “brace” or “crash” positions are called for. A rare exception to this situation would be a tail dragger jump plane, running out of a rough, short strip. Aborted Take-off If the pilot decides to abort the take-off, the only warnings may be the reduced engine power and rapid de-acceleration. Issue the command “Emergency Brace Position” or “Crash Positions”. After the aircraft stops take directions from the pilot. Stand by to issue the command “Get Out” and assist everyone to get out as quickly as possible. Engine Failure on Take-off Again, there is little time or altitude to do anything. Take directions from the pilot. Brace position for everyone. Evacuation of the aircraft is necessary after the off-field landing. Do not stay in the plane! Engine Failure at 1500’ or Below

Page 116 of 138 4.2 Aircraft Emergencies -- Unusual In-flight Situations
©Canadian Sport Parachuting Association, 2009
Engine failure results in an initial rapid loss of altitude. Quickly check your altitude and check with the pilot to verify the problem. Issue the command “Emergency, Brace Position”. All will remain on board. Engine Failure Below 2500’ but above 1500’ Quickly check your altitude, look out to check the terrain and check with the pilot to verify the problem. If the pilot agrees on evacuation, then you must issue the command "Emergency, Reserve... GO!" IAD and freefall students exit on their reserves and SL students will go using their mains if they are hooked up (reserves if they are not). The student will immediately put their left hand in the reserve handle, make their way to and out the door. They will pull the reserve upon clearing the aircraft. The JM makes sure that the student has the left hand in the reserve handle prior to launching. Continue dispatching on the reserves all the way down until 1500’. At that time all remaining will be ordered to stay on board. Seat belts on and prepare for landing. Engine Failure at Altitude above 2500’ IAD, freefall and SL students will exit using their mains. Quickly check your altitude, look out to check the terrain and check with the pilot to verify the problem. If the pilot agrees on evacuation, then you must issue the command "Emergency, Main Parachute, Door” When the student stops at the door, extract their pilot chute and tell them to “GO!” The student should hop out facing the tail of the aircraft tucked into a ball. You will short-line them. Fifteen second delay students and above will pull their own main immediately after exiting. Continue dispatching on the main parachute all the way down until 2500’. At that point, command to switch to reserves. Structural Failure * (collisions, loss of control surfaces) As a safe landing is unlikely, an emergency bailout is called for, as above, but at almost any altitude. Control Problems * If the pilot experiences control failures, they will likely advise an evacuation. Loss of control, on the other hand, may be their fault, but may be correctable. Two possibilities are a stall (stall warning, shuddering, nose snapping downward) and a spin (stall, rapid downward rotation). If sufficient altitude remains, the pilot can regain control. Evacuation under these circumstances is not advisable, may not even be possible if centrifugal forces prevent movement to the door.

Appendix Page 117 of 138
©Canadian Sport Parachuting Association, 2009
4.3 Accidents and Safety Routines Accident Investigation Accident investigation is an ongoing voluntary process of the members and officers of the CSPA in an effort to monitor and improve the level of safety in the sport of parachuting. Accident reports are provided to the National Office for their informational value. These reports are confidential to the Association; their distribution is restricted to the Investigating Officer, the Coaching Working Committee, the Board of Directors and the Technical and Safety Committee. A summary of each accident report can be circulated within the skydiving community for its information and prevention value. Primary Investigation: Complete AIM Form (F109) The report should be completed within 48 hours after the event and arrive at CSPA within seven days. Limit the content to statement of the facts, avoiding opinions. Personal Data: name, address, age, experience, etc. Equipment Data: specifics of all equipment, including protective clothing. Details of event: activities (planned and actual), date, time, weather conditions, other participants,
pilot, including individual's statement. Background data such as prior experience and training. Summary: list the known facts in sequence of the event, use a timeline; avoid conjecture and
placement of fault. Is further investigation warranted? The assistance of CSPA's TSC and CWC is obtained by requesting secondary investigation in the space adjacent to the Investigating Officer's signature. Secondary Investigation This level of investigation is conducted in the case of a serious or fatal accident or request by the DZ or involved individual. Collect statements from witness: those in the aircraft, on the ground, pilot and friends. (Note: Ask for
observations; do not encourage speculation as to the cause of accident.) Separate witnesses to prevent them from talking it over.
Interview the individual (if possible) for statement. Take photos of the site and equipment in an undisturbed condition if possible (100 plus). Police take
equipment. Obtain statements/background from DZ Instructors, Staff, and experienced jumpers. Contact family to obtain their comments and questions after police. Prepare a report for review by CSPA's TSC. It should be restricted to detailed description of the
equipment and events plus a summary of facts. Individual statements, copies of documents, equipment inspection reports and equipment service records should be included as appendices. Personal comments and conjecture, if any, should be submitted on a separate page.
Contact the Chair of the TSC or the Chair of the CWC for assistance and to arrange for an impartial investigation where necessary.
Fatality / Serious Injury JM immediate role – if senior instructor: Take charge of the situation. Do not touch anything. Administer first aid if required. Call 911. Ask for ambulance. Ask for police too if fatality. Send a first aid person to the scene. Call DZ Operator or the senior instructor on duty.

Page 118 of 138 Jump Master Reference Manual
©Canadian Sport Parachuting Association, 2009
Crowd control - assign others to do this. Do not let witnesses leave. Separate them from the crowd and each other. Brief the situation to the DZ Operator or the senior instructor when they arrive. Hand over situation to the DZ Operator or the senior instructor but remain on site as available
assistance. On the next page is a sample AIM report. For the true version, please obtain a form from the CSPA office.

Appendix Page 119 of 138
©Canadian Sport Parachuting Association, 2009

Page 120 of 138 Jump Master Reference Manual
©Canadian Sport Parachuting Association, 2009
Summary In this chapter we have looked at the role of a Jump Master and their responsibility toward the student and toward CSPA in dealing with unusual situations. Review Questions
Appendix

Appendix Page 121 of 138
©Canadian Sport Parachuting Association, 2009
Appendix - IAD Dispatching Techniques for Specific Aircraft The technique of IAD Dynamic and IAD Hanging will be discussed here with referenced to the following aircraft; C-180 and C-185, C-182 and C-206P from front (under wing) right door and a C-206U (cargo) from the rear door. Both the sequence of the Student and Jump Master actions appears. Student exit techniques: There are two variables in the selection of an IAD exit technique. These are: 1. aircraft type (i.e. Cessna 180, 182 or 206) 2. exit technique (dynamic or hanging) The below-mentioned exits are recommended when utilizing the Instructor Assisted Deployment method. These are the only exits that are recommended.
IAD – Flying or Hanging - C-182 Type (C-205P / C-206P) The scene: 1. The aircraft door is open. 2. The JM is on their knees, facing the back of the aircraft, sitting beside the pilot. 3. JM should have their LEFT leg hanging outside the open door prior to the student’s climb-out to provide
balance for the JM and to ensure that close proximity is maintained with the student as they prepare for the hanging exit position.
4. The student is on their knees, facing forward and directly in front of the JM, both hands in their lap. 5. The JM is holding the pilot chute and bridle in an "S" folded configuration on the student’s left hip (right-
hand hold), with only enough slack in the bridle to prevent tension on the main release pin (excess bridle routed and hidden underneath bottom flaps of container, nothing is exposed to the wind).
6. The aircraft is approaching the exit point. The exit speed should be kept steady at minimum 78 mph The Student The JM • • Gives the "Climb out" command. • On the command "Climb out", • Grips the door frame front and back while
turning the body slightly outwards. Right hand grip is outward (knuckles to outside) and left is inward (knuckles outside, thumbs down).
• Has pilot chute "S" folded on students’ left-side adjuster.
• Left hand covers chest to protect handles • Give room for student to exit, being aware of
the aircraft instruments behind the JM • Extends the right leg out the door, sliding their
foot down to the step on the wheel strut or brake.
• Assists student's climb out with a right-hand grip on the student's harness. The JM remains close to the student while controlling the pilot chute. Harness grip must be maintained.
• Transfers their full weight on to the right foot, which is still on the wheel strut, and reaches for the wing strut with their LEFT hand (closest to the strut), gripping it near the aircraft as is comfortable (approximately 18”).
• Using the Left hand, student starts to pull their body up onto their right leg and out the door.
• The student’s body cuts through the air at this point.
• Assist student to get their LEFT hand on the wing strut by pulling the torso outwards and towards the strut using the right hand, maintaining constant hold on the PC and harness.
• Once the student has a grip, the JM can drop the assisting Left-hand grip and take a steadying grip on the strut with their left hand.
• JM should slide their left foot down the wheel strut behind the student’s right foot and finish with their left foot up against the wheel and transfer their weight onto this foot for balance as the student climbs out further.
• The right grip on the door frame has been dropped and is placed as high up/far up the strut as comfortable.
• Now brings their left foot in FRONT (cross

Page 122 of 138 Jump Master Reference Manual
©Canadian Sport Parachuting Association, 2009
over) past the right foot and steps on the wheel, or
• Shuffle feet side-by-side • Transfers all their weight onto the left leg and
brings the right foot behind the left to hang past the wheel.
• If the JM has not already placed left foot in a solid place, they should now place it on the step or in the wheel brake as the student leaves it.
• While still standing on the wheel/step, slide the hand grips further out towards the end of the wing strut. The placement of the LEFT hand must be beyond the outer edge of the wheel with the right hand being placed as far outwards on the strut as possible. The arms are flexed using upper body strength in anticipation to support their body weight. (Put tape marks on the strut.)
• Moving with the student the JM also slides his left hand up the wing strut and maintains his grip on the student
• As the weight is taken by the arms/chest, the right leg is brought out to hang and the left foot is drawn sideways off the step.
• Arms are then extended, gently lowering the student to the hanging position. They should hang already in the arch position, legs straight, toes pointed, head back eyes looking Up.
• Head is turned to the left to make eye contact with the JM.
• Communication is applied at this time. • Check the legs for width and provide a signal to
widen legs (show two fingers in a "V" shape) • Another is to get the jumper's attention by
saying “look up” or by pulling their chin up.
• On eye contact, student responds to signals given by the JM.
• Snap arms to the X-Man (hard arch) position, the body is arched with the arms extended wide, punching the hips forward hard. The legs should already be in a fully spread arched position which is maintained following release.
• Gives the command "Go". • Dispatch’s the pilot chute AFTER hands have
released the strut.
• JM sits down on the door edge, rotates, then comes back inside.
• Blocks door by moving to the tail. • Pilot closes the door behind him. • Smile! • Next student.

Appendix Page 123 of 138
©Canadian Sport Parachuting Association, 2009
Climb-out Procedure – Hanging Exit C182
Door Frame
Grip the door frame with thumbs down while turning the body slightly outwards (about 45°), Hips forward over the knees, and Knees at the edge of the door frame.
Right Foot
Extend Right Foot down along the front of the strut, and Keeping toes pointed forward makes it easier to control the leg in the airflow.
Left Hand
Transfer weight fully on to the Right Foot, Reach for the wing strut with the Left Hand, The grip should be about 18” from the body of the aircraft or whichever is comfortable, and Align the left shoulder over the Left Hand to lessen the strain on the upper body.

Page 124 of 138 Jump Master Reference Manual
©Canadian Sport Parachuting Association, 2009
Right Hand
The Right Hand is dropped from the door frame and grips the wing strut about shoulder width apart, Again align the right shoulder over the Right Hand, and Rely on the strength of the legs to maintain balance in the airflow.
Left Foot
The Left Foot crosses in front of the Right Foot and placed on the step or wheel.
Slide, Slide
Slide the hands along the strut about shoulder width apart without letting go, and Keeping feet still helps maintain balance and stability.

Appendix Page 125 of 138
©Canadian Sport Parachuting Association, 2009
Step Off Gently step off the strut/wheel and hang with full arm extension, and
Hips pushed forward looking at the Jump Master

Page 126 of 138 Jump Master Reference Manual
©Canadian Sport Parachuting Association, 2009
IAD - Dynamic - C-182 Type (C-205 / C-206P) Knuckles outside aircraft! The scene: • The aircraft door is open. • The JM is on their knees facing the tail of the aircraft. • The student is on their knees, facing and directly in front of the JM. • The JM holds the pilot chute and bridle in an "S" folded configuration on the student’s left shoulder, with
only enough slack in the bridle to prevent tension on the main release pin. • The aircraft is approaching the exit point. • The exit speed should be kept at 78+ mph or more The Student The JM • On the command "Get Ready". • Gives the "Get Ready" command. • Turns and grips the door frame, facing outward
with hands about shoulder level and knuckles toward the inside of the aircraft.
• Is holding the pilot chute on the student’s shoulder which is now directly in front of the JM's chest. The right hand is gripping the students harness with pilot chute. The JM’s left hand is free to assist the student to get the left hand grip on the strut.
• Leans out the door and places the toe or ball of their left foot on the wheel strut step.
• Reaches out with their left hand and grips the wing strut as far out as comfortable.
• Assisting grip is maintained until the student has a grip on the strut, then the JM's left hand can be transferred to the door frame to steady themselves.
• With the left foot on the step and left hand on the strut, bring the right foot forward and place it in the upper rear corner of the door. The right hand remains gripping the rear door frame.
• Maintain close proximity to the student, keeping the pilot chute on the student’s shoulder. A light grip should be taken with the thumb (or a finger) of the pilot chute hand on the left shoulder strap or yoke.
• The student should look back over their
shoulder, making eye contact with the JM. The student should try and square their upper body off into the direction of flight (wind) as much as possible. If balanced, the student’s right hand grip may be released allowing a more squared off position.
• Ensure left hand on bottom of door frame to support body for the toss
• On eye contact, student should respond (nod) to signals given by the JM.
• To launch, the student uses their legs to propel themselves towards the wing tip. As the body extends towards the wing tip the torso and hips are extended forward into the arch position.
• Then stepping lightly off of the step while reaching for the wingtip and looking up.
• Following release the body should continue through to a full arch position (fully stretched, positive curve and relaxed).
• The exit motion should be all sideways (to the wing tip). The exit should not be done with any backwards push.
• Give command to "Go". Follow the student’s body down below the aircraft. Follow the student down as far as the step to ensure adequate depth. It is more important to get the pilot chute down as far as possible on a C-182.
Climb-out Procedure – Dynamic Exit C182

Appendix Page 127 of 138
©Canadian Sport Parachuting Association, 2009
Door Frame
Grip the door frame with thumbs down while turning the body slightly outwards. Knuckles outside aircraft! Lean out the door. Left foot on step.
Left Hand
Reach out with left hand and grip the wing strut.
Right Foot
Bring the right foot forward and place it in the lower rear corner of the door. Look back, make eye contact with JM.

Page 128 of 138 Jump Master Reference Manual
©Canadian Sport Parachuting Association, 2009
Launch
Use both legs to propel towards the wing tip. No backwards motion, only to the side.
Arch
The torso and hips are extended forward into the arch position.

Appendix Page 129 of 138
©Canadian Sport Parachuting Association, 2009
IAD - Dynamic - C- 206U (cargo right rear door) The scene: 3. The JM is on their knees in the back of the aircraft facing forward. 4. The student is on their knees, facing and directly in front of the JM. 5. The JM is holding the pilot chute and bridle in an "S" folded configuration on the student’s left shoulder,
with only enough slack in the bridle to prevent tension on the main release pin. 6. The aircraft is approaching the exit point. 7. The exit speed should be kept steady at 78 mph and no slower The Student The JM • On the command "Get Ready". • Gives the "Get Ready" command. • Turns and grips the door frame, facing outward
with hands about shoulder level and knuckles toward the inside of the aircraft.
• Is holding the pilot chute on the student's shoulder which is now directly in front of the JM's chest. The left hand is gripping the student's harness to help assist them.
• Sits on doorway with feet dangling below the door.
• Left hand is placed on bottom edge of door right beside rear end. Right hand is placed midway up rear of door frame. Weight is transferred to left hand as body is squared off into the direction of flight.
• Assisting grip is maintained until the student has grips on both the door frame and floor.
• The student should square their upper body off into the direction of flight (wind) as much as possible. They should look back over their left shoulder to attain eye contact with the JM.
• On eye contact, the student should respond (nod) to signals given by the JM.
• Asking “Are you ready?” can provide communication.
• To launch, the student reaches their right hand outwards towards the wing tip, slides their hip off of the aircraft door sideways followed by a push off with the left hand. The hips are immediately brought forward into the arch position.
• Give command to "Go". • Follow the student’s body down below the
aircraft releasing the pilot chute well below the bottom edge of the door.
• Places their right foot in the lower, rear corner of the door. • Facing outward he grips the door frame, with hands about shoulder level and left hand knuckles in, right
hand knuckles toward the outside of the aircraft. • As student squares their upper body off into the direction of flight (wind), they place their left foot on the
step and drop right knee down outside the aircraft to help their body rotate to aircraft heading. They look back over their left shoulder to make eye contact with the JM.
• On eye contact student should respond (nod) to signals given by the JM. • To launch, the student lifts their weight off the floor and onto their left foot, reaches their right hand
outward to the wing tip and steps away from the aircraft. The hips are immediately brought forward into the arch position.

Page 130 of 138 Jump Master Reference Manual
©Canadian Sport Parachuting Association, 2009
Harness Grip Methods The recommended and desired grip on a student during climb out is at the hip. This method of holding on provides significant increase in control of the student’s speed and balance, as well as control of the body when stepping into the hanging position to prevent a 1-arm roll. It also places the hand lower in the air stream for placement of the pilot chute. However, there are a couple of circumstances where a shoulder grip may be preferred. C - 180 / 185 hanging - shoulder / yolk on the left side of the students’ container C - 182 / 206P hanging - hip / side harness on the left side of the students container With the C - 182 / 206P hanging exit, there are some situations where you would want to use the shoulder / yolk on the left side of the students’ container. If the student rig has an FXC AAD on the left side adjuster, the bridle is at risk of catching on the AAD, therefore it may be better to use the shoulder grip. If the aircraft door has no method of keeping it fully open, use the shoulder grip. When the student climbs out, the airflow is disturbed and the door comes down on the student’s rig, right around the reserve flaps. If the aircraft has a step that goes over the wheel, you may have to use the shoulder grip because the distance between the door and the step is shorter than without a step. When the student climbs out, there is risk of a door scrape on the student’s rig, right around the reserve flaps. In these cases the JM with the shoulder grip, moves their elbow over the reserve flap during the climb out thus protecting the rig from the rig scrap. The instructor’s head can be used to keep the door fully open; another good reason for wearing a helmet. Use caution that you do not pop the window out. C - 180 / 185 dynamic - shoulder / yolk on the left side of the students’ container C - 182 / 206P dynamic - shoulder / yolk on the left side of the students’ container C - 206C dynamic - shoulder / yolk on the left side of the students’ container

Appendix Page 131 of 138
©Canadian Sport Parachuting Association, 2009
Static Line (SL) Deployment - Direct Bag The system uses a Static Line attached from the aircraft down to the deployment bag containing the parachute. The SL and bag are one component and cannot be separated under normal operation. The SL is also used to close the container. The parachute is packed similar to a free bag reserve parachute. There is no pilot chute attached to the parachute. The system operates as follows: 1. The Jumper exits the aircraft using a poised, dynamic or hanging exit 2. the SL opens the container 3. the SL continues to pull the bag out of the container over the jumper’s shoulder 4. the lines un-stow as the jumper falls away 5. upon full line extension the canopy is pulled out from the bag (which detaches) and stretches
perpendicular to the relative wind 6. the canopy now blows back into the relative wind and inflation begins Advantages of this system are: 1. The possibility of deployment interference is reduced as the bag is attached to the SL and
aircraft. If the jumper grabs the bag it will be torn free as soon as the SL reaches full extension. 2. Severe malfunction rate is low. Disadvantages of this system are:
1. Deployment time is very short for training pulls, making them difficult for the student. 2. Line twists are very common. 3. The dynamic exit can cause the student to turn or roll, making presentation to the relative
wind very difficult for some. Exiting from a sitting position, particularly for light people, can be very difficult to control.
4. The deployment sequence is perpendicular to the relative wind creating an un-staged, non-pre-tensioned deployment (no guiding pilot chute). This situation creates a slightly higher malfunction rate of the canopies whether round or square due to "Sail Effect". The “Sail Effect” is a condition caused by the canopy being exposed to the relative wind in an unnatural direction with no protecting deployment device or pilot chute to at least guide the opening and provide pre-tension to the parachute assembly. As the canopy "sails" back into the relative wind it starts getting blown about and pre-inflating. This transfer into the proper airflow disturbs the order in which the canopy was packed and can create an off loaded opening. This unequal loading on a round or square can contribute to malfunctions. The malfunction rate is relatively low. However, line twists are very common.
SL preparation: Closed Door: SL preparation should be done prior to opening the door. Remove SL from the retainer, check the reserve pins, reroute the SL if necessary, check the main pin, route the SL over the students left shoulder. For the first student, start this as you climb through 2000’. Hold the SL so that your hand can close completely around it obtaining maximum control. Place that hand on the student’s shoulder while waiting to open the door.
Page 132 of 138 Jump Master Reference Manual
©Canadian Sport Parachuting Association, 2009
Open Door: If the door is open or the aircraft has no in-flight door, then move into the rear of the aircraft away from the door to prepare the SL. If there is a door, it should be closed during SL preparation to eliminate the possibility of a parachute going out the door.
Final Preparation and Dispatch Boarding the Aircraft- Conventional - attach the SL according to the DZ’s procedure. Prior to the door opening, the slack in the SL should be taken up in the right hand. As you gather up the SL, route it over the student’s shoulder. "S" fold the SL into the palm of the hand as opposed to around the hand. You want the SL to slide free of the hand if there is a premature exit rather than tighten around the hand pulling it down into the door frame. Assist exit: SL control: During the climb-out, keep the SL high above the shoulders and head. Allow slight slack to develop in the SL to prevent direct pressure on closing loops or pins. Do not, however, allow a large loop of slack to develop as it can interfere with the push-off by getting under the student's arm or create enough drag to catch the wind and prematurely open the container. Ensure that the SL is indeed clear. You must make sure that the SL does not start to slip from your hand nor your hand from their rig. Also be conscious of the amount of pressure that you may be exerting downward on the student as they try to get out and you are trying to keep your balance. You are there to assist them climb-out to the set-up position, not push them off of the aircraft. When the student is set-up, eye contact has been made and you are over the spot give the command to "Go".
2.9.3 Deployment System Control For Static Line dispatch method: As the student clears the aircraft, allow the SL to play out. If instability occurs, short line the student by tightening the SL. Once the SL opens the container, allow it to extend fully to normal length. If this is not done, the canopy may be released from the bag too close to the aircraft, thereby risking an entanglement with the tail section. Following the jump, pull in the SL, disconnect it from the attachment point and stow it away. Disconnect only after all SL students have been dispatched (to avoid you mistakenly disconnecting a student who is yet to jump)!
Go • over the spot, give them the command and watch their actions carefully • as the student clears the aircraft, allow the SL to pay out • if they are unstable, pull the SL in to release and open the container • ensure that the deployment device is lifting clear from the student's body • let the SL out to its full length for extension and release of the canopy After Go • pull in the bridle; Keep the SL connector attached and tuck the storage bag aside or under
the floor mat • close the door, smile and be positive for the next student
Make sure that the Static Line is fastened to the aircraft fuselage and NOT fastened to the pilot seat.

Appendix Page 133 of 138
©Canadian Sport Parachuting Association, 2009
• work with your next student, ensure that they are physically and mentally ready observe flight of your student's canopy to verify the accuracy of your spot
Unusual Situations: Student Static Line Hang-up: Conscious Look to see if your student has recognized the situation and has placed both hands on their head as a sign that they are prepared to go to emergency procedures; if they are looking at you but not acting, put your hands on your head to see if they will recall and start the procedure. The hands on the head also keeps their hands away from their emergency handle to help avoid a premature activation. If they initiate this step, grasp and show them the knife that will be used to cut the SL. When they have grabbed their reserve ripcord in their left hand and given you the thumbs-up with their right hand, cut the SL and observe their actions. Student Static Line Hang-up: Unconscious If they fail to respond by placing both hands on their head, put your hands on your head to see if they will recall and start the procedure. Advise the pilot, asking them to climb and circle the spot. If there is another jumper on the aircraft, give them the knife. After which you can climb down the SL, get a firm grip on the student, preferably through the main lift web, give the thumbs-up signal to the jumper in the aircraft to cut the SL, then activate the reserve and release the student. Check that you are clear from them and deploy your main. You should follow them down, if above, or proceed to where they are headed, if your canopy is descending more quickly. If there are no other jumpers on the aircraft, take the knife with you, climb down the SL, get a firm grip on the student, preferably through the main lift web, then cut the SL, activate the reserve and release the student. Check that you are clear from them and deploy your main. You should follow them down under canopy, if you are above them, or proceed to where they are headed if your canopy is descending more quickly.

Page 134 of 138 Jump Master Reference Manual
©Canadian Sport Parachuting Association, 2009
SL Dispatching Techniques for Specific Aircraft
SL - Poised - C-182 Type (C-205 / C-206P) The scene: • The aircraft door is open. • The JM is on their knees, facing the tail of the aircraft. • The student is on their knees, facing and directly in front of the JM. • The JM holds the SL in an "S" folded configuration on the student’s left shoulder, with only enough slack in
the bridle to prevent tension on the main release pin (or other attachment method). • The aircraft is approaching the exit point. • The exit speed should be 78+ mph or more. The Student The JM • On the command “Get Ready”. • Gives the “Get Ready” command. • They turn and grip the door frame, facing
outward with hands about shoulder level and knuckles toward the outside of the aircraft.
•
• Places the toe or ball of their left foot on the step.
•
• Reaches out with their left hand and grips the wing strut approximately 18" from the aircraft. A tall student may take the grip a little further out.
•
• Reaches out with the right hand, griping the strut further out from the aircraft.
•
• With the left foot on the step and both hands on the strut, bring the right leg out to place the foot on the step just at its outer end.
•
• The body should be positioned with the head and upper chest over top of the strut, head looking back into the doorway for your signal.
•
• Note: The remainder of the steps are as per SL in C-180, below.
•
SL - Poised - C-180 Type (C-185) The scene is the same as for the C-182 Type. The Student The JM • On the command “Get Ready”. • Gives the “Get Ready” command. • They turn and grip the door frame, facing
outward with hands about shoulder level and knuckles toward the outside of the aircraft.
•
• Places the toe or ball of their left foot on the step.
•
• Reaches out with their left hand and grips the wing strut approximately 18" from the aircraft. A tall student may take the grip a little further out.
•
• Reaches out with the right hand, griping the strut further out from the aircraft.
•
• With the left foot on the step and both hands on the strut, bring the right leg out to trail in the airflow (or with a jump step, to place the foot on the step just at its outer end).
•
• The body should be positioned with the head •

Appendix Page 135 of 138
©Canadian Sport Parachuting Association, 2009
and upper chest over top of the strut, head looking back into the doorway for your signal.
• This provides the student with a balanced position into the wind. The student should then look back over their left shoulder making eye contact with the JM. The student should square their upper body into the direction of flight (wind) as much as possible.
•
• On eye contact, the student should respond (nod) to signals given by the JM.
•
• To launch, the student leans forward slightly shifting more of their weight onto their hands and kicks their left foot (or both feet) out behind.
•
• Then they push back with both arms, allowing the arms to extend fully rising above shoulder level (as his body begins to fall). As the body is spread out the torso or hips are extended forward approaching the arch position.
•
• Following release the body should continue through to a full arch position (fully stretched and slightly relaxed).
•
• The exit motion should be both backward from the strut and away from the aircraft (to the student's right).
•
• The exit should be done with only a gentle backwards push.
•
SL - Dynamic - C-206U (right rear door) The scene: • The aircraft door is open. • The JM is at the back of the aircraft, on their knees facing forward. • Prior to the exit, the student is seated, facing and directly in front of the JM. • The JM holds the SL in an "S" folded configuration on the student’s left shoulder, with only enough slack in
the bridle to prevent tension on the main release pin (or other attachment method). • The aircraft is approaching the exit point. • The exit speed should be 78+ mph or more. The Student The JM • On the command “Get Ready”. • Gives the “Get Ready” command. • Places their right foot in the lower, rear corner
of the door. •
• Facing outward they grip the door frame, with hands about shoulder level and left hand knuckles in, right hand knuckles toward the outside of the aircraft.
•
• As student squares their upper body off into the direction of flight (wind), they place their left foot on the step and drop right knee down outside the aircraft to help their body rotate to aircraft heading. They look back over their left
•

Page 136 of 138 Jump Master Reference Manual
©Canadian Sport Parachuting Association, 2009
shoulder to make eye contact with the JM. • On eye contact student should respond (nod)
to signals given by the JM. •
• To launch, the student lifts their weight off the floor and onto their left foot, reaches their right hand outward to the wing tip and steps away from the aircraft. The hips are immediately brought forward into the arch position.
• For the seated exit the student facing the rear of the plane and the JM on the command “Get in the door” will place their left hand on the floor with knuckles facing out of the plane and their right hand on the back of the door with knuckles face out of the plane, then bring their legs out of the plane turning their body to face the front of the plane. Keeping their knees together and bringing their butts as far out of the plane as possible keeping in control not to fall out, they look up wait for the JM to give the command “get ready, Go the student will then throw their right hand and leg out towards the tip of the wing while pushing off the plane with their left hand and arching.
•
SL - Hanging - C-180 Type (C-185) The scene is the same as for the C-182 Type. The Student The JM • On the command “Get Ready”. • Gives the “Get Ready” command. • They turn and grip the door frame, facing
outward with hands about shoulder level and knuckles toward the outside of the aircraft.
•
• Leans out the door, placing their left foot on the step.
•
• Reaches out with their left hand and grips the wing strut approximately 18" from the aircraft. A tall student may take the grip a little further out.
•
• With the left foot on the step and left hand on the strut, bring the right hand forward to grip the strut as the left leg is extended. The right hand should be placed as far out the strut as comfortable so as not to slip while the body weight is transferred; the right leg is brought out to hang.
•
• The torso is then lowered, transferring the body’s weight to the arms; the forearms are held flexed allowing the body weight to be born by the chest muscles.
•
• As the weight is taken by the upper body and the left foot is drawn sideways off the step.
•
• Arms are then extended, lowering the student to the hanging position.
•
• This provides the student with a balanced position into the wind. The student should then
•

Appendix Page 137 of 138
©Canadian Sport Parachuting Association, 2009
look back over their left shoulder making eye contact with the JM. The student has squared their upper body into the direction of flight (wind).
• Head is turned to the left to make eye contact with the JM.
•
• On eye contact, student responds to signals given by the JM.
•
• As grips are released, the body is arched with the arms extended wide, punching forward the chest and hips. The legs should already be in a fully spread arched position which is maintained following release.
•
• Following release the body should continue through to a full arch position (fully stretched and slightly relaxed).
•

Page 138 of 138 Jump Master Reference Manual
©Canadian Sport Parachuting Association, 2009
2. Appendix - JM Reference Manual Change Log Apr 24 –Section 1.2 Page 14 added to pages showing JM ratings Page 95, PAF plan for practice pilot chute toss for first free fall 17-Jun-08: edited general paragraphs, text to be less wordy, shorten descriptions where redundant phrasing. 25-Jun-08: fixed header descriptions to match sections 12-Sep-08: review edits from Tony Mercer 2-Nov-08: final edits by Scott before review by CWC 24-Jan-10 (SM): Removed references to IB, Instructor B, IA, Instructor A, CA, Certificate Administrator, LE, Logbook Examiner Last Saved: 24/01/2010 4:19:00 PM