Embed Size (px)
Citation preview

JULIET PRO Version 1.4 10/07/2016
INSTALLING WORDPRESS DOWNLOADING THE THEME INSTALLING THE THEME
Using the Administration Panel Using cPanel Manually Using FTP
UPGRADING FROM THE FREE VERSION UPDATING THE THEME INSTALLING DEMO DATA SOCIAL MEDIA MENU / ICONS MAIN MENU / HEADER MENU TOP LEFT MENU SITE IDENTITY - LOGO AND TAGLINE OFF CANVAS MENU FANCY SCROLL BAR STICKY NAVIGATION STICKY POSTS FRONT PAGE - SLIDESHOW / BANNER
Front Page Banner Front Page Posts Slider Front Page Custom Slider A Note On Slider Types
FRONT PAGE - FEATURED LINKS/PAGES FRONT PAGE - FEATURED POSTS FRONT PAGE - BLOG FEED FRONT PAGE - LARGE / HIGHLIGHT POST FRONT PAGE - FOCUS POSTS / MORE POSTS BLOG FEED
Layout More Options
POSTS Related Posts
PAGES CUSTOM TYPOGRAPHY CUSTOM COLORS AD OPTIONS ADVANCED SIDEBAR WIDGETS FOOTER
Copyright Message

JULIET PRO
Footer Widgets LOOKBOOK/INDEX TEMPLATE JETPACK SHARING INTEGRATION WP INSTAGRAM WIDGET INTEGRATION MAILPOET NEWSLETTERS INTEGRATION RECENT POSTS WIDGET WITH THUMBNAILS INTEGRATION
INSTALLING WORDPRESS
This documentation assumes that you have Wordpress installed. You would either be installing
WordPress on your computer (localhost) or on a hosting account. Please refer to the following
links for any help regarding the installation:
● https://codex.wordpress.org/Installing_WordPress
● https://codex.wordpress.org/Installing_WordPress_in_Your_Language
● http://www.wpbeginner.com/how-to-install-wordpress/
● https://www.siteground.com/tutorials/wordpress/wordpress-installation.htm
DOWNLOADING THE THEME
Please log into https://www.lyrathemes.com/my-account and download the theme. It will come
as a zip file called juliet-pro.zip. Store it on your computer. If you extract the zip file, it will
create a folder called juliet.
INSTALLING THE THEME
The theme you just purchased comes as a zip file. See below for some ways you can install your
new theme - they are listed easiest-first!
2
JULIET PRO
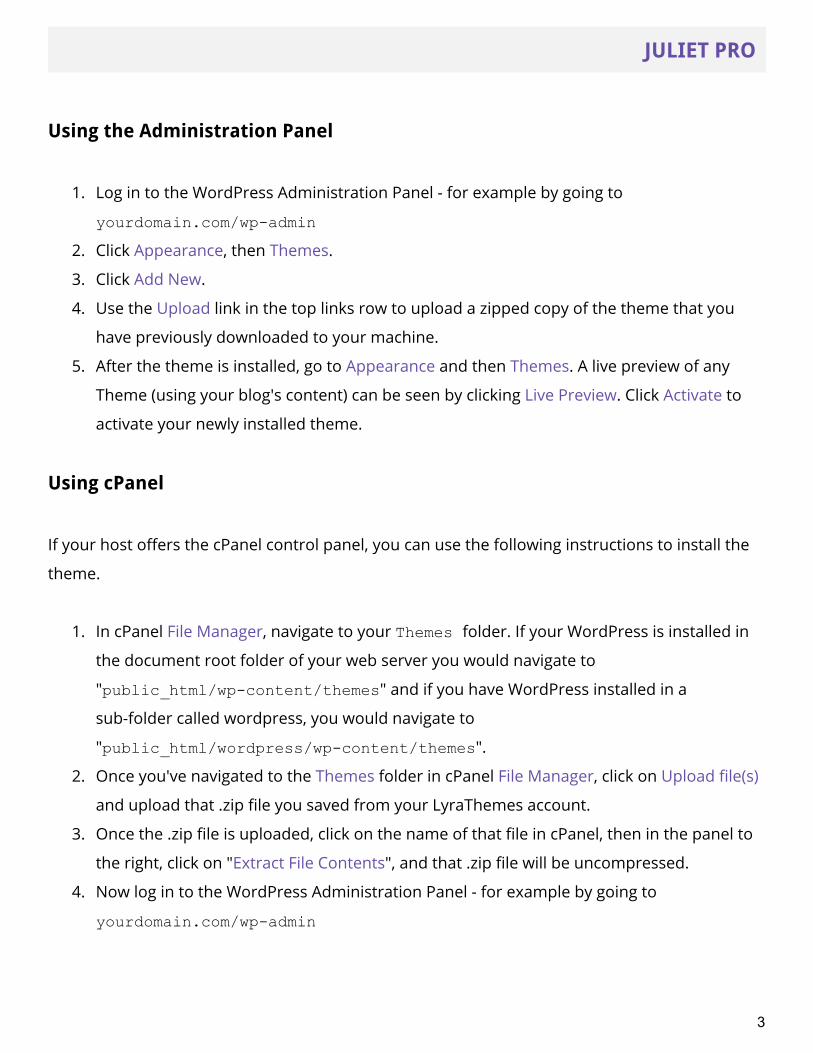
Using the Administration Panel
1. Log in to the WordPress Administration Panel - for example by going to
yourdomain.com/wp-admin
2. Click Appearance, then Themes.
3. Click Add New.
4. Use the Upload link in the top links row to upload a zipped copy of the theme that you
have previously downloaded to your machine.
5. After the theme is installed, go to Appearance and then Themes. A live preview of any
Theme (using your blog's content) can be seen by clicking Live Preview. Click Activate to
activate your newly installed theme.
Using cPanel
If your host offers the cPanel control panel, you can use the following instructions to install the
theme.
1. In cPanel File Manager, navigate to your Themes folder. If your WordPress is installed in
the document root folder of your web server you would navigate to
"public_html/wp-content/themes" and if you have WordPress installed in a
sub-folder called wordpress, you would navigate to
"public_html/wordpress/wp-content/themes".
2. Once you've navigated to the Themes folder in cPanel File Manager, click on Upload file(s)
and upload that .zip file you saved from your LyraThemes account.
3. Once the .zip file is uploaded, click on the name of that file in cPanel, then in the panel to
the right, click on "Extract File Contents", and that .zip file will be uncompressed.
4. Now log in to the WordPress Administration Panel - for example by going to
yourdomain.com/wp-admin
3

JULIET PRO
5. Go to Appearance and then Themes. A live preview of any Theme (using your blog's
content) can be seen by clicking Live Preview. Click Activate to activate your newly installed
theme.
Manually Using FTP
You would need an FTP client in order to install the theme via FTP. FileZilla is a free FTP solution
that can be downloaded from https://filezilla-project.org/.
1. Extract the zip file for the theme that you downloaded from your LyraThemes account.
This will create a folder containing all the theme files on your computer.
2. Use your FTP client to connect to your web hosting server. You will need the server
address (such as ftp.yourdomain.com), a username and a password.
3. If your WordPress is installed in the document root folder of your web server you would
navigate to "public_html/wp-content/themes" and if you have WordPress installed in
a sub-folder called wordpress, you would navigate to
"public_html/wordpress/wp-content/themes".
4. Upload the theme folder into the wp-content/themes folder. So your newly uploaded
theme would be in wp-content/themes/juliet.
5. Go to Appearance and then Themes. A live preview of any Theme (using your blog's
content) can be seen by clicking Live Preview. Click Activate to activate your newly installed
theme.
UPGRADING FROM THE FREE VERSION
Please read this section carefully if you are upgrading from the free version Juliet.
4
JULIET PRO
● In order to keep the settings from your free version, make sure that the folder name for
the free version and the pro version are the same. We have made sure of this in our
theme package - but please double-check.
● If your free theme is installed in a folder wp-content/themes/juliet then you should
upload the files from the pro package juliet-pro.zip into the same folder.
● If you are uploading the pro theme using FTP, simply overwrite the old free theme folder
with the folder from the new pro package.
Tip: We recommend backing up all files and the database before performing the theme
upgrade.
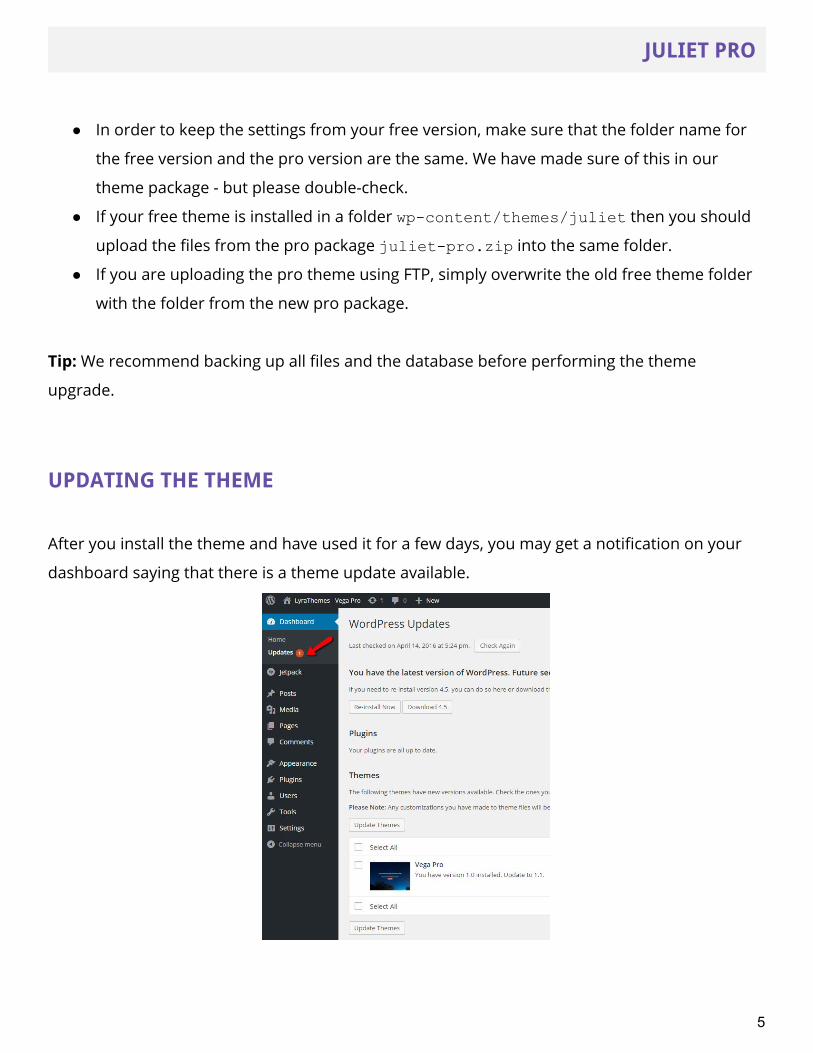
UPDATING THE THEME
After you install the theme and have used it for a few days, you may get a notification on your
dashboard saying that there is a theme update available.
5

JULIET PRO
That will happen whenever we make changes, updates, and fixes to the theme. It is best to
update your theme as soon as possible after you see the update notification. The theme will
not update automatically if you check the theme name and click “Update Themes”. Go to
Appearance > Themes to view the theme update details.
Follow these instructions to update the theme:
1. Download the latest version of the theme by logging into your LyraThemes account. It will
come as a zip file called juliet-pro.zip. Store it on your computer. If you extract the
zip file, it will create a folder called juliet.
2. Use your FTP client to connect to your web hosting server. If your host offers the cPanel
control panel, you can access the File Manager. If your WordPress is installed in the
document root folder of your web server you would navigate to
"public_html/wp-content/themes" and if you have WordPress installed in a
sub-folder called wordpress, you would navigate to
"public_html/wordpress/wp-content/themes".
3. You should see the current theme folder called juliet here.
6

JULIET PRO
4. You can either delete this folder (please make a backup!) or rename it to something else
like juliet-old.
5. After deleting or renaming the old theme folder, simply upload the latest theme folder
(newly downloaded and extracted on your computer) into the wp-content/themes folder.
So your newly uploaded theme would be in wp-content/themes/juliet.
Read More: Here is a tutorial that gives more information on this topic
https://premium.wpmudev.org/blog/upgrade-wordpress-themes-even-if-they-are-customized/
INSTALLING DEMO DATA
Here is how you can install the data and settings shown on our demo site at
http://www.lyrathemes.com/preview/?theme=juliet-pro.
1. Download the demo data from
https://www.lyrathemes.com/sample-data/juliet-pro-sample-data.zip.
2. You will have two files in the zip file: julietpro.wordpress.*.xml and
juliet-pro-export.dat. The XML provides the WordPress import data (all posts,
pages, menus, etc.) and the DAT file gives you a way to import our Customize settings.
3. Now go to Tools > Import and click on WordPress. Read more about this here
https://codex.wordpress.org/Importing_Content#WordPress Import the XML file from the
zip file you just downloaded.
4. Next, you will need to install and activate this plugin:
https://wordpress.org/plugins/customizer-export-import/
5. Go to Appearance > Customize. Scroll down to the last option called Export/Import. Now
import the DAT file here.
6. Go to Appearance > Menus or go to the Menus section in the Customizer. Here you need
to assign the “Main” menu to the “Main Menu” and the “Off Canvas Menu” locations.
7

JULIET PRO
SOCIAL MEDIA MENU / ICONS
Appearance > Menus
If you want to show a list of your social media icons, start at Appearance > Menus. Create a new
menu called “Social”. Please note, the name “Social” is important. It has to be exactly the same
spelling, nothing more or less.
8

JULIET PRO
Now enter each of your social media URLs as a “Custom Link”. You can enter whatever you like
for the Link Text . It will be automatically replaced by the relevant social media icon.
Once you’ve created this menu, you can assign it to any widget area in order to show the social
media icons in that location. Go to Appearance > Widgets, and assign the “Custom Menu” widget
to any widget area, and select the “Social” menu for the Custom Menu.
In our demo, we’ve assigned the Social menu in the following widget locations:
● Header - Right
● Sidebar - Front Page
● Footer - Last
MAIN MENU / HEADER MENU
Appearance > Menus
The theme has one main menu location “Main Menu”. This is the top header menu right next to
the logo.
9

JULIET PRO
On smaller screens (such as mobile phones and some tablets in portrait mode) the navigation
will collapse into a button that can be clicked to drop down the navigation items.
If you want to show a menu in the “Off Canvas Menu”, you can create a new menu and then
assign it to the “Off Canvas Menu” location.
Read More: For more information on how to create menus, please read
https://codex.wordpress.org/WordPress_Menu_User_Guide
TOP LEFT MENU
Appearance > Menus
The top two header area widgets called Header - Left and Header - Right are capable of handling
any sort of widget. It can be a Custom Menu or Text; whatever you may want to show in those
areas.
If a Custom Menu widget is assigned with a menu called “Social” being displayed, it will
automatically show social media icons - as mentioned above in the “Social Media Menu / Icons”
section.
10

JULIET PRO
If it is a menu called anything other than “Social”, it will display as a normal text menu such as
the one displayed in our demo on the top left.
SITE IDENTITY - LOGO AND TAGLINE
Appearance > Customize > Site Identity
Go to Appearance > Customize > Site Identity to manage your logo settings. You can choose to
display an image logo or a text logo. You can also specify a site tagline here which would appear
right under the logo.
OFF CANVAS MENU
Appearance > Customize > General Settings
You can turn the off canvas menu on or off by going to the General Settings in the Customizer. If
you turn this off, the little “burger” menu (the three lines on the top left) will no longer show up
for the user to click on and reveal the side page or off canvas menu.
11

JULIET PRO
FANCY SCROLL BAR
Appearance > Customize > General Settings
The theme shows a fancy scrollbar by default. If you’d like to turn this off, simply go to the
General Settings and use the toggle switch to turn it off.
STICKY NAVIGATION
Appearance > Customize > General Settings
The theme sticks the main navigation to the top as the user scrolls down. If you’d like to turn this
feature off, simply go to the General Settings and use the toggle switch to turn it off.
STICKY POSTS
Appearance > Customize > General Settings
Juliet Pro has some special styling for your Sticky posts. You can optionally also show a signature
or autograph - basically just an image - at the end of your Sticky Posts. You can upload this
signature image under the General Settings area.
FRONT PAGE - SLIDESHOW / BANNER
Appearance > Front Page > Banner / Slider
There are three main options for the home page slider area:
● Banner
● Posts Slider
12

JULIET PRO
● Custom Slider
For the slider option, you can have two types of sliders:
● Single Slider (basic, 1 image at a time)
● Strip Slider (like a film strip, 3 images at a time)
Front Page Banner
Set up the banner under Appearance > Header Image. You can enter a heading, description, and
URL if you like. This will show up as a banner on the home page.
13
JULIET PRO
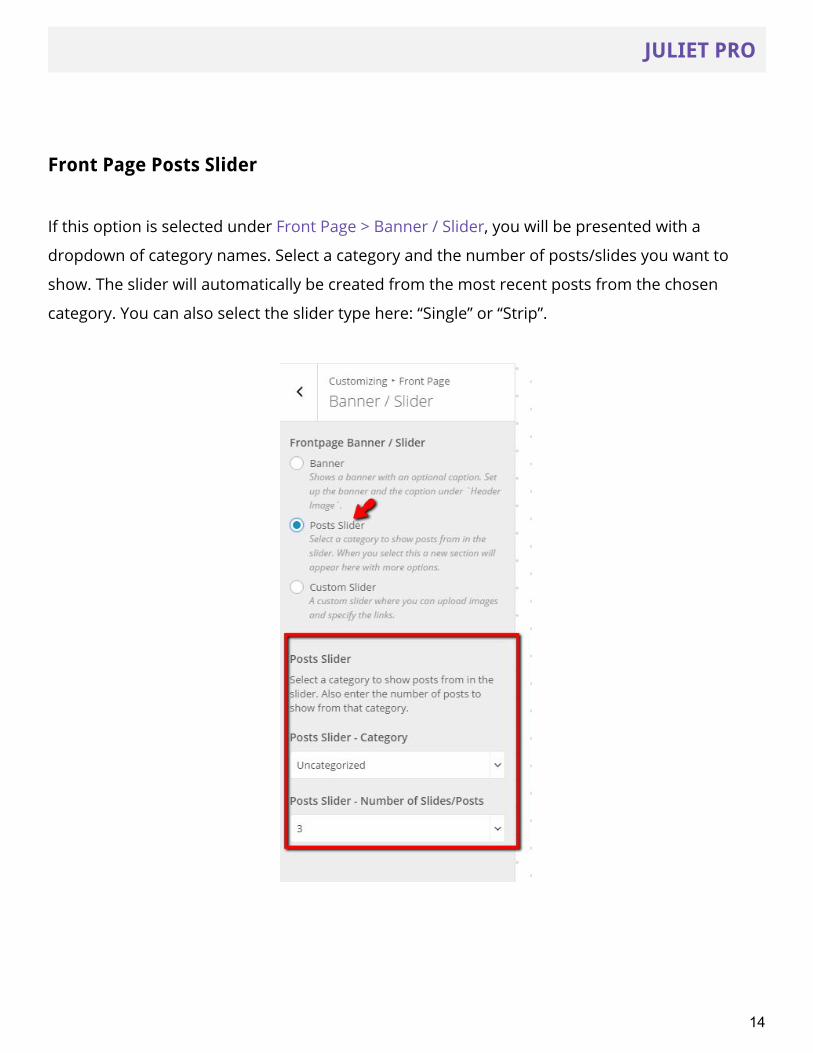
Front Page Posts Slider
If this option is selected under Front Page > Banner / Slider, you will be presented with a
dropdown of category names. Select a category and the number of posts/slides you want to
show. The slider will automatically be created from the most recent posts from the chosen
category. You can also select the slider type here: “Single” or “Strip”.
14

JULIET PRO
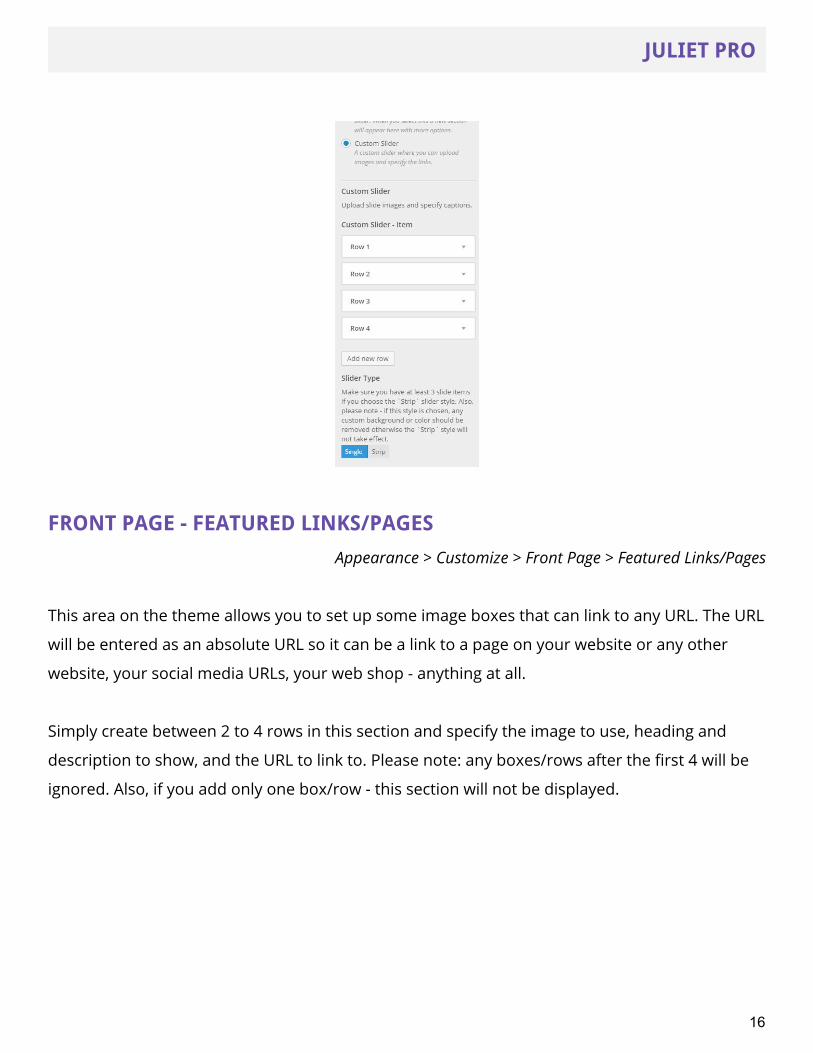
Front Page Custom Slider
This is a custom slider where you can specify your own images and captions without being
bound to a category or posts. You can add as many slides as you want!
When this option is selected, a new section with a button saying “Add new row” will be shown.
Click “Add new row” and you will be presented will all the options for a new slide item. Upload an
image, enter a header, description, and URL. You can rearrange the items to change the order in
which the slides appear on the front end. You can also select the slider type here: “Default” or
“Strip”.
You can also set up YouTube and Vimeo slides by entering the YouTube or Vimeo video embed
URL (for example: https://www.youtube.com/embed/7sDE0u6ybN0?enablejsapi=1 ) for the
slide item. If the video URL is entered, the image uploaded will be ignored and the slide will
display the video. Please note: the caption (heading, description) will not show up for the video.
A Note On Slider Types
Please note that the Strip slider requires that no background image or color be set. The Strip
slider needs a full width page to work with, so the site area cannot be boxed.
15
JULIET PRO
FRONT PAGE - FEATURED LINKS/PAGES
Appearance > Customize > Front Page > Featured Links/Pages
This area on the theme allows you to set up some image boxes that can link to any URL. The URL
will be entered as an absolute URL so it can be a link to a page on your website or any other
website, your social media URLs, your web shop - anything at all.
Simply create between 2 to 4 rows in this section and specify the image to use, heading and
description to show, and the URL to link to. Please note: any boxes/rows after the first 4 will be
ignored. Also, if you add only one box/row - this section will not be displayed.
16

JULIET PRO
FRONT PAGE - FEATURED POSTS
Appearance > Customize > Front Page > Featured Posts
Select whether to show “Featured Posts” on the home page. If you select “Show” for this section,
you will be presented with four options where you can select the posts that you want to display
in this area.
17

JULIET PRO
FRONT PAGE - BLOG FEED
Appearance > Customize > Front Page > Blog Feed
You can select whether to show the content on the homepage along with a sidebar or in a full
width format. You can also enter the heading to display for the recent posts in this section.
FRONT PAGE - LARGE / HIGHLIGHT POST
Appearance > Customize > Front Page > Large / Highlight Post
This theme allows you to select a post to display in a large full format on the home page right
under the recent posts blog feed. If you want to show this, select “Show” here and then select
the post you want to display.
18

JULIET PRO
FRONT PAGE - FOCUS POSTS / MORE POSTS
Appearance > Customize > Front Page > Focus Posts / More Posts
The theme provides another section to highlight your posts from a specific category in the
“Focus Posts” section. Turn this section to “Show” and then choose the category from which the
posts will be displayed. Select the number of posts to display (2, 4, or 6). The front end would
show the most recent posts from the selected category here.
BLOG FEED
Appearance > Customize > Blog Feed
Layout
19

JULIET PRO
Whether you are displaying your latest blog posts on the front page or you have a page to show
your blog posts - the blog feed display is controlled via this section.
Image and Excerpt: This setting shows the excerpt of the post along with the featured image.
Image and Full Content: Choosing this will show full content of the post along with the featured
image (thumbnail). If you use the “more tag” (see https://en.support.wordpress.com/more-tag/)
you can control how much content is visible in the blog feed and the user can click “more” to
view the complete post.
More Options
You can control the display of your blog feed even further by choosing whether to display the
meta information, such as the date, author, and category for the posts.
The “Show Share for Posts” option controls whether you want to display the Jetpack sharing
options for your posts. Read more about how to set up the sharing options here.
POSTS
Appearance > Customize > Posts
Control the post layout here by choosing whether you want to show a sidebar, the featured
image at the top, and the post meta information.
You can also choose whether to display share icons on the post - at the beginning and end of the
post.
Related Posts
20
JULIET PRO
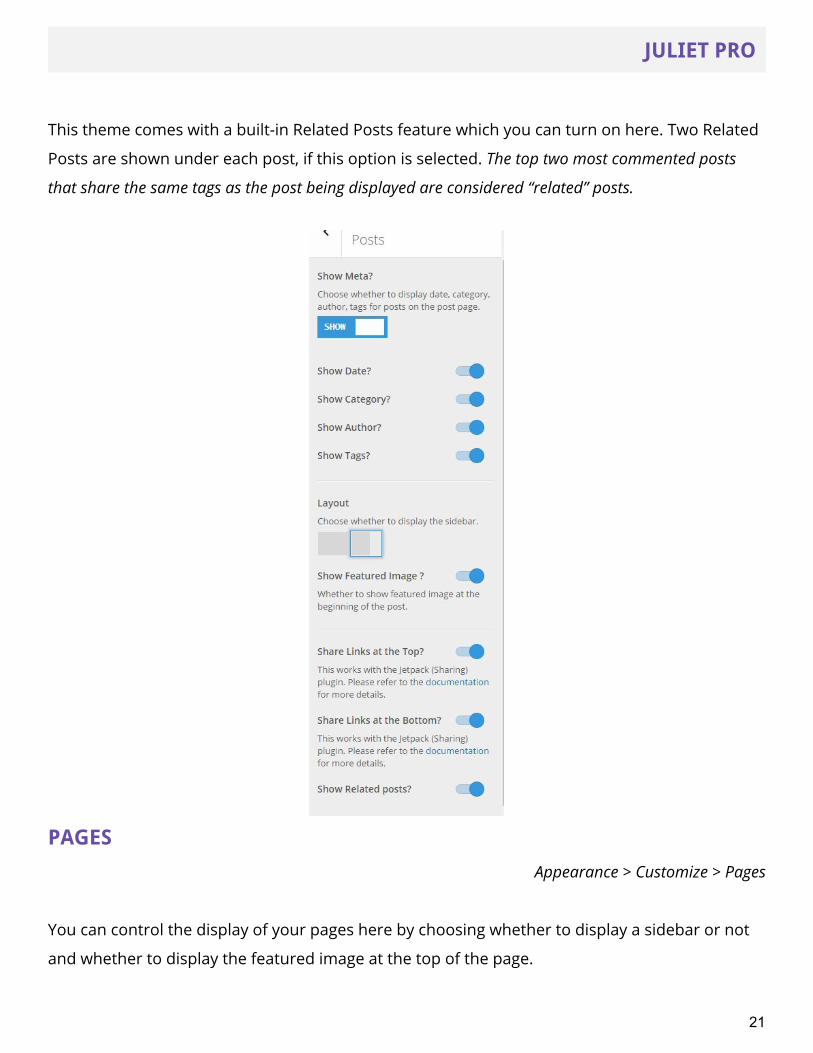
This theme comes with a built-in Related Posts feature which you can turn on here. Two Related
Posts are shown under each post, if this option is selected. The top two most commented posts
that share the same tags as the post being displayed are considered “related” posts.
PAGES
Appearance > Customize > Pages
You can control the display of your pages here by choosing whether to display a sidebar or not
and whether to display the featured image at the top of the page.
21
JULIET PRO
Tip: A “Full Width” page template is available for overriding the sidebar selection here, so that
any page can be displayed as a full width page if needed.
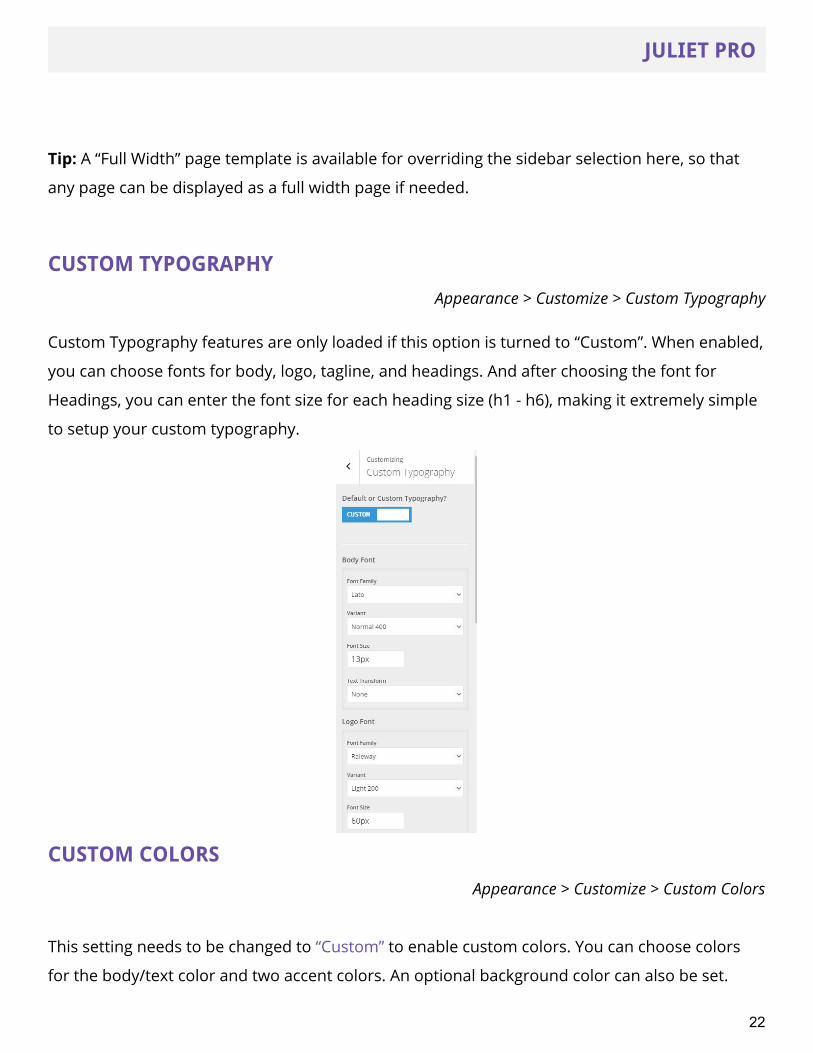
CUSTOM TYPOGRAPHY
Appearance > Customize > Custom Typography Custom Typography features are only loaded if this option is turned to “Custom”. When enabled,
you can choose fonts for body, logo, tagline, and headings. And after choosing the font for
Headings, you can enter the font size for each heading size (h1 - h6), making it extremely simple
to setup your custom typography.
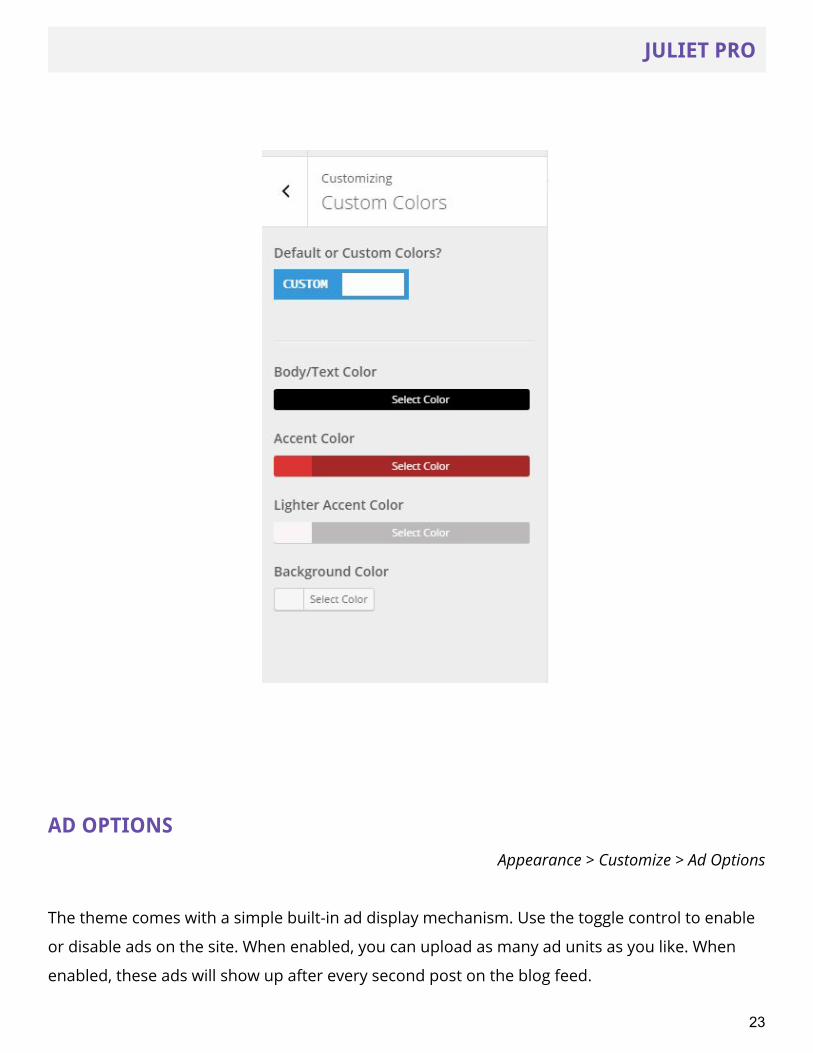
CUSTOM COLORS
Appearance > Customize > Custom Colors
This setting needs to be changed to “Custom” to enable custom colors. You can choose colors
for the body/text color and two accent colors. An optional background color can also be set.
22
JULIET PRO
AD OPTIONS
Appearance > Customize > Ad Options
The theme comes with a simple built-in ad display mechanism. Use the toggle control to enable
or disable ads on the site. When enabled, you can upload as many ad units as you like. When
enabled, these ads will show up after every second post on the blog feed.
23

JULIET PRO
ADVANCED
Appearance > Customize > Advanced
This section is mainly used to enter any custom CSS code that you may want to use to alter the
display of the theme in any way.
You can also set up your Google Analytics code by entering it here.
SIDEBAR WIDGETS
This theme comes with many sidebar widgets which can be used in many multiple ways to
create a unique look for your blog or website.
There are sidebar blocks available for each of the following:
● Front Page
● Posts
● Pages
● Default
The default sidebars will display across the website. So assign any widgets to “Sidebar - Default”
that you always want to show across all pages. To target the front page specifically, assign
widgets to the front page sidebars. The Front Page sidebars will not show up on the posts and
pages; they will display their own specific sidebars and the default sidebar. Similarly for the Post
and Page specific sidebars.
There are two widget areas in the header: Header - Right and Header - Left. These have been
discussed earlier in detail.
The footer widgets are discussed next.
24

JULIET PRO
FOOTER
Copyright Message
You can change the copyright message by editing the Copyright Text field under Appearance >
Customize > General Settings.
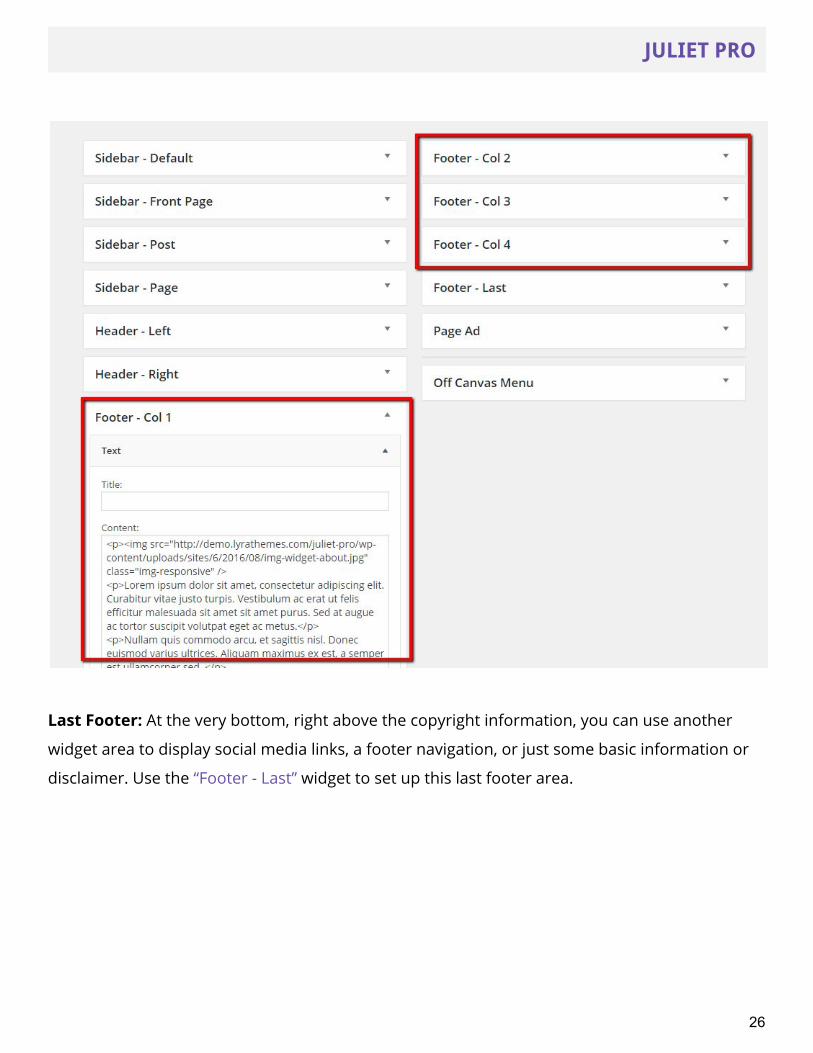
Footer Widgets
There are two footer sections available in this theme.
Footer Columns: There is a secondary footer available in this theme if you want to display more
information across the bottom of the page. Simply use the Footer Secondary - Col 1 to Footer
Col 4 widgets under Appearance > Widgets to populate the content for the footer columns.
Tip: If you want to show just 2 columns in the footer area, just populate two of the widget areas
and the theme will automatically adjust to display just two equal columns! So you can control
how many columns you want to show and are not restricted to using all 4 columns.
25
JULIET PRO
Last Footer: At the very bottom, right above the copyright information, you can use another
widget area to display social media links, a footer navigation, or just some basic information or
disclaimer. Use the “Footer - Last” widget to set up this last footer area.
26

JULIET PRO
LOOKBOOK/INDEX TEMPLATE
This is a special template available in this theme using which you can display an “index” or
collection of posts belonging to specific categories and grouped by those categories. See it in
action here.
In order to set up a new Lookbook/Index page, create a new page and select “Lookbook / Index”
as the page template.
Click “Save” or “Update” for the page to reveal a new set of special options for this page: “Juliet -
Lookbook / Index Options”.
If you enter nothing into the special options for this page (Juliet - Lookbook / Index Options),
then the resulting page will show 3 posts each for all the categories in your blog without a
sidebar.
In order to control what categories show up on the index page and in which order, enter the
category IDs separated by commas into the “Category IDs” field. To change the default number
of posts that will be shown, enter the number of posts you’d like to show for each category.
27

JULIET PRO
You can also control the number of columns (Posts in Each Row) to display. Choose from 2, 3, or
4. The sidebar can also be controlled setting the “Show Sidebar” option.
You can have as many Lookbook/Index pages as you like - create a new one for every set of
categories that you want to display.
JETPACK SHARING INTEGRATION
Juliet Pro integrates in a unique manner with the Jetpack plugin’s Sharing options. In order to set
this up, you will need to install the Jetpack plugin, then go to Jetpack > Settings > Sharing >
Configure.
Select the services you want to show for sharing your posts. For the “Button Style” choose “Icon
only”.
From the theme Customize screen, you can further control where these sharing icons are
displayed:
● Posts in blog feed (Appearance > Customize > Blog Feed: Show Share for Posts )
● Posts (Appearance > Customize > Posts: Share Links at the Top, Share Links at the Bottom )
28

JULIET PRO
The sharing links appear customized to the theme layout and design.
WP INSTAGRAM WIDGET INTEGRATION
The theme integrates well with the WP Instagram Widget plugin. Install this plugin and use the
available Instagram widget to set up a feed in one of the footer columns widget areas or the
sidebar widget areas.
MAILPOET NEWSLETTERS INTEGRATION
The theme integrates well with the MailPoet Newsletters plugin. Assign the newsletter widget to
any of the sidebars to create a beautiful, custom designed newsletter sign up form.
RECENT POSTS WIDGET WITH THUMBNAILS INTEGRATION
Juliet Pro also integrates with the Recent Posts Widget With Thumbnails plugin. Assign the
widget to any sidebar location to show recent posts from any category (or multiple categories)
29

JULIET PRO
along with their featured images. Make sure to select “Thumbnail (150 x 150)” as the image size
to display and also check on the “Use aspect ratios of original images? “ option (which makes
sure that the images are displayed in a responsive fashion).
30