Embed Size (px)
Citation preview

J U D YSEWING MACHINE CABINET
OWNER’S MANUALWhere Creativity Meets Color!
Assembly Instructions
IMPORTANT: Please read these instructions before assembling!
Model Numbers:
101 White

LIMITED WARRANTYArrow™ Sewing Furniture 10-Year Warranty
WHAT THIS WARRANTY COVERS: Arrow Companies, LLC (Arrow) provides limited warranty coverage to the original
purchaser of this product against defects in materials or workmanship of Arrow furniture components for a period of
ten years from the date of purchase. As used in this Warranty, “defect” means imperfections in components which
substantially impair the utility of the product. This Warranty gives you specific legal rights, and you may also have
other rights which vary from state to state.
HOW TO GET SERVICE: Simply contact Arrow at 1-800-533-7347 or [email protected]. When you request
warranty service, you must also present proof of purchase documentation, which includes the date of purchase
(detailed receipt), and photos of the product. Arrow will replace any defective part (at its sole option), excluding labor.
Replacement parts will be warranted for only the remaining period of the original Warranty.
Replacement parts will be shipped freight prepaid on any initial warranty claim during first year of Warranty only.
Warranty applies only to defects confirmed by Arrow Companies, LLC and will be replaced or repaired at Arrow’s
option. In the event parts are no longer available for a warranty claim, customer may receive brand new cabinet at a
price equal to 60% off the MSRP of a current comparable model.
WHAT’S NOT COVERED: There is no warranty coverage for defects or conditions that result from the failure to follow
product assembly instructions, information or warnings, misuse or abuse, intentional damage, fire, flood, alteration or
modification of the product, or use of the product in a manner inconsistent with its intended use, nor any condition
resulting from incorrect or inadequate maintenance, cleaning, or care, or neglect, cuts or scratches. Caster damage
as a result of moving furniture fully loaded or with locked casters. Damage resulting from electrical surge or lightning.
Use in commercial or education environments. Arrow Sewing Furniture is designed for residential use only.
ARROW SHALL HAVE NO LIABILITY for ANY INCIDENTAL OR CONSEQUENTIAL DAMAGES OF ANY KIND and all such
damages are EXCLUDED FROM THIS WARRANTY, such as loss of use, disassembly, transportation, labor or damage
to property on or near the product. Some states do not allow the exclusion or limitation of incidental or consequential
damages, so the above limitation or exclusion may not apply to you. The Warranty cannot be transferred to subsequent
owners or users of the product, and it shall be immediately void in the event the product is resold, transferred, leased
or rented to any third party or person other than the original purchaser.
ADDITIONAL LIMITATIONS:
THERE ARE NO OTHER WARRANTIES APPLICABLE TO THIS PRODUCT. Under the laws of certain states, there
may be no implied warranties from Arrow and all implied warranties, INCLUDING ANY IMPLIED WARRANTY OF
MERCHANTABILITY OR FITNESS FOR A PARTICULAR PURPOSE are disclaimed where allowed by law. TO THE EXTENT
ANY IMPLIED WARRANTIES ARE APPLICABLE, ANY IMPLIED WARRANTIES, INCLUDING ANY IMPLIED WARRANTY
OF MERCHANTABILITY OR FITNESS FOR A PARTICULAR PURPOSE, ARE LIMITED IN DURATION TO THE DURATION
OF THIS EXPRESS WARRANTY or the minimum period allowed by law, whichever is shorter. Some states do not allow
limitations on how long an implied Warranty lasts, so the above limitation may not apply to you. This limited warranty
gives you specific legal rights. This limited warranty does not, in any way, affect the rights given to you by law.
REGISTER YOUR PRODUCT: Original purchaser should register the purchase online at www.ArrowCabinets.com/warranty.

Assembly InstructionsJudy Sewing Machine Cabinet Page 1
Left Side Panel
Door Bin BottomBottom Panel
Right Side Panel
Platform
Door Bin Front Panel
If any of these parts arrived damaged, please call us at 1-800-533-7347 and we will send a replacement part out.
For additional strength dab wood glue on tip of screws before attaching.
Door Bin SidesTop/Leaf
NOTE: To assure proper handling of replacement parts please include the following information:
• Model Number of Unit • Production ID Number • Number of Part Required • Your Name, Address, and Phone Number
Notice to Customer:
Before beginning assembly, remove all parts from the carton. Please review the illustrations below to determine that all parts are Included.For assembly or operating assistance, or to report any missing or damaged parts, you may call or write to:[email protected] 1-800-533-7347 Ext. 1Arrow CabinetsP.O. Box 307, Delavan, WI 53115
TO ORDER REPLACEMENT PARTS CALL1-800-533-7347
Parts are labeled with capital letters. To reference letters, turn to the Wood Parts List in the back of your manual.
Wooden Materials
Door
Back Top/Bottom PanelsA I
B J
KC
D
E
F
H
B
H
C
I
I
D
K
J
E
E
A
F

Assembly InstructionsJudy Sewing Machine Cabinet Page 2
Hardware Included
Tools required
Door Hinge x3
Set: Magnet with Catch Plate & 3 screws
Bow Handle & 2 Bolts x1
#5x5/8” Brass Flathead Screw x1
Screw M4x14 x26
#5x5/8” Panhead Screw x2
Cam Bolt x16
Cam 12mm x8
Cam 10mm x8
Dowel 8x30 x8
Wood Dowel x6
*Screws are NOT separated into individual bags, they are in the bags with the item you will use them with. Example: Screws for the door hinges are in with the door hinges.*Items not drawn to scale.
Phillips Screwdriver Hammer
Electric screwdriver
Castor 50mm Locking x2
Caster Washer x4
Spaner x1
Lifter Rail L/H x1
Lifter Rail R/H x1
Castor 50mm Non-Locking x3
Cover Cap x4
Screw 10x60mm x4
Lifter (621mm) x1

180°
Assembly InstructionsJudy Sewing Machine Cabinet Page 3
Understanding How the “ARROW-LOC” Cam Fastener Works
Cabinet Assembly
Position bolt in pre-drilled hole and turn until tight.
Press cam Into pre-drilled hole until flush with surface.
Insert bolt through pre-drilled hole in edge of panel.
To lock, rotate cam until tight, using screwdriver.
ARROW TOWARDS HOLE IN EDGE!
FIG. 1
Step 1. Place Top (A), Bottom (B), Door (K) and Door Bin Front Panel (H) on a flat protected surface to
prevent scratching of parts, thread cam bolts (16 total) into pre-drilled holes (as shown In FIG. 1).
Cam Bolt x16
A
B
K
H

Assembly InstructionsJudy Sewing Machine Cabinet Page 4
FIG. 2
Step 2. Install Cams (8 total) by pushing a cam into each hole flush with surface, the arrow on the cams should be turned (using a regular screwdriver) to face the hole in each edge where the cam bolts will enter.
After installing the cams, insert the Dowels 8x30 (x8) in the both Side panels (C & D) as shown in FIG. 2.
Cam x8
Step 3. Attach magnet with #5x5/8 Brass Panhead Screws (x2) packed with magnet to Right Side Panel (D) into the pre-drilled holes so that the metal part is facing front edge.
FIG. 3Door Magnet x1
Dowel 8x30 x8
#5x5/8” Panhead Screw x2
D
C
D

Assembly InstructionsJudy Sewing Machine Cabinet Page 5
Step 4. Turn Bottom (B) panel over and install the Locking caster on right front and Non-locking casters in the back and left front. Using
Step 5. Install Lifter rails on Left (C) and Right (D)Side Panel using pre-drilled holes with 6 Screws M4x14mm. Top of rail is even with top of panel.
FIG. 4
FIG. 5
the preinstalled threaded seats, place the caster washer between caster and cabinet bottom and tighten with spanner.
Locking Caster x1
Non-locking Caster x3
Caster Washer x4
Screw M4x14 x6
Lifter Rail L/H x1
Lifter Rail R/H x1
C
D
B

Assembly InstructionsJudy Sewing Machine Cabinet Page 6
Step 6. In each of the two Door Bin Sides (I) panels, install 10 mm cams (x8) with arrow on cam pointing to hole on outer edge as shown in FIG. 6.
Step 7. Attach Sides (I) to Bottom panel (J) by pushing dowels on short sides of J into holes on sides I (FIG. 7).
FIG. 6
FIG. 7
In Door Bin Bottom Panel (J) install Wood dowels (x6) in the holes on all sides.
Attach Front Panel (H) to unit by inserting cam bolts into Sides (I) and seating dowel from Bottom (J) (FIG. 8).
Cam 10mm x8
Wood Dowel x6
FIG. 8
J
I
I
J
J
I
I I
I
H
Assembly InstructionsJudy Sewing Machine Cabinet Page 7
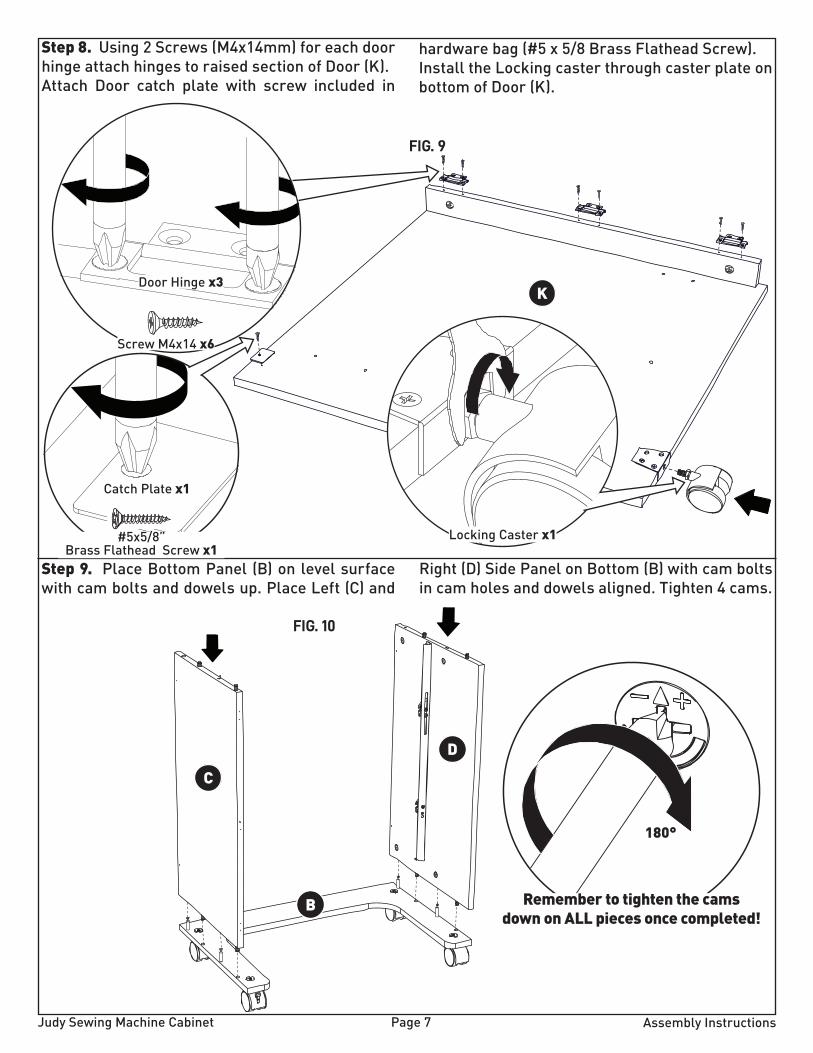
Step 8. Using 2 Screws (M4x14mm) for each door hinge attach hinges to raised section of Door (K).Attach Door catch plate with screw included in
Step 9. Place Bottom Panel (B) on level surface with cam bolts and dowels up. Place Left (C) and
FIG. 9
hardware bag (#5 x 5/8 Brass Flathead Screw).Install the Locking caster through caster plate on bottom of Door (K).
Catch Plate x1
Right (D) Side Panel on Bottom (B) with cam bolts in cam holes and dowels aligned. Tighten 4 cams.
Locking Caster x1
Screw M4x14 x6
Door Hinge x3
180°
FIG. 10
Remember to tighten the cams down on ALL pieces once completed!
#5x5/8” Brass Flathead Screw x1
K
C
D
B

Assembly InstructionsJudy Sewing Machine Cabinet Page 8
Step 10. Set Back Panels (E) between panels C and D. Insert the Screw 10x60mm (x4) through
Step 11. Attach the Platform (F) to Lifter unit with Screws M4x14mm (x4).
FIG. 11
holes in side panels into back and tighten 2 screws on each side. Press screw head covers in place.
FIG. 12
Cover Cap x4
Screw 10x60mm x4
Screw M4x14 x4
F
E
E

Assembly InstructionsJudy Sewing Machine Cabinet Page 9
Step 12. Install the lift onto side rails following these steps. A. Position lift guides (white plastic) over railsand gently slide the lifter into position.B. Loop cable through metal tab on top of each lifter rail and secure. A flat screwdriver can be
used to push cord into tab. Push platform down until it clicks into first position. When lift has locked into the first position, a small block of wood will disengage from the rear of the lift where it was holding the cylinder, be sure to remove and discard it.
FIG. 13
FIG. 14
Step 13. Place Top (A) onto the cabinet and tighten 4 cams inside to secure the top.
Remember to tighten the cams down on ALL pieces once completed!
180°
If wood block is dislodged during shipping, please view our video “alternative Airlift” at www.arrowcabinets.com Assembly videos
or call 1-800-533-73747.
A B
F
A

Assembly InstructionsJudy Sewing Machine Cabinet Page 10
Step 14. Attach the Door (K) to Left Side Panel (C) with 3 flush door hinges using the 6 remaining Screws M4x14mm.
Step 15. Add door handle using bolts found with handle.
Step 16. Slide the preassembled door bin over the 4 cam bolts and 1 wood dowel found in theDoor (K). Tighten the cam bolts to secure.
FIG. 15
FIG. 16
180°
K
K
Bow Handle
Screw M4x14 x6
2 Bolts
K C
FIG. 17

Assembly InstructionsJudy Sewing Machine Cabinet Page 11

P.O. Box 307 Delavan, WI 53115 1-800-533-7347 Ext. 1
[email protected] www.arrowcabinets.com 07-19
Enhance your sewing experience with a custom-made insert for your Arrow or Kangaroo cabinet. Inserts are designed to reduce the gap between the machine and cabinet opening. This provides an ergonomic work surface for the free arm of the sewing machine, allowing for straighter stitches, less fatigue and an overall better experience using your machine and cabinet.
Hydraulic Sewing Chair
Insert
Our adjustable height sewing chair is a perfect accessory for any craft and sewing room. The chair’s height is adjustable with easy to use controls and the cushions provide perfect lumbar support and comfort for those long sewing hours. Chair features five casters on a star base for greater movement at your sewing cabinet or crafting surface. Lift the seat cushion to reveal a hidden storage compartment for your small notions or patterns.
Accessories to Complete Your Sewing Experience
Custom Insert Arrow Sewing Chairs