Embed Size (px)
Citation preview

Each Bracket is supplied with - 3x Screws - 3x Wall plugs
Kit supplied with 1x Allen key
a
e
b
c
d
John LewisCurtain Pole Kit
Necessary Tools
Fittings and parts checklist
Pole Length
Part 1.2m 1.5m 1.8m 2.4m 3.0m 3.6m
a Pole 1 1 1 2x1.2m 2x1.5m 2x1.8m
b Brackets 2 2 2 3 3 3
c Finials 2 2 2 2 2 2
d Rings 12 16 18 24 30 36
e Joiner n|a n|a n|a 1 1 1
Quantities Required
Thank you for purchasing this product. Please read the instructions carefully before use to ensure safe and satisfactory operation of this product.
Pre-assembly preparationPlease ensure instructions are read in full before attempting to assemble this product.
Please check the pack contents before attempting to assemble this product. A full checklist of components is given in this leaflet. If any components are missing, please contact the retailer from whom you bought this product.This product takes approximately 30 MINUTES to assemble with 2 PEOPLE.The fittings pack contains SMALL ITEMS which should be KEPT AWAY FROM YOUNG CHILDREN. Read this leaflet in full before commencing assembly.
d1+d2+d1=Pole Length
Approx.10cm
d1 d2 (distance between end brackets)
Approx.10cm
d1
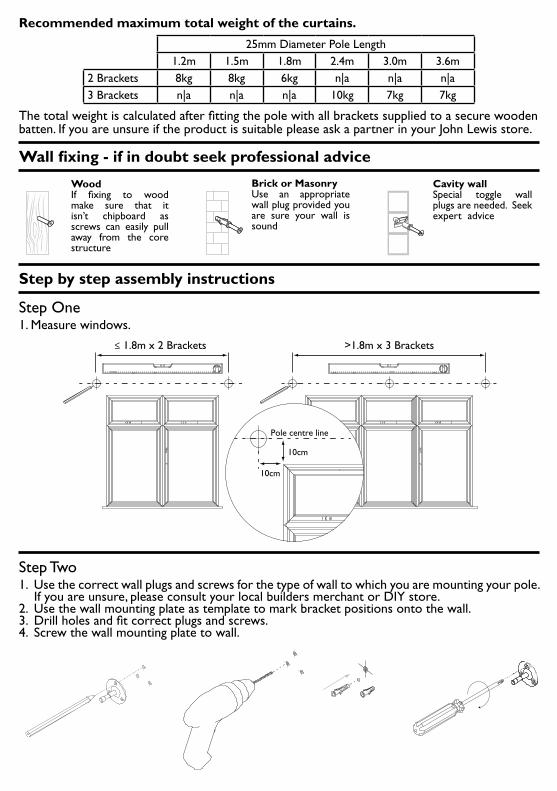
Wall fixing - if in doubt seek professional advice
Step by step assembly instructions
Step One
Step Two
25mm Diameter Pole Length1.2m 1.5m 1.8m 2.4m 3.0m 3.6m
2 Brackets 8kg 8kg 6kg n|a n|a n|a3 Brackets n|a n|a n|a 10kg 7kg 7kg
Recommended maximum total weight of the curtains.
The total weight is calculated after fitting the pole with all brackets supplied to a secure wooden batten. If you are unsure if the product is suitable please ask a partner in your John Lewis store.
1. Measure windows.
≤ 1.8m x 2 Brackets >1.8m x 3 Brackets
10cm
10cm
Pole centre line
1. Use the correct wall plugs and screws for the type of wall to which you are mounting your pole. If you are unsure, please consult your local builders merchant or DIY store.
2. Use the wall mounting plate as template to mark bracket positions onto the wall.3. Drill holes and fit correct plugs and screws.4. Screw the wall mounting plate to wall.
Brick or MasonryUse an appropriate wall plug provided you are sure your wall is sound
Cavity wallSpecial toggle wall plugs are needed. Seek expert advice
WoodIf fixing to wood make sure that it isn’t chipboard as screws can easily pull away from the core structure
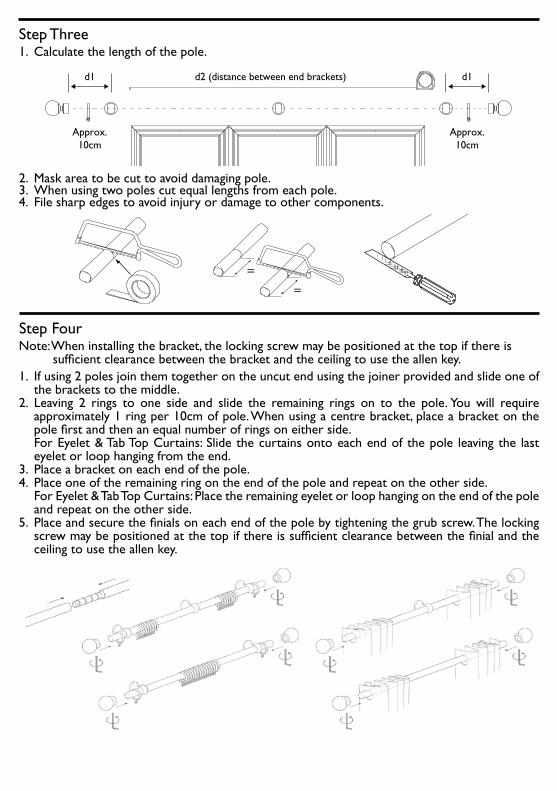
1. Calculate the length of the pole.Step Three
Step Four
=
=
2. Mask area to be cut to avoid damaging pole.3. When using two poles cut equal lengths from each pole.4. File sharp edges to avoid injury or damage to other components.
Note: When installing the bracket, the locking screw may be positioned at the top if there is sufficient clearance between the bracket and the ceiling to use the allen key.
1. If using 2 poles join them together on the uncut end using the joiner provided and slide one of the brackets to the middle.
2. Leaving 2 rings to one side and slide the remaining rings on to the pole. You will require approximately 1 ring per 10cm of pole. When using a centre bracket, place a bracket on the pole first and then an equal number of rings on either side.For Eyelet & Tab Top Curtains: Slide the curtains onto each end of the pole leaving the last eyelet or loop hanging from the end.
3. Place a bracket on each end of the pole.4. Place one of the remaining ring on the end of the pole and repeat on the other side.
For Eyelet & Tab Top Curtains: Place the remaining eyelet or loop hanging on the end of the pole and repeat on the other side.
5. Place and secure the finials on each end of the pole by tightening the grub screw. The locking screw may be positioned at the top if there is sufficient clearance between the finial and the ceiling to use the allen key.
d1+d2+d1=Pole Length
Approx.10cm
d1 d2 (distance between end brackets)
Approx.10cm
d1
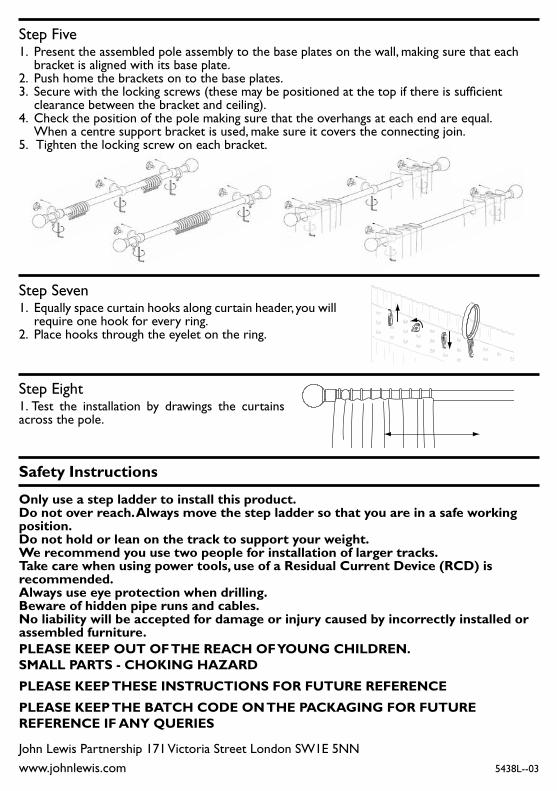
Step Five
Only use a step ladder to install this product.Do not over reach. Always move the step ladder so that you are in a safe working position.Do not hold or lean on the track to support your weight.We recommend you use two people for installation of larger tracks.Take care when using power tools, use of a Residual Current Device (RCD) is recommended.Always use eye protection when drilling.Beware of hidden pipe runs and cables.No liability will be accepted for damage or injury caused by incorrectly installed or assembled furniture.PLEASE KEEP OUT OF THE REACH OF YOUNG CHILDREN. SMALL PARTS - CHOKING HAZARD
PLEASE KEEP THESE INSTRUCTIONS FOR FUTURE REFERENCE
PLEASE KEEP THE BATCH CODE ON THE PACKAGING FOR FUTURE REFERENCE IF ANY QUERIES
Safety Instructions
1. Test the installation by drawings the curtains across the pole.
Step Eight
5438L--03
John Lewis Partnership 171 Victoria Street London SW1E 5NN www.johnlewis.com
1. Equally space curtain hooks along curtain header, you will require one hook for every ring.
2. Place hooks through the eyelet on the ring.
Step Seven
1. Present the assembled pole assembly to the base plates on the wall, making sure that each bracket is aligned with its base plate.
2. Push home the brackets on to the base plates.3. Secure with the locking screws (these may be positioned at the top if there is sufficient
clearance between the bracket and ceiling). 4. Check the position of the pole making sure that the overhangs at each end are equal.
When a centre support bracket is used, make sure it covers the connecting join. 5. Tighten the locking screw on each bracket.