Embed Size (px)
Citation preview

John Deere
Operation Center
Guide
Table of Contents:
Navigating the Map:
Add Equipment:

1
Creating a New Field:
Drawing the Boundary:
Creating a Job:
Adding a Product:
User Menu:
Notification Center:
Using the Tools:
Agronomic Report:
Field Analyzer:
Permissions Report:
Remote Display Access Report:
Prescription Creator by Agrian:
Menu Button:
Files:
Organization:
Terminals:
Setup Builder:
John Deere Software Manager:
John Deere Data Manager:
5 Ways to Upload Data:
Functionality of a Staff Member:
Set Staff Roles for Agronomic Data (My Files)
Set Staff Roles for Machine Data (My Equipment/JDLink™ telematics system):
Functionality of a Partnership:
Machine Optimization:
Agronomic Decision Making:
Work Collaborator:
Partnership Capabilities:
Navigating the Map: ● The icon is located in the top left hand side of the screen.
● At the upper right hand side of the map there is the option to have a Map layout or a
Satellite layout.
● There is a column of 4 boxes.
○ The top box allows you to see everything that is included in your operation.
■ All fields and equipment will be available to see on the map

2
○ The second box has a plus sign in it, and that box allows the user to zoom in on
the map by clicking it.
○ The third box has a minus sign in it, and that box allows the user to zoom out on
the map by clicking it.
■ Zooming in and out can also be done by scrolling with your mouse.
○ The last black box called Map Layers allows you to choose what you want on
display on your field such as: Equipment, Location History, Fields, Weather, and
Jobs. The weather icon allows you to see the temperature, wind speed and
direction, precipitation levels, and a 5 day forecast ( click on the temperature and
wind speed)
● Add Equipment:
Non-JDlink equipment.
● Click on the tractor icon on the left
side of the map page
● Click the plus sign
● Fill out the following information
○ Equipment Name
○ Make
○ Type
○ Model

3
● The click Add Equipment
● Creating a New Field:
Fields can also be added by uploading data
● When creating a new field.
● Locate your field on the map.
● Click the field icon on the left side
of the screen.
● Locate and click the plus sign.
● Under the field details you will need
to type a field name in.
● Click the client name (if the client
name is not there click add client).
● Click the farm and select the farm
(if the farm name is not there click
add farm name).
● Under the Boundary Information
(Optional) type in how the
boundary will be added: Ex: Drawn,
Implement.
● Drawing the Boundary:
● Draw a Polygon
Polygons work the best if your fields are oddly shaped.
○ To create a polygon, click to drop points around
the edge of the field
○ To complete the polygon, click on the first point
you made.

4
● Draw a Circle boundary
○ Select the circle. Click the middle of the field,
more towards the edge of the field
○ Click when you have the circle the right size.
○ If at any point the circle is the wrong size you
can resize the boundary.
○ If you had the circle correct before you adjusted
the size of the circle a box with an arrow in it will
appear next to the boundary which will allow
you to undo your last adjustment.
● Drawing a Square Boundary
○ Select the box with a square in it, click
on the edge of the field to make the first
point, move the mouse to adjust the
size of the square until the square is the
correct size, click again to complete the
square.
○ At any point the square is the wrong
size you can resize the boundary by
clicking one of the little white circles in
the boundary and move them.
○ If you had a square that was the correct size before you adjusted the size
of the square. A box with an arrow in it will appear next to the boundary
which will allow you to undo your last adjustment.
● If you are not satisfied with the boundary you have made, you can click clear
boundary, which will allow you to make a new boundary.
● Once have made the boundary, click add field, and your field will now appear on
your map.
● Creating a Job:
● Before you can create a job you must
have a field set up on the map.
● Once you have done that you can click on
the jobs icon on the left side of the screen.
● Click on the plus sign, select what year
you did the job, select what type of job it

5
is. Ex: Harvest, Seeding, Application, Tillage, Other.
● Select where the job is happening or what field.
● Then select your product that you are using.
● You then have the option to add a prescription, details, equipment/people,
guidance lines or notes. (None of these are required)
● Click Add to create the job.
● Adding a Product:
● Click the Product Icon on the left
side of the map screen
● Click the Plus sign
● Search for your product. If you
can’t find it, click the plus to add
a product.
● Add a Category Ex: Chemical/
Fertilizer, Variety
● Click Add Product
● User Menu:
● Go to MyJohnDeere Account: this
takes you back to the first page you get to after you login.
● Edit Profile: allows you to change your password, change your challenge
question ( If you forget your Password), Change Account Merge Preference,
Personal Information
● User Preferences: this is where you can set the Preferred Organization
○ If you have more than one or are a staff member for someone else’s
● Organization Preferences: Organization Details (Name, Address), Setting (Time
zone, Unit of Measure, Yield Preference, Support Partner Organization, Terminal
Retrieval Options, Manual Data Routing, and Field Detection) File Naming
(Selected Preset, Available Presets) Data Usage (Machine Data for John Deere
Use, Production Data to Provide You Services and for Anonymized Internal John
Deere Use, Anonymized Machine/Production Data for External Sharing.

6
● Terms of Use: Terms and Conditions
● Create a New Organization: Make a New Organization
● Contact Us: Give Feedback
● Help: Takes you too John Deere Operation Center Guide, Click Operation Center
on the left side of page for more options
● Logout: Logout of your
profile
● Notification Center:
● The notification center lets you know when something changes inside of your
operation center.
● When you click on the bell, it will bring up the notification page.
● This page is color coded.
○ Red is high priority
○ Yellow is medium priority
○ Grey is low priority
○ Blue is information
● Inside the notification center is where you accept partnership requests or more
information requests.
● When there is a new notification, a red circle with a number will appear on the
bell.
● This number tells you have many new notifications there are on your account.
Using the Tools:
Located in the tools icon at the top left of the screen.
In the tools section, you will see options the icons Agronomic Report, Field Analyzer,
Permissions Report, Remote Display Access Report and Prescription Creator by Agrian. Each
of these tabs can be clicked on. Below are detailed descriptions of how to use each application.

7
● Agronomic Report:
● To access your Agronomic Report, click on the Agronomic Report icon,
● Choose the report you want (choose from Agronomic Report drop down and crop
season dropdown)
● Choose the settings that you want (Date range, Fields, Products)
● Field Analyzer:
Visually compare field information between multiple fields.
● To access the Field Analyzer, click on the Field Analyzer icon.
● Choose what field you would like to look at.
● Change the operation and layer for the field. Ex: Yield, Yield Contour, Wet
Weight, and Moisture.
● If you want to compare one field with another, click the compare button and an
identical screen will pop up and you can choose a different operation or layer

8
● Permissions Report:
● To access the Permissions Report, click on the Permissions Report icon.
● See who has access to what information of yours.
● Each column shows a different level of access. If someone has access to what
the column has described, there will be a check mark in the row of their name.
● You have the option to export to CSV or print. Exporting it will place it into an
excel document and printing it will allow you to print the report.
● Remote Display Access Report:
● To access the Remote Display Access Report, click on the Remote Display
Access Report icon

9
● See how the remote display access is being used in your farm.
● See the user, start time, time used, which machine was used and other details
about your machine usage.
● Choose a date range to see the specific usage of a machine in a certain time
period.
● You can also export this report to an excel file by clicking Export to CSV.
● Prescription Creator by Agrian:
● To access the Prescription Creator, click on the Remote Display Access Report
icon
● By clicking on this tab, you are taken to the Agrian website.
● You may click login with MyJohnDeere and it will take you to create a
prescription.
● You must then select an organization,client, farm, field and farm boundary. If you
don’t have an option for one of these, YOU MUST CREATE IT IN THE
OPERATION CENTER.
● Then choose a layer. (Field Operation, Free Form Zones, or Soil Survey)
● Click Next, a screen will show you your field. You may see/edit the zones that
have been created in your field. (you cannot edit zones if you are using Soil
Survey layer)
● Click next again. Add a column, choose seeding or application and the rates that
you want to apply.
● Click save. A notification will pop up saying you may close out of this screen. Do
that.

10
● After that, the prescription will be sent to your files in the Operation Center
waiting for you to send them to a machine for use.
● Here is a video to walk you through the process as well.
○ https://www.youtube.com/watch?v=9Fin5Or8JY8

11
Menu Button:
● Files:
● In files, you can view your files.
● If you select a file, you will have the option to share, download, send to
equipment, or archive a file.
● There is also an option for adding a file manually.
● Organization:
Descriptions of each functionality for a staff/partner are detailed later in this document

12
● In the organization tab, you can view/edit your staff or your partners.
● Staff
○ To add a staff member, click the plus button in the staff tab and type in
the email and choose what role you want the person to have.
○ To edit a staff member’s roles, click on the name of the person you want
to edit and choose edit roles. Proceed to choose what capabilities you
want them to have.
○ To remove a staff member, click on the name of the person you want to
remove and choose remove user.
● Partner
○ To add a partner, click the plus button in the partner tab. Then choose if
you want to share or request information and type in their email address.
○ You can then choose what capabilities you want to share/have with that
partner
○ You will not become a partner with them until they accept the invitation.
○ Once the partnership has been accepted you must logout and login to
make the partnership appear.
○ You can delete a partner at any time by clicking on the box by their name
and then the trash can.
■ DO NOT DELETE PARTNERSHIP WITH CUSTOMER IF THEY
OWN A TERMINAL. You cannot retrieve it after a partnership is
deleted.
○ When changing partnership permissions click on the partner you wish to
alter, then edit permissions in the machine optimization, agronomic
decision making and work collaborator tabs. Select what permissions you
want and click save.
○ Requesting More Access:
■ Click on desired partner’s name

13
■ Choose partner access. Choose edit and click on permissions you
wish to receive.
■ Click save and a notification will be sent to the partner for them to
accept your request.
○ How to support your partners:
■ As a default, John Deere makes it so that you don’t support
partners. To change this:
● Click on organization preferences (right hand drop down).
● Click settings. Edit. Click on Organization supports
partners. Save.
● You will now be able to support your partners and access
the shared information
● Terminals:
Terminals must be transferred to customer account by dealer.
● In the terminal tab, you can view or transfer the terminals in your account.
● To transfer, click the check mark by the machine you desire then click the
transfer button near the top of the screen. (The Terminal must be apart of your
organization)
● It will ask you if you want to include machine data. If the machine is new, you
may click yes. If it is used, click no, don’t send because a previous owner's data
may still be on the machine.
● Choose what organization you would like to send it to.
● Click review. A screen will show up reviewing the transfer. If everything looks
good, click transfer. Otherwise click back and fix what is wrong.
14
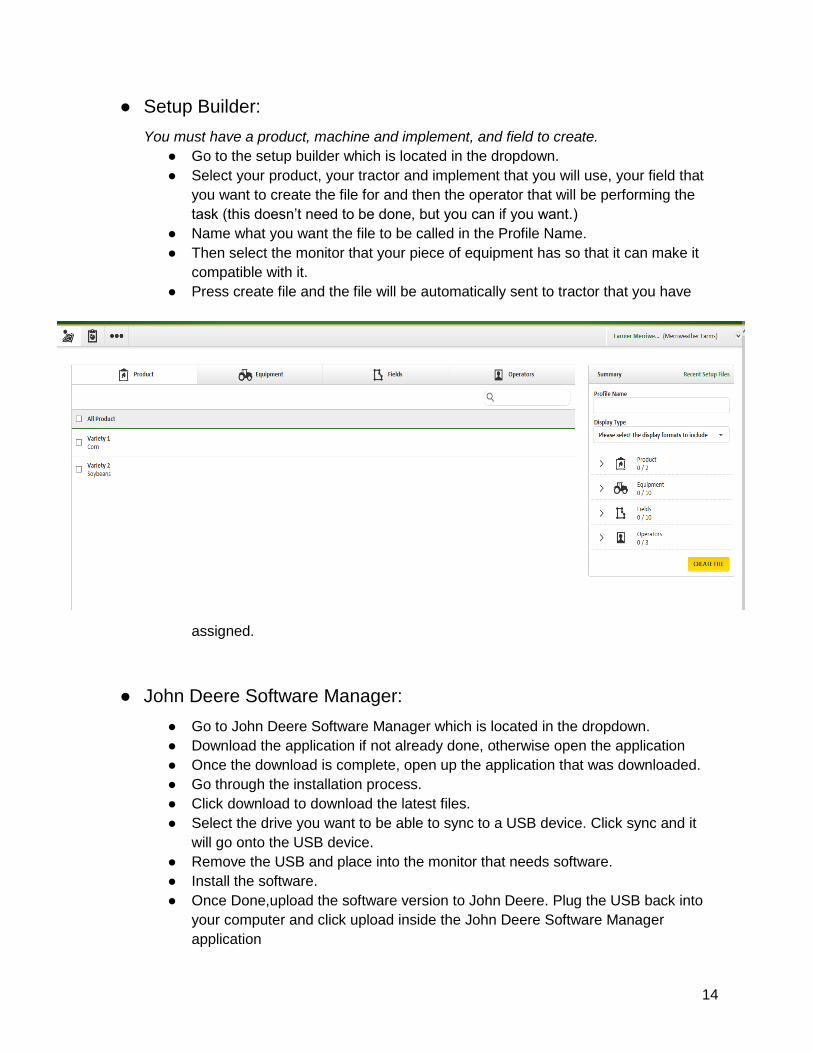
● Setup Builder:
You must have a product, machine and implement, and field to create.
● Go to the setup builder which is located in the dropdown.
● Select your product, your tractor and implement that you will use, your field that
you want to create the file for and then the operator that will be performing the
task (this doesn’t need to be done, but you can if you want.)
● Name what you want the file to be called in the Profile Name.
● Then select the monitor that your piece of equipment has so that it can make it
compatible with it.
● Press create file and the file will be automatically sent to tractor that you have
assigned.
● John Deere Software Manager:
● Go to John Deere Software Manager which is located in the dropdown.
● Download the application if not already done, otherwise open the application
● Once the download is complete, open up the application that was downloaded.
● Go through the installation process.
● Click download to download the latest files.
● Select the drive you want to be able to sync to a USB device. Click sync and it
will go onto the USB device.
● Remove the USB and place into the monitor that needs software.
● Install the software.
● Once Done,upload the software version to John Deere. Plug the USB back into
your computer and click upload inside the John Deere Software Manager
application

15
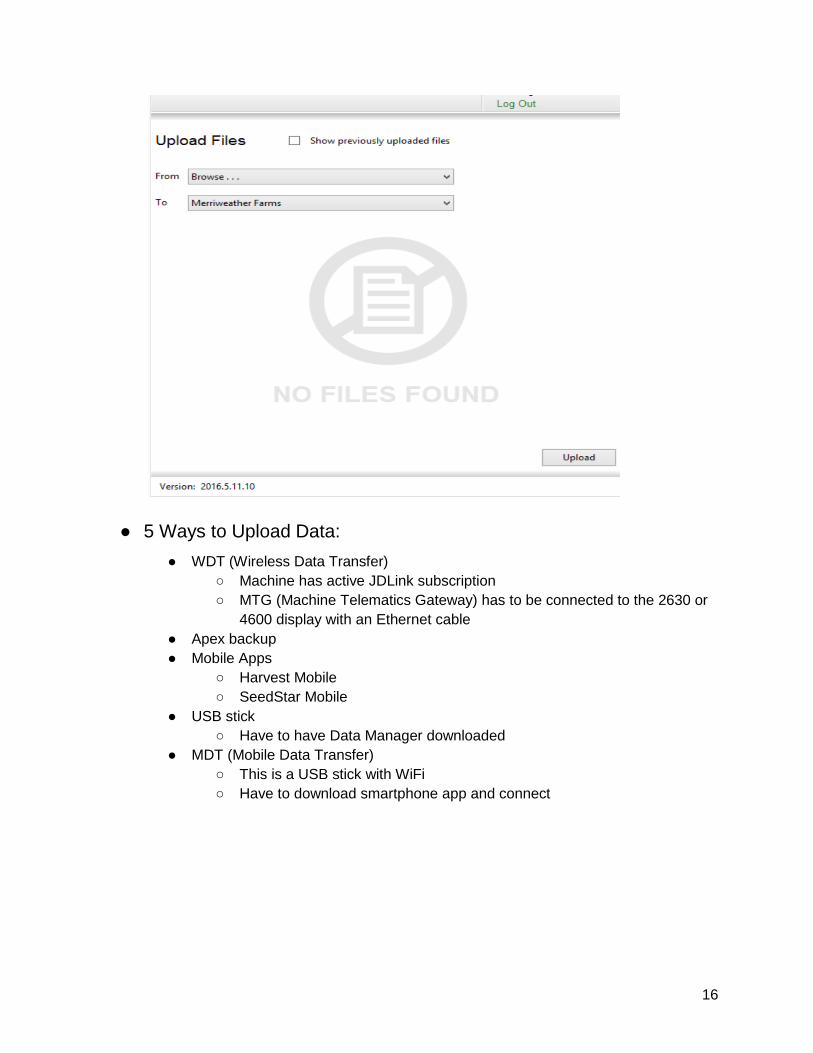
● John Deere Data Manager:
● Go to John Deere Data Manager which is located in the dropdown.
● Download the application if not already done, otherwise open the application
● Once the download is complete, open up the application that was downloaded.
● Go through the installation process.
● Once done, it will prompt you to log in to your My John Deere account.
● It will bring you back to the John Deere Data Manager.
● Proceed to find the files you want to upload, then select who you want to upload
them too. Once done, click upload and the files will upload the that organization
on the Operation Center.
16
● 5 Ways to Upload Data:
● WDT (Wireless Data Transfer)
○ Machine has active JDLink subscription
○ MTG (Machine Telematics Gateway) has to be connected to the 2630 or
4600 display with an Ethernet cable
● Apex backup
● Mobile Apps
○ Harvest Mobile
○ SeedStar Mobile
● USB stick
○ Have to have Data Manager downloaded
● MDT (Mobile Data Transfer)
○ This is a USB stick with WiFi
○ Have to download smartphone app and connect

17
Functionality of a Staff Member: http://dlrdoc.deere.com/sales/salesmanual/en_NA/ams/2016/feature/my_jd/staff_roles.ht
ml
● Must be the original member to edit the profile
● Invite new staff members into the organization via email
● Set Staff Roles for Agronomic Data (My Files)
● None
● No authorization for agronomic data.
● No option to see files
● Can’t see fields
● Tools Available:
○ Remote Display Access and Prescription Creator
○ Can’t run prescription creator because you don’t have access to enough
information
● Logistics
● Authorized to upload, download, and send to machines setup and prescription
information. Not authorized to view documentation data or sharing relationships.
○ Can’t share information
○ Can still add information
○ Can’t access the setup builder
○ Can’t see the Job tab
● Tools Available:
○ Can see Remote Display Access Report and Prescription Creator
● Editor
● Authorized to take all actions on all production and agronomic data. Not
authorized to establish or request sharing relationships.
○ Meaning you can’t add,delete, or edit partners or staff members
● Tools Available:
○ Has access to all tools
● Admin
● Authorized to take all actions on production and agronomic data, and manage
the sharing permission relationships.
● Tools Available:
○ Access to all tools

18
● Set Staff Roles for Machine Data (My Equipment/JDLink™ telematics
system):
● None
○ No authorization for agronomic data.
○ No option to see equipment
● Subscriber
○ Authorized to view settings, landmarks, driving directions for authorized
equipment, org preferences and staff.
○ Can view but can’t edit
● Manager
○ Authorized to view and change settings, landmarks, driving directions for
authorized equipment and org preferences and staff.
○ Meaning you can’t edit how the information is transferred from machine to
Operation Center
○ Can’t see the terminals
● Admin
○ Authorized to view and change settings, landmarks, driving directions, org
preferences and manage access to machine information.
19
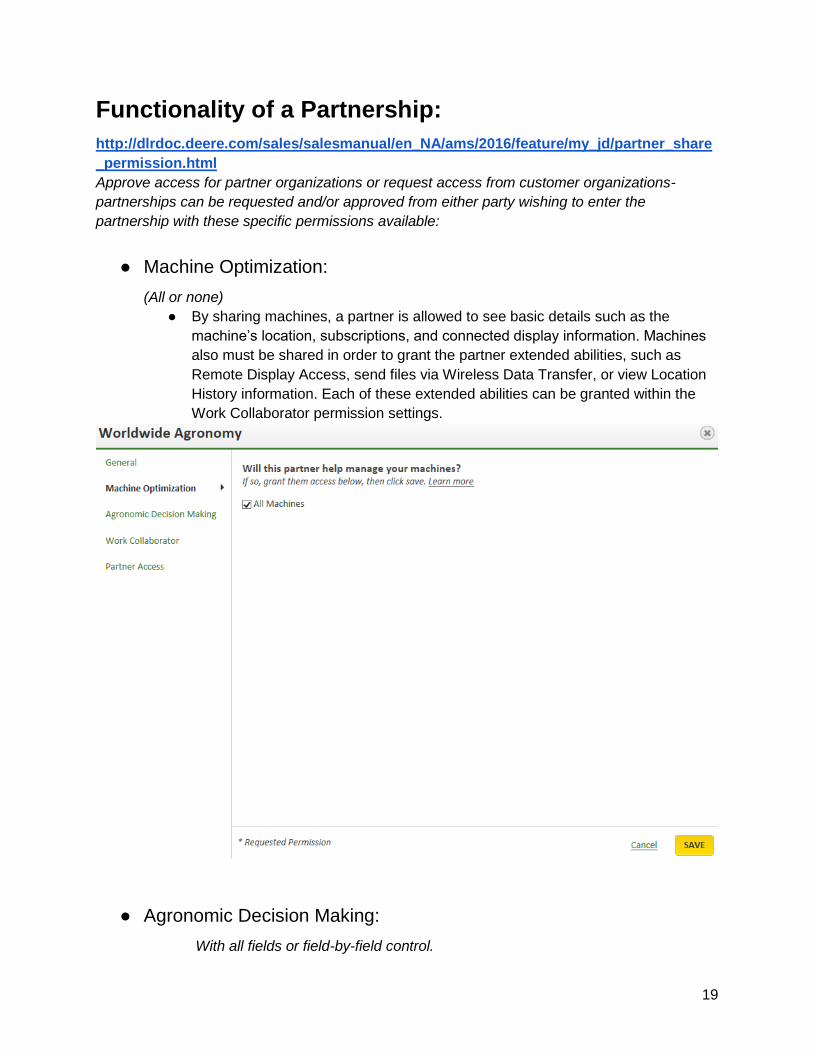
Functionality of a Partnership: http://dlrdoc.deere.com/sales/salesmanual/en_NA/ams/2016/feature/my_jd/partner_share
_permission.html
Approve access for partner organizations or request access from customer organizations-
partnerships can be requested and/or approved from either party wishing to enter the
partnership with these specific permissions available:
● Machine Optimization:
(All or none)
● By sharing machines, a partner is allowed to see basic details such as the
machine’s location, subscriptions, and connected display information. Machines
also must be shared in order to grant the partner extended abilities, such as
Remote Display Access, send files via Wireless Data Transfer, or view Location
History information. Each of these extended abilities can be granted within the
Work Collaborator permission settings.
● Agronomic Decision Making:
With all fields or field-by-field control.

20
● All Fields and Production Data
○ By selecting the All Fields and Production Data option, the partner will
also be granted access to raw documentation files, including any Cotton
or TimberMatic files.
○ Selecting this option will automatically share any additional fields that are
added to the organization in the future.
○ Sharing fields grants a partner access to the associated boundaries,
guidance lines and operational data
● Individual Field
○ Sharing an individual field will not grant access to documentation files, but
will allow the partner to export shapefiles for that field.
○ Sharing fields grants a partner access to the associated boundaries,
guidance lines and operational data
● No Fields or Production Data
○ By not selecting this option, your partner will not have access to your
fields. They will also not be able to create a setup file or view, create, or
edit a job because a job requires a field to be associated with it.

21
● Work Collaborator:
● Remote Display Access
○ Ability to remotely view capable onboard displays of machines for support
purposes. Requires machine permissions.
● View Location History
○ Access to see Location History lines for machines that have the capability
and have also been shared. Requires machine permissions.
● Send files to Machines
○ Ability to wirelessly send setup files and prescriptions to machines.
Requires machine permissions, view prescription for prescription files,
and create setup for setup files.
● View Prescription
○ Access to view, upload and download prescription files.
● Create Setup
○ Access to create, view, upload and download setup files.
● View Jobs
○ Ability to view jobs and Job Monitor for fields that have been shared.
● Create and edit jobs
Ability to create and edit jobs for fields that have been shared.

22
○
Partnership Capabilities: ● No Fields or Production Data
Cannot create a setup with no fields
Cannot view, create, or edit a job without having a field to associate with a job
● machine optimization, send files to machine, create setup
○ can see setup files
○ can send files to machine
○ No option to see fields
● Machine optimization, send files to machine, create setup, remote display access
○ Can see setup files
○ Can send files to the machine
○ No option to see fields
○ Can have remote display access
○ No doc files
● Machine optimization, send files to machine, create setup, view location history
○ Can see setup files
○ Can send files to the machine

23
○ No option to see fields
○ Can view location history
○ No doc files
● Machine optimization, send files to machine, create setup, remote display
access, view location history
○ Can see setup files
○ Can send files to the machine
○ No option to see fields
○ Can view location history
○ Can have remote display access
○ No doc files
● Machine optimization, send files to machine, create setup, remote display
access, view location history, view jobs
○ Can see setup files
○ Can send files to the machine
○ No option to see fields
○ Can view location history
○ Can have remote display access
○ No doc files
○ Job tab is available but no jobs show up
● Machine optimization, send files to machine, create setup, remote display
access, view location history, view jobs, create and edit jobs
○ Can see setup files
○ Can send files to the machine
○ No option to see fields
○ Can view location history
○ Can have remote display access
○ No doc files
○ Job tab is available but no jobs show up
○ Can create/edit jobs, but still no jobs
● Machine optimization, send files to machine, create setup, remote display
access, view location history, view jobs, create and edit jobs, view prescription
○ Can see setup files
○ Can see prescription file
○ Can send files to the machine
○ No option to see fields
○ Can view location history
○ Can have remote display access
○ No doc files
○ Job tab is available but no jobs show up
○ Can create/edit jobs, but still no jobs
● Machine optimization, create setup, create and edit jobs, send files to the
machine

24
○ Can see setup files
○ Can send files to the machine
○ Can view, edit or create jobs
○ No prescription/doc files
○ No option to see fields
○ No location history/display access

25
● All fields and Production Data
● Machine optimization
○ view field analyzer
○ view doc files
● machine optimization & view prescription:
○ able to view Rx file
○ not able to send files to machine
○ Can see .doc file
● machine optimization & send files to machine
○ Can only see doc files, No Rx/setup
○ Can send doc file to machine
● Machine optimization & create setup
○ Can see setup/doc files
○ Not able to send files to machine
● Machine optimization, create setup & view prescription
○ Can see all files
○ Cannot send files
● machine optimization, send files to machine, & view prescription
○ able to view Rx/doc files
○ Able to send files to machine
○ not able to view setup files
● Machine optimization, send files to machine, view prescription & create setup
○ Can see all files
○ Cannot send files
● machine optimization & send files to machine
○ can only see doc files
○ cannot see Rx or setup files
○ Can send files to machine
● Machine Optimization & Remote display access
○ Can see doc files
○ Can view remote display access
● Machine Optimization & View Location History
○ Can see location history
○ Can see doc files
● Machine Optimization, View Location History, & Remote Display Access
○ Can see doc files
○ Can view location history
○ Has access to remote display
● Machine Optimization, view location history, remote display access, & Send files
○ Can see doc files
○ Can send files to machine
○ Can view location history
○ Has access to remote display

26
● Machine Optimization, view location history, remote display access, view
prescription & Send files
○ Can see doc and Rx files
○ Can send files to machine
○ Can view location history
○ Has access to remote display
● Machine Optimization, view location history, remote display access, view
prescription, create setup & Send files
○ Can see doc, setup and Rx files
○ Can send files to machine
○ Can view location history
○ Has access to remote display
○ Can create a setup
● Machine Optimization, view location history, remote display access, view
prescription, create setup, view jobs & Send files
○ Can see doc, setup and Rx files
○ Can send files to machine
○ Can view location history
○ Has access to remote display
○ Can create a setup
○ Can view jobs
● Machine Optimization, view location history, remote display access, view
prescription, create setup, view jobs, create and edit jobs & Send files
○ Can see doc, setup and Rx files
○ Can send files to machine
○ Can view location history
○ Has access to remote display
○ Can create a setup
○ Can view, edit and create jobs