Embed Size (px)
Citation preview
Project Module ITE/CW/SYT
Module Unit Code: EC3029PA Page 1 of 23
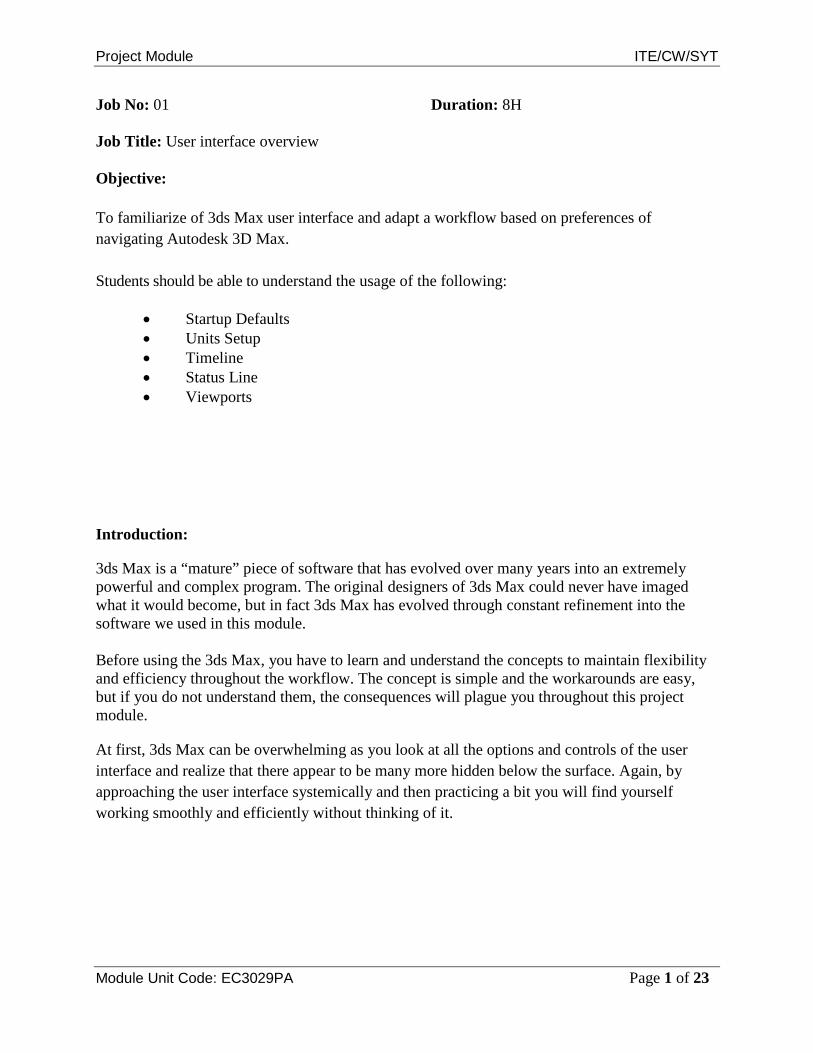
Job No: 01 Duration: 8H Job Title: User interface overview Objective: To familiarize of 3ds Max user interface and adapt a workflow based on preferences of navigating Autodesk 3D Max. Students should be able to understand the usage of the following:
• Startup Defaults • Units Setup • Timeline • Status Line • Viewports
Introduction:
3ds Max is a “mature” piece of software that has evolved over many years into an extremely powerful and complex program. The original designers of 3ds Max could never have imaged what it would become, but in fact 3ds Max has evolved through constant refinement into the software we used in this module. Before using the 3ds Max, you have to learn and understand the concepts to maintain flexibility and efficiency throughout the workflow. The concept is simple and the workarounds are easy, but if you do not understand them, the consequences will plague you throughout this project module.
At first, 3ds Max can be overwhelming as you look at all the options and controls of the user interface and realize that there appear to be many more hidden below the surface. Again, by approaching the user interface systemically and then practicing a bit you will find yourself working smoothly and efficiently without thinking of it.
Project Module ITE/CW/SYT
Module Unit Code: EC3029PA Page 2 of 23
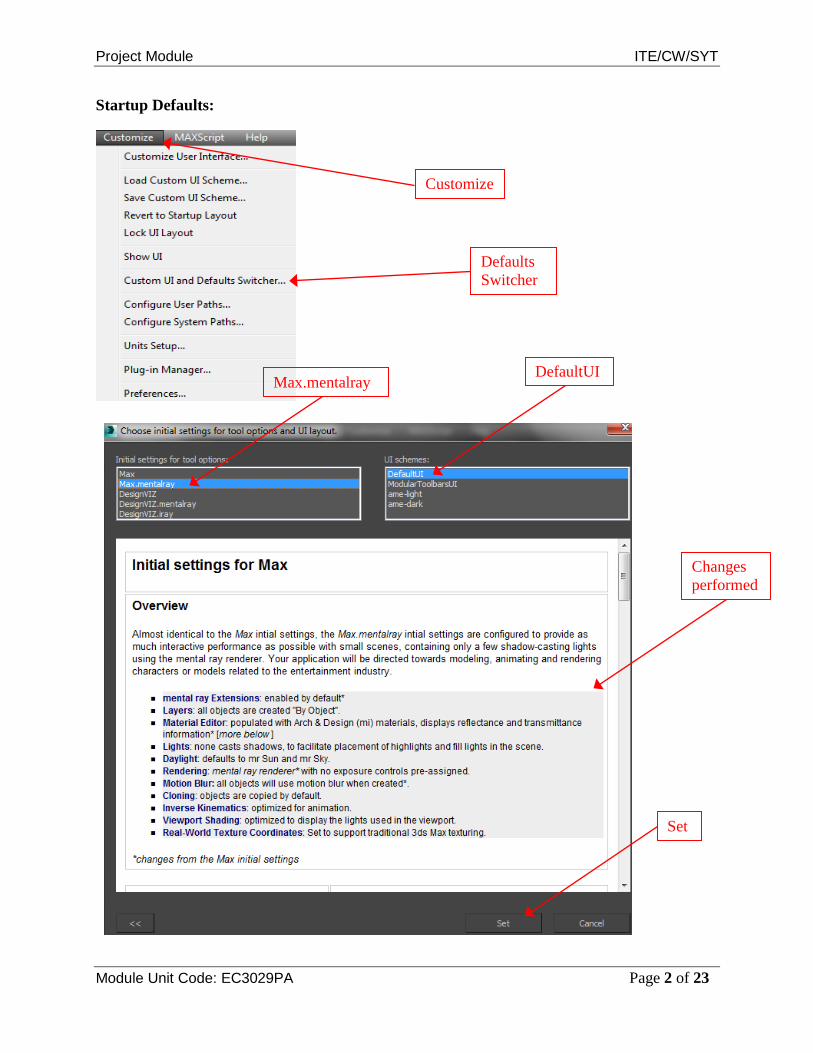
Startup Defaults:
Customize
DefaultUI
Changes performed
Max.mentalray
Defaults Switcher
Set
Project Module ITE/CW/SYT
Module Unit Code: EC3029PA Page 3 of 23
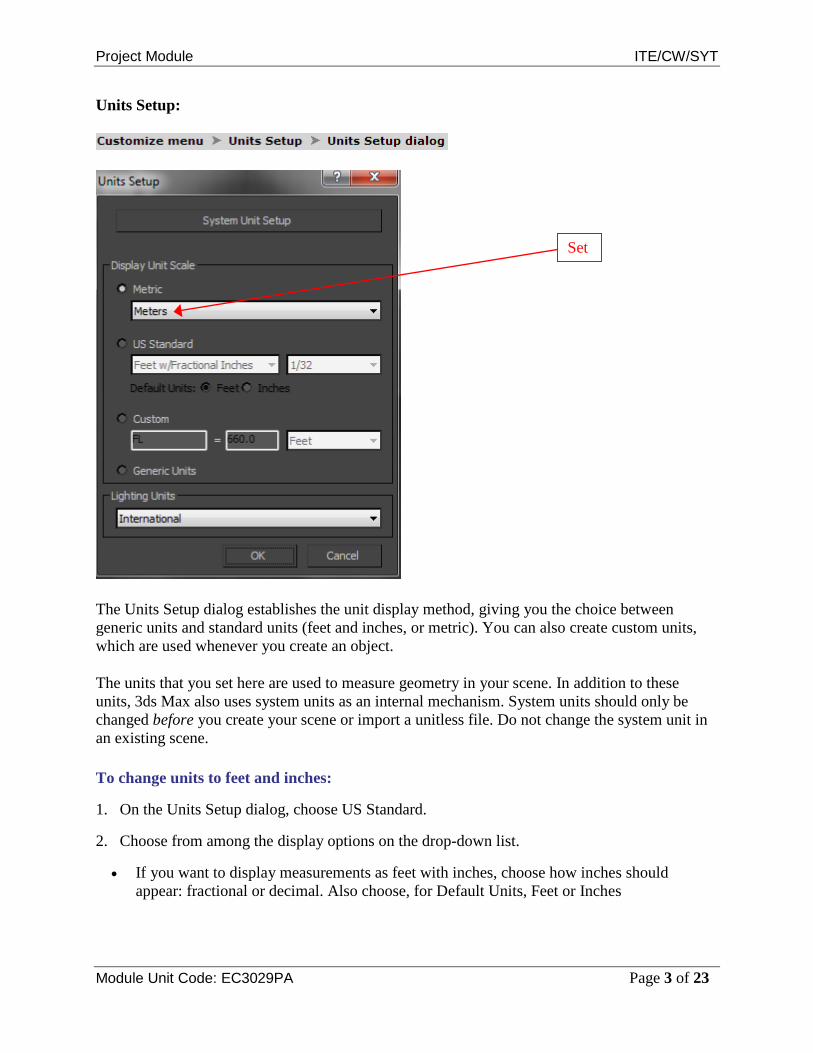
Units Setup:
The Units Setup dialog establishes the unit display method, giving you the choice between generic units and standard units (feet and inches, or metric). You can also create custom units, which are used whenever you create an object.
The units that you set here are used to measure geometry in your scene. In addition to these units, 3ds Max also uses system units as an internal mechanism. System units should only be changed before you create your scene or import a unitless file. Do not change the system unit in an existing scene.
To change units to feet and inches:
1. On the Units Setup dialog, choose US Standard.
2. Choose from among the display options on the drop-down list.
• If you want to display measurements as feet with inches, choose how inches should appear: fractional or decimal. Also choose, for Default Units, Feet or Inches
Set
Project Module ITE/CW/SYT
Module Unit Code: EC3029PA Page 4 of 23
• If you choose one of the Fractional display options, choose the fraction on the drop-down list to the right.
To enter fractions in numeric fields:
• When you enter fractions in numeric fields, they are converted to the correct units. For example, if units are set to Feet w/ Decimal Inches, and Default Units is set to Feet, type 37/45 and press Enter for the result 0'9.867", or 37/45'.
To enter a fraction and a units specifier, place the specifier after the divisor. For example, type 17/5', but not 17'/5.
To convert between unit types:
• You can convert between unit types by entering any valid unit specifier, along with the number, and then pressing Enter.
The number is converted to the current unit display type. For example, if units are set to Meters, type 1/2 to get the result 0.5M. However, if you type 1/2' or 6" the result is 0.152M.
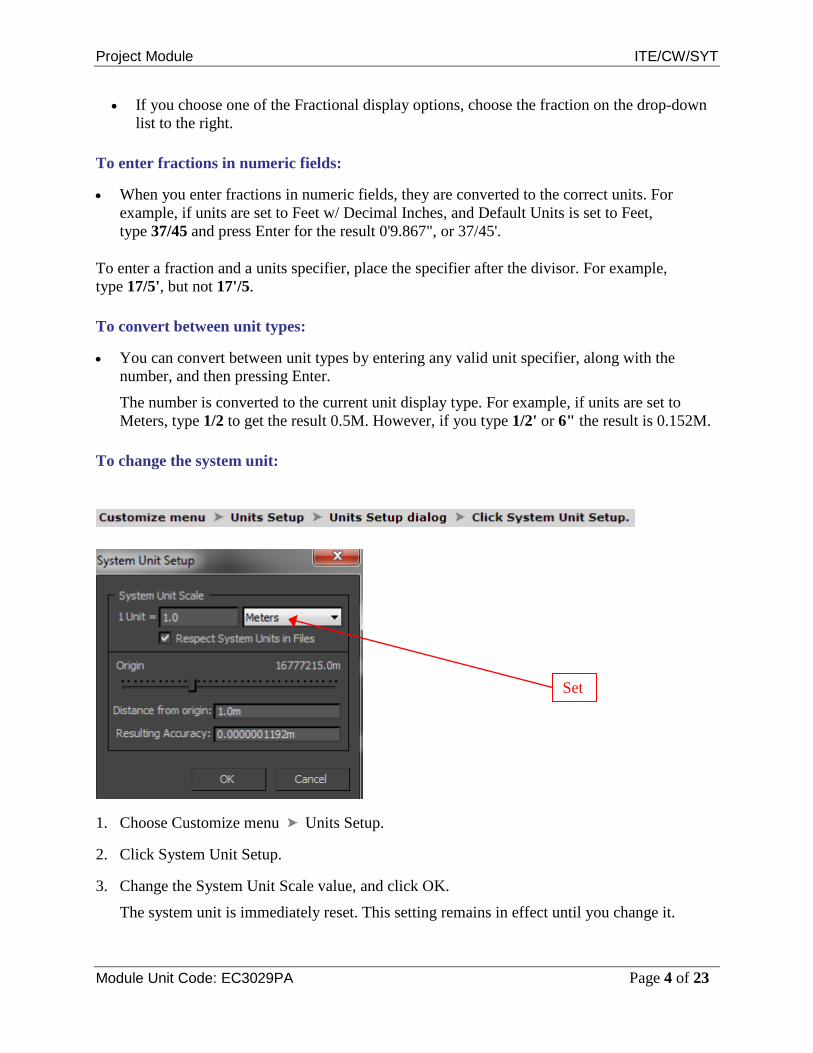
To change the system unit:
1. Choose Customize menu Units Setup.
2. Click System Unit Setup.
3. Change the System Unit Scale value, and click OK.
The system unit is immediately reset. This setting remains in effect until you change it.
Set

Project Module ITE/CW/SYT
Module Unit Code: EC3029PA Page 5 of 23
Timeline: A couple of elements running horizontally along the bottom of the viewports make up the timeline in 3ds Max; there is a frame slider button with 0/100 printed on it, and there is a ruler line with tick marks 0 through 100. Several buttons to the right and below the timeline allow you to create animation keys defining the keyframes animation.
Status Line: Just below the timeline, we have the MAXScript listener window and status lines that contain information relevant to the current functions you are performing in 3ds Max, as well as a couple of useful tool buttons and coordinate numeric fields. For new 3ds Max users, it is useful to glance at the status line to see if there are any prompts or information that might be helpful to your assignments and project.
Frame silder
Timeline Keyframe buttons
Status lines Listener window Tool
buttons Coordinate numeric fields
Project Module ITE/CW/SYT
Module Unit Code: EC3029PA Page 6 of 23
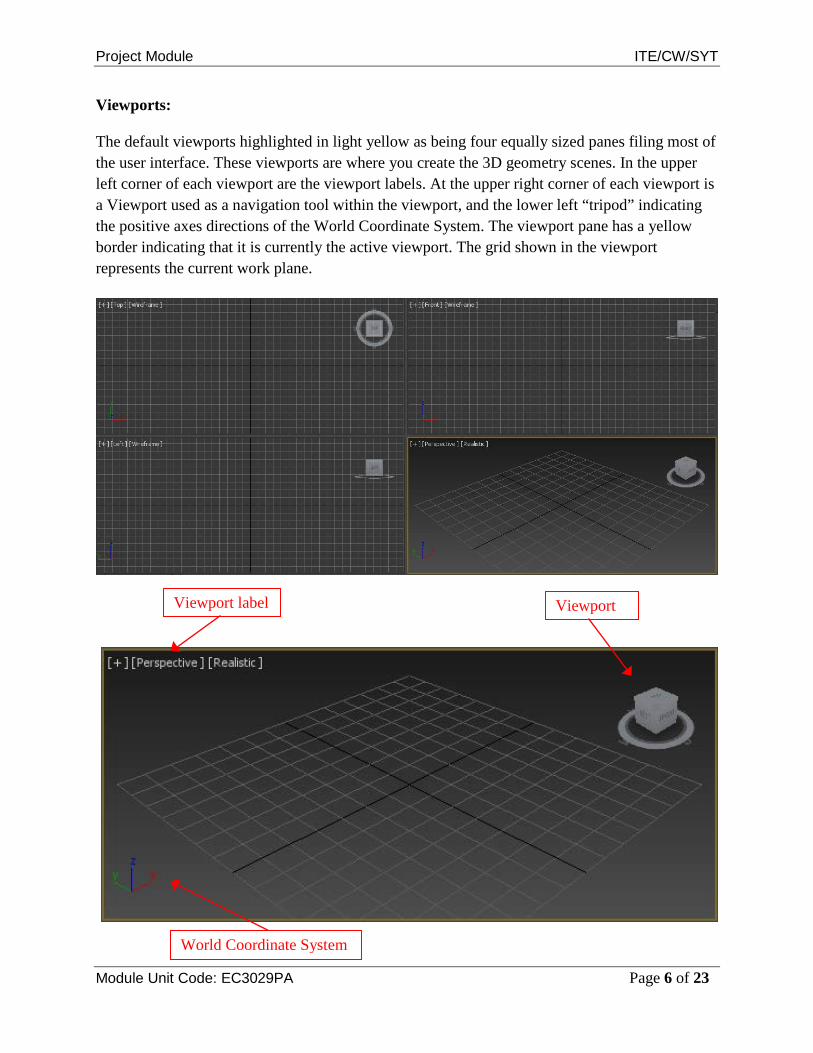
Viewports: The default viewports highlighted in light yellow as being four equally sized panes filing most of the user interface. These viewports are where you create the 3D geometry scenes. In the upper left corner of each viewport are the viewport labels. At the upper right corner of each viewport is a Viewport used as a navigation tool within the viewport, and the lower left “tripod” indicating the positive axes directions of the World Coordinate System. The viewport pane has a yellow border indicating that it is currently the active viewport. The grid shown in the viewport represents the current work plane.
Viewport label Viewport
World Coordinate System
Project Module ITE/CW/SYT
Module Unit Code: EC3029PA Page 7 of 23
Job No: 02 Duration: 8H Job Title: User interface overview Objective: To familiarize of 3ds Max user interface and adapt a workflow based on preferences of navigating Autodesk 3D Max. Students should be able to understand the usage of the following:
• Application Button • Pull-Down Menus • Main Toolbars • Command Panel
Project Module ITE/CW/SYT
Module Unit Code: EC3029PA Page 8 of 23
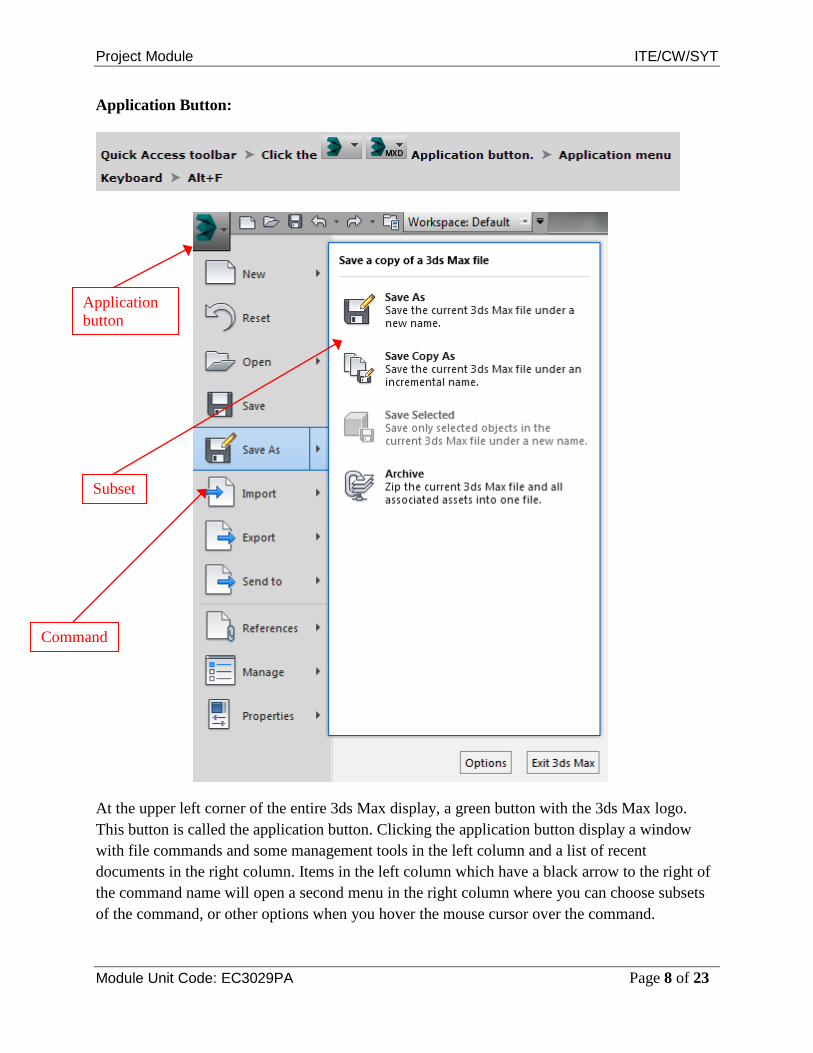
Application Button:
At the upper left corner of the entire 3ds Max display, a green button with the 3ds Max logo. This button is called the application button. Clicking the application button display a window with file commands and some management tools in the left column and a list of recent documents in the right column. Items in the left column which have a black arrow to the right of the command name will open a second menu in the right column where you can choose subsets of the command, or other options when you hover the mouse cursor over the command.
Application button
Subset
Command
Project Module ITE/CW/SYT
Module Unit Code: EC3029PA Page 9 of 23
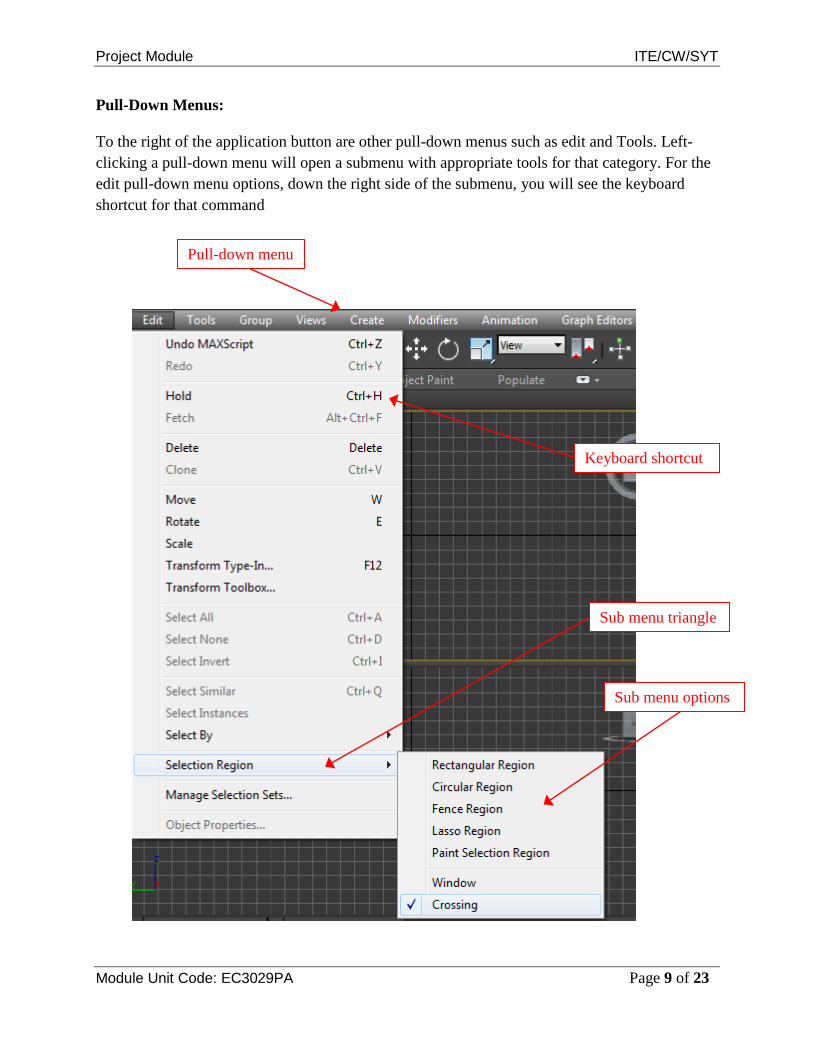
Sub menu triangle
Sub menu options
Pull-Down Menus: To the right of the application button are other pull-down menus such as edit and Tools. Left-clicking a pull-down menu will open a submenu with appropriate tools for that category. For the edit pull-down menu options, down the right side of the submenu, you will see the keyboard shortcut for that command
Pull-down menu
Keyboard shortcut
Project Module ITE/CW/SYT
Module Unit Code: EC3029PA Page 10 of 23
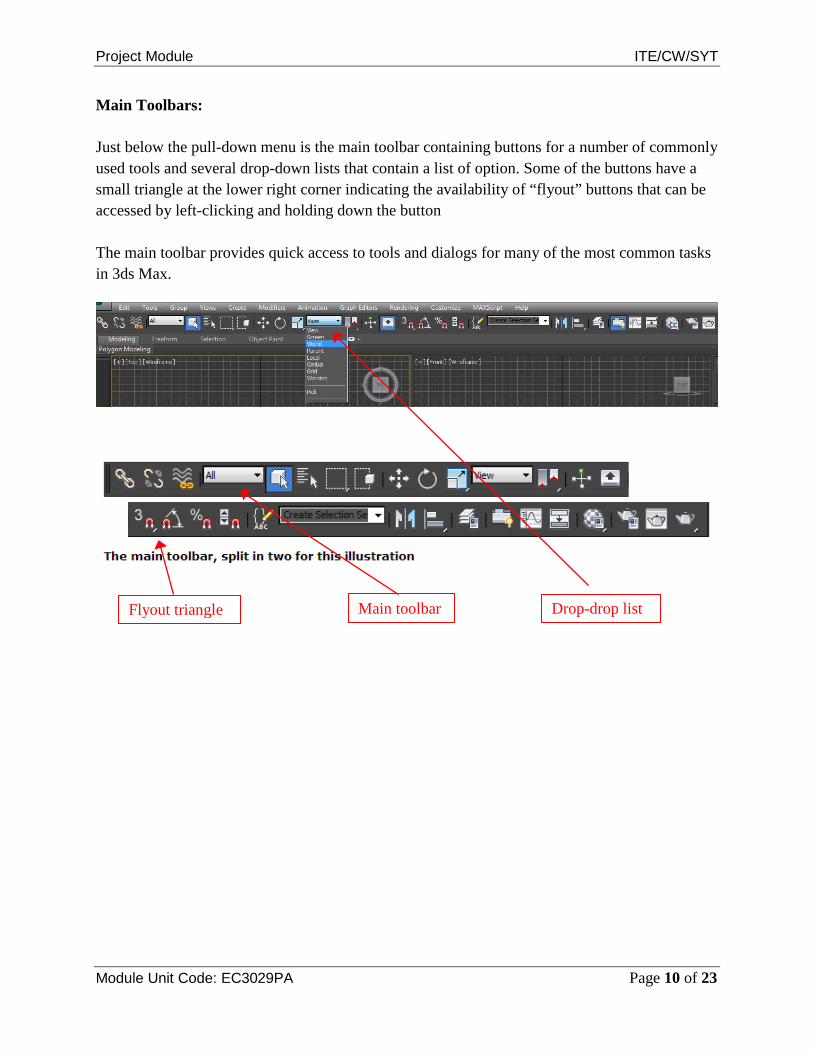
Main toolbar Flyout triangle Drop-drop list
Main Toolbars: Just below the pull-down menu is the main toolbar containing buttons for a number of commonly used tools and several drop-down lists that contain a list of option. Some of the buttons have a small triangle at the lower right corner indicating the availability of “flyout” buttons that can be accessed by left-clicking and holding down the button The main toolbar provides quick access to tools and dialogs for many of the most common tasks in 3ds Max.
Project Module ITE/CW/SYT
Module Unit Code: EC3029PA Page 11 of 23
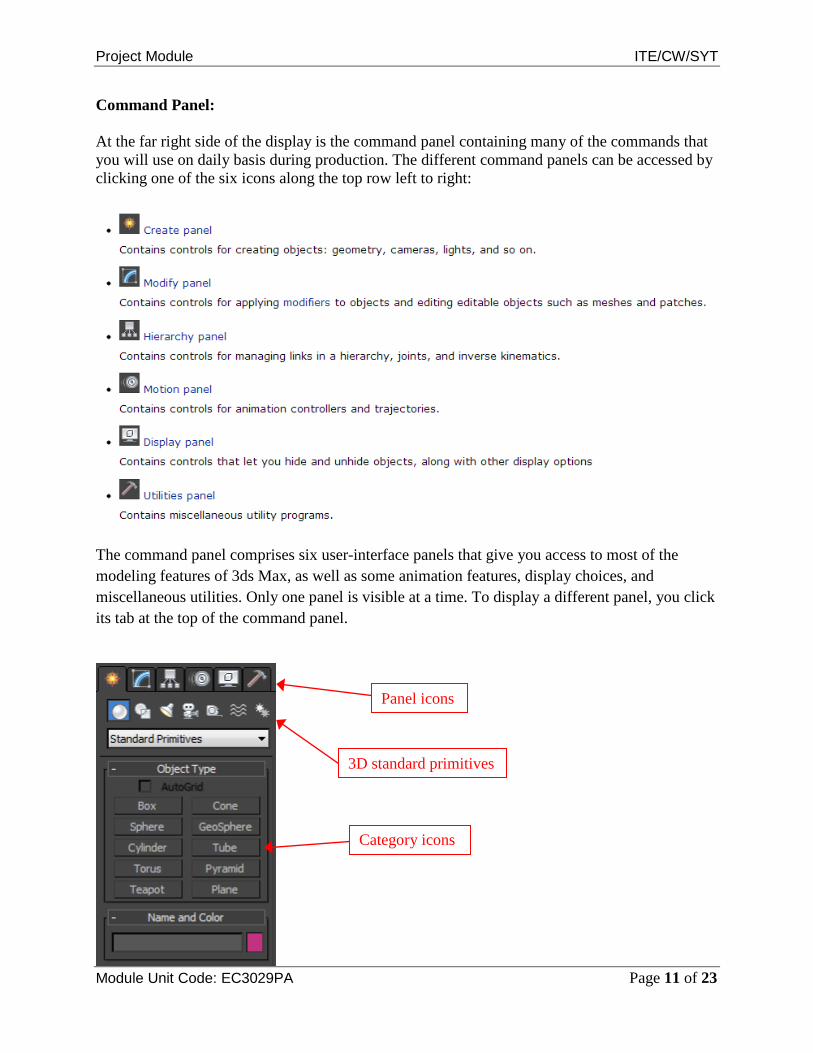
Panel icons
Category icons
3D standard primitives
Command Panel: At the far right side of the display is the command panel containing many of the commands that you will use on daily basis during production. The different command panels can be accessed by clicking one of the six icons along the top row left to right:
The command panel comprises six user-interface panels that give you access to most of the modeling features of 3ds Max, as well as some animation features, display choices, and miscellaneous utilities. Only one panel is visible at a time. To display a different panel, you click its tab at the top of the command panel.

Project Module ITE/CW/SYT
Module Unit Code: EC3029PA Page 12 of 23
Job No: 03 Duration: 8H Job Title: User interface overview Objective: To familiarize of 3ds Max user interface and adapt a workflow based on preferences of navigating Autodesk 3D Max. Students should be able to understand the usage of the following:
• Ribbon Menus • Navigation Button • File Management • Short-Cut Keys

Project Module ITE/CW/SYT
Module Unit Code: EC3029PA Page 13 of 23
Ribbon menu
Graphite Modeling Tools
Ribbon Menus:
The Ribbon menu is a “strip” of commands grouped according to types of workflows. The Ribbon contains many commonly used tools that are otherwise available only deep in the menu structure. The submenus can be accessed by hovering the mouse cursor over the command option you want to use. The selection commands for the Graphite Tools ribbon menu. Most of the options are grayed out because there are no appropriate objects selected in the scene.
Project Module ITE/CW/SYT
Module Unit Code: EC3029PA Page 14 of 23
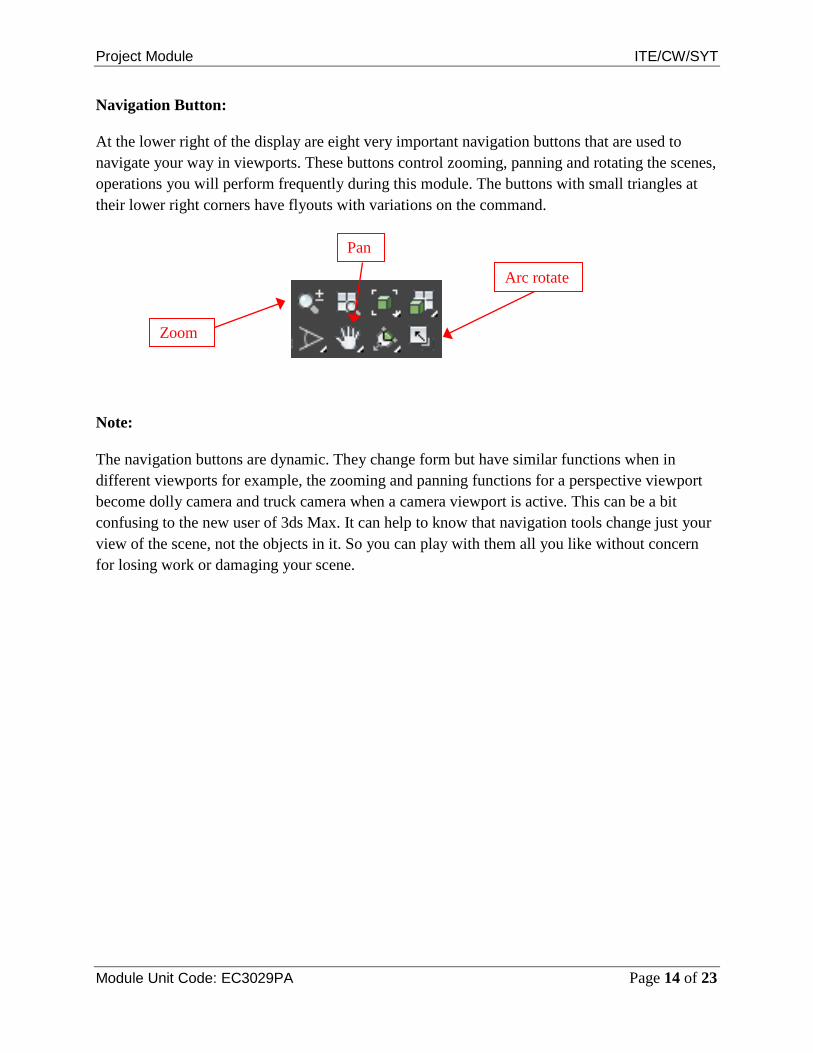
Arc rotate
Pan
Zoom
Navigation Button: At the lower right of the display are eight very important navigation buttons that are used to navigate your way in viewports. These buttons control zooming, panning and rotating the scenes, operations you will perform frequently during this module. The buttons with small triangles at their lower right corners have flyouts with variations on the command.
Note:
The navigation buttons are dynamic. They change form but have similar functions when in different viewports for example, the zooming and panning functions for a perspective viewport become dolly camera and truck camera when a camera viewport is active. This can be a bit confusing to the new user of 3ds Max. It can help to know that navigation tools change just your view of the scene, not the objects in it. So you can play with them all you like without concern for losing work or damaging your scene.
Project Module ITE/CW/SYT
Module Unit Code: EC3029PA Page 15 of 23
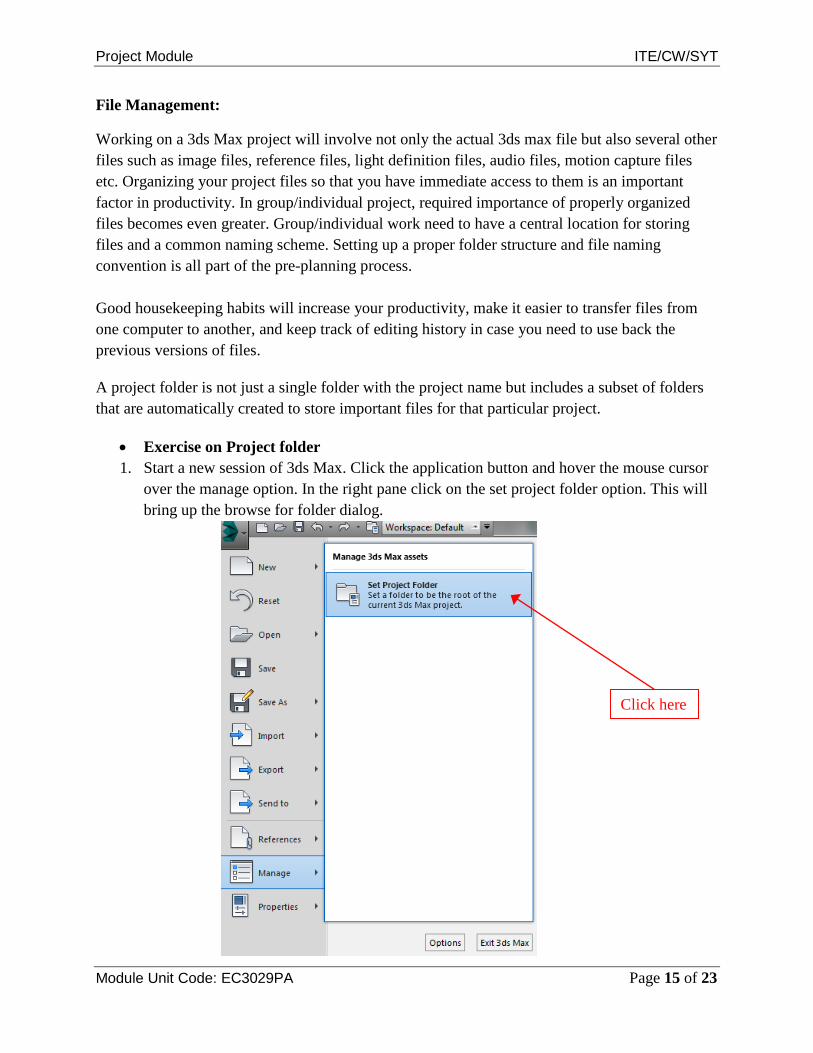
Click here
File Management:
Working on a 3ds Max project will involve not only the actual 3ds max file but also several other files such as image files, reference files, light definition files, audio files, motion capture files etc. Organizing your project files so that you have immediate access to them is an important factor in productivity. In group/individual project, required importance of properly organized files becomes even greater. Group/individual work need to have a central location for storing files and a common naming scheme. Setting up a proper folder structure and file naming convention is all part of the pre-planning process. Good housekeeping habits will increase your productivity, make it easier to transfer files from one computer to another, and keep track of editing history in case you need to use back the previous versions of files.
A project folder is not just a single folder with the project name but includes a subset of folders that are automatically created to store important files for that particular project.
• Exercise on Project folder 1. Start a new session of 3ds Max. Click the application button and hover the mouse cursor
over the manage option. In the right pane click on the set project folder option. This will bring up the browse for folder dialog.

Project Module ITE/CW/SYT
Module Unit Code: EC3029PA Page 16 of 23
Enter folder name
2. In the browse for folder dialog, navigate to the drive or folder where you want your projects stored, and then click the make new folder button. Rename the new folder with your project folder name (for example, your NAME_CLASS). Click the OK button to finish the process.
Project Module ITE/CW/SYT
Module Unit Code: EC3029PA Page 17 of 23
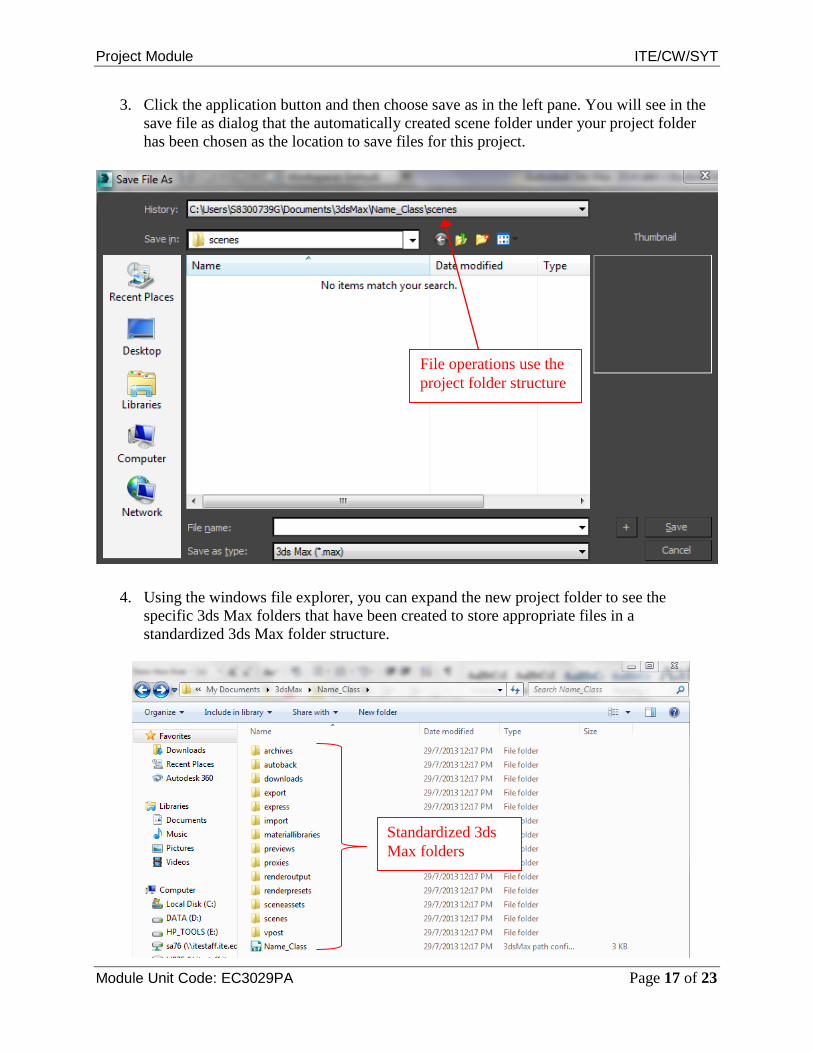
File operations use the project folder structure
Standardized 3ds Max folders
3. Click the application button and then choose save as in the left pane. You will see in the save file as dialog that the automatically created scene folder under your project folder has been chosen as the location to save files for this project.
4. Using the windows file explorer, you can expand the new project folder to see the
specific 3ds Max folders that have been created to store appropriate files in a standardized 3ds Max folder structure.
Project Module ITE/CW/SYT
Module Unit Code: EC3029PA Page 18 of 23
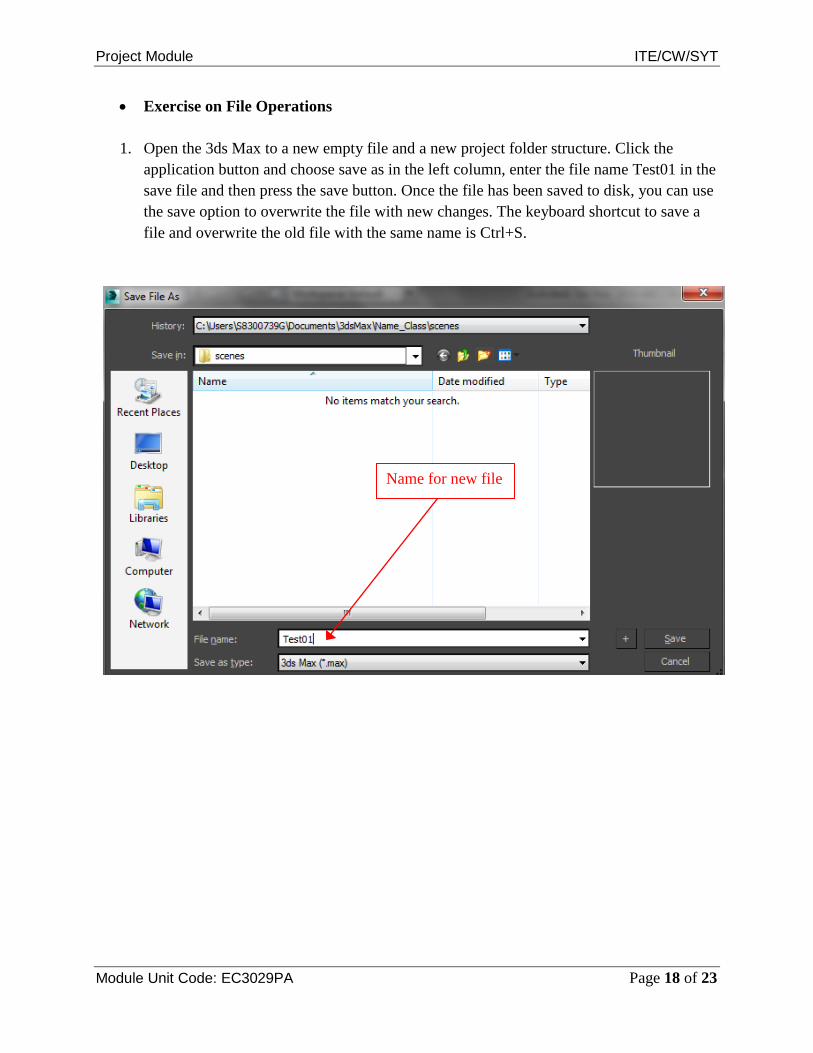
Name for new file
• Exercise on File Operations
1. Open the 3ds Max to a new empty file and a new project folder structure. Click the application button and choose save as in the left column, enter the file name Test01 in the save file and then press the save button. Once the file has been saved to disk, you can use the save option to overwrite the file with new changes. The keyboard shortcut to save a file and overwrite the old file with the same name is Ctrl+S.
Project Module ITE/CW/SYT
Module Unit Code: EC3029PA Page 19 of 23
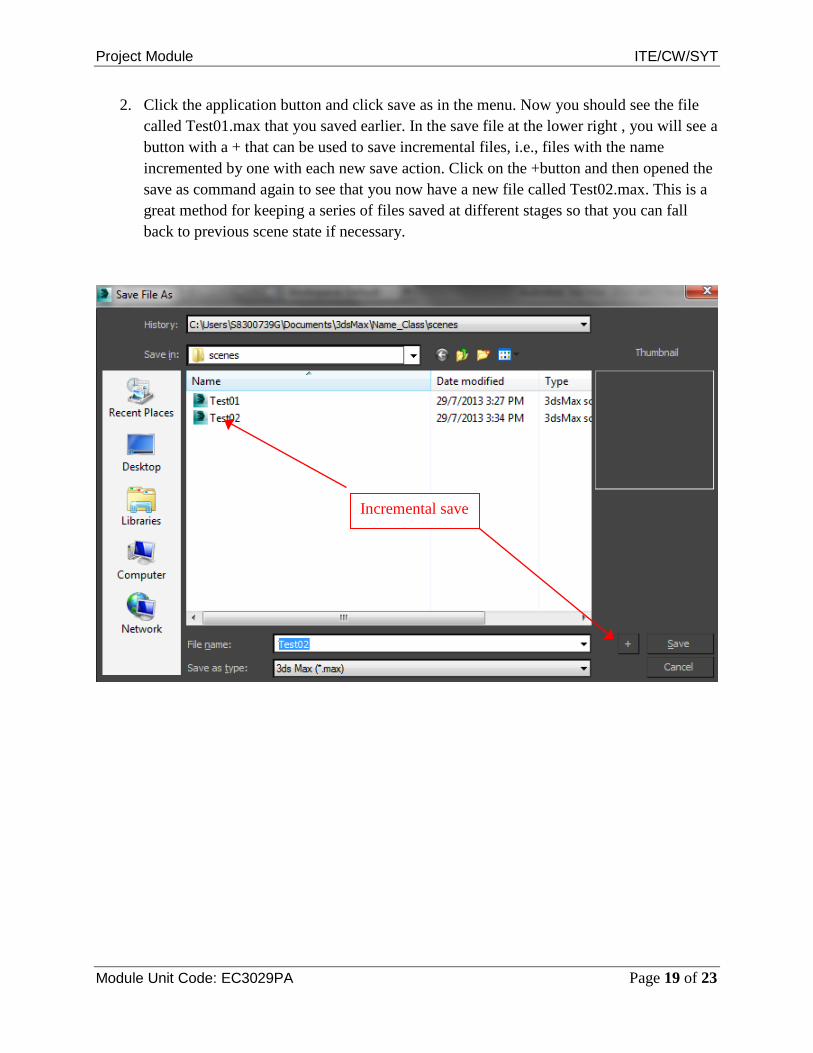
Incremental save
2. Click the application button and click save as in the menu. Now you should see the file called Test01.max that you saved earlier. In the save file at the lower right , you will see a button with a + that can be used to save incremental files, i.e., files with the name incremented by one with each new save action. Click on the +button and then opened the save as command again to see that you now have a new file called Test02.max. This is a great method for keeping a series of files saved at different stages so that you can fall back to previous scene state if necessary.

Project Module ITE/CW/SYT
Module Unit Code: EC3029PA Page 20 of 23
Open preferences dialog
Auto backup settings
• Exercise on Backup Files 1. Click the customize pull-down menu and choose preferences in the submenu. Backup
setting are not found in the application menu even though it is a file operation.
2. In the preferences settings dialog, click the files tab and in the lower left corner you will see an auto backup area with the auto backup feature automatically enabled. The number of backup files is set to 3 and the backup interval is set to 5 minutes by default. This means that for every 5 minutes, 3ds Max will create a new backup file, and 5 minute later, it will create a third backup file. Five minute later, the first backup file (the oldest one) will be overwritten, and the process will continue throughout the working session.
Project Module ITE/CW/SYT
Module Unit Code: EC3029PA Page 21 of 23
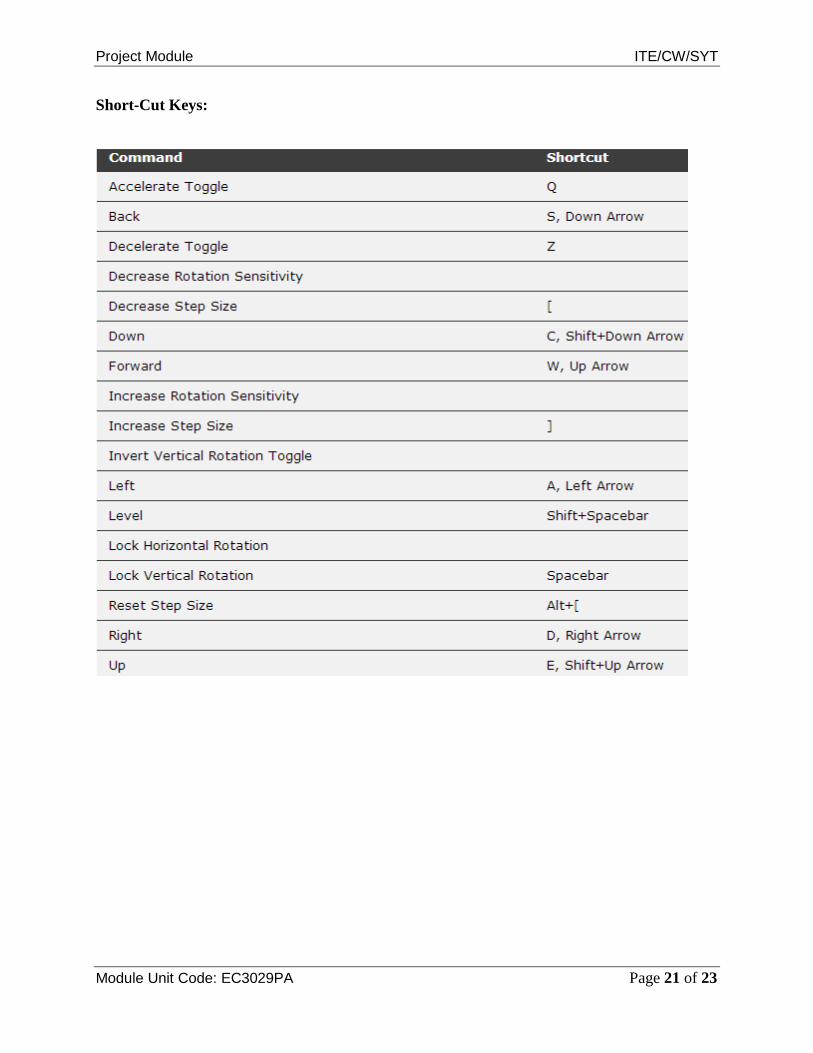
Short-Cut Keys:
Project Module ITE/CW/SYT
Module Unit Code: EC3029PA Page 22 of 23
Open Environment G – Hide/Show Grid J – Show Selection Bracket Toggle M - bring up material editorZ - reset all viewports Hold Mouse Middle Button/scrollwheer - Pan V – Open view shortcut menu. Z – Zooms in on the current selection CTRL-X – Toggle Expert mode ALT-Q – Isolate Object O – Adaptive Degradation Toggle X – Transform Gizmo Toggle D – Disables the viewport Shift-Z / Shift-Y – Undo /Redo viewport operation + and – – Increase/decrease Gizmo size CTRL-V – Clone object Alt-X – Display As See-Through Toggle
Editable Poly Alt-L – Select Edge Loop ALT-C – Cut SHIFT -E / ALT-E – Extrude poly - Enable Extrude tool.
Selection Keys Q – Select W – Select and Move E – Select and Rotate R – Select and Scale H – Select by Name F2 – Shade selected faces toggle F3 – Toggle between Wireframe and Smooth + Highlights F4 – View Edged Faces CTRL-A – Select all CTRL-D – Deselect all Spacebar – Selection Lock toggle
Project Module ITE/CW/SYT
Module Unit Code: EC3029PA Page 23 of 23
Viewport Hotkeys F – Switch to the Front viewport T – Switch to the Top viewport L – Switch to the Left viewport R – Switch to the Right viewport P – Switch to the Perspective viewport B – Switch to the Bottom viewport C – Switch to a Camera viewport Sub-object level X Selection 1 – Vertex 2 – Edge 3 – Border 4 – Polygon 5 – Element 7 - Polygon Counter Rendering F9 – Render last rendered viewport, or selected viewport. Shift-Q – Quick renders selected viewport. F10 – Opens the Render Scene window allowing you to set rendering options. M – Brings up Material Editor Create Your own Shortcuts 1. Choose Customize menu > Customize User Interface > Keyboard panel. 2. Use the Group and Category lists to find the desired action 3. Click action. 4. In the Hotkey field, enter the keyboard shortcut you want to assign to the action. 5. Click Assign. Note: search for Default Keyboard Shortcuts in the 3D Studio MAX user reference for a complete overview.