Embed Size (px)
Citation preview
April 2021 GM1021E2-1 (Edition 1) FUJIFILM Business Innovation Corp.
Job History ExportUser Guide
• Adobe, and PostScript are trademarks or registered trademarks of Adobe in the United Statesand other countries.
• Microsoft and Excel are registered trademarks of US Microsoft Corporation in the U.S. and othercountries.
• All product and company names are registered trademarks or trademarks of their respectiveowners.
• Microsoft product screen shots reprinted with permission from Microsoft Corporation.
Important• This manual may not be edited, modified or copied in whole or part without the written consent
of the publisher.• Parts of this manual is subject to change without prior notice.• The screen shots and the illustrations in this manual are used as examples. They may differ from
yours depending on the model, the software, or the OS.
FUJIFILM and FUJIFILM logo are registered trademarks or trademarks of FUJIFILM Corporation.DocuWorks is a registered trademark or a trademark of FUJIFILM Business Innovation Corp. in Japan and/or other countries.
3
Using This Guide
Before using the machine, please read this manual thoroughly. Be sure to keep this manual for future reference.
Conventions■ In this manual, hard disks and solid state drives are collectively referred to as
"storage".■ The following icons are used in this guide, depending on the content described.
ImportantIndicates important information you have to know or be reminded before operations.Note
Indicates supplemental information useful for operation.Refer
Indicates references to other chapters and manuals.
■ The following symbols are used in this guide.
" " • A cross-reference included in this guide.• Names of features, touch screen messages and input text.• The guides to be referred.
[ ] • Folders, files, applications, button or menu names displayed on the touch screen.
• Names of menus, commands, windows, or dialog boxes displayed on the computer screen and their buttons and menu names.
{ } • This indicates the variable value depending on the operation or operating environment.For example: [{Login User Name}] is displayed.
< > button • Hardware buttons on the control panel.
< > key • Keys on the keyboard of the computer.
> • Represents abbreviation of procedure for selecting items in order on the operation panel or computer, and referenced items.
1 Overview of Job History Export
4
1 Overview of Job History ExportWhat You Can Do with Job History Export
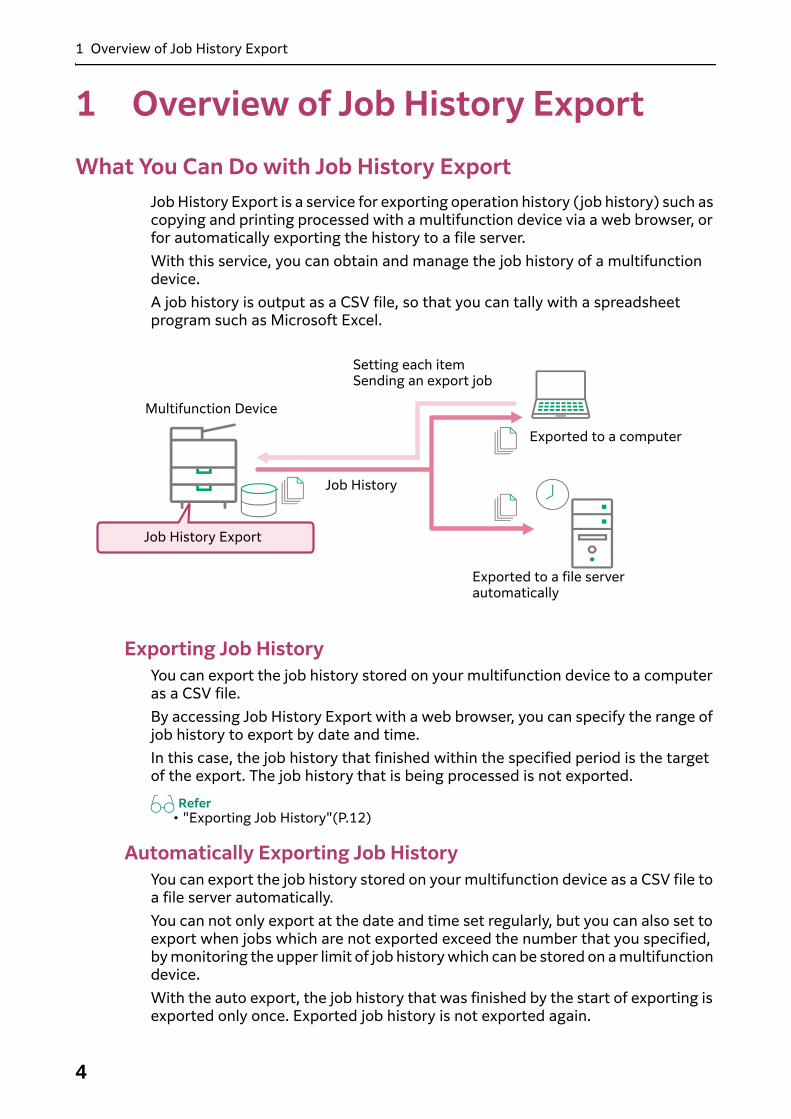
Job History Export is a service for exporting operation history (job history) such as copying and printing processed with a multifunction device via a web browser, or for automatically exporting the history to a file server.With this service, you can obtain and manage the job history of a multifunction device.A job history is output as a CSV file, so that you can tally with a spreadsheet program such as Microsoft Excel.
Exporting Job HistoryYou can export the job history stored on your multifunction device to a computer as a CSV file.By accessing Job History Export with a web browser, you can specify the range of job history to export by date and time.In this case, the job history that finished within the specified period is the target of the export. The job history that is being processed is not exported.
Refer• "Exporting Job History"(P.12)
Automatically Exporting Job HistoryYou can export the job history stored on your multifunction device as a CSV file to a file server automatically.You can not only export at the date and time set regularly, but you can also set to export when jobs which are not exported exceed the number that you specified, by monitoring the upper limit of job history which can be stored on a multifunction device.With the auto export, the job history that was finished by the start of exporting is exported only once. Exported job history is not exported again.
Exported to a computer
Exported to a file server automatically
Job History Export
Multifunction Device
Job History
Setting each itemSending an export job
1 Overview of Job History Export
5
For the destination to export, you can set a file sever which communicates via the Server Message Block (SMB) protocol.
Refer• "Setting Auto Export"(P.10)
Format Setting of Job History FileYou can set the encoding to output the job history information, the format of the date and time in the job history, and the language of the header line of the job history.The job information of one job is output as one line.For a name of the output file, the date and time is added. The format of the date and time follows the setting of a multifunction device. Other than the date and time, you can set whether to add any text string and the identity information obtained from a multifunction device.
Refer• The setting of the file format → "Setting the Format of a File to Output the Job
History"(P.8)• The output job information → "8 Appendix"(P.18)
Re-export of Job HistoryYou can manually re-export job history that failed to be automatically exported.If you re-export the job history, the date that was originally set so that it was automatically exported is added to the output file name.For example, if you specify the export method to “Monthly, Month End, 23:00”, and then if you stop the SMB server from June 20 2017 to July 10 2017 and you re-export the job history on July 10 2017, the date value that is added to the file name will be “20170630_2300”.The destination to be re-exported is in accordance with the Auto Export Settings.
Refer• "Re-exporting Job History"(P.13)
2 Operating Environment
6
2 Operating EnvironmentMultifunction Device
Job History Export works in the following environment. If the environment of your multifunction device does not meet the following conditions, add the required options.• A storage is equipped inside a multifunction device.• The system memory is more than 2 GB.• The printer kit is equipped.• The multifunction device is connected to a network.
You can check the storage and the system memory of your multifunction device by the following procedures.
Steps0 1 Select [Device] > [Information & Reports].
2 Press [Machine Configuration].
3 Check that [Storage] is shown on the screen, and the value for [System Memory Size] is 2,048 MB or larger.
File ServerThe file server that can communicate in the Server Message Block (SMB) protocol. Hereafter, referred as the SMB server.For details of the sorts of supported SMB servers or the information related to the SMB protocol communication, refer to the description of the SMB transfer feature in the guides provided with each machine.
3 Environmental Settings
7
3 Environmental SettingsThis chapter describes the environment settings of your multifunction device to use Job History Export.
Note• Enable Custom Services and Embedded Plug-ins to use this service.
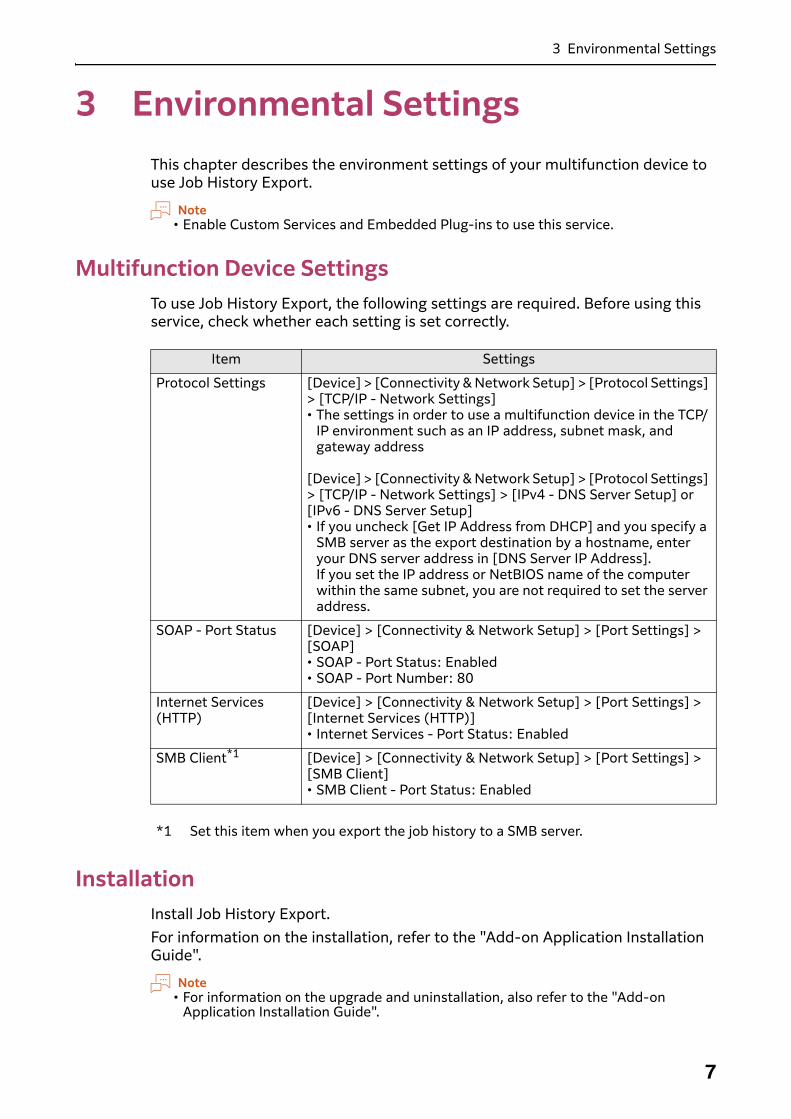
Multifunction Device SettingsTo use Job History Export, the following settings are required. Before using this service, check whether each setting is set correctly.
InstallationInstall Job History Export.For information on the installation, refer to the "Add-on Application Installation Guide".
Note• For information on the upgrade and uninstallation, also refer to the "Add-on
Application Installation Guide".
Item Settings
Protocol Settings [Device] > [Connectivity & Network Setup] > [Protocol Settings] > [TCP/IP - Network Settings]• The settings in order to use a multifunction device in the TCP/
IP environment such as an IP address, subnet mask, and gateway address
[Device] > [Connectivity & Network Setup] > [Protocol Settings] > [TCP/IP - Network Settings] > [IPv4 - DNS Server Setup] or [IPv6 - DNS Server Setup]• If you uncheck [Get IP Address from DHCP] and you specify a
SMB server as the export destination by a hostname, enter your DNS server address in [DNS Server IP Address].If you set the IP address or NetBIOS name of the computer within the same subnet, you are not required to set the server address.
SOAP - Port Status [Device] > [Connectivity & Network Setup] > [Port Settings] > [SOAP]• SOAP - Port Status: Enabled• SOAP - Port Number: 80
Internet Services (HTTP)
[Device] > [Connectivity & Network Setup] > [Port Settings] > [Internet Services (HTTP)]• Internet Services - Port Status: Enabled
SMB Client*1 [Device] > [Connectivity & Network Setup] > [Port Settings] > [SMB Client]• SMB Client - Port Status: Enabled
*1 Set this item when you export the job history to a SMB server.
4 Operation of Job History Export
8
4 Operation of Job History ExportDisplaying the Setting Screen of Job History Export
Steps0 1 Start your computer, and then start a web browser.
2 Enter the IP address of your multifunction device or internet address in the address bar of a web browser.The Internet Services is started.
3 Enter the system administration mode.
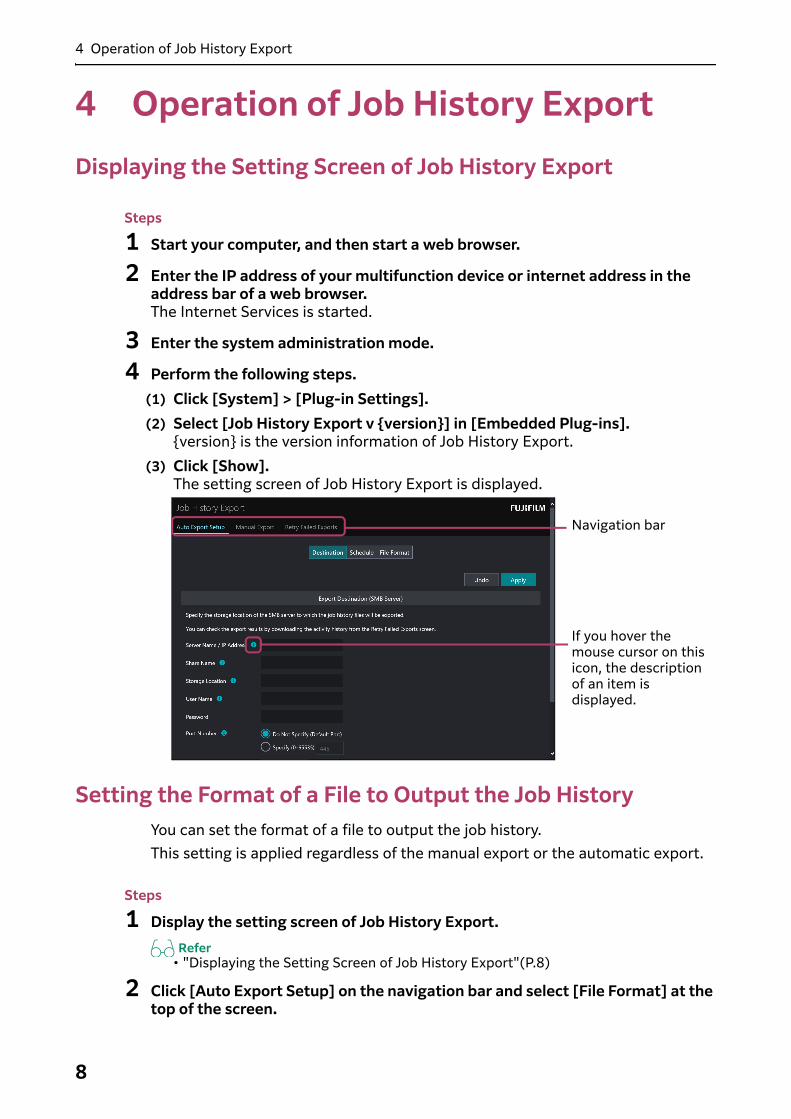
4 Perform the following steps.(1) Click [System] > [Plug-in Settings].(2) Select [Job History Export v {version}] in [Embedded Plug-ins].
{version} is the version information of Job History Export.(3) Click [Show].
The setting screen of Job History Export is displayed.
Setting the Format of a File to Output the Job HistoryYou can set the format of a file to output the job history.This setting is applied regardless of the manual export or the automatic export.
Steps0 1 Display the setting screen of Job History Export.
Refer• "Displaying the Setting Screen of Job History Export"(P.8)
2 Click [Auto Export Setup] on the navigation bar and select [File Format] at the top of the screen.
Navigation bar
If you hover the mouse cursor on this icon, the description of an item is displayed.
4 Operation of Job History Export
9
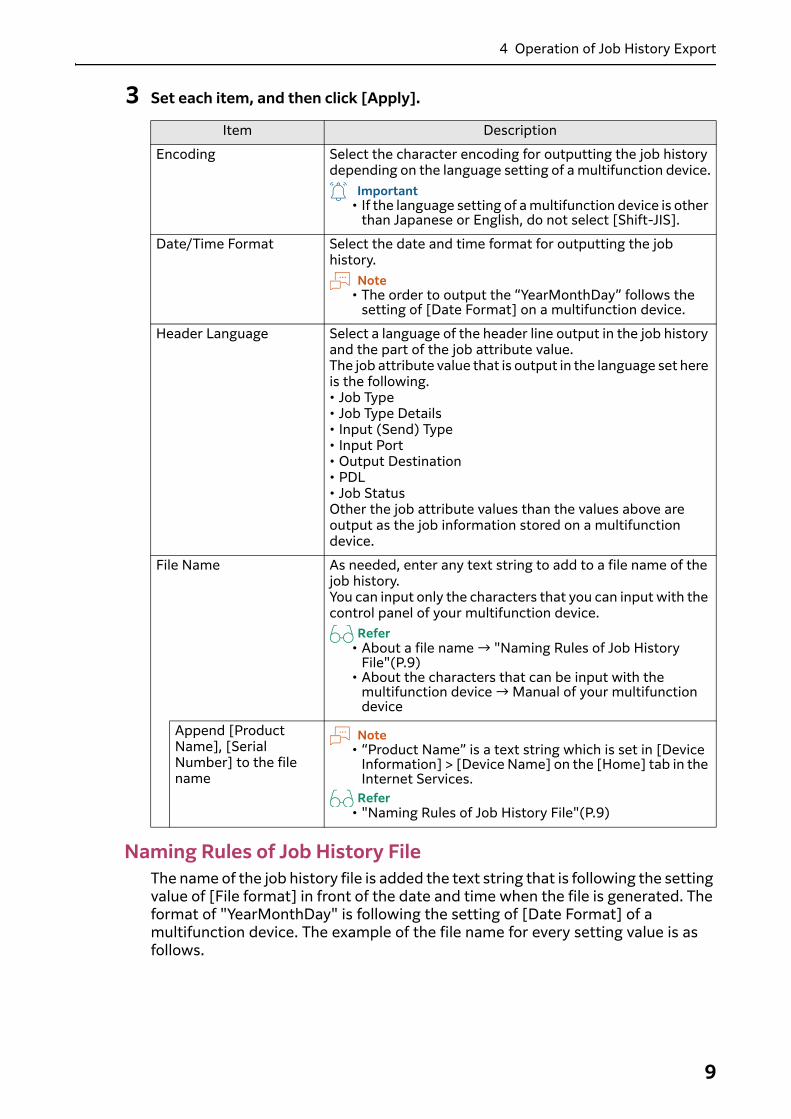
3 Set each item, and then click [Apply].
Naming Rules of Job History FileThe name of the job history file is added the text string that is following the setting value of [File format] in front of the date and time when the file is generated. The format of "YearMonthDay" is following the setting of [Date Format] of a multifunction device. The example of the file name for every setting value is as follows.
Item Description
Encoding Select the character encoding for outputting the job history depending on the language setting of a multifunction device.
Important• If the language setting of a multifunction device is other
than Japanese or English, do not select [Shift-JIS].
Date/Time Format Select the date and time format for outputting the job history.
Note• The order to output the “YearMonthDay” follows the
setting of [Date Format] on a multifunction device.
Header Language Select a language of the header line output in the job history and the part of the job attribute value.The job attribute value that is output in the language set here is the following.• Job Type• Job Type Details• Input (Send) Type• Input Port• Output Destination• PDL• Job StatusOther the job attribute values than the values above are output as the job information stored on a multifunction device.
File Name As needed, enter any text string to add to a file name of the job history.You can input only the characters that you can input with the control panel of your multifunction device.
Refer• About a file name → "Naming Rules of Job History
File"(P.9)• About the characters that can be input with the
multifunction device → Manual of your multifunction device
Append [Product Name], [Serial Number] to the file name
Note• “Product Name” is a text string which is set in [Device
Information] > [Device Name] on the [Home] tab in the Internet Services.
Refer• "Naming Rules of Job History File"(P.9)
4 Operation of Job History Export
10
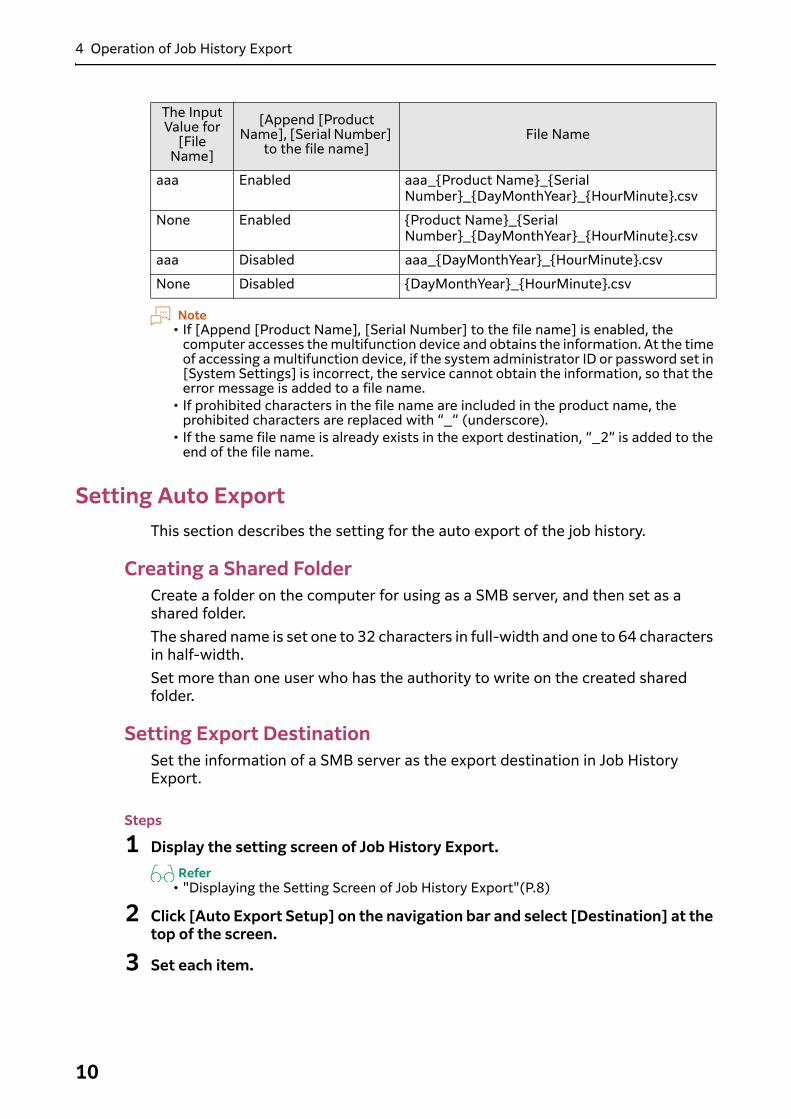
Note• If [Append [Product Name], [Serial Number] to the file name] is enabled, the
computer accesses the multifunction device and obtains the information. At the time of accessing a multifunction device, if the system administrator ID or password set in [System Settings] is incorrect, the service cannot obtain the information, so that the error message is added to a file name.
• If prohibited characters in the file name are included in the product name, the prohibited characters are replaced with “_” (underscore).
• If the same file name is already exists in the export destination, “_2” is added to the end of the file name.
Setting Auto ExportThis section describes the setting for the auto export of the job history.
Creating a Shared FolderCreate a folder on the computer for using as a SMB server, and then set as a shared folder.The shared name is set one to 32 characters in full-width and one to 64 characters in half-width.Set more than one user who has the authority to write on the created shared folder.
Setting Export DestinationSet the information of a SMB server as the export destination in Job History Export.
Steps0 1 Display the setting screen of Job History Export.
Refer• "Displaying the Setting Screen of Job History Export"(P.8)
2 Click [Auto Export Setup] on the navigation bar and select [Destination] at the top of the screen.
3 Set each item.
The Input Value for
[File Name]
[Append [Product Name], [Serial Number]
to the file name]File Name
aaa Enabled aaa_{Product Name}_{Serial Number}_{DayMonthYear}_{HourMinute}.csv
None Enabled {Product Name}_{Serial Number}_{DayMonthYear}_{HourMinute}.csv
aaa Disabled aaa_{DayMonthYear}_{HourMinute}.csv
None Disabled {DayMonthYear}_{HourMinute}.csv
4 Operation of Job History Export
11
4 If you want to check whether the setting is correct, click [Send Empty File].If the setting is correct, the job history file that followed the setting input and is only the header line is exported.If an error message appears, refer to "5 Troubleshooting"(P.14) to find the appropriate solution, and troubleshoot the error.
5 Click [Apply].
Setting Export MethodSet the method for the auto export.
Steps0 1 Display the setting screen of Job History Export.
Refer• "Displaying the Setting Screen of Job History Export"(P.8)
2 Click [Auto Export Setup] on the navigation bar and select [Schedule] at the top of the screen.
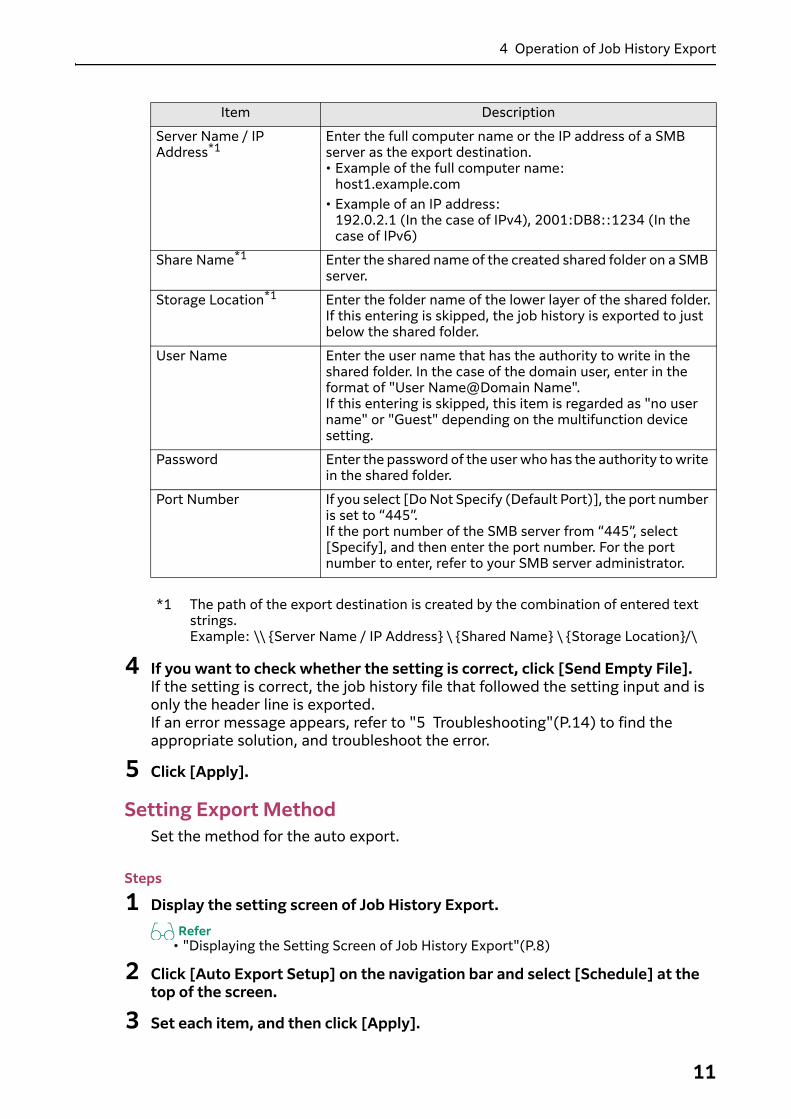
3 Set each item, and then click [Apply].
Item Description
Server Name / IP Address*1
Enter the full computer name or the IP address of a SMB server as the export destination.• Example of the full computer name:
host1.example.com• Example of an IP address:
192.0.2.1 (In the case of IPv4), 2001:DB8::1234 (In the case of IPv6)
Share Name*1 Enter the shared name of the created shared folder on a SMB server.
Storage Location*1 Enter the folder name of the lower layer of the shared folder.If this entering is skipped, the job history is exported to just below the shared folder.
User Name Enter the user name that has the authority to write in the shared folder. In the case of the domain user, enter in the format of "User Name@Domain Name".If this entering is skipped, this item is regarded as "no user name" or "Guest" depending on the multifunction device setting.
Password Enter the password of the user who has the authority to write in the shared folder.
Port Number If you select [Do Not Specify (Default Port)], the port number is set to “445”.If the port number of the SMB server from “445”, select [Specify], and then enter the port number. For the port number to enter, refer to your SMB server administrator.
*1 The path of the export destination is created by the combination of entered text strings.Example: \\ {Server Name / IP Address} \ {Shared Name} \ {Storage Location}/\
4 Operation of Job History Export
12
About the Retry ProcessThe file that is exported by the retry process is the job history that cannot be exported at the specified date and time due to such as a communication error. The job information that is finished during the process is not exported.The job history that could not be exported even if the number of the retries reached the specified number is exported at the next specified date and time.During the process of the retry, the number of saved jobs in a multifunction device is not monitored.
Checking Auto Export ResultYou can check the result of auto export with the activity history.For information on how to download the activity history, refer to "How to Obtain Activity History"(P.15).
Exporting Job HistorySpecify the period, and then export the job history that is finished in the period.
Note• If the finished job does not exist in the specified period, a job history file which
includes only the header line is output.
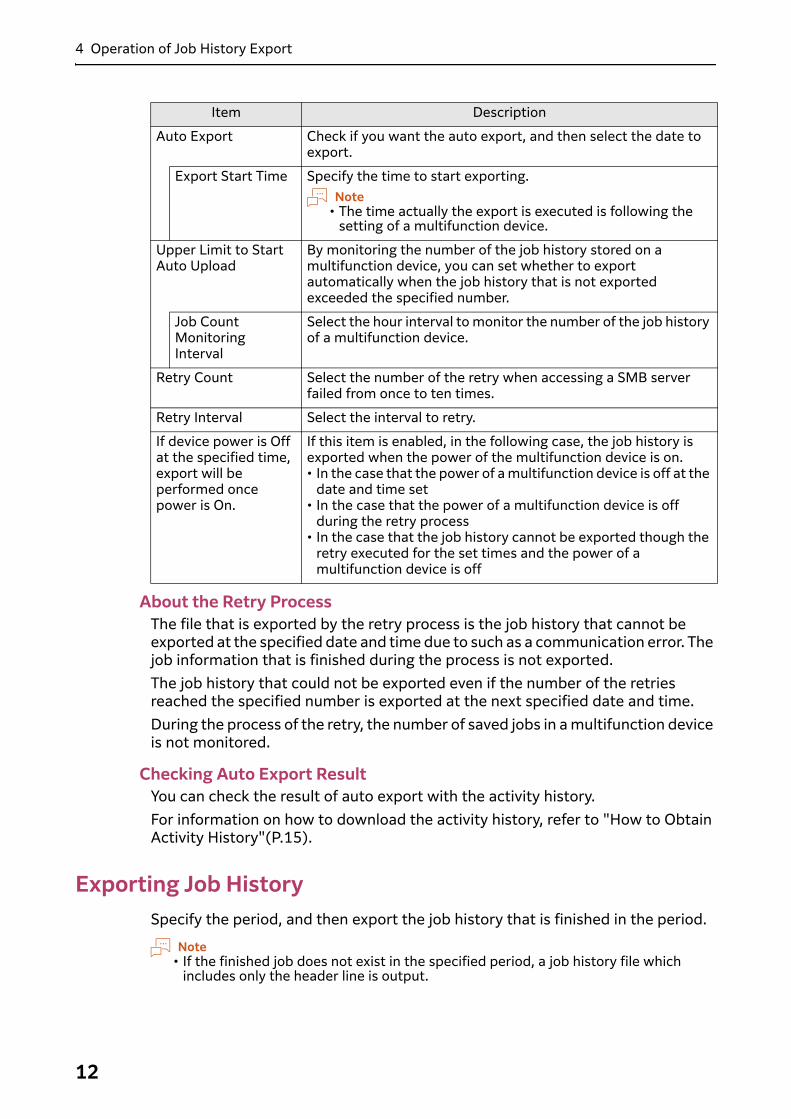
Item Description
Auto Export Check if you want the auto export, and then select the date to export.
Export Start Time Specify the time to start exporting.Note
• The time actually the export is executed is following the setting of a multifunction device.
Upper Limit to Start Auto Upload
By monitoring the number of the job history stored on a multifunction device, you can set whether to export automatically when the job history that is not exported exceeded the specified number.
Job Count Monitoring Interval
Select the hour interval to monitor the number of the job history of a multifunction device.
Retry Count Select the number of the retry when accessing a SMB server failed from once to ten times.
Retry Interval Select the interval to retry.
If device power is Off at the specified time, export will be performed once power is On.
If this item is enabled, in the following case, the job history is exported when the power of the multifunction device is on.• In the case that the power of a multifunction device is off at the
date and time set• In the case that the power of a multifunction device is off
during the retry process• In the case that the job history cannot be exported though the
retry executed for the set times and the power of a multifunction device is off
4 Operation of Job History Export
13
Steps0 1 Display the setting screen of Job History Export.
Refer• "Displaying the Setting Screen of Job History Export"(P.8)
2 Select [Manual Export] on the navigation bar.
3 Set [Start Date/Time] and [End Date/Time], and then click [Export].
Re-exporting Job HistoryYou can manually re-export job history that failed to be automatically exported.
Steps0 1 Display the setting screen of Job History Export.
Refer• "Displaying the Setting Screen of Job History Export"(P.8)
2 Select [Retry Failed Exports] on the navigation bar.
3 Perform the following steps.(1) Click [Send Empty File].
Check whether the empty file is sent to the SMB server specified in [Export Destination Settings]. If the file has been successfully sent to the server, go to step (2). If failed to be sent, check the condition of the server, and try this step again.
(2) Click [Export Now].

5 Troubleshooting
14
5 TroubleshootingError Message and Remedy
This section describes troubles that may occur with your multifunction device while using Job History Export and their solutions.If the error is not resolved with a remedy, contact our service representative.
Note• When you make an inquiry about the error, we may ask you for the activity history.
For information on how to obtain the activity history, refer to "How to Obtain Activity History"(P.15).
Message Remedy
SMB communication feature is disabled. Check the device settings.
Check the network setting of your multifunction device.
Refer• "Multifunction Device Settings"(P.7)
Server is not found. Check what you entered in [Server Name / IP Address] in [Destination].
Refer• "Setting Export Destination"(P.10)
Shared name is not found. Check what you entered in [Share Name] in [Destination].
Refer• "Setting Export Destination"(P.10)
The specified path name or directory name is incorrect.
Check what you entered in [Storage Location] in [Destination].
Refer• "Setting Export Destination"(P.10)
User name is incorrect. Enable a user, or set other users.
User is locked out.
User is restricted. Empty password is not allowed.
User is disabled.
User validity period has expired.
User limit has exceeded. Change the number of users who can share the shared folder as the export destination, or specify other users.
Password is incorrect. Check what you entered in [Password] in [Export Destination (SMB Server)].
Password change is required. The password is invalid or exceeded the validity period. After you change the password of the SMB server, set the changed password for [Password] in [Export Destination (SMB Server)].
Password validity period has expired.
The specified file name cannot be used.
Check what you entered in [File Name] in [Destination].
5 Troubleshooting
15
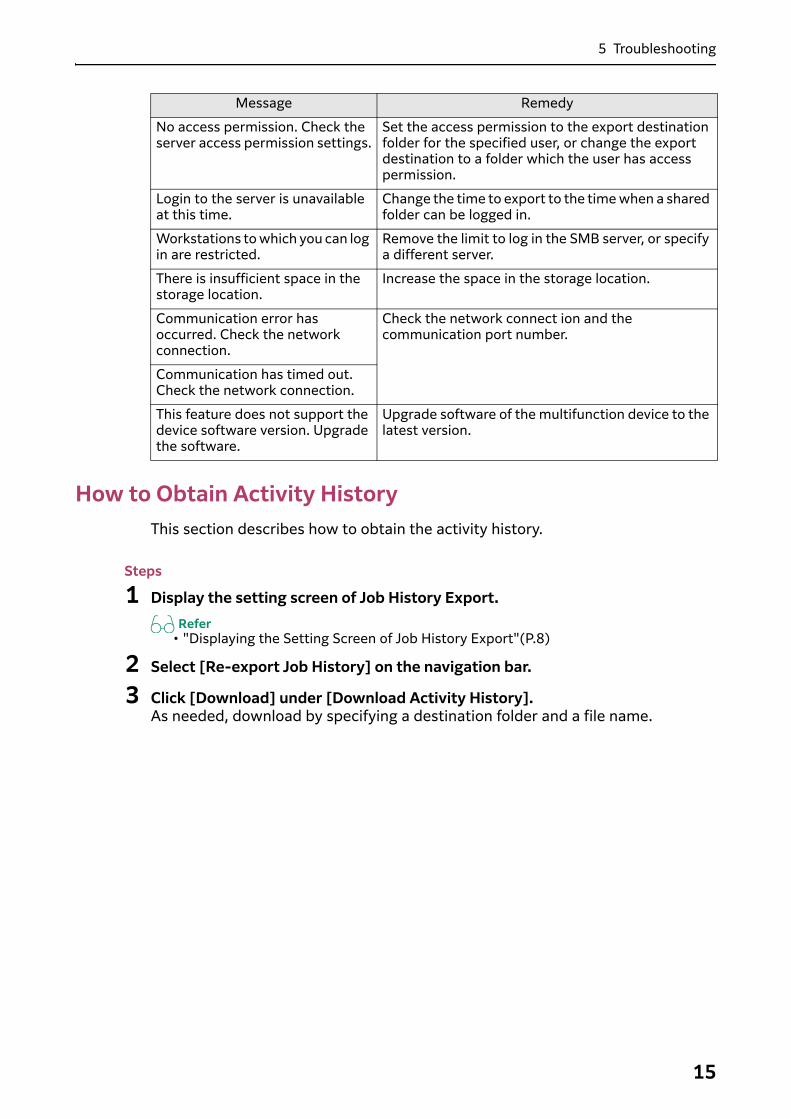
How to Obtain Activity HistoryThis section describes how to obtain the activity history.
Steps0 1 Display the setting screen of Job History Export.
Refer• "Displaying the Setting Screen of Job History Export"(P.8)
2 Select [Re-export Job History] on the navigation bar.
3 Click [Download] under [Download Activity History].As needed, download by specifying a destination folder and a file name.
No access permission. Check the server access permission settings.
Set the access permission to the export destination folder for the specified user, or change the export destination to a folder which the user has access permission.
Login to the server is unavailable at this time.
Change the time to export to the time when a shared folder can be logged in.
Workstations to which you can log in are restricted.
Remove the limit to log in the SMB server, or specify a different server.
There is insufficient space in the storage location.
Increase the space in the storage location.
Communication error has occurred. Check the network connection.
Check the network connect ion and the communication port number.
Communication has timed out. Check the network connection.
This feature does not support the device software version. Upgrade the software.
Upgrade software of the multifunction device to the latest version.
Message Remedy
6 Importing/Exporting Settings
16
6 Importing/Exporting SettingsExporting/Importing Overview
With "Settings cloning for Add-on Applications", you can save the settings information to a computer, and then you can duplicate the information to other devices.Storing the setting to a computer is called "Export", and duplicating the stored setting to a device is called "Import".
Settings Which Can Be DuplicatedThe settings which can be duplicated by exporting/importing are the following.• Job History Export
File Format, Destination, ScheduleNote that the password for Export Destination Settings is not exported or imported.

7 Notes and Restrictions
17
7 Notes and Restrictions• The range of the job history that is output on the job history file is as follows.
-In the case of manually exporting: the history that were complete within the specified period
-In the case of automatically exporting: the job histories that are not automatically exported and jobs that were already complete at the start time of exporting
Note• Not only the job history that finished correctly, but also the job history that did
not finished correctly is included.
• If the time setting of a multifunction device is changed, the exported job history may be not exported properly. Be careful about that the application and removal of summer time are also included in the change of the time setting.
• If an error occurred in the auto export of the job history and the auto export failed even though the retry was operated for the specified times, the job history that could not be exported will be export at the next specified date.When the specified time of the export comes, if there is the job history that is not exported yet, its job history and the latest job history file will be exported.At the time, after the export date and time when the retry occurred, even if the language or encoding of the job history file is changed, the change is not applied to the re-created job history file. The change will be applied at the time that the job history file is newly created at the next export.
• [Header Language] that is set in [File Format] is applied to the language of the job history file to be output. The language used in a web browser is applied to the setting screen of Job History Export. If the language that Job History Export does not support is used in the web browser, the language of the setting screen will be in English.
8 Appendix
18
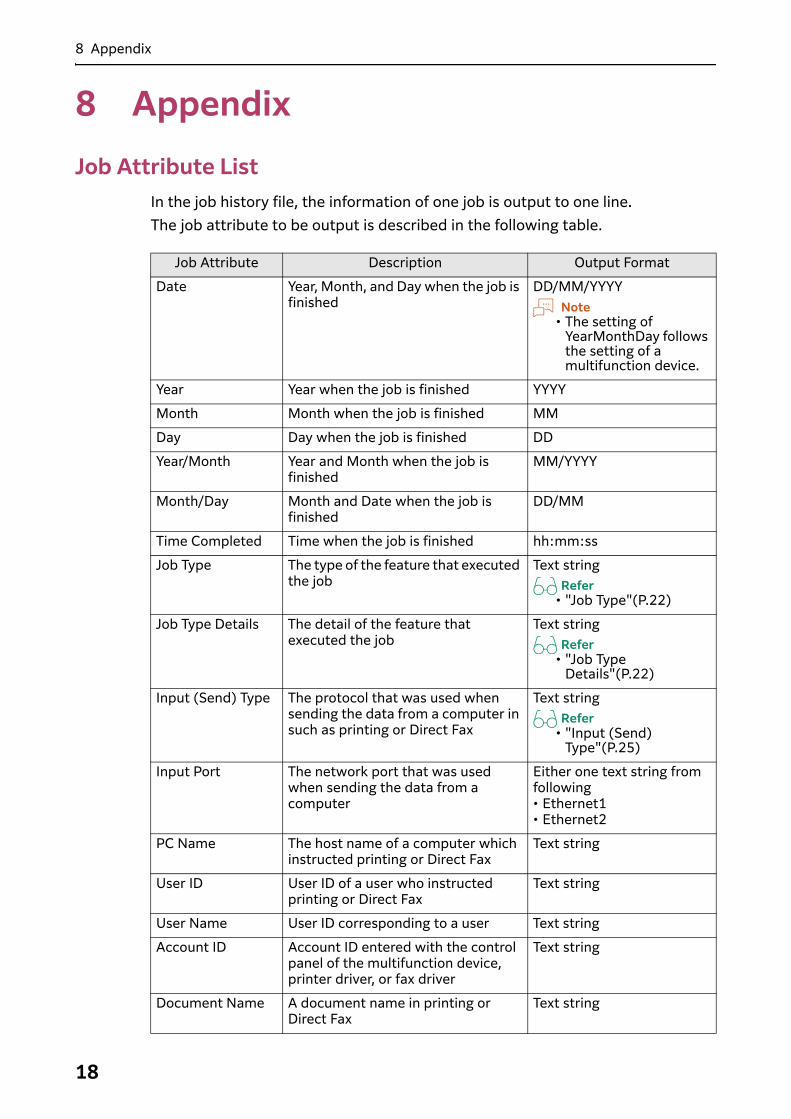
8 AppendixJob Attribute List
In the job history file, the information of one job is output to one line.The job attribute to be output is described in the following table.
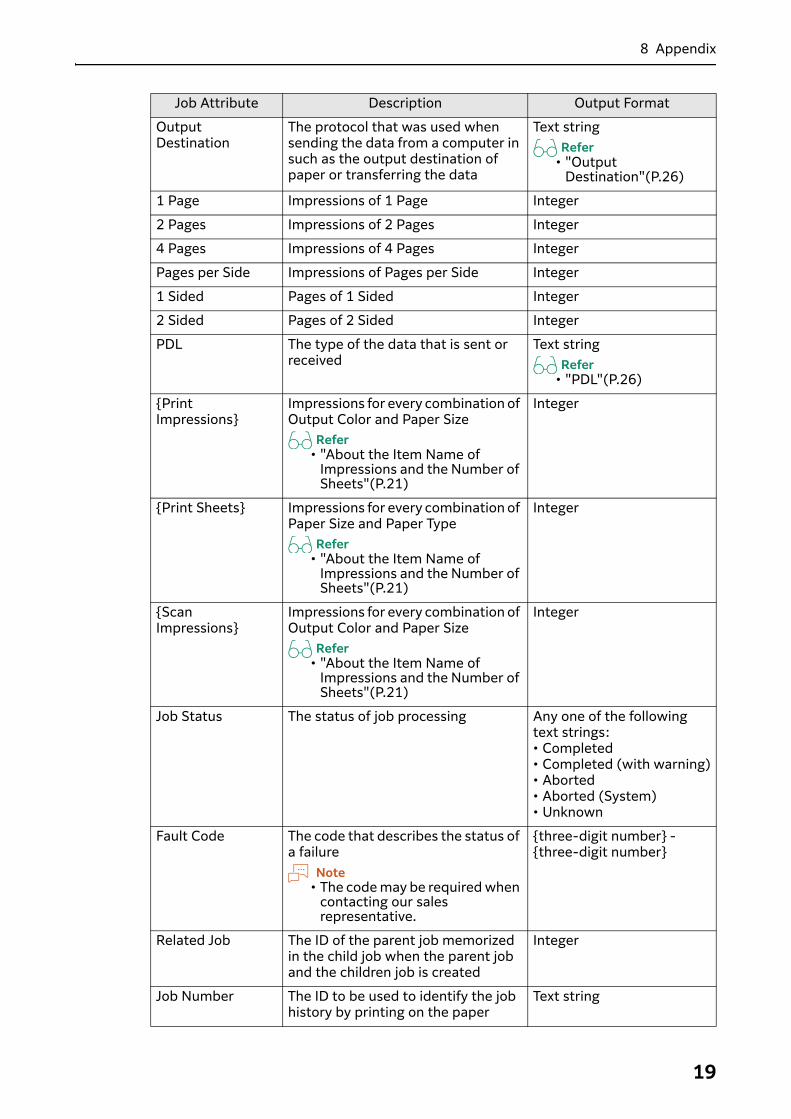
Job Attribute Description Output Format
Date Year, Month, and Day when the job is finished
DD/MM/YYYYNote
• The setting of YearMonthDay follows the setting of a multifunction device.
Year Year when the job is finished YYYY
Month Month when the job is finished MM
Day Day when the job is finished DD
Year/Month Year and Month when the job is finished
MM/YYYY
Month/Day Month and Date when the job is finished
DD/MM
Time Completed Time when the job is finished hh:mm:ss
Job Type The type of the feature that executed the job
Text stringRefer
• "Job Type"(P.22)
Job Type Details The detail of the feature that executed the job
Text stringRefer
• "Job Type Details"(P.22)
Input (Send) Type The protocol that was used when sending the data from a computer in such as printing or Direct Fax
Text stringRefer
• "Input (Send) Type"(P.25)
Input Port The network port that was used when sending the data from a computer
Either one text string from following• Ethernet1• Ethernet2
PC Name The host name of a computer which instructed printing or Direct Fax
Text string
User ID User ID of a user who instructed printing or Direct Fax
Text string
User Name User ID corresponding to a user Text string
Account ID Account ID entered with the control panel of the multifunction device, printer driver, or fax driver
Text string
Document Name A document name in printing or Direct Fax
Text string
8 Appendix
19
Output Destination
The protocol that was used when sending the data from a computer in such as the output destination of paper or transferring the data
Text stringRefer
• "Output Destination"(P.26)
1 Page Impressions of 1 Page Integer
2 Pages Impressions of 2 Pages Integer
4 Pages Impressions of 4 Pages Integer
Pages per Side Impressions of Pages per Side Integer
1 Sided Pages of 1 Sided Integer
2 Sided Pages of 2 Sided Integer
PDL The type of the data that is sent or received
Text stringRefer
• "PDL"(P.26)
{Print Impressions}
Impressions for every combination of Output Color and Paper Size
Refer• "About the Item Name of
Impressions and the Number of Sheets"(P.21)
Integer
{Print Sheets} Impressions for every combination of Paper Size and Paper Type
Refer• "About the Item Name of
Impressions and the Number of Sheets"(P.21)
Integer
{Scan Impressions}
Impressions for every combination of Output Color and Paper Size
Refer• "About the Item Name of
Impressions and the Number of Sheets"(P.21)
Integer
Job Status The status of job processing Any one of the following text strings:• Completed• Completed (with warning)• Aborted• Aborted (System)• Unknown
Fault Code The code that describes the status of a failure
Note• The code may be required when
contacting our sales representative.
{three-digit number} - {three-digit number}
Related Job The ID of the parent job memorized in the child job when the parent job and the children job is created
Integer
Job Number The ID to be used to identify the job history by printing on the paper
Text string
Job Attribute Description Output Format
8 Appendix
20
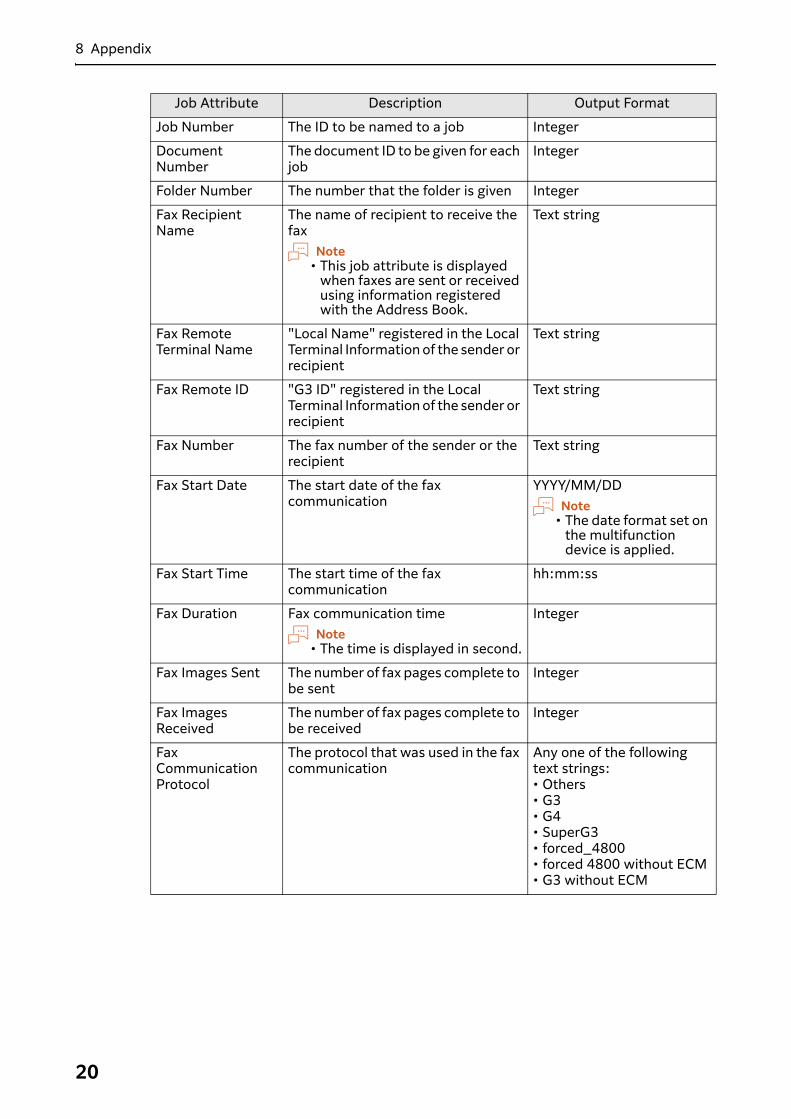
Job Number The ID to be named to a job Integer
Document Number
The document ID to be given for each job
Integer
Folder Number The number that the folder is given Integer
Fax Recipient Name
The name of recipient to receive the fax
Note• This job attribute is displayed
when faxes are sent or received using information registered with the Address Book.
Text string
Fax Remote Terminal Name
"Local Name" registered in the Local Terminal Information of the sender or recipient
Text string
Fax Remote ID "G3 ID" registered in the Local Terminal Information of the sender or recipient
Text string
Fax Number The fax number of the sender or the recipient
Text string
Fax Start Date The start date of the fax communication
YYYY/MM/DDNote
• The date format set on the multifunction device is applied.
Fax Start Time The start time of the fax communication
hh:mm:ss
Fax Duration Fax communication timeNote
• The time is displayed in second.
Integer
Fax Images Sent The number of fax pages complete to be sent
Integer
Fax Images Received
The number of fax pages complete to be received
Integer
Fax Communication Protocol
The protocol that was used in the fax communication
Any one of the following text strings:• Others• G3• G4• SuperG3• forced_4800• forced 4800 without ECM• G3 without ECM
Job Attribute Description Output Format
8 Appendix
21
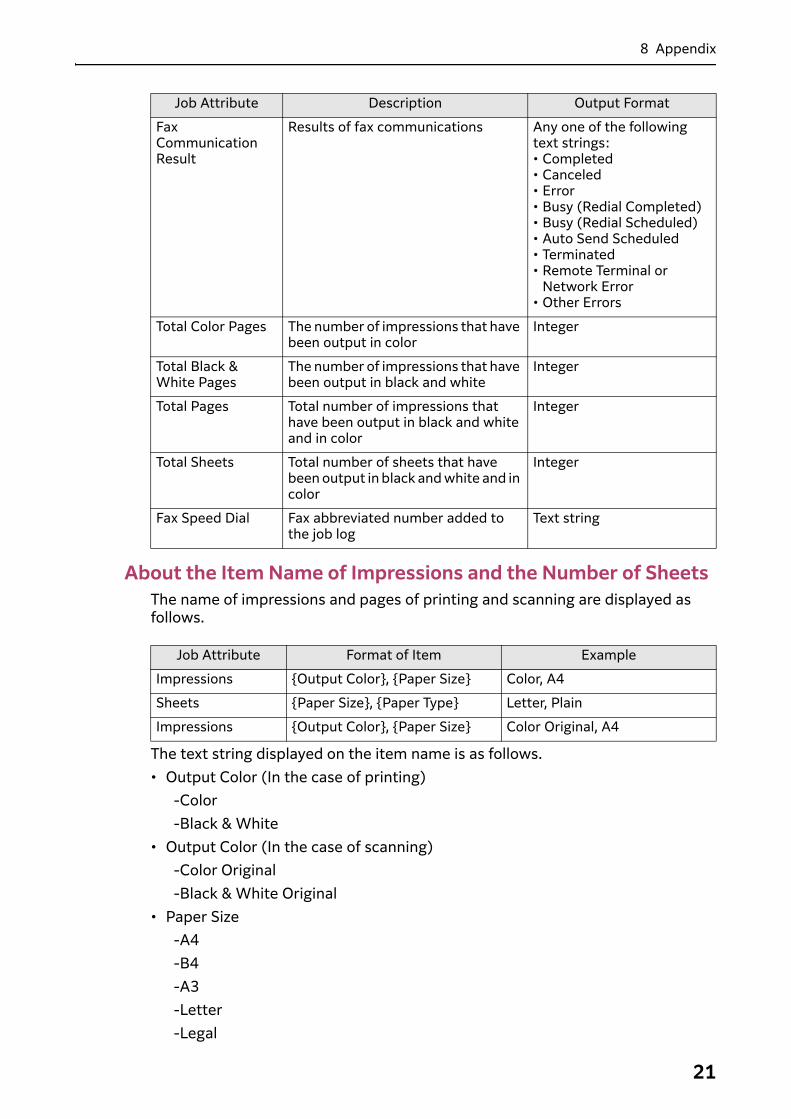
About the Item Name of Impressions and the Number of SheetsThe name of impressions and pages of printing and scanning are displayed as follows.
The text string displayed on the item name is as follows.• Output Color (In the case of printing)
-Color-Black & White
• Output Color (In the case of scanning)-Color Original-Black & White Original
• Paper Size-A4-B4-A3-Letter-Legal
Fax Communication Result
Results of fax communications Any one of the following text strings:• Completed• Canceled• Error• Busy (Redial Completed)• Busy (Redial Scheduled)• Auto Send Scheduled• Terminated• Remote Terminal or
Network Error• Other Errors
Total Color Pages The number of impressions that have been output in color
Integer
Total Black & White Pages
The number of impressions that have been output in black and white
Integer
Total Pages Total number of impressions that have been output in black and white and in color
Integer
Total Sheets Total number of sheets that have been output in black and white and in color
Integer
Fax Speed Dial Fax abbreviated number added to the job log
Text string
Job Attribute Format of Item Example
Impressions {Output Color}, {Paper Size} Color, A4
Sheets {Paper Size}, {Paper Type} Letter, Plain
Impressions {Output Color}, {Paper Size} Color Original, A4
Job Attribute Description Output Format
8 Appendix
22
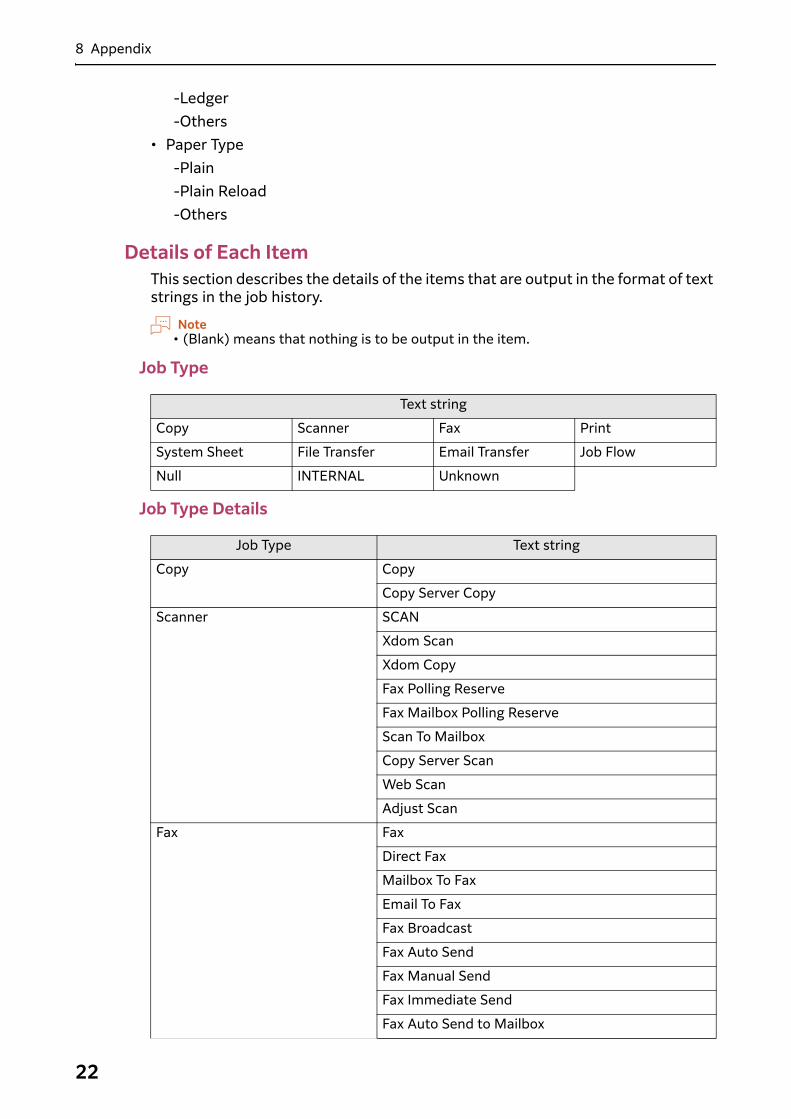
-Ledger-Others
• Paper Type-Plain-Plain Reload-Others
Details of Each ItemThis section describes the details of the items that are output in the format of text strings in the job history.
Note• (Blank) means that nothing is to be output in the item.
Job Type
Job Type Details
Text string
Copy Scanner Fax Print
System Sheet File Transfer Email Transfer Job Flow
Null INTERNAL Unknown
Job Type Text string
Copy Copy
Copy Server Copy
Scanner SCAN
Xdom Scan
Xdom Copy
Fax Polling Reserve
Fax Mailbox Polling Reserve
Scan To Mailbox
Copy Server Scan
Web Scan
Adjust Scan
Fax Fax
Direct Fax
Mailbox To Fax
Email To Fax
Fax Broadcast
Fax Auto Send
Fax Manual Send
Fax Immediate Send
Fax Auto Send to Mailbox
8 Appendix
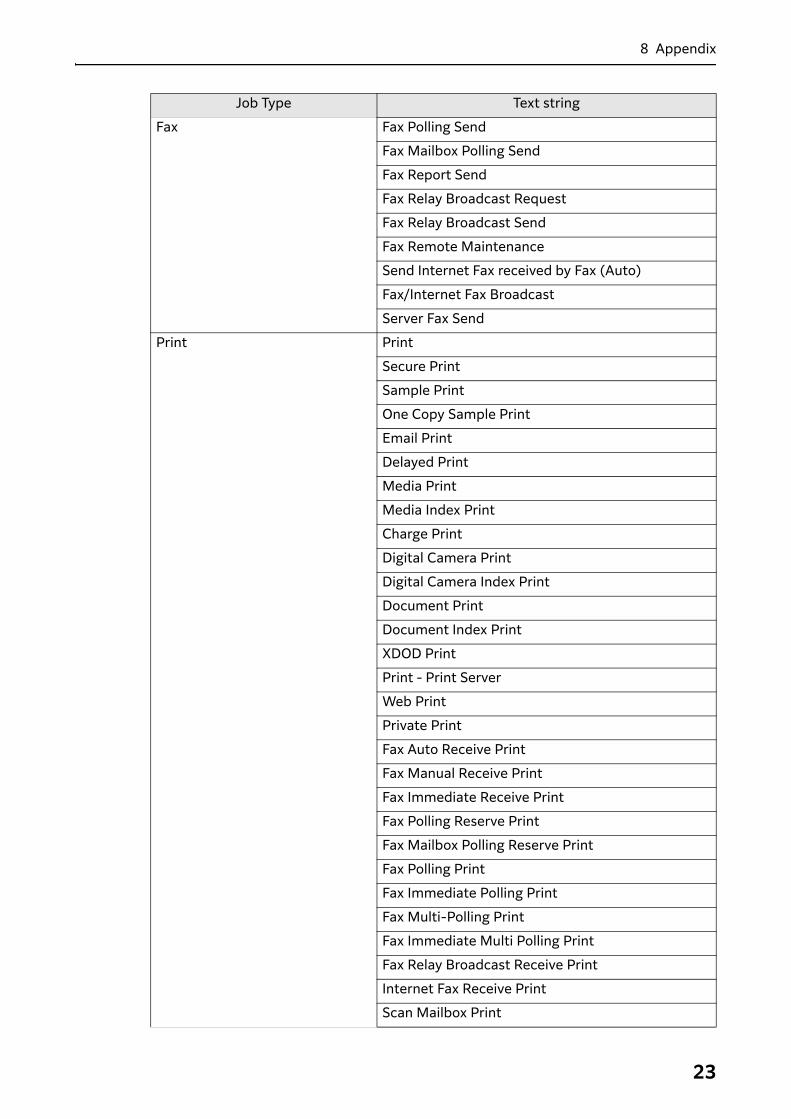
23
Fax Fax Polling Send
Fax Mailbox Polling Send
Fax Report Send
Fax Relay Broadcast Request
Fax Relay Broadcast Send
Fax Remote Maintenance
Send Internet Fax received by Fax (Auto)
Fax/Internet Fax Broadcast
Server Fax Send
Print Print
Secure Print
Sample Print
One Copy Sample Print
Email Print
Delayed Print
Media Print
Media Index Print
Charge Print
Digital Camera Print
Digital Camera Index Print
Document Print
Document Index Print
XDOD Print
Print - Print Server
Web Print
Private Print
Fax Auto Receive Print
Fax Manual Receive Print
Fax Immediate Receive Print
Fax Polling Reserve Print
Fax Mailbox Polling Reserve Print
Fax Polling Print
Fax Immediate Polling Print
Fax Multi-Polling Print
Fax Immediate Multi Polling Print
Fax Relay Broadcast Receive Print
Internet Fax Receive Print
Scan Mailbox Print
Job Type Text string
8 Appendix
24
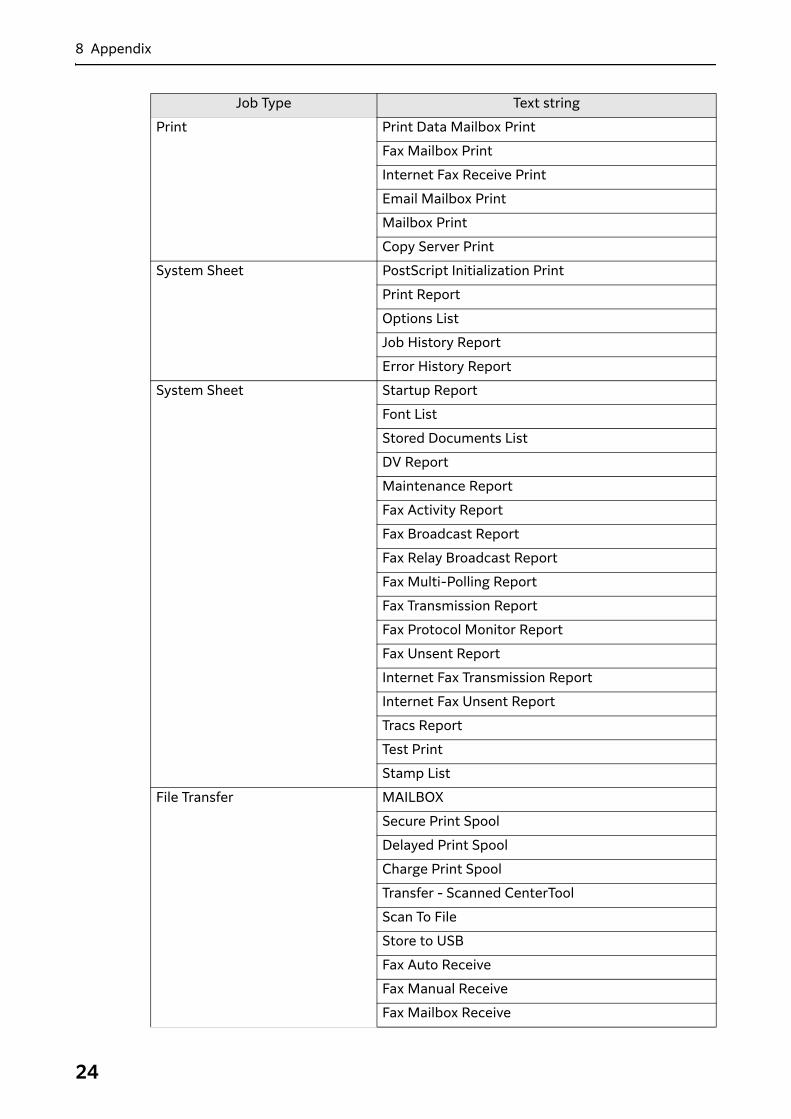
Print Print Data Mailbox Print
Fax Mailbox Print
Internet Fax Receive Print
Email Mailbox Print
Mailbox Print
Copy Server Print
System Sheet PostScript Initialization Print
Print Report
Options List
Job History Report
Error History Report
System Sheet Startup Report
Font List
Stored Documents List
DV Report
Maintenance Report
Fax Activity Report
Fax Broadcast Report
Fax Relay Broadcast Report
Fax Multi-Polling Report
Fax Transmission Report
Fax Protocol Monitor Report
Fax Unsent Report
Internet Fax Transmission Report
Internet Fax Unsent Report
Tracs Report
Test Print
Stamp List
File Transfer MAILBOX
Secure Print Spool
Delayed Print Spool
Charge Print Spool
Transfer - Scanned CenterTool
Scan To File
Store to USB
Fax Auto Receive
Fax Manual Receive
Fax Mailbox Receive
Job Type Text string
8 Appendix
25
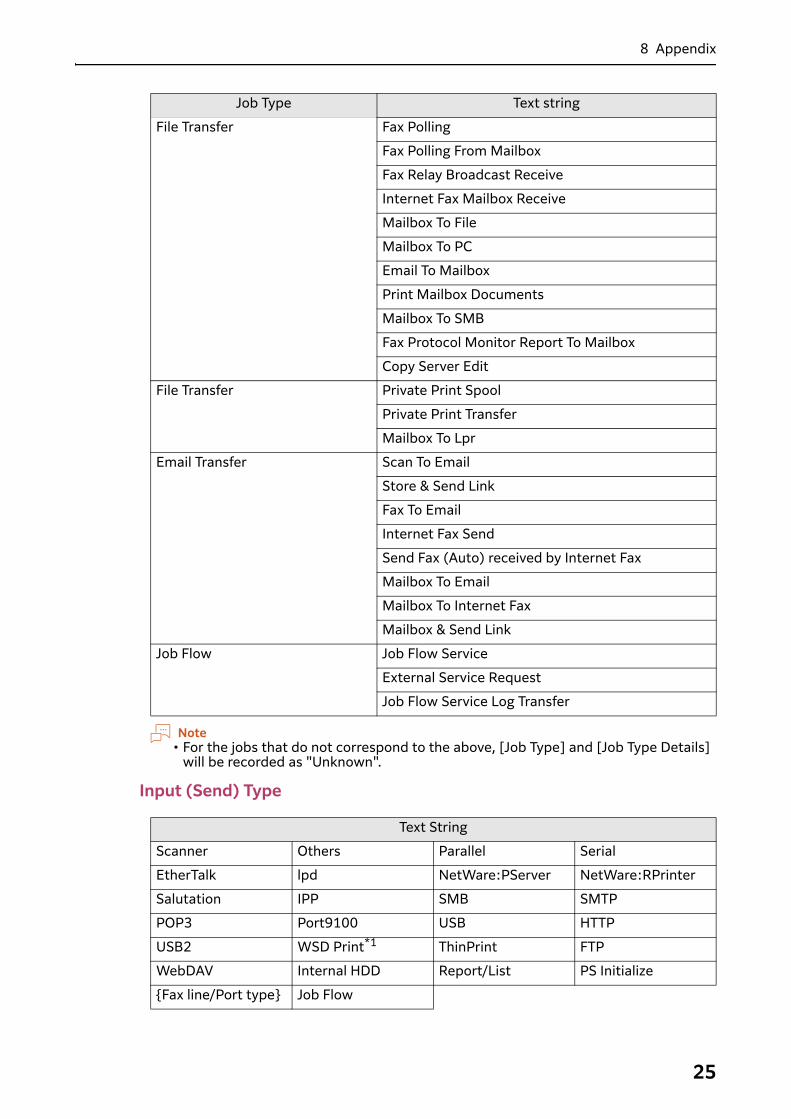
Note• For the jobs that do not correspond to the above, [Job Type] and [Job Type Details]
will be recorded as "Unknown".
Input (Send) Type
File Transfer Fax Polling
Fax Polling From Mailbox
Fax Relay Broadcast Receive
Internet Fax Mailbox Receive
Mailbox To File
Mailbox To PC
Email To Mailbox
Print Mailbox Documents
Mailbox To SMB
Fax Protocol Monitor Report To Mailbox
Copy Server Edit
File Transfer Private Print Spool
Private Print Transfer
Mailbox To Lpr
Email Transfer Scan To Email
Store & Send Link
Fax To Email
Internet Fax Send
Send Fax (Auto) received by Internet Fax
Mailbox To Email
Mailbox To Internet Fax
Mailbox & Send Link
Job Flow Job Flow Service
External Service Request
Job Flow Service Log Transfer
Text String
Scanner Others Parallel Serial
EtherTalk lpd NetWare:PServer NetWare:RPrinter
Salutation IPP SMB SMTP
POP3 Port9100 USB HTTP
USB2 WSD Print*1 ThinPrint FTP
WebDAV Internal HDD Report/List PS Initialize
{Fax line/Port type} Job Flow
Job Type Text string
8 Appendix
26
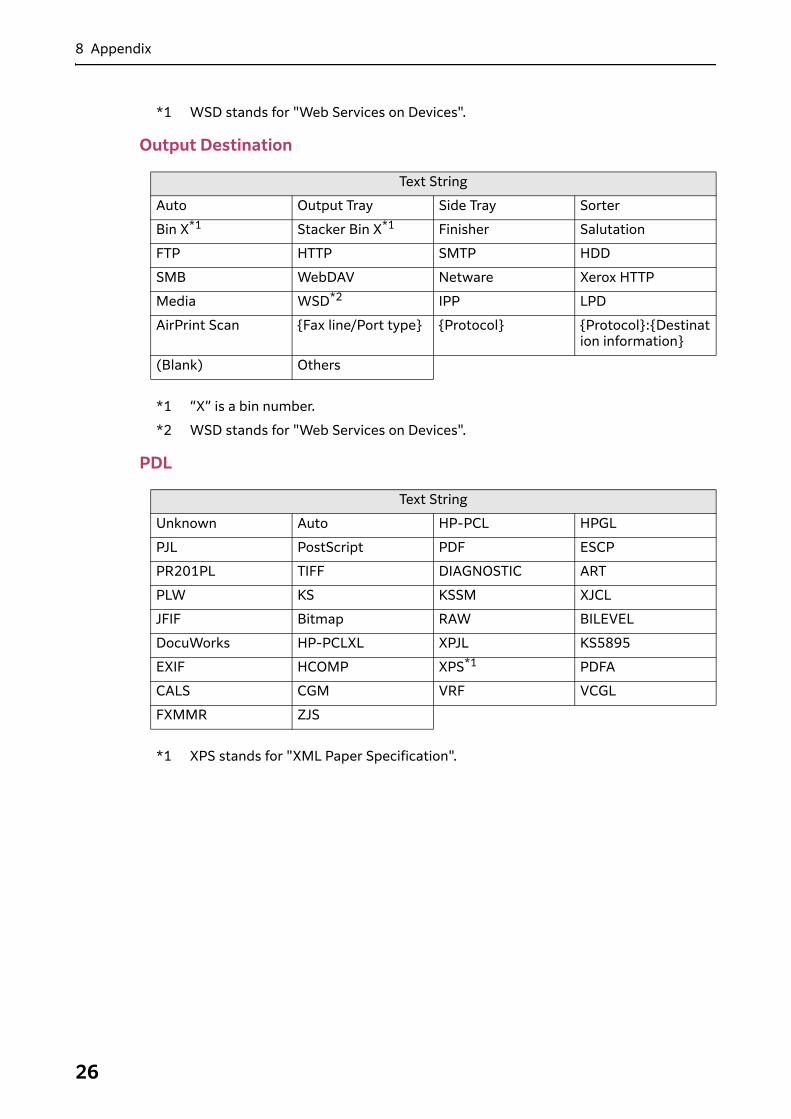
Output Destination
PDL
*1 WSD stands for "Web Services on Devices".
Text String
Auto Output Tray Side Tray Sorter
Bin X*1 Stacker Bin X*1 Finisher Salutation
FTP HTTP SMTP HDD
SMB WebDAV Netware Xerox HTTP
Media WSD*2 IPP LPD
AirPrint Scan {Fax line/Port type} {Protocol} {Protocol}:{Destination information}
(Blank) Others
*1 “X” is a bin number.
*2 WSD stands for "Web Services on Devices".
Text String
Unknown Auto HP-PCL HPGL
PJL PostScript PDF ESCP
PR201PL TIFF DIAGNOSTIC ART
PLW KS KSSM XJCL
JFIF Bitmap RAW BILEVEL
DocuWorks HP-PCLXL XPJL KS5895
EXIF HCOMP XPS*1 PDFA
CALS CGM VRF VCGL
FXMMR ZJS
*1 XPS stands for "XML Paper Specification".