Embed Size (px)
Citation preview
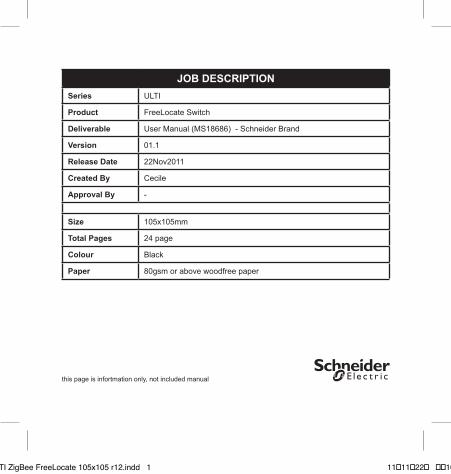
JOB DESCRIPTIONSeries ULTI
Product FreeLocate Switch
Deliverable User Manual (MS18686) - Schneider Brand
Version 01.1
Release Date 22Nov2011
Created By Cecile
Approval By -
Size 105x105mm
Total Pages 24 page
Colour Black
Paper 80gsm or above woodfree paper
this page is infortmation only, not included manual
ULTI ZigBee FreeLocate 105x105 r12.indd 1 11�11�22� ��10:09
User ManualFreeLocate Switch
ULTI ZigBee FreeLocate 105x105 r12.indd 1 11�11�22� ��10:09
This User Manual applies to the following products:
Product No. DescriptionU102RWMZB 2 Key FreeLocate SwitchU106RWMZB 6 Key FreeLocate Switch
ULTI ZigBee FreeLocate 105x105 r12.indd 2 11�11�22� ��10:09
1ENGLISH
This User Manual applies to the following products:
Product No. DescriptionU102RWMZB 2 Key FreeLocate SwitchU106RWMZB 6 Key FreeLocate Switch
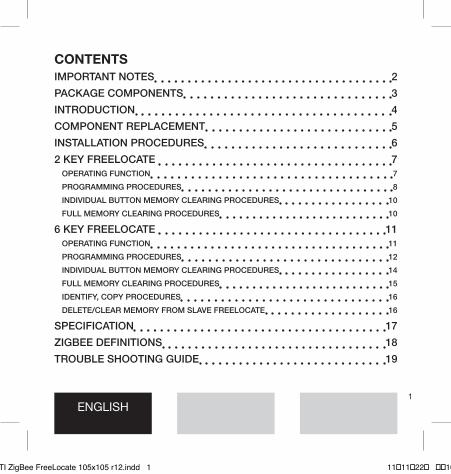
CONTENTSIMPORTANT NOTES 2
PACKAGE COMPONENTS 3
INTRODUCTION 4
COMPONENT REPLACEMENT 5
INSTALLATION PROCEDURES 6
2 KEY FREELOCATE 7OPERATING FUNCTION 7
PROGRAMMING PROCEDURES 8
INDIVIDUAL BUTTON MEMORY CLEARING PROCEDURES 10
FULL MEMORY CLEARING PROCEDURES 10
6 KEY FREELOCATE 11OPERATING FUNCTION 11
PROGRAMMING PROCEDURES 12
INDIVIDUAL BUTTON MEMORY CLEARING PROCEDURES 14
FULL MEMORY CLEARING PROCEDURES 15
IDENTIFY, COPY PROCEDURES 16
DELETE/CLEAR MEMORY FROM SLAVE FREELOCATE 16
SPECIFICATION 17
ZIGBEE DEFINITIONS 18
TROUBLE SHOOTING GUIDE 19
ULTI ZigBee FreeLocate 105x105 r12.indd 1 11�11�22� ��10:09
2
IMPORTANT NOTES
HOW TO USE THIS MANUALThis manual explains how to operate your ULTI FreeLocate Switch. It provides the guidelines you need to programme your ULTI switches and dimmers for different lighting scenario settings.
PRODUCT SAFETYThe FreeLocate Unit operates at a RF frequency of 2.4GHz, ISM band.
Please contact local sale representatives for specifications in various countries. The effective radiated power of FreeLocate Unit does not exceed 1mW.
WARRANTYULTI products come with a one-year, equipment-only warranty. For more details, please refer to the attached warranty form.
ULTI ZigBee FreeLocate 105x105 r12.indd 2 11�11�22� ��10:09
3ENGLISH
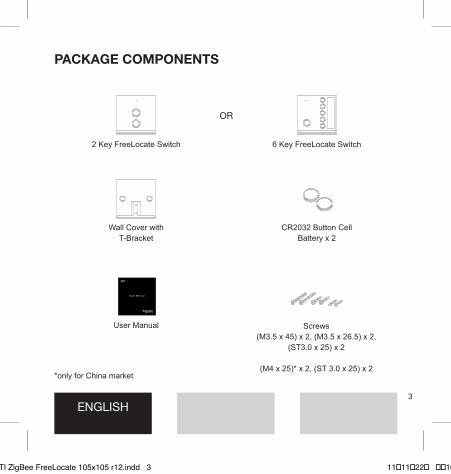
PACKAGE COMPONENTS
Wall Cover with T-Bracket
CR2032 Button Cell Battery x 2
Screws(M3.5 x 45) x 2, (M3.5 x 26.5) x 2,
(ST3.0 x 25) x 2
(M4 x 25)* x 2, (ST 3.0 x 25) x 2
OR
2 Key FreeLocate Switch 6 Key FreeLocate Switch
User Manual
*only for China market
ULTI ZigBee FreeLocate 105x105 r12.indd 3 11�11�22� ��10:09
4
INTRODUCTION
ULTI CONCEPTThe ULTI FreeLocate is a Schneider Electric concept. It is a state-of-the-art lighting control and electrical automation scheme for residential, hotel and office use, offering sophisticated design, operational simplicity and flexibility to control electrical devices.
ULTI WIRELESS LIGHTING CONTROL SOLUTIONEach ULTI Remote Controller and FreeLocate Switch works in parallel with your ULTI Switches and Dimmers and allows you to pre-program and recall lighting scenes to perfectly match your mood, giving you complete freedom of movement and control over your light settings.
ULTI TERMINOLOGYZone - An area illuminated/controlled by a single lighting circuit
Switch - A switch that controls the on-off of a zone
Device - A device is a combination of lights and electronic appliances across zones that can be switched on or off
Scene - A scene is defined as a combination of lights and electronic appliances across various zones with different light levels. You can set your favourite scenes by following Programming Procedures in this manual
Dimmer - A switch that controls the on-off and Dimming level of a zone
ULTI ZigBee FreeLocate 105x105 r12.indd 4 11�11�22� ��10:09
5ENGLISH
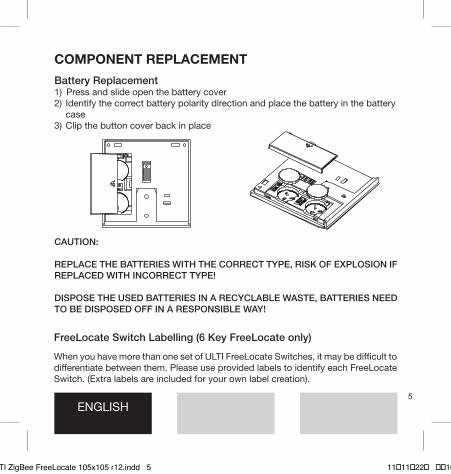
COMPONENT REPLACEMENT
Battery Replacement1) Press and slide open the battery cover2) Identify the correct battery polarity direction and place the battery in the battery
case3) Clip the button cover back in place
CAUTION:
REPLACE THE BATTERIES WITH THE CORRECT TYPE, RISK OF EXPLOSION IF REPLACED WITH INCORRECT TYPE!
DISPOSE THE USED BATTERIES IN A RECYCLABLE WASTE, BATTERIES NEED TO BE DISPOSED OFF IN A RESPONSIBLE WAY!
FreeLocate Switch Labelling (6 Key FreeLocate only)
When you have more than one set of ULTI FreeLocate Switches, it may be difficult to differentiate between them. Please use provided labels to identify each FreeLocate Switch. (Extra labels are included for your own label creation).
ULTI ZigBee FreeLocate 105x105 r12.indd 5 11�11�22� ��10:09
6
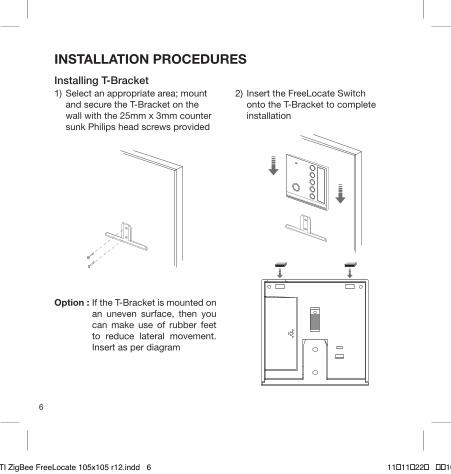
INSTALLATION PROCEDURES
Installing T-Bracket1) Select an appropriate area; mount
and secure the T-Bracket on the wall with the 25mm x 3mm counter sunk Philips head screws provided
Option : If the T-Bracket is mounted on an uneven surface, then you can make use of rubber feet to reduce lateral movement. Insert as per diagram
2) Insert the FreeLocate Switch onto the T-Bracket to complete installation
ULTI ZigBee FreeLocate 105x105 r12.indd 6 11�11�22� ��10:09
7ENGLISH
2
INSTALLATION PROCEDURES
Installing T-Bracket
56
3
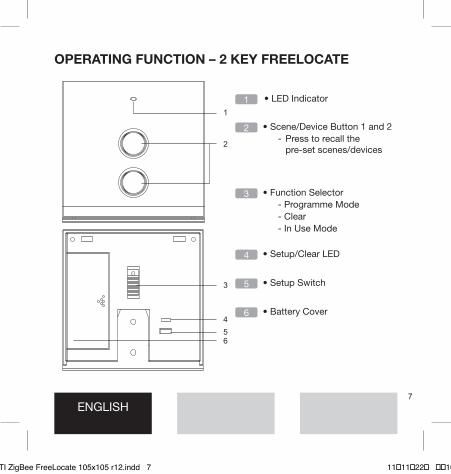
OPERATING FUNCTION – 2 KEY FREELOCATE
• Scene/Device Button 1 and 2 - Press to recall the pre-set scenes/devices
2
• Function Selector - Programme Mode - Clear - In Use Mode
3
• Setup/Clear LED4
• Setup Switch5
• Battery Cover64
1
• LED Indicator1
ULTI ZigBee FreeLocate 105x105 r12.indd 7 11�11�22� ��10:09
8
PROGRAMMING PROCEDURES
Scene/Device Programming
The two buttons of the FreeLocate Setting Switch can act as either Scene or Device buttons. In Scene mode, you can set a lighting scene with multiple switches and dimmers, while in Device mode, you can control on/off of one or a group of switches and dimmers.
A) Saving a Scene to scene/device button
1. Slide the Function Selector Switch to Program position and press the setup button. The green LED on the FreeLocate and units in the network will turn ON
2. Set Switches/Dimmers to programming mode:
2.1 Remove cover plate
2.2 Check that the programme LED is already ON in green. If not then do it manually by pressing the Programme button
2.3 Set the desired lighting scenes with multiple Switches/Dimmers. (Refer Dimmer/switch programming procedure)
2.4 Long press the desired Scene/Device Button (more than 2 seconds) on the FreeLocate Switch to save current settings. The channel indicators LED will turn off immediately, indicating that the channel is saved in the scene, and the green Programme LED will turn off indicating exit from Program mode
3. Select the Function Selector to ‘In Use’ position
ULTI ZigBee FreeLocate 105x105 r12.indd 8 11�11�22� ��10:09
9ENGLISH
B) Saving a Device to scene/device button
1. Slide Function Selector Switch to Program position and press the setup button. The green LED on the FreeLocate and units in the network will turn ON
2. Set Switches/Dimmers to programming mode:
2.1 Remove cover plate
2.2 Check that the programme LED is already ON in green. If not then do it manually by pressing the Programme button
2.3 Set the desired lighting scenes with multiple Switches/Dimmers. (Refer Dimmer/switch programming procedure)
2.4 Press the desired Scene/Device Button (less than 2 seconds) on the FreeLocate Switch to save current settings. The channel indicators LED will turn off immediately, indicating that the channel is saved in the device, and the green Programme LED will turn off indicating exit from Program mode
3. Select the Function Selector to ‘In Use’ position
The FreeLocate is now ready to use.
ULTI ZigBee FreeLocate 105x105 r12.indd 9 11�11�22� ��10:09
10
INDIVIDUAL BUTTON MEMORY CLEARING PROCEDURESTo remove or delete the saved scene/device from the FreeLocate buttons - Any subsequent press on that buttons will not result in any scene/device being recalled anymore.
1. Select the Function Selector to Clear position
2. Press the Setup/clear Button. The Setup/clear LED indicator will turn on
3. Press the user button from which you wish to clear the memory. Red indicator will blink to indicate memory deleted
4. Return the Function Selector switch to the ‘In Use’ position
FULL MEMORY CLEARING PROCEDURESTo remove or delete the saved scene/device from all FreeLocate buttons - This will remove all the scene/device information and will also remove the FreeLocate out of the ZigBee network.
1. Select the Function Selector to Clear position
2. Press and hold the setup/clear button for 5 seconds, Red indicator will turn on while the button is held. Orange indicator will turn on once device is reset to factory defaults
3. Return the Function Selector switch to the ‘In Use’ position
ULTI ZigBee FreeLocate 105x105 r12.indd 10 11�11�22� ��10:09
11ENGLISH
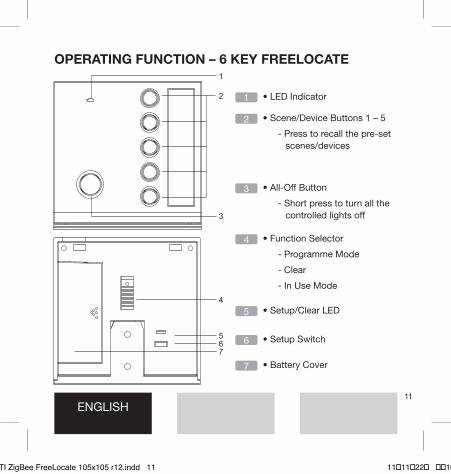
OPERATING FUNCTION – 6 KEY FREELOCATE
2
1
3
• LED Indicator1
• Scene/Device Buttons 1 – 5
- Press to recall the pre-set scenes/devices
2
• All-Off Button
- Short press to turn all the controlled lights off
3
• Setup/Clear LED5
• Setup Switch6
• Function Selector
- Programme Mode
- Clear
- In Use Mode
4
• Battery Cover7
76
4
5
ULTI ZigBee FreeLocate 105x105 r12.indd 11 11�11�22� ��10:09
12
PROGRAMMING PROCEDURESAll Scene/Device Buttons of the 6 Key FreeLocate Switch can act as either Scene or Device buttons. In Scene mode, you can set a lighting scene with multiple switches and dimmers, while in Device mode, you can control on/off of one or a group of switches and dimmers. The All-Off Button by default is set to switch all programmed lighting off in any scene.
Using 6 Key FreeLocate Switch to set a lighting scene with multiple Switches/Dimmers, and save the settings on the FreeLocate Switch.
Scene/Device Programming
A) Saving a Scene to scene/device button
1. Slide the Function Selector Switch to Program position and press the setup button. The green LED on the FreeLocate and units in the network will turn ON
2. Set Switches/Dimmers to programming mode:
2.1 Remove cover plate
2.2 Check that the programme LED is already ON in green. If not then do it manually by pressing the Programme button
2.3 Set the desired lighting scenes with multiple Switches/Dimmers. (Refer Dimmer/switch programming procedure)
2.4 Long press the desired Scene/Device Button (more than 2 seconds) on the FreeLocate Switch to save current settings. The channel indicators LED will turn off immediately, indicating that the channel is saved in the scene, and the green Programme LED will turn off indicating exit from Program mode.
3. Select the Function Selector to ‘In Use’ position
ULTI ZigBee FreeLocate 105x105 r12.indd 12 11�11�22� ��10:09

13ENGLISH
B) Saving a Device to scene/device button
1. Slide the Function Selector Switch to Program position and press the setup button. The green LED on the FreeLocate and units in the network will turn ON
2. Set Switches/Dimmers to programming mode:
2.1 Remove cover plate
2.2 Check that the programme LED is already ON in green. If not then do it manually by pressing the Programme button
2.3 Set the desired lighting scenes with multiple Switches/Dimmers. (Refer Dimmer/switch programming procedure)
2.4 Press the desired Scene/Device Button (less than 2 seconds) on the FreeLocate Switch to save current settings. The channel indicators LED will turn off immediately, indicating that the channel is saved in the scene, and the green Programme LED will turn off indicating exit from Program mode.
3. Select the Function Selector to ‘In Use’ position
The FreeLocate is now ready to use.
ULTI ZigBee FreeLocate 105x105 r12.indd 13 11�11�22� ��10:09
14
INDIVIDUAL BUTTON MEMORY CLEARING PROCEDURESTo remove the ID of individual FreeLocate Switch that has been stored on the Switch/Dimmer so that the Switch/Dimmer will not respond to the FreeLocate Switch anymore.
1. Select the Function Selector to Clear position
2. Press the Setup/clear Button. The Setup/clear LED will light up
3. Press the user button from which you wish to clear the memory. Red indicator will blink to indicate memory deleted
4. Return the slide switch to the ‘In Use’ position
ULTI ZigBee FreeLocate 105x105 r12.indd 14 11�11�22� ��10:09
15ENGLISH
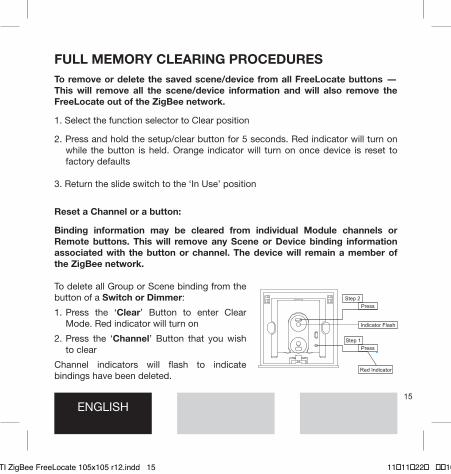
FULL MEMORY CLEARING PROCEDURESTo remove or delete the saved scene/device from all FreeLocate buttons - This will remove all the scene/device information and will also remove the FreeLocate out of the ZigBee network.
1. Select the function selector to Clear position
2. Press and hold the setup/clear button for 5 seconds. Red indicator will turn on while the button is held. Orange indicator will turn on once device is reset to factory defaults
3. Return the slide switch to the ‘In Use’ position
Reset a Channel or a button:
Binding information may be cleared from individual Module channels or Remote buttons. This will remove any Scene or Device binding information associated with the button or channel. The device will remain a member of the ZigBee network.
To delete all Group or Scene binding from the button of a Switch or Dimmer:
1. Press the ‘Clear’ Button to enter Clear Mode. Red indicator will turn on
2. Press the ‘Channel’ Button that you wish to clear
Channel indicators will flash to indicate bindings have been deleted.
Step 2Press
Indicator Flash
Step 1Press
Red Indicator
ULTI ZigBee FreeLocate 105x105 r12.indd 15 11�11�22� ��10:09
16
IDENTIFY, COPY (FROM ONE FREELOCATE TO ANOTHER) PROCEDURESLearning from 6 Key FreeLocate Switch to 6 Key FreeLocate Switch
Copy the scene/device of Master 6 Key FreeLocate Switch to Slave 6 Key FreeLocate Switch so that the Slave can control the same lighting settings as that of the Master.
1. Select the Function Selector of both Master and Slave to Program position
2. Press the Setup Button on the Master FreeLocate Switch. The setup LED will turn on and the setup LED of all the unit on network will also turn on
3. Press the user button on the Master FreeLocate which is to be copied on slave FreeLocate – All the dimmers/switches controlled by the switch (Master) will flash indicating they are part of that scene / device
4. Press the Setup / clear button first and then the User button on the slave on which you intend to copy the scene/device from master. For Scene, long press the user button (more than 2 seconds) and for Device, press the user button (less than 2 seconds)
5. Select the Function Selector of both Master and Slave to ‘In Use’ position
DELETE / CLEAR MEMORY FROM SLAVE FREELOCATERefer to MEMORY CLEARING PROCEDURE / FULL MEMORY CLEARING PROCEDURE sections.
ULTI ZigBee FreeLocate 105x105 r12.indd 16 11�11�22� ��10:09
17ENGLISH
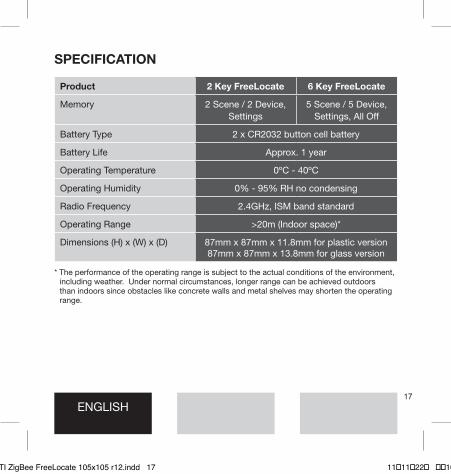
SPECIFICATION
Product 2 Key FreeLocate 6 Key FreeLocate
Memory 2 Scene / 2 Device, Settings
5 Scene / 5 Device, Settings, All Off
Battery Type 2 x CR2032 button cell battery
Battery Life Approx. 1 year
Operating Temperature 0ºC - 40ºC
Operating Humidity 0% - 95% RH no condensing
Radio Frequency 2.4GHz, ISM band standard
Operating Range >20m (Indoor space)*
Dimensions (H) x (W) x (D) 87mm x 87mm x 11.8mm for plastic version87mm x 87mm x 13.8mm for glass version
* The performance of the operating range is subject to the actual conditions of the environment, including weather. Under normal circumstances, longer range can be achieved outdoors than indoors since obstacles like concrete walls and metal shelves may shorten the operating range.
ULTI ZigBee FreeLocate 105x105 r12.indd 17 11�11�22� ��10:09
18
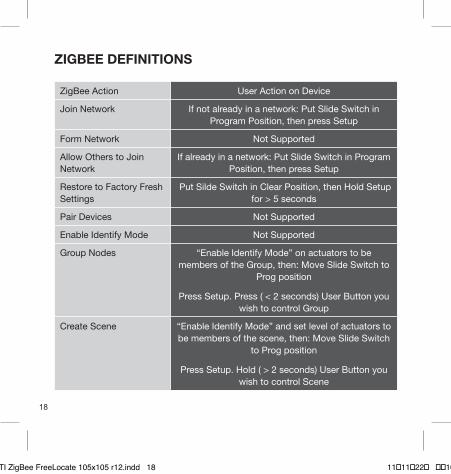
ZIGBEE DEFINITIONS
ZigBee Action User Action on Device
Join Network If not already in a network: Put Slide Switch in Program Position, then press Setup
Form Network Not Supported
Allow Others to Join Network
If already in a network: Put Slide Switch in Program Position, then press Setup
Restore to Factory Fresh Settings
Put Silde Switch in Clear Position, then Hold Setup for > 5 seconds
Pair Devices Not Supported
Enable Identify Mode Not Supported
Group Nodes “Enable Identify Mode” on actuators to be members of the Group, then: Move Slide Switch to
Prog position
Press Setup. Press ( < 2 seconds) User Button you wish to control Group
Create Scene “Enable Identify Mode” and set level of actuators to be members of the scene, then: Move Slide Switch
to Prog position
Press Setup. Hold ( > 2 seconds) User Button you wish to control Scene
ULTI ZigBee FreeLocate 105x105 r12.indd 18 11�11�22� ��10:09

19ENGLISH
TROUBLE SHOOTING GUIDE
Symptom Possible Cause Solution
Switch/Dimmer is not
responding to the
FreeLocate
1. Not previously programmed or improper programming
Repeat the Programming Procedures
2. The scene/device switch is not right position
Slide the scene/device switch to desired position and retry
3. Voltage is too low Make sure the operating voltage range is within the requirement
4.Strong presence of another RF network very close to the switch/dimmer
Ensure that there is a minimum of 2 meter distance between another RF network/signal from the unit(s)
5.Another ZigBee network is accidentally created on the FreeLocate
Clear the memory and reprogramme the FreeLocate. It’s possible that multiple ZigBee networks are accidentally created while programming
6.Not within the range Ensure that the remote is within the prescribed range of operation. The FreeLocate LED will flash in red to indicate that it is out of range
ZIGBEE DEFINITIONS
ZigBee Action User Action on Device
Join Network If not already in a network: Put Slide Switch in Program Position, then press Setup
Form Network Not Supported
Allow Others to Join Network
If already in a network: Put Slide Switch in Program Position, then press Setup
Restore to Factory Fresh Settings
Put Silde Switch in Clear Position, then Hold Setup for > 5 seconds
Pair Devices Not Supported
Enable Identify Mode Not Supported
Group Nodes “Enable Identify Mode” on actuators to be members of the Group, then: Move Slide Switch to
Prog position
Press Setup. Press ( < 2 seconds) User Button you wish to control Group
Create Scene “Enable Identify Mode” and set level of actuators to be members of the scene, then: Move Slide Switch
to Prog position
Press Setup. Hold ( > 2 seconds) User Button you wish to control Scene
ULTI ZigBee FreeLocate 105x105 r12.indd 19 11�11�22� ��10:09
20
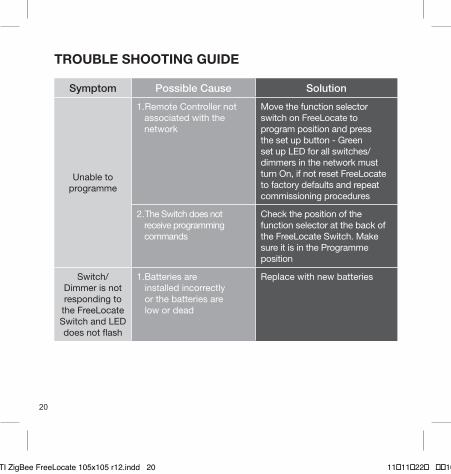
TROUBLE SHOOTING GUIDE
Symptom Possible Cause Solution
Unable to programme
1. Remote Controller not associated with the network
Move the function selector switch on FreeLocate to program position and press the set up button - Green set up LED for all switches/dimmers in the network must turn On, if not reset FreeLocate to factory defaults and repeat commissioning procedures
2. The Switch does not receive programming commands
Check the position of the function selector at the back of the FreeLocate Switch. Make sure it is in the Programme position
Switch/Dimmer is not responding to the FreeLocate Switch and LED does not flash
1.Batteries are installed incorrectly or the batteries are low or dead
Replace with new batteries
ULTI ZigBee FreeLocate 105x105 r12.indd 20 11�11�22� ��10:09
21ENGLISH
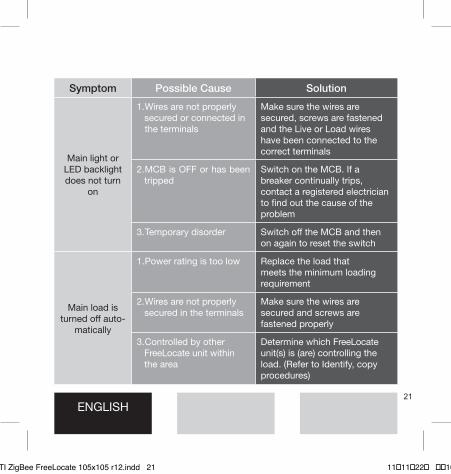
Symptom Possible Cause Solution
Main light or LED backlight does not turn
on
1. Wires are not properly secured or connected in the terminals
Make sure the wires are secured, screws are fastened and the Live or Load wires have been connected to the correct terminals
2. MCB is OFF or has been tripped
Switch on the MCB. If a breaker continually trips, contact a registered electrician to find out the cause of the problem
3. Temporary disorder Switch off the MCB and then on again to reset the switch
Main load is turned off auto-
matically
1. Power rating is too low Replace the load that meets the minimum loading requirement
2. Wires are not properly secured in the terminals
Make sure the wires are secured and screws are fastened properly
3. Controlled by other FreeLocate unit within the area
Determine which FreeLocate unit(s) is (are) controlling the load. (Refer to Identify, copy procedures)
TROUBLE SHOOTING GUIDE
ULTI ZigBee FreeLocate 105x105 r12.indd 21 11�11�22� ��10:09
MS18686(22I11 ver.01.1)
All rights reservedSpecifications subject to change without notice
ULTI ZigBee FreeLocate 105x105 r12.indd 22 11�11�22� ��10:09