Embed Size (px)
Citation preview
JIMI Judge V54G Body-worn Camera
User Manual (Version 1.0)
Thank you for purchasing our product. Please read this manual carefully before use and keep it for future reference.
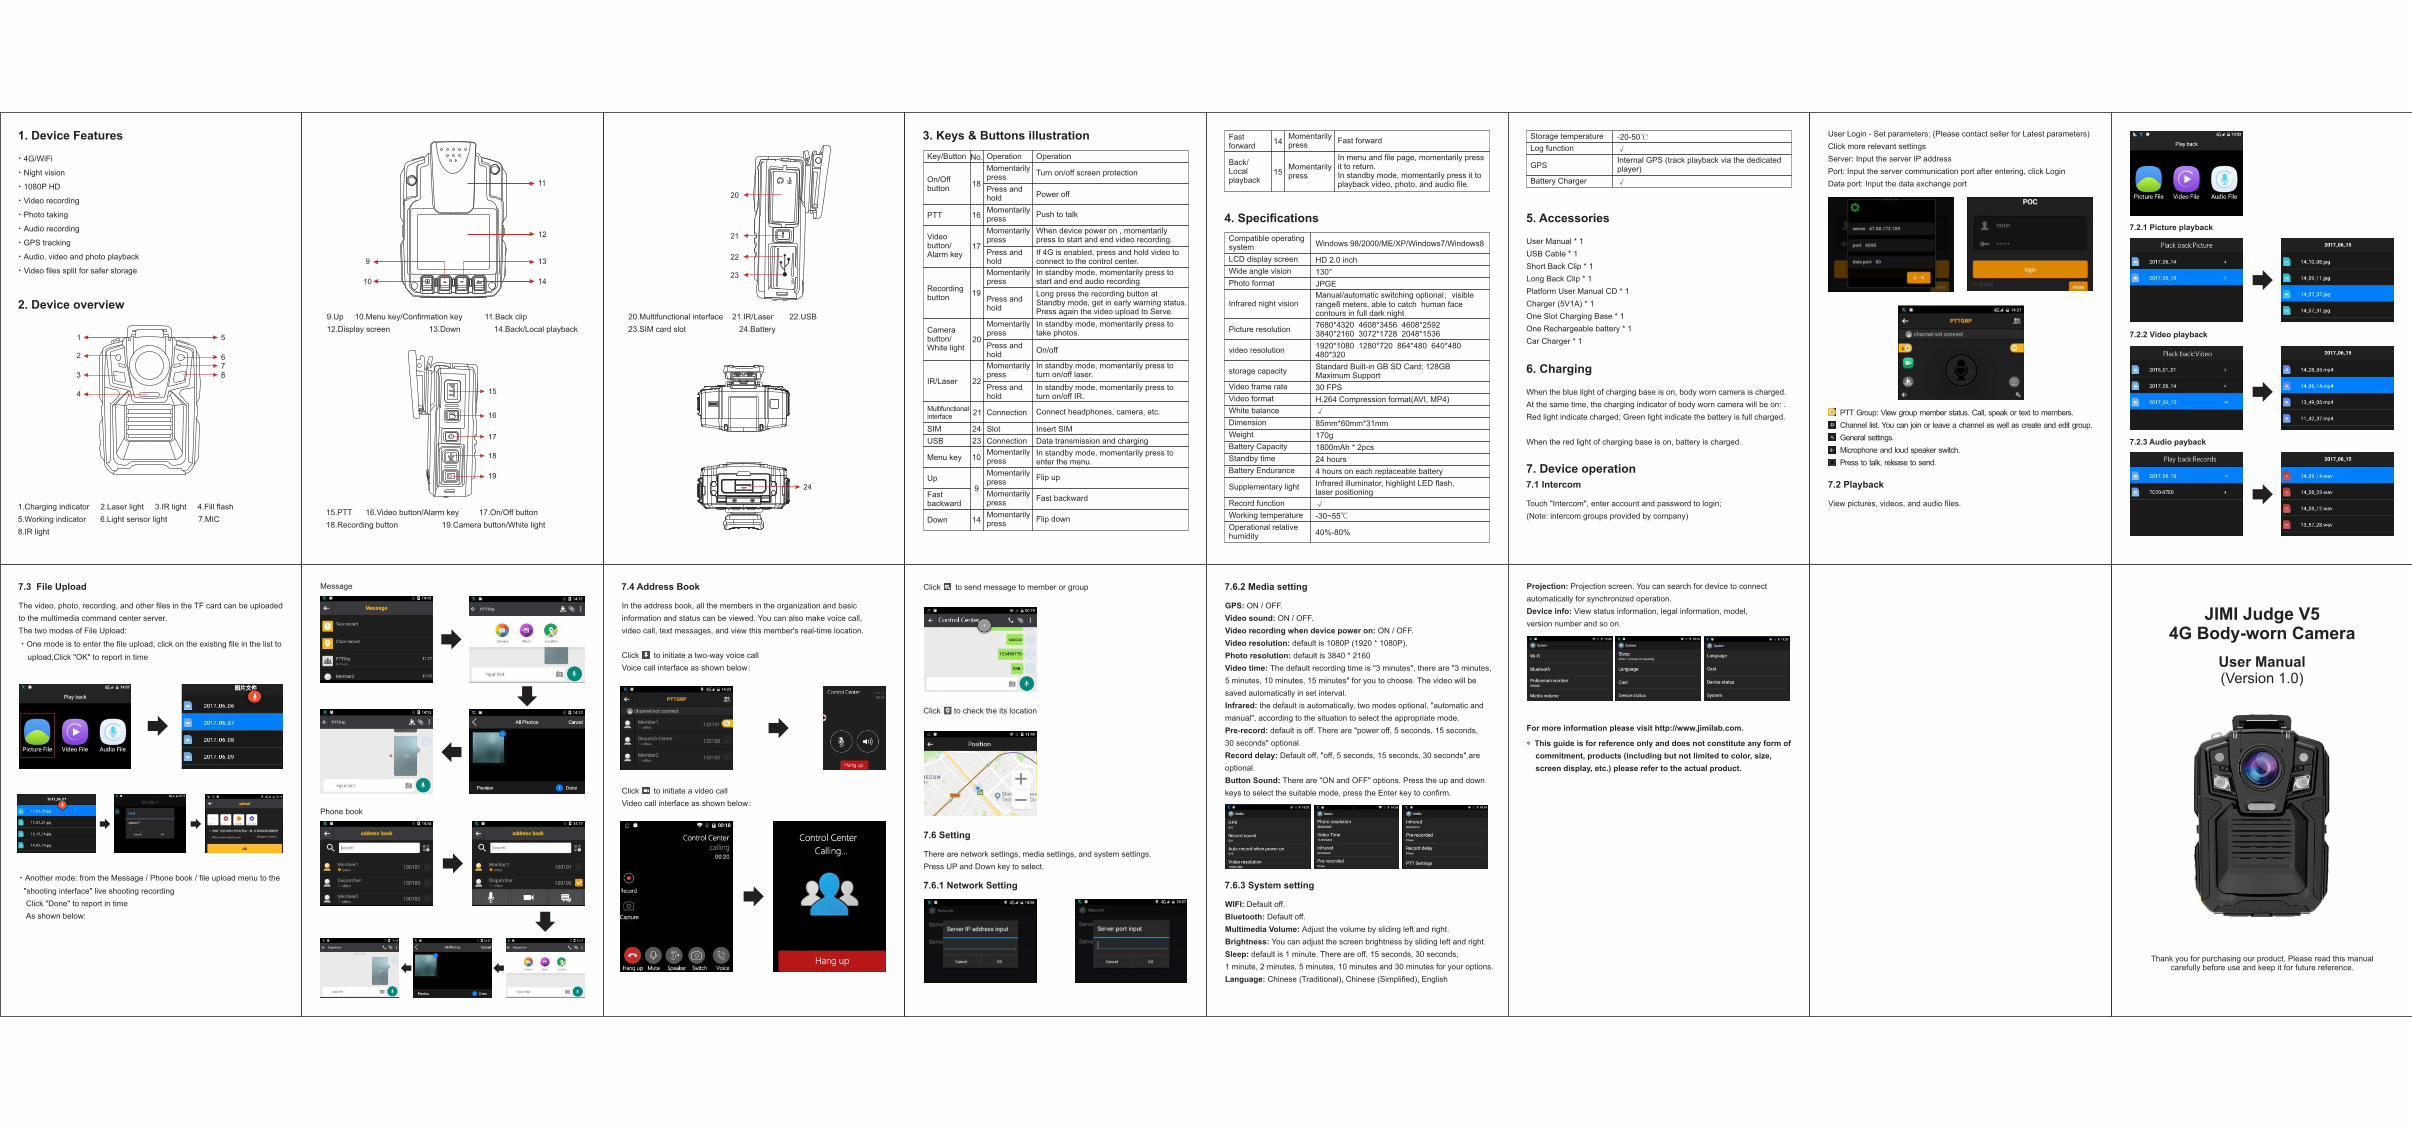
1. Device Features
·4G/WiFi
·Night vision
·1080P HD
·Video recording
·Photo taking
·Audio recording
·GPS tracking
·Audio, video and photo playback
·Video files split for safer storage
2. Device overview
1
2
3
4
5
678
9
10
11
12
13
14
15
16
17
18
19
20
21
22
23
24
3. Keys & Buttons illustration
Key/Button
On/Off button
PTT
Video button/Alarm key
Recording button
Camera button/White light
IR/Laser
Multifunctional interface
SIM
USB
Menu key
Up
Fast backward
Down
Fast forward
Back/Local playback
Momentarily press
Fast forward
In menu and file page, momentarily press it to return.In standby mode, momentarily press it to playback video, photo, and audio file.
Momentarily press
4. Specifications
Compatible operating system Windows 98/2000/ME/XP/Windows7/Windows8
LCD display screen HD 2.0 inch
Wide angle vision 130°
Photo format JPGE
Infrared night visionManual/automatic switching optional;visible range8 meters, able to catch human face contours in full dark night
Picture resolution7680*4320 4608*3456 4608*2592 3840*2160 3072*1728 2048*1536
video resolution1920*1080 1280*720 864*480 640*480 480*320
storage capacityStandard Built-in GB SD Card; 128GB Maximum Support
Video frame rate 30 FPS
Video format H.264 Compression format(AVI, MP4)
White balance √
Dimension 85mm*60mm*31mm
Weight 170g
Battery Capacity 1800mAh * 2pcs
Standby time 24 hours
Battery Endurance 4 hours on each replaceable battery
Supplementary light Infrared illuminator, highlight LED flash, laser positioning
Record function √
Working temperature -30~55℃
Operation Operation
Momentarily press
Turn on/off screen protection
Press and hold Power off
Momentarily press
Push to talk
Momentarily press
When device power on , momentarily press to start and end video recording.
Press and hold
If 4G is enabled, press and hold video to connect to the control center.
Momentarily press
In standby mode, momentarily press to start and end audio recording
Press and hold
Long press the recording button at Standby mode, get in early warning status. Press again the video upload to Serve.
Momentarily press
In standby mode, momentarily press to take photos.
Press and hold
On/off
Momentarily press
In standby mode, momentarily press to turn on/off laser.
Press and hold
In standby mode, momentarily press to turn on/off IR.
Connection Connect headphones, camera, etc.
Slot Insert SIM
Connection Data transmission and charging
Momentarily press
In standby mode, momentarily press to enter the menu.
Momentarily press
Flip up
Momentarily press
Fast backward
Momentarily press
Flip downOperational relative humidity 40%-80%
Storage temperature -20-50℃
Log function
GPSInternal GPS (track playback via the dedicated player)
√
Battery Charger √
5. Accessories
User Manual * 1
USB Cable * 1
Short Back Clip * 1
Long Back Clip * 1
Platform User Manual CD * 1
Charger (5V1A) * 1
One Slot Charging Base * 1
One Rechargeable battery * 1
Car Charger * 1
6. Charging
When the blue light of charging base is on, body worn camera is charged.
At the same time, the charging indicator of body worn camera will be on: .
Red light indicate charged; Green light indicate the battery is full charged.
When the red light of charging base is on, battery is charged.
7. Device operation
Touch "Intercom", enter account and password to login;
(Note: intercom groups provided by company)
7.1 Intercom
PTT Group: View group member status. Call, speak or text to members.
Channel list. You can join or leave a channel as well as create and edit group.
General settings.
Microphone and loud speaker switch.
Press to talk, release to send.
User Login - Set parameters: (Please contact seller for Latest parameters)
Click more relevant settings
Server: Input the server IP address
Port: Input the server communication port after entering, click Login
Data port: Input the data exchange port
7.2 Playback
View pictures, videos, and audio files.
7.2.1 Picture playback
7.2.2 Video playback
7.2.3 Audio payback
7.3 File Upload
The video, photo, recording, and other files in the TF card can be uploaded
to the multimedia command center server.
The two modes of File Upload:
·One mode is to enter the file upload, click on the existing file in the list to
����upload,Click "OK" to report in time
·Another mode: from the Message / Phone book / file upload menu to the
�� "shooting interface" live shooting recording
����Click "Done" to report in time
����As shown below:
Message
Phone book
7.4 Address Book
In the address book, all the members in the organization and basic
information and status can be viewed. You can also make voice call,
video call, text messages, and view this member's real-time location.
Click to initiate a two-way voice call
Voice call interface as shown below:
Click to initiate a video call
Video call interface as shown below:
Click to send message to member or group
Click to check the its location
7.6 Setting
There are network settings, media settings, and system settings.
Press UP and Down key to select.
7.6.1 Network Setting
7.6.2 Media setting
GPS: ON / OFF.
Video sound: ON / OFF.
Video recording when device power on: ON / OFF.
Video resolution: default is 1080P (1920 * 1080P).
Photo resolution: default is 3840 * 2160
Video time: The default recording time is "3 minutes", there are "3 minutes,
5 minutes, 10 minutes, 15 minutes" for you to choose. The video will be
saved automatically in set interval.
Infrared: the default is automatically, two modes optional, "automatic and
manual", according to the situation to select the appropriate mode.
Pre-record: default is off. There are "power off, 5 seconds, 15 seconds,
30 seconds" optional.
Record delay: Default off, "off, 5 seconds, 15 seconds, 30 seconds" are
optional.
Button Sound: There are "ON and OFF" options. Press the up and down
keys to select the suitable mode, press the Enter key to confirm.
7.6.3 System setting
WIFI: Default off.
Bluetooth: Default off.
Multimedia Volume: Adjust the volume by sliding left and right.
Brightness: You can adjust the screen brightness by sliding left and right.
Sleep: default is 1 minute. There are off, 15 seconds, 30 seconds,
1 minute, 2 minutes, 5 minutes, 10 minutes and 30 minutes for your options.
Language: Chinese (Traditional), Chinese (Simplified), English
Projection: Projection screen. You can search for device to connect
automatically for synchronized operation.
Device info: View status information, legal information, model,
version number and so on.
For more information please visit http://www.jimilab.com.
* This guide is for reference only and does not constitute any form of
commitment, products (including but not limited to color, size,
screen display, etc.) please refer to the actual product.
1.Charging indicator 2.Laser light 3.IR light 4.Fill flash
5.Working indicator 6.Light sensor light 7.MIC
8.IR light
9.Up�����10.Menu key/Confirmation key 11.Back clip
12.Display screen 13.Down 14.Back/Local playback
15.PTT �����16.Video button/Alarm key 17.On/Off button
18.Recording button 19.Camera button/White light
20.Multifunctional interface����21.IR/Laser 22.USB
23.SIM card slot 24.Battery
No.
18
16
17
19
20
22
21
24
23
10
9
14
14
15